Contents
- Configuring Administration Server
- Configuring the connection of Kaspersky Security Center Web Console to Administration Server
- Configuring Administration Server connection events logging
- Setting the maximum number of events in the event repository
- Connection settings of UEFI protection devices
- Creating a hierarchy of Administration Servers: adding a secondary Administration Server
- Viewing the list of secondary Administration Servers
- Deleting a hierarchy of Administration Servers
- Administration Server maintenance
- Configuring the interface
- Managing virtual Administration Servers
- Enabling account protection from unauthorized modification
- Two-step verification
- About two-step verification
- Scenario: Configuring two-step verification for all users
- Enabling two-step verification for your own account
- Enabling required two-step verification for all users
- Disabling two-step verification for a user account
- Disabling required two-step verification for all users
- Excluding accounts from two-step verification
- Generating a new secret key
- Editing the name of a security code issuer
- Backup copying and restoration of Administration Server data
- Creating a data backup task
- Moving Administration Server to another device
Configuring Administration Server
This section describes the configuration process and properties of Kaspersky Security Center Administration Server.
Configuring the connection of Kaspersky Security Center Web Console to Administration Server
To set the connection ports of Administration Server:
- At the top of the screen, click the settings icon (
 ) next to the name of the required Administration Server.
The Administration Server properties window opens.
- On the General tab, select the Connection ports section.
The application displays the main connection settings of the selected Server.
Kaspersky Security Center Web Console is connected to Administration Server through SSL port TCP 13299. The same port can be used by klakaut automation objects.
Port TCP 14000 can be used for connecting Kaspersky Security Center Web Console, distribution points, secondary Administration Servers, and klakaut automation objects, as well as for receiving data from client devices.
Normally, SSL port TCP 13000 can only be used by Network Agent, a secondary Administration Server, and the primary Administration Server in DMZ. In some cases, Kaspersky Security Center Web Console may have to be connected through SSL port 13000:
- If a single SSL port is likely to be used both for Kaspersky Security Center Web Console and for other activities (receiving data from client devices, connecting distribution points, connecting secondary Administration Servers).
- If a klakaut automation object is not connected to Administration Server directly but through a distribution point in the DMZ.
Configuring Administration Server connection events logging
The history of connections and attempts to connect to the Administration Server during its operation can be saved to a log file. The information in the file allows you to track not only connections inside your network infrastructure, but unauthorized attempts to access the server as well.
To log events of connection to the Administration Server:
- In the main menu, click the settings icon () next to the name of the required Administration Server.
The Administration Server properties window opens.
- On the General tab, select the Connection ports section.
- Enable the Log Administration Server connection events option.
All further events of inbound connections to the Administration Server, authentication results, and SSL errors will be saved to the file %ProgramData%\KasperskyLab\adminkit\logs\sc.syslog.
Page topSetting the maximum number of events in the event repository
In the Events repository section of the Administration Server properties window, you can edit the settings of events storage in the Administration Server database by limiting the number of event records and record storage term. When you specify the maximum number of events, the application calculates an approximate amount of storage space required for the specified number. You can use this approximate calculation to evaluate whether you have enough free space on the disk to avoid database overflow. The default capacity of the Administration Server database is 400,000 events. The maximum recommended capacity of the database is 45 million events.
The application checks the database every 10 minutes. If the number of events reaches the specified maximum value plus 10,000, the application deletes the oldest events so that only the specified maximum number of events remains.
When the Administration Server deletes old events, it cannot save new events to the database. During this period of time, information about events that were rejected is written to the Kaspersky Event Log. The new events are queued and then saved to the database after the deletion operation is complete.
To limit the number of events that can be stored in the events repository on the Administration Server:
- At the top of the screen, click the settings icon () next to the name of the required Administration Server.
The Administration Server properties window opens.
- On the General tab, select the Events repository section. Specify the maximum number of events stored in the database.
- Click the Save button.
Additionally, you can change the settings of any task to save events related to the task progress, or save only task execution results. In doing so, you will reduce the number of events in the database, increase the speed of execution of scenarios associated with analysis of the event table in the database, and lower the risk that critical events will be overwritten by a large number of events.
Connection settings of UEFI protection devices
A UEFI protection device is a device with a Kaspersky solution or application for UEFI integrated at the BIOS level. Integrated protection ensures device security from the moment the system starts, while protection on devices without integrated software begins functioning only after the security application starts. Kaspersky Security Center supports management of these devices.
To modify the connection settings of UEFI protection devices:
- In the main menu, click the settings icon () next to the name of the required Administration Server.
The Administration Server properties window opens.
- On the General tab, select the Additional ports section.
- Modify the relevant settings:
- Click the Save button.
The UEFI protection devices can now connect to the Administration Server.
Page topCreating a hierarchy of Administration Servers: adding a secondary Administration Server
Adding secondary Administration Server (performed on the future primary Administration Server)
You can add an Administration Server as a secondary Administration Server, thus establishing a "primary/secondary" hierarchy.
To add a secondary Administration Server that is available for connection through Kaspersky Security Center Web Console:
- Make sure that port 13000 of the future primary Administration Server is available for receipt of connections from secondary Administration Servers.
- On the future primary Administration Server, click the settings icon ().
- On the properties page that opens, select the Administration Servers tab.
- Select the check box next to the name of th administration group to which you want to add the Administration Server.
- In the menu line, click Connect secondary Administration Server.
The Connect secondary Administration Server Wizard starts. Proceed through the wizard by using the Next button.
- Fill in the following fields:
- Specify the connection settings:
- Enter the address of the future primary Administration Server.
- If the future secondary Administration Server uses a proxy server, enter the proxy server address and user credentials to connect to the proxy server.
- Enter the credentials of the user that has access rights on the future secondary Administration Server.
Make sure that two-step verification is disabled for the account that you specify. If two-step verification is enabled for this account, then you can create the hierarchy from the future secondary Server only (see instructions below). This is a known issue.
If the connection settings are correct, the connection with the future secondary Server is established and the "primary/secondary" hierarchy is built. If the connection has failed, check the connection settings or specify the certificate of the future secondary Server manually.
The connection may also fail because the future secondary Server is authenticated with a self-signed certificate that was automatically generated by Kaspersky Security Center. As a result, the browser might block downloading the self-signed certificate. If this is the case, you can do one of the following:
- For the future secondary Server, create a certificate that is trusted in your infrastructure and that meets the requirements for custom certificates.
- Add the self-signed certificate of the future secondary Server to the list of trusted browser certificates. We recommend that you use this option only if you cannot create a custom certificate. For the information about adding a certificate to the list of trusted certificates, refer to the documentation of your browser.
After the Wizard finishes, the "primary/secondary" hierarchy is built. Connection between the primary and secondary Administration Servers is established through port 13000. The tasks and policies from the primary Administration Server are received and applied. The secondary Administration Server is displayed on the primary Administration Server, in the administration group to which it was added.
Adding secondary Administration Server (performed on the future secondary Administration Server)
If you could not connect to the future secondary Administration Server (for example, because it was temporarily disconnected or unavailable), you are still able to add a secondary Administration Server.
To add as secondary an Administration Server that is not available for connection through Kaspersky Security Center Web Console:
- Send the certificate file of the future primary Administration Server to the system administrator of the office where the future secondary Administration Server is located. (You can, for example, write the file to an external device, such as a flash drive, or send it by email.)
The certificate file is located on the future primary Administration Server, at %ALLUSERSPROFILE%\Application Data\KasperskyLab\adminkit\1093\cert\klserver.cer.
- Prompt the system administrator in charge of the future secondary Administration Server to do the following:
- Click the settings icon ().
- On the properties page that opens, proceed to the Hierarchy of Administration Servers section of the General tab.
- Select the This Administration Server is secondary in the hierarchy option.
- In the Primary Administration Server address field, enter the network name of the future primary Administration Server.
- Select the previously saved file with the certificate of the future primary Administration Server by clicking Browse.
- If necessary, select the Connect primary Administration Server to secondary Administration Server in DMZ check box.
- If the connection to the future secondary Administration Server is performed through a proxy server, select the Use proxy server option and specify the connection settings.
- Click Save.
- Click the settings icon (
The "primary/secondary" hierarchy is built. The primary Administration Server starts receiving connection from the secondary Administration Server using port 13000. The tasks and policies from the primary Administration Server are received and applied. The secondary Administration Server is displayed on the primary Administration Server, in the administration group where it was added.
Viewing the list of secondary Administration Servers
To view the list of the secondary (including virtual) Administration Servers:
In the main menu, click the name of the Administration Server, which is next to the settings icon (![]() ).
).
The drop-down list of the secondary (including virtual) Administration Servers is displayed.
You can proceed to any of these Administration Servers by clicking its name.
The administration groups are shown, too, but they are grayed and not available for management in this menu.
If you are connected to your primary Administration Server in Kaspersky Security Center Web Console, and can not connect to a virtual Administration Server that is managed by a secondary Administration Server, you can use one of the following ways:
- Modify the existing Kaspersky Security Center Web Console installation to add the secondary Server to the list of trusted Administration Servers. Then you will be able to connect to the virtual Administration Server in Kaspersky Security Center Web Console.
- Use Kaspersky Security Center Web Console to connect directly to the secondary Administration Server where the virtual Server was created. Then you will be able to switch to the virtual Administration Server in Kaspersky Security Center Web Console.
- Use MMC-based Administration Console to connect directly to the virtual Server.
Deleting a hierarchy of Administration Servers
If you no longer want to have a hierarchy of Administration Servers, you can disconnect them from this hierarchy.
To delete a hierarchy of Administration Servers:
- At the top of the screen, click the settings icon () next to the name of the primary Administration Server.
- On the page that opens, proceed to the Administration Servers tab.
- In the administration group from which you want to delete the secondary Administration Server, select the secondary Administration Server.
- On the menu line, click Delete.
- In the window that opens, click OK to confirm that you want to delete the secondary Administration Server.
The former primary Administration Server and the former secondary Administration Server are now independent of each other. The hierarchy no longer exists.
Page topAdministration Server maintenance
The Administration Server maintenance allows you to free up space in the folder of the Administration Server and reduce the database volume by deleting objects that are no longer needed. This helps you to improve the performance and operation reliability of the application. We recommend that you maintain the Administration Server at least every week.
The Administration Server maintenance is performed using the dedicated task. The application performs the following actions when maintaining the Administration Server:
- Deletes unnecessary folders and files from the storage folder.
- Deletes unnecessary records from tables (also known as "dangling pointers").
- Clears the cache.
- Maintains the database (if you use SQL Server or PostgreSQL as a DBMS):
- Checks the database for errors (available only for SQL Server).
- Re-organizes database indexes.
- Updates the database statistics.
- Shrinks the database (if necessary).
The Administration Server maintenance task does not support MariaDB. If this DBMS is used in your network, administrators will have to maintain MariaDB on their own.
The Administration Server maintenance task is created automatically when you install Kaspersky Security Center. If the Administration Server maintenance task is deleted, you can create it manually.
To create the Administration Server maintenance task:
- In the main menu, go to DEVICES → TASKS.
- Click the Add button.
The Add Task Wizard starts.
- In the New task window of the Wizard, select Administration Server maintenance as the task type and click the Next button.
- Follow the rest of the Wizard instructions.
The newly created task is displayed in the list of tasks. Only one Administration Server maintenance task can be running for a single Administration Server. If an Administration Server maintenance task has already been created for an Administration Server, no new Administration Server maintenance task can be created.
Page topConfiguring the interface
You can configure the Kaspersky Security Center Web Console interface to display and hide sections and interface elements, depending on the features being used.
To configure the Kaspersky Security Center Web Console interface in accordance with the currently used set of features:
- In the main menu, click the account menu.
- In the drop-down list, select Interface options.
- In the Interface options window that opens, enable or disable the required options.
- Click Save.
After that, the console displays sections in the main menu in accordance with enabled options. For example, if you enable Show EDR alerts, the MONITORING & REPORTING → ALERTS section appears in the main menu.
Page topManaging virtual Administration Servers
This section describes the following actions to manage virtual Administration Servers:
- Create virtual Administration Servers
- Enable and disable virtual Administration Servers
- Assign an administrator for a virtual Administration Server
- Change the Administration Server for client devices
- Delete virtual Administration Servers
Creating a virtual Administration Server
You can create virtual Administration Servers and add them to administration groups.
To create and add a virtual Administration Server:
- In the main menu, click the settings icon () next to the name of the required Administration Server.
- On the page that opens, proceed to the Administration Servers tab.
- Select the administration group to which you want to add a virtual Administration Server.
The virtual Administration Server will manage devices from the selected group (including the subgroups). - On the menu line, click New virtual Administration Server.
- On the page that opens, define the properties of the new virtual Administration Server:
- Name of virtual Administration Server.
- Administration Server connection address
You can specify the name or the IP address of your Administration Server.
- From the list of users, select the virtual Administration Server administrator. If you want, you can edit one of the existing accounts before assigning it the administrator's role, or create a new user account.
- Click Save.
The new virtual Administration Server is created, added to the administration group and displayed on the Administration Servers tab.
If you are connected to your primary Administration Server in Kaspersky Security Center Web Console, and can not connect to a virtual Administration Server that is managed by a secondary Administration Server, you can use one of the following ways:
- Modify the existing Kaspersky Security Center Web Console installation to add the secondary Server to the list of trusted Administration Servers. Then you will be able to connect to the virtual Administration Server in Kaspersky Security Center Web Console.
- Use Kaspersky Security Center Web Console to connect directly to the secondary Administration Server where the virtual Server was created. Then you will be able to switch to the virtual Administration Server in Kaspersky Security Center Web Console.
- Use MMC-based Administration Console to connect directly to the virtual Server.
Enabling and disabling a virtual Administration Server
When you create a new virtual Administration Server, it is enabled by default. You can disable or enable it again at any time. Disabling or enabling a virtual Administration Server is equal to switching off or on a physical Administration Server.
To enable or disable a virtual Administration Server:
- In the main menu, click the settings icon () next to the name of the Administration Server.
- On the page that opens, proceed to the Administration Servers tab.
- Select the virtual Administration Server that you want to enable or disable.
- On the menu line, click the Enable / disable virtual Administration Server button.
The virtual Administration Server state is changed to enabled or disabled, depending on its previous state. The updated state is displayed next to the Administration Server name.
Deleting a virtual Administration Server
When you delete a virtual Administration Server, all of the objects created on the Administration Server, including policies and tasks, will be deleted as well. The managed devices from the administration groups that were managed by the virtual Administration Server will be removed from the administration groups. To return the devices under management of Kaspersky Security Center, run the network polling, and then move the found devices from the Unassigned devices group to the administration groups.
To delete a virtual Administration Server:
- In the main menu, click the settings icon () next to the name of the Administration Server.
- On the page that opens, proceed to the Administration Servers tab.
- Select the virtual Administration Server that you want to delete.
- On the menu line, click the Delete button.
The virtual Administration Server is deleted.
Changing the Administration Server for client devices
You can change the Administration Server that manages client devices to a different Server using the Change Administration Server task. After the task completion, the selected client devices will be put under the management of the Administration Server that you specify.
You cannot use the Change Administration Server task for client devices connected to Administration Server through connection gateways. For such devices you have to either reconfigure Network Agent or reinstall Network Agent and specify connection gateway.
To change the Administration Server that manages client devices to a different Server:
- In the main menu, go to DEVICES → TASKS.
- Click Add.
The Add Task Wizard starts. Proceed through the Wizard by using the Next button.
- For the Kaspersky Security Center application, select the Change Administration Server task type.
- Specify the name for the task that you are creating.
A task name cannot be more than 100 characters long and cannot include any special characters ("*<>?\:|).
- Select devices to which the task will be assigned.
- Select the Administration Server that you want to use to manage the selected devices.
- Specify the account settings:
- If on the Finish task creation page you enable the Open task details when creation is complete option, you can modify the default task settings. If you do not enable this option, the task is created with the default settings. You can modify the default settings later, at any time.
- Click the Finish button.
The task is created and displayed in the list of tasks.
- Click the name of the created task to open the task properties window.
- In the task properties window, specify the general task settings according to your needs.
- Click the Save button.
The task is created and configured.
- Run the created task.
After the task is complete, the client devices for which it was created are put under the management of the Administration Server specified in the task settings.
Enabling account protection from unauthorized modification
You can enable an additional option to protect a user account from unauthorized modification. If this option is enabled, modifying user account settings requires authorization of the user with the rights for modification.
To enable or disable account protection from unauthorized modification:
- In the main menu, go to USERS & ROLES → USERS.
- Click the name of the internal user account for which you want to specify account protection from unauthorized modification.
- In the user settings window that opens, select the Account protection tab.
- On the Account protection tab, select the Request authentication to check the permission to modify user accounts option, if you want to request credentials every time when account settings are changed or modified. Otherwise, select the Allow users to modify this account without additional authentication option.
- Click the Save button.
Account protection from unauthorized modification is enabled for a user account.
Page topTwo-step verification
This section describes how you can use two-step verification to reduce the risk of unauthorized access to Kaspersky Security Center Web Console.
About two-step verification
When two-step verification is enabled for an account, a single-use security code is required, in addition to the user name and password, to log in to Administration Console or Kaspersky Security Center Web Console. With domain authentication enabled, the user only needs to enter the single-use security code.
To use two-step verification, install an authenticator app that generates single-use security codes on the mobile device or computer. You can use any application that supports the Time-based One-time Password algorithm (TOTP), such as:
- Google Authenticator
- Microsoft Authenticator
- Bitrix24 OTP
- Yandex Key
- Avanpost Authenticator
- Aladdin 2FA
To check if Kaspersky Security Center supports the authenticator app that you want to use, enable two-step verification for all users or for a particular user.
One of the steps suggests that you specify the security code generated by the authenticator app. If it succeeds, then Kaspersky Security Center supports the selected authenticator.
We highly recommend that you save the secret key or QR code and keep it in a safe place. This will help you to restore access to Kaspersky Security Center Web Console in case you lose access to the mobile device.
To secure the usage of Kaspersky Security Center, you can enable two-step verification for your own account and enable two-step verification for all users.
You can exclude accounts from two-step verification. This can be necessary for service accounts that cannot receive a security code for authentication.
Rules and Limitations
To be able to activate two-step verification for all users and deactivate two-step verification for particular users:
- Ensure your account has the Modify object ACLs right in the General features: User permissions functional area.
- Enable two-step verification for your account.
To be able to deactivate two-step verification for all users:
- Ensure your account has the Modify object ACLs right in the General features: User permissions functional area.
- Log in to Kaspersky Security Center Web Console by using two-step verification.
If two-step verification is enabled for a user account on Kaspersky Security Center Administration Server version 13 or later, the user will not be able to log in to the Kaspersky Security Center Web Console versions 12, 12.1 or 12.2.
Reissuing the secret key
Any user can reissue the secret key used for two-step verification. When a user logs in to the Administration Server with the reissued secret key, the new secret key is saved for the user account. If the user enters the new secret key incorrectly, the new secret key is not saved, and the current secret key remains valid.
A security code has an identifier referred to as issuer name. The security code issuer name is used as an identifier of the Administration Server in the authenticator app. The security code issuer name has a default value that is the same as the name of the Administration Server. You can change the name of the security code issuer name. If you change the security code issuer name, you must issue a new secret key and pass it to the authenticator app.
Scenario: Configuring two-step verification for all users
This scenario describes how to enable two-step verification for all users and how to exclude user accounts from two-step verification. If you did not enable two-step verification for your account before you enable it for other users, the application opens the window for enabling two-step verification for your account, first. This scenario also describes how to enable two-step verification for your own account.
If you enabled two-step verification for your account, you may proceed to the stage of enabling of two-step verification for all users.
Prerequisites
Before you start:
- Make sure that your user account has the Modify object ACLs right of the General features: User permissions functional area for modifying security settings for other users' accounts.
- Make sure that the other users of Administration Server install an authenticator app on their devices.
Stages
Enabling two-step verification for all users proceeds in stages:
- Installing an authenticator app on a device
You can install any application that supports the Time-based One-time Password algorithm (TOTP), such as:
- Google Authenticator
- Microsoft Authenticator
- Bitrix24 OTP
- Yandex Key
We strongly do not recommend installing the authenticator app on the same device from which the connection to Administration Server is established.
- Synchronizing the authenticator app time with the time of the device on which Administration Server is installed
Ensure that the time set in the authenticator app is synchronized with the time of Administration Server.
- Enabling two-step verification for your account and receiving the secret key for your account
How-to instructions:
- For MMC-based Administration Console: Enabling two-step verification for your own account
- For Kaspersky Security Center Web Console: Enabling two-step verification for your own account
After you enable two-step verification for your account, you can enable two-step verification for all users.
- Enabling two-step verification for all users
Users with two-step verification enabled must use it to log in to Administration Server.
How-to instructions:
- For MMC-based Administration Console: Enabling two-step verification for all users
- For Kaspersky Security Center Web Console: Enabling two-step verification for all users
- Editing the name of a security code issuer
If you have several Administration Servers with similar names, you may have to change the security code issuer names for better recognition of different Administration Servers.
How-to instructions:
- For MMC-based Administration Console: Editing the name of a security code issuer
- For Kaspersky Security Center Web Console: Editing the name of a security code issuer
- Excluding user accounts for which you do not need to enable two-step verification
If required, you can exclude users from two-step verification. Users with excluded accounts do not have to use two-step verification to log in to Administration Server.
How-to instructions:
- For MMC-based Administration Console: Excluding accounts from two-step verification
- For Kaspersky Security Center Web Console: Excluding accounts from two-step verification
Results
Upon completion of this scenario:
- Two-step verification is enabled for your account.
- Two-step verification is enabled for all user accounts of the Administration Server, except for user accounts that were excluded.
Enabling two-step verification for your own account
You can enable two-step verification only for your own account.
Before you enable two-step verification for your account, ensure that an authenticator app is installed on the mobile device. Ensure that the time set in the authenticator app is synchronized with the time set of the device on which Administration Server is installed.
To enable two-step verification for a user account:
- In the main menu, go to USERS & ROLES → USERS.
- Click the name of your account.
- In the user settings window that opens, select the Authentication security tab.
- On the Authentication security tab:
- Select the Request user name, password, and security code (two-step verification) option. Click the Save button.
- In the two-step verification window that opens, click View how to set up two-step verification.
Enter the secret key in the authenticator app or click View QR code and scan the QR code by the authenticator app on the mobile device to receive one-time security code.
- In the two-step verification window, specify the security code generated by the authenticator app, and then click the Check and apply button.
- Click the Save button.
Two-step verification is enabled for your account.
Enabling required two-step verification for all users
You can enable two-step verification for all users of Administration Server if your account has the Modify object ACLs right in the General features: User permissions functional area and if you are authenticated by using two-step verification.
To enable two-step verification for all users:
- In the main menu, click the settings icon () next to the name of the required Administration Server.
The Administration Server properties window opens.
- On the Authentication security tab of the properties window, switch the toggle button of the two-step verification for all users option to the enabled position.
- If you did not enable two-step verification for your account, the application opens the window for enabling two-step verification for your own account.
- In the two-step verification window, click View how to set up two-step verification.
- Enter the secret key in the authenticator application manually or click View QR code and scan the QR code by the authenticator application on the mobile device to receive one-time security code.
- In the two-step verification window, specify the security code generated by the authenticator application, and then click the Check and apply button.
Two-step verification is enabled for all users. From now on, users of the Administration Server, including the users that were added after enabling two-step verification for all users, have to configure two-step verification for their accounts, except for users that are excluded from two-step verification.
Disabling two-step verification for a user account
You can disable two-step verification for your own account, as well as for an account of any other user.
You can disable two-step verification of another user's account if your account has the Modify object ACLs right in the General features: User permissions functional area and if you are authenticated by using two-step verification.
To disable two-step verification for a user account:
- In the main menu, go to USERS & ROLES → USERS.
- Click the name of the internal user account for whom you want to disable two-step verification. This may be your own account or an account of any other user.
- In the user settings window that opens, select the Account protection tab.
- On the Account protection tab, select the Request only user name and password option if you want to disable two-step verification for a user account.
- Click the Save button.
Two-step verification is disabled for the user account.
If you want to restore access for a user that cannot log in to Kaspersky Security Center Web Console by using two-step verification, disable two-step verification for this user account, and then select the Request only user name and password option as described above. After that, log in to Kaspersky Security Center Web Console under the user account for which you disabled two-step verification, and then enable verification again.
Disabling required two-step verification for all users
You can disable required two-step verification for all users if two-step verification is enabled for your account and your account has the Modify object ACLs right in the General features: User permissions functional area. If two-step verification is not enabled for your account, you must enable two-step verification for your account before disabling it for all users.
To disable two-step verification for all users:
- In the main menu, click the settings icon () next to the name of the required Administration Server.
The Administration Server properties window opens.
- On the Authentication security tab of the properties window, switch the toggle button of the two-step verification for all users option to disabled position.
- Enter the credentials of your account in the authentication window.
Two-step verification is disabled for all users. Disabling two-step verification for all users does not applied to specific accounts for which two-step verification was previously enabled separately.
Excluding accounts from two-step verification
You can exclude user accounts from two-step verification if you have the Modify object ACLs right in the General features: User permissions functional area.
If a user account is excluded from the list of two-step verification for all users, this user does not have to use two-step verification.
Excluding accounts from two-step verification can be necessary for service accounts that cannot pass the security code during authentication.
If you want to exclude some user accounts from two-step verification:
- You must perform Active Directory polling in order to refresh the list of Administration Server users, if you want to exclude Active Directory accounts.
- In the main menu, click the settings icon () next to the name of the required Administration Server.
The Administration Server properties window opens.
- On the Authentication security tab of the properties window, in the two-step verification exclusions table click the Add button.
- In the window that opens:
- Select the user accounts that you want to exclude.
- Click the OK button.
The selected user accounts are excluded from two-step verification.
Generating a new secret key
You can generate a new secret key for a two-step verification for your account only if you are authorized by using two-step verification.
To generate a new secret key for a user account:
- In the main menu, go to USERS & ROLES → USERS.
- Click the name of the user account for whom you want to generate a new secret key for two-step verification.
- In the user settings window that opens, select the Account protection tab.
- In the Account protection tab, click the Generate a new secret key link.
- In the two-step verification window that opens, specify a new security key generated by the authenticator app.
- Click the Check and apply button.
A new secret key is generated for the user.
If you lose the mobile device, you can install an authenticator app on another mobile device and generate a new secret key to restore access to Kaspersky Security Center Web Console.
Page topEditing the name of a security code issuer
You can have several identifiers (they are called issuers) for different Administration Servers. You can change the name of a security code issuer in case, for example, if the Administration Server already uses a similar name of security code issuer for another Administration Server. By default, the name of a security code issuer is the same as the name of the Administration Server.
After you change the security code issuer name you have to reissue a new secret key and pass it to the authenticator app.
To specify a new name of security code issuer:
- In the main menu, click the settings icon () next to the name of the required Administration Server.
The Administration Server properties window opens.
- In the user settings window that opens, select the Account protection tab.
- On the Account protection tab, click the Edit link.
The Edit Security code issuer section opens.
- Specify a new security code issuer name.
- Click the OK button.
A new security code issuer name is specified for the Administration Server.
Backup copying and restoration of Administration Server data
Data backup allows you to move Administration Server from one device to another without data loss. Through backup, you can restore data when moving the Administration Server database to another device, or when upgrading to a newer version of Kaspersky Security Center. Also, you can use data backup to move Administration Server data from Kaspersky Security Center Windows under management of Kaspersky Security Center Linux (moving data from Kaspersky Security Center Linux to Kaspersky Security Center Windows is not supported).
Note that the installed management plug-ins are not backed up. After you restore Administration Server data from a backup copy, you need to download and reinstall plug-ins for managed applications.
Before you back up the Administration Server data, check whether a virtual Administration Server is added to the administration group. If a virtual Administration Server is added, make sure that an administrator is assigned to this virtual Administration Server before the backup. You cannot grant the administrator access rights to the virtual Administration Server after the backup. Note that if the administrator account credentials are lost, you will not be able to assign a new administrator to the virtual Administrator Server.
You can create a backup copy of Administration Server data in one of the following ways:
- By creating and running a data backup task through Administration Console.
- By running the klbackup utility on the device that has Administration Server installed. This utility is included in the Kaspersky Security Center distribution kit. After the installation of Administration Server, the utility is located in the root of the destination folder specified at the application installation.
The following data is saved in the backup copy of Administration Server:
- Database of Administration Server (policies, tasks, application settings, events saved on the Administration Server).
- Configuration details of the structure of administration groups and client devices.
- Repository of distribution packages of applications for remote installation.
- Administration Server certificate.
Recovery of Administration Server data is only possible using the klbackup utility.
Page topCreating a data backup task
Backup tasks are Administration Server tasks; they are created through the Quick Start Wizard. If a backup task created by the Quick Start Wizard has been deleted, you can create one manually.
To create an Administration Server data backup task:
- In the main menu, go to DEVICES → TASKS.
- Click the Add button.
The Add Task Wizard starts.
- In the New task window of the Wizard, select the task type named Backup of Administration Server data.
- Follow the rest of the Wizard instructions.
The Backup of Administration Server data task can only be created in a single copy. If the Administration Server data backup task has already been created for the Administration Server, it is not displayed in the task type selection window of the Backup Task Creation Wizard.
To configure the Backup of Administration Server data task:
- In the main menu, go to DEVICES → TASKS, and then select the Backup of Administration Server data task.
- Click the Backup of Administration Server data task.
The task properties window opens.
- If necessary, specify the general task settings according to your needs.
- In the Application settings section, specify the path to the folder for storage backup copies of Administration Server data, set the backup protection password, and number of backup copies if needed.
- Click Save to apply changes.
The Backup of Administration Server data task is configured.
Page topMoving Administration Server to another device
If you need to use Administration Server on a new device, you can move it in one of the following ways:
- Move Administration Server and the database server to a new device (the database server can be installed on the new device together with Administration Server, or on another device).
- Keep the database server on the previous device and move only Administration Server to a new device.
To move Administration Server and the database server to a new device:
- On the previous device, create a backup of Administration Server data.
To do this, you can run the data backup task through Kaspersky Security Center Web Console or run the klbackup utility.
If you use SQL Server as a DBMS for Administration Server, you can migrate the data from SQL Server to MySQL or MariaDB DBMS. To do this, run the klbackup utility in interactive mode to create a data backup. Enable the Migrate to MySQL/MariaDB format option in the Backup settings window of the Backup and restore wizard. Kaspersky Security Center will create a backup compatible with MySQL and MariaDB. After that, you can restore the data from the backup into MySQL or MariaDB.
You can also enable the Migrate to Azure format option to if you want to migrate the data from SQL Server to Azure SQL DBMS.
- On the previous device, disconnect Administration Server from the network.
- Select a new device on which to install the Administration Server. Make sure that the hardware and software on the selected device meet the requirements for Administration Server, Kaspersky Security Center Web Console, and Network Agent. Also, check that ports used on Administration Server are available.
- Assign the same address to the new device.
The new Administration Server can be assigned the NetBIOS name, FQDN, and static IP address. It depends on which Administration Server address was set in the Network Agent installation package when Network Agents were deployed. Alternatively, you can use the connection address that determines the Administration Server to which Network Agent connects (you can obtain this address on managed devices by using the klnagchk utility).
- If needed, on another device, install the database management system (DBMS) that the Administration Server will use.
The database can be installed on the new device together with Administration Server, or on another device. Ensure that this device meets the hardware and software requirements. When you select a DBMS, consider the number of devices covered by the Administration Server.
- Run the installation of the Administration Server on the new device.
- During the Administration Server installation, configure the database server connection settings.
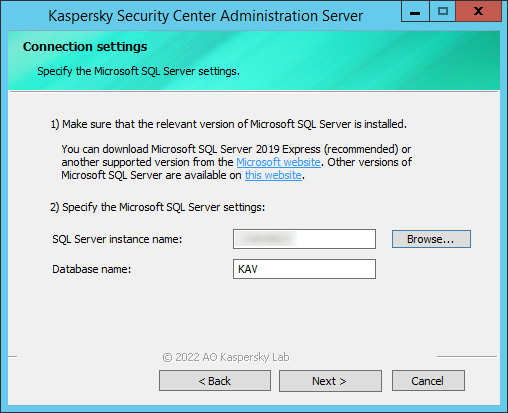
Example of the Connection settings window for Microsoft SQL Server
Depending on where you need to locate the database server, do one of the following:
- After the installation is complete, recover Administration Server data on the new device by using the klbackup utility.
If you use SQL Server as a DBMS on the previous and new devices, note that the version of SQL Server installed on the new device must be the same or later than the version of SQL Server installed on the previous device. Otherwise, you cannot recover Administration Server data on the new device.
- Open Kaspersky Security Center Web Console and connect to the Administration Server.
- Verify that all manage devices are connected to the Administration Server.
- Uninstall the Administration Server and the database server from the previous device.
You can also use Administration Console to move Administration Server and a database server to another device.