Certificates for work with Kaspersky Security Center Web Console
The section describes how to issue and replace certificates for Kaspersky Security Center Web Console and how to renew a certificate for Administration Server if the Server interacts with Kaspersky Security Center Web Console.
Reissuing the certificate for Kaspersky Security Center Web Console
Most browsers impose a limit on the validity term of a certificate. To fall within this limit, the validity term of the Kaspersky Security Center Web Console certificate is limited to 397 days. You can replace an existing certificate received from a certification authority (CA) by issuing a new self-signed certificate manually. Alternatively, you can reissue your expired Kaspersky Security Center Web Console certificate.
Automatically reissuing the certificate for Kaspersky Security Center Web Console is not supported. You have to manually reissue the expired certificate.
If you already use a self-signed certificate, you can also reissue it by upgrading Kaspersky Security Center Web Console through the standard procedure in the installer (Upgrade option).
When you open the Web Console, the browser may inform you that the connection to the Web Console is not private and the Web Console certificate is invalid. This warning appears because the Web Console certificate is self-signed and automatically generated by Kaspersky Security Center. To remove or prevent this warning, you can do one of the following:
- Specify a custom certificate when you reissue it (recommended option). Create a certificate that is trusted in your infrastructure and that meets the requirements for custom certificates.
- Add the Web Console certificate to the list of trusted browser certificates after you reissue the certificate. We recommend that you use this option only if you cannot create a custom certificate.
To issue a new certificate when you install Kaspersky Security Center Web Console for the first time:
- Run the routine installation of Kaspersky Security Center Web Console.
- When you reach the Client certificate step of the Setup Wizard, select the Generate new certificate option, and then click the Next button.
- Progress through the remaining steps of the Setup Wizard until you finish the installation.
A new certificate for Kaspersky Security Center Web Console is issued with a validity term of 397 days.
To reissue the expired Kaspersky Security Center Web Console certificate:
- Under an account with administrator rights, run the ksc-web-console-<version number>.<build number>.exe installation file.
- In the Setup Wizard window that opens, select a language, and then click OK.
- In the welcome window, select the Reissue certificate option, and then click Next.
- On the next step, wait until the reconfiguration of Kaspersky Security Center Web Console is complete, and then click Finish.
The Kaspersky Security Center Web Console certificate is reissued for another validity term of 397 days.
If you use Identity and Access Manager, you must also reissue all the TLS certificates for the ports that Identity and Access Manager uses. Kaspersky Security Center Web Console displays a notification when a certificate expires. You must follow the notification instructions.
Page topReplacing certificate for Kaspersky Security Center Web Console
By default, when you install Kaspersky Security Center Web Console Server, a browser certificate for the application is generated automatically. You can replace the automatically generated certificate with a custom one.
To replace the certificate for Kaspersky Security Center Web Console Server with a custom one:
- On the device where Kaspersky Security Center Web Console Server is installed, run the ksc-web-console-<version number>.<build number>.exe installation file under an account with administrative privileges.
This starts the Setup Wizard.
- On the first page of the Wizard, select the Upgrade option.
- On the Client certificate page, select the Choose existing certificate option and specify the path to the custom certificate.
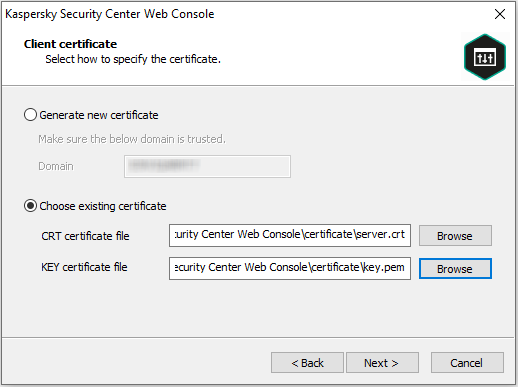
Specifying client certificate
- On the last page of the Wizard, click Modify to apply the new settings.
- After the application reconfiguration successfully completes, click the Finish button.
Kaspersky Security Center Web Console works with the specified certificate.
Page topSpecifying certificates for trusted Administration Servers in Kaspersky Security Center Web Console
The existing Administration Server certificate is automatically replaced with a new one before the certificate expiration date. You can also replace the existing Administration Server certificate with a custom one. Every time the certificate is changed, the new certificate must be specified in the settings of Kaspersky Security Center Web Console. Otherwise, Kaspersky Security Center Web Console will not be able to connect to the Administration Server.
To specify a new certificate for the Administration Server:
- On the device where the Administration Server is installed, copy the certificate file, for example, to a mass storage device.
By default, the certificate file is stored in the following folder:
- For Windows—%ALLUSERSPROFILE%\Application Data\KasperskyLab\adminkit\1093\cert
- For Linux—/var/opt/kaspersky/klnagent_srv/1093/cert/
- On the device where Kaspersky Security Center Web Console is installed, place the certificate file in a local folder.
- Run the ksc-web-console-<version number>.<build number>.exe installation file under an account with administrative privileges.
This starts the Setup Wizard.
- On the first page of the Wizard, select the Upgrade option.
Follow the instructions of the Wizard.
- On the Trusted Administration Servers page of the Wizard, select the required Administration Server and click the Edit button.
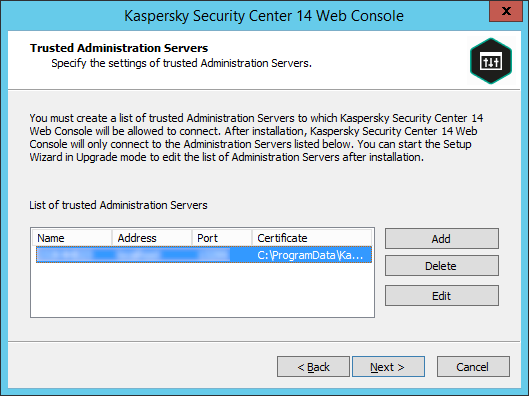
Specifying trusted Administration Servers
- In the Edit Administration Server window that opens, click the Browse button, specify the path to the new certificate file, and then click the Update button to apply changes.
- On the Ready for Kaspersky Security Center 14 Web Console installation page of the Wizard, click the Upgrade button to start the upgrade.
- After the application reconfiguration successfully completes, click the Finish button.
- Log in to Kaspersky Security Center Web Console.
Kaspersky Security Center Web Console works with the specified certificate.
Converting a PFX certificate to the PEM format
To use a PFX certificate in Kaspersky Security Center Web Console, you must first convert it to the PEM format by using any convenient OpenSSL-based cross-platform utility.
To convert a PFX certificate to the PEM format in the Windows operating system:
- In an OpenSSL-based cross-platform utility, execute the following commands:
openssl pkcs12 -in <filename.pfx> -clcerts -nokeys -out server.crtopenssl pkcs12 -in <filename.pfx> -nocerts -nodes -out key.pemAs a result, you get a public key as a .crt file and a private key as a passphrase-protected .pem file.
- Make sure that the .crt and .pem files are generated to the same folder where the .pfx file is stored.
- If the .crt or .pem file contains the "Bag Attributes", delete these attributes by using any convenient text editor, and then save the file.
- Restart the Windows service.
- Kaspersky Security Center Web Console does not support passphrase-protected certificates. Therefore, run the following command in an OpenSSL-based cross-platform utility to remove a passphrase from the .pem file:
openssl rsa -in key.pem -out key-without-passphrase.pemDo not use the same name for the input and output .pem files.
As a result, the new .pem file is unencrypted. You do not have to enter a passphrase to use it.
The .crt and .pem files are ready to use, so you can specify them in the Kaspersky Security Center Web Console installer.
To convert a PFX certificate to the PEM format in the Linux operating system:
- In an OpenSSL-based cross-platform utility, execute the following commands:
openssl pkcs12 -in <filename.pfx> -clcerts -nokeys | sed -ne '/-BEGIN CERTIFICATE-/,/-END CERTIFICATE-/p' > server.crtopenssl pkcs12 -in <filename.pfx> -nocerts -nodes | sed -ne '/-BEGIN PRIVATE KEY-/,/-END PRIVATE KEY-/p' > key.pem - Make sure that the certificate file and the private key are generated to the same directory where the .pfx file is stored.
- Kaspersky Security Center Web Console does not support passphrase-protected certificates. Therefore, run the following command in an OpenSSL-based cross-platform utility to remove a passphrase from the .pem file:
openssl rsa -in key.pem -out key-without-passphrase.pemDo not use the same name for the input and output .pem files.
As a result, the new .pem file is unencrypted. You do not have to enter a passphrase to use it.
The .crt and .pem files are ready to use, so you can specify them in the Kaspersky Security Center Web Console installer.
Page top