Contents
- Managing client devices
- Connecting client devices to the Administration Server
- Manually connecting a client device to the Administration Server. Klmover utility
- Tunneling the connection between a client device and the Administration Server
- Remotely connecting to the desktop of a client device
- Connecting to devices through Windows Desktop Sharing
- Configuring the restart of a client device
- Auditing actions on a remote client device
- Checking the connection between a client device and the Administration Server
- Identifying client devices on the Administration Server
- Moving devices to an administration group
- Changing the Administration Server for client devices
- Moving devices connected to Administration Server through connection gateways to another Administration Server
- Clusters and server arrays
- Turning on, turning off, and restarting client devices remotely
- About the usage of the continuous connection between a managed device and the Administration Server
- About forced synchronization
- About connection schedule
- Sending messages to device users
- Managing Kaspersky Security for Virtualization
- Configuring the switching of device statuses
- Tagging devices and viewing assigned tags
- Remote diagnostics of client devices. Kaspersky Security Center remote diagnostics utility
- Connecting the remote diagnostics utility to a client device
- Enabling and disabling tracing, downloading the trace file
- Downloading application settings
- Downloading event logs
- Downloading multiple diagnostic information items
- Starting diagnostics and downloading the results
- Starting, stopping, and restarting applications
- UEFI protection devices
- Settings of a managed device
- General policy settings
- Network Agent policy settings
Managing client devices
This section contains information about working with client devices.
Connecting client devices to the Administration Server
The connection of the client device to Administration Server is established by the Network Agent installed on the client device.
When a client device connects to Administration Server, the following operations are performed:
- Automatic data synchronization:
- Synchronization of the list of applications installed on the client device.
- Synchronization of policies, application settings, tasks, and task settings.
- Retrieval of up-to-date information about the condition of applications, execution of tasks, and applications' operation statistics by Administration Server.
- Delivery of the event information to Administration Server that is for processing.
Automatic data synchronization is performed regularly in accordance with the Network Agent settings (for example, every 15 minutes). You can specify the connection interval manually.
Information about an event is delivered to Administration Server as soon as it occurs.
If an Administration Server is remotely located outside a corporate network, client devices can connect to it over the internet.
For devices to connect to an Administration Server over the internet, the following conditions must be met:
- The remote Administration Server must have an external IP address and the incoming port 13000 must remain open (for connection of Network Agents). We recommend that you also open UDP port 13000 (for receiving notifications of device shut down).
- Network Agents must be installed on the devices.
- When installing Network Agent on devices, you must specify the external IP address of the remote Administration Server. If an installation package is used for installation, specify the external IP address manually in the properties of the installation package, in the Settings section.
- To use the remote Administration Server to manage applications and tasks for a device, in the properties window of the device, in the General section select the Do not disconnect from the Administration Server check box. After the check box is selected, wait until the Administration Server is synchronized with the remote device. The number of client devices maintaining a continuous connection with an Administration Server cannot exceed 300.
To speed up the performance of tasks initiated by a remote Administration Server, you can open port 15000 on a device. In this case, to run a task, the Administration Server sends a special packet to Network Agent over port 15000 without waiting until completion of synchronization with the device.
Kaspersky Security Center allows you to configure connection between a client device and Administration Server so that the connection remains active after all operations are completed. Uninterrupted connection is necessary in cases when real-time monitoring of application status is required and Administration Server is unable to establish a connection to the client for some reason (for example, connection is protected by a firewall, opening of ports on the client device is not allowed, or the client device IP address is unknown). You can establish an uninterrupted connection between a client device and Administration Server in the device properties window in the General section.
We recommend that you establish an uninterrupted connection with the most important devices. The total number of connections simultaneously maintained by the Administration Server is limited to 300.
When synchronized manually, the system uses an auxiliary connection method that allows connection initiated by Administration Server. Before establishing the connection on a client device, you must open the UDP port. Administration Server sends a connection request to the UDP port of the client device. In response, the Administration Server's certificate is verified. If the Administration Server certificate matches the certificate copy stored on the client device, the connection is established.
The manual launch of synchronization is also used for obtaining up-to-date information about the condition of applications, execution of tasks, and operation statistics of applications.
Page topManually connecting a client device to the Administration Server. Klmover utility
If you have to manually connect a client device to the Administration Server, you can use the klmover utility on the client device.
When Network Agent is installed on a client device, the utility is automatically copied to the Network Agent installation folder.
To manually connect a client device to the Administration Server by using the klmover utility:
On the device, start the klmover utility from the command line.
When started from the command line, the klmover utility can perform the following actions (depending on which keys are in use):
- Connects Network Agent to Administration Server with the specified settings;
- Records the operation results in the event log file or displays them on the screen.
You cannot use the klmover utility for client devices connected to Administration Server through connection gateways. For such devices you have to either reconfigure Network Agent or reinstall Network Agent and specify connection gateway.
Utility command line syntax:
klmover [-logfile <file name>] [-address <server address>] [-pn <port number>] [-ps <SSL port number>] [-nossl] [-cert <path to certificate file>] [-silent] [-dupfix] [-virtserv] [-cloningmode]
The administrator rights are required to run the utility.
Descriptions of the keys:
-logfile <file name>—Record the utility run results in a log file.By default, information is saved in the standard output stream (stdout). If the key is not in use, results and error messages are displayed on the screen.
-address <server address>—Address of the Administration Server for connection.You can specify an IP address, the NetBIOS name, or the DNS name of a device as its address.
-pn <port number>—Number of the port through which non-encrypted connection to the Administration Server is established.The default port number is 14000.
-ps <SSL port number>—Number of the SSL port through which encrypted connection to the Administration Server is established using SSL.The default port number is 13000.
-nossl—Use non-encrypted connection to the Administration Server.If the key is not in use, Network Agent is connected to Administration Server by using encrypted SSL protocol.
-cert <path to certificate file>—Use the specified certificate file for authentication of access to Administration Server.If the key is not in use, Network Agent receives a certificate at the first connection to Administration Server.
-silent—Run the utility in silent mode.Using the key may be useful if, for example, the utility is started from the logon script at the user's registration.
-dupfix—The key is used if Network Agent has been installed using a method that differs from the usual one (with the distribution package)—for example, by recovering it from an ISO disk image.-virtserv—Name of the virtual Administration Server.-cloningmode—Network Agent disk cloning mode.Use one of the following parameters to configure the disk cloning mode:
-cloningmode—Request the status of the disk cloning mode.-cloningmode 1—Enable the disk cloning mode.-cloningmode 0—Disable the disk cloning mode.
For example, to connect Network Agent to Administration Server, run the following command:
klmover -address kscserver.mycompany.com -logfile klmover.log
Tunneling the connection between a client device and the Administration Server
Kaspersky Security Center allows tunneling TCP connections from Administration Console via the Administration Server and then via Network Agent to a specified port on a managed device. Tunneling is designed for connecting a client application on a device with Administration Console installed to a TCP port on a managed device—if no direct connection is possible between Administration Console and the target device.
For example, tunneling is used for connections to a remote desktop, both for connecting to an existing session, and for creating a new remote session.
Tunneling can also be enabled by using external tools. For example, the administrator can run the putty utility, the VNC client, and other tools in this way.
Connection tunneling between a remote client device and Administration Server is required if the port used for connection to Administration Server is not available on the device. The port on the device may be unavailable in the following cases:
- The remote device is connected to a local network that uses the NAT mechanism.
- The remote device is part of the local network of Administration Server, but its port is closed by a firewall.
To tunnel the connection between a client device and Administration Server:
- In the console tree, select the folder of the group that contains the client device.
- On the Devices tab, select the device.
- In the context menu of the device, select All tasks → Connection Tunneling.
- In the Connection Tunneling window that opens, create a tunnel.
Remotely connecting to the desktop of a client device
The administrator can obtain remote access to the desktop of a client device through a Network Agent installed on the device.
Remote connection to a device through the Network Agent is possible even if the TCP and UDP ports of the client device are closed. Upon establishing the connection with the device, the administrator gains full access to information stored on this device and can manage applications installed on it.
This section describes how to establish a connection to a Windows client device and a macOS client device through the Network Agent.
Connecting to Windows client devices
Remote connection with a Windows client device can be established in one of the following ways:
- By using a standard Microsoft Windows component named Remote Desktop Connection.
Connection to a remote desktop is established through the standard Windows utility mstsc.exe in accordance with the utility's settings.
- By using the Windows Desktop Sharing technology.
Connecting to the Windows client device using Remote Desktop Connection
Connection to the current remote desktop session of the user is established without the user's knowledge. Once the administrator connects to the session, the device user is disconnected from the session without an advance notification.
To connect to the desktop of a client device through the Remote Desktop Connection component:
- In the Administration Console tree, select the device to which you need to obtain access.
- In the context menu of the device, select All tasks → Connect to device → New RDP session.
The standard Windows utility mstsc.exe starts, which helps to connect to the remote desktop.
- Follow the instructions shown in the utility's dialog boxes.
When connection to the device is established, the desktop is available in the Remote Desktop Connection window of Microsoft Windows.
Connecting to the Windows client device using Windows Desktop Sharing
When connecting to an existing session of the remote desktop, the session user on the device receives a connection request from the administrator. No information about remote activity on the device and its results will be saved in reports created by Kaspersky Security Center.
The administrator can connect to an existing session on a client device without disconnecting the user in this session. In this case, the administrator and the session user on the device share access to the desktop.
The administrator can configure an audit of user activity on a remote client device. During the audit, the application saves information about files on the client device that have been opened and/or modified by the administrator.
To connect to the desktop of a client device through Windows Desktop Sharing, the following conditions must be met:
- Microsoft Windows Vista or later is installed on the administrator's workstation. The type of operating system of the device hosting Administration Server imposes no restrictions on connection through Windows Desktop Sharing.
To check whether the Windows Desktop Sharing feature is included in your Windows edition, make sure that there is CLSID\{32BE5ED2-5C86-480F-A914-0FF8885A1B3F} key in the Windows Registry.
- Microsoft Windows Vista or later is installed on the client device.
- Kaspersky Security Center uses a license for Vulnerability and patch management.
To connect to the desktop of a client device through Windows Desktop Sharing:
- In the Administration Console tree, select the device to which you need to obtain access.
- In the context menu of the device, select All tasks → Connect to device → Windows Desktop Sharing.
- In the Select remote desktop session window that opens, select the session on the device to which you need to connect.
If connection to the device is established successfully, the desktop of the device will be available in the Kaspersky Remote Desktop Session Viewer window.
- To start interacting with the device, in the main menu of the Kaspersky Remote Desktop Session Viewer window, select Actions → Interactive mode.
Connecting to macOS client devices
The administrator can use the Virtual Network Computing (VNC) system to connect to macOS devices.
Connection to a remote desktop is established through a VNC client installed on the Administration Server device. The VNC client switches the keyboard and mouse control from the client device to the administrator.
When the administrator connects to the remote desktop, the user does not receive notifications or connection requests from the administrator. The administrator connects to an existing session on the client device, without disconnecting the user from this session.
To connect to the desktop of a client macOS device through the VNC client, the following conditions must be met:
- VNC client is installed on the Administration Server device.
- Remote login and remote management are allowed on the client device.
- User has allowed the administrator access to the client device in the Sharing settings of the macOS operating system.
To connect to the desktop of a client device through the Virtual Network Computing system:
- In the Administration Console tree, select the device to which you need to obtain access.
- In the context menu of the device, select All tasks → Connection Tunneling.
- In the Connection Tunneling window that opens, do the following:
- In the 1. Network port section, specify the network port number of the device to which you need to connect.
By default, port 5900 is used.
- In the 2. Tunneling section, click the Create tunnel button.
- In the 3. Network settings section, click the Copy button.
- In the 1. Network port section, specify the network port number of the device to which you need to connect.
- Open the VNC client and paste the copied network attributes into the text field. Press Enter.
- In the window that opens, view the certificate details. If you agree to use the certificate, click the Yes button.
- In the Authentication window, specify the credentials of the client device, and then click OK.
Connecting to devices through Windows Desktop Sharing
To connect to a device through Windows Desktop Sharing:
- In the console tree, on the Devices tab, select the Managed devices folder.
The workspace of this folder displays a list of devices.
- In the context menu of the device to which you want to connect, select Connect to device → Windows Desktop Sharing.
The Select remote desktop session window opens.
- In the Select remote desktop session window, select a desktop session for connection to the device.
- Click OK.
The device is connected.
Page topConfiguring the restart of a client device
When using, installing, or removing Kaspersky Security Center, you may have to restart the device. You can specify the restart settings only for devices running Windows.
To configure the restart of a client device:
- In the console tree, select the administration group for which you have to configure the restart.
- In the workspace of the group, select the Policies tab.
- In the workspace, select a policy of Kaspersky Security Center Network Agent in the list of policies, and then select Properties in the context menu of the policy.
- In the policy properties window, select the Restart management section.
- Select the action that must be performed if a restart of the device is required:
- Select Do not restart the operating system to block automatic restart.
- Select Restart the operating system automatically if necessary to allow automatic restart.
- Select Prompt user for action to enable prompting the user to allow the restart.
You can specify the frequency of restart requests, and enable forced restart and forced closure of applications in blocked sessions on the device by selecting the corresponding check boxes and time settings in spin boxes.
- Click OK to save changes and close the policy properties window.
Restart of the device will now be configured.
Page topAuditing actions on a remote client device
The application enables auditing of the administrator's actions on a remote client devices running Windows. During the audit, the application saves, on the device, information about files that have been opened and/or modified by the administrator. Audit of the administrator's actions is available when the following conditions are met:
- The Vulnerability and Patch Management license is in use.
- The administrator has the right to start shared access to the desktop of the remote device.
To enable auditing of actions on a remote client device:
- In the console tree, select the administration group for which the audit of the administrator's actions should be configured.
- In the workspace of the group, select the Policies tab.
- Select a policy of Kaspersky Security Center Network Agent, then select Properties in the context menu of the policy.
- In the policy properties window, select the Windows Desktop Sharing section.
- Select the Enable audit check box.
- In the Masks of files to monitor when read and Masks of files to monitor when modified lists, add file masks on which the application must monitor actions during the audit.
By default, the application monitors actions on files with .txt, .rtf, .doc, .xls, .docx, .xlsx, .odt, and .pdf extensions.
- Click OK to save changes and close the policy properties window.
This results in configuration of the audit of the administrator's actions on the user's remote device with shared desktop access.
Records of the administrator's actions on the remote device are logged:
- In the event log on the remote device.
- In a file with the syslog extension located in the Network Agent folder on a remote device (for example, C:\ProgramData\KasperskyLab\adminkit\1103\logs).
- In the events database of Kaspersky Security Center.
Checking the connection between a client device and the Administration Server
Kaspersky Security Center allows you to check connections between a client device and the Administration Server, automatically or manually.
Automatic check of connection is performed on Administration Server. Manual check of the connection is performed on the device.
Automatically checking the connection between a client device and the Administration Server
To start an automatic check of the connection between a client device and Administration Server:
- In the console tree, select the administration group that includes the device.
- In the workspace of the administration group, on the Devices tab, select the device.
- In the context menu of the device, select Check device accessibility.
A window opens that contains information about the accessibility of the device.
Page topManually checking the connection between a client device and the Administration Server. Klnagchk utility
You can check the connection, and obtain detailed information about the settings of the connection, between a client device and Administration Server by using the klnagchk utility. The klnagchk utility is located in the Network Agent installation folder.
When started from the command line, the klnagchk utility can perform the following actions (depending on the keys in use):
- Display on the screen or logs the values of the settings used for connecting Network Agent installed on the device to Administration Server.
- Record into an event log file Network Agent statistics (since its last startup) and utility operation results, or displays the information on the screen.
- Attempt to establish a connection between Network Agent and Administration Server.
If the connection attempt fails, the utility sends an ICMP packet to check the status of the device on which Administration Server is installed.
To check the connection between a client device and Administration Server by using the klnagchk utility,
On the device with Network Agent installed, start the klnagchk utility from the command line under a local administrator account.
Utility command line syntax:
klnagchk [-logfile <file name>] [-sp] [-savecert <path to certificate file>] [-restart][-sendhb]
Descriptions of the keys:
-logfile <file name>—Records in a log file with the values of the connection settings between Network Agent and Administration Server, and the utility operation results.By default, information is saved in the standard output stream (stdout). If the key is not in use, settings, results, and error messages are displayed on the screen.
-sp—Shows the password for the user's authentication on the proxy server.The key is in use if connection to the Administration Server is established through a proxy server.
-savecert <file name>—Saves the certificate used to access the Administration Server, in a specified file.-restart—Starts Network Agent after the utility has completed.-sendhb—Starts the synchronization of Network Agent with Administration Server.
After startup, the klnagchk utility accesses the configuration files of Network Agent and displays the connection parameters. These parameters are specified during the Network Agent installation and in the Network Agent policy settings:
Current device—Windows network name of the client device.Network Agent version—Full number of the Network Agent version (with patches) installed on the device.Administration Server address—Address of Administration Server.Use SSL—Parameter that indicates whether a secure connection is used when connecting to the Administration Server.Possible values:
- 0—Secure connection is not used.
- 1—Secure connection is used.
Compress traffic—Parameter that indicates whether the traffic between the client device and Administration Server is compressed.Numbers of the Administration Server SSL ports—Numbers of valid ports for communication with Administration Server when using a secure connection.Numbers of the Administration Server ports—Numbers of valid ports for communication with the Administration Server when using an ordinary connection.Use proxy server—Parameter that indicates whether a proxy server is used.Possible values:
- 0—Proxy server is not used.
- 1—Proxy server is used.
Address—Address and port of the proxy server, separated by a colon. This parameter is displayed only if a proxy server is used.User name—User name for accessing the proxy server. This parameter is displayed only if a proxy server is used.Password—Password for accessing the proxy server. This parameter is displayed only if a proxy server is used. To show the proxy server password, you need to use thespkey in the command.Administration Server certificate—Parameter that indicates whether the client device has an Administration Server certificate. A certificate may not exist, for example, if Network Agent has never successfully connected to Administration Server.Possible values:
not installed—Client device does not have an Administration Server certificate.available—Client device has an Administration Server certificate.
Open UDP port—Parameter that indicates whether Network Agent uses the UDP port to receive synchronization requests from Administration Server.Possible values:
- 0—UDP port is closed for receiving synchronization requests from Administration Server.
- 1—UDP port is opened for receiving synchronization requests from Administration Server.
Numbers of UDP ports—Numbers of UDP ports that can be used by Network Agent.Location name—Network location of the device.State of network location—Parameter that indicates whether the client device can be switched from one Administration Server connection profile to another.Possible values:
Enabled—Administration Server connection profile can be switched for the client device.Disabled—Administration Server connection profile cannot be switched for the client device.
Profile to use—Connection profile for Administration Server.Condition—IP address and subnet mask of the network to which the client device is connected.Synchronization interval (min)—Standard interval between synchronizations.Connection timeout (in seconds)—Connection timeout.Send / receive timeout (in seconds)—Connection timeout of read-write operations.Device ID—Device identifier in the network. TheDevice IDis unique among the client devices managed by a particular Administration Server.Locations of connection gateways—Parameters for connecting the client device to Administration Server through the connection gateway.Location of distribution points—Parameters for connecting the client device to Administration Server through the distribution point.Connection with server—Parameter that indicates whether the connection gateway has a continuous connection to Administration Server. The parameter shows only if the client device acts as a connection gateway.Possible values:
active—The connection gateway has a continuous connection to Administration Server.inactive—The connection gateway does not have a continuous connection to Administration Server.
Connection with server through connection gateway—Parameter that indicates whether the connection to Administration Server through a connection gateway is established correctly. The parameter shows only if the client device acts as a connection gateway.Possible values:
active—The connection to Administration Server through a connection gateway is established correctly.inactive—The connection to Administration Server through a connection gateway is established incorrectly.
Also, the klnagchk utility output can contain one of the following lines:
Administration Server is installed on this device—The klnagchk utility is run on the Administration Server device.This device has been assigned a connection gateway but is not yet registered on Administration Server—The klnagchk utility is run on the device on which Network Agent is installed, in the connection gateway mode. The configured connection gateway is waiting for a connection from Administration Server, but Administration Server does not list the device among managed devices. You need to ensure Administration Server initiates a connection to the connection gateway.This device is a connection gateway—The klnagchk utility is run on the device that acts as a connection gateway.Acts as a distribution point—The klnagchk utility is run on the device that acts as a distribution point.
The klnagchk utility checks the status of the Network Agent service. If the service is not running, the utility stops. If the service is running, the utility displays the following connection statistics:
Total number of synchronization requests—Number of attempts to connect the client device to Administration Server.The number of successful synchronization request—Number of successful attempts to connect the client device to Administration Server.Total number of synchronizations—Number of attempts to synchronize the client device settings with the Administration Server settings.The number of successful synchronizations—Number of successful attempts to synchronize the client device settings with Administration Server.Date/time of the last request for synchronization—Date and time of the last connection.
You need to use the Total number of synchronization requests and The number of successful synchronization request parameters when analyzing the connection between Administration Server and Network Agent. The client device settings synchronize with the Administration Server settings only if the Administration Server settings were changed (for example, if new tasks were added or policy settings were modified). Otherwise, the Total number of synchronizations and The number of successful synchronizations parameter values remain unchanged.
For more information on how to troubleshoot issues with connecting Network Agent to Administration Server, refer to Kaspersky Security Center FAQ.
Page topAbout checking the time of connection between a device and the Administration Server
Upon shutting down a device, Network Agent notifies the Administration Server of this event. In Administration Console that device is displayed as shut down. However, Network Agent cannot notify Administration Server of all such events. The Administration Server, therefore, periodically analyzes the Connected to Administration Server attribute (the value of this attribute is displayed in Administration Console, in the device properties, in the General section) for each device and compares it against the synchronization interval from the current settings of Network Agent. If a device has not responded over more than three successive synchronization intervals, that device is marked as shut down.
Page topIdentifying client devices on the Administration Server
Client devices are identified based on their names. A device name is unique among all the names of devices connected to Administration Server.
The name of a device is relayed to Administration Server either when the Windows network is polled and a new device is discovered in it, or at the first connection of Network Agent installed on a device to Administration Server. By default, the name matches the device name in the Windows network (NetBIOS name). If a device with this name is already registered on the Administration Server, an index with the next sequence number will be added to the new device name, for example: <Name>-1, <Name>-2. Under this name, the device is added to the administration group.
Page topMoving devices to an administration group
You can move devices from one administration group to another only if you have the Modify permission in the Management of administration groups area for both source and target administration groups (or for the Administration Server to which these groups belong).
To include one or several devices in a selected administration group:
- In the console tree, expand the Managed devices folder.
- In the Managed devices folder, select the subfolder that corresponds to the group in which the client devices will be included.
If you want to include the devices in the Managed devices group, you can skip this step.
- In the workspace of the selected administration group, on the Devices tab, start the process of including the devices in the group in one of the following ways:
- By adding the devices to the group by clicking the Move devices to group button in the information box for the list of devices
- By selecting Create → Device in the context menu of the list of devices
The Move Devices Wizard starts. Following its instructions, select a method for moving the devices to the group and create a list of devices to include in the group.
If you create the list of devices manually, you can use an IP address (or an IP range), a NetBIOS name, or a DNS name as the address of a device. You can manually move to the list only devices for which information has already been added to the Administration Server database upon connection of the device, or after device discovery.
To import a list of devices from a file, specify a TXT file with a list of addresses of the devices to be added. Each address must be specified in a separate line.
After the Wizard completes, the selected devices are included in the administration group and are displayed in the list of devices under names generated by Administration Server.
You can move a device to the selected administration group by dragging it from the Unassigned devices folder to the folder of that administration group.
Page topChanging the Administration Server for client devices
You can change the Administration Server that manages client devices to a different Server using the Change Administration Server task.
To change the Administration Server that manages client devices to a different Server:
- Connect to the Administration Server that manages the devices.
- Create the Administration Server change task in one of the following ways:
- If you need to change the Administration Server for devices included in the selected administration group, create a task for the selected group.
- If you need to change the Administration Server for devices included in different administration groups or in none of the existing administration groups, create a task for specific devices.
The Add Task Wizard starts. Follow the instructions of the Wizard. In the Select the task type window of the Add Task Wizard, select the Kaspersky Security Center node, open the Advanced folder, and select the Change Administration Server task.
- Run the created task.
After the task is completed, the client devices for which it was created are put under the management of the Administration Server specified in the task settings.
If the Administration Server supports encryption and data protection and you are creating a Change Administration Server task, a warning is displayed. The warning states that if any encrypted data is stored on devices, after the new Server begins managing the devices, users will be able to access only the encrypted data with which they previously worked. In other cases, no access to encrypted data is provided. For detailed descriptions of scenarios in which access to encrypted data is not provided, refer to the Kaspersky Endpoint Security for Windows Online Help.
Page topMoving devices connected to Administration Server through connection gateways to another Administration Server
You can move devices connected to the Administration Server through connection gateways to another Administration Server. For example, this may be required if you install another version of Administration Server and do not want to reinstall Network Agent on the devices as it may be time consuming.
The commands described in the instruction must be run on client devices under an account with administrator rights.
To move a device connected through the connection gateway to another Administration Server:
- Run the klmover utility with the
-address <server address>parameter, to switch to the new Administration Server. - Run the
klnagchk -nagwait -tl 4command. - Run the following commands to set a new connection gateway:
klscflag -ssvset -pv klnagent -s FileTransfer -n ft_gateway_mode -sv false -svt BOOL_T -ss "|ss_type = \"SS_SETTINGS\";"klscflag -ssvset -pv klnagent -s FileTransfer -n ft_gateway_loc -sv "gateway_ip_or_name" -svt STRING_T -ss "|ss_type = \"SS_SETTINGS\";"Here
gateway_ip_or_nameis the address of the connection gateway accessible from the internet.klscflag -ssvset -pv klnagent -s FileTransfer -n ft_gateway_ssl_port -sv 13000 -svt INT_T -ss "|ss_type = \"SS_SETTINGS\";"The
13000is the number of the TCP port that the connection gateway is listening to.
- Run the
klnagchk -restart -tl 4command to start the Network Agent service.
The device is moved to the new Administration Server and connected through the new connected gateway.
Page topClusters and server arrays
Kaspersky Security Center supports the cluster technology. If Network Agent sends information to Administration Server confirming that an application installed on a client device is part of a server array, this client device becomes a cluster node. The cluster will be added as an individual object in the Managed devices folder of the console tree with the servers icon ( ).
).
A few typical features of a cluster can be distinguished:
- A cluster and any of its nodes are always in the same administration group.
- If the administrator attempts to move a cluster node, the node moves back to its original location.
- If the administrator attempts to move a cluster to a different group, all of its nodes move with it.
Turning on, turning off, and restarting client devices remotely
Kaspersky Security Center allows you to manage client devices remotely by turning on, shutting down, or restarting them.
To remotely manage client devices:
- Connect to the Administration Server that manages the devices.
- Create a device management task in one of the following ways:
- If you need to turn on, turn off or restart devices that are included in the selected administration group, create a task for the selected group.
- If you have to turn on, turn off or restart devices that are included in various administration groups or belong to none of them, create a task for specific devices.
The Add Task Wizard starts. Follow the instructions of the Wizard. In the Select the task type window of the Add Task Wizard, select the Kaspersky Security Center node, open the Advanced folder, and select the Manage devices task.
- Run the created task.
After the task is completed, the command (turn on, turn off, or restart) will be executed on the selected devices.
Page topAbout the usage of the continuous connection between a managed device and the Administration Server
By default, Kaspersky Security Center does not feature continuous connectivity between managed devices and the Administration Server. Network Agents on managed devices periodically establish connections and synchronize with the Administration Server. The interval between those synchronization sessions is defined in a policy of Network Agent and is 15 minutes by default. If an early synchronization is required (for example, to force the application of a policy), the Administration Server sends a signed network packet to Network Agent on port UDP 15000. (The Administration Server can send this packet over an IPv4 or IPv6 network.) If no connection through UDP is possible between the Administration Server and a managed device for any reason, synchronization runs at the next routine connection between Network Agent and the Administration Server within the synchronization interval.
However, some operations cannot be performed without an early connection between Network Agent and the Administration Server. These operation include running and stopping local tasks, receiving statistics for a managed application, and creating a tunnel. To make these operations possible, you must enable the Do not disconnect from the Administration Server option on the managed device.
About forced synchronization
Although Kaspersky Security Center automatically synchronizes the status, settings, tasks, and policies for managed devices, in some cases the administrator needs to know exactly whether synchronization has already been performed for a specified device at the present moment.
In the context menu of managed devices in Administration Console, the All tasks menu item contains the Force synchronization command. When Kaspersky Security Center 14 executes this command, the Administration Server attempts to connect to the device. If this attempt is successful, forced synchronization will be performed. Otherwise, synchronization will be forced only after the next scheduled connection between Network Agent and the Administration Server.
About connection schedule
In the Network Agent properties window, in the Connectivity section, in the Connection schedule subsection, you can specify time intervals during which Network Agent will transmit data to the Administration Server.
Connect when necessary. If this option is selected, the connection is established when Network Agent has to send data to the Administration Server.
Connect at specified time intervals. If this option is selected, Network Agent connects to the Administration Server at a specified time. You can add several connection time periods.
Page topSending messages to device users
To send a message to users of devices:
- In the console tree, select the node with the name of the required Administration Server.
- Create a message sending task for device users in one of the following ways:
- If you want to send a message to the users of devices that belong to the selected administration group, create a task for the selected group.
- If you want to send a message to the users of devices that belong to different administration groups or that do not belong to any administration groups, create a task for specific devices.
The Add Task Wizard starts. Follow the instructions of the Wizard.
- In the task type window of the Add Task Wizard, select the Kaspersky Security Center 14 Administration Server node, open the Advanced folder, and select the Send message to user task. The send messages to user task is available only for devices running Windows. You can also send messages in the user's context menu in the User accounts folder.
- Run the created task.
After the task is completed, the created message will be sent to the users of the selected devices. The send messages to user task is available only for devices running Windows. You can also send messages in the user's context menu in the User accounts folder.
Page topManaging Kaspersky Security for Virtualization
Kaspersky Security Center supports the option of connection of virtual machines to the Administration Server. Virtual machines are protected by Kaspersky Security for Virtualization. For more details, please refer to the documentation for this application.
Page topConfiguring the switching of device statuses
You can change conditions to assign the Critical or Warning status to a device.
To enable changing the device status to Critical:
- Open the properties window in one of the following ways:
- In the Policies folder, in the context menu of an Administration Server policy, select Properties.
- Select Properties in the context menu of an administration group.
- In the Properties window that opens, in the Sections pane, select Device status.
- In the right pane, in the Set to Critical if these are specified section, select the check box next to a condition in the list.
You can change only settings that are not locked in the parent policy.
- Double-click the name of the selected condition, and then in the window that opens, set the required value for the condition.
You cannot set values for the following conditions: Security application is not installed, Incompatible applications are installed, Software vulnerabilities have been detected, Mobile device settings do not comply with the policy, Unprocessed incidents detected, Device status defined by application, Device has become unmanaged, Security application is not running, License expired.
For the Restart is required condition, you can specify the restart reasons. We recommend that you select the check boxes next to all the reasons from the list.
- Click OK.
When specified conditions are met, the managed device is assigned the Critical status.
To enable changing the device status to Warning:
- Open the properties window in one of the following ways:
- In the Policies folder, in the context menu of the Administration Server policy, select Properties.
- Select Properties in the context menu of the administration group.
- In the Properties window that opens, in the Sections pane select Device status.
- In the right pane, in the Set to Warning if these are specified section, select the check box next to a condition in the list.
You can change only settings that are not locked in the parent policy.
- Double-click the name of the selected condition, and then in the window that opens, set the required value for the condition.
You cannot set values for the following conditions: Security application is not installed, Incompatible applications are installed, Software vulnerabilities have been detected, Mobile device settings do not comply with the policy, Unprocessed incidents detected, Device status defined by application, Device has become unmanaged, Security application is not running, License expired.
For the Restart is required condition, you can specify the restart reasons. We recommend that you select the check boxes next to all the reasons from the list.
- Click OK.
When specified conditions are met, the managed device is assigned the Warning status.
Tagging devices and viewing assigned tags
Kaspersky Security Center allows you to tag devices. A tag is the ID of a device that can be used for grouping, describing, or finding devices. Tags assigned to devices can be used for creating selections, for finding devices, and for distributing devices among administration groups.
You can tag devices manually or automatically. Tag a device manually in the device properties; you may use manual tagging when you have to tag an individual device. Auto-tagging is performed by Administration Server in accordance with the specified tagging rules.
In the properties of an Administration Server, you can set up auto-tagging for devices managed by this Administration Server. Devices are tagged automatically when specified rules are met. An individual rule corresponds to each tag. Rules are applied to the network properties of the device, operating system, applications installed on the device, and other device properties. For example, you can set up a rule that will assign the Win tag to all devices running Windows. Then, you can use this tag when creating a device selection; this will help you sort out all devices running Windows, and assign them a task.
You can also use tags as conditions of policy profile activation on a managed device in order to apply specific policy profiles only on devices with specific tags. For example, if a device tagged as Courier appears in the Users administration group and if activation of the corresponding policy profile by the Courier tag has been enabled, then the policy created for the Users group will not be applied to this device—but the profile of the policy profile will be applied. The policy profile can allow this device to start some applications that have been blocked from running by the policy.
You can create multiple tagging rules. A single device can be assigned multiple tags if you have created multiple tagging rules and if the respective conditions of these rules are met simultaneously. You can view the list of all assigned tags in the device properties. Each tagging rule can be enabled or disabled. If a rule is enabled, it is applied to devices managed by Administration Server. If you are not using a rule currently but may need it in the future, you do not have to remove it; you can simply clear the Enable rule check box instead. In this case, the rule is disabled; it will not be executed until the Enable rule check box is selected again. You may need to disable a rule without removing it if you have to exclude the rule from the list of tagging rules temporarily and then include it again.
Automatic device tagging
You can create and edit automatic tagging rules in the Administration Server properties window.
To tag devices automatically:
- In the console tree, select the node with the name of the Administration Server for which you have to specify tagging rules.
- In the context menu of the Administration Server, select Properties.
- In the Administration Server properties window, select the Tagging rules section.
- In the Tagging rules section, click the Add button.
The New rule window opens.
- In the New rule window, configure the general properties of the rule:
- Specify the rule name.
The rule name cannot be more than 255 characters long and cannot include any special characters (such as
"*<>?\:|). - Enable or disable the rule using the Enable rule check box.
By default, the Enable rule check box is selected.
- In the Tag field, enter the tag name.
The tag name cannot be more than 255 characters long and cannot include any special characters (such as
"*<>?\:|).
- Specify the rule name.
- In the Conditions section, click the Add button to add a new condition, or click the Properties button to edit an existing condition.
The New Auto-Tagging Rule Condition Wizard window opens.
- In the Tag assignment condition window, select the check boxes for the conditions that must affect tagging. You can select multiple conditions.
- Depending on which tagging conditions you selected, the Wizard displays the windows for setup of the corresponding conditions. Set up the triggering of the rule by the following conditions:
- Device's use or association with a specific network—Network properties of the device, such as device name in the Windows network, and device inclusion in a domain or an IP subnet.
If case sensitive collation is set for the database that you use for Kaspersky Security Center, keep case when you specify a device DNS name. Otherwise, the auto-tagging rule will not work.
- Use of Active Directory—Presence of the device in an Active Directory organizational unit and membership of the device in an Active Directory group.
- Specific applications—Presence of Network Agent on the device, operating system type, version, and architecture.
- Virtual machines—Inclusion of the device in a specific type of virtual machines.
- Application from the applications registry installed—Presence of applications of different vendors on the device.
- Device's use or association with a specific network—Network properties of the device, such as device name in the Windows network, and device inclusion in a domain or an IP subnet.
- After the condition is set up, enter a name for it, and then close the Wizard.
If necessary, you can set multiple conditions for a single rule. In this case, the tag will be assigned to a device if it meets at least one condition. The conditions that you added will be displayed in the rule properties window.
- Click OK in the New rule window, then click OK in the Administration Server properties window.
The newly created rules are enforced on devices managed by the selected Administration Server. If the settings of a device meet the rule conditions, the device is assigned the tag.
Page topViewing and configuring tags assigned to a device
You can view the list of all tags that have been assigned to a device, as well as proceed to set up automatic tagging rules in the device properties window.
To view and set up the tags that have been assigned to a device:
- In the console tree, open the Managed devices folder.
- In the workspace of the Managed devices folder, select the device for which you want to view the assigned tags.
- In the context menu of the mobile device, select Properties.
- In the device properties window, select the Tags section.
A list of tags assigned to the selected device is displayed, as well as the way in which each of the tags were assigned: manually or by a rule.
- If necessary, perform one of the following actions:
- To proceed to setup of tagging rules, click the Set up auto-tagging rules link (only for Windows).
- To rename a tag, select one and click the Rename button.
- To remove a tag, select one and click the Remove button.
- To add a tag manually, enter one in the field in the lower part of the Tags section and click the Add button.
- Click the Apply button, if you have made changes to the Tags section, for your changes to take effect.
- Click OK.
If you removed or renamed a tag in the device properties, this change will not affect the tagging rules that have been set up in the Administration Server properties. The change will only apply to the device whose properties it has been made.
Page topRemote diagnostics of client devices. Kaspersky Security Center remote diagnostics utility
The utility for remote diagnostics of Kaspersky Security Center (hereinafter referred to as the remote diagnostics utility) is designed for remote execution of the following operations on client devices:
- Enabling and disabling tracing, changing the tracing level, downloading the trace file.
- Downloading system information and application settings.
- Downloading event logs.
- Generating a dump file for an application.
- Starting diagnostics and downloading diagnostics reports.
- Starting and stopping applications.
You can use event logs and diagnostics reports downloaded from a client device to troubleshoot problems on your own. Also, a Kaspersky Technical Support specialist might ask you to download trace files, dump files, event logs, and diagnostics reports from a client device for further analysis at Kaspersky.
The remote diagnostics utility is automatically installed on the device together with Administration Console.
Connecting the remote diagnostics utility to a client device
To connect the remote diagnostics utility to a client device:
- Select any administration group in the console tree.
- In the workspace, on the Devices tab, in the context menu of any device, select Custom tools → Remote diagnostics.
The main window of the remote diagnostics utility opens.
- In the first field of the main window of the remote diagnostics utility, specify which tools you intend to use to connect to the device:
- Access using Microsoft Windows network.
- Access using Administration Server.
- If you have selected Access using Microsoft Windows network in the first field of the main utility window, perform the following actions:
- In the Device field, specify the address of the device to which you need to connect
You can use an IP address, NetBIOS name, or DNS name as the device address.
The default value is the address of the device from whose context menu the utility was started.
- Specify an account for connecting to the device:
- Connect as current user (selected by default). Connect by using the current user account.
- Use provided user name and password to connect. Connect by using a provided user account. Specify the User name and the Password of the required account.
Connection to a device is possible only under the account of the local administrator of the device.
- In the Device field, specify the address of the device to which you need to connect
- If you have selected Access using Administration Server in the first field of the main utility window, perform the following actions:
- In the Administration Server field, specify the address of the Administration Server from which you intend to connect to the device.
You can use an IP address, NetBIOS name, or DNS name as the server address.
The default value is the address of the Administration Server from which the utility has been run.
- If required, select the Use SSL, Compress traffic, and Device belongs to secondary Administration Server check boxes.
If the Device belongs to secondary Administration Server check box is selected, you can fill in the Device belongs to secondary Administration Server field with the name of the secondary Administration Server that manages the device by clicking the Browse button.
- In the Administration Server field, specify the address of the Administration Server from which you intend to connect to the device.
- To connect to the device, click the Sign in button.
You have to authorize by using two-step verification if two-step verification is enabled for your account.
This opens the window intended for remote diagnostics of the device (see the figure below). The left part of the window contains links to operations of device diagnostics. The right part of the window contains the object tree of the device with which the utility can operate. The lower part of the window displays the progress of the utility operations.
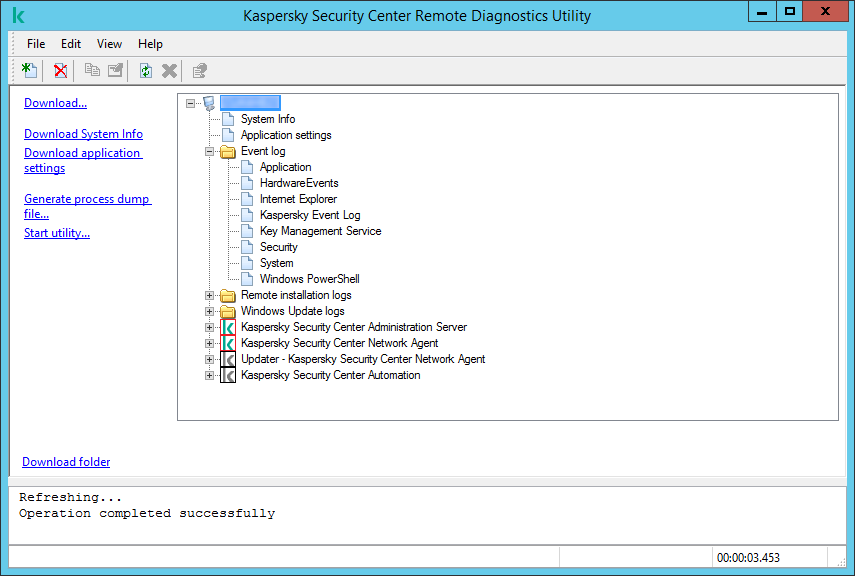
Remote diagnostics utility. Remote device diagnostics window
The remote diagnostics utility saves files downloaded from devices on the desktop of the device from which it was started.
Enabling and disabling tracing, downloading the trace file
To enable tracing on a remote device:
- Run the remote diagnostics utility and connect to the necessary device.
- In the objects tree of the device, select the application for which you want to enable tracing.
Tracing can be enabled and disabled for applications with self-defense only if the device is connected using Administration Server tools.
If you want to enable tracing for Network Agent, you can also do it while creating the Install required updates and fix vulnerabilities task. In this case, Network Agent will write the tracing information even if tracing is disabled for Network Agent in the remote diagnostics utility.
- To enable tracing:
- In the left part of the remote diagnostics utility window, click Enable tracing.
- In the Select tracing level window that opens, we recommend that you keep the default values of the settings. When required, a Technical Support specialist will guide you through the configuration process. The following settings are available:
- Tracing level
- Rotation-based tracing (available for Kaspersky Endpoint Security only)
- Click OK.
- For Kaspersky Endpoint Security, a Technical Support specialist may ask you to enable Xperf tracing for information about the system performance.
To enable Xperf tracing:
- In the left part of the remote diagnostics utility window, click Enable Xperf tracing.
- In the Select tracing level window that opens, depending on the request from the Technical Support specialist, select one of the following tracing levels:
- Select one of the following tracing types:
- You may also be asked to enable the Rotation-based tracing option to prevent excessive increase in the size of the trace file. Then specify the maximum size of the trace file. When the file reaches the maximum size, the oldest tracing information is overwritten with new information.
- Click OK.
In some cases, the security application and its task must be restarted in order to enable tracing.
The remote diagnostics utility enables tracing for the selected application.
To download a trace file of an application:
- Run the remote diagnostics utility and connect to the necessary device, as described in "Connecting the remote diagnostics utility to a client device".
- In the node of the application, in the Trace files folder, select the required file.
- In the left part of the remote diagnostics utility window, click Download entire file.
For large files the most recent trace parts can be downloaded.
You can delete the highlighted trace file. The file can be deleted after tracing is disabled.
The selected file is downloaded to the location specified in the lower part of the window.
To disable tracing on a remote device:
- Run the remote diagnostics utility and connect to the necessary device, as described in "Connecting the remote diagnostics utility to a client device".
- In the device object tree, select the application for which you want to disable tracing.
Tracing can be enabled and disabled for applications with self-defense only if the device is connected using Administration Server tools.
- In the left part of the remote diagnostics utility window, click Disable tracing.
The remote diagnostics utility disables tracing for the selected application.
Page topDownloading application settings
To download application settings from a remote device:
- Run the remote diagnostics utility and connect to the necessary device, as described in "Connecting the remote diagnostics utility to a client device".
- In the objects tree of the remote diagnostics utility window, select the top node with the name of the device.
- In the left part of the remote diagnostics utility window, select the action you need from the following options:
- Download System Info
- Download application settings
- Generate process dump file
In the window that opens after you click this link, specify the executable file of the application for which you want to generate a dump file.
- Start utility
In the window that opens after you click this link, specify the executable file of the utility that you want to start, and its run settings.
The selected utility is downloaded and launched on the device.
Page topDownloading event logs
To download an event log from a remote device:
- Run the remote diagnostics utility and connect to the necessary device, as described in "Connecting the remote diagnostics utility to a client device".
- In the Event log folder of the device object tree, select the relevant log.
- Download the selected log by clicking the Download event log <Event log name> link in the left part of the remote diagnostics utility window.
The selected event log is downloaded to the location specified in the lower pane.
Page topDownloading multiple diagnostic information items
Kaspersky Security Center remote diagnostics utility allows you to download multiple items of diagnostic information including event logs, system information, trace files, and dump files.
To download diagnostic information from a remote device:
- Run the remote diagnostics utility and connect to the necessary device, as described in "Connecting the remote diagnostics utility to a client device".
- In the left part of the remote diagnostics utility window, click Download.
- Select the check boxes next to the items that you want to download.
- Click Start.
Every selected item is downloaded to the location specified in the lower pane.
Page topStarting diagnostics and downloading the results
To start diagnostics for an application on a remote device and download the results:
- Run the remote diagnostics utility and connect to the necessary device, as described in "Connecting the remote diagnostics utility to a client device".
- In the object tree of the device, select the necessary application.
- Start diagnostics by clicking the Run diagnostics link in the left part of the remote diagnostics utility window.
A diagnostics report appears in the node of the selected application in the object tree.
- Select the newly generated diagnostics report in the objects tree and download it by clicking the Download folder link.
The selected report is downloaded to the location specified in the lower pane.
Page topStarting, stopping, and restarting applications
You can start, stop, and restart applications only if you have connected the device using Administration Server tools.
To start, stop, or restart an application:
- Run the remote diagnostics utility and connect to the necessary device, as described in "Connecting the remote diagnostics utility to a client device".
- In the object tree of the device, select the necessary application.
- Select an action in the left part of the remote diagnostics utility window:
- Stop application
- Restart application
- Start application
Depending on the action that you have selected, the application is started, stopped, or restarted.
Page topUEFI protection devices
A UEFI protection device is a device with a Kaspersky solution or application for UEFI integrated at the BIOS level. Integrated protection ensures device security from the moment the system starts, while protection on devices without integrated software begins functioning only after the security application starts. Kaspersky Security Center supports management of these devices.
To modify the connection settings of UEFI protection devices:
- In the console tree, select the node with the name of the required Administration Server.
- In the context menu of the Administration Server, select Properties.
- In the Administration Server properties window, select Server connection settings → Additional ports.
- In the Additional ports section, modify the relevant settings:
- Click OK.
Settings of a managed device
To view the settings of a managed device:
- In the console tree, select the Managed devices folder.
- In the workspace of the folder, select a device.
- In the context menu of the device, select Properties.
The properties window of the selected device opens, with the General section selected.
General
The General section displays general information about the client device. Information is provided on the basis of data received during the last synchronization of the client device with the Administration Server:
- Name
- Description
- Windows domain
- NetBIOS name
- DNS name
- IP address
- Group
- Last updated
- Last visible
- Connected to Administration Server
- Do not disconnect from the Administration Server
Protection
The Protection section provides information about the current status of anti-virus protection on the client device:
- Device status
- All problems
- Real-time protection
- Last on-demand scan
- Total number of threats detected
- Active threats
- Disk encryption status
Applications
The Applications section lists all Kaspersky applications installed on the client device. This section contains the start button ( ) and stop button (
 ) that allow you to start and stop the selected Kaspersky application (excluding Network Agent). These buttons are enabled if port 15000 UDP is available on the managed device for receipt push-notifications from Administration Server. If the managed device is unavailable for push-notifications, but the mode of continuous connection to Administration Server is enabled (the Do not disconnect from the Administration Server option in the General section is enabled), the start and stop buttons are available too. Also the Applications section contains the following buttons:
Tasks
In the Tasks tab, you can manage client device tasks: view the list of existing tasks, create new ones, remove, start, and stop tasks, modify their settings, and view execution results. The list of tasks is provided based on data received during the last session of client synchronization with the Administration Server. The Administration Server requests the task status details from the client device.
The start (![]() ), stop (
), stop (![]() ), and remove (
), and remove ( ) buttons are enabled if port 15000 UDP is available on the managed device for receipt push-notifications from Administration Server. If the managed device is unavailable for push-notifications, but the mode of continuous connection to Administration Server is enabled (the Do not disconnect from the Administration Server option in the General section is enabled), the start, stop, and remove buttons are available too.
If connection is not established, the task status is not displayed and buttons are disabled.
Events
The Events tab displays events logged on the Administration Server for the selected client device.
Tags
In the Tags tab, you can manage the list of keywords that are used for finding client devices: view the list of existing tags, assign tags from the list, configure auto-tagging rules, add new tags and rename old tags, and remove tags.
System Info
The General system info section provides information about the application installed on the client device.
Applications registry
In the Applications registry section, you can view the registry of applications installed on the client device and their updates; you can also set up the display of the applications registry.
Information about installed applications is provided if Network Agent installed on the client device sends required information to the Administration Server. You can configure sending of information to the Administration Server in the properties window of Network Agent or its policy, in the Repositories section. Information about installed applications is provided only for devices running Windows.
Network Agent provides information about the applications based on data received from the system registry.
Executable files
The Executable files section displays executable files found on the client device.
Hardware registry
In the Hardware registry section, you can view information about hardware installed on the client device. You can view this information for Windows devices and Linux devices.
Ensure that the lshw utility is installed on Linux devices from which you want to fetch hardware details. Hardware details fetched from virtual machines may be incomplete depending on the hypervisor used.
Sessions
The Sessions section displays information about the client device owner, as well as accounts of users who have worked on the selected client device.
Information about domain users is generated based on Active Directory data. The details of local users are provided by Windows Security Account Manager installed on the client device.
The list displays accounts of users that work on the client device.
Incidents
In the Incidents tab, you can view, edit, and create incidents for the client device. Incidents can be created either automatically, through managed Kaspersky applications installed on the client device, or manually by the administrator. For example, if some users regularly move malware from their removable drives to devices, the administrator can create an incident. The administrator can provide a brief description of the case and recommended actions (such as disciplinary actions to be taken against a user) in the text of the incident, and can add a link to the user or users.
An incident for which all of the required actions have been taken is called processed. The presence of unprocessed incidents can be chosen as the condition for a change of the device status to Critical or Warning.
This section contains a list of incidents that have been created for the device. Incidents are classified by severity level and type. The type of an incident is defined by the Kaspersky application, which creates the incident. You can highlight processed incidents in the list by selecting the check box in the Processed column.
Software vulnerabilities
The Software vulnerabilities section provides information about vulnerabilities in third-party applications installed on client devices. You can use the search field above the list to look for vulnerabilities by name.
Available updates
This section displays a list of software updates found on this device but not installed yet.
Active policies
This section displays a list of Kaspersky application policies currently active on this device.
Active policy profiles
Distribution points
This section provides a list of distribution points with which the device interacts.
General policy settings
General
In the General section, you can modify the policy status and specify the inheritance of policy settings:
- In the Policy status block, you can select one of the policy modes:
- In the Settings inheritance settings group, you can configure the policy inheritance:
Event configuration
The Event configuration section allows you to configure event logging and event notification. Events are distributed by importance level on the following tabs:
- Critical
The Critical tab is not displayed in the Network Agent policy properties.
- Functional failure
- Warning
- Info
On each tab, the list shows the types of events and the default event storage term on the Administration Server (in days). Clicking the Properties button lets you specify the settings of event logging and notifications about events selected in the list. By default, common notification settings specified for the entire Administration Server are used for all event types. However, you can change specific settings for the required event types.
For example, on the Warning tab, you can configure the Incident has occurred event type. Such events may happen, for instance, when the free disk space of a distribution point is less than 2 GB (at least 4 GB are required to install applications and download updates remotely). To configure the Incident has occurred event, select it and click the Properties button. After that, you can specify where to store the occurred events and how to notify about them.
If Network Agent detected an incident, you can manage this incident by using the settings of a managed device.
To select multiple event types, use the Shift or Ctrl key; to select all types, use the Select all button.
Network Agent policy settings
To configure the Network Agent policy:
- In the console tree, select the Policies folder.
- In the workspace of the folder, select the Network Agent policy.
- In the context menu of the policy, select Properties.
The properties window of the Network Agent policy opens.
General
In the General section, you can modify the policy status and specify the inheritance of policy settings:
- In the Policy status block, you can select one of the policy modes:
- In the Settings inheritance settings group, you can configure the policy inheritance:
Event configuration
The Event configuration section allows you to configure event logging and event notification. Events are distributed by importance level on the following tabs:
- Critical
The Critical tab is not displayed in the Network Agent policy properties.
- Functional failure
- Warning
- Info
On each tab, the list shows the types of events and the default event storage term on the Administration Server (in days). Clicking the Properties button lets you specify the settings of event logging and notifications about events selected in the list. By default, common notification settings specified for the entire Administration Server are used for all event types. However, you can change specific settings for the required event types.
For example, on the Warning tab, you can configure the Incident has occurred event type. Such events may happen, for instance, when the free disk space of a distribution point is less than 2 GB (at least 4 GB are required to install applications and download updates remotely). To configure the Incident has occurred event, select it and click the Properties button. After that, you can specify where to store the occurred events and how to notify about them.
If Network Agent detected an incident, you can manage this incident by using the settings of a managed device.
To select multiple event types, use the Shift or Ctrl key; to select all types, use the Select all button.
Settings
In the Settings section, you can configure the Network Agent policy:
- Distribute files through distribution points only
- Maximum size of event queue, in MB
- Application is allowed to retrieve policy's extended data on device
- Protect Network Agent service against unauthorized removal or termination, and prevent changes to the settings
- Use uninstallation password
Repositories
In the Repositories section, you can select the types of objects whose details will be sent from Network Agent to Administration Server:
- Details of Windows Update updates
- Details of software vulnerabilities and corresponding updates
- Hardware registry details
- Details of installed applications
- Include information about patches
If modification of some settings in this section is prohibited by the Network Agent policy, you cannot modify these settings.
Software updates and vulnerabilities
In the Software updates and vulnerabilities section, you can configure search and distribution of Windows updates, as well as enable scanning of executable files for vulnerabilities:
- Use Administration Server as a WSUS server
- Under Allow users to manage installation of Windows Update updates, you can limit Windows updates that users can install on their devices manually by using Windows Update.
On devices running Windows 10, if Windows Update has already found updates for the device, the new option that you select under Allow users to manage installation of Windows Update updates will be applied only after the updates found are installed.
Select an item in the drop-down list:
- In the Windows Update search mode settings group, you can select the update search mode:
- Scan executable files for vulnerabilities when running them
Restart management
In the Restart management section, you can specify the action to be performed if the operating system of a managed device has to be restarted for correct use, installation, or uninstallation of an application:
- Do not restart the operating system
- Restart the operating system automatically if necessary
- Prompt user for action
Windows Desktop sharing
In the Windows Desktop Sharing section, you can enable and configure the audit of the administrator's actions performed on a remote device when desktop access is shared:
Manage patches and updates
In the Manage patches and updates section, you can configure download and distribution of updates, as well as installation of patches, on managed devices:
- Automatically install applicable updates and patches for components that have the Undefined status
- Download updates and anti-virus databases from Administration Server in advance (recommended)
Connectivity
The Connectivity section includes three nested subsections:
- Network
- Connection profiles (only for Windows and macOS)
- Connection schedule
In the Network subsection, you can configure the connection to Administration Server, enable the use of a UDP port, and specify its number. The following options are available:
- In the Connection to Administration Server settings group, you can configure connection to the Administration Server and specify the time interval for synchronization between client devices and the Administration Server:
- Use UDP port
- UDP port number
- Use distribution point to force connection to the Administration Server
In the Connection profiles subsection, you can specify the network location settings, configure connection profiles for Administration Server, and enable out-of-office mode when Administration Server is not available:
- Network location settings
- Administration Server connection profiles
- Enable out-of-office mode when Administration Server is not available
In the Connection schedule subsection, you can specify the time intervals during which Network Agent sends data to the Administration Server:
Distribution points
The Distribution points section includes four nested subsections:
- Network polling
- Internet connection settings
- KSN Proxy
- Updates
In the Network polling subsection, you can configure automatic polling of the network. You can enable three types of polling, that is, network polling, IP range polling, and Active Directory polling:
- Enable network polling
- Enable IP range polling
- Use Zeroconf polling (on Linux platforms only; manually specified IP ranges will be ignored)
- Enable Active Directory polling
In the Internet connection settings subsection, you can specify the internet access settings:
- Use proxy server
- Proxy server address
- Port number
- Bypass proxy server for local addresses
- Proxy server authentication
- User name
- Password
In the KSN Proxy subsection, you can configure the application to use the distribution point to forward KSN requests from the managed devices:
- Enable KSN Proxy on distribution point side
- Forward KSN requests to Administration Server
- Access KSN Cloud/Private KSN directly over the internet
- TCP port
- Use UDP port
In the Updates subsection, you can specify whether Network Agent should download diff files by enabling or disabling the Download diff files option. (By default, this option is enabled.)
Revision history
On the Revision history tab, you can view the history of Network Agent policy revisions. You can compare revisions, view revisions, and perform advanced operations, such as save revisions to a file, roll back to a revision, and add and edit revision descriptions.
Feature comparison by the Network Agent operating systems
The table below shows which Network Agent policy settings you can use to configure Network Agent with a specific operating system.
Network Agent policy settings: comparison by operating systems
Policy section |
Windows |
Mac |
Linux |
|---|---|---|---|
General |
|
|
|
Event configuration |
|
|
|
Settings |
|
|
Only the Maximum size of event queue, in MB and Application is allowed to retrieve policy's extended data on device options are available. |
Repositories |
|
|
Only the Details of installed applications and Hardware registry details options are available. |
Software updates and vulnerabilities |
|
|
|
Restart management |
|
|
|
Windows Desktop Sharing |
|
|
|
Manage patches and updates |
|
|
|
Connectivity → Network |
|
|
Except the Open Network Agent ports in Microsoft Windows Firewall option. |
Connectivity → Connection profiles |
|
|
|
Connectivity → Connection schedule |
|
|
|
Distribution points → Network polling |
|
|
Only the IP range polling section is available. |
Distribution points → Internet connection settings |
|
|
|
Distribution points → KSN Proxy |
|
|
|
Distribution points → Updates |
|
|
|
Revision history |
|
|
|