Contents
- Appendices
- Additional examples
- hello example
- echo example
- ping example
- net_with_separate_vfs example
- net2_with_separate_vfs example
- embedded_vfs example
- vfs_extfs example
- multi_vfs_ntpd example
- multi_vfs_dns_client example
- multi_vfs_dhcpcd example
- mqtt_publisher (Mosquitto) example
- mqtt_subscriber (Mosquitto) example
- gpio_input example
- gpio_output example
- gpio_interrupt example
- gpio_echo example
- koslogger example
- pcre example
- messagebus example
- I2c_ds1307_rtc example
- iperf_separate_vfs example
- Uart example
- spi_check_regs example
- barcode_scanner example
- perfcnt example
- watchdog_system_reset example
- shared_libs example
- Information about certain limits set in the system
- Additional examples
Appendices
This section provides additional information to supplement the primary text of the document.
Additional examples
This section provides descriptions of additional examples that are included in KasperskyOS Community Edition.
See also the descriptions of security pattern implementation examples:
- Secure Logger example
- Separate Storage example
- Defer to Kernel example
- Device Access example
- Secure Login (Civetweb, TLS-terminator) example
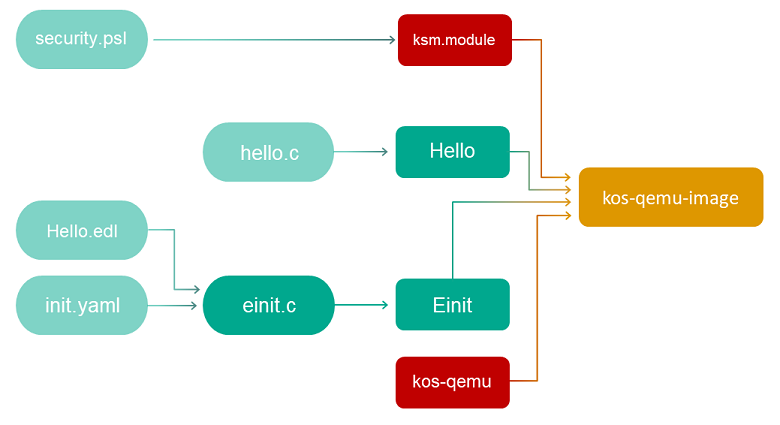
hello example
The hello.c code looks familiar and simple to a developer that uses C, and is fully compatible with POSIX:
hello.c
Compile this code using aarch64-kos-gcc, which is included in the development tools of KasperskyOS Community Edition:
The program name (and, consequently, the name of the executable file) must begin with an uppercase letter.
EDL description of the Hello process class
A static description of the Hello program consists of a single file named Hello.edl that must indicate the name of the process class:
Hello.edl
The process class name must begin with an uppercase letter. The name of an EDL file must match the name of the class that it describes.
Creating the Einit initializing program
When KasperskyOS is loaded, the kernel starts a program named Einit. The Einit program starts all other programs included in the solution, which means that it serves as the initializing program.
The KasperskyOS Community Edition toolkit includes the einit tool, which generates the code of the initializing program (einit.c) based on the init description. In the example provided below, the file containing the init description is named init.yaml, but it can have any name.
For more details, refer to "Starting processes".
If you want the Hello program to start after the operating system is loaded, all you need to do is specify its name in the init.yaml file and build an Einit program based on it.
init.yaml
Building the security module
The hello example contains a basic solution security policy (security.psl) that allows all interactions.
The security module (ksm.module) is built based on security.psl.
Example files
The code of the example and build scripts are available at the following path:
Building and running example
See Building and running examples section.
The general build scheme for the hello example looks as follows:
echo example
The echo example demonstrates the use of IPC transport.
It shows how to use the main tools that let you implement interaction between programs.
The echo example describes a basic case of interaction between two programs:
- The
Clientprogram sends a number (value) to theServerprogram. - The
Serverprogram modifies this number and sends the new number (result) to theClientprogram. - The
Clientprogram prints theresultnumber to the screen.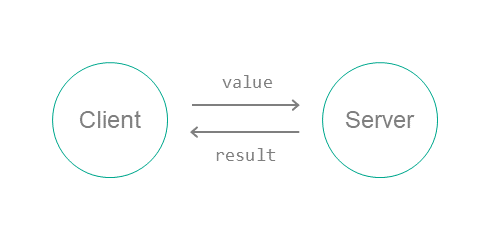
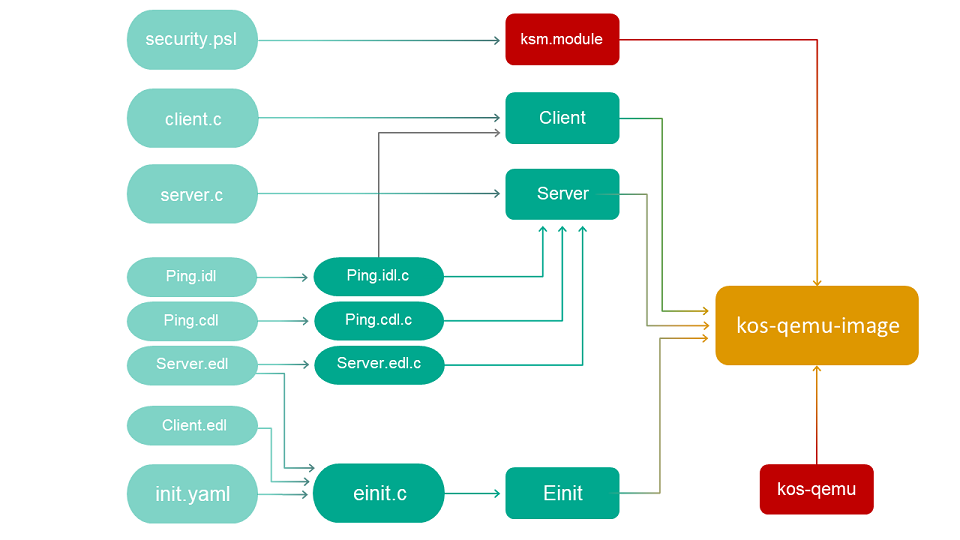
To set up this interaction between programs:
- Connect the
ClientandServerprograms by using the init description. - On the server, implement an interface with a single
Pingmethod that has one input argument (the original number (value)) and one output argument (the modified number (result)).Description of the
Pingmethod in the IDL language:Ping(in UInt32 value, out UInt32 result);
- Create static description files in the EDL, CDL and IDL languages. Use the NK compiler to generate files containing transport methods and types (proxy object, dispatchers, etc.).
- In the code of the
Clientprogram, initialize all required objects (transport, proxy object, request structure, etc.) and call the interface method. - In the code of the
Serverprogram, prepare all the required objects (transport, component dispatcher and program dispatcher, etc.), accept the request from the client, process it and send a response.
Example files
The code of the example and build scripts are available at the following path:
The echo example consists of the following source files:
client/src/client.ccontains implementation of theClientprogram.server/src/server.ccontains implementation of theServerprogram.resources/Server.edl,resources/Client.edl,resources/Responder.cdl,resources/Pingable.idlare static descriptions.init.yamlcontains the init description.
Building and running example
See Building and running examples section.
The build scheme for the echo example looks as follows:
ping example
The ping example demonstrates the use of a solution security policy to control interactions between programs.
The ping example includes four programs: Client, Server, KlogEntity and KlogStorageEntity.
The Server program provides two identical Ping and Pong methods that receive a number and return a modified number:
The Client program calls both of these methods in a different sequence. If the method call is denied by the solution security policy, a message regarding the failed call attempt is displayed.
The system programs KlogEntity and KlogStorageEntity perform a security audit.
The transport part of the ping example is virtually identical to its counterpart in the echo example. The only difference is that the ping example uses two methods (Ping and Pong) instead of just one.
Solution security policy in the ping example
The solution security policy in this example allows startup of the KasperskyOS kernel and the Einit program, which is allowed to start all programs in the solution. Queries to the Server program are managed by methods of the Flow security model.
The finite-state machine described in the configuration of the request_state Flow security model object has two states: not_sent and sent. The initial state is not_sent. Only transitions from not_sent to sent and vice versa are allowed.
When the Ping and Pong methods are called, the current state of the request_state object is checked. In the not_sent state, only a Ping call is allowed, in which case the state changes to sent. Likewise, in the sent state, only a Pong call is allowed, in which case the state changes to not_sent.
Therefore, the Ping and Pong methods can be called only in succession.
Fragment of the security.psl file
The security policy description in the ping example also contains a section for solution security policy tests.
For an example of such a policy, see the "Example 2" section in "Examples of tests for KasperskyOS-based solution security policies".
The full security policy description for the ping example is located in the security.psl.in and core.psl files at the following path: /opt/KasperskyOS-Community-Edition-<version>/examples/ping/einit/src.
Example files
The code of the example and build scripts are available at the following path:
Building and running example
See Building and running examples section.
Page topnet_with_separate_vfs example
This example presents a basic case of network interaction using Berkeley sockets.
The example consists of Client and Server programs linked by a TCP socket using a loopback interface. Standard POSIX functions are used in the code of the programs.
To connect programs using a socket through a loopback, they must use the same network stack instance. This means that they must interact with a "shared" VFS program (in this example, this program is called NetVfs).
The CMake system, which is included with KasperskyOS Community Edition, is used to build and run the example.
Example files
The code of the example and build scripts are available at the following path:
Building and running example
See Building and running examples section.
Page topnet2_with_separate_vfs example
This example demonstrates the special features of a solution in which a program uses standard POSIX functions to interact with an external server.
The net2_with_separate_vfs example is a modified net_with_separate_vfs example. In contrast to the net_with_separate_vfs example, in this example a program interacts over the network with an external server rather than another program running in KasperskyOS.
This example consists of the Client program running in KasperskyOS on QEMU or Raspberry Pi and the Server program running in a Linux host operating system. The Client program and Server program are bound by a TCP socket. Standard POSIX functions are used in the code of the Client program.
To connect the Client program and the Server program using a socket, the Client program must interact with the NetVfs program. During the build, the NetVfs program is linked to a network driver that supports interaction with the Server program running in Linux.
The CMake system, which is included with KasperskyOS Community Edition, is used to build and run the example.
Example files
The code of the example and build scripts are available at the following path:
Building and running example
See Building and running examples section.
To ensure that an example runs correctly, you must run the Server program in a Linux host operating system or on a computer connected to Raspberry Pi.
After performing the build, the server executable file of the Server program is located in the following directory:
To independently build the executable file of the Server program, you need to run the following commands:
embedded_vfs example
This example demonstrates how to embed the virtual file system (VFS) provided in KasperskyOS Community Edition into a program being developed.
In this example, the Client program fully encapsulates the VFS implementation from KasperskyOS Community Edition. This lets you eliminate the use of IPC for all the standard I/O functions (stdio.h, socket.h, etc.) for debugging or performance improvement purposes, for example.
The Client program tests the following operations:
- Create a folder.
- Create and delete a file.
- Read from a file and write to a file.
Supplied resources
The example includes the hdd.img image of a hard drive with the FAT32 file system.
Example files
The code of the example and build scripts are available at the following path:
Building and running example
See Building and running examples section.
Page topvfs_extfs example
This example shows how to embed a new file system into the virtual file system (VFS) that is provided in KasperskyOS Community Edition.
In this example, the Client program tests the operation of file systems (ext2, ext3, ext4) on block devices. To do so, the Client queries the virtual file system (the FileVfs program) via IPC, and FileVfs in turn queries the block device via IPC.
The ext2 and ext3 file systems work with the default settings. The ext4 file system works if you disable extent (mkfs.ext4 -O ^64bit,^extent /dev/foo).
Example files
The code of the example and build scripts are available at the following path:
Building and running example
See Building and running examples section.
Preparing an SD card to run on Raspberry Pi 4 B
To run the vfs_extfs example on Raspberry Pi 4 B, the SD card must have a bootable partition with the solution image as well as 3 additional partitions with the ext2, ext3 and ext4 file systems, respectively.
multi_vfs_ntpd example
This example shows how to use an external NTP server in KasperskyOS. The Ntpd program is included in KasperskyOS Community Edition and is an implementation of an NTP client, which gets time parameters from external NTP servers in the background and passes them to the KasperskyOS kernel.
The example also demonstrates the use of various virtual file systems (VFS) in a single solution:
- The
VfsNetprogram is used for working with the network. - The
VfsSdCardFsprogram is used to work with the file system.
The Client program uses standard libc library functions for getting time data. These functions are converted into queries to the VFS program via IPC.
The CMake system, which is included with KasperskyOS Community Edition, is used to build and run the example.
Supplied resources
- The directory
./resources/edlcontains theClient.edlfile, which contains a static description of theClientprogram. - The directory
./resources/hdd/etccontains the configuration files for theVfsNet,DhcpcdandNtpdprograms:hosts,dhcpcd.confandntp.conf, respectively.
Example files
The code of the example and build scripts are available at the following path:
Building and running example
See Building and running examples section.
Page topmulti_vfs_dns_client example
This example shows how to use an external DNS server in KasperskyOS.
The example also demonstrates the use of various virtual file systems (VFS) in a single solution:
- The
VfsNetprogram is used for working with the network. - The
VfsSdCardFsprogram is used to work with the file system.
The Client program uses standard libc library functions for contacting an external DNS service. These functions are converted into queries to the VfsNet program via IPC.
The CMake system, which is included with KasperskyOS Community Edition, is used to build and run the example.
Supplied resources
- The directory
./resources/edlcontains theClient.edlfile, which contains a static description of theClientprogram. - The directory
./resources/hdd/etccontains the configuration files for theVfsNetandDhcpcdprograms:hostsanddhcpcd.conf, respectively.
Example files
The code of the example and build scripts are available at the following path:
Building and running example
See Building and running examples section.
Page topmulti_vfs_dhcpcd example
Example use of the kl.rump.Dhcpcd program.
The Dhcpcd program is an implementation of a DHCP client, which gets network interface parameters from an external DHCP server in the background and passes them to a virtual file system (hereinafter referred to as a VFS).
The example also demonstrates the use of different VFSes in a single solution. The example uses different VFS to access the functions for working with the file system and functions for working with the network:
- The
VfsNetprogram is used for working with the network. - The
VfsSdCardFsprogram is used to work with the file system.
The Client program uses standard libc library functions for getting information on network interfaces (ioctl). These functions are converted into queries to the VFS program via IPC.
The CMake system, which is included with KasperskyOS Community Edition, is used to build and run the example.
Supplied resources
The ./resources/hdd/etc directory contains configuration files for the VFS and Dhcpcd programs. The standard syntax of dhcpcd.conf is used for the Dhcpcd program configuration.
The CMakeLists.txt root file defines the values of variables that determine the selected configuration file:
DHCPCD_FALLBACKDynamically receive the parameters of network interfaces from an external DHCP server but statically define the parameters if the DHCP server is not available. This value is used by default.
DHCPCD_DYNAMICDynamically receive the parameters of network interfaces from an external DHCP server.
DHCPCD_STATICStatically define the parameters of network interfaces.
Example files
The code of the example and build scripts are available at the following path:
Building and running example
See Building and running examples section.
Page topmqtt_publisher (Mosquitto) example
Example use of the MQTT protocol in KasperskyOS.
In this example, an MQTT subscriber must be started on the host operating system, and an MQTT publisher must be started on KasperskyOS. The Publisher program is an implementation of an MQTT publisher that publishes the current time with a 5-second interval.
When the example starts and runs successfully, an MQTT subscriber started on the host operating system prints a "received PUBLISH" message with a "datetime" topic.
The example also demonstrates the use of various virtual file systems (VFS) in a single solution:
- The
VfsNetprogram is used for working with the network. - The
VfsSdCardFsprogram is used to work with the file system.
The CMake system, which is included with KasperskyOS Community Edition, is used to build and run the example.
Starting Mosquitto
To run this example, a Mosquitto MQTT broker must be installed and started on the host system. To install and start Mosquitto, run the following commands:
To start an MQTT subscriber on the host system, run the following command:
Supplied resources
- The directory
./resources/edlcontains thePublisher.edlfile, which contains a static description of thePublisherprogram. - The directory
./resources/hdd/etccontains the configuration files for theVfsNet,DhcpcdandNtpdprograms:hosts,dhcpcd.confandntp.conf, respectively.
Example files
The code of the example and build scripts are available at the following path:
Building and running example
See Building and running examples section.
Page topmqtt_subscriber (Mosquitto) example
Example use of the MQTT protocol in KasperskyOS.
In this example, an MQTT publisher must be started on the host operating system, and an MQTT subscriber must be started on KasperskyOS. The Subscriber program is an implementation of an MQTT subscriber.
When the example starts and runs successfully, an MQTT subscriber started on KasperskyOS prints a "Got message with topic: my/awesome/topic, payload: hello" message.
The example also demonstrates the use of various virtual file systems (VFS) in a single solution:
- The
VfsNetprogram is used for working with the network. - The
VfsSdCardFsprogram is used to work with the file system.
The CMake system, which is included with KasperskyOS Community Edition, is used to build and run the example.
Starting Mosquitto
To run this example, a Mosquitto MQTT broker must be installed and started on the host system. To install and start Mosquitto, run the following commands:
To start an MQTT publisher on the host system, run the following command:
Supplied resources
- The directory
./resources/edlcontains theSubscriber.edlfile, which contains a static description of theSubscriberprogram. - The directory
./resources/hdd/etccontains the configuration files for theVfsNet,DhcpcdandNtpdprograms:hosts,dhcpcd.confandntp.conf, respectively.
Example files
The code of the example and build scripts are available at the following path:
Building and running example
See Building and running examples section.
Page topgpio_input example
Example use of the GPIO driver.
This example lets you verify the functionality of GPIO input pins. The "gpio0" port is used. All pins except those indicated in exceptionPinArr array are set for input by default. The voltage on the pins corresponds to the state of the registers of the pull-up resistors. The state of all pins, starting from GPIO0 (accounting for the pins indicated in the exceptionPinArr array), will be read in succession. Messages about the state of the pins will be displayed on the console. The delay between the readings of adjacent pins is determined by the DELAY_S macro (the time is indicated in seconds).
exceptionPinArr is an array of GPIO pin numbers that need to be excluded from the example. This may be necessary if some pins are already being used for other functions, e.g. if pins are being used for a UART connection during debugging.
If you build and run this example on QEMU, an error will occur. This is the expected behavior, because there is no GPIO driver for QEMU.
If you build and run this example on Raspberry Pi 4 B, an error will occur.
Example files
The code of the example and build scripts are available at the following path:
Building and running example
See Building and running examples section.
Page topgpio_output example
Example use of the GPIO driver.
This example lets you verify the functionality of GPIO output pins. The "gpio0" port is used. The initial state of all GPIO pins should correspond to a logical zero (no voltage on the pin). All pins other than those indicated in the exceptionPinArr array are configured for output. Each pin, starting with GPIO0 (accounting for those indicated in the exceptionPinArr array), will be sequentially changed to a logical one (voltage on the pin) and then to a logical zero. The delay between the changes of pin state is determined by the DELAY_S macro (the time is indicated in seconds). The pins are turned on/off from GPIO0 to GPIO27 and then back against to GPIO0.
exceptionPinArr is an array of GPIO pin numbers that need to be excluded from the example. This may be necessary if some pins are already being used for other functions, e.g. if pins are being used for a UART connection during debugging.
If you build and run this example on QEMU, an error will occur. This is the expected behavior, because there is no GPIO driver for QEMU.
If you build and run this example on Raspberry Pi 4 B, an error will occur.
Example files
The code of the example and build scripts are available at the following path:
Building and running example
See Building and running examples section.
Page topgpio_interrupt example
Example use of the GPIO driver.
This example lets you verify the functionality of GPIO pin interrupts. The "gpio0" port is used. In the pinsBitmap bitmask of the CallBackContext interrupt context, the pins from exceptionPinArr array are marked as handled so that the example can properly terminate later. All pins other than those indicated in the exceptionPinArr array are switched to the PINS_MODE state. An interrupt handler will be registered for all pins other than those indicated in the exceptionPinArr array.
In an endless loop, the example checks whether the pinsBitmap bitmask from the CallBackContext interrupt context is equal to the DONE_BITMASK bitmask (which corresponds to the condition when an interrupt has occurred on each GPIO pin). Additionally, the handler function for the latest interrupted pin is removed in the loop. When a pin is interrupted for the first time, the handler function is called, which marks the corresponding pin in the pinsBitmap bitmask in the CallBackContext interrupt context. The handler function for this pin is removed later.
Keep in mind how the example may be affected by the initial state of the registers of pull-up resistors for each pin.
Interrupts for the GPIO_EVENT_LOW_LEVEL and GPIO_EVENT_HIGH_LEVEL events are not supported.
exceptionPinArr is an array of GPIO pin numbers that need to be excluded from the example. This may be necessary if some pins are already being used for other functions, e.g. if pins are being used for a UART connection during debugging.
If you build and run this example on QEMU, an error will occur. This is the expected behavior, because there is no GPIO driver for QEMU.
If you build and run this example on Raspberry Pi 4 B, an error will occur.
Example files
The code of the example and build scripts are available at the following path:
Building and running example
See Building and running examples section.
Page topgpio_echo example
Example use of the GPIO driver.
This example makes it possible to verify the functionality of GPIO pins as well as the operation of GPIO interrupts. The "gpio0" port is used. The output pin (GPIO_PIN_OUT) should be connected to the input pin (GPIO_PIN_IN). The output pin (the pin number is defined in the GPIO_PIN_OUT macro) as well as the input pin (GPIO_PIN_IN) are configured. Use of the input pin is configured in the IN_MODE macro. The interrupt handler for the input pin is registered. The state of the output pin changes several times. If the example works correctly, then when the state of the output pin changes the interrupt handler will be called and will display the state of the input pin. What's more, the state of the output pin and the input pin must match.
If you build and run this example on QEMU, an error will occur. This is the expected behavior, because there is no GPIO driver for QEMU.
If you build and run this example on Raspberry Pi 4 B, an error will occur.
Example files
The code of the example and build scripts are available at the following path:
Building and running example
See Building and running examples section.
Page topkoslogger example
This example demonstrates use of the spdlog library in KasperskyOS using the KOSLogger wrapper library.
In this example, the Client program creates log entries that are saved on an SD card (when running the example on Raspberry Pi) or in the image file named build/einit/sdcard0.img (when running the example in QEMU).
The example also demonstrates the use of various virtual file systems (VFS) in a single solution. The example uses different VFS to access the functions for working with the file system and functions for working with the network:
- The
VfsNetprogram is used for working with the network. - The
VfsSdCardFsprogram is used to work with the file system.
The kl.Ntpd program is included in KasperskyOS Community Edition and is an implementation of an NTP client, which gets time parameters from external NTP servers in the background and passes them to the KasperskyOS kernel.
The kl.rump.Dhcpcd program is included in KasperskyOS Community Edition and is an implementation of a DHCP client, which gets the parameters of network interfaces from an external DHCP server in the background and passes them to the virtual file system.
The CMake system, which is included with KasperskyOS Community Edition, is used to build and run the example.
Example files
The code of the example and build scripts are available at the following path:
Building and running example
See Building and running examples section.
To ensure that the koslogger example will correctly run in Raspberry Pi, you must do the following after building the example and preparing your bootable SD card:
- Create the
/libdirectory on the bootable SD card if this directory doesn't already exist. - Open the
build/hdd/libdirectory that was generated when building the example and copy the directory contents to the/libdirectory on the bootable SD card.
pcre example
This example demonstrates use of the pcre library in KasperskyOS.
In this example, the Client program uses the pcre library and prints the results to the console.
The CMake system, which is included with KasperskyOS Community Edition, is used to build and run the example.
Example files
The code of the example and build scripts are available at the following path:
Building and running example
See Building and running examples section.
To ensure that the pcre example will correctly run in Raspberry Pi, you must do the following after building the example and preparing your bootable SD card:
- Create the
/libdirectory on the bootable SD card if this directory doesn't already exist. - Open the
build/hdd/libdirectory that was generated when building the example and copy the directory contents to the/libdirectory on the bootable SD card.
messagebus example
This example demonstrates use of the MessageBus component in KasperskyOS.
In this example, the Publisher, SubscriberA and SubscriberB programs use the MessageBus component to exchange messages.
The MessageBus component implements the message bus. The Publisher program is the publisher that transfers messages to the bus. The SubscriberA and SubscriberB programs are the subscribers that receive messages from the bus.
The example also demonstrates the use of various virtual file systems (VFS) in a single solution. The example uses different VFS to access the functions for working with the file system and functions for working with the network:
- The
VfsNetprogram is used for working with the network. - The
VfsSdCardFsprogram is used to work with the file system.
The kl.Ntpd program is included in KasperskyOS Community Edition and is an implementation of an NTP client, which gets time parameters from external NTP servers in the background and passes them to the KasperskyOS kernel.
The kl.rump.Dhcpcd program is included in KasperskyOS Community Edition and is an implementation of a DHCP client, which gets the parameters of network interfaces from an external DHCP server in the background and passes them to the virtual file system.
The CMake system, which is included with KasperskyOS Community Edition, is used to build and run the example.
Example files
The code of the example and build scripts are available at the following path:
Building and running example
See Building and running examples section.
To ensure that the messagebus example will correctly run in Raspberry Pi, you must do the following after building the example and preparing your bootable SD card:
- Create the
/libdirectory on the bootable SD card if this directory doesn't already exist. - Open the
build/hdd/libdirectory that was generated when building the example and copy the directory contents to the/libdirectory on the bootable SD card.
I2c_ds1307_rtc example
This example demonstrates use of the i2c driver (Inter-Integrated Circuit) in KasperskyOS.
In this example, the I2cClient program uses the i2c driver interface.
The client library of the i2c driver is statically linked to the I2cClient program. The i2c driver implementation uses a BSP (Board Support Platform) subsystem for configuring clock frequencies (Clocks) and pins multiplexing (PinMux). Therefore, to ensure correct operation of the driver, you need to do the following:
- Link the
I2cClientprogram to thei2c_CLIENT_LIBclient library. - Link the
I2cClientprogram to thebsp_CLIENT_LIBclient library. - Create an IPC channel between the
I2cClientprogram and thekl.drivers.I2Cdriver. - Create an IPC channel between the
I2cClientprogram and thekl.drivers.BSPdriver.
The CMake system, which is included with KasperskyOS Community Edition, is used to build and run the example.
Example files
The code of the example and build scripts are available at the following path:
Building and running example
This example is intended to run only on Raspberry Pi. For the example to work correctly, you must connect a DS1307Z real-time clock module to the i2c port.
See Building and running examples section.
Page topiperf_separate_vfs example
This example demonstrates use of the iperf library in KasperskyOS.
In this example, the Server program uses the iperf library.
By default, the example uses network software emulation (SLIRP) in QEMU. If you configured TAP interfaces for QEMU, you need to change the network settings for starting QEMU (QEMU_FLAGS variable) in the einit/CMakeLists.txt file to make sure that the example works correctly (for more details, see the comments in the file).
The example does not use DHCP, therefore the IP address of the network interface must be manually indicated in the code of the Server program (server/src/main.cpp). SLIRP uses the default values.
The iperf library in the example is used in server mode. To connect to this server, install the iperf3 program on the host machine and run it by using the iperf3 -c localhost command. If you configured TAP interfaces, indicate the current IP address instead of localhost.
The first startup of the example may take a long time because the iperf client uses /dev/urandom to fill packets with random data. To avoid this, run the iperf client with the --repeating-payload parameter.
The CMake system, which is included with KasperskyOS Community Edition, is used to build and run the example.
Example files
The code of the example and build scripts are available at the following path:
Building and running example
See Building and running examples section.
Page topUart example
Example use of the UART driver.
This example shows how to print "Hello World!" to the appropriate port using the UART driver.
When running the example simulation in QEMU, -serial stdio is indicated in the QEMU flags. This means that the first UART port will be printed only to the standard stream of the host machine.
A full description of the UART driver interface is provided in the file /opt/KasperskyOS-Community-Edition-<version>/sysroot-aarch64-kos/include/uart/uart.h.
Example files
The code of the example and build scripts are available at the following path:
Building and running example
See Building and running examples section.
Page topspi_check_regs example
This example demonstrates use of the SPI (Serial Peripheral Interface) driver in KasperskyOS.
The example shows how to work with the SPI interface on the Sense HAT add-on board for Raspberry Pi. In this example, the Client program uses the SPI driver interface. The program opens an SPI channel, displays its parameters and sets the necessary operating mode. Then the program sends a data sequence over this channel and waits to receive the ID of the ATTiny controller installed on the Sense HAT board.
The client library of the SPI driver is statically linked to the Client program. The Client program also uses the gpio driver to set the controller operating mode and the BSP (Board Support Platform) subsystem for configuring clock frequencies (Clocks) and pins multiplexing (PinMux).
The CMake system, which is included with KasperskyOS Community Edition, is used to build and run the example.
Example files
The code of the example and build scripts are available at the following path:
Building and running example
This example is intended to run only on Raspberry Pi. For the example to work correctly, you must connect the Sense HAT module to the SPI port.
See Building and running examples section.
Page topbarcode_scanner example
This example demonstrates use of a USB (Universal Serial Bus) driver in KasperskyOS using the libevdev library.
In this example, the BarcodeScanner program uses the libevdev library for interaction with a barcode scanner connected to the USB port of Raspberry Pi.
The program waits for signals from the barcode scanner and prints the obtained data to stderr.
The CMake system, which is included with KasperskyOS Community Edition, is used to build and run the example.
Example files
The code of the example and build scripts are available at the following path:
Building and running example
This example is intended to run only on Raspberry Pi. For the example to work correctly, you must connect a barcode scanner running in keyboard emulation mode (such as Zebra Symbol LS2208) to the USB port.
See Building and running examples section.
Page topperfcnt example
This example demonstrates use of the performance counters in KasperskyOS.
The example includes two programs: Worker and Monitor.
The Worker program performs computations in a loop by periodically loading the processor and utilizing memory.
The Monitor program uses the KnProfilerGetCounter() function of the libkos library to get the values of performance counters for the Worker program and prints them to the console.
The CMake system, which is included with KasperskyOS Community Edition, is used to build and run the example.
If you build and run this example on QEMU, some performance counters may not function correctly.
Example files
The code of the example and build scripts are available at the following path:
Building and running example
See Building and running examples section.
Page topwatchdog_system_reset example
This example demonstrates use of the Watchdog driver in KasperskyOS.
In this example, the Client program uses the Watchdog driver interface to interact with the Watchdog timer as follows:
- Receives the current parameters of the
Watchdogdriver and prints them tostderr. - Changes the default value of the timer to a new value and starts the timer.
- Resets the timer several times.
- Waits for the system to restart when the timer is triggered.
The client library of the Watchdog driver is statically linked to the Client program.
The CMake system, which is included with KasperskyOS Community Edition, is used to build and run the example.
Example files
The code of the example and build scripts are available at the following path:
Building and running example
See Building and running examples section.
Page topInformation about certain limits set in the system
Header files and IDL files from the KasperskyOS SDK contain constants that set limits in the system (see table below).
Constants that set limits in the system
Subsystem |
Constants |
|---|---|
|
The constants in the |
|
The constants in the
|
|
The constants in the
|
|
The constants in the
The constants in the
|
|
The constants in the
|
|
The constants in the
|
|
The constants in the
|
|
The constants in the
|
|
The constants in the
|
|
The constants in the
|
|
The constants in the
|