Contents
Editing the settings of an account in Kaspersky Security Center Cloud Console
This section provides instructions on how to edit and delete an account in Kaspersky Security Center Cloud Console.
Changing an email address
To change your email address in the settings of your account in Kaspersky Security Center Cloud Console:
- In Kaspersky Security Center Cloud Console, click the link containing your account name, and then select Manage user account.
The My Profile window of the Kaspersky Account portal opens.
- Click the Change your email address link (see the figure below).
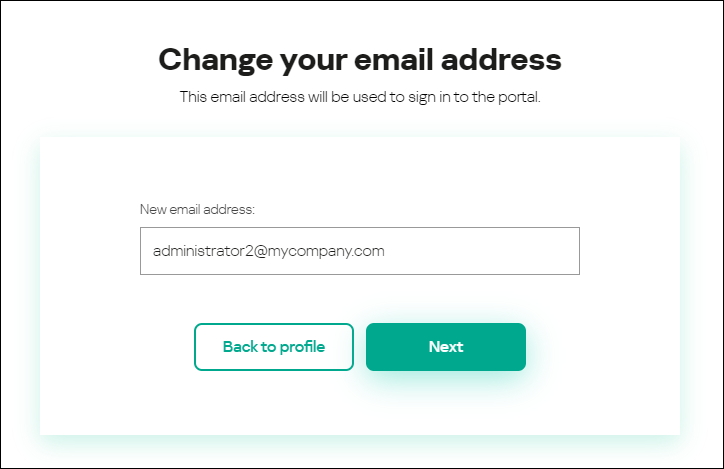
Changing the email address in the settings of an account in Kaspersky Security Center Cloud Console
- In the New email address entry field, enter your new email.
Please enter the address carefully. If you enter an invalid address, you will not be able to proceed to your account and use Kaspersky Security Center Cloud Console.
- Click the Next button.
- In the Enter your current password window that opens, specify the password of your account in Kaspersky Security Center Cloud Console, and then click the Next button.
- A message from Kaspersky is sent to the email address that you specified. The message contains a one-time security code.
Open the email message, and then copy the one-time security code that it contains.
- Return to Kaspersky Account, and then paste the code to the entry field.
- Go back to Kaspersky Security Center Cloud Console by clicking the Go back to Kaspersky Security Center Cloud Console link or exit the portal by clicking the Account → Sign out link.
Your email address is now changed in the Kaspersky Security Center Cloud Console account settings and in the My Kaspersky account settings. A message is sent to your new email address to notify you that your email address for gaining access to the account has been changed. The next time you sign in to Kaspersky Security Center Cloud Console, you will have to specify your new email address.
Page topChanging a password
To change your password in the settings of your account in Kaspersky Security Center Cloud Console:
- In Kaspersky Security Center Cloud Console, click the link containing your account name, and then select Manage user account.
The My Profile window of the Kaspersky Account portal opens.
- Click the Change password link (see the figure below).
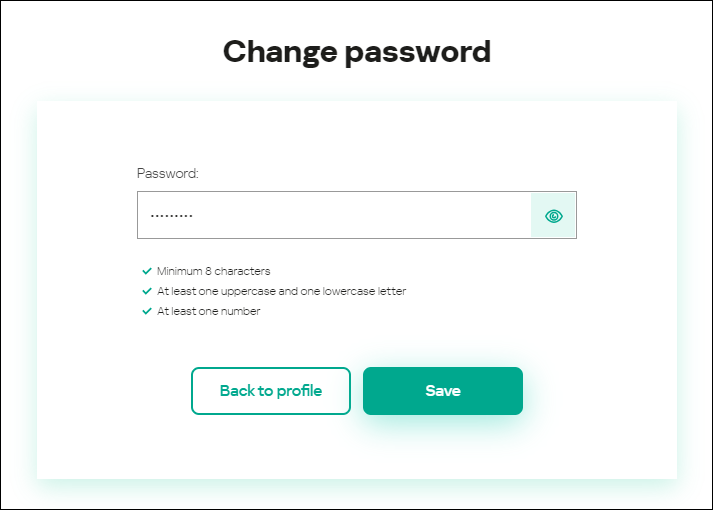
Changing the account password in Kaspersky Security Center Cloud Console
- In the Password entry field, enter your new password.
Under the entry field, the requirements for the password are shown. You cannot save the new password until you comply with the requirements.
- Click the Save button.
- In the Enter your current password window that opens, specify the password of your account in Kaspersky Security Center Cloud Console, and then click the Next button.
- Select or clear the Automatically request password change every 180 days check box.
By default, this check box is selected.
- Go back to Kaspersky Security Center Cloud Console by clicking the Go back to Kaspersky Security Center Cloud Console link or exit the portal by clicking the Account → Sign out link.
Your password is now changed. You will have to enter the new password when signing in to Kaspersky Security Center Cloud Console and when signing in to My Kaspersky.
Page topUsing two-step verification
This section describes two-step verification, which can help you increase the security of your account in Kaspersky Security Center Cloud Console.
About two-step verification
Two-step verification can help you increase the security of your account in Kaspersky Security Center Cloud Console. When this feature is enabled, every time you sign in to Kaspersky Security Center Cloud Console with your email address and password, you enter an additional one-time security code. With two-step verification, criminals cannot sign in to your account if they steal or guess your password, they must have access to your mobile phone as well. Also, when two-step verification is enabled, you must enter an additional one-time security code if you forget your password.
After you set up two-step verification, you are responsible for keeping your mobile phone physically secure and for maintaining access to your phone number.
You can get a one-time security code in either of the following ways:
- A security code is sent by SMS to your mobile phone number.
In this case, if you lose access to your mobile phone, you are not able to sign in to your account in Kaspersky Security Center Cloud Console until you restore access to your phone number.
- A security code is generated in an authenticator app that is installed on your mobile phone.
We strongly recommend that you set up two-step verification by using an authenticator app. In this case, you can sign in to your account even if your mobile phone is not connected to the internet or a mobile network.
We have tested only Google Authenticator and Microsoft Authenticator for compatibility with Kaspersky Security Center Cloud Console, and these applications were free to use at that time. The interfaces of these applications may be unavailable in your preferred language. Please also check the GDPR compliance and privacy policies of the applications before using them. Kaspersky is in no way sponsored, endorsed by, or otherwise affiliated with any of the owners of these applications.
Microsoft Authenticator can be installed on mobile devices only.
We also recommend that you install an authenticator app on a device other than your mobile phone. This will allow you to sign in to your account if your mobile phone is ever lost or stolen.
In this case, if you lose access to your mobile phone and you do not have an authenticator app on another device, you are not able to sign in to your account in Kaspersky Security Center Cloud Console until you restore access to your phone number. After that, use the security code that is sent by SMS.
If you previously configured a secret question to restore your password if it is lost, the security question feature will be permanently disabled after you set up two-step verification.
Page topScenario: Setting up two-step verification
Two-step verification can help you increase the security of your account in Kaspersky Security Center Cloud Console. After you complete the scenario in this section, two-step verification of your account will be set up.
The scenario proceeds in stages:
- Adding your phone number
At this stage, you set up two-step verification by SMS.
- Installing and configuring an authenticator app
Install and configure an authenticator app.
We strongly recommend that you set up two-step verification by using an authenticator app. In this case, you can sign in to your account even if your mobile phone is not connected to the internet or a mobile network.
We also recommend that you install an authenticator app on a device other than your mobile phone. This will allow you to sign in to your account if your mobile phone is ever lost or stolen.
- Changing your phone number
If necessary, you can change the phone number that you use for two-step verification.
Setting up two-step verification by SMS
To set up two-step verification by SMS:
- In Kaspersky Security Center Cloud Console, click the link containing your account name, and then select Manage user account.
The My Profile window of the Kaspersky Account portal opens.
- If two-step verification is disabled, enable the Two-step verification is disabled toggle switch.
- In the No phone number provided window that appears, click the Confirm button.
- Under Enter your phone number, specify the mobile phone number that you want to use in two-step verification, and then click the Provide phone number button.
You can use the same phone number for up to five accounts.
A 6-digit security code is sent to the specified phone number.
- Under Enter the verification code that was sent to <phone number>, enter the received security code.
- In the Enter your current password window that opens, specify the password of your account in Kaspersky Security Center Cloud Console, and then click the Next button.
Two-step verification is set up. Now, every time you sign in with your email address and password, or if you forget your password, you will need to enter a one-time security code that you get by SMS to the specified phone number.
You can now install and configure an authenticator app, change your phone number, or disable two-step verification.
Page topSetting up two-step verification by using an authenticator app
Authenticator apps cannot be used in Kaspersky Security Center Cloud Console as a standalone verification method. You must first set up two-step verification by SMS. If you disable two-step verification via your mobile phone number, verification via an authenticator app is turned off automatically. After you have set up both verification via SMS and via an app, you will be able to select a verification method on the sign-in page or if you forget your password.
To set up two-step verification by an authenticator app:
- Set up two-step verification by SMS.
- Download, install, and run the authenticator app that you want to use.
We have tested only Google Authenticator and Microsoft Authenticator for compatibility with Kaspersky Security Center Cloud Console, and these applications were free to use at that time. The interfaces of these applications may be unavailable in your preferred language. Please also check the GDPR compliance and privacy policies of the applications before using them. Kaspersky is in no way sponsored, endorsed by, or otherwise affiliated with any of the owners of these applications.
Microsoft Authenticator can be installed on mobile devices only.
If you want, you can use other apps at your own risk. The app that you use must support 6-digit security codes.
We also recommend that you install an authenticator app on a device other than your mobile phone. This will allow you to sign in to your account if your mobile phone is ever lost or stolen.
- In Kaspersky Security Center Cloud Console, click the link containing your account name, and then select Manage user account.
The My Profile window of the Kaspersky Account portal opens.
- If two-step verification is disabled, enable the Two-step verification is disabled toggle switch.
- Enable the Authenticator app is disabled toggle switch.
The portal page displays a QR code.
If you want to set up the authenticator app on a device that cannot scan QR codes, click the I can't scan it link. A 16-character secret key is displayed.
- In the authenticator app on each device, scan the QR code to create an account. Please refer to your app's documentation for more information.
If you want to set up the authenticator app on a device that cannot scan QR codes, create an account in the authenticator app, and then enter the displayed secret key.
A 6-digit security code is generated in your authenticator apps.
- Verify that the security codes generated in your apps are the same on each device.
- Return to the Kaspersky Account portal, and then click the Next button.
- Enter the generated security code.
- In the Enter your current password window that opens, specify the password of your account in Kaspersky Security Center Cloud Console, and then click the Next button.
Two-step verification by an authenticator app is set up. Now, every time you sign in with your email address and password, or if you forget your password, you will need to enter a one-time security code that is generated in your authenticator app.
You can now disable the use of an authenticator app or completely disable two-step verification.
Page topChanging your mobile phone number
To change the mobile phone number that is used in two-step verification by SMS:
- In Kaspersky Security Center Cloud Console, click the link containing your account name, and then select Manage user account.
The My Profile window of the Kaspersky Account portal opens.
- If two-step verification is disabled, enable the Two-step verification is disabled toggle switch.
- Under Phone number, click the Change phone number link.
- Under Enter your phone number, specify the new mobile phone number that you want to use in two-step verification, and then click the Provide phone number button.
A 6-digit security code is sent to the specified phone number.
- Under Enter the verification code that was sent to <phone number>, enter the received security code.
Your mobile phone number is changed. Now, one-time security codes will be sent to the new phone number.
Page topDisabling two-step verification
If you no longer want to use two-step verification, you can disable it, as described in this section.
Disabling two-step verification will decrease the security of your account. We strongly recommend that you continue using two-step verification.
If you set up two-step verification by SMS, you can disable two-step verification. If you set up two-step verification by an authenticator app, you can disable the use of the app or completely disable two-step verification.
To disable the use of an authenticator app:
- In Kaspersky Security Center Cloud Console, click the link containing your account name, and then select Manage user account.
The My Profile window of the Kaspersky Account portal opens.
- Disable the Authenticator app is enabled toggle switch.
- In the confirmation window that opens, click the Confirm button.
- In the Enter your current password window that opens, specify the password of your account in Kaspersky Security Center Cloud Console, and then click the Next button.
The use of an authenticator app is disabled. The settings of two-step verification by an authenticator app are deleted. You can now delete accounts in your authenticator apps.
Later, you can set up two-step verification by an authenticator app again.
To completely disable two-step verification:
- In Kaspersky Security Center Cloud Console, click the link containing your account name, and then select Manage user account.
The My Profile window of the Kaspersky Account portal opens.
- Disable the Two-step verification is enabled toggle switch.
- In the confirmation window that opens, click the Confirm button.
- In the Enter your current password window that opens, specify the password of your account in Kaspersky Security Center Cloud Console, and then click the Next button.
Two-step verification is disabled. If you used two-step verification by an authenticator app, the settings of two-step verification are deleted. You can now delete accounts in your authenticator apps.
Later, you can set up two-step verification again.
Page topDeleting an account in Kaspersky Security Center Cloud Console
If you want to stop using Kaspersky Security Center Cloud Console, you can delete your
.When deleting an account, all data associated with that account is lost.
After you delete your account, you can no longer gain access to your workspaces in Kaspersky Endpoint Security Cloud, Kaspersky Security for Microsoft Office 365, and Kaspersky Security Center Cloud Console. If you were the only administrator in a workspace, the workspace will be duly deleted. Additionally, you lose access to your My Kaspersky account.
To delete an account in Kaspersky Security Center Cloud Console:
- In Kaspersky Security Center Cloud Console, click the link containing your account name, and then select Manage user account.
The My Profile window of the Kaspersky Account portal opens.
- Click the Account → Delete link.
- In the Delete your account window that opens, read the information about the consequences of account deletion, and then click the Delete button to confirm the account deletion.
- In the Enter your current password window that opens, specify the password of your account in Kaspersky Security Center Cloud Console, and then click the Next button.
Your account is deleted.
Page top