Contents
- Quick Start Guide for Managed Service Providers (MSPs)
- About Kaspersky Security Center Cloud Console
- Getting started with Kaspersky Security Center Cloud Console
- Recommendations on managing your customers' devices
- Typical deployment scheme for MSPs
- Scenario: Protection deployment (tenant management through virtual Administration Servers)
- Scenario: Protection deployment (tenant management through administration groups)
- Joint usage of Kaspersky Security Center on-premises and Kaspersky Security Center Cloud Console
- Licensing of Kaspersky applications for MSPs
- Monitoring and reporting capabilities for MSPs
Quick Start Guide for Managed Service Providers (MSPs)
This Quick Start Guide is intended for administrators of Managed Service Providers (MSPs).
Kaspersky Security Center Cloud Console supports multitenancy. The Guide contains tips and best practices for managing accounts of your customers (tenants) and installing security applications on their devices.
About Kaspersky Security Center Cloud Console
Kaspersky Security Center Cloud Console is an application hosted and maintained by Kaspersky. You do not have to install Kaspersky Security Center Cloud Console on your computer or server. Kaspersky Security Center Cloud Console enables the administrator to install Kaspersky security applications on devices on a corporate network, remotely run scan and update tasks, and manage the security policies of managed applications. The administrator can use a detailed dashboard that provides a snapshot of corporate device statuses, detailed reports, and granular settings in protection policies.
Key features of Kaspersky Security Center Cloud Console
Kaspersky Security Center Cloud Console enables you to do the following:
- Install Kaspersky applications on devices on your network and manage the installed applications.
- Create a hierarchy of administration groups to manage a selection of client devices as a whole.
- Create virtual Administration Servers and arrange them in a hierarchy.
- Protect your network devices, including workstations and servers:
- Manage an antimalware protection system built on Kaspersky applications.
- Use the detection and response (EDR and MDR) capabilities (a license for Kaspersky Endpoint Detection and Response and/or for Kaspersky Managed Detection and Response is required), including:
- Analyzing and investigating incidents
- Incident visualization through creating a threat development chain graph
- Accepting or rejecting responses manually or setting up the auto-accept of all responses
- Use Kaspersky Security Center Cloud Console as a multi-tenant application.
- Remotely manage Kaspersky applications installed on client devices.
- Perform centralized deployment of license keys for Kaspersky applications to client devices.
- Create and manage security policies for devices on your network.
- Create and manage user accounts.
- Create and manage user roles (RBAC).
- Create and manage tasks for applications installed on your network devices.
- View reports on the security system status for every client organization individually.
About licensing of Kaspersky Security Center Cloud Console for MSPs
When you start using Kaspersky Security Center Cloud Console, you can either request a trial workspace (in this case, you are granted a 30-day trial license that is embedded in your workspace) or enter an activation code for a commercial license.
You cannot convert a trial workspace into a commercial one. To continue using Kaspersky Security Center Cloud Console after the trial license expires, you must delete the trial workspace and create another one with a commercial license.
Later, you can add one or several commercial license keys to the Administrator Server repository.
Page topAbout detection and response capabilities for MSPs
Kaspersky Security Center Cloud Console can integrate features of other Kaspersky applications into the console interface. For example, you can add the detection and response features to the functionality of Kaspersky Security Center Cloud Console by integrating the following applications:
- Kaspersky Endpoint Detection and Response Optimum
Kaspersky Endpoint Detection and Response Optimum is a solution designed to protect an organization's IT infrastructure from complex cyberthreats. The solution's functionality combines automatic threat detection with the ability to respond to these threats to resist complex attacks, including new exploits, ransomware, fileless attacks, and methods that use legitimate system tools.
After a Kaspersky Endpoint Protection Platform (EPP) application detects a security incident, a detailed card with important data about the security incident is generated in Kaspersky Security Center Cloud Console. The incident card is generated by one of the following applications:
- Kaspersky Endpoint Agent which is installed together with a Kaspersky EPP application
- Kaspersky Endpoint Security 11.7.0 for Windows or later which has built-in EDR Optimum functionality and does not require additional installation of Kaspersky Endpoint Agent
An incident card enables you to analyze and investigate the incident. Also, you can visualize the incident by creating a threat development chain graph. The graph describes the deployment stages of the detected attack in time. The created graph includes information about the modules involved in the attack and the actions performed by these modules.
You can also initiate a chain of response actions: create an execution prevention rule for an untrusted object; search for similar incidents in the device group, based on the selected indicators of compromise (IOC); isolate an untrusted object; isolate a compromised device from the network.
For information about the application activation, see the Kaspersky Endpoint Detection and Response Optimum documentation.
If integrated, this application adds the Alerts section to the interface of Kaspersky Security Center Cloud Console (Monitoring & reporting → Alerts).
- Kaspersky Managed Detection and Response
Kaspersky Managed Detection and Response delivers round-the-clock protection from the growing volume of threats that circumvent automated security barriers to organizations who struggle to find the expertise and staff, or for those with limited in-house resources. The MDR SOC analysts of Kaspersky or a third-party company investigate the incidents and offer responses to solve the incidents. You can accept or reject the offered measures manually, or enable the option to auto-accept all of the responses.
For information about the application activation, see the Kaspersky Managed Detection and Response documentation.
If integrated, this application adds the Incidents section to the interface of Kaspersky Security Center Cloud Console (Monitoring & reporting → Incidents).
You can show or hide the interface elements that refer to the Kaspersky Endpoint Detection and Response or Kaspersky Managed Detection and Response features at any time in the Interface options section of Kaspersky Security Center Cloud Console.
Page topGetting started with Kaspersky Security Center Cloud Console
After you complete the scenario in this section, Kaspersky Security Center Cloud Console is ready to use.
Getting started scenario
The scenario proceeds in stages:
- Create an account
To start using Kaspersky Security Center Cloud Console, you need an account.
To create an account:
- Open your browser and enter the following address: https://ksc.kaspersky.com.
- Click the Create an account button.
- Follow the onscreen instructions.
- Create a workspace
After you create the account, you can register your company and create your workspace.
When you start using Kaspersky Security Center Cloud Console, you can either request a trial workspace (in this case, you are granted a 30-day trial license that is embedded in your workspace) or enter an activation code for a commercial license.
You cannot convert a trial workspace into a commercial one. To continue using Kaspersky Security Center Cloud Console after the trial license expires, you must delete the trial workspace and create another one with a commercial license.
To register a company and create a workspace:
- Open your browser and enter the following address: https://ksc.kaspersky.com.
- Click the Sign in button.
- Follow the onscreen instructions.
- Perform initial setup of Kaspersky Security Center Cloud Console
When you enter the created workspace for the first time, you are automatically prompted to run the quick start wizard. The quick start wizard guides you to create a minimum of necessary tasks and policies, adjust a minimum of settings, and start creating installation packages of Kaspersky applications. Follow the onscreen instructions.
When initial setup is complete, Kaspersky Security Center Cloud Console is ready to use.
Page topRecommendations on managing your customers' devices
This section contains recommendations for organizing the customer devices that you want to protect.
Recommendations depend on whether you are using Kaspersky Security Center for the first time or have already used the on-premises version:
- If you have never used Kaspersky Security Center before, you have two options:
- Create a virtual Administration Server for the devices of each customer (recommended option). In this case, the devices of each customer can be managed through a dedicated virtual Administration Server independently from other customers. At the same time, you can use the primary Administration Server to create common policies and tasks for all of the customers. The reports generated on the primary Administration Server can include data from all of the virtual Administration Servers.
- Create an administration group for the devices of each customer. If you want to divide customer devices further, you can create a hierarchy of subordinate administration groups under each parent group. For example, you may need subordinate groups if you want to use different protection settings for devices of employees who work in different departments.
- If you have already used Kaspersky Security Center running on-premises, you can migrate your existing administration groups and related objects from Kaspersky Security Center on-premises to Kaspersky Security Center Cloud Console.
You cannot migrate virtual Administration Servers. After migrating the administration groups and other objects, you can create virtual Administration Servers in Kaspersky Security Center Cloud Console.
Proceed to configuring migration.
The administrator of a virtual Administration Server can only proceed to this virtual Server from the primary Administration Server. All the objects created on the primary Administration Server are available for reading to the administrator of a virtual Administration Server (for example, widgets, reports, or the user roles).
Page topTypical deployment scheme for MSPs
This section provides a description of the deployment scheme typically used by MSPs to manage multiple tenants. The scheme is based on management through virtual Administration Servers individually created for each tenant.
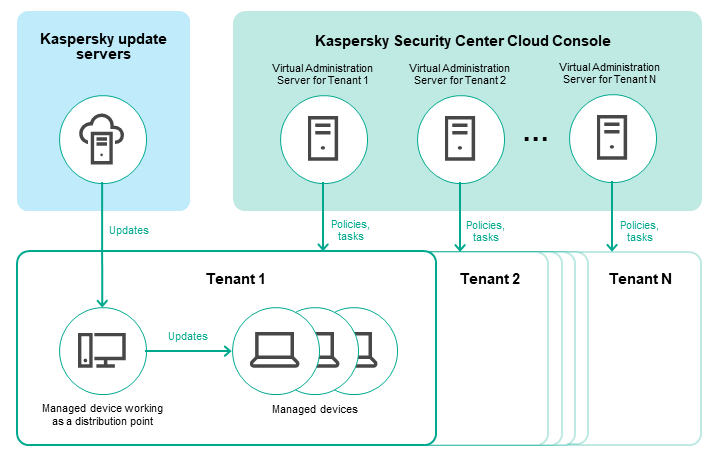
Typical deployment scheme for MSPs
The scheme comprises the following main components:
- Kaspersky Security Center Cloud Console. Provides a user interface to the administration services of your workspace. You use Kaspersky Security Center Cloud Console to deploy, manage, and maintain the protection system of a client organization's network.
- Kaspersky update servers. HTTP(S) servers at Kaspersky from which Kaspersky applications download database and application module updates.
- Virtual Administration Servers. An MSP administrator typically creates a virtual Administration Server for each tenant to deploy, manage, and maintain the protection system of the corresponding client organization's network.
- Tenants. Client organizations whose devices are to be protected.
- Managed devices. Client company's devices protected by Kaspersky Security Center Cloud Console. Each device that has to be protected must have Network Agent and one of the Kaspersky security applications installed.
- Managed device working as a distribution point. Computer that has Network Agent installed and is used for update distribution, network polling, remote installation of applications, getting information about computers in an administration group, and / or broadcasting domain. The administrator selects the appropriate devices and assigns them distribution points manually.
Scenario: Protection deployment (tenant management through virtual Administration Servers)
If you have never used Kaspersky Security Center and you want to manage your tenants through virtual Administration Servers, proceed as described in this section. After you complete this scenario, your customers' devices will be protected.
If you manage several tenants, then perform the scenario for each of the tenants separately.
The scenario proceeds in stages:
- Creating a virtual Administration Server
Create a virtual Administration Server for your customer. The new virtual Administration Server appears in the hierarchy of Administration Servers:
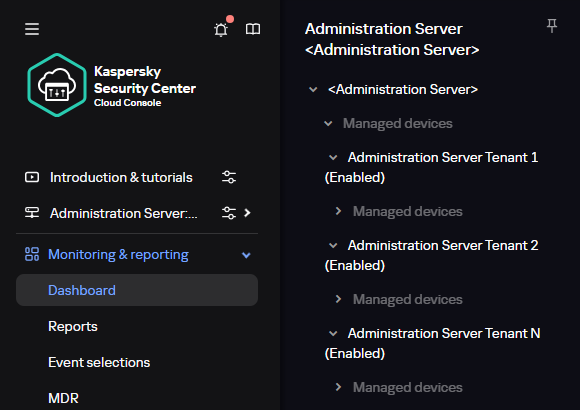
Virtual Administration Servers in the hierarchy of Administration Servers
- Selecting a device to act as a distribution point
Among the devices of the customer, decide which device will act as a
.You cannot have more than 100 distribution points within one workspace.
- Creating a stand-alone installation package for Network Agent
Switch to the created virtual Administration Server, and then create a stand-alone installation package for Network Agent. You can switch Administration Servers in the main menu by clicking the chevron icon (
 ) to the right of the current Administration Server name, and then selecting the required Administration Server. During creation of the stand-alone installation package, specify the Managed devices administration group to move the device to.
 - Installing Network Agent on the selected device to act as a distribution point
You can use any method that is suitable for you:
- Manual installation
To deliver the stand-alone installation package to the device, you can, for example, copy it to a removable drive (such as a flash drive) or place it in a shared folder.
- Deployment by using Active Directory
- Deployment by using your remote monitoring and management (RMM) software solution
- Manual installation
- Assigning a distribution point
Assign the device with Network Agent installed to act as a distribution point.
- Network polling
Configure and perform network polling through the distribution point.
Kaspersky Security Center Cloud Console provides the following methods of network polling:
- IP range polling
- Windows network polling
- Active Directory polling
After network polling according to schedule is complete, your customers' devices are discovered and placed in the Unassigned devices group.
- Moving the discovered devices to the administration groups
Set up the rules for automatically moving the discovered devices to the required administration groups; or move these devices to the required administration groups manually. If you plan to manage the customer's devices in a single administration group, you can move the devices to the Managed devices group.
- Creating installation packages for Network Agent and managed Kaspersky applications
- Removing third-party security applications
If third-party security applications are installed on your customers' devices, remove them before installing Kaspersky applications.
- Installing Kaspersky applications on client devices
Create remote installation tasks to install Network Agent and managed Kaspersky applications on your customers' devices.
If necessary, you can create several remote installation tasks to install managed Kaspersky applications for different administration groups or different device selections.
After the tasks are created, you can configure their settings. Make sure that the schedule for each task meets your requirements. First, the task to install Network Agent must be run. After Network Agent is installed on your customers' devices, the task to install managed Kaspersky applications must be run.
- Verifying initial deployment of Kaspersky applications
Generate and view the Report on Kaspersky application versions. Make sure that the managed Kaspersky applications are installed on all of the devices of your customer.
- Creating policies for Kaspersky applications
Create a policy for the required Kaspersky application. If you want to create a universal policy for all your customers, switch the current virtual Administration Server to the primary Administration Server, and then create a policy for the required Kaspersky application.
Scenario: Protection deployment (tenant management through administration groups)
If you have never used Kaspersky Security Center and you want to manage your tenants through administration groups, proceed as described in this section. After you complete this scenario, your customers' devices will be protected.
The scenario proceeds in stages:
- Creating administration groups
Create an administration group for each of your customers.
- Planning the distribution points structure
Among the devices of each customer, decide which device will act as a distribution point.
You cannot have more than 100 distribution points within one workspace.
- Creating a stand-alone installation package for Network Agent
Create a stand-alone installation package for Network Agent.
- Installation of Network Agent on the selected devices to act as distribution points
Install Network Agent on the selected devices that will act as distribution points.
You can use any method that is suitable for you:
- Manual installation
To deliver the stand-alone installation package to the devices, you can, for example, copy it to a removable drive (such as a flash drive) or place it in a shared folder.
- Deployment by using Active Directory
- Deployment by using your remote monitoring and management (RMM) software solution
- Manual installation
- Assigning distribution points
Assign the devices with Network Agent installed to act as distribution points.
- Network polling
Configure and perform network polling through the distribution point.
Kaspersky Security Center Cloud Console provides the following methods of network polling:
- IP range polling
- Windows network polling
- Active Directory polling
After network polling according to schedule is complete, your customers' devices are discovered and placed in the Unassigned devices group.
- Moving the discovered devices to the administration groups
Set up the rules for automatically moving the discovered devices to the required administration groups; or move these devices to the required administration groups manually.
- Creating installation packages for Network Agent and managed Kaspersky applications
If you did not start the quick start wizard, or skipped the step of creating installation packages, create installation packages for Kaspersky applications.
- Removing third-party security applications
If third-party security applications are installed on your customers' devices, remove them before installing Kaspersky applications.
- Installing Kaspersky applications on your customers' devices
Create remote installation tasks to install Network Agent and managed Kaspersky applications on your customers' devices.
If necessary, you can create several remote installation tasks to install managed Kaspersky applications for different administration groups or different device selections.
After the tasks are created, you can configure their settings. Make sure that the schedule for each task meets your requirements. First, the task to install Network Agent must be run. After Network Agent is installed on your customers' devices, the task to install managed Kaspersky applications must be run.
- Verifying initial deployment of Kaspersky applications
Generate and view the Report on Kaspersky application versions. Make sure that the managed Kaspersky applications are installed on all of the devices of your customers.
- Creating policies for Kaspersky applications
Go to the Assets (Devices) → Groups menu; if you want to create a universal policy for all your customers, select Administration Server. If you want to create a specific policy for an individual customer, select the administration group corresponding to that customer. Create a policy for the required Kaspersky application.
Joint usage of Kaspersky Security Center on-premises and Kaspersky Security Center Cloud Console
If you have already used Kaspersky Security Center running on-premises, you can convert your existing Administration Servers running on-premises into secondary Administration Servers of your new Kaspersky Security Center Cloud Console Administration Server, as described in this section.
If you configure joint usage of Kaspersky Security Center on-premises and Kaspersky Security Center Cloud Console, you will not be able to migrate from Kaspersky Security Center on-premises to Kaspersky Security Center Cloud Console unless you remove the hierarchy of Administration Servers.
To create a hierarchy of Administration Servers,
Add your existing Administration Servers running on-premises as secondary Administration Servers.
Page topLicensing of Kaspersky applications for MSPs
Kaspersky Security Center Cloud Console enables you to perform centralized distribution of license keys for Kaspersky applications on your customers' devices, monitor their use, and renew licenses.
If you manage several tenants, you can distribute license keys in the following ways:
- One license key for all of the tenants.
- An individual license key for each tenant.
To distribute license keys to your customers' devices:
- Add the required license keys to the Administration Server repository.
- Do one of the following:
- Configure automatic distribution of a license key.
In this case, Kaspersky Security Center Cloud Console selects one of the applicable license keys and automatically deploys it every time a new device is discovered.
- Configure the Add a key task to distribute a license key to devices.
When configuring the task, you select the license key that must be deployed to devices and select the administration group that contains the required devices.
One task can distribute only one license key. This means that if you want to distribute several license keys, you must create a task for each of them.
- Configure automatic distribution of a license key.
The Kaspersky applications installed on your customers' devices are activated.
Adding an active license key to the primary Administration Server is mandatory. Otherwise, the associated workspace will be deleted in 90 days, regardless of the status of license keys on other Administration Servers within that workspace.
Page topMonitoring and reporting capabilities for MSPs
Kaspersky Security Center Cloud Console provides you with monitoring and reporting capabilities. These capabilities give you an overview of your organization infrastructure, protection statuses, and statistics.
When you have deployed Kaspersky Security Center Cloud Console, you can configure the monitoring and reporting features to best suit your needs.
Kaspersky Security Center Cloud Console provides the following types features of monitoring and reporting:
- Dashboard
- Reports
- Event selections
- Email notifications
Dashboard
The dashboard allows you to monitor security trends on your organization's network by providing you with a graphical display of information. (See the figure below.)
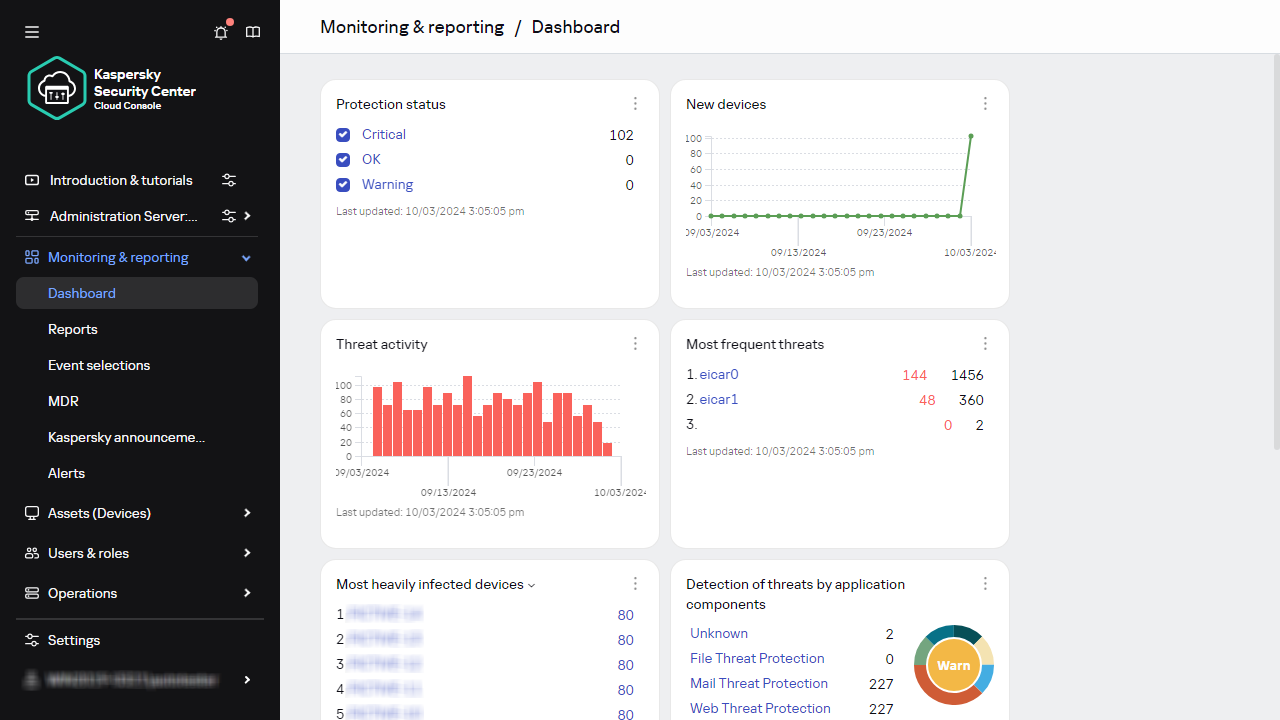
The Dashboard section
Reports
The Reports feature allows you to get detailed numerical information about the security of your organization's network, save this information to a file, send it by email, and print it. You can also schedule report delivery by email (see the figure below).
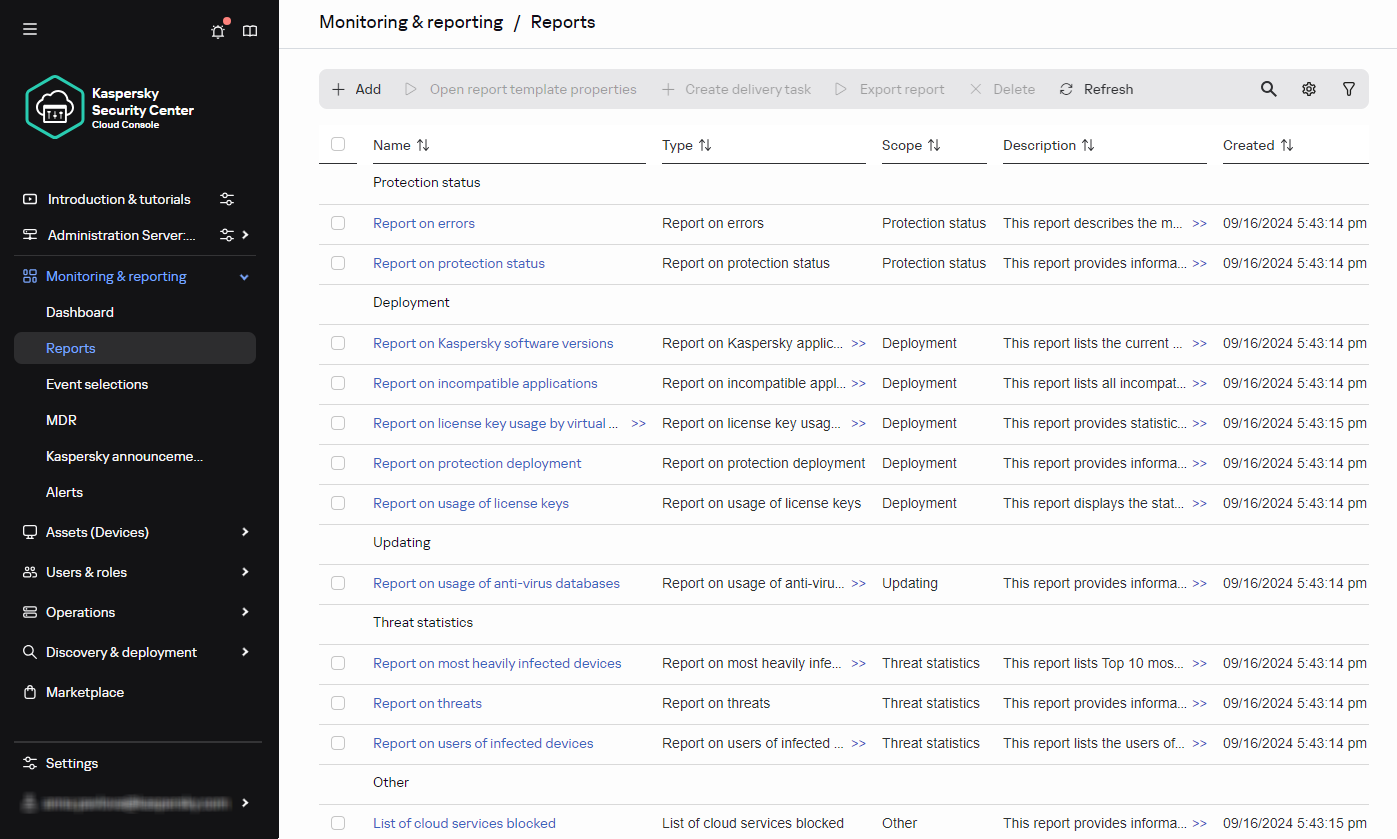
The Reports section
Event selections
Event selections provide an onscreen view of named sets of events that are selected from the Administration Server database. Kaspersky Security Center Cloud Console contains a number of predefined event selections (for example, Recent events and Critical events). Also, you can create custom event selections.
Email notifications
You can configure email notification about events occurring in Kaspersky Security Center Cloud Console and on your customers' devices.
Page top