Contents
Getting started with Kaspersky Security Center Cloud Console
This section describes how to sign up for and start using Kaspersky Security Center Cloud Console.
Signing up for Kaspersky Security Center Cloud Console consists of the following steps:
Page topCreating an account
This article describes how to create an
.As an alternative, you can create an account on My Kaspersky, and then use it to sign in to Kaspersky Security Center Cloud Console and create your workspace.
Your My Kaspersky account must be created directly on the website and not by using an external authentication provider (like Google). Otherwise, you will not be able to use Kaspersky Security Center Cloud Console.
To create an account in Kaspersky Security Center Cloud Console:
- In your browser, go to Kaspersky Security Center Cloud Console.
- Click the Create an account button on the start page of Kaspersky Security Center Cloud Console.
The Kaspersky Account portal opens.
- On the Sign up to enter Kaspersky Security Center Cloud Console page, enter the email address and password for your account (see the figure below).
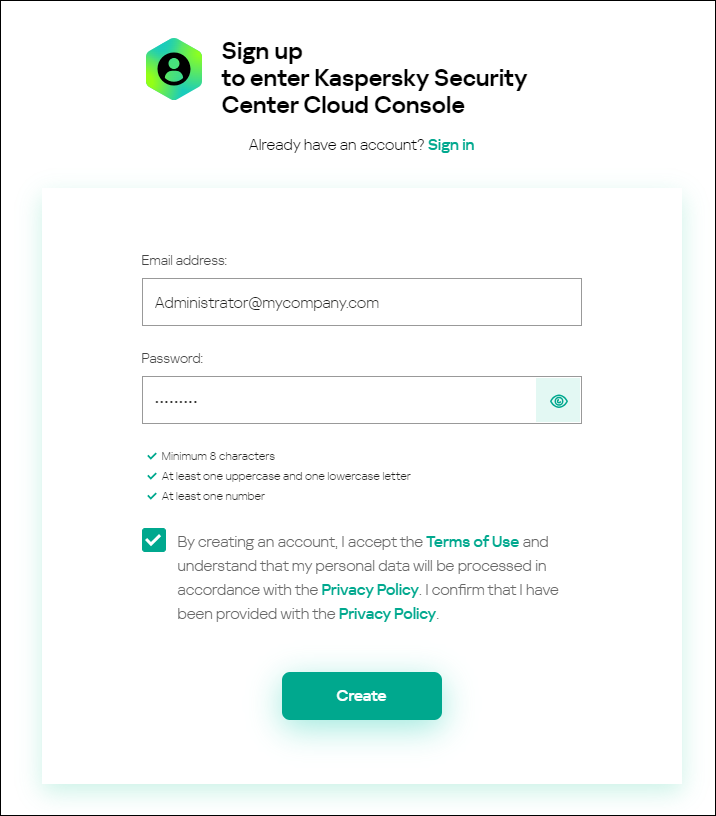
Creating an account in Kaspersky Security Center Cloud Console
- Click the Privacy Policy link and carefully read the Privacy Policy text.
- If you are aware and agree that your data will be handled and transmitted (including to third countries) as described in the Privacy Policy and you confirm that you have fully read and understand the Privacy Policy, select the check box next to the text of consent to data processing in accordance with the Privacy Policy, and then click the Create button.
If you do not accept the Privacy Policy, do not use Kaspersky Security Center Cloud Console.
- A message from Kaspersky is sent to the email address that you specified. The message contains a one-time security code.
Open the email message, and then copy the one-time security code that it contains.
- Return to Kaspersky Account, and then paste the code to the entry field.
Creation of the account in Kaspersky Security Center Cloud Console is complete.
Registering a company and creating a workspace
Immediately after the account is created, you can register a company and create a workspace for it.
If you want to protect more than 10,000 devices, you do not have to register a company and create a workspace on Kaspersky Security Center Cloud Console as described below. Instead, send a request to Kaspersky Technical Support. In the request, specify information about your company and the workspace that you want to create.
Before you start, make sure that you know the following:
- The name of the company in which you intend to use the software solution.
- The country in which the company is located. If the company is located in Canada, you must also know the province.
- The total number of company computers and mobile devices that you want to protect.
To register a company and create a workspace in Kaspersky Security Center Cloud Console:
- In your browser, go to Kaspersky Security Center Cloud Console.
- Click the Sign in button on the start page of Kaspersky Security Center Cloud Console.
- Enter the email address and password that you specified when you created the account, and then click the Sign in button.
The Create a workspace wizard starts. Proceed through the wizard by using the Next button.
- On the Step 01: Terms of Use of Kaspersky Security Center Cloud Console page of the wizard, do the following:
- Carefully read the Agreement, the Privacy Policy, and the Data Processing Agreement for the software solution.
- If you agree to the terms and conditions of the Agreement and the Data Processing Agreement and if you are aware and agree that your data will be handled and transmitted (including to third countries) as described in the Privacy Policy, and you confirm that you have fully read and understand the Privacy Policy, select the check boxes next to the three listed documents and click the Accept button.
If you do not agree to the terms and conditions, do not use Kaspersky Security Center Cloud Console.
If you click the Decline button, the workspace creation process will be terminated.
- On the Step 02: Company information page of the wizard, specify the main details of your company.
Fill in the following fields:
- Name of your company (required)
Specify the name of the company in which you intend to use the software solution. You can enter a string up to 255 characters long. The string can contain upper- and lowercase characters, numerals, whitespaces, dots, commas, minuses, dashes, and underscores. The specified company name will be displayed in Kaspersky Security Center Cloud Console.
- Additional company description field (optional)
You may specify additional information about the company that you register. You can enter a string up to 255 characters long. The string can contain upper- and lowercase characters, numerals, whitespaces, dots, commas, minuses, dashes, and underscores.
- Name of your company (required)
- On the Step 03: Workspace information page of the wizard, specify the information about the workspace that you want to create for your company.
Fill in the following required fields:
- Workspace name. Specify the name of the workspace in which you intend to use the software solution. You can enter a string up to 255 characters long. The string can contain upper- and lowercase characters, numerals, whitespaces, dots, commas, minuses, dashes, and underscores. The specified workspace name will be displayed in Kaspersky Security Center Cloud Console.
- Country. In the drop-down list, select the country in which your workspace is located. If you select Canada, also specify the province in the State drop-down list that appears below this field.
- Number of devices. Enter the total number of computers and mobile devices that you want to protect in this workspace.
In the entry field, you can enter a number from 20 to 10,000. The exact minimum number of devices that you can protect depends on the license that you purchased.
- On the Step 04: License for new workspace page of the wizard, do either of the following:
- If you want to try Kaspersky Security Center Cloud Console, click the I want to request a trial workspace link.
We recommend that you connect your own devices to your trial workspace and test any modifications to the settings, noting the results.
You will not be able to switch a trial workspace to commercial mode by entering an activation code. To switch to commercial mode, you must delete the workspace and create it again.
- If you want to use Kaspersky Security Center Cloud Console in the commercial mode, enter the activation code and click the Verify button.
- If you want to try Kaspersky Security Center Cloud Console, click the I want to request a trial workspace link.
Registration of a company and creation of a workspace in Kaspersky Security Center Cloud Console is complete.
After the workspace is prepared, you receive an email message with the link to access the workspace.
Page top