Contents
- Policies and policy profiles
- About policies
- About lock and locked settings
- Inheritance of policies and policy profiles
- Managing policies
- Viewing the list of policies
- Creating a policy
- Modifying a policy
- General policy settings
- Enabling and disabling a policy inheritance option
- Copying a policy
- Moving a policy
- Exporting a policy
- Importing a policy
- Viewing the policy distribution status chart
- Activating a policy automatically at the Virus outbreak event
- Forced synchronization
- Deleting a policy
- Managing policy profiles
Policies and policy profiles
In Kaspersky Security Center Cloud Console, you can create policies for Kaspersky applications. This section describes policies and policy profiles, and provides instructions for creating and modifying them.
About policies
A policy is a set of Kaspersky application settings that are applied to an administration group and its subgroups. You can install several Kaspersky applications on the devices of an administration group. Kaspersky Security Center Cloud Console provides a single policy for each Kaspersky application in an administration group. A policy has one of the following statuses (see the table below):
The status of the policy
Status |
Description |
|---|---|
Active |
The current policy that is applied to the device. Only one policy may be active for a Kaspersky application in each administration group. Devices apply the settings values of an active policy for a Kaspersky application. |
Inactive |
A policy that is not currently applied to a device. |
Out-of-office |
If this option is selected, the policy becomes active when the device leaves the corporate network. |
Policies function according to the following rules:
- Multiple policies with different values can be configured for a single application.
- Only one policy can be active for the current application.
- You can activate an inactive policy when a specific event occurs. For example, you can enforce stricter anti-virus protection settings during virus outbreaks.
- A policy can have child policies.
Generally, you can use policies as preparations for emergency situations, such as a virus attack. For example, if there is an attack via flash drives, you can activate a policy that blocks access to flash drives. In this case, the current active policy automatically becomes inactive.
In order to prevent maintaining multiple policies, for example, when different occasions assume changing of several settings only, you may use policy profiles.
A policy profile is a named subset of policy settings values that replaces the settings values of a policy. A policy profile affects the effective settings formation on a managed device. Effective settings are a set of policy settings, policy profile settings, and local application settings that are currently applied for the device.
Policy profiles function according to the following rules:
- A policy profile takes an effect when a specific activation condition occurs.
- Policy profiles contain values of settings that differ from the policy settings.
- Activation of a policy profile changes the effective settings of the managed device.
- A policy can include a maximum of 100 policy profiles.
You cannot create an Administration Server policy.
About lock and locked settings
Each policy setting has a lock button icon ( ). The table below shows lock button statuses:
Lock button statuses
Status |
Description |
|---|---|
|
If an open lock is displayed next to a setting and the toggle button is disabled, the setting is not specified in the policy. A user can change these settings in the managed application interface. These type of settings are called unlocked. |
|
If a closed lock is displayed next to a setting and the toggle button is enabled, the setting is applied to the devices where the policy is enforced. A user cannot modify the values of these settings in the managed application interface. These type of settings are called locked. |


We highly recommend that you close locks for the policy settings that you want to apply on the managed devices. The unlocked policy settings can be reassigned by Kaspersky application settings on a managed device.
You can use a lock button for performing the following actions:
- Locking settings for an administration subgroup policy
- Locking settings of a Kaspersky application on a managed device
Thus, a locked setting is used for implementing effective settings on a managed device.
A process of effective settings implementation includes the following actions:
- Managed device applies settings values of Kaspersky application.
- Managed device applies locked settings values of a policy.
A policy and managed Kaspersky application contain the same set of settings. When you configure policy settings, the Kaspersky application settings change values on a managed device. You cannot adjust locked settings on a managed device (see the figure below):
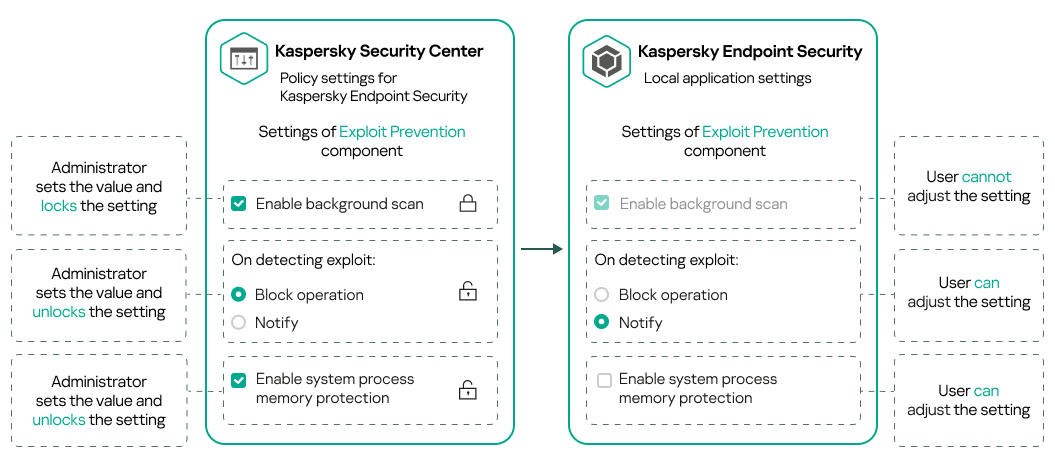
Locks and Kaspersky application settings
Inheritance of policies and policy profiles
This section provides information about the hierarchy and inheritance of policies and policy profiles.
Hierarchy of policies
If different devices need different settings, you can organize devices into administration groups.
You can specify a policy for a single administration group. Policy settings can be inherited. Inheritance means receiving policy settings values in subgroups (child groups) from a policy of a higher-level (parent) administration group.
Hereinafter, a policy for a parent group is also referred to as a parent policy. A policy for a subgroup (child group) is also referred to as a child policy.
By default, at least one managed devices group exists on Administration Server. If you want to create custom groups, they are created as subgroups (child groups) within the managed devices group.
Policies of the same application act on each other, according to a hierarchy of administration groups. Locked settings from a policy of a higher-level (parent) administration group will reassign policy settings values of a subgroup (see the figure below).
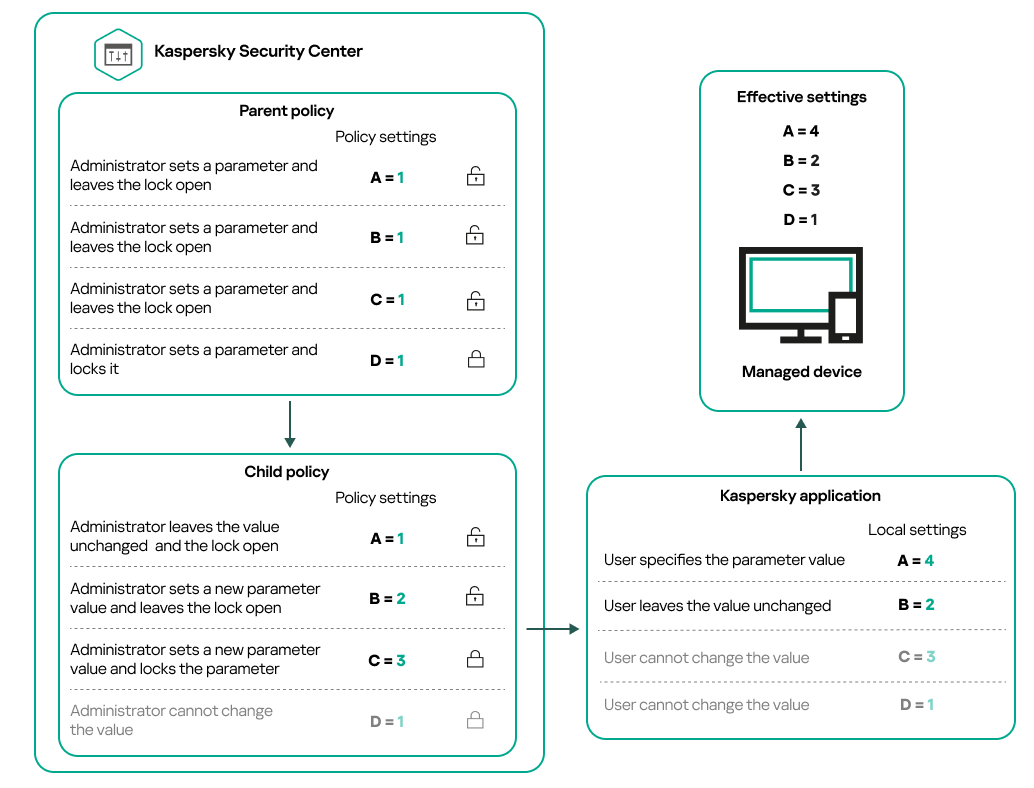
Hierarchy of policies
Page topPolicy profiles in a hierarchy of policies
Policy profiles have the following priority assignment conditions:
- A profile's position in a policy profile list indicates its priority. You can change a policy profile priority. The highest position in a list indicates the highest priority (see the figure below).
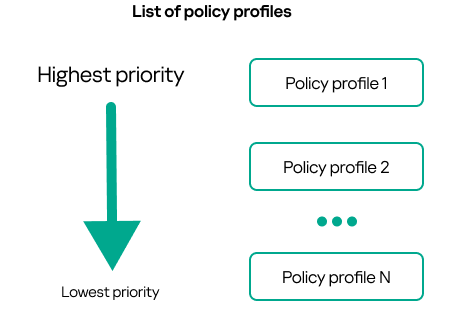
Priority definition of a policy profile
- Activation conditions of policy profiles do not depend on each other. Several policy profiles can be activated simultaneously. If several policy profiles affect the same setting, the device takes the setting value from the policy profile with the highest priority (see the figure below).

Managed device configuration fulfills activation conditions of several policy profiles
Policy profiles in a hierarchy of inheritance
Policy profiles from different hierarchy level policies comply with the following conditions:
- A lower-level policy inherits policy profiles from a higher-level policy. A policy profile inherited from a higher-level policy obtains higher priority than the original policy profile's level.
- You cannot change a priority of an inherited policy profile (see the figure below).
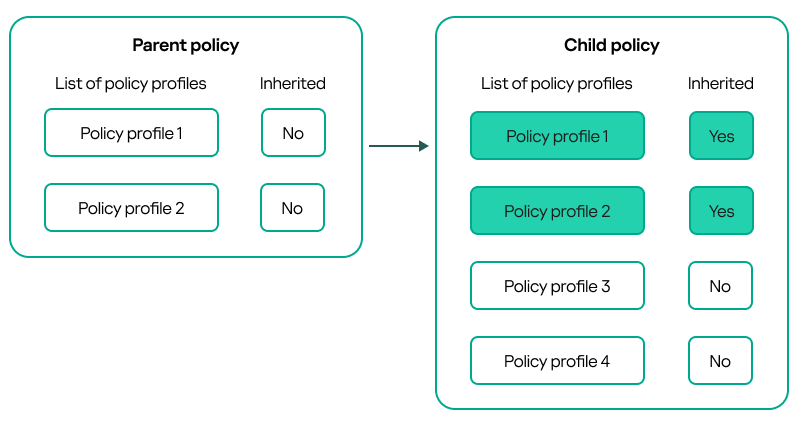
Inheritance of policy profiles
Policy profiles with the same name
If there are two policies with the same names in different hierarchy levels, these policies function according to the following rules:
- Locked settings and the profile activation condition of a higher-level policy profile changes the settings and profile activation condition of a lower-level policy profile (see the figure below).

Child profile inherits settings values from a parent policy profile
- Unlocked settings and the profile activation condition of a higher-level policy profile do not change the settings and profile activation condition of a lower-level policy profile.
How settings are implemented on a managed device
Implementation of effective settings on a managed device can be described as follows:
- The values of all settings that have not been locked are taken from the policy.
- Then they are overwritten with the values of managed application settings.
- And then the locked settings values from the effective policy are applied. Locked settings values change the values of unlocked effective settings.
Managing policies
This section describes managing policies and provides information about viewing the list of policies, creating a policy, modifying a policy, copying a policy, moving a policy, forced synchronization, viewing the policy distribution status chart, and deleting a policy.
Viewing the list of policies
You can view lists of policies created for the Administration Server or for any administration group.
To view a list of policies:
- In the main menu, go to Assets (Devices) → Hierarchy of groups.
- In the administration group structure, select the administration group for which you want to view the list of policies.
The list of policies appears in tabular format. If there are no policies, the table is empty. You can show or hide the columns of the table, change their order, view only lines that contain a value that you specify, or use search.
Creating a policy
You can create policies; you can also modify and delete existing policies.
You cannot create an Administration Server policy.
To create a policy:
- In the main menu, go to Assets (Devices) → Policies & profiles.
- Click Add.
The Select application window opens.
- Select the application for which you want to create a policy.
- Click Next.
The new policy settings window opens with the General tab selected.
- If you want, change the default name, default status, and default inheritance settings of the policy.
- Click the Application settings tab.
Or, you can click Save and exit. The policy will appear in the list of policies, and you can edit its settings later.
- On the Application settings tab, in the left pane select the category that you want and in the results pane on the right, edit the settings of the policy. You can edit policy settings in each category (section).
The application settings depend on the application for which you create a policy. For details, refer to the following:
- Administration Server configuration
- Network Agent policy settings
- Kaspersky Endpoint Security for Windows documentation
For details about settings of other security applications, refer to the documentation for the corresponding application.
When editing the settings, you can click Cancel to cancel the last operation.
- Click Save to save the policy.
The policy will appear in the list of policies.
Modifying a policy
To modify a policy:
- In the main menu, go to Assets (Devices) → Policies & profiles.
- Click the policy that you want to modify.
The policy settings window opens.
- Specify the general settings and settings of the application for which you create a policy. For details, refer to the following:
- Administration Server configuration
- Network Agent policy settings
- Kaspersky Endpoint Security for Windows documentation
For details about settings of other security applications, refer to the documentation for that application.
- Click Save.
The changes made to the policy will be saved in the policy properties, and will appear in the Revision history section.
General policy settings
General
On the General tab, you can modify the policy status and specify the inheritance of policy settings:
- In the Policy status block, you can select one of the policy modes:
- Active
- Out-of-office
- Inactive
- In the Settings inheritance settings group, you can configure the policy inheritance:
Event configuration
The Event configuration tab enables you to configure event logging and event notification. Events are distributed by importance level on the following tabs:
- Critical
The Critical section is not displayed in the Network Agent policy properties.
- Functional failure
- Warning
- Info
In each section, the list shows the types of events and the default event storage term on the Administration Server (in days). Clicking an event type lets you specify the following settings:
- Event registration
You can specify how many days to store the event and select where to store the event:
- Store in the Administration Server database for (days)
- Store in the OS event log on device
- Event notifications
You can select if you want to be notified about the event by email.
By default, the notification settings specified on the Administration Server properties tab (such as recipient address) are used. If you want, you can change these settings on the Email tab.
Also, the Event configuration tab displays a notification when new event types are added (for example, in a new version of the product) and enables you to apply the new settings by clicking the Save or Save and close button.
Revision history
The Revision history tab enables you to view the list of the policy revisions and roll back changes made to the policy, if necessary.
Enabling and disabling a policy inheritance option
To enable or disable the inheritance option in a policy:
- Open the required policy.
- Open the General tab.
- Enable or disable policy inheritance:
- If you enable Inherit settings from parent policy in a child policy and an administrator locks some settings in the parent policy, then you cannot change these settings in the child policy.
- If you disable Inherit settings from parent policy in a child policy, then you can change all of the settings in the child policy, even if some settings are locked in the parent policy.
- If you enable Force inheritance of settings in child policies in the parent group, this enables the Inherit settings from parent policy option for each child policy. In this case, you cannot disable this option for any child policy. All of the settings that are locked in the parent policy are forcibly inherited in the child groups, and you cannot change these settings in the child groups.
- Click the Save button to save changes or click the Cancel button to reject changes.
By default, the Inherit settings from parent policy option is enabled for a new policy.
If a policy has profiles, all of the child policies inherit these profiles.
Copying a policy
You can copy policies from one administration group to another.
To copy a policy to another administration group:
- In the main menu, go to Assets (Devices) → Policies & profiles.
- Select the check box next to the policy (or policies) that you want to copy.
- Click the Copy button.
On the right side of the screen, the tree of the administration groups appears.
- In the tree, select the target group, that is, the group to which you want to copy the policy (or policies).
- Click the Copy button at the bottom of the screen.
- Click OK to confirm the operation.
The policy (policies) will be copied to the target group with all its profiles. The status of each copied policy in the target group will be Inactive. You can change the status to Active at any time.
If a policy with the name identical to that of the newly moved policy already exists in the target group, the name of the newly moved policy is expanded with the (<next sequence number>) index, for example: (1).
Moving a policy
You can move policies from one administration group to another. For example, you want to delete a group, but you want to use its policies for another group. In this case, you may want move the policy from the old group to the new one before deleting the old group.
To move a policy to another administration group:
- In the main menu, go to Assets (Devices) → Policies & profiles.
- Select the check box next to the policy (or policies) that you want to move.
- Click the Move button.
On the right side of the screen, the tree of the administration groups appears.
- In the tree, select the target group, that is, the group to which you want to move the policy (or policies).
- Click the Move button at the bottom of the screen.
- Click OK to confirm the operation.
If a policy is not inherited from the source group, it is moved to the target group with all its profiles. The status of the policy in the target group is Inactive. You can change the status to Active at any time.
If a policy is inherited from the source group, it remains in the source group. It is copied to the target group with all its profiles. The status of the policy in the target group is Inactive. You can change the status to Active at any time.
If a policy with the name identical to that of the newly moved policy already exists in the target group, the name of the newly moved policy is expanded with the (<next sequence number>) index, for example: (1).
Exporting a policy
Kaspersky Security Center Cloud Console allows you to save a policy, its settings, and the policy profiles to a KLP file. You can use this KLP file to import the saved policy both to Kaspersky Security Center Windows and Kaspersky Security Center Linux.
To export a policy:
- In the main menu, go to Assets (Devices) → Policies & profiles.
- Select the check box next to the policy that you want to export.
You cannot export multiple policies at the same time. If you select more than one policy, the Export button will be disabled.
- Click the Export button.
- In the opened Save as window, specify the policy file name and path. Click the Save button.
The Save as window is displayed only if you use Google Chrome, Microsoft Edge, or Opera. If you use another browser, the policy file is automatically saved in the Downloads folder.
Importing a policy
Kaspersky Security Center Cloud Console allows you to import a policy from a KLP file. The KLP file contains the exported policy, its settings, and the policy profiles.
To import a policy:
- In the main menu, go to Assets (Devices) → Policies & profiles.
- Click the Import button.
- Click the Browse button to choose a policy file that you want to import.
- In the opened window, specify the path to the KLP policy file, and then click the Open button. Note that you can select only one policy file.
The policy processing starts.
- After the policy is processed successfully, select the administration group to which you want to apply the policy.
- Click the Complete button to finish the policy import.
The notification with the import results appears. If the policy is imported successfully, you can click the Details link to view the policy properties.
After a successful import, the policy is displayed in the policy list. The settings and profiles of the policy are also imported. Regardless of the policy status that was selected during the export, the imported policy is inactive. You can change the policy status in the policy properties.
If the newly imported policy has a name identical to that of an existing policy, the name of the imported policy is expanded with the (<next sequence number>) index, for example: (1), (2).
Page topViewing the policy distribution status chart
In Kaspersky Security Center Cloud Console, you can view the status of policy application on each device in a policy distribution status chart.
To view the policy distribution status on each device:
- In the main menu, go to Assets (Devices) → Policies & profiles.
- Select check box next to the name of the policy for which you want to view the distribution status on devices.
- In the menu that appears, click the Distribution link.
The <Policy name> distribution results window opens.
- In the <Policy name> distribution results window that opens, the Status description (if available) of the policy is displayed.
You can change number of results displayed in the list with policy distribution. The maximum number of devices is 100,000.
To change the number of devices displayed in the list with policy distribution results:
- In the main menu, go to your account settings, and then select Interface options.
- In the Maximum number of devices displayed in policy distribution results, enter the number of devices (up to 100,000).
By default, the number is 5000.
- Click Save.
The settings are saved and applied.
Activating a policy automatically at the Virus outbreak event
To make a policy perform automatic activation at a Virus outbreak event:
- In the main menu, click the settings icon (
 ) next to the name of the required Administration Server.
 The Administration Server properties window opens, with the General tab selected.
- Select the Virus outbreak section.
- In the right pane, click the Configure policies to activate when a virus outbreak event occurs link.
The Policy activation window opens.
- In the section relating to the component that detects a virus outbreak—Anti-Virus for workstations and file servers, Anti-Virus for mail servers, or Anti-Virus for perimeter defense—select the option button next to the entry you want, and then click Add.
A window opens with the Managed devices administration group.
- Click the chevron icon (
 ) next to Managed devices.
A hierarchy of administration groups and their policies is displayed.
- In the hierarchy of administration groups and their policies, click the name of a policy or policies that are activated when a virus outbreak is detected.
To select all policies in the list or in a group, select the check box next to the required name.
- Click the Save button.
The window with the hierarchy of administration groups and their policies is closed.
The selected policies are added to the list of policies that are activated when a virus outbreak is detected. The selected policies are activated at the virus outbreak, independent whether they are active or inactive.
If a policy has been activated on the Virus outbreak event, you can return to the previous policy only by using the manual mode.
Forced synchronization
Although Kaspersky Security Center Cloud Console automatically synchronizes the status, settings, tasks, and policies for managed devices, in some cases you need to know for certain, at a given moment, whether synchronization has already been performed for a specified device.
Synchronizing a single device
To force synchronization between the Administration Server and a managed device:
- In the main menu, go to Assets (Devices) → Managed devices.
- Click the name of the device that you want to synchronize with the Administration Server.
A property window opens with the General section selected.
- Click the Force synchronization button.
The application synchronizes the selected device with the Administration Server.
Synchronizing multiple devices
To force synchronization between the Administration Server and multiple managed devices:
- Open the device list of an administration group or a device selection:
- In the main menu, go to Assets (Devices) → Managed devices → Groups, and then select the administration group that contains devices to synchronize.
- Run a device selection to view the device list.
- Select the check boxes next to the devices that you want to synchronize with the Administration Server.
- Click the Force synchronization button.
The application synchronizes the selected devices with the Administration Server.
- In the device list, check that the time of last connection to the Administration Server has changed, for the selected devices, to the current time. If the time has not changed, update the page content by clicking the Refresh button.
The selected devices are synchronized with the Administration Server.
Viewing the time of a policy delivery
After changing a policy for a Kaspersky application on the Administration Server, you can check whether the changed policy has been delivered to a specific managed device. A policy can be delivered during a regular synchronization or a forced synchronization.
To view the date and time that an application policy was delivered to a managed device:
- In the main menu, go to Assets (Devices) → Managed devices.
- Click the name of the device that you want to synchronize with the Administration Server.
A property window opens with the General section selected.
- Click the Applications tab.
- Select the application for which you want to view the policy synchronization date.
The application policy window opens with the General section selected and the policy delivery date and time displayed.
Deleting a policy
You can delete a policy if you do not need it anymore. You can delete only a policy that is not inherited in the specified administration group. If a policy is inherited, you can only delete it in the upper-level group for which it was created.
To delete a policy:
- In the main menu, go to Assets (Devices) → Policies & profiles.
- Select the check box next to the policy that you want to delete, and click Delete.
The Delete button becomes unavailable (dimmed) if you select an inherited policy.
- Click OK to confirm the operation.
The policy is deleted together with all its profiles.
Managing policy profiles
This section describes managing policy profiles and provides information about viewing the profiles of a policy, changing a policy profile priority, creating a policy profile, modifying a policy profile, copying a policy profile, creating a policy profile activation rule, and deleting a policy profile.
Viewing the profiles of a policy
To view profiles of a policy:
- In the main menu, go to Assets (Devices) → Policies & profiles.
- Click the name of the policy whose profiles you want to view.
The policy properties window opens with the General tab selected.
- Open the Policy profiles tab.
The list of policy profiles appears in tabular format. If the policy does not have profiles, an empty table appears.
Changing a policy profile priority
To change a policy profile priority:
- Proceed to the list of profiles of a policy that you want.
The list of policy profiles appears.
- On the Policy profiles tab, select the check box next to the policy profile for which you want to change priority.
- Set a new position of the policy profile in the list by clicking Prioritize or Deprioritize.
The higher a policy profile is located in the list, the higher its priority.
- Click the Save button.
Priority of the selected policy profile is changed and applied.
Creating a policy profile
To create a policy profile:
- Proceed to the list of profiles of the policy that you want.
The list of policy profiles appears. If the policy does not have profiles, an empty table appears.
- Click Add.
- If you want, change the default name and default inheritance settings of the profile.
- Select the Application settings tab.
Alternatively, you can click Save and exit. The profile that you have created appears in the list of policy profiles, and you can edit its settings later.
- On the Application settings tab, in the left pane, select the category that you want and in the results pane on the right, edit the settings for the profile. You can edit policy profile settings in each category (section).
When editing the settings, you can click Cancel to cancel the last operation.
- Click Save to save the profile.
The profile will appear in the list of policy profiles.
Modifying a policy profile
The capability to edit a policy profile is only available for policies of Kaspersky Endpoint Security for Windows.
To modify a policy profile:
- Proceed to the list of profiles of a policy that you want.
The list of policy profiles appears.
- On the Policy profiles tab, click the policy profile that you want to modify.
The policy profile properties window opens.
- Configure the profile in the properties window:
- If necessary, on the General tab, change the profile name and enable or disable the profile.
- Edit the profile activation rules.
- Edit the application settings.
For details about settings of security applications, please see the documentation of the corresponding application.
- Click Save.
The modified settings will take effect either after the device is synchronized with the Administration Server (if the policy profile is active), or after an activation rule is triggered (if the policy profile is inactive).
Copying a policy profile
You can copy a policy profile to the current policy or to another, for example, if you want to have identical profiles for different policies. You can also use copying if you want to have two or more profiles that differ in only a small number of settings.
To copy a policy profile:
- Proceed to the list of profiles of a policy that you want.
The list of policy profiles appears. If the policy does not have profiles, an empty table appears.
- On the Policy profiles tab, select the policy profile that you want to copy.
- Click Copy.
- In the window that opens, select the policy to which you want to copy the profile.
You can copy a policy profile to the same policy or to a policy that you specify.
- Click Copy.
The policy profile is copied to the policy that you selected. The newly copied profile gets the lowest priority. If you copy the profile to the same policy, the name of the newly copied profile will be expanded with the () index, for example: (1), (2).
Later, you can change the settings of the profile, including its name and its priority; the original policy profile will not be changed in this case.
Creating a policy profile activation rule
To create a policy profile activation rule:
- Proceed to the list of profiles of a policy that you want.
The list of policy profiles appears.
- On the Policy profiles tab, click the policy profile for which you need to create an activation rule.
If the list of policy profiles is empty, you can create a policy profile.
- On the Activation rules tab, click the Add button.
The window with policy profile activation rules opens.
- Specify a name for the rule.
- Select the check boxes next to the conditions that must affect activation of the policy profile that you are creating:
- General rules for policy profile activation
For this option, specify at the next step:
- Rules for specific device owner
For this option, specify at the next step:
- Rules for hardware specifications
For this option, specify at the next step:
- Rules for role assignment
For this option, specify at the next step:
- Rules for tag usage
For this option, specify at the next step:
- Rules for Active Directory usage
For this option, specify at the next step:
The number of additional pages of the wizard depends on the settings that you select at the first step. You can modify policy profile activation rules later.
- General rules for policy profile activation
- Check the list of the configured parameters. If the list is correct, click Create.
The profile will be saved. The profile will be activated on the device when activation rules are triggered.
Policy profile activation rules created for the profile are displayed in the policy profile properties on the Activation rules tab. You can modify or remove any policy profile activation rule.
Multiple activation rules can be triggered simultaneously.
Deleting a policy profile
To delete a policy profile:
- Proceed to the list of profiles of a policy that you want.
The list of policy profiles appears.
- On the Policy profiles tab, select the check box next to the policy profile that you want to delete, and click Delete.
- In the window that opens, click Delete again.
The policy profile is deleted. If the policy is inherited by a lower-level group, the profile remains in that group, but becomes the policy profile of that group. This is done to eliminate significant change in settings of the managed applications installed on the devices of lower-level groups.