Contents
- Discovering networked devices and creating administration groups
- Scenario: Discovering networked devices
- Network polling
- Adjustment of distribution points and connection gateways
- Calculating the number and configuration of distribution points
- Standard configuration of distribution points: Single office
- Standard configuration of distribution points: Multiple small remote offices
- Assigning distribution points manually
- Modifying the list of distribution points for an administration group
- Using a distribution point as a push server
- Using the "Do not disconnect from the Administration Server" option to provide continuous connectivity between a managed device and the Administration Server
- Creating administration groups
- Creating device moving rules
- Copying device moving rules
- Adding devices to an administration group manually
- Moving devices or clusters to an administration group manually
- Configuring retention rules for unassigned devices
Discovering networked devices and creating administration groups
This section describes search and discovery of networked devices, as well as creating administration groups for these devices.
Kaspersky Security Center Cloud Console enables you to find devices on the basis of specified criteria. You can save search results to a text file.
The search and discovery feature enables you to find the following devices:
- Managed devices in administration groups of Kaspersky Security Center Cloud Console Administration Server and its secondary Administration Servers.
- Unassigned devices managed by Kaspersky Security Center Cloud Console Administration Server and its secondary Administration Servers.
Scenario: Discovering networked devices
You must perform device discovery before the initial deployment of the security applications. When all networked devices are discovered, you can get information about them and manage them through policies. Regular network polls are needed to discover if there are any new devices and whether the previously discovered devices are still on the network.
When you complete the scenario, device discovery is set up and will be conducted according to the specified schedule.
Prerequisites
In Kaspersky Security Center Cloud Console, device discovery is performed by distribution points. Before you start, do the following:
- Decide which devices will act as distribution points.
- Install Network Agents on the devices that you chose.
- Manually assign the devices to act as distribution points.
Stages
The scenario proceeds in stages:
- Choosing types of discovery
Decide which type(s) of discovery you want to use regularly.
- Configuring polls
In the properties of each distribution point, enable and configure the types of network polling that you chose: Windows network polling, domain controller polling, or IP range polling. Make sure that the poll schedule meets the needs of your organization.
If networked devices are included in a domain, it is recommended to use domain controller polling.
- Setting up rules for adding discovered devices to administration groups (optional)
If new devices appear on your network, they are discovered during regular polls and are automatically included in the Unassigned devices group. If you want, you can set up the rules for automatically moving these devices to the Managed devices group. You can also establish retention rules.
If you skip this rule-setting step, all the newly discovered devices go to the Unassigned devices group and stay there. If you want, you can move these devices to the Managed devices group manually. If you move the devices to the Managed devices group manually, you can analyze information about each device and decide whether you want to move it to an administration group, and, if so, to which group.
When a network polling operation is complete, check that the newly discovered devices are arranged according to the configured rules. If no rules are configured, the devices stay in the Unassigned devices group.
Network polling
Information about the structure of the network and devices on this network is received by Kaspersky Security Center Cloud Console through regular polling of the Windows network, IP ranges, Microsoft Active Directory domain controller and a Samba domain controller. For a Samba domain controller, Samba 4 is used as an Active Directory domain controller. Network polling can be started either manually or automatically according to a schedule.
Based on the results of this polling, Kaspersky Security Center Cloud Console updates the list of unassigned devices. You can also configure rules for newly discovered devices to be moved automatically to administration groups.
Kaspersky Security Center Cloud Console uses the following methods of network polling:
- IP range polling. Kaspersky Security Center Cloud Console polls the specified IP ranges using Internet Control Message Protocol (ICMP) packets and compiles a complete set of data on devices within those IP ranges.
- Windows network polling. You can run either of the two Windows network polls: fast or full. During a fast poll, Kaspersky Security Center Cloud Console only retrieves information from the list of the NetBIOS names of devices in all network domains and work groups. During a full poll, the following information is requested from each device: operating system (OS) name, IP address, DNS name, and NetBIOS name.
- Domain controllers polling. Information about the Active Directory unit structure and about DNS names of the devices from Active Directory groups is recorded to the Kaspersky Security Center Cloud Console database.
Polling results are shown in the Discovery & deployment → Discovery section separately for the Windows network polling and the Domain controllers polling methods.
Polling results for the IP range polling method are shown in the Discovery & deployment → Unassigned devices section.
One device can be shown in more than one detection area. If a device is detected in the HQ domain and its address is 192.168.0.1, the device will appear in both the Windows domains section and the Unassigned devices section. You can modify network polling settings for each polling method. For example, you may want to modify the polling schedule or to set whether to poll the entire Active Directory forest or only a specific domain.
Windows network polling
About Windows network polling
During a quick poll, the Administration Server only retrieves information from the list of the NetBIOS names of devices in all network domains and workgroups. During a full poll, the following information is requested from each client device:
- Operating system name
- IP address
- DNS name
- NetBIOS name
Both quick polls and full polls require the following:
- Ports UDP 137/138, TCP 139 must be available on the network.
- The Microsoft Computer Browser service must be used, and the primary browser computer must be enabled on the distribution point.
- The Microsoft Computer Browser service must be used, and the primary browser computer must be enabled on the client devices:
- On at least one device, if the number of networked devices does not exceed 32.
- On at least one device for each 32 networked devices.
The full poll can run only if the quick poll has run at least once.
Viewing and modifying the settings for Windows network polling
To modify the properties of Windows network polling:
- In the main menu, click the settings icon (
 ) next to the name of the required Administration Server.
 The Administration Server properties window opens.
- On the General tab, select the Distribution points section.
- Click the name of the distribution point that you want to use to poll the network.
The distribution point properties window opens.
- Select the Windows domains polling section.
- Enable or disable Windows network polling by using the Enable network polling toggle button.
- Configure the schedule for the quick polling and the full polling.
- Click the OK button.
The properties are saved and applied to all of the discovered Windows domains and workgroups.
Domain controller polling
Kaspersky Security Center Cloud Console supports polling of a Microsoft Active Directory domain controller and a Samba domain controller only by using a distribution point.
Kaspersky Security Center Cloud Console allows you to poll a Samba domain controller only by using a Linux distribution point. For a Samba domain controller, Samba 4 is used as an Active Directory domain controller.
When you poll a domain controller, a distribution point retrieves information about the domain structure, user accounts, security groups, and DNS names of the devices that are included in the domain. Domain controller polling is performed according to a schedule that you set.
Prerequisites
Before you poll a domain controller, ensure that the following protocols are enabled:
- Simple Authentication and Security Layer (SASL)
- Lightweight Directory Access Protocol (LDAP)
Ensure that the following ports are available on the domain controller device:
- 389 for SASL
- 636 for TLS
Domain controller polling by using a distribution point
You can also poll a domain controller by using a distribution point. A Windows- or Linux-based managed device can act as a distribution point.
For a Linux distribution point, polling of a Microsoft Active Directory domain controller and a Samba domain controller are supported.
For a Windows distribution point, only polling of a Microsoft Active Directory domain controller is supported.
Polling with a Mac distribution point is not supported.
To configure domain controller polling by using the distribution point:
- Open the distribution point properties.
- Select the Domain controller polling section.
- Select the Enable domain controller polling option.
- Select the domain controller that you want to poll.
If you use a Linux distribution point, in the Poll specified domains section, click Add, and then specify the address and user credentials of the domain controller.
If you use a Windows distribution point, you can select one of the following options:
- Poll current domain
- Poll entire domain forest
- Poll specified domains
- Click the Set polling schedule button to specify the polling schedule options if needed.
Polling starts only according to the specified schedule. Manual start of polling is not available.
After the polling is completed, the domain structure will be displayed in the Domain controllers section.
If you set up and enabled device moving rules, the newly discovered devices are automatically included in the Managed devices group. If no moving rules have been enabled, the newly discovered devices are automatically included in the Unassigned devices group.
The discovered user accounts can be used for domain authentication in Kaspersky Security Center Cloud Console.
Viewing the results of domain controller polling
To view the results of domain controller polling:
- In the main menu, go to Discovery & deployment → Discovery → Domain controllers.
The list of discovered organizational units is displayed.
- Select an organizational unit, and then click the Devices button.
The list of devices in the organizational unit is displayed.
You can search the list and filter the results.
IP range polling
Kaspersky Security Center Cloud Console attempts to perform reverse name resolution for every address from the specified range to a DNS name using standard DNS requests. If this operation succeeds, the server sends an ICMP ECHO REQUEST (the same as the ping command) to the received name. If the device responds, the information about it is added to the Kaspersky Security Center Cloud Console database. The reverse name resolution is necessary to exclude the network devices that can have an IP address but are not computers, for example, network printers or routers.
This polling method relies upon a correctly configured local DNS service. It must have a reverse lookup zone. If this zone is not configured, IP subnet polling will yield no results. On the networks where Active Directory is used, such a zone is maintained automatically. But on these networks, IP subnet polling does not provide more information than Active Directory polling. Moreover, administrators of small networks often do not configure the reverse lookup zone because it is not necessary for the work of many network services. For these reasons, IP subnet polling is disabled by default.
Initially, Kaspersky Security Center Cloud Console gets IP ranges for polling from the network settings of the distribution point device which is used for network polling. If the device address is 192.168.0.1 and the subnet mask is 255.255.255.0, Kaspersky Security Center Cloud Console includes the network 192.168.0.0/24 in the list of polling address automatically. Kaspersky Security Center Cloud Console polls all addresses from 192.168.0.1 to 192.168.0.254.
It is not recommended to use IP range polling if you use Windows network polling and/or Active Directory polling.
Viewing and modifying the settings for IP range polling
To view and modify the properties of IP range polling:
- In the main menu, click the settings icon () next to the name of the required Administration Server.
The Administration Server properties window opens.
- On the General tab, select the Distribution points section.
- Click the name of the distribution point that you want to use to poll the network.
The distribution point properties window opens.
- Select the IP range polling section.
- Enable or disable IP polling by using the Enable range polling toggle button.
- Configure the polling schedule. By default, IP polling runs every 420 minutes (seven hours).
- If necessary, add or modify IP ranges to poll.
When specifying the polling interval, make sure that this setting does not exceed the value of the IP address lifetime parameter. If an IP address is not verified by polling during the IP address lifetime, this IP address is automatically removed from the polling results. By default, the life span of the polling results is 24 hours, because dynamic IP addresses (assigned using Dynamic Host Configuration Protocol (DHCP)) change every 24 hours.
- Click the OK button.
The properties are saved and applied to all IP ranges.
Configuring a Samba domain controller
Kaspersky Security Center Cloud Console supports a Linux domain controller running only on Samba 4.
A Samba domain controller supports the same schema extensions as a Microsoft Active Directory domain controller. You can enable full compatibility of a Samba domain controller with a Microsoft Active Directory domain controller by using the Samba 4 schema extension. This is an optional action.
We recommend enabling full compatibility of a Samba domain controller with a Microsoft Active Directory domain controller. This will ensure the correct interaction between Kaspersky Security Center Cloud Console and the Samba domain controller.
To enable full compatibility of a Samba domain controller with a Microsoft Active Directory domain controller:
- Execute the following command to use the RFC2307 schema extension:
samba-tool domain provision --use-rfc2307 --interactive - Enable the schema update in a Samba domain controller. To do this, add the following line to the /etc/samba/smb.conf file:
dsdb:schema update allowed = trueIf the schema update completes with an error, you need to perform a full restore of the domain controller that acts as a schema master.
If you want to poll a Samba domain controller correctly, you have to specify the netbios name and workgroup parameters in the /etc/samba/smb.conf file.
Adding and modifying an IP range
Initially, Kaspersky Security Center Cloud Console gets IP ranges for polling from the network settings of the distribution point device which is used for network polling. If the device address is 192.168.0.1 and the subnet mask is 255.255.255.0, Kaspersky Security Center Cloud Console includes the network 192.168.0.0/24 in the list of polling address automatically. Kaspersky Security Center Cloud Console polls all addresses from 192.168.0.1 to 192.168.0.254. You can modify the automatically defined IP ranges or add custom IP ranges.
To add a new IP range:
- In the main menu, click the settings icon () next to the name of the required Administration Server.
The Administration Server properties window opens.
- On the General tab, select the Distribution points section.
- Click the name of the distribution point that you want to use to poll the network.
The distribution point properties window opens.
- Select the IP range polling section.
- To add a new IP range, click the Add button.
- In the window that opens, specify the following settings:
- Click the OK button.
The new IP range is added to the list of IP ranges.
When the polling is complete, you can view the list of discovered devices by using the Devices button. By default, the life span of the polling results is 24 hours and it is equal to the IP address lifetime setting.
Adjustment of distribution points and connection gateways
A structure of administration groups in Kaspersky Security Center Cloud Console serves the following functions:
- Sets the scope of policies
There is an alternate way of applying relevant settings on devices, by using policy profiles. In this case, the scope of policies is set with tags, device locations in Active Directory organizational units, membership in Active Directory security groups, etc.
- Sets the scope of group tasks
There is an approach to defining the scope of group tasks that is not based on a hierarchy of administration groups: use of tasks for device selections and tasks for specific devices.
- Sets access rights to devices and secondary Administration Servers
- Assigns distribution points
When building the structure of administration groups, you must take into account the topology of the organization's network for the optimum assignment of distribution points. The optimum distribution of distribution points enables you to save traffic in the organization's network.
Depending on the organizational schema and network topology, the following standard configurations can be applied to the structure of administration groups:
- Single office
- Multiple small remote offices
Devices functioning as distribution points must be protected, including physical protection, against any unauthorized access.
Calculating the number and configuration of distribution points
The more client devices a network contains, the more distribution points it requires. Use the tables below to calculate the number of distribution points required for your network.
Make sure that the devices that you intend to use as distribution points have sufficient volume of free disk space, are not shut down regularly, and have Sleep mode disabled.
Number of exclusively assigned distribution points on a network that contains a single network segment, based on the number of networked devices
Number of client devices in the network segment |
Number of distribution points |
|---|---|
Less than 300 |
0 (Do not assign distribution points) |
More than 300 |
Acceptable: (N/10,000 + 1), recommended: (N/5000 + 2), where N is the number of networked devices |
Number of exclusively assigned distribution points on a network that contains multiple network segments, based on the number of networked devices
Number of client devices per network segment |
Number of distribution points |
|---|---|
Less than 10 |
0 (Do not assign distribution points) |
10... 100 |
1 |
More than 100 |
Acceptable: (N/10,000 + 1), recommended: (N/5000 + 2), where N is the number of networked devices |
Using standard client devices (workstations) as distribution points
If you plan to use standard client devices (that is, workstations) as distribution points, we recommend that you assign distribution points as shown in the tables below in order to avoid excessive load on the communication channels and on Administration Server:
Number of workstations functioning as distribution points on a network that contains a single network segment, based on the number of networked devices
Number of client devices in the network segment |
Number of distribution points |
|---|---|
Less than 300 |
0 (Do not assign distribution points) |
More than 300 |
(N/300 + 1), where N is the number of networked devices; there must be at least 3 distribution points |
Number of workstations functioning as distribution points on a network that contains multiple network segments, based on the number of networked devices
Number of client devices per network segment |
Number of distribution points |
|---|---|
Less than 10 |
0 (Do not assign distribution points) |
10... 30 |
1 |
31... 300 |
2 |
More than 300 |
(N/300 + 1), where N is the number of networked devices; there must be at least 3 distribution points |
If a distribution point is not available, update Kaspersky databases, software modules, and applications manually or directly from the Kaspersky update servers.
Standard configuration of distribution points: Single office
In a standard "single-office" configuration, all devices are on the organization's network so they can "see" each other. The organization's network may consist of a few separate parts (networks or network segments) linked by narrow channels.
The following methods of building the structure of administration groups are possible:
- Building the structure of administration groups taking into account the network topology. The structure of administration groups may not reflect the network topology with absolute precision. A match between the separate parts of the network and certain administration groups would be enough.
- Building the structure of administration groups, without taking the network topology into account. In this case, you must assign one or several devices to act as distribution points for a root administration group in each of the separate parts of the network, for example, for the Managed devices group. All distribution points will be at the same level and will feature the same scope spanning all devices in the organization's network. In this case, each Network Agent will connect to the distribution point that has the shortest route. The route to a distribution point can be traced with the tracert utility.
Standard configuration of distribution points: Multiple small remote offices
This standard configuration provides for a number of small remote offices, which may communicate with the head office over the internet. Each remote office is located behind the NAT, that is, connection from one remote office to another is not possible because offices are isolated from one another.
The configuration must be reflected in the structure of administration groups: a separate administration group must be created for each remote office (groups Office 1 and Office 2 in the figure below).
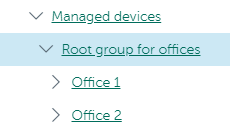
Remote offices are included in the administration group structure
One or multiple distribution points must be assigned to each administration group that correspond to an office. Distribution points must be devices at the remote office that have a sufficient amount of free disk space. Devices deployed in the Office 1 group, for example, will access distribution points assigned to the Office 1 administration group.
If some users move between offices physically, with their laptops, you must select two or more devices (in addition to the existing distribution points) in each remote office and assign them to act as distribution points for a top-level administration group (Root group for offices in the figure above).
Example: A laptop is deployed in the Office 1 administration group and then is moved physically to the office that corresponds to the Office 2 administration group. After the laptop is moved, Network Agent attempts to access the distribution points assigned to the Office 1 group, but those distribution points are unavailable. Then, Network Agent starts attempting to access the distribution points that have been assigned to the Root group for offices. Because remote offices are isolated from one another, attempts to access distribution points assigned to the Root group for offices administration group will only be successful when Network Agent attempts to access distribution points in the Office 2 group. That is, the laptop will remain in the administration group that corresponds to the initial office, but the laptop will use the distribution point of the office where it is physically located at the moment.
Assigning distribution points manually
Kaspersky Security Center Cloud Console enables you to manually assign devices to act as distribution points. We recommend that you calculate the number and configuration of distribution points required for your network.
Distribution point devices running macOS cannot download updates from Kaspersky update servers.
If one or more devices running macOS are within the scope of the Download updates to the repositories of distribution points task, the task completes with the Failed status, even if it has successfully completed on all Windows devices.
Devices functioning as distribution points must be protected, including physical protection, against any unauthorized access.
To manually assign a device to act as distribution point:
- In the main menu, click the settings icon () next to the name of the required Administration Server.
The Administration Server properties window opens.
- On the General tab, select the Distribution points section.
- Click the Assign button.
- Select the device that you want to make a distribution point.
When selecting a device, keep in mind the operation features of distribution points and the requirements set for the device that acts as distribution point.
- Select the administration group that you want to include in the scope of the selected distribution point.
- Click the Add button.
The distribution point that you have added will be displayed in the list of distribution points, in the Distribution points section.
- Select the newly added distribution point in the list to open its properties window.
- Configure the distribution point in the properties window:
- The General section contains the settings of interaction between the distribution point and client devices:
- In the Scope section, specify the scope to which the distribution point will distribute updates (administration groups and / or network location).
Only devices running a Windows operating system can determine their network location. Network location cannot be determined for devices running other operating systems.
- In the KSN Proxy section, you can configure the application to use the distribution point to forward KSN requests from the managed devices:
- Configure the polling of Windows domains, domain controller, and IP ranges by the distribution point:
- In the Advanced section, specify the folder that the distribution point must use to store distributed data:
- Click the OK button.
The selected devices act as distribution points.
Modifying the list of distribution points for an administration group
You can view the list of distribution points assigned to a specific administration group and modify the list by adding or removing distribution points.
To view and modify the list of distribution points assigned to an administration group:
- In the main menu, go to Assets (Devices) → Groups.
- In the administration group structure, select the administration group for which you want to view the assigned distribution points.
- Click the Distribution points tab.
- Add new distribution points for the administration group by using the Assign button or remove the assigned distribution points by using the Unassign button.
Depending on your modifications, the new distribution points are added to the list or existing distribution points are removed from the list.
Using a distribution point as a push server
In Kaspersky Security Center Cloud Console, a distribution point can work as a push server for Windows-based and Linux-based devices that are managed by Network Agent. A push server has the same scope of managed devices as the distribution point on which the push server is enabled. If you have several distribution points assigned for the same administration group, you can enable a push server on each of the distribution points. In this case, Administration Server balances the load between the distribution points.
You can use distribution points as push servers to ensure that continuous connectivity between a managed device and the Administration Server. Continuous connectivity is needed for some operations, such as running and stopping local tasks, receiving statistics for a managed application, or creating a tunnel. If you use a distribution point as a push server, you do not have to send packets to the UDP port of Network Agent.
To use a distribution point as a push server:
- In the main menu, click the settings icon () next to the name of the required Administration Server.
The Administration Server properties window opens.
- On the General tab, select the Distribution points section.
- Click the distribution point that you want to use as a push server.
- In the property list of the selected distribution point, go to the General section, and then enable the Run push server option.
The Push server port entry field becomes available.
- In the Push server port entry field, specify the port on the distribution point that client devices will use for connection. By default, port 13295 is used.
To establish connection between the distribution point acting as a push server and a managed device, you must manually add the specified push server port to the Microsoft Windows Firewall exclusion list.
- Click OK to exit the distribution point properties window, and then click Save to apply changes.
After you enable the Run push server option, the Do not disconnect from the Administration Server option is automatically enabled on the distribution point that acts as a push server. This option provides an early connection between Network Agent and the Administration Server.
- Open the Network Agent policy settings window.
- Go to Connectivity → Network, and then enable the Use distribution point to force connection to the Administration Server option. Close the lock for this option.
- Also in the Network subsection, you can disable the Use UDP port option. The configured push server will provide continuous connectivity between a managed device and the Administration Server instead of sending packets through the UDP port.
- Click OK to exit the window.
The distribution point starts acting as a push server. It can now send push notifications to client devices.
Using the "Do not disconnect from the Administration Server" option to provide continuous connectivity between a managed device and the Administration Server
If you do not use push servers, Kaspersky Security Center Cloud Console does not provide continuous connectivity between managed devices and the Administration Server. Network Agents on managed devices periodically establish connections and synchronize with the Administration Server. The interval between those synchronization sessions is defined in a Network Agent policy. If an early synchronization is required, the Administration Server (or a distribution point, if it is in use) sends a signed network packet over an IPv4 or IPv6 network to the UDP port of Network Agent. By default, the port number is 15000. If no connection through UDP is possible between the Administration Server and a managed device, synchronization will run at the next regular connection of Network Agent to the Administration Server within the synchronization interval.
Some operations cannot be performed without an early connection between Network Agent and the Administration Server, such as running and stopping local tasks, receiving statistics for a managed application, or creating a tunnel. To resolve this issue, if you are not using push servers, you can use the Do not disconnect from the Administration Server option to ensure continuous connectivity between a managed device and the Administration Server.
To provide continuous connectivity between a managed device and the Administration Server:
- Do one of the following:
- If the managed device accesses the Administration Server directly (that is, not via a distribution point):
- In the main menu, go to Devices → Managed devices.
- Click the name of the device with which you want to provide continuous connectivity.
The property window of the managed device opens.
- If the managed device accesses the Administration Server through a distribution point running in gateway mode, not directly:
- In the main menu, click the settings icon () next to the name of the required Administration Server.
The Administration Server properties window opens.
- On the General tab, select the Distribution points section.
- In the distribution point list, click the name of the required distribution point.
The properties window of the selected distribution point opens.
- In the main menu, click the settings icon (
- If the managed device accesses the Administration Server directly (that is, not via a distribution point):
- In the General section of the opened properties window, select the Do not disconnect from the Administration Server option.
Continuous connectivity is established between the managed device and the Administration Server.
The maximum total number of devices with the Do not disconnect from the Administration Server option selected is 300.
Creating administration groups
Initially, the hierarchy of administration groups contains the only administration group named Managed devices. When creating a hierarchy of administration groups, you can add devices and virtual machines to the Managed devices group and add subgroups. For each administration group, the properties window contains information about policies, tasks, and devices related to the group.
To create an administration group:
- In the main menu, go to Assets (Devices) → Hierarchy of groups.
- Select the check box next to the administration group for which you want to create a new subgroup.
- Click the Add button.
- Type a name for the new administration group.
- Click the Add button.
A new administration group with the specified name appears in the administration group hierarchy.
The application allows creation of a hierarchy of administration groups based on the structure of Active Directory or on the structure of the domain network. Also, you can create a structure of groups from a text file.
To create a structure of administration groups:
- In the main menu, go to Assets (Devices) → Hierarchy of groups.
- Click the Import button.
The New administration group structure wizard starts. Follow the instructions of the wizard.
Creating device moving rules
You can set up device moving rules, that is, rules that automatically allocate devices to administration groups.
To create a moving rule:
- In the main menu, go to Assets (Devices) → Moving rules.
- Click Add.
- In the window that opens, specify the following information on the General tab:
- On the Rule conditions tab, specify at least one criterion by which the devices are moved to an administration group.
- Click Save.
The moving rule is created. It is displayed in the list of moving rules.
The higher the position is on the list, the higher the priority of the rule. To increase or decrease the priority of a moving rule, move the rule up or down in the list, respectively, using the mouse.
If the Apply rule continuously option is selected, the moving rule is applied regardless of the priority settings. Such rules are applied according to the schedule which the Administration Server sets up automatically.
If the device attributes meet the conditions of multiple rules, the device is moved to the target group of the rule with the highest priority (that is, has the highest rank in the list of rules).
Copying device moving rules
You can copy moving rules, for example, if you want to have several identical rules for different target administration groups.
To copy an existing a moving rule:
- Do one of the following:
- In the main menu, go to Assets (Devices) → Moving rules.
- In the main menu, go to Discovery & deployment → Deployment & assignment → Moving rules.
The list of moving rules is displayed.
- Select the check box next to the rule you want to copy.
- Click Copy.
- In the window that opens, change the following information on the General tab—or make no changes if you only want to copy the rule without changing its settings:
- On the Rule conditions tab, specify at least one criterion for the devices that you want to be moved automatically.
- Click Save.
The new moving rule is created. It is displayed in the list of moving rules.
Adding devices to an administration group manually
You can move devices to administration groups automatically by creating device moving rules or manually by moving devices from one administration group to another or by adding devices to a selected administration group. This section describes how to manually add devices to an administration group.
To add manually one or more devices to a selected administration group:
- In the main menu, go to Assets (Devices) → Managed devices.
- Click the Current path:
<current path>link above the list. - In the window that opens, select the administration group to which you want to add the devices.
- Click the Add devices button.
The Move devices wizard starts.
- Make a list of the devices that you want to add to the administration group.
You can add only devices for which information has already been added to the Administration Server database either upon connection of the device or after device discovery.
Select how you want to add devices to the list:
- Click the Add devices button, and then specify the devices in one of the following ways:
- Select devices from the list of devices detected by the Administration Server.
- Specify a device IP address or an IP range.
- Specify the NetBIOS name or DNS name of a device.
The device name field must not contain space characters, backspace characters, or the following prohibited characters: , \ / * ' " ; : & ` ~ ! @ # $ ^ ( ) = + [ ] { } | < > %
- Click the Import devices from file button to import a list of devices from a .txt file. Each device address or name must be specified on a separate line.
The file must not contain space characters, backspace characters, or the following prohibited characters: , \ / * ' " ; : & ` ~ ! @ # $ ^ ( ) = + [ ] { } | < > %
- Click the Add devices button, and then specify the devices in one of the following ways:
- View the list of devices to be added to the administration group. You can edit the list by adding or removing devices.
- After making sure that the list is correct, click the Next button.
The wizard processes the device list and displays the result. The successfully processed devices are added to the administration group and are displayed in the list of devices under names generated by Administration Server.
Moving devices or clusters to an administration group manually
You can move devices from one administration group to another, or from the group of unassigned devices to an administration group.
You can also move clusters or server arrays from one administration group to another. When you move a cluster or server array to another group, all of its nodes move with it, because a cluster and any of its nodes always belong to the same administration group. When you select a single cluster node on the Devices tab, the Move to group button becomes unavailable.
To move one or several devices or clusters to a selected administration group:
- Open the administration group from which you want to move the devices. To do this, perform one of the following:
- To open an administration group, in the main menu, go to Assets (Devices) → Groups → <group name> → Managed devices.
- To open the Unassigned devices group, in the main menu, go to Discovery & deployment → Unassigned devices.
- If the administration group contains clusters or server arrays, the Managed devices section is divided into two tabs—the Devices tab and the Clusters and server arrays tab. Open the tab for the object that you want to move.
- Select the check boxes next to the devices or clusters that you want to move to a different group.
- Click the Move to group button.
- In the hierarchy of administration groups, select the check box next to the administration group to which you want to move the selected devices or clusters.
- Click the Move button.
The selected devices or clusters are moved to the selected administration group.
Configuring retention rules for unassigned devices
After Windows network polling is complete, the found devices are placed into subgroups of the Unassigned devices administration group. This administration group can be found at Discovery & deployment → Discovery → Windows domains. The Windows domains folder is the parent group. It contains child groups named after the corresponding domains and workgroups that have been found during the poll. The parent group may also contain the administration group of mobile devices. You can configure the retention rules of the unassigned devices for the parent group and for each of the child groups. The retention rules do not depend on the device discovery settings and work even if the device discovery is disabled.
The device retention rules do not affect the devices that have one or more drives encrypted with full disk encryption. Such devices are not deleted automatically—you can only delete them manually. If you need to delete a device with an encrypted drive, first decrypt the drive, and then delete the device.
To configure retention rules for unassigned devices:
- In the main menu, go to Discovery & deployment → Discovery → Windows domains.
- Do one of the following:
- To configure settings of the parent group, click the Properties button.
The Windows domain properties window opens.
- To configure settings of a child group, click its name.
The child group properties window opens.
- To configure settings of the parent group, click the Properties button.
- Define the following settings:
- Click the Accept button.
Your changes are saved and applied.
Page top