Contents
- Kaspersky Secure Mobility Management help
- What's new
- Working in MMC-based Administration Console
- Key use cases
- About Kaspersky Secure Mobility Management
- Distribution kit
- About Kaspersky Endpoint Security for Android app
- About Kaspersky Device Management for iOS
- About the Kaspersky Endpoint Security for Android Administration Plug-in
- About the Kaspersky Device Management for iOS Administration Plug-in
- Hardware and software requirements
- Known issues and considerations
- Deployment
- Solution architecture
- Deployment scenarios for Kaspersky Endpoint Security for Android
- Deployment scenarios for iOS MDM profile
- Preparing the Administration Console for deployment of the integrated solution
- Configuring Administration Server settings for connection of mobile devices
- Configuring a connection gateway to connect mobile devices to Kaspersky Security Center Administration Server
- Displaying the Mobile Device Management folder in the Administration Console
- Creating an administration group
- Creating a rule for device automatic allocating to administration groups
- Working with certificates of mobile devices
- Deploying mobile device management systems
- Scenario: Mobile Device Management deployment
- Enabling Mobile Device Management
- Deploying a management system using the iOS MDM protocol
- iOS MDM Server deployment scenarios
- Simplified deployment scheme
- Deployment scheme involving Kerberos constrained delegation (KCD)
- Enabling support of Kerberos Constrained Delegation
- Installing iOS MDM Server
- Receiving an APNs certificate
- Renewing an APNs certificate
- Configuring a reserve iOS MDM Server certificate
- Installing an APNs certificate on an iOS MDM Server
- Configuring access to Apple Push Notification service
- Connecting KES devices to the Administration Server
- Disabling Mobile Device Management
- Installing Kaspersky Endpoint Security for Android
- Permissions
- Installation of Kaspersky Endpoint Security for Android on personal devices
- Installation of Kaspersky Endpoint Security for Android in device owner mode
- Installation of Kaspersky Endpoint Security for Android in device owner mode in a closed network
- Other methods of installation of Kaspersky Endpoint Security for Android
- Configuring synchronization settings
- Activating the Kaspersky Endpoint Security for Android app
- Installing an iOS MDM profile
- Installing administration plug-ins
- Updating a previous version of the application
- Removing Kaspersky Endpoint Security for Android
- Configuration and Management
- Getting Started
- Control
- Protection
- Configuring anti-malware protection on Android devices
- Protecting Android devices on the internet
- Protection of stolen or lost device data
- Configuring device unlock password strength
- Configuring a virtual private network (VPN)
- Configuring Firewall on Android devices (only Samsung)
- Protecting Kaspersky Endpoint Security for Android against removal
- Detecting device hacks (root)
- Configuring a global HTTP proxy on iOS MDM devices
- Adding security certificates to iOS MDM devices
- Adding a SCEP profile to iOS MDM devices
- Restricting SD card usage (only Samsung)
- Management of mobile devices
- Managing KES devices
- Managing iOS MDM devices
- Signing an iOS MDM profile by a certificate
- Adding a configuration profile
- Installing a configuration profile on a device
- Removing the configuration profile from a device
- Adding a provisioning profile
- Installing a provisioning profile to a device
- Removing a provisioning profile from a device
- Configuring managed apps
- Installing an app on a mobile device
- Removing an app from a device
- Installing and uninstalling apps on a group of iOS MDM devices
- Configuring roaming on an iOS MDM mobile device
- Viewing information about an iOS MDM device
- Disconnecting an iOS MDM device from management
- Configuring kiosk mode for iOS MDM devices
- Management of mobile device settings
- Configuring connection to a Wi-Fi network
- Configuring email
- Configuring device status in Kaspersky Security Center
- Managing app configurations
- Managing app permissions
- Creating a report on installed mobile apps
- Installing root certificates on Android devices
- Configuring notifications for Kaspersky Endpoint Security for Android
- Key features of mobile device management in MMC-based Administration Console
- Connecting iOS MDM devices to AirPlay
- Connecting iOS MDM devices to AirPrint
- Bypassing the Activation Lock on supervised iOS devices
- Configuring the Access Point Name (APN)
- Configuring the Android work profile
- Adding an LDAP account
- Adding a calendar account
- Adding a contacts account
- Configuring calendar subscription
- Managing web clips
- Setting wallpaper
- Adding fonts
- Working with commands for mobile devices
- Managing the app by using third-party EMM systems (Android only)
- Network load
- Participating in Kaspersky Security Network
- Data provision to third-party services
- Global acceptance of additional Statements
- Samsung KNOX
- Appendices
- Using the Kaspersky Endpoint Security for Android app
- App features
- Main window at a glance
- Status bar icon
- Device scan
- Running a scheduled scan
- Changing the Protection mode
- Anti-malware database updates
- Scheduled database update
- Things to do if your device gets lost or stolen
- Web Protection
- Get Certificate
- Synchronizing with Kaspersky Security Center
- Activating the Kaspersky Endpoint Security for Android app without Kaspersky Security Center
- Installing the app in device owner mode
- Installing root certificates on the device
- Enabling accessibility on Android 13 or later
- Enabling accessibility for the app on Android 13
- Updating the app
- Removing the app
- Applications with a briefcase icon
- KNOX app
- Using the Kaspersky Security for iOS app
- Working in Kaspersky Security Center Web Console and Kaspersky Security Center Cloud Console
- About mobile device management in Kaspersky Security Center Web Console and Cloud Console
- Distribution kit
- Key features of mobile device management in Kaspersky Security Center Web Console and Cloud Console
- About the Kaspersky Endpoint Security for Android app
- About the Kaspersky Security for iOS app
- About the Kaspersky Security for Mobile (Devices) plug-in
- About the Kaspersky Security for Mobile (Policies) plug-in
- Hardware and software requirements
- Known issues and considerations
- Deploying a mobile device management solution in Kaspersky Security Center Web Console or Cloud Console
- Managing mobile devices in Kaspersky Security Center Web Console and Cloud Console
- Managing group policies
- Defining policy settings
- Configuring anti-malware protection
- Defining device unlock settings
- Configuring protection of stolen or lost device data
- Configuring app control
- Configuring compliance control of mobile devices with corporate security requirements
- Configuring user access to websites
- Configuring feature restrictions
- Protecting Kaspersky Endpoint Security for Android against removal
- Configuring synchronization of mobile devices with Kaspersky Security Center
- Kaspersky Security Network
- Exchanging information with Google Analytics for Firebase, Firebase Performance Monitoring, and Crashlytics
- Configuring notifications on mobile devices
- Detecting device hacks
- Defining licensing settings
- Configuring events
- Configuring events about the installation, update, and removal of apps on users' devices
- Network load
- About mobile device management in Kaspersky Security Center Web Console and Cloud Console
- Application licensing
- Comparison of solution features depending on the management tools
- Contact Technical Support
- Sources of information about the application
- Glossary
- Activating the application
- Activation code
- Administration group
- Administration Server
- Administrator's workstation
- Android work profile
- Anti-malware databases
- Apple Push Notification service (APNs) certificate
- Application management plug-in
- Certificate Signing Request
- Compliance control
- Device administrator
- End User License Agreement
- Group task
- IMAP
- Installation package
- iOS MDM device
- iOS MDM profile
- iOS MDM Server
- Kaspersky categories
- Kaspersky Private Security Network (KPSN)
- Kaspersky Security Center Administrator
- Kaspersky Security Center Web Server
- Kaspersky Security Network (KSN)
- Kaspersky update servers
- KES device
- Key file
- License
- License term
- Malware
- Manifest file
- Network Agent
- Phishing
- Policy
- POP3
- Provisioning profile
- Proxy server
- Quarantine
- SSL
- Standalone installation package
- Subscription
- Supervised device
- Unlock code
- Virtual Administration Server
- Information about third-party code
- Trademark notices
The help for this version of the solution is no longer updated, so it may contain outdated information. For up-to-date information about the solution refer to the Kaspersky Secure Mobility Management 4.1 Help.
Kaspersky Secure Mobility Management help
|
Find out what's new in the latest solution release. |
|
Set up device protection Manage mobile device protection remotely. Features include Anti-Malware, Web Protection, Anti-Theft, and more. |
|
Learn about various components, depending on the chosen application version. |
|
Set up device settings Manage mobile devices remotely: configure Wi-Fi, VPN, email, root certificates on Android devices, web clips, and more. |
|
Deployment Learn how to deploy solution in your organization, including preparing the Administration Console, deploying Kaspersky Endpoint Security for Android, and the MDM profile for iOS devices. |
|
Set up device control Monitor mobile devices remotely, including configuring restrictions, user access to websites, Compliance Control, App Control, and more. |
|
Remotely manage mobile devices with mobile commands. Lock, Wipe corporate data, Locate, Mugshot, Alarm, and more. |
|
Set up device owner mode Manage Android operating system restrictions, Google Chrome settings, Kiosk mode, and more. |
|
Android work profile Discover the benefits of Android work profile and learn how to configure it for your device. |
|
Other Manage the security of your Android devices using a third-party EMM solution, or install our solution via KNOX for enhanced security on Samsung devices. |
|
Corporate App Catalog Create a customized corporate app catalog and use a browser to download apps from the catalog to users' devices. |
|
|


The help for this version of the solution is no longer updated, so it may contain outdated information. For up-to-date information about the solution refer to the Kaspersky Secure Mobility Management 4.1 Help.
What's new
Version 4.0
In this release, we added some features to the plug-in of MMC-based Administration Console for managing Android devices via Kaspersky Endpoint Security for Android app:
- New features for App Control:
- You can configure a report on the apps installed on users' devices. This report is available in the list of reports in Kaspersky Security Center. The following options are available:
- Send data on installed apps.
- Send data on system apps.
- Send data on service apps.
- You can configure a report on the apps installed on users' devices. This report is available in the list of reports in Kaspersky Security Center. The following options are available:
- New rules for Compliance Control:
- You can check if the device is within or outside the specified geofence areas and view a geofence area on the map in the Yandex.Maps program.
- You can check if the Kaspersky Endpoint Security for Android app has access to precise or background location of a device.
- You can set the continuous actions to be performed on the device if the specified non-compliance criterion is detected. These actions are as follows:
- Prohibit safe boot.
- Prohibit use of camera.
- Prohibit use of Bluetooth.
- Prohibit use of Wi-Fi.
- Prohibit USB debugging features.
- Prohibit airplane mode.
- New features for Web Protection:
- Web Protection and Web Control are now available in device owner mode without requesting the Accessibility rights.
- New commands for Android devices:
- Send message (this command sends message to the user's mobile device).
- Get device location history (this command displays the user's mobile device location history for the last 14 days).
- Other improvements:
- You can configure permission granting rules for apps installed on devices operating in device owner mode or for apps installed in an Android work profile.
This release also includes the following new features in the plug-in of MMC-based Administration Console for managing iOS MDM devices:
- The Wipe corporate data action in Compliance Control when a user's account is disabled in Active Directory.
The help for this version of the solution is no longer updated, so it may contain outdated information. For up-to-date information about the solution refer to the Kaspersky Secure Mobility Management 4.1 Help.
Working in MMC-based Administration Console
This Help section describes protection and management of mobile devices by using the MMC-based Administration Console of Kaspersky Security Center.
The help for this version of the solution is no longer updated, so it may contain outdated information. For up-to-date information about the solution refer to the Kaspersky Secure Mobility Management 4.1 Help.
Key use cases
 INSTALLATION
 PROTECTION
 USING THIRD-PARTY SOLUTIONS
 CONTROL
 MANAGEMENT
The help for this version of the solution is no longer updated, so it may contain outdated information. For up-to-date information about the solution refer to the Kaspersky Secure Mobility Management 4.1 Help.
About Kaspersky Secure Mobility Management
Kaspersky Secure Mobility Management is an integrated solution for protecting and managing corporate mobile devices as well as personal mobile devices used by company employees for corporate purposes.
Kaspersky Secure Mobility Management includes the following components:
- Kaspersky Endpoint Security for Android mobile app
The Kaspersky Endpoint Security for Android app ensures protection of mobile devices against web threats, viruses, and other programs that pose threats.
- Kaspersky Endpoint Security for Android Administration Plug-in
The Administration Plug-in of Kaspersky Endpoint Security for Android provides the interface for managing mobile devices and mobile apps installed on them through the Administration Console of Kaspersky Security Center.
- Kaspersky Device Management for iOS Administration Plug-in
The Kaspersky Device Management for iOS Administration Plug-in lets you define the configuration settings for devices connected to Kaspersky Security Center via the iOS MDM protocol (hereinafter referred to as "iOS MDM devices"), without using the iPhone Configuration Utility.
The administration plug-ins are integrated into the Kaspersky Security Center remote administration system. The administrator can use a single Administration Console of Kaspersky Security Center to manage all mobile device on the corporate network as well as client computers and virtual systems. After you connect mobile devices to the Administration Server, they become managed. The administrator can remotely monitor managed devices.
The Kaspersky Endpoint Security for Android mobile app may also operate as part of the Kaspersky Endpoint Security Cloud remote administration system. For more details on working with apps through Kaspersky Endpoint Security Cloud, please refer to Kaspersky Endpoint Security Cloud Online Help.
The Kaspersky Endpoint Security for Android mobile app can also operate as part of third-party EMM solutions of AppConfig Community participants.
The help for this version of the solution is no longer updated, so it may contain outdated information. For up-to-date information about the solution refer to the Kaspersky Secure Mobility Management 4.1 Help.
Distribution kit
The Kaspersky Secure Mobility Management distribution kit may include various components, depending on the chosen application version.
Kaspersky Security Center
ksc_14_<version>_full_<language>.exeKaspersky Security Center installer. This is a special version that is customized specially for Kaspersky Secure Mobility Management.
ksc_14_<version>_Console_<language>.exeInstaller of MMC-based Administration Console. This is a special version that is customized specially for Kaspersky Secure Mobility Management.
You can install Administration Console on another device and manage Kaspersky Security Center Administration Server remotely.
Mobile device management in MMC-based Administration Console
klcfginst.exeInstaller of Kaspersky Endpoint Security for Android Administration Plug-in.
klmdminst.exeInstaller of Kaspersky Device Management for iOS Administration Plug-in.
Mobile device management in Kaspersky Security Center Web Console
on_prem_ksm_devices_<version>.zipArchive that contains the files required for the installation of the Kaspersky Security for Mobile (Devices) plug-in:
plugin.zipArchive that contains the Kaspersky Security for Mobile (Devices) plug-in.
signature.txtFile that contains the signature for the Kaspersky Security for Mobile (Devices) plug-in.
on_prem_ksm_policies_<version>.zipArchive that contains the files required for the installation of the Kaspersky Security for Mobile (Policies) plug-in:
plugin.zipArchive that contains the Kaspersky Security for Mobile (Policies) plug-in.
signature.txtFile that contains the signature for the Kaspersky Security for Mobile (Policies) plug-in.
Mobile device management in Kaspersky Security Center Cloud Console
To manage mobile device in Kaspersky Security Center Cloud Console, you do not need to download a distribution package. You only need to create an account in Kaspersky Security Center Cloud Console. For more information about creating an account, please refer to Kaspersky Security Center Cloud Console Help.
File of the Kaspersky Endpoint Security for Android app
kesandroid10<version><languages>.apk—Android package file of the Kaspersky Endpoint Security for Android app.
File of Corporate App Catalog
Install_<version>.exe—Distribution package of Corporate App Catalog. The package includes the following components:
- Corporate App Catalog
- Corporate App Catalog Management Console
- Apache server
For more information about installing Corporate App Catalog, please refer to Corporate App Catalog Help.
Auxiliary files
sc_package_<languages>.exeSelf-extracting archive that contains the files required for installing the Kaspersky Endpoint Security for Android app by creating installation packages:
adb.exe, AdbWinApi.dll, AdbWinUsbApi.dllFiles required for creating installation packages.
installer.iniConfiguration file that contains Administration Server connection settings.
kesandroid10<version><languages>.apkAndroid package file of the Kaspersky Endpoint Security for Android app.
kmlisten.exeUtility for delivering installation packages through the administrator's computer.
kmlisten.iniConfiguration file that contains the settings for the
kmlisten.exeutility.kmlisten.kpdApplication description file.
If you create an installation package with the
sc_package.exearchive in the Kaspersky Security Center version earlier than 14.2, the installation of Kaspersky Endpoint Security for Android app will fail on devices running Android 10 or later. To avoid this issue, please upgrade to Kaspersky Security Center 14.2 or contact Technical Support to receive an appropriate version of the archive.
Documentation
- Help for Kaspersky Secure Mobility Management.
The help for this version of the solution is no longer updated, so it may contain outdated information. For up-to-date information about the solution refer to the Kaspersky Secure Mobility Management 4.1 Help.
About Kaspersky Endpoint Security for Android app
The Kaspersky Endpoint Security for Android app ensures protection of mobile devices against web threats, viruses, and other programs that pose threats.
Kaspersky Endpoint Security for Android app includes the following components:
- Anti-Malware. It allows you to detect and neutralize threats on your device by using the anti-malware databases and the Kaspersky Security Network cloud service. Anti-Malware includes the following components:
- Protection. Detects threats in open files, scans new apps, and prevents device infection in real time.
- Scan. It is started on demand for the entire file system, only for installed apps, or a selected file or folder.
- Update. Update allows you to download new anti-malware databases for the application.
- Anti-Theft. This component protects information on the device against unauthorized access in case the device is lost or stolen. This component lets you send the following commands to the device:
- Locate to get the coordinates of the device's location.
- Alarm to make the device sound a loud alarm.
- Mugshot to make the device take pictures with the frontal camera if someone attempts to unlock it.
- Wipe corporate data to protect sensitive company information.
- Web Protection. This component blocks malicious sites designed to spread malicious code. Web Protection also blocks fake (phishing) websites designed to steal confidential data of the user (for example, passwords to online banking or e-money systems) and access the user's financial info. Web Protection scans websites before you open them using the Kaspersky Security Network cloud service. After scanning, Web Protection allows trustworthy websites to load and blocks malicious websites. Web Protection also supports website filtering by categories defined in Kaspersky Security Network cloud service. This allows the administrator to restrict user access to certain categories of web pages (for example, web pages from the "Gambling, lotteries, sweepstakes" or "Internet communication" categories).
- App Control. This component lets you install recommended and required apps to your device via a direct link to the distribution package or a link to Google Play. App Control lets you remove blocked apps that violate corporate security requirements.
- Compliance Control. This component lets you check managed devices for compliance with corporate security requirements and impose restrictions on certain functions of non-compliant devices.
You can also install the Kaspersky Endpoint Security for Android app in device owner mode. This will give you full control over company-owned Android devices and let you configure a wide range of device settings. In device owner mode, you can:
- Restrict Android operating system features.
- Configure Google Chrome settings.
- Configure app startup settings in App Control.
- Limit the set of apps that are available to a device user in Kiosk mode.
- Configure Exchange ActiveSync settings for Gmail.
- Configure the connection to an NDES/SCEP server.
- Install root certificates on devices.
The help for this version of the solution is no longer updated, so it may contain outdated information. For up-to-date information about the solution refer to the Kaspersky Secure Mobility Management 4.1 Help.
About Kaspersky Device Management for iOS
Kaspersky Device Management for iOS ensures protection and control of mobile devices that are connected to Kaspersky Security Center and includes device management features, such as:
- Password protection. This feature allows you to set password complexity requirements so that users use complex passwords compliant with corporate password policy.
- Network management. This feature allows you to add approved VPN and Wi-Fi networks or restrict access to others.
- Wipe corporate data. In case the device is lost or stolen, you can send the Wipe command to it to protect sensitive company information.
- Web Protection. This component blocks malicious sites designed to spread malicious code. Web Protection also blocks fake (phishing) websites designed to steal confidential data of the user (for example, passwords to online banking or e-money systems) and access the user's financial info. Web Protection scans websites before you open them using the Kaspersky Security Network cloud service. After scanning, Web Protection allows trustworthy websites to load and blocks malicious websites. Web Protection also supports website filtering by categories defined in Kaspersky Security Network cloud service. This allows the administrator to restrict user access to certain categories of web pages (for example, web pages from the "Gambling, lotteries, sweepstakes" or "Internet communication" categories).
- Applications restrictions. This component lets you control whether device native apps, such as iTunes, Safari, or Game Center can be used on a supervised device.
- Feature restrictions. This component allows to check managed devices for compliance with the corporate security requirements and impose restrictions on certain functions of non-compliant devices.
- Compliance Control. This component monitors iOS MDM devices for compliance with corporate security requirements and takes actions in case of non-compliance. Compliance control is based on a list of rules. Each rule includes the following components:
- Status (whether the rule is enabled or disabled).
- Device check criteria (for example, absence of the specified apps or operating system version).
- Actions performed on the device in case of non-compliance (for example, wipe corporate data or send an email message to the user).
The help for this version of the solution is no longer updated, so it may contain outdated information. For up-to-date information about the solution refer to the Kaspersky Secure Mobility Management 4.1 Help.
About the Kaspersky Endpoint Security for Android Administration Plug-in
The Administration Plug-in of Kaspersky Endpoint Security for Android provides the interface for managing mobile devices and mobile apps installed on them through the Administration Console of Kaspersky Security Center. The Kaspersky Endpoint Security for Android Administration Plug-in can be used to:
- Create group security policies for mobile devices.
- Remotely configure the operating settings of the Kaspersky Endpoint Security for Android app on users' mobile devices.
- Receive reports and statistics on the operation of the Kaspersky Endpoint Security for Android mobile app on users' devices.
The Kaspersky Endpoint Security for Android Administration Plug-in is installed by default when deploying Kaspersky Security Center. The plug-in does not require individual installation.
Page top
The help for this version of the solution is no longer updated, so it may contain outdated information. For up-to-date information about the solution refer to the Kaspersky Secure Mobility Management 4.1 Help.
About the Kaspersky Device Management for iOS Administration Plug-in
The Administration Plug-in of Kaspersky Device Management for iOS provides an interface for managing mobile devices connected by means of the iOS MDM protocol through the Administration Console of Kaspersky Security Center. The Kaspersky Device Management for iOS Administration Plug-in can be used to do the following:
- Create group security policies for mobile devices.
- Remotely configure devices connected by using the iOS MDM protocol (hereinafter referred to as "iOS MDM devices").
For more details on connecting mobile devices to Kaspersky Security Center by using the iOS MDM protocol, please refer to the "Managing iOS MDM devices" section.
The Kaspersky Device Management for iOS Administration Plug-in is installed by default when deploying Kaspersky Security Center. The plug-in does not require separate installation.
Page top
The help for this version of the solution is no longer updated, so it may contain outdated information. For up-to-date information about the solution refer to the Kaspersky Secure Mobility Management 4.1 Help.
Hardware and software requirements
This section lists the hardware and software requirements for the administrator's computer that is used to deploy the apps on mobile devices, as well as the mobile device operating systems supported by Kaspersky Secure Mobility Management.
Hardware and software requirements for the administrator's computer
To deploy the comprehensive solution Kaspersky Secure Mobility Management, the administrator's computer must meet the hardware requirements of Kaspersky Security Center. For more details on using the hardware requirements of Kaspersky Security Center, please refer to Kaspersky Security Center Help.
To work with the Administration Plug-in of Kaspersky Endpoint Security for Android, the Administration Console of Kaspersky Security Center version 14.2 or later must be installed on the administrator's computer.
To work with the Kaspersky Device Management for iOS Administration Plug-in, the administrator's computer must meet the following software requirements:
- Administration Console of Kaspersky Security Center 14.2 or later
- iOS MDM Server component
- Instruction set of version SSE2 or more recent version
To deploy the Kaspersky Endpoint Security for Android mobile app via the Administration Server, the administrator's computer must meet the following software requirements:
- Kaspersky Security Center 14.2 or later
- Administration Plug-in for Kaspersky Endpoint Security for Android
There are no software requirements for the administrator's computer when the Kaspersky Endpoint Security for Android mobile app is deployed from the relevant online stores.
The Kaspersky Endpoint Security for Android mobile app can also be used as part of the Kaspersky Endpoint Security Cloud remote administration system (Version 6.0 and above). For more details on working with apps through Kaspersky Endpoint Security Cloud, please refer to Kaspersky Endpoint Security Cloud Help.
The Kaspersky Endpoint Security for Android mobile app can function within third-party EMM systems:
- VMware AirWatch 9.3 or later
- MobileIron 10.0 or later
- IBM MaaS360 10.68 or later
- Microsoft Intune 1908 or later
- SOTI MobiControl 14.1.4 (1693) or later
Hardware and software requirements for the user's mobile device to support installation of the Kaspersky Endpoint Security for Android app
The Kaspersky Endpoint Security for Android app has the following hardware and software requirements:
- Smartphone or tablet with a screen resolution of 320x480 pixels or higher
- 65 MB of free disk space in the main memory of the device
- Android 5.0 or later (including Android 12L, excluding Go Edition)
- x86, x86-64, Arm5, Arm6, Arm7, or Arm8 processor architecture
The app can be installed only to the main memory of the device.
Hardware and Software Requirements for an iOS MDM Profile
For an iOS MDM profile, the device must meet the following hardware and software requirements:
- iOS 10–17 or iPadOS 13–17
- Internet connection
The help for this version of the solution is no longer updated, so it may contain outdated information. For up-to-date information about the solution refer to the Kaspersky Secure Mobility Management 4.1 Help.
Known issues and considerations
The following known issues are non-critical for the operation of the solution.
Known issues when installing apps
- Kaspersky Endpoint Security for Android is installed only in the main memory of the device.
- On devices running Android 7.0, an error may occur during attempts to disable administrator rights for Kaspersky Endpoint Security for Android in device settings if Kaspersky Endpoint Security for Android is prohibited from overlaying on other windows. This issue is caused by a well-known defect in Android 7.
- Kaspersky Endpoint Security for Android on devices running Android 7.0 or later does not support multi-window mode.
- Kaspersky Endpoint Security for Android does not work on Chromebook devices running the Chrome operating system.
- Kaspersky Endpoint Security for Android does not work on devices running Android (Go edition) operating systems.
- When using the Kaspersky Endpoint Security for Android app with third-party EMM systems (for example, VMWare AirWatch), only the Anti-Malware and Web Protection components are available. The administrator can configure the settings of Anti-Malware and Web Protection in the EMM system console. In this case, notifications about app operation are available only in the interface of the Kaspersky Endpoint Security for Android app (Reports).
Known issues when upgrading the app version
- You can upgrade Kaspersky Endpoint Security for Android only to a more recent version of the app. Kaspersky Endpoint Security for Android cannot be downgraded to an older version.
- To upgrade Kaspersky Endpoint Security for Android using a standalone installation package, installation of apps from unknown sources must be allowed on the user's mobile device.
- You can update through Google Play if Kaspersky Endpoint Security for Android was installed from Google Play. If the app was installed using another method, you cannot update through Google Play.
- You can update through Kaspersky Security Center if Kaspersky Endpoint Security for Android was installed through Kaspersky Security Center. If the app was installed from Google Play, you cannot update the app through Kaspersky Security Center.
- After you upgrade administration plug-ins to Technical Release 33, the Kaspersky Endpoint Security for Android app must also be upgraded to Technical Release 33. Otherwise, you will not be able to activate Samsung KNOX on some of your users' devices.
Known issues in Anti-Malware operation
- Due to technical limitations, Kaspersky Endpoint Security for Android cannot scan files with a size of 2 GB or more. During a scan, the app skips such files without notifying you that such files were skipped.
- For additional analysis of a device for new threats whose information has not yet been added to anti-malware databases, you must enable the use of Kaspersky Security Network. Kaspersky Security Network (KSN) is an infrastructure of cloud services providing access to Kaspersky online knowledge base with information about the reputation of files, web resources, and software. To use KSN, the mobile device must be connected to the internet.
- In some cases, updating anti-malware databases from the Administration Server on a mobile device may fail. In this case, run the anti-malware database update task on the Administration Server.
- On some devices, Kaspersky Endpoint Security for Android does not detect devices connected over USB OTG. It is not possible to run a malware scan on such devices.
- On devices running Android 11 or later, the Kaspersky Endpoint Security for Android app can't scan the "Android/data" and "Android/obb" folders and detect malware in them due to technical limitations.
- On devices running Android 11 or later, the user must grant the "Allow access to manage all files" permission.
- On devices running Android 7.0 or later, the configuration window for the malware scan run schedule might be incorrectly displayed (management elements are not shown). This issue is caused by a well-known defect in Android 7.
- On devices running Android 7.0, real-time protection in the extended mode does not detect threats in files that are stored on an external SD card.
- On devices running Android 6, Kaspersky Endpoint Security for Android does not detect the downloading of a malicious file to the device memory. A malicious file may be detected by Anti-Malware when the file is run, or during a malware scan of the device. This issue is caused by a well-known defect in Android 6. To ensure device security, it is recommended to configure scheduled malware scans.
Known issues in Web Protection operation
- Web Protection on Android devices is supported only by Google Chrome, HUAWEI Browser, Samsung Internet Browser, and Yandex Browser.
- The Custom Tabs feature is supported by Google Chrome, HUAWEI Browser, and Samsung Internet Browser.
- Web Protection for HUAWEI Browser, Samsung Internet Browser, and Yandex Browser does not block sites on a mobile device if the work profile is used and Web Protection is enabled only for the work profile.
- Kaspersky Endpoint Security in the work profile scans only the website domain in HTTPS traffic. Malicious and phishing websites may remain unblocked if the app installed in the work profile. If the domain is trusted, Web Protection can skip a threat (for example,
https://trusted.domain.com/phishing/). If the domain is untrusted, Web Protection blocks malicious and phishing websites. - For Web Protection to work, you must enable the use of Kaspersky Security Network. Web Protection blocks websites based on the KSN data on the reputation and category of websites.
- Forbidden websites may remain unblocked by Web Protection on devices running Android 6 with Google Chrome version 51 (or any earlier version) installed if the website is opened in the following ways (this issue is caused by a well-known defect in Google Chrome):
- From search results.
- From the bookmarks list.
- From search history.
- Using the web address autocomplete function.
- Opening the website in a new tab in Google Chrome.
- Forbidden websites may remain unblocked in Google Chrome version 50 (or any earlier version) if the website is opened from Google search results while the Merge Tabs and Apps feature is enabled in the browser settings. This issue is caused by a well-known defect in Google Chrome.
- Websites from blocked categories may remain unblocked in Google Chrome if the user opens them from third-party apps, for example, from an IM client app. This issue is related to how the Accessibility service works with the Chrome Custom Tabs feature.
- Forbidden websites may remain unblocked in Samsung Internet Browser if the user opens them in background mode from the context menu or from third-party apps, for example, from an IM client app.
- Kaspersky Endpoint Security for Android must be set as an Accessibility feature to ensure proper functioning of Web Protection.
- On some Xiaomi devices, the "Display pop-up window" and "Display pop-up windows while running in the background" permissions should be granted for Web Protection to work.
- When entering a website address in Web Protection settings, adhere to the following rules:
- For Android devices, specify the address in regular expressions format (for example,
https://example.com.*). - For iOS MDM devices, specify the HTTP or HTTPS data transport protocol (for example,
http://www.example.com).
- For Android devices, specify the address in regular expressions format (for example,
- Allowed websites may be blocked in Samsung Internet Browser in the Only listed websites are allowed Web Protection mode when the page is refreshed. Websites are blocked if a regular expression contains advanced settings (for example,
^https?://example.com/pictures/). It is recommended to use regular expressions without additional settings (for example,^https?://example.com). - If Web Protection is set to All websites are blocked, Kaspersky Endpoint Security for Android does not block search in the Google Search widget. Instead, it blocks user access to the search results.
- In a work profile, if Web Protection is set to All websites are blocked, Kaspersky Endpoint Security for Android endlessly reloads the Google Chrome home page, blocks the browser, and interferes with the device.
- To make sure that the Kaspersky Endpoint Security for Android app allows or blocks access to the specified website in all supported versions of Google Chrome, HUAWEI Browser, Samsung Internet Browser, or Yandex Browser, include the same URL twice, once with the HTTP protocol (e.g., http://example.com) and once with the HTTPS protocol (e.g., https://example.com). As an alternative, you can use regular expressions.
- In Yandex Browser and Samsung Internet Browser, malicious and phishing websites may remain unblocked. This is because only the website domain is scanned, and if it is trusted, Web Protection can skip a threat.
- If Kaspersky Endpoint Security for Android is not set as an Accessibility feature, Web Protection may block an allowed website that loads some elements from a website with a domain that is not in the list of allowed domains.
Known issues in Anti-Theft operation
- For timely delivery of commands to Android devices, the app uses the Firebase Cloud Messaging (FCM) service. If FCM is not configured, commands will be delivered to the device only during synchronization with Kaspersky Security Center according to the schedule defined in the policy, for example, every 24 hours.
- To lock a device, Kaspersky Endpoint Security for Android must be set as the device administrator.
- To lock devices running Android 7.0 or later, Kaspersky Endpoint Security for Android must be set as an Accessibility feature.
- On some devices, Anti-Theft commands may fail to execute if Battery Saver mode is enabled on the device. This defect has been confirmed on Alcatel 5080X.
- To locate devices running Android 10 or later, the user must grant the "All the time" permission to device location.
- To take a mugshot with devices running Android 11 or later, the user must grant the "While using the app" permission to access the camera.
Known issues in App Control operation
- Kaspersky Endpoint Security for Android must be set as an Accessibility feature to ensure proper functioning of App Control. This does not apply to device owner mode.
- For App Control (app categories) to work, you must enable the use of Kaspersky Security Network. App Control determines the category of an app based on data that is available in KSN. To use KSN, the mobile device must be connected to the internet. For App Control, you can add individual apps to the lists of blocked and allowed apps. In this case, KSN is not required.
- When configuring App Control, it is recommended to clear the Block system apps check box. Blocking system apps may lead to problems in device operation.
- On iOS MDM devices, if you specify allowed apps in the list of apps allowed to be installed, all apps except system apps and those added to the list of allowed apps will be hidden on the device screen.
- On some HUAWEI and Honor personal devices, apps from allowed categories may be blocked and apps from forbidden categories may remain unblocked. This is because the category for some apps from App Gallery cannot be correctly defined.
- On some Samsung and Oppo devices, app icons may remain hidden on the home screen after clearing the Block system apps check box. This is due to limitations of the Android operating system.
Known issues when configuring certificates in iOS MDM policy
- When you add a certificate to an iOS MDM policy and attempt to save or close the policy, MMC-based Administration Console of Kaspersky Security Center may crash, but the certificate is saved to the policy settings.
Known issues when configuring email
- Remote configuration of a mailbox is available only on the following devices:
- iOS MDM devices.
- Samsung devices (Exchange ActiveSync).
- Android devices with the TouchDown mail client installed.
In previous versions of Kaspersky Endpoint Security for Android, you can use Kaspersky Security Center to remotely configure TouchDown profile settings on a user's device. TouchDown support has been discontinued in Kaspersky Endpoint Security for Android Service Pack 4. For more detail, refer to the Symantec technical support website.
After upgrading the Kaspersky Endpoint Security for Android Administration Plug-in, the TouchDown settings in the policy are hidden but saved. When new devices are connected, TouchDown settings will be configured after the policy is applied.
After the policy is modified and saved, TouchDown settings will be deleted. The TouchDown settings on a user's devices will be cleared after a policy is applied.
Known issues when configuring device unlock password strength
- On devices running Android 10 or later, Kaspersky Endpoint Security resolves the password strength requirements into one of the system values: medium or high.
If the password length required is 1 to 4 symbols, then the app prompts the user to set a medium-strength password. It must be either numeric (PIN), with no repeating or ordered (e.g. 1234) sequences; or alphanumeric. The PIN or password must be at least 4 characters long.
If the password length required is 5 or more symbols, then the app prompts the user to set a high-strength password. It must be either numeric (PIN), with no repeating or ordered sequences; or alphanumeric (password). The PIN must be at least 8 digits long; the password must be at least 6 characters long.
- On devices running Android 10 or later, using a fingerprint to unlock the screen can be managed for work profile only.
- On devices running Android 7.1.1, if the unlock password does not meet the corporate security requirements (Compliance Control), the Settings system app may function improperly when an attempt is made to change the unlock password through Kaspersky Endpoint Security for Android. The issue is caused by a well-known defect in Android 7.1.1. In this case, to change the unlock password, use the Settings system app only.
- On some devices running Android 6 or later, an error may occur when screen unlock password is entered, if device data is encrypted. This issue is related to specific features of the Accessibility service with MIUI firmware.
- On some HUAWEI devices, an issue message about too simple screen unlocking method appears, and the user must set a PIN code that is compliant with policy requirements. For more details about setting a correct PIN code on HUAWEI devices, please refer to Configuring a strong unlock password for an Android device.
Known issues when configuring Wi-Fi
- On devices running Android version 8.0 or later, settings of the proxy server for Wi-Fi cannot be redefined with the policy. However, you can manually configure the proxy server settings for a Wi-Fi network on the mobile device.
- On supervised iOS MDM devices, if you select the Force connection to allowed Wi-Fi networks only (supervised only, iOS 14.5+) check box when configuring feature restrictions, the current Wi-Fi connection will be interrupted even if it belongs to the allowed Wi-Fi networks list. This is due to iOS operating system specifics. The user must reconnect to the Wi-Fi network manually.
Known issues when configuring APN
- Remote configuration of APN is available only on iOS MDM devices or Samsung devices.
- Configure APN for iOS MDM devices in the Cellular communications section. The APN section is out of date. Before configuring the APN settings, make sure that the Apply on device check box in the APN section is cleared.
Known issues with Firewall
- Use of Firewall is available only on Samsung devices.
Known issues when configuring VPN
- Remote configuration of VPN is available only on the following devices:
- iOS MDM devices.
- Samsung devices.
- When you set up a VPN connection for selected domains in Safari, if you change the Connect automatically option, the changes are not applied on the device. The Connect automatically check box is selected by default and we recommend against changing it if you want to activate a VPN automatically for specified domains.
Known issues with App removal protection
- Kaspersky Endpoint Security for Android must be set as the device administrator.
- To protect the app from removal on devices running Android 7.0 or later, Kaspersky Endpoint Security for Android must be set as an Accessibility feature.
- On some Xiaomi and HUAWEI devices, Kaspersky Endpoint Security for Android removal protection does not work. This issue is caused by the specific features of MIUI 7 and 8 firmware on Xiaomi and EMUI firmware on HUAWEI.
Known issues when configuring device restrictions
- On devices running Android 10 or later, prohibiting the use of Wi-Fi networks is not supported.
- On devices running Android 11 or later, Kaspersky Endpoint Security for Android must be set as an Accessibility feature. Kaspersky Endpoint Security for Android prompts the user to set the app as an Accessibility feature through the Initial Configuration Wizard. The user can skip this step or disable this service in the device settings at a later time. If this is the case, you will not be able to restrict use of the camera.
Known issues when sending commands to mobile devices
- On devices running Android 12 or later, if the user granted the "Use approximate location" permission, the Kaspersky Endpoint Security for Android app first tries to get the precise device location. If this is not successful, the approximate device location is returned only if it was received not more than 30 minutes earlier. Otherwise, the Locate device command fails.
- The Locate device command does not work on Android devices if Google Location Accuracy is disabled in settings. Please be aware that not all Android devices come with this location setting.
- If you send the Enable Lost Mode command to a supervised iOS MDM device without a SIM card and this device is restarted, the device won't be able to connect to Wi-Fi and receive the Disable Lost Mode command. This is a specific feature of iOS devices. To avoid this issue, you can either send the command only to devices with a SIM card, or insert a SIM card into the locked device to allow it to receive the Disable Lost Mode command over the mobile network.
Known issues with Android work profile
- If you create an Android work profile by using a policy, the user must grant the "Allow access to manage all files" permission to Kaspersky Endpoint Security for Android that is installed on the devices running Android 11 or later and that is related to the work profile.
- The Prohibit activation of USB debugging mode Android work profile function does not work on devices with Android 13. This is caused by an issue in Android 13.
- On some Xiaomi devices with Android work profile, the work profile may be unlocked by a fingerprint only if you set the Period of inactivity before the device screen locks value after setting a fingerprint as the screen unlocking method.
- When the Deny permissions automatically action is selected in the Granting runtime permissions for apps setting, if the user configures the necessary permissions for an app after device synchronization with Kaspersky Security Center but before this app requests all permissions, these permissions cannot be changed without reinstalling the app or wiping its data.
Known issues with specific devices
- On certain devices (for example, HUAWEI, Meizu, and Xiaomi), you must grant Kaspersky Endpoint Security for Android an autostart permission or manually add it to the list of apps that are started when the operating system starts. If the app is not added to the list, Kaspersky Endpoint Security for Android stops performing all of its functions after the mobile device is restarted. In addition, if the device has been locked, you cannot use a command to unlock the device. You can unlock the device only by using a one-time unlock code.
- On certain devices (for example, Meizu and Asus) running Android 6 or later, after encrypting data and restarting the Android device, you must enter a numeric password to unlock the device. If the user uses a graphic password to unlock the device, you must convert the graphic password to a numeric password. For more details about converting a graphic password into a numeric password, please refer to the Technical Support website of the mobile device manufacturer. This issue is related to the operation of the Accessibility Features service.
- On some HUAWEI devices running Android 5.Х, after Kaspersky Endpoint Security for Android is set as an Accessibility feature, an incorrect message about the lack of appropriate rights may be displayed. To hide this message, enable the app as a protected app in the device settings.
- On some HUAWEI devices running Android 5.X or 6, when Battery Saver mode is enabled for Kaspersky Endpoint Security for Android, the user can manually terminate the app. The user device becomes unprotected after that. This issue is due to some features of HUAWEI software. To restore the device protection, run Kaspersky Endpoint Security for Android manually. It is recommended to disable Battery Saver mode for Kaspersky Endpoint Security for Android in the device settings.
- On HUAWEI devices with EMUI firmware running Android 7.0, the user can hide the notification regarding the protection status of Kaspersky Endpoint Security for Android. This issue is due to some features of HUAWEI software.
- On some Xiaomi devices, the user can use the Foreground Services Task Manager to stop Kaspersky Endpoint Security for Android from running in the background. This issue is due to some features of Xiaomi software.
- On some Xiaomi devices, when setting the password length to more than 5 characters in a policy, the user will be prompted to change the screen unlock password instead of the PIN code. You cannot set a PIN code that has more than 5 characters. This issue is due to some features of Xiaomi software.
- On Xiaomi devices with MIUI firmware running Android 6, the Kaspersky Endpoint Security for Android icon may be hidden in the status bar. This issue is due to some features of Xiaomi software. It is recommended to allow the display of notification icons in Notifications settings.
- On some Nexus devices running Android 6.0.1, the privileges required for proper operation cannot be granted through the Quick Start Wizard of Kaspersky Endpoint Security for Android. This issue is caused by a well-known defect in Security Patch for Android by Google. To ensure proper operation, the required privileges must be manually granted in the device settings.
- On certain Samsung devices running Android 7.0 or later, when the user attempts to configure unsupported methods for unlocking the device (for example, a graphical password), the device may be locked if the following conditions are met: Kaspersky Endpoint Security for Android removal protection is enabled and screen unlock password strength requirements are set. To unlock the device, you must send a special command to the device.
- On certain Samsung devices, it is impossible to block the use of fingerprints for unlocking the screen.
- Web Protection cannot be enabled on some Samsung devices, if the device is connected to a 3G/4G network, has Battery Saver mode enabled and restricts background data. It is recommended to disable the function that restricts background processes in Battery Saver settings.
- On certain Samsung devices, if the unlock password does not comply with corporate security requirements, Kaspersky Endpoint Security for Android does not block the use of fingerprints for unlocking the screen.
- After executing Anti-Theft commands (such as Locate, Device Lock, Unlock, and Mugshot), the mobile certificate and the VPN certificate may be deleted on some Samsung devices. The certificates have to be reinstalled to continue. This issue occurs due to the Mobile Device Fundamentals Protection Profile (MDFPP) security standard.
- On some Honor and HUAWEI devices, you cannot restrict the use of Bluetooth. When Kaspersky Endpoint Security for Android attempts to restrict the use of Bluetooth, the operating system shows a notification containing the options to reject or allow this restriction. The user can reject this restriction and continue to use Bluetooth.
- On some Samsung devices, after Kaspersky Endpoint Security is installed or updated from a standalone installation package, KNOX MDM profile activation is unavailable.
- On Blackview devices, the user can clear the memory for the Kaspersky Endpoint Security for Android app. As a result, the device protection and management are disabled, all defined settings become ineffective, and the Kaspersky Endpoint Security for Android app is removed from the Accessibility features. This is because this vendor's devices provide the customized Recent screens app with elevated privileges. This app can override Kaspersky Endpoint Security for Android settings and cannot be replaced because it is part of the Android operating system.
- On some Google Pixel devices running Android 11 or earlier, the Kaspersky Endpoint Security for Android app crashes immediately after the start. This is caused by an issue in Android.
- On some TECNO and OnePlus devices, the user can unlock the device using face scanning, even if this biometric unlock method is prohibited by the policy.
- On some devices (for example, Xiaomi, TECNO, and Realme) running Android 9 or later, when you select the Prohibit changing language check box in device owner mode, the user still can change the language, and no warning message appears.
- On some Xiaomi devices, when deploying the Kaspersky Endpoint Security for Android app via an installation package downloaded from Kaspersky Security Center, the built-in device anti-virus may suggest downloading the app from a trusted service, for example, Xiaomi GetApps. This is because the certificate used to sign the installation package differs from the one specified in the app marketplace. If the app is installed from the app marketplace, a subsequent upgrade may fail. To prevent this, the user should continue the installation by clicking the Ignore button in the Security risks detected message that appears.
- On some HUAWEI devices, the Accessibility permissions may be reset after starting the built-in Digital Balance app.
- On some Sony and Google Pixel devices running Android 13 or later, the Kaspersky Endpoint Security Help, which has information about enabling accessibility is displayed incorrectly.
- On Samsung Galaxy S23 and S24 series devices Real-Time Protection may not work.
Known issues in app operation on Android 13
- On Android 13, the user can use the Foreground Services Task Manager to stop Kaspersky Endpoint Security from running in the background. This is caused by a well-known issue in Android 13.
- On Android 13, the permission to send notifications is requested when the initial app configuration begins. This is due to specifics of the Android 13 operating system.
Known issues when adding web clips
- The maximum number of web clips that can be added to an Android device depends on the device type. When this number is reached, web clips are no longer added to the Android device.
Known issues in device owner mode
- Some device owner mode features and control options may not work properly on Xiaomi devices (including Redmi and POCO) due to vendor specifics.
- Restricting Android features may not work on Xiaomi, Redmi, and POCO devices for the following control options:
- Prohibit modification of apps in Settings
- Prohibit uninstallation of apps
- Other issues:
- When installing the Kaspersky Endpoint Security for Android app in device owner mode on Xiaomi devices running Android 12, the app does not start automatically once the device setup completes. Please start the app manually.
- When setting up permissions for Kaspersky Endpoint Security for Android on Xiaomi MI A3 devices running stock Android 11, you may need to provide the Accessibility permission twice for the settings to apply. After Allow is selected, you may be redirected to the Accessibility permission request again. Please turn the switch to OFF and then to ON again to apply the changes and continue the setup.
- Kaspersky Endpoint Security for Android removal protection feature may not work on some Xiaomi devices. This issue is caused by the specifics of MIUI 7 and 8 firmware on Xiaomi.
- Restricting Android features may not work on Xiaomi, Redmi, and POCO devices for the following control options:
- On certain devices running Android 10 or earlier, if you select the Prohibit modification of apps in Settings check box when configuring restrictions for apps, the user still can clear app defaults and stop apps in app settings. This is due to Android operating system specifics.
- Managing update settings on mobile devices is vendor-specific. On some Android devices, the restriction on manual installation of operating system updates may work incorrectly.
- The Kaspersky Endpoint Security for Android app can't be installed in device owner mode on the following devices: Honor 30i (Android 10), HUAWEI y8p, HUAWEI Y5 (Android 8.0), HUAWEI Mate 40 PRO (Android 10), Xiaomi Redmi 4X (Android 7.1), Honor 5c (Android 7.0, EMUI 5.0). This is due to the device firmware specifics: the QR code scanner is not available after the device is reset to factory settings.
- On devices with Android 10, location permissions are automatically set to Allow only while using the app instead of Allow all the time and can't be changed by the administrator or users. This issue is caused by a well-known bug in Android 10.
- The Prohibit screen capture restriction does not block the device user from capturing the device settings screen.
- On some Samsung and Xiaomi devices, the Prohibit file transfer over USB restriction does not block the device user from transferring files via Android Debug Bridge (ADB).
- On some devices (for example, Samsung, Oppo, or Google Pixel), if the Forbidden apps are installed non-compliance criterion is detected, and then the time period allocated for the user to fix this non-compliance expires, the selected action may be performed with a delay or may require device synchronization with Kaspersky Security Center.
Known issues in kiosk mode
- On iOS MDM devices running iOS 17 and iPadOS 17, if the Auto-Rotate Screen check box is cleared in Kiosk mode settings, screen orientation still changes automatically when the device is rotated.
Known issues with app configurations
- The Set Restricted Mode for YouTube, Enforce at least moderate restricted mode, Do not enforce restricted mode settings do not work for Google Chrome. This issue is caused by a well-known defect in Google Chrome.
The help for this version of the solution is no longer updated, so it may contain outdated information. For up-to-date information about the solution refer to the Kaspersky Secure Mobility Management 4.1 Help.
Deployment
This Help section is intended for specialists who install Kaspersky Secure Mobility Management, as well as for specialists who provide technical support to organizations that use Kaspersky Secure Mobility Management.
The help for this version of the solution is no longer updated, so it may contain outdated information. For up-to-date information about the solution refer to the Kaspersky Secure Mobility Management 4.1 Help.
Solution architecture
Kaspersky Secure Mobility Management includes the following components:
- Kaspersky Endpoint Security for Android mobile app
The Kaspersky Endpoint Security for Android app ensures protection of mobile devices against web threats, viruses, and other programs that pose threats. It supports interaction between the mobile device and the Kaspersky Security Center Administration Server using Firebase Cloud Messaging.
- Kaspersky Endpoint Security for Android Administration Plug-in
The Administration Plug-in of Kaspersky Endpoint Security for Android provides the interface for managing mobile devices and mobile apps installed on them through the Administration Console of Kaspersky Security Center.
- Kaspersky Device Management for iOS Administration Plug-in
The Administration Plug-in of Kaspersky Device Management for iOS provides an interface for managing mobile devices connected by means of the iOS MDM protocol through the Administration Console of Kaspersky Security Center.
The architecture of the Kaspersky Secure Mobility Management integrated solution is shown in the figure below.
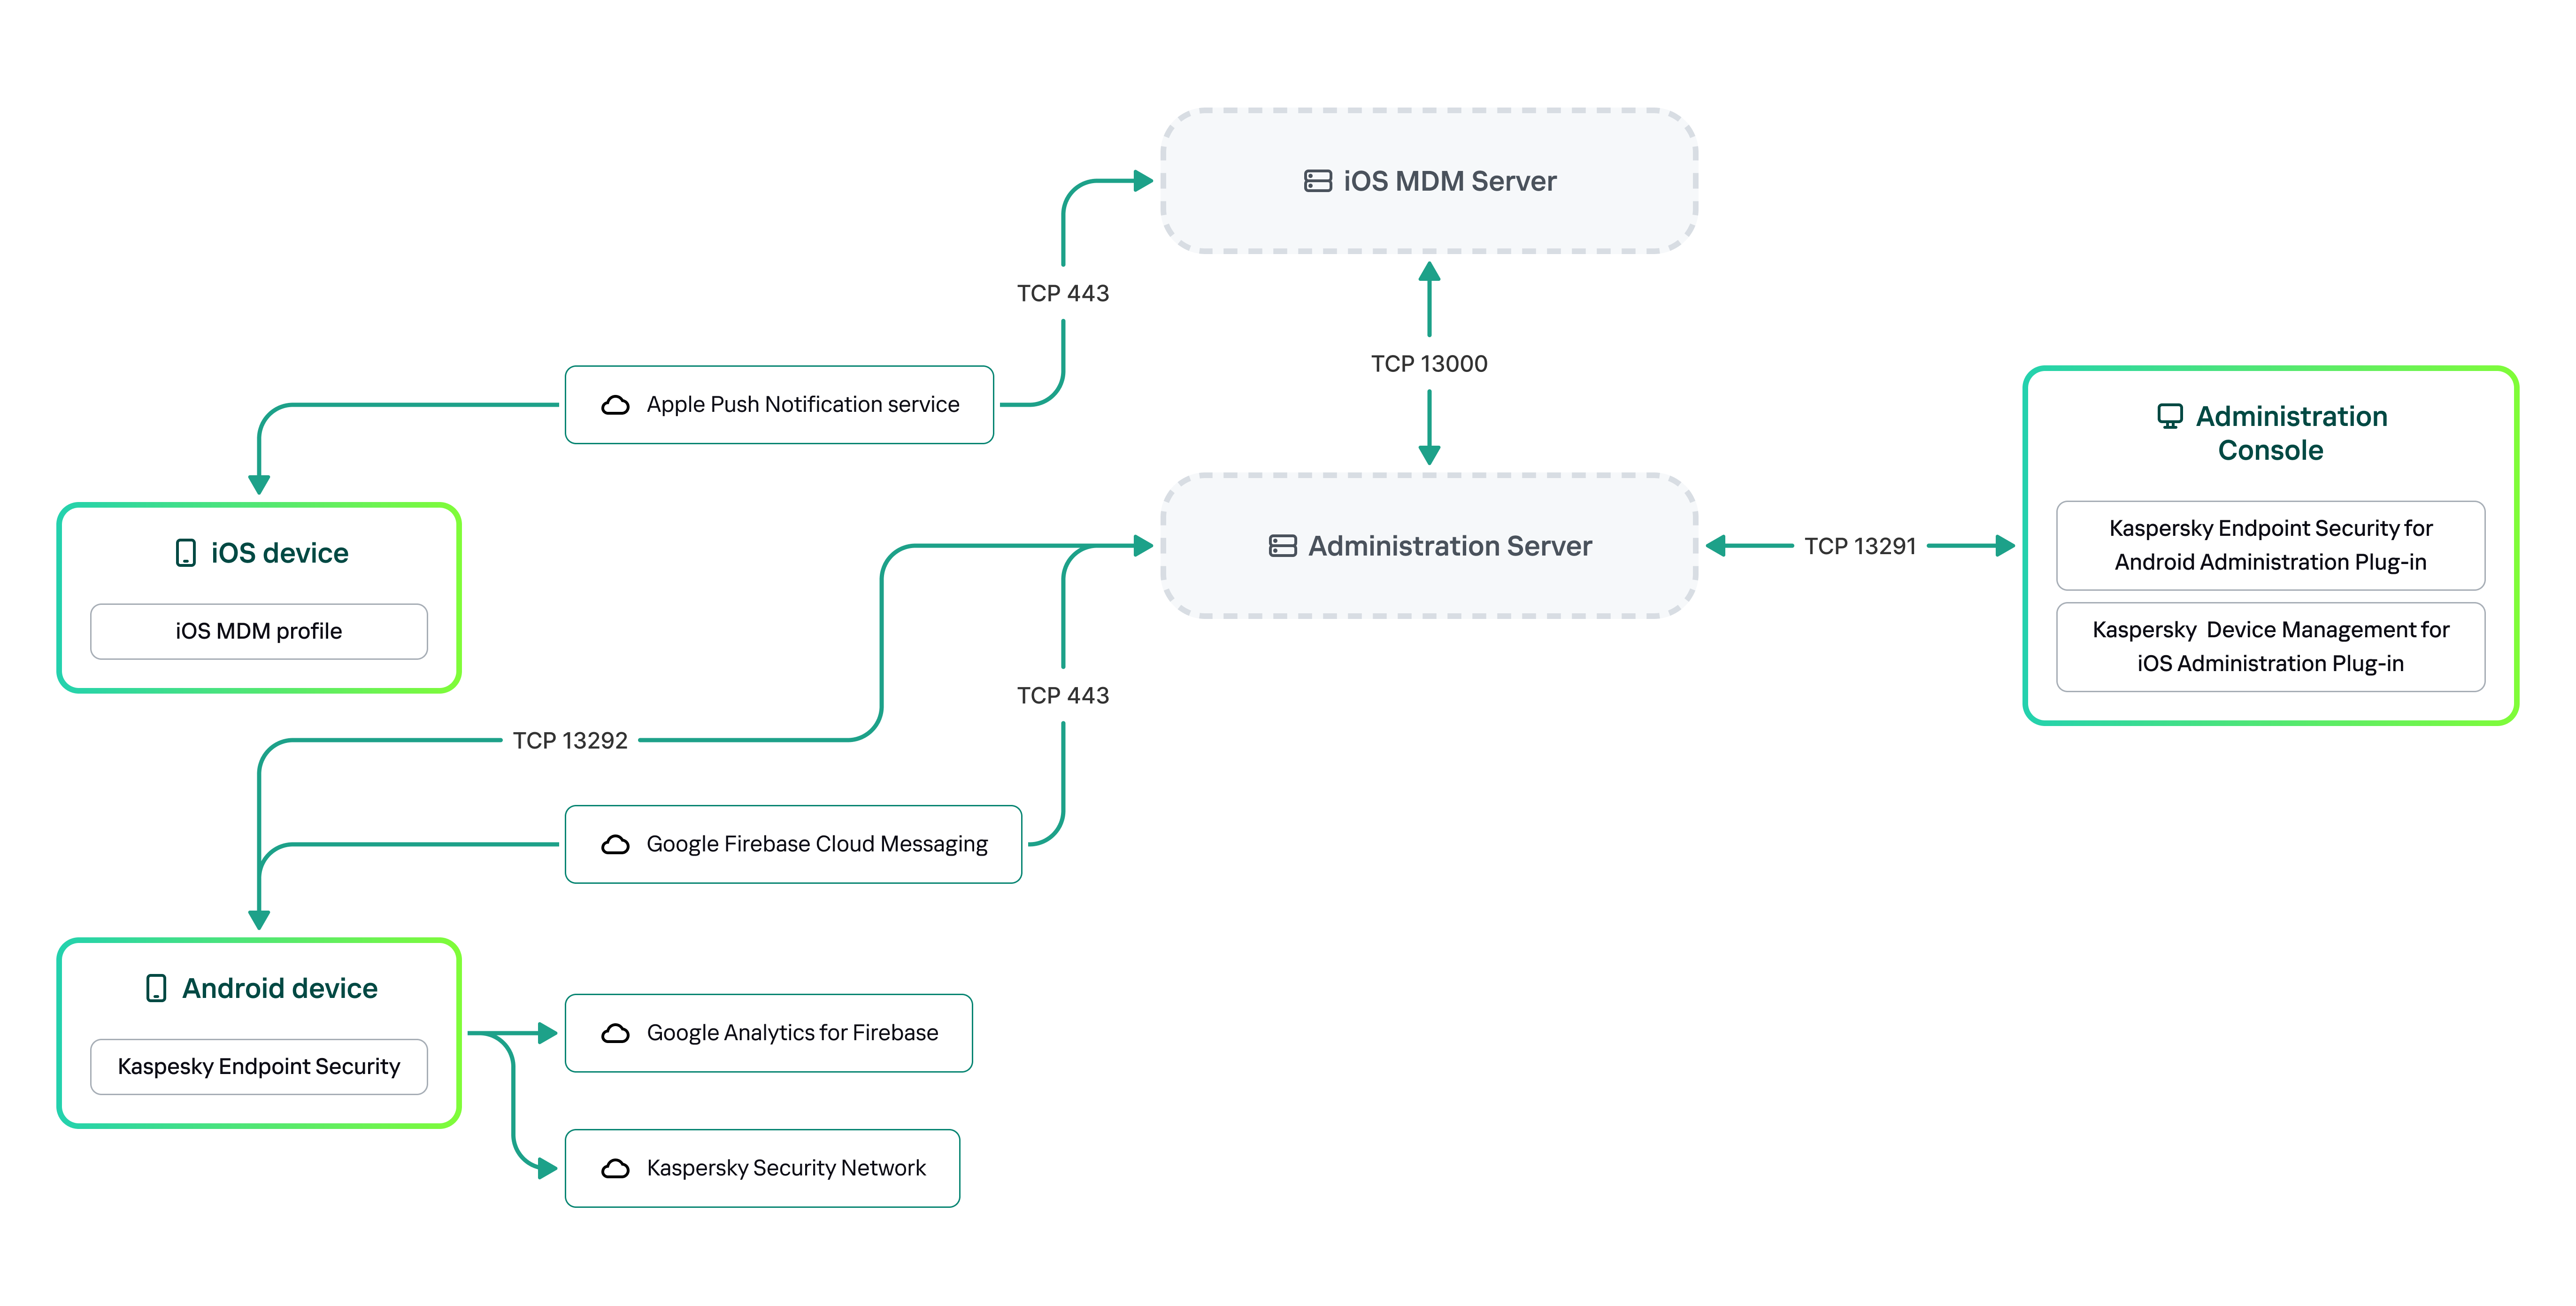
The architecture of Kaspersky Secure Mobility Management
For details on Administration Console, Administration Server, and iOS MDM Server, please refer to Kaspersky Security Center Help.
Page top
The help for this version of the solution is no longer updated, so it may contain outdated information. For up-to-date information about the solution refer to the Kaspersky Secure Mobility Management 4.1 Help.
Deployment scenarios for Kaspersky Endpoint Security for Android
Kaspersky Endpoint Security for Android can be deployed on mobile devices within the corporate network in several ways. You can use the most suitable deployment scenario for your organization or combine several deployment scenarios.
For details on deploying Kaspersky Endpoint Security for Android in Kaspersky Endpoint Security Cloud, please refer to Kaspersky Endpoint Security Cloud help.
Deploying Kaspersky Endpoint Security for Android via Kaspersky Security Center on personal devices
For personal devices, you can deploy Kaspersky Endpoint Security for Android via Kaspersky Security Center by using the following methods:
- Deliver messages with the link to download the app from Google Play (recommended)
- Deliver messages with the link to download the app installation package from Kaspersky Security Center
Deployment of Kaspersky Endpoint Security for Android using Google Play consists in sending messages containing the Google Play link to users of devices from the Administration Console.
To deploy Kaspersky Endpoint Security for Android via the installation package, do the following:
- Create and configure an app installation package.
- Create a standalone installation package.
- Send messages with the link to download a standalone installation package to users of Android devices. Mass mailing is available.
The user installs Kaspersky Endpoint Security for Android on a mobile device after receiving the message with the link. No additional preparations are needed to begin using the app.
When deploying the app via the installation package downloaded from Kaspersky Security Center, the "Blocked by Play Protect" message may appear on the device. The issue is caused by the installation package signing certificate being different from the one specified in Google Play. The user should continue the installation by choosing Install anyway. If OK is selected, the installation process will be interrupted and the device will be reset to factory settings.
Deploying Kaspersky Endpoint Security for Android via Kaspersky Security Center on company-owned devices (device owner mode)
For company-owned devices (device owner mode), you can deploy Kaspersky Endpoint Security for Android via Kaspersky Security Center by using the following methods:
- Deliver the QR code with the link to download the app from Kaspersky website
- Deliver the QR code with the link to download the app installation package from Kaspersky Security Center
To deploy Kaspersky Endpoint Security for Android in device owner mode via the app from Kaspersky website, do the following:
- Create a QR code for app installation from the Administration Console.
- Pre-configure the mobile device and install Kaspersky Endpoint Security for Android using the QR code.
To deploy Kaspersky Endpoint Security for Android in device owner mode via the app installation package, do the following:
- Create and configure an app installation package.
- Create a standalone installation package.
- Create a QR code for app installation via the installation package.
- Pre-configure the mobile device and install Kaspersky Endpoint Security for Android using the QR code.
When deploying the app via the installation package downloaded from Kaspersky Security Center, after the device is reset to factory settings and the QR code is scanned, the Blocked by Play Protect message may appear on the device. The issue is caused by the installation package signing certificate being different from the one specified in Google Play. The user should continue the installation by choosing Install anyway. If OK is selected, the installation process will be interrupted and the device will be reset to factory settings.
Deploying Kaspersky Endpoint Security for Android from Google Play
Kaspersky Endpoint Security for Android is installed from Google Play independently by the users of devices. Users download the mobile app distribution package from Google Play and install the app on devices. After the app has been installed on the device, you need to make additional preparations before you can begin using it: configure the settings of the connection to the Administration Server and install a mobile certificate.
Deploying Kaspersky Endpoint Security for Android via KNOX Mobile Enrollment
Deployment of Kaspersky Endpoint Security for Android consists of adding a KNOX MDM profile to mobile devices. The KNOX MDM profile contains a link to an app deployed on the Kaspersky Security Center Web Server or another server. After the app is installed on the mobile device, you must also install a mobile certificate.
You can read about installation through KNOX Mobile Enrollment in the Samsung KNOX section.
Page top
The help for this version of the solution is no longer updated, so it may contain outdated information. For up-to-date information about the solution refer to the Kaspersky Secure Mobility Management 4.1 Help.
Deployment scenarios for iOS MDM profile
An iOS MDM profile is a profile that contains the settings for connecting mobile devices running iOS to Kaspersky Security Center. After installation of an iOS MDM profile and synchronization with Kaspersky Security Center, the device becomes a managed device. Mobile devices are managed through the Apple Push Notification service (APNs).
Using an iOS MDM profile, you can do the following:
- Remotely configure the settings of iOS MDM devices by using group policies.
- Send device lock and data wipe commands.
- Remotely install Kaspersky apps and other third-party apps.
An iOS MDM profile can be deployed on mobile devices within the corporate network in several ways. You can use the most suitable deployment scenario for your organization or combine several deployment scenarios.
Before deploying an iOS MDM profile, you must deploy a mobile device management system.
For details on deploying an iOS MDM profile in Kaspersky Endpoint Security Cloud, please refer to Kaspersky Endpoint Security Cloud help.
Deploying an iOS MDM profile via Kaspersky Security Center
Deployment of an iOS MDM profile via Kaspersky Security Center can be carried out by sending messages containing a link to download the iOS MDM profile. Mass mailing is available.
The user installs the iOS MDM profile to a mobile device after receiving the message with a link to the Kaspersky Security Center Web Server. No additional preparations for the iOS MDM profile are required.
Page top
The help for this version of the solution is no longer updated, so it may contain outdated information. For up-to-date information about the solution refer to the Kaspersky Secure Mobility Management 4.1 Help.
Preparing the Administration Console for deployment of the integrated solution
This section provides instructions on preparing the Administration Console for deployment of the integrated solution.
The help for this version of the solution is no longer updated, so it may contain outdated information. For up-to-date information about the solution refer to the Kaspersky Secure Mobility Management 4.1 Help.
Configuring Administration Server settings for connection of mobile devices
In order for mobile devices to be able to connect to the Administration Server, before installing the Kaspersky Endpoint Security mobile app, configure the mobile device connection settings in the Administration Server properties.
To configure Administration Server settings for connecting mobile devices:
- In the context menu of the Administration Server, select Properties.
The Administration Server settings window opens.
- Configure the Administration Server ports that will be used by mobile devices:
- Select Administration server connection settings → Additional ports.
- Select the Open port for mobile devices check box.
- In the Port for mobile device synchronization field, specify the port through which mobile devices will connect to the Administration Server.
Port 13292 is used by default.
If the Open port for mobile devices check box is cleared or the wrong connection port is specified, mobile devices will not be able to connect to the Administration Server.
- In the Port for mobile device activation field, specify the port to be used by mobile devices to connect to the Administration Server for activation of the Kaspersky Endpoint Security for Android app.
Port 17100 is used by default.
- Click OK.
- If necessary, replace the certificate used by devices to connect to the Administration Server:
By default, the certificate that has been created during the Administration Server installation is used. Replace this certificate with a different one or reissue the certificate.
- Select the Certificates section.
- Define the required settings.
- Specify a reserve Administration Server certificate.
You need to specify a reserve Administration Server certificate to meet the security requirements of your organization and maintain a continuous connection between managed devices and the Administration Server. A reserve certificate is not issued by default.
- Click Save to save the changes you have made to the settings and exit the Administration Server properties window.
After you configure the mobile device connection settings, you can install the Kaspersky Endpoint Security app on mobile devices and connect them to the Administration Server by using the specified settings.
Page top
The help for this version of the solution is no longer updated, so it may contain outdated information. For up-to-date information about the solution refer to the Kaspersky Secure Mobility Management 4.1 Help.
Configuring a connection gateway to connect mobile devices to Kaspersky Security Center Administration Server
This topic describes how to configure a connection gateway to connect mobile devices to Kaspersky Security Center Administration Server. The configuration proceeds in the following steps:
- Install Network Agent in the connection gateway role on a host
- Configure the connection gateway on Kaspersky Security Center Administration Server
This article contains an overview of the scenario. For detailed instructions, please refer to the Kaspersky Security Center documentation.
Requirements
For a connection gateway to work correctly with mobile devices, the following requirements must be met:
- Port 13292 must be open on the host with the connection gateway.
- Port 13000 must be open between the connection gateway and Kaspersky Security Center. It does not need to be open outside the DMZ.
- The host must have a static address accessible from the internet.
Install Network Agent in the connection gateway role on a host
First, you need to install Network Agent on the selected host device acting in the gateway connection role. You can download a full installation package of Kaspersky Security Center or use a local installation of Kaspersky Security Center.
By default, the installation file is located at: \\<server name>\KLSHARE\PkgInst\NetAgent_<version number>
To install Network Agent in the connection gateway role:
- Start the Network Agent Setup Wizard and follow its instructions leaving default values for all of the options until the Select Administration Server window opens.
- In the Select Administration Server window, configure the following settings:
- Enter the address of the device with Administration Server installed.
- In the Port, SSL port, and UDP port fields, leave the default values.
- Select the Use SSL to connect to Administration Server check box to establish a connection to the Administration Server through a secure port via SSL.
We recommend that you do not clear this check box so your connection remains secured.
- Select the Allow Network Agent to open UDP port check box to manage client devices and receive information about them.
- Click Next and proceed through the Wizard with default settings up to the Connection gateway window.
- In the Connection gateway window, select Use Network Agent as a connection gateway in DMZ.
This mode simultaneously activates the connection gateway role and tells Network Agent to wait for connections from Administration Server, rather than establish connections to Administration Server.
- Click Next and start the installation.
Network Agent is now installed and configured in the connection gateway role.
Configure the connection gateway on Kaspersky Security Center Administration Server
Once you have installed Network Agent in the connection gateway role, you need to connect it to Administration Server. Administration Server does not yet list the device with the connection gateway among the managed devices because the connection gateway has not tried to connect to Administration Server. Therefore, you need to add the connection gateway as a distribution point to ensure that Administration Server initiates a connection to the connection gateway.
To configure the connection gateway on Administration Server:
- Add the connection gateway as a distribution point in Kaspersky Security Center.
- In the console tree, select the Administration Server node.
- In the context menu of Administration Server, select Properties.
- In the Administration Server properties window, select the Distribution points section.
- Click the Add button.
The Add distribution point window opens.
- In the Add distribution point window, perform the following actions:
- Specify the IP address of the device with Network Agent installed in the Device to act as distribution point field. To do this, select Add connection gateway in DMZ by address in the drop-down list.
Enter the IP address of the connection gateway or enter the name if the connection gateway is accessible by name.
- In the Distribution point scope field, select the group to which the connection gateway will be distributed from the drop-down list, and then click OK.
- Specify the IP address of the device with Network Agent installed in the Device to act as distribution point field. To do this, select Add connection gateway in DMZ by address in the drop-down list.
- In the Distribution points section, click OK to save the changes you have made.
The connection gateway will be saved as a new entry named Temporary entry for connection gateway.
Administration Server almost immediately attempts to connect to the connection gateway at the address that you specified. If it succeeds, the entry name changes to the name of the connection gateway device. This process takes up to five minutes.
While the temporary entry for the connection gateway is being converted to a named entry, the connection gateway also appears in the Unassigned devices group.
- Create a new group under the Managed devices group. This new group will contain external managed devices.
- Move the connection gateway from the Unassigned devices group to the group that you have created for external devices.
- Configure properties of the connection gateway that you have deployed:
- In the Distribution points section of the Administration Server properties, select the connection gateway and click Properties.
- In the General section, under DNS domain names of the distribution point for access by mobile devices (included in the certificate), specify your connection gateway DNS name that will be used to connect to the mobile device.
- In the Connection Gateway section, select the following check boxes and leave the default port numbers:
- Open port for mobile devices (SSL authentication of the Administration Server only)
- Open port for mobile devices (two-way SSL authentication)
- Click OK to save the changes you have made.
The connection gateway is now configured. You can now add new mobile devices by specifying the connection gateway address. New devices will appear on Administration Server.
Page top
The help for this version of the solution is no longer updated, so it may contain outdated information. For up-to-date information about the solution refer to the Kaspersky Secure Mobility Management 4.1 Help.
Displaying the Mobile Device Management folder in the Administration Console
By displaying the Mobile Device Management folder in the Administration Console, you can view the list of mobile devices managed by the Administration Server, configure the mobile device management settings, and install certificates on mobile devices of users.
To enable the display of the Mobile Device Management folder in the Administration Console:
- In the context menu of the Administration Server, select View → Configuring interface.
- In the window that opens, select the Display Mobile Device Management check box.
- Click OK.
The Mobile Device Management folder is displayed in the Administration Console tree after the Administration Console is restarted.
Page top
The help for this version of the solution is no longer updated, so it may contain outdated information. For up-to-date information about the solution refer to the Kaspersky Secure Mobility Management 4.1 Help.
Creating an administration group
To perform centralized configuration of the Kaspersky Endpoint Security for Android app installed on the users' mobile devices, the group policies must be applied to the devices.
To apply the policy to a device group, you are advised to create a separate group for these devices in the Managed devices prior to installing mobile apps on user devices.
After creating an administration group, it is recommended to configure the option to automatically allocate devices on which you want to install the apps to this group. Then configure settings that are common to all devices using a group policy.
To create administration group, follow the steps below:
- In the console tree, select the Managed devices folder.
- In the workspace of the Managed devices folder or subfolder, select the Devices tab.
- Click the New group button.
This opens the window in which you can create a new group.
- In the Group name window type the group name and click OK.
A new administration group folder with the specified name appears in the console tree. For more detailed information on use of administration groups, see Kaspersky Security Center Help.
Page top
The help for this version of the solution is no longer updated, so it may contain outdated information. For up-to-date information about the solution refer to the Kaspersky Secure Mobility Management 4.1 Help.
Creating a rule for device automatic allocating to administration groups
You can centrally administer the settings of Kaspersky Endpoint Security for Android app installed on users' mobile devices only if the devices belong to a previously created administration group for which a group policy has been configured.
If the rule to automatically allocate mobile devices detected on the network to the administration group is not configured, during the first synchronization of the device with the Administration Server, the device is automatically sent to the Administration Console in the Advanced → Device discovery → Domains → KES10 folder (KES10 is used by default). A group policy does not apply to this device.
To create the rule for automatic allocating of mobile devices to administration group, follow the steps below:
- In the console tree, select the Unassigned devices folder.
- From the context menu of the Unassigned devices folder, select Properties.
The Properties: Unassigned devices window appears.
- In the Move devices section, click Add to start the process of creating a rule for automatically allocating devices to an administration group.
The New rule window appears.
- Type the rule name.
- Specify the administration group to which mobile devices should be allocated after the Kaspersky Endpoint Security for Android mobile app has been installed on them. To do so, click Browse to the right of the Group to move devices to field and select the group in the window that appears.
- In the Apply rule section, select Run once for each device.
- Select the Move only devices not added to administration groups check box to prevent allocating to the selected group the mobile devices that were allocated to other administration groups when applying the rule.
- Select the Enable rule check box, so that the rule can be applied to newly detected devices.
- Open the Applications section and do the following:
- Select the Operating system version check box.
- Select one or several types of operating systems of the devices to be allocated to the specified group: Android or iOS.
- Click OK.
The newly created rule is displayed in the list of device allocation rules in the Move devices section in the properties window of the Unassigned devices folder.
According to the rule, Kaspersky Security Center allocates all devices that meet the specified requirements from the Unassigned devices folder to the selected group. The mobile devices which were earlier allocated to the Unassigned devices folder can also be allocated to the required administration group of the Managed devices folder manually. For more detailed information on administration groups management and actions with undistributed devices, see Kaspersky Security Center Help.
Page top
The help for this version of the solution is no longer updated, so it may contain outdated information. For up-to-date information about the solution refer to the Kaspersky Secure Mobility Management 4.1 Help.
Working with certificates of mobile devices
This section contains information about how to work with certificates of mobile devices. The section contains instructions on how to install certificates on users' mobile devices and how to configure certificate issuance rules. The section also contains instructions on how to integrate the application with the public keys infrastructure and how to configure the support of Kerberos.
The help for this version of the solution is no longer updated, so it may contain outdated information. For up-to-date information about the solution refer to the Kaspersky Secure Mobility Management 4.1 Help.
Reissuing the mobile Administration Server certificate
You need to specify a reserve Administration Server certificate to meet the security requirements of your organization and maintain a continuous connection between managed devices and the Administration Server. A reserve certificate is not issued by default.
We recommend that you specify a reserve certificate when installing the Administration Server or no later than 30 days before the expiration of the existing certificate. The exact expiration time is available in the Valid to field of the certificate settings (in the context menu of the Administration Server, select Properties → Administration server connection settings → Certificates).
The maximum validity period of any Administration Server certificate does not exceed 397 days.
The reserve certificate is delivered to the device during synchronization and becomes the main certificate immediately after the existing certificate expires. If the certificate expires and no reserve has been specified, the connection between the Administration Server and Kaspersky Endpoint Security on managed devices will be lost. In this case, to reconnect devices, you must specify a new certificate and reinstall Kaspersky Endpoint Security on each of the managed devices.
To reissue the Administration Server certificate with delayed activation (to use a certificate as a reserve one):
- In the console tree, in the context menu of the Administration Server, select Properties.
- In the Administration Server properties window, select Administration server connection settings → Certificates.
- If you plan to continue using the certificate issued by Kaspersky Security Center:
- In the Administration Server authentication by mobile devices group of settings, select the Certificate issued through Administration Server option and click Reissue.
- In the Reissue certificate window that opens:
- In the Connection address group of settings, select Use old connection address or Change connection address to, if a new connection address will be used.
- In the Activation term group of settings, select After this period expires, days to use the certificate as a reserve one.
It is recommended to specify a certificate activation period of at least 30 days so that all devices have time to receive the certificate. Please note that the specified period must be greater than the period for synchronizing devices with the Administration Server. For more information about configuring settings for device synchronization with the Administration Server, see the Configuring synchronization settings section.
- Click OK.
- In the confirmation window, click Yes.
Alternatively, if you plan to use your own custom certificate:
- Check whether your certificate meets the requirements of Kaspersky Security Center and the requirements for trusted certificates by Apple. If necessary, modify the certificate.
- Select the Other certificate option and click Browse.
- In the Certificate window that opens, in the Certificate type field, select the type of your certificate and then specify the certificate location and settings:
- If you select PKCS #12 container, click the Browse button next to the Certificate file field and specify the certificate file on your hard drive. If the certificate file is password-protected, enter the password in the Password (if any) field.
- If you select X.509 certificate, click the Browse button next to the Private key (.prk, .pem) field and specify the private key on your hard drive. If the private key is password-protected, enter the password in the Password (if any) field. Then click the Browse button next to the Public key (.cer) field and specify the private key on your hard drive.
- In the Activation term group of settings, select After this period expires, days to use the certificate as a reserve one.
- In the Certificate window, click OK.
- In the confirmation window, click Yes.
The certificate is reissued for use as the Administration Server certificate or as a reserve one.
To immediately reissue the Administration Server certificate (not recommended if you have any managed mobile devices):
Do not select Immediately if you have any managed mobile devices. If you select this option, the connection with all managed devices will be lost, since the new certificate will not be delivered to devices, and the previously existing certificate will no longer be valid.
- In the console tree, in the context menu of the Administration Server, select Properties.
- In the Administration Server properties window, select Administration server connection settings → Certificates.
- If you plan to continue using the certificate issued by Kaspersky Security Center:
- In the Administration Server authentication by mobile devices group of settings, select the Certificate issued through Administration Server option and click Reissue.
- In the Reissue certificate window that opens:
- In the Connection address group of settings, select Use old connection address or Change connection address to, if a new connection address will be used.
- In the Activation term group of settings, select Immediately.
- Click OK.
- In the confirmation window, click Yes.
Alternatively, if you plan to use your own custom certificate:
- Check whether your certificate meets the requirements of Kaspersky Security Center and the requirements for trusted certificates by Apple. If necessary, modify the certificate.
- Select the Other certificate option and click Browse.
- In the Certificate window that opens, in the Certificate type field select the type of your certificate and then specify the certificate location and settings:
- If you select PKCS #12 container, click the Browse button next to the Certificate file field and specify the certificate file on your hard drive. If the certificate file is password-protected, enter the password in the Password (if any) field.
- If you select X.509 certificate, click the Browse button next to the Private key (.prk, .pem) field and specify the private key on your hard drive. If the private key is password-protected, enter the password in the Password (if any) field. Then click the Browse button next to the Public key (.cer) field and specify the private key on your hard drive.
- In the Activation term group of settings, select Immediately.
- In the Certificate window, click OK.
- In the confirmation window, click Yes.
The certificate is reissued for use as the Administration Server certificate or as a reserve one.
For more information about certificates, please refer to the Kaspersky Security Center Help.
Page top
The help for this version of the solution is no longer updated, so it may contain outdated information. For up-to-date information about the solution refer to the Kaspersky Secure Mobility Management 4.1 Help.
Configuring certificate issuance rules
The certificates are used for the device authentication on the Administration Server. All managed mobile devices must have certificates. You can configure how the certificates are issued.
To configure certificate issuance rules:
- In the console tree, expand the Mobile Device Management folder and select the Certificates subfolder.
- In the workspace of the Certificates folder, click the Add certificate button to open the Certificate issuance rules window.
- Proceed to the section with the name of a certificate type:
Issuance of mobile certificates—To configure the issuance of certificates for the mobile devices.
Issuance of mail certificates—To configure the issuance of mail certificates.
Issuance of VPN certificates—To configure the issuance of VPN certificates.
- In the Issuance settings section, configure the issuance of the certificate:
- Specify the certificate term in days.
- Select a certificate source (Administration Server or Certificates are specified manually).
Administration Server is selected as the default source of certificates.
- Specify a certificate template (Default template, Other template).
Configuration of templates is available if the Integration with PKI section features the integration with Public Key Infrastructure enabled.
- For VPN and mail certificates if the integration with the PKI is configured, enable and configure automatic issuance of the certificate on device connection to Kaspersky Security Center.
To do so, in the Automatic issuance of <certificate type> certificate on device connection section, select the Issue for KES devices managed by Kaspersky Secure Mobility Management and/or Issue for iOS MDM devices check boxes.
If you selected the Issue for iOS MDM devices check box, select the tag for the certificate issuance from the drop-down list. The following tags are available: Certificate template 1, Certificate template 2, or Certificate template 3.
You can configure the further use of the selected tag for the certificate issuance in the following sections:
- If the Issuance of mail certificates section has been selected in the Certificate issuance rules window:
- In the properties of the Email account for iOS MDM devices.
- In the properties of the Exchange ActiveSync account for iOS MDM devices.
- If the Issuance of VPN certificates section has been selected in the Certificate issuance rules window:
- In the properties of the VPN network for iOS MDM devices.
- In the properties of the Wi-Fi network for iOS MDM devices.
- If the Issuance of mail certificates section has been selected in the Certificate issuance rules window:
- In the Automatic Updates settings section, configure automatic updates of the certificate:
- In the Renew when certificate is to expire in (days) field, specify how many days before expiration the certificate must be renewed.
- To enable automatic updates of certificates, select the Reissue certificate automatically if possible check box.
A mobile certificate can be renewed manually only.
- In the Password protection section, enable and configure the use of a password when decrypting certificates.
Password protection is only available for mobile certificates.
- Select the Prompt for password during certificate installation check box.
- Use the slider to define the maximum number of symbols in the password for encryption.
- Click OK.
The help for this version of the solution is no longer updated, so it may contain outdated information. For up-to-date information about the solution refer to the Kaspersky Secure Mobility Management 4.1 Help.
Creating a certificate of mobile devices
You can create the following types of certificates on a user's mobile device:
- Mobile certificates for identifying the mobile device
- Mail certificates for configuring the corporate mail on the mobile device
- VPN certificate for configuring access to a virtual private network on the mobile device
To create a certificate of mobile devices:
- In the console tree, select the Mobile Device Management → Certificates folder.
- In the workspace of the Certificates folder, click the Add certificate button to start the Certificate Installation wizard.
- At the Certificate type step of the wizard, specify the type of certificate that must be installed on the user's mobile device:
- Mobile certificate
This certificate is needed for identifying the mobile device.
- Mail certificate
This certificate is needed for configuring the corporate mail on the mobile device.
- VPN certificate
This certificate is needed for configuring access to a virtual private network on the mobile device.
- Mobile certificate
- At the Selecting device type step of the wizard, specify the type of the operating system on the device:
- iOS MDM device
Select this option if you want to install a certificate on a mobile device that is connected to the iOS MDM Server by using iOS MDM protocol.
- KES device managed by Kaspersky Security for Mobile
Select this option if you want to install a certificate on a KES device. In this case, the certificate will be used for user identification upon every connection to the Administration Server.
- KES device connected to Administration Server without user certificate authentication
Select this option if you want to install a certificate on a KES device using no certificate authentication. In this case, at the final step of the wizard, in the User notification method window you must select the user authentication type used at every connection to the Administration Server.
This step is displayed only if you selected Mail certificate or VPN certificate as the certificate type.
- iOS MDM device
- At the User selection step of the wizard, select users, user groups, or Active Directory user groups for which you want to create the certificate.
- At the Certificate source step of the wizard, select the method by which the certificate is created.
- To create a certificate automatically by using Administration Server tools, select Issue certificate through Administration Server tools.
- To assign a previously created certificate to a user, select the Specify certificate file option. Click the Browse button to open the Certificate window and specify the certificate file in it.
- At the Certificate publishing settings step of the wizard, select the Do not notify the user about a new certificate check box if you do not want to notify the user about certificate creation. In this case, the User notification method step will not be displayed.
- At the User notification method step of the wizard, configure the settings of mobile device user notification about certificate creation using a text message or via email.
This step is not displayed if you selected iOS MDM device as the device type or if you selected the Do not notify the user about a new certificate option.
- In the Authentication method field, specify the user authentication type:
This field is displayed if you selected Mobile certificate in the Certificate type window or if you selected KES device connected to Administration Server without user certificate authentication as the device type.
- Select the user notification option:
- In the Authentication method field, specify the user authentication type:
- At the Generating the certificate step of the wizard, click Done to finish the Certificate Installation wizard.
After the wizard finishes, a certificate is created and added to the list of the user's certificates; in addition, a notification is sent to the user, providing the user with a link for downloading and installing the certificate on the mobile device. You can delete and reissue certificates, as well as view their properties.
Page top
The help for this version of the solution is no longer updated, so it may contain outdated information. For up-to-date information about the solution refer to the Kaspersky Secure Mobility Management 4.1 Help.
Integration with Public Key Infrastructure
Integration with Public Key Infrastructure (hereinafter referred to as PKI) is primarily intended for simplifying the issuance of domain user certificates by Administration Server. Following integration, certificates are issued automatically.
The minimum supported PKI server version is Windows Server 2008.
The administrator can assign a domain certificate for a user in Administration Console. This can be done by using one of the following methods:
- Assign the user a special (customized) certificate from a file in the Certificate installation wizard.
- Perform integration with PKI and assign PKI to act as the source of certificates for a specific type of certificates or for all types of certificates.
General principle of integration with PKI for issuance of domain user certificates
Please note the following:
- The settings of integration with PKI provide you the possibility to specify the default template for all types of certificates. Note that the rules for issuance of certificates (available in the workspace of the Mobile Device Management / Certificates folder by clicking the Configure certificate issuance rules button) allow you to specify an individual template for every type of certificates.
- A special Enrollment Agent (EA) certificate must be installed on the device with Administration Server, in the certificates repository of the account under which integration with PKI is performed. The Enrollment Agent (EA) certificate is issued by the administrator of the domain's CA (Certificate Authority).
The account under which integration with PKI is performed must meet the following criteria:
- It is a domain user.
- It is a local administrator of the device with Administration Server from which integration with PKI is initiated.
- It has the right to Log On As Service.
- The device with Administration Server installed must be run at least once under this account to create a permanent user profile.
To create a permanent user profile, log on at least once under the configured user account on the device with Administration Server installed. In this user's certificate repository on the Administration Server device, install the Enrollment Agent certificate provided by domain administrators.
Configuring integration with PKI
To configure integration with the public keys infrastructure:
- In the console tree, expand the Mobile Device Management folder and select the Certificates subfolder.
- In the workspace, click the Certificate type button to open the Integration with PKI section of the Certificate issuance rules window.
The Integration with PKI section of the Certificate issuance rules window opens.
- Select the Integrate issuance of certificates with PKI check box.
- In the Account field, specify the name of the user account to be used for integration with the public key infrastructure.
- In the Password field, enter the domain password for the account.
- In the Certificate template name in PKI system list, select the certificate template that will be used for the issuance of certificates to domain users.
A dedicated service is run in Kaspersky Endpoint Security under the specified user account. This service is responsible for issuing users' domain certificates. The service is run when the list of certificate templates is loaded by clicking the Refresh list button or when a certificate is generated.
When connecting a non-domain user's mobile device (running either Android or iOS) to Kaspersky Security Center, the attempt to issue a certificate may fail.
- Click OK to save the settings.
Following integration, certificates are issued automatically.
The help for this version of the solution is no longer updated, so it may contain outdated information. For up-to-date information about the solution refer to the Kaspersky Secure Mobility Management 4.1 Help.
Deploying mobile device management systems
This section describes the deployment of mobile device management systems by using the iOS MDM and Kaspersky Endpoint Security protocols.
The help for this version of the solution is no longer updated, so it may contain outdated information. For up-to-date information about the solution refer to the Kaspersky Secure Mobility Management 4.1 Help.
Scenario: Mobile Device Management deployment
This section provides a scenario for configuring the Mobile Device Management feature in Kaspersky Security Center.
Prerequisites
Make sure that you have a license that grants access to the Mobile Device Management feature.
Stages
Deployment of the Mobile Device Management feature proceeds in stages:
- Preparing the ports
Make sure that port 13292 is available on the Administration Server. This port is required for connecting mobile devices. Also, you may want to make port 17100 available. This port is only required for the activation proxy server for managed mobile devices; if managed mobile devices have internet access, you do not have to make this port available.
- Enabling Mobile Device Management
You can enable Mobile Device Management when you are running the Administration Server quick start wizard or later.
- Specifying the external address of the Administration Server
You can specify the external address when you run the Administration Server quick start wizard or later. If you did not select Mobile Device Management for installation and did not specify the address in the installation wizard, specify the external address in the installation package properties.
- Adding mobile devices to the Managed devices group
Add the mobile devices to the Managed devices group so that you can manage these devices through policies. You can create a moving rule in one of the steps of the Administration Server quick start wizard. You can also create the moving rule later. If you do not create such a rule, you can add mobile devices to the Managed devices group manually.
You can add mobile devices to the Managed devices group directly, or you can create a subgroup (or multiple subgroups) for them.
At any time afterward, you can connect any new mobile device to the Administration Server using the Mobile device connection wizard.
- Creating a policy for mobile devices
To manage mobile devices, create a policy (or multiple polices) for them in the group where these devices belong. You can change the settings of this policy at any time afterward.
Results
Upon completion of the scenario, you can manage Android and iOS devices by using Kaspersky Security Center. You can work with certificates of mobile devices and send commands to mobile devices.
Page top
The help for this version of the solution is no longer updated, so it may contain outdated information. For up-to-date information about the solution refer to the Kaspersky Secure Mobility Management 4.1 Help.
Enabling Mobile Device Management
To manage mobile devices, you must enable Mobile Device Management. If you did not enable this feature in the quick start wizard of Kaspersky Security Center, you can enable it later. Mobile Device Management requires a license.
Enabling Mobile Device Management is only available on the primary Administration Server.
To enable Mobile Device Management:
- In the console tree, select the Mobile Device Management folder.
- In the workspace of the folder, click the Enable Mobile Device Management button. This button is only available if you have not enabled Mobile Device Management before.
The Additional components page of the Administration Server quick start wizard is displayed.
- Select Enable Mobile Device Management in order to manage mobile devices.
- On the Select application activation method page, activate the application by using a key file or activation code.
Management of mobile devices will not be possible until you activate the Mobile Device Management feature.
- On the Proxy server settings to gain access to the Internet page, select the Use proxy server check box if you want to use a proxy server when connecting to the internet. When this check box is selected, the fields become available for entering settings. Specify the settings for proxy server connection.
- On the Check for updates for plug-ins and installation packages page, select one of the following options:
- Check whether plug-ins and installation packages are up to date
- Skip check
Skipping the check of updates for plug-ins may result in improper functioning of the application.
- On the Latest plug-in versions available page, download and install the latest versions of plug-ins in the language that your application version requires. Updating the plug-ins does not require a license.
After you install the plug-ins and packages, the application checks whether all plug-ins required for proper functioning of mobile devices have been installed. If outdated versions of some plug-ins are detected, the wizard prompts you to download up-to-date versions to replace the outdated ones.
- On the Mobile device connection settings page, set up the Administration Server ports.
When the wizard completes, the following changes will be made:
- The Kaspersky Endpoint Security for Android policy will be created.
- The Kaspersky Device Management for iOS policy will be created.
- Ports will be opened on the Administration Server for mobile devices.
The help for this version of the solution is no longer updated, so it may contain outdated information. For up-to-date information about the solution refer to the Kaspersky Secure Mobility Management 4.1 Help.
Deploying a management system using the iOS MDM protocol
Kaspersky Endpoint Security lets you manage mobile devices running iOS. iOS MDM devices are iOS mobile devices that are connected to an iOS MDM Server and managed by an Administration Server.
Mobile devices are connected to an iOS MDM Server through the following steps:
- The administrator installs the iOS MDM Server.
- The administrator gets an Apple Push Notification Service (APNs) certificate.
The APNs certificate lets Administration Server connect to the APNs server to send push notifications to iOS MDM devices.
- The administrator installs the APNs certificate on the iOS MDM Server.
- The administrator creates an iOS MDM profile for the user of the iOS mobile device.
The iOS MDM profile contains a collection of settings for connecting iOS mobile devices to the Administration Server.
After the iOS MDM profile is installed and the iOS MDM device is synchronized with the Administration Server, the device is displayed in the Mobile devices folder, which is a subfolder of the Mobile Device Management folder in the console tree.
The help for this version of the solution is no longer updated, so it may contain outdated information. For up-to-date information about the solution refer to the Kaspersky Secure Mobility Management 4.1 Help.
iOS MDM Server deployment scenarios
The number of copies of iOS MDM Server to be installed can be selected either based on available hardware or on the total number of mobile devices covered.
Please keep in mind that the recommended maximum number of mobile devices for a single installation of Kaspersky Device Management for iOS is 50,000 at most. In order to reduce the load, the entire pool of devices can be distributed among several servers that have iOS MDM Server installed.
Authentication of iOS MDM devices is performed through user certificates (any profile installed on a device contains the certificate of the device owner). Thus, two deployment schemes are possible for an iOS MDM Server:
Page top
The help for this version of the solution is no longer updated, so it may contain outdated information. For up-to-date information about the solution refer to the Kaspersky Secure Mobility Management 4.1 Help.
Simplified deployment scheme
When deploying an iOS MDM Server under the simplified scheme, mobile devices connect to the iOS MDM web service directly. In this case, user certificates issued by Administration Server can only be applied for devices authentication. Integration with Public Key Infrastructure (PKI) is impossible for user certificates.
Page top
The help for this version of the solution is no longer updated, so it may contain outdated information. For up-to-date information about the solution refer to the Kaspersky Secure Mobility Management 4.1 Help.
Deployment scheme involving Kerberos constrained delegation (KCD)
The deployment scheme with Kerberos constrained delegation (KCD) requires the Administration Server and the iOS MDM Server to be located on the internal network of the organization.
This deployment scheme provides for the following:
- Integration with Microsoft Forefront TMG
- Use of KCD for authentication of mobile devices
- Integration with the PKI for applying user certificates
When using this deployment scheme, you must do the following:
- In Administration Console, in the settings of the iOS MDM web service, select the Ensure compatibility with Kerberos constrained delegation check box.
- As the certificate for the iOS MDM web service, specify the customized certificate that was defined when the iOS MDM web service was published on TMG.
- User certificates for iOS devices must be issued by the Certificate Authority (CA) of the domain. If the domain contains multiple root CAs, user certificates must be issued by the CA that was specified when the iOS MDM web service was published on TMG.
You can ensure that the user certificate is in compliance with the this CA-issuance requirement by using one of the following methods:
- Specify the user certificate in the New iOS MDM profile wizard and in the Certificate installation wizard.
- Integrate the Administration Server with the domain's PKI and define the corresponding setting in the rules for issuance of certificates:
- In the console tree, expand the Mobile Device Management folder and select the Certificates subfolder.
- In the workspace of the Certificates folder, click the Configure certificate issuance rules button to open the Certificate issuance rules window.
- In the Integration with PKI section, configure integration with the Public Key Infrastructure.
- In the Issuance of mobile certificates section, specify the source of certificates.
Below is an example of setup of Kerberos Constrained Delegation (KCD) with the following assumptions:
- The iOS MDM web service is running on port 443.
- The name of the device with TMG is tmg.mydom.local.
- The name of device with the iOS MDM web service is iosmdm.mydom.local.
- The name of external publishing of the iOS MDM web service is iosmdm.mydom.global.
Service Principal Name for http/iosmdm.mydom.local
In the domain, you have to register the service principal name (SPN) for the device with the iOS MDM web service (iosmdm.mydom.local):
setspn -a http/iosmdm.mydom.local iosmdm
Configuring the domain properties of the device with TMG (tmg.mydom.local)
To delegate traffic, trust the device with TMG (tmg.mydom.local) to the service that is defined by the SPN (http/iosmdm.mydom.local).
To trust the device with TMG to the service defined by the SPN (http/iosmdm.mydom.local), the administrator must perform the following actions:
- In the Microsoft Management Console snap-in named "Active Directory Users and Computers", select the device with TMG installed (tmg.mydom.local).
- In the device properties, on the Delegation tab, set the Trust this computer for delegation to specified service only toggle to Use any authentication protocol.
- Add the SPN (http/iosmdm.mydom.local) to the Services to which this account can present delegated credentials list.
Special (customized) certificate for the published web service (iosmdm.mydom.global)
You have to issue a special (customized) certificate for the iOS MDM web service on the FQDN iosmdm.mydom.global and specify that it replaces the default certificate in the settings of iOS MDM web service in Administration Console.
Please note that the certificate container (file with the p12 or pfx extension) must also contain a chain of root certificates (public keys).
Publishing the iOS MDM web service on TMG
On TMG, for traffic that goes from a mobile device to port 443 of iosmdm.mydom.global, you have to configure KCD on the SPN (http/iosmdm.mydom.local), using the certificate issued for the FQDN (iosmdm.mydom.global). Please note that publishing, and the published web service must share the same server certificate.
The help for this version of the solution is no longer updated, so it may contain outdated information. For up-to-date information about the solution refer to the Kaspersky Secure Mobility Management 4.1 Help.
Enabling support of Kerberos Constrained Delegation
The application supports usage of Kerberos Constrained Delegation.
To enable support of Kerberos Constrained Delegation:
- In the console tree, open the Mobile Device Management folder.
- In the Mobile Device Management folder in the console tree, select the Mobile Device Servers subfolder.
- In the workspace of the Mobile Device Servers folder, select an iOS MDM Server.
- In the context menu of the iOS MDM Server, select Properties.
- In the properties window of the iOS MDM Server, select the Settings section.
- In the Settings section, select the Ensure compatibility with Kerberos constrained delegation check box.
- Click OK.
The help for this version of the solution is no longer updated, so it may contain outdated information. For up-to-date information about the solution refer to the Kaspersky Secure Mobility Management 4.1 Help.
Installing iOS MDM Server
To install iOS MDM Server on a client device:
- In the Mobile Device Management folder of the console tree, select the Mobile Device Servers subfolder.
- Click the Install iOS MDM Server button.
The iOS MDM Server Deployment wizard starts. Proceed through the wizard by using the Next button.
- At the Select installation package step of the wizard, select the iOS MDM Server installation package that you want to install.
If there is no suitable package in the list, click the New button and create the required package.
- If necessary, at the Selecting Network Agent installation package for combined installation step of the wizard, keep the Install Network Agent together with this application check box, and then select the Network Agent version that you want to install. is needed for the iOS MDM Server to connect to Kaspersky Security Center. You can skip this step if Network Agent is already installed on the device where you plan to install the iOS MDM Server.
- At the Connection settings step of the wizard, in the External port for connection to iOS MDM field, specify an external port for connecting mobile devices to the iOS MDM service.
External port 5223 is used by mobile devices for communication with the APNs server. Make sure that port 5223 is open in the firewall for connection with the address range 17.0.0.0/8.
Port 443 is used for connection to iOS MDM Server by default. If port 443 is already in use by another service or application, it can be replaced with, for example, port 9443.
The iOS MDM Server uses external port 2197 to send notifications to the APNs server.
APNs servers run in load-balancing mode. Mobile devices do not always connect to the same IP addresses to receive notifications. The 17.0.0.0/8 address range is reserved for Apple, and it is therefore recommended to specify this entire range as an allowed range in Firewall settings.
- If you want to configure interaction ports for application components manually, select the Set up local ports manually option, and then specify values for the following settings:
- Port for connection to Network Agent
In this field, specify a port for connecting the iOS MDM service to Network Agent. The default port number is 9799.
- Local port to connect to iOS MDM service
In this field, specify a local port for connecting Network Agent to the iOS MDM service. The default port number is 9899.
It is recommended to use default values.
- Port for connection to Network Agent
- Under iOS MDM Server address, specify the address of the client device on which iOS MDM Server is to be installed.
This address will be used for connecting managed mobile devices to the iOS MDM service. The client device must be available for connection of iOS MDM devices.
You can specify the address of a client device in any of the following formats:
- Use device FQDN
The fully qualified domain name (FQDN) of the device will be used.
- Use this address
Specify the specific address of the device manually.
Please avoid adding the URL scheme and the port number in the address string: these values will be added automatically.
- Use device FQDN
- At the Select devices for installation step of the wizard, select the devices on which you want to install the iOS MDM Server.
- At the Move to list of managed devices step of the wizard, select whether you want to move the devices to any administration group after Network Agent installation.
This option is applicable if you selected one or more unassigned devices at the previous step. If you selected only managed devices, skip this step.
- Define other settings of the wizard. For detailed information about the remote installation of apps, please refer to Kaspersky Security Center help.
When the wizard finishes, iOS MDM Server is installed on the selected devices. The iOS MDM Server is displayed in the Mobile Device Management folder in the console tree.
The wizard proceeds to the Install APNs certificate step. If you do not want to manage the certificate right now, you can create a certificate or install an already existing certificate later.
Page top
The help for this version of the solution is no longer updated, so it may contain outdated information. For up-to-date information about the solution refer to the Kaspersky Secure Mobility Management 4.1 Help.
Receiving an APNs certificate
If you already have an APNs certificate, please consider renewing it instead of creating a new one. When you replace the existing APNs certificate with a newly created one, the Administration Server loses the ability to manage the currently connected iOS mobile devices.
When the Certificate Signing Request (CSR) is created at the first step of the APNs Certificate Wizard, its private key is stored in the RAM of your device. Therefore, all the steps of the wizard must be completed within a single session of the application.
To receive an APNs certificate:
- In the Mobile Device Management folder of the console tree, select the Mobile Device Servers subfolder.
- In the workspace of the Mobile Device Servers folder, select an iOS MDM Server.
- In the context menu of the iOS MDM Server, select Properties.
This opens the properties window of the iOS MDM Server.
- In the properties window of the iOS MDM Server, select the Certificates section.
- In the Certificates section, in the Apple Push Notification certificate group of settings, click the Request new button.
The Request new APNs certificate wizard starts.
- Create a Certificate Signing Request (hereinafter referred to as CSR):
- Click the Create CSR button.
- In the Create CSR window that opens, specify a name for your request, the names of your company and department, your city, region, and country.
- Click the Save button and specify a name for the file to which your CSR will be saved.
The private key of the certificate is saved in the device memory.
- Use your CompanyAccount to send the file with the CSR you have created to Kaspersky to be signed.
Signing of your CSR will only be available after you upload to CompanyAccount portal a key that allows using Mobile Device Management.
After your online request is processed, you will receive a CSR file signed by Kaspersky.
- Send the signed CSR file to Apple Inc. website, using a random Apple ID.
We recommend that you avoid using a personal Apple ID. Create a dedicated Apple ID to make it your corporate ID. After you have created an Apple ID, link it with the organization's mailbox, not a mailbox of an employee.
After your CSR is processed in Apple Inc., you will receive the public key of the APNs certificate. Save the file on disk.
- Export the APNs certificate together with the private key created when generating the CSR, in PFX file format:
- In the Request new APNs certificate wizard, click the Complete CSR button.
- In the Open window, choose a file with the public key of the certificate received from Apple Inc. as the result of CSR processing, and then click the Open button.
The certificate export process starts.
- In the next window, enter the private key password and click OK.
This password will be used for the APNs certificate installation on the iOS MDM Server.
- In the Save APNs certificate window that opens, specify a file name for APNs certificate, choose a folder, and then click Save.
The private and public keys of the certificate are combined, and the APNs certificate is saved in PFX format. After this, you can install the APNs certificate on the iOS MDM Server.
The help for this version of the solution is no longer updated, so it may contain outdated information. For up-to-date information about the solution refer to the Kaspersky Secure Mobility Management 4.1 Help.
Renewing an APNs certificate
To renew an APNs certificate:
- In the Mobile Device Management folder of the console tree, select the Mobile Device Servers subfolder.
- In the workspace of the Mobile Device Servers folder, select an iOS MDM Server.
- In the context menu of the iOS MDM Server, select Properties.
This opens the properties window of the iOS MDM Server.
- In the properties window of the iOS MDM Server, select the Certificates section.
- In the Certificates section, in the Apple Push Notification certificate group of settings click the Renew button.
The Renew APNs certificate wizard starts.
- Create a Certificate Signing Request (hereinafter referred to as CSR):
- Click the Create CSR button.
- In the Create CSR window that opens, specify a name for your request, the names of your company and department, your city, region, and country.
- Click the Save button and specify a name for the file to which your CSR will be saved.
The private key of the certificate is saved in the device memory.
- Use your CompanyAccount to send the file with the CSR you have created to Kaspersky to be signed.
Signing of your CSR will only be available after you upload to CompanyAccount portal a key that allows using Mobile Device Management.
After your online request is processed, you will receive a CSR file signed by Kaspersky.
- Send the signed CSR file to Apple Inc. website, using a random Apple ID.
We recommend that you avoid using a personal Apple ID. Create a dedicated Apple ID to make it your corporate ID. After you have created an Apple ID, link it with the organization's mailbox, not a mailbox of an employee.
After your CSR is processed in Apple Inc., you will receive the public key of the APNs certificate. Save the file on disk.
- Request the public key of the certificate. To do this, perform the following actions:
- Proceed to Apple Push Certificates portal. To log in to the portal, use the Apple Id received at the initial request of the certificate.
- In the list of certificates, select the certificate whose APSP name (in "APSP: <number>" format) matches the APSP name of the certificate used by iOS MDM Server and click the Renew button.
The APNs certificate is renewed.
- Save the certificate created on the portal.
- Export the APNs certificate together with the private key created when generating the CSR, in PFX file format:
- In the Renew APNs certificate wizard, click the Complete CSR button.
- In the Open window, choose a file with the public key of the certificate, received from Apple Inc. as the result of CSR processing, and click the Open button.
The certificate export process will start.
- In the next window, enter the private key password and click OK.
This password will be used for the APNs certificate installation on the iOS MDM Server.
- In the Renew APNs certificate window that opens, specify a file name for APNs certificate, choose a folder, and then click Save.
The private and public keys of the certificate are combined, and the APNs certificate is saved in PFX format.
The help for this version of the solution is no longer updated, so it may contain outdated information. For up-to-date information about the solution refer to the Kaspersky Secure Mobility Management 4.1 Help.
Configuring a reserve iOS MDM Server certificate
The iOS MDM Server functionality enables you to issue a reserve certificate. This certificate is intended for use in iOS MDM profiles, to ensure seamless switching of managed iOS devices after the iOS MDM Server certificate expires.
If your iOS MDM Server uses a default certificate issued by Kaspersky, you can issue a reserve certificate (or specify your own custom certificate as reserve) before the iOS MDM Server certificate expires. By default, the reserve certificate is automatically issued 60 days before the iOS MDM Server certificate expiration. The reserve iOS MDM Server certificate becomes the main certificate immediately after the iOS MDM Server certificate expiration. The public key is distributed to all managed devices through configuration profiles, so you do not have to transmit it manually.
To issue an iOS MDM Server reserve certificate or specify a custom reserve certificate:
- In the console tree, in the Mobile Device Management folder, select the Mobile Device Servers subfolder.
- In the list of Mobile Device Servers, select the relevant iOS MDM Server, and on the right pane, click the Configure iOS MDM Server button.
- In the iOS MDM Server settings window that opens, select the Certificates section.
- In the Reserve certificate block of settings, do one of the following:
- If you plan to continue using a self-signed certificate (that is, the one issued by Kaspersky):
- Click the Issue button.
- In the Activation date window that opens, select one of the two options for the date when the reserve certificate must be applied:
- If you want to apply the reserve certificate at the time of expiration of the current certificate, select the When current certificate expires option.
- If you want to apply the reserve certificate before the current certificate expires, select the After specified period (days) option. In the entry field next to this option, specify the duration of the period after which the reserve certificate must replace the current certificate.
The validity period of the reserve certificate that you specify cannot exceed the validity term of the current iOS MDM Server certificate.
- Click the OK button.
The reserve iOS MDM Server certificate is issued.
- If you plan to use a custom certificate issued by your certification authority:
- Click the Add button.
- In the File Explorer window that opens, specify a certificate file in the PEM, PFX, or P12 format, which is stored on your device, and then click the Open button.
Your custom certificate is specified as the reserve iOS MDM Server certificate.
- If you plan to continue using a self-signed certificate (that is, the one issued by Kaspersky):
You have a reserve iOS MDM Server certificate specified. The details of the reserve certificate are displayed in the Reserve certificate block of settings (certificate name, issuer name, expiration date, and the date the reserve certificate must be applied, if any).
The help for this version of the solution is no longer updated, so it may contain outdated information. For up-to-date information about the solution refer to the Kaspersky Secure Mobility Management 4.1 Help.
Installing an APNs certificate on an iOS MDM Server
After you receive the APNs certificate, you must install it on the iOS MDM Server.
To install the APNs certificate on the iOS MDM Server:
- In the Mobile Device Management folder of the console tree, select the Mobile Device Servers subfolder.
- In the workspace of the Mobile Device Servers folder, select an iOS MDM Server.
- In the context menu of the iOS MDM Server, select Properties.
This opens the properties window of the iOS MDM Server.
- In the properties window of the iOS MDM Server, select the Certificates section.
- In the Certificates section, in the Apple Push Notification certificate group of settings click the Install button.
- Select the PFX file that contains the APNs certificate.
- Enter the password of the private key specified when exporting the APNs certificate.
The APNs certificate will be installed on the iOS MDM Server. The certificate details will be displayed in the properties window of the iOS MDM Server, in the Certificates section.
Page top
The help for this version of the solution is no longer updated, so it may contain outdated information. For up-to-date information about the solution refer to the Kaspersky Secure Mobility Management 4.1 Help.
Configuring access to Apple Push Notification service
To ensure a proper functioning of the iOS MDM web service and timely responses of mobile devices to the administrator's commands, you need to specify an Apple Push Notification Service certificate (hereinafter referred to as APNs certificate) in the iOS MDM Server settings.
Interacting with Apple Push Notification (hereinafter referred to as APNs), the iOS MDM web service connects to the external address api.push.apple.com through port 2197 (outbound). Therefore, the iOS MDM web service requires access to port TCP 2197 for the range of addresses 17.0.0.0/8. From the iOS device side is access to port TCP 5223 for the range of addresses 17.0.0.0/8.
If you intend to access APNs from the iOS MDM web service side through a proxy server, you must perform the following actions on the device with the iOS MDM web service installed:
- Add the following strings to the registry:
- For 32-bit operating systems:
HKEY_LOCAL_MACHINE\SOFTWARE\KasperskyLab\Components\34\Connectors\KLIOSMDM\1.0.0.0\Conset
"ApnProxyHost"="<Proxy Host Name>"
"ApnProxyPort"="<Proxy Port>"
"ApnProxyLogin"="<Proxy Login>"
"ApnProxyPwd"="<Proxy Password>"
- For 64-bit operating systems:
HKEY_LOCAL_MACHINE\SOFTWARE\Wow6432Node\KasperskyLab\Components\34\Connectors\KLIOSMDM\1.0.0.0\Conset
"ApnProxyHost"="<Proxy Host Name>"
"ApnProxyPort"="<Proxy Port>"
"ApnProxyLogin"="<Proxy Login>"
"ApnProxyPwd"="<Proxy Password>"
- Restart the iOS MDM web service.
The help for this version of the solution is no longer updated, so it may contain outdated information. For up-to-date information about the solution refer to the Kaspersky Secure Mobility Management 4.1 Help.
Connecting KES devices to the Administration Server
Depending on the method used for connection of devices to the Administration Server, two deployment schemes are possible for Kaspersky Device Management for iOS for KES devices:
- Scheme of deployment with direct connection of devices to the Administration Server
- Scheme of deployment involving Forefront Threat Management Gateway (TMG)
The help for this version of the solution is no longer updated, so it may contain outdated information. For up-to-date information about the solution refer to the Kaspersky Secure Mobility Management 4.1 Help.
Direct connection of devices to the Administration Server
KES devices can connect directly to port 13292 of the Administration Server.
Depending on the method used for authentication, two options are possible for connection of KES devices to the Administration Server:
- Connecting devices with a user certificate
- Connecting devices without a user certificate
Connecting a device with a user certificate
When connecting a device with a user certificate, that device is associated with the user account to which the corresponding certificate has been assigned through Administration Server tools.
In this case, two-way SSL authentication (mutual authentication) will be used. Both the Administration Server and the device will be authenticated with certificates.
Connecting a device without a user certificate
When connecting a device without a user certificate, that device is associated with none of the user's accounts on the Administration Server. However, when the device receives any certificate, the device will be associated with the user to which the corresponding certificate has been assigned through Administration Server tools.
When connecting that device to the Administration Server, one-way SSL authentication will be applied, which means that only the Administration Server is authenticated with the certificate. After the device retrieves the user certificate, the type of authentication will change to two-way SSL authentication (2-way SSL authentication, mutual authentication).
Page top
The help for this version of the solution is no longer updated, so it may contain outdated information. For up-to-date information about the solution refer to the Kaspersky Secure Mobility Management 4.1 Help.
Scheme for connecting KES devices to the Server involving Kerberos constrained delegation (KCD)
The scheme for connecting KES devices to the Administration Server involving Kerberos constrained delegation (KCD) provides for the following:
- Integration with Microsoft Forefront TMG.
- Use of Kerberos Constrained Delegation (hereinafter referred to as KCD) for authentication of mobile devices.
- Integration with Public Key Infrastructure (hereinafter referred to as PKI) for applying user certificates.
When using this connection scheme, please note the following:
- The type of connection of KES devices to TMG must be "two-way SSL authentication", that is, a device must connect to TMG through its proprietary user certificate. To do this, you need to integrate the user certificate into the installation package of Kaspersky Endpoint Security for Android, which has been installed on the device. This KES package must be created by the Administration Server specifically for this device (user).
- You must specify the special (customized) certificate instead of the default server certificate for the mobile protocol:
- In the Administration Server properties window, in the Settings section, select the Open port for mobile devices check box and select Add certificate in the drop-down list.
- In the window that opens, specify the same certificate that was set on TMG when the point of access to the mobile protocol was published on the Administration Server.
- User certificates for KES devices must be issued by the Certificate Authority (CA) of the domain. Keep in mind that if the domain includes multiple root CAs, user certificates must be issued by the CA, which has been set in the publication on TMG.
You can make sure the user certificate is in compliance with the above-described requirement, using one of the following methods:
- Specify the special user certificate in the New package wizard and in the Certificate installation wizard.
- Integrate the Administration Server with the domain's PKI and define the corresponding setting in the rules for issuance of certificates:
- In the console tree, expand the Mobile Device Management folder and select the Certificates subfolder.
- In the workspace of the Certificates folder, click the Configure certificate issuance rules button to open the Certificate issuance rules window.
- In the Integration with PKI section, configure integration with the Public Key Infrastructure.
- In the Issuance of mobile certificates section, specify the source of certificates.
Below is an example of setup of Kerberos Constrained Delegation (KCD) with the following assumptions:
- Point of access to the mobile protocol on the Administration Server is set up on port 13292.
- The name of the device with TMG is tmg.mydom.local.
- The name of the device with Administration Server is ksc.mydom.local.
- Name of the external publishing of the point of access to the mobile protocol is kes4mob.mydom.global.
Domain account for Administration Server
You must create a domain account (for example, KSCMobileSrvcUsr) under which the Administration Server service will run. You can specify an account for the Administration Server service when installing the Administration Server or through the klsrvswch utility. The klsrvswch utility is located in the installation folder of Administration Server.
A domain account must be specified by the following reasons:
- The feature for management of KES devices is an integral part of Administration Server.
- To ensure a proper functioning of Kerberos Constrained Delegation (KCD), the receive side (i.e., the Administration Server) must run under a domain account.
Service Principal Name for http/kes4mob.mydom.local
In the domain, under the KSCMobileSrvcUsr account, add an SPN for publishing the mobile protocol service on port 13292 of the device with Administration Server. For the kes4mob.mydom.local device with Administration Server, this will appear as follows:
setspn -a http/kes4mob.mydom.local:13292 mydom\KSCMobileSrvcUsr
Configuring the domain properties of the device with TMG (tmg.mydom.local)
To delegate traffic, you must trust the device with TMG (tmg.mydom.local) to the service defined by the SPN (http/kes4mob.mydom.local:13292).
To trust the device with TMG to the service defined by the SPN (http/kes4mob.mydom.local:13292), the administrator must perform the following actions:
- In the Microsoft Management Console snap-in named "Active Directory Users and Computers", select the device with TMG installed (tmg.mydom.local).
- In the device properties, on the Delegation tab, set the Trust this computer for delegation to specified service only toggle to Use any authentication protocol.
- In the Services to which this account can present delegated credentials list, add the SPN http/kes4mob.mydom.local:13292.
Special (customized) certificate for the publishing (kes4mob.mydom.global)
To publish the mobile protocol of Administration Server, you must issue a special (customized) certificate for the FQDN kes4mob.mydom.global and specify it instead of the default server certificate in the settings of the mobile protocol of Administration Server in Administration Console. To do this, in the properties window of the Administration Server, in the Settings section select the Open port for mobile devices check box and then select Add certificate in the drop-down list.
Please note that the server certificate container (file with the p12 or pfx extension) must also contain a chain of root certificates (public keys).
Configuring publication on TMG
On TMG, for traffic that goes from the mobile device side to port 13292 of kes4mob.mydom.global, you have to configure KCD on the SPN (http/kes4mob.mydom.local:13292), using the server certificate issued for the FQND kes4mob.mydom.global. Please note that publishing and the published access point (port 13292 of the Administration Server) must share the same server certificate.
The help for this version of the solution is no longer updated, so it may contain outdated information. For up-to-date information about the solution refer to the Kaspersky Secure Mobility Management 4.1 Help.
Using Google Firebase Cloud Messaging
To ensure timely delivery of commands to KES devices managed by the Android operating system, Kaspersky Security Center uses the mechanism of push notifications. Push notifications are exchanged between KES devices and Administration Server through Google Firebase Cloud Messaging (hereinafter referred to as FCM). In Kaspersky Security Center Administration Console, you can specify the Google Firebase Cloud Messaging settings to connect KES devices to the service.
To retrieve the settings of Google Firebase Cloud Messaging, you must have a Google account.
To enable the use of FCM:
- In Administration Console, select the Mobile Device Management node, and the Mobile devices folder.
- In the context menu of the Mobile devices folder, select Properties.
- In the folder properties, select the Google Firebase Cloud Messaging settings section.
- In the Sender ID and Server key fields, specify the FCM settings: SENDER_ID and API Key.
At the next synchronization with Administration Server, KES devices managed by Android operating systems will be connected to Google Firebase Cloud Messaging.
You can edit the Google Firebase Cloud Messaging settings by clicking the Reset settings button.
FCM service runs in the following address ranges:
- From the KES device's side, access is required to ports 443 (HTTPS), 5228 (HTTPS), 5229 (HTTPS), and 5230 (HTTPS) of the following addresses:
- google.com
- fcm.googleapis.com
- android.apis.google.com
- All of the IP addresses listed in Google's ASN of 15169
- From the Administration Server side, access is required to port 443 (HTTPS) of the following addresses:
- fcm.googleapis.com
- All of the IP addresses listed in Google's ASN of 15169
If the proxy server settings (Advanced / Configuring Internet access) have been specified in the Administration Server properties in Administration Console, they will be used for interaction with FCM.
Configuring FCM: retrieving SENDER_ID and API Key
To configure FCM:
- Register on the Google portal.
- Go to the Firebase console.
- Do one of the following:
- To create a new project, click Create a project and follow the instructions on the screen.
- Open an existing project.
- Click the gear icon and choose Project settings.
The Project settings window opens.
- Select the Cloud Messaging tab.
- Open the 3-dot menu next to the Cloud Messaging API (Legacy) section and click Manage API in Google Cloud Console.
The Google Cloud console opens.
You can skip steps 6–8 if the Cloud Messaging API (Legacy) is already enabled for your project.
- In the Google Cloud console, click Enable.
- Go to the Firebase console and refresh the web page.
- Retrieve the relevant SENDER_ID from the Sender ID field in the Cloud Messaging API (Legacy) section.
- Retrieve the API Key from the Server key field.
Firebase Cloud Messaging is now configured.
Page top
The help for this version of the solution is no longer updated, so it may contain outdated information. For up-to-date information about the solution refer to the Kaspersky Secure Mobility Management 4.1 Help.
Disabling Mobile Device Management
Disabling Mobile Device Management is only available on the primary Administration Server.
To disable Mobile Device Management:
- In the console tree, select the Mobile Device Management folder.
- In the workspace of this folder, click the Add iOS mobile device link.
The Additional components page of the Administration Server quick start wizard is displayed.
- Select Do not enable Mobile Device Management if you do not want to manage mobile devices any longer.
- Click OK.
Previously connected mobile devices will not be able to connect to Administration Server. The port for mobile device connection and the port for mobile device activation will be closed automatically.
Policies that were created for Kaspersky Endpoint Security for Android and Kaspersky Device Management for iOS will not be deleted. The certificate issuance rules will not be modified. The plug-ins that have been installed will not be removed. The moving rule for mobile devices will not be deleted.
After you re-enable Mobile Device Management on managed mobile devices, you may have to reinstall mobile apps that are required for mobile device management.
The help for this version of the solution is no longer updated, so it may contain outdated information. For up-to-date information about the solution refer to the Kaspersky Secure Mobility Management 4.1 Help.
Installing Kaspersky Endpoint Security for Android
This section describes the methods for deploying Kaspersky Endpoint Security for Android on a corporate network.
The help for this version of the solution is no longer updated, so it may contain outdated information. For up-to-date information about the solution refer to the Kaspersky Secure Mobility Management 4.1 Help.
Permissions
For all features of apps, Kaspersky Endpoint Security for Android prompts the user for the required permissions. Kaspersky Endpoint Security for Android prompts for the mandatory permissions while completing the Setup Wizard, as well as after installation prior to using individual features of apps. It is impossible to install Kaspersky Endpoint Security for Android without providing the mandatory permissions.
On certain devices (for example, HUAWEI, Meizu, and Xiaomi), you must manually add Kaspersky Endpoint Security for Android to the list of apps that are started when the operating system starts in the device settings. If the app is not added to the list, Kaspersky Endpoint Security for Android stops performing all of its functions after the mobile device is restarted.
On devices running Android 11 or later or Android 6-10 with Google Play services, you must disable the Remove permissions if app isn't used system setting. Otherwise, after the app is not used for a few months, the system automatically resets the permissions that the user granted to the app.
Permissions requested by Kaspersky Endpoint Security for Android
Permission |
App function |
|---|---|
Phone (for Android 5.0 – 9) |
Connect to Kaspersky Security Center (device ID) |
Storage (mandatory) |
Anti-Malware |
Access to manage all files (for Android 11 or later) |
Anti-Malware |
Nearby Bluetooth devices (for Android 12 or later) |
Restrict use of Bluetooth On some Xiaomi and HUAWEI devices running Android 12, Kaspersky Endpoint Security for Android does not prompt the user for the Nearby Bluetooth devices permission. This issue is caused by the specific features of MIUI firmware on Xiaomi and EMUI firmware on HUAWEI. Despite the absence of the request for this permission, all features related to using Bluetooth work correctly on these devices. |
Ignore battery optimization (for Android 12 or later)
|
App Control |
Web Protection |
|
Anti-Theft |
|
Notifications (for Android 13) |
Notify the user about security issues and app events |
Allow running in the background (for Android 12 or later) |
Ensure continuous operation of the app. If permission is not granted, the app may be unloaded from memory and unable to restart. |
Device administrator (mandatory)
|
Anti-Theft – lock the device (only for Android 5.0 – 6) |
Anti-Theft – take a mugshot with frontal camera |
|
Anti-Theft – sound an alarm |
|
Anti-Theft – full reset |
|
Password protection |
|
App removal protection |
|
Install security certificate |
|
App Control |
|
Manage KNOX (only for Samsung devices) |
|
Configure Wi-Fi |
|
Configure Exchange ActiveSync |
|
Restrict use of the camera, Bluetooth, and Wi-Fi |
|
|
|
Camera |
Anti-Theft – take a mugshot with frontal camera On devices running Android 11 or later, the user must grant the "While using the app" permission when prompted. |
Location |
Anti-Theft – locate device On devices running Android 10 or later, the user must grant the "All the time" permission when prompted. |
Accessibility |
Anti-Theft – lock the device (only for Android 7.0 or later) |
Web Protection |
|
App Control |
|
App removal protection (only for Android 7.0 or later) |
|
Display of warnings of Kaspersky Endpoint Security for Android (only for Android 10 or later) |
|
Restrict use of the camera (only for Android 11 or later) |
|
|
|
Display pop-up window (for some Xiaomi devices) |
Web Protection |
Display pop-up windows while running in the background (for some Xiaomi devices) |
Web Protection |
Run in the background (for Xiaomi devices with MIUI firmware on Android 11 or earlier) |
App Control |
Web Protection |
|
Anti-Theft |
The help for this version of the solution is no longer updated, so it may contain outdated information. For up-to-date information about the solution refer to the Kaspersky Secure Mobility Management 4.1 Help.
Installation of Kaspersky Endpoint Security for Android on personal devices
Kaspersky Endpoint Security for Android is installed on the mobile devices of users whose user accounts have been added in Kaspersky Security Center. For more details about user accounts in Kaspersky Security Center, please refer to Kaspersky Security Center Help.
You can install the Kaspersky Endpoint Security for Android app on devices through Kaspersky Security Center by using one of the following methods:
- Download the app from Google Play (recommended method)
- Download the app installation package from Kaspersky Security Center
To install Kaspersky Endpoint Security for Android through Kaspersky Security Center on personal devices:
- In the console tree, select the Mobile Device Management → Mobile devices folder.
- In the workspace of the Mobile devices folder, click the Add mobile device button.
This starts the New Mobile Device Connection Wizard. Follow the instructions of the Wizard.
- In the Operating system section, select Android.
- In the Device type section, select Personal device.
Kaspersky Security Center checks for administration plug-in updates. If Kaspersky Security Center detects updates, you can install the new version of the administration plug-in. When the administration plug-in is updated, you can accept the Terms and Conditions of the End User of the License Agreement (EULA) and additional Statements for Kaspersky Endpoint Security for Android. If the administrator accepts the License Agreement and additional Statements in Administration Console, Kaspersky Endpoint Security for Android skips the acceptance step during installation of the app. This feature is available in Kaspersky Security Center version 12.
- At the Method to install Kaspersky Endpoint Security for Android on devices step of the wizard, select one of two options:
- Download the app from Google Play (recommended default option)
- Download the app installation package from Kaspersky Security Center if Google Play cannot be used for some reason or you need a specific version of the app (for example, for device owner mode)
- At the Select users step of the wizard, select one or more users for installation of Kaspersky Endpoint Security for Android to their mobile devices.
If a user is not in the list, you can add a new user account without exiting the Mobile Device Connection wizard.
- At the Certificate source step of the wizard, select the source of the certificate for protection of data transfer between Kaspersky Endpoint Security for Android and Kaspersky Security Center:
- Issue certificate through Administration Server tools. In this case, the certificate will be created automatically.
- Specify certificate file. In this case, your own certificate must be prepared ahead of time and then selected in the window of the wizard. This option cannot be used if you want to install Kaspersky Endpoint Security for Android to several mobile devices. A separate certificate must be created for each user.
- At the User notification method step of the wizard, select the method to be used to send the QR code for app installation:
- Select Show QR code in wizard to scan the QR code with the camera of the mobile device on which you want to install the app.
- Select Send QR code to user to send the QR code with the corresponding link by email to the selected users in your organization. To install the app, a user must then scan the QR code using the camera of the mobile device or open the link to the installation package.
If you select this method, specify the following parameters in the By email section:
- Select the User emails check box. In the drop-down list, select one of the following options:
- All emails
- Main email
- Alternate email
These email addresses must be specified in the user account settings in Kaspersky Security Center.
- If you want to send the QR code to an email address that is not specified in the user account settings in Kaspersky Security Center, select the Another email check box, and then specify the required email address.
- Click the Edit message button to configure the subject and the text of the notification message.
If you selected the Prompt for password during certificate installation check box in the Issuance of mobile certificates section, add the
%PASS%macro to the text of a notification message to send a password to the user. Otherwise, a warning appears and the notification message cannot be sent.
Click the Next button to send the generated email message.
- Select the User emails check box. In the drop-down list, select one of the following options:
- The Result step of the wizard displays a summary of the entered information. Scan the QR code if you selected the Show QR code in wizard option at the previous step of the wizard.
- Click Finish to close the Mobile Device Connection wizard.
After installing Kaspersky Endpoint Security for Android on users' mobile devices, you will be able to configure the settings for devices and apps by using group policies. You will also be able to send commands to mobile devices for data protection in case devices are lost or stolen.
Page top
The help for this version of the solution is no longer updated, so it may contain outdated information. For up-to-date information about the solution refer to the Kaspersky Secure Mobility Management 4.1 Help.
Installation of Kaspersky Endpoint Security for Android in device owner mode
Device owner mode is the device operation mode for company-owned Android devices. This mode lets you have full control over the entire device and configure a wide range of device functions.
Kaspersky Security Center lets you install the Kaspersky Endpoint Security for Android app in device owner mode by generating a QR code for app installation on the device.
Kaspersky Endpoint Security for Android is installed on the mobile devices of users whose user accounts have been added in Kaspersky Security Center. For more details about user accounts in Kaspersky Security Center, please refer to Kaspersky Security Center Help.
Ways to install the app
The Kaspersky Endpoint Security for Android app can be installed via a QR code in one of the following ways:
- Download the app from Kaspersky website
Choose this method for mobile devices that can access the internet to download the APK installation file from the Kaspersky website. The app will then be updated using Google Play or HUAWEI AppGallery.
- Download the app installation package from Kaspersky Security Center
The app's installation package will be downloaded from the Kaspersky Security Center server. The app will also be updated through Kaspersky Security Center using policy settings. You can also choose this method if mobile devices in your company have no access to the internet.
For this method, follow the steps below before generating a QR-code:
- Create and configure an app installation package.
- Create a standalone installation package.
When deploying the app via the installation package downloaded from Kaspersky Security Center, after the device is reset to factory settings and the QR code is scanned, the Blocked by Play Protect message may appear on the device. The issue is caused by the installation package signing certificate being different from the one specified in Google Play. The user should continue the installation by choosing Install anyway. If OK is selected, the installation process will be interrupted and the device will be reset to factory settings.
Generating QR code for app installation
To generate a QR code for app installation in device owner mode:
- In the console tree, select the Mobile Device Management → Mobile devices folder.
- In the workspace of the Mobile devices folder, click the Add mobile device button.
This starts the New Mobile Device Connection Wizard. Follow the instructions of the Wizard.
- In the Operating system section, select Android.
- In the Device type section, select Company-owned device (device owner mode).
- In the Network for downloading the Kaspersky Endpoint Security app section, select one of the following options:
- Prompt the user to select a Wi-Fi network on the device
If you choose this option, the device user will be prompted to connect to any available Wi-Fi network for downloading the app.
This option is selected by default.
- Use only the specified Wi-Fi network (Android 9 or later)
If you choose this option, the device will try to automatically connect to the network that you have specified. This option is supported on Android 9.0 or later.
Be sure to correctly specify all the network parameters. Otherwise, if any parameter is incorrect or the network is not available, the installation process will be interrupted and the device will be reset to the factory settings.
To configure the connection for the required Wi-Fi network, click the Specify network button. In the Wi-Fi network for downloading Kaspersky Endpoint Security window, specify the following parameters:
- Try to use mobile data (Android 8.0 or later)
If you choose this option, the device will try to use mobile data to download the app. If the device does not have a SIM card, or the mobile network is not available, the user will be prompted to select any available Wi-Fi network.
This option is supported on Android 8.0 or later.
- Prompt the user to select a Wi-Fi network on the device
- In the Additional section, select the Enable all system apps check box if you want system apps to be active on the device. If the check box is cleared, all system apps are disabled.
- Click Next.
Kaspersky Security Center checks for administration plug-in updates. If Kaspersky Security Center detects updates, you can install the new version of the administration plug-in. When the administration plug-in is updated, you can accept the Terms and Conditions of the End User of the License Agreement (EULA) and additional Statements for Kaspersky Endpoint Security for Android. If the administrator accepts the License Agreement and additional Statements in Administration Console, Kaspersky Endpoint Security for Android skips the acceptance step during installation of the app.
- At the Method to install Kaspersky Endpoint Security for Android on devices in device owner mode step, select an installation method:
- Download the app from Kaspersky website
- Download the app installation package from Kaspersky Security Center
If you choose this option, leave the Allow HTTP use for app download in device owner mode check box selected to ensure the app is downloaded. Otherwise, the app will be downloaded via HTTPS only if the Kaspersky Security Center Web Server certificate was issued by a trusted certificate authority.
For more details about these methods, see the Ways to install the app section above.
- At the Select users step of the wizard, select one or more users for installation of Kaspersky Endpoint Security for Android to their mobile devices.
If a user is not in the list, you can add a new user account without exiting the Mobile Device Connection wizard.
- At the Certificate source step of the wizard, select the source of the certificate for protection of data transfer between Kaspersky Endpoint Security for Android and Kaspersky Security Center:
- Issue certificate through Administration Server tools. In this case, the certificate will be created automatically.
- Specify certificate file. In this case, your own certificate must be prepared ahead of time and then selected in the window of the wizard. This option cannot be used if you want to install Kaspersky Endpoint Security for Android to several mobile devices. A separate certificate must be created for each user.
- At the User notification method step of the wizard, select the method to be used to send the QR code for app installation:
- Select Show QR code in wizard to scan the QR code with the camera of the mobile device on which you want to install the app.
- Select Send QR code to user to send the QR code with the corresponding link by email to the selected users in your organization. To install the app, a user must then scan the QR code using the camera of the mobile device or open the link to the installation package.
If you select this method, specify the following parameters in the By email section:
- Select the User emails check box. In the drop-down list, select one of the following options:
- All emails
- Main email
- Alternate email
These email addresses must be specified in the user account settings in Kaspersky Security Center.
- If you want to send the QR code to an email address that is not specified in the user account settings in Kaspersky Security Center, select the Another email check box, and then specify the required email address.
- Click the Edit message button to configure the subject and the text of the notification message.
If you selected the Prompt for password during certificate installation check box in the Issuance of mobile certificates section, add the
%PASS%macro to the text of a notification message to send a password to the user. Otherwise, a warning appears and the notification message cannot be sent.
Click the Next button to send the generated email message.
- Select the User emails check box. In the drop-down list, select one of the following options:
- The Result step of the wizard displays a summary of the entered information. Scan the QR code if you selected the Show QR code in wizard option at the previous step of the wizard.
- Click Finish to close the New Mobile Device Connection Wizard.
Additional configuration on the Android device is required to install Kaspersky Endpoint Security for Android in device owner mode.
After installing Kaspersky Endpoint Security for Android on users' mobile devices, you will be able to configure the settings for devices and apps by using group policies. You will also be able to send commands to mobile devices for data protection in case devices are lost or stolen.
Page top
The help for this version of the solution is no longer updated, so it may contain outdated information. For up-to-date information about the solution refer to the Kaspersky Secure Mobility Management 4.1 Help.
Installation of Kaspersky Endpoint Security for Android in device owner mode in a closed network
When deploying Kaspersky Endpoint Security for Android in device owner mode via QR code on devices with pre-installed Google Mobile Services (GMS), their connectivity to certain Google endpoints via Wi-Fi networks is checked. If a Wi-Fi network has no access to the internet, the connectivity check fails and the deployment finishes with an error.
To avoid the connectivity check, you can deploy the Kaspersky Endpoint Security for Android app in device owner mode in a closed network by using a Proxy Auto-Configuration (PAC) file.
To use a PAC file for Kaspersky Endpoint Security for Android app deployment:
- Create a PAC file (for example, proxy.pac) with the following contents:
function FindProxyForURL(url, host) {
return "DIRECT";
} - Publish the created PAC file on a resource which will be available within the closed network (for example, on the IIS Web server).
Save the link to the PAC file (for example, https://intranet.mycompany.com/files/proxy.pac).
- Make sure the APK file of the Kaspersky Endpoint Security for Android app being deployed is available within the closed network. To do this, use one of the methods below:
- Download the app installation package from the Kaspersky Security Center server. If the server is accessible, the installation packages will be available there.
- Download the APK installation file from the Kaspersky website and upload it to the closed network.
Choose the general version of the app as a source.
- Generate the QR code for app installation in device owner mode and forward it to the user by following the instructions of the New Mobile Device Connection Wizard.
When connecting the device to Kaspersky Security Center, you will be asked to specify the network for downloading the Kaspersky Endpoint Security for Android app. At this step, configure the use of the previously created PAC file for network connection by linking it to the Wi-Fi network settings on a device. To do this, use one of the methods below:
- In the Network for downloading the Kaspersky Endpoint Security for Android section, choose Prompt the user to select a Wi-Fi network on the device. While deploying the app, the user will need to specify the link to the PAC file (step 2) in the network settings while choosing a Wi-Fi network on the device. After the connection is established, the user will be able to continue the device setup and activate the app by following the instructions of the app's Initial Configuration Wizard.
- In the Network for downloading the Kaspersky Endpoint Security for Android section, choose Use only the specified Wi-Fi network (Android 9.0 or later), click the Specify network button, insert the link to the previously created PAC file (step 2) in the PAC file URL field, and then click OK.
If the APK installation file has been downloaded from the Kaspersky website (step 3), you need to change the link in the QR code by specifying the closed network link address.
For more information about configuring the Kaspersky Endpoint Security for Android app in device owner mode, please refer to the Installing the app in device owner mode section.
When deploying the app via the installation package downloaded from Kaspersky Security Center, after the device is reset to factory settings and the QR code is scanned, the Blocked by Play Protect message may appear on the device. The issue is caused by the installation package signing certificate being different from the one specified in Google Play. The user should continue the installation by choosing Install anyway. If OK is selected, the installation process will be interrupted and the device will be reset to factory settings.
The Kaspersky Endpoint Security for Android app is installed on the device in device owner mode in a closed network.
Page top
The help for this version of the solution is no longer updated, so it may contain outdated information. For up-to-date information about the solution refer to the Kaspersky Secure Mobility Management 4.1 Help.
Other methods of installation of Kaspersky Endpoint Security for Android
You can install Kaspersky Endpoint Security for Android using a link to your own web server or instruct the users to install the app manually.
The help for this version of the solution is no longer updated, so it may contain outdated information. For up-to-date information about the solution refer to the Kaspersky Secure Mobility Management 4.1 Help.
Manual installation from Google Play or HUAWEI AppGallery
Users can manually install Kaspersky Endpoint Security for Android from Google Play or HUAWEI AppGallery. The app can be installed by following the standard installation procedure of the Android platform. Users use their own Google accounts to install the application.
For details on the procedure of installing Kaspersky Endpoint Security for Android from Google Play, see the Google technical support website.
For details on the procedure of installing Kaspersky Endpoint Security for Android from HUAWEI AppGallery, see the HUAWEI Support website.
Some HUAWEI and Honor devices do not have Google services and therefore an access to apps in Google Play. If some users of HUAWEI and Honor devices cannot install the app from Google Play, they should be instructed to install the app from HUAWEI App Gallery.
After installing Kaspersky Endpoint Security for Android from Google Play or HUAWEI AppGallery, you must prepare the app for use. The process of preparing the app for use includes the following steps:
- The administrator sends the settings of mobile device synchronization with the Administration Server (server address and port number) using any available method (for example, by sending an email message).
- The user can configure the settings of mobile device synchronization with the Administration Server during operation of the Initial Configuration Wizard or in the Kaspersky Endpoint Security for Android settings.
- The administrator creates a mobile certificate for the mobile device user.
- The user receives an automatic notification with a prompt to install the mobile certificate. When installation is confirmed, the mobile certificate is installed on the mobile device.
Internet access should be enabled on the mobile device for synchronization with the Administration Server.
See the "Configuring synchronization settings" section for details on how to configure the settings of mobile device synchronization with the Administration Server and receive a mobile certificate.
During the next synchronization of the mobile device with Administration Server, the user's mobile device on which Kaspersky Endpoint Security for Android is installed is moved to the Advanced → Device discovery → Domains folder in the administration group that was specified during installation of the application (the default group is KES10). You can move a mobile device to the administration group that you created in the Managed devices folder either manually or using automatic allocation rules.
This installation method is convenient if you want to install a specific version of Kaspersky Endpoint Security for Android.
To install Kaspersky Endpoint Security for Android by using a link to your own web server:
- Create an installation package and configure its settings.
The installation package is a set of files created for remote installation of the Kaspersky app through Kaspersky Security Center.
- Create a standalone installation package.
A standalone installation package is the installation file of a mobile app that contains the settings of the app connection to the Administration Server and an indicator of acceptance of the Terms and Conditions of the End User License Agreement (EULA) for the Kaspersky Endpoint Security for Android. It is created on the basis of the Kaspersky Endpoint Security for Android installation package. The standalone installation package is a special case of an installation package.
The user will receive a link to the web server hosting the standalone installation package for Kaspersky Endpoint Security for Android. To install the app, the user must run the APK file. Additional configuration of Kaspersky Endpoint Security for Android after installation is not required.
To install Kaspersky Endpoint Security for Android using a link to your own web server, installation of apps from unknown sources must be allowed on the user's mobile device.
Page top
The help for this version of the solution is no longer updated, so it may contain outdated information. For up-to-date information about the solution refer to the Kaspersky Secure Mobility Management 4.1 Help.
Creating and configuring an installation package
The Kaspersky Endpoint Security for Android installation package is the sc_package.exe self-extracting archive. The archive includes files required for installing mobile app on devices:
adb.exe,AdbWinApi.dll,AdbWinUsbApi.dll– Set of files required for installing Kaspersky Endpoint Security for Android.installer.ini– Configuration file that contains the Administration Server connection settings.KES10_xx_xx_xxx.apk– Setup file for Kaspersky Endpoint Security for Android.kmlisten.exe– Utility for delivering the application installation package through a the workstation.kmlisten.ini– Configuration file that contains the settings for the installation package delivery utility.kmlisten.kpd– Application description file.
To create the Kaspersky Endpoint Security for Android installation package:
- In the console tree, select the Advanced → Remote installation → Installation packages folder.
- In the workspace of the Installation packages folder, click the Create installation package button.
The Installation Package Creation wizard starts. Follow the instructions of the wizard.
- At the Select installation package type step of the wizard, click the Create installation package for Kaspersky application button.
- At the Defining installation package name step of the wizard, enter the installation package name to be displayed in the workspace of the Installation packages folder.
- At the Select application installation package for installation step of the wizard, select the
sc_package.exeself-extracting archive included in the distribution kit.If you have already unpacked the archive, choose the application description file,
kmlisten.kpd. The application name and the version number appear in the entry field.If you create an installation package with the
sc_package.exearchive in the Kaspersky Security Center version earlier than 14.2, the installation of Kaspersky Endpoint Security for Android app will fail on devices running Android 10 or later. To avoid this issue, please upgrade to Kaspersky Security Center 14.2 or contact Technical Support to receive an appropriate version of the archive. - At the Accept EULA step of the wizard, read, understand, and accept the terms and conditions of the End User License Agreement.
You must accept the terms and conditions of the End User License Agreement for creating the installation package. If you accept the terms of License Agreement in the Administration Console, Kaspersky Endpoint Security for Android skips the acceptance step during installation of the app.
If you decide to stop the protection of the mobile devices, you can uninstall Kaspersky Endpoint Security for Android app and revoke your End User License Agreement (EULA) for the app. To learn more about revoking EULA, please refer to Kaspersky Security Center Help.
After the wizard finishes, the created installation package appears in the Installation packages folder workspace. The installation packages are stored in the Packages folder, in the public shared folder on the Administration Server.
To configure the installation package settings:
- In the console tree, select the Advanced → Remote installation → Installation packages folder.
- In the context menu of the Kaspersky Endpoint Security for Android installation package, select Properties.
- On the Settings tab, specify the Administration Server connection settings for mobile devices and the name of the administration group to which the mobile devices will be added automatically after the first synchronization with the Administration Server. Follow the steps below:
- In the Connection to the Administration Server section, in the Server address field, type the name of the Administration Server for mobile devices in the format that was used for installing Mobile devices support during the Administration Server deployment.
Depending on the Administration Server name format for the Mobile devices support component, specify the DNS name or the IP address of the Administration Server. In the SSL port number field, specify the number of the port open on the Administration Server for connecting mobile devices. Port 13292 is used by default.
- In the Allocation of computers to groups section, in the Group name field, type the name of the group to which mobile devices will be added after the first synchronization with the Administration Server (KES10 is used by default).
The specified group will be automatically created in the Advanced → Device discovery → Domains folder.
- In the Actions during installation section, select the Request email address check box if you want the app to ask users to provide their corporate email address when the app is started for the first time.
The user's email address is used to form the name of the mobile device when it is added to the administration group.
- In the Connection to the Administration Server section, in the Server address field, type the name of the Administration Server for mobile devices in the format that was used for installing Mobile devices support during the Administration Server deployment.
- To apply the specified settings, click Apply.
The help for this version of the solution is no longer updated, so it may contain outdated information. For up-to-date information about the solution refer to the Kaspersky Secure Mobility Management 4.1 Help.
Creating a standalone installation package
To create a standalone installation package, follow the steps below:
- In the console tree, select the Advanced → Remote installation → Installation packages folder.
- Choose the installation package of Kaspersky Endpoint Security for Android.
- In the context menu of the installation package, select Create stand-alone installation package.
The wizard that creates the standalone installation package will be started. Follow the instructions of the Wizard.
- Configure ways in which the standalone installation package is distributed:
- To distribute the path to the created standalone installation package among users via email, in the Further actions section click the link Email link to stand-alone installation package.
The message editor window opens, and the text in the window contains the path to the shared folder with the standalone installation package.
- To post the link to the created standalone installation package on your corporate website, click the link Sample HTML code for link publication on a website.
A tmp file containing HTML_RJL links opens.
- To distribute the path to the created standalone installation package among users via email, in the Further actions section click the link Email link to stand-alone installation package.
- To publish the created standalone installation package on the Kaspersky Security Center Web Server and view the entire list of standalone packages for the selected installation package, in the Stand-alone installation package creation wizard window select the Open the stand-alone packages list check box.
After the wizard closes, the window List of standalone packages for the installation package <Installation package name> opens.
The List of standalone packages for the installation package <Installation package name> window contains the following information:
- A list of standalone installation packages.
- The network path to the shared folder in the Path field.
- The address of the standalone package on the Kaspersky Security Center Web Server in the URL field.
When sending email notifications, you can specify either the address in the URL field or the path in the Path field as a resource from which users can download the setup file of the app. When sending text message notifications to users, you have to specify the download link appearing in the URL field.
You are advised to copy the address of the created standalone package to clipboard and then paste the link to the required installation package into the email or text message notification for users.
Page top
The help for this version of the solution is no longer updated, so it may contain outdated information. For up-to-date information about the solution refer to the Kaspersky Secure Mobility Management 4.1 Help.
Configuring synchronization settings
To manage mobile devices and receive reports or statistics from mobile devices of users, you must configure the synchronization settings. Mobile device synchronization with Kaspersky Security Center may be performed in the following ways:
- By schedule. Synchronization by schedule is performed by using the HTTP protocol. You can configure the synchronization schedule in the group policy settings. Modifications to group policy settings, commands and tasks will be performed when the device is synchronizing with Kaspersky Security Center according to the schedule, i.e. with a delay. By default, mobile devices are synchronized with the Kaspersky Security Center automatically every 6 hours.
- Forced. Forced synchronization is performed by using push notifications of the FCM service (Firebase Cloud Messaging). Forced synchronization is primarily intended for timely delivery of commands to a mobile device. It might be useful when a device is in battery saver mode, because in this case the app may perform tasks later than specified. If you want to use forced synchronization, make sure that the FCM settings are configured in Kaspersky Security Center.
To configure the settings of mobile device synchronization with the Kaspersky Security Center:
- In the console tree, in the Managed devices folder, select the administration group to which the Android devices belong.
- In the workspace of the group, select the Policies tab.
- Open the policy properties window by double-clicking any column.
Complete the following steps within 15 minutes. Otherwise, you may face an error when saving changes to the policy.
- In the policy Properties window, select the Synchronization section.
- Select the frequency of synchronization in the Synchronize drop-down list.
- To disable synchronization of a device with Kaspersky Security Center while roaming, select the Do not synchronize while roaming check box.
The device user can manually perform synchronization in the app settings (
 → Settings → Synchronization → Synchronize).
 - To hide synchronization settings (server address, port and administration group) from the user in the app settings, clear the Show synchronization settings on device check box. It is impossible to modify hidden settings.
- To receive the device's location history, select the Send device location history during synchronization check box in the Device location history block. The location history will be sent to the Administration Server during each synchronization.
The functionality must be used in accordance with the requirements of local legislation, with the notification or consent (depending on the requirements of the legislation) of the person using the device to enable the location tracking functionality on the device.
Enabling this setting and specifying the geofence area will result in increased device power consumption.
This setting works only if the Device location history informational event type is stored in the Administration Server database. The events are configured in the Events section of the policy properties. For more details, please refer to the Kaspersky Security Center Help. - In the How often to get the device location drop-down list, specify the frequency of getting the device location. The default value is Every 15 minutes.
Due to technical limitations on Android devices, the device location may be retrieved less often than specified.
- Click the Apply button to save the changes you have made.
Mobile device settings are changed after the next device synchronization with Kaspersky Security Center. You can manually synchronize the mobile device by using a special command. To learn more about working with commands for mobile devices, please refer to the "Sending commands" section.
Page top
The help for this version of the solution is no longer updated, so it may contain outdated information. For up-to-date information about the solution refer to the Kaspersky Secure Mobility Management 4.1 Help.
Activating the Kaspersky Endpoint Security for Android app
In Kaspersky Security Center, the license can cover various groups of features. To ensure that the Kaspersky Endpoint Security for Android app is fully functional, the Kaspersky Security Center license purchased by the organization must provide for the Mobile Device Management functionality. The Mobile Device Management functionality is intended for connecting mobile devices to Kaspersky Security Center and managing them.
For detailed information about the licensing of Kaspersky Security Center and licensing options, please refer to Kaspersky Security Center Help.
Activating the Kaspersky Endpoint Security for Android app on a mobile device is done by providing valid license information to the app. License information is delivered to the mobile device, together with the policy, when the device is synchronized with Kaspersky Security Center.
If the activation of the Kaspersky Endpoint Security for Android app is not completed within 30 days from the time of installation on the mobile device, the app is automatically switched to the limited functionality mode. In this mode, most of the app components are not operational. When switched to the limited functionality mode, the app stops performing automatic synchronization with Kaspersky Security Center. Therefore, if the activation of the app has not been completed within 30 days after the installation, the user must synchronize the device with Kaspersky Security Center manually.
If Kaspersky Security Center is not deployed in your organization or is not accessible to mobile devices, users can activate the Kaspersky Endpoint Security for Android app on their devices manually.
To activate the Kaspersky Endpoint Security for Android app:
- In the console tree, in the Managed devices folder, select the administration group to which the Android devices belong.
- In the workspace of the group, select the Policies tab.
- Open the policy properties window by double-clicking any column.
Complete the following steps within 15 minutes. Otherwise, you may face an error when saving changes to the policy.
- In the policy Properties window, select the Licensing section.
- In the Licensing section, open the Key drop-down list, and then select the required application activation key from the key storage of the Kaspersky Security Center Administration Server.
The details of the app for which the license has been purchased are displayed in the field below.
- Select the Activate with a key from Kaspersky Security Center storage check box.
If the app was activated without a key stored in the Kaspersky Security Center storage, Kaspersky Secure Mobility Management replaces this key with the activation key selected in the Key drop-down list.
- To activate the app on the user's mobile device, block changes to settings.
- Click the Apply button to save the changes you have made.
Mobile device settings are changed after the next device synchronization with Kaspersky Security Center.
The help for this version of the solution is no longer updated, so it may contain outdated information. For up-to-date information about the solution refer to the Kaspersky Secure Mobility Management 4.1 Help.
Installing an iOS MDM profile
This section describes the methods of deploying iOS MDM profiles on a corporate network.
Before deploying an iOS MDM profile, you must deploy a mobile device management system.
For details on deploying an iOS MDM profile in Kaspersky Endpoint Security Cloud, please refer to Kaspersky Endpoint Security Cloud help.
The help for this version of the solution is no longer updated, so it may contain outdated information. For up-to-date information about the solution refer to the Kaspersky Secure Mobility Management 4.1 Help.
About iOS device management modes
You can deploy an iOS device management system in several different ways. The management mode depends on the owner of the mobile device (personal or corporate) and corporate security requirements. You can choose the management mode that is most suitable for the company, and use several modes at the same time.
Unsupervised devices
Unsupervised iOS devices are employees' personal devices that are connected to Kaspersky Security Center. In this mode, the user is allowed to use a personal Apple ID, work with any apps, and store personal data on the device. You can use a Kaspersky Device Management for iOS group policy to configure access to corporate resources, security settings, and other settings. By default, all iOS devices are unsupervised.
Supervised devices
Supervised iOS devices are corporate devices that are connected to Kaspersky Security Center. Initial configuration of the mobile device is performed in Apple Configurator. Apple Configurator is an application designed to prepare and configure iOS devices. Apple Configurator is installed on a computer running OS X. For more details about working with Apple Configurator, please refer to the Apple Technical Support website. You can use a Kaspersky Device Management for iOS group policy for further configuration. On supervised devices, you can access an extended selection of settings. For example, you can configure Global HTTP Proxy and additional restrictions (for example, blocked use of iMessage and Game Center), and you can block user account modifications.
To work with supervised and unsupervised iOS devices, the iOS MDM Server must have an APNs certificate installed, and an iOS MDM profile must be installed on the mobile devices of users.
Page top
The help for this version of the solution is no longer updated, so it may contain outdated information. For up-to-date information about the solution refer to the Kaspersky Secure Mobility Management 4.1 Help.
Installing via Kaspersky Security Center
The iOS MDM profile is installed to the mobile devices of users whose user accounts have been added in Kaspersky Security Center. For more details about user accounts in Kaspersky Security Center, please refer to Kaspersky Security Center Help.
To install an iOS MDM profile:
- In the console tree, select the Mobile Device Management → Mobile devices folder.
- In the workspace of the Mobile devices folder, click the Add mobile device button.
This starts the New Mobile Device Connection Wizard. Follow the instructions of the Wizard.
- In the Operating system section, select iOS.
- At the Selecting iOS MDM Server step of the wizard, select an iOS MDM Server from the list.
- At the Select users step of the wizard, select one or several users for installation of the iOS MDM profile to their mobile devices.
If the user is not in the list, you can add a new user account without exiting the Mobile Device Connection wizard.
- At the Certificate source step of the wizard, select the source of the certificate for protection of data transfer between the mobile device and Kaspersky Security Center:
- Issue certificate through Administration Server tools. In this case, the certificate will be created automatically.
- Specify certificate file. In this case, your own certificate must be prepared ahead of time and then selected in the window of the wizard. This option cannot be used if you want to install the iOS MDM profile to several mobile devices. A separate certificate must be created for each user.
- At the User notification method step of the wizard, select the method to be used to send the QR code for the iOS MDM profile installation:
- Select Show QR code in wizard to scan the QR code with the camera of the mobile device on which you want to install the profile.
- Select Send QR code to user to send the QR code with the corresponding link by email to the selected users in your organization. To install the iOS MDM profile, a user must then scan the QR code using the camera of the mobile device or open the link to the profile.
If you select this method, specify the following parameters in the By email section:
- Select the User emails check box. In the drop-down list, select one of the following options:
- All emails
- Main email
- Alternate email
These email addresses must be specified in the user account settings in Kaspersky Security Center.
- If you want to send the QR code to an email address that is not specified in the user account settings in Kaspersky Security Center, select the Another email check box, and then specify the required email address.
- Click the Edit message button to configure the subject and the text of the notification message.
If you selected the Prompt for password during certificate installation check box in the Issuance of mobile certificates section, add the
%PASS%macro to the text of a notification message to send a password to the user. Otherwise, a warning appears and the notification message cannot be sent.
Click the Next button to send the generated email message.
- Select the User emails check box. In the drop-down list, select one of the following options:
- The Result step of the wizard displays a summary of the entered information. Scan the QR code if you selected the Show QR code in wizard option at the previous step of the wizard.
- Finish the Mobile Device Connection wizard.
After installing the iOS MDM profile to users' mobile devices, you will be able to configure the app settings by using group policies. You will also be able to send commands to mobile devices for data protection in case devices are lost or stolen.
On mobile devices running iOS 12.1 or later, you must manually confirm installation of an iOS MDM profile on the mobile device. You must also grant permission for remote management of the device.
Page top
The help for this version of the solution is no longer updated, so it may contain outdated information. For up-to-date information about the solution refer to the Kaspersky Secure Mobility Management 4.1 Help.
Installing administration plug-ins
To manage mobile devices, the following administration plug-ins must be installed to the administrator's workstation:
- The Administration Plug-in of Kaspersky Endpoint Security for Android provides the interface for managing mobile devices and mobile apps installed on them through the Administration Console of Kaspersky Security Center.
- The Administration Plug-in of Kaspersky Device Management for iOS provides an interface for managing mobile devices connected by means of the iOS MDM protocol through the Administration Console of Kaspersky Security Center.
You can install administration plug-ins by using the following methods:
- Install an administration plug-in using Quick Start Wizard of Kaspersky Security Center.
The application automatically prompts you to run the Quick Start Wizard after Administration Server installation, at the first connection to it. You can also start the Quick Start Wizard manually at any time.
The Quick Start Wizard allows you to accept the Terms and Conditions of the End User License Agreement (EULA) for the Kaspersky Endpoint Security for Android app in Administration Console. If the administrator accepts the terms of the License Agreement in Administration Console, Kaspersky Endpoint Security for Android skips the acceptance step during installation of the app. For more details on the Quick Start Wizard for Kaspersky Security Center, please refer to Kaspersky Security Center Help.
- Install the administration plug-in using the list of available distribution packages in Administration Console of Kaspersky Security Center.
The list of available distribution packages is updated automatically after new versions of Kaspersky applications are released.
- Download the distribution package from an external source and install the administration plug-in using the EXE file.
For example, the distribution package of the administration plug-in can be downloaded on the Kaspersky website.
Installing administration plug-ins from the list in Administration Console
To install the administration plug-ins:
- In the console tree, select Advanced → Remote installation → Installation packages.
- In the workspace, select Additional actions → View current versions of Kaspersky applications.
This opens the list of up-to-date versions of Kaspersky applications.
- In the Mobile devices section, select the Kaspersky Endpoint Security for Android or Kaspersky Device Management for iOS plug-in.
- Click Download distribution package button.
A plug-in distribution will be downloaded to the computer memory (EXE file).
- Run the EXE file and follow the instructions of the Installation Wizard.
Installing administration plug-ins from the distribution package
To install the Kaspersky Endpoint Security for Android Administration Plug-in,
Copy the plug-in installation file klcfinst.exe from the integrated solution distribution package and run it on the administrator's workstation.
The installation is performed by the Wizard, and you do not have to configure the settings.
To install the Kaspersky Device Management for iOS Administration Plug-in,
Copy the plug-in installation file klmdminst.exe from the integrated solution distribution package and run it on the administrator's workstation.
The installation is performed by the Wizard, and you do not have to configure the settings.
You can make sure that the administration plug-ins are installed by viewing the list of installed app administration plug-ins in the properties window of the Administration Server in the Advanced → Details of application management plug-ins installed section.
Page top
The help for this version of the solution is no longer updated, so it may contain outdated information. For up-to-date information about the solution refer to the Kaspersky Secure Mobility Management 4.1 Help.
Updating a previous version of the application
The application upgrade must meet the following requirements:
- The version of the Kaspersky Endpoint Security for Android Administration Plug-in and the version of the Kaspersky Endpoint Security for Android mobile app must match.
You can view the build numbers of the versions of the Administration Plug-in and mobile app in the Release Notes for Kaspersky Secure Mobility Management.
- Make sure that Kaspersky Security Center satisfies the software requirements of Kaspersky Secure Mobility Management.
- The administration plug-ins of Kaspersky Endpoint Security for Android 10.0 Service Pack 2 (Build 10.6.0.1801) and Kaspersky Device Management for iOS 10.0 Service Pack 2 (Build 10.6.0.1767) and later versions can be automatically upgraded to the current version. Upgrades of earlier versions of administration plug-ins are not supported.
To upgrade administration plug-ins of earlier versions, you must remove the installed administration plug-ins and group policies that were created with them. Then install the new versions of the administration plug-ins. For details on removing administration plug-ins, please visit the Kaspersky Technical Support website.
- Use the same version of Kaspersky Endpoint Security for Android on all mobile devices of the organization.
The terms and conditions of technical support for Kaspersky Secure Mobility Management versions are available on the Kaspersky Technical Support website.
To view the version and build number of administration plug-ins:
- In the console tree in the context menu of the Administration Server, select Properties.
- In the Administration Server properties window, select Advanced → Details of application management plug-ins installed.
The workspace displays information about installed administration plug-ins in the format <Plug-in name> <Version> <Build>.
You can view the version and build number of the Kaspersky Endpoint Security for Android app by using the following methods:
- If Kaspersky Endpoint Security for Android was installed with a standalone installation package, you can view the version and build number of the app in the package properties.
- If Kaspersky Endpoint Security for Android was installed through Google Play, you can view the build number in the app settings ( → About the app).
Updates functionality (including providing anti-malware signature updates and codebase updates), as well as KSN functionality will not be available in the software in the U.S. territory from 12:00 AM Eastern Daylight Time (EDT) on September 10, 2024 in accordance with the restrictive measures.
The help for this version of the solution is no longer updated, so it may contain outdated information. For up-to-date information about the solution refer to the Kaspersky Secure Mobility Management 4.1 Help.
Upgrading the previous version of Kaspersky Endpoint Security for Android
Kaspersky Endpoint Security for Android can be updated in the following ways:
- Using Google Play. The mobile device user downloads the new version of the app from Google Play and installs it on the device.
- Using Kaspersky Security Center. You can remotely update the version of the app on the device using the Kaspersky Security Center remote administration system.
You can select the app update method that is most suitable for your organization. You can use only one update method.
Updating the app from Google Play
The app can be updated from Google Play by following the standard update procedure of the Android platform. The following conditions must be met in order for the app to be updated:
- The device user must have a Google account.
- The device must be linked to your Google account.
- The device must be connected to the internet.
After downloading the app from Google Play, Kaspersky Endpoint Security for Android checks the Terms and Conditions of the End User License Agreement (EULA). If the terms of the EULA are updated, the app sends a request to the Kaspersky Security Center. If the administrator accepts the EULA in Administration Console, Kaspersky Endpoint Security for Android skips the acceptance step during installation of the app. If the administrator uses an outdated version of the administration plug-in, Kaspersky Security Center prompts you to update the administration plug-in. When updating the administration plug-in, an administrator can accept the terms of the EULA in Administration Console for the Kaspersky Endpoint Security for Android.
You can update the app through Google Play if Kaspersky Endpoint Security for Android was installed from Google Play. If the app was installed using another method, you cannot update the app through Google Play.
Updating the app through Kaspersky Security Center
Kaspersky Endpoint Security for Android can be upgraded using Kaspersky Security Center after application of a group policy. In the group policy settings, you can select the Kaspersky Endpoint Security for Android standalone installation package of the version that meets the corporate security requirements.
You can update through Kaspersky Security Center if Kaspersky Endpoint Security for Android was installed through Kaspersky Security Center. If the app was installed from Google Play, you cannot update the app through Kaspersky Security Center.
To upgrade Kaspersky Endpoint Security for Android using a standalone installation package, installation of apps from unknown sources must be allowed on the user's mobile device. For details about installing apps without Google Play, please refer to the Android Help Guide.
To update the version of the app:
- In the console tree, in the Managed devices folder, select the administration group to which the Android devices belong.
- In the workspace of the group, select the Policies tab.
- Open the policy properties window by double-clicking any column.
Complete the following steps within 15 minutes. Otherwise, you may face an error when saving changes to the policy.
- In the policy Properties window, select the Additional section.
- In the Upgrading Kaspersky Endpoint Security for Android section, click the Select button.
This opens the Upgrading Kaspersky Endpoint Security for Android window.
- In the list of Kaspersky Endpoint Security for Android standalone installation packages, select the package whose version meets the corporate security requirements.
You can upgrade Kaspersky Endpoint Security for Android only to a more recent application version. Kaspersky Endpoint Security for Android cannot be upgraded to an older application version.
- Click the Select button.
A description of the selected standalone installation package is displayed in the Upgrading Kaspersky Endpoint Security for Android section.
- Click the Apply button to save the changes you have made.
Mobile device settings are changed after the next device synchronization with Kaspersky Security Center. The mobile device user is prompted to install the new version of the app. After the user gives consent, the new app version is installed on the mobile device.
Page top
The help for this version of the solution is no longer updated, so it may contain outdated information. For up-to-date information about the solution refer to the Kaspersky Secure Mobility Management 4.1 Help.
Installing an earlier version of Kaspersky Endpoint Security for Android
If you want to prevent automatic update of the app and use a specific version of Kaspersky Endpoint Security for Android, disable automatic update of the app in Google Play settings. For more detail, refer to the Google technical support website.
Automatic update of Kaspersky Endpoint Security for Android is available only if the app was installed from Google Play or through Kaspersky Security Center using the Google Play link. If the app was installed through Kaspersky Security Center using a link to your own web server (using the standalone installation package), automatic update is not available. In this case, you can use a group policy to manually update Kaspersky Endpoint Security for Android.
To install an earlier version of Kaspersky Endpoint Security for Android:
- Remove Kaspersky Endpoint Security for Android from users' mobile devices.
- Install Kaspersky Endpoint Security for Android through Kaspersky Security Center using a link to your own web server. To do so, you will need the installation package for the specific version. You can download the distribution package for earlier versions of Kaspersky Endpoint Security for Android on the Kaspersky Technical Support website.
For details on earlier versions of Kaspersky Endpoint Security for Android, please refer to the Help for the appropriate version of Kaspersky Secure Mobility Management.
Page top
The help for this version of the solution is no longer updated, so it may contain outdated information. For up-to-date information about the solution refer to the Kaspersky Secure Mobility Management 4.1 Help.
Upgrading previous versions of administration plug-ins
You can upgrade administration plug-ins by using the following methods:
- Install new version administration plug-in from the list of available distribution packages in Administration Console of Kaspersky Security Center.
The list of available distribution packages is updated automatically after new versions of Kaspersky applications are released.
- Download the distribution package from an external source and install new version administration plug-in using the EXE file.
To upgrade Kaspersky Endpoint Security for Android and Kaspersky Device Management for iOS Administration Plug-ins, you need to download the latest version of the application from the web page of Kaspersky Secure Mobility Management and run the Setup Wizard for each of the two plug-ins. Previous versions of plug-ins are removed automatically during operation of the Installation Wizard.
Kaspersky experts recommend using the same version of the app and administration plug-ins. If user upgrades the app from Google Play, the Kaspersky Security Center shows notification with a prompt to upgrade the administration plug-in.
When administration plug-ins are updated, the existing administration groups in the Managed devices folder and rules for the automatic allocation of devices from the Unassigned devices folder to these groups are saved. The existing group policies for mobile devices are also saved. New policy settings that implement the new functions of the Kaspersky Secure Mobility Management integrated solution will be added to the existing policies and will have the default values.
If new settings have been added or the default values have been changed in the new version of the administration plug-in, the changes will be applied only after a group policy is opened. Until the administrator opens a group policy, the settings of the previous version of the plug-in will be applied on mobile devices even if the plug-in version has been updated.
Upgrading from the list in Administration Console
To upgrade the administration plug-ins:
- In the console tree, select Advanced → Remote installation → Installation packages.
- In the workspace, select Additional actions → View current versions of Kaspersky applications.
This opens the list of up-to-date versions of Kaspersky applications.
- In the Mobile devices section, select the Kaspersky Endpoint Security for Android or Kaspersky Device Management for iOS plug-in.
- Click Download distribution package button.
A plug-in distribution will be downloaded to computer memory (EXE file). Run the EXE file. Follow the instructions of the Installation Wizard.
Upgrading from the distribution package
To upgrade the Kaspersky Endpoint Security for Android Administration Plug-in,
Copy the plug-in installation file klcfinst.exe from the integrated solution distribution package and run it on the administrator's workstation.
The installation is performed by the Wizard, and you do not need to configure the settings.
To upgrade the Kaspersky Device Management for iOS Administration Plug-in,
Copy the plug-in installation file klmdminst.exe from the integrated solution distribution package and run it on the administrator's workstation.
Plug-in installation is performed by the Wizard, and you do not need to configure the settings.
You can make sure that the administration plug-ins are upgraded by viewing the list of installed app administration plug-ins in the properties window of the Administration Server, in the Advanced → Details of application management plug-ins installed section.
Page top
The help for this version of the solution is no longer updated, so it may contain outdated information. For up-to-date information about the solution refer to the Kaspersky Secure Mobility Management 4.1 Help.
Removing Kaspersky Endpoint Security for Android
Kaspersky Endpoint Security for Android can be removed in the following ways:
- App removal by the user
The user removes Kaspersky Endpoint Security for Android manually using the app interface. In order for users to be able to remove the app, app removal should be allowed in the policy applied to the device.
- App removal by the administrator
The administrator removes the app remotely using the Administration Console of Kaspersky Security Center. The app can be removed from a separate device or from several devices at once.
To remove Kaspersky Endpoint Security for Android from a device operating in device owner mode:
- Send the Reset to factory settings command from Administration Console to the device. This command removes all device data and rolls back device settings to their factory values.
- Manually remove the device from the list of managed devices in Administration Console.
If the device is not removed from Administration Console, there can be problems with further installation of Kaspersky apps on this device.
The help for this version of the solution is no longer updated, so it may contain outdated information. For up-to-date information about the solution refer to the Kaspersky Secure Mobility Management 4.1 Help.
Remote app removal
You can remove Kaspersky Endpoint Security for Android from users' mobile devices remotely in the following ways:
- Using a group policy. This method is convenient if you want to remove the app from several devices at once.
- By configuring local app settings. This method is convenient if you want to remove the app from a separate device.
For information about removing Kaspersky Endpoint Security for Android from devices operating in device owner mode, see the App removal in device owner mode section below.
To remove the app by applying a group policy:
- In the console tree, in the Managed devices folder, select the administration group to which the Android devices belong.
- In the workspace of the group, select the Policies tab.
- Open the policy properties window by double-clicking any column.
Complete the following steps within 15 minutes. Otherwise, you may face an error when saving changes to the policy.
- In the policy Properties window, select the Additional section.
- In the Removal of Kaspersky Endpoint Security for Android section, select the Remove Kaspersky Endpoint Security for Android from device check box.
This setting doesn't apply to devices operating in device owner mode.
- Click the Apply button to save the changes you have made.
As a result, Kaspersky Endpoint Security for Android is removed from mobile devices after synchronization with the Administration Server. Users of mobile devices receive a notification that the app has been removed.
To remove the app by configuring local settings:
- In the console tree, select Mobile Device Management → Mobile devices.
- In the list of devices, select the device on which you want to remove the app.
- Open the device properties window double-clicking.
- Select Applications → Kaspersky Endpoint Security for Android.
- Open the Kaspersky Endpoint Security properties window by double-clicking.
- Select the Additional section.
- In the Removal of Kaspersky Endpoint Security for Android section, select the Remove Kaspersky Endpoint Security for Android from device check box.
This setting doesn't apply to devices operating in device owner mode.
- Click the Apply button to save the changes you have made.
As a result, Kaspersky Endpoint Security for Android is removed from mobile device after synchronization with the Administration Server. The mobile device user receives a notification that the app has been removed.
App removal in device owner mode
To remove Kaspersky Endpoint Security for Android from a device operating in device owner mode:
- In the console tree, select Mobile Device Management → Mobile devices.
- In the list of devices, select the device on which you want to remove the app.
- Right-click the device.
- In the context menu, select Mobile Device Management → Reset to factory settings.
The Reset to factory settings command is sent to the device. This command removes all device data and rolls back device settings to their factory values.
- In the list of devices, right-click the device and select Delete.
The device is removed from the list of managed devices in Administration Console.
If the device is not removed from Administration Console, there can be problems with further installation of Kaspersky apps on this device.
The help for this version of the solution is no longer updated, so it may contain outdated information. For up-to-date information about the solution refer to the Kaspersky Secure Mobility Management 4.1 Help.
Permitting users to remove the app
To protect the app from removal on devices running Android 7.0 or later, Kaspersky Endpoint Security for Android must be set as an Accessibility feature. When the Initial Configuration Wizard is running, Kaspersky Endpoint Security for Android prompts the user to grant the application all required permissions. The user can skip these steps or disable these permissions in the device settings at a later time. If this is the case, the app is not protected from removal.
You can allow users to remove Kaspersky Endpoint Security for Android from their mobile devices in the following ways:
- Using a group policy. This method is convenient if you want to allow users to remove the app from several devices at once.
- Using local app settings. This method is convenient if you want to allow the user of a separate device to remove the app.
On devices operating in device owner mode, Kaspersky Endpoint Security for Android can be removed only by the administrator. For instructions, please refer to Remote app removal.
To allow removal of the app in a group policy:
- In the console tree, in the Managed devices folder, select the administration group to which the Android devices belong.
- In the workspace of the group, select the Policies tab.
- Open the policy properties window by double-clicking any column.
Complete the following steps within 15 minutes. Otherwise, you may face an error when saving changes to the policy.
- In the policy Properties window, select the Additional section.
- In the Removal of Kaspersky Endpoint Security for Android section, set the Allow removal of Kaspersky Endpoint Security for Android check box.
This setting doesn't apply to devices operating in device owner mode.
- Click the Apply button to save the changes you have made.
As a result, removal of the app by users is allowed on mobile devices after synchronization with the Administration Server. The app removal button becomes available in the Kaspersky Endpoint Security for Android settings.
To allow removal of the app in the local app settings:
- In the console tree, select Additional → Mobile Device Management → Mobile devices.
- In the list of devices, select the device from which you want to allow app removal by the user.
- Open the device properties window by double-clicking.
- Select Applications → Kaspersky Endpoint Security for Mobile.
- Open the Kaspersky Endpoint Security properties window by double-clicking.
- Select the section Additional.
- In the Removal of Kaspersky Endpoint Security for Android section, set the Allow removal of Kaspersky Endpoint Security for Android check box.
This setting doesn't apply to devices operating in device owner mode.
- Click the Apply button to save the changes you have made.
As a result, removal of the app by the user is allowed on the mobile device after synchronization with the Administration Server. The app removal button becomes available in the Kaspersky Endpoint Security for Android settings.
Page top
The help for this version of the solution is no longer updated, so it may contain outdated information. For up-to-date information about the solution refer to the Kaspersky Secure Mobility Management 4.1 Help.
App removal by the user
To independently remove Kaspersky Endpoint Security for Android from a mobile device, the user must do the following:
- In the main window of Kaspersky Endpoint Security for Android, tap → Uninstall the app.
A confirmation prompt appears on the screen.
If the Uninstall the app button is missing, this means that the administrator enabled protection against removal of Kaspersky Endpoint Security for Android or the device operates in device owner mode.
On devices operating in device owner mode, Kaspersky Endpoint Security for Android can be removed only by the administrator. For instructions, please refer to Remote app removal.
- Confirm removal of Kaspersky Endpoint Security for Android.
The Kaspersky Endpoint Security for Android app will be removed from the user's mobile device.
Page top
The help for this version of the solution is no longer updated, so it may contain outdated information. For up-to-date information about the solution refer to the Kaspersky Secure Mobility Management 4.1 Help.
Configuration and Management
This Help section is intended for specialists who administer Kaspersky Secure Mobility Management, as well as for specialists who provide technical support to organizations that use Kaspersky Secure Mobility Management.
The help for this version of the solution is no longer updated, so it may contain outdated information. For up-to-date information about the solution refer to the Kaspersky Secure Mobility Management 4.1 Help.
Getting Started
This section describes the actions that you are recommended to perform when getting started with Kaspersky Secure Mobility Management.
The help for this version of the solution is no longer updated, so it may contain outdated information. For up-to-date information about the solution refer to the Kaspersky Secure Mobility Management 4.1 Help.
Starting and stopping the application
Kaspersky Security Center automatically starts and stops administration plug-ins of Kaspersky Endpoint Security for Android and Kaspersky Device Management for iOS.
Kaspersky Endpoint Security for Android launches when the operating system starts up and protects the mobile device during the entire session. The user can stop the app by disabling all Kaspersky Endpoint Security for Android components. You can use group policies to configure user permissions to manage app components.
On certain devices (for example, HUAWEI, Meizu, and Xiaomi), you must manually add Kaspersky Endpoint Security for Android to the list of apps that are started when the operating system starts (Security → Permissions → Autorun). If the app is not added to the list, Kaspersky Endpoint Security for Android stops performing all of its functions after the mobile device is restarted.
You must also disable Battery Saver mode for Kaspersky Endpoint Security for Android. This is necessary for the app to run in the background, such as running a scheduled malware scan or synchronizing the device with Kaspersky Security Center. This issue is attributable to the specific features of the embedded software of these devices.
Page top
The help for this version of the solution is no longer updated, so it may contain outdated information. For up-to-date information about the solution refer to the Kaspersky Secure Mobility Management 4.1 Help.
Creating an administration group
To perform centralized configuration of the Kaspersky Endpoint Security for Android app installed on the users' mobile devices, the group policies must be applied to the devices.
To apply the policy to a device group, you are advised to create a separate group for these devices in the Managed devices prior to installing mobile apps on user devices.
After creating an administration group, it is recommended to configure the option to automatically allocate devices on which you want to install the apps to this group. Then configure settings that are common to all devices using a group policy.
To create administration group, follow the steps below:
- In the console tree, select the Managed devices folder.
- In the workspace of the Managed devices folder or subfolder, select the Devices tab.
- Click the New group button.
This opens the window in which you can create a new group.
- In the Group name window type the group name and click OK.
A new administration group folder with the specified name appears in the console tree. For more detailed information on use of administration groups, see Kaspersky Security Center Help.
Page top
The help for this version of the solution is no longer updated, so it may contain outdated information. For up-to-date information about the solution refer to the Kaspersky Secure Mobility Management 4.1 Help.
Group policies for managing mobile devices
A group policy is a package of settings for managing mobile devices that belong to an administration group and for managing mobile apps installed on the devices. You can create a group policy using the Policy Wizard.
You can use a policy to configure settings of both individual devices and a group of devices. For a group of devices, administration settings can be configured in the window of group policy properties. For an individual device, they can be configured in the window of local application settings. Individual management settings specified for one device may differ from the values of settings configured in the policy for a group to which this device belongs.
Each parameter represented in a policy has a "lock" attribute, which shows whether the setting is allowed for modification in the policies of nested hierarchy levels (for nested groups and secondary Administration Servers), in local application settings.
The values of settings configured in the policy and in local application settings are saved on the Administration Server, distributed to mobile devices during synchronization, and saved to devices as current settings. If the user has specified other values of settings that have not been "locked", during the next synchronization of the device with the Administration Server the new values of settings are relayed to the Administration Server and saved in the local settings of the application instead of the values that had been previously specified by the administrator.
To keep corporate security of mobile devices up to date, you can monitor users' devices for compliance with the group management policy.
The security level indicator is displayed in the upper part of the group policy window. The security level indicator will help you configure the policy so as to ensure a high level of device protection. The protection level indicator status changes depending on the policy settings:
 High protection level – an appropriate level of device protection is provided. All protection components function according to the settings recommended by Kaspersky.
 Medium protection level – the protection level is lower than recommended. Some critical protection components are disabled (for example, Web Protection). Important issues are marked with the
  icon.
icon. Low protection level – there are problems that may lead to infection of the device and loss of data. Some critical protection components are disabled (for example, real-time protection of devices is disabled). Critical issues are marked with the
  icon.
icon.
For more details on managing policies and administration groups in the Administration Console of Kaspersky Security Center, please refer to Kaspersky Security Center Help.
The help for this version of the solution is no longer updated, so it may contain outdated information. For up-to-date information about the solution refer to the Kaspersky Secure Mobility Management 4.1 Help.
Creating a group policy
This section describes the process of creating group policies for devices on which Kaspersky Endpoint Security for Android mobile app are installed and policies for iOS MDM devices.
Policies created for an administration group are shown in the group workspace in the Administration Console of Kaspersky Security Center on the Policies tab. The icon indicating the policy status (active / inactive) appears before the policy name. Several policies for different apps can be created in one group. Only one policy for each app can be active. When a new active policy is created, the previous active policy becomes inactive.
You can modify a policy after it is created.
To a policy for managing mobile devices:
- From the console tree, select an administration group for which you want to create a policy.
- In the workspace of the group, select the Policies tab.
- Click the New policy link to start the Policy Wizard.
This starts the Policy Wizard.
Step 1. Choose an application for creating a group policy
At this step, select the application for which you want to create a group policy in the list of applications:
- Kaspersky Endpoint Security for Android – for devices using the Kaspersky Endpoint Security for Android mobile app.
It is recommended to create a separate policy for HUAWEI and Honor devices that do not have Google play services. This way you can send links to HUAWEI AppGallery to the users of all such devices.
- Kaspersky Device Management for iOS – for iOS MDM devices.
A policy for mobile devices can be created if the Kaspersky Endpoint Security for Android Administration Plug-in and the Kaspersky Device Management for iOS Administration Plug-in are installed on the administrator's desktop. If the plug-ins are not installed, the name of the relevant application does not appear in the list of applications.
Proceed to the next step of the Policy Wizard.
Step 2. Enter a group policy name
At this step, type the name for the new policy in the Name field. If you specify the name of an existing policy, it will have (1) added at the end automatically.
Proceed to the next step of the Policy Wizard.
Step 3. Create a group policy for the application
At this step, the Wizard prompts you to select the status of the policy:
- Active policy. The Wizard saves the created policy on the Administration Server. At the next synchronization of the mobile device with the Administration Server, the policy will be used on the device as the active policy.
- Inactive policy. The Wizard saves the created policy on the Administration Server as a backup policy. This policy can be activated in the future after a specific event. If necessary, an inactive policy can be switched to active state.
Several policies can be created for one application in the group, but only one of them can be active. When a new active policy is created, the previous active policy automatically becomes inactive.
Exit the Wizard.
Page top
The help for this version of the solution is no longer updated, so it may contain outdated information. For up-to-date information about the solution refer to the Kaspersky Secure Mobility Management 4.1 Help.
Configuring synchronization settings
To manage mobile devices and receive reports or statistics from mobile devices of users, you must configure the synchronization settings. Mobile device synchronization with Kaspersky Security Center may be performed in the following ways:
- By schedule. Synchronization by schedule is performed by using the HTTP protocol. You can configure the synchronization schedule in the group policy settings. Modifications to group policy settings, commands and tasks will be performed when the device is synchronizing with Kaspersky Security Center according to the schedule, i.e. with a delay. By default, mobile devices are synchronized with the Kaspersky Security Center automatically every 6 hours.
- Forced. Forced synchronization is performed by using push notifications of the FCM service (Firebase Cloud Messaging). Forced synchronization is primarily intended for timely delivery of commands to a mobile device. It might be useful when a device is in battery saver mode, because in this case the app may perform tasks later than specified. If you want to use forced synchronization, make sure that the FCM settings are configured in Kaspersky Security Center.
To configure the settings of mobile device synchronization with the Kaspersky Security Center:
- In the console tree, in the Managed devices folder, select the administration group to which the Android devices belong.
- In the workspace of the group, select the Policies tab.
- Open the policy properties window by double-clicking any column.
Complete the following steps within 15 minutes. Otherwise, you may face an error when saving changes to the policy.
- In the policy Properties window, select the Synchronization section.
- Select the frequency of synchronization in the Synchronize drop-down list.
- To disable synchronization of a device with Kaspersky Security Center while roaming, select the Do not synchronize while roaming check box.
The device user can manually perform synchronization in the app settings (
→ Settings → Synchronization → Synchronize). - To hide synchronization settings (server address, port and administration group) from the user in the app settings, clear the Show synchronization settings on device check box. It is impossible to modify hidden settings.
- To receive the device's location history, select the Send device location history during synchronization check box in the Device location history block. The location history will be sent to the Administration Server during each synchronization.
The functionality must be used in accordance with the requirements of local legislation, with the notification or consent (depending on the requirements of the legislation) of the person using the device to enable the location tracking functionality on the device.
Enabling this setting and specifying the geofence area will result in increased device power consumption.
This setting works only if the Device location history informational event type is stored in the Administration Server database. The events are configured in the Events section of the policy properties. For more details, please refer to the Kaspersky Security Center Help. - In the How often to get the device location drop-down list, specify the frequency of getting the device location. The default value is Every 15 minutes.
Due to technical limitations on Android devices, the device location may be retrieved less often than specified.
- Click the Apply button to save the changes you have made.
Mobile device settings are changed after the next device synchronization with Kaspersky Security Center. You can manually synchronize the mobile device by using a special command. To learn more about working with commands for mobile devices, please refer to the "Sending commands" section.
Page top
The help for this version of the solution is no longer updated, so it may contain outdated information. For up-to-date information about the solution refer to the Kaspersky Secure Mobility Management 4.1 Help.
Managing revisions to group policies
Kaspersky Security Center lets you track group policy modifications. Every time you save changes made to a group policy, a revision is created. Each revision has a number.
You can manage revisions only for Kaspersky Endpoint Security for Android policies. You cannot manage revisions for a Kaspersky Device Management for iOS policy.
You can perform the following actions on group policy revisions:
- Compare a selected revision to the current one.
- Compare selected revisions.
- Compare a policy with a selected revision of another policy.
- View a selected revision.
- Roll back policy changes to a selected revision.
- Save revisions as a .txt file.
For more details about managing revisions of group policies and other objects (for example, user accounts), please refer to Kaspersky Security Center Help.
To view the history of group policy revisions:
- In the console tree, in the Managed devices folder, select the administration group to which the Android devices belong.
- In the workspace of the group, select the Policies tab.
- Open the policy properties window by double-clicking any column.
Complete the following steps within 15 minutes. Otherwise, you may face an error when saving changes to the policy.
- In the policy Properties window, select the Revision history section.
A list of policy revisions is displayed. It contains the following information:
- Policy revision number.
- Date and time the policy was modified.
- Name of the user who modified the policy.
- Action performed on the policy.
- Description of the revision made to policy settings.
The help for this version of the solution is no longer updated, so it may contain outdated information. For up-to-date information about the solution refer to the Kaspersky Secure Mobility Management 4.1 Help.
Removing a group policy
To remove a group policy:
- In the console tree, select an administration group for which you want to remove a policy.
- In the workspace of the administration group on the Policies tab select the policy you want to remove.
- In the context menu of the policy, select Delete.
As a result, the group policy is deleted. Before the new group policy is applied, mobile devices belonging to the administration group continue to work with the settings specified in the policy that has been deleted.
Page top
The help for this version of the solution is no longer updated, so it may contain outdated information. For up-to-date information about the solution refer to the Kaspersky Secure Mobility Management 4.1 Help.
Restricting permissions to configure group policies
Kaspersky Security Center administrators can configure the access permissions of Administration Console users for different functions of the Kaspersky Secure Mobility Management integrated solution depending on the job duties of users.
In the Administration Console interface, you can configure access rights in the Administration Server properties window on the Security and User roles tabs. The User roles tab lets you add standard user roles with a predefined set of rights. The Security section lets you configure rights for one user or a group of users or assign roles to one user or a group of users. User rights for each application are configured according to functional scopes.
You can also configure user permissions specific to functional areas. Information about the correspondence between functional areas and policy tabs is given in Annex.
For each functional area, the administrator can assign the following permissions:
- Allow editing. The Administration Console user is allowed to change the policy settings in the properties window.
- Block editing. The Administration Console user is prohibited from changing the policy settings in the properties window. Policy tabs belonging to the functional scope for which this right has been assigned are not displayed in the interface.
For more details on managing user rights and roles in the Administration Console of Kaspersky Security Center, please refer to Kaspersky Security Center Help.
Page top
The help for this version of the solution is no longer updated, so it may contain outdated information. For up-to-date information about the solution refer to the Kaspersky Secure Mobility Management 4.1 Help.
Control
This section contains information about how to remotely monitor mobile devices in the Administration Console of Kaspersky Security Center.
The help for this version of the solution is no longer updated, so it may contain outdated information. For up-to-date information about the solution refer to the Kaspersky Secure Mobility Management 4.1 Help.
Configuring restrictions
This section provides instructions on how to configure user access to the features of mobile devices.
The help for this version of the solution is no longer updated, so it may contain outdated information. For up-to-date information about the solution refer to the Kaspersky Secure Mobility Management 4.1 Help.
Special considerations for devices running Android 10 or later
Android 10 introduced numerous changes and restrictions targeting API 29 or higher. Some of these changes affect the availability or functionality of some of the app's features. These considerations apply only to devices running Android 10 or later.
Ability to enable, disable, and configure Wi-Fi
- Wi-Fi networks can be added, deleted, and configured in the Administration Console of Kaspersky Security Center. When a Wi-Fi network is added to a policy, Kaspersky Endpoint Security receives this network configuration when it first connects to Kaspersky Security Center.
- When a device detects a network configured through Kaspersky Security Center, Kaspersky Endpoint Security prompts the user to connect to that network. If the user chooses to connect to the network, all of the settings configured through Kaspersky Security Center are automatically applied. The device then automatically connects to that network when in range, without showing further notifications to the user.
- If a user's device is already connected to another Wi-Fi network, sometimes the user may not be prompted to approve a network addition. In such cases, the user must turn Wi-Fi off and on again to receive the suggestion.
- When Kaspersky Endpoint Security suggests a user connect to a Wi-Fi network and the user refuses to do so, the app's permission to change the Wi-Fi state is revoked. Kaspersky Endpoint Security then cannot suggest connecting to Wi-Fi networks until the user grants the permission again by going to Settings → Apps & notifications → Special App access → Wi-Fi Control → Kaspersky Endpoint Security.
- Only open networks and networks encrypted with WPA2-PSK are supported. WEP and WPA encryption are not supported.
- If the password for a network previously suggested by the app is changed, the user must manually delete that network from the list of known networks. The device will then be able to receive a network suggestion from Kaspersky Endpoint Security and connect to it.
- When a device OS is updated from Android 9 or earlier to Android 10 or later, and/or Kaspersky Endpoint Security installed on a device running Android 10 or later is updated, the networks that were previously added via Kaspersky Security Center cannot be modified or deleted through Kaspersky Security Center policies. The user, however, can manually modify or delete such networks in the device settings.
- On devices running Android 10, a user is prompted for the password during an attempt to connect manually to a protected suggested network. Automatic connection does not require entering the password. If a user's device is connected to some other Wi-Fi network, the user must first disconnect from that network to connect automatically to one of the suggested networks.
- On devices running Android 11, a user may manually connect to a protected network suggested by the app, without entering the password.
- When Kaspersky Endpoint Security is removed from a device, the networks previously suggested by the app are ignored.
- Prohibiting use of Wi-Fi networks is not supported.
Camera access
- On devices running Android 10, use of the camera cannot be completely prohibited. Prohibiting use of the camera for a work profile is still available.
- If a third-party app attempts to access the device's camera, that app will be blocked, and the user will be notified about the issue. However, the apps that use the camera while running in background mode cannot be blocked.
- When an external camera is disconnected from a device, a notification about the camera not being available may be displayed in some cases.
Managing screen unlock methods
- Kaspersky Endpoint Security now resolves the password strength requirements into one of the system values: medium or high.
- If the password length required is 1 to 4 symbols, then the app prompts the user to set a medium-strength password. It must be either numeric (PIN), with no repeating or ordered (e.g. 1234) sequences; or alphanumeric. The PIN or password must be at least 4 characters long.
- If the password length required is 5 or more symbols, then the app prompts the user to set a high-strength password. It must be either numeric (PIN), with no repeating or ordered sequences; or alphanumeric (password). The PIN must be at least 8 digits long; the password must be at least 6 characters long.
- Using a fingerprint to unlock the screen can be managed for a work profile only.
The help for this version of the solution is no longer updated, so it may contain outdated information. For up-to-date information about the solution refer to the Kaspersky Secure Mobility Management 4.1 Help.
Configuring restrictions for Android devices
To keep an Android device secure, configure the Wi-Fi, camera, and Bluetooth usage settings on the device.
By default, the user can use Wi-Fi, camera, and Bluetooth on the device without restrictions.
To configure the Wi-Fi, camera, and Bluetooth usage restrictions on the device:
- In the console tree, in the Managed devices folder, select the administration group to which the Android devices belong.
- In the workspace of the group, select the Policies tab.
- Open the policy properties window by double-clicking any column.
Complete the following steps within 15 minutes. Otherwise, you may face an error when saving changes to the policy.
- In the policy Properties window, select the Device Management section.
- In the Restrictions section, configure usage of Wi-Fi, camera, and Bluetooth:
- To disable the Wi-Fi module on the user's mobile device, select the Prohibit use of Wi-Fi check box.
On devices running Android 10 or later, prohibiting the use of Wi-Fi networks is not supported.
- To disable the camera on the user's mobile device, select the Prohibit use of camera check box.
When camera usage is prohibited, the app displays a notification upon opening and then closes shortly after. On Asus and OnePlus devices, the notification is shown in full screen. The device user can tap the Close button to exit the app.
On devices running Android 11 or later, Kaspersky Endpoint Security for Android must be set as an Accessibility feature. Kaspersky Endpoint Security for Android prompts the user to set the app as an Accessibility feature through the Initial Configuration Wizard. The user can skip this step or disable this service in the device settings at a later time. If this is the case, you will not be able to restrict use of the camera.
- To disable Bluetooth on the user's mobile device, select the Prohibit use of Bluetooth check box.
On Android 12 or later, the use of Bluetooth can be disabled only if the device user granted the Nearby Bluetooth devices permission. The user can grant this permission during the Initial Configuration Wizard or at a later time.
On personal devices running Android 13 or later, the use of Bluetooth cannot be disabled.
- To disable the Wi-Fi module on the user's mobile device, select the Prohibit use of Wi-Fi check box.
- Click the Apply button to save the changes you have made.
Mobile device settings are changed after the next device synchronization with Kaspersky Security Center.
The help for this version of the solution is no longer updated, so it may contain outdated information. For up-to-date information about the solution refer to the Kaspersky Secure Mobility Management 4.1 Help.
Configuring iOS MDM device feature restrictions
To ensure compliance with corporate security requirements, configure restrictions on the operation of the iOS MDM device. For information about available restrictions, refer to the context help of the administration plug-in.
To configure iOS MDM device feature restrictions:
- In the console tree, in the Managed devices folder, select the administration group to which the iOS MDM devices belong.
- In the workspace of the group, select the Policies tab.
- Open the policy properties window by double-clicking any column.
Complete the following steps within 15 minutes. Otherwise, you may face an error when saving changes to the policy.
- In the policy Properties window, select the Features Restriction section.
- In the Features restriction settings section, select the Apply settings on device check box.
- Configure iOS MDM device feature restrictions.
- Click the Apply button to save the changes you have made.
- Select the Restrictions for applications section.
- In the Applications restriction settings section, select the Apply settings on device check box.
- Configure restrictions for apps on the iOS MDM device.
- Click the Apply button to save the changes you have made.
- Select the Restrictions for Media Content section.
- In the Media content restriction settings section, select the Apply settings on device check box.
- Configure restrictions for media content on the iOS MDM device.
- Click the Apply button to save the changes you have made.
As a result, once the policy is applied, restrictions on features, apps, and media content will be configured on the user's mobile device.
Page top
The help for this version of the solution is no longer updated, so it may contain outdated information. For up-to-date information about the solution refer to the Kaspersky Secure Mobility Management 4.1 Help.
Configuring user access to websites
This section contains instructions on how to configure access to websites on Android and iOS devices.
The help for this version of the solution is no longer updated, so it may contain outdated information. For up-to-date information about the solution refer to the Kaspersky Secure Mobility Management 4.1 Help.
Configuring access to websites on Android devices
You can use Web Protection to configure access of Android device users to websites. Web Protection supports website filtering by categories defined in Kaspersky Security Network cloud service. Filtering allows you to restrict user access to certain websites or categories of websites (for example, those from the "Gambling, lotteries, sweepstakes", or "Internet communication" categories). Web Protection also protects the personal data of users on the internet.
To enable Web Protection:
- The Statement regarding data processing for the purpose of using Web Protection (Web Protection Statement) should be accepted. Kaspersky Endpoint Security uses Kaspersky Security Network (KSN) to scan websites. The Web Protection Statement contains the terms of data exchange with KSN.
You can accept the Web Protection Statement for the user in Kaspersky Security Center. In this case, the user is not required to take any action.
If you have not accepted the Web Protection Statement and prompt the user to do this, the user must read and accept the Web Protection Statement in the app settings.
If you have not accepted the Web Protection Statement, Web Protection is not available.
Web Protection on Android devices is supported only by Google Chrome, HUAWEI Browser, Samsung Internet Browser, and Yandex Browser.
If the Kaspersky Endpoint Security for Android app in device owner mode is not enabled as an Accessibility Features service, Web Protection is supported only by the Google Chrome browser and checks only the domain of a website. To allow other browsers (Samsung Internet Browser, Yandex Browser, and HUAWEI Browser) support Web Protection, enable Kaspersky Endpoint Security as an Accessibility Features service. This will also enable the Custom Tabs feature operation.
The Custom Tabs feature is supported by Google Chrome, HUAWEI Browser, and Samsung Internet Browser.
Web Protection for HUAWEI Browser, Samsung Internet Browser, and Yandex Browser does not block sites on a mobile device if a work profile is used and Web Protection is enabled only for the work profile.
Web Protection is enabled by default: user access to websites in the Phishing and Malware categories is blocked. On devices managed by the Kaspersky Endpoint Security for Android app in device owner mode, Web Protection is supported only by the Google Chrome browser and checks only the domain of a website. To allow other browsers (Samsung Internet Browser, Yandex Browser, and HUAWEI Browser) to support Web Protection, Kaspersky Endpoint Security must be enabled as an Accessibility Features service.
To configure the settings of the device user's access to websites:
- In the console tree, in the Managed devices folder, select the administration group to which the Android devices belong.
- In the workspace of the group, select the Policies tab.
- Open the policy properties window by double-clicking any column.
Complete the following steps within 15 minutes. Otherwise, you may face an error when saving changes to the policy.
- In the policy Properties window, select the Web Protection.
- To use Web Protection, you or device user must read and accept the Statement regarding data processing for the purpose of using Web Protection (Web Protection Statement):
- Click the Web Protection Statement link at the top of the section.
This opens Statement regarding data processing for purpose of using Web Protection window.
- Read and accept Privacy Policy by selecting the corresponding check box. To view Privacy Policy, click the Privacy Policy link.
If you do not accept Privacy Policy, mobile device user can accept Privacy Policy in the Initial Configuration Wizard or in the app (
→ About → Terms and conditions → Privacy Policy). - Select the Web Protection Statement acceptance mode:
- I have read and accept the Web Protection Statement
- Request acceptance of the Web Protection Statement from the device user
- I do not accept the Web Protection Statement
If you select I do not accept the Web Protection Statement, the Web Protection does not block sites on a mobile device. Mobile device user cannot enable Web Protection in the Kaspersky Endpoint Security.
- Click OK to close the window.
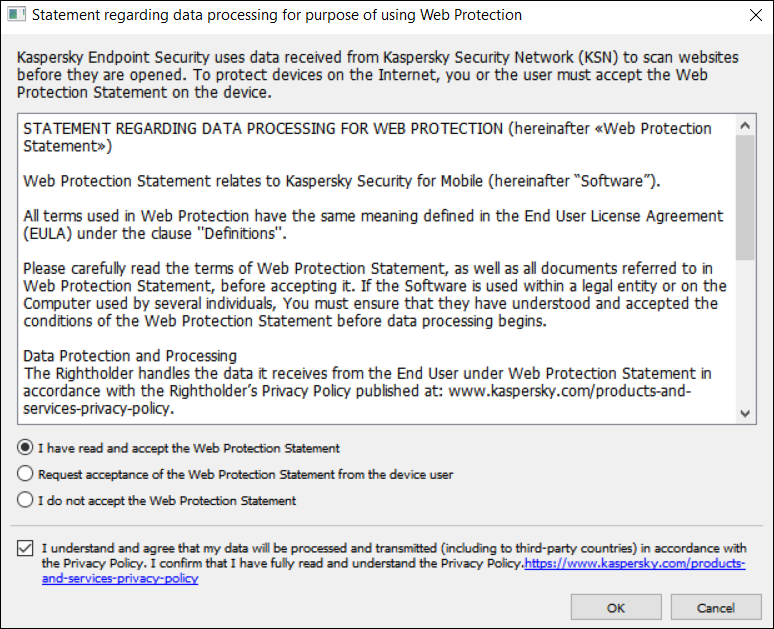
Step 5. Accept the Statement regarding data processing for purpose of using Web Protection.
- Click the Web Protection Statement link at the top of the section.
- Select the Enable Web Protection check box.
- If you want the app to check a full URL when opening a website in Custom Tabs, select the Check full URL when using Custom Tabs check box.
Custom Tabs is an in-app browser that allows the user to view web pages without having to leave the app and switch to a full web browser version. This option provides better detection of a URL and its check against the configured Web Protection rules. If the check box is selected, Kaspersky Endpoint Security for Android opens the website in a full version of the browser and checks whole web address of the website. If the check box is cleared, Kaspersky Endpoint Security for Android checks only the domain of a website in Custom Tabs.
- Select one of the following options:
- If you want the app to restrict user access to websites depending on their content, do the following:
- In the Web Protection section, in the drop-down list select Websites of selected categories are forbidden.
- Create a list of blocked categories by selecting check boxes next to the categories of websites to which the app will block access.

Step 8. Web Protection section. Select the categories of websites to block access to.
- If you want the app to allow or restrict user access only to websites specified by the administrator, do the following:
- In the Web Protection section, in the drop-down list select Only listed websites are allowed or Only listed websites are blocked.
If Kaspersky Endpoint Security for Android is not set as an Accessibility feature, Web Protection may block an allowed website that loads some elements from a website with a domain that is not in the list of allowed domains.
- Create a list of websites by adding addresses of websites to which the app will allow or block access, depending on the value selected in the drop-down list. You can add websites by link (full URL, including the protocol, e.g.
https://example.com).To make sure that the app allows or blocks access to the specified website in all supported versions of Google Chrome, HUAWEI Browser, Samsung Internet Browser, and Yandex Browser, include the same URL twice, once with the HTTP protocol (e.g.,
http://example.com) and once with the HTTPS protocol (e.g.,https://example.com).For example:
https://example.com—The main page of the website is either allowed or blocked. This URL can only be accessed through the HTTPS protocol.http://example.com—The main page of the website is either allowed or blocked, but only when accessed through the HTTP protocol. Other protocols like HTTPS are not affected.https://example.com/page/index.html—Only theindex.htmlpage of the website will be allowed or blocked. The rest of the website is not affected by this entry.
The app also supports regular expressions. When entering the address of an allowed or blocked website, use the following templates:
https://example\.com/.*—This template blocks or allows all child pages of the website, accessed via the HTTPS protocol (for example,https://example.com/about).https?://example\.com/.*—This template blocks or allows all child pages of the website, accessed via both the HTTP and HTTPS protocols.https?://.*\.example\.com—This template blocks or allows all subdomain pages of the website (e.g.,https://pictures.example.com).https?://example\.com/[abc]/.*—This template blocks or allows all child pages of the website where the URL path begins with 'a', 'b', or 'c' as the first directory (e.g.,https://example.com/b/about).https?://\w{3,5}.example\.com/.*—This template blocks or allows all child pages of the website where the subdomain consists of a word with 3 to 5 characters (e.g.,http://abde.example.com/about).
Use the expression
https?to select both the HTTP and HTTPS protocols. For more details on regular expressions, please refer to the Oracle Technical Support website.
- In the Web Protection section, in the drop-down list select Only listed websites are allowed or Only listed websites are blocked.
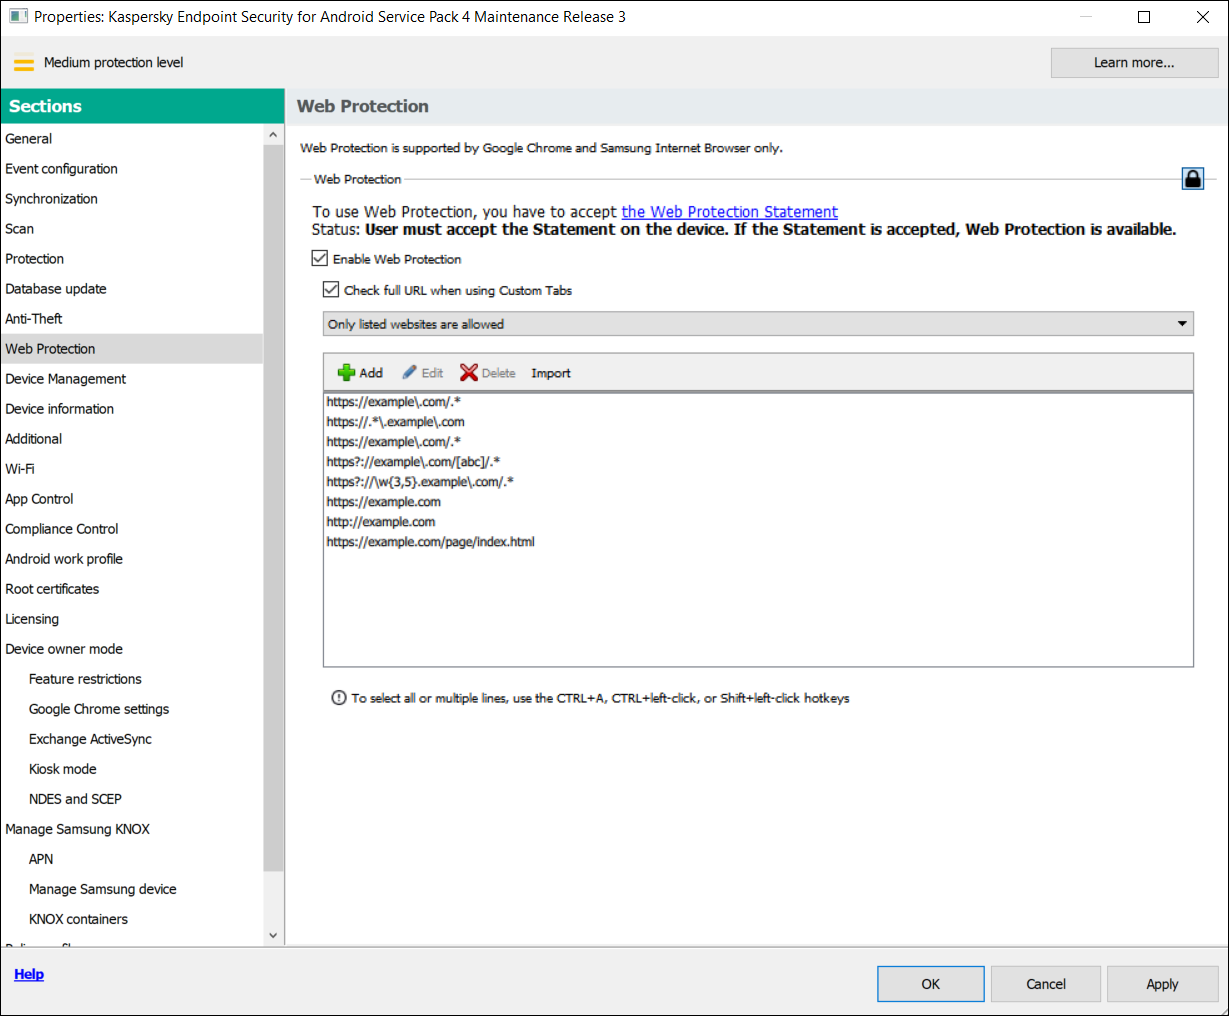
Step 9. Web Protection section. Specify the list of websites to allow access to.
- If you want the app to block user access to all websites, in the Web Protection section, in the drop-down list, select All websites are blocked.
- If you want the app to restrict user access to websites depending on their content, do the following:
- To lift content-based restrictions on user access to websites, clear the Enable Web Protection check box.
- Click the Apply button to save the changes you have made.
Mobile device settings are changed after the next device synchronization with Kaspersky Security Center.
Managing the website list
You can manage the list of websites with the following buttons:
- Add - Click to add a website to the list by entering a URL or regular expression.
- Import - Click to add multiple websites to the list by specifying a
.txtfile which contains the required URLs or regular expressions. The file must be encoded in UTF-8. URLs or regular expressions in the file must be separated by semicolons or by line breaks. - Edit - Click to change the address of a website.
- Delete - Click to remove a website from the list. To remove multiple websites from the list, select them with the CTRL+A, CTRL+left-click, or SHIFT+left-click hotkeys, and then click Delete.
The help for this version of the solution is no longer updated, so it may contain outdated information. For up-to-date information about the solution refer to the Kaspersky Secure Mobility Management 4.1 Help.
Configuring access to websites on iOS MDM devices
Configure Web Protection settings to control access to websites for iOS MDM device users. Web Protection controls a user's access to websites based on lists of allowed and blocked websites. Web Protection also lets you add website bookmarks on the bookmark panel in Safari.
By default, access to websites is not restricted.
Web Protection settings can be configured for supervised devices only.
To configure access to websites on the user's iOS MDM device:
- In the console tree, in the Managed devices folder, select the administration group to which the iOS MDM devices belong.
- In the workspace of the group, select the Policies tab.
- Open the policy properties window by double-clicking any column.
Complete the following steps within 15 minutes. Otherwise, you may face an error when saving changes to the policy.
- In the policy Properties window, select the Web Protection section.
- In the Web Protection settings section, select the Apply settings on device check box.
- To block access to blocked websites and allow access to allowed websites:
- In the Web Filter Mode drop-down list, select the Limit adult content mode.
- In the Allowed websites section, create a list of allowed websites.
The website address should begin with
"http://"or"https://". Kaspersky Device Management for iOS allows access to all websites in the domain. For example, if you have added http://www.example.com to the list of allowed websites, access is allowed to http://pictures.example.com and http://example.com/movies. If the list of allowed websites is empty, the application allows access to all websites other than those included in the list of blocked websites. - In the Forbidden websites section, create a list of blocked websites.
The website address should begin with
"http://"or"https://". Kaspersky Device Management for iOS blocks access to all websites in the domain.
- To block access to all websites other than allowed websites on the tab list:
- In the Web Filter Mode drop-down list, select the Allow bookmarked websites only mode.
- In the Bookmarks section, create a list of bookmarks of allowed websites.
The website address should begin with
"http://"or"https://". Kaspersky Device Management for iOS allows access to all websites in the domain. If the bookmark list is empty, the application allows access to all websites. Kaspersky Device Management for iOS adds websites from the list of bookmarks on the bookmarks tab in Safari in the user's mobile device.
- Click the Apply button to save the changes you have made.
As a result, once the policy is applied, Web Protection will be configured on the user's mobile device according to the mode selected and lists created.
Page top
The help for this version of the solution is no longer updated, so it may contain outdated information. For up-to-date information about the solution refer to the Kaspersky Secure Mobility Management 4.1 Help.
Compliance control
This section contains instructions on how to monitor device compliance with corporate requirements and how to configure compliance control rules.
The help for this version of the solution is no longer updated, so it may contain outdated information. For up-to-date information about the solution refer to the Kaspersky Secure Mobility Management 4.1 Help.
Compliance control of Android devices with corporate security requirements
You can control Android devices for compliance with the corporate security requirements. Corporate security requirements regulate how the user can work with the device. For example, the real-time protection must be enabled on the device, the anti-malware databases must be up-to-date, and the device password must be sufficiently strong. Compliance control is based on a list of rules. A compliance rule includes the following components:
- Device check criterion (for example, absence of blocked apps on the device).
- Time period allocated for the user to fix the non-compliance (for example, 24 hours).
- Actions that will be taken on the device if the user does not fix the non-compliance within the set time period (for example, lock the device).
If the device is in battery saver mode, the app may perform this task later than specified. To ensure timely responses of KES devices on Android to the administrator's commands, enable the use of Google Firebase Cloud Messaging.
To create a rule for checking devices for compliance with a group policy:
- In the console tree, in the Managed devices folder, select the administration group to which the Android devices belong.
- In the workspace of the group, select the Policies tab.
- Open the policy properties window by double-clicking any column.
Complete the following steps within 15 minutes. Otherwise, you may face an error when saving changes to the policy.
- In the policy Properties window, select the Compliance Control section.
- To receive notifications about devices that do not comply with the policy, in the Non-compliance notification section select the Notify administrator check box.
If the device does not comply with a policy, during device synchronization with the Administration Server, Kaspersky Endpoint Security for Android writes an entry for Violation detected: <name of the criterion checked> in the event log. You can view the Event log on the Events tab in the Administration Server properties or in the local properties of the application.
- To notify the device user that the user's device does not comply with the policy, in the Non-compliance notification section select the Notify user check box.
If the device does not comply with a policy, during device synchronization with the Administration Server, Kaspersky Endpoint Security for Android notifies the user about this.
- In the Compliance Control rules section, compile a list of rules for checking the device for compliance with the policy.
- To add a rule, click Add.
The Compliance Rule Wizard starts. Proceed through the wizard by using the Next button.
- Select a non-compliance criterion for the rule.
The following criteria are available:
- Real-time protection is disabled
Checks whether the security app is not installed on the device or is not running.
- Anti-malware databases are out of date
Checks whether the anti-malware databases were last updated 3 or more days ago.
- Forbidden apps are installed
Checks whether the list of apps on the device contains apps that are set as forbidden in the App Control.
- Apps from forbidden categories are installed
Checks whether the list of apps on the device contains apps from the categories that are set as forbidden in the App Control.
- Not all required apps are installed
Checks whether the list of apps on the device does not contains an app that is set as required in the App Control.
- Operating system version is out of date
Checks whether the Android version on the device is within the allowed range.
For this criterion, specify the minimum and maximum allowed versions of Android. If the maximum allowed version is set to Any, it means that future Android versions supported by Kaspersky Endpoint Security for Android will also be allowed.
- Device has not been synchronized for a long time
Checks how long ago the device last synchronized with Administration Server.
For this criterion, specify the maximum period after the last sync.
- Device has been rooted
Checks whether the device is hacked (whether root access is gained on the device).
- Unlock password is not compliant with security requirements
Checks whether the unlock password on the device does not comply with the settings defined in the Device Management section of the policy.
- Installed version of Kaspersky Endpoint Security for Android is not supported
Checks whether the security application installed on the device is not obsolete.
This criterion applies only to an app installed using a Kaspersky Endpoint Security for Android installation package and if the latest version is specified in the Upgrade of Kaspersky Endpoint Security for Android section of Additional properties of the policy.
For this criterion, you also need to specify the minimum allowed version of Kaspersky Endpoint Security for Android.
- SIM card usage is not compliant with security requirements
Checks whether the device SIM card has been replaced or removed compared to the previous check state.
You can also enable the check for an additional SIM card.
In some cases, replacement, removal, and insertion of an eSIM is also checked.
- Device is within or outside the geofence areas
Specifying the geofence area will result in increased device power consumption.
For this criterion, select the specific requirement that must be monitored:
- The device is within any of the geofence areas in the list (the geofence areas are combined using the OR logical operator).
- The device is outside all of the geofence areas in the list (the geofence areas are combined using the AND logical operator).
In the List of geofence areas block, you can add, edit, or delete geofence areas.
To add a new geofence area:
- Click the Add button.
Opens the Add geofence area window.
- Specify the Geofence area name.
- In the Coordinates of the geofence area perimeter section, specify a latitude and a longitude for each point.
If you want to add more than 3 points, click the Add point button. To delete a point, click the X button.
For each geofence area, you can manually enter from 3 to 100 coordinate pairs (latitude, longitude) as decimal numbers.
A geofence area perimeter must not contain intersecting lines.
- You can view the specified geofence area in the Yandex.Maps program, by clicking the View on map button.
- Click the Add button to add the specified geofence area.
The new geofence area appears in the list.
To edit a geofence area:
- Select the geofence area you want to edit, and then click the Edit button.
- Specify the new geofence area settings, as described earlier.
- Click the Add button.
The edited geofence area appears in the list.
To delete a geofence area:
- Select the geofence area you want to delete, and then click the Delete button.
The geofence area is removed from the list.
- Kaspersky Endpoint Security for Android has no access to precise or background location
Checks whether the Kaspersky Endpoint Security for Android app is not allowed to access the precise location of the device or use the device location in the background.
- Real-time protection is disabled
- Select the actions to be performed on the device if the specified non-compliance criterion is detected. You can add multiple actions. They are combined by the AND logical operator.
Some of the actions are continuous. Continuous actions remain in effect until one of the following conditions are met:
- The non-compliance criterion no longer applies.
- A policy is applied in which the corresponding Compliance Control rule is deleted.
The following actions are available:
- Block all apps except system apps
All apps on the user's mobile device, except system apps, are blocked from starting.
As soon as the non-compliance criterion selected for the rule is no longer detected on the device, the apps are automatically unblocked.
- Lock device
The mobile device is locked. To obtain access to data, you must unlock the device. If the reason for locking the device is not rectified after the device is unlocked, the device will be locked again after the specified time period.
- Wipe corporate data
The corporate data is wiped from the device. The list of wiped data depends on the mode in which the device operates:
- On a personal device, KNOX container and mail certificate are wiped.
- If the device operates in device owner mode, KNOX container and the certificates installed by Kaspersky Endpoint Security for Android (mail, VPN, and SCEP profile certificates, except the mobile certificates) are wiped.
- Additionally, if Android work profile is created, the work profile (its content, configurations, and restrictions) and the certificates installed in the work profile (mail, VPN, and SCEP profile certificates, except the mobile certificates) are wiped.
- Full reset
All data is deleted from the mobile device and the settings are rolled back to their factory values. After this action is completed, the device will no longer be a managed device. To connect the device to Kaspersky Security Center, you must reinstall Kaspersky Endpoint Security for Android.
- Lock work profile
The work profile on the device is locked. To obtain access to the work profile, you must unlock it. If the reason for locking the work profile is not rectified after it is unlocked, the work profile will be locked again after the specified time period.
The action is only applicable to Android 6 or later.
After the work profile on a device is locked, the history of work profile passwords is cleared. It means that the user can specify one of the recent passwords, regardless of the work profile password settings.
- Wipe data of all apps
The action is only applicable to devices running Android 9 or later in device owner mode or with created Android work profile.
If the device works in device owner mode, data of all apps on the device is wiped. If Android work profile is created on the device, data of all apps in the work profile is wiped.
As a result, apps are rolled back to their default state.
- Wipe data for a specified app
The action is only applicable to devices running Android 9 or later in device owner mode or with created Android work profile.
For this action, you need to specify the package name for the app whose data is to be deleted. How to get the package name of an app
As a result, the app is rolled back to its default state.
- Prohibit safe boot
The user is not allowed to boot the device in safe mode.
The action is only applicable to devices running Android 6 or later in device owner mode.
This is a continuous action.
- Prohibit use of camera
The user is not allowed to use any cameras on the device.
This is a continuous action.
- Prohibit use of Bluetooth
The device user is not allowed to turn on and configure Bluetooth in Settings.
The action is only applicable to personal devices running Android 12 or earlier, devices operating in device owner mode, or devices with created Android work profile.
This is a continuous action.
- Prohibit use of Wi-Fi
The device user is not allowed to use Wi-Fi and configure it in Settings.
The action is only applicable to devices operating in device owner mode (all Android versions), personal devices running Android 9 or earlier.
This is a continuous action.
- Prohibit USB debugging features
The user is not allowed to use USB debugging features and developer mode on the device.
The action is only applicable to devices operating in device owner mode or devices with created Android work profile.
This is a continuous action.
- Prohibit airplane mode
The user is not allowed to enable airplane mode on the device.
The action is only applicable to devices running Android 9 or later in device owner mode.
This is a continuous action.
The new rule appears in the Compliance Control rules section.
- To temporarily disable a rule that you have created, use the toggle switch opposite the selected rule.
- In the Actions when user accounts are disabled in Active Directory section, you can configure the actions to perform on devices when a user account is disabled in Active Directory.
These parameters require integration with Microsoft Active Directory.
To enable the automatic wiping of data from devices associated with disabled accounts of Active Directory users, select the Wipe data from devices with disabled Active Directory user accounts check box and choose one of the following actions:
- Wipe corporate data
- Reset to factory settings
- Click the Apply button to save the changes you have made.
Mobile device settings are changed after the next device synchronization with Kaspersky Security Center. If the user device does not comply with the rules, the restrictions you have specified in the scan rule list are applied to the device.
Page top
The help for this version of the solution is no longer updated, so it may contain outdated information. For up-to-date information about the solution refer to the Kaspersky Secure Mobility Management 4.1 Help.
Compliance control of iOS MDM devices with corporate security requirements
Compliance Control allows you to monitor iOS MDM devices for compliance with corporate security requirements and take actions if non-compliance is found. Compliance Control is based on a list of rules. Each rule includes the following components:
- Status (whether the rule is enabled or disabled).
- Non-compliance criteria (for example, absence of the specified apps or operating system version).
- Actions performed on the device if non-compliance is found (for example, wipe corporate data or send an email message to the user).
To create a rule:
- In the console tree, in the Managed devices folder, select the administration group to which the iOS MDM devices belong.
- In the workspace of the group, select the Policies tab.
- Open the policy properties window by double-clicking any column.
Complete the following steps within 15 minutes. Otherwise, you may face an error when saving changes to the policy.
- In the policy Properties window, select the Compliance Control section.
- In the Compliance Control rules section, click Add.
The Compliance Control Rule Wizard starts.
- Select the Enable rule check box if you want to activate the rule. If the check box is cleared, the rule is disabled.
- On the Non-compliance criteria tab, click Add criterion and select a non-compliance criterion for the rule. You can add multiple criteria. They are combined by the AND logical operator.
The following criteria are available:
- List of apps on device
Checks whether the list of apps on the device contains forbidden apps or does not contain required apps.
For this criterion, you need to select a check type (Contains or Does not contain) and specify the app's bundle ID. How to get the bundle ID of an app
- Operating system version
Checks the version of the operating system on the device.
For this criterion, you need to select a comparison operator (Equal to, Not equal to, Less than, Less than or equal to, Greater than, or Greater than or equal to) and specify the iOS version.
Note that the Equal to and Not equal to operators check for a full match of the operating system version with the specified value. For instance, if you specify 15 in the rule, but the device is running iOS 15.2, the Equal to criterion is not met. If you need to specify a range of versions, you can create two criteria and use the Less than and Greater than operators.
- Management mode
Checks the device's management mode.
For this criterion, you need to select a mode (Supervised device or Non-supervised device).
- Device type
Checks the device type.
For this criterion, you need to select a type (iPhone or iPad).
- Device model
Checks the device model.
For this criterion, you need to select an operator (Included in the list or Not included in the list), and then specify models that will be checked or excluded from the check, respectively.
To specify a model, type at least one character in the Identifier field, and then select the required model from the appeared list. The list contains mobile device codes and their matching product names. For example, if you want to add all iPhone 14 models, type "iPhone 14". In this case, you can select any of the available models: "iPhone 14", "iPhone 14 Plus", "iPhone 14 Pro", "iPhone 14 Pro Max".
In some cases, the same product name may correspond to several mobile device codes (for example, the "iPhone 7" product name corresponds to two mobile device codes, "iPhone 9.1" and "iPhone 9.3"). Be sure that you select all of the mobile device codes that correspond to the required models.
If you type a value that is not on the list, nothing will be found. However, you can click the OK button in the field to add the typed value to the criterion.
- Device is roaming
Checks whether the device is roaming (if you select True) or not (if you select False).
- Device password was set
Checks whether a password is set (if you select True) or not (if you select False).
If you select True, select whether the device password must match (if you select Matches policy) or must not match (if you select Does not match policy) the settings specified in the Password Settings section.
- Device free space
Checks whether the amount of free space on the device becomes less than the threshold that you specify.
For this criterion, specify the threshold amount of free space, and then select the measurement unit (GB or MB).
- Device is not encrypted
Checks whether the device is not encrypted.
Data encryption is enabled by default on password-locked iOS devices (Settings > Touch ID / Face ID and Password > Enable Password). Also, the hardware encryption on a device must be set to At block and file level (you can check this parameter in the device properties: in the console tree, select Additional > Mobile Device Management > Mobile devices, and then double-click the required device).
- SIM card has been changed
Checks whether the device SIM card has been replaced or removed compared to the previous check state.
You can also enable the check for inserting an additional SIM card.
On eSIM compatible devices, the non-compliance detection cannot be removed by inserting the previously removed eSIM. This is because the device's operating system recognizes each added eSIM as a new one. In this case, you need to delete the compliance control rule from the policy.
- Last sync earlier than
Checks how long ago the device last synchronized with Administration Server.
For this criterion, specify the maximum time after the last sync, and then select the measurement unit (Hours or Days).
We do not recommend that you specify a value less than the value of the Updating frequency for information about devices parameter in the iOS MDM Server settings.
If you specify criteria that contradict each other (for example, Device type is set to iPhone but the list of values of Device model, with the Included in the list operator selected, contains an iPad model), an error message is displayed. You cannot save such a rule.
- List of apps on device
- On the Actions tab, specify actions to be performed on the device if all specified non-compliance criteria are detected.
Actions are performed during the compliance rule check, which happens every 40 minutes, and persist until the next synchronization with the Administration Server. To prevent repeat actions from a single instance of non-compliance, set the Updating frequency for information about devices parameter in the iOS MDM Server settings to 30 minutes.
Add an action in one of the following ways:
- Click the Add action button if the action should be taken on the device immediately after non-compliance is detected.
- Click the Add postponed action button if you want to also set a time period in which the user can fix the non-compliance. If the non-compliance is not fixed within this period, the action is performed on the device.
The following actions are available:
- Send email message to user
The device user is informed about the non-compliance by email.
For this action, you need to specify the user's email address(es). If necessary, you can edit the default text of the email message.
- Wipe corporate data
All installed configuration profiles, provisioning profiles, the iOS MDM profile, and applications for which the Remove together with iOS MDM profile check box has been selected are removed from the device. This action is performed by sending the Wipe corporate data command.
- Install profile
The configuration profile is installed on the device. This action is performed by sending the Install profile command.
For this action, you need to specify the ID of the configuration profile to be installed.
When the non-compliance criteria selected for the rule are no longer detected on the device, you can revert the action by sending the respective command to the device.
- Delete profile
The configuration profile is deleted from the device. This action is performed by sending the Remove profile command.
For this action, you need to specify the ID of the configuration profile to be removed.
When the non-compliance criteria selected for the rule are no longer detected on the device, you can revert the action by sending the respective command to the device.
- Delete all profiles
All previously installed configuration profiles are deleted from the device.
When the non-compliance criteria selected for the rule are no longer detected on the device, you can install the deleted configuration profiles one by one, by sending the respective command to the device.
- Update operating system
The device operating system is updated.
For this action, you need to select the specific operation (Download and install, Download only, or Install only if you want to install a previously downloaded version) and the iOS version to be downloaded and/or installed.
- Change Bluetooth settings (supervised only)
For this action, you need to select whether you want to enable or disable Bluetooth on the device.
When the non-compliance criteria selected for the rule are no longer detected on the device, you can revert the action by sending the respective command to the device.
- Reset to factory settings
All data is deleted from the device and the settings are rolled back to their default values.
- Delete managed app
For this action, you need to specify the bundle ID of the managed app that you want to delete from the device. An app is considered managed if it has been installed on a device through Kaspersky Security Center. How to get the bundle ID of an app
When the non-compliance criteria selected for the rule are no longer detected on the device, you can revert the action by sending the respective command to the device.
- Delete all managed apps
All managed apps are deleted from the device. An app is considered managed if it has been installed on a device through Kaspersky Security Center.
When the non-compliance criteria selected for the rule are no longer detected on the device, you can install the deleted apps one by one, by sending the respective command to the device.
- Delete profile(s) of a specific type
For this action, you need to select the type of the profile to be deleted from the device (for example, Web Clips or Calendar subscriptions).
As soon as the non-compliance criteria selected for the rule are no longer detected on the device, the deleted profiles are automatically restored.
- Change roaming settings
For this action, you need to select whether you want to enable or disable data roaming on the device.
When the non-compliance criteria selected for the rule are no longer detected on the device, you can revert the action by sending the respective command to the device.
If you specify actions that contradict each other (for example, Enable Bluetooth and Disable Bluetooth at the same time, an error message is displayed. You cannot save such a rule.
- Click the OK button to save the rule and close the wizard.
The new rule appears in the list in the Compliance Control rules section.
- In the Actions when user accounts are disabled in Active Directory section, you can configure the actions to perform on devices when a user account is disabled in Active Directory.
These parameters require integration with Microsoft Active Directory.
To enable the automatic wiping of data from devices associated with disabled accounts of Active Directory users, select the Wipe data from devices with disabled Active Directory user accounts check box and choose one of the following actions:
- Wipe corporate data
- Reset to factory settings
If you use policy profiles, be sure to enable the wipe data option for the entire policy. When a user account is disabled in Active Directory, it is first removed from the Active Directory user group. As a result, the policy profile is no longer applied to this user account, so the data is not wiped from the device.
- Click the Apply button to save the changes you have made.
Mobile device settings are changed after the next device synchronization with Kaspersky Security Center.
Page top
The help for this version of the solution is no longer updated, so it may contain outdated information. For up-to-date information about the solution refer to the Kaspersky Secure Mobility Management 4.1 Help.
App control
This section contains instructions on how to configure user access to apps on a mobile device.
The help for this version of the solution is no longer updated, so it may contain outdated information. For up-to-date information about the solution refer to the Kaspersky Secure Mobility Management 4.1 Help.
App control on Android devices
The App Control component allows you to manage apps on Android devices to keep these devices secure.
You can impose restrictions on the user's activity on a device on which blocked apps are installed or required apps are not installed (for example, lock the device). You can impose restrictions using the Compliance Control component. To do so, in the scan rule settings, you must select the Forbidden apps are installed, Apps from forbidden categories are installed, or Not all required apps are installed criterion.
Kaspersky Endpoint Security for Android must be set as an Accessibility feature to ensure proper functioning of App Control. Kaspersky Endpoint Security for Android prompts the user to set the app as an Accessibility feature through the Initial Configuration Wizard. The user can skip this step or disable this service in the device settings at a later time. If this is the case, App Control does not run.
In device owner mode, you have extended control over the device. App Control operates without notifying the device user:
- Required apps are installed automatically in the background. To install apps silently, you need to specify a link to the APK file of the required app in the policy settings.
- Forbidden apps can be deleted from the device automatically. To delete apps silently, you need to select the Delete blocked apps automatically (in device owner mode only) check box in the policy settings.
To configure the settings of app startup on the mobile device:
- In the console tree, in the Managed devices folder, select the administration group to which the Android devices belong.
- In the workspace of the group, select the Policies tab.
- Open the policy properties window by double-clicking any column.
Complete the following steps within 15 minutes. Otherwise, you may face an error when saving changes to the policy.
- In the policy Properties window, select the App Control section.
- In the Operation mode section, select the mode of app startup on the user's mobile device:
- To allow the user to start all apps except those specified in the list of categories and apps as blocked apps, select the Blocked apps mode. The app will hide blocked app icons.
- To allow the user to start only apps specified in the list of categories and apps as allowed, recommended, or required apps, select the Allowed apps mode. The app will hide all app icons except those specified in the list of allowed, recommended, or required apps and system apps.
- If you want Kaspersky Endpoint Security for Android to send data on forbidden apps to the event log without blocking them, select the Do not block forbidden apps, only add a record to the event log check box.
During the next synchronization of the user's mobile device with the Administration Server, Kaspersky Endpoint Security for Android writes an entry for A forbidden app has been installed in the event log. You can view the Event log on the Events tab in the Administration Server properties or in the local properties of the application.
- If the device is in device owner mode, select the Delete blocked apps automatically (in device owner mode only) check box to remove forbidden apps from the device in the background without notifying the user.
- If you want Kaspersky Endpoint Security for Android to block the startup of system apps on the user's mobile device (such as Calendar, Camera, and Settings) in Allowed apps mode, select the Block system apps check box.
Kaspersky experts recommend against blocking system apps because this could lead to failures in device operation.
- Create a list of categories and apps to configure startup of apps.
Mobile app packages previously created in the Kaspersky Security Center can be added to the list. How to get the package name of an app
For details on app categories, please refer to the Appendices.
For a list of the apps that belong to each category, please visit the Kaspersky website.
- If you want Kaspersky Endpoint Security for Android to create a report on installed apps, in the Report on installed mobile apps block, select the Send data on installed apps check box to send information about apps installed on mobile devices, and specify the following settings if required:
- To send data about the system apps installed on users' devices to the Administration Server, select the Send data on system apps check box.
- To send data about the service apps installed on users' devices to the Administration Server, select the Send data on service apps check box.
If a system app or a service app is configured in the App Control settings, the app data is sent regardless of the state of the Send data on system apps or the Send data on service apps check boxes respectively.
Kaspersky Endpoint Security for Android sends data to the event log each time an app is installed to a device or removed from it.
- Click the Apply button to save the changes you have made.
Mobile device settings are changed after the next device synchronization with Kaspersky Security Center.
Page top
The help for this version of the solution is no longer updated, so it may contain outdated information. For up-to-date information about the solution refer to the Kaspersky Secure Mobility Management 4.1 Help.
App control on iOS MDM devices
Kaspersky Security Center allows you to manage apps on iOS MDM devices to keep these devices secure. You can create a list of apps allowed to be installed on devices and a list of apps prohibited from being displayed and launching on devices.
These restrictions apply only to supervised iOS MDM devices.
Open Restrictions for applications section
To open settings for app restrictions on iOS MDM devices:
- In the console tree, in the Managed devices folder, select the administration group to which the iOS MDM devices belong.
- In the workspace of the group, select the Policies tab.
- Open the policy properties window by double-clicking any column.
Complete the following steps within 15 minutes. Otherwise, you may face an error when saving changes to the policy.
- In the policy Properties window, select the Restrictions for applications section.
Restrict app installation
By default, the user can install any apps on the supervised iOS MDM device.
To restrict the apps that can be installed on the device:
- Select the Allow installation of apps from the list (supervised only) check box.
- In the table, click Add to add an app to the list.
- Specify the app's bundle ID. Specify the
com.apple.webappvalue to allow all web clips. How to get the bundle ID of an app - Click the Apply button to save the changes you have made.
Once the policy is applied to a device, the specified restrictions for apps are configured on the device. Only apps from the list and system apps will be available for installation. All other apps can't be installed on the device.
The specified apps can be installed on the device in the following ways (if the corresponding options are enabled in the Features restrictions section):
- Installation from Apple Configurator or iTunes
- Installation from App Store
- Automatic loading
Specify prohibited apps
By default, all apps can be displayed and launched on the supervised iOS MDM device.
To specify prohibited apps:
- Select the Prohibit displaying and launching apps from the list (supervised only) check box.
- In the table, click Add to add an app to the list.
- Specify the app's bundle ID. Specify the
com.apple.webappvalue to restrict all web clips. How to get the bundle ID of an app - Click the Apply button to save the changes you have made.
Once the policy is applied to a device, the specified restrictions for apps are configured on the device. Apps from the list will be prohibited from being displayed and launching on the device. All other apps will be displayed and available to run.
Page top
The help for this version of the solution is no longer updated, so it may contain outdated information. For up-to-date information about the solution refer to the Kaspersky Secure Mobility Management 4.1 Help.
Statuses of mobile devices
Mobile device statuses defined by Kaspersky Security Center
Administration Console allows you to quickly assess the current status of Kaspersky Security Center and managed mobile devices by checking traffic lights. The traffic lights are shown in the workspace of the Administration Server node, in the Mobile Device Management folder, in the Mobile devices subfolder. The subfolder workspace displays a table of managed mobile devices.
A traffic light is a colored icon in the Management column of the table. Each traffic light can be any of these colors (see the table Color codes of traffic lights). The color of a traffic light depends on the current status of Kaspersky Security Center and on the events that were logged.
A device can have one of the following statuses: OK, Critical, or Warning.
The statuses are assigned and sent to Kaspersky Security Center, in accordance with the following requirements:
- One reason for status assignment is detected on the device — the device gets the status which is displayed in the list of managed devices.
- Several reasons for status assignment are detected on the device — Kaspersky Secure Mobility Management selects the most critical status and sets it as general.
- No reasons for status assignment are detected on the device — Kaspersky Secure Mobility Management does not send the structure of statuses to Kaspersky Security Center, and the status is set as OK.
Color codes of traffic lights
Icon
Status
Traffic light color meaning

Light blue
Mobile device detected on the network and included in none of the administration groups.
Events have been logged that are unrelated to potential or actual threats to the security of managed devices.

Green
Mobile device included in an administration group, with the OK status.
Administrator's intervention is required.

Yellow
Mobile device included in an administration group, with the Warning status.
Events have been logged that are unrelated to potential or actual threats to the security of managed devices.

Red
Mobile device included in an administration group, with the Critical status.
Serious problems have been encountered. An administrator's intervention is required to solve them.

Mobile device included in an administration group, having lost its connection with the Administration Server.
Can be any of the colors: light blue, green, yellow, red.
The administrator's goal is to keep traffic lights green on all of the devices.
You can select Properties from the context menu of the mobile device, and then go to the Protection section to view the logged events that affect traffic lights and the status of Kaspersky Security Center (see the table Name, description, and traffic light colors of logged events).
Name, description, and traffic light colors of logged events
Traffic light color |
Event type display name |
Description |
|---|---|---|
Red |
License expired on %1 device(s) |
Events of this type occur when the commercial license has expired. Once a day, Kaspersky Security Center checks whether the license has expired on the devices. When the commercial license expires, Kaspersky Security Center provides only basic functionality. To continue using Kaspersky Security Center, renew your commercial license. |
Red |
Security application is not running on: %1 device(s) This does not apply to iOS MDM devices. |
Events of this type occur when the security application installed on the device is not running. Make sure that Kaspersky Endpoint Security is running on the device. |
Red |
Protection is disabled on: %1 device(s) |
Events of this type occur when the security application on the device has been disabled for longer than the specified time interval. Check the current status of real-time protection on the device and make sure that all the protection components that you need are enabled. |
Red |
Critical events have been registered on the Administration Server |
Events of this type occur when Administration Server critical events are detected. Check the list of events stored on the Administration Server, and then fix the critical events one by one. |
Red |
Errors have been logged in events on the Administration Server |
Events of this type occur when unexpected errors are logged on the Administration Server side. Check the list of events stored on the Administration Server, and then fix the errors one by one. |
Red |
Lost connection to %1 device(s) |
Events of this type occur when the connection between the Administration Server and the device is lost. View the list of disconnected devices, and then try to reconnect them. |
Red |
%1 device(s) have not connected to the Administration Server in a long time |
Events of this type occur when the device has not connected to the Administration Server within the specified time interval, because the device was turned off. Make sure that the device is turned on and that Network Agent is running. |
Red |
Databases are outdated on: %1 device(s) |
Events of this type occur when the anti-malware databases have not been updated on the device within the specified time interval. Follow the instructions to update Kaspersky databases. |
Red |
Active threats are detected on %1 device(s) |
Events of this type occur when active threats are detected on managed devices. View information about the detected threats, and then follow the recommendations. |
Red |
Too many viruses have been detected on: %1 device(s) |
Events of this type occur when viruses are detected on managed devices. View information about the detected viruses, and then follow the recommendations. |
Red |
Virus outbreak |
Events of this type occur when the number of malicious objects detected on several managed devices exceeds the threshold within a short period of time. View information about the detected threats, and then follow the recommendations. |
Yellow |
Malware scan has not been performed in a long time on: %1 device(s) |
Events of this type occur when you need to perform a malware scan on managed devices. Run a virus scan. |
Green |
Managed device(s): %3. Unassigned device(s) detected: %1 |
Events of this type occur when new devices are detected in administration groups. |
Green |
Security application is installed on all managed devices |
Events of this type occur when Kaspersky Endpoint Security is installed on all managed devices. |
Green |
Kaspersky Security Center is functioning properly |
Events of this type occur when Kaspersky Security Center is functioning properly. |
Green |
Protection is enabled |
Events of this type occur when the real-time protection is enabled on managed devices. |
Green |
Security application is not installed |
Events of this type occur when the anti-malware application is not installed on managed devices. |
Green |
Malware scan is running on schedule |
Events of this type occur when the Malware scan task is running on schedule. |
Light blue |
End User License Agreement for Kaspersky mobile software has not been accepted |
Events of this type occur when the administrator has not yet accepted the End User License Agreement for Kaspersky mobile software. |
Light blue |
End User License Agreement for Kaspersky software updates has not been accepted |
Events of this type occur when the administrator has not yet accepted the End User License Agreement for Kaspersky software updates. |
Light blue |
Kaspersky Security Network Statement for Kaspersky software updates has not been accepted |
Events of this type occur when the administrator has not yet accepted the Kaspersky Security Network Statement for Kaspersky software updates. |
Light blue |
New versions of Kaspersky applications are available |
Events of this type occur when new versions of Kaspersky applications are available for installation on managed devices. |
Light blue |
Updates are available for Kaspersky applications |
Events of this type occur when updates are available for Kaspersky applications. |
Light blue |
Full scan has never been performed on %1 device(s) |
Events of this type occur when a full scan has never been performed on the specified number of devices. |
Mobile device statuses defined by Kaspersky Secure Mobility Management
These are additional statues that function together with the statuses defined by Kaspersky Security Center (see the table Name, description, and traffic light colors of logged events).
Kaspersky Secure Mobility Management defines the status of mobile devices, based on the policy settings, and then sends the structure of statuses to Kaspersky Security Center when it is synchronized. The administrator can change the device status in the policy, depending on the severity level of the condition (see the table Default values, reasons, and conditions for status assignment). In this case, the value set by the administrator overrides the default value defined by Kaspersky Secure Mobility Management.
Default values, reasons, and conditions for status assignment
Condition |
Reason for status assignment |
Default value |
|---|---|---|
Real-time protection is not running. |
One of the following reasons:
|
Critical |
Web Protection is not running. |
One of the following reasons:
|
Warning |
App Control is not running. |
The Accessibility permission is not granted. |
Warning |
Device lock is not available.
|
One of the following reasons:
|
Warning |
Device locate is not available. |
One of the following reasons:
|
Warning |
The versions of the KSN Statement do not match. |
The version of the Kaspersky Security Network Statement that the user accepted in the policy and the version of the Kaspersky Security Network Statement on the device do not match. |
Warning |
The versions of the Marketing Statement do not match. |
The version of the Statement regarding data processing for marketing purposes that the user accepted in the policy and the version of the Statement regarding data processing for marketing purposes on the device do not match. |
OK |
The help for this version of the solution is no longer updated, so it may contain outdated information. For up-to-date information about the solution refer to the Kaspersky Secure Mobility Management 4.1 Help.
Software inventory on Android devices
You can inventory apps on Android devices connected to Kaspersky Security Center. Kaspersky Endpoint Security for Android receives information about all apps installed on mobile devices. Information acquired during inventory is displayed in the device properties in the Events section. You can view detailed information on each installed app, including its version and publisher.
To enable software inventory:
- In the console tree, in the Managed devices folder, select the administration group to which the Android devices belong.
- In the workspace of the group, select the Policies tab.
- Open the policy properties window by double-clicking any column.
Complete the following steps within 15 minutes. Otherwise, you may face an error when saving changes to the policy.
- In the policy Properties window, select the App Control section.
- In the Software inventory section, select the Send data on installed apps check box.
- Click the Apply button to save the changes you have made.
Mobile device settings are changed after the next device synchronization with Kaspersky Security Center. Kaspersky Endpoint Security for Android sends data to the event log each time an app is installed or removed from the device.
Page top
The help for this version of the solution is no longer updated, so it may contain outdated information. For up-to-date information about the solution refer to the Kaspersky Secure Mobility Management 4.1 Help.
Configuring the display of Android devices in Kaspersky Security Center
For convenient operations with the list of mobile devices, you should configure the settings for displaying devices in Kaspersky Security Center. By default, the list of mobile devices is displayed in the Additional → Mobile Device Management → Mobile devices console tree. Device information is updated automatically. You can also manually update the list of mobile devices by clicking the Update button in the upper right corner.
After connecting the device to Kaspersky Security Center, devices are added to the mobile device list automatically. The mobile device list may contain detailed information about that device: model, operation system, IP address, and others.
You can configure the device name format and select the device status. The device status informs you about how the components of Kaspersky Endpoint Security for Android are operating on the user's mobile device.
Kaspersky Endpoint Security for Android components could be non-operational for the following reasons:
- The user disabled the component in the device settings.
- The user did not grant the app the necessary permissions for the component to operate (for example, there is no permission to determine the device location for the corresponding Anti-Theft command).
To display the device status, you must enable the Determined by the application condition in the administration group properties (Properties > Device status > Set device status to Critical if and Set device status to Warning if). In the administration group properties, you can also select other criteria for forming the mobile device status.
To configure the display of Android devices in Kaspersky Security Center:
- In the console tree, in the Managed devices folder, select the administration group to which the Android devices belong.
- In the workspace of the group, select the Policies tab.
- Open the policy properties window by double-clicking any column.
Complete the following steps within 15 minutes. Otherwise, you may face an error when saving changes to the policy.
- In the policy Properties window, select the Device information section.
- In the Device name in Kaspersky Security Center section, select the device name format for the device name in the Administration Console:
- Device model [email, device ID]
- Device model [email (if any) or device ID]
A device ID is a unique ID that Kaspersky Endpoint Security for Android generates from the data received from a device as follows:
- On personal devices running Android 9 and earlier, the app uses the IMEI. For later versions of Android, the app uses SSAID (Android ID) or checksum of other data received from the device.
- In device owner mode, the app uses IMEI on all Android versions.
- When a work profile is created on devices running Android 11 or earlier, the app uses IMEI. On other Android versions, the app uses the SSAID (Android ID) or checksum of other data received from the device.
- Set the Lock attribute in the locked position (
 ).
). - In the Device status in Kaspersky Security Center section, select the appropriate device status if a component of Kaspersky Endpoint Security for Android is not working:
 (Critical),
  (Warning) or
  (OK).
(OK).In the list of mobile devices, the device status will be changed according to the selected status.
- Set the Lock attribute in the locked position.
- Click the Apply button to save the changes you have made.
Mobile device settings are changed after the next device synchronization with Kaspersky Security Center.
Page top
The help for this version of the solution is no longer updated, so it may contain outdated information. For up-to-date information about the solution refer to the Kaspersky Secure Mobility Management 4.1 Help.
Protection
This section contains information about how to remotely manage protection of mobile devices in the Administration Console of Kaspersky Security Center.
The help for this version of the solution is no longer updated, so it may contain outdated information. For up-to-date information about the solution refer to the Kaspersky Secure Mobility Management 4.1 Help.
Configuring anti-malware protection on Android devices
For the timely detection of threats, viruses, and other malicious applications, you should configure the settings for real-time protection and autorun of malware scans.
Kaspersky Endpoint Security for Android detects the following types of objects:
- Viruses, worms, Trojans, and malicious tools
- Adware
- Apps that can be exploited by criminals to harm your device or personal data
Anti-Malware has a number of limitations:
- When Anti-Malware is running, a threat detected in the external memory of the device (such as an SD card) cannot be neutralized automatically in the Work profile (Applications with a briefcase icon, Configuring the Android work profile). Kaspersky Endpoint Security for Android does not have access to external memory in the Work profile. Information about detected objects is displayed in app notifications. To neutralize objects detected in the external memory, the object files have to be deleted manually and the device scan restarted.
- Due to technical limitations, Kaspersky Endpoint Security for Android cannot scan files with a size of 2 GB or more. During a scan, the app skips such files without notifying you that such files were skipped.
- On devices running Android 11 or later, the Kaspersky Endpoint Security for Android app can't scan the "Android/data" and "Android/obb" folders and detect malware in them due to technical limitations.
To configure the mobile device real-time protection settings:
- In the console tree, in the Managed devices folder, select the administration group to which the Android devices belong.
- In the workspace of the group, select the Policies tab.
- Open the policy properties window by double-clicking any column.
Complete the following steps within 15 minutes. Otherwise, you may face an error when saving changes to the policy.
- In the policy Properties window, select the Protection section.
- In the Protection section, configure the settings of mobile device file system protection:
- To enable real-time protection of the mobile device against threats, select the Enable Protection check box.
Kaspersky Endpoint Security for Android scans only new apps and files from the Downloads folder.
- To enable extended protection of the mobile device against threats, select the Extended protection mode check box.
Kaspersky Endpoint Security for Android will scan all files that the user opens, modifies, moves, copies, installs or saves on the device, as well as newly installed mobile apps.
On devices running Android 8.0 or later, Kaspersky Endpoint Security for Android scans files that the user modifies, moves, installs and saves, as well as copies of files. Kaspersky Endpoint Security for Android does not scan files when they are opened, or source files when they are copied.
- To enable additional scanning of new apps before they are started for the first time on the user's device with the help of the Kaspersky Security Network cloud service, select the Cloud protection (KSN) check box.
- To block adware and apps that can be exploited by criminals to harm the device or user data, select the Detect adware, autodialers, and riskware check box.
- To enable real-time protection of the mobile device against threats, select the Enable Protection check box.
- In the Action on threat detection list, select one of the following options:
- Delete
Detected objects will be automatically deleted. The user is not required to take any additional actions. Prior to deleting an object, Kaspersky Endpoint Security for Android will display a temporary notification about the detection of the object.
- Skip
If the detected objects have been skipped, Kaspersky Endpoint Security for Android warns the user about problems in device protection. For each skipped threat, the app provides actions that the user can perform to eliminate the threat. The list of skipped objects may change, for example, if a malicious file was deleted or moved. To receive an up-to-date list of threats, run a full device scan. To ensure reliable protection of your data, eliminate all detected objects.
- Quarantine
- Delete
- Click the Apply button to save the changes you have made.
Mobile device settings are changed after the next device synchronization with Kaspersky Security Center.
To configure autorun of malware scans on the mobile device:
- In the console tree, in the Managed devices folder, select the administration group to which the Android devices belong.
- In the workspace of the group, select the Policies tab.
- Open the policy properties window by double-clicking any column.
Complete the following steps within 15 minutes. Otherwise, you may face an error when saving changes to the policy.
- In the policy Properties window, select the Scan section.
- To block adware and apps that can be exploited by criminals to harm the device or user data, select the Detect adware, autodialers, and riskware check box.
- In the Action on threat detection list, select one of the following options:
- Delete
Detected objects will be automatically deleted. The user is not required to take any additional actions. Prior to deleting an object, Kaspersky Endpoint Security for Android will display a temporary notification about the detection of the object.
- Skip
If the detected objects have been skipped, Kaspersky Endpoint Security for Android warns the user about problems in device protection. For each skipped threat, the app provides actions that the user can perform to eliminate the threat. The list of skipped objects may change, for example, if a malicious file was deleted or moved. To receive an up-to-date list of threats, run a full device scan. To ensure reliable protection of your data, eliminate all detected objects.
- Quarantine
- Ask user
The Kaspersky Endpoint Security for Android app displays a notification prompting the user to choose the action to take on the detected object: Skip or Delete.
When the app detects several objects, the Ask user option allows the device user to apply a selected action to each file by using the Apply to all threats check box.
Kaspersky Endpoint Security for Android must be set as an Accessibility feature to ensure the display of notifications on mobile devices running Android 10 or later. Kaspersky Endpoint Security for Android prompts the user to set the app as an Accessibility feature through the Initial Configuration Wizard. The user can skip this step or disable this service in the device settings at a later time. In this case, Kaspersky Endpoint Security for Android displays an Android system window prompting the user to choose the action to take on the detected object: Skip or Delete. To apply an action to multiple objects, you need to open Kaspersky Endpoint Security.
If during a scan Kaspersky Endpoint Security for Android detects malicious apps on users' devices, the actions differ depending on the device management mode.
- Delete
- The Scheduled scan section lets you configure the settings of the automatic launch of the full scan of the device file system. To do so, click the Schedule button and specify the frequency and start time of the full scan in the Schedule window.
If the device is in battery saver mode, the app may perform this task later than specified. To ensure timely responses of KES devices on Android to the administrator's commands, enable the use of Google Firebase Cloud Messaging.
- Click the Apply button to save the changes you have made.
Mobile device settings are changed after the next device synchronization with Kaspersky Security Center. Kaspersky Endpoint Security for Android scans all files, including the contents of archives.
To keep mobile device protection up to date, configure the anti-malware database update settings.
By default, anti-malware database updates are disabled for when the device is roaming. Scheduled updates of anti-malware databases are not performed.
To configure the settings of anti-malware database updates:
- In the console tree, in the Managed devices folder, select the administration group to which the Android devices belong.
- In the workspace of the group, select the Policies tab.
- Open the policy properties window by double-clicking any column.
Complete the following steps within 15 minutes. Otherwise, you may face an error when saving changes to the policy.
- In the policy Properties window, select the Database update section.
- If you want Kaspersky Endpoint Security for Android to download database updates according to the update schedule when the device is in the roaming zone, select the Allow database update while roaming check box in the Database update while roaming section.
Even if the check box is cleared, the user can manually start an anti-malware database update when the device is roaming.
- In the Database update source section, specify the update source from which Kaspersky Endpoint Security for Android receives and installs anti-malware database updates:
- Kaspersky servers
Using a Kaspersky update server as an update source for downloading the databases of Kaspersky Endpoint Security for Android on users' mobile devices. To update databases from Kaspersky servers, Kaspersky Endpoint Security for Android transmits data to Kaspersky (for example, the update task run ID). The list of data that is transmitted during database updates is provided in the End User License Agreement.
- Administration Server
Using the repository of Kaspersky Security Center Administration Server as an update source for downloading the databases of Kaspersky Endpoint Security for Android on users' mobile devices.
- Other source
Using a third-party server as an update source for downloading the databases of Kaspersky Endpoint Security for Android on users' mobile devices. To start an update, you should enter the address of an HTTP server in the field below (e.g., http://domain.com/).
- Kaspersky servers
- In the Scheduled database update section, configure the settings for automatic anti-malware database updates on the user's device. To do so, click the Schedule button and specify the frequency and start time of updates in the Schedule window.
If the device is in battery saver mode, the app may perform this task later than specified. To ensure timely responses of KES devices on Android to the administrator's commands, enable the use of Google Firebase Cloud Messaging.
- Click the Apply button to save the changes you have made.
Mobile device settings are changed after the next device synchronization with Kaspersky Security Center.
Page top
The help for this version of the solution is no longer updated, so it may contain outdated information. For up-to-date information about the solution refer to the Kaspersky Secure Mobility Management 4.1 Help.
Protecting Android devices on the internet
To protect the personal data of a mobile device user on the internet, enable Web Protection. Web Protection blocks malicious websites that distribute malicious code, and phishing websites designed to steal your confidential data and gain access to your financial accounts. Web Protection scans websites before you open them using the Kaspersky Security Network cloud service. Web Protection also lets you configure a user's access to websites based on predefined lists of allowed and blocked websites.
Kaspersky Endpoint Security for Android must be set as an Accessibility feature. Kaspersky Endpoint Security for Android prompts the user to set the app as an Accessibility feature through the Initial Configuration Wizard. The user can skip this step or disable this service in the device settings at a later time.
Web Protection on Android devices is supported only by Google Chrome, HUAWEI Browser, Samsung Internet Browser, and Yandex Browser.
If the Kaspersky Endpoint Security for Android app in device owner mode is not enabled as an Accessibility Features service, Web Protection is supported only by the Google Chrome browser and checks only the domain of a website. To allow other browsers (Samsung Internet Browser, Yandex Browser, and HUAWEI Browser) support Web Protection, enable Kaspersky Endpoint Security as an Accessibility Features service. This will also enable the Custom Tabs feature operation.
The Custom Tabs feature is supported by Google Chrome, HUAWEI Browser, and Samsung Internet Browser.
Web Protection for HUAWEI Browser, Samsung Internet Browser, and Yandex Browser does not block sites on a mobile device if a work profile is used and Web Protection is enabled only for the work profile.
To enable Web Protection in Google Chrome, HUAWEI Browser, Samsung Internet Browser, or Yandex Browser:
- In the console tree, in the Managed devices folder, select the administration group to which the Android devices belong.
- In the workspace of the group, select the Policies tab.
- Open the policy properties window by double-clicking any column.
Complete the following steps within 15 minutes. Otherwise, you may face an error when saving changes to the policy.
- In the policy Properties window, select the Web Protection.
- To use Web Protection, you or device user must read and accept the Statement regarding data processing for the purpose of using Web Protection (Web Protection Statement):
- Click the Web Protection Statement link at the top of the section.
This opens Statement regarding data processing for purpose of using Web Protection window.
- Read and accept Privacy Policy by selecting the corresponding check box. To view Privacy Policy, click the Privacy Policy link.
If you do not accept Privacy Policy, mobile device user can accept Privacy Policy in the Initial Configuration Wizard or in the app (
→ About → Terms and conditions → Privacy Policy). - Select the Web Protection Statement acceptance mode:
- I have read and accept the Web Protection Statement
- Request acceptance of the Web Protection Statement from the device user
- I do not accept the Web Protection Statement
If you select I do not accept the Web Protection Statement, the Web Protection does not block sites on a mobile device. Mobile device user cannot enable Web Protection in the Kaspersky Endpoint Security.
- Click OK to close the window.
- Click the Web Protection Statement link at the top of the section.
- Select the Enable Web Protection check box.
- Click the Apply button to save the changes you have made.
Mobile device settings are changed after the next device synchronization with Kaspersky Security Center.
Page top
The help for this version of the solution is no longer updated, so it may contain outdated information. For up-to-date information about the solution refer to the Kaspersky Secure Mobility Management 4.1 Help.
Protection of stolen or lost device data
This section describes how you can configure the unauthorized access protection settings on the device in case it gets lost or stolen.
The help for this version of the solution is no longer updated, so it may contain outdated information. For up-to-date information about the solution refer to the Kaspersky Secure Mobility Management 4.1 Help.
Sending commands to a lost or stolen mobile device
To protect data on a mobile device that is lost or stolen, you can send special commands.
You can send commands to the following types of managed mobile devices:
- Android devices managed via the Kaspersky Endpoint Security for Android app
- iOS MDM devices
Each device type supports a dedicated set of commands (see the tables below).
Commands for Android devices
Commands for protecting data on a lost or stolen Android device
Command |
Command execution result |
|---|---|
Lock |
The mobile device is locked. To obtain access to data, you must unlock the device. |
Unlock |
The mobile device is unlocked. After unlocking a device running Android 5.0 – 6, the screen unlock password is reset to "1234". After unlocking a device running Android 7.0 or later, the screen unlock password is not changed. |
Locate device |
The mobile device's location coordinates are obtained. On devices running Android 12 or later, if the user granted the "Use approximate location" permission, the Kaspersky Endpoint Security for Android app first tries to get the precise device location. If this is not successful, the approximate device location is returned only if it was received not more than 30 minutes earlier. Otherwise, the Locate device command fails. The Locate device command does not work on Android devices if Google Location Accuracy is disabled in settings. Please be aware that not all Android devices come with this location setting. |
Mugshot |
The mobile device is locked. The mugshot photo is taken by the front camera of the device when somebody attempts to unlock the device. On devices with a pop-up front camera, the photo will be black if the camera is stowed. When attempting to unlock the device, the user automatically consents to the mugshot. If the permission to use the camera has been revoked, the mobile device displays a notification and prompts to provide the permission. On a mobile device running Android 12 or later, if the permission to use camera has been revoked via Quick Settings, the notification is not displayed but the photo taken is black. |
Alarm |
The mobile device sounds an alarm. The alarm is sounded for 5 minutes (or for 1 minute if the device battery is low). |
Wipe app data |
The data of a specified app is wiped from the mobile device. The action is only applicable to devices running Android 9 or later in device owner mode or with created Android work profile. |
Wipe data of all apps |
The data of all apps is wiped from the mobile device. The action is only applicable to devices running Android 9 or later in device owner mode or with created Android work profile. |
Wipe corporate data |
The corporate data is wiped from the device. The list of wiped data depends on the mode in which the device operates:
|
Reset to factory settings |
All data is deleted from the mobile device and the settings are rolled back to their factory values. After this command is executed, the device will not be able to receive or execute subsequent commands. |
Get device location history |
The mobile device's location history for the last 14 days is displayed. This command works only if the Device location history informational event type is stored in the Administration Server database. The events are configured in the Events section of the policy properties. For more details, please refer to the Kaspersky Security Center Help. |
Commands for iOS MDM devices
Commands for protecting data on a lost or stolen iOS MDM device
Command |
Command execution result |
|---|---|
Lock |
The mobile device is locked. To obtain access to data, you must unlock the device. |
Reset password |
The mobile device's screen unlock password is reset, and the user is prompted to set a new password in accordance with policy requirements. |
Wipe corporate data |
All installed configuration profiles, provisioning profiles, the iOS MDM profile, and applications for which the Remove together with iOS MDM profile check box has been selected are removed from the device. |
Reset to factory settings |
All data is deleted from the mobile device and the settings are rolled back to their factory values. After this command is executed, the device will not be able to receive or execute subsequent commands. |
Enable Lost Mode (supervised only) |
Lost Mode is enabled on the supervised mobile device, and the device is locked. The device screen shows the message and phone number that you can edit. If you send the Enable Lost Mode command to a supervised iOS MDM device without a SIM card and this device is restarted, the device won't be able to connect to Wi-Fi and receive the Disable Lost Mode command. This is a specific feature of iOS devices. To avoid this issue, you can either send the command only to devices with a SIM card, or insert a SIM card into the locked device to allow it to receive the Disable Lost Mode command over the mobile network. |
Locate device (supervised only) |
The location of the mobile device is obtained. You can click the link in the command log to view device coordinates and check the device location on a map. This command is supported only for supervised devices that are in Lost Mode. |
Play sound (supervised only) |
The sound is played on the lost mobile device. This command is supported only for supervised devices that are in Lost Mode. |
Disable Lost Mode (supervised only) |
Lost Mode is disabled on the mobile device, and the device is unlocked. This command is supported only for supervised devices. |
Special rights and permissions are required for the execution of commands of Kaspersky Endpoint Security for Android. When the Initial Configuration Wizard is running, Kaspersky Endpoint Security for Android prompts the user to grant the application all required rights and permissions. The user can skip these steps or disable these permissions in the device settings at a later time. If this is the case, it will be impossible to execute commands.
On devices running Android 10 or later, the user must grant the "All the time" permission to access the location. On devices running Android 11 or later, the user must also grant the "While using the app" permission to access camera. Otherwise, Anti-Theft commands will not function. The user will be notified of this limitation and will again be prompted to grant the permissions of required level. If the user selects the "Only this time" option for the camera permission, access is considered granted by the app. It is recommended to contact the user directly if the Camera permission is requested again.
For the complete list of available commands, please refer to the "Commands for mobile devices" section. To learn more about sending commands from Administration Console, please refer to the "Sending commands" section.
Page top
The help for this version of the solution is no longer updated, so it may contain outdated information. For up-to-date information about the solution refer to the Kaspersky Secure Mobility Management 4.1 Help.
Unlocking a mobile device
You can unlock a mobile device by using the following methods:
- Send the mobile device unlock command.
- Enter the one-time unlock code on the mobile device (only for Android devices).
On certain devices (for example, HUAWEI, Meizu, and Xiaomi), you must manually add Kaspersky Endpoint Security for Android to the list of apps that are started when the operating system starts. If the app is not added to the list, you can unlock the device only by using a one-time unlock code. You cannot use commands to unlock the device.
To learn more about sending commands from the list of mobile devices in Administration Console, please refer to the "Sending commands" section.
A one-time unlock code is a secret application code for unlocking the mobile device. The one-time code is generated by the application and is unique to each mobile device. You can change the length of the one-time code (4, 8 or 16 digits) in group policy settings in the Anti-Theft section.
To unlock the mobile device using a one-time code:
- In the console tree, select Mobile Device Management → Mobile devices.
- Select a mobile device for which you want to get a one-time unlock code.
- Open the mobile device properties window by double-clicking.
- Select Apps → Kaspersky Endpoint Security for Android.
- Open the Kaspersky Endpoint Security properties window by double-clicking.
- Select the Anti-Theft section.
- A unique code for the selected device is shown in the One-time code field of the One-time device unlock code section.
- Use any available method (such as email) to communicate the one-time code to the user of the locked device.
- The user enters the one-time code on the screen of the device that is locked by Kaspersky Endpoint Security for Android.
The mobile device is unlocked.
After unlocking a device running Android 5.0 – 6, the screen unlock password is reset to "1234". After unlocking a device running Android 7.0 or later, the screen unlock password is not changed.
Page top
The help for this version of the solution is no longer updated, so it may contain outdated information. For up-to-date information about the solution refer to the Kaspersky Secure Mobility Management 4.1 Help.
Data encryption
To protect data against unauthorized access, you must enable encryption of all data on the device (for example, account credentials, external devices and apps, as well as email messages, SMS messages, contacts, photos, and other files). For access to encrypted data, you must specify a special key – device unlock password. If data is encrypted, access to it can be obtained only when the device is unlocked.
Data encryption is enabled by default on password-locked iOS devices (Settings > Touch ID / Face ID and Password > Enable Password). Also, the hardware encryption on a device must be set to At block and file level (you can check this parameter in the device properties: in the console tree, select Additional > Mobile Device Management > Mobile devices, and then double-click the required device).
To encrypt all data on an Android device:
- Enable screen lock on the Android device (Settings → Security → Screen lock).
- Set a device unlock password that is compliant with corporate security requirements.
It is not recommended to use a pattern lock for unlocking the device. On certain Android devices running Android 6 or later, after encrypting data and restarting the Android device, you must enter a numeric password to unlock the device instead of a pattern lock. This issue is related to the operation of the Accessibility Features service. To unlock the device screen in this case, convert the pattern lock into a numeric password. For more details about converting a pattern lock into a numeric password, please refer to the Technical Support website of the mobile device manufacturer.
- Enable encryption of all data on the device (Settings → Security → Encrypt data).
The help for this version of the solution is no longer updated, so it may contain outdated information. For up-to-date information about the solution refer to the Kaspersky Secure Mobility Management 4.1 Help.
Deleting data on Android devices after failed password entry attempts
You can configure deleting all data on an Android device (that is, resetting the device to factory settings) after the user makes too many failed attempts to enter the screen unlock password.
These settings apply to devices operating in device owner mode and to personal devices on which the Kaspersky Endpoint Security for Android app is enabled as a device administrator.
To configure wiping all data:
- In the console tree, in the Managed devices folder, select the administration group to which the Android devices belong.
- In the workspace of the group, select the Policies tab.
- Open the policy properties window by double-clicking any column.
Complete the following steps within 15 minutes. Otherwise, you may face an error when saving changes to the policy.
- In the policy Properties window, select the Anti-Theft section.
- In the Data wipe on device section, select the Wipe all data after failed attempts to enter unlock password check box.
- In the Maximum number of attempts to enter unlock password field, specify the number of attempts that the user can make to unlock the device. The default value is 8. The maximum available value is 20.
- Click the Apply button to save the changes you have made.
Mobile device settings are configured after the next device synchronization with Kaspersky Security Center. If the user exceeds the specified number of attempts to enter the correct screen unlock password, the Kaspersky Endpoint Security for Android app wipes all device data.
Page top
The help for this version of the solution is no longer updated, so it may contain outdated information. For up-to-date information about the solution refer to the Kaspersky Secure Mobility Management 4.1 Help.
Configuring device unlock password strength
To protect access to a user's mobile device, you should set a device unlock password.
This section contains information about how to configure password protection on Android and iOS devices.
The help for this version of the solution is no longer updated, so it may contain outdated information. For up-to-date information about the solution refer to the Kaspersky Secure Mobility Management 4.1 Help.
Configuring a strong unlock password for an Android device
To keep an Android device secure, you need to configure the use of a password for which the user is prompted when the device comes out of sleep mode.
You can impose restrictions on the user's activity on the device if the unlock password is weak (for example, lock the device). You can impose restrictions using the Compliance Control component. To do this, in the scan rule settings, you must select the Unlock password is not compliant with security requirements criterion.
On certain Samsung devices running Android 7.0 or later, when the user attempts to configure unsupported methods for unlocking the device (for example, a graphical password), the device may be locked if the following conditions are met: Kaspersky Endpoint Security for Android removal protection is enabled and screen unlock password strength requirements are set. To unlock the device, you must send a special command to the device.
To configure the use of an unlock password:
- In the console tree, in the Managed devices folder, select the administration group to which the Android devices belong.
- In the workspace of the group, select the Policies tab.
- Open the policy properties window by double-clicking any column.
Complete the following steps within 15 minutes. Otherwise, you may face an error when saving changes to the policy.
- In the policy Properties window, select the Device Management section.
- If you want the app to check whether an unlock password has been set, select the Require to set screen unlock password check box in the Screen lock section.
If the application detects that no system password has been set on the device, it prompts the user to set it. The password is set according to the parameters defined by the administrator.
- Specify the following options, if required:
- Minimum number of characters
- Minimum password complexity requirements (Android 12 or earlier in device owner mode)
- Maximum password age, in days
- Number of days to notify that a password change is required (for device owner mode)
- Number of recent passwords that can't be used as a new password (all Android versions; Android 10 or later in device owner mode)
- Period of inactivity before the device screen locks, in seconds
- Period after unlocking by biometric methods before entering a password, in minutes (Android 8.0 or later in device owner mode)
- Allow biometric unlock methods (Android 9 or later; Android 10 in device owner mode)
- Allow use of fingerprints (all Android versions; Android 10 in device owner mode)
- Allow face scanning (Android 9 or later; Android 10 in device owner mode)
- Allow iris scanning (Android 9 or later; Android 10 in device owner mode)
- Allow the device to start up before prompting the password
- Unlock password
- Click the Apply button to save the changes you have made.
Mobile device settings are changed after the next device synchronization with Kaspersky Security Center.
On some HUAWEI devices, an issue message about too simple screen unlocking method appears.
To set a correct PIN code on a HUAWEI device, the user must do the following:
- In the issue message, tap the Edit button.
- Enter the current PIN code.
- In the Set new password window, tap the Change unlock method button.
- Select the Custom PIN unlock method.
- Set the new PIN code.
The PIN code must be compliant with policy requirements.
A correct PIN code is now set on the device.
Page top
The help for this version of the solution is no longer updated, so it may contain outdated information. For up-to-date information about the solution refer to the Kaspersky Secure Mobility Management 4.1 Help.
Configuring a strong unlock password for iOS MDM devices
To protect iOS MDM device data, configure the unlock password strength settings.
By default, the user can use a simple password. A simple password is a password that contains successive or repetitive characters, such as "abcd" or "2222". The user is not required to enter an alphanumeric password that includes special symbols. By default, the password validity period and the number of password entry attempts are not limited.
To configure the strength settings for an iOS MDM device unlock password:
- In the console tree, in the Managed devices folder, select the administration group to which the iOS MDM devices belong.
- In the workspace of the group, select the Policies tab.
- Open the policy properties window by double-clicking any column.
Complete the following steps within 15 minutes. Otherwise, you may face an error when saving changes to the policy.
- In the policy Properties window, select the Password section.
- In the Password settings section, select the Apply settings on device check box.
- Configure unlock password strength settings:
- To allow the user to use a simple password, select the Allow simple password check box.
- To require use of both letters and numbers in the password, select the Prompt for alphanumeric value check box.
- To require use of a password, select the Force use of password check box. If the check box is cleared, the mobile device can be used without a password.
- In the Minimum password length list, select the minimum password length in characters.
- In the Minimum number of special characters list, select the minimum number of special characters in the password (such as "$", "&", "!").
- In the Maximum password lifetime field, specify the period of time in days during which the password will stay current. When this period expires, Kaspersky Device Management for iOS prompts the user to change the password.
- In the Enable Auto-Lock in list, select the amount of time after which iOS MDM device Auto-Lock should be enabled.
- In the Password history field, specify the number of used passwords (including the current password) that Kaspersky Device Management for iOS will compare with the new password when the user changes the old password. If passwords match, the new password is rejected.
- In the Maximum time for unlock without password list, select the amount of time during which the user can unlock the iOS MDM device without entering the password.
- In the Maximum number of access attempts, select the number of access attempts that the user can make to enter the iOS MDM device unlock password.
- Click the Apply button to save the changes you have made.
As a result, once the policy is applied, Kaspersky Device Management for iOS checks the strength of the password set on the user's mobile device. If the strength of the device unlock password does not conform to the policy, the user is prompted to change the password.
Page top
The help for this version of the solution is no longer updated, so it may contain outdated information. For up-to-date information about the solution refer to the Kaspersky Secure Mobility Management 4.1 Help.
Configuring a virtual private network (VPN)
This section contains information on configuring virtual private network (VPN) settings for secure connection to Wi-Fi networks.
The help for this version of the solution is no longer updated, so it may contain outdated information. For up-to-date information about the solution refer to the Kaspersky Secure Mobility Management 4.1 Help.
Configuring VPN on Android devices (only Samsung)
To securely connect an Android device to Wi-Fi networks and protect data transfer, you should configure the settings for VPN (Virtual Private Network).
Configuration of VPN is possible only for Samsung devices running Android 11 or earlier.
The following requirements should be considered when using a virtual private network:
- The app that uses the VPN connection must be allowed in Firewall settings.
- Virtual private network settings configured in the policy cannot be applied to system applications. The VPN connection for system applications has to be configured manually.
- Some applications that use the VPN connection need to have additional settings configured at first startup. To configure settings, the VPN connection has to be allowed in application settings.
To configure VPN on a user's mobile device:
- In the console tree, in the Managed devices folder, select the administration group to which the Android devices belong.
- In the workspace of the group, select the Policies tab.
- Open the policy properties window by double-clicking any column.
Complete the following steps within 15 minutes. Otherwise, you may face an error when saving changes to the policy.
- In the policy Properties window, select the Manage Samsung KNOX → Manage Samsung devices section.
- In the VPN section, click the Configure button.
This opens the VPN network window.
- In the Connection type drop-down list, select the type of VPN connection.
- In the Network name field, enter the name of the VPN tunnel.
- In the Server address field, enter the network name or IP address of the VPN server.
- In the DNS search domain(s) list, enter the DNS search domain to be automatically added to the DNS server name.
You can specify several DNS search domains, separating them with blank spaces.
- In the DNS server(s) field, enter the full domain name or IP address of the DNS server.
You can specify several DNS servers, separating them with blank spaces.
- In the Routing field, enter the range of network IP addresses with which data is exchanged via the VPN connection.
If the range of IP addresses is not specified in the Routing field, all internet traffic will pass through the VPN connection.
- Additionally configure the following settings for networks of the IPSec Xauth PSK and L2TP IPSec PSK types:
- In the IPSec shared key field, enter the password for the preset IPSec security key.
- In the IPSec ID field, enter the name of the mobile device user.
- For an L2TP IPSec PSK network, additionally specify the password for the L2TP key in the L2TP key field.
- For a PPTP network, select the Use SSL connection check box so that the app will use the MPPE (Microsoft Point-to-Point Encryption) method of data encryption to secure data transmission when the mobile device connects to the VPN server.
- Click the Apply button to save the changes you have made.
Mobile device settings are changed after the next device synchronization with Kaspersky Security Center.
Page top
The help for this version of the solution is no longer updated, so it may contain outdated information. For up-to-date information about the solution refer to the Kaspersky Secure Mobility Management 4.1 Help.
Configuring VPN on iOS MDM devices
To connect an iOS MDM device to a virtual private network (VPN) and protect data during the connection to the VPN, configure the VPN connection settings. The IKEv2 and IPSec VPN protocols also let you set up a VPN connection for selected website domains in Safari.
To configure the VPN connection on a user's iOS MDM device:
- In the console tree, in the Managed devices folder, select the administration group to which the iOS MDM devices belong.
- In the workspace of the group, select the Policies tab.
- Open the policy properties window by double-clicking any column.
Complete the following steps within 15 minutes. Otherwise, you may face an error when saving changes to the policy.
- In the policy Properties window, select the VPN section.
- Click the Add button in the VPN networks section.
This opens the VPN network window.
- In the Network name field, enter the name of the VPN tunnel.
- In the Connection type drop-down list, select the type of VPN connection:
- L2TP (Layer 2 Tunneling Protocol). The connection supports authentication of iOS MDM device user using MS-CHAP v2 passwords, two-factor authentication, and automatic authentication using a public key.
- PPTP (Point-to-Point Tunneling Protocol). The connection supports authentication of iOS MDM device user using MS-CHAP v2 passwords and two-factor authentication.
The PPTP connection is no longer supported.
- IKEv2 (Internet Key Exchange version 2). The connection establishes the Security Association (SA) attribute between two network entities and supports authentication using EAP (Extensible Authentication Protocols), shared secrets, and certificates.
- IPSec (Cisco). The connection supports password-based user authentication, two-factor authentication, and automatic authentication using a public key and certificates.
- Cisco AnyConnect. The connection supports the Cisco Adaptive Security Appliance (ASA) firewall of version 8.0(3).1 or later. To configure the VPN connection, install the Cisco AnyConnect app from App Store on the iOS MDM device.
- Juniper SSL. The connection supports the Juniper Networks SSL VPN gateway, Series SA, of version 6.4 or later with the Juniper Networks IVE package of version 7.0 or later. To configure the VPN connection, install the JUNOS app from App Store on the iOS MDM device.
- F5 SSL. The connection supports F5 BIG-IP Edge Gateway, Access Policy Manager, and Fire SSL VPN solutions. To configure the VPN connection, install the F5 BIG-IP Edge Client app from App Store on the iOS MDM device.
- SonicWALL Mobile Connect. The connection supports SonicWALL Aventail E-Class Secure Remote Access devices of version 10.5.4 or later, SonicWALL SRA devices of version 5.5 or later, as well as SonicWALL Next-Generation Firewall devices, including TZ, NSA, E-Class NSA with SonicOS of version 5.8.1.0 or later. To configure the VPN connection, install the SonicWALL Mobile Connect app from App Store on the iOS MDM device.
- Aruba VIA. The connection supports Aruba Networks mobile access controllers. To configure them, install the Aruba Networks VIA app from App Store on the iOS MDM device.
- Custom SSL. The connection supports authentication of the iOS MDM device user using passwords and certificates and two-factor authentication.
- In the Server address field, enter the network name or IP address of the VPN server.
- In the Account name field, enter the account name for authorization on the VPN server. You can use macros from the Macros available drop-down list.
- Configure the security settings for the VPN connection according to the selected type of virtual private network. For information about these settings, refer to the context help of the administration plug-in.
- For IKEv2 and IPsec connections, if necessary, set up Per App VPN functionality for supported system apps (Email, Calendar, Safari, and Contacts). For details, refer to the Configuring Per App VPN on iOS MDM devices section or the context help of the administration plug-in.
- If necessary, configure the settings of the VPN connection via a proxy server:
- Select the Proxy server settings tab.
- Select the proxy server configuration mode and specify the connection settings.
- Click OK.
As a result, the settings of the device connection to a VPN via a proxy server are configured on the iOS MDM device.
- Click OK.
The new VPN is displayed in the list.
- Click the Apply button to save the changes you have made.
As a result, a VPN connection will be configured on the user's iOS MDM device once the policy is applied.
Page top
The help for this version of the solution is no longer updated, so it may contain outdated information. For up-to-date information about the solution refer to the Kaspersky Secure Mobility Management 4.1 Help.
Configuring Per App VPN on iOS MDM devices
The Per App VPN functionality allows a device to establish a VPN connection when supported system apps (Email, Calendar, Safari, and Contacts) are launched. This functionality is available for IKEv2 and IPsec connections.
To enable the Per App VPN functionality:
- Perform the initial setup of the VPN connection. For more details on the pre-configuring process, please refer to the Configuring VPN on iOS MDM devices section.
- Select the Enable Per App VPN check box.
Set up Per App VPN for supported system apps (Email, Calendar, Safari, and Contacts) in the corresponding policy sections.
When you select the Enable Per App VPN check box, the Turn on VPN automatically for system apps check box becomes available and is also selected. This means that the device will automatically activate the VPN connection when associated system apps initiate network communication.
To specify the Per App VPN configuration for the Email, Calendar, and Contacts apps:
- Go to the corresponding policy section.
- Click Add to create a new account or select the existing account in the list and click Edit.
- In the Per App VPN settings section, select the Enable Per App VPN (iOS 14+) check box.
- Choose this Per App VPN configuration from the Select Per App VPN configuration drop-down list and click OK to save the changes.
To specify the Per App VPN configuration for Safari:
- Go to the Safari policy section.
- Click Add.
The Adding domain for Safari window opens.
- Choose this Per App VPN configuration from the Per App VPN configuration drop-down list.
- In the Domain for the VPN connection that will be activated field, specify the website domain that will trigger the VPN connection in Safari. The domain should be in the
"www.example.com"format. - Click OK to add the domain to the list.
The help for this version of the solution is no longer updated, so it may contain outdated information. For up-to-date information about the solution refer to the Kaspersky Secure Mobility Management 4.1 Help.
Configuring Firewall on Android devices (only Samsung)
Configure Firewall settings to monitor network connections on the user's mobile device.
To configure Firewall on a mobile device:
- In the console tree, in the Managed devices folder, select the administration group to which the Android devices belong.
- In the workspace of the group, select the Policies tab.
- Open the policy properties window by double-clicking any column.
Complete the following steps within 15 minutes. Otherwise, you may face an error when saving changes to the policy.
- In the policy Properties window, select the Manage Samsung KNOX → Manage Samsung devices section.
- In the Firewall window, click Configure.
The Firewall window opens.
- Select the Firewall mode:
- To allow all inbound and outbound connections, move the slider to Allow all.
- To block all network activity except that of apps on the list of exclusions, move the slider up to Block all but exceptions.
- If you have set the Firewall mode to Block all but exceptions, create a list of exclusions:
- Click Add.
This opens the Exclusion for Firewall window.
- In the App name field, enter the name of the mobile app.
- In the Package name field, enter the system name of the mobile app package (for example,
com.mobileapp.example). - Click OK.
- Click Add.
- Click the Apply button to save the changes you have made.
Mobile device settings are changed after the next device synchronization with Kaspersky Security Center.
Page top
The help for this version of the solution is no longer updated, so it may contain outdated information. For up-to-date information about the solution refer to the Kaspersky Secure Mobility Management 4.1 Help.
Protecting Kaspersky Endpoint Security for Android against removal
For mobile device protection and compliance with corporate security requirements, you can enable protection against removal of Kaspersky Endpoint Security for Android. In this case, the user cannot remove the app using the Kaspersky Endpoint Security for Android interface. When removing the app using the tools of the Android operating system, you are prompted to disable administrator rights for Kaspersky Endpoint Security for Android. After disabling the rights, the mobile device will be locked.
On certain Samsung devices running Android 7.0 or later, when the user attempts to configure unsupported methods for unlocking the device (for example, a graphical password), the device may be locked if the following conditions are met: Kaspersky Endpoint Security for Android removal protection is enabled and screen unlock password strength requirements are set. To unlock the device, you must send a special command to the device.
To enable protection against removal of Kaspersky Endpoint Security for Android:
- In the console tree, in the Managed devices folder, select the administration group to which the Android devices belong.
- In the workspace of the group, select the Policies tab.
- Open the policy properties window by double-clicking any column.
Complete the following steps within 15 minutes. Otherwise, you may face an error when saving changes to the policy.
- In the policy Properties window, select the Additional section.
- In the Removal of Kaspersky Endpoint Security for Android section, clear the Allow removal of Kaspersky Endpoint Security for Android check box.
To protect the app from removal on devices running Android 7.0 or later, Kaspersky Endpoint Security for Android must be set as an Accessibility feature. When the Initial Configuration Wizard is running, Kaspersky Endpoint Security for Android prompts the user to grant the application all required permissions. The user can skip these steps or disable these permissions in the device settings at a later time. If this is the case, the app is not protected from removal.
- Click the Apply button to save the changes you have made.
Mobile device settings are changed after the next device synchronization with Kaspersky Security Center. If an attempt is made to remove the app, the mobile device will be locked.
Page top
The help for this version of the solution is no longer updated, so it may contain outdated information. For up-to-date information about the solution refer to the Kaspersky Secure Mobility Management 4.1 Help.
Detecting device hacks (root)
Kaspersky Secure Mobility Management enables you to detect device hacks (root). System files are unprotected on a hacked device and can therefore be modified. Moreover, third-party apps from unknown sources could be installed on hacked devices. Upon detection of a hack attempt, we recommend that you immediately restore normal operation of the device.
Kaspersky Endpoint Security for Android uses the following services to detect when a user obtains root privileges:
- Embedded service of Kaspersky Endpoint Security for Android. A Kaspersky service that checks whether a mobile device user has obtained root privileges (Kaspersky Mobile Security SDK).
If the device is hacked, you receive a notification. You can view hacking notifications in the workspace of the Administration Server on the Monitoring tab. You can also disable notifications about hacks in the event notification settings.
On devices running Android, you can impose restrictions on the user's activity on the device if the device is hacked (for example, lock the device). You can impose restrictions by using the Compliance Control component. To do this, in the compliance rule settings, select the Device has been rooted criterion.
Page top
The help for this version of the solution is no longer updated, so it may contain outdated information. For up-to-date information about the solution refer to the Kaspersky Secure Mobility Management 4.1 Help.
Configuring a global HTTP proxy on iOS MDM devices
To protect the user's internet traffic, configure the connection of the iOS MDM device to the internet via a proxy server.
Automatic connection to the internet via a proxy server is available for controlled devices only.
To configure global HTTP proxy settings on the user's iOS MDM device:
- In the console tree, in the Managed devices folder, select the administration group to which the iOS MDM devices belong.
- In the workspace of the group, select the Policies tab.
- Open the policy properties window by double-clicking any column.
Complete the following steps within 15 minutes. Otherwise, you may face an error when saving changes to the policy.
- In the policy Properties window, select the Global HTTP Proxy section.
- In the Global HTTP proxy settings section, select the Apply settings on device check box.
- Select the type of global HTTP proxy configuration.
By default, the manual type of global HTTP proxy configuration is selected, and the user is prohibited from connecting to captive networks without connecting to a proxy server. Captive networks are wireless networks that require preliminary authentication on the mobile device without connecting to the proxy server.
- To specify the proxy server connection settings manually:
- In the Proxy settings type drop-down list, select Manual.
- In the Proxy server address and port field, enter the name of a host or the IP address of a proxy server and the number of the proxy server port.
- In the User name field, set the user account name for proxy server authorization. You can use macros from the Macros available drop-down list.
- In the Password field, set the user account password for proxy server authorization.
- To allow the user to access captive networks, select the Allow access to captive networks without connecting to proxy check box.
- To configure the proxy server connection settings using a predefined PAC (Proxy Auto Configuration) file:
- In the Proxy settings type drop-down list, select Automatic.
- In the URL of PAC file field, enter the web address of the PAC file (for example: http://www.example.com/filename.pac).
- To allow the user to connect the mobile device to a wireless network without using a proxy server when the PAC file cannot be accessed, select the Allow direct connection if PAC file cannot be accessed check box.
- To allow the user to access captive networks, select the Allow access to captive networks without connecting to proxy check box.
- To specify the proxy server connection settings manually:
- Click the Apply button to save the changes you have made.
As a result, once the policy is applied, the mobile device user will connect to the internet via a proxy server.
Page top
The help for this version of the solution is no longer updated, so it may contain outdated information. For up-to-date information about the solution refer to the Kaspersky Secure Mobility Management 4.1 Help.
Adding security certificates to iOS MDM devices
To simplify user authentication and ensure data security, add certificates on the user's iOS MDM device. Data signed with a certificate is protected against modification during network exchange. Data encryption using a certificate provides an added level of security for data. The certificate can be also used to verify the user's identity.
Kaspersky Device Management for iOS supports the following certificate standards:
- PKCS#1 – encryption with a public key based on RSA algorithms.
- PKCS#12 – storage and transmission of a certificate and a private key.
To add a security certificate on a user's iOS MDM device:
- In the console tree, in the Managed devices folder, select the administration group to which the iOS MDM devices belong.
- In the workspace of the group, select the Policies tab.
- Open the policy properties window by double-clicking any column.
Complete the following steps within 15 minutes. Otherwise, you may face an error when saving changes to the policy.
- In the policy Properties window, select the Certificates section.
- Click the Add button in the Certificates section.
The Certificate window opens.
- In the File name field, specify the path to the certificate:
Files of PKCS#1 certificates have the cer, crt, or der extensions. Files of PKCS#12 certificates have the p12 or pfx extensions.
- Click Open.
If the certificate is password-protected, specify the password. The new certificate appears in the list.
- Click the Apply button to save the changes you have made.
As a result, once the policy is applied, the user will be prompted to install certificates from the list that has been created.
Page top
The help for this version of the solution is no longer updated, so it may contain outdated information. For up-to-date information about the solution refer to the Kaspersky Secure Mobility Management 4.1 Help.
Adding a SCEP profile to iOS MDM devices
You have to add a SCEP profile to enable the iOS MDM device user to automatically receive certificates from the Certification Center via the internet. The SCEP profile enables support of the Simple Certificate Enrollment Protocol.
A SCEP profile with the following settings is added by default:
- The alternative subject name is not used for registering certificates.
- Three attempts 10 seconds apart are made to poll the SCEP server. If all attempts to sign the certificate have failed, you have to generate a new certificate signing request.
- The certificate that has been received cannot be used for data signing or encryption.
You can edit the specified settings when adding the SCEP profile.
To add a SCEP profile:
- In the console tree, in the Managed devices folder, select the administration group to which the iOS MDM devices belong.
- In the workspace of the group, select the Policies tab.
- Open the policy properties window by double-clicking any column.
Complete the following steps within 15 minutes. Otherwise, you may face an error when saving changes to the policy.
- In the policy Properties window, select the SCEP section.
- Click the Add button in the SCEP profiles section.
The SCEP profile window opens.
- In the Server web address field, enter the web address of the SCEP server on which the Certification Center is deployed.
The URL can contain the IP address or the full domain name (FQDN). For example, http://10.10.10.10/certserver/companyscep.
- In the Name field, enter the name of the Certification Center deployed on the SCEP server.
- In the Subject field, enter a string with the attributes of the iOS MDM device user that are contained in the X.500 certificate.
Attributes can contain details of the country (C), organization (O), and common user name (CN). For example: /C=RU/O=MyCompany/CN=User/. You can also use other attributes specified in RFC 5280.
- In the Type of alternative name of subject drop-down list, select the type of alternative name of the subject of the SCEP server:
- No – alternative name identification is not used.
- RFC 822 name – identification using the email address. The email address must be specified according to RFC 822.
- DNS name – identification using the domain name.
- URI – identification using the IP address or address in FQDN format.
You can use an alternative name of the subject for identifying the user of the iOS MDM device.
- In the Subject Alternative Name field, enter the alternative name of the subject of the X.500 certificate. The value of the subject alternative name depends on the subject type: the user's email address, domain, or web address.
- In the NT subject name field, enter the DNS name of the iOS MDM device user on the Windows NT network.
The NT subject name is contained in the certificate request sent to the SCEP server.
- In the Number of polling attempts on SCEP server field, specify the maximum number of attempts to poll the SCEP server to get the certificate signed.
- In the Frequency of attempts (sec) field, specify the period of time in seconds between attempts to poll the SCEP server to get the certificate signed.
- In the Registration request field, enter a pre-published registration key.
Before signing a certificate, the SCEP server requests the mobile device user to supply a key. If this field is left blank, the SCEP does not request the key.
- In the Key Size drop-down list, select the size of the registration key in bits: 1024 or 2048.
- If you want to allow the user to use a certificate received from the SCEP server as a signing certificate, select the Use for signing check box.
- If you want to allow the user to use a certificate received from the SCEP server for data encryption, select the Use for encryption check box.
It is prohibited to use the SCEP server certificate as a data signing certificate and a data encryption certificate at the same time.
- In the Certificate fingerprint field, enter a unique certificate fingerprint for verifying the authenticity of the response from the Certification Center. You can use certificate fingerprints with the SHA1 or MD5 hashing algorithm. You can copy the certificate fingerprint manually or select a certificate using the Create from certificate button. When the fingerprint is created using the Create from certificate button, the fingerprint is added to the field automatically.
The certificate fingerprint has to be specified if data exchange between the mobile device and the Certification Center takes place via the HTTP protocol.
- Click OK.
The new SCEP profile appears in the list.
- Click the Apply button to save the changes you have made.
As a result, once the policy is applied, the user's mobile device is configured to automatically receive a certificate from the Certification Center via the internet.
Page top
The help for this version of the solution is no longer updated, so it may contain outdated information. For up-to-date information about the solution refer to the Kaspersky Secure Mobility Management 4.1 Help.
Restricting SD card usage (only Samsung)
Configure SD card settings to control usage of the SD card on the user's mobile device.
To restrict SD card usage on a mobile device:
- In the console tree, in the Managed devices folder, select the administration group to which the Android devices belong.
- In the workspace of the group, select the Policies tab.
- Open the policy properties window by double-clicking any column.
Complete the following steps within 15 minutes. Otherwise, you may face an error when saving changes to the policy.
- In the policy Properties window, select the Manage Samsung KNOX → Manage Samsung devices section.
- In the SD card settings section specify the needed restrictions:
- Click the Apply button to save the changes you have made.
SD card settings are now configured.
Page top
The help for this version of the solution is no longer updated, so it may contain outdated information. For up-to-date information about the solution refer to the Kaspersky Secure Mobility Management 4.1 Help.
Management of mobile devices
This section contains information about how to remotely manage mobile devices in the Administration Console of Kaspersky Security Center.
The help for this version of the solution is no longer updated, so it may contain outdated information. For up-to-date information about the solution refer to the Kaspersky Secure Mobility Management 4.1 Help.
Managing KES devices
In Kaspersky Security Center, you can manage KES mobile devices in the following ways:
- Centrally manage KES devices by using commands.
- View information about the settings for management of KES devices.
- Install applications by using mobile app packages.
- Disconnect KES devices from management.
The help for this version of the solution is no longer updated, so it may contain outdated information. For up-to-date information about the solution refer to the Kaspersky Secure Mobility Management 4.1 Help.
Device owner mode
This section contains information about how to manage the settings of Android mobile devices in device owner mode. For information about device owner mode deployment, see here.
Device owner mode offers the following features and control options for Android mobile devices:
- Restrictions on Android operating system features
- Management of Google Chrome settings
- Silent installation of required apps and removal of blocked apps in App Control
- Kiosk mode
- Management of Exchange ActiveSync for Gmail
- NDES and SCEP integration
The help for this version of the solution is no longer updated, so it may contain outdated information. For up-to-date information about the solution refer to the Kaspersky Secure Mobility Management 4.1 Help.
Restricting Android features on devices
You can restrict Android operating system features in device owner mode. For example, you can restrict factory reset, changing credentials, use of Google Play and Google Chrome, file transfer over USB, changing location settings, and manage system updates.
You can restrict Android features in the Feature restrictions section.
To open the Feature restrictions section:
- In the console tree, in the Managed devices folder, select the administration group to which the Android devices belong.
- In the workspace of the group, select the Policies tab.
- Open the policy properties window by double-clicking any column.
Complete the following steps within 15 minutes. Otherwise, you may face an error when saving changes to the policy.
- In the policy Properties window, select the Device owner mode > Feature restrictions section.
Restrict device features
On the Device Features tab of the Feature restrictions section, you can enable or disable the following features:
- Prohibit factory reset
- Prohibit screen sharing, recording, and screenshots
- Prohibit changing language (Android 9 or later)
- Prohibit changing date, time, and time zone (Android 9 or later)
- Prohibit adding and removing Google accounts
- Prohibit adjusting volume and mute device
- Prohibit outgoing phone calls
- Prohibit sending and receiving SMS messages
- Prohibit changing credentials
- Prohibit keyguard camera
- Prohibit keyguard notifications
- Prohibit keyguard trust agents
- Disable keyguard swipe
- Prohibit adjusting brightness (Android 9 or later)
- Prohibit ambient display (Android 9 or later)
- Force screen on when plugged in to AC charger (Android 6 or later)
- Force screen on when plugged in to USB charger (Android 6 or later)
- Force screen on when plugged in to wireless charger (Android 6 or later)
- Prohibit changing wallpaper (Android 7.0 or later)
- Prohibit status bar (Android 6 or later)
- Prohibit adding users
- Prohibit switching user (Android 9 or later)
- Prohibit removing users
- Prohibit safe boot (Android 6 or later)
- Prohibit unmuting microphone
- Prohibit disabling microphone (Android 12 or later)
Restrict app features
On the Apps tab of the Feature restrictions section, you can enable or disable the following features:
- Prohibit use of camera
- Prohibit camera toggle (Android 12 or later)
- Prohibit use of Google Play
- Prohibit use of Google Chrome
- Prohibit use of Google Assistant
- Prohibit installation of apps from unknown sources
- Prohibit modification of apps in Settings
- Prohibit installation of apps
- Prohibit uninstallation of apps
- Prohibit disabling app verification
- Granting runtime permissions for apps
Restrict storage features
On the Storage tab of the Feature restrictions section, you can enable or disable the following features:
- Prohibit debugging features
- Prohibit mounting physical external media
- Prohibit file transfer over USB
- Prohibit backup service (Android 8.0 or later)
Restrict network features
On the Network tab of the Feature restrictions section, you can enable or disable the following features:
- Prohibit use of Wi-Fi
- Prohibit enabling/disabling Wi-Fi (Android 13 or later)
- Prohibit changing Wi-Fi settings
- Prohibit Wi-Fi Direct (Android 13 or later)
- Prohibit sharing pre-configured Wi-Fi networks (Android 13 or later)
- Prohibit adding Wi-Fi networks (Android 13 or later)
- Prohibit changing pre-configured Wi-Fi networks
- Prohibit airplane mode (Android 9 or later)
- Prohibit use of Bluetooth (Android 8.0 or later)
- Prohibit changing Bluetooth settings
- Prohibit outgoing data sharing over Bluetooth (Android 8.0 or later)
- Prohibit changing VPN settings
- Prohibit resetting network settings (Android 6 or later)
- Prohibit changing mobile network settings
- Prohibit use of cellular data while roaming (Android 7.0 or later)
- Prohibit use of Android Beam via NFC
- Prohibit use of tethering
Restrict location services
On the Location Services tab of the Feature restrictions section, you can configure the following settings:
- Prohibit use of location
- Prohibit sharing location
- Prohibit changing location settings (Android 9 or later)
Restrict system updates
Managing update settings on mobile devices is vendor-specific. On some Android devices, the restriction on manual installation of operating system updates may work incorrectly.
On the Updates tab of the Feature restrictions section, you can configure the following settings:
The help for this version of the solution is no longer updated, so it may contain outdated information. For up-to-date information about the solution refer to the Kaspersky Secure Mobility Management 4.1 Help.
Configuring kiosk mode for Android devices
Kiosk mode is a Kaspersky Endpoint Security for Android feature that lets you limit the set of apps available to a device user, whether a single app or multiple apps. You can also efficiently manage some device settings.
The kiosk mode settings apply to devices managed via Kaspersky Endpoint Security for Android in device owner mode.
Kiosk mode does not affect the work of the Kaspersky Endpoint Security for Android app. It runs in the background, shows notifications, and can be updated.
Kiosk mode types
The following kiosk mode types are available in Kaspersky Endpoint Security:
- Single-app mode
Kiosk mode with only a single app. In this mode, a device user can open only one app that is allowed on the device and specified in the kiosk mode settings. If the app that you want to add to kiosk mode is not installed on the device, kiosk mode activates after the app is installed.
On devices with Android 9 or later, the app launches directly in kiosk mode.
On devices with Android 8.0 or earlier, the specified app must support kiosk mode functionality and call the
startLockTask()method itself to launch the app. - Multi-app mode
Kiosk mode with multiple apps. In this mode, a device user can open only the set of apps that are allowed on the device and specified in the kiosk mode settings.
Presettings
Pre-configuration for kiosk mode includes the following:
- Before specifying apps that are allowed to be run on the device in kiosk mode, you need first to add these apps in App Control > List of categories and apps and mark them as required. Then, they will appear in the App package list of the kiosk mode.
- Before activating kiosk mode, we recommend that you prohibit launching of Google Assistant by enabling the corresponding restriction in Policy > Device owner mode > Feature restrictions > Apps > Prohibit use of Google Assistant. Otherwise, Google Assistant launches in kiosk mode and allows non-trusted apps to be opened.
Open the kiosk mode settings
To open the kiosk mode settings:
- In the console tree, in the Managed devices folder, select the administration group to which the Android devices belong.
- In the workspace of the group, select the Policies tab.
- Open the policy properties window by double-clicking any column.
Complete the following steps within 15 minutes. Otherwise, you may face an error when saving changes to the policy.
- In the policy Properties window, select the Device owner mode → Kiosk mode section.
Configure single-app mode
To configure single-app mode:
- In the Kiosk mode drop-down list, select Single-app mode.
- In the App package drop-down list, select an app package with the app that is allowed to be run on the device.
- Specify any required restrictions. For available restrictions, see the "Kiosk mode restrictions" section below.
- Select the Allow navigation to additional apps check box if you want to add other apps that a device user can navigate to. For more details, see the Add additional apps section below.
- Click the Apply button to save the changes you have made.
Configure multi-app mode
To configure multi-app mode:
- In the Kiosk mode drop-down list, select Multi-app mode.
- Click Add, select apps that are allowed to be run on the device, and then click OK.
- Specify any required restrictions. For available restrictions, see the "Kiosk mode restrictions" section below.
- Select the Allow navigation to additional apps check box if you want to add other apps that a device user can navigate to. For more details, see the Add additional apps section below.
- Click the Apply button to save the changes you have made.
Kiosk mode restrictions
You can set the following restrictions in kiosk mode:
- Prohibit status bar (Android 9 or later)
- Prohibit Overview button (Android 9 or later)
- Prohibit Home button (Android 9 or later)
- Prohibit displaying system notifications (Android 9 or later)
Add additional apps
Besides locking the device to a single app or set of apps, you can also specify additional apps, that the main app can use. These additional apps provide full functionality of the apps added to kiosk mode. A device user cannot launch additional apps manually.
To add additional apps in the Kiosk mode section:
- Select the Allow navigation to additional apps check box.
- Click Add, specify the desired app package name, and then click OK. How to get the package name of an app
- Click the Apply button to save the changes you have made.
The help for this version of the solution is no longer updated, so it may contain outdated information. For up-to-date information about the solution refer to the Kaspersky Secure Mobility Management 4.1 Help.
Connecting to an NDES/SCEP server
You can configure a connection to an NDES/SCEP server to obtain a certificate from a certificate authority (CA) using Simple Certificate Enrollment Protocol (SCEP). To do this, you need to set up a connection to the CA using SCEP and specify a certificate profile.
To add a connection to a certificate authority and specify a certificate profile:
- In the console tree, in the Managed devices folder, select the administration group to which the Android devices belong.
- In the workspace of the group, select the Policies tab.
- Open the policy properties window by double-clicking any column.
Complete the following steps within 15 minutes. Otherwise, you may face an error when saving changes to the policy.
- In the policy Properties window, select the Device owner mode > NDES and SCEP section.
- In the Connection to certificate authority (CA) section, click Add.
The Connection to certificate authority dialog appears.
- Specify the following settings, and then click OK:
- In the Certificate profiles section, click Add.
The Certificate profile dialog appears.
- Specify the following certificate profile settings and click OK:
- Click Apply to save the changes you have made.
Manage connections and certificate profiles
You can later edit or remove the added connections and certificate profile.
To edit a connection or certificate profile:
- Select the needed connection or certificate profile in the corresponding section.
- Click Edit, make the required changes, and click OK.
- Click Apply to save the changes you have made.
After you edit the certificate profile in policy settings, the corresponding certificate on the device is deleted automatically during the next synchronization with Administration server and a new certificate is installed.
To remove a connection or certificate profile:
- Select the needed connection or certificate profile in the corresponding section.
- Click Delete, and then click OK.
If you remove a certificate authority connection, all certificate profiles that use this connection are also removed.
- Click Apply to save the changes you have made.
After you delete the certificate profile in policy settings, the corresponding certificate on the device will be deleted automatically during the next synchronization with Administration server.
Page top
The help for this version of the solution is no longer updated, so it may contain outdated information. For up-to-date information about the solution refer to the Kaspersky Secure Mobility Management 4.1 Help.
Enabling certificate-based authentication of KES devices
To enable certificate-based authentication of a KES device:
- Open the system registry of the client device that has Administration Server installed (for example, locally, using the regedit command in the Start → Run menu).
- Go to the following hive:
- For 32-bit systems:
HKEY_LOCAL_MACHINE\SOFTWARE\KasperskyLab\Components\34\.core\.independent\KLLIM
- For 64-bit systems:
HKEY_LOCAL_MACHINE\SOFTWARE\Wow6432Node\KasperskyLab\Components\34\.core\.independent\KLLIM
- For 32-bit systems:
- Create a key with the LP_MobileMustUseTwoWayAuthOnPort13292 name.
- Specify REG_DWORD as the key type.
- Set the key value on 1.
- Restart the Administration Server service.
Mandatory certificate-based authentication of the KES device using a shared certificate will be enabled after you run the Administration Server service.
The first connection of the KES device to the Administration Server does not require a certificate.
By default, certificate-based authentication of KES devices is disabled.
The help for this version of the solution is no longer updated, so it may contain outdated information. For up-to-date information about the solution refer to the Kaspersky Secure Mobility Management 4.1 Help.
Creating a mobile applications package for KES devices
A Kaspersky Endpoint Security for Android license is required to create a mobile applications package for KES devices.
To create a mobile applications package:
- In the Remote installation folder of the console tree, select the Installation packages subfolder.
The Remote installation folder is a subfolder of the Advanced folder by default.
- Click the Help button and select Mobile apps packages are intended for installation on mobile devices without Kaspersky Security Center. For example, a mobile apps package can be sent to a user by email or can be published on a Web Server for further download and installation in the drop-down list.
- In the Mobile apps package management window, click the New button.
- The New package wizard starts. Follow the instructions of the wizard.
The newly created mobile applications package is displayed in the Mobile apps package management window.
The help for this version of the solution is no longer updated, so it may contain outdated information. For up-to-date information about the solution refer to the Kaspersky Secure Mobility Management 4.1 Help.
Viewing information about a KES device
To view information about a KES device:
- In the Mobile Device Management folder in the console tree, select the Mobile devices subfolder.
The folder workspace displays a list of managed mobile devices.
- In the workspace, filter KES devices by protocol type (KES).
- Select the mobile device for which you want to view the information.
- From the context menu of the mobile device select Properties.
The properties window of the KES device opens.
The properties window of the mobile device displays information about the connected KES device.
The help for this version of the solution is no longer updated, so it may contain outdated information. For up-to-date information about the solution refer to the Kaspersky Secure Mobility Management 4.1 Help.
Disconnecting a KES device from management
To disconnect a KES device from management, the user has to remove Network Agent from the mobile device. After the user has removed Network Agent, the mobile device details are removed from the Administration Server database, and the administrator can remove the mobile device from the list of managed devices.
To remove a KES device from the list of managed devices:
- In the Mobile Device Management folder in the console tree, select the Mobile devices subfolder.
The folder workspace displays a list of managed mobile devices.
- In the workspace, filter KES devices by protocol type (KES).
- Select the mobile device that you must disconnect from management.
- In the context menu of the mobile device, select Delete.
The mobile device is removed from the list of managed devices.
If Kaspersky Endpoint Security for Android has not been removed from the mobile device, that mobile device reappears in the list of managed devices after synchronization with the Administration Server.
The help for this version of the solution is no longer updated, so it may contain outdated information. For up-to-date information about the solution refer to the Kaspersky Secure Mobility Management 4.1 Help.
Managing iOS MDM devices
This section describes advanced features for management of iOS MDM devices through Kaspersky Security Center. The application supports the following features for management of iOS MDM devices:
- Define the settings of managed iOS MDM devices in centralized mode and restrict features of devices through configuration profiles. You can add or modify configuration profiles and install them on mobile devices.
- Install apps on mobile devices by means of provisioning profiles, bypassing App Store. For example, you can use provisioning profiles for installation of in-house corporate apps on users' mobile devices. A provisioning profile contains information about an app and a mobile device.
- Install apps on an iOS MDM device through the App Store. Before installing an app on an iOS MDM device, you must add that app to an iOS MDM Server.
Every 24 hours, a push notification is sent to all connected iOS MDM devices in order to synchronize data with the iOS MDM Server.
For information about the configuration profile and the provisioning profile, as well as apps installed on an iOS MDM device, please refer to the properties window of the device.
The help for this version of the solution is no longer updated, so it may contain outdated information. For up-to-date information about the solution refer to the Kaspersky Secure Mobility Management 4.1 Help.
Signing an iOS MDM profile by a certificate
You can sign an iOS MDM profile by a certificate. You can use a certificate that you issued yourself or you can receive a certificate from trusted certification authorities.
To sign an iOS MDM profile by a certificate:
- In the Mobile Device Management folder in the console tree, select the Mobile devices subfolder.
- In the context menu of the Mobile devices folder, select Properties.
- In the properties window of the folder, select the Connection settings for iOS devices section.
- Click the Browse button under the Select certificate file field.
The Certificate window opens.
- In the Certificate type field, specify the public or private certificate type:
- If the PKCS #12 container value is selected, specify the certificate file and the password.
- If the X.509 certificate value is selected:
- Specify the private key file (one with the *.prk or *.pem extension).
- Specify the private key password.
- Specify the public key file (one with the *.cer extension).
- Click OK.
The iOS MDM profile is signed by a certificate.
The help for this version of the solution is no longer updated, so it may contain outdated information. For up-to-date information about the solution refer to the Kaspersky Secure Mobility Management 4.1 Help.
Adding a configuration profile
To create a configuration profile, you can use Apple Configurator 2, which is available at the Apple Inc. website. Apple Configurator 2 works only on devices running macOS; if you do not have such devices at your disposal, you can use iPhone Configuration Utility on the device with Administration Console instead. However, Apple Inc. does not support iPhone Configuration Utility any longer.
To create a configuration profile using iPhone Configuration Utility and to add it to an iOS MDM Server:
- In the console tree, select the Mobile Device Management folder.
- In the workspace of the Mobile Device Management folder, select the Mobile Device Servers subfolder.
- In the workspace of the Mobile Device Servers folder, select an iOS MDM Server.
- In the context menu of the iOS MDM Server, select Properties.
The Mobile Device Server properties window opens.
- In the properties window of the iOS MDM Server, select the Configuration profiles section.
- In the Configuration profiles section, click the Create button.
The New configuration profile window opens.
- In the New configuration profile window, specify a name and ID for the profile.
The configuration profile ID should be unique; the value should be specified in Reverse-DNS format, for example, com.companyname.identifier.
- Click OK.
iPhone Configuration Utility then starts if you have it installed.
- Reconfigure the profile in iPhone Configuration Utility.
For a description of the profile settings and instructions on how to configure the profile, please refer to the documentation enclosed with iPhone Configuration Utility.
After you configure the profile with iPhone Configuration Utility, the new configuration profile is displayed in the Configuration profiles section in the properties window of the iOS MDM Server.
You can click the Modify button to modify the configuration profile.
You can click the Import button to load the configuration profile to a program.
You can click the Export button to save the configuration profile to a file.
The profile that you have created must be installed on iOS MDM devices.
The help for this version of the solution is no longer updated, so it may contain outdated information. For up-to-date information about the solution refer to the Kaspersky Secure Mobility Management 4.1 Help.
Installing a configuration profile on a device
To install a configuration profile to a mobile device:
- In the Mobile Device Management folder in the console tree, select the Mobile devices subfolder.
The folder workspace displays a list of managed mobile devices.
- In the workspace, filter iOS MDM devices:
- Click the No filter specified, records total: <number> link.
- On the Management protocol list, select iOS MDM.
- Select the mobile device on which you want to install a configuration profile.
You can select multiple mobile devices to install the profile on them simultaneously.
- In the context menu of the mobile device, select Show command log.
- In the Mobile device <device name> management commands window, proceed to the Install profile section and click the Send command button.
You can also send the command to the mobile device by selecting All commands in the context menu of that mobile device, and then selecting Install profile.
The Select profiles window opens showing a list of profiles. Select from the list the profile that you want to install on the mobile device. You can select multiple profiles to install them on the mobile device simultaneously. To select the range of profiles, use the Shift key. To combine profiles into a group, use the CTRL key.
- Click OK to send the command to the mobile device.
When the command is executed, the selected configuration profile will be installed on the user's mobile device. If the command is successfully executed, the current status of the command in the command log will be shown as Done.
You can click the Resend button to send the command to the user's mobile device again.
You can click the Remove from queue button to cancel execution of a command that was sent if the command has not yet been executed.
The Command log section displays commands that have been sent to the mobile device, with the respective execution statuses. Click Refresh to update the list of commands.
- Click OK to close the Mobile device <device name> management commands window.
You can view the profile that you installed and remove it, if necessary.
The help for this version of the solution is no longer updated, so it may contain outdated information. For up-to-date information about the solution refer to the Kaspersky Secure Mobility Management 4.1 Help.
Removing the configuration profile from a device
To remove a configuration profile from a mobile device:
- In the Mobile Device Management folder in the console tree, select the Mobile devices subfolder.
The folder workspace displays a list of managed mobile devices.
- In the workspace, filter iOS MDM devices:
- Click the No filter specified, records total: <number> link.
- On the Management protocol list, select iOS MDM.
- Select the mobile device from which you want to remove the configuration profile.
You can select multiple mobile devices to remove the profile from them simultaneously.
- In the context menu of the mobile device, select Show command log.
- In the Mobile device <device name> management commands window, proceed to the Remove profile section and click the Send command button.
You can also send the command to the mobile device by selecting All commands from the context menu of the device, and then selecting Remove profile.
The Remove profiles window opens showing a list of profiles.
- Select from the list the profile that you want to remove from the mobile device. You can select multiple profiles to remove them from the mobile device simultaneously. To select the range of profiles, use the Shift key. To combine profiles into a group, use the CTRL key.
- Click OK to send the command to the mobile device.
When the command is executed, the selected configuration profile will be removed from the user's mobile device. If the command is executed successfully, the current status of the command will be shown as Completed.
You can click the Resend button to send the command to the user's mobile device again.
You can click the Remove from queue button to cancel execution of a command that was sent if the command has not yet been executed.
The Command log section displays commands that have been sent to the mobile device, with the respective execution statuses. Click Refresh to update the list of commands.
- Click OK to close the Mobile device <device name> management commands window.
The help for this version of the solution is no longer updated, so it may contain outdated information. For up-to-date information about the solution refer to the Kaspersky Secure Mobility Management 4.1 Help.
Adding a provisioning profile
To add a
to an iOS MDM Server:- In the console tree, open the Mobile Device Management folder.
- In the Mobile Device Management folder in the console tree, select the Mobile Device Servers subfolder.
- In the workspace of the Mobile Device Servers folder, select an iOS MDM Server.
- In the context menu of the iOS MDM Server, select Properties.
The Mobile Device Server properties window opens.
- In the properties window of the iOS MDM Server, go to the Provisioning profiles section.
- In the Provisioning profiles section, click the Import button and specify the path to a provisioning profile file.
The profile will be added to the iOS MDM Server settings.
You can click the Export button to save the provisioning profile to a file.
You can install the provisioning profile that you imported on iOS MDM devices.
The help for this version of the solution is no longer updated, so it may contain outdated information. For up-to-date information about the solution refer to the Kaspersky Secure Mobility Management 4.1 Help.
Installing a provisioning profile to a device
To install a provisioning profile on a mobile device:
- In the Mobile Device Management folder in the console tree, select the Mobile devices subfolder.
The folder workspace displays a list of managed mobile devices.
- In the workspace, filter iOS MDM devices:
- Click the No filter specified, records total: <number> link.
- On the Management protocol list, select iOS MDM.
- Select the mobile device on which you want to install the provisioning profile.
You can select multiple mobile devices to install the provisioning profile simultaneously.
- In the context menu of the mobile device, select Show command log.
- In the Mobile device <device name> management commands window, proceed to the Install provisioning profile section and click the Send command button.
You can also send the command to the mobile device by selecting All commands from the context menu of that mobile device, and then selecting Install provisioning profile.
The Select provisioning profiles window opens showing a list of provisioning profiles. Select from the list the provisioning profile that you want to install on the mobile device. You can select multiple provisioning profiles to install them on the mobile device simultaneously. To select the range of provisioning profiles, use the Shift key. To combine provisioning profiles into a group, use the Ctrl key.
- Click OK to send the command to the mobile device.
When the command is executed, the selected provisioning profile will be installed on the user's mobile device. If the command is successfully executed, its current status in the command log is shown as Completed.
You can click the Resend button to send the command to the user's mobile device again.
You can click the Remove from queue button to cancel execution of a command that was sent if the command has not yet been executed.
The Command log section displays commands that have been sent to the mobile device, with the respective execution statuses. Click Refresh to update the list of commands.
- Click OK to close the Mobile device <device name> management commands window.
You can view the profile that you installed and remove it, if necessary.
The help for this version of the solution is no longer updated, so it may contain outdated information. For up-to-date information about the solution refer to the Kaspersky Secure Mobility Management 4.1 Help.
Removing a provisioning profile from a device
To remove a provisioning profile from a mobile device:
- In the Mobile Device Management folder in the console tree, select the Mobile devices subfolder.
The folder workspace displays a list of managed mobile devices.
- In the workspace, filter iOS MDM devices:
- Click the No filter specified, records total: <number> link.
- On the Management protocol list, select iOS MDM.
- Select the mobile device from which you want to remove the provisioning profile.
You can select multiple mobile devices to remove the provisioning profile from them simultaneously.
- In the context menu of the mobile device, select Show command log.
- In the Mobile device <device name> management commands window, proceed to the Remove provisioning profile section and click the Send command button.
You can also send the command to the mobile device by selecting All commands from the context menu and then selecting Remove provisioning profile.
The Remove provisioning profiles window opens showing a list of profiles.
- Select from the list the provisioning profile that you need to remove from the mobile device. You can select multiple provisioning profiles to remove them from the mobile device simultaneously. To select the range of provisioning profiles, use the Shift key. To combine provisioning profiles into a group, use the Ctrl key.
- Click OK to send the command to the mobile device.
When the command is executed, the selected provisioning profile will be removed from the user's mobile device. Applications that are related to the deleted provisioning profile will not be operable. If the command is executed successfully, the current status of the command will be shown as Completed.
You can click the Resend button to send the command to the user's mobile device again.
You can click the Remove from queue button to cancel execution of a command that was sent if the command has not yet been executed.
The Command log section displays commands that have been sent to the mobile device, with the respective execution statuses. Click Refresh to update the list of commands.
- Click OK to close the Mobile device <device name> management commands window.
The help for this version of the solution is no longer updated, so it may contain outdated information. For up-to-date information about the solution refer to the Kaspersky Secure Mobility Management 4.1 Help.
Configuring managed apps
Before installing an app on an iOS MDM device, you must add that app to an iOS MDM Server. An app is considered managed if it has been installed on a device through Kaspersky Endpoint Security. A managed app can be managed remotely by means of Kaspersky Endpoint Security.
To add a managed app to an iOS MDM Server:
- In the console tree, open the Mobile Device Management folder.
- In the Mobile Device Management folder in the console tree, select the Mobile Device Servers subfolder.
- In the workspace of the Mobile Device Servers folder, select an iOS MDM Server.
- In the context menu of the iOS MDM Server, select Properties.
This opens the properties window of the iOS MDM Server.
- In the properties window of the iOS MDM Server, select the Managed applications section.
- Click the Add button in the Managed applications section.
The Add an application window opens.
- In the Add an application window, in the App name field, specify the name of the app to be added.
- In the Apple ID or link to manifest file field, specify the Apple ID of the application to be added, or specify a link to a manifest file that can be used to download the app.
- If you want a managed app to be removed from the user's mobile device along with the iOS MDM profile when removing the latter, select the Remove together with iOS MDM profile check box.
- If you want to block the app data backup through iTunes, select the Block data backup check box.
- If you want to configure settings of the managed app, click the App configuration button.
The App configuration window opens.
- In the App configuration window, click the Browse button to select and upload a configuration file in PLIST format.
To generate a configuration file, you may use a configuration generator (for example, https://appconfig.jamfresearch.com/generator) or refer to the official documentation on the app to be configured.
An example of configured basic parameters for the Microsoft Outlook app.
An example of a configuration file for the Microsoft Outlook app.
- After the PLIST file is imported, the app configuration will be displayed in the App configuration window.
You can change the configuration by editing the text of the PLIST file after its import.
- Click OK to apply the app configuration.
- Click OK once again to close the Add an application window.
The added app is displayed in the Managed applications section of the properties window of the iOS MDM Server.
It is also possible to change or delete the configuration of an already added app.
To change the configuration of a managed app:
- In the Managed applications section, select the managed app from the list, and then click the Modify button.
The Changing mobile app settings window opens.
- In the Changing mobile app settings window, click the App configuration button.
The App configuration window opens.
- Click the Browse button to select and upload a configuration file in PLIST format.
- If necessary, edit the text of the PLIST file after its import.
- Click OK to apply the app configuration.
- Click OK to close the Changing mobile app settings window.
Mobile device settings are configured after the next device synchronization with the Kaspersky Security Center.
To delete a managed app configuration:
- In the Managed applications section, select the managed app from the list, and then click the Modify button.
The Changing mobile app settings window opens.
- In the Changing mobile app settings window, click the Delete configuration button.
The applied configuration of the managed app is deleted.
The help for this version of the solution is no longer updated, so it may contain outdated information. For up-to-date information about the solution refer to the Kaspersky Secure Mobility Management 4.1 Help.
Installing an app on a mobile device
To install an app on an iOS MDM mobile device:
- In the Mobile Device Management folder in the console tree, select the Mobile devices subfolder.
The folder workspace displays a list of managed mobile devices.
- In the workspace, filter iOS MDM devices:
- Click the No filter specified, records total: <number> link.
- On the Management protocol list, select iOS MDM.
- Select the mobile device on which you want to install an app.
You can select multiple mobile devices to install the application on them simultaneously.
- In the context menu of the mobile device, select Show command log.
- In the Mobile device <device name> management commands window, proceed to the Install app section and click the Send command button.
You can also send the command to the mobile device by selecting All commands in the context menu of that mobile device, and then selecting Install app.
The Select apps window opens showing a list of profiles. Select from the list the application that you want to install on the mobile device. You can select multiple applications to install them on the mobile device simultaneously. To select a range of apps, use the Shift key. To combine apps into a group, use the Ctrl key.
- Click OK to send the command to the mobile device.
When the command is executed, the selected application will be installed on the user's mobile device. If the command is successfully executed, its current status in the command log will be shown as Completed.
You can click the Resend button to send the command to the user's mobile device again. You can click the Remove from queue button to cancel execution of a command that was sent if the command has not yet been executed.
The Command log section displays commands that have been sent to the mobile device, with the respective execution statuses. Click Refresh to update the list of commands.
- Click OK to close the Mobile device <device name> management commands window.
Information about the application installed is displayed in the properties of the iOS MDM mobile device. You can remove the application from the mobile device through the command log or the context menu of the mobile device.
The help for this version of the solution is no longer updated, so it may contain outdated information. For up-to-date information about the solution refer to the Kaspersky Secure Mobility Management 4.1 Help.
Removing an app from a device
To remove an app from a mobile device:
- In the Mobile Device Management folder in the console tree, select the Mobile devices subfolder.
The folder workspace displays a list of managed mobile devices.
- In the workspace, filter iOS MDM devices:
- Click the No filter specified, records total: <number> link.
- On the Management protocol list, select iOS MDM.
- Select the mobile device from which you want to remove the app.
You can select multiple mobile devices to remove the app from them simultaneously.
- In the context menu of the mobile device, select Show command log.
- In the Mobile device <device name> management commands window, proceed to the Remove app section and click the Send command button.
You can also send the command to the mobile device by selecting All commands in the context menu of that mobile device, and then selecting Remove app.
The Remove apps window opens showing a list of applications.
- Select from the list the app that you need to remove from the mobile device. You can select multiple apps to remove them simultaneously. To select a range of apps, use the Shift key. To combine apps into a group, use the Ctrl key.
- Click OK to send the command to the mobile device.
When the command is executed, the selected app will be removed from the user's mobile device. If the command is executed successfully, the current status of the command will be shown as Completed.
You can click the Resend button to send the command to the user's mobile device again.
You can click the Remove from queue button to cancel execution of a command that was sent if the command has not yet been executed.
The Command log section displays commands that have been sent to the mobile device, with the respective execution statuses. Click Refresh to update the list of commands.
- Click OK to close the Mobile device <device name> management commands window.
The help for this version of the solution is no longer updated, so it may contain outdated information. For up-to-date information about the solution refer to the Kaspersky Secure Mobility Management 4.1 Help.
Installing and uninstalling apps on a group of iOS MDM devices
Kaspersky Security Center allows you to install and remove apps on iOS MDM devices by sending commands to these devices.
Selecting devices
To select iOS MDM devices on which apps should be installed or removed:
- In the Mobile Device Management folder in the console tree, select the Mobile devices subfolder.
The folder workspace displays a list of managed mobile devices.
- In the workspace, filter iOS MDM devices by protocol type (iOS MDM).
- Select the iOS MDM device on which apps should be installed or removed.
You can also select multiple devices and send commands simultaneously. To select a group of devices, do one of the following:
- To select all devices in the workspace, filter the list of devices as required and press Ctrl+A.
- To select a range of devices, hold down the Shift key, click the first device in the range, and then click the last device in the range.
- To select individual devices, hold down the Ctrl key and click devices you want to include in the group.
Installing apps on devices
Before installing an app on an iOS MDM device, you must add that app to an iOS MDM Server. For more information, refer to Adding a managed app.
To install apps on selected iOS MDM devices:
- Right-click the selected devices. In the context menu that appears, select All commands, and then select Install app.
For a single device, you can also select Show command log in the context menu, proceed to the Install app section, and click the Send command button.
The Select apps window opens showing a list of managed apps.
- Select the apps you want to install on iOS MDM devices. To select a range of apps, use the Shift key. To select multiple apps individually, use the Ctrl key.
- Click OK to send the command to the devices.
When the command is executed on a device, the selected apps are installed. If the command is successfully executed, the command log will show its current status as Completed.
Removing apps from devices
To remove apps from selected iOS MDM devices:
- Right-click the selected devices. In the context menu that appears, select All commands, and then select Remove app.
For a single device, you can also select Show command log in the context menu, proceed to the Remove app section, and click the Send command button.
The Remove apps window opens showing a list of previously installed apps.
- Select the apps you want to remove from iOS MDM devices. To select a range of apps, use the Shift key. To select multiple apps individually, use the Ctrl key.
- Click OK to send the command to the devices.
When the command is executed on a device, the selected apps are uninstalled. If the command is successfully executed, the command log will show its current status as Completed.
The help for this version of the solution is no longer updated, so it may contain outdated information. For up-to-date information about the solution refer to the Kaspersky Secure Mobility Management 4.1 Help.
Configuring roaming on an iOS MDM mobile device
To configure roaming:
- In the Mobile Device Management folder in the console tree, select the Mobile devices subfolder.
The folder workspace displays a list of managed mobile devices.
- In the workspace, filter iOS MDM devices:
- Click the No filter specified, records total: <number> link.
- On the Management protocol list, select iOS MDM.
- Select the mobile device owned by the user for whom you want to configure roaming.
You can select multiple mobile devices to configure roaming on them simultaneously.
- In the context menu of the mobile device, select Show command log.
- In the Mobile device <device name> management commands window, proceed to the Configure roaming section and click the Send command button.
You can also send the command to the mobile device by selecting All commands → Configure roaming from the context menu of the device.
- In the Roaming settings window, specify the relevant settings:
Roaming is configured for the selected devices.
The help for this version of the solution is no longer updated, so it may contain outdated information. For up-to-date information about the solution refer to the Kaspersky Secure Mobility Management 4.1 Help.
Viewing information about an iOS MDM device
To view information about an iOS MDM device:
- In the Mobile Device Management folder in the console tree, select the Mobile devices subfolder.
The folder workspace displays a list of managed mobile devices.
- In the workspace, filter iOS MDM devices:
- Click the No filter specified, records total: <number> link.
- On the Management protocol list, select iOS MDM.
- Select the mobile device for which you want to view the information.
- From the context menu of the mobile device select Properties.
The properties window of the iOS MDM device opens.
The properties window of the mobile device displays information about the connected iOS MDM device.
The help for this version of the solution is no longer updated, so it may contain outdated information. For up-to-date information about the solution refer to the Kaspersky Secure Mobility Management 4.1 Help.
Disconnecting an iOS MDM device from management
If you want to stop managing an iOS MDM device, you can disconnect it from management in Kaspersky Security Center.
As an alternative, you or the device owner can remove the iOS MDM profile from the device. However, after that you nevertheless must disconnect the device from management, as described in this section. Otherwise, you will not be able to start managing this device again.
To disconnect an iOS MDM device from the iOS MDM Server:
- In the Mobile Device Management folder in the console tree, select the Mobile devices subfolder.
The folder workspace displays a list of managed mobile devices.
- In the workspace, filter iOS MDM devices:
- Click the No filter specified, records total: <number> link.
- On the Management protocol list, select iOS MDM.
- Select the mobile device that you want to disconnect.
- In the context menu of the mobile device, select Delete.
The iOS MDM device is marked in the list for removal. Within one minute, the device is removed from the iOS MDM Server database, after which it is automatically removed from the list of managed devices.
After the iOS MDM device is disconnected from management, all installed configuration profiles, the iOS MDM profile, and applications for which the Remove together with iOS MDM profile option has been enabled in the iOS MDM Server settings, will be removed from the mobile device.
The help for this version of the solution is no longer updated, so it may contain outdated information. For up-to-date information about the solution refer to the Kaspersky Secure Mobility Management 4.1 Help.
Configuring kiosk mode for iOS MDM devices
Kiosk mode is an iOS feature that lets you limit the set of apps available to a device user to a single app. In this mode, a device user can open only one app that is allowed on the device and specified in the kiosk mode settings.
The kiosk mode settings apply to iOS MDM devices managed through Kaspersky Security Center.
Open the kiosk mode settings
To open the kiosk mode settings:
- In the console tree, in the Managed devices folder, select the administration group to which the iOS MDM devices belong.
- In the workspace of the group, select the Policies tab.
- Open the policy properties window by double-clicking any column.
Complete the following steps within 15 minutes. Otherwise, you may face an error when saving changes to the policy.
- In the policy Properties window, select the Kiosk mode section.
Configure kiosk mode
To enable kiosk mode:
- Click the Enable kiosk mode (supervised only) check box to activate kiosk mode on a supervised device.
- In the App's bundle ID field, enter the unique identifier of an app selected for kiosk mode (for example, com.apple.calculator). How to get the bundle ID of an app
To select a different app, you need to disable kiosk mode, save the changes to the policy, and enable kiosk mode for a new app.
The app that is selected for kiosk mode must be installed on the device. Otherwise, the device will be locked until kiosk mode is disabled.
The use of the selected app must also be allowed in the policy settings. If the use of the app is prohibited, kiosk mode will not be enabled until the selected app is removed from the list of forbidden apps.
In some cases, if the use of the selected app is prohibited in the policy settings, kiosk mode can still be enabled.
- Specify the settings that will be enabled on the device in kiosk mode. For available settings, see the "Kiosk mode settings" section below.
- Specify the settings that the user can edit on the device in kiosk mode.
- Click the Apply button to save the changes you have made.
Once the changes to the policy are saved, kiosk mode is enabled. The selected app is forced to open on a supervised device, while the use of other apps is prohibited. The selected app reopens immediately after the device is restarted.
To edit the kiosk mode settings, you need to disable kiosk mode, save changes to the policy, and then enable kiosk mode again with the new settings.
To disable kiosk mode:
- Select the Disable kiosk mode (supervised only) check box to deactivate kiosk mode on a supervised device.
- Click the Apply button to save the changes you have made.
Once the changes to the policy are saved, kiosk mode is disabled. The use of all apps is allowed on a supervised device.
Now, you can enable kiosk mode again with the new settings.
Kiosk mode settings
- Auto-Lock
- Touch (not recommended to disable)
- AssistiveTouch
- Voice Control
- VoiceOver
- Speak Selection
- Volume Buttons
- Mono Audio
- Zoom
- Auto-Rotate Screen
- Invert Colors
- Ring/Silent Switch
- Sleep/Wake Button
The help for this version of the solution is no longer updated, so it may contain outdated information. For up-to-date information about the solution refer to the Kaspersky Secure Mobility Management 4.1 Help.
Management of mobile device settings
This section contains information about how to remotely manage the settings of mobile devices in the Administration Console of Kaspersky Security Center.
The help for this version of the solution is no longer updated, so it may contain outdated information. For up-to-date information about the solution refer to the Kaspersky Secure Mobility Management 4.1 Help.
Configuring connection to a Wi-Fi network
This section provides instructions on how to configure automatic connection to a corporate Wi-Fi network on Android and iOS MDM devices.
The help for this version of the solution is no longer updated, so it may contain outdated information. For up-to-date information about the solution refer to the Kaspersky Secure Mobility Management 4.1 Help.
Connecting Android devices to a Wi-Fi network
For an Android device to automatically connect to an available Wi-Fi network and protect data during the connection, you should configure the connection settings.
To connect the mobile device to a Wi-Fi network:
- In the console tree, in the Managed devices folder, select the administration group to which the Android devices belong.
- In the workspace of the group, select the Policies tab.
- Open the policy properties window by double-clicking any column.
Complete the following steps within 15 minutes. Otherwise, you may face an error when saving changes to the policy.
- In the policy Properties window, select the Wi-Fi section.
- In the Wi-Fi networks section, click Add.
This opens the Wi-Fi network window.
- In the Service set identifier (SSID) field, enter the name of the Wi-Fi network that includes the access point (SSID).
- Select the Hidden network check box if you want the Wi-Fi network to be hidden in the list of available networks on the device. In this case, to connect to the network the user needs to manually enter the Service set identifier (SSID) specified in the settings of the Wi-Fi router on the mobile device.
- Select the Automatic connection to network check box if you want the device to connect to the Wi-Fi network automatically.
- In the Network protection section, select the type of Wi-Fi network security (open or secure network protected with the WEP, WPA/WPA2 PSK, or 802.1.x EAP protocol).
The 802.1.x EAP security protocol is supported only in the Kaspersky Endpoint Security for Android app version 10.48.1.1 or later. The WEP protocol is supported only on Android 9 or earlier.
- If you selected the 802.1.x EAP security protocol, specify the following network protection settings:
- In the Password field, set a network access password if you selected a secure network at step 9.
- Select the Use proxy server option if you want to use a proxy server to connect to a Wi-Fi network. Otherwise, select the Do not use proxy server option.
- If you selected Use proxy server, in the Proxy server address and port field, enter the IP address or DNS name of the proxy server and port number, if necessary.
On devices running Android version 8.0 or later, settings of the proxy server for Wi-Fi cannot be redefined with the policy. However, you can manually configure the proxy server settings for a Wi-Fi network on the mobile device.
If you are using a proxy server to connect to a Wi-Fi network, you can use a policy to configure the settings for connecting to the network. On devices running Android 8.0 or later, you must manually configure the proxy server settings. On devices running Android 8.0 or later, you cannot use a policy to change the Wi-Fi network connection settings, except for the network access password.
If you are not using a proxy server to connect to a Wi-Fi network, there are no limitations on using policies to manage a Wi-Fi network connection.
- In the Do not use proxy server for addresses field, generate a list of web addresses that can be accessed without the use of the proxy server.
For example, you can enter the address
example.com. In this case, the proxy server will not be used for the addressespictures.example.com,example.com/movies, etc. The protocol (for example,http://) can be omitted.On devices running Android version 8.0 or later, the proxy server exclusion for web addresses does not work.
- Click OK.
The added Wi-Fi network is displayed in the list of Wi-Fi networks.
This list contains the names of suggested wireless networks.
On personal devices running Android 10 or later, the operating system prompts the user to connect to such networks. Suggested networks don't appear on the saved networks list on these devices.
On devices operating in device owner mode and personal devices running Android 9 or earlier, after synchronizing the device with the Administration Server, the device user can select a suggested wireless network in the saved networks list and connect to it without having to specify any network settings.
You can modify or delete Wi-Fi networks in the list of networks using the Edit and Delete buttons at the top of the list.
- Click the Apply button to save the changes you have made.
Mobile device settings are changed after the next device synchronization with Kaspersky Security Center.
On devices running Android version 10 or later, if a user refuses to connect to the suggested Wi-Fi network, the app's permission to change Wi-Fi state is revoked. The user must grant this permission manually.
Page top
The help for this version of the solution is no longer updated, so it may contain outdated information. For up-to-date information about the solution refer to the Kaspersky Secure Mobility Management 4.1 Help.
Connecting iOS MDM devices to a Wi-Fi network
For an iOS MDM device to automatically connect to an available Wi-Fi network and protect data during the connection, you should configure the connection settings.
To configure the connection of an iOS MDM device to a Wi-Fi network:
- In the console tree, in the Managed devices folder, select the administration group to which the iOS MDM devices belong.
- In the workspace of the group, select the Policies tab.
- Open the policy properties window by double-clicking any column.
Complete the following steps within 15 minutes. Otherwise, you may face an error when saving changes to the policy.
- In the policy Properties window, select the Wi-Fi section.
- Click the Add button in the Wi-Fi networks section.
This opens the Wi-Fi network window.
- In the Service set identifier (SSID) field, enter the name of the Wi-Fi network that includes the access point (SSID).
- If you want the iOS MDM device to connect to the Wi-Fi network automatically, select the Automatic connection check box.
- To make it impossible to connect iOS MDM devices to a Wi-Fi network requiring preliminary authentication (captive network), select the Disable captive networks detection check box.
To use a captive network, you must subscribe, accept an agreement, or make a payment. Captive networks may be deployed in cafes and hotels, for example.
- If you want the Wi-Fi network to be hidden in the list of available networks on the iOS MDM device, select the Hidden Network check box.
In this case, to connect to the network the user needs to manually enter the Service set identifier (SSID) specified in the settings of the Wi-Fi router on the mobile device.
- In the Network protection drop-down list, select the type of protection of the Wi-Fi network connection:
- Disabled. User authentication is not required.
- WEP. The network is protected using Wireless Encryption Protocol (WEP).
- WPA/WPA2 (Personal). The network is protected using WPA / WPA2 protocol (Wi-Fi Protected Access).
- WPA2 (Personal). The network is protected using WPA2 protocol (Wi-Fi Protected Access 2.0). WPA2 protection is available on devices running iOS version 8 or later. WPA2 is not available on Apple TV devices.
- Any (Personal). The network is protected using the WEP, WPA or WPA2 encryption protocol depending on the type of Wi-Fi router. An encryption key unique to each user is used for authentication.
- WEP (Dynamic). The network is protected using the WEP protocol with the use of a dynamic key.
- WPA/WPA2 (Enterprise). The network is protected using the WPA/WPA2 encryption protocol with use of the 802.1X protocol.
- WPA2 (Enterprise). The network is protected using the WPA2 encryption protocol with the use of one key shared by all users (802.1X). WPA2 protection is available on devices running iOS version 8 or later. WPA2 is not available on Apple TV devices.
- Any (Enterprise). The network is protected using WEP or WPA / WPA2 protocol depending on the type of Wi-Fi router. One encryption key shared by all users is used for authentication.
If you have selected WEP (Dynamic), WPA/WPA2 (Enterprise), WPA2 (Enterprise) or Any (Enterprise) in the Network protection list, in the Protocols section you can select the types of EAP protocols (Extensible Authentication Protocol) for user identification on the Wi-Fi network.
In the Trusted certificates section, you can also create a list of trusted certificates for authentication of the iOS MDM device user on trusted servers.
- Configure the settings of the account for user authentication upon connection of the iOS MDM device to the Wi-Fi network:
- In the Authentication section, click the Configure button.
The Authentication window opens.
- In the User name field, enter the account name for user authentication upon connection to the Wi-Fi network.
- To require the user to enter the password manually upon every connection to the Wi-Fi network, select the Prompt for password at each connection check box.
- In the Password field, enter the password of the account for authentication on the Wi-Fi network.
- In the Authentication certificate drop-down list, select a certificate for user authentication on the Wi-Fi network. If the list does not contain any certificates, you can add them in the Certificates section.
- In the User ID field, enter the user ID displayed during data transmission upon authentication instead of the user's real name.
The user ID is designed to make the authentication process more secure, as the user name is not displayed openly, but transmitted via an encrypted TLS tunnel.
- Click OK.
As a result, the settings of the account for user authentication upon connection to the Wi-Fi network will be configured on the iOS MDM device.
- In the Authentication section, click the Configure button.
- If necessary, configure the settings of the Wi-Fi network connection via a proxy server:
- In the Proxy server section, click the Configure button.
- In the Proxy server window that opens, select the proxy server configuration mode and specify the connection settings.
- Click OK.
As a result, the settings of the device connection to the Wi-Fi network via a proxy server are configured on the iOS MDM device.
- Click OK.
The new Wi-Fi network is displayed in the list.
- Click the Apply button to save the changes you have made.
As a result, a Wi-Fi network connection will be configured on the user's iOS MDM device once the policy is applied. The user's mobile device will automatically connect to available Wi-Fi networks. Data security during a Wi-Fi network connection is ensured by the authentication technology.
Page top
The help for this version of the solution is no longer updated, so it may contain outdated information. For up-to-date information about the solution refer to the Kaspersky Secure Mobility Management 4.1 Help.
Configuring email
This section contains information on configuring mailboxes on mobile devices.
The help for this version of the solution is no longer updated, so it may contain outdated information. For up-to-date information about the solution refer to the Kaspersky Secure Mobility Management 4.1 Help.
Configuring a mailbox on iOS MDM devices
To enable an iOS MDM device user to work with email, add the user's email account to the list of accounts on the iOS MDM device.
By default, the email account is added with the following settings:
- Email protocol – IMAP.
- The user can move email messages between the user's accounts and synchronize account addresses.
- The user can use any email clients (other than Mail) to use email.
- The SSL connection is not used during transmission of messages.
You can edit the specified settings when adding the account.
To add an email account of the iOS MDM device user:
- In the console tree, in the Managed devices folder, select the administration group to which the iOS MDM devices belong.
- In the workspace of the group, select the Policies tab.
- Open the policy properties window by double-clicking any column.
Complete the following steps within 15 minutes. Otherwise, you may face an error when saving changes to the policy.
- In the policy Properties window, select the Email.
- Click the Add button in the Email account section.
The Email account window opens.
- In the Description field, enter a description of the user's email account.
- Select the email protocol:
- POP
- IMAP
- If necessary, specify the IMAP path prefix in the IMAP path prefix field.
The IMAP path prefix must be entered using upper-case letters (for example: GMAIL for Google Mail). This field is available if the IMAP account protocol is selected.
- In the User name as displayed in messages field, enter the user name to be displayed in the From: field for all outgoing messages.
- In the Email address field, specify the email address of the iOS MDM device user.
- Configure Additional Settings of the email account:
- To allow the user to move email messages between the user's accounts, select the Allow movement of messages between accounts check box.
If you want to prohibit saving, moving, and sharing attachments from a corporate mailbox, clear the Allow movement of messages between accounts, Allow non-managed apps to use documents from managed apps, and Allow managed apps to use documents from non-managed apps check boxes.
- To allow the email addresses used to be synchronized among user accounts, select the Allow sync of recent addresses check box.
- To allow a user to use the Mail Drop service to forward large-sized attachments, select the Allow Mail Drop check box.
- To allow the user to use only the standard iOS mail client, select the Allow use of only Mail app check box.
- To allow the user to move email messages between the user's accounts, select the Allow movement of messages between accounts check box.
- Configure the settings for using the S/MIME protocol in the Mail app. S/MIME is a protocol for transmitting digitally signed encrypted messages.
- To use the S/MIME protocol to sign outgoing mail, select the Sign messages check box and select a certificate for the signature. A digital signature confirms the authenticity of the sender and indicates that the contents of the message have not been modified during transmission to the recipient. A message signature is available on devices running iOS version 10.3 or later.
- To use the S/MIME protocol to encrypt outgoing mail, select the Encrypt messages by default check box and select a certificate for encryption (public key). Message encryption is available on devices running iOS version 10.3 or later.
- To enable a user to encrypt individual messages, select the Show toggle button for encrypting messages check box. To send encrypted messages, the user must click the
 icon in the Mail app in the To field.
- In the Inbound mail server and Outbound mail server sections, click the Settings button to configure the server connection settings:
- Server address and port: Names of hosts or IP addresses of inbound mail servers and outbound mail servers and server port numbers.
- Account name: Name of the user's account for inbound and outbound mail server authorization.
- Authentication type: Type of user's email account authentication on inbound mail servers and outbound mail servers.
- Password: Account password for authentication on the inbound and outbound mail server protected using the selected authentication method.
- Use one password for incoming and outgoing mail servers: use one password for user authentication on incoming and outgoing mail servers.
- Use SSL connection: usage of the SSL (Secure Sockets Layer) data transport protocol that uses encryption and certificate-based authentication to secure data transmission.
- Click OK.
The new email account appears in the list.
- Click the Apply button to save the changes you have made.
As a result, once the policy is applied, email accounts from the compiled list will be added on the user's mobile device.
Page top
The help for this version of the solution is no longer updated, so it may contain outdated information. For up-to-date information about the solution refer to the Kaspersky Secure Mobility Management 4.1 Help.
Configuring an Exchange mailbox on iOS MDM devices
To enable the iOS MDM device user to use corporate email, calendar, contacts, notes, and tasks, add the user's Exchange ActiveSync account on the Microsoft Exchange server.
By default, an account with the following settings is added on the Microsoft Exchange server:
- Email is synchronized once per week.
- The user can move messages between the user's accounts and synchronize account addresses.
- The user can use any email clients (other than Mail) to use email.
- The SSL connection is not used during transmission of messages.
You can edit the specified settings when adding the Exchange ActiveSync account.
To add the Exchange ActiveSync account of the iOS MDM device user:
- In the console tree, in the Managed devices folder, select the administration group to which the iOS MDM devices belong.
- In the workspace of the group, select the Policies tab.
- Open the policy properties window by double-clicking any column.
Complete the following steps within 15 minutes. Otherwise, you may face an error when saving changes to the policy.
- In the policy Properties window, select the Exchange ActiveSync section.
- Click the Add button in the Exchange ActiveSync accounts section.
The Exchange ActiveSync account window opens on the General tab.
- In the Account name field, enter the account name for authorization on the Microsoft Exchange server. You can use macros from the Macros available drop-down list.
- In the Server address field, enter the network name or IP address of the Microsoft Exchange server.
- To use the SSL (Secure Sockets Layer) data transport protocol to secure the transmission of data, select the Use SSL connection check box.
- In the Domain field, enter the name of the iOS MDM device user's domain. You can use macros from the Macros available drop-down list.
- In the Account User Name field, enter the name of the iOS MDM device user.
If you leave this field blank, Kaspersky Device Management for iOS prompts the user to enter the user name when applying the policy on the iOS MDM device. You can use macros from the Macros available drop-down list.
- In the Email address field, specify the email address of the iOS MDM device user. You can use macros from the Macros available drop-down list.
- In the Password field, enter the password of the Exchange ActiveSync account for authorization on the Microsoft Exchange server.
- Select the Additional tab and configure the additional settings of the Exchange ActiveSync account:
- Number of Days to Sync Mail for <time period>.
- Authentication type.
- Allow movement of messages between accounts.
If you want to prohibit saving, moving, and sharing attachments from a corporate mailbox, clear the Allow movement of messages between accounts, Allow non-managed apps to use documents from managed apps, and Allow managed apps to use documents from non-managed apps check boxes.
- Allow sync of recent addresses.
- Allow use of only Mail app.
- Configure the settings for using the S/MIME protocol in the Mail app. S/MIME is a protocol for transmitting digitally signed encrypted messages.
- To use the S/MIME protocol to sign outgoing mail, select the Sign messages check box and select a certificate for the signature. A digital signature confirms the authenticity of the sender and indicates that the contents of the message have not been modified during transmission to the recipient. A message signature is available on devices running iOS version 10.3 or later.
- To use the S/MIME protocol to encrypt outgoing mail, select the Encrypt messages by default check box and select a certificate for encryption (public key). Message encryption is available on devices running iOS version 10.3 or later.
- To enable a user to encrypt individual messages, select the Show toggle button for encrypting messages check box. To send encrypted messages, the user must click the icon in the Mail app in the To field.
- Click OK.
The new Exchange ActiveSync account appears in the list.
- Click the Apply button to save the changes you have made.
As a result, once the policy is applied, Exchange ActiveSync accounts from the compiled list will be added on the user's mobile device.
Page top
The help for this version of the solution is no longer updated, so it may contain outdated information. For up-to-date information about the solution refer to the Kaspersky Secure Mobility Management 4.1 Help.
Configuring an Exchange mailbox on Android devices (only Samsung)
To work with corporate mail, contacts, and the calendar on the mobile device, you should configure the Exchange mailbox settings (available only on Android 9 and earlier).
Configuration of an Exchange mailbox is possible only for Samsung devices.
To configure an Exchange mailbox on a mobile device:
- In the console tree, in the Managed devices folder, select the administration group to which the Android devices belong.
- In the workspace of the group, select the Policies tab.
- Open the policy properties window by double-clicking any column.
Complete the following steps within 15 minutes. Otherwise, you may face an error when saving changes to the policy.
- In the policy Properties window, select the Manage Samsung KNOX → Manage Samsung devices section.
- In the Exchange ActiveSync window, click the Configure button.
The Exchange mail server settings window opens.
- In the Server address field, enter the IP address or DNS name of the server hosting the mail server.
- In the Domain field, enter the name of the mobile device user's domain on the corporate network.
- In the Synchronization interval drop-down list, select the desired interval for mobile device synchronization with the Microsoft Exchange server.
- To use the SSL (Secure Sockets Layer) data transport protocol, select the Use SSL connection check box.
- To use digital certificates to protect data transfer between the mobile device and the Microsoft Exchange server, select the Verify server certificate check box.
- Click the Apply button to save the changes you have made.
Mobile device settings are changed after the next device synchronization with Kaspersky Security Center.
Page top
The help for this version of the solution is no longer updated, so it may contain outdated information. For up-to-date information about the solution refer to the Kaspersky Secure Mobility Management 4.1 Help.
Configuring device status in Kaspersky Security Center
To configure the device status in Kaspersky Security Center:
- In the console tree, in the Managed devices folder, select the administration group to which the Android devices belong.
- In the workspace of the group, select the Policies tab.
- Open the policy properties window by double-clicking any column.
- In the policy properties window, select the Device information section.
- In the window that opens, select the OK, Critical, or Warning status for each of the following conditions:
- Real-time protection is not running
- Web Protection is not running
- App Control is not running
- Device lock is not available
- Device locate is not available
- The versions of the KSN Statement do not match
- The versions of the Marketing Statement do not match
- Click the OK button.
Complete the following steps within 15 minutes. Otherwise, you may face an error when saving changes to the policy.
The help for this version of the solution is no longer updated, so it may contain outdated information. For up-to-date information about the solution refer to the Kaspersky Secure Mobility Management 4.1 Help.
Managing app configurations
This section provides instructions on how to manage settings and edit configurations of the apps installed on your users' devices.
The help for this version of the solution is no longer updated, so it may contain outdated information. For up-to-date information about the solution refer to the Kaspersky Secure Mobility Management 4.1 Help.
Managing Google Chrome settings
The Google Chrome settings section lets you manage settings of Google Chrome installed in Android work profile or on devices managed via the Kaspersky Endpoint Security for Android app in device owner mode.
To open the Google Chrome settings section:
- In the console tree, in the Managed devices folder, select the administration group to which the Android devices belong.
- In the workspace of the group, select the Policies tab.
- Open the policy properties window by double-clicking any column.
Complete the following steps within 15 minutes. Otherwise, you may face an error when saving changes to the policy.
- In the policy Properties window, select the App configuration > Google Chrome settings section.
Manage content settings
On the Content tab of the Google Chrome settings section, you can specify the following content settings:
- Set default cookie settings
- Allow cookies on these sites
- Block cookies on these sites
- Allow cookies on these sites for one session only
- Set default JavaScript settings
- Allow JavaScript on these sites
- Block JavaScript on these sites
- Set default pop-up settings (based on Google abusive pop-ups database)
- Allow pop-ups on these sites
- Block pop-ups on these sites (based on Google abusive pop-ups database)
- Set user location tracking settings
Manage proxy settings
On the Proxy tab of the Google Chrome settings section, you can specify the following proxy settings:
Manage search settings
On the Search tab of the Google Chrome settings section, you can specify the following search settings:
- New tab URL
- Parameters for search URL that uses POST
- Parameters for suggest URL that uses POST
- Parameters for image URL that uses POST
Manage password settings
On the Passwords tab of the Google Chrome settings section, you can specify the following password settings:
Manage page settings
On the Pages tab of the Google Chrome settings section, you can specify the following page settings:
Manage other settings
On the Other tab of the Google Chrome settings section, you can specify the following settings:
- Enable printing
- Set Google Safe Browsing settings
- Disable saving browser history
- Disable proceeding from Google Safe Browsing warning page
- Enable network prediction
- Set Restricted Mode for YouTube
- Set availability of Incognito mode
- Enable search suggestions
- Set translation settings
- Enable bookmark editing
- Managed bookmarks
- Block access to these URLs
- Allow access to these URLs (exceptions to blocked URLs)
The help for this version of the solution is no longer updated, so it may contain outdated information. For up-to-date information about the solution refer to the Kaspersky Secure Mobility Management 4.1 Help.
Managing Exchange ActiveSync for Gmail
The Exchange ActiveSync section lets you manage Exchange ActiveSync settings for Gmail installed in Android work profile or on devices managed via the Kaspersky Endpoint Security for Android app in device owner mode.
To open the Exchange ActiveSync section:
- In the console tree, in the Managed devices folder, select the administration group to which the Android devices belong.
- In the workspace of the group, select the Policies tab.
- Open the policy properties window by double-clicking any column.
Complete the following steps within 15 minutes. Otherwise, you may face an error when saving changes to the policy.
- In the policy Properties window, select the App configuration > Exchange ActiveSync section.
- Specify the following settings:
- Click the Apply button to save the changes you have made.
Mobile device settings are changed after the next device synchronization with Kaspersky Security Center.
Page top
The help for this version of the solution is no longer updated, so it may contain outdated information. For up-to-date information about the solution refer to the Kaspersky Secure Mobility Management 4.1 Help.
Configuring other apps
The Other apps section lets you configure apps installed on devices managed via the Kaspersky Endpoint Security for Android app in device owner mode or to apps installed in Android work profile.
When configuring some apps, the certificates installed on devices via the Kaspersky Security Center can be used. In this case, you need to specify a certificate alias in the app configuration:
VpnCertfor VPN certificates.MailCertfor mail certificates.SCEP_profile_namefor certificates received by using SCEP.
To configure apps via the Other apps section:
- In the console tree, in the Managed devices folder, select the administration group to which the Android devices belong.
- In the workspace of the group, select the Policies tab.
- Open the policy properties window by double-clicking any column.
Complete the following steps within 15 minutes. Otherwise, you may face an error when saving changes to the policy.
- In the policy Properties window, select the App configuration > Other apps section.
- In the List of apps configurations section, click the Add button.
The Add app configuration window opens.
- In the window that opens, specify the following parameters:
- In the same window, select how to add configuration:
An example of configured basic parameters for the Microsoft Outlook app.
- Click OK to apply the configuration.
The configuration appears in the List of apps configurations.
- Click the Apply button to save the changes you have made.
The configuration is applied. Mobile device settings are changed after the next device synchronization with Kaspersky Security Center.
To change an app configuration:
- In the Other apps section, select the app from the list, and then click the Edit button.
The Edit app configuration window opens.
- In the Edit app configuration window, you can edit a configuration of the selected app:
- To upload a new APK file from your computer, click the Select button.
- To add a new setting to the configuration, click the Add button below all the settings, and then specify the required parameters.
- To delete a setting added manually, click the X button in the upper right corner of the setting's field.
- Click OK to close the Edit app configuration window.
- Click the Apply button to save the changes you have made.
The applied configuration is edited. Mobile device settings are changed after the next device synchronization with Kaspersky Security Center.
To enable or disable the app configuration:
- In the Other apps section, select the app from the list.
- Do either of the following:
- Switch the toggle button to On to enable the configuration.
- Switch the toggle button to Off to disable the configuration.
- Click the Apply button to save the changes you have made.
The applied configuration is edited. Mobile device settings are changed after the next device synchronization with Kaspersky Security Center.
To delete an app configuration:
- In the Other apps section, select the app from the list, and then click the Delete button.
- Click the Apply button to save the changes you have made.
The applied configuration is deleted. Mobile device settings are changed after the next device synchronization with Kaspersky Security Center.
Page top
The help for this version of the solution is no longer updated, so it may contain outdated information. For up-to-date information about the solution refer to the Kaspersky Secure Mobility Management 4.1 Help.
Managing app permissions
The App permission management section lets you configure rules for granting runtime permissions to apps installed on devices managed via the Kaspersky Endpoint Security for Android app in device owner mode or to apps installed in an Android work profile.
You can configure rules for granting runtime permissions by creating or editing configuration files for specific apps.
Permission granting rules configured for specific apps have precedence over the general policy for granting permissions to apps installed on devices or in the Android work profile. For example, if you first select the Deny permissions automatically option in an Android work profile section, and then select the Grant permissions automatically option for a specific app in the App permission management section, the permission for this app will be granted automatically.
To add app permissions:
- In the console tree, in the Managed devices folder, select the administration group to which the Android devices belong.
- In the workspace of the group, select the Policies tab.
- Open the policy properties window by double-clicking any column.
Complete the following steps within 15 minutes. Otherwise, you may face an error when saving changes to the policy.
- In the policy Properties window, select the App permission management section.
- Click the Add button.
The Add permission granting rules window opens.
- Select how to add a configuration with permission granting rules:
- Specify the following parameters:
- Click the Add permission button to open the block of the app permission configuration. You can add several permissions.
Select one of the following permissions.
To configure granting rules for app runtime permissions, you need to select one of the following actions for each permission:
You can save only one granting rule for each app permission.
- Click OK to apply the configuration.
The configuration appears in the List of app permissions.
- Click the Apply button to save your changes.
The configuration with permission granting rules is applied. Mobile device settings are changed after the next device synchronization with Kaspersky Security Center.
To edit app permissions:
- In the console tree, in the Managed devices folder, select the administration group to which the Android devices belong.
- In the workspace of the group, select the Policies tab.
- Open the policy properties window by double-clicking any column.
Complete the following steps within 15 minutes. Otherwise, you may face an error when saving changes to the policy.
- In the policy Properties window, select the App permission management section.
- Select the app in the List of app permissions block, and then click the Edit button.
The Edit permission granting rules window opens.
- Edit the selected permission granting rule as follows:
- To add a new permission to the configuration, click the Add permission button below all the settings, and then select a permission and an action to be performed for this permission.
You can add several permissions.
- To edit an action for an existing permission, select another action in the list.
- To delete a permission that was added manually, click the X button in the upper right corner of the permission's field.
- To add a new permission to the configuration, click the Add permission button below all the settings, and then select a permission and an action to be performed for this permission.
- Click OK to close the Edit permission granting rules window.
- Click the Apply button to save your changes.
The edited configuration with permission granting rules is applied. Mobile device settings are changed after the next device synchronization with Kaspersky Security Center.
To delete app permissions:
- In the console tree, in the Managed devices folder, select the administration group to which the Android devices belong.
- In the workspace of the group, select the Policies tab.
- Open the policy properties window by double-clicking any column.
Complete the following steps within 15 minutes. Otherwise, you may face an error when saving changes to the policy.
- In the policy Properties window, select the App permission management section.
- Select the app from the List of app permissions block, and then click the Delete button.
- Click the Apply button to save your changes.
The configured permissions for the selected app are deleted. Mobile device settings are changed after the next device synchronization with Kaspersky Security Center.
Page top
The help for this version of the solution is no longer updated, so it may contain outdated information. For up-to-date information about the solution refer to the Kaspersky Secure Mobility Management 4.1 Help.
Creating a report on installed mobile apps
The Report on installed mobile apps lets you get the detailed information about the apps installed on users' Android devices, save this information to a file, send it by email, and print it.
To allow the report to display information, the Send data on installed apps check box in the App Control section must be selected and the An app has been installed or removed (list of installed apps) informational event type must be stored in the Administration Server database.
To enable sending data:
- In the console tree, in the Managed devices folder, select the administration group to which the Android devices belong.
- In the workspace of the group, select the Policies tab.
- Open the policy properties window by double-clicking any column.
Complete the following steps within 15 minutes. Otherwise, you may face an error when saving changes to the policy.
- In the policy Properties window, select the App Control section.
- In the Report on installed mobile apps section, select the Send data on installed apps check box.
The following settings are now available:
- Select the Send data on system apps check box to send information about system apps. If a system app is configured in the App Control settings, its data is sent regardless of the state of this check box.
- Select the Send data on service apps check box to send information about service apps without interface. If a service app is configured in the App Control settings, its data is sent regardless of the state of this check box.
- Click the Apply button to apply your changes.
- In the policy Properties window, select the Event Configuration section.
- In the workspace of the section, select the Info tab.
- Open the An app has been installed or removed (list of installed apps) event properties by double-clicking any column.
- In the event's Properties window, select the Store in the Administration Server database for (days) check box and set the storage period. By default, the storage period is 30 days.
After the storage period expires, the Administration Server deletes outdated information from the database. For more information about events, please refer to the Kaspersky Security Center Help.
- Click OK to save your changes.
Sending data is enabled.
To configure a report on installed mobile apps:
- In the console tree, go to the Administration Server folder.
- In the workspace of the Administration Server folder, select the Reports tab.
- In the context menu of the report template named Report on installed mobile apps, select Properties.
- In the window that opens, edit the report template properties:
- In the General section, specify the following parameters:
- Report template name.
- Maximum number of entries to display
- Print version
- In the Fields section, select the fields that will be displayed in the report, and the order of these fields, and configure whether the report should be sorted and filtered by each of the fields.
- In the Group section, change the set of client devices the report is created for.
- In the Hierarchy of Administration Servers section, specify the following parameters:
- In the General section, specify the following parameters:
- Click OK to save your changes.
The updated report template appears in the list of report templates.
To create and view a report on installed mobile apps:
- In the console tree, go to the Administration Server folder.
- In the workspace of the Administration Server folder, select the Reports tab.
- Select the report template named Report on installed mobile apps by double-clicking any column.
The report on installed mobile apps opens.
This report displays the following data:
For more information about using reports, managing custom report templates, using report templates to generate new reports, and creating report delivery tasks, please refer to the Kaspersky Security Center Help.
Page top
The help for this version of the solution is no longer updated, so it may contain outdated information. For up-to-date information about the solution refer to the Kaspersky Secure Mobility Management 4.1 Help.
Installing root certificates on Android devices
A root certificate is a public key certificate issued by a trusted certificate authority (CA). Root certificates are used to verify custom certificates and guarantee their identity.
Kaspersky Security Center lets you add root certificates to be installed on Android devices to a trusted certificate store.
These certificates are installed on user devices as follows:
- On devices operating in device owner mode, the certificates are installed automatically.
If you delete a root certificate in policy settings, it will also be automatically deleted on the device during the next synchronization with the Administration Server.
- On personal devices (not operating in device owner mode):
- If a work profile was not created, the device user is prompted to install each certificate manually in a personal profile by following the instructions in the notification.
- If a work profile was created, the certificates are installed automatically to this profile. If the Duplicate installation of root certificates in personal profile check box is selected in work profile settings, the certificates can also be installed in a personal profile. The device user is prompted to do this manually by following the instructions in the notification.
If you delete a root certificate in policy settings, it will also be automatically deleted on the device during the next synchronization with the Administration Server.
For instructions on how to install certificates in personal profiles, please refer to Installing root certificates on the device.
To add a root certificate in Kaspersky Security Center:
- In the console tree, in the Managed devices folder, select the administration group to which the Android devices belong.
- In the workspace of the group, select the Policies tab.
- Open the policy properties window by double-clicking any column.
Complete the following steps within 15 minutes. Otherwise, you may face an error when saving changes to the policy.
- In the policy Properties window, select the Root certificates section.
- In the Root certificates section, click Add.
The file explorer opens.
- Select a certificate file (.cer, .pem, or .key) and click Open.
The Certificate window opens.
- View the certificate information and click Install Certificate.
This starts the standard Certificate Import Wizard.
- Follow the wizard's instructions.
After the wizard is finished, the root certificate appears in the list of certificates.
- Click the Apply button to save the changes you have made.
Mobile device settings are configured after the next device synchronization with the Kaspersky Security Center.
Page top
The help for this version of the solution is no longer updated, so it may contain outdated information. For up-to-date information about the solution refer to the Kaspersky Secure Mobility Management 4.1 Help.
Configuring notifications for Kaspersky Endpoint Security for Android
If you do not want the mobile device user to be distracted by Kaspersky Endpoint Security for Android notifications, you can disable certain notifications.
The Kaspersky Endpoint Security uses the following tools to display the device protection status:
- Protection status notification. This notification is pinned to the notification bar. Protection status notification cannot be removed. The notification displays the device protection status (for example,
 ) and number of issues, if any. You can tap the device protection status and see the list issues in the app.
 - App notifications. These notifications inform the device user about the application (for example, threat detection).
- Pop-up messages. Pop-up messages require action from the device user (for example, action to take when a threat is detected).
All Kaspersky Endpoint Security for Android notifications are enabled by default.
On Android 13, the device user should grant permission to send notifications during the Initial Configuration Wizard or later.
An Android device user can disable all notifications from Kaspersky Endpoint Security for Android in the settings on the notification bar. If notifications are disabled, the user does not monitor the operation of the app and can ignore important information (for example, information about failures during device synchronization with Kaspersky Security Center). In this case, to find out the app operating status, the user must open Kaspersky Endpoint Security for Android.
To configure the display of notifications about the operation of Kaspersky Endpoint Security for Android:
- In the console tree, in the Managed devices folder, select the administration group to which the Android devices belong.
- In the workspace of the group, select the Policies tab.
- Open the policy properties window by double-clicking any column.
Complete the following steps within 15 minutes. Otherwise, you may face an error when saving changes to the policy.
- In the policy Properties window, select the Additional section.
- In the App notifications section, click the Configure button.
The Device notification settings window opens.
- Select the Kaspersky Endpoint Security for Android issues that you want to hide on the user's mobile device and click the OK button.
The Kaspersky Endpoint Security for Android will not display issues in the protection status notification. The Kaspersky Endpoint Security for Android will continue to display protection status notification and app notifications.
Certain Kaspersky Endpoint Security for Android issues are mandatory and impossible to disable (such as issues about license expiration).
- To hide all notifications and pop-up messages, select the Disable notifications and pop-ups when app is background mode.
Kaspersky Endpoint Security for Android will display the protection status notification only. The notification displays device protection status (for example,
) and number of issues. Also the app display notifications when user is working with the app (the user updates anti-malware databases manually, for example).Kaspersky experts recommended that you enable notifications and pop-up messages. If you disable notifications and pop-up messages when the app is in background mode, the app will not warn users about threats in real time. Mobile device users can learn about the device protection status only when they open the app.
- Click the Apply button to save the changes you have made.
Mobile device settings are changed after the next device synchronization with Kaspersky Security Center. The Kaspersky Endpoint Security for Android notifications that you disable will not be displayed on the user's mobile device.
Page top
The help for this version of the solution is no longer updated, so it may contain outdated information. For up-to-date information about the solution refer to the Kaspersky Secure Mobility Management 4.1 Help.
Key features of mobile device management in MMC-based Administration Console
Kaspersky Secure Mobility Management provides the following features:
- Connecting Android devices to Kaspersky Security Center by distributing email messages with a link and a QR code to download the Kaspersky Endpoint Security for Android app from Google Play, or by using the app installation package to download from Kaspersky Security Center server.
- Connecting iOS devices to Kaspersky Security Center by distributing email messages with a link and a QR code to download the iOS MDM profile from the iOS MDM Server.
- Remote connection of mobile devices to Kaspersky Security Center and other third-party EMM systems (for example, VMWare AirWatch, MobileIron, IBM Maas360, Microsoft Intune, SOTI MobiControl).
- Remote configuration of the Kaspersky Endpoint Security for Android app, as well as remote configuration of services, apps, and functions of Android devices.
- Remote configuration of mobile devices in accordance with the corporate security requirements.
- Detection and neutralization of threats on mobile devices (Anti-Malware).
- Prevention of leakage of corporate information stored on mobile devices, in case they are lost or stolen (Anti-Theft).
- Control of internet use on mobile devices (Web Protection).
- Control of app installation and removal (App Control).
- Control of compliance with corporate security requirements (Compliance Control).
- Setup of corporate mail on mobile devices, including organizations with a Microsoft Exchange mail server deployed in the company (only for iOS and Samsung devices).
- Configuration of the corporate network (Wi-Fi, VPN) allowing VPN to be used on mobile devices. VPN can be configured only on iOS and Samsung devices.
- Configuration of the mobile device status to be displayed in Kaspersky Security Center when policy rules are violated: Critical, Warning, OK.
- Setup of notifications shown to the user in the Kaspersky Endpoint Security for Android app.
- Configuration of settings on devices supporting Samsung KNOX 2.6 or later.
- Configuration of settings on devices supporting Android work profiles.
- Configuration of settings of Android mobile devices in device owner mode.
- Deployment of the Kaspersky Endpoint Security for Android app through the Samsung KNOX Mobile Enrollment console. Samsung KNOX Mobile Enrollment is intended for batch installation and initial configuration of apps on Samsung devices purchased from official vendors.
- Management of group security policies for mobile devices.
- An upgrade of the Kaspersky Endpoint Security for Android app to the specified version can be performed by using Kaspersky Security Center policies.
- Administrator notifications about the status and events of the Kaspersky Endpoint Security for Android app can be communicated in Kaspersky Security Center or by email.
- Change Control for policy settings (revision history).
- Commands for remote mobile device management. For example, if a mobile device is lost or stolen, you can send commands to locate the device or wipe all corporate data from the device.
- Configuration of screen unlock password settings for mobile devices.
- Configuration of Wi-Fi network settings for mobile devices.
- Adding web clips to open websites from the Home screen of mobile devices.
Kaspersky Secure Mobility Management includes the following protection and management components:
- For Android devices:
- Anti-Malware
- Anti-Theft
- Web Protection
- App Control
- Compliance Control
- For iOS devices:
- Password protection
- Network management
- Web Protection
- Applications restrictions
- Feature restrictions
- Compliance Control
The help for this version of the solution is no longer updated, so it may contain outdated information. For up-to-date information about the solution refer to the Kaspersky Secure Mobility Management 4.1 Help.
Connecting iOS MDM devices to AirPlay
Configure the connection to AirPlay devices to enable streaming of music, photos, and videos from the iOS MDM device to AirPlay devices. To be able to use AirPlay technology, the mobile device and AirPlay devices must be connected to the same wireless network. AirPlay devices include Apple TV devices (of the second and third generations), AirPort Express devices, speakers or radio sets with AirPlay support.
Automatic connection to AirPlay devices is available for controlled devices only.
To configure the connection of an iOS MDM device to AirPlay devices:
- In the console tree, in the Managed devices folder, select the administration group to which the iOS MDM devices belong.
- In the workspace of the group, select the Policies tab.
- Open the policy properties window by double-clicking any column.
Complete the following steps within 15 minutes. Otherwise, you may face an error when saving changes to the policy.
- In the policy Properties window, select the AirPlay section.
- In the AirPlay devices section, select the Apply settings on device check box.
- Click the Add button in the Passwords section.
An empty row is added in the password table.
- In the Device name column, enter the name of the AirPlay device on the wireless network.
- In the Password column, enter the password to the AirPlay device.
- To restrict access of iOS MDM devices to AirPlay devices, create a list of allowed devices in the Allowed devices (supervised only) section. To do so, add the MAC addresses of AirPlay devices to the list of allowed devices.
Access to AirPlay devices that are not on the list of allowed devices is blocked. If the list of allowed devices is left blank, Kaspersky Device Management for iOS will allow access to all AirPlay devices.
- Click the Apply button to save the changes you have made.
As a result, once the policy is applied, the user's mobile device will automatically connect to AirPlay devices to stream media content.
Page top
The help for this version of the solution is no longer updated, so it may contain outdated information. For up-to-date information about the solution refer to the Kaspersky Secure Mobility Management 4.1 Help.
Connecting iOS MDM devices to AirPrint
To enable printing of documents from the iOS MDM device wirelessly using AirPrint technology, configure automatic connection to AirPrint printers. The mobile device and printer must be connected to the same wireless network. Shared access for all users has to be configured on the AirPrint printer.
To configure the connection of an iOS MDM device to an AirPrint printer:
- In the console tree, in the Managed devices folder, select the administration group to which the iOS MDM devices belong.
- In the workspace of the group, select the Policies tab.
- Open the policy properties window by double-clicking any column.
Complete the following steps within 15 minutes. Otherwise, you may face an error when saving changes to the policy.
- In the policy Properties window, select the AirPrint section.
- Click the Add button in the AirPrint printers section.
The Printer window opens.
- In the IP address field, enter the IP address of the AirPrint printer.
- In the Resource Path field, enter the path to the AirPrint printer.
The path to the printer corresponds to the rp (resource path) key of the Bonjour protocol. For example:
- printers/Canon_MG5300_series
- ipp/print
- Epson_IPP_Printer
- Click OK.
The newly added AirPrint printer appears on the list.
- Click the Apply button to save the changes you have made.
As a result, once the policy is applied, the mobile device user can wirelessly print documents on the AirPrint printer.
Page top
The help for this version of the solution is no longer updated, so it may contain outdated information. For up-to-date information about the solution refer to the Kaspersky Secure Mobility Management 4.1 Help.
Bypassing the Activation Lock on supervised iOS devices
Activation Lock is an iOS feature that is designed to prevent others from using a lost or stolen iOS device or reactivating it without an owner's permission. Kaspersky Security Center allows to bypass the Activation Lock on supervised iOS devices without entering Apple ID and user's password by using a bypass code.
A bypass code is generated when an iOS device is connected to Kaspersky Security Center and becomes supervised.
To disable Activation Lock using a bypass code:
- In the console tree, select Mobile Device Management → Mobile devices.
- In the list of devices, select the device for which you need to view the bypass code by double-clicking.
The properties window of the selected device opens.
- In the properties window of the selected device, select the Advanced iOS MDM settings tab.
- On the Advanced iOS MDM settings tab, click the crossed-out eye icon next to the Bypass code for Activation Lock (supervised only) option.
The bypass code for Activation Lock is displayed.
- On the Activation Lock screen of the supervised iOS device, enter the bypass code in the Apple ID password field. Leave the username field empty.
Activation Lock is disabled on the device.
The help for this version of the solution is no longer updated, so it may contain outdated information. For up-to-date information about the solution refer to the Kaspersky Secure Mobility Management 4.1 Help.
Configuring the Access Point Name (APN)
To connect a mobile device to data transfer services on a mobile network, you should configure the APN (Access Point Name) settings.
The help for this version of the solution is no longer updated, so it may contain outdated information. For up-to-date information about the solution refer to the Kaspersky Secure Mobility Management 4.1 Help.
Configuring APN on Android devices (only Samsung)
Configuration of APN is possible only for Samsung devices.
A SIM card must be inserted to be able to use an access point on the user's mobile device. Access point settings are provided by the mobile telephony operator. Incorrect access point settings may result in additional mobile telephony charges.
To configure the Access Point Name (APN) settings:
- In the console tree, in the Managed devices folder, select the administration group to which the Android devices belong.
- In the workspace of the group, select the Policies tab.
- Open the policy properties window by double-clicking any column.
Complete the following steps within 15 minutes. Otherwise, you may face an error when saving changes to the policy.
- In the policy Properties window, select the Manage Samsung KNOX → APN section.
- In the APN section, click the Configure button.
The APN settings window opens.
- On the General tab, specify the following access point settings:
- In the APN type drop-down list, select the type of access point.
- In the APN name field, specify the name of the access point.
- In the MCC field, enter the mobile country code (MCC).
- In the MNC field, enter the mobile network code (MNC).
- If you have selected MMS or Internet and MMS as the type of access point, specify the following additional MMS settings:
- In the MMS server field, specify the full domain name of the mobile carrier's server used for MMS exchange.
- In the MMS proxy server field, specify the network name or IP address of the proxy server and the port number of the mobile carrier's server used for MMS exchange.
- On the Additional tab, configure the additional settings of the Access Point Name (APN):
- In the Authentication type drop-down list, select the type of mobile device user's authentication on the mobile carrier's server for network access.
- In the Server address field, specify the network name of the mobile carrier's server through which data transmission services are accessed.
- In the Proxy server address field, specify the network name or IP address and port number of the mobile carrier's proxy server for network access.
- In the User name field, enter the user name for authorization on the mobile network.
- In the Password field, enter the password for user authorization on the mobile network.
- Click the Apply button to save the changes you have made.
Mobile device settings are changed after the next device synchronization with Kaspersky Security Center.
Page top
The help for this version of the solution is no longer updated, so it may contain outdated information. For up-to-date information about the solution refer to the Kaspersky Secure Mobility Management 4.1 Help.
Configuring APN on iOS MDM devices
The Access Point Name (APN) has to be configured in order to enable the mobile network data transmission service on the user's iOS MDM device.
The APN section is out of date. It is recommended to configure APN settings in the Cellular communications section. Before configuring cellular communication settings, make sure that the settings of the APN section have not been applied on the device (the Apply settings on device check box is cleared). The settings of the APN and Cellular communications sections cannot be used concurrently.
To configure an access point on a user's iOS MDM device:
- In the console tree, in the Managed devices folder, select the administration group to which the iOS MDM devices belong.
- In the workspace of the group, select the Policies tab.
- Open the policy properties window by double-clicking any column.
Complete the following steps within 15 minutes. Otherwise, you may face an error when saving changes to the policy.
- In the policy Properties window, select the Cellular communications section.
- In the Cellular communication settings section, select the Apply settings on device check box.
- In the APN type list, select the type of access point for data transfer on a GPRS/3G/4G mobile network:
- Built-in APN – configuration of cellular communication settings for data transfer via a mobile network operator that supports operation with a built-in Apple SIM. For more details about devices with a built-in Apple SIM, please visit the Apple Technical Support website.
- APN – configuration of cellular communication settings for data transfer via the mobile network operator of the inserted SIM card.
- Built-in APN and APN – configuration of cellular communication settings for data transfer via the mobile network operators of the inserted SIM card and the built-in Apple SIM. For more details about devices with a built-in Apple SIM and a SIM card slot, please visit the Apple Technical Support website.
- In the APN name field, specify the name of the access point.
- In the Authentication type drop-down list, select the type of device user authentication on the mobile operator's server for network access (internet and MMS):
- In the User name field, enter the user name for authorization on the mobile network.
- In the Password field, enter the password for user authorization on the mobile network.
- In the Proxy server address and port field, enter the name of a host or the IP address of a proxy server and the number of the proxy server port.
- Click the Apply button to save the changes you have made.
As a result, the access point name (APN) is configured on the user's mobile device after the policy is applied.
Page top
The help for this version of the solution is no longer updated, so it may contain outdated information. For up-to-date information about the solution refer to the Kaspersky Secure Mobility Management 4.1 Help.
Configuring the Android work profile
This section contains information about working with an Android work profile.
The help for this version of the solution is no longer updated, so it may contain outdated information. For up-to-date information about the solution refer to the Kaspersky Secure Mobility Management 4.1 Help.
About Android work profile
Android Enterprise is a platform for managing the corporate mobile infrastructure, which provides company employees with a work environment in which they can use mobile devices. For details on using Android Enterprise, see the Google support website.
You can create the Android work profile (hereinafter also "work profile") on the user's mobile device. Android work profile is a safe environment on the user's device in which the administrator can manage apps and user accounts without restricting the user's use of his/her own data. When a work profile is created on the user's mobile device, the following corporate apps are automatically installed to it: Google Play Market, Google Chrome, Downloads, Kaspersky Endpoint Security for Android, and others. Corporate apps installed in the work profile and notifications of these apps are marked with a  icon. You have to create a separate Google corporate account for the Google Play Market app. Apps installed in the work profile appear in the common list of apps.
The help for this version of the solution is no longer updated, so it may contain outdated information. For up-to-date information about the solution refer to the Kaspersky Secure Mobility Management 4.1 Help.
Configuring the work profile
To configure the settings of the Android work profile:
- In the console tree, in the Managed devices folder, select the administration group to which the Android devices belong.
- In the workspace of the group, select the Policies tab.
- Open the policy properties window by double-clicking any column.
Complete the following steps within 15 minutes. Otherwise, you may face an error when saving changes to the policy.
- In the policy Properties window, select the Android work profile.
- In the Android work profile workspace, select the Create work profile check box.
- Specify the work profile settings:
- On the General tab, specify the data sharing, contact, and other settings:
- Settings in the Data access and sharing section:
- Prohibit personal profile apps to share data with work profile apps
- Prohibit work profile apps to share data with personal profile apps
- Prohibit work profile apps to access files in personal profile
- Prohibit personal profile apps to access files in work profile
- Prohibit use of clipboard content across personal and work profiles
- Prohibit activation of USB debugging mode
- Prohibit the user to add and remove accounts in work profile
- Prohibit screen sharing, recording, and screenshots in work profile apps
- Settings in the Contacts section:
- Settings in the Data access and sharing section:
- On the Apps tab, specify the following settings:
- Enable App Control in Work profile only
- Enable Web Protection in work profile only
For Samsung Internet Browser, HUAWEI Browser, and Yandex Browser, leave the Enable Web Protection in work profile only check box unselected. These browsers do not allow you to enable Web Protection only in the work profile. If you select this check box, Web Protection in these browsers will not work.
You can specify website access settings (create a list of blocked website categories or a list of allowed websites) in the Web Protection section.
- Prohibit installation of apps in the work profile from unknown sources
- Prohibit removal of apps from work profile
- Prohibit display of notifications from work profile apps when screen is locked
- Prohibit use of camera for work profile apps
- Granting runtime permissions for work profile apps
- Adding widgets of work profile apps to device home screen
- On the Certificates tab, you can configure the following settings:
- On the Password tab, specify work profile password settings:
- Require to set password for work profile
- Minimum number of characters
- Minimum password complexity requirements (Android 12 or earlier)
- Maximum number of incorrect password attempts before deletion of work profile
- Maximum password age, in days
- Number of days to notify that a password change is required
- Number of recent passwords that can't be used as a new password
- The period of inactivity before the device screen locks, in seconds
- Period after unlocking by biometric methods before entering a password, in minutes (Android 8.0 or later)
- Allow biometric unlock methods (Android 9+)
- Allow use of fingerprints
- Allow face scanning (Android 9 or later)
- Allow iris scanning (Android 9 or later)
- On the Passcode tab, specify the one-time passcode settings. The user will be prompted to enter the one-time passcode to unlock their work profile if it was locked.
- On the General tab, specify the data sharing, contact, and other settings:
- To configure work profile settings on the user's mobile device, block changes to settings.
- Click the Apply button to save the changes you have made.
Mobile device settings are changed after the next device synchronization with Kaspersky Security Center. The space of the user's mobile device is divided into a work profile and a personal profile.
Page top
The help for this version of the solution is no longer updated, so it may contain outdated information. For up-to-date information about the solution refer to the Kaspersky Secure Mobility Management 4.1 Help.
Unlocking the work profile
The work profile can be locked if the device does not meet the Compliance Control security requirements.
To unlock the work profile, the user of the mobile device must enter a one-time work profile passcode on the locked screen. The passcode is generated by MMC-based Administration Console and is unique for each mobile device. When the device work profile is unlocked, the work profile password is set to default value (1234).
As an administrator, you can view the passcode in the policy settings, which are applied to the mobile device. The length of the passcode can be changed (4, 8, 12 or 16 digits).
To unlock the mobile device using the one-time passcode:
- In the console tree, select Mobile Device Management → Mobile devices.
- Select the mobile device for which you want to get the one-time passcode.
- Open the mobile device properties window.
- Select Apps → Kaspersky Endpoint Security for Android.
- Open the Kaspersky Endpoint Security properties window.
- Select the Android work profile section.
The passcode for the selected device is shown on the Passcode tab in the Passcode field.
Use any available method (such as email) to communicate the one-time passcode to the user.
The user should enter the received one-time passcode on their device.
After the work profile on a device is locked, the history of work profile passwords is cleared. It means that the user can specify one of the recent passwords, regardless of the work profile password settings.
Page top
The help for this version of the solution is no longer updated, so it may contain outdated information. For up-to-date information about the solution refer to the Kaspersky Secure Mobility Management 4.1 Help.
Adding an LDAP account
To enable the iOS MDM device user to access corporate contacts on the LDAP server, add the LDAP account.
To add the LDAP account of the iOS MDM device user:
- In the console tree, in the Managed devices folder, select the administration group to which the iOS MDM devices belong.
- In the workspace of the group, select the Policies tab.
- Open the policy properties window by double-clicking any column.
Complete the following steps within 15 minutes. Otherwise, you may face an error when saving changes to the policy.
- In the policy Properties window, select the LDAP section.
- Click the Add button in the LDAP accounts section.
The LDAP account window opens.
- In the Description field, enter a description of the user's LDAP account. You can use macros from the Macros available drop-down list.
- In the Account name field, enter the account name for authorization on the LDAP server. You can use macros from the Macros available drop-down list.
- In the Password field, enter the password of the LDAP account for authorization on the LDAP server.
- In the Server address field, enter the name of the LDAP server domain. You can use macros from the Macros available drop-down list.
- To use the SSL (Secure Sockets Layer) data transport protocol to secure the transmission of messages, select the Use SSL connection check box.
- Compile a list of search queries for the iOS MDM device user access to corporate data on the LDAP server:
- Click the Add button in the Search settings section.
A blank row appears in the table with search queries.
- In the Name column, enter the name of a search query.
- In the Search scope column, select the nesting level of the folder for the corporate data search on the LDAP server:
- Base – search in the base folder of the LDAP server.
- One level – search in folders on the first nesting level counting from the base folder.
- Subtree – search in folders on all nesting levels counting from the base folder.
- In the Search base column, enter the path to the folder on the LDAP server with which the search begins (for example: "ou=people", "o=example corp").
- Repeat steps a-d for all search queries that you want to add to the iOS MDM device.
- Click the Add button in the Search settings section.
- Click OK.
The new LDAP account appears in the list.
- Click the Apply button to save the changes you have made.
As a result, once the policy is applied, LDAP accounts from the compiled list will be added on the user's mobile device. The user can access corporate contacts in the standard iOS apps: Contacts, Messages, and Mail.
Page top
The help for this version of the solution is no longer updated, so it may contain outdated information. For up-to-date information about the solution refer to the Kaspersky Secure Mobility Management 4.1 Help.
Adding a calendar account
To enable the iOS MDM device user to access the user's calendar events on the CalDAV server, add the CalDAV account. Synchronization with the CalDAV server enables the user to create and receive invitations, receive event updates, and synchronize tasks with the Reminders app.
To add the CalDAV account of the iOS MDM device user:
- In the console tree, in the Managed devices folder, select the administration group to which the iOS MDM devices belong.
- In the workspace of the group, select the Policies tab.
- Open the policy properties window by double-clicking any column.
Complete the following steps within 15 minutes. Otherwise, you may face an error when saving changes to the policy.
- In the policy Properties window, select the Calendar section.
- Click the Add button in the CalDAV accounts section.
The CalDAV account window opens.
- In the Description field, enter a description of the user's CalDAV account.
- In the Server address and port field, enter the name of a host or the IP address of a CalDAV server and the number of the CalDAV server port.
- In the Main URL field, specify the URL of the CalDAV account of the iOS MDM device user on the CalDAV server (for example: http://example.com/caldav/users/mycompany/user).
The URL should begin with
"http://"or"https://". - In the Account name field, enter the account name for authorization on the CalDAV server.
- In the Password field, set the CalDAV account password for authorization on the CalDAV server.
- To use the SSL (Secure Sockets Layer) data transport protocol to secure the transmission of event data between the CalDAV server and the mobile device, select the Use SSL connection check box.
- Click OK.
The new CalDAV account appears in the list.
- Click the Apply button to save the changes you have made.
As a result, once the policy is applied, CalDAV accounts from the compiled list will be added on the user's mobile device.
Page top
The help for this version of the solution is no longer updated, so it may contain outdated information. For up-to-date information about the solution refer to the Kaspersky Secure Mobility Management 4.1 Help.
Adding a contacts account
To enable the iOS MDM device user to synchronize data with the CardDAV server, add the CardDAV account. Synchronization with the CardDAV server enables the user to access the contact details from any device.
To add the CardDAV account of the iOS MDM device user:
- In the console tree, in the Managed devices folder, select the administration group to which the iOS MDM devices belong.
- In the workspace of the group, select the Policies tab.
- Open the policy properties window by double-clicking any column.
Complete the following steps within 15 minutes. Otherwise, you may face an error when saving changes to the policy.
- In the policy Properties window, select the Contacts section.
- Click the Add button in the CardDAV accounts section.
The CardDAV account window opens.
- In the Description field, enter a description of the user's CardDAV account. You can use macros from the Macros available drop-down list.
- In the Server address and port field, enter the name of a host or the IP address of a CardDAV server and the number of the CardDAV server port.
- In the Main URL field, specify the URL of the CardDAV account of the iOS MDM device user on the CardDAV server (for example: http://example.com/carddav/users/mycompany/user).
The URL should begin with
"http://"or"https://". - In the Account name field, enter the account name for authorization on the CardDAV server. You can use macros from the Macros available drop-down list.
- In the Password field, set the CardDAV account password for authorization on the CardDAV server.
- To use the SSL (Secure Sockets Layer) data transport protocol to secure the transmission of contacts between the CardDAV server and the mobile device, select the Use SSL connection check box.
- Click OK.
The new CardDAV account appears in the list.
- Click the Apply button to save the changes you have made.
As a result, once the policy is applied, CardDAV accounts from the compiled list will be added on the user's mobile device.
Page top
The help for this version of the solution is no longer updated, so it may contain outdated information. For up-to-date information about the solution refer to the Kaspersky Secure Mobility Management 4.1 Help.
Configuring calendar subscription
To enable the iOS MDM device user to add events of shared calendars (such as the corporate calendar) to the user's calendar, add subscription to this calendar. Shared calendars are calendars of other users who have a CalDAV account, iCal calendars, and other openly published calendars.
To add calendar subscription:
- In the console tree, in the Managed devices folder, select the administration group to which the iOS MDM devices belong.
- In the workspace of the group, select the Policies tab.
- Open the policy properties window by double-clicking any column.
Complete the following steps within 15 minutes. Otherwise, you may face an error when saving changes to the policy.
- In the policy Properties window, select the Calendar subscription section.
- Click the Add button in the Calendar subscriptions section.
The Calendar Subscription window opens.
- In the Description field, enter a description of the calendar subscription.
- In the Server web address field, specify the URL of the third-party calendar.
In this field, you can enter the mail URL of the CalDAV account of the user to whose calendar you are subscribing. You can also specify the URL of an iCal calendar or a different openly published calendar.
- In the User name field, enter the user account name for authentication on the server of the third-party calendar.
- In the Password field, enter the calendar subscription password for authentication on the server of the third-party calendar.
- To use the SSL (Secure Sockets Layer) data transport protocol to secure the transmission of event data between the CalDAV server and the mobile device, select the Use SSL connection check box.
- Click OK.
The new calendar subscription appears in the list.
- Click the Apply button to save the changes you have made.
As a result, once the policy is applied, events from shared calendar on the list will be added to the calendar on the user's mobile device.
Page top
The help for this version of the solution is no longer updated, so it may contain outdated information. For up-to-date information about the solution refer to the Kaspersky Secure Mobility Management 4.1 Help.
Managing web clips
A web clip is an app that opens a website from the Home screen of the mobile device. By clicking web clip icons on the home screen of the device, the user can quickly open websites (such as the corporate website).
You can add or delete web clips on user devices and specify web clip icons displayed on the screen.
Managing web clips on Android devices
To manage web clips on a user's Android device:
- In the console tree, in the Managed devices folder, select the administration group to which the Android devices belong.
- In the workspace of the group, select the Policies tab.
- Open the policy properties window by double-clicking any column.
Complete the following steps within 15 minutes. Otherwise, you may face an error when saving changes to the policy.
- In the policy Properties window, select the Device management section.
- In the Adding web clips to device home screen section, do any of the following:
- To add a web clip:
- Click the Add button.
The Add web clip window opens.
- In the Name field, enter the name of the web clip to be displayed on the home screen of the Android device.
- In the URL field, enter the web address of the website that will open when the web clip icon is clicked. The address should begin with "http://" or "https://".
- In the Icon field, specify the image for the web clip icon: click Browse... and select an image file. The PNG and JPEG file formats are supported. If you do not select an image for the web clip, a blank square is displayed as the icon.
- Click OK.
The new web clip appears in the list.
The maximum number of web clips that can be added to an Android device depends on the device type. When this number is reached, web clips are no longer added to the Android device.
- Click the Add button.
- To edit a web clip:
- Select the web clip that you want to edit, and then click Edit.
The Add web clip window opens.
- Define the new settings of the web clip, as described earlier in this section.
- Click OK.
- Select the web clip that you want to edit, and then click Edit.
- To delete a web clip:
- Select the web clip that you want to delete, and then click Delete.
The web clip disappears from the list.
- Select the web clip that you want to delete, and then click Delete.
- To add a web clip:
- Click the Apply button to save the changes you have made.
Once the policy is applied to a device, the Kaspersky Endpoint Security for Android app shows notifications to prompt the user to install the web clips you created. After the user installs these web clips, the corresponding icons are added on the home screen of the device.
The deleted web clips are disabled on the home screen of the Android device. If the user taps the corresponding icon, a notification appears that the web clip is no longer available. The user should delete the web clip from the home screen by following a vendor-specific procedure.
Managing web clips on iOS MDM devices
By default, the following restrictions on web clip usage apply:
- The user cannot manually remove web clips from the mobile device.
- Websites that open when the user clicks a web clip icon do not open in full-screen mode.
- The corner rounding, shadow, and gloss visual effects are applied to the web clip icon on the screen.
To manage web clips on a user's iOS MDM device:
- In the console tree, in the Managed devices folder, select the administration group to which the iOS MDM devices belong.
- In the workspace of the group, select the Policies tab.
- Open the policy properties window by double-clicking any column.
Complete the following steps within 15 minutes. Otherwise, you may face an error when saving changes to the policy.
- In the policy Properties window, select the Web Clip section.
- In the Web Clip section, do any of the following:
- To add a web clip:
- Click the Add button.
The Web Clip window opens.
- In the Name field, enter the name of the web clip to be displayed on the home screen of the iOS MDM device.
- In the URL field, enter the web address of the website that will open when the web clip icon is clicked. The address should begin with
"http://"or"https://". - To allow the user to remove a web clip from the iOS MDM device, select the Allow removal check box.
- Click Select and specify the file with the image for the web clip icon that will be displayed on the home screen of the iOS MDM device.
The image must meet the following requirements:
- Image size no greater than 400 х 400 pixels.
- File format: GIF, JPEG, or PNG.
- File size no greater than 1 MB.
The web clip icon is available for preview in the Icon field. If you do not select an image for the web clip, a blank square is displayed as the icon.
If you want the web clip icon to be displayed without special visual effects (rounding of icon corners and gloss effect), select the Precomposed icon check box.
- If you want the website to open in full-screen mode on the iOS MDM device when you click the icon, select the Full screen Web Clip check box.
In full-screen mode, the Safari toolbar is hidden and only the website is shown on the device screen.
- Click OK.
The new web clip appears in the list.
- Click the Add button.
- To edit a web clip:
- Select the web clip that you want to edit, and then click Edit.
The Web Clip window opens.
- Define the new settings of the web clip, as described earlier in this section.
- Click OK.
- Select the web clip that you want to edit, and then click Edit.
- To delete a web clip:
- Select the web clip that you want to delete, and then click Delete.
The web clip disappears from the list.
- Select the web clip that you want to delete, and then click Delete.
- To add a web clip:
- Click the Apply button to save the changes you have made.
Once the policy is applied, the web clip icons from the list you have created are added on the home screen of the user's mobile device.
The deleted web clips are removed from the home screen of the iOS MDM device.
Page top
The help for this version of the solution is no longer updated, so it may contain outdated information. For up-to-date information about the solution refer to the Kaspersky Secure Mobility Management 4.1 Help.
Setting wallpaper
You can set the same image as a wallpaper for a home screen and a lock screen on your users' devices that fall under the same policy.
To set a wallpaper on your users' Android devices:
- In the console tree, in the Managed devices folder, select the administration group to which the Android devices belong.
- In the workspace of the group, select the Policies tab.
- Open the policy properties window by double-clicking any column.
Complete the following steps within 15 minutes. Otherwise, you may face an error when saving changes to the policy.
- In the policy Properties window, select the Device management section.
- In the Setting wallpaper for home screen and lock screen section, click Set.
The Setting wallpaper window opens.
- In the How to set wallpaper drop-down list, select the way of setting a wallpaper:
- Once the image is imported, you can preview it in the Setting wallpaper window.
- If you want to use the same image as a wallpaper for a lock screen, select the Use the same image for lock screen check box. Otherwise, the image is used only as a home screen wallpaper.
The check box is cleared by default.
- Click the OK button to save the changes you have made.
The imported image is set as a wallpaper on users' devices.
Page top
The help for this version of the solution is no longer updated, so it may contain outdated information. For up-to-date information about the solution refer to the Kaspersky Secure Mobility Management 4.1 Help.
Adding fonts
To add a font on a user's iOS MDM device:
- In the console tree, in the Managed devices folder, select the administration group to which the iOS MDM devices belong.
- In the workspace of the group, select the Policies tab.
- Open the policy properties window by double-clicking any column.
Complete the following steps within 15 minutes. Otherwise, you may face an error when saving changes to the policy.
- In the policy Properties window, select the Fonts section.
- Click the Add button in the Fonts section.
The Font window opens.
- In the File name field, specify the path to the font file (a file with the .ttf or .otf extension).
Fonts with the ttc or otc extension are not supported.
Fonts are identified using the PostScript name. Do not install fonts with the same PostScript name even if their content is different. Installing fonts with the same PostScript name will result in an undefined error.
- Click Open.
The new font appears in the list.
- Click the Apply button to save the changes you have made.
As a result, once the policy is applied, the user will be prompted to install fonts from the list that has been created.
Page top
The help for this version of the solution is no longer updated, so it may contain outdated information. For up-to-date information about the solution refer to the Kaspersky Secure Mobility Management 4.1 Help.
Working with commands for mobile devices
This section contains information about commands for managing mobile devices supported by Kaspersky Security Center. The section provides instructions on how to send commands to mobile devices, as well as how to view the execution statuses of commands in the command log.
The help for this version of the solution is no longer updated, so it may contain outdated information. For up-to-date information about the solution refer to the Kaspersky Secure Mobility Management 4.1 Help.
Commands for mobile devices
Kaspersky Security Center supports commands for remote mobile device management. For instance, if a mobile device is lost or stolen, you can send commands to locate the device or wipe all corporate data from the device.
You can send commands to the following types of managed mobile devices:
- Android devices managed via the Kaspersky Endpoint Security for Android app
- iOS MDM devices
Each device type supports a dedicated set of commands.
Commands for Android devices
Command |
Command execution result |
|
|---|---|---|
Lock |
The mobile device is locked. To obtain access to data, you must unlock the device. |
|
Unlock |
The mobile device is unlocked. After unlocking a device running Android 5.0 – 6, the screen unlock password is reset to "1234". After unlocking a device running Android 7.0 or later, the screen unlock password is not changed. |
|
Reset to factory settings |
All data is deleted from the mobile device and the settings are rolled back to their factory values. After this command is executed, the device will not be able to receive or execute subsequent commands. |
|
Wipe corporate data |
The corporate data is wiped from the device. The list of wiped data depends on the mode in which the device operates:
|
|
Synchronize device |
The mobile device data is synchronized with the Administration Server. |
|
Locate device |
The mobile device's location coordinates are obtained. On devices running Android 12 or later, if the user granted the "Use approximate location" permission, the Kaspersky Endpoint Security for Android app first tries to get the precise device location. If this is not successful, the approximate device location is returned only if it was received not more than 30 minutes earlier. Otherwise, the Locate device command fails. The Locate device command does not work on Android devices if Google Location Accuracy is disabled in settings. Please be aware that not all Android devices come with this location setting. |
|
Mugshot |
The mobile device is locked. The mugshot photo is taken by the front camera of the device when somebody attempts to unlock the device. On devices with a pop-up front camera, the photo will be black if the camera is stowed. When attempting to unlock the device, the user automatically consents to the mugshot. If the permission to use the camera has been revoked, the mobile device displays a notification and prompts to provide the permission. On a mobile device running Android 12 or later, if the permission to use camera has been revoked via Quick Settings, the notification is not displayed but the photo taken is black. |
|
Alarm |
The mobile device sounds an alarm. The alarm is sounded for 5 minutes (or for 1 minute if the device battery is low). |
|
Wipe app data |
The data of a specified app is wiped from the mobile device. The action is only applicable to devices running Android 9 or later in device owner mode or with created Android work profile. |
|
Wipe data of all apps |
The data of all apps is wiped from the mobile device. The action is only applicable to devices running Android 9 or later in device owner mode or with created Android work profile. |
|
Send message |
The message with the specified subject and text is sent to the user's mobile device. You can send only a push notification or both a push notification and a pop-up window. This command is available only if the Send commands to mobile devices permission is given. For more details, please refer to the Kaspersky Security Center Help. |
|
Get device location history |
The mobile device's location history for the last 14 days is displayed. This command works only if the Device location history informational event type is stored in the Administration Server database. The events are configured in the Events section of the policy properties. For more details, please refer to the Kaspersky Security Center Help. |
|
Commands for iOS MDM devices
Command |
Command execution result |
|---|---|
Lock |
The mobile device is locked. To obtain access to data, you must unlock the device. |
Reset password |
The mobile device's screen unlock password is reset, and the user is prompted to set a new password in accordance with policy requirements. |
Reset to factory settings |
All data is deleted from the mobile device and the settings are rolled back to their factory values. After this command is executed, the device will not be able to receive or execute subsequent commands. |
Wipe corporate data |
All installed configuration profiles, provisioning profiles, the iOS MDM profile, and applications for which the Remove together with iOS MDM profile check box has been selected are removed from the device. |
Synchronize device |
The mobile device data is synchronized with the Administration Server. |
Install profile |
The configuration profile is installed on the mobile device. |
Remove profile |
The configuration profile is deleted from the mobile device. |
Install provisioning profile |
The provisioning profile is installed on the mobile device. |
Remove provisioning profile |
The provisioning profile is deleted from the mobile device. |
Install app |
The app is installed on the mobile device. |
Remove app |
The app is removed from the mobile device. |
Enter redemption code |
Redemption code entered for a paid app. |
Schedule operating system update (supervised only) |
Operating system updates are scheduled on the mobile device according to the specified update settings. This command is supported only for supervised devices. |
Configure roaming |
Data roaming and voice roaming enabled or disabled. |
Set Bluetooth state (supervised only) |
Bluetooth is enabled or disabled on the mobile device. This command is supported only for supervised devices running iOS 11.3 or later. |
Enable Lost Mode (supervised only) |
Lost Mode is enabled on the supervised mobile device, and the device is locked. The device screen shows the message and phone number that you can edit. If you send the Enable Lost Mode command to a supervised iOS MDM device without a SIM card and this device is restarted, the device won't be able to connect to Wi-Fi and receive the Disable Lost Mode command. This is a specific feature of iOS devices. To avoid this issue, you can either send the command only to devices with a SIM card, or insert a SIM card into the locked device to allow it to receive the Disable Lost Mode command over the mobile network. |
Locate device (supervised only) |
The location of the mobile device is obtained. You can click the link in the command log to view device coordinates and check the device location on a map. This command is supported only for supervised devices that are in Lost Mode. |
Play sound (supervised only) |
The sound is played on the lost mobile device. This command is supported only for supervised devices that are in Lost Mode. |
Disable Lost Mode (supervised only) |
Lost Mode is disabled on the mobile device, and the device is unlocked. This command is supported only for supervised devices. |
Permissions for execution of commands
Special rights and permissions are required for the execution of commands of Kaspersky Endpoint Security for Android. When the Initial Configuration Wizard is running, Kaspersky Endpoint Security for Android prompts the user to grant the application all required rights and permissions. The user can skip these steps or disable these permissions in the device settings at a later time. If this is the case, it will be impossible to execute commands.
On devices running Android 10 or later, the user must grant the "All the time" permission to access the location. On devices running Android 11 or later, the user must also grant the "While using the app" permission to access camera. Otherwise, Anti-Theft commands will not function. The user will be notified of this limitation and will again be prompted to grant the permissions of required level. If the user selects the "Only this time" option for the camera permission, access is considered granted by the app. It is recommended to contact the user directly if the Camera permission is requested again.
Page top
The help for this version of the solution is no longer updated, so it may contain outdated information. For up-to-date information about the solution refer to the Kaspersky Secure Mobility Management 4.1 Help.
Sending commands
To send a command to the user's mobile device:
- In the Mobile Device Management folder in the console tree, select the Mobile devices subfolder.
The folder workspace displays a list of managed mobile devices.
- Select the user's mobile device to which you need to send a command.
- In the context menu of the mobile device, select Show command log.
- In the Mobile device <device name> management commands window, proceed to the section with the name of the command that you need to send to the mobile device, then click the Send command button.
Depending on the command that you have selected, clicking the Send command button may open the window of advanced settings of the application. For example, when you send the command for deleting a provisioning profile from a mobile device, the application prompts you to select the provisioning profile that must be deleted from the mobile device. Define the advanced settings of the command in that window and confirm your selection. After that, the command will be sent to the mobile device.
You can click the Resend button to send the command to the user's mobile device again.
You can click the Remove from queue button to cancel execution of a command that was sent if the command has not yet been executed.
The Command log section displays commands that have been sent to the mobile device, with the respective execution statuses. Click Refresh to update the list of commands.
- Click OK to close the Mobile device <device name> management commands window.
The help for this version of the solution is no longer updated, so it may contain outdated information. For up-to-date information about the solution refer to the Kaspersky Secure Mobility Management 4.1 Help.
Viewing the statuses of commands in the command log
The application saves to the command log information about all commands that have been sent to mobile devices. The command log contains information about the time and date that each command was sent to the mobile device, their respective statuses, and detailed descriptions of command execution results. For example, in case execution of a command is unsuccessful, the log displays the cause of the error. Records are stored in the command log for 30 days maximum.
Commands sent to mobile devices can have the following statuses:
- Running—The command has been sent to the mobile device.
- Completed—The command execution has successfully completed.
- Completed with error—The command execution has failed.
- Deleting—The command is being removed from the queue of commands sent to the mobile device.
- Deleted—The command has been successfully removed from the queue of commands sent to the mobile device.
- Error deleting—The command could not be removed from the queue of commands sent to the mobile device.
The application maintains a command log for each mobile device.
To view the log of commands sent to a mobile device:
- In the Mobile Device Management folder in the console tree, select the Mobile devices subfolder.
The folder workspace displays a list of managed mobile devices.
- In the list of mobile devices, select the one for which you want to view the command log.
- In the context menu of the mobile device, select Show command log.
The Mobile device <device name> management commands window opens. The sections of the Mobile device <device name> management commands window correspond to the commands that can be sent to the mobile device.
- Select sections containing the necessary commands and view information about how the commands are sent and executed in the Command log section.
In the Command log section, you can view the list of commands that have been sent to the mobile device and details about those commands. The Show commands filter allows you to display in the list only commands with the selected status.
The help for this version of the solution is no longer updated, so it may contain outdated information. For up-to-date information about the solution refer to the Kaspersky Secure Mobility Management 4.1 Help.
Managing the app by using third-party EMM systems (Android only)
You can use the Kaspersky Endpoint Security for Android app without Kaspersky Administration Systems. Use solutions of other EMM (Enterprise Mobility Management) service providers to deploy and manage the Kaspersky Endpoint Security for Android app. Kaspersky participates in the AppConfig Community to ensure that the app operates with third-party EMM solutions.
You can manage the Kaspersky Endpoint Security for Android app through third-party EMM solutions only on devices running Android.
You can use the third-party EMM solutions to deploy the Kaspersky Endpoint Security for Android app only. Connect the device to Kaspersky Security Center and manage the app in the Administration Console. In this case, managing Kaspersky Endpoint Security for Android app in the EMM console will be unavailable.
If you deployed the Kaspersky Endpoint Security for Android app using the third-party EMM system, it is impossible to manage the app in Kaspersky Endpoint Security Cloud. You can manage the Kaspersky Endpoint Security for Android app in the EMM Console.
The following EMM solutions support the use of the Kaspersky Endpoint Security for Android app:
- VMware AirWatch
- MobileIron
- IBM Maas360
- Microsoft Intune
- SOTI MobiControl
You can perform the following actions in the EMM Console:
- Deploy the app to an Android work profile on users' devices.
- Activate the app.
- Configure app settings:
- Enable protection against malicious and phishing websites on the internet.
- Configure settings for connecting the device to Kaspersky Security Center.
- Configure Anti-Malware settings.
- Configure the schedule for running a malware scan on the device.
- Enable detection of adware and apps that could be exploited by criminals to harm the user's device or personal data.
- Configure the schedule for app database updates.
The help for this version of the solution is no longer updated, so it may contain outdated information. For up-to-date information about the solution refer to the Kaspersky Secure Mobility Management 4.1 Help.
Getting Started
To deploy the app on users' mobile devices, you must add Kaspersky Endpoint Security for Android to the EMM app store. You can add Kaspersky Endpoint Security for Android to the EMM app store by using a Google Play link. For more details about working with apps in the EMM Console, visit the technical support website of the EMM service provider.
The Kaspersky Endpoint Security for Android app is deployed in an Android work profile. The app is isolated from the user's personal data and protects only corporate data in the work profile. It is recommended to ensure that Kaspersky Endpoint Security for Android is protected from removal by EMM Console tools.
Page top
The help for this version of the solution is no longer updated, so it may contain outdated information. For up-to-date information about the solution refer to the Kaspersky Secure Mobility Management 4.1 Help.
How to install the app
Depending on the EMM Console, select the method for installing the app to devices: silent installation, send an email containing a link to the app in Google Play, or another available method.
The following permissions are required for the app to work:
- Storage permission for accessing files when Anti-Malware is running (only for Android 6 or later).
- Phone permission for identifying the device, for example, when activating the app.
- Request to add Kaspersky Endpoint Security for Android to the list of apps that are started at operating system startup (on certain devices, such as HUAWEI, Meizu, and Xiaomi). If the add request is not displayed, manually add Kaspersky Endpoint Security for Android to the list of startup apps. The request may not be displayed if the Security app is not installed in the work profile.
You can grant the required permissions in the EMM Console before deploying the Kaspersky Endpoint Security for Android app. For more details about granting the permissions in the EMM Console, visit the technical support website of the EMM service provider. You can also grant the permissions while completing the Initial Configuration Wizard of Kaspersky Endpoint Security for Android on device.
The Kaspersky Endpoint Security for Android app will be installed in the Android work profile.
For operation of Web Protection, you must also configure a proxy server in Google Chrome settings:
- Proxy server configuration mode: manual.
- Proxy server address and port: 127.0.0.1:3128.
- SPDY protocol support: disabled.
- Data compression through proxy server: disabled.
The help for this version of the solution is no longer updated, so it may contain outdated information. For up-to-date information about the solution refer to the Kaspersky Secure Mobility Management 4.1 Help.
Protecting devices on the internet
To protect the personal data of a mobile device user on the internet, enable Web Protection. Web Protection blocks malicious websites that distribute malicious code, and phishing websites designed to steal your confidential data and gain access to your financial accounts. Web Protection scans websites before you open them using the Kaspersky Security Network cloud service.
For the Web Protection component to work, the following conditions must be met:
- The proxy server is configured in the browser settings:
ProxyMode = "fixed_servers"ProxyServer = "127.0.0.1:3128"DisableSpdy = trueDataCompressionProxyEnabled = falseProxy server configuration may vary depending on the Google Chrome version. For more details about configuring Google Chrome, visit the Chromium project website.
After the Kaspersky Endpoint Security for Android app is removed from the mobile device, reset the proxy server settings.
- Device users accept the Privacy Policy and the Web Protection Statement in the Initial Configuration Wizard or app settings.
Administrator can accept the Web Protection Statement in the Kaspersky Security Center Administration Console.
- Web Protection is enabled in the app settings:
EnableWebFilter = True,EnableWebFilterLock = True. - Use of KSN is enabled in the app settings:
UseKsnMode = RecommendedorUseKsnMode = Extended.
To configure Google Chrome proxy server via the VMware Workspace ONE Console:
- In the console, select Apps & Books → Application → Native.
App catalog opens.
- Select the Public section.
- Select the Google Chrome app.
App properties window opens.
- Select the Assignment section.
- In the window that opens, click the Assign button.
The list of devices that the app is assigned opens.
- Click the Edit button.
- In the window that opens, click Configure.
The app configuration opens. You can read about each of the app parameters using tool tip.
- Specify the necessary settings:
- Proxy Mode – Use fixed proxy server.
- Proxy Server URL – 127.0.0.1:3128.
- SPDY protocol support – disabled.
- Data compression through proxy server – disabled.
- Save changes.
To enable Web Protection in Google Chrome via the VMware Workspace ONE Console:
- In the console, select Apps & Books → Application → Native.
App catalog opens.
- Select the Public section.
- Select the Kaspersky Endpoint Security app.
App properties window opens.
- Select the Assignment section.
- In the window that opens, click the Assign button.
The list of devices that the app is assigned opens.
- Click the Edit button.
- In the window that opens, click Configure.
The app configuration opens. You can read about each of the app parameters using tool tip.
- Specify the necessary settings:
- Web Protection – Enable.
- Forbid configuration of Web Protection settings – Enable. The user cannot access Web Protection settings within the app settings.
- Kaspersky Security Network mode – Recommended or Extended.
Recommended – The app exchanges data with Kaspersky Security Network (KSN). Kaspersky Endpoint Security for Android uses KSN for real-time protection of the device against threats (Cloud Protection) and the operation of Web Protection on the internet.
Extended – The app exchanges data with Kaspersky Security Network and also sends the Virus Laboratory certain performance statistics from Kaspersky Endpoint Security for Android. This information makes it possible to keep track of threats in real time. No personal data is collected, processed, or stored by KSN services.
- Save changes.
If users' devices are connected to the Kaspersky Security Center, enable Web Protection in the group policy. Also, you can accept the Web Protection Statement in the Kaspersky Security Center Administration Console.
After enabling Web Protection in the Kaspersky Endpoint Security for Android app and configuring Google Chrome, check protection against web threats. To check protection, you can use EICAR test.
Page top
The help for this version of the solution is no longer updated, so it may contain outdated information. For up-to-date information about the solution refer to the Kaspersky Secure Mobility Management 4.1 Help.
How to activate the app
Information about the license is transmitted to the mobile device together with the other settings in the configuration file.
If the app is not activated within 30 days after its installation on the mobile device, the trial license expires. When the trial license expires, all features of the Kaspersky Endpoint Security for Android mobile app are disabled.
When the commercial license expires, the mobile app continues running with limited functionality (for example, Kaspersky Endpoint Security for Android database updates are not available). To continue using the app in fully functional mode, you must renew your commercial license.
To activate Kaspersky Endpoint Security for Android:
- In the EMM Console, open the settings of the Kaspersky Endpoint Security for Android app.
- In the
LicenseActivationCodefield, enter the app activation code.To activate the app on a device, you must have access to Kaspersky activation servers.
The help for this version of the solution is no longer updated, so it may contain outdated information. For up-to-date information about the solution refer to the Kaspersky Secure Mobility Management 4.1 Help.
How to connect a device to Kaspersky Security Center
After Kaspersky Endpoint Security for Android is installed on a mobile device, you can connect the device to Kaspersky Security Center. The data necessary for connecting the device to Kaspersky Security Center is transmitted to the mobile device together with the other settings listed in the configuration file. After connecting the device to Kaspersky Security Center, you can use group policies to centrally configure the app settings. You can also receive reports and statistics on the performance of Kaspersky Endpoint Security for Android.
Prior to connecting devices to Kaspersky Security Center, make sure that the following conditions are fulfilled:
- The Kaspersky Endpoint Security for Android Administration Plug-in is installed on the administrator's workstation.
- The port for connecting mobile devices is opened in the Administration Server properties.
- The display of the Mobile Device Management folder is enabled in the Administration Console.
- A mobile certificate for identifying the mobile device user has been created in the Kaspersky Security Center certificate storage.
Prior to connecting devices to Kaspersky Security Center, it is recommended to do the following:
- If you want to create tasks and policies for mobile devices, create a separate administration group for mobile devices.
- If you want to automatically move mobile devices to a separate administration group, create a rule for automatically moving devices from the Unassigned devices folder.
- If you want to centrally configure Kaspersky Endpoint Security for Android, create a group policy.
To connect a device to Kaspersky Security Center:
- In the EMM Console, open the settings of the Kaspersky Endpoint Security for Android app.
- In the
KscServerfield, enter the DNS name or IP address of the Kaspersky Security Center Administration Server. The default port is 13292. - If you do not want the user to be distracted by Kaspersky Endpoint Security for Android notifications, disable app notifications. To do so, set the
DisableNotification = Truesetting.After connecting, the app shows all notifications. You can disable certain app notifications in the policy settings.
Do not disable app notifications if you do not use Kaspersky Security Center. This could cause a user to not receive notifications about the license expiring. As a result, the app will stop performing its functions.
After the connection settings are configured, Kaspersky Endpoint Security for Android displays a notification prompting you to grant the following additional rights and permissions:
- Permission to use the Camera for Anti-Theft operation (Mugshot command).
- Permission to use Location for Anti-Theft operation (Locate device command).
- Device administrator rights (Android work profile owner) for operation of the following app functions:
- Install security certificate.
- Configure Wi-Fi.
- Configure Exchange ActiveSync.
- Restrict use of the camera, Bluetooth, and Wi-Fi.
Due to the specific characteristics of an Android work profile (absence of the Accessibility service), the App Control and Anti-Theft features are unavailable in the app.
When the user grants the necessary rights and permissions, the device will be connected to Kaspersky Security Center. If a rule for automatically moving devices to an administration group has not been created, the device will be automatically added to the Unassigned devices folder. If a rule for automatically moving devices to an administration group has been created, the device will be automatically added to the defined group.
Kaspersky Endpoint Security provides the following devices name format:
- Device model [email, device ID]
- Device model [email (if any) or device ID]
A device ID is a unique ID that Kaspersky Endpoint Security for Android generates from the data received from a device as follows:
- On personal devices running Android 9 and earlier, the app uses the IMEI. For later versions of Android, the app uses SSAID (Android ID) or checksum of other data received from the device.
- In device owner mode, the app uses IMEI on all Android versions.
- When a work profile is created on devices running Android 11 or earlier, the app uses IMEI. On other Android versions, the app uses the SSAID (Android ID) or checksum of other data received from the device.
You can configure device name format in the group policy.
In SOTI MobiControl, you can use the %DEVICENAME% macro in the KscDeviceName field. This macro allows you automatically get the device name from the SOTI MobiControl console to Kaspersky Security Center.
You can also add a tag to the device name. This makes it easier to find and sort devices in Kaspersky Security Center. The tag is available only for VMware AirWatch.
To add the tag to the device name:
- In the EMM Console, open the settings of the Kaspersky Endpoint Security for Android app.
- In the
KscDeviceNameTagfield, select the values:{DeviceSerialNumber}– Serial number of the device.{DeviceUid}– Unique device identifier (UDID).{DeviceAssetNumber}– Device asset number. This number is created internally from within your organization.
We recommend using only these values. VMware AirWatch supports other values, but Kaspersky Endpoint Security cannot guarantee work these values.
You can add some values (for example, {DeviceSerialNumber} {DeviceUid}). The tag will be added to the device name in Kaspersky Security Center. A space separates the tag and the device name. For example, if the device name is Google Pixel 2 a10c6b75f7b31de9 22:7D:78:9E:C5:1E, then 22:7D:78:9E:C5:1E is UDID tag. If you use Kaspersky Security Center and VMwareAirWatch, the tag allows you to identify devices in both consoles. To match the device, select the same values for the device name (for example, the serial number of the device).
After the device is connected to Kaspersky Security Center, the app settings will be changed according to the group policy. Kaspersky Endpoint Security for Android ignores the app settings from the configuration file that was configured in the EMM Console. You can configure all sections of the policy except the following sections:
- Anti-Theft (Device lock)
- Device management (Screen lock)
- App Control (Block forbidden apps)
- Android work profile
- Manage Samsung KNOX
Due to the method used to deploy a work profile, you cannot apply group policy settings from the Android work profile section. These settings can be applied only if the work profile was created using Kaspersky Security Center.
Page top
The help for this version of the solution is no longer updated, so it may contain outdated information. For up-to-date information about the solution refer to the Kaspersky Secure Mobility Management 4.1 Help.
Silent mode of the app
An Android device user can disable all notifications from Kaspersky Endpoint Security for Android in the settings on the notification bar. If notifications are disabled, the user does not monitor the operation of the app and can ignore important information (for example, information about threats in real time). In this case, to find out the app operating status, the user must open Kaspersky Endpoint Security for Android.
If you do not want the mobile device user to be distracted by Kaspersky Endpoint Security for Android notifications, you can disable certain notifications.
The Kaspersky Endpoint Security uses the following tools to display the device protection status:
- Protection status notification. This notification is pinned to the notification bar. Protection status notification cannot be removed. The notification displays the device protection status (for example, ) and number of issues, if any. You can tap the device protection status and see the list issues in the app.
- App notifications. These notifications inform the device user about the application (for example, threat detection).
- Pop-up messages. Pop-up messages require action from the device user (for example, action to take when a threat is detected).
The silent mode settings are transmitted to the mobile device together with the other settings in the configuration file. Set True value for the DisableNotification parameter.
To enable silent mode of the app via the VMware Workspace ONE Console:
- In the console, select Apps & Books → Application → Native.
App catalog opens.
- Select the Public section.
- Select the Kaspersky Endpoint Security app.
App properties window opens.
- Select the Assignment section.
- In the window that opens, click the Assign button.
The list of devices that the app is assigned opens.
- Click the Edit button.
- In the window that opens, click Configure.
The app configuration opens. You can read about each of the app parameters using tool tip.
- In the Disable app notifications before connecting to Kaspersky Security Center.
If you use Kaspersky Security Center, enable silent mode in the group policy too.
- Save changes.
As a result, the app will only show the Protection status notification. Other notifications and pop-ups will be disabled.
Page top
The help for this version of the solution is no longer updated, so it may contain outdated information. For up-to-date information about the solution refer to the Kaspersky Secure Mobility Management 4.1 Help.
AppConfig File
A configuration file is generated to configure the app in an EMM Console. The app settings in the configuration file are presented in the table below.
Configuration file settings
Configuration key |
Description |
Type |
Value |
Default value |
|---|---|---|---|---|
|
App activation code |
String |
App activation code consisting of 20 Latin letters and numerals. To activate the app by using the activation code, you need internet access to connect to Kaspersky activation servers. If you leave the field blank, the app will be activated with a trial license. The trial license is valid for 30 days. When the trial license expires, all features of the Kaspersky Endpoint Security for Android mobile app are disabled. To continue using the app, you must purchase a commercial license. |
|
|
<License Agreement link> |
Choice |
This setting is available only for VMware AirWatch.
To accept the terms and conditions of the EULA for all mobile devices, you need internet access to connect to Kaspersky servers. If you chose |
|
|
License Agreement code |
String |
These settings are available only for VMware AirWatch. Use License Agreement code is contained in the End User License Agreement. To learn License Agreement code:
|
|
|
License Agreement codes |
String |
|
|
|
Kaspersky Security Center Administration Server address and port |
String |
DNS name or IP address of the Kaspersky Security Center Administration Server and port number. Enter the address as follows: |
|
|
Disable app notifications before connecting to Kaspersky Security Center |
Boolean |
Do not disable app notifications if you do not use Kaspersky Security Center. This could cause a user to miss receiving notifications about a license expiration. In this case, the app would stop performing its functions.
|
|
|
Scan run mode |
Choice |
Irrespective of which value is set, the device user can manually start a malware scan. |
|
|
Day of scan |
Choice |
You can select only one value for this setting. |
|
|
Time of scan |
String |
The time can be indicated in 24-hour format (for example, 13:00) or 12-hour format (for example, 10:30 P.M.). |
|
|
Block configuration of the scan run mode |
Boolean |
|
|
|
Types of files to scan (malware scan) |
Choice |
In Kaspersky Endpoint Security for Android Service Pack 4 Maintenance Release 1, you cannot enable scanning of executable files only. |
|
|
Scan archives with unpacking |
Boolean |
The app scans only archives with the .zip (.apk) extension. In Kaspersky Endpoint Security for Android Service Pack 4 Maintenance Release 1, you cannot disable scanning of contents of archives. |
|
|
Action on threat detection (malware scan) |
Choice |
Information about detected threats and the actions taken on them is logged in app reports. |
|
|
Block configuration of scan settings |
Boolean |
|
|
|
Block adware, autodialers, and apps that can be used by criminals to cause harm to the user's device and data |
Boolean |
|
|
|
Real-time protection mode |
Choice |
|
|
|
Kaspersky Security Network mode |
Choice |
|
|
|
Types of files to scan (Real-time Protection) |
Boolean |
In Kaspersky Endpoint Security for Android Service Pack 4 Maintenance Release 1, you cannot enable scanning of executable files only. |
|
|
Action on threat detection (Real-time Protection) |
Choice |
Information about detected threats and the actions taken on them is logged in app reports. |
|
|
Block configuration of real-time protection settings |
Boolean |
|
|
|
Databases update run mode |
Choice |
Irrespective of which value is set, the device user can manually start an update of anti-malware databases. |
|
|
Day to start a database update |
Choice |
You can select only one value for this setting. |
|
|
Database update start time |
String |
The time can be indicated in 24-hour format (for example, 13:00) or 12-hour format (for example, 10:30 P.M.). |
|
|
Block configuration of the database update run mode |
Boolean |
|
|
|
Update databases in roaming |
Boolean |
|
|
|
Web Protection |
Boolean |
Malicious and phishing websites using the HTTPS protocol are allowed to remain unblocked if the domain is trusted. If the domain is untrusted, Web Protection blocks malicious and phishing websites.
For the Web Protection component to work, the following conditions must be met:
|
|
|
Block configuration of Web Protection |
Boolean |
|
|
|
Database update source server address |
String |
Address of the server hosting the database updates, for example, If you leave the field blank, Kaspersky Endpoint Security for Android uses the Kaspersky database update servers. |
|
|
Submit data to the Google Analytics for Firebase, Firebase Performance Monitoring, and Crashlytics services |
Boolean |
|
|
|
Device Name Tag for Kaspersky Security Center |
String |
This setting is available only for VMware AirWatch. The tag will be added to the device name in Kaspersky Security Center. A space separates the tag and the device name. This makes it easier to find and sort devices in Kaspersky Security Center.
You can add some values (for example, We recommend using only these values. VMware AirWatch supports other values, but Kaspersky Endpoint Security cannot guarantee that these values work. |
|
|
Device group name |
String |
You can specify device groups in an EMM console. When a device is connected to Kaspersky Security Center, it will be automatically added to a subfolder of the of Unassigned devices folder. The name of the subfolder will match the group name specified in this parameter. You can then create rules for automatically moving devices from subfolders of the Unassigned devices folder to administration groups in the Managed devices folder. If you leave the field blank, the device will be automatically added to the root of the Unassigned devices folder. |
|
|
User's corporate email |
String |
You can specify users' corporate email addresses in an EMM console. These emails will be displayed in Kaspersky Security Center. The string must be a valid email address. Other values are ignored. |
|
|
Device name in Kaspersky Security Center |
String |
This setting is available only for SOTI MobiControl. You can specify the device name displayed in Kaspersky Security Center. You can type any name or use the %DEVICENAME% macro to automatically get the device name from the SOTI MobiControl console. If you leave the field blank, the device name will be generated according to the format specified in the Kaspersky Security Center group policy. |
|
The help for this version of the solution is no longer updated, so it may contain outdated information. For up-to-date information about the solution refer to the Kaspersky Secure Mobility Management 4.1 Help.
Network load
This section contains information on the volume of network traffic that is exchanged between mobile devices and Kaspersky Security Center.
Traffic volume
Task |
Outgoing traffic |
Incoming traffic |
Total traffic |
|---|---|---|---|
Initial deployment of the app, Mb |
0.08 |
17.76 |
17.84 |
Initial update of anti-malware databases (the traffic volume may differ due to the size of anti-malware databases), MB |
0.04 |
2.21 |
2.25 |
Synchronization of the mobile device with Kaspersky Security Center, MB |
0.03 |
0.02 |
0.05 |
Regular update of anti-malware databases (the traffic volume may differ due to the size of anti-malware databases), MB |
0.08 |
3.06 |
3.14 |
Execution of Anti-Theft commands. Locate device (the traffic volume may differ due to the specifications of the embedded camera and the quality of images), MB |
0.09 |
0.8 |
0.17 |
Execution of Anti-Theft commands. Mugshot, MB |
1.0 |
0.02 |
1.02 |
Execution of Anti-Theft commands. Device lock, MB |
0.06 |
0.05 |
0.11 |
Average daily volume, MB |
0.22 |
6.96 |
7.18 |
The help for this version of the solution is no longer updated, so it may contain outdated information. For up-to-date information about the solution refer to the Kaspersky Secure Mobility Management 4.1 Help.
Participating in Kaspersky Security Network
To protect mobile devices more effectively, Kaspersky Endpoint Security for Android uses data acquired from users around the globe. Kaspersky Security Network is designed to process such data.
Kaspersky Security Network (KSN) is an infrastructure of cloud services providing access to Kaspersky online knowledge base with information about the reputation of files, web resources, and software. The use of data from Kaspersky Security Network ensures faster responses by Kaspersky applications to threats, improves the performance of some protection components, and reduces the likelihood of false alarms.
Your participation in Kaspersky Security Network helps Kaspersky to acquire real-time information about the types and sources of new threats, develop methods of neutralizing them, and reduce the number of false alarms of Kaspersky Endpoint Security for Android. Participation in Kaspersky Security Network also lets you access reputation statistics for applications and websites.
When you participate in Kaspersky Security Network, some statistics are acquired while Kaspersky Endpoint Security for Android are running and are automatically sent to Kaspersky. This information makes it possible to keep track of threats in real time. Files or their parts which may be exploited by intruders to harm the computer or user's content can be also sent to Kaspersky for additional examination.
Use of Kaspersky Security Network is required for the operation of Kaspersky Endpoint Security for Android. KSN is used by the main components of the app: Anti-Malware, Web Protection, and App Control. Refusal to participate in KSN reduces the level of device protection, which may lead to infection of the device and loss of data. To start using Kaspersky Security Network, you must accept the terms of the End User License Agreement when installing the app. By reading the End User License Agreement, you can learn which data is transmitted to Kaspersky Security Network by Kaspersky Endpoint Security for Android.
To improve the performance of the app, you can additionally provide statistical data to Kaspersky Security Network. Providing the above information to the KSN is voluntary. To start using Kaspersky Security Network, you have to accept the terms of a special agreement – the Kaspersky Security Network Statement. You can opt out of participating in Kaspersky Security Network at any time. The Kaspersky Security Network Statement describes the types of data that Kaspersky Endpoint Security for Android transmits to Kaspersky Security Network.
Updates functionality (including providing anti-malware signature updates and codebase updates), as well as KSN functionality will not be available in the software in the U.S. territory from 12:00 AM Eastern Daylight Time (EDT) on September 10, 2024 in accordance with the restrictive measures.
The help for this version of the solution is no longer updated, so it may contain outdated information. For up-to-date information about the solution refer to the Kaspersky Secure Mobility Management 4.1 Help.
Information exchange with Kaspersky Security Network
To improve real-time protection, Kaspersky Secure Mobility Management uses the Kaspersky Security Network cloud service for the operation of the following components:
- Anti-Malware. The app obtains access to the Kaspersky online knowledge base regarding the reputation of files and apps. The scan is performed for threats whose information has not yet been added to anti-malware databases but is already available in KSN. Kaspersky Security Network cloud service provides full operation of Anti-Malware and reduces the likelihood of false alarms.
- Web Protection. The app uses data received from KSN to run scan of websites before they are opened. The app also determines the website category to control internet access to users based on lists of allowed and blocked categories (for example, the "Internet communication" category).
- App Control. The app determines the app category to restrict the startup of apps that do not meet corporate security requirements based on lists of allowed and blocked categories (for example, the "Games" category).
Information on the type of data submitted to Kaspersky when using KSN during operation of Anti-Malware and App Control is available in the End User License Agreement. By accepting the terms and conditions of the License Agreement, you agree to transfer this information.
Information on the type of data submitted to Kaspersky when using KSN during operation of Web Protection is available in the Statement regarding data processing for Web Protection. By accepting the terms and conditions of the Statement, you agree to transfer this information.
For the purposes of identifying emerging information security threats, intrusion threats, and threats that are hard to detect (along with their respective sources), and to improve the protection of information stored and processed on a device, you can extend your participation in Kaspersky Security Network.
To exchange data with KSN for the purposes of improving the performance of the app, the following conditions must be fulfilled:
- You or the device user must read and accept the terms of the Kaspersky Security Network Statement. If you choose for the Statement to be accepted by users, they will be prompted by a notification on the main app screen to accept the terms of the Statement. Users can also accept the Statements in the About the app section in the Kaspersky Endpoint Security for Android settings.
If you choose to accept the statements globally, the versions of the statements accepted via Kaspersky Security Center must match the versions already accepted by users. Otherwise, the users will be informed about the issue and prompted to accept the version of a statement that matches the version accepted globally by the administrator. The device status in the Kaspersky Security for Mobile (Devices) plug-in will also change to Warning.
- You must configure the group policy settings to allow statistics to be sent to KSN.
You can opt out of sending statistic data to Kaspersky Security Network at any time. Information on the type of statistic data submitted to Kaspersky when using KSN during operation of the Kaspersky Endpoint Security for Android mobile app is available in the Kaspersky Security Network Statement.
For more information about data provision to KSN, refer to the "Data provision" section.
Providing data to KSN is voluntary. If you want, you can disable data exchange with KSN.
Page top
The help for this version of the solution is no longer updated, so it may contain outdated information. For up-to-date information about the solution refer to the Kaspersky Secure Mobility Management 4.1 Help.
Enabling and disabling the use of Kaspersky Security Network
For the operation of Kaspersky Endpoint Security for Android components that use Kaspersky Security Network, the app sends requests to cloud services. Requests contain the data as described in the "Data provision" section.
If the use of Kaspersky Security Network is disabled on the device, the Cloud Protection, Web Protection, and App Control components are disabled automatically.
To enable or disable the use of Kaspersky Security Network:
- Open the window with the settings of the management policy for mobile devices on which Kaspersky Endpoint Security for Android is installed.
- In the policy Properties window, select the Additional section.
- In the Kaspersky Security Network (KSN) settings section, configure the settings for using Kaspersky Security Network:
- Select the Use Kaspersky Security Network check box for operation of the following components: Anti-Malware (Cloud Protection), Web Protection, and App Control (App categories).
- Select the Allow statistics to be sent to KSN check box to submit data to Kaspersky. This data will help the Kaspersky Endpoint Security for Android app more quickly respond to threats, improve the performance of protection components, and decrease the likelihood of false alarms.
- Click the Apply button to save the changes you have made.
Mobile device settings are changed after the next device synchronization with Kaspersky Security Center. Once the policy has been applied, the components that use Kaspersky Security Network are disabled and component settings become unavailable.
Page top
The help for this version of the solution is no longer updated, so it may contain outdated information. For up-to-date information about the solution refer to the Kaspersky Secure Mobility Management 4.1 Help.
Using Kaspersky Private Security Network
Kaspersky Private Security Network (hereinafter also referred to as KPSN) is a solution that grants access to the reputation databases of Kaspersky Security Network (KSN), without sending data from users' devices to Kaspersky Security Network.
A database of the reputations of objects (files or URLs) is stored on the Kaspersky Private Security Network server, but not on Kaspersky Security Network servers. KPSN reputation databases are stored within the corporate network and are managed by the company administrator.
When KPSN is enabled, Kaspersky Endpoint Security does not send any statistical data from users' devices to KSN.
To enable use of KPSN via Kaspersky Security Center:
- In the main window of Kaspersky Security Center Web Console or Cloud Console, click Settings (
 ).
).The Administration Server properties window opens.
- On the General tab, select the KSN Proxy settings section.
- Switch the toggle button to the Use Kaspersky Private Security Network Enabled position.
- Click the Select file with KSN Proxy settings button, and then browse for the configuration file that has the pkcs7 or pem extension (provided by Kaspersky).
- Click Open.
- If you have the proxy server settings configured in the Administration Server properties, but your network architecture requires that you use KPSN directly, enable the Ignore proxy server settings when connecting to Private KSN option. Otherwise, requests from the managed applications cannot reach KPSN.
- Click the Save button.
After the settings are downloaded, the interface displays the provider's name and contacts, as well as the creation date of the file with the settings of KPSN. KPSN settings are applied to mobile devices.
When you switch to KPSN, App Control does not support the app categories available when using KSN. App categorization will be available if you choose to switch back to KSN.
Page top
The help for this version of the solution is no longer updated, so it may contain outdated information. For up-to-date information about the solution refer to the Kaspersky Secure Mobility Management 4.1 Help.
Data provision to third-party services
Kaspersky Endpoint Security for Android uses the Google services known as Firebase Cloud Messaging, Google Analytics for Firebase, Firebase Performance Monitoring, and Crashlytics. Kaspersky Endpoint Security for Android uses the Firebase Cloud Messaging (FCM) service to ensure timely delivery of commands to mobile devices and forced synchronization when policy settings are changed. Kaspersky Endpoint Security for Android uses the Google Analytics for Firebase, Firebase Performance Monitoring, and Crashlytics services to improve the performance of the app and to help Kaspersky create more effective marketing materials.
The help for this version of the solution is no longer updated, so it may contain outdated information. For up-to-date information about the solution refer to the Kaspersky Secure Mobility Management 4.1 Help.
Exchanging information with Firebase Cloud Messaging
Kaspersky Endpoint Security for Android uses the Firebase Cloud Messaging (FCM) service to ensure timely delivery of commands to mobile devices and forced synchronization when policy settings are changed. The app also uses push notifications.
To use the Firebase Cloud Messaging service, you must configure the service settings in Kaspersky Security Center. If Firebase Cloud Messaging settings are not configured, commands on the mobile device and policy settings will be delivered when the device is synchronized with Kaspersky Security Center according to the schedule set in the policy (for example, every 24 hours). In other words, commands and policy settings will be delivered with a delay.
For the purposes of supporting the main functionality of the product, you agree to automatically provide the Firebase Cloud Messaging service with the unique ID of the app installation (Instance ID), and the following data:
- Information about the installed software: app version, app ID, app build version, app package name.
- Information about the computer on which the software is installed: OS version, device ID, version of Google services.
- Information about FCM: app ID in FCM, FCM user ID, protocol version.
Data is transmitted to Firebase services over a secure connection. Access to and protection of information is regulated by the relevant terms of use of the Firebase services: https://firebase.google.com/terms/data-processing-terms/, https://firebase.google.com/support/privacy/.
To prevent the exchange of information with the Firebase Cloud Messaging service:
- In the console tree, select Mobile Device Management → Mobile devices.
- From the context menu of the Mobile devices folder, select Properties.
- In the properties window of the Mobile devices folder, select the Google Firebase Cloud Messaging settings section.
- Click the Reset settings button.
The help for this version of the solution is no longer updated, so it may contain outdated information. For up-to-date information about the solution refer to the Kaspersky Secure Mobility Management 4.1 Help.
Exchanging information with Google Analytics for Firebase, Firebase Performance Monitoring, and Crashlytics
If you use the Administration Plug-in of an earlier version and have enabled data exchange with the Google Analytics service, Kaspersky Endpoint Security for Android Service Pack 4 Maintenance Release 3 will perform exchange data with the Google Analytics for Firebase service. Google Analytics support has been discontinued.
Kaspersky Secure Mobility Management exchanges data with the Google Analytics for Firebase, Firebase Performance Monitoring, and Crashlytics services for the following purposes:
- To improve the performance of the app.
To exchange data with the Google Analytics for Firebase, Firebase Performance Monitoring, and Crashlytics services for the purposes of improving the performance of the app, the following conditions must be fulfilled:
- The administrator or the device user must read and accept the terms of the Kaspersky Security Network Statement. If you choose for the Statement to be accepted by users, they will be prompted by a notification on the main app screen to accept the terms of the Statement. Users can also accept the Statements in the About the app section in the Kaspersky Endpoint Security for Android settings.
If you choose to accept the statements globally, the versions of the statements accepted via Kaspersky Security Center must match the versions already accepted by users. Otherwise, the users will be informed about the issue and prompted to accept the version of a statement that matches the version accepted globally by the administrator. The device status in the Kaspersky Security for Mobile (Devices) plug-in will also change to Warning.
- The administrator must configure the group policy settings to allow statistics to be sent to KSN (see below).
- The administrator or the device user must read and accept the terms of the Kaspersky Security Network Statement. If you choose for the Statement to be accepted by users, they will be prompted by a notification on the main app screen to accept the terms of the Statement. Users can also accept the Statements in the About the app section in the Kaspersky Endpoint Security for Android settings.
- To help Kaspersky create more effective marketing materials.
To exchange data with the Google Analytics for Firebase, Firebase Performance Monitoring, and Crashlytics services for the purposes of helping Kaspersky create effective marketing materials, the following conditions must be fulfilled:
- The administrator or the device user must read and accept the terms of the Statement regarding data processing for marketing purposes. If you choose the Statement to be accepted by users, they can accept the terms of the Statement when installing the app or in the About the app section in the Kaspersky Endpoint Security for Android settings.
- The administrator must configure the group policy settings to allow data to be sent to Google Analytics for Firebase, Firebase Performance Monitoring, and Crashlytics (see below).
To disable data exchange with the Google Analytics for Firebase, Firebase Performance Monitoring, and Crashlytics services:
- Open the configuration window of the management policy for mobile devices on which the Kaspersky Endpoint Security for Android app is installed.
- In the policy Properties window, select the Additional section.
- In the Data transfer section, clear the Allow data transfer to help improve the quality, appearance, and performance of the app check box.
- Click the Apply button to save the changes you have made.
Mobile device settings are changed after the next device synchronization with Kaspersky Security Center.
Page top
The help for this version of the solution is no longer updated, so it may contain outdated information. For up-to-date information about the solution refer to the Kaspersky Secure Mobility Management 4.1 Help.
Global acceptance of additional Statements
To enable the protection provided by Kaspersky Endpoint Security for Android, the terms of the End User License Agreement, as well as additional Statements (see below), have to be accepted. You configure a policy to accept the Statements listed below globally, for all users. The users will not be prompted to read and accept the terms of the following Agreements and Statements that have already been accepted globally:
- Kaspersky Security Network Statement
- Statement regarding data processing for Web Protection
- Statement regarding data processing for marketing purposes
If you choose to accept the statements globally, the versions of the statements accepted via Kaspersky Security Center must match the versions already accepted by users. Otherwise, the users will be informed about the issue and prompted to accept the version of a statement that matches the version accepted globally by the administrator. The device status in the Kaspersky Security for Mobile (Devices) plug-in will also change to Warning.
To choose whether the terms must be accepted globally or by users by applying a group policy:
- In the console tree, in the Managed devices folder, select the administration group to which the Android devices belong.
- In the workspace of the group, select the Policies tab.
- Open the policy properties window by double-clicking any column.
Complete the following steps within 15 minutes. Otherwise, you may face an error when saving changes to the policy.
- In the policy Properties window, select the Additional section.
- In the Data Transfer section, choose whether the Statement regarding data processing for marketing purposes will be accepted globally or by users.
- In the Kaspersky Security Network (KSN) settings section, choose whether Kaspersky Security Network Statement will be accepted globally or by users.
- Click the Apply button to save the changes you have made.
The user may accept the terms of a Statement or decline them at any time in the About the app section in the settings of Kaspersky Endpoint Security for Android.
Page top
The help for this version of the solution is no longer updated, so it may contain outdated information. For up-to-date information about the solution refer to the Kaspersky Secure Mobility Management 4.1 Help.
Samsung KNOX
Samsung KNOX is a mobile solution for configuring and protecting Samsung mobile devices running the Android operating system. For more details about Samsung KNOX, please visit the Samsung technical support website.
The help for this version of the solution is no longer updated, so it may contain outdated information. For up-to-date information about the solution refer to the Kaspersky Secure Mobility Management 4.1 Help.
Installation of the Kaspersky Endpoint Security for Android app via KNOX Mobile Enrollment
KNOX Mobile Enrollment (KME) is part of the Samsung KNOX mobile solution. It is used for batch installation and initial configuration of apps on new Samsung devices purchased from official vendors.
Installation of the Kaspersky Endpoint Security for Android app via KNOX Mobile Enrollment consists of the following steps:
- Creating a KNOX MDM profile with the Kaspersky Endpoint Security for Android app
- Adding devices in KNOX Mobile Enrollment
- Installing the Kaspersky Endpoint Security for Android app on the user's mobile devices
For more details about working with KNOX Mobile Enrollment, please refer to the KNOX Mobile Enrollment User Guide.
Deployment via KNOX Mobile Enrollment is possible only for Samsung devices. For the list of supported devices, visit the Samsung technical support website.
The help for this version of the solution is no longer updated, so it may contain outdated information. For up-to-date information about the solution refer to the Kaspersky Secure Mobility Management 4.1 Help.
Creating a KNOX MDM profile
A KNOX MDM profile is a profile that contains links to apps for their quick deployment and initial configuration on mobile devices.
To create a KNOX MDM profile:
- Sign in to the Samsung KNOX console → KNOX Mobile Enrollment.
- Select the MDM profiles section.
- Click Add.
The New KNOX MDM Profile Wizard starts.
- At the MDM server connection step, select Server URI is not required for my MDM service and click Next.
- At the MDM profile info step:
- Enter general information about the KNOX MDM profile: Profile name and Description.
- Click the Add MDM apps button and enter the path to the APK installation file.
The installation file for Kaspersky Endpoint Security for Android is included in the Kaspersky Secure Mobility Management distribution kit. Beforehand, place the APK installation file on the Kaspersky Security Center Web Server or on another server that is accessible for downloading from the device.
- Enter the settings for connecting the device to Kaspersky Security Center in the JSON user data field in the following format:
{"serverAddress":"ksc.server.com","serverPort":"12345","groupName":"MOBILE GROUP"}.The device must be connected to Kaspersky Security Center to activate the app, configure the device, and send commands.
- Select the Add Knox agreements check box.
To install Kaspersky Endpoint Security for Android via KNOX Mobile Enrollment, the mobile device user must accept the terms of the Samsung License Agreement. You can view the terms of the Samsung License Agreement in the section named End User License Agreements, Terms of Service, and User Agreements. You can also add other legal documents of your company that are necessary for deploying a KNOX MDM profile by clicking the Add user agreement button.
- Clear the Bind Knox license to this profile check box.
Samsung KNOX license information is delivered to the mobile device together with the policy when the device is synchronized with Kaspersky Security Center.
- Click the Save button.
As a result, the new KNOX MDM profile with the Kaspersky Endpoint Security for Android app will be added to the list in the KME console.
Page top
The help for this version of the solution is no longer updated, so it may contain outdated information. For up-to-date information about the solution refer to the Kaspersky Secure Mobility Management 4.1 Help.
Adding devices in KNOX Mobile Enrollment
Devices can be added in the KNOX Mobile Enrollment (KME) console in the following ways:
- The vendor automatically adds devices in the KME console after the devices are purchased.
Select this method if your organization is working with an official vendor of Samsung devices.
- The administrator installs the KNOX Deployment app from Google Play on their mobile device and migrates the KNOX MDM profile to users' devices using Bluetooth, NFC (Near Field Communication), or a QR code. After deployment of the KNOX MDM profile, the device will be automatically added in the KME console.
Select this method if the Samsung devices were not purchased from an official vendor.
Adding a device through the vendor
An official vendor of Samsung devices is registered in Samsung KNOX. For the list of official vendors, visit the Samsung technical support website. The vendor automatically adds devices in the KME console for your Samsung account immediately after the devices are purchased. To have the devices added by the vendor, you must register the vendor in the KME console for your Samsung account. You will need a reseller ID to add the vendor of Samsung devices in the KME console. To receive the reseller ID, you must send a request to the vendor. In the request, specify your KNOX client ID.
To view your KNOX client ID:
- Sign in to the Samsung KNOX console → KNOX Mobile Enrollment.
- Select the Resellers section.
- Your ID is displayed in the KNOX client ID field.
After you receive a response from the vendor with the reseller ID, register the vendor in the KME console. Prior to registering the vendor, you can create a KNOX MDM profile so that the profile can be automatically deployed when adding new devices.
To register an official vendor in the KME console:
- Sign in to the Samsung KNOX console → KNOX Mobile Enrollment.
- Select the Resellers section.
- Click the Register reseller button.
This opens a window for registering the device vendor.
- In the Reseller ID field, enter the ID received from the official vendor of Samsung devices.
- If you created a KNOX MDM profile, select the KNOX MDM profile in the vendor registration window.
When you add new devices, the KNOX MDM profile is automatically installed.
- In the Preferred download confirmation method list, select a method for confirming the addition of a device for a vendor.
- All downloads must be confirmed. When a device is added by the vendor, you will need to confirm the operation.
- Automatically confirm all downloads of this reseller. Devices of the vendor will be automatically added in the KME console.
- Click OK.
The vendor of Samsung devices will be added to the list of vendors in the KME console.
After new devices are purchased from the official vendor, the Kaspersky Endpoint Security for Android app will be automatically installed to the devices after the devices are connected to the internet. For more details about working with KNOX Mobile Enrollment, please refer to the KNOX Mobile Enrollment User Guide. If you already have a list of devices in the KME console, add the KNOX MDM profile with the KNOX MDM app to the device.
To deliver a KNOX MDM profile to devices:
- Sign in to the Samsung KNOX console → KNOX Mobile Enrollment.
- Select Devices → All devices.
- Select the devices on which you want to install the KNOX MDM profile.
- Click the Configure button.
The Device info window opens.
- In the MDM profile list, select the KNOX MDM profile with the Kaspersky Endpoint Security for Android app.
- In the Tags field, enter tags for grouping and labeling devices, and for search optimization in the KME console.
- Enter the user account credentials of the device into the User ID and Password fields.
Account credentials are required for receiving a mobile certificate. The user ID and password must match the user account credentials in Kaspersky Security Center (Full name and Password in user account properties).
- Select the KNOX MDM profile for the remaining devices.
- Click the Save button.
After the device is connected to the internet, the user will be prompted to install the KNOX MDM profile.
Adding a device through the KNOX Deployment app
If you did not purchase your Samsung device from an official vendor, you can add the device to KNOX Mobile Enrollment using Bluetooth, NFC, or a QR code. This will require the administrator's mobile device that will be used to deliver KNOX MDM profiles to users' mobile devices.
To add devices using the KNOX Deployment app, the following conditions must be met:
- Depending on the selected delivery mode, Bluetooth or NFC modules must be enabled on the mobile devices.
- The mobile devices must be connected to the internet.
To deliver a KNOX MDM profile using the KNOX Deployment app:
- Install the KNOX Deployment app from Google Play on the administrator's mobile device.
- Start the KNOX Deployment app.
- Enter your Samsung account credentials.
- In the KNOX Deployment window, configure the settings for deploying a KNOX MDM profile:
- Select the KNOX MDM profile.
- Select the deployment mode: Bluetooth or NFC.
When using Bluetooth, you can add a KNOX MDM profile to several devices at the same time.
- Click Start deployment:
- Bluetooth. On the user's mobile device, open the website https://configure.samsungknox.com.
This starts the Samsung KNOX Device Registration Wizard. Follow the instructions on the screen.
After the KNOX MDM profile is installed, the new device with the Bluetooth tag will be added in the KME console.
- NFC. Bring the administrator's mobile device close to the user's mobile device and transfer the KNOX MDM profile.
On the user's mobile device, there will be a prompt to install the KNOX MDM profile. The new device with the NFC tag will be added in the KME console.
- Bluetooth. On the user's mobile device, open the website https://configure.samsungknox.com.
The help for this version of the solution is no longer updated, so it may contain outdated information. For up-to-date information about the solution refer to the Kaspersky Secure Mobility Management 4.1 Help.
Installing the app
Prior to installing the Kaspersky Endpoint Security for Android app, issue a mobile certificate for mobile device users in the Kaspersky Security Center Administration Console. A mobile certificate is required for identifying the mobile device user in the Kaspersky Security Center Administration Console.
After deployment of the KNOX MDM profile is started, the APK installation file will be automatically downloaded on the mobile device. Installation of the Kaspersky Endpoint Security for Android app is started automatically. The user must accept the Samsung KNOX License Agreement and the Kaspersky Endpoint Security for Android License Agreement. No additional configuration of the app is required. After the app is installed, synchronization with Kaspersky Security Center will be performed automatically. The mobile device will be added to the Kaspersky Security Center Administration Console to the administration group specified in the KNOX MDM profile settings (groupName).
The help for this version of the solution is no longer updated, so it may contain outdated information. For up-to-date information about the solution refer to the Kaspersky Secure Mobility Management 4.1 Help.
Configuring KNOX containers
This section contains information about working with KNOX containers on Samsung devices running Android.
Use of KNOX containers is available only on Samsung devices running Android version 6 or later.
The help for this version of the solution is no longer updated, so it may contain outdated information. For up-to-date information about the solution refer to the Kaspersky Secure Mobility Management 4.1 Help.
About KNOX containers
A KNOX container is a safe environment on a user's device that has its own desktop, launch panel, apps, and widgets. A KNOX container lets you isolate corporate apps and data from personal apps and data. A KNOX container is a component of the Samsung KNOX mobile solution.
Samsung KNOX is a mobile solution for configuring and protecting Samsung mobile devices running the Android operating system. For more details about Samsung KNOX, please visit the Samsung technical support website.
KNOX containers let you separate personal and corporate data on a mobile device. For example, it is impossible to use a personal mailbox to send a file that is located in a KNOX container. It is recommended to deploy a KNOX container if personal mobile devices of employees are used for working with corporate data.
To use KNOX containers, you must activate Samsung KNOX. After synchronizing a device with Kaspersky Security Center, the user of the mobile device will be prompted to install the KNOX container. Before installing the KNOX container, the user must accept the terms of the End User License Agreement from Samsung.
After installing the KNOX container, the KNOX icon ![]() will be added to the desktop of the mobile device. Or the workspace will be added to the app list on the mobile device. To work with corporate data, the user needs to start the app from KNOX container.
will be added to the desktop of the mobile device. Or the workspace will be added to the app list on the mobile device. To work with corporate data, the user needs to start the app from KNOX container.
Kaspersky Endpoint Security for Android is not installed to the KNOX container and does not protect corporate data. Kaspersky Endpoint Security for Android does not detect the downloading of malicious files and block malicious sites in the KNOX container. You cannot control app launch or prohibit the use of the camera in the KNOX container. Kaspersky Endpoint Security for Android protects private data only. You can protect corporate data with the Samsung KNOX tools. For more details about Samsung KNOX, please visit the Samsung technical support website.
Page top
The help for this version of the solution is no longer updated, so it may contain outdated information. For up-to-date information about the solution refer to the Kaspersky Secure Mobility Management 4.1 Help.
Activating Samsung KNOX
To use a KNOX container on the user's mobile device, you must activate Samsung KNOX. The procedure of activating Samsung KNOX depends on the Kaspersky Endpoint Security for Android version installed on your users' devices:
- If the current version of Kaspersky Endpoint Security for Android is installed on the devices, you do not need any keys to activate Samsung KNOX.
- If an old version Kaspersky Endpoint Security for Android (10.8.3.174 or earlier) is installed on the devices, you need to obtain a KNOX License Manager key (hereinafter referred to as a KLM key) from Samsung. A KNOX License Manager key is a unique code that is used by the Samsung KNOX licensing system. For detailed information about a KLM key, please refer to the Samsung KNOX Technical Support website.
Use of KNOX containers is possible only on Samsung devices.
To activate Samsung KNOX:
- In the console tree, in the Managed devices folder, select the administration group to which the Android devices belong.
- In the workspace of the group, select the Policies tab.
- Open the policy properties window by double-clicking any column.
Complete the following steps within 15 minutes. Otherwise, you may face an error when saving changes to the policy.
- In the policy Properties window, select the Manage Samsung KNOX → KNOX containers section.
- In the KNOX License Manager key field, specify the following:
- If the current version of Kaspersky Endpoint Security for Android is installed on the devices, type any character.
- If an old version Kaspersky Endpoint Security for Android (10.8.3.174 or earlier) is installed on the devices, enter the KLM key received from Samsung.
- Set the Lock attribute in the locked position .
- Click the Apply button to save the changes you have made.
Samsung KNOX will be activated after the next device synchronization with Kaspersky Security Center. The user will be prompted to accept the terms of the End User License Agreement from Samsung and install the KNOX container.
To deactivate Samsung KNOX:
- In the console tree, in the Managed devices folder, select the administration group to which the Android devices belong.
- In the workspace of the group, select the Policies tab.
- Open the policy properties window by double-clicking any column.
Complete the following steps within 15 minutes. Otherwise, you may face an error when saving changes to the policy.
- In the policy Properties window, select the Manage Samsung KNOX → KNOX containers section.
- Clear the KNOX License Manager key field value.
- Click the Apply button to save the changes you have made.
Samsung KNOX will be deactivated after the next device synchronization with Kaspersky Security Center. Access to the KNOX container will be blocked.
Samsung KNOX limitations
- Use of KNOX containers is available only on Samsung devices.
- On Samsung devices that support KNOX 2.6, 2.7 and 2.7.1, Web Protection and App Control do not work in a KNOX container. This issue is related to the lack of required permissions in the KNOX container (Accessibility service). On devices that support KNOX 2.8 or later, all components of the app operate without limitations.
- Kaspersky Endpoint Security for Android versions prior to Service Pack 4 Maintenance Release 3 Update 2 may work unstable on Samsung Android 10 devices due to Samsung KNOX updates. It is recommended to update Kaspersky Endpoint Security for Android to Service Pack 4 Maintenance Release 3 Update 2 version.
The help for this version of the solution is no longer updated, so it may contain outdated information. For up-to-date information about the solution refer to the Kaspersky Secure Mobility Management 4.1 Help.
Configuring Firewall in KNOX
You should configure the Firewall settings to monitor network connections in a KNOX container.
To configure Firewall in a KNOX container:
- In the console tree, in the Managed devices folder, select the administration group to which the Android devices belong.
- In the workspace of the group, select the Policies tab.
- Open the policy properties window by double-clicking any column.
Complete the following steps within 15 minutes. Otherwise, you may face an error when saving changes to the policy.
- In the policy Properties window, select the Manage Samsung KNOX → KNOX containers section.
- In the Firewall window, click Configure.
The Firewall window opens.
- Select the Firewall mode:
- To allow all inbound and outbound connections, move the slider to Allow all.
- To block all network activity except that of apps on the list of exclusions, move the slider up to Block all but exceptions.
- If you have set the Firewall mode to Block all but exceptions, create a list of exclusions:
- Click Add.
This opens the Exclusion for Firewall window.
- In the App name field, enter the name of the mobile app.
- In the Package name field, enter the system name of the mobile app package (for example,
com.mobileapp.example). - Click OK.
- Click Add.
- Click the Apply button to save the changes you have made.
Mobile device settings are changed after the next device synchronization with Kaspersky Security Center.
Page top
The help for this version of the solution is no longer updated, so it may contain outdated information. For up-to-date information about the solution refer to the Kaspersky Secure Mobility Management 4.1 Help.
Configuring an Exchange mailbox in KNOX
To work with corporate mail, contacts, and the calendar in a KNOX container, you should configure the Exchange mailbox settings (available only on Android 9 and earlier).
To configure an Exchange mailbox in a KNOX container:
- In the console tree, in the Managed devices folder, select the administration group to which the Android devices belong.
- In the workspace of the group, select the Policies tab.
- Open the policy properties window by double-clicking any column.
Complete the following steps within 15 minutes. Otherwise, you may face an error when saving changes to the policy.
- In the policy Properties window, select the Manage Samsung KNOX → KNOX containers section.
- In the Exchange ActiveSync window, click the Configure button.
The Exchange mail server settings window opens.
- In the Server address field, enter the IP address or DNS name of the server hosting the mail server.
- In the Domain field, enter the name of the mobile device user's domain on the corporate network.
- In the Synchronization interval drop-down list, select the desired interval for mobile device synchronization with the Microsoft Exchange server.
- To use the SSL (Secure Sockets Layer) data transport protocol, select the Use SSL connection check box.
- To use digital certificates to protect data transfer between the mobile device and the Microsoft Exchange server, select the Verify server certificate check box.
- Click the Apply button to save the changes you have made.
Mobile device settings are changed after the next device synchronization with Kaspersky Security Center.
Page top
The help for this version of the solution is no longer updated, so it may contain outdated information. For up-to-date information about the solution refer to the Kaspersky Secure Mobility Management 4.1 Help.
Appendices
This section provides information that complements the document text.
The help for this version of the solution is no longer updated, so it may contain outdated information. For up-to-date information about the solution refer to the Kaspersky Secure Mobility Management 4.1 Help.
Permissions to configure group policies
Kaspersky Security Center administrators can configure the access rights of Administration Console users for different application functions, depending on the job duties of users.
For each functional area, the administrator can assign the following permissions:
- Allow editing. The Administration Console user is allowed to change the policy settings in the properties window.
- Block editing. The Administration Console user is prohibited from changing the policy settings in the properties window. Policy tabs belonging to the functional scope for which this right has been assigned are not displayed in the interface.
Permissions to access sections of the Kaspersky Endpoint Security for Android Administration Plug-in
Functional scope
Policies section
Android work profile
Android work profile
Anti-Theft
Anti-Theft
App Control
App Control
Protection
Scan, Protection, Database update
Compliance Control
Compliance Control
Device Management
Device Management, Synchronization
Manage Samsung device
APN, Manage Samsung device, KNOX containers, Firewall
System management
Additional, Wi-Fi
Web Protection
Web Protection
Device owner mode
Feature restrictions, Google Chrome settings, Exchange ActiveSync, Kiosk mode, NDES and SCEP
Permissions to access sections of the Kaspersky Device Management for iOS Administration Plug-in
Functional scope
Policies section
Additional
Web clips, Fonts, AirPlay, AirPrint
Exchange ActiveSync
General, Password, Synchronization, Features restrictions, Applications restrictions
General
General, Single Sign-On, Web Protection, Wi-Fi, Access Point Name (APN), Exchange ActiveSync, Email, Custom Payloads
LDAP (calendar / contacts)
LDAP, Calendar, Contacts, Calendar subscriptions
Limitations and security
Feature Restriction, Restrictions for Applications, Restrictions for Media Content, Password, VPN, Global HTTP proxy, Certificates, SCEP
The help for this version of the solution is no longer updated, so it may contain outdated information. For up-to-date information about the solution refer to the Kaspersky Secure Mobility Management 4.1 Help.
App categories
App Control supports categorization of apps. The operation mode configured for the app category is applied to all apps in this category. The category of each app is determined by the Kaspersky Security Network cloud service.
App categories
Category |
Description |
Entertainment |
Apps for interactive entertainment. |
IM Clients, Mobile Messaging Apps |
Apps for instant messaging, voice and video communication over IP. |
Social networks |
Apps for using social networks and blogs. |
Business software |
Apps for tax calculation, management of banking operations, handling spreadsheets, accounting, and other business-oriented apps. Text editors. |
Home, Family, Hobbies, Health |
Apps with recipes, style tips. Apps for exercising, keeping a schedule of workouts, receiving tips on dieting, healthy nutrition, safety, and accident prevention. |
Medical |
Apps containing catalogs of symptoms and medications, apps for healthcare professionals, healthcare magazines and news. |
Multimedia |
Services for movie subscription, media players and video players. Musical services, players, radio broadcasts. |
Graphic design software |
Apps for use with a camera, graphics editors, apps for managing and publishing photos. |
Plug-ins for reading news and RSS feeds |
Apps for reading newspapers, magazines, blogs, news aggregators. |
Weather |
Apps displaying the weather forecast. |
Education apps |
Book readers, manuals, textbooks, dictionaries, thesauruses, encyclopedias. Apps helping to study for exams, training materials, dictionaries, developmental games, language study tools. |
Online shopping |
Apps for making online purchases and bidding in auctions, gift coupons, price comparison tools, shopping list apps, apps for reading feedback about products. |
Startup utilities |
Apps aimed at redesigning the desktop, widgets, shortcuts. |
Operating systems and utilities |
System apps that provide the operating system management, user interaction, and RAM management. |
Map viewers |
City guides, information about local businesses, trip planning tools. |
Other apps |
Software libraries, technical demo versions of apps. Apps not included in any category. |
Transportation |
Apps for using public transport, navigation tools, apps for drivers. |
Games |
Arcades, Sweepstakes, Racing, Other, Casino, Card Games, Music, Board Games, Tutorials, Puzzles, Adventures, RPG, Simulators, Word Games, Sports Games, Strategies, Action. |
Browsers |
Apps for viewing websites, the contents of web documents and files. Apps for managing web applications. |
Development tools |
Apps intended for developing software. Debuggers, compilers, code editors, graphic user interface editors. |
OS Apps |
Apps delivered together with the operating system and required for the proper functioning of the operating system. |
Internet apps |
Download managers, mail clients, web search apps, and other apps for convenient internet browsing. |
Network infrastructure software |
Apps for managing servers, data storage devices, network equipment, software within a corporate network, automation and integration of the complete infrastructure. |
Networking software |
Apps for organizing collaboration of a group of users on multiple devices, communication among devices. |
System utilities |
Apps supplied concurrently with the operating system: file managers, archiving tools, utilities for hardware and software diagnostics, memory optimization tools, uninstallers, processor management utilities. |
Security software |
Device data protection apps. Apps that detect and neutralize threats on the device. Firewalls. Data encryption apps. |
Download managers |
Apps for downloading files from external sources. |
Apps for storing files on the internet |
Apps for managing online storage of files, notes, and multimedia. |
Reference systems |
Book readers, manuals, textbooks, dictionaries, thesauruses, wiki-encyclopedias. |
Email applications |
Apps used for sending and receiving email messages. |
The help for this version of the solution is no longer updated, so it may contain outdated information. For up-to-date information about the solution refer to the Kaspersky Secure Mobility Management 4.1 Help.
Using the Kaspersky Endpoint Security for Android app
This Help section describes features and operations that are available to users of the Kaspersky Endpoint Security for Android app.
Articles in this section comprise all the options that can be available or visible on a mobile device. The actual layout and behavior of the app depends on the remote administration system that is implemented and how the administrator configures your device in accordance with corporate security requirements. Some functions and options described in this section may not apply to your actual experience with the app. If you have any questions about the app on your specific device, contact your administrator.
The help for this version of the solution is no longer updated, so it may contain outdated information. For up-to-date information about the solution refer to the Kaspersky Secure Mobility Management 4.1 Help.
App features
Kaspersky Endpoint Security offers the following key features.
Protection against viruses and other malware
The app uses the Anti-Malware component to protect the device against viruses and other malware.
Anti-Malware performs the following functions:
- Scans the entire device, installed apps, or selected folders for threats
- Protects the device in real time
- Scans newly installed apps before they are launched for the first time
- Updates anti-malware databases
If an application that collects information and sends it to be processed is installed on a mobile device, Kaspersky Endpoint Security for Android may classify this application as malware.
Protection of stolen or lost device data
The Anti-Theft component protects your data against unauthorized access and helps you to locate the device if it gets lost or stolen.
Anti-Theft lets you perform the following operations remotely:
- Lock the device.
To prevent a hacker from having the capability to unlock the device, Kaspersky Endpoint Security must be enabled as an Accessibility Features service on mobile devices running Android 7.0 or later.
- Turn on a loud alarm on the device even if the device sound is disabled.
- Get the device location coordinates.
- Wipe data stored on the device.
- Reset to factory settings.
- Secretly take a mugshot of the person using your device.
To enable Anti-Theft operations, Kaspersky Endpoint Security must be enabled as a device administrator. If you did not grant device administrator rights during the initial configuration of apps, you can grant administrator rights to Kaspersky Endpoint Security using the appropriate notification or in the device settings (Android Settings → Security → Device administrators).
Protection against online threats
The Web Protection component provides protection against online threats.
Web Protection blocks malicious websites that distribute malicious code, and phishing websites designed to steal your confidential data and gain access to your financial accounts. Web Protection scans websites before you open them by using the Kaspersky Security Network cloud service. Learn more.
App Control
According to corporate security requirements, the administrator of the remote administration system (hereinafter also "administrator") creates lists of recommended, blocked, and required apps. The App Control component is used to install recommended and required apps, update them, and remove blocked apps.
App Control lets you install recommended and required apps to your device via a direct link to the distribution package or a link to Google Play. App Control lets you remove blocked apps that violate corporate security requirements.
Kaspersky Endpoint Security must be enabled as an Accessibility Features service to ensure proper functioning of App Control. If you did not enable this service during the Initial Configuration Wizard for the app, you can enable Kaspersky Endpoint Security as an Accessibility Features service using the appropriate notification or in the device settings (Android Settings → Accessibility → Services).
Compliance Control
The Compliance Control component automatically checks whether the device conforms to corporate security requirements. If your device does not meet corporate security requirements, the app shows a notification with the following information:
- Reason for the non-compliance (for example, blocked apps were detected on the device or anti-malware databases are out of date).
- Time period within which you must eliminate the non-compliance (for example, 24 hours).
- Action that will be taken on the device if you do not eliminate the non-compliance within the specified time period (for example, device will be locked).
- Action performed to fix the device's non-compliance with corporate security requirements.
The help for this version of the solution is no longer updated, so it may contain outdated information. For up-to-date information about the solution refer to the Kaspersky Secure Mobility Management 4.1 Help.
Main window at a glance
The appearance of the main window slightly differs for different screen resolutions.
The main window displays the overall protection status of your device. This status determines the color of the window:
- Green indicates that device protection is at an optimal level.
- Red indicates critical problems with device security.
In the main app window, you can also do the following:
- View notifications by clicking the button at the top right corner. They inform you about security issues, problems in app operation, compliance with corporate security requirements, and the status of your license.
- Navigate between the main window and app settings using the buttons at the bottom.
The help for this version of the solution is no longer updated, so it may contain outdated information. For up-to-date information about the solution refer to the Kaspersky Secure Mobility Management 4.1 Help.
Status bar icon
After the first launch wizard finishes, the icon of Kaspersky Endpoint Security appears in the status bar.
The icon reflects the operation of the app and provides access to the main window of Kaspersky Endpoint Security.
The icon signals the operation of Kaspersky Endpoint Security and reflects the protection status of your device:
 – Device is protected.
– There are problems with protection (for example, the anti-malware databases are out of date or a newly installed app has not been scanned).
The help for this version of the solution is no longer updated, so it may contain outdated information. For up-to-date information about the solution refer to the Kaspersky Secure Mobility Management 4.1 Help.
Device scan
Anti-Malware has a number of limitations:
- When Anti-Malware is running, a threat detected in the external memory of the device (such as an SD card) cannot be neutralized automatically in the Work profile (Applications with a briefcase icon, Configuring the Android work profile). Kaspersky Endpoint Security for Android does not have access to external memory in the Work profile. Information about detected objects is displayed in app notifications. To neutralize objects detected in the external memory, the object files have to be deleted manually and the device scan restarted.
- Due to technical limitations, Kaspersky Endpoint Security for Android cannot scan files with a size of 2 GB or more. During a scan, the app skips such files without notifying you that such files were skipped.
- On devices running Android 11 or later, the Kaspersky Endpoint Security for Android app can't scan the "Android/data" and "Android/obb" folders and detect malware in them due to technical limitations.
To start a device scan:
- In the main window of Kaspersky Endpoint Security, tap Settings → App settings → Anti-Malware → Start scan.
- Select the device scan scope:
- Scan entire device. The app scans the entire file system of the device.
- Scan installed apps. The app scans only installed apps.
- Custom Scan. The app scans the selected folder or individual file. You can select an individual object (folder or file) or one of the following partitions of device memory:
- Device memory. Read-accessible memory of the entire device. This also includes the system memory partition that stores operating system files.
- Internal memory. Device memory partition intended for installation of apps and storage of media content, documents, and other files.
- External memory. External SD card memory. If no external SD card is installed, this option is hidden.
Access to malware scan settings may be restricted by your administrator.
To configure the malware scan:
- In the main window of Kaspersky Endpoint Security, tap Settings → App settings → Anti-Malware → Scan settings.
- If you want the app to detect adware and apps that could be used by hackers to cause harm to your device or data when the app performs a scan, switch on the Adware, dialers, and other toggle button.
- Click Action on threat detection, and then select the action taken by the app by default:
- Quarantine
Quarantine stores files as archives, so they cannot harm the device. The Quarantine lets you delete or restore the files that were moved to isolated storage.
- Request action
The app prompts you to select an action for each detected object: skip, quarantine, or delete. When multiple objects are detected, you can apply a selected action to all objects.
- Delete
Detected objects will be automatically deleted. No additional actions are required. Prior to deleting an object, Kaspersky Endpoint Security will display a temporary notification about the detection of the object.
- Skip
If the detected objects have been skipped, Kaspersky Endpoint Security warns you about problems in device protection. For each skipped threat, the app provides actions that you can perform to eliminate the threat. The list of skipped objects may change, for example, if a malicious file was deleted or moved. To receive an up-to-date list of threats, run a full device scan. To ensure reliable protection of your data, eliminate all detected objects.
- Quarantine
Information about detected threats and the actions taken on them is logged in app reports (Settings → Reports). You can choose to display reports on Anti-Malware operations.
Page top
The help for this version of the solution is no longer updated, so it may contain outdated information. For up-to-date information about the solution refer to the Kaspersky Secure Mobility Management 4.1 Help.
Running a scheduled scan
Anti-Malware has a number of limitations:
- When Anti-Malware is running, a threat detected in the external memory of the device (such as an SD card) cannot be neutralized automatically in the Work profile (Applications with a briefcase icon, Configuring the Android work profile). Kaspersky Endpoint Security for Android does not have access to external memory in the Work profile. Information about detected objects is displayed in app notifications. To neutralize objects detected in the external memory, the object files have to be deleted manually and the device scan restarted.
- Due to technical limitations, Kaspersky Endpoint Security for Android cannot scan files with a size of 2 GB or more. During a scan, the app skips such files without notifying you that such files were skipped.
- On devices running Android 11 or later, the Kaspersky Endpoint Security for Android app can't scan the "Android/data" and "Android/obb" folders and detect malware in them due to technical limitations.
To configure the full scan schedule for a device:
- In the main window of Kaspersky Endpoint Security, tap Settings → App settings → Anti-Malware → Scan settings.
- Tap Schedule, and then select the full scan frequency:
- Weekly
- Daily
- Disabled
- After database update
- Click Start day, and then select the day of the week when you want to start the full scan.
- Click Start time, and then select the time for starting the full scan.
A full scan of the device is started according to schedule.
If the device is in battery saver mode, the app may perform this task later than specified. To ensure timely responses of KES devices on Android to the administrator's commands, enable the use of Google Firebase Cloud Messaging.
Page top
The help for this version of the solution is no longer updated, so it may contain outdated information. For up-to-date information about the solution refer to the Kaspersky Secure Mobility Management 4.1 Help.
Changing the Protection mode
Real-Time Protection lets you detect threats in files being opened, and scan apps while they are being installed on the device in real time. The anti-malware databases and the Kaspersky Security Network cloud service (Cloud Protection) are used to ensure security automatically.
To change the device protection mode:
- In the main window of Kaspersky Endpoint Security, tap Settings → App settings → Anti-Malware → Real-time protection mode.
- Select the device Protection mode:
- Disabled. Protection is disabled.
- Recommended. Anti-Malware scans only installed apps and files from the Downloads folder. Anti-Malware scans new apps as soon as they are installed.
- Extended. Anti-Malware scans all device files for malicious objects when any operation is performed with them (for example, when they are saved, moved, or modified). Anti-Malware also scans new apps as soon as they are installed.
Information about the current Protection mode is displayed under the description of the component.
Access to Real-Time Protection settings may be restricted by your administrator.
To enable Cloud Protection (KSN):
- Tap Settings → App settings → Anti-Malware in the main window of Kaspersky Endpoint Security.
- Switch on the Cloud Protection (KSN) toggle button.
The Cloud Protection (KSN) toggle button manages the use of Kaspersky Security Network only for real-time protection of a device. If the check box is cleared, Kaspersky Endpoint Security continues to use KSN for the operation of other components of the app.
As a result, the app obtains access to the Kaspersky online knowledge base regarding the reputation of files and apps. The scan is performed for threats whose information has not yet been added to anti-malware databases but is already available in KSN. Kaspersky Security Network cloud service provides full operation of Anti-Malware and reduces the likelihood of false alarms. Only your administrator can fully disable the use of Kaspersky Security Network.
To configure Real-Time Protection:
- In the main window of Kaspersky Endpoint Security, tap Settings → App settings → Anti-Malware → Scan settings.
- If you want the app to detect adware and apps that could be used by hackers to cause harm to your device or data when the app performs a scan, switch on the Adware, dialers, and other toggle button.
- Click Action on threat detection, and then select the action taken by the app by default:
- Quarantine
Quarantine stores files as archives, so they cannot harm the device. Quarantine lets you delete or restore the files that were moved to isolated storage.
- Delete
Detected objects will be automatically deleted. No additional actions are required. Prior to deleting an object, Kaspersky Endpoint Security will display a temporary notification about the detection of the object.
- Skip
If the detected objects have been skipped, Kaspersky Endpoint Security warns you about problems in device protection. For each skipped threat, the app provides actions that you can perform to eliminate the threat. The list of skipped objects may change, for example, if a malicious file was deleted or moved. To receive an up-to-date list of threats, run a full device scan. To ensure reliable protection of your data, eliminate all detected objects.
- Quarantine
Information about detected threats and the actions taken on them is logged in the app reports (Settings → Reports). You can choose to display reports on Anti-Malware operations.
Page top
The help for this version of the solution is no longer updated, so it may contain outdated information. For up-to-date information about the solution refer to the Kaspersky Secure Mobility Management 4.1 Help.
Anti-malware database updates
To update anti-malware databases of the app:
In the main window of Kaspersky Endpoint Security, tap Settings → App settings → Anti-Malware → Start database update.
Page top
The help for this version of the solution is no longer updated, so it may contain outdated information. For up-to-date information about the solution refer to the Kaspersky Secure Mobility Management 4.1 Help.
Scheduled database update
The app can automatically update the anti-malware databases according to the schedule you specify.
To configure the update schedule:
- In the main window of Kaspersky Endpoint Security, tap Settings → App settings → Anti-Malware → Database update settings.
- Click Schedule, and then select the update frequency:
- Weekly
- Daily
- Disabled
- Click Start day, and then select the day of the week when you want to run the update.
- Click Start time, and then select the time for starting the update.
Anti-malware database updates are started according to schedule.
If the device is in battery saver mode, the app may perform this task later than specified. To ensure timely responses of KES devices on Android to the administrator's commands, enable the use of Firebase Cloud Messaging.
Updates functionality (including providing anti-malware signature updates and codebase updates), as well as KSN functionality will not be available in the software in the U.S. territory from 12:00 AM Eastern Daylight Time (EDT) on September 10, 2024 in accordance with the restrictive measures.
Page top
The help for this version of the solution is no longer updated, so it may contain outdated information. For up-to-date information about the solution refer to the Kaspersky Secure Mobility Management 4.1 Help.
Things to do if your device gets lost or stolen
If your device gets lost or stolen, contact your system administrator. The administrator can execute Anti-Theft commands on your device remotely according to corporate security requirements.
If a Full reset command is sent to the device, control over the device will be lost, and the remaining Anti-Theft commands will not work.
Page top
The help for this version of the solution is no longer updated, so it may contain outdated information. For up-to-date information about the solution refer to the Kaspersky Secure Mobility Management 4.1 Help.
Web Protection
The following conditions must be met to enable Web Protection:
- The Statement regarding data processing for the purpose of using Web Protection (Web Protection Statement) should be accepted. Kaspersky Endpoint Security uses Kaspersky Security Network (KSN) to scan websites. The Web Protection Statement contains the terms of data exchange with KSN.
Your administrator can accept the Web Protection Statement for you in Kaspersky Security Center. In this case, you are not required to take any action.
If your administrator has not accepted the Web Protection Statement and has sent you the request to do this, you must read and accept the Web Protection Statement in the app settings.
If your administrator has not accepted the Web Protection Statement, Web Protection is not available.
Web Protection on Android devices is supported only by Google Chrome, HUAWEI Browser, Samsung Internet Browser, and Yandex Browser.
If the Kaspersky Endpoint Security for Android app in device owner mode is not enabled as an Accessibility Features service, Web Protection is supported only by the Google Chrome browser and checks only the domain of a website. To allow other browsers (Samsung Internet Browser, Yandex Browser, and HUAWEI Browser) support Web Protection, enable Kaspersky Endpoint Security as an Accessibility Features service. This will also enable the Custom Tabs feature operation.
The Custom Tabs feature is supported by Google Chrome, HUAWEI Browser, and Samsung Internet Browser.
To use Web Protection in Telegram, disable opening links in the In-App Browser in Telegram settings.
Web Protection for HUAWEI Browser, Samsung Internet Browser, and Yandex Browser does not block sites on a mobile device if a work profile is used and Web Protection is enabled only for the work profile.
To use Web Protection at all times when you browse the web, set Google Chrome, HUAWEI Browser, Samsung Internet Browser, or Yandex Browser as the default browser.
To set a supported browser as the default browser and use Web Protection for website scanning at all times:
- In the main window of Kaspersky Endpoint Security, tap Settings → App settings → Web Protection.
- Switch the Web Protection toggle button to On.
- Tap Set default browser.
This button is displayed when Web Protection is enabled and a supported browser has not been set as the default browser.
The default browser selection wizard starts.
- Follow the wizard instructions.
The wizard sets Google Chrome, HUAWEI Browser, or Samsung Internet Browser as the default browser. Web Protection continuously scans websites while you browse the web.
Page top
The help for this version of the solution is no longer updated, so it may contain outdated information. For up-to-date information about the solution refer to the Kaspersky Secure Mobility Management 4.1 Help.
Get Certificate
To obtain a certificate for accessing corporate network resources:
- In the main window of Kaspersky Endpoint Security, tap Settings → App settings → Additional → Get certificate.
- Specify your corporate network account credentials. The login must be specified in one of the following formats:
userPrincipalName@DNSDomainNamesAMAccountNamesAMADomain\sAMAccountName
For more information on these attributes, visit the Microsoft Technical documentation website. For details, you may contact your administrator.
- If you have received a one-time password from the administrator, select the One-time password check box, and then enter the password you received.
The Certificate Installation Wizard starts.
- Follow the wizard's instructions.
The help for this version of the solution is no longer updated, so it may contain outdated information. For up-to-date information about the solution refer to the Kaspersky Secure Mobility Management 4.1 Help.
Synchronizing with Kaspersky Security Center
Synchronization of the mobile device with the Kaspersky Security Center remote administration system is required for protecting and configuring your device in accordance with corporate security requirements. The device is automatically synchronized with Kaspersky Security Center, and you can also start synchronization manually. After the first synchronization, your device is added to the list of mobile devices managed via Kaspersky Security Center. The administrator can then configure your device in accordance with corporate security requirements.
You can configure synchronization settings while running the Initial Configuration Wizard or in the settings of Kaspersky Endpoint Security. Synchronization settings have to be configured if you have installed Kaspersky Endpoint Security by using Google Play. Request the values of synchronization settings from your system administrator.
Modify the settings of device synchronization with the Kaspersky Security Center remote administration system only when instructed to do so by the administrator.
To synchronize your device with Kaspersky Security Center:
- In the main window of Kaspersky Endpoint Security, tap Settings → App settings → Synchronization.
- In the Synchronization settings section, specify the values of the following settings:
- Server
- Port
- Group
- Corporate email address
Synchronization settings can be hidden by the administrator.
- Tap Synchronize.
The help for this version of the solution is no longer updated, so it may contain outdated information. For up-to-date information about the solution refer to the Kaspersky Secure Mobility Management 4.1 Help.
Activating the Kaspersky Endpoint Security for Android app without Kaspersky Security Center
In most cases, the Kaspersky Endpoint Security for Android app that is installed on your device is activated by the administrator centrally in the Kaspersky Security Center remote administration system. If your device is not connected to Kaspersky Security Center, you can enter the activation code manually. To get the activation code, contact the administrator.
Activate the app manually only when instructed to do so by the administrator.
To enter the activation code:
- In the error message that says that your license will soon expire or has expired and that your device is not connected to the Administration Server, tap Activate.
- In the activation window, enter the activation code that the administrator gave you, and then tap Activate.
- If the activation code is correct, a notification is displayed saying that the app has activated, along with the license expiration date.
The Kaspersky Endpoint Security for Android app on your device is activated.
Page top
The help for this version of the solution is no longer updated, so it may contain outdated information. For up-to-date information about the solution refer to the Kaspersky Secure Mobility Management 4.1 Help.
Installing the app in device owner mode
Device owner mode is the device operation mode for company-owned Android devices. This mode allows the administrator to have full control over the entire device and configure a wide range of device functions.
The Kaspersky Endpoint Security for Android app can be installed in one of the following ways:
- Using the QR code generated in Kaspersky Security Center for devices running Android 7 and later.
- Using the app installation package from Kaspersky Security Center and running the command in ADB. This method is suitable for devices running Android 5-6 and devices with later Android versions on which the QR code scanner is not available.
The help for this version of the solution is no longer updated, so it may contain outdated information. For up-to-date information about the solution refer to the Kaspersky Secure Mobility Management 4.1 Help.
Configuring the app in device owner mode on Android 7 and later
To deploy the app in device owner mode, you need to reset the device to factory settings and install the app using the QR code generated in Kaspersky Security Center. The QR code contains all the necessary data for app configuration.
To install the Kaspersky Endpoint Security for Android app on the device in device owner mode:
- Reset the device to factory settings.
The device reboots, and the welcome screen appears.
- Tap six times on an empty space of the device's welcome screen.
The QR code reader appears.
- Scan the QR code generated in Kaspersky Security Center for app installation.
- Perform the initial setup of the device. The operating system installs the Kaspersky Endpoint Security for Android app in the background.
Once the device setup completes, Kaspersky Endpoint Security for Android starts on the device.
On Xiaomi devices running Android 12, Kaspersky Endpoint Security for Android does not start automatically. In this case, please, start the app manually.
- Activate the app by following the instructions in the app's Initial Configuration Wizard.
When deploying the app via the installation package downloaded from Kaspersky Security Center, after the device is reset to factory settings and the QR code is scanned, the Blocked by Play Protect message may appear on the device. The issue is caused by the installation package signing certificate being different from the one specified in Google Play. The user should continue the installation by choosing Install anyway. If OK is selected, the installation process will be interrupted and the device will be reset to factory settings.
The Kaspersky Endpoint Security for Android app is installed and activated on the device in device owner mode.
Page top
The help for this version of the solution is no longer updated, so it may contain outdated information. For up-to-date information about the solution refer to the Kaspersky Secure Mobility Management 4.1 Help.
Configuring the app in device owner mode on Android 5-6
For devices running Android 5-6, the process of configuring the device owner mode differs from the standard one. You need to pre-configure the device, install the app, and use Android Debug Bridge (ADB) for additional settings.
This scenario can also be used for other Android versions and for devices on which the QR code scanner is not available.
Pre-configuration
When creating an installation package in the Administration Console, select Personal device in the Device type section and Download the app installation package from Kaspersky Security Center on the Method to install Kaspersky Endpoint Security for Android on devices page. For more details, see the Installation of Kaspersky Endpoint Security for Android on personal devices section.
Deployment
To deploy the Kaspersky Endpoint Security for Android app on the device with Android 5-6 in device owner mode:
- Reset the device to factory settings. You can skip this step and go to step 3 if the device has not been used before.
- Delete all accounts on your device in the Settings → Accounts section.
- Delete all screen lock protection you may have.
- Enable the developer mode:
- Navigate to the Settings → About phone section.
- Tap the Build Number option seven times until you see the "You are now a developer!" message.
On some devices, these sections might be located or named differently. For more details, please refer to the Android documentation.
- Enable the USB debugging option in the Settings → Developer options section.
- Allow app installation from the sources other than Google Play:
- Navigate to the Settings → Security section.
- Enable the Unknown sources option.
- Install the Kaspersky Endpoint Security for Android app on the device via the app installation package from Kaspersky Security Center or using other suitable methods of installation (for example .apk).
- In the window that opens on the device after installation, tap Done to exit the Installation Wizard.
For this scenario to work correctly, do not launch the app before running the ADB command described in step 11.
- Install ADB on your computer.
- Connect the device to the computer using a USB cable.
The system will show a dialog asking whether to allow the device debugging on the computer. Click OK.
- Start ADB and run the following command:
adb shell dpm set-device-owner com.kaspersky.kes/com.kms.selfprotection.DeviceAdmin. - Start the Kaspersky Endpoint Security for Android app and activate it by following the instructions in the app's Initial Configuration Wizard.
Some Xiaomi devices cannot be enrolled using ADB if MIUI optimization is turned on. To enroll these devices, turn off MIUI optimization by navigating to Settings → Build number. Tap on the build number six to eight times to enable Developer options and disable MIUI optimization. Perform the above mentioned steps again to successfully enroll these devices.
Page top
The help for this version of the solution is no longer updated, so it may contain outdated information. For up-to-date information about the solution refer to the Kaspersky Secure Mobility Management 4.1 Help.
Installing root certificates on the device
A root certificate is a public key certificate issued by a trusted certificate authority (CA). Root certificates are used to verify custom certificates and guarantee their identity.
Your administrator can specify root certificates to be installed on the device. On devices operating in device owner mode and in a work profile, these certificates are installed automatically. In personal profiles, you will get notifications and have to install each certificate manually by following the instructions below.
To manually install a root certificate on the device:
- Open the device Settings.
- Navigate to the security settings. The path depends on the device model and operating system version. For instance, you may need to tap Advanced settings → Security or Security & lock screen → Credential storage.
- Tap Install from Phone Storage / Install from SD Card or a similar option.
- Tap CA Certificate.
- On the confirmation window, tap Install Anyway.
- In the appeared file manager, select the required root certificate.
On some devices, the downloaded certificates may not be displayed in Recent files. Please wait for 3-5 minutes and open the file manager again. The waiting time depends on the device model. If after 3-5 minutes no files have appeared, go to the Internal storage\Download\kesm_certs or SD card\Download\kesm_certs folder and select the required root certificate.
The root certificate will be installed on the device.
Page top
The help for this version of the solution is no longer updated, so it may contain outdated information. For up-to-date information about the solution refer to the Kaspersky Secure Mobility Management 4.1 Help.
Enabling accessibility on Android 13 or later
On Android 13 or later, accessibility services are restricted for apps not downloaded from Google Play or HUAWEI AppGallery. You must manually allow accessibility services if you downloaded Kaspersky Endpoint Security for Android from the Kaspersky Security Center server or the Kaspersky website.
If you update the Kaspersky Endpoint Security for Android app using a Kaspersky Security Center installation package or APK file from the Kaspersky website, accessibility services will be disabled. You must manually enable accessibility services again.
Accessibility is used for the following purposes:
- Check websites and apps in Kaspersky Security Network
- Lock the device in case of theft
- Display warnings
- Block the camera when restricted by the administrator
To enable accessibility for Kaspersky Endpoint Security:
- Open the Accessibility page in the device settings and find Kaspersky Endpoint Security.
- Turn on the Kaspersky Endpoint Security switch. In the dialog that says that accessibility services are restricted, tap OK.
Now you can give Kaspersky Endpoint Security access to the restricted settings.
- Open the Kaspersky Endpoint Security info page in the device settings. For example, go to Settings > Apps and then find the app in the list of apps.
- On the Kaspersky Endpoint Security info page, tap
 in the top right corner and select the Allow restricted settings menu item.
Kaspersky Endpoint Security now has access to the restricted settings.
- Go back to the Accessibility page in the device settings and find Kaspersky Endpoint Security.
- Turn on the Kaspersky Endpoint Security switch. In the dialog that opens, allow the app to have full control of your device.
Accessibility services are now enabled for Kaspersky Endpoint Security.
Page top
The help for this version of the solution is no longer updated, so it may contain outdated information. For up-to-date information about the solution refer to the Kaspersky Secure Mobility Management 4.1 Help.
Enabling accessibility for the app on Android 13
To enable accessibility for Kaspersky Endpoint Security:
- In the dialog that asks you to turn on accessibility services, tap Turn On.
The Accessibility page in the device settings opens.
- Turn on the Kaspersky Endpoint Security switch. In the dialog that says that accessibility services are restricted, tap OK.
Now you can give Kaspersky Endpoint Security access to the restricted settings.
- Open the Kaspersky Endpoint Security info page in the device settings. For example, go to Settings > Apps and then find the app in the list of apps.
- On the Kaspersky Endpoint Security info page, tap in the top right corner and select the Allow restricted settings menu item.
Kaspersky Endpoint Security now has access to the restricted settings.
- Go back to the app and in the dialog that asks you to turn on accessibility services, tap Turn On.
The Accessibility page in the device settings opens.
- Turn on the Kaspersky Endpoint Security switch. In the dialog that opens, allow the app to have full control of your device.
Accessibility services are now enabled for Kaspersky Endpoint Security.
Page top
The help for this version of the solution is no longer updated, so it may contain outdated information. For up-to-date information about the solution refer to the Kaspersky Secure Mobility Management 4.1 Help.
Updating the app
Kaspersky Endpoint Security can be updated in the following ways:
- Manually by using Google Play. You can download the new version of the app from Google Play and install it on your device.
- With the help of the administrator. The administrator can remotely update the version of the app on your device by using the Kaspersky Security Center remote administration system.
Updating the app from Google Play
The administrator can block you from updating the app from Google Play.
The app can be updated from Google Play by following the standard update procedure of the Android platform. The following conditions must be met in order for the app to be updated:
- You must have a Google account.
- The device must be linked to your Google account.
- The device must be connected to the internet.
To learn more about creating a Google account, linking your device to your account, or working with Google Play Store, see Google's support website.
Updating the app via Kaspersky Security Center
Updating the app via Kaspersky Security Center consists of the following steps:
- The administrator sends to your mobile device the distribution package of the app whose version meets the corporate security requirements.
A prompt to install Kaspersky Endpoint Security on your device is displayed.
- Accept the update terms and conditions.
The new version of the app will be installed to your device. The app does not require additional configuration after the update.
Updates functionality (including providing anti-malware signature updates and codebase updates), as well as KSN functionality will not be available in the software in the U.S. territory from 12:00 AM Eastern Daylight Time (EDT) on September 10, 2024 in accordance with the restrictive measures.
Page top
The help for this version of the solution is no longer updated, so it may contain outdated information. For up-to-date information about the solution refer to the Kaspersky Secure Mobility Management 4.1 Help.
Removing the app
The administrator can block you from removing the app on your own. If this is the case, you cannot remove Kaspersky Endpoint Security.
Kaspersky Endpoint Security can be removed by the following methods:
- Manually in the device settings.
- With the help of the administrator. The administrator can remotely remove the app from your device by using the Kaspersky Security Center remote administration system.
On devices operating in device owner mode, Kaspersky Endpoint Security for Android can be removed only by the administrator by resetting the device to factory settings.
Removal in the device settings
The app is removed by following the standard procedure for the Android platform. To remove the app, administrator rights for Kaspersky Endpoint Security must be disabled in the device security settings.
On devices running Android 7.0 or later, if the administrator has blocked removal, the device will be locked if an attempt is made to remove the app in the Android settings. To unlock the device, contact your administrator.
Removal via Kaspersky Security Center
App removal by using Kaspersky Security Center consists of the following steps:
- The administrator sends the app removal command to your mobile device.
Your mobile device displays a prompt to confirm removal of Kaspersky Endpoint Security.
- Confirm app removal.
The app will be removed from your device.
The help for this version of the solution is no longer updated, so it may contain outdated information. For up-to-date information about the solution refer to the Kaspersky Secure Mobility Management 4.1 Help.
Applications with a briefcase icon
![]()
Application icon in the Android work profile
Apps marked with a briefcase icon (corporate apps) are stored on your device in the Android work profile (hereinafter also referred to as the "work profile"). Android work profile is a safe environment on your device in which the administrator can manage apps and accounts without restricting your capabilities to work with personal data.
The work profile lets you store corporate data separately from personal data. This keeps corporate data confidential and protects it against malware. When a work profile is created on your device, the following corporate apps are automatically installed in the work profile: Google Play Market, Google Chrome, Downloads, Kaspersky Endpoint Security for Android, and others.
Page top
The help for this version of the solution is no longer updated, so it may contain outdated information. For up-to-date information about the solution refer to the Kaspersky Secure Mobility Management 4.1 Help.
KNOX app
![]()
KNOX icon
The KNOX app opens a KNOX container on your device. A KNOX container is a safe environment on your device that has its own desktop, launch panel, apps, and widgets. The administrator can manage apps and accounts in a KNOX container without restricting your capabilities to work with personal data.
A KNOX container lets you store corporate data separately from personal data. This keeps corporate data confidential and protects it against malware.
In a KNOX container, you can access your company mailbox, the contact information of enterprise employees, file storage, and other applications.
For more details about working with KNOX, please visit the Samsung technical support website.
Page top
The help for this version of the solution is no longer updated, so it may contain outdated information. For up-to-date information about the solution refer to the Kaspersky Secure Mobility Management 4.1 Help.
Using the Kaspersky Security for iOS app
This Help section describes features and operations that are available to users of the Kaspersky Security for iOS app.
Articles in this section comprise all the options that can be available or visible on a mobile device. The actual layout and behavior of the app depends on the remote administration system that is implemented and how the administrator configures your device in accordance with corporate security requirements. Some functions and options described in this section may not apply to your actual experience with the app. If you have any questions about the app on your specific device, contact your administrator.
The help for this version of the solution is no longer updated, so it may contain outdated information. For up-to-date information about the solution refer to the Kaspersky Secure Mobility Management 4.1 Help.
App features
Kaspersky Security for iOS offers the following key features.
Protection against online threats
The Web Protection component provides protection against online threats.
Web Protection blocks malicious websites that distribute malicious code, and phishing websites designed to steal your confidential data and gain access to your financial accounts. Web Protection scans websites before you open them by using the Kaspersky Security Network cloud service. Web Protection also checks the online activity of the apps on your device.
For Web Protection to work, you must allow the app to add a VPN configuration.
Jailbreak detection
When Kaspersky Security for iOS detects a jailbreak, it displays a critical message and informs your administrator about the issue.
The app cannot guarantee the security of your device, because a jailbreak bypasses security features and can cause numerous issues, including:
- Security vulnerabilities
- Stability issues
- Disruption of Apple services
- Potential crashes and freezes
- Shortened battery life
- Inability to apply iOS updates
The help for this version of the solution is no longer updated, so it may contain outdated information. For up-to-date information about the solution refer to the Kaspersky Secure Mobility Management 4.1 Help.
Installing the app
To install the Kaspersky Security for iOS app:
- Find the email message with the administrator's invitation to install the Kaspersky Security for iOS app from the App Store.
- Go to the App Store in one of the following ways:
- Tap the link in the message if you are reading it on the iOS device on which you want to install the app.
- Scan the QR code using the iOS device on which you want to install the app, if you are reading the message on a computer.
The invitation link is valid for 24 hours. If you don't manage to install the app in time, contact your administrator for a new invitation.
- Download and install the app from the App Store by following the standard installation procedure on the iOS platform.
The Kaspersky Security for iOS app is installed on your device. To protect the device, active the app.
Page top
The help for this version of the solution is no longer updated, so it may contain outdated information. For up-to-date information about the solution refer to the Kaspersky Secure Mobility Management 4.1 Help.
Activating the app
To activate the Kaspersky Security for iOS app:
- Start the app on your device.
- Accept the agreements and statements by selecting the End User License Agreement and Products and Services Privacy Policy checkboxes.
Optionally, accept the Kaspersky Security Network Statement to allow statistics to be sent to Kaspersky Security Network. This improves the performance of the app and ensures its uninterrupted operation.
- Tap Next. The app connects to the Kaspersky Security Center remote administration system and gets license information.
- Allow the app to add a VPN configuration. The app uses the VPN configuration to check websites for phishing and protect your device from web threats.
- Allow the app to send push notifications. The app uses notifications to inform you about security issues and the status of your license.
The Kaspersky Security for iOS app on your device is activated.
Page top
The help for this version of the solution is no longer updated, so it may contain outdated information. For up-to-date information about the solution refer to the Kaspersky Secure Mobility Management 4.1 Help.
Activating the app with an activation code
When you install the Kaspersky Security for iOS app on your device, the app connects to the Kaspersky Security Center remote administration system and gets license information automatically. If your device is not connected to Kaspersky Security Center, you can enter the activation code manually. To get the activation code, contact the administrator.
Activate the app manually only when instructed to do so by the administrator.
To enter the activation code:
- In the message that says that the app is not activated, tap Activate the app.
- In the activation window, enter the activation code that the administrator gave you, and then tap Activate.
If the activation code is correct, a notification is displayed saying that the app has activated, along with the license expiration date.
The Kaspersky Security for iOS app on your device is activated.
Page top
The help for this version of the solution is no longer updated, so it may contain outdated information. For up-to-date information about the solution refer to the Kaspersky Secure Mobility Management 4.1 Help.
Main window at a glance
The appearance of the main window slightly differs for different screen resolutions.
The main window displays:
- Overall protection status of your device.
- Messages that indicate app component statuses and protection issues.
There are three types of messages:
- Highlighted in green. Status messages that inform you that protection is active in the specified area.
- Highlighted in yellow. Information messages that inform you about events that may affect device security.
- Highlighted in red. Critical messages that inform you about events of critical importance to device security.
You can tap a message for details.
Page top
The help for this version of the solution is no longer updated, so it may contain outdated information. For up-to-date information about the solution refer to the Kaspersky Secure Mobility Management 4.1 Help.
Updating the app
You can download the latest version of the Kaspersky Security for iOS app from the App Store and install it on your device by following the standard update procedure on the iOS platform. You can also turn on automatic updates. The app does not require any additional configuration after the update.
The following conditions must be met in order for the app to be updated:
- You must have an Apple ID.
- The device must be linked to your Apple ID.
- The device must be connected to the internet.
To learn more about creating an Apple ID, linking your device to your Apple ID, or working with the App Store, see the Apple support website.
Updates functionality (including providing anti-malware signature updates and codebase updates), as well as KSN functionality will not be available in the software in the U.S. territory from 12:00 AM Eastern Daylight Time (EDT) on September 10, 2024 in accordance with the restrictive measures.
Page top
The help for this version of the solution is no longer updated, so it may contain outdated information. For up-to-date information about the solution refer to the Kaspersky Secure Mobility Management 4.1 Help.
Removing the app
To remove the Kaspersky Security for iOS app, follow the standard procedure on the iOS platform:
- On the Home screen, touch and hold the app icon.
- Remove the app.
The Kaspersky Security for iOS app is removed from your device.
Page top
The help for this version of the solution is no longer updated, so it may contain outdated information. For up-to-date information about the solution refer to the Kaspersky Secure Mobility Management 4.1 Help.
Working in Kaspersky Security Center Web Console and Kaspersky Security Center Cloud Console
This Help section describes protection and management of mobile devices by using Kaspersky Security Center Web Console (hereinafter also referred to as Web Console) or Kaspersky Security Center Cloud Console (hereinafter also referred to as Cloud Console).
The help for this version of the solution is no longer updated, so it may contain outdated information. For up-to-date information about the solution refer to the Kaspersky Secure Mobility Management 4.1 Help.
About mobile device management in Kaspersky Security Center Web Console and Cloud Console
You can manage mobile devices in Kaspersky Security Center Web Console and Cloud Console by using the following components:
- Kaspersky Endpoint Security for Android app
The Kaspersky Endpoint Security for Android app ensures protection of mobile devices against web threats, viruses, and other programs that pose threats.
- Kaspersky Security for iOS app
The Kaspersky Security for iOS app ensures protection of mobile devices against phishing and web threats.
- Kaspersky Security for Mobile (Devices) plug-in
The Kaspersky Security for Mobile (Devices) plug-in provides the interface for managing mobile devices and the mobile apps installed on them through Kaspersky Security Center Web Console and Cloud Console.
- Kaspersky Security for Mobile (Policies) plug-in
The Kaspersky Security for Mobile (Policies) plug-in lets you define the configuration settings for devices connected to Kaspersky Security Center, by using group policies.
The plug-ins are integrated into the Kaspersky Security Center remote administration system. You can use Kaspersky Security Center Web Console or Cloud Console to manage mobile devices, as well as client computers and virtual systems. After you connect mobile devices to the Administration Server, they become managed. You can remotely monitor managed devices.
The help for this version of the solution is no longer updated, so it may contain outdated information. For up-to-date information about the solution refer to the Kaspersky Secure Mobility Management 4.1 Help.
Distribution kit
The Kaspersky Secure Mobility Management distribution kit may include various components, depending on the chosen application version.
Kaspersky Security Center
ksc_14_<version>_full_<language>.exeKaspersky Security Center installer. This is a special version that is customized specially for Kaspersky Secure Mobility Management.
ksc_14_<version>_Console_<language>.exeInstaller of MMC-based Administration Console. This is a special version that is customized specially for Kaspersky Secure Mobility Management.
You can install Administration Console on another device and manage Kaspersky Security Center Administration Server remotely.
Mobile device management in MMC-based Administration Console
klcfginst.exeInstaller of Kaspersky Endpoint Security for Android Administration Plug-in.
klmdminst.exeInstaller of Kaspersky Device Management for iOS Administration Plug-in.
Mobile device management in Kaspersky Security Center Web Console
on_prem_ksm_devices_<version>.zipArchive that contains the files required for the installation of the Kaspersky Security for Mobile (Devices) plug-in:
plugin.zipArchive that contains the Kaspersky Security for Mobile (Devices) plug-in.
signature.txtFile that contains the signature for the Kaspersky Security for Mobile (Devices) plug-in.
on_prem_ksm_policies_<version>.zipArchive that contains the files required for the installation of the Kaspersky Security for Mobile (Policies) plug-in:
plugin.zipArchive that contains the Kaspersky Security for Mobile (Policies) plug-in.
signature.txtFile that contains the signature for the Kaspersky Security for Mobile (Policies) plug-in.
Mobile device management in Kaspersky Security Center Cloud Console
To manage mobile device in Kaspersky Security Center Cloud Console, you do not need to download a distribution package. You only need to create an account in Kaspersky Security Center Cloud Console. For more information about creating an account, please refer to Kaspersky Security Center Cloud Console Help.
File of the Kaspersky Endpoint Security for Android app
kesandroid10<version><languages>.apk—Android package file of the Kaspersky Endpoint Security for Android app.
File of Corporate App Catalog
Install_<version>.exe—Distribution package of Corporate App Catalog. The package includes the following components:
- Corporate App Catalog
- Corporate App Catalog Management Console
- Apache server
For more information about installing Corporate App Catalog, please refer to Corporate App Catalog Help.
Auxiliary files
sc_package_<languages>.exeSelf-extracting archive that contains the files required for installing the Kaspersky Endpoint Security for Android app by creating installation packages:
adb.exe, AdbWinApi.dll, AdbWinUsbApi.dllFiles required for creating installation packages.
installer.iniConfiguration file that contains Administration Server connection settings.
kesandroid10<version><languages>.apkAndroid package file of the Kaspersky Endpoint Security for Android app.
kmlisten.exeUtility for delivering installation packages through the administrator's computer.
kmlisten.iniConfiguration file that contains the settings for the
kmlisten.exeutility.kmlisten.kpdApplication description file.
If you create an installation package with the
sc_package.exearchive in the Kaspersky Security Center version earlier than 14.2, the installation of Kaspersky Endpoint Security for Android app will fail on devices running Android 10 or later. To avoid this issue, please upgrade to Kaspersky Security Center 14.2 or contact Technical Support to receive an appropriate version of the archive.
Documentation
- Help for Kaspersky Secure Mobility Management.
The help for this version of the solution is no longer updated, so it may contain outdated information. For up-to-date information about the solution refer to the Kaspersky Secure Mobility Management 4.1 Help.
Key features of mobile device management in Kaspersky Security Center Web Console and Cloud Console
Kaspersky Secure Mobility Management provides the following features:
- Distribution of email messages for connecting Android mobile devices to Kaspersky Security Center by using links to download the Kaspersky Endpoint Security for Android app from Google Play.
- Distribution of email messages for connecting iOS mobile devices to Kaspersky Security Center by using links to download the Kaspersky Security for iOS app from App Store.
- Remote connection of mobile devices to Kaspersky Security Center and other third-party EMM systems (for example, VMWare AirWatch, MobileIron, IBM Maas360, SOTI MobiControl).
- Remote configuration of the mobile app, as well as remote configuration of services, apps, and functions of mobile devices.
- Remote configuration of mobile devices in accordance with the corporate security requirements.
- Prevention of leakage of corporate information stored on mobile devices, in case they are lost or stolen (Anti-Theft). Supported for Android devices only.
- Control of compliance with corporate security requirements (Compliance Control). Supported for Android devices only.
- Control of protection against online threats and control of internet use on mobile devices (Web Protection).
- Setup of notifications shown to the user in the Kaspersky Endpoint Security for Android and Kaspersky Security for iOS apps.
- Administrator notifications about the status and events of the Kaspersky Endpoint Security for Android and Kaspersky Security for iOS apps can be communicated in Kaspersky Security Center or by email.
- Change Control for policy settings (revision history).
Kaspersky Secure Mobility Management includes the following protection and management components:
- Anti-Malware (for Android devices)
- Anti-Theft (for Android devices)
- Web Protection (for Android and iOS devices)
- App Control (for Android devices)
- Compliance Control (for Android devices)
- Detection of root privileges on Android devices and jailbreak detection on iOS devices
The help for this version of the solution is no longer updated, so it may contain outdated information. For up-to-date information about the solution refer to the Kaspersky Secure Mobility Management 4.1 Help.
About the Kaspersky Endpoint Security for Android app
The Kaspersky Endpoint Security for Android app ensures protection of mobile devices against web threats, viruses, and other programs that pose threats.
The Kaspersky Endpoint Security for Android app includes the following components:
- Anti-Malware. This component detects and neutralizes threats on your device by using the anti-malware databases and the Kaspersky Security Network cloud service. Anti-Malware includes the following components:
- Protection. It detects threats in open files, scans new apps, and prevents device infection in real time.
- Scan. It is started on demand for the entire file system, only for installed apps, or a selected file or folder.
- Update. It allows you to download new anti-malware databases for the application.
- Anti-Theft. This component protects information on the device against unauthorized access in case the device is lost or stolen. This component lets you send the following commands to the device:
- Locate. Get the coordinates of the device's location.
- Alarm. Make the device sound a loud alarm.
- Wipe. Erase corporate data to protect sensitive company information.
- Web Protection. This component blocks malicious websites designed to spread malicious code. Web Protection also blocks fake (phishing) websites designed to steal confidential data of the user (for example, passwords for online banking or e-money systems) and access the user's financial info. Web Protection scans websites before you open them, by using the Kaspersky Security Network cloud service. After scanning, Web Protection allows trustworthy websites to load and blocks malicious websites. Web Protection also supports website filtering by categories defined in the Kaspersky Security Network cloud service. This allows the administrator to restrict user access to certain categories of web pages (for example, web pages from the "Gambling, lotteries, sweepstakes" or "Internet communication" categories).
- App Control. This component lets you install recommended and required apps to your device via a direct link to the distribution package or a link to Google Play. App Control lets you remove blocked apps that violate corporate security requirements.
- Compliance control. This component allows you to check managed devices for compliance with the corporate security requirements and impose restrictions on certain functions of non-compliant devices.
You can configure the components of the Kaspersky Endpoint Security for Android app in Kaspersky Security Center Web Console and Cloud Console by defining the settings of group policies.
Page top
The help for this version of the solution is no longer updated, so it may contain outdated information. For up-to-date information about the solution refer to the Kaspersky Secure Mobility Management 4.1 Help.
About the Kaspersky Security for iOS app
The Kaspersky Security for iOS app ensures protection of mobile devices against phishing and web threats.
The Kaspersky Security for iOS app offers the following key features:
- Web Protection. This component blocks malicious websites designed to spread malicious code. Web Protection also blocks fake (phishing) websites designed to steal confidential data of the user (for example, passwords for online banking or e-money systems) and access the user's financial info. Web Protection scans websites before you open them, by using the Kaspersky Security Network cloud service. After scanning, Web Protection allows trustworthy websites to load and blocks malicious websites. You can configure this component in Kaspersky Security Center Web Console and Cloud Console by defining the settings of group policies.
- Jailbreak detection. When Kaspersky Security for iOS detects a jailbreak, it displays a critical message and informs you about the issue.
The help for this version of the solution is no longer updated, so it may contain outdated information. For up-to-date information about the solution refer to the Kaspersky Secure Mobility Management 4.1 Help.
About the Kaspersky Security for Mobile (Devices) plug-in
The Kaspersky Security for Mobile (Devices) plug-in provides the interface for managing mobile devices and the mobile apps installed on them through Kaspersky Security Center Web Console and Cloud Console. The Kaspersky Security for Mobile (Devices) plug-in allows you to perform the following:
- Connect mobile devices to Kaspersky Security Center.
- Manage the certificates of mobile devices.
- Configure Firebase Cloud Messaging (for Android devices only).
- Send commands to mobile devices (for Android devices only).
The Kaspersky Security for Mobile (Devices) plug-in can be installed when configuring Kaspersky Security Center Web Console. If you are using Kaspersky Security Center Cloud Console, you do not need to install this plug-in. For more information about deployment scenarios in different types of consoles, see section "Deployment scenarios".
Page top
The help for this version of the solution is no longer updated, so it may contain outdated information. For up-to-date information about the solution refer to the Kaspersky Secure Mobility Management 4.1 Help.
About the Kaspersky Security for Mobile (Policies) plug-in
The Kaspersky Security for Mobile (Policies) plug-in lets you define the configuration settings for devices connected to Kaspersky Security Center, by using group policies. The Kaspersky Security for Mobile (Policies) plug-in can be used to perform the following:
- Create group security policies for mobile devices.
- Remotely configure the operating settings of the mobile app on users' mobile devices.
- Receive reports and statistics on the operation of the mobile app on users' mobile devices.
The Kaspersky Security for Mobile (Policies) plug-in can be installed when configuring Kaspersky Security Center Web Console. If you are using Kaspersky Security Center Cloud Console, you do not need to install this plug-in. For more information about deployment scenarios in different types of consoles, see section "Deployment scenarios".
Page top
The help for this version of the solution is no longer updated, so it may contain outdated information. For up-to-date information about the solution refer to the Kaspersky Secure Mobility Management 4.1 Help.
Hardware and software requirements
This section lists the hardware and software requirements for the administrator's computer that is used to install the Kaspersky Security for Mobile (Devices) plug-in and the Kaspersky Security for Mobile (Policies) plug-in in Kaspersky Security Center Web Console and Cloud Console, as well as the hardware and software requirements of the mobile apps.
Hardware and software requirements for the administrator's computer
To install the Kaspersky Security for Mobile (Devices) plug-in and the Kaspersky Security for Mobile (Policies) plug-in, the administrator's computer must meet the hardware requirements of Kaspersky Security Center. For more information about the hardware and software requirements of Kaspersky Security Center:
- If you use Kaspersky Security Center Web Console, please refer to Kaspersky Security Center Help.
- If you use Kaspersky Security Center Cloud Console, please refer to Kaspersky Security Center Cloud Console Help.
To use the Kaspersky Security for Mobile (Devices) plug-in and the Kaspersky Security for Mobile (Policies) plug-in in Kaspersky Security Center Web Console, Kaspersky Security Center Web Console must be installed on the administrator's computer.
To use the Kaspersky Security for Mobile (Devices) plug-in and the Kaspersky Security for Mobile (Policies) plug-in in Kaspersky Security Center Cloud Console, you must create an account in Kaspersky Security Center Cloud Console. For more information about creating an account, please refer to Kaspersky Security Center Cloud Console Help.
The Kaspersky Endpoint Security for Android app can function within the following third-party EMM systems:
- VMware AirWatch 9.3 or later
- MobileIron 10.0 or later
- IBM MaaS360 10.68 or later
- Microsoft Intune 1908 or later
- SOTI MobiControl 14.1.4 (1693) or later
Hardware and software requirements for the user's mobile device to support installation of the Kaspersky Endpoint Security for Android app
The Kaspersky Endpoint Security for Android app has the following hardware and software requirements:
- Smartphone or tablet with a screen resolution of 320x480 pixels or higher
- 65 MB of free disk space in the main memory of the device
- Android 5.0 or later (including Android 12L, excluding Go Edition)
- x86, x86-64, Arm5, Arm6, Arm7, or Arm8 processor architecture
The app can be installed only to the main memory of the device.
Hardware and software requirements for the user's mobile device to support installation of the Kaspersky Security for iOS app
The Kaspersky Security for iOS app has the following hardware requirements:
- iPhone 6S or later
- iPad Air 2 or later
The Kaspersky Security for iOS app has the following software requirements:
- iOS 14.1 or later
- iPadOS 14.1 or later
The Kaspersky Security for iOS app can't operate properly when a VPN client with an active VPN connection is running on the same mobile device.
Page top
The help for this version of the solution is no longer updated, so it may contain outdated information. For up-to-date information about the solution refer to the Kaspersky Secure Mobility Management 4.1 Help.
Known issues and considerations
Kaspersky Endpoint Security for Android and Kaspersky Security for iOS have several known issues that are non-critical for the operation of these apps.
Known issues of Kaspersky Security for iOS
- The Kaspersky Security for iOS app can't operate properly when a VPN client with an active VPN connection is running on the same mobile device.
Known issues of Kaspersky Endpoint Security for Android
Known issues when installing apps
- Kaspersky Endpoint Security for Android is installed only in the main memory of the device.
- On devices running Android 7.0, an error may occur during attempts to disable administrator rights for Kaspersky Endpoint Security for Android in device settings if Kaspersky Endpoint Security for Android is prohibited from overlaying on other windows. This issue is caused by a well-known defect in Android 7.
- Kaspersky Endpoint Security for Android on devices running Android 7.0 or later does not support multi-window mode.
- Kaspersky Endpoint Security for Android does not work on Chromebook devices running the Chrome operating system.
- Kaspersky Endpoint Security for Android does not work on devices running Android (Go edition) operating systems.
- When using the Kaspersky Endpoint Security for Android app with third-party EMM systems (for example, VMWare AirWatch), only the Anti-Malware and Web Protection components are available. The administrator can configure the settings of Anti-Malware and Web Protection in the EMM system console. In this case, notifications about app operation are available only in the interface of the Kaspersky Endpoint Security for Android app (Reports).
Known issues when upgrading the app version
- You can upgrade Kaspersky Endpoint Security for Android only to a more recent version of the app. Kaspersky Endpoint Security for Android cannot be downgraded to an older version.
Known issues in Anti-Malware operation
- Due to technical limitations, Kaspersky Endpoint Security for Android cannot scan files with a size of 2 GB or more. During a scan, the app skips such files without notifying you that such files were skipped.
- For additional analysis of a device for new threats whose information has not yet been added to anti-malware databases, you must enable the use of Kaspersky Security Network. Kaspersky Security Network (KSN) is an infrastructure of cloud services providing access to Kaspersky online knowledge base with information about the reputation of files, web resources, and software. To use KSN, the mobile device must be connected to the internet.
- In some cases, updating anti-malware databases from the Administration Server on a mobile device may fail. In this case, run the anti-malware database update task on the Administration Server.
- On some devices, Kaspersky Endpoint Security for Android does not detect devices connected over USB OTG. It is not possible to run a malware scan on such devices.
- On devices running Android 11 or later, the Kaspersky Endpoint Security for Android app can't scan the "Android/data" and "Android/obb" folders and detect malware in them due to technical limitations.
- On devices running Android 11 or later, the user must grant the "Allow access to manage all files" permission.
- On devices running Android 7.0 or later, the configuration window for the malware scan run schedule might be incorrectly displayed (management elements are not shown). This issue is caused by a well-known defect in Android 7.
- On devices running Android 7.0, real-time protection in the extended mode does not detect threats in files that are stored on an external SD card.
- On devices running Android 6, Kaspersky Endpoint Security for Android does not detect the downloading of a malicious file to the device memory. A malicious file may be detected by Anti-Malware when the file is run, or during a malware scan of the device. This issue is caused by a well-known defect in Android 6. To ensure device security, it is recommended to configure scheduled malware scans.
Known issues in Web Protection operation
- Web Protection on Android devices is supported only by Google Chrome, HUAWEI Browser, Samsung Internet Browser, and Yandex Browser.
- The Custom Tabs feature is supported by Google Chrome, HUAWEI Browser, and Samsung Internet Browser.
- Web Protection for HUAWEI Browser, Samsung Internet Browser, and Yandex Browser does not block sites on a mobile device if the work profile is used and Web Protection is enabled only for the work profile.
- For Web Protection to work, you must enable the use of Kaspersky Security Network. Web Protection blocks websites based on the KSN data on the reputation and category of websites.
- Forbidden websites may remain unblocked by Web Protection on devices running Android 6.0 with Google Chrome version 51 (or any earlier version) installed if the website is opened in the following ways (this issue is caused by a well-known defect in Google Chrome):
- From search results.
- From the bookmarks list.
- From search history.
- Using the web address autocomplete function.
- Opening the website in a new tab in Google Chrome.
- Forbidden websites may remain unblocked in Google Chrome version 50 (or any earlier version) if the website is opened from Google search results while the Merge Tabs and Apps feature is enabled in the browser settings. This issue is caused by a well-known defect in Google Chrome.
- Websites from blocked categories may remain unblocked in Google Chrome if the user opens them from third-party apps, for example, from an IM client app. This issue is related to how the Accessibility service works with the Chrome Custom Tabs feature.
- Forbidden websites may remain unblocked in Samsung Internet Browser if the user opens them in background mode from the context menu or from third-party apps, for example, from an IM client app.
- Kaspersky Endpoint Security for Android must be set as an Accessibility feature to ensure proper functioning of Web Protection.
- On some Xiaomi devices, the "Display pop-up window" and "Display pop-up windows while running in the background" permissions should be granted for Web Protection to work.
- Allowed websites may be blocked in Samsung Internet Browser in the Only listed websites are allowed Web Protection mode when the page is refreshed. Websites are blocked if a regular expression contains advanced settings (for example,
^https?://example.com/pictures/). It is recommended to use regular expressions without additional settings (for example,^https?://example.com). - If Web Protection is set to All websites are blocked, Kaspersky Endpoint Security for Android does not block search in the Google Search widget. Instead, it blocks user access to the search results.
- In a work profile, if Web Protection is set to All websites are blocked, Kaspersky Endpoint Security for Android endlessly reloads the Google Chrome home page, blocks the browser, and interferes with the device.
Known issues in Anti-Theft operation
- For timely delivery of commands to Android devices, the app uses the Firebase Cloud Messaging (FCM) service. If FCM is not configured, commands will be delivered to the device only during synchronization with Kaspersky Security Center according to the schedule defined in the policy, for example, every 24 hours.
- To lock a device, Kaspersky Endpoint Security for Android must be set as the device administrator.
- To lock devices running Android 7.0 or later, Kaspersky Endpoint Security for Android must be set as an Accessibility feature.
- On some devices, Anti-Theft commands may fail to execute if Battery Saver mode is enabled on the device. This defect has been confirmed on Alcatel 5080X.
- To locate devices running Android 10.0 or later, the user must grant the "All the time" permission to device location.
Known issues in App Control operation
- Kaspersky Endpoint Security for Android must be set as an Accessibility feature to ensure proper functioning of App Control. This does not apply to device owner mode.
- For App Control (app categories) to work, you must enable the use of Kaspersky Security Network. App Control determines the category of an app based on data that is available in KSN. To use KSN, the mobile device must be connected to the internet. For App Control, you can add individual apps to the lists of blocked and allowed apps. In this case, KSN is not required.
- When configuring App Control, it is recommended to clear the Block system apps check box. Blocking system apps may lead to problems in device operation.
- On iOS MDM devices, if you specify allowed apps in the list of apps allowed to be installed, all apps except system apps and those added to the list of allowed apps will be hidden on the device screen.
- On some HUAWEI and Honor personal devices, apps from allowed categories may be blocked and apps from forbidden categories may remain unblocked. This is because the category for some apps from App Gallery cannot be correctly defined.
- On some Samsung and Oppo devices, app icons may remain hidden on the home screen after clearing the Block system apps check box. This is due to limitations of the Android operating system.
Known issues when configuring device unlock password strength
- On devices running Android 10.0 or later, Kaspersky Endpoint Security resolves the password strength requirements into one of the system values: medium or high.
If the password length required is 1 to 4 symbols, then the app prompts the user to set a medium-strength password. It must be either numeric (PIN), with no repeating or ordered (e.g. 1234) sequences; or alphanumeric. The PIN or password must be at least 4 characters long.
If the password length required is 5 or more symbols, then the app prompts the user to set a high-strength password. It must be either numeric (PIN), with no repeating or ordered sequences; or alphanumeric (password). The PIN must be at least 8 digits long; the password must be at least 6 characters long.
- On devices running Android 7.1.1, if the unlock password does not meet the corporate security requirements (Compliance Control), the Settings system app may function improperly when an attempt is made to change the unlock password through Kaspersky Endpoint Security for Android. The issue is caused by a well-known defect in Android 7.1.1. In this case, to change the unlock password, use the Settings system app only.
- On some devices running Android 6.0 or later, an error may occur when screen unlock password is entered, if device data is encrypted. This issue is related to specific features of the Accessibility service with MIUI firmware.
Known issues with App removal protection
- Kaspersky Endpoint Security for Android must be set as the device administrator.
- To protect the app from removal on devices running Android 7.0 or later, Kaspersky Endpoint Security for Android must be set as an Accessibility feature.
- On some Xiaomi and HUAWEI devices, Kaspersky Endpoint Security for Android removal protection does not work. This issue is caused by the specific features of MIUI 7 and 8 firmware on Xiaomi and EMUI firmware on HUAWEI.
Known issues when configuring device restrictions
- On devices running Android 10 or later, prohibiting the use of Wi-Fi networks is not supported.
- On devices running Android 11 or later, Kaspersky Endpoint Security for Android must be set as an Accessibility feature. Kaspersky Endpoint Security for Android prompts the user to set the app as an Accessibility feature through the Initial Configuration Wizard. The user can skip this step or disable this service in the device settings at a later time. If this is the case, you will not be able to restrict use of the camera.
Known issues when sending commands to mobile devices
- On devices running Android 12 or later, if the user granted the "Use approximate location" permission, the Kaspersky Endpoint Security for Android app first tries to get the precise device location. If this is not successful, the approximate device location is returned only if it was received not more than 30 minutes earlier. Otherwise, the Locate device command fails.
- The Locate device command does not work on Android devices if Google Location Accuracy is disabled in settings. Please be aware that not all Android devices come with this location setting.
- If you send the Enable Lost Mode command to a supervised iOS MDM device without a SIM card and this device is restarted, the device won't be able to connect to Wi-Fi and receive the Disable Lost Mode command. This is a specific feature of iOS devices. To avoid this issue, you can either send the command only to devices with a SIM card, or insert a SIM card into the locked device to allow it to receive the Disable Lost Mode command over the mobile network.
Known issues with specific devices
- On certain devices (for example, HUAWEI, Meizu, and Xiaomi), you must grant Kaspersky Endpoint Security for Android an autostart permission or manually add it to the list of apps that are started when the operating system starts. If the app is not added to the list, Kaspersky Endpoint Security for Android stops performing all of its functions after the mobile device is restarted. In addition, if the device has been locked, you cannot use a command to unlock the device. You can unlock the device only by using a one-time unlock code.
- On certain devices (for example, Meizu and Asus) running Android 6.0 or later, after encrypting data and restarting the Android device, you must enter a numeric password to unlock the device. If the user uses a graphic password to unlock the device, you must convert the graphic password to a numeric password. For more details about converting a graphic password into a numeric password, please refer to the Technical Support website of the mobile device manufacturer. This issue is related to the operation of the Accessibility Features service.
- On some HUAWEI devices running Android 5.Х, after Kaspersky Endpoint Security for Android is set as an Accessibility feature, an incorrect message about the lack of appropriate rights may be displayed. To hide this message, enable the app as a protected app in the device settings.
- On some HUAWEI devices running Android 5.X or 6.X, when Battery Saver mode is enabled for Kaspersky Endpoint Security for Android, the user can manually terminate the app. The user device becomes unprotected after that. This issue is due to some features of HUAWEI software. To restore the device protection, run Kaspersky Endpoint Security for Android manually. It is recommended to disable Battery Saver mode for Kaspersky Endpoint Security for Android in the device settings.
- On HUAWEI devices with EMUI firmware running Android 7.0, the user can hide the notification regarding the protection status of Kaspersky Endpoint Security for Android. This issue is due to some features of HUAWEI software.
- On some Xiaomi devices, when setting the password length to more than 5 characters in a policy, the user will be prompted to change the screen unlock password instead of the PIN code. You cannot set a PIN code that has more than 5 characters. This issue is due to some features of Xiaomi software.
- On Xiaomi devices with MIUI firmware running Android 6.0, the Kaspersky Endpoint Security for Android icon may be hidden in the status bar. This issue is due to some features of Xiaomi software. It is recommended to allow the display of notification icons in Notifications settings.
- On some Nexus devices running Android 6.0.1, the privileges required for proper operation cannot be granted through the Quick Start Wizard of Kaspersky Endpoint Security for Android. This issue is caused by a well-known defect in Security Patch for Android by Google. To ensure proper operation, the required privileges must be manually granted in the device settings.
- On certain Samsung devices running Android 7.0 or later, when the user attempts to configure unsupported methods for unlocking the device (for example, a graphical password), the device may be locked if the following conditions are met: Kaspersky Endpoint Security for Android removal protection is enabled and screen unlock password strength requirements are set. To unlock the device, you must send a special command to the device.
- On certain Samsung devices, it is impossible to block the use of fingerprints for unlocking the screen.
- Web Protection cannot be enabled on some Samsung devices, if the device is connected to a 3G/4G network, has Battery Saver mode enabled and restricts background data. It is recommended to disable the function that restricts background processes in Battery Saver settings.
- On certain Samsung devices, if the unlock password does not comply with corporate security requirements, Kaspersky Endpoint Security for Android does not block the use of fingerprints for unlocking the screen.
- On some Honor and HUAWEI devices, you cannot restrict the use of Bluetooth. When Kaspersky Endpoint Security for Android attempts to restrict the use of Bluetooth, the operating system shows a notification containing the options to reject or allow this restriction. The user can reject this restriction and continue to use Bluetooth.
- On Blackview devices, the user can clear the memory for the Kaspersky Endpoint Security for Android app. As a result, the device protection and management are disabled, all defined settings become ineffective, and the Kaspersky Endpoint Security for Android app is removed from the Accessibility features. This is because this vendor's devices provide the customized Recent screens app with elevated privileges. This app can override Kaspersky Endpoint Security for Android settings and cannot be replaced because it is part of the Android operating system.
- On some Google Pixel devices running Android 11 or earlier, the Kaspersky Endpoint Security for Android app crashes immediately after the start. This is caused by an issue in Android.
- On Samsung Galaxy S23 and S24 series devices Real-Time Protection may not work.
Known issues in app operation on Android 13
- On Android 13, the user can use the Foreground Services Task Manager to stop Kaspersky Endpoint Security from running in the background. This is caused by a well-known issue in Android 13.
- On Android 13, the permission to send notifications is requested when the initial app configuration begins. This is due to specifics of the Android 13 operating system.
The help for this version of the solution is no longer updated, so it may contain outdated information. For up-to-date information about the solution refer to the Kaspersky Secure Mobility Management 4.1 Help.
Deploying a mobile device management solution in Kaspersky Security Center Web Console or Cloud Console
To manage mobile devices by using Kaspersky Security Center Web Console or Cloud Console, you must deploy a mobile device management solution.
The help for this version of the solution is no longer updated, so it may contain outdated information. For up-to-date information about the solution refer to the Kaspersky Secure Mobility Management 4.1 Help.
Deployment scenarios
Deployment in Kaspersky Security Center Web Console
Deployment of mobile device management solution in Kaspersky Security Center Web Console consists of the following steps:
- Preparing Kaspersky Security Center Web Console for deployment
- Deploying administration plug-ins
- Deploying the mobile app
- (Optional, for Android only) Configuring the information exchange with Firebase Cloud Messaging
It is recommended to perform this step to ensure timely delivery of commands to mobile devices and forced synchronization when policy settings are changed.
Deployment in Kaspersky Security Center Cloud Console
Deployment of mobile device management solution in Kaspersky Security Center Cloud Console consists of the following steps:
- Preparing Kaspersky Security Center Cloud Console for deployment
- Deploying the mobile app
- (Optional, for Android only) Configuring the information exchange with Firebase Cloud Messaging
It is recommended to perform this step to ensure timely delivery of commands to mobile devices and forced synchronization when policy settings are changed.
The help for this version of the solution is no longer updated, so it may contain outdated information. For up-to-date information about the solution refer to the Kaspersky Secure Mobility Management 4.1 Help.
Preparing Kaspersky Security Center Web Console and Cloud Console for deployment
This section provides instructions on preparing Kaspersky Security Center Web Console and Cloud Console for deployment.
The help for this version of the solution is no longer updated, so it may contain outdated information. For up-to-date information about the solution refer to the Kaspersky Secure Mobility Management 4.1 Help.
Configuring Administration Server for connection of mobile devices
To connect mobile devices to the Administration Server, you must define the connection settings before installing the app on devices.
- If you are using Kaspersky Security Center Web Console, configure its properties as described below.
- If you are using Kaspersky Security Center Cloud Console, the connection settings are defined during the initial configuration of Kaspersky Security Center Cloud Console. For more information, please refer to Kaspersky Security Center Cloud Console Help.
To define Kaspersky Security Center Web Console properties for a mobile device connection:
- In the main window of Kaspersky Security Center Web Console, click Settings ().
The Administration Server properties window opens.
- Configure the Administration Server ports that will be used by mobile devices:
- Select the Additional ports section.
- Enable the Open port for mobile devices toggle button.
- In the Port for mobile device synchronization field, specify the port through which mobile devices will connect to the Administration Server.
Port 13292 is used by default.
If the Open port for mobile devices toggle button is off or an incorrect connection port is specified, mobile devices will not be able to connect to the Administration Server.
- In the Port for mobile device activation field, specify the port to be used by mobile devices to connect to the Administration Server for activation of the mobile app.
Port 17100 is used by default.
If you specify an incorrect connection port, the users of mobile devices will not be able to activate the mobile app by using the Administration Server.
- If necessary, edit the certificate that will be used by mobile devices to connect to the Administration Server.
By default, Administration Server uses the certificate that was created during Administration Server installation. If you want, replace the certificate issued through the Administration Server with another certificate or reissue the certificate issued through the Administration Server.
To edit the certificate:
- Select the Certificates section.
- Define the required settings.
For detailed information about the certificates, please refer to Kaspersky Security Center Help.
- Click the Save button to save the changes you have made to the settings and exit the Administration Server properties window.
After you configure the mobile device connection settings, you can install the Kaspersky Endpoint Security for Android app or the Kaspersky Security for iOS app on mobile devices and connect them to the Administration Server by using the specified settings.
Page top
The help for this version of the solution is no longer updated, so it may contain outdated information. For up-to-date information about the solution refer to the Kaspersky Secure Mobility Management 4.1 Help.
Configuring a connection gateway to connect mobile devices to Kaspersky Security Center Administration Server
This topic describes how to configure a connection gateway to connect mobile devices to Kaspersky Security Center Administration Server. The configuration proceeds in the following steps:
- Install Network Agent in the connection gateway role on a host
- Configure the connection gateway on Kaspersky Security Center Administration Server
This article contains an overview of the scenario. For detailed instructions, please refer to the Kaspersky Security Center documentation.
Requirements
For a connection gateway to work correctly with mobile devices, the following requirements must be met:
- Port 13292 must be open on the host with the connection gateway.
- Port 13000 must be open between the connection gateway and Kaspersky Security Center. It does not need to be open outside the DMZ.
- The host must have a static address accessible from the internet.
Install Network Agent in the connection gateway role on a host
First, you need to install Network Agent on the selected host device acting in the gateway connection role. You can download a full installation package of Kaspersky Security Center or use a local installation of Kaspersky Security Center.
By default, the installation file is located at: \\<server name>\KLSHARE\PkgInst\NetAgent_<version number>
To install Network Agent in the connection gateway role:
- Start the Network Agent Setup Wizard and follow its instructions leaving default values for all of the options until the Select Administration Server window opens.
- In the Select Administration Server window, configure the following settings:
- Enter the address of the device with Administration Server installed.
- In the Port, SSL port, and UDP port fields, leave the default values.
- Select the Use SSL to connect to Administration Server check box to establish a connection to the Administration Server through a secure port via SSL.
We recommend that you do not clear this check box so your connection remains secured.
- Select the Allow Network Agent to open UDP port check box to manage client devices and receive information about them.
- Click Next and proceed through the Wizard with default settings up to the Connection gateway window.
- In the Connection gateway window, select Use Network Agent as a connection gateway in DMZ.
This mode simultaneously activates the connection gateway role and tells Network Agent to wait for connections from Administration Server, rather than establish connections to Administration Server.
- Click Next and start the installation.
Network Agent is now installed and configured in the connection gateway role.
Configure the connection gateway on Kaspersky Security Center Administration Server
Once you have installed Network Agent in the connection gateway role, you need to connect it to Administration Server. Administration Server does not yet list the device with the connection gateway among the managed devices because the connection gateway has not tried to connect to Administration Server. Therefore, you need to add the connection gateway as a distribution point to ensure that Administration Server initiates a connection to the connection gateway.
To configure the connection gateway on Administration Server:
- Add the connection gateway as a distribution point in Kaspersky Security Center.
- In the console tree, select the Administration Server node.
- In the context menu of Administration Server, select Properties.
- In the Administration Server properties window, select the Distribution points section.
- Click the Add button.
The Add distribution point window opens.
- In the Add distribution point window, perform the following actions:
- Specify the IP address of the device with Network Agent installed in the Device to act as distribution point field. To do this, select Add connection gateway in DMZ by address in the drop-down list.
Enter the IP address of the connection gateway or enter the name if the connection gateway is accessible by name.
- In the Distribution point scope field, select the group to which the connection gateway will be distributed from the drop-down list, and then click OK.
- Specify the IP address of the device with Network Agent installed in the Device to act as distribution point field. To do this, select Add connection gateway in DMZ by address in the drop-down list.
- In the Distribution points section, click OK to save the changes you have made.
The connection gateway will be saved as a new entry named Temporary entry for connection gateway.
Administration Server almost immediately attempts to connect to the connection gateway at the address that you specified. If it succeeds, the entry name changes to the name of the connection gateway device. This process takes up to five minutes.
While the temporary entry for the connection gateway is being converted to a named entry, the connection gateway also appears in the Unassigned devices group.
- Create a new group under the Managed devices group. This new group will contain external managed devices.
- Move the connection gateway from the Unassigned devices group to the group that you have created for external devices.
- Configure properties of the connection gateway that you have deployed:
- In the Distribution points section of the Administration Server properties, select the connection gateway and click Properties.
- In the General section, under DNS domain names of the distribution point for access by mobile devices (included in the certificate), specify your connection gateway DNS name that will be used to connect to the mobile device.
- In the Connection Gateway section, select the following check boxes and leave the default port numbers:
- Open port for mobile devices (SSL authentication of the Administration Server only)
- Open port for mobile devices (two-way SSL authentication)
- Click OK to save the changes you have made.
The connection gateway is now configured. You can now add new mobile devices by specifying the connection gateway address. New devices will appear on Administration Server.
Page top
The help for this version of the solution is no longer updated, so it may contain outdated information. For up-to-date information about the solution refer to the Kaspersky Secure Mobility Management 4.1 Help.
Creating an administration group
Group policies are used to perform centralized configuration of the Kaspersky Endpoint Security for Android and Kaspersky Security for iOS apps installed on the users' mobile devices.
To apply a policy to a group of devices, you are advised to create a separate group for these devices in Managed devices prior to installing mobile apps on user devices.
After creating an administration group, it is recommended to configure the option to automatically allocate devices on which you want to install the apps to this group. Then configure settings that are common to all devices by using a group policy.
To create an administration group:
- In the main window of Kaspersky Security Center Web Console or Cloud Console, select Devices > Hierarchy of groups.
- In the administration group structure, select the administration group that is to include the new administration group.
- Click the Add button.
- In the Name of the new administration group window that opens, enter a name for the group, and then click the Add button.
A new administration group with the specified name appears in the hierarchy of administration groups.
Page top
The help for this version of the solution is no longer updated, so it may contain outdated information. For up-to-date information about the solution refer to the Kaspersky Secure Mobility Management 4.1 Help.
Creating a rule for automatically allocating a device to administration groups
When the Kaspersky Endpoint Security for Android app or the Kaspersky Security for iOS app is installed on mobile devices, they are displayed on the Discovery & deployment > Unassigned devices page of Kaspersky Security Center Web Console or Cloud Console. In order to manage newly connected devices, you can move them to an administration group manually or create a rule for allocating them automatically to administration groups.
To create a rule for automatic allocation of mobile devices to administration groups:
- In the main window of Kaspersky Security Center Web Console or Cloud Console, select Discovery & deployment > Deployment & assignment > Moving rules.
- In the New rule window that opens, click the Add button.
- In the Rule name field, specify the rule name.
- In the Administration group field, select the administration group to which mobile devices will be allocated after the app has been installed on them.
- In the Apply rule section, select Run once for each device.
- Select the Move only devices not added to an administration group check box to prevent the moving of the mobile devices that are allocated to other administration groups when applying the rule.
- Select the Enable rule check box, to apply the rule immediately after creating it.
You can enable the rule at any time later by using the toggle button on the Moving rules page.
- Select Rule conditions > Applications and do the following:
- Enable the Operating system version toggle button.
- In the list of operating systems that opens, select Android or iOS.
The rule will be applied to the corresponding devices. You must specify at least one condition to create a rule.
- Click Save to create the rule.
The newly created rule is displayed on the Moving rules page. According to the rule, Kaspersky Security Center will allocate all newly connected devices to the selected administration group.
For detailed information on administration groups management and actions with unassigned devices:
- If you use Kaspersky Security Center Web Console, please refer to Kaspersky Security Center Help.
- If you use Kaspersky Security Center Cloud Console, please refer to Kaspersky Security Center Cloud Console Help.
The help for this version of the solution is no longer updated, so it may contain outdated information. For up-to-date information about the solution refer to the Kaspersky Secure Mobility Management 4.1 Help.
Deploying administration plug-ins
To manage mobile devices in Kaspersky Security Center Web Console, the following administration plug-ins must be installed:
If you are using Kaspersky Security Center Cloud Console, you do not need to install the administration plug-ins. You only need to create an account in Kaspersky Security Center Cloud Console. For more information about creating an account, please refer to Kaspersky Security Center Cloud Console Help.
You can use the following methods to install administration plug-ins:
- By using the Quick Start Wizard of Kaspersky Security Center Web Console.
Kaspersky Security Center Web Console automatically prompts you to run the Quick Start Wizard after Administration Server installation, at the first connection to it. You can also start the Quick Start Wizard manually at any time.
For more information on the Quick Start Wizard for Kaspersky Security Center, please refer to Kaspersky Security Center Help.
- By using the list of available distribution packages in Kaspersky Security Center Web Console.
The list of available distribution packages is updated automatically after new versions of Kaspersky applications are released.
- Download the distribution packages from an external source and add administration plug-ins to Kaspersky Security Center Web Console.
For example, the distribution packages of administration plug-ins can be downloaded on the Kaspersky website.
The help for this version of the solution is no longer updated, so it may contain outdated information. For up-to-date information about the solution refer to the Kaspersky Secure Mobility Management 4.1 Help.
Installing administration plug-ins from the list of available distribution packages
To install the administration plug-ins:
- In the main window of Kaspersky Security Center Web Console, select Console settings > Web plug-ins.
- Click the Add button.
This opens the list of up-to-date versions of Kaspersky applications.
- Install the administration plug-ins:
- In the list of available applications, click the Mobile devices section to expand it.
- Select Kaspersky Security for Mobile (Devices), and then click Install plug-in.
- Select Kaspersky Security for Mobile (Policies), and then click Install plug-in.
The distribution packages are downloaded and the plug-ins are installed. When each plug-in is installed and added to Kaspersky Security Center Web Console, a confirmation window is displayed.
Page top
The help for this version of the solution is no longer updated, so it may contain outdated information. For up-to-date information about the solution refer to the Kaspersky Secure Mobility Management 4.1 Help.
Installing administration plug-ins from the distribution package
You can download the distribution package on the Kaspersky website.
To install the Kaspersky Security for Mobile (Devices) plug-in from the distribution package:
- Copy the
plugin.zipandsignature.txtfiles from theon_prem_ksm_devices_xx.x.x.x.ziparchive of the distribution package to the administrator's workstation. - In the main window of Kaspersky Security Center Web Console, select Console settings > Web plug-ins.
- Click Add from file.
- In the Add from file window that opens, click Upload ZIP file, and then browse for
plugin.zip. - Click Upload signature, and then browse for
signature.txt. - Click the Add button.
The Kaspersky Security for Mobile (Devices) plug-in is installed and added to Kaspersky Security Center Web Console.
To install the Kaspersky Security for Mobile (Policies) plug-in from the distribution package:
- Copy the
plugin.zipandsignature.txtfiles from theon_prem_ksm_policies_xx.x.x.x.ziparchive of the distribution package to the administrator's workstation. - In the main window of Kaspersky Security Center Web Console, select Console settings > Web plug-ins.
- Click Add from file.
- In the Add from file window that opens, click Upload ZIP file, and then browse for
plugin.zip. - Click Upload signature, and then browse for
signature.txt. - Click the Add button.
The Kaspersky Security for Mobile (Policies) plug-in is installed and added to Kaspersky Security Center Web Console.
You can make sure that the administration plug-ins have been installed by viewing the list of installed plug-ins on the Console settings > Web plug-ins page.
Page top
The help for this version of the solution is no longer updated, so it may contain outdated information. For up-to-date information about the solution refer to the Kaspersky Secure Mobility Management 4.1 Help.
Deploying the mobile app
To manage mobile devices in Kaspersky Security Center Web Console or Cloud Console, you must deploy the Kaspersky Endpoint Security for Android app or the Kaspersky Security for iOS app on mobile devices. You can deploy apps on mobile devices by using Kaspersky Security Center Web Console or Cloud Console.
The help for this version of the solution is no longer updated, so it may contain outdated information. For up-to-date information about the solution refer to the Kaspersky Secure Mobility Management 4.1 Help.
Deploying the mobile app by using Kaspersky Security Center Web Console or Cloud Console
The mobile app is deployed on the mobile devices of users whose user accounts have been added to Kaspersky Security Center. For more information about user accounts in Kaspersky Security Center:
- If you use Kaspersky Security Center Web Console, please refer to Kaspersky Security Center Help.
- If you use Kaspersky Security Center Cloud Console, please refer to Kaspersky Security Center Cloud Console Help.
You can use the Kaspersky Security for Mobile (Devices) plug-in to install the app from Kaspersky Security Center Web Console and Cloud Console by sending an installation link to a mobile device.
- On an Android device, the user receives a Google Play link to download the Kaspersky Endpoint Security for Android app. The app can be installed by following the standard installation procedure on the Android platform. After the installation of the app, the user must provide the required permissions.
Some HUAWEI and Honor devices do not have Google services and therefore no access to apps in Google Play. If some users of HUAWEI and Honor devices cannot install the app from Google Play, they should be instructed to install the app from HUAWEI App Gallery.
- On an iOS device, the user receives an App Store link to download the Kaspersky Security for iOS app. The app can be installed by following the standard installation procedure on the iOS platform.
Before connecting an iOS device, send the address of Kaspersky Security Center to the device user to improve connection security. The user will see this address during app installation and can cancel the connection if the displayed address doesn't match the address you sent.
The link contains the following data:
- Kaspersky Security Center synchronization settings
- Mobile certificate
To deploy the app on a mobile device:
- Start the Mobile Device Connection Wizard:
- In the main window of Kaspersky Security Center Web Console or Cloud Console, select Devices > Mobile > Devices, and then click Add.
- In the main window of Kaspersky Security Center Web Console or Cloud Console, select Users & roles > Users. Click the name of the user or the user group to whom you want to send the link for connecting a mobile device, and then select Devices. Click Add mobile device. In this case, skip step 3.
Proceed through the Wizard by using the Next button.
- Select the operating system of the devices that you want to add:
- Android
- iOS and iPadOS
- Select users and user groups to whom you want to send the link for connecting a mobile device.
- Select email addresses where to send the link:
- All email addresses
- Main email address
- Alternative email address
- Another email address
If you select this option, specify the email address below.
- The link summary is displayed.
Make sure that all parameters of the link are correct, and then click Send.
- A window opens with a confirmation that the link for adding a mobile device has been sent.
Click OK to finish the Wizard.
When the user installs the Kaspersky Endpoint Security for Android app or the Kaspersky Security for iOS app, the user's device will be displayed on the Devices > Mobile > Devices tab of Web Console or Cloud Console.After installing the app on users' mobile devices, you will be able to configure the settings for devices and apps by using group policies. You will also be able to send commands to mobile devices (for Android only) for data protection in case devices are lost or stolen.
Page top
The help for this version of the solution is no longer updated, so it may contain outdated information. For up-to-date information about the solution refer to the Kaspersky Secure Mobility Management 4.1 Help.
Activating the mobile app
In Kaspersky Security Center, the license can cover various groups of features. To ensure that the Kaspersky Endpoint Security for Android app and the Kaspersky Security for iOS app are fully functional, the Kaspersky Security Center license purchased by the organization must provide for the Mobile Device Management functionality. The Mobile Device Management functionality is intended for connecting mobile devices to Kaspersky Security Center and managing them.
For detailed information about licensing Kaspersky Security Center and licensing options:
- If you use Kaspersky Security Center Web Console, please refer to Kaspersky Security Center Help.
- If you use Kaspersky Security Center Cloud Console, please refer to Kaspersky Security Center Cloud Console Help.
Activating the Kaspersky Endpoint Security for Android app or the Kaspersky Security for iOS app on a mobile device is done by providing valid license information to the app. License information is delivered to the mobile device, together with the policy, when the device is synchronized with Kaspersky Security Center.
If the activation of the mobile app is not completed within 30 days from the time of installation on the mobile device, the app is automatically switched to the limited functionality mode. In this mode, most of the app components are not operational. When switched to the limited functionality mode, the app stops performing automatic synchronization with Kaspersky Security Center. Therefore, if the activation of the app has not been completed within 30 days after the installation, the user must synchronize the device with Kaspersky Security Center manually.
If Kaspersky Security Center is not deployed in your organization or is not accessible to mobile devices, users can activate the mobile app on their devices manually.
To activate the mobile app:
- Open the policy properties window:
- In the main window of Kaspersky Security Center Web Console or Cloud Console, select Devices > Policies & profiles. In the list of group policies that opens, click the name of the policy that you want to configure.
- In the main window of Kaspersky Security Center Web Console or Cloud Console, select Devices > Mobile > Devices. Click the mobile device that falls under the policy that you want to configure, and then select the policy on the Active policies and policy profiles tab.
- In the policy properties page, select Application settings > Licenses.
- Use the drop-down list to select the required license key from the key storage of the Administration Server.
The details of the license key are displayed in the fields below.
If a key file is selected from the Kaspersky Security Center key storage and sent to the device, Kaspersky Security for iOS will be not able to process it, because Kaspersky Security for iOS does not support this activation method. To activate Kaspersky Security for iOS, you must add the license to Kaspersky Security Center as an activation code.
You can replace the existing activation key on the mobile device if it is different from the one selected in the drop-down list above. To do so, select the If the key on device is different, replace with this key check box.
- Click the Save button to save the changes you have made to the policy and exit the policy properties window.
Mobile device settings are configured after the next device synchronization with Kaspersky Security Center.
Page top
The help for this version of the solution is no longer updated, so it may contain outdated information. For up-to-date information about the solution refer to the Kaspersky Secure Mobility Management 4.1 Help.
Providing the required permissions for the Kaspersky Endpoint Security for Android app
Certain features of the Kaspersky Endpoint Security for Android app require permissions. Kaspersky Endpoint Security for Android asks for mandatory permissions during installation, as well as after installation and prior to using individual features of the app. It is impossible to install Kaspersky Endpoint Security for Android without providing the mandatory permissions.
On certain devices (for example, HUAWEI, Meizu, and Xiaomi), you must manually add Kaspersky Endpoint Security for Android to the list of apps that are started when the operating system starts, in the device settings. If the app is not added to the list, Kaspersky Endpoint Security for Android stops performing all of its functions after the mobile device is restarted.
On devices running Android 11 or later or Android 6-10 with Google Play services, you must disable the Remove permissions if app isn't used system setting. Otherwise, after the app is not used for a few months, the system automatically resets the permissions that the user granted to the app.
Permissions requested by the Kaspersky Endpoint Security for Android app
Permission |
App function |
|---|---|
Phone (for Android 5.0–9.X) |
Connect to Kaspersky Security Center (device ID) |
Storage (mandatory) |
Anti-Malware |
Access to manage all files (for Android 11 or later) |
Anti-Malware |
Nearby Bluetooth devices (for Android 12 or later) |
Restrict use of Bluetooth |
Notifications (for Android 13) |
Notify the user about security issues and app events |
Allow running in the background (for Android 12 or later) |
Ensure continuous operation of the app. If permission is not granted, the app may be unloaded from memory and unable to restart. |
Device administrator (mandatory) |
Anti-Theft—lock the device (only for Android 5.0–6.X) |
Anti-Theft—take a mugshot with frontal camera Although taking mugshots is not supported in Kaspersky Security Center Web Console and Cloud Console, the Kaspersky Endpoint Security for Android app requires this permission so that it can be managed by all Kaspersky Security Center consoles. |
|
Anti-Theft—sound an alarm |
|
Anti-Theft—full reset |
|
Password protection |
|
App removal protection |
|
Install security certificate |
|
App Control |
|
Restrict use of the camera, Bluetooth, and Wi-Fi |
|
Camera |
Anti-Theft—take a mugshot with frontal camera Although taking mugshots is not supported in Kaspersky Security Center Web Console and Cloud Console, the Kaspersky Endpoint Security for Android app requires this permission so that it can be managed by all Kaspersky Security Center consoles. On devices running Android 11.0 or later, the user must grant the "While using the app" permission when prompted. |
Location |
Anti-Theft—locate device On devices running Android 10.0 or later, the user must grant the "All the time" permission when prompted. |
Accessibility
|
Anti-Theft—lock the device (only for Android 7.0 or later) |
Web Protection |
|
App Control |
|
App removal protection (only for Android 7.0 or later) |
|
Display of warnings of Kaspersky Endpoint Security for Android (only for Android 10.0 or later) |
|
Restrict use of the camera (only for Android 11 or later) |
|
Display pop-up window (for some Xiaomi devices) |
Web Protection |
Display pop-up windows while running in the background (for some Xiaomi devices) |
Web Protection |
Run in the background (for Xiaomi devices with MIUI firmware on Android 11 or earlier) |
App Control |
Web Protection |
|
Anti-Theft |
The help for this version of the solution is no longer updated, so it may contain outdated information. For up-to-date information about the solution refer to the Kaspersky Secure Mobility Management 4.1 Help.
Managing certificates
Mobile certificates are used for the purpose of identifying the users of mobile devices on the Administration Server.
Kaspersky Security Center Web Console and Cloud Console allow you to perform the following actions with user mobile certificates:
- View the certificates and their statuses.
- Create new certificates.
- Renew the expiring certificates.
- Delete certificates.
For more information on Kaspersky Security Center certificates:
- If you use Kaspersky Security Center Web Console, please refer to Kaspersky Security Center Help.
- If you use Kaspersky Security Center Cloud Console, please refer to Kaspersky Security Center Cloud Console Help.
The help for this version of the solution is no longer updated, so it may contain outdated information. For up-to-date information about the solution refer to the Kaspersky Secure Mobility Management 4.1 Help.
Viewing the list of certificates
Kaspersky Security Center Web Console and Cloud Console allow you to view the applied user mobile certificates, their statuses, and properties.
To view the list of applied user mobile certificates:
- In the main window of Kaspersky Security Center Web Console or Cloud Console, select Devices > Mobile > Devices.
- Select Manage certificates.
The Mobile certificates page opens with information about the applied user mobile certificates. You can view details of a certificate by clicking it in the User name column.
Page top
The help for this version of the solution is no longer updated, so it may contain outdated information. For up-to-date information about the solution refer to the Kaspersky Secure Mobility Management 4.1 Help.
Defining certificate settings
You can use Kaspersky Security Center Web Console or Cloud Console to configure the lifetime, automatic updates, and password protection of mobile certificates.
To define mobile certificate settings:
- In the main window of Kaspersky Security Center Web Console or Cloud Console, select Devices > Mobile > Devices.
- Select Manage certificates.
- Select Certificate settings.
- In the Generate mobile certificates window that opens, you can configure the following:
- Certificate validity period (days)
Certificate lifetime period in days. The default lifetime of a certificate is 365 days. When this period expires, the mobile device will not be able to connect to the Administration Server.
- Reissue when certificate will expire in (days)
The number of days remaining until the current certificate's expiration during which Administration Server should issue a new certificate. For example, if the value of the field is 4, Administration Server issues a new certificate four days before the current certificate expires. The default value is 1.
- Reissue certificate automatically if possible
If possible, certificates will be reissued automatically. If this option is disabled, certificates must be reissued manually as they expire. By default, this option is disabled.
- Prompt for password during certificate installation
The user will be prompted for a password when the certificate is installed on a mobile device. The password is used only once—during installation of the certificate on the mobile device. The password will be automatically generated by the Administration Server and sent to the user by email. You can specify the password length in the Password length field.
- Certificate validity period (days)
- Click Save to apply the changes and close the window.
The specified settings will be used by Kaspersky Security Center for creating, updating, and protecting mobile certificates.
Page top
The help for this version of the solution is no longer updated, so it may contain outdated information. For up-to-date information about the solution refer to the Kaspersky Secure Mobility Management 4.1 Help.
Creating a certificate
You can create mobile certificates in Kaspersky Security Center Web Console and Cloud Console for the purpose of identifying the users of mobile devices.
To create a mobile certificate:
- In the main window of Kaspersky Security Center Web Console or Cloud Console, select Devices > Mobile > Devices.
- Select Manage certificates.
- In the Mobile certificates window that opens, click Add to start Mobile Certificate Creation Wizard. Proceed through the Wizard by using the Next button.
- Select users or user groups whose mobile devices you want to manage with a new certificate.
- Specify the Publication parameters:
- If you want to notify the users about the new certificate, select the Notify user about the new certificate check box.
- If you want to allow using one certificate multiple times on the same device, select the Allow using one certificate multiple times on the same device (only for devices with Kaspersky Endpoint Security for Android installed) check box.
- Select the Authentication type:
- Select Credentials (domain login or user name) if you want users to access the certificate by using their credentials.
On devices, users will have to specify the login in one of the following formats:
userPrincipalName@DNSDomainNamesAMAccountNamesAMADomain\sAMAccountName
- Select One-time password if you want users to access the certificate by using a one-time password.
This option is available if you did not select the Allow using one certificate multiple times on the same device (only for devices with Kaspersky Endpoint Security for Android installed) check box in the previous step.
- Select Password if you want users to access the certificate by using a password.
This option is available if you selected the Allow using one certificate multiple times on the same device (only for devices with Kaspersky Endpoint Security for Android installed) check box in the previous step.
- Select Credentials (domain login or user name) if you want users to access the certificate by using their credentials.
- Specify the method of certificate delivery in the Certificate delivery field:
- If you have selected One-time password in the previous step, select one of the following options:
- If you want to send the password by email, select Notify user by email.
Then select which email address to use or select Another email address to specify another email address.
- If you want to notify users about the password by other means, select Show the password after finishing the Wizard.
- If you want to send the password by email, select Notify user by email.
- If you have selected Credentials (domain login or user name) in the previous step, select which email address to use or select Another email address to specify another email address.
- If you have selected One-time password in the previous step, select one of the following options:
- The certificate summary is displayed.
Make sure that all parameters are correct, and then click Create.
As a result, Mobile Certificate Creation Wizard creates a certificate that users can install on their mobile devices. The certificate becomes available after the next synchronization of mobile devices with Kaspersky Security Center.
For more information about creating certificates and configuring rules for issuing them:
- If you use Kaspersky Security Center Web Console, please refer to Kaspersky Security Center Help.
- If you use Kaspersky Security Center Cloud Console, please refer to Kaspersky Security Center Cloud Console Help.
The help for this version of the solution is no longer updated, so it may contain outdated information. For up-to-date information about the solution refer to the Kaspersky Secure Mobility Management 4.1 Help.
Renewing a certificate
If any of the applied mobile certificates is about to expire, you can renew it by using Kaspersky Security Center Web Console or Cloud Console.
To renew a mobile certificate:
- In the main window of Kaspersky Security Center Web Console or Cloud Console, select Devices > Mobile > Devices.
- Select Manage certificates.
- Select the certificate that you want to renew, and then click Reissue.
The status of the certificate changes to The certificate has been reissued.
Page top
The help for this version of the solution is no longer updated, so it may contain outdated information. For up-to-date information about the solution refer to the Kaspersky Secure Mobility Management 4.1 Help.
Deleting a certificate
You can delete mobile certificates by using Kaspersky Security Center Web Console or Cloud Console.
If you delete a mobile certificate, the device can no longer synchronize with the Administration Server and cannot be managed by means of Kaspersky Security Center. To start managing the mobile device again, you will need to reinstall the Kaspersky Endpoint Security for Android app on it.
To delete a mobile certificate:
- In the main window of Kaspersky Security Center Web Console or Cloud Console, select Devices > Mobile > Devices.
- Select Manage certificates.
- Select the certificate that you want to delete, and then click Delete.
The certificate is deleted and removed from the list of certificates.
Page top
The help for this version of the solution is no longer updated, so it may contain outdated information. For up-to-date information about the solution refer to the Kaspersky Secure Mobility Management 4.1 Help.
Exchanging information with Firebase Cloud Messaging
Kaspersky Endpoint Security for Android uses the Firebase Cloud Messaging (FCM) service to ensure timely delivery of commands to mobile devices and forced synchronization when policy settings are changed.
To use the Firebase Cloud Messaging service, you must define the service settings in Kaspersky Security Center Web Console or Cloud Console.
To enable Firebase Cloud Messaging in Kaspersky Security Center Web Console or Cloud Console:
- In the main window of Kaspersky Security Center Web Console or Cloud Console, select Devices > Mobile > Android devices synchronization.
The Android devices synchronization window opens.
- In the Sender ID and Server key fields, specify the Firebase Cloud Messaging settings: SENDER_ID and API Key.
Firebase Cloud Messaging is enabled.
To obtain a Sender ID and the Server key:
- Register on Google portal.
- Go to Google Cloud Platform.
- Create a new project.
Wait for the project to be created.
- Find the relevant SENDER_ID of the project.
- Enable Google Firebase Cloud Messaging for Android.
- Follow the onscreen instructions to create credentials.
- Retrieve the API Key from the properties of the newly created credentials.
For detailed information about operations in Google Cloud Platform, please refer to its documentation.
You now have a Sender ID and a Server key to configure the Firebase Cloud Messaging settings.
If the Firebase Cloud Messaging settings are not defined, commands on the mobile device and policy settings will be delivered when the device is synchronized with Kaspersky Security Center, according to the schedule set in the policy (for example, every 24 hours). In other words, commands and policy settings will be delivered with a delay.
For the purposes of supporting the main functionality of the product, you agree to automatically provide the Firebase Cloud Messaging service with the unique ID of the app installation (Instance ID), and the following data:
- Information about the installed software: app version, app ID, app build version, app package name.
- Information about the computer on which the software is installed: OS version, device ID, version of Google services.
- Information about FCM: app ID in FCM, FCM user ID, protocol version.
Data is transmitted to Firebase services over a secure connection. Access to and protection of information is regulated by the relevant terms of use of the Firebase services: Firebase Data Processing and Security Terms, Privacy and Security in Firebase.
To prevent the exchange of information with the Firebase Cloud Messaging service:
- In the main window of Kaspersky Security Center Web Console or Cloud Console, select Devices > Mobile > Android devices synchronization.
The Android devices synchronization window opens.
- Click Reset.
- In the window that opens, click the OK button to confirm resetting.
The Firebase Cloud Messaging settings are cleared.
Page top
The help for this version of the solution is no longer updated, so it may contain outdated information. For up-to-date information about the solution refer to the Kaspersky Secure Mobility Management 4.1 Help.
Managing mobile devices in Kaspersky Security Center Web Console and Cloud Console
You can manage mobile devices in Kaspersky Security Center Web Console and Cloud Console by using group policies and by sending commands to mobile devices (for Android only).
To manage mobile devices in Kaspersky Security Center Web Console, you must install administration plug-ins.
The help for this version of the solution is no longer updated, so it may contain outdated information. For up-to-date information about the solution refer to the Kaspersky Secure Mobility Management 4.1 Help.
Connecting mobile devices to Kaspersky Security Center
To manage a mobile device by using Kaspersky Security Center Web Console or Cloud Console, the device must be connected to Kaspersky Security Center. You can view the list of mobile devices connected to Kaspersky Security Center on the Devices > Mobile > Devices tab of Web Console or Cloud Console.
Before connecting an iOS device, send the address of Kaspersky Security Center to the device user to improve connection security. The user will see this address during app installation and can cancel the connection if the displayed address doesn't match the address you sent.
To connect a mobile device to Kaspersky Security Center:
- Start the Mobile Device Connection Wizard:
- In the main window of Kaspersky Security Center Web Console or Cloud Console, select Devices > Mobile > Devices, and then click Add.
- In the main window of Kaspersky Security Center Web Console or Cloud Console, select Users & roles > Users. Click the name of the user or the user group to whom you want to send the link for connecting a mobile device, and then select Devices. Click Add mobile device. In this case, skip step 3.
Proceed through the Wizard by using the Next button.
- Select the operating system of the devices that you want to add:
- Android
- iOS and iPadOS
- Select users and user groups to whom you want to send the link for connecting a mobile device.
- Select email addresses where to send the link:
- All email addresses
- Main email address
- Alternative email address
- Another email address
If you select this option, specify the email address below.
- The link summary is displayed.
Make sure that all parameters of the link are correct, and then click Send.
- A window opens with a confirmation that the link for adding a mobile device has been sent.
Click OK to finish the Wizard.
When the user installs the Kaspersky Endpoint Security for Android app or the Kaspersky Security for iOS app, the user's device will be displayed on the Devices > Mobile > Devices tab of Web Console or Cloud Console.
Page top
The help for this version of the solution is no longer updated, so it may contain outdated information. For up-to-date information about the solution refer to the Kaspersky Secure Mobility Management 4.1 Help.
Moving unassigned mobile devices to administration groups
When the Kaspersky Endpoint Security for Android app or the Kaspersky Security for iOS app is installed on mobile devices, they are displayed on the Discovery & deployment > Unassigned devices page of Kaspersky Security Center Web Console or Cloud Console. In order to manage newly connected devices, you can create a rule for their automatic allocating to administration groups or move them to an administration group manually.
To move an unassigned mobile device to an administration group:
- In the main window of Kaspersky Security Center Web Console or Cloud Console, select Discovery & deployment > Unassigned devices.
- Select the device that you want to move to an administration group, and then click Move to group.
- In the tree of administration groups that opens, select the target group to which you want to move the device.
You can create a new administration group by selecting an existing group, and then clicking Add child group.
- Click Move.
The device is moved to the specified administration group and the group policy is applied to it.
Page top
The help for this version of the solution is no longer updated, so it may contain outdated information. For up-to-date information about the solution refer to the Kaspersky Secure Mobility Management 4.1 Help.
Sending commands to mobile devices
You can send commands to Android mobile devices to protect data on a mobile device that is lost or stolen, or to perform forced synchronization of a mobile device with Kaspersky Security Center.
You can't send commands to iOS devices.
The following commands are supported:
- Lock device
The mobile device is locked.
- Unlock device
The mobile device is unlocked.
After unlocking a device running Android 5.0 – 6, the screen unlock password is reset to "1234". After unlocking a device running Android 7.0 or later, the screen unlock password is not changed.
- Reset to factory settings
All data is deleted from the mobile device and the settings are rolled back to their default values.
- Wipe corporate data
The corporate data is wiped from the device. The list of wiped data depends on the mode in which the device operates:
- On a personal device, KNOX container and mail certificate are wiped.
- If the device operates in device owner mode, KNOX container and the certificates installed by Kaspersky Endpoint Security for Android (mail, VPN, and SCEP profile certificates, except the mobile certificates) are wiped.
- Additionally, if Android work profile is created, the work profile (its content, configurations, and restrictions) and the certificates installed in the work profile (mail, VPN, and SCEP profile certificates, except the mobile certificates) are wiped.
- Locate device
Device is located and shown on Google Maps. The mobile service provider may charge a fee for internet access.
On devices running Android 12 or later, if the user granted the "Use approximate location" permission, the Kaspersky Endpoint Security for Android app first tries to get the precise device location. If this is not successful, the approximate device location is returned only if it was received not more than 30 minutes earlier. Otherwise, the Locate device command fails.
- Sound alarm
The mobile device sounds an alarm. The alarm sounds for 5 minutes (or for 1 minute if the device battery is low).
- Synchronize device
The mobile device is synchronized with Kaspersky Security Center.
Kaspersky Endpoint Security for Android app requires specific permissions for the execution of commands. When the Initial Configuration Wizard is running, Kaspersky Endpoint Security for Android prompts the user to grant the application all required permissions. The user can skip these steps or disable these permissions in the device settings at a later time. If this is the case, it will be impossible to execute commands.
On devices running Android 10.0 or later, the user must grant the "All the time" permission to access the location. On devices running Android 11.0 or later, the user must also grant the "While using the app" permission to access the camera. Otherwise, anti-theft commands will not function. The user will be notified of this limitation and will again be prompted to grant the required level of permissions. If the user selects the "Only this time" option for the camera permission, access is considered granted by the app. It is recommended to contact the user directly if the camera permission is requested again.
To send a command to a mobile device:
- In the main window of Kaspersky Security Center Web Console or Cloud Console, select Devices > Mobile > Devices.
- Select the device to which you want to send the command, and then click either Control or Manage.
- Select the required command in the Available commands list, and then click OK.
- Click OK if you are prompted to confirm the operation.
The specified command is sent to the mobile device and the confirmation window is displayed.
Page top
The help for this version of the solution is no longer updated, so it may contain outdated information. For up-to-date information about the solution refer to the Kaspersky Secure Mobility Management 4.1 Help.
Removing mobile devices from Kaspersky Security Center
If you do not need to manage a mobile device any longer, you can remove it from Kaspersky Security Center by using Web Console or Cloud Console.
To remove a mobile device from Kaspersky Security Center:
- Remove the mobile app from the device or make sure that the user has removed the app from the required device.
- In the main window of Kaspersky Security Center Web Console or Cloud Console, select Devices > Mobile > Devices.
- Select the mobile device that you want to remove, and then click Delete.
- Click OK to confirm the operation.
The device is removed from Kaspersky Security Center.
Page top
The help for this version of the solution is no longer updated, so it may contain outdated information. For up-to-date information about the solution refer to the Kaspersky Secure Mobility Management 4.1 Help.
Managing group policies
This section describes how to manage group policies in Kaspersky Security Center Web Console and Cloud Console.
The help for this version of the solution is no longer updated, so it may contain outdated information. For up-to-date information about the solution refer to the Kaspersky Secure Mobility Management 4.1 Help.
Group policies for managing mobile devices
A group policy is a package of settings for managing mobile devices that belong to an administration group and for managing mobile apps installed on the devices.
You can use a policy to configure settings of both individual devices and a group of devices. For a group of devices, administration settings can be configured in the window of group policy properties.
Each parameter represented in a policy has a "lock" attribute, which shows whether the setting is allowed for modification in the policies of nested hierarchy levels (for nested groups and secondary Administration Servers), in local application settings.
The values of settings configured in the policy and in local application settings are saved on the Administration Server, distributed to mobile devices during synchronization, and saved to devices as current settings. If the user has specified other values of settings that have not been "locked", during the next synchronization of the device with the Administration Server the new values of settings are relayed to the Administration Server and saved in the local settings of the application instead of the values that had been previously specified by the administrator.
To keep corporate security of Android mobile devices up to date, you can monitor users' devices for compliance with corporate security requirements.
For more details on managing policies and administration groups in Kaspersky Security Center Web Console and Cloud Console:
- If you use Kaspersky Security Center Web Console, please refer to Kaspersky Security Center Help.
- If you use Kaspersky Security Center Cloud Console, please refer to Kaspersky Security Center Cloud Console Help.
The help for this version of the solution is no longer updated, so it may contain outdated information. For up-to-date information about the solution refer to the Kaspersky Secure Mobility Management 4.1 Help.
Viewing the list of group policies
Kaspersky Security Center Web Console and Cloud Console allow you to view the group policies, their statuses, and properties.
To view the list of group policies,
In the main window of Kaspersky Security Center Web Console or Cloud Console, select Devices > Policies & profiles.
The list of group policies opens with brief information about the group policies. On this page, you can create, modify, copy, move, and delete group policies.
Page top
The help for this version of the solution is no longer updated, so it may contain outdated information. For up-to-date information about the solution refer to the Kaspersky Secure Mobility Management 4.1 Help.
Viewing the policy distribution results
Kaspersky Security Center Web Console and Cloud Console allow you to view the distribution chart of a group policy and information about all devices that fall under that policy.
To view the distribution results of a group policy:
- In the main window of Kaspersky Security Center Web Console or Cloud Console, select Devices > Policies & profiles.
- In the list of group policies that opens, select the check box next to the name of the policy for which you want to view the distribution results, and then click Distribution.
The policy distribution results page opens. This page contains the policy summary, the policy distribution chart, and the table with information about all devices that fall under that policy. You can open the policy properties window by clicking the Configure policy button.
Page top
The help for this version of the solution is no longer updated, so it may contain outdated information. For up-to-date information about the solution refer to the Kaspersky Secure Mobility Management 4.1 Help.
Creating a group policy
Kaspersky Security Center Web Console and Cloud Console allow you to create group policies for the purpose of managing mobile devices.
To create a group policy:
- In the main window of Kaspersky Security Center Web Console or Cloud Console, select Devices > Policies & profiles.
- In the list of Kaspersky Security Center group policies that opens, click Current path to select the administration group for which you want to create a policy.
By default, the new group policy is applied to the Managed devices group.
- Click Add to start the Policy Creation Wizard. Proceed through the Wizard by using the Next button.
- Select Kaspersky Security for Mobile (Policies).
- Type the name for the new policy in the Name field. If you specify the name of an existing policy, it will have (1) added at the end automatically.
- Select the policy status:
- Active
The Wizard saves the created policy on the Administration Server. At the next synchronization of the mobile device with the Administration Server, the policy will be used on the device as the active policy.
- Inactive
The Wizard saves the created policy on the Administration Server as a backup policy. This policy can be activated in the future after a specific event. If necessary, an inactive policy can be switched to active state.
Several policies can be created for one application in the group, but only one of them can be active. When a new active policy is created, the previous active policy automatically becomes inactive.
- Active
- You can enable or disable two options of inheritance, Inherit settings from parent policy and Force inheritance of settings in child policies:
- If you enable Inherit settings from parent policy for a child administration group and lock some settings in the parent policy, then you cannot change these settings in the policy for the child group. You can, however, change the settings that are not locked in the parent policy.
- If you disable Inherit settings from parent policy for a child administration group, then you can change all the settings in the child group, even if some settings are locked in the parent policy.
- If you enable Force inheritance of settings in child policies in the parent administration group, this enables the Inherit settings from parent policy option for each child policy. In this case, you cannot disable this option for any child policy. All the settings that are locked in the parent policy are forcibly inherited in the child groups and you cannot change these settings in the child groups.
- In the policies for the Managed devices group, the Inherit settings from parent policy option does not affect any settings, because the Managed devices group does not have any upstream groups and therefore does not inherit any policies.
By default, the Inherit settings from parent policy option is enabled and the Force inheritance of settings in child policies option is disabled.
- If you want, you can define the settings of the newly created policy. To do so, select the Application settings tab, and then proceed as described in the "Defining policy settings" section.
Alternatively, you can do that later.
- Click Save to create the policy.
A new group policy for managing mobile devices is created.
Page top
The help for this version of the solution is no longer updated, so it may contain outdated information. For up-to-date information about the solution refer to the Kaspersky Secure Mobility Management 4.1 Help.
Modifying a group policy
Kaspersky Security Center Web Console and Cloud Console allow you to modify the settings of group policies.
To modify a group policy:
- Open the policy properties window:
- In the main window of Kaspersky Security Center Web Console or Cloud Console, select Devices > Policies & profiles. In the list of group policies that opens, click the name of the policy that you want to configure.
- In the main window of Kaspersky Security Center Web Console or Cloud Console, select Devices > Mobile > Devices. Click the mobile device that falls under the policy that you want to configure, and then select the policy on the Active policies and policy profiles tab.
- In the policy properties window, select Application settings, and then define the policy settings as described in the "Defining policy settings" section.
You can also configure general settings, settings inheritance, events logging and notifications, policy profiles, and view revision history. For more information, please refer to Kaspersky Security Center Help.
- Click the Save button to save the changes you have made to the policy and exit the policy properties window.
Mobile device settings are configured after the next device synchronization with Kaspersky Security Center.
Page top
The help for this version of the solution is no longer updated, so it may contain outdated information. For up-to-date information about the solution refer to the Kaspersky Secure Mobility Management 4.1 Help.
Copying a group policy
Kaspersky Security Center Web Console and Cloud Console allow you to create a copy of a group policy.
To create a copy of a group policy:
- In the main window of Kaspersky Security Center Web Console or Cloud Console, select Devices > Policies & profiles.
- In the list of group policies that opens, select the check box next to the name of the policy for which you want to create a copy, and then click Copy.
- In the tree of administration groups that opens, select the target group in which you want to create a copy of the policy.
You can create a new administration group by selecting an existing group, and then clicking Add child group.
- Click Copy.
- Click OK to confirm the operation.
A copy of the policy will be created in the target group under the same name. The status of each copied or moved policy in the target group will be Inactive. You can change the status to Active at any time.
If a policy with a name identical to that of the newly created or moved policy already exists in the target group, the (<next sequence number>) index is added to the name of the newly created or moved policy, for example: (1).
Page top
The help for this version of the solution is no longer updated, so it may contain outdated information. For up-to-date information about the solution refer to the Kaspersky Secure Mobility Management 4.1 Help.
Moving a policy to another administration group
Kaspersky Security Center Web Console and Cloud Console allow you to move a policy to another administration group.
To move a policy to another administration group:
- In the main window of Kaspersky Security Center Web Console or Cloud Console, select Devices > Policies & profiles.
- In the list of group policies that opens, select the check box next to the name of the policy that you want to move to another administration group, and then click Move.
- In the tree of administration groups that opens, select the target group to which you want to move the policy.
You can create a new administration group by selecting an existing group, and then clicking Add child group.
- Click Move.
- Click OK to confirm the operation.
The result depends on the policy inheritance properties:
- If the policy is not inherited in the source group, it will be moved to the target group.
- If the policy is inherited in the source group, it will not be moved. Instead, a copy of this policy will be created in the target group.
The status of each copied or moved policy in the target group will be Inactive. You can change the status to Active at any time.
If a policy with a name identical to that of the newly created or moved policy already exists in the target group, the (<next sequence number>) index is added to the name of the newly created or moved policy, for example: (1).
Page top
The help for this version of the solution is no longer updated, so it may contain outdated information. For up-to-date information about the solution refer to the Kaspersky Secure Mobility Management 4.1 Help.
Deleting a group policy
Kaspersky Security Center Web Console and Cloud Console allow you to delete group policies.
You can delete only a policy that is not inherited in the current administration group. If a policy is inherited, you can only delete it in the upper-level group for which it was created.
To delete a group policy:
- In the main window of Kaspersky Security Center Web Console or Cloud Console, select Devices > Policies & profiles.
- In the list of group policies that opens, select the check box next to the name of the policy that you want to delete, and then click Delete.
- Click OK to confirm the operation.
The group policy will be deleted.
Page top
The help for this version of the solution is no longer updated, so it may contain outdated information. For up-to-date information about the solution refer to the Kaspersky Secure Mobility Management 4.1 Help.
Defining policy settings
This section describes how to define the settings of Kaspersky Security Center policies for managing mobile devices.
You can define policy settings either when creating or modifying a policy.
The help for this version of the solution is no longer updated, so it may contain outdated information. For up-to-date information about the solution refer to the Kaspersky Secure Mobility Management 4.1 Help.
Configuring anti-malware protection
You can define these policy settings only for Android devices.
For the timely detection of threats, viruses, and other malicious applications, you should configure real-time protection and autorun of malware scans.
Kaspersky Endpoint Security for Android detects the following types of objects:
- Viruses, worms, Trojans, and malicious tools
- Adware
- Apps that can be exploited by criminals to harm your device or personal data
Due to technical limitations, Kaspersky Endpoint Security for Android cannot scan files with a size of 2 GB or more. During a scan, the app skips large files and does not notify you that such files were skipped.
The help for this version of the solution is no longer updated, so it may contain outdated information. For up-to-date information about the solution refer to the Kaspersky Secure Mobility Management 4.1 Help.
Configuring real-time protection
You can define these policy settings only for Android devices.
To configure real-time protection:
- Open the policy properties window:
- In the main window of Kaspersky Security Center Web Console or Cloud Console, select Devices > Policies & profiles. In the list of group policies that opens, click the name of the policy that you want to configure.
- In the main window of Kaspersky Security Center Web Console or Cloud Console, select Devices > Mobile > Devices. Click the mobile device that falls under the policy that you want to configure, and then select the policy on the Active policies and policy profiles tab.
- In the policy properties window, select Application settings > Essential protection.
- In the Anti-Malware section, configure the mobile device file system protection:
- To enable real-time protection of the mobile device against threats, select the Enable real-time anti-malware protection check box.
- Specify the level of protection:
- If you want Kaspersky Endpoint Security for Android to scan only new apps and files from the Downloads folder, select Scan only new apps.
- To enable extended protection of the mobile device against threats, select Scan all apps and monitor actions with files.
Kaspersky Endpoint Security for Android will scan all files that the user opens, modifies, moves, copies, installs, or saves on the device, as well as newly installed mobile apps.
On devices running Android 8.0 or later, Kaspersky Endpoint Security for Android scans files that the user modifies, moves, installs, and saves, as well as copies of files. Kaspersky Endpoint Security for Android does not scan files when they are opened, or source files when they are copied.
- To enable additional scanning of new apps before they are started for the first time on the user's device by using the Kaspersky Security Network cloud service, select the Additional protection by Kaspersky Security Network check box.
- To block adware and apps that can be exploited by criminals to harm the device or user data, select the Detect adware, autodialers, and apps that may be used by cybercriminals to cause harm to the user's device and data check box.
- In the Anti-Malware settings section, select the action to be performed on threat detection:
- Delete and save a backup copy of file in quarantine
Detected objects will be automatically deleted. The user is not required to take any additional actions. Prior to deleting an object, Kaspersky Endpoint Security for Android will create a backup copy of file and save it in quarantine.
- Delete
Detected objects will be automatically deleted. The user is not required to take any additional actions. Prior to deleting an object, Kaspersky Endpoint Security for Android will display a temporary notification about the detection of the object.
- Skip
If the detected objects have been skipped, Kaspersky Endpoint Security for Android warns the user about problems in device protection. For each skipped threat, the app provides actions that the user can perform to eliminate the threat. The list of skipped objects may change, for example, if a malicious file was deleted or moved. To receive an up-to-date list of threats, run a full device scan. To ensure reliable protection of your data, eliminate all detected objects.
- Delete and save a backup copy of file in quarantine
- Click the Save button to save the changes you have made to the policy and exit the policy properties window.
Mobile device settings are configured after the next device synchronization with Kaspersky Security Center.
Page top
The help for this version of the solution is no longer updated, so it may contain outdated information. For up-to-date information about the solution refer to the Kaspersky Secure Mobility Management 4.1 Help.
Configuring autorun of malware scans on a mobile device
You can define these policy settings only for Android devices.
To configure autorun of malware scans on a mobile device:
- Open the policy properties window:
- In the main window of Kaspersky Security Center Web Console or Cloud Console, select Devices > Policies & profiles. In the list of group policies that opens, click the name of the policy that you want to configure.
- In the main window of Kaspersky Security Center Web Console or Cloud Console, select Devices > Mobile > Devices. Click the mobile device that falls under the policy that you want to configure, and then select the policy on the Active policies and policy profiles tab.
- In the policy properties window, select Application settings > Essential protection.
- To block adware and apps that can be exploited by criminals to harm the device or user data, select the Detect adware, autodialers, and apps that may be used by cybercriminals to cause harm to the user's device and data checkbox in the Device scan section.
- In the Action on threat detection list, select one of the following options:
- Delete and save a backup copy of file in quarantine
Detected objects will be automatically deleted. The user is not required to take any additional actions. Prior to deleting an object, Kaspersky Endpoint Security for Android will create a backup copy of file and save it in quarantine.
- Delete
Detected objects will be automatically deleted. The user is not required to take any additional actions. Prior to deleting an object, Kaspersky Endpoint Security for Android will display a temporary notification about the detection of the object.
- Skip
If the detected objects have been skipped, Kaspersky Endpoint Security for Android warns the user about problems in device protection. For each skipped threat, the app provides actions that the user can perform to eliminate the threat. The list of skipped objects may change, for example, if a malicious file was deleted or moved. To receive an up-to-date list of threats, run a full device scan. To ensure reliable protection of your data, eliminate all detected objects.
- Ask user
The Kaspersky Endpoint Security for Android app displays a notification prompting the user to choose the action to take on the detected object: Skip or Delete.
When the app detects several objects, the Ask user option allows the device user to apply a selected action to each file by using the Apply to all threats check box.
Kaspersky Endpoint Security for Android must be set as an Accessibility feature to ensure the display of notifications on mobile devices running Android 10.0 or later. Kaspersky Endpoint Security for Android prompts the user to set the app as an Accessibility feature through the Initial Configuration Wizard. The user can skip this step or disable this service in the device settings at a later time. In this case, Kaspersky Endpoint Security for Android displays an Android system window prompting the user to choose the action to take on the detected object: Skip or Delete. To apply an action to multiple objects, you need to open Kaspersky Endpoint Security.
- Delete and save a backup copy of file in quarantine
- In the Scheduled scan section, you can configure the automatic full scan of the device file system.
Select one of the following options:
- Disabled
The scan of the device file system will not be launched automatically.
- After database update
The device file system will be scanned automatically on each anti-malware database update.
- Daily
The device file system will be scanned automatically every day.
If you select this option, you can also specify the time of the scan in the Start time field.
- Weekly on
The device file system will be scanned automatically once a week.
If you select this option, you can also select the day of the week when you want to run the scan, by using the drop-down list and specify the time of the scan in the Start time field.
If the device is in battery saver mode, the app may perform this task later than specified. To ensure timely responses of KES devices on Android to the administrator's commands, enable the use of Google Firebase Cloud Messaging.
- Disabled
- Click the Save button to save the changes you have made to the policy and exit the policy properties window.
Mobile device settings are configured after the next device synchronization with Kaspersky Security Center.
Page top
The help for this version of the solution is no longer updated, so it may contain outdated information. For up-to-date information about the solution refer to the Kaspersky Secure Mobility Management 4.1 Help.
Configuring anti-malware database updates
You can define these policy settings only for Android devices.
To configure anti-malware database updates:
- Open the policy properties window:
- In the main window of Kaspersky Security Center Web Console or Cloud Console, select Devices > Policies & profiles. In the list of group policies that opens, click the name of the policy that you want to configure.
- In the main window of Kaspersky Security Center Web Console or Cloud Console, select Devices > Mobile > Devices. Click the mobile device that falls under the policy that you want to configure, and then select the policy on the Active policies and policy profiles tab.
- In the policy properties window, select Application settings > Database update.
- In the Database update section, configure the schedule of automatic database updates on the user's device.
Select one of the following options:
- Disabled
Automatic updates of anti-malware databases will be disabled.
- Daily
Anti-malware databases will be updated every day.
If you select this option, you can also specify the time of update in the Update time field.
- Weekly
Anti-malware databases will be updated once a week.
If you select this option, you can also specify the time of update in the Update time field and the day of the week when you want to run update in the Day of the week drop-down list.
If the device is in battery saver mode, the app may perform this task later than specified. To ensure timely responses of KES devices on Android to the administrator's commands, enable the use of Firebase Cloud Messaging.
- Disabled
- In the Database update source section, specify the update source from which Kaspersky Endpoint Security for Android receives and installs anti-malware database updates:
- Kaspersky servers
Kaspersky Endpoint Security for Android will use a Kaspersky update server as an update source for downloading anti-malware databases to the user's device.
- Administration Server
Available only if you use Kaspersky Security Center Web Console.
Kaspersky Endpoint Security for Android will use the repository of Kaspersky Security Center Administration Server as an update source for downloading anti-malware databases to the user's device.
- Other source
Kaspersky Endpoint Security for Android will use a third-party server as an update source for downloading anti-malware databases to the user's device.
If you select this option, you must specify the address of an HTTP server in the Use another server as an update source for anti-malware databases field.
- Kaspersky servers
- If you want Kaspersky Endpoint Security for Android to download anti-malware database updates according to the update schedule when the user's device is roaming, select the Allow database update while roaming check box in the Update anti-malware databases while roaming section.
- Click the Save button to save the changes you have made to the policy and exit the policy properties window.
Mobile device settings are configured after the next device synchronization with Kaspersky Security Center.
Updates functionality (including providing anti-malware signature updates and codebase updates), as well as KSN functionality will not be available in the software in the U.S. territory from 12:00 AM Eastern Daylight Time (EDT) on September 10, 2024 in accordance with the restrictive measures.
Page top
The help for this version of the solution is no longer updated, so it may contain outdated information. For up-to-date information about the solution refer to the Kaspersky Secure Mobility Management 4.1 Help.
Defining device unlock settings
You can define these policy settings only for Android devices.
To keep a mobile device secure, you need to configure the use of a password for which the user is prompted when the device comes out of sleep mode.
You can impose restrictions on the user's activity on the device if the unlock password is weak (for example, lock the device). You can impose restrictions by using the Compliance Control component.
On certain Samsung devices running Android 7.0 or later, when the user attempts to configure unsupported methods for unlocking the device (for example, a graphical password), the device may be locked if the following conditions are met: Kaspersky Endpoint Security for Android removal protection is enabled and screen unlock password strength requirements are set. To unlock the device, you must send a special command to the device.
To configure device unlock password strength:
- Open the policy properties window:
- In the main window of Kaspersky Security Center Web Console or Cloud Console, select Devices > Policies & profiles. In the list of group policies that opens, click the name of the policy that you want to configure.
- In the main window of Kaspersky Security Center Web Console or Cloud Console, select Devices > Mobile > Devices. Click the mobile device that falls under the policy that you want to configure, and then select the policy on the Active policies and policy profiles tab.
- In the policy properties window, select Application settings > Essential protection.
- If you want the app to check whether an unlock password has been set, select the Require to set screen unlock password in the Password protection section.
If the application detects that no system password has been set on the device, it prompts the user to set it. The password is set according to the parameters defined by the administrator.
- Specify the minimum number of characters in the user password.
Possible values: 4 to 16 characters.
The user's password is 4 characters long by default.
On devices running Android 10.0 or later, Kaspersky Endpoint Security resolves the password strength requirements into one of the system values: medium or high.
The values for devices running Android 10.0 or later are determined by the following rules:
- If the password length required is 1 to 4 symbols, then the app prompts the user to set a medium-strength password. It must be either numeric (PIN) with no repeating or ordered (e.g. 1234) sequences, or alphanumeric. The PIN or password must be at least 4 characters long.
- If the password length required is 5 or more symbols, then the app prompts the user to set a high-strength password. It must be either numeric (PIN) with no repeating or ordered sequences, or alphanumeric (password). The PIN must be at least 8 digits long; the password must be at least 6 characters long.
- If you want the user to have the capability to use fingerprints to unlock the screen, select the Allow use of fingerprints (Android 9 or earlier) check box. If the unlock password is not compliant with corporate security requirements, you cannot use a fingerprint scanner to unlock the screen.
On devices running Android 10.0 or later, the use of a fingerprint to unlock the screen is not supported.
Kaspersky Endpoint Security for Android does not restrict the use of a fingerprint scanner for signing in to apps or confirming purchases.
On certain Samsung devices, it is impossible to block the use of fingerprints for unlocking the screen.
On certain Samsung devices, if the unlock password does not comply with corporate security requirements, Kaspersky Endpoint Security for Android does not block the use of fingerprints for unlocking the screen.
After adding a fingerprint in the device settings, the user can unlock the screen by using the following methods:
- Press the finger to the fingerprint scanner (main method).
- Enter the unlock password (backup method).
- Click the Save button to save the changes you have made to the policy and exit the policy properties window.
Mobile device settings are configured after the next device synchronization with Kaspersky Security Center.
Page top
The help for this version of the solution is no longer updated, so it may contain outdated information. For up-to-date information about the solution refer to the Kaspersky Secure Mobility Management 4.1 Help.
Configuring protection of stolen or lost device data
You can define these policy settings only for Android devices.
To protect corporate data in case a mobile device is lost or stolen, you must configure the unauthorized access protection.
To ensure protection of stolen or lost device data, Kaspersky Endpoint Security for Android must be set as an Accessibility feature. Kaspersky Endpoint Security for Android prompts the user to set the app as an Accessibility feature through the Initial Configuration Wizard. The user can skip this step or disable this service in the device settings at a later time.
To configure protection of stolen or lost device data:
- Open the policy properties window:
- In the main window of Kaspersky Security Center Web Console or Cloud Console, select Devices > Policies & profiles. In the list of group policies that opens, click the name of the policy that you want to configure.
- In the main window of Kaspersky Security Center Web Console or Cloud Console, select Devices > Mobile > Devices. Click the mobile device that falls under the policy that you want to configure, and then select the policy on the Active policies and policy profiles tab.
- In the policy properties window, select Application settings > Essential protection.
- In the Anti-Theft section, configure device locking:
- Specify the number of characters in the unlock code.
- Specify the text to be displayed when the device is locked.
- Click the Save button to save the changes you have made to the policy and exit the policy properties window.
Mobile device settings are configured after the next device synchronization with Kaspersky Security Center.
Page top
The help for this version of the solution is no longer updated, so it may contain outdated information. For up-to-date information about the solution refer to the Kaspersky Secure Mobility Management 4.1 Help.
Configuring app control
You can define these policy settings only for Android devices.
App Control checks that the apps installed on a mobile device are compliant with corporate security requirements. In Kaspersky Security Center, the administrator creates lists of allowed, blocked, mandatory, and recommended apps according to the corporate security requirements. As a result of App Control, Kaspersky Endpoint Security prompts the user to install mandatory and recommended apps, and to remove blocked apps. It is impossible to start blocked apps on the user's mobile device.
In Kaspersky Security Center Web Console and Cloud Console, you can manage apps on users' devices by applying pre-defined rules. You can configure two types of App Control rules: application rules and category rules.
An App rule is applied to a specific app, while a Category rule is applied to any app that belongs to a pre-defined category. App categories are specified by Kaspersky experts.
To configure App Control:
- Open the policy properties window:
- In the main window of Kaspersky Security Center Web Console or Cloud Console, select Devices > Policies & profiles. In the list of group policies that opens, click the name of the policy that you want to configure.
- In the main window of Kaspersky Security Center Web Console or Cloud Console, select Devices > Mobile > Devices. Click the mobile device that falls under the policy that you want to configure, and then select the policy on the Active policies and policy profiles tab.
- In the policy properties page, select Application settings > Security controls.
- In the table under the App Control section, add rules that will define what apps will be controlled.
- To add a rule for a specific app:
- In the table, click App rule.
- In the App rule window that opens, choose the action that will be performed with the apps covered by the created rule.
- Specify the app that will be subject to the rule by filling in Link to installation package (for example, https://play.google.com/store/apps/details?id=com.kaspersky.kes), Package name (for example, katana.facebook.com), and App name.
- Click Save.
The rule is added to the list of App Control rules.
- To add a rule for a category of apps:
- In the table under the App Control section, click Category rule.
- In the Category rule window that opens, select the app category from the drop-down list.
Apps within the selected category will be subject to the created rule.
- In the Operation mode section, select the action that will be performed when any apps within the selected category attempt to start up: Forbidden apps or Allowed apps.
- Fill in the Additional comment shown on the user's device when an app of a specified category is detected, if necessary.
- Click Save.
The rule is added to the list of App Control rules.
- To add a rule for a specific app:
- In the Actions with forbidden apps section, choose what action is performed for forbidden applications:
- If you want Kaspersky Endpoint Security for Android to block the startup of forbidden applications on the user's mobile device, select Block apps from launching.
- If you want Kaspersky Endpoint Security for Android to send data on forbidden apps to the event log without blocking them, select Do not block forbidden apps, report only.
- In the Operation mode section, choose whether the rules you add will define allowed apps or forbidden apps:
- If you want the rules to define which apps are allowed, select Forbidden apps.
If you want Kaspersky Endpoint Security for Android to block the startup of system apps on the user's mobile device (such as Calendar, Camera, and Settings) in the Forbidden apps mode, select the Block system apps check box.
Kaspersky experts recommend against blocking system apps because this could lead to failures in device operation.
- If you want the rules to define which apps are forbidden, select Allowed apps.
- If you want the rules to define which apps are allowed, select Forbidden apps.
- To receive information about all apps installed on mobile devices, in the Application report section, select the Send a list of installed apps on all mobile devices check box.
Kaspersky Endpoint Security for Android sends data to the event log each time an app is installed or removed from the device.
- Click the Save button to save the changes you have made to the policy and exit the policy properties window.
Mobile device settings are configured after the next device synchronization with Kaspersky Security Center.
Page top
The help for this version of the solution is no longer updated, so it may contain outdated information. For up-to-date information about the solution refer to the Kaspersky Secure Mobility Management 4.1 Help.
Configuring compliance control of mobile devices with corporate security requirements
You can define these policy settings only for Android devices.
Compliance control allows you to monitor Android devices for compliance with corporate security requirements and take actions in case of non-compliance. Corporate security requirements regulate how the user can work with the device. For example, real-time protection must be enabled on the device, anti-malware databases must be up-to-date, and the device password must be sufficiently strong. Compliance control is based on a list of rules. A compliance rule includes the following components:
- Device non-compliance criterion.
- Action that will be taken on a device if the user does not fix the non-compliance within the set time period.
- Time period allocated for the user to fix the non-compliance (for example, 24 hours).
When the specified time period is over, the selected action will be taken on the user's device.
If the device is in battery saver mode, the app may perform this task later than specified. To ensure timely responses of KES devices on Android to the administrator's commands, enable the use of Google Firebase Cloud Messaging.
To configure compliance control, you can perform the following actions:
- Enable or disable existing compliance rules.
- Edit an existing compliance rule.
- Add a new rule.
- Delete a rule.
The help for this version of the solution is no longer updated, so it may contain outdated information. For up-to-date information about the solution refer to the Kaspersky Secure Mobility Management 4.1 Help.
Enabling and disabling compliance rules
You can define these policy settings only for Android devices.
To enable or disable existing rules of compliance control of mobile devices with corporate security requirements:
- Open the policy properties window:
- In the main window of Kaspersky Security Center Web Console or Cloud Console, select Devices > Policies & profiles. In the list of group policies that opens, click the name of the policy that you want to configure.
- In the main window of Kaspersky Security Center Web Console or Cloud Console, select Devices > Mobile > Devices. Click the mobile device that falls under the policy that you want to configure, and then select the policy on the Active policies and policy profiles tab.
- In the policy properties page, select Application settings > Security controls.
- In the Compliance Control section, enable or disable the existing compliance rules by using the toggle buttons in the Status column.
- Click the Save button to save the changes you have made to the policy and exit the policy properties window.
Mobile device settings are configured after the next device synchronization with Kaspersky Security Center.
Page top
The help for this version of the solution is no longer updated, so it may contain outdated information. For up-to-date information about the solution refer to the Kaspersky Secure Mobility Management 4.1 Help.
Editing compliance rules
You can define these policy settings only for Android devices.
To edit a rule for controlling the compliance of mobile devices with corporate security requirements:
- Open the policy properties window:
- In the main window of Kaspersky Security Center Web Console or Cloud Console, select Devices > Policies & profiles. In the list of group policies that opens, click the name of the policy that you want to configure.
- In the main window of Kaspersky Security Center Web Console or Cloud Console, select Devices > Mobile > Devices. Click the mobile device that falls under the policy that you want to configure, and then select the policy on the Active policies and policy profiles tab.
- In the policy properties page, select Application settings > Security controls.
- In the Compliance Control section, select the rule that you want to edit, and then click Edit.
- In the Rule window that opens, edit the rule as follows:
- In the Action column, configure the list of actions to be performed in case of non-compliance with the rule by adding new actions, editing the existing actions, or deleting them.
- Optionally, specify the time period in which a user can fix the non-compliance by using the Time to rectification column for each action.
- Click the Save button to save the rule.
- Click the Save button to save the changes you have made to the policy and exit the policy properties window.
Mobile device settings are configured after the next device synchronization with Kaspersky Security Center.
Page top
The help for this version of the solution is no longer updated, so it may contain outdated information. For up-to-date information about the solution refer to the Kaspersky Secure Mobility Management 4.1 Help.
Adding compliance rules
You can define these policy settings only for Android devices.
To add a rule for controlling the compliance of mobile devices with corporate security requirements:
- Open the policy properties window:
- In the main window of Kaspersky Security Center Web Console or Cloud Console, select Devices > Policies & profiles. In the list of group policies that opens, click the name of the policy that you want to configure.
- In the main window of Kaspersky Security Center Web Console or Cloud Console, select Devices > Mobile > Devices. Click the mobile device that falls under the policy that you want to configure, and then select the policy on the Active policies and policy profiles tab.
- In the policy properties page, select Application settings > Security controls.
- In the Compliance Control section, click Rule.
- In the Rule window that opens, define the rule as follows:
- Select the non-compliance criterion for the rule.
- Click Add, and then select the action to be performed in case of non-compliance with the rule in the Action column.
You can add several actions.
- Specify the time period in which a user can fix the non-compliance by using the Time to rectification column for each action.
- Click the Save button to save the rule.
- Click the Save button to save the changes you have made to the policy and exit the policy properties window.
Mobile device settings are configured after the next device synchronization with Kaspersky Security Center.
Page top
The help for this version of the solution is no longer updated, so it may contain outdated information. For up-to-date information about the solution refer to the Kaspersky Secure Mobility Management 4.1 Help.
Deleting compliance rules
You can define these policy settings only for Android devices.
To delete a rule for controlling the compliance of mobile devices with corporate security requirements:
- Open the policy properties window:
- In the main window of Kaspersky Security Center Web Console or Cloud Console, select Devices > Policies & profiles. In the list of group policies that opens, click the name of the policy that you want to configure.
- In the main window of Kaspersky Security Center Web Console or Cloud Console, select Devices > Mobile > Devices. Click the mobile device that falls under the policy that you want to configure, and then select the policy on the Active policies and policy profiles tab.
- In the policy properties page, select Application settings > Security controls.
- In the Compliance Control section, select the rule that you want to delete, and then click Delete.
- Click the Save button to save the changes you have made to the policy and exit the policy properties window.
Mobile device settings are configured after the next device synchronization with Kaspersky Security Center.
Page top
The help for this version of the solution is no longer updated, so it may contain outdated information. For up-to-date information about the solution refer to the Kaspersky Secure Mobility Management 4.1 Help.
List of non-compliance criteria
You can define these policy settings only for Android devices.
To ensure that an Android device complies with corporate security requirements, Kaspersky Endpoint Security for Android can check the device against the following criteria:
- Real-time protection is disabled.
Real-time protection must be enabled.
For more information on configuring real-time protection, see the "Configuring real-time protection" section.
- Anti-malware databases are out of date.
The anti-malware database of Kaspersky Endpoint Security for Android must be regularly updated.
For more information on defining the settings of anti-malware database updates, see the "Configuring anti-malware protection" section.
- Forbidden apps are installed.
The device must not have applications installed that are classified as Block from launching, as specified in the App Control section.
For more information on creating rules for applications, see the "Configuring App Control" section.
- Apps from forbidden categories are installed.
The device must not have applications installed that fall under a category that is classified as Block from launching, as specified in the App Control section.
For more information on creating rules for application categories, see the "Configuring App Control" section.
- Not all required apps are installed.
The device must have specific applications installed that are classified as Force to install, as specified in the App Control section.
For more information on creating rules for applications, see the "Configuring App Control" section.
- Operating system version is out of date.
The device must have an allowed version of the operating system.
For using this non-compliance criterion, you must specify the range of allowed operating system versions in the Minimum operating system version and Maximum operating system version drop-down lists.
- Device has not been synchronized for a long time.
The device must be regularly synchronized with the Administration Server.
For using this non-compliance criterion, you must specify the maximum time interval between device synchronizations in the Synchronization period drop-down list.
- Device has been rooted.
The device must not be rooted.
For more information, see the "Detecting device hacks (root)" section.
- Unlock password is not compliant with security requirements.
The device must be protected with an unlock password that complies with the unlock password strength requirements.
The help for this version of the solution is no longer updated, so it may contain outdated information. For up-to-date information about the solution refer to the Kaspersky Secure Mobility Management 4.1 Help.
List of actions in case of non-compliance
You can define these policy settings only for Android devices.
If the user does not fix a non-compliance issue within the specified time, the following actions are available:
- Block all apps except system apps.
All apps on the user's mobile device, except system apps, are blocked from starting.
- Lock device.
Mobile device is locked. To obtain access to data, you must unlock the device. If the reason for locking the device is not rectified after the device is unlocked, the device will be locked again after the specified time period.
- Wipe corporate data.
The corporate data is wiped from the device. The list of wiped data depends on the mode in which the device operates:
- On a personal device, KNOX container and mail certificate are wiped.
- If the device operates in device owner mode, KNOX container and the certificates installed by Kaspersky Endpoint Security for Android (mail, VPN, and SCEP profile certificates, except the mobile certificates) are wiped.
- Additionally, if Android work profile is created, the work profile (its content, configurations, and restrictions) and the certificates installed in the work profile (mail, VPN, and SCEP profile certificates, except the mobile certificates) are wiped.
- Fully reset device to factory settings.
All data is deleted from the mobile device and the settings are rolled back to their factory values.
The help for this version of the solution is no longer updated, so it may contain outdated information. For up-to-date information about the solution refer to the Kaspersky Secure Mobility Management 4.1 Help.
Configuring user access to websites
You can define these policy settings for Android and iOS devices.
To protect personal and corporate data stored on mobile devices during internet browsing, you can configure user access to websites by using Web Protection. Web Protection scans websites before a user opens them, and then blocks websites that distribute malicious code and phishing websites designed to steal confidential data and gain access to financial accounts.
For Android devices, this feature also supports website filtering by categories defined in the Kaspersky Security Network cloud service. Filtering allows you to restrict access to certain websites or categories of websites (for example, those from the "Gambling, lotteries, sweepstakes" or "Internet communication" categories).
To enable Web Protection on iOS devices, the user must allow the Kaspersky Security for iOS app to add a VPN configuration.
To enable Web Protection on Android devices:
- The Statement regarding data processing for the purpose of using Web Protection (Web Protection Statement) should be accepted. Kaspersky Endpoint Security uses Kaspersky Security Network (KSN) to scan websites. The Web Protection Statement contains the terms of data exchange with KSN.
You can accept the Web Protection Statement for the user in Kaspersky Security Center. In this case, the user is not required to take any action.
If you have not accepted the Web Protection Statement and prompt the user to do this, the user must read and accept the Web Protection Statement in the app settings.
If you have not accepted the Web Protection Statement, Web Protection is not available.
Web Protection on Android devices is supported only by Google Chrome, HUAWEI Browser, Samsung Internet Browser, and Yandex Browser.
If the Kaspersky Endpoint Security for Android app in device owner mode is not enabled as an Accessibility Features service, Web Protection is supported only by the Google Chrome browser and checks only the domain of a website. To allow other browsers (Samsung Internet Browser, Yandex Browser, and HUAWEI Browser) support Web Protection, enable Kaspersky Endpoint Security as an Accessibility Features service. This will also enable the Custom Tabs feature operation.
The Custom Tabs feature is supported by Google Chrome, HUAWEI Browser, and Samsung Internet Browser.
Web Protection for HUAWEI Browser, Samsung Internet Browser, and Yandex Browser does not block sites on a mobile device if a work profile is used and Web Protection is enabled only for the work profile.
To configure user access to websites:
- Open the policy properties window:
- In the main window of Kaspersky Security Center Web Console or Cloud Console, select Devices > Policies & profiles. In the list of group policies that opens, click the name of the policy that you want to configure.
- In the main window of Kaspersky Security Center Web Console or Cloud Console, select Devices > Mobile > Devices. Click the mobile device that falls under the policy that you want to configure, and then select the policy on the Active policies and policy profiles tab.
- In the policy properties page, select Application settings > Security controls.
- In the Web Protection section, select the Enable Web Protection check box to enable the feature.
- For Android devices, you can select one of the following options:
- To restrict user access to websites based on their content:
- Select Block websites of specified categories.
- Select the check boxes next to the categories of websites to which Kaspersky Endpoint Security for Android will block access.
If Web Protection is enabled, user access to websites in the Phishing and Malware sites categories is always blocked.
- To specify the list of allowed websites:
- Select Allow only specified websites.
- Create a list of websites by adding website addresses to which the app will not block access. You can add websites by link (full URL, including the protocol, e.g.
https://example.com).Kaspersky Endpoint Security for Android also supports regular expressions. When entering the address of an allowed or blocked website, use the following templates:
https://example\.com/.*—This template blocks or allows all child pages of the website, accessed via the HTTPS protocol (for example,https://example.com/about).https?://example\.com/.*—This template blocks or allows all child pages of the website, accessed via both the HTTP and HTTPS protocols.https?://.*\.example\.com—This template blocks or allows all subdomain pages of the website (e.g.,https://pictures.example.com).https?://example\.com/[abc]/.*—This template blocks or allows all child pages of the website where the URL path begins with 'a', 'b', or 'c' as the first directory (e.g.,https://example.com/b/about).https?://\w{3,5}.example\.com/.*—This template blocks or allows all child pages of the website where the subdomain consists of a word with 3 to 5 characters (e.g.,http://abde.example.com/about).
Use the expression
https?to select both the HTTP and HTTPS protocols. For more details on regular expressions, please refer to the Oracle Technical Support website.
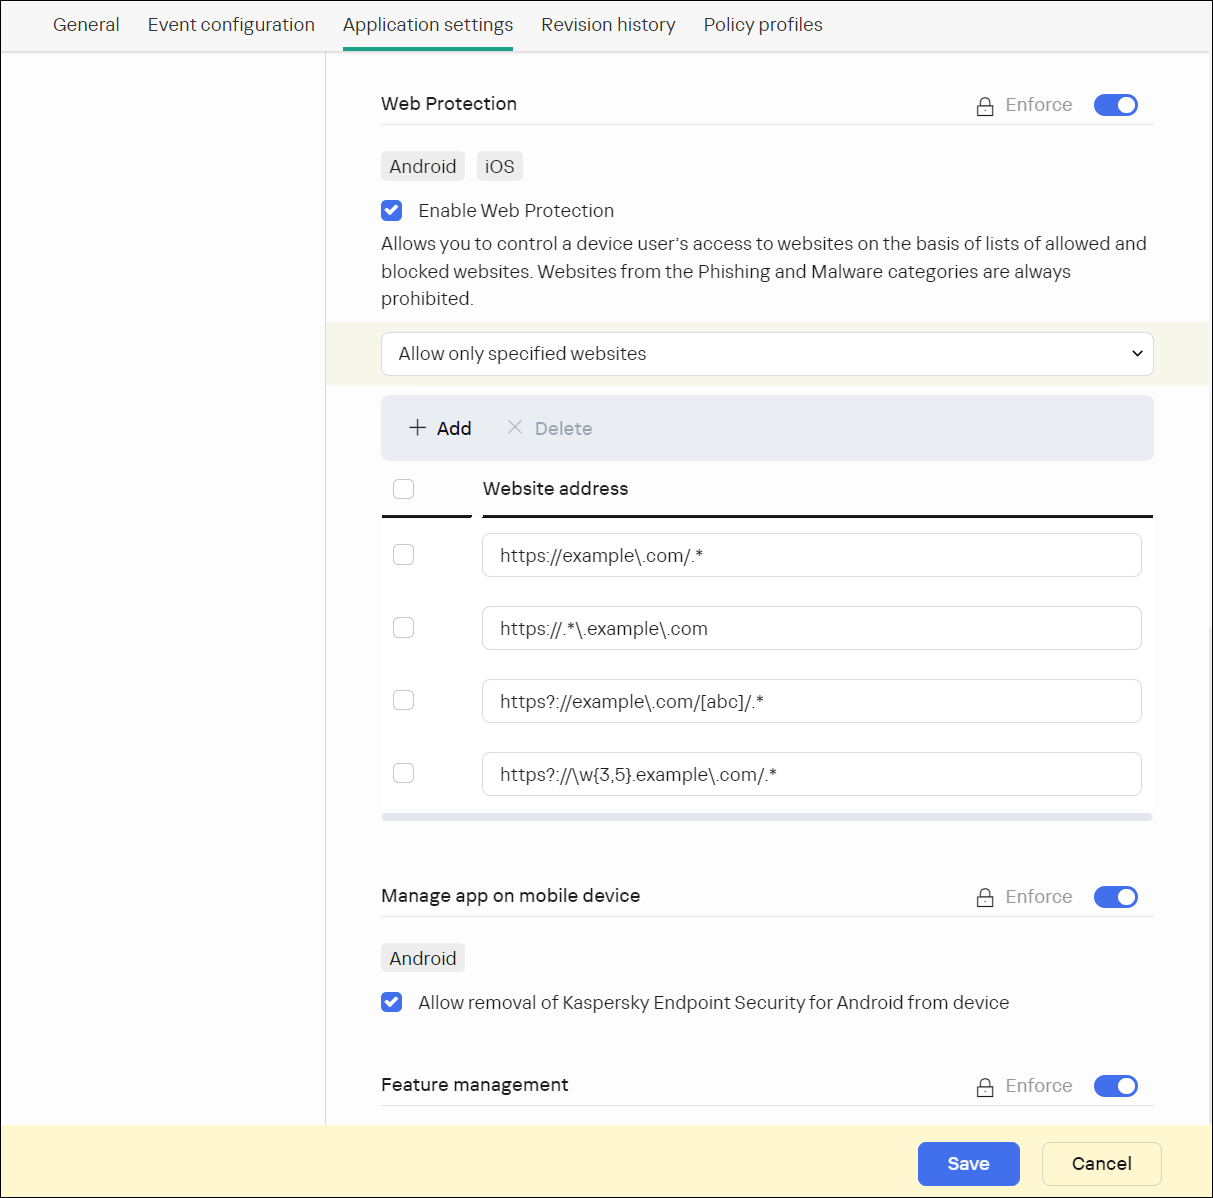
Web Protection section with regular expressions' examples
- To block user access to all websites, select Block all websites.
- To restrict user access to websites based on their content:
- Click the Save button to save the changes you have made to the policy and exit the policy properties window.
Mobile device settings are configured after the next device synchronization with Kaspersky Security Center.
Page top
The help for this version of the solution is no longer updated, so it may contain outdated information. For up-to-date information about the solution refer to the Kaspersky Secure Mobility Management 4.1 Help.
Configuring feature restrictions
You can define these policy settings only for Android devices.
Kaspersky Security Center Web Console enables you to configure user access to the following features of mobile devices:
- Wi-Fi
- Camera
- Bluetooth
By default, the user can use Wi-Fi, camera, and Bluetooth on the device without restrictions.
To configure the Wi-Fi, camera, and Bluetooth usage restrictions on the device:
- Open the policy properties window:
- In the main window of Kaspersky Security Center Web Console or Cloud Console, select Devices > Policies & profiles. In the list of group policies that opens, click the name of the policy that you want to configure.
- In the main window of Kaspersky Security Center Web Console or Cloud Console, select Devices > Mobile > Devices. Click the mobile device that falls under the policy that you want to configure, and then select the policy on the Active policies and policy profiles tab.
- In the policy properties page, select Application settings > Security controls.
- In the Feature management section, configure the usage of Wi-Fi, camera, and Bluetooth:
- To disable the Wi-Fi module on the user's mobile device, select the Prohibit use of Wi-Fi (Android 9 or earlier) check box.
On devices running Android 10 or later, prohibiting the use of Wi-Fi networks is not supported.
- To disable the camera on the user's mobile device, select the Prohibit use of camera check box.
On devices running Android 11 or later, Kaspersky Endpoint Security for Android must be set as an Accessibility feature. Kaspersky Endpoint Security for Android prompts the user to set the app as an Accessibility feature through the Initial Configuration Wizard. The user can skip this step or disable this service in the device settings at a later time. If this is the case, you will not be able to restrict use of the camera.
- To disable Bluetooth on the user's mobile device, select the Prohibit use of Bluetooth check box.
On Android 12 or later, the use of Bluetooth can be disabled only if the device user granted the Nearby Bluetooth devices permission. The user can grant this permission during the Initial Configuration Wizard or at a later time.
On personal devices running Android 13 or later, the use of Bluetooth cannot be disabled.
- To disable the Wi-Fi module on the user's mobile device, select the Prohibit use of Wi-Fi (Android 9 or earlier) check box.
- Click the Save button to save the changes you have made to the policy and exit the policy properties window.
Mobile device settings are configured after the next device synchronization with Kaspersky Security Center.
Page top
The help for this version of the solution is no longer updated, so it may contain outdated information. For up-to-date information about the solution refer to the Kaspersky Secure Mobility Management 4.1 Help.
Protecting Kaspersky Endpoint Security for Android against removal
For mobile device protection and compliance with corporate security requirements, you can enable protection against the removal of Kaspersky Endpoint Security for Android. In this case, the user cannot remove the app by using the Kaspersky Endpoint Security for Android interface. When removing the app by using the tools of the Android operating system, the user is prompted to disable administrator rights for Kaspersky Endpoint Security for Android. After disabling the rights, the mobile device will be locked.
To enable protection against the removal of Kaspersky Endpoint Security for Android:
- Open the policy properties window:
- In the main window of Kaspersky Security Center Web Console or Cloud Console, select Devices > Policies & profiles. In the list of group policies that opens, click the name of the policy that you want to configure.
- In the main window of Kaspersky Security Center Web Console or Cloud Console, select Devices > Mobile > Devices. Click the mobile device that falls under the policy that you want to configure, and then select the policy on the Active policies and policy profiles tab.
- In the policy properties page, select Application settings > Security controls.
- In the Manage app on mobile device section, clear the Allow removal of Kaspersky Endpoint Security for Android from device check box.
To protect the app from removal on devices running Android 7.0 or later, Kaspersky Endpoint Security for Android must be set as an Accessibility feature. When the Initial Configuration Wizard is running, Kaspersky Endpoint Security for Android prompts the user to grant the application all required permissions. The user can skip these steps or disable these permissions in the device settings at a later time. If this is the case, the app is not protected from removal.
- Click the Save button to save the changes you have made to the policy and exit the policy properties window.
Mobile device settings are configured after the next device synchronization with Kaspersky Security Center.
If an attempt is made to remove the app, the mobile device will be locked.
Page top
The help for this version of the solution is no longer updated, so it may contain outdated information. For up-to-date information about the solution refer to the Kaspersky Secure Mobility Management 4.1 Help.
Configuring synchronization of mobile devices with Kaspersky Security Center
You can define these policy settings for Android and iOS devices.
To manage mobile devices and receive reports or statistics from mobile devices, you must define synchronization settings. Synchronization of mobile devices with Kaspersky Security Center can be performed in the following ways:
- By schedule. Synchronization by schedule is performed by using HTTP. You can configure the synchronization schedule in the policy properties. Modifications to policy settings, commands, and tasks are performed when mobile devices are synchronized with Kaspersky Security Center according to the schedule—that is, with a delay. By default, mobile devices are synchronized with Kaspersky Security Center automatically every six hours.
- Forced (for Android devices). Forced synchronization is performed by using push notifications of the FCM service (Firebase Cloud Messaging). Forced synchronization is primarily intended for timely delivery of commands to a mobile device. It might be useful when a device is in battery saver mode, because in this case the app may perform tasks later than specified. If you want to use forced synchronization, make sure that the FCM settings are configured in Kaspersky Security Center.
To configure mobile device synchronization with Kaspersky Security Center:
- Open the policy properties window:
- In the main window of Kaspersky Security Center Web Console or Cloud Console, select Devices > Policies & profiles. In the list of group policies that opens, click the name of the policy that you want to configure.
- In the main window of Kaspersky Security Center Web Console or Cloud Console, select Devices > Mobile > Devices. Click the mobile device that falls under the policy that you want to configure, and then select the policy on the Active policies and policy profiles tab.
- In the policy properties page, select Application settings > Synchronization.
- In the Synchronization with the Administration Server section, use the Synchronization period drop-down list to select the synchronization period.
By default, synchronization is performed every six hours.
When the specified synchronization period is very short, the actual synchronization period may be a bit longer due to technical limitations. This is especially true for devices in the battery saver mode. Frequent synchronizations discharge the device battery more quickly.
- For Android devices, you can disable synchronization when the device is roaming. To do so, select the Do not synchronize while roaming check box.
By default, synchronization while roaming is enabled.
- Click the Save button to save the changes you have made to the policy and exit the policy properties window.
Mobile device settings are configured after the next device synchronization with Kaspersky Security Center.
Page top
The help for this version of the solution is no longer updated, so it may contain outdated information. For up-to-date information about the solution refer to the Kaspersky Secure Mobility Management 4.1 Help.
Kaspersky Security Network
To protect mobile devices more effectively, Kaspersky Endpoint Security for Android and Kaspersky Security for iOS use data acquired from users around the globe. Kaspersky Security Network is designed to process such data.
Kaspersky Security Network (KSN) is an infrastructure of cloud services providing access to the Kaspersky online knowledge base with information about the reputation of files, web resources, and software. The use of data from Kaspersky Security Network ensures faster responses by Kaspersky applications to threats, improves the performance of some protection components, and reduces the likelihood of false alarms.
Your participation in Kaspersky Security Network helps Kaspersky to acquire real-time information about the types and sources of new threats, develop methods of neutralizing them, and reduce the number of false alarms. Participation in Kaspersky Security Network also lets you access reputation statistics for applications and websites.
When you participate in Kaspersky Security Network, some statistics are acquired while the mobile apps are running and they are automatically sent to Kaspersky. This information makes it possible to keep track of threats in real time. Files or their parts that may be exploited by intruders to harm the computer or user's content can be also sent to Kaspersky for additional examination.
The following app components use the Kaspersky Security Network cloud service:
- The Anti-Malware, Web Protection, and App Control components in the Kaspersky Endpoint Security for Android app.
- The Web Protection component in the Kaspersky Security for iOS app.
To start using KSN, you must accept the terms and conditions of the End User License Agreement.
Refusal to participate in KSN reduces the level of device protection, which may lead to infection of the device and loss of data.
To improve the performance of the mobile app, you can also provide statistical data to Kaspersky Security Network.
Providing the information to Kaspersky Security Network is voluntary.
You can opt out of participating in Kaspersky Security Network at any time.
Updates functionality (including providing anti-malware signature updates and codebase updates), as well as KSN functionality will not be available in the software in the U.S. territory from 12:00 AM Eastern Daylight Time (EDT) on September 10, 2024 in accordance with the restrictive measures.
The help for this version of the solution is no longer updated, so it may contain outdated information. For up-to-date information about the solution refer to the Kaspersky Secure Mobility Management 4.1 Help.
Information exchange with Kaspersky Security Network
Information exchange in Kaspersky Endpoint Security for Android
To improve real-time protection, Kaspersky Endpoint Security for Android uses the Kaspersky Security Network cloud service for operating the following components:
- Anti-Malware. The app obtains access to the Kaspersky online knowledge base regarding the reputation of files and apps. The scan is performed for threats whose information has not yet been added to anti-malware databases but is already available in KSN. Kaspersky Security Network cloud service provides full operation of Anti-Malware and reduces the likelihood of false alarms.
- Web Protection. The app uses data received from KSN to scan websites before they are opened. The app also determines the website category to control internet access to users, based on lists of allowed and blocked categories (for example, the "Internet communication" category).
- App Control. The app determines the app category to restrict the startup of apps that do not meet corporate security requirements, based on lists of allowed and blocked categories (for example, the "Games" category).
Information on the type of data submitted to Kaspersky when using KSN during operation of Anti-Malware and App Control is available in the End User License Agreement. By accepting the terms and conditions of the License Agreement, you agree to transfer this information.
Information on the type of data submitted to Kaspersky when using KSN during operation of Web Protection is available in the Statement regarding data processing for Web Protection. By accepting the terms and conditions of the Statement, you agree to transfer this information.
For more information about data provision to KSN, refer to Data provision in Kaspersky Endpoint Security for Android.
Providing data to KSN is voluntary. If you want, you can disable data exchange with KSN.
Information exchange in Kaspersky Security for iOS
To improve real-time protection, Kaspersky Security for iOS uses the Kaspersky Security Network cloud service for operating the Web Protection component. The app uses data received from KSN to scan web resources before they are opened.
Information on the type of data submitted to Kaspersky when using KSN during operation of Web Protection is available in the End User License Agreement. By accepting the terms and conditions of the License Agreement, you agree to transfer this information.
For more information about data provision to KSN, refer to Data provision in Kaspersky Security for iOS.
Providing data to KSN is voluntary. If you want, you can disable data exchange with KSN.
Sending statistics to KSN from Android and iOS apps
To exchange data with KSN for the purposes of improving the performance of the app, the following conditions must be fulfilled:
- The device user must read and accept the terms of the Kaspersky Security Network Statement.
- You must configure the group policy settings to allow statistics to be sent to KSN.
You can opt out of sending statistic data to Kaspersky Security Network at any time. Information on the type of statistic data submitted to Kaspersky when using KSN during operation of the mobile app is available in the Kaspersky Security Network Statement.
Page top
The help for this version of the solution is no longer updated, so it may contain outdated information. For up-to-date information about the solution refer to the Kaspersky Secure Mobility Management 4.1 Help.
Enabling and disabling Kaspersky Security Network
By default, the use of Kaspersky Security Network is enabled.
If the use of Kaspersky Security Network is disabled, Web Protection, App Control, and additional protection in Kaspersky Security Network are disabled automatically and their settings become unavailable.
To enable or disable the use of Kaspersky Security Network:
- Open the policy properties window:
- In the main window of Kaspersky Security Center Web Console or Cloud Console, select Devices > Policies & profiles. In the list of group policies that opens, click the name of the policy that you want to configure.
- In the main window of Kaspersky Security Center Web Console or Cloud Console, select Devices > Mobile > Devices. Click the mobile device that falls under the policy that you want to configure, and then select the policy on the Active policies and policy profiles tab.
- In the policy properties page, select Application settings > KSN and statistics.
- To enable or disable the use of Kaspersky Security Network, select or clear the Use Kaspersky Security Network check box.
- If the use of Kaspersky Security Network is enabled and if you agree to submit data to Kaspersky, select the Allow statistics to be sent to Kaspersky Security Network check box. This data will help the mobile app more quickly respond to threats, improve the performance of protection components, and decrease the likelihood of false alarms.
- Click the Save button to save the changes you have made to the policy and exit the policy properties window.
Mobile device settings are configured after the next device synchronization with Kaspersky Security Center.
Page top
The help for this version of the solution is no longer updated, so it may contain outdated information. For up-to-date information about the solution refer to the Kaspersky Secure Mobility Management 4.1 Help.
Exchanging information with Google Analytics for Firebase, Firebase Performance Monitoring, and Crashlytics
You can define these policy settings only for Android devices.
Kaspersky Endpoint Security for Android exchanges data with the Google Analytics for Firebase, Firebase Performance Monitoring, and Crashlytics services in order to improve the quality, appearance, and performance of Kaspersky software, products, services, and infrastructure by analyzing users' experience, features, status, and device settings used.
Exchanging information with the Google Analytics for Firebase, Firebase Performance Monitoring, and Crashlytics services is disabled by default.
To enable data exchange:
- Open the policy properties window:
- In the main window of Kaspersky Security Center Web Console or Cloud Console, select Devices > Policies & profiles. In the list of group policies that opens, click the name of the policy that you want to configure.
- In the main window of Kaspersky Security Center Web Console or Cloud Console, select Devices > Mobile > Devices. Click the mobile device that falls under the policy that you want to configure, and then select the policy on the Active policies and policy profiles tab.
- In the policy properties page, select Application settings > KSN and statistics.
- In the Sending statistics to third-party services section, select the Allow data transfer to help improve the quality, appearance, and performance of the app check box.
- Click the Save button to save the changes you have made to the policy and exit the policy properties window.
Mobile device settings are configured after the next device synchronization with Kaspersky Security Center.
Page top
The help for this version of the solution is no longer updated, so it may contain outdated information. For up-to-date information about the solution refer to the Kaspersky Secure Mobility Management 4.1 Help.
Configuring notifications on mobile devices
You can define these policy settings only for Android devices.
If you do not want the mobile device user to be distracted by Kaspersky Endpoint Security for Android notifications, you can disable certain notifications.
Kaspersky Endpoint Security uses the following tools to display the device protection status:
- Protection status notification. This notification is pinned to the notification bar. A protection status notification cannot be removed. The notification displays the device protection status (for example, ) and number of issues, if any. The device user can tap the device protection status and see the list of issues in the app.
- App notifications. These notifications inform the device user about the application (for example, threat detection).
- Pop-up messages. Pop-up messages require an action from the device user (for example, an action to take when a threat is detected).
All Kaspersky Endpoint Security for Android notifications are enabled by default.
On Android 13, the device user should grant permission to send notifications during the Initial Configuration Wizard or later.
An Android device user can disable all notifications from Kaspersky Endpoint Security for Android in the settings on the notification bar. If notifications are disabled, the user does not monitor the operation of the app and can ignore important information (for example, information about failures during device synchronization with Kaspersky Security Center). In this case, to find out the app operating status, the user must open Kaspersky Endpoint Security for Android.
To configure the display of notifications about the operation of Kaspersky Endpoint Security for Android on a mobile device:
- Open the policy properties window:
- In the main window of Kaspersky Security Center Web Console or Cloud Console, select Devices > Policies & profiles. In the list of group policies that opens, click the name of the policy that you want to configure.
- In the main window of Kaspersky Security Center Web Console or Cloud Console, select Devices > Mobile > Devices. Click the mobile device that falls under the policy that you want to configure, and then select the policy on the Active policies and policy profiles tab.
- In the policy properties page, select Application settings > Notifications and reports.
- In the Notifications section, configure the display of notifications:
- To hide all notifications and pop-up messages, disable the Display notifications when Kaspersky Endpoint Security is in the background toggle button.
Kaspersky Endpoint Security for Android will display the protection status notification only. The notification displays the device protection status (for example,
) and number of issues. The app also displays notifications when the user is working with the app (for example, the user updates anti-malware databases manually).Kaspersky experts recommend that you enable notifications and pop-up messages. If you disable notifications and pop-up messages when the app is in background mode, the app will not warn users about threats in real time. Mobile device users can learn about the device protection status only when they open the app.
- In List of security issues displayed on users' devices, select the Kaspersky Endpoint Security for Android issues that you want to be displayed on the user's mobile device.
- To hide all notifications and pop-up messages, disable the Display notifications when Kaspersky Endpoint Security is in the background toggle button.
- Click the Save button to save the changes you have made to the policy and exit the policy properties window.
Mobile device settings are configured after the next device synchronization with Kaspersky Security Center.
Page top
The help for this version of the solution is no longer updated, so it may contain outdated information. For up-to-date information about the solution refer to the Kaspersky Secure Mobility Management 4.1 Help.
Detecting device hacks
Kaspersky Security Center Web Console enables you to detect device hacks (root) on Android devices and jailbreaks on iOS devices. System files are unprotected on a hacked device and can therefore be modified. Moreover, third-party apps from unknown sources could be installed on hacked devices. Upon detection of a hack attempt, we recommend that you immediately restore normal operation of the device.
Kaspersky Endpoint Security for Android uses the following services to detect when a user obtains root privileges:
- Embedded service of Kaspersky Endpoint Security for Android. A Kaspersky service that checks whether a mobile device user has obtained root privileges (Kaspersky Mobile Security SDK).
Kaspersky Security for iOS uses the following service to detect a jailbreak:
- Embedded service of Kaspersky Security for iOS. A Kaspersky service that checks whether a mobile device is jailbroken (Kaspersky Mobile Security SDK).
If the device is hacked, you receive a notification. You can view hacking notifications in Kaspersky Security Center Web Console on the Monitoring & reporting > Dashboard tab. You can also disable notifications about hacks in the event notification settings.
On Android devices, you can impose restrictions on the user's activity if the device is hacked (for example, lock the device). You can impose restrictions by using the Compliance Control component. To do this, create a compliance rule with the Device has been rooted criterion.
Page top
The help for this version of the solution is no longer updated, so it may contain outdated information. For up-to-date information about the solution refer to the Kaspersky Secure Mobility Management 4.1 Help.
Defining licensing settings
You can define these policy settings for Android and iOS devices.
To manage mobile devices in Kaspersky Security Center Web Console or Cloud Console, you must activate the mobile app on the mobile devices. Activating the Kaspersky Endpoint Security for Android app or the Kaspersky Security for iOS app on a mobile device is done by providing valid license information to the app. License information is delivered to the mobile device, together with the policy, when the device is synchronized with Kaspersky Security Center.
If the activation of the mobile app is not completed within 30 days from the time of installation on the mobile device, the app is automatically switched to the limited functionality mode. In this mode, most of the app components are not operational. When switched to the limited functionality mode, the app stops performing automatic synchronization with Kaspersky Security Center. Therefore, if the activation of the app has not been completed within 30 days after the installation, the user must synchronize the device with Kaspersky Security Center manually.
To define licensing settings of a group policy:
- Open the policy properties window:
- In the main window of Kaspersky Security Center Web Console or Cloud Console, select Devices > Policies & profiles. In the list of group policies that opens, click the name of the policy that you want to configure.
- In the main window of Kaspersky Security Center Web Console or Cloud Console, select Devices > Mobile > Devices. Click the mobile device that falls under the policy that you want to configure, and then select the policy on the Active policies and policy profiles tab.
- In the policy properties page, select Application settings > Licenses.
- Use the drop-down list to select the required license key from the key storage of the Administration Server.
The details of the license key are displayed in the fields below.
You can replace the existing activation key on the mobile device if it is different from the one selected in the drop-down list above. To do so, select the If the key on device is different, replace with this key check box.
- Click the Save button to save the changes you have made to the policy and exit the policy properties window.
Mobile device settings are configured after the next device synchronization with Kaspersky Security Center.
Page top
The help for this version of the solution is no longer updated, so it may contain outdated information. For up-to-date information about the solution refer to the Kaspersky Secure Mobility Management 4.1 Help.
Configuring events
You can define these policy settings for Android and iOS devices.
You can define the storage and notification settings of events that occur on your users' devices and that are sent to Kaspersky Security Center.
You can configure events only when modifying a policy.
Events are distributed by importance level on the following tabs:
- Critical
A critical event indicates a problem that may lead to data loss, an operational malfunction, or a critical error.
- Functional failure
A functional failure indicates a serious problem, error, or malfunction that occurred during the operation of the app.
- Warning
A warning is not necessarily serious, but nevertheless indicates a potential future problem.
- Info
An informational event notifies about the successful completion of an operation or a procedure, or of the proper functioning of the app.
In each section, the list shows the types of events and the default event storage term in Kaspersky Security Center (in days).
From the list of events, you can do the following:
- Add or remove an event type from the list of event types that are sent to Kaspersky Security Center.
- Define the storage and notification settings for each event type, for example: how long events of this type must be stored in the Administration Server database or whether you will be notified about events of this type by email.
For more details on configuring events in Kaspersky Security Center Web Console and Cloud Console:
- If you use Kaspersky Security Center Web Console, please refer to Kaspersky Security Center Help.
- If you use Kaspersky Security Center Cloud Console, please refer to Kaspersky Security Center Cloud Console Help.
The help for this version of the solution is no longer updated, so it may contain outdated information. For up-to-date information about the solution refer to the Kaspersky Secure Mobility Management 4.1 Help.
Configuring events about the installation, update, and removal of apps on users' devices
You can define these policy settings for Android and iOS devices.
If you use Kaspersky Security Center Cloud Console, the list of types of events that occur on your users' devices, and that are sent to Kaspersky Security Center, does not include the installation, update, and removal of apps on the devices. This is because such events occur often and these events may replace other important events in the Kaspersky Security Center database when the events count limit is reached. They may also affect the performance of Administration Server or the DBMS, and the bandwidth of the internet connection with Kaspersky Security Center Cloud Console.
If you nevertheless want to store events of this type and be notified about them, proceed as described in this section.
To configure events about the installation, update, and removal of apps on users' devices:
- In the settings of a policy, on the Event configuration tab, add the An app has been installed or removed (list of installed apps) informational event type to the list of events that are stored in the Administration Server database.
For more details on configuring events, please refer to Kaspersky Security Center Cloud Console Help.
- Enable the Send a list of installed apps on all mobile devices option.
Events about the installation, update, and removal of apps on users' devices are stored in the Kaspersky Security Center database. You are notified about these events.
Page top
The help for this version of the solution is no longer updated, so it may contain outdated information. For up-to-date information about the solution refer to the Kaspersky Secure Mobility Management 4.1 Help.
Network load
This section contains information on the volume of network traffic that is exchanged between mobile devices and Kaspersky Security Center.
Traffic volume
Task |
Outgoing traffic |
Incoming traffic |
Total traffic |
|---|---|---|---|
Initial deployment of the app, MB |
0.08 |
17.76 |
17.84 |
Initial update of anti-malware databases (the traffic volume may differ due to the size of anti-malware databases), MB |
0.04 |
2.21 |
2.25 |
Synchronization of the mobile device with Kaspersky Security Center, MB |
0.03 |
0.02 |
0.05 |
Regular update of anti-malware databases (the traffic volume may differ due to the size of anti-malware databases), MB |
0.08 |
3.06 |
3.14 |
Execution of Anti-Theft commands. Locate device (the traffic volume may differ due to the specifications of the embedded camera and the quality of images), MB |
0.09 |
0.8 |
0.17 |
Execution of Anti-Theft commands. Mugshot, MB |
1.0 |
0.02 |
1.02 |
Execution of Anti-Theft commands. Device lock, MB |
0.06 |
0.05 |
0.11 |
Average daily volume, MB |
0.22 |
6.96 |
7.18 |
The help for this version of the solution is no longer updated, so it may contain outdated information. For up-to-date information about the solution refer to the Kaspersky Secure Mobility Management 4.1 Help.
Application licensing
This section provides information about the general terms related to licensing Kaspersky Secure Mobility Management.
The help for this version of the solution is no longer updated, so it may contain outdated information. For up-to-date information about the solution refer to the Kaspersky Secure Mobility Management 4.1 Help.
About the End User License Agreement
The End User License Agreement (EULA) is a binding agreement between you and AO Kaspersky Lab, stipulating the Terms and Conditions on which you may use Kaspersky Secure Mobility Management.
We recommend carefully reading the Terms and Conditions of the EULA before using Kaspersky Secure Mobility Management.
You can view the Terms and Conditions of the EULA in the following ways:
- During installation of components of Kaspersky Secure Mobility Management.
- By reading the license.txt file included in the self-extracting archive of the distribution kit for installing the Kaspersky Endpoint Security for Android app.
- In the About the app section in Kaspersky Endpoint Security for Android.
- In the About the App → Agreements and Statements section in Kaspersky Security for iOS.
- In the Advanced → Accepted License Agreements section in the Administration Server properties. This feature is available in Kaspersky Security Center version 12.1 and later.
By confirming that you agree with the End User License Agreement (EULA) when installing the components of Kaspersky Secure Mobility Management, you signify your acceptance of the Terms and Conditions of the End User License Agreement. If you do not accept the terms of the End User License Agreement, you must cancel installation of Kaspersky Secure Mobility Management components and refrain from using them.
Page top
The help for this version of the solution is no longer updated, so it may contain outdated information. For up-to-date information about the solution refer to the Kaspersky Secure Mobility Management 4.1 Help.
About the license
A license is a time-limited right to use Kaspersky Secure Mobility Management, granted under the terms of the signed License Contract (End User License Agreement).
The scope of services and validity period depend on the license under which the application is used.
The following license types are provided:
- Trial
A free license intended for trying out the Kaspersky Secure Mobility Management.
A trial license is valid for 30 days. When a trial license expires, the Kaspersky Endpoint Security for Android mobile app and the Kaspersky Security for iOS mobile app stop performing most functions, except for synchronization with the Administration Server. To continue using the app, you need to purchase a commercial license.
- Commercial
A paid license.
When a commercial license expires, the mobile apps continue to work, but with limited functionality.
In limited functionality mode, the following components are available depending on the app.
- Kaspersky Endpoint Security for Android app:
- Anti-Malware. Real-time Protection and malware scan of the device are available, but anti-malware database updates are not available.
- Anti-Theft. Only sending commands to mobile device is available.
- Synchronization with the Administration Server.
Kaspersky Endpoint Security for Android stops exchanging information with Kaspersky Security Network, Google Analytics for Firebase, Firebase Performance Monitoring, and Crashlytics if the Kaspersky key is blocked, if a trial license expires or if a license is missing (the activation code is removed from the group policy).
- Kaspersky Security for iOS app:
- Synchronization with the Administration Server.
Kaspersky Security for iOS stops exchanging information with Kaspersky Security Network if a trial license expires or if a license is missing (the activation code is removed from the group policy).
The remaining components of the mobile apps are not available to the device user. You can use group policies to manage these components in limited functionality mode and cannot use group policies to configure other components of the apps.
To continue using the apps in fully functional mode, you must renew your commercial license. We recommend renewing the license term or buying a new license before the current one expires, to ensure uninterrupted protection of your users' devices against all security threats.
- Kaspersky Endpoint Security for Android app:
The help for this version of the solution is no longer updated, so it may contain outdated information. For up-to-date information about the solution refer to the Kaspersky Secure Mobility Management 4.1 Help.
About the subscription
Subscription for Kaspersky Secure Mobility Management is an order for using the mobile app with the selected parameters (subscription expiry date, number of mobile devices protected). You can order subscription for Kaspersky Secure Mobility Management from your service provider (such as your ISP). Subscription can be renewed manually or automatically, or you may cancel your subscription. You can manage your subscription on the website of the service provider.
Subscription can be limited (for example, one-year) or unlimited (with no expiration date). To keep Kaspersky Secure Mobility Management working after expiry of the limited subscription term, you have to renew your subscription. Unlimited subscription is renewed automatically provided a prepayment to the service provider was timely.
If the subscription is limited, when it expires you may be offered a grace period for renewing the subscription, during which time the apps will retain their functionality. The availability and duration of such grace period are at the discretion of the service provider.
To use Kaspersky Secure Mobility Management under subscription, you have to apply the activation code received from the service provider. After the activation code is applied, the key is installed for the license for using the application under subscription.
The possible subscription management options may vary with each service provider. The service provider may not offer a subscription renewal grace period during which the apps will retain their functionality.
Activation codes purchased under subscription cannot be used for activating earlier versions of Kaspersky Secure Mobility Management.
Page top
The help for this version of the solution is no longer updated, so it may contain outdated information. For up-to-date information about the solution refer to the Kaspersky Secure Mobility Management 4.1 Help.
About the license key
A license key is a sequence of bits that you can apply to activate and then use the integrated solution Kaspersky Secure Mobility Management in accordance with the terms of the End User License Agreement. License keys are generated by Kaspersky specialists.
You can add a license key for the mobile app by using a key file or an activation code:
- If your organization has deployed the Kaspersky Security Center software suite, you have to apply the key file and distribute it to Android mobile apps. The license key is displayed in the interface of Kaspersky Security Center and the interface of the Android mobile app as a unique alphanumeric sequence.
After adding license keys, you can replace them with other license keys.
You can't activate the Kaspersky Security for iOS app with a key file.
- If your organization does not use Kaspersky Security Center, you have to share the activation code with the user. The user enters this activation code in the Android or iOS mobile app. The license key is displayed in the mobile app interface as a unique alphanumeric sequence.
The license key may be blocked by Kaspersky if, for example, the terms of the End User License Agreement have been violated. If the license key has been blocked, the mobile apps stop performing all their functions except for synchronization with the Administration Server. To continue using the apps, you need to add a different license key.
Page top
The help for this version of the solution is no longer updated, so it may contain outdated information. For up-to-date information about the solution refer to the Kaspersky Secure Mobility Management 4.1 Help.
About the activation code
Activation code is a unique sequence of 20 alphanumeric characters. You enter an activation code to add a key that activates the Kaspersky Endpoint Security for Android mobile app or the Kaspersky Security for iOS mobile app. You receive the activation code at the email address that you have specified after purchasing the integrated solution Kaspersky Secure Mobility Management or after ordering the trial version of Kaspersky Secure Mobility Management.
To activate the mobile app by using the activation code, you need internet access to connect to Kaspersky activation servers.
If you have lost your activation code after you activated the app, it can be restored. You may need your activation code, e.g., to register with Kaspersky CompanyAccount. To restore the activation code, contact Kaspersky Technical Support.
Page top
The help for this version of the solution is no longer updated, so it may contain outdated information. For up-to-date information about the solution refer to the Kaspersky Secure Mobility Management 4.1 Help.
About the key file
A key file is a file with the .key extension that you receive from Kaspersky. The purpose of a key file is to add a key that activates the Kaspersky Endpoint Security for Android app.
You can't activate the Kaspersky Security for iOS app with a key file.
You receive a key file at the email address that you provided when you bought the integrated solution Kaspersky Secure Mobility Management or ordered the trial version of Kaspersky Secure Mobility Management.
You do not need to connect to Kaspersky activation servers in order to activate the application with a key file.
You can restore a key file if it has been accidentally deleted. You may need a key file to register a Kaspersky CompanyAccount, for example.
To restore your key file, perform any of the following actions:
- Contact the license seller.
- Receive a key file through Kaspersky website by using your available activation code.
The help for this version of the solution is no longer updated, so it may contain outdated information. For up-to-date information about the solution refer to the Kaspersky Secure Mobility Management 4.1 Help.
Data provision in Kaspersky Endpoint Security for Android
Kaspersky Secure Mobility Management complies with the General Data Protection Regulations (GDPR).
To install the app, either you or a device user must read and accept the terms of the End User License Agreement. In addition, you can configure a policy to accept the Statements listed below globally, for all users. Otherwise, users will be prompted by a notification on the main app screen to accept the following Statements regarding the processing of the user's personal data:
- Kaspersky Security Network Statement
- Statement regarding data processing for Web Protection
- Statement regarding data processing for marketing purposes
If you choose to accept the statements globally, the versions of the statements accepted via Kaspersky Security Center must match the versions already accepted by users. Otherwise, the users will be informed about the issue and prompted to accept the version of a statement that matches the version accepted globally by the administrator. The device status in the Kaspersky Security for Mobile (Devices) plug-in will also change to Warning.
The user may accept the terms of a Statement or decline them at any time in the About the app section in the settings of Kaspersky Endpoint Security for Android.
Information exchange with Kaspersky Security Network
To improve real-time protection, Kaspersky Endpoint Security for Android uses the Kaspersky Security Network cloud service for operating the following components:
- Anti-Malware. The app obtains access to the Kaspersky online knowledge base regarding the reputation of files and apps. The scan is performed for threats whose information has not yet been added to anti-malware databases but is already available in KSN. Kaspersky Security Network cloud service provides full operation of Anti-Malware and reduces the likelihood of false alarms.
- Web Protection. The app uses data received from KSN to scan websites before they are opened. The app also determines the website category to control internet access to users, based on lists of allowed and blocked categories (for example, the "Internet communication" category).
- App Control. The app determines the app category to restrict the startup of apps that do not meet corporate security requirements, based on lists of allowed and blocked categories (for example, the "Games" category).
Information on the type of data submitted to Kaspersky when using KSN during operation of Anti-Malware and App Control is available in the End User License Agreement. By accepting the terms and conditions of the License Agreement, you agree to transfer this information.
Information on the type of data submitted to Kaspersky when using KSN during operation of Web Protection is available in the Statement regarding data processing for Web Protection. By accepting the terms and conditions of the Statement, you agree to transfer this information.
Information on the type of statistic data submitted to Kaspersky when using KSN during operation of the Kaspersky Endpoint Security for Android mobile app is available in the Kaspersky Security Network Statement. By accepting the terms and conditions of the Statement, you agree to transfer this information.
Data provision under the End User License Agreement
Where the Activation Code is used to activate the Software, in order to verify legitimate use of the Software, the End User agrees to periodically provide the Rightholder the following information:
- format of the data in the request to Rightholder infrastructure; accessed IPv4 address of the web service; size of the content of the request to Rightholder infrastructure; protocol ID; Software activation code; data compression type; Software ID; set of IDs of Software that can be activated on the user's device; Software localization; full version of the Software; unique device ID; date and time on the user's device; Software installation ID (PCID); OS version, OS build number, OS update number, OS edition, extended information about the OS edition; device model; operating system family; format of the data in the request to Rightholder infrastructure; checksum type for the object being processed; Software license header; ID of a regional activation center; Software license key creation date and time; Software license ID; ID of the information model used to provide the Software license; Software license expiration date and time; current status of the Software license key; type of Software license used; type of the license used to activate the Software; Software ID derived from the license.
In order to protect the Computer against information security threats, the End User agrees to periodically provide the Rightholder the following information:
- checksum type for the object being processed; checksum of the object being processed; the Software component ID;
- ID of the triggered record in the Software's anti-malware databases; timestamp of the triggered record in the Software's anti-malware databases; type of the triggered record in the Software's anti-malware databases; name of the detected malware or legitimate software that can be used to damage the user's device or data;
- name of store from which the application was installed; application package name; public key used to sign the APK file; checksum of the certificate used to sign the APK file; digital certificate timestamp;
- full version of the Software; Software update ID; type of installed Software; the config identifier; the result of the Software action; error code;
- numbers that are derived from the Android application APK file according to certain mathematical rules and that do not allow restoration of the original file content; this data does not contain file names, file paths, addresses, phone numbers, or other personal information of users.
If You use the Rightholder's update servers to download the Updates, the End User, in order to increase the efficiency of the update procedure, agrees to periodically provide the Rightholder the following information:
- Software ID derived from the license; full version of the Software; Software license ID; type of Software license used; Software installation ID (PCID); ID of the Software update start; web address being processed.
The Rightholder can use such information also for receiving statistical information about the distribution and use of the Software.
The received information is protected by Kaspersky in accordance with the requirements established by law. The original received information is stored in encrypted form and is destroyed as it is accumulated (twice per year) or at the request of the User. General statistics are stored indefinitely.
Data provision under the Kaspersky Security Network Statement
Use of the KSN could lead to increase the effectiveness of protection provided by the Software, against information and network security threats.
If you use a license for 5 or more nodes, the Rightholder will automatically receive and process the following data during use of the KSN:
- ID of the triggered record in the Software's anti-malware databases; timestamp of the triggered record in the Software's anti-malware databases; type of the triggered record in the Software's anti-malware databases; release date and time of the Software's databases; OS version, OS build number, OS update number, OS edition, extended information about the OS edition; OS Service Pack version; detect characteristics; checksum (MD5) of the object being processed; name of the object being processed; flag indicating whether the object being processed is a PE file; checksum (MD5) of the mask that blocked the web service; checksum (SHA256) of the object being processed; size of the object being processed; object type code; the Software's decision on the object being processed; path to the object being processed; directory code; version of the Software's component; version of the statistics being sent; accessed address of the web service (URL, IP); type of client used to access the web service; accessed IPv4 address of the web service; accessed IPv6 address of the web service; web address of the source of the web service request (referer); web address being processed;
- information about scanned objects (application version from AndroidManifest.xml; the Software's decision on the application; method used to get the Software's decision on the application; store installer package name; package name (or bundle name) from AndroidManifest.xml; Google SafetyNet category; flag indicating whether the SafetyNet is enabled on the device; SHA256 value from Google SafetyNet response; APK Signature Scheme for the APK certificate; version code of the installed Software; serial number of the certificate that was used to sign the APK file; name of the APK file that is being installed; path to the APK file that is being installed; issuer of the certificate that was used to sign the APK file; public key used to sign the APK file; checksum of the certificate used to sign the APK file; date and time when the certificate expires; date and time when the certificate was issued; version of the statistics being sent; algorithm for calculating the digital certificate thumbprint; MD5 hash of the installed APK file; MD5 hash of the DEX file located within the APK file; permissions granted dynamically to the application; third-party software version; flag indicating whether the application is the default SMS messenger; flag indicating whether the application has Device Administrator rights; flag indicating whether the application is in the system catalog; flag indicating whether the application uses accessibility services);
- information about all potentially malicious objects and activities (fragment content of the object being processed; date and time when the certificate expires; date and time when the certificate was issued; ID of the key from the keystore used for encryption; protocol used to exchange data with KSN; fragment order in the object being processed; data of the internal log, generated by the anti-malware Software module for an object being processed; certificate issuer name; public key of the certificate; calculation algorithm of public key of the certificate; certificate serial number; date and time of signing the object; certificate owner name and settings; digital certificate thumbprint of the scanned object and hashing algorithm; date and time of the last modification of the object being processed; date and time of creating an object being processed; objects or its parts being processed; description of an object being processed as defined in the object properties; format of the object being processed; checksum type for the object being processed; checksum (MD5) of the object being processed; name of the object being processed; checksum (SHA256) of the object being processed; size of the object being processed; Software vendor name; the Software's decision on the object being processed; version of the object being processed; source of the decision made for the object being processed; checksum of the object being processed; parent application name; path to the object being processed; information about file signature check results; logon session key; encryption algorithm for the logon session key; storage time for object being processed; algorithm for calculating the digital certificate thumbprint);
- build type, for example, "user" or "eng"; full product name; product/hardware manufacturer; whether apps can be installed from outside of Google Play; status of the cloud service for verification of Google apps; status of the cloud service for verification of Google apps being installed through ADB; current development codename or "REL" for production builds; incremental build number; user-visible version string; user device name; user-visible Software's build ID; firmware fingerprint; firmware ID; flag indicating whether the device is rooted; operating system; Software name; type of Software license used;
- information about the quality of KSN services (protocol used to exchange data with KSN; ID of the KSN service accessed by the Software; date and time when statistics stopped being received; number of KSN connections taken from the cache; number of requests for which a response was found in the local request database; number of unsuccessful KSN connections; number of unsuccessful KSN transactions; temporal distribution of cancelled requests to KSN; temporal distribution of unsuccessful KSN connections; temporal distribution of unsuccessful KSN transactions; temporal distribution of successful KSN connections; temporal distribution of successful KSN transactions; temporal distribution of successful requests to KSN; temporal distribution of requests to KSN that timed out; number of new KSN connections; number of unsuccessful requests to KSN caused by routing errors; number of unsuccessful requests caused by KSN being disabled in the Software settings; number of unsuccessful requests to KSN caused by network problems; number of successful KSN connections; number of successful KSN transactions; total number of requests to KSN; date and time when statistics started being received);
- device ID; full version of the Software; Software update ID; Software installation ID (PCID); type of installed Software;
- device screen height; device screen width; information about the overlapping application: MD5 hash of the APK file; information about the overlapping application: MD5 hash of the classes.dex file; information about the overlapping application: name of the APK file; information about the overlapping application: path to the APK file without the file name; overlap height; information about the overlapped Software: MD5 hash of the APK file; overlapped application information: classes.dex file MD5 hash; overlapped application information: APK file name; overlapped application information: path to APK file without file name; overlapped application information: application package name (for the overlapped application: if the advertisement is shown on an empty desktop, the value should be "launcher"); overlap date and time; information about the overlapping application: application package name; overlap width;
- settings of the Wi-Fi access point in use (detected device type; DHCP settings (checksums of gateway local IPv6, DHCP IPv6, DNS1 IPv6, DNS2 IPv6; checksum of network prefix length; checksum of local address IPv6); DHCP settings (checksums of the local IP address of the gateway, DHCP IP, DNS1 IP, DNS2 IP, and subnet mask); flag indicating whether the DNS domain exists; checksum of the assigned local IPv6 address; checksum of the assigned local IPv4 address; flag indicating whether the device is plugged in; Wi-Fi network authentication type; list of available Wi-Fi networks and their settings; checksum (MD5 with salt) of the MAC address of the access point; checksum (SHA256 with salt) of the MAC address of the access point; connection types supported by the Wi-Fi access point; Wi-Fi network encryption type; local time of the start and end of the Wi-Fi network connection; Wi-Fi network ID based on the MAC address of the access point; Wi-Fi network ID based on the Wi-Fi network name; Wi-Fi network ID based on the Wi-Fi network name and the MAC address of the access point; Wi-Fi signal strength; Wi-Fi network name; set of authentication protocols supported by this configuration; authentication protocol used for a WPA-EAP connection; internal authentication protocol; set of group ciphers supported by this configuration; set of key management protocols supported by this configuration; the network's final privacy category in the Software; the network's final security category in the Software; set of block ciphers for WPA that are supported by this configuration; set of security protocols supported by this configuration);
- installation date and time for the Software; Software activation date; identifier of the partner organization via which the Software license order was placed; Software ID derived from the license; serial number of the Software license key; Software localization; flag indicating whether participation in KSN is enabled; ID of the licensed Software; Software license ID; OS ID; operating system bit version.
Also, in order to achieve the declared purpose of increasing the effectiveness of protection provided by the Software, the Rightholder may receive objects that could be exploited by intruders to harm the Computer and create information security threats.
Providing the above information to the KSN is voluntary. You can opt out of participating in Kaspersky Security Network at any time.
Data provision under the Statement regarding data processing for Web Protection
According to Web Protection Statement the Rightholder processes data in order for Web Protection functionality. The stated purpose includes detecting web threats and determining the categories of visited websites using the cloud service Kaspersky Security Network (KSN).
With Your consent, the following data will be automatically sent on a regular basis to the Rightholder under the Web Protection Statement:
- Product version; Unique device identifier; Installation ID; Product type.
- URL address of the page, port number, URL protocol, URL, which refers to the requested information.
Data provision under the Statement regarding data processing for marketing purposes
The Rightholder uses third-party information systems to process data. Their data processing is governed by the privacy statements of such third-party information systems. The following are the services that the Rightholder uses and the data they process:
Google Analytics for Firebase
During use of the Software, the following data will be sent to Google Analytics for Firebase automatically and on a regular basis in order to achieve the declared purpose:
- app info (app version, app ID, and the ID of the app in the Firebase service, instance ID in the Firebase service, name of the store where the application was obtained, timestamp of the first launch of the Software)
- ID of app installation on the device and method of installation on the device
- information about the region and language localization
- information about the device screen resolution
- information about the user obtaining root
- information about setting Kaspersky Endpoint Security for Android as an Accessibility feature
- information about transitions between application screens, session duration, beginning and end of a screen session, screen name
- information about the protocol used to submit data to the Firebase service, its version, and ID of the data submission method used
- details on the type and parameters of the event for which data is submitted
- information about the app license, its availability, the number of devices
- information about the frequency of anti-malware database updates and synchronization with Administration Server
- information about the Administration Console (Kaspersky Security Center or third-party EMM systems)
- Android ID
- advertising ID
- information about the User: age category and gender, identifier of the country of residence, and list of interests
- information about the User's computer where the Software is installed: computer manufacturer name, type of computer, model, version and the language (locale) of the operating system, information about the application first opened in the last 7 days and the application first opened more than 7 days ago
Data is forwarded to Firebase over a secure channel. Information about how data is processed in Firebase is published at: https://firebase.google.com/support/privacy.
Firebase Performance Monitoring
During the use of the Software, the following data will be sent to Firebase Performance Monitoring automatically and on a regular basis in order to achieve the declared purpose:
- unique installation ID
- application package name
- version of the installed software
- battery level and battery-charging state
- carrier
- app foreground or background state
- geography
- IP address
- device language code
- information about the radio/network connection
- pseudonymous Software instance ID
- RAM and disk size
- flag indicating whether the device is jailbroken or rooted
- signal strength
- duration of automated traces
- network, and the following corresponding information: response code, payload size in bytes, response time
- device description
Data is forwarded to Firebase Performance Monitoring over a secure channel. Information about how data is processed in Firebase Performance Monitoring is published at: https://firebase.google.com/support/privacy.
Crashlytics
During the use of the Software, the following data will be sent to Crashlytics automatically and on a regular basis in order to achieve the declared purpose:
- Software ID
- version of the installed software
- flag indicating whether the Software was running in the background
- CPU architecture
- unique event ID
- event date and time
- device model
- total disk space and amount currently used
- name and version of the OS
- total RAM and amount currently used
- flag indicating whether the device is rooted
- screen orientation at the time of the event
- product/hardware manufacturer
- unique installation ID
- version of the statistics being sent
- the Software exception type
- text of the error message
- a flag indicating that the Software exception was caused by a nested exception
- thread ID
- a flag indicating whether the frame was the cause of the Software error
- a flag indicating that the thread caused the Software to terminate unexpectedly
- information about the signal that caused the Software to terminate unexpectedly: signal name, signal code, signal address
- for each frame associated with a thread, exception, or error: the name of the frame file, line number of the frame file, debug symbols, address and offset in the binary image, display name of the library with the frame, type of the frame, flag indicating whether the frame was the cause of the error
- OS ID
- ID of the issue associated with the event
- information about events that happened before the Software terminated unexpectedly: event identifier, event date and time, event type and value
- CPU register values
- event type and value
Data is forwarded to Crashlytics over a secure channel. Information about how data is processed in Crashlytics is published at: https://firebase.google.com/terms/crashlytics-app-distribution-data-processing-terms.
Providing the above information for processing for marketing purposes is voluntary.
Page top
The help for this version of the solution is no longer updated, so it may contain outdated information. For up-to-date information about the solution refer to the Kaspersky Secure Mobility Management 4.1 Help.
Data provision in Kaspersky Security for iOS
Kaspersky Secure Mobility Management complies with the General Data Protection Regulations (GDPR).
To install the app, a device user must read and accept the terms of the following statements regarding the processing of the user's personal data:
- End User License Agreement
- Products and Services Privacy Policy
Optionally, the user may read and accept the terms of the following statement:
- Kaspersky Security Network Statement
The user can view the terms of these documents at any time in the About the App → Agreements and Statements section in the settings of Kaspersky Security for iOS. In this section, the user can also accept or decline the terms of the KSN Statement.
Information exchange with Kaspersky Security Network
To improve real-time protection, Kaspersky Security for iOS uses the Kaspersky Security Network cloud service for operating the Web Protection component. The app uses data received from KSN to scan web resources before they are opened.
Information on the type of data submitted to Kaspersky when using KSN during operation of Web Protection is available in the End User License Agreement. By accepting the terms and conditions of the License Agreement, you agree to transfer this information.
Information on the type of statistic data submitted to Kaspersky when using KSN during operation of the Kaspersky Security for iOS mobile app is available in the Kaspersky Security Network Statement. By accepting the terms and conditions of the Statement, you agree to transfer this information.
Data provision under the End User License Agreement
Where the Activation Code is used to activate the Software, in order to verify legitimate use of the Software, the End User agrees to periodically provide the Rightholder the following information:
- Format of the data in the request to Rightholder's infrastructure; accessed IPv4 address of the web service; size of the content of the request to Rightholder infrastructure; protocol ID; Software activation code; data compression type; Software ID; set of IDs of Software that can be activated on the user's device; Software localization; full version of the Software; unique device ID; date and time on the user's device; Software installation ID (PCID); currently used Software activation code; OS version, OS build number, OS update number, OS edition, extended information about the OS edition; device model; mobile carrier code; operating system family; Software ID derived from the license; list of agreements presented to the user by the Software; type of legal agreement accepted by the user while using the Software; version of the legal agreement accepted by the user while using the Software; flag indicating whether the user has accepted the terms of the legal agreement while using the Software; checksum type for the object being processed; Software license header; ID of a regional activation center; Software license key creation date and time; Software license ID; ID of the information model used to provide the Software license; Software license expiration date and time; current status of the Software license key; type of Software license used; type of the license used to activate the Software; Software ID derived from the license.
The Rightholder can use such information also for gathering statistical information about the distribution and use of the Rightholder's Software.
In order to protect the Computer against information security threats, the End User agrees to periodically provide the Rightholder the following information:
- Format of the data in the request to Rightholder's infrastructure; accessed address of the web service (URL, IP); port number; web address of the source of the web service request (referrer).
- Full version of the Software; Software update ID; type of the installed Software; Software ID; the configuration identifier; the result of the Software action; error code.
- Web address being processed; accessed IPv4 address of the web service; digital certificate thumbprint of the scanned object and hashing algorithm; certificate type; contents of the digital certificate being processed.
Data provision under the Kaspersky Security Network Statement
When the KSN Statement is accepted, the Rightholder automatically receives and processes the following data:
- Information about the quality of KSN services (protocol used to exchange data with KSN; ID of the KSN service accessed by the Software; date and time when statistics stopped being received; number of KSN connections taken from the cache; number of requests for which a response was found in the local request database; number of unsuccessful KSN connections; number of unsuccessful KSN transactions; temporal distribution of cancelled requests to KSN; temporal distribution of unsuccessful KSN connections; temporal distribution of unsuccessful KSN transactions; temporal distribution of successful KSN connections; temporal distribution of successful KSN transactions; temporal distribution of successful requests to KSN; temporal distribution of requests to KSN that timed out; number of new KSN connections; number of unsuccessful requests to KSN caused by routing errors; number of unsuccessful requests caused by KSN being disabled in the Software settings; number of unsuccessful requests to KSN caused by network problems; number of successful KSN connections; number of successful KSN transactions; total number of requests to KSN; date and time when statistics started being received).
- Device ID; full version of the Software; Software update ID; Software installation ID (PCID); type of the installed Software.
- Installation date and time for the Software; Software activation date; Software localization; flag indicating whether participation in KSN is enabled; ID of the licensed Software; Software license ID; OS ID; version of the operating system installed on the user's computer; operating system bit version.
Providing the above information to the KSN is voluntary. You can opt out of participating in Kaspersky Security Network at any time.
Page top
The help for this version of the solution is no longer updated, so it may contain outdated information. For up-to-date information about the solution refer to the Kaspersky Secure Mobility Management 4.1 Help.
Comparison of solution features depending on the management tools
You can manage mobile devices in Kaspersky Security Center by using the following management tools:
- Microsoft Management Console-based (hereinafter referred to as "MMC-based") Administration Console of Kaspersky Security Center
- Kaspersky Security Center Web Console
- Kaspersky Security Center Cloud Console
The table below compares the features that are available in these tools.
Availability of features depending on the management tools
|
MMC-based Console |
Web Console |
Cloud Console |
|---|---|---|---|
General |
|||
Android devices management |
|||
iOS devices management |
(via an APNs certificate) |
(via the Kaspersky Security for iOS app) |
(via the Kaspersky Security for iOS app) |
Mobile devices management |
|||
Adding devices by using a Google Play link |
|||
Adding devices by using an App Store link |
Not available |
||
Adding iOS devices by using an iOS MDM profile |
Not available |
Not available |
|
Adding devices by creating an installation package |
Not available |
Not available |
|
Sending commands to mobile devices |
(except the Mugshot command) |
(except the Mugshot command) |
|
Removing mobile devices from Kaspersky Security Center |
(Removing from the list of devices only. The app must be removed from the device manually.) |
(Removing from the list of devices only. The app must be removed from the device manually.) |
|
Certificates management |
|||
Issuing mail certificates |
Available |
Not available |
Not available |
Issuing VPN certificates |
Available |
Not available |
Not available |
Issuing mobile certificates |
Available |
Available |
Available |
Issuing mobile certificates through Administration Server tools |
|||
Specifying certificate files |
Not available |
Not available |
|
Integration with Public Key Infrastructure |
Available |
Not available |
Not available |
Policies management |
|||
Role-based access to configuring group policies |
Available |
Not available |
Not available |
Configuring mobile device synchronization with Kaspersky Security Center |
|||
Configuring malware scans on mobile devices |
|||
Configuring mobile device protection |
|||
Configuring anti-malware database updates |
|||
Configuring protection of stolen or lost device data |
|||
Configuring user access to websites |
|||
Configuring app control |
|||
Configuring compliance control |
|||
Configuring Android work profiles |
Not available |
Not available |
|
Configuring connection to a Wi-Fi network |
Not available |
Not available |
|
Samsung KNOX |
Not available |
Not available |
|
Other features |
|||
Global acceptance of EULA in Kaspersky Security Center |
Not available |
Not available |
|
Configuring Kaspersky Private Security Network |
Not available |
Not available |
|
The help for this version of the solution is no longer updated, so it may contain outdated information. For up-to-date information about the solution refer to the Kaspersky Secure Mobility Management 4.1 Help.
Contact Technical Support
This section describes how to get technical support and the terms on which it is available.
The help for this version of the solution is no longer updated, so it may contain outdated information. For up-to-date information about the solution refer to the Kaspersky Secure Mobility Management 4.1 Help.
How to get technical support
If you can't find a solution to your issue in the Kaspersky Secure Mobility Management documentation or in any of the sources of information about Kaspersky Secure Mobility Management, contact Technical Support. Technical Support specialists will answer all your questions about installing and using Kaspersky Secure Mobility Management.
Kaspersky provides support of Kaspersky Secure Mobility Management during its lifecycle (see the product support lifecycle page). Before contacting Technical Support, please read the support rules.
You can contact Technical Support in one of the following ways:
- By visiting the Technical Support website
- By sending a request to Technical Support from the Kaspersky CompanyAccount portal
The help for this version of the solution is no longer updated, so it may contain outdated information. For up-to-date information about the solution refer to the Kaspersky Secure Mobility Management 4.1 Help.
Technical support via Kaspersky CompanyAccount
Kaspersky CompanyAccount is a portal for companies that use Kaspersky applications. The Kaspersky CompanyAccount portal is designed to facilitate interaction between users and Kaspersky specialists through online requests. You can use Kaspersky CompanyAccount to track the status of your online requests and store a history of them as well.
You can register all of your organization's employees under a single account on Kaspersky CompanyAccount. A single account lets you centrally manage electronic requests from registered employees to Kaspersky and also manage the privileges of these employees via Kaspersky CompanyAccount.
The Kaspersky CompanyAccount portal is available in the following languages:
- English
- Spanish
- Italian
- German
- Polish
- Portuguese
- Russian
- French
- Japanese
To learn more about Kaspersky CompanyAccount, visit the Technical Support website.
Page top
The help for this version of the solution is no longer updated, so it may contain outdated information. For up-to-date information about the solution refer to the Kaspersky Secure Mobility Management 4.1 Help.
Sources of information about the application
Kaspersky Secure Mobility Management web page on the Kaspersky website
On the Kaspersky Secure Mobility Management page, you can find general information about the application, its features and operation parameters.
The web page of Kaspersky Secure Mobility Management provides a link to eStore. There you can purchase or renew the application.
Kaspersky Secure Mobility Management web page in the Knowledge Base
Knowledge Base is a section on the Kaspersky Customer Service website.
On the Kaspersky Secure Mobility Management page in the Knowledge Base you can find articles that contain useful information, recommendations and answers to frequently asked questions on the application purchasing, installation, and use.
Knowledge Base articles can answer questions relating to not only to Kaspersky Secure Mobility Management but also to other Kaspersky applications. Knowledge Base articles can also include Technical Support news.
Online help
The online help of the application comprises help files.
The context help of administration plug-ins for Kaspersky Secure Mobility Management provides information about the windows of Kaspersky Security Center: a description of Kaspersky Secure Mobility Management settings and links to descriptions of the tasks that use these settings.
Full help of the Kaspersky Endpoint Security for Android and Kaspersky Security for iOS apps provides information on how to configure and use mobile apps.
Discussing Kaspersky applications on Kaspersky Support Forum
If your question does not require an immediate answer, you can discuss it with Kaspersky experts and other users on our Forum.
On the Forum, you can view discussion topics, post your comments, and create new discussion topics.
Page topGlossary
Activating the application
Switching the application to fully functional mode. Application activation is performed by the user during or after installation of the application. You should have an activation code or key file to activate the application.
Activation code
A code that you receive when purchasing a license for Kaspersky Endpoint Security. This code is required for activating the application.
The activation code is a unique sequence of twenty letters and numbers in the format xxxxx-xxxxx-xxxxx-xxxxx.
Administration group
A set of managed devices, such as mobile devices grouped according to the functions they perform and the set of apps installed on them. Managed devices are grouped so that they can be managed as a single whole. For example, mobile devices running the same operating system can be combined into an administration group. A group may include other administration groups. It is possible to create group policies and group tasks for group devices.
Administration Server
A component of Kaspersky Security Center that centrally stores information about all Kaspersky applications that are installed within the corporate network. It can also be used to manage these applications.
Administrator's workstation
The computer on which Kaspersky Security Center Administration Console has been deployed. If the application administration plug-in is installed on the administrator's workstation, the administrator can manage Kaspersky Endpoint Security mobile apps deployed on user devices.
Android work profile
A safe environment on the user's device in which the administrator can manage apps and user accounts without restricting the use of personal data by the user. When a work profile is created on the user's mobile device, the following corporate apps are automatically installed in the work profile: Google Play Market, Google Chrome, Downloads, Kaspersky Endpoint Security for Android, and others. Corporate apps installed in the work profile and notifications of these apps are marked with a red briefcase icon. You have to create a separate Google corporate account for the Google Play Market app. Apps installed in the work profile appear in the common list of apps.
Anti-malware databases
Databases that contain information about computer security threats known to Kaspersky as of when the anti-malware databases are released. Entries in anti-malware databases allow malicious code to be detected in scanned objects. Anti-malware databases are created by Kaspersky specialists and updated hourly.
Apple Push Notification service (APNs) certificate
Certificate signed by Apple, which allows you to use Apple Push Notification. Through Apple Push Notification, an iOS MDM Server can manage iOS devices.
Application management plug-in
A dedicated component that provides the interface for managing Kaspersky applications through Administration Console. Each application that can be managed through Kaspersky Security Center SPE has its own management plug-in. The management plug-in is included in all Kaspersky applications that can be managed via Kaspersky Security Center.
Certificate Signing Request
File with the settings of an Administration Server, which is approved by Kaspersky and then sent to Apple to obtain an APNs certificate.
Compliance control
Verification that the settings of a mobile device and Kaspersky Endpoint Security for Android comply with corporate security requirements. Corporate security requirements regulate the device usage. For example, real-time protection must be enabled on the device, the anti-malware databases must be up-to-date, and the device password must be strong enough. Compliance control is based on a list of rules. A compliance rule includes the following components:
- Device check criterion (for example, absence of prohibited apps on the device)
- Time interval allocated for the user to fix the noncompliance (for example, 24 hours)
- Action that will be taken on the device if the user does not fix the noncompliance within the time set (for example, locking the device)
Device administrator
A set of app rights on an Android device that enables the app to use device management policies. It is necessary to implement full functionality of Kaspersky Endpoint Security on Android devices.
End User License Agreement
Binding agreement between you and AO Kaspersky Lab that stipulates the terms on which you may use the application.
Group task
A task intended for an administration group and performed on all managed devices included in the group.
IMAP
Protocol for accessing email. In contrast to the POP3 protocol, IMAP provides extended capabilities for working with mailboxes, such as managing folders and handling messages without copying their contents from the mail server. The IMAP protocol uses port 134.
Installation package
A set of files created for remote installation of a Kaspersky application by using the remote administration system. An installation package is created on the basis of dedicated files included in the application distribution package. The installation package contains a range of settings needed to install the application and get it running immediately after installation. The values of settings in the distribution kit correspond to default values of application settings.
iOS MDM device
An iOS mobile device controlled by the iOS MDM Server.
iOS MDM profile
A profile that contains a set of settings for connecting iOS mobile devices to the Administration Server. An iOS MDM profile makes it possible to distribute iOS configuration profiles in background mode using the iOS MDM Server, and also receive extended diagnostic information about mobile devices. A link to the iOS MDM profile needs to be sent to a user in order to enable the iOS MDM Server to discover and connect the user's iOS mobile device.
iOS MDM Server
A component of Kaspersky Endpoint Security that is installed on a client device, allowing connection of iOS mobile devices to the Administration Server and management of iOS mobile devices through Apple Push Notifications (APNs).
Kaspersky categories
Predefined data categories developed by Kaspersky experts. Categories can be updated during application database updates. A security officer cannot modify or delete predefined categories.
Kaspersky Private Security Network (KPSN)
Kaspersky Private Security Network is a solution that gives users of devices with Kaspersky applications installed access to reputation databases of Kaspersky Security Network and other statistical data—without sending data from their devices to Kaspersky Security Network. Kaspersky Private Security Network is designed for corporate customers who are unable to participate in Kaspersky Security Network for any of the following reasons:
- Devices are not connected to the internet.
- Transmission of any data outside the country or the corporate LAN is prohibited by law or corporate security policies.
Kaspersky Security Center Administrator
The person managing application operations through the Kaspersky Security Center remote centralized administration system.
Kaspersky Security Center Web Server
A component of Kaspersky Security Center that is installed together with Administration Server. Web Server is designed for transmission, over a network, of stand-alone installation packages, iOS MDM profiles, and files from a shared folder.
Kaspersky Security Network (KSN)
An infrastructure of cloud services that provides access to the Kaspersky database with constantly updated information about the reputation of files, web resources, and software. Kaspersky Security Network ensures faster responses by Kaspersky applications to threats, improves the performance of some protection components, and reduces the likelihood of false positives.
Kaspersky update servers
HTTP(S) servers at Kaspersky from which Kaspersky applications download database and application module updates.
KES device
A mobile device that is connected to Kaspersky Security Center Administration Server and managed through the Kaspersky Endpoint Security for Android app.
Key file
A file in xxxxxxxx.key format that makes it possible to use a Kaspersky application under a trial or commercial license. The application generates the key file based on the activation code. You may use the application only when you have a key file.
License
A time-limited right to use the app, granted under the End User License Agreement.
License term
A time period during which you have access to the application features and rights to use additional services. The services you can use depend on the type of the license.
Malware
A program that infects other ones, by adding its code to them in order to gain control when infected files are run. This simple definition allows identifying the main action performed by any malware: infection.
Manifest file
A file in PLIST format containing a link to the app file (ipa file) located on a web server. It is used by iOS devices to locate, download, and install apps from a web server.
Network Agent
A Kaspersky Security Center component that enables interaction between the Administration Server and Kaspersky applications that are installed on a specific network node (workstation or server).
Phishing
A type of internet fraud aimed at obtaining unauthorized access to users' confidential data.
Policy
A set of settings of the application and Kaspersky Endpoint Security mobile apps applied to devices in administration groups or to individual devices. Different policies can be applied to different administration groups. A policy includes the configured settings of all functions of Kaspersky Endpoint Security mobile apps.
POP3
Network protocol used by a mail client to receive messages from a mail server.
Provisioning profile
Collection of settings for applications' operation on iOS mobile devices. A provisioning profile contains information about the license; it is linked to a specific application.
Proxy server
A computer network service which allows users to make indirect requests to other network services. First, a user connects to a proxy server and requests a resource (e.g., a file) located on another server. Then the proxy server either connects to the specified server and obtains the resource from it or returns the resource from its own cache (if the proxy has its own cache). In some cases, a user's request or a server's response can be modified by the proxy server for certain purposes.
Quarantine
The folder to which the Kaspersky application moves probably infected objects that have been detected. Objects are stored in Quarantine in encrypted form in order to avoid any impact on the computer.
SSL
A data encryption protocol used on the internet and local networks. The Secure Sockets Layer (SSL) protocol is used in web applications to create a secure connection between a client and server.
Standalone installation package
An installation file of Kaspersky Endpoint Security for the Android operating system, which contains the settings of application connection to the Administration Server. It is created on the basis of the installation package of this application and is a particular case of mobile app package.
Subscription
Enables use of the application within the selected parameters (expiration date and number of devices). You can pause or resume your subscription, renew it automatically, or cancel it.
Supervised device
iOS device whose settings are monitored by Apple Configurator, a program for group configuration of iOS devices. A supervised device has the supervised status in Apple Configurator. Every time a supervised device connects to the computer, Apple Configurator checks the device configuration against the specified reference settings, and then redefines them if necessary. A supervised device cannot be synchronized with Apple Configurator installed on a different computer.
Every supervised device provides more settings to redefine through the Kaspersky Device Management for iOS policy than a non-supervised device. For example, you can configure an HTTP proxy server to monitor internet traffic on a device within the corporate network. By default, all mobile devices are non-supervised.
Unlock code
A code that you can get in Kaspersky Security Center. It is needed to unlock a device after the Lock & Locate, Alarm, or Mugshot commands have been executed, and when Self-Defense is triggered.
Virtual Administration Server
A component of Kaspersky Security Center, designed for management of the protection system of a client organization's network.
Virtual Administration Server is a particular case of a secondary Administration Server and has the following restrictions as compared with a physical Administration Server:
- Virtual Administration Server can be created only on a primary Administration Server.
- Virtual Administration Server uses the primary Administration Server database in its operation. Data backup and restoration tasks, as well as update scan and download tasks, are not supported on a virtual Administration Server.
- Virtual Server does not support creation of secondary Administration Servers (including virtual Servers).
The help for this version of the solution is no longer updated, so it may contain outdated information. For up-to-date information about the solution refer to the Kaspersky Secure Mobility Management 4.1 Help.
Information about third-party code
You can download and read information about third-party code in the following files:
- legal_notices_Android.txt (for the Kaspersky Endpoint Security for Android app)
- legal_notices_iOS.txt (for the Kaspersky Security for iOS app)
On mobile devices, information about third-party code is available in the About the App section of the mobile apps.
Page top
The help for this version of the solution is no longer updated, so it may contain outdated information. For up-to-date information about the solution refer to the Kaspersky Secure Mobility Management 4.1 Help.
Trademark notices
Registered trademarks and service marks are the property of their respective owners.
Adobe, Flash, and PostScript are either registered trademarks or trademarks of Adobe in the United States and/or other countries.
AMD64 is a trademark or registered trademark of Advanced Micro Devices, Inc.
Amazon, Amazon EC2, Amazon Web Services, AWS, and AWS Marketplace are trademarks of Amazon.com, Inc. or its affiliates.
Apache is either a registered trademark or a trademark of the Apache Software Foundation.
Apple, Apple Configurator, AirDrop, AirPlay, AirPort, AirPort Express, AirPrint, Aperture, App Store, Apple Music, Apple TV, Apple Watch, AppleScript, Bonjour, Face ID, FaceTime, FileVault, Find My, Find My Friends, Handoff, iBeacon, iBooks, iBooks Store, iCal, iCloud, iCloud Keychain, iMessage, iPad, iPadOS, iPhone, iPhoto, iTunes, iTunes Store, iTunes U, Keychain, macOS, OS X, Safari, Siri, Spotlight, and Touch ID are trademarks of Apple Inc.
Aruba Networks is a trademark of Aruba Networks, Inc. in the United States and certain other countries.
The Bluetooth word, mark and logos are owned by Bluetooth SIG, Inc.
Aironet, Cisco, Cisco AnyConnect, and IOS are registered trademarks or trademarks of Cisco Systems, Inc. and/or its affiliates in the United States and certain other countries.
Dell Technologies, Dell, SecurID, and other trademarks are trademarks of Dell Inc. or its subsidiaries.
F5 is a trademark of F5 Networks, Inc. in the U.S. and in certain other countries.
Google, Android, Chrome, Chromebook, Chromium, Crashlytics, Firebase, Gmail, Google Analytics, Google Assistant, Google Chrome, Google Mail, Google Maps, Google Mobile, Google Play, Google Safe Browsing, Google SafeSearch, Google Translate, Nexus, SPDY, and YouTube are trademarks of Google LLC.
HTC is a trademark of HTC Corporation.
HUAWEI and EMUI are trademarks of Huawei Technologies Co., Ltd.
IBM and Maas360 are trademarks of International Business Machines Corporation, registered in many jurisdictions worldwide.
Juniper Networks, Juniper, and JUNOS are trademarks or registered trademarks of Juniper Networks, Inc. in the United States and other countries.
Microsoft, Active Directory, ActiveSync, Forefront, Microsoft Intune, Tahoma, Windows, Windows Mobile and Windows Phone are trademarks of the Microsoft group of companies.
MOTOROLA and the Stylized M Logo are trademarks or registered trademarks of Motorola Trademark Holdings, LLC.
Mozilla and Firefox are trademarks of the Mozilla Foundation in the U.S. and other countries.
OPPO is a trademark or registered trademark of Guangdong OPPO Mobile Telecommunications Co., Ltd.
Oracle, JavaScript are registered trademarks of Oracle and/or its affiliates.
The BlackBerry trademark is owned by Research In Motion Limited and is registered in the United States and may be pending or registered in other countries.
Samsung is a trademark of SAMSUNG in the United States or other countries.
SonicWALL, Aventail, and SonicWALL Mobile Connect are trademarks of SonicWall, Inc.
SOTI and MobiControl are registered trademarks of SOTI Inc. in the United States and in other jurisdictions.
Symantec is a trademark or registered trademark of Symantec Corporation or its affiliates in the U.S. and other countries.
Symbian trademark is owned by the Symbian Foundation Ltd.
AirWatch, VMware, and VMware Workspace ONE are registered trademarks or trademarks of VMware, Inc. in the United States and/or other jurisdictions.
Page top