Kaspersky Next Pro View
- Kaspersky Next help
- What's new
- About Kaspersky Next
- Quick Start Guide
- Getting started with Kaspersky Next
- Kaspersky Next Management Console
- Initial setup of Kaspersky Next
- Interface of Kaspersky Next Management Console
- Deployment of security applications
- Upgrading Kaspersky Next
- Managing user accounts
- Managing devices
- Viewing the list of devices
- About device statuses
- Viewing the properties of a device
- Connecting devices running Windows, macOS, and Linux
- Renaming devices
- Assigning the owner of a device running Windows, macOS, or Linux
- Scenario: Creating, renewing, and uploading an APNs certificate
- Connecting mobile devices
- Sending commands to users' devices
- Deleting devices from the list of devices
- Starting and stopping anti-malware database updates and malware scans
- Updating the security application on devices running Windows, macOS, and Linux
- Managing device protection
- Managing security profiles
- About security profiles
- Viewing the list of security profiles
- Creating a security profile
- Editing a security profile
- Switching between security profile modes
- Assigning a security profile to a user or group of users
- Copying a security profile
- Exporting and importing security profiles
- Resetting a security profile
- Deleting a security profile
- Configuring device protection
- Configuring updates of anti-malware databases
- Configuring a malware scan
- Managing security profiles
- Endpoint Detection and Response
- About Endpoint Detection and Response
- About Indicators of Compromise
- Starting the use of Endpoint Detection and Response
- Scenario: Configuring and using Endpoint Detection and Response
- Configuring IoC scans for potential threats
- Configuring execution prevention
- Viewing information about Endpoint Detection and Response alerts
- Taking manual response measures
- Canceling network isolation of a Windows device
- Exporting information about Endpoint Detection and Response alerts
- Disabling Endpoint Detection and Response
- Root-Cause Analysis
- Adaptive Anomaly Control
- Data Discovery
- About Data Discovery
- Categories of information detected by Data Discovery
- Starting the use of Data Discovery
- Connecting a Microsoft 365 organization to your workspace
- Viewing information about Data Discovery detections
- Example of analyzing a Data Discovery detection
- Exporting information about Data Discovery detections
- Disabling Data Discovery
- Cloud Discovery
- About Cloud Discovery
- Starting the use of Cloud Discovery
- Enabling and disabling Cloud Discovery in security profiles
- Viewing information about the use of cloud services
- Risk level of a cloud service
- Blocking access to unwanted cloud services
- Enabling and disabling the monitoring of internet connections on Windows devices
- Vulnerability Assessment and Patch Management
- Encryption Management
- Performing typical tasks
- Reports on device protection
- List of reports on device protection
- Protection status report
- Threats report
- Status of anti-malware database updates report
- Network attacks report
- Vulnerabilities report
- Cloud Discovery reports
- Adaptive Anomaly Control reports
- Detections by Device Control component report
- Detections by Web Control component report
- Encryption status of devices report
- Kaspersky applications versions report
- Working with reports
- Configuring regular delivery of reports by email
- List of reports on device protection
- Viewing the event log and configuring event notifications
- Managing objects in Quarantine
- Kaspersky Security Network
- About Kaspersky Security Network
- Exchanging information with Kaspersky Security Network
- Enabling the use of Kaspersky Security Network in Kaspersky Next
- Accepting terms and conditions of a KSN Statement
- Declining terms and conditions of a KSN Statement
- Disabling the use of Kaspersky Security Network in Kaspersky Next
- Kaspersky Business Hub
- About Kaspersky Business Hub
- Managing the list of companies on Kaspersky Business Hub
- Viewing the list of companies on Kaspersky Business Hub
- Viewing aggregated protection statistics
- Adding a new company to Kaspersky Business Hub
- Adding another workspace for a company registered on Kaspersky Business Hub
- Editing company information
- Deleting the workspace of a company
- Canceling deletion of a company workspace
- Viewing news and sending feedback
- Managing the list of licenses on Kaspersky Business Hub
- Taking cybersecurity training
- Selecting the data centers used to store Kaspersky Next information
- Resetting your password
- Editing the settings of an account in Kaspersky Business Hub
- Quick Start Guide for Managed Service Providers (MSPs)
- Kaspersky Next licensing
- Contact Technical Support
- Sources of information about the application
- Glossary
- Account on Kaspersky Business Hub
- Administration Server
- Anti-malware databases
- Apple Push Notification service (APNs) certificate
- Background scan
- Certificate Signing Request
- Compliance control
- Device owner
- File Threat Protection
- Host Intrusion Prevention (Application Privilege Control)
- iOS MDM device
- iOS MDM Server
- Kaspersky Business Hub
- Kaspersky Next Management Console
- Kaspersky Security Network (KSN)
- Mail Threat Protection
- Malicious web addresses
- Malware
- Managed device
- Network Agent
- Network Threat Protection
- Patch
- Phishing
- Proxy server
- Quarantine
- Security application
- Security profile
- Supervised device
- Trusted device
- Trusted Platform Module (TPM)
- Trusted zone
- Update importance level
- User alias
- Vulnerability
- Vulnerability severity level
- Web Threat Protection
- Windows device name
- Workspace
- Information about third-party code
- Trademark notices
Example of analyzing a Data Discovery detection
This section contains an example of a Data Discovery detection and how you can analyze and process it.
Let's consider that you open the Data Discovery widget (see the figure below) and see a file that is accessible to everyone (the value in the Access type column is Public).
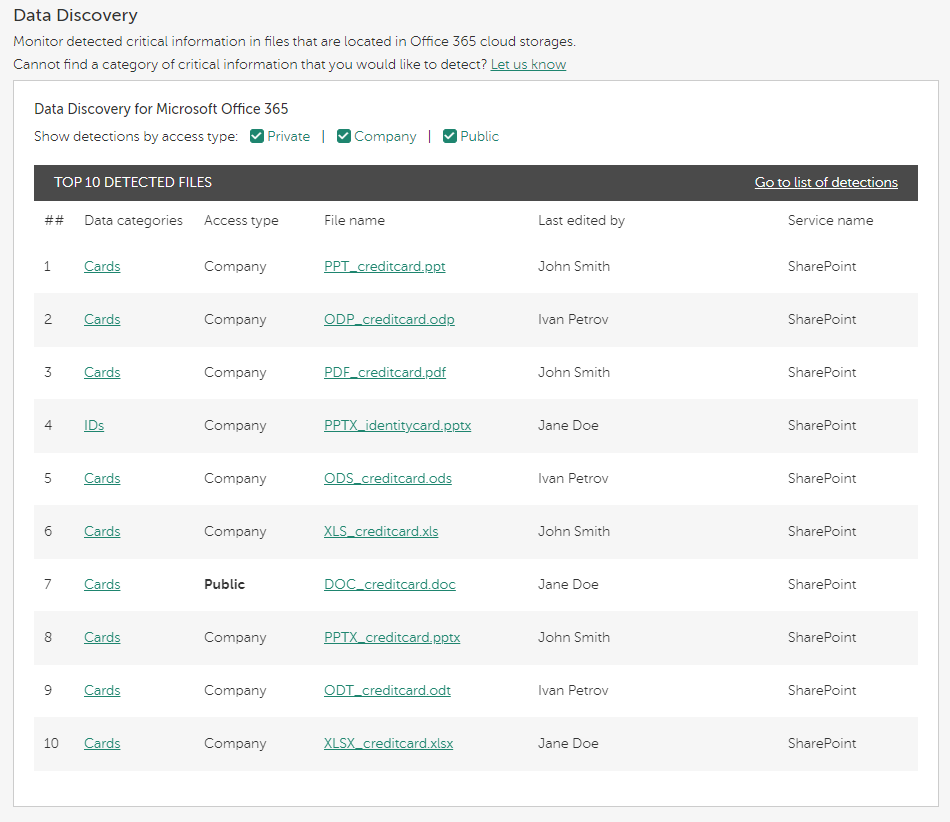
Data Discovery widget with a file that is accessible to everyone
From the value in the Data categories column, you conclude that the file contains credit card details. The value in the Last edited by column most often shows the user who configured the accessibility of the file.
By clicking the link in the Data categories or File name column, you can view detailed information about the detected file (see the figure below).
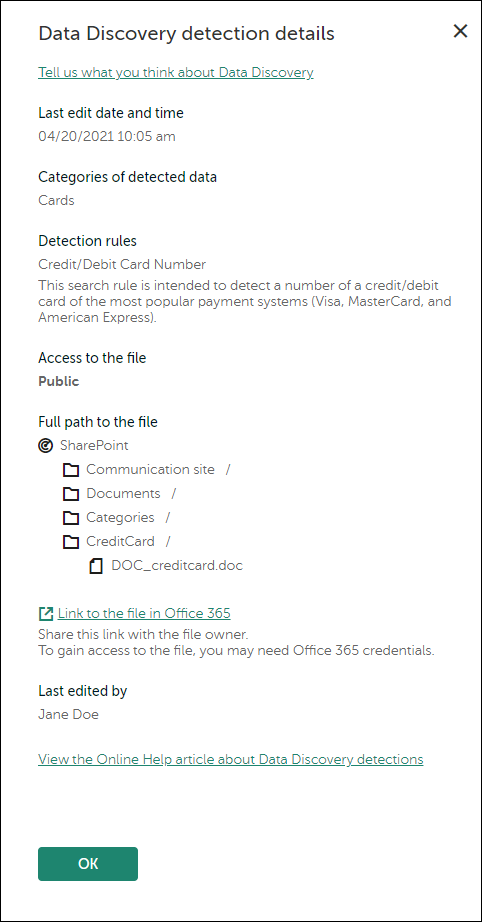
Data Discovery detection details
You can copy either the direct link to the file (Link to the file in Microsoft 365) or the structure of the path to it (under Full path to the file).
Then you can address the user directly, show him or her the file, and explain that making a file with personal details accessible to everyone may lead to a data breach. Then, you can ask the user to reduce the file audience to the user himself or herself.
Some time later, after the user follows your advice, you can open the Data Discovery table, apply the filters (if necessary), and see the same document that is accessible only to its owner (see the figure below).
Data Discovery table with applied filters