Contents
- Kaspersky Security Integrations for MSP
- Kaspersky Security Plug-in for ConnectWise Automate
- Kaspersky Security Plug-in for ConnectWise Automate
- Deployment schemas of Kaspersky Security Plug-in for ConnectWise Automate
- Installing and removing Kaspersky Security Plug-in for ConnectWise Automate
- Getting started with Kaspersky Security Plug-in for ConnectWise Automate
- Connecting to Kaspersky Lab products
- Viewing information on Kaspersky dashboard
- Running Kaspersky Lab management commands
- Monitoring and alerting
- Deploying Kaspersky products from the Control Center
- Plug-in modifications to ConnectWise Automate configuration
- Enabling and disabling tracing
- Glossary
- Contact Technical Support
- AO Kaspersky Lab
- Information about third-party code
- Trademark notices
- Kaspersky Security Integration with ConnectWise Manage
- Kaspersky Security Integration with ConnectWise Manage
- Deployment schemas of Kaspersky Security Integration with ConnectWise Manage
- Integration scenario
- Installing and removing Kaspersky Security Integration with ConnectWise Manage
- Updating Kaspersky Security Integration with ConnectWise Manage
- Interface of Kaspersky Security Integration with ConnectWise Manage
- Getting started
- Managing integrations
- Configuring integration in Kaspersky Security Integration with ConnectWise Manage
- Managing administrators
- Enabling and disabling tracing
- Reporting
- Custom fields in ConnectWise Manage
- Glossary
- Contact Technical Support
- AO Kaspersky Lab
- Information about third-party code
- Trademark notices
- Kaspersky Security Integration with Autotask
- Kaspersky Security Integration with Autotask
- Deployment schemas of Kaspersky Security Integration with Autotask
- Integration scenario
- Installing and removing Kaspersky Security Integration with Autotask
- Updating Kaspersky Security Integration with Autotask
- Interface of Kaspersky Security Integration with Autotask
- Getting started
- Managing integrations
- Configuring integration in Kaspersky Security Integration with Autotask
- Managing administrators
- Enabling and disabling tracing
- Reporting
- User-defined fields in Autotask
- Contact Technical Support
- AO Kaspersky Lab
- Information about third-party code
- Trademark notices
- Kaspersky Security Integration with Tigerpaw
- Kaspersky Security Integration with Tigerpaw
- Integration scenario
- Installing and removing Kaspersky Security Integration with Tigerpaw
- Interface of Kaspersky Security Integration with Tigerpaw
- Getting started
- Managing integrations
- Configuring integration in Kaspersky Security Integration with Tigerpaw
- Managing administrators
- Enabling and disabling tracing
- Custom fields in Tigerpaw
- Contact Technical Support
- AO Kaspersky Lab
- Information about third-party code
- Trademark notices
- Kaspersky Security Plug-in for ConnectWise Automate
Kaspersky Security Integrations for MSP
Kaspersky Security Plug-in for ConnectWise Automate
Kaspersky Security Integration with ConnectWise Manage
Kaspersky Security Integration with Autotask
Kaspersky Security Integration with Tigerpaw
Page top
Kaspersky Security Plug-in for ConnectWise Automate
This section describes the purpose, functions, and distribution kit of Kaspersky Security Plug-in for ConnectWise Automate, and provides hardware and software requirements for Kaspersky Security Plug-in for ConnectWise Automate.
About Kaspersky Security Plug-in for ConnectWise Automate
Kaspersky Security Plug-in for ConnectWise Automate is used to integrate Kaspersky Lab products into your ConnectWise Automate Control Center to provide a powerful combination of monitoring and management tools, high performance, and protection technologies. The Plug-in allows you to monitor and manage the state of all Kaspersky Lab products installed at your clients’ locations by means of one convenient tool—so multiple software products are not needed.
Kaspersky Endpoint Security products provide enterprise-class protection services and, when integrated with ConnectWise Automate Control Center by means of Kaspersky Security Plug-in for ConnectWise Automate, help to boost the efficiency of your protection monitoring and management.
ConnectWise Automate administrators can use Kaspersky Security Plug-in for ConnectWise Automate to install Kaspersky Endpoint Security and Kaspersky Network Agent remotely, monitor and manage different security aspects of computers in the client's corporate network, and initiate virus scanning and anti-virus database update tasks on the client computers. Security incident data is received and can be used to generate tickets and alerts or perform specific actions.
Kaspersky Security Plug-in for ConnectWise Automate significantly enhances the administrator's ability to provide and manage protection for the client computers.
About data provision
Kaspersky Security Plug-in for ConnectWise Automate is designed for integration of Kaspersky Lab solutions for administration of security applications with ConnectWise Automate within the framework of the functionality described in this Help document.
To use Kaspersky Security Plug-in for ConnectWise Automate, you must install the integration components and connect them to the Kaspersky Lab solution you use, create an integration with ConnectWise Automate, specify connection parameters and integration settings and select your customers’ virtual servers / workspaces for the integration.
By using the product, you agree that the said product may receive data from ConnectWise Automate and the connected virtual servers / workspaces, as well as store, process, and display information that is intended for ensuring the product functionality.
By creating an integration and connecting ConnectWise Automate and virtual servers / workspaces to the product, you thus confirm that you are the sole owner of any data you provide or that you are entitled to provide any data.
Any information provided is protected and processed in accordance with the Kaspersky Lab Privacy Policy.
For the purpose of integration of Kaspersky Security Center / Kaspersky Endpoint Security Cloud and ConnectWise Automate, Kaspersky Security Plug-in for ConnectWise Automate may receive, store, and process the following types of data:
- Data required to connect to the integrated software:
- Parameters for connecting to Kaspersky Security Center Administration Server, including an account.
- Account for connecting to Kaspersky Endpoint Security Cloud.
- Data about Kaspersky Security Center / Kaspersky Endpoint Security Cloud events and about facts that computers managed by Kaspersky Security Center / Kaspersky Endpoint Security Cloud are set the Critical and Warning statuses. This data is required for automatic creation of tickets or similar entities.
- Data about licenses used at Kaspersky Security Center virtual servers / Kaspersky Endpoint Security Cloud workspaces and about attributes of these licenses. This data is displayed in reports and on dashboards in ConnectWise Automate.
- Data about the protection status of computers managed by Kaspersky Security Center / Kaspersky Endpoint Security Cloud (the computer name, the protection status, the detailed description of the status, the number of viruses found, the last scan date and time, and the last anti-virus database update date and time) and data about events. This data is displayed on dashboards in ConnectWise Automate.
- Integration settings:
- Type of integrated platform (ConnectWise Automate).
- Set of integrated virtual servers / workspaces.
- List of Kaspersky Endpoint Security Cloud administrators (their aliases and email addresses) who are also granted administrative privileges in the integration.
For integrations with Kaspersky Endpoint Security Cloud, the received data may be stored and processed within the Kaspersky Endpoint Security Cloud infrastructure according to the Kaspersky Endpoint Security Cloud data provision. For details, refer to section "About data provision" in Kaspersky Endpoint Security Cloud Online Help.
All received data is used by the MSP administrators and technicians. Kaspersky Lab Technical Support specialists may also use the above data when an MSP administrator contacts Technical Support.
Page top
Features of Kaspersky Security Plug-in for ConnectWise Automate
Kaspersky Security Plug-in for ConnectWise Automate provides the following features.
Protection monitoring
Kaspersky Lab monitors for ConnectWise Automate are designed specifically to react to any security issues that may occur on protected computers. The monitors perform appropriate actions depending on the issue type: raise alerts, create tickets, and automatically run virus scans and update commands for the anti-virus database. The monitoring feature of Kaspersky Security Plug-in for ConnectWise Automate automates most routine tasks, allowing you to focus on activities that are most critical and valuable for your business.
Ticketing
With the help of Kaspersky Security Plug-in for ConnectWise Automate, Kaspersky Lab products can be integrated directly into the ConnectWise Automate ticketing system to create tickets on the basis of the security issues.
Simplified protection management
Integration with Kaspersky Lab products allows you to manage everyday tasks through a single, easy-to-use dashboard embedded in ConnectWise Automate. Management features include on-demand endpoint scans and virus signature database updates.
Remote deployment
Integration with Kaspersky Lab products includes a script that easily enables silent and remote installation of Kaspersky Network Agents and Kaspersky Endpoint Security directly from ConnectWise Automate.
Centralized dashboard
Kaspersky Lab's powerful and easy-to-use dashboard, integrated into ConnectWise Automate, gives managed service providers (MSPs) an overview of all aspects of their clients’ security. You can briefly view the protection status in high-level diagrams, where important issues are highlighted, and then proceed to more detailed views of events and full information about protected computers. Thus, you can start solving problems immediately. Also, the dashboard provides the information about all license keys added to Kaspersky Security Center Administration Servers or Kaspersky Endpoint Security Cloud workspaces.
Compatibility
Kaspersky Lab products can be integrated with both installed and cloud versions of ConnectWise Automate. Kaspersky Security Plug-in for ConnectWise Automate also supports Multivendor Antivirus Dashboard, so that you are able to use this convenient tool to monitor and manage the state of Kaspersky Lab products installed on your client companies’ workstations or Windows servers.
Distribution kit
Kaspersky Security Plug-in for ConnectWise Automate is delivered as a free plug-in, which you can unpack and install on the computer that has ConnectWise Automate Control Center installed.
You can download the plug-in from the Kaspersky Lab website or from ConnectWise Automate Solution Center.
Page top
Software and hardware requirements
Software requirements:
- Kaspersky Security Center 10 Service Pack 2 Maintenance Release 1 and later or Kaspersky Endpoint Security Cloud.
- ConnectWise Automate 10.5, 11, and 12.
Kaspersky Security Plug-in for ConnectWise Automate Maintenance Release 2.1 or later is required for successful integration with ConnectWise Automate 12. Earlier versions of Kaspersky Security Plug-in are not compatible with ConnectWise Automate 12.
- Supported operating systems are the same as those supported by ConnectWise Automate Agent. Refer to ConnectWise Automate documentation for details.
Recommended hardware:
- The recommended minimum screen resolution for work with Kaspersky Security Plug-in for ConnectWise Automate is 1280x1024 or 1366x768, as the minimum window size is 1240x700.
Deployment schemas of Kaspersky Security Plug-in for ConnectWise Automate
Kaspersky Security Plug-in for ConnectWise Automate is used to integrate Kaspersky Lab products with ConnectWise Automate Control Center. The Plug-in allows you to monitor and manage the state of all Kaspersky Lab products installed at your clients’ locations by means of one convenient tool—so multiple software products are not needed.
The deployment schema that suits your integration depends on the Kaspersky Lab solution you use and on your integration model. There are three deployment schemas:
- For an on-premises version of a Kaspersky Lab solution—Kaspersky Security Center.
- For an on-premises version of a Kaspersky Lab solution—Kaspersky Security Center with slave Administration Servers.
- For a cloud-based version of a Kaspersky Lab solution—Kaspersky Endpoint Security Cloud.
This section describes the deployment schemas in detail.
Deployment schema for on-premises solution
Deploy Kaspersky Security Plug-in for ConnectWise Automate based on this schema if you use an on-premises version of a Kaspersky Lab solution—Kaspersky Security Center—and if you do not have slave Administration Servers in your managed company infrastructure.
The components of Kaspersky Security Plug-in for ConnectWise Automate are shown as orange rectangles in the following figure.

Deployment schema for on-premises solution
The following list describes deployment sequence and data flow:
- First, Kaspersky Security Plug-in for ConnectWise Automate is installed on the computer where ConnectWise Automate Server is installed.
- Then the computers managed by ConnectWise Automate, and with Kaspersky Security Center Administration Server installed, are detected and Kaspersky Security Plug-in for ConnectWise Automate is installed on those computers.
- ConnectWise Automate Server exchanges data with the computers that have ConnectWise Automate Agents installed.
- Kaspersky Security Center Administration Server exchanges data with client computers that have Kaspersky Lab programs installed. These computers are considered managed if they have only Network Agent installed, or protected if they have Kaspersky Endpoint Security installed.
Deployment schema for on-premises solution and slave servers
Deploy Kaspersky Security Plug-in for ConnectWise Automate based on this schema if you use an on-premises version of a Kaspersky Lab solution—Kaspersky Security Center—and if you use slave Administration Servers in your managed company infrastructure.
The components of Kaspersky Security Plug-in for ConnectWise Automate are shown as orange rectangles in the following figure.
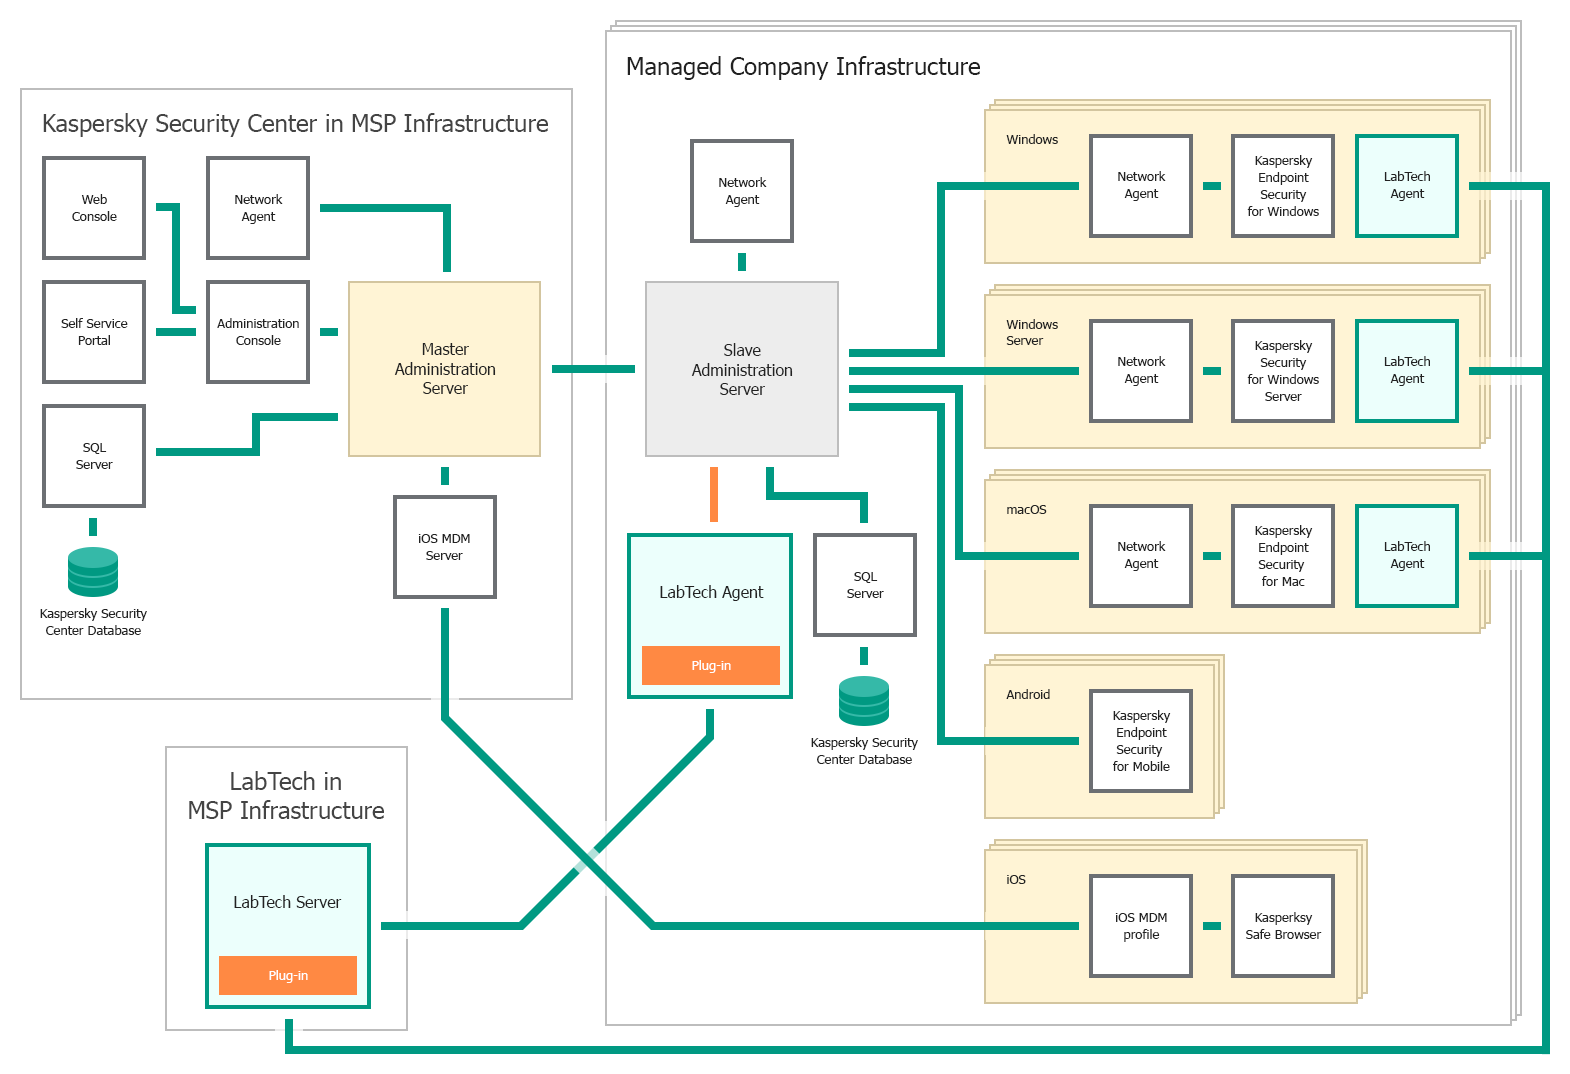
Deployment schema for on-premises solution and slave servers
The following list describes deployment prerequisites, deployment sequence, and data flow:
- One or more Administration Servers are used in the client's infrastructure. These Administration Servers are slave Administration Servers relative to the Administration Server that is installed in the MSP infrastructure. The Administration Server that is installed in the MSP infrastructure is the master Administration Server. You can use this type of deployment to decrease load on your master Administration Server.
- First, Kaspersky Security Plug-in for ConnectWise Automate is installed on the computer where ConnectWise Automate Server is installed.
- Then the computers managed by ConnectWise Automate, and with Kaspersky Security Center Administration Server installed, are detected and Kaspersky Security Plug-in for ConnectWise Automate is installed on those computers.
- ConnectWise Automate Server exchanges data with the computers that have ConnectWise Automate Agents installed.
- Kaspersky Security Center Administration Server exchanges data with client computers that have Kaspersky Lab programs installed. These computers are considered managed if they have only Network Agent installed, or protected if they have Kaspersky Endpoint Security installed.
Deployment schema for cloud-based solution
Deploy Kaspersky Security Plug-in for ConnectWise Automate based on this schema if you use the cloud-based version of a Kaspersky Lab solution—Kaspersky Endpoint Security Cloud.
The components of Kaspersky Security Plug-in for ConnectWise Automate are shown as orange rectangles in the following figure.
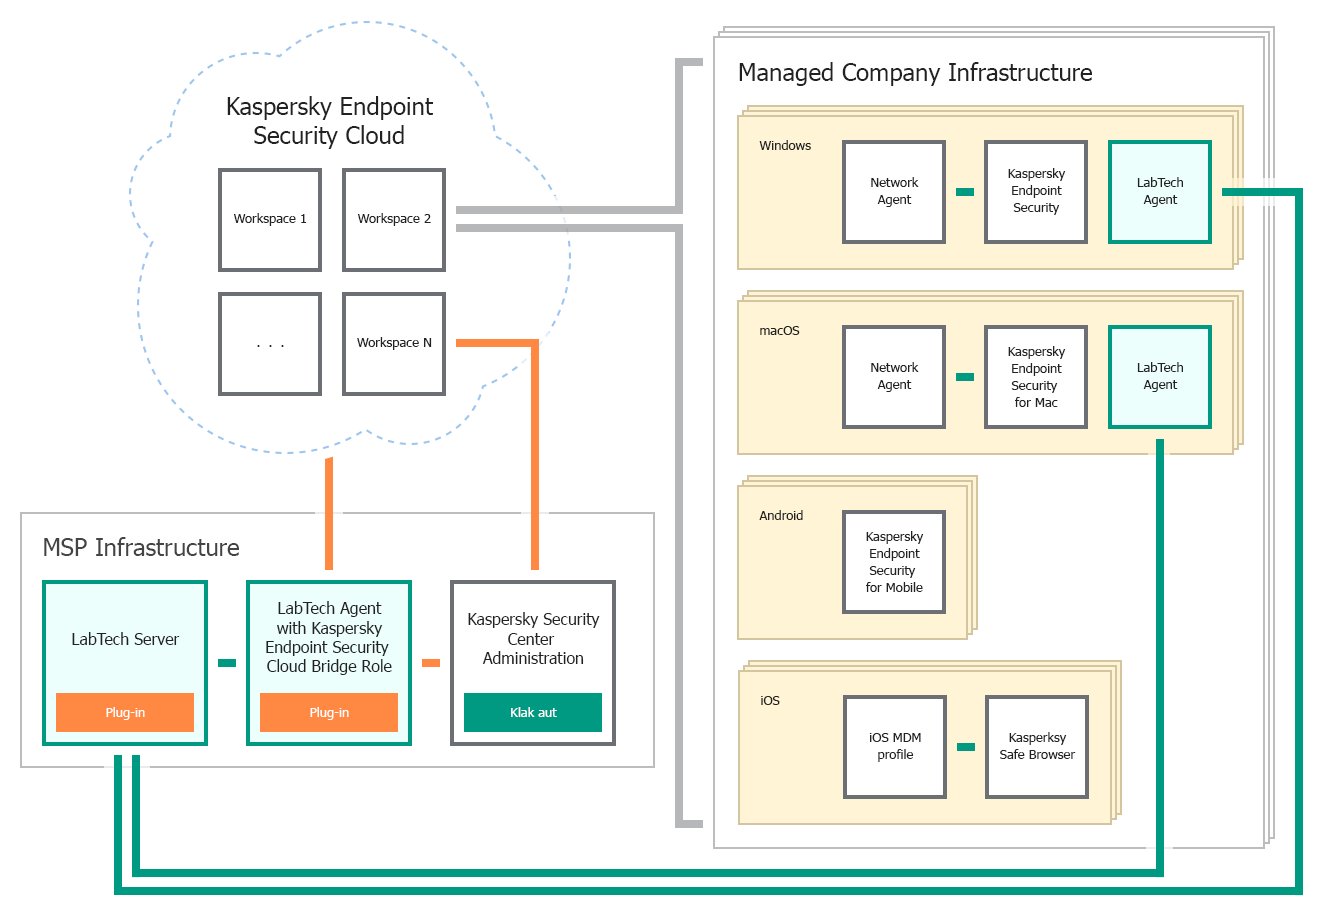
Deployment schema for cloud-based solution
The following list describes deployment prerequisites, deployment sequence, and data flow:
- First, Kaspersky Security Plug-in for ConnectWise Automate is installed on the computer, where ConnectWise Automate Server is installed.
- Kaspersky Security Plug-in for ConnectWise Automate is installed on a computer that has ConnectWise Automate Server installed and the "Cloud Bridge" role assigned. The "Cloud Bridge" role indicates that this computer interacts with Kaspersky Endpoint Security Cloud and connects ConnectWise Automate and Kaspersky Endpoint Security Cloud like a bridge.
- ConnectWise Automate Server exchanges data with the computers that have ConnectWise Automate Agents installed.
- Data from Kaspersky Endpoint Security Cloud workspaces is transferred to Kaspersky Security Plug-in for ConnectWise Automate and ConnectWise Automate through the "Cloud Bridge" computer.
Installing and removing Kaspersky Security Plug-in for ConnectWise Automate
Kaspersky Security Plug-in for ConnectWise Automate is delivered as a plug-in, which you unpack and install on the computer that has ConnectWise Automate Control Center installed.
This section contains step-by-step instructions for Kaspersky Security Plug-in for ConnectWise Automate installation, update, and removal.
Installing Kaspersky Security Plug-in for ConnectWise Automate
To successfully install Kaspersky Security Plug-in for ConnectWise Automate, download and save the latest version of Kaspersky Security Plug-in for ConnectWise Automate from the Kaspersky Lab website.
Before you install Kaspersky Security Plug-in for ConnectWise Automate, it is strongly recommended to check its digital signature, to make sure that the Plug-in is issued by Kaspersky Lab.
To check the Kaspersky Security Plug-in for ConnectWise Automate digital signature:
- Locate the KasperskyPlugin.dll file, which you downloaded from the Kaspersky Lab website.
- Right-click the KasperskyPlugin.dll file and select Properties.
- In the Properties window that opens, click the Digital Signatures tab and check that the KasperskyPlugin.dll file has Kaspersky Lab signatures.
- Close the Properties window.
After you download and check the digital signature of Kaspersky Security Plug-in for ConnectWise Automate, use ConnectWise Automate Plugin Manager to install Kaspersky Security Plug-in for ConnectWise Automate.
To install Kaspersky Security Plug-in for ConnectWise Automate:
- Open ConnectWise Automate Control Center and on the main menu bar select Help → Plugin Manager.
- In the Plugin Manager window that opens, select Advanced → Manage Plugins → Add Plugin.
- In the window that opens, locate the Plug-in file and click Open.
- In the Add a Plugin dialog box, do the following:
- Specify the Plug-in settings.
- Make sure that the Remote Agent check box is cleared.
If the Remote Agent check box is selected, the Plug-in is installed on all the computers on the network, including those on which Kaspersky Lab products are not installed. This causes an additional load on ConnectWise Automate.
- Click the Save and Close button.
The Plug-in is added to the Disabled Plugins list in ConnectWise Automate Plugin Manager.
- In the Plugin Manager window, click the Refresh button.
The list of installed plug-ins is updated and now contains Kaspersky Security Plug-in for ConnectWise Automate.
- Enable Kaspersky Security Plug-in for ConnectWise Automate:
- In the list of plug-ins, right-click Kaspersky Security Plug-in for ConnectWise Automate and select Enable.
- From the Advanced drop-down list, select Reload Plugins → Reload DBAgent Plugins.
- Close the Plugin Manager window. If you are prompted, click OK.
- Restart ConnectWise Automate Control Center. The new Plug-in is downloaded.
The Kaspersky icon is displayed on the ConnectWise Automate Control Center toolbar. Click this icon to open the Kaspersky Security Plug-in for ConnectWise Automate dashboard.
Updating Kaspersky Security Plug-in for ConnectWise Automate
If an earlier version of Kaspersky Security Plug-in for ConnectWise Automate is already installed, you can upgrade it to the latest version. For this purpose, download and save the latest version of Kaspersky Security Plug-in for ConnectWise Automate from the Kaspersky Lab website, and then use ConnectWise Automate Plugin Manager to update to the latest version.
Before you use the new version of Kaspersky Security Plug-in for ConnectWise Automate, it is strongly recommended to check its digital signature, to make sure that the Plug-in is issued by Kaspersky Lab.
To check the Kaspersky Security Plug-in for ConnectWise Automate digital signature:
- Locate the KasperskyPlugin.dll file, which you downloaded from the Kaspersky Lab website.
- Right-click the KasperskyPlugin.dll file and select Properties.
- In the Properties window that opens, click the Digital Signatures tab and check that the KasperskyPlugin.dll file has Kaspersky Lab signatures.
- Close the Properties window.
After you download and check the digital signature of Kaspersky Security Plug-in for ConnectWise Automate, use ConnectWise Automate Plugin Manager to update Kaspersky Security Plug-in for ConnectWise Automate.
To update Kaspersky Security Plug-in for ConnectWise Automate:
- Open ConnectWise Automate Control Center.
- On the ConnectWise Automate Control Center main menu bar, select Help → Plugin Manager.
- In the Plugin Manager window that opens, in the list of plug-ins select Kaspersky Security Plug-in for ConnectWise Automate.
- In the Plugin Manager window, on the menu bar select Advanced → Manage Plugins → Update Plugin.
- In the window that opens, locate the Plug-in file and click Open.
The Plug-in update starts automatically. After the Plug-in is updated, you are notified that the process is complete.
Removing Kaspersky Security Plug-in for ConnectWise Automate
You can remove Kaspersky Security Plug-in for ConnectWise Automate by means of ConnectWise Automate Plugin Manager.
To remove Kaspersky Security Plug-in for ConnectWise Automate:
- Open ConnectWise Automate Control Center.
- On the ConnectWise Automate Control Center main menu bar, select Help → Plugin Manager.
- In the Plugin Manager window that opens, select Kaspersky Security Plug-in for ConnectWise Automate.
- In the Plugin Manager window, on the menu bar select Advanced → Manage Plugins → Remove Plugin.
- A message appears, confirming removal of the Plug-in.
Kaspersky Security Plug-in for ConnectWise Automate is removed.
After Kaspersky Security Plug-in for ConnectWise Automate is removed, all modifications that the Plug-in made to the initial ConnectWise Automate configuration remain in the system. That is, all the scripts, roles, monitors, and other items are still available, as well as any database tables added by the Plug-in. The process of complete removal of the Plug-in and all its items is described in the Knowledge Base. The SQL scripts for removing all Plug-in components are provided as well.
If tracing is enabled, the trace files are not removed from the temporary folders on the ConnectWise Automate server, computers that have ConnectWise Automate Control Center installed, or Automate Agents. You can manually remove them later from the following folder: %windir%\temp\KasperskyPluginLogs\.
Getting started with Kaspersky Security Plug-in for ConnectWise Automate
After you install Kaspersky Security Plug-in for ConnectWise Automate, you must perform additional configuration in ConnectWise Automate Control Center to be able to use the Plug-in with your Kaspersky Lab product.
This section describes the actions that you must perform when getting started with Kaspersky Security Plug-in for ConnectWise Automate. The actions depend on the Kaspersky Lab product you use. Refer to one of the following sections to get started with Kaspersky Security Plug-in for ConnectWise Automate.
Prerequisites
When configuring integration, you must specify the parameters of the Kaspersky Lab solution you integrate with: Kaspersky Security Center parameters or Kaspersky Endpoint Security Cloud parameters. It is recommended that you check these parameters in advance in order to prepare for setting up integration.
Kaspersky Security Center parameters
Check the following parameters:
- Address of the computer on which Kaspersky Security Center Administration Server is installed.
- Credentials: user name and password for the computer on which Administration Server is installed.
- If you establish connection to the Administration Server through a proxy server, check the proxy server parameters: network address or domain name and credentials for the proxy server.
Kaspersky Endpoint Security Cloud parameters
Check the credentials of your Kaspersky Endpoint Security Cloud account: email address and password.
Additional prerequisites
During the integration process, it is required to add Kaspersky Endpoint Security Cloud workspaces to your integration. Prior to integration, you must create workspaces and distribute computers of client companies between these workspaces.
If you use Kaspersky Security Center, creation of virtual servers is optional.
Page top
Getting started if Kaspersky Security Center Administration Server is used
After you install Kaspersky Security Plug-in for ConnectWise Automate, deploy it on the computers where Kaspersky Security Center Administration Server is installed.
Kaspersky Security Plug-in for ConnectWise Automate adds new role detection rules to the ConnectWise Automate database. The new roles are Kaspersky Security Administration Server and Kaspersky Security Network Agent. These roles are used by the Plug-in to automatically detect the Administration Server computers, and the client computers, managed by the Administration Server. The Plug-in is then deployed on computers that have Administration Server installed. However, role detection and Plug-in deployment occur not immediately but instead during the scheduled synchronization procedure. You can force the process of role detection and Plug-in deployment manually using the tools provided by ConnectWise Automate.
You can perform the Plug-in deployment procedure at any level: for a client, a location, or an individual computer. When you deploy the Plug-in for a higher level, it is deployed for all sublevels as well. For example, when you deploy the Plug-in for a location, it is deployed for all the computers at this location that have Kaspersky Security Center installed.
To get started using the Plug-in:
- In the ConnectWise Automate navigation tree, use the context menu to execute the Commands → Inventory → Update Config command for all Kaspersky Security Center Administration Servers and computers, managed by the Administration Servers, or for the computers' parent client or location.
When you execute the command for a client or location, the command is applied to all the computers under this client or location. As a result, the configuration of the selected computers is updated and includes new Plug-in role definitions.
- Also in the ConnectWise Automate navigation tree, use the context menu to execute the Commands → Inventory → Resend System Info command for all Administration Servers and computers, managed by the Administration Servers, or for the computers' parent client or location.
As a result, the Automate Agents on the selected computers send the updated system information, including information on the detected roles, to the ConnectWise Automate server.
Getting started if Kaspersky Endpoint Security Cloud is used
After you install Kaspersky Security Plug-in for ConnectWise Automate, it must be integrated with Kaspersky Endpoint Security Cloud.
The integration process consists of the following phases:
- Creating a new integration or editing an existing one. At this phase, you create an integration and add workspaces and administrators to this integration, or edit the list of workspaces and administrators of an existing integration. Adding workspaces to an integration is required to get information on computers and events from these workspaces. Adding administrators is required to allow these administrators to manage the workspaces and integration itself.
- Assigning the "bridge" role to the computer. This role indicates that this computer interacts with Kaspersky Endpoint Security Cloud and connects ConnectWise Automate and Kaspersky Endpoint Security Cloud like a bridge.
- Providing the connection settings for the bridge. At this step, you specify the Kaspersky account credentials to be used by the bridge to connect to Kaspersky Endpoint Security Cloud.
Managing integrations
This section describes how to edit or delete an existing integration and how to create a new integration.
Creating a new integration
When you use Kaspersky Security Plug-in for ConnectWise Automate for the first time, you must create an integration between Kaspersky Endpoint Security Cloud and ConnectWise Automate.
Later, you can edit an existing integration, as described in Editing an integration, or create another integration. You may have to create several integrations for load balancing purposes by selecting different workspaces in different integrations, and then assigning the "bridge" role to several computers and connecting each of these computers to different integrations. As a result, the load of interacting with Kaspersky Endpoint Security Cloud is distributed between several computers.
To create an integration:
- Open ConnectWise Automate Control Center and on the toolbar select Dashboard.
- In the System Dashboard window that opens, click the following sequence of tabs: Config → Integration → Kaspersky.
- On the Kaspersky tab, specify the Kaspersky account user name and password that you use to connect to Kaspersky Endpoint Security Cloud:
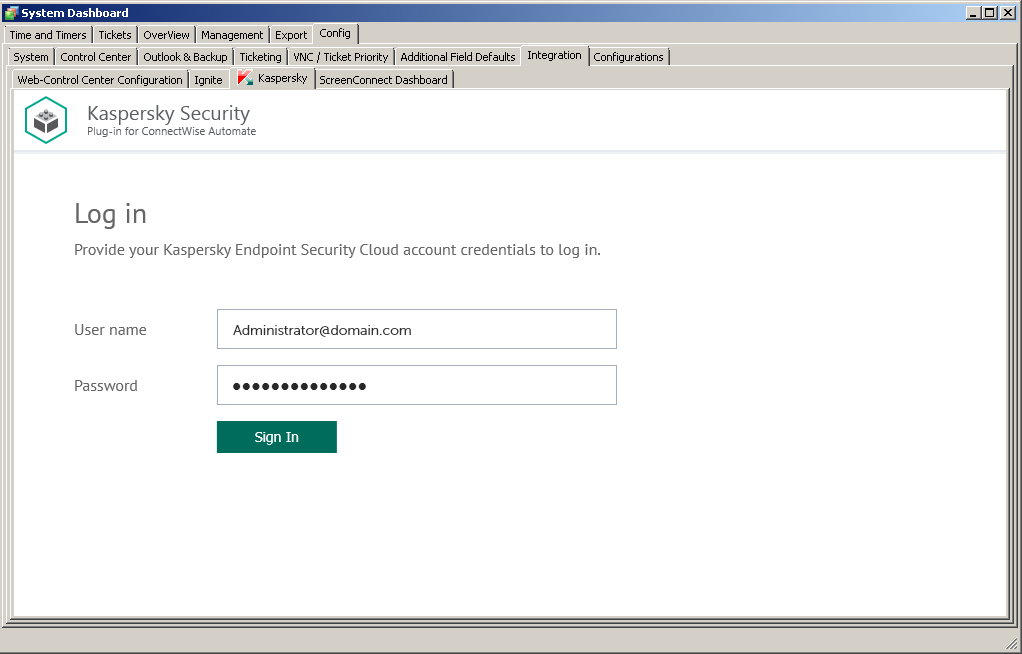
Connecting to Kaspersky Endpoint Security Cloud
- User name—Email address used for your Kaspersky Endpoint Security Cloud account. This field cannot be blank.
- Password—Password to connect to Kaspersky Endpoint Security Cloud. This field cannot be blank.
- Click the Sign in button.
After you connect to Kaspersky Endpoint Security Cloud, the Integration settings section appears.
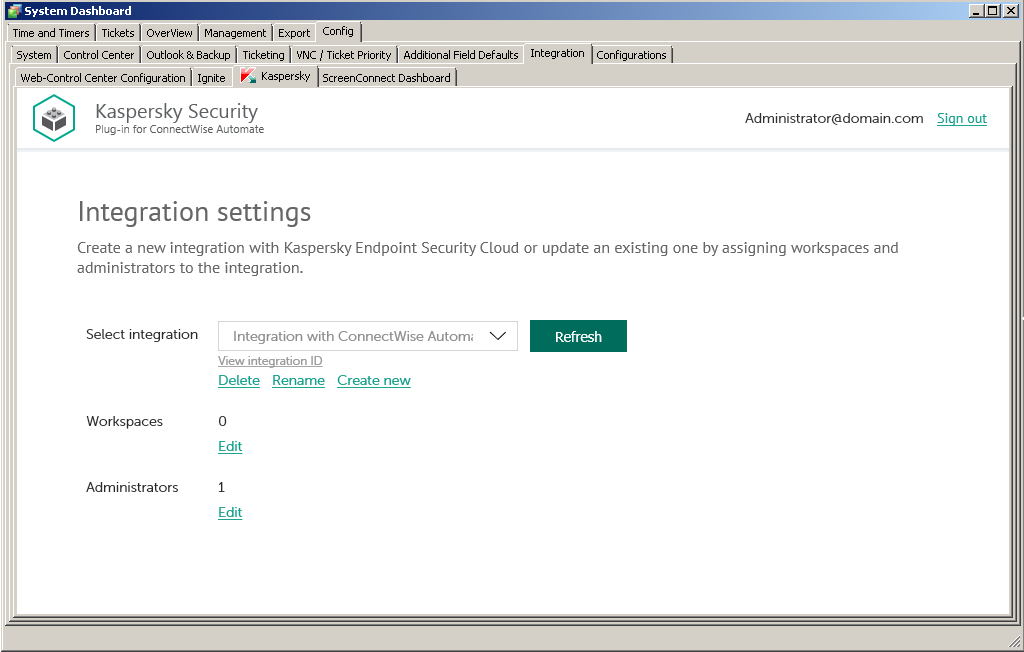
Specifying integration settings
- Click the Create new link.
- Provide the integration name in the dialog box that opens. The Integration name field cannot be blank. By default, the integration name is Integration with ConnectWise Automate.
For an integration with Kaspersky Endpoint Security Cloud, click the View integration ID link under the integration name to view the identifier of the integration. You may have to provide this ID to Kaspersky Lab Technical Support for diagnostics and troubleshooting.
- Specify the following integration settings:
- Workspaces. Select workspaces of your integration. For details, refer to Editing the list of integration workspaces.
- Administrators. Select administrators of your integration. For details, refer to Editing the list of integration administrators.
- To save changes, close the System Dashboard window when you have finished specifying the integration settings.
Kaspersky Endpoint Security Cloud is now integrated with ConnectWise Automate.
Editing an integration
Editing an integration means renaming it or editing the list of workspaces and administrators that are related to the integration, that is, adding or removing workspaces and administrators to / from the integration.
To edit an integration:
- On the Kaspersky tab of ConnectWise Automate Control Center, go to the Integration settings section. For details, refer to Creating a new integration, steps 1–4.
- In the Select integration drop-down list, select the integration that you want to edit.
- If you want to rename the integration, click the Rename link and provide the new integration name in the dialog box that opens. The Integration name field cannot be blank.
For an integration with Kaspersky Endpoint Security Cloud, click the View integration ID link under the integration name to view the identifier of the integration. You may have to provide this ID to Kaspersky Lab Technical Support for diagnostics and troubleshooting.
- If you want to edit the list of workspaces for your integration, refer to Editing the list of integration workspaces.
- If you want to edit the list of administrators for your integration, refer to Editing the list of integration administrators.
- To save changes, close the System Dashboard window when you have finished editing the integration settings.
Kaspersky Endpoint Security Cloud integration with ConnectWise Automate is now updated.
Page top
Editing the list of integration workspaces
When you create or edit an integration with ConnectWise Automate, edit the list of Kaspersky Endpoint Security Cloud workspaces associated with your integration.
When you add workspaces to the integration, information from these workspaces is synchronized between Kaspersky Endpoint Security Cloud and ConnectWise Automate, and ConnectWise Automate gains access to these workspaces. You may also have to remove a client’s workspace from the integration, for example, if your company no longer provides services to this client. After you remove a workspace, information from this workspace is no longer synchronized with ConnectWise Automate, but all integration administrators are able to continue administering this workspace in Kaspersky Endpoint Security Cloud.
Adding workspaces to the integration is required when you create a new integration.
To edit the list of integration workspaces:
- In the Integration settings window that opens after you connect to Kaspersky Endpoint Security Cloud, click the Edit link next to Workspaces.
- In the Select workspaces dialog box, the list of workspaces is displayed. Do one of the following:
- Select the check boxes next to the workspaces that you want to add to the integration.
- Clear the check boxes next to the workspaces that you want to remove from the integration.
- Click OK when you have selected the required workspaces.
The list of workspaces associated with the selected integration is now saved.
Editing the list of integration administrators
When you create or edit an integration with ConnectWise Automate, edit the list of administrators of your integration. You can add integration administrators as well.
When you add administrators to the integration, they have the same rights as existing administrators: they can administer all Kaspersky Endpoint Security Cloud workspaces bound to this integration and manage the integration settings.
When you remove administrators from the integration, they can no longer manage this integration and cannot administer its workspaces. You may have to remove administrators, for example, if they stop working for your company or move to new positions within the company and are no longer allowed to manage integrations.
Adding administrators to the integration is required when you create a new integration.
To add integration administrators:
- In the Integration settings window that opens after you connect to Kaspersky Endpoint Security Cloud, click the Add new link next to Administrators.
- In the Add administrators dialog box that opens, specify the email addresses and aliases associated with the Kaspersky Lab accounts of the users that you want to add as new administrators. You can add several administrators at a time.
- Use a semicolon to separate the email address and alias of an administrator.
- Type the data for each administrator in a new line.
Only users registered in Kaspersky Endpoint Security Cloud can be added to the integration.
- Click Next and check the data that you provided. If everything is correct, click Finish to add the administrators to the integration. If you want to change the information you provided, click Back.
- After you perform all the actions with administrators' accounts, click OK.
- The new administrators are added to the list of administrators of the selected integration.
To remove integration administrators:
- In the Integration settings window that opens after you connect to Kaspersky Endpoint Security Cloud, click the Edit link next to Administrators.
The Select administrators dialog box opens, and names of all the administrators of the selected integration are displayed. The check boxes are selected next to all administrators of the integration.
- To remove one or more administrators from the integration, clear the check boxes next to these administrator names.
- Click OK.
The list of administrators associated with the selected integration is now saved. The removed administrators can no longer administer the workspaces of this integration.
Deleting an existing integration
You can delete an existing integration in the Integration settings section.
When you delete an integration, all workspaces linked to the integration are unbound from the integration and continue to exist in Kaspersky Endpoint Security Cloud. All administrators of the deleted integration receive notifications that the integration was deleted, but they can continue to administer workspaces that were linked to this integration. All workspaces that are unbound from the deleted integration can be added to other integrations.
To delete an integration:
- On the Kaspersky tab of ConnectWise Automate Control Center, go to the Integration settings section. For details, refer to Creating a new integration, steps 1–4.
- In the Select integration drop-down list, select the integration that you want to delete.
- Click Delete.
- Confirm integration deletion in the dialog box.
The integration is deleted.
Page top
Supplementary parameter
The parameter that indicates the type of Kaspersky Endpoint Security Cloud server to which Kaspersky Security Plug-in for ConnectWise Automate connects may be included in the .config file of ConnectWise Automate.
The parameter name is KESCloudServer; its possible values are:
- production—Kaspersky Security Plug-in for ConnectWise Automate works with the Production server.
- beta—Kaspersky Security Plug-in for ConnectWise Automate works with the Beta server.
- test—Kaspersky Security Plug-in for ConnectWise Automate works with the Test server.
You are strongly urged not to modify the KESCloudServer parameter unless you receive clear instructions from Kaspersky Lab.
By default, the KESCloudServer parameter is not displayed in the .config file of ConnectWise Automate.
The KESCloudServer parameter can be specified as follows:
<appSettings>
<add key="KESCloudServer" value="production" />
</appSettings>
Managing the "bridge" role of a computer
When you install Kaspersky Security Plug-in for ConnectWise Automate, a new role definition is added to the ConnectWise Automate configuration. This role definition is Kaspersky Endpoint Security Cloud Bridge. This role shows that a computer with such a role interacts with Kaspersky Endpoint Security Cloud, connecting it to ConnectWise Automate like a bridge.
The computer to be assigned the "bridge" role must meet the following requirements:
- Stable access to the Internet.
- ConnectWise Automate Agent installed.
- Kaspersky Security Center Administration Console installed.
The "bridge" role is assigned to a computer manually. When you assign the "bridge" role to a computer, the computer is authorized to perform requests to Kaspersky Endpoint Security Cloud and return the results to ConnectWise Automate.
You can also remove the "bridge" role from a computer, for example, if you want to assign this role to another computer.
The exact steps required to assign and remove the "bridge" role depend on the ConnectWise Automate version that you use.
If you use ConnectWise Automate 10.5 or 11
To assign the "bridge" role to a computer:
- In the ConnectWise Automate navigation tree, select the computer to which you want to assign the "bridge" role.
- Right-click the selected computer, point to Commands → LabTech, and then click Kaspersky - Assign Kaspersky Endpoint Security Cloud Bridge Role.
Configuration of the selected computer is updated and the "bridge" role is assigned to the computer.
- Double-click the selected computer. The computer management screen opens.
- Click the Detected Roles tab (if you use ConnectWise Automate 10.5), or on the Automation (
 ) tab click the Detected Roles tile (if you use ConnectWise Automate 11), and check that the "bridge" role is present in the list of roles for the selected computer.
To remove the "bridge" role from a computer:
- In the ConnectWise Automate navigation tree, select the computer from which you want to remove the "bridge" role.
- Right-click the selected computer, point to Commands → LabTech, and then click Kaspersky - Remove Kaspersky Endpoint Security Cloud Bridge Role.
Configuration of the selected computer is updated and the "bridge" role is removed from the computer.
- Double-click the selected computer. The computer management screen opens.
- Click the Detected Roles tab (if you use ConnectWise Automate 10.5), or on the Automation () tab click the Detected Roles tile (if you use ConnectWise Automate 11), and check that the "bridge" role is absent in the list of roles for the selected computer.
If you use ConnectWise Automate 12
To assign the "bridge" role to a computer:
- In the ConnectWise Automate 12 browser, select the computer to which you want to assign the "bridge" role.
- Double-click the selected computer. The computer management screen opens.
- On the Automation () tab, click the Detected Roles tile. Click the Add button.
- In the Role Template list, select Kaspersky Endpoint Security Cloud Bridge. Click OK to save the changes.
- In the ConnectWise Automate navigation tree, right-click the computer, point to Commands → Remote Agent, and then click Update Plug-ins.
- On the Automation () tab of the computer management screen, click the Detected Roles tile and check that the "bridge" role is present in the list of roles for the selected computer.
To remove the "bridge" role from a computer:
- In the ConnectWise Automate 12 browser, select the computer from which you want to remove the "bridge" role.
- Double-click the selected computer. The computer management screen opens.
- On the Automation () tab, click the Detected Roles tile.
- Right-click the Kaspersky Endpoint Security Cloud Bridge role, and then click Delete Role. Confirm the action.
- In the ConnectWise Automate navigation tree, right-click the computer, point to Commands → Remote Agent, and then click Update Plug-ins.
- On the Automation () tab of the computer management screen, click the Detected Roles tile and check that the "bridge" role is absent in the list of roles for the selected computer.
Connecting to Kaspersky Lab products
This section describes the Kaspersky tab of the Computer Management screen in ConnectWise Automate Control Center. This section also explains how to use this tab to configure connection between Kaspersky Security for Windows Server 10.1 and the Kaspersky Lab solution you use (Kaspersky Security Center or Kaspersky Endpoint Security Cloud) and how to view information about computers and events.
About the Kaspersky tab
Kaspersky Security Plug-in for ConnectWise Automate adds the Kaspersky tab to the Computer Management screen for computers that have the Kaspersky Security Center Administration Server role or Kaspersky Endpoint Security Cloud Bridge role in ConnectWise Automate. On this tab, you can view and edit connection settings for Kaspersky Security Center Administration Servers or Kaspersky Endpoint Security Cloud integrations. The Kaspersky tab also provides information about the computers managed by the selected Administration Server or retrieved from Kaspersky Endpoint Security Cloud workspaces by the selected bridge and about the events that occurred on those computers.
Click the Kaspersky tab to specify connection settings for the Kaspersky Lab solution you use:
- Kaspersky Security Center Administration Server, if you use an on-premises version of a Kaspersky Lab solution.
- Kaspersky Endpoint Security Cloud integration, if you use the Cloud version of a Kaspersky Lab solution.
The channel of data exchange between ConnectWise Automate Agent and ConnectWise Automate Server must be secure, since it is used for transferring data from Kaspersky Security Center. You may use VPN to ensure that you connection is protected.
The Kaspersky tab is displayed only for computers that have the Kaspersky Security Center Administration Server role or the Kaspersky Endpoint Security Cloud Bridge role in ConnectWise Automate.
The Kaspersky tab of the Computer Management screen has three second-level tabs. In the left vertical pane of the Kaspersky tab, you can shift between these three tabs. By default, the Settings tab is displayed.
- Settings—Click this tab to view and configure the connection settings for the Kaspersky Lab solution you use. The appearance of the Settings tab depends on the Kaspersky Lab solution that is being used.
- Computers—Click this tab to view information about computers managed by the selected Administration Server or retrieved from Kaspersky Endpoint Security Cloud workspaces by the selected bridge.
- Events—Click this tab to view information about events registered on the computers managed by the selected Administration Server or retrieved from Kaspersky Endpoint Security Cloud workspaces by the selected bridge.
Connecting to Kaspersky Security Center Administration Server
After Kaspersky Security Plug-in for ConnectWise Automate is installed, specify the connection settings for all Kaspersky Security Center Administration Servers. Connection settings can be specified in ConnectWise Automate, on the Kaspersky tab of the Computer Management screen for each of the Administration Server computers. Kaspersky Security Plug-in for ConnectWise Automate uses the specified settings to connect to the Administration Servers and receive security information from them. This security information is then displayed on the Kaspersky dashboard.
Use the Settings tab to view and specify the connection settings for Kaspersky Security Center Administration Server.
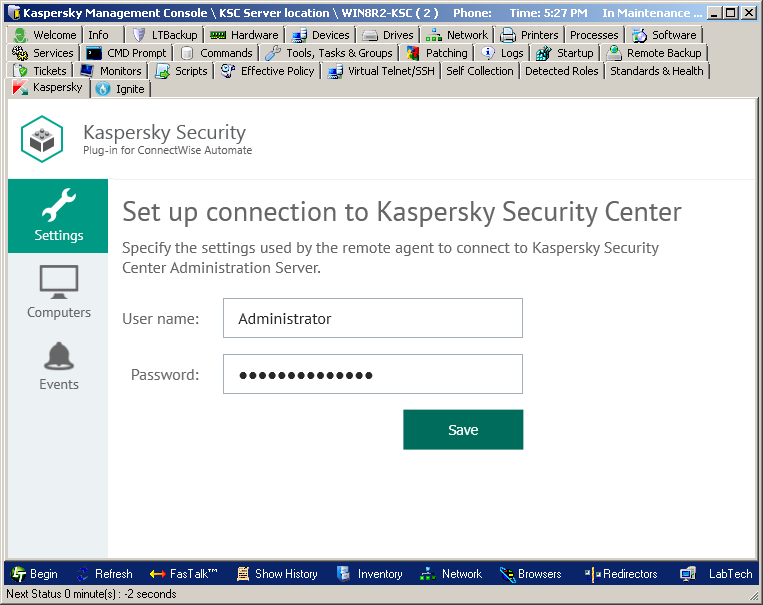
Connecting to Kaspersky Security Center Administration Server
Specify the following settings to connect to Kaspersky Security Center Administration Server:
- User name—User name to connect to Administration Server. This field cannot be blank.
- Password—Password to connect to Administration Server. This field cannot be blank.
If you changed any of the connection settings, click Save for your changes to take effect. The newly specified connection settings are then checked and saved. Usually, establishing a new connection takes several minutes.
The Administration Server connection settings you provided are stored in the ConnectWise Automate server database. The password is stored in encrypted form by Kaspersky Security Plug-in for ConnectWise Automate.
Connecting to Kaspersky Endpoint Security Cloud
After you assign the "bridge" role to the computer (see section Managing the "bridge" role of a computer for details), open the Computer Management screen of this computer and proceed to the Kaspersky tab. On the Kaspersky tab, specify your Kaspersky account credentials to be used by the bridge to connect to Kaspersky Endpoint Security Cloud.
To connect to Kaspersky Endpoint Security Cloud:
- Click the Kaspersky tab of the Computer Management screen.
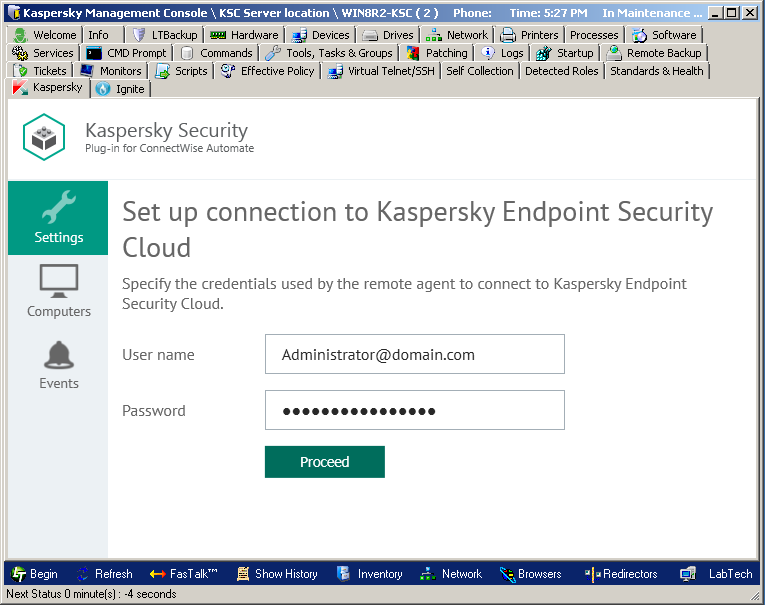
Connecting to Kaspersky Endpoint Security Cloud
- On the Settings tab, specify the following connection settings:
- User name—Email address used for your Kaspersky Endpoint Security Cloud account. This field cannot be blank.
- Password—Password to connect to Kaspersky Endpoint Security Cloud. This field cannot be blank
- Click Proceed to connect to Kaspersky Endpoint Security Cloud using the specified settings.
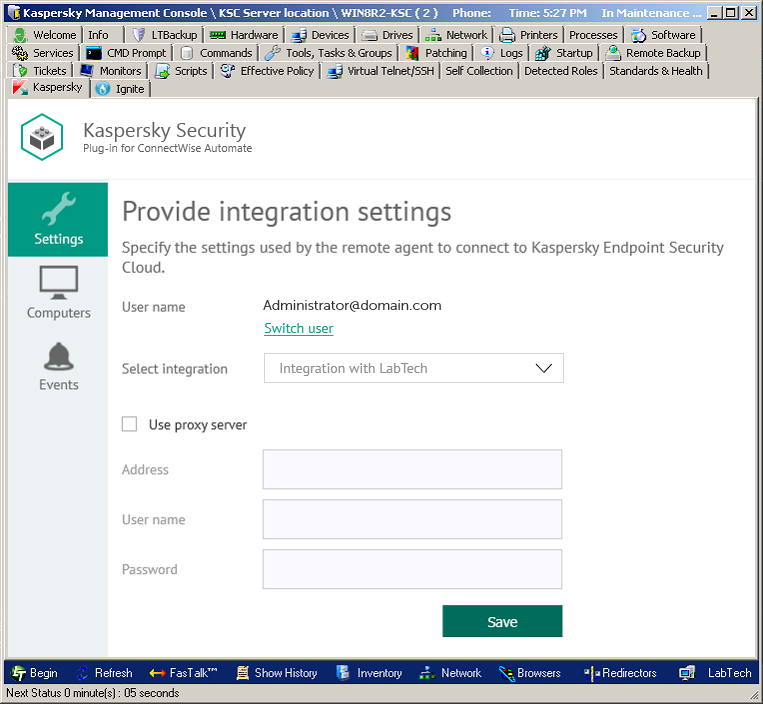
Selecting integration and specifying integration settings
- In the Provide integration settings section that is displayed, select the previously configured integration in the Select Integration drop-down list.
You can view the identifier of your integration by clicking the Integration ID link.
- If you cannot find the required integration in the drop-down list, make sure that the user account provided in step 2 has access to this integration. To change the user specified in step 2 and connect to the integration using other credentials, click Switch user and in the Set up connection to Kaspersky Endpoint Security Cloud section specify the user name and password as instructed in step 2.
- If you want the Kaspersky Endpoint Security Cloud Bridge computer to establish connection through the proxy server, in the Provide integration settings section select the Use proxy server check box and provide the following proxy server settings:
- Address—Network address of the proxy server. Provide the address in the following format: host:port.
- User name—User name to connect to the proxy server
- Password—Password to connect to the proxy server.
- Click Save to save the connection settings you provided.
The system validates the settings. If the settings you provided are correct, connection with Kaspersky Endpoint Security Cloud is established.
Viewing computer information
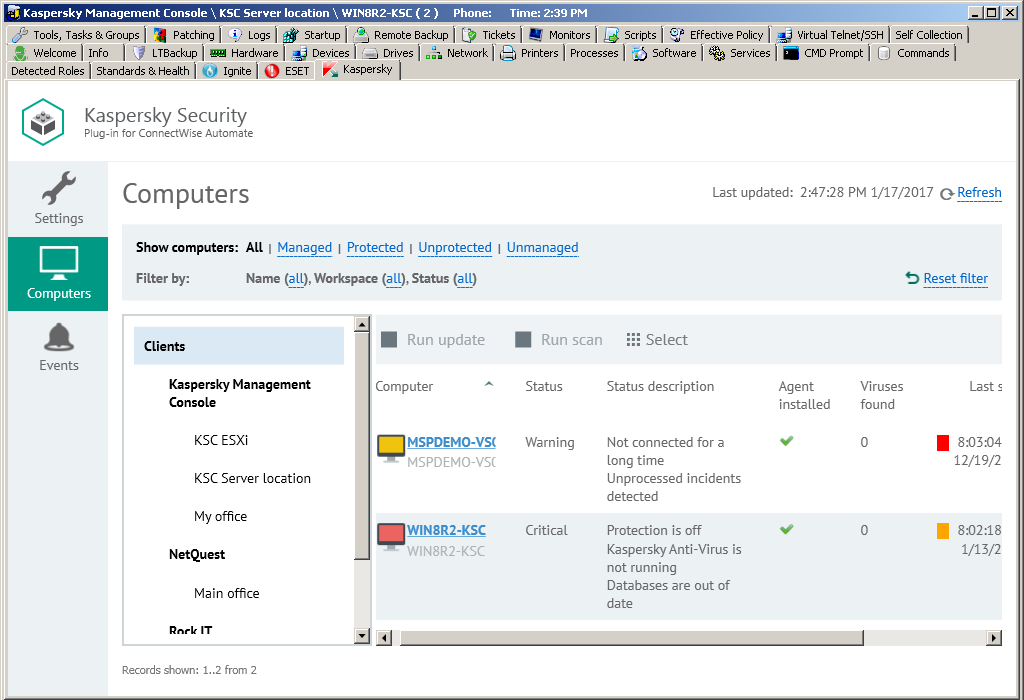
The Computers tab displays a list of computers managed by the selected Administration Server or retrieved from Kaspersky Endpoint Security Cloud workspaces by the selected bridge.
Viewing computer information
Click the Computers tab to view information, provided by the Kaspersky Lab product, about protection of the computers in your network. You can use the left navigation tree and the set of filters to quickly find required computers, for example, those installed in a specific location or with a specific protection status.
Filters in the top pane allow convenient searching of computers. You can filter the computers by protection states, name, and status. To restrict your computer selection and to view only the computers with selected properties, apply several filters at the same time. Every time you open the Computers tab, the previously used filter settings are restored—there is no need to set up filters again.
Use the navigation tree to display the computers of a specific client or location. Do one of the following:
- Click the Clients node to display all the computers managed by the selected Administration Server or received from Kaspersky Endpoint Security Cloud workspaces by the selected "bridge".
- Click the name of a specific client to view the computers of this client that are managed by the selected Administration Server or retrieved from Kaspersky Endpoint Security Cloud workspaces by the selected bridge.
- Click the name of a specific location to view the computers at this location that are managed by the selected Administration Server or retrieved from Kaspersky Endpoint Security Cloud workspaces by the selected bridge.
Information about the computers is displayed as a table. You can sort information in the table by any of the table columns by clicking the column header. For each computer you can find the following information:
- Computer—Name of the computer. The computer name can be different in ConnectWise Automate and in the Kaspersky Lab solution. The computer name for ConnectWise Automate is displayed on the first line of the entry and the name for Kaspersky Security Center or Kaspersky Endpoint Security Cloud on the second line. When you click the computer name, the Computer Management screen of ConnectWise Automate Control Center is displayed for this computer.
- Status—Current protection status of the managed computer. If the computer is not managed by Kaspersky Security Center or Kaspersky Endpoint Security Cloud, this field is blank.
- Status description—Detailed description of the problems detected on the selected computer, if the computer status differs from OK. If the computer is not managed by Kaspersky Security Center or Kaspersky Endpoint Security Cloud, this field is blank.
- Agent installed—Yes, if Kaspersky Security Center Network Agent is installed on the selected computer; otherwise, No.
- Viruses found—Number of viruses found on the selected computer. If the computer is not managed by Kaspersky Security Center or Kaspersky Endpoint Security Cloud, this field is blank.
- Last scan—Date and time when a scan of the selected computer was last performed. If the computer is not managed by Kaspersky Security Center or Kaspersky Endpoint Security Cloud, this field is blank.
- Database issued—Date and time when anti-virus databases on the selected computer were issued. If the computer is not managed by Kaspersky Security Center or Kaspersky Endpoint Security Cloud, this field is blank.
- Last information update—Date and time when information on a computer was last updated in Kaspersky Security Center or Kaspersky Endpoint Security Cloud. If more than five days passed since the date when information on a computer was last updated, this computer is deleted from the ConnectWise Automate database and is no longer displayed in the computer list.
When you select a computer or a group of computers in the table, its properties are displayed in the Statistics and commands pane on the right side of the screen. You can run a virus scan and anti-virus database update task in the Statistics and commands pane for the selected computer or group.
In addition to the properties in the table, the following computer properties and actions are displayed in the Statistics and commands pane:
- Commands—Click one of the links in this group to scan the computer for viruses or update the anti-virus databases on the computer.
- Client—Name of the ConnectWise Automate client that the computer belongs to.
- Location—Name of the ConnectWise Automate location that the computer belongs to.
You can view which problems on the computers require your attention. For this purpose, select the computers you are interested in. The problems detected on these computers are displayed in the Detected problems field in the Statistics and commands pane, accompanied by the total number of computers selected.
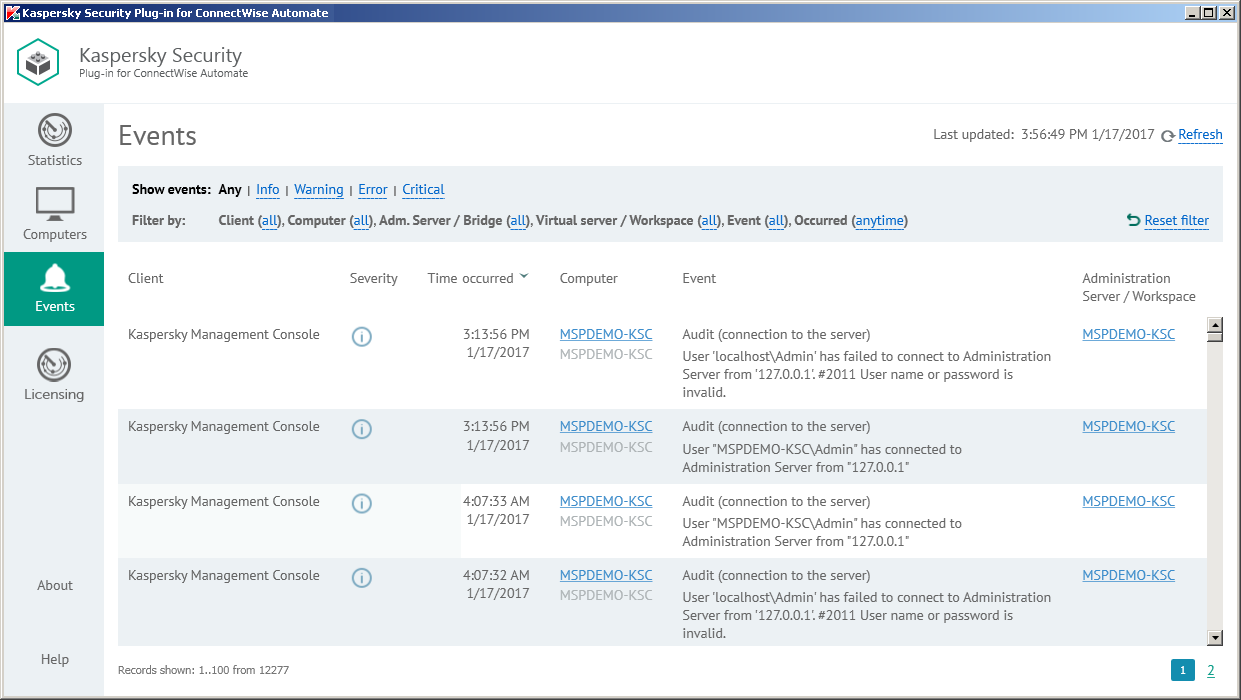
Viewing event information
On the Events tab, a list of events is displayed that occurred on the computers managed by the selected Administration Server or received from Kaspersky Endpoint Security Cloud workspaces by the selected bridge.
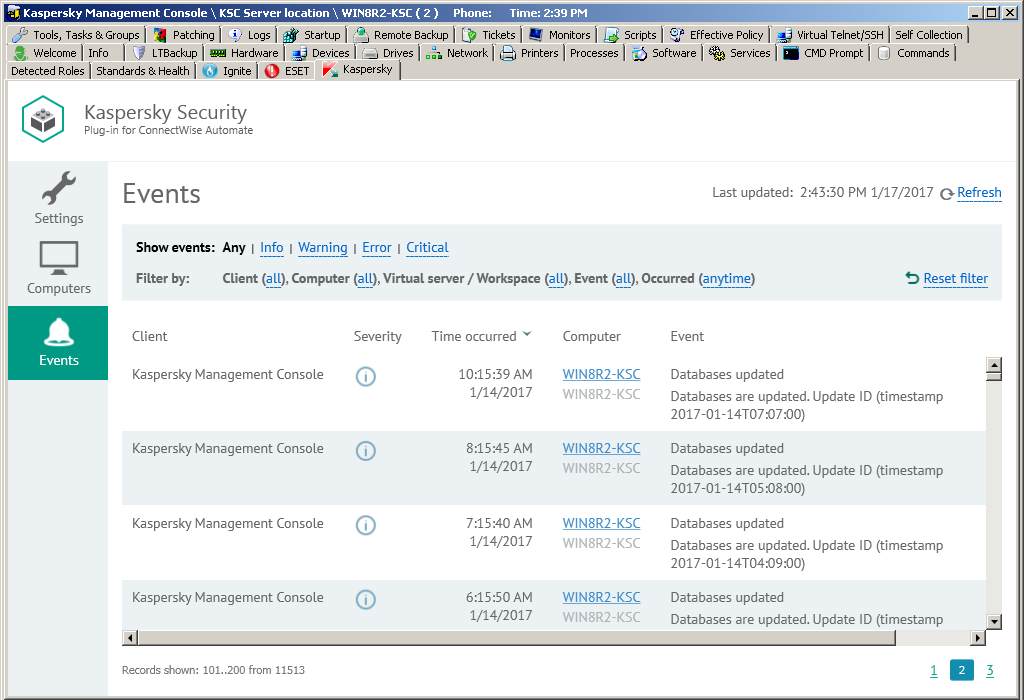
Viewing event information
Click the Events tab to view additional information, obtained from the Kaspersky Lab product, about the security issues detected on a particular computer or group of computers.
In the top pane, you can configure filters to view only the events with selected properties. You can filter events by severity level, client, computer, or time of occurrence. To restrict your event selection and view only those events with selected properties, apply several filters at the same time. Every time you open the Events tab, the previously used filter settings are restored—there is no need to set up filters again.
Information on the events is displayed as a table. You can sort information in the table by any of the table columns by clicking the column header. For each event, you can view the following information:
- Client—Name of a ConnectWise Automate client company. The computer on which the event occurred belongs to this client. This field is applicable if you use Kaspersky Security Center; it is blank if you use Kaspersky Endpoint Security Cloud.
- Severity—Severity level of the event according to Kaspersky Security Center or Kaspersky Endpoint Security Cloud.
- Time occurred—Time when the event occurred.
- Computer—Name of the computer on which the event occurred. The computer name can be different in ConnectWise Automate and in the Kaspersky Lab solution. The computer name for ConnectWise Automate is displayed on the first line of the entry and the name for Kaspersky Security Center or Kaspersky Endpoint Security Cloud on the second line. When you click the computer name, the Computer Management screen of ConnectWise Automate Control Center is displayed for this computer.
- Event—Name and description of the event.
When you select an event in the table, its properties are displayed in the pane on the right side of the screen. In addition to those in the table, the following event properties are displayed:
- Location—Name of the ConnectWise Automate location. The computer on which the event occurred belongs to this location. This field is displayed if you use Kaspersky Security Center; it is not displayed if you use Kaspersky Endpoint Security Cloud.
- Virtual Server—Name of the Kaspersky Security Center virtual server. The computer on which the event occurred is located on this server. This field is displayed if you use Kaspersky Security Center; it is not displayed if you use Kaspersky Endpoint Security Cloud.
- Kaspersky Security Center group—Name of a Kaspersky Security Center group. The computer on which the event occurred belongs to this group. This field is displayed if you use Kaspersky Security Center; it is not displayed if you use Kaspersky Endpoint Security Cloud.
- Application—Name of the application that the event is related to.
- Version—Version the application that the event is related to.
- Task—Name of the task that the event is related to. This field is displayed if you use Kaspersky Security Center; it is not displayed if you use Kaspersky Endpoint Security Cloud.
Viewing information on Kaspersky dashboard
Kaspersky Security Plug-in for ConnectWise Automate adds the Kaspersky icon to the ConnectWise Automate Control Center toolbar. When you click this icon, the Kaspersky Security Plug-in for ConnectWise Automate window opens. This window contains a set of dashboards where you can view Kaspersky Lab-related information about the computers in your network.
When you open the Kaspersky Security Plug-in for ConnectWise Automate window, the Statistics tab is displayed, showing a set of charts with information about the protection status of the computers on the network.
In the left vertical pane of the Kaspersky Security Plug-in for ConnectWise Automate, window you can shift between the following tabs:
- Statistics—Click this tab to view high-level information about computer protection, deployment, and database status in graphical format.
- Computers—Click this tab to view detailed information about the computers.
- Events—Click this tab to view information about events registered by the Kaspersky Lab product that is integrated with ConnectWise Automate.
- Licensing—Click this tab to view information about the Kaspersky Lab keys used by all managed devices on the network.
Viewing protection information
This section describes the Statistics tab and explains how to use it to view aggregated protection information about the computers of all your client companies.
About the Statistics tab
On the Statistics tab, you can view aggregated protection information, represented as a set of charts, about the computers of all your clients. The charts help you to manage the state of your network by allowing you to observe statistical information about the computers. You can monitor protection statuses of computers on the network by viewing information provided by Kaspersky Security Plug-in for ConnectWise Automate. For example, you can immediately detect how many computers on the network are in the critical state or have outdated anti-virus databases.
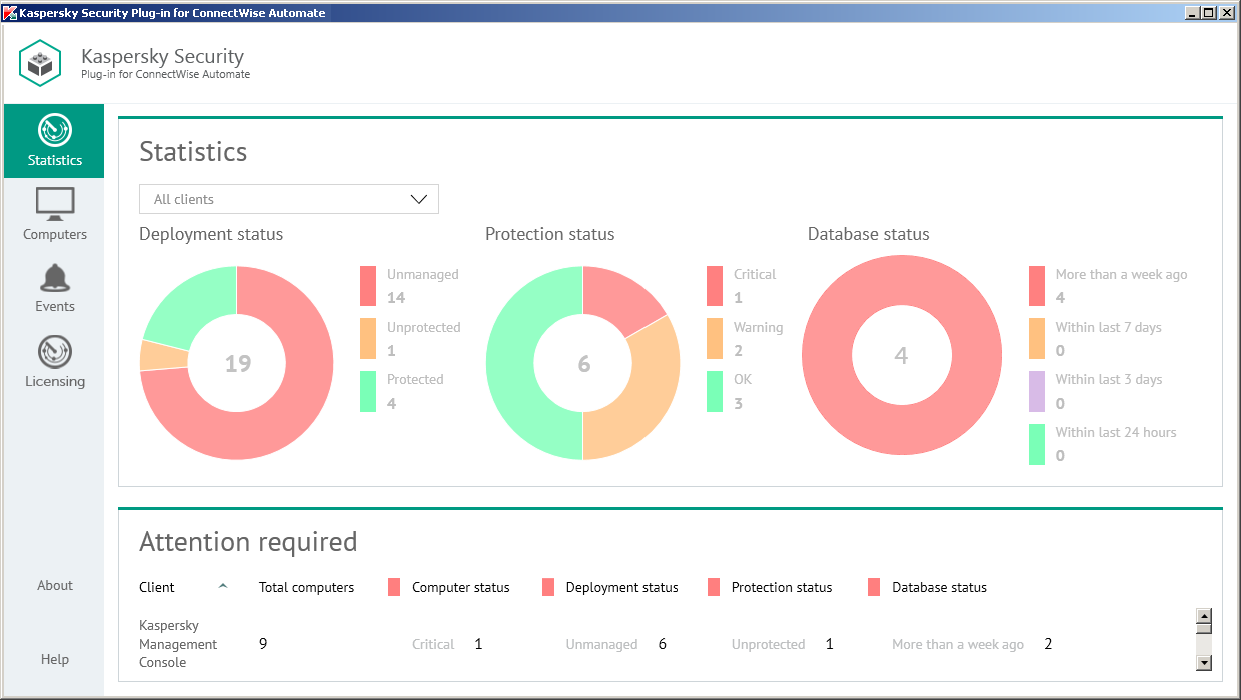
Viewing protection information
The following pie charts provide snapshots of several aspects of computer protection:
You can filter information displayed in the charts by client and location.
To filter information displayed,
In the Clients drop-down list, select a client or location you want to view.
In the Attention required section below the charts, you can also view statistics on clients that have computers requiring your attention. This section shows information on the number of computers on the network of client companies that require your attention. These are the computers with the following statuses:
- Critical protection status.
- Unmanaged and Unprotected deployment status.
- Anti-virus databases were issued more than a week ago database status.
Deployment status chart
The Deployment status chart displays the total number of computers managed by ConnectWise Automate, which have the deployment statuses below.
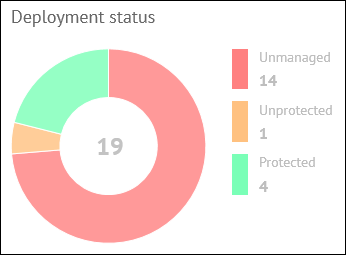
Deployment status chart
- Unmanaged—Kaspersky Security Center Network Agent is not installed (computers are not managed by Kaspersky Security Center or Kaspersky Endpoint Security Cloud).
- Unprotected—Kaspersky Security Center Network Agent is installed (computers are managed by Kaspersky Security Center or Kaspersky Endpoint Security Cloud) but no real-time protection solution by Kaspersky Lab is installed.
- Protected—Both Kaspersky Security Center Network Agent and a real-time protection solution by Kaspersky Lab are installed.
In the middle of the pie chart, the total number of computers is displayed. To the right of the chart, the legend shows details on how many computers, with each status, are on the network.
When you click any deployment status color icon in the chart legend or any chart sector, a window appears, showing details on the computers with the selected deployment status.
The following information is displayed for each computer:
- Computer—Name of the computer. The computer name can be different in ConnectWise Automate and in the Kaspersky Lab solution. The computer name for ConnectWise Automate is displayed above and the name for Kaspersky Security Center or Kaspersky Endpoint Security Cloud is displayed below. When you click the computer name, the Computer Management screen of ConnectWise Automate Control Center is displayed for this computer.
- Client / Location—Name of the ConnectWise Automate client and location that the computer belongs to.
- Workspace—If you use Kaspersky Endpoint Security Cloud, this field shows the name of the workspace to which the selected computer belongs. When you click the workspace name, the corresponding Kaspersky Endpoint Security Cloud workspace opens in your browser window.
Protection status chart
Protection status chart displays the total number of computers, managed by Kaspersky Security Center or Kaspersky Endpoint Security Cloud (depending on the solution you use), which take the following protection statuses: Critical, Warning, or OK.
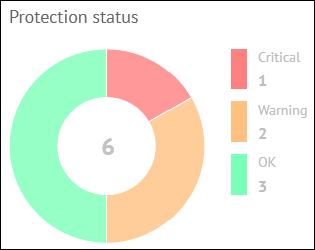
Protection status chart
In the middle of the chart, the total number of managed computers is displayed. To the right of the chart, the legend shows the number of computers with each status. This allows you to instantly know the number of critical or warning computers on the network.
When you click any computer status color icon in the chart legend, or any chart sector, a window appears, showing details on the computers with the selected status.
The following information is displayed for each computer:
- Computer—Name of the computer. The computer name can be different in ConnectWise Automate and in the Kaspersky Lab solution. The computer name for ConnectWise Automate is displayed above and the name for Kaspersky Security Center or Kaspersky Endpoint Security Cloud is displayed below. When you click the computer name, the Computer Management screen of ConnectWise Automate Control Center is displayed for this computer.
- Client / Location—Name of the ConnectWise Automate client and location that the computer belongs to.
- Status description—Detailed description of the problems detected on the computer, if the computer status differs from OK.
- Workspace—If you use Kaspersky Endpoint Security Cloud, this field shows the name of the workspace to which the selected computer belongs. When you click the workspace name, the corresponding Kaspersky Endpoint Security Cloud workspace opens in your browser window.
Database status chart
The Database status chart displays the total number of computers (managed by Kaspersky Security Center or Kaspersky Endpoint Security Cloud) on which a real-time protection solution by Kaspersky Lab is installed, categorized according to the time since the anti-virus databases being used were issued.
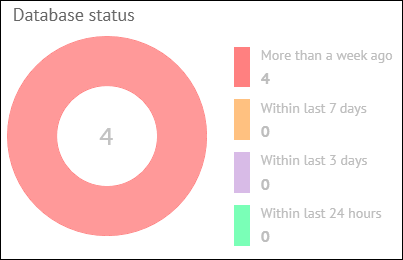
Database status chart
In the middle of the pie chart, the total number of protected computers is displayed. To the right of the chart, the legend shows the number of computers in each group. This allows you to see the number of computers that use anti-virus databases issued a long time ago.
When you click any database status color icon in the chart legend or in any color sector of the pie chart, a window opens showing details about the computers with the selected database status.
The following information is displayed for each computer:
- Computer—Name of the computer. The computer name can be different in ConnectWise Automate and in the Kaspersky Lab solution. The computer name for ConnectWise Automate is displayed above and the name for Kaspersky Security Center or Kaspersky Endpoint Security Cloud is displayed below. When you click the computer name, the Computer Management screen of ConnectWise Automate Control Center is displayed for this computer.
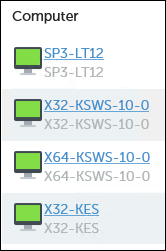
Computer names
- Client / Location—Name of the ConnectWise Automate client and location that the computer belongs to.
- Workspace—If you use Kaspersky Endpoint Security Cloud, this field shows the name of the workspace to which the selected computer belongs. When you click the workspace name, the corresponding Kaspersky Endpoint Security Cloud workspace opens in your browser window.
Viewing computer information
This section describes the Computers tab and explains how to use it to view information about managed computers on your network.
About the Computers tab
The Computers tab displays a list of all computers managed by ConnectWise Automate.
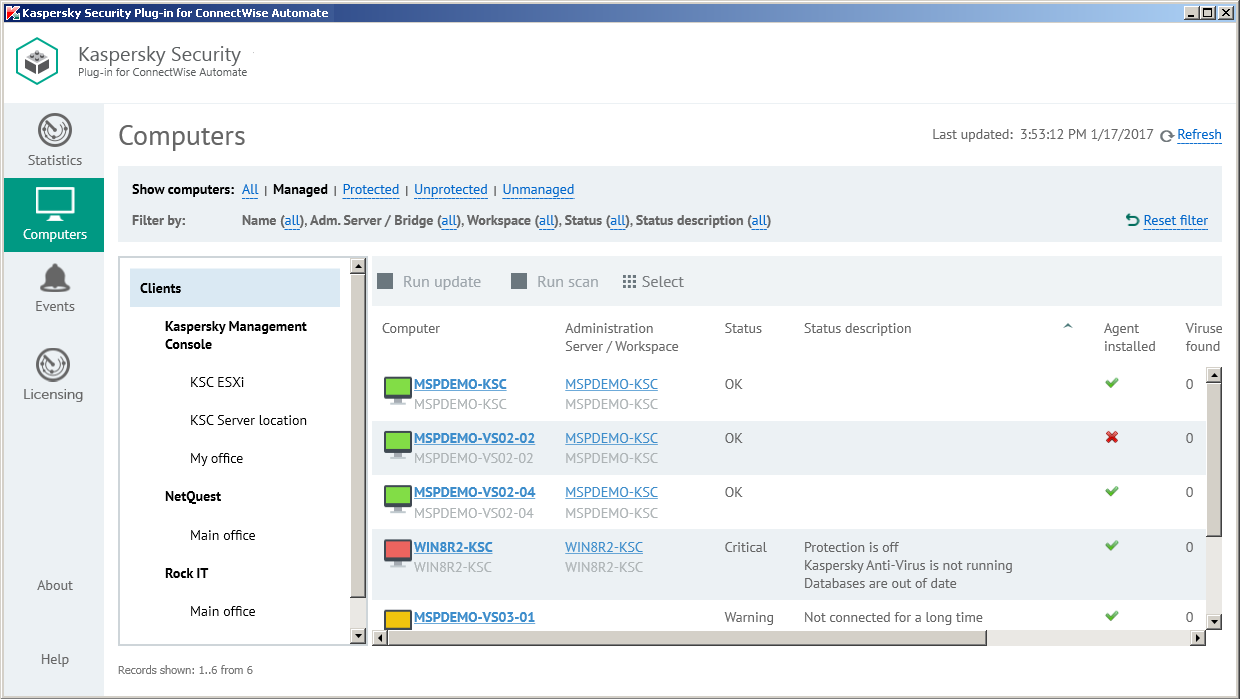
Viewing computer information
Click the Computers tab to view information, provided by the Kaspersky Lab product, about protection of the computers in your network. You can use the left navigation tree and the set of filters to quickly find required computers, for example, those installed in a specific location or with a specific protection status.
Filters in the top pane allow convenient searching of computers. You can filter the computers by management and protection states, name, and status. To restrict your computer selection and to view only the computers with selected properties, apply several filters at the same time. Every time you open the Computers tab, the previously used filter settings are restored—there is no need to set up filters again.
Use the navigation tree to display the computers of a specific client or location. Do one of the following:
- Click the Clients node to display all the computers.
- Click the name of a specific client to display the computers of this client.
- Click the name of a specific location to display the computers in this location.
Information about the computers is displayed as a table. You can sort information in the table by any of the table columns by clicking the column header. For each computer you can find the following information:
- Computer—Name of the computer. The computer name can be different in ConnectWise Automate and in the Kaspersky Lab solution. The computer name for ConnectWise Automate is displayed on the first line of the entry and the name for Kaspersky Security Center or Kaspersky Endpoint Security Cloud on the second line. When you click the computer name, the Computer Management screen of ConnectWise Automate Control Center is displayed for this computer.
- Administration Server / Workspace—The content of this field depends on which Kaspersky Lab product you use:
- If you use Kaspersky Security Center Administration Server, this field shows the computer name of the Administration Server that manages the selected computer. The Administration Server computer name can be different in ConnectWise Automate and in Kaspersky Security Center. The Administration Server computer name for ConnectWise Automate is displayed on the first line of the entry and the name for Kaspersky Security Center on the second line. When you click the computer name, the Computer Management screen of ConnectWise Automate Control Center is displayed for this computer.
- If you use Kaspersky Endpoint Security Cloud, this field shows the name of the workspace to which the selected computer belongs.
- Status—Current protection status of the managed computer. If the computer is not managed by Kaspersky Security Center or Kaspersky Endpoint Security Cloud, this field is blank.
- Status description—Detailed description of the problems detected on the selected computer, if the computer status differs from OK. If the computer is not managed by Kaspersky Security Center or Kaspersky Endpoint Security Cloud, this field is blank.
- Agent installed—Yes, if Kaspersky Security Center Network Agent is installed on the selected computer; otherwise, No.
- Viruses found—Number of viruses found on the selected computer. If the computer is not managed by Kaspersky Security Center or Kaspersky Endpoint Security Cloud, this field is blank.
- Last scan—Date and time when a scan of the selected computer was last performed. If the computer is not managed by Kaspersky Security Center or Kaspersky Endpoint Security Cloud, this field is blank.
- Database issued—Date and time when anti-virus databases on the selected computer were issued. If the computer is not managed by Kaspersky Security Center or Kaspersky Endpoint Security Cloud, this field is blank.
- Last information update—Date and time when information on a computer was last updated in Kaspersky Security Center or Kaspersky Endpoint Security Cloud. If more than five days passed since the date when information on a computer was last updated, this computer is deleted from the ConnectWise Automate database and is no longer displayed in the computer list.
When you select a computer or a group of computers in the table, its properties are displayed in the Statistics and commands pane on the right side of the screen. You can run a virus scan and anti-virus database update task in the Statistics and commands pane for the selected computer or group.
In addition to the properties in the table, the following computer properties and actions are displayed in the Statistics and commands pane:
- Commands—Click one of the links in this group to scan the computer for viruses or update the anti-virus databases on the computer.
- Client—Name of the ConnectWise Automate client that the computer belongs to.
- Location—Name of the ConnectWise Automate location that the computer belongs to.
You can view which problems on the computers require your attention. For this purpose, select the computers you are interested in. The problems detected on these computers are displayed in the Detected problems field in the Statistics and commands pane, accompanied by the total number of computers selected.
Sorting the list of computers
Sorting the list of computers is useful if you want, for example, to view computers with a specific status or computers with the most time since the last virus scan at the top of the list.
You can sort both filtered and unfiltered list of computers.
To sort the list of computers:
- Click the Computers tab.
- Click the name of the column you want to sort by. You can sort by any column of the list.
The list of computers is sorted by the columns you select.
When you click the column name for the first time, the values are sorted in ascending order. When you click the column name again, the values are sorted in descending order. The arrow next to the column name shows the sort direction.
Filtering computers by management and protection status
Filtering the list of computers by management and protection status is useful if, for example, you want to view only computers that are not managed and then move them into Kaspersky Security Center or Kaspersky Endpoint Security Cloud management or if you want to view only computers that are not protected and then install Kaspersky Anti-Virus on them.
To filter the computers by management and protection status:
- Click the Computers tab.
- Click one of the following links in the Show computers section:
Link
Action
All
Displays all the computers managed by ConnectWise Automate.
Managed
Displays the computers on which Network Agent is installed; these computers are managed by Kaspersky Security Center or Kaspersky Endpoint Security Cloud.
Unmanaged
Displays the computers on which Network Agent is not installed; these computers are not managed by Kaspersky Security Center or Kaspersky Endpoint Security Cloud.
Protected
Displays the managed computers on which Kaspersky Anti-Virus is installed.
Unprotected
Displays the managed computers on which Kaspersky Anti-Virus is not installed.
Only the selected computers are displayed.
- Click Reset filter to display all the computers.
Advanced filter of computers
Advanced filter enables you to filter the list of computers and to search for computers that match specific criteria. For example, you can view only computers with a specific name or part of a name, or with a specific protection status.
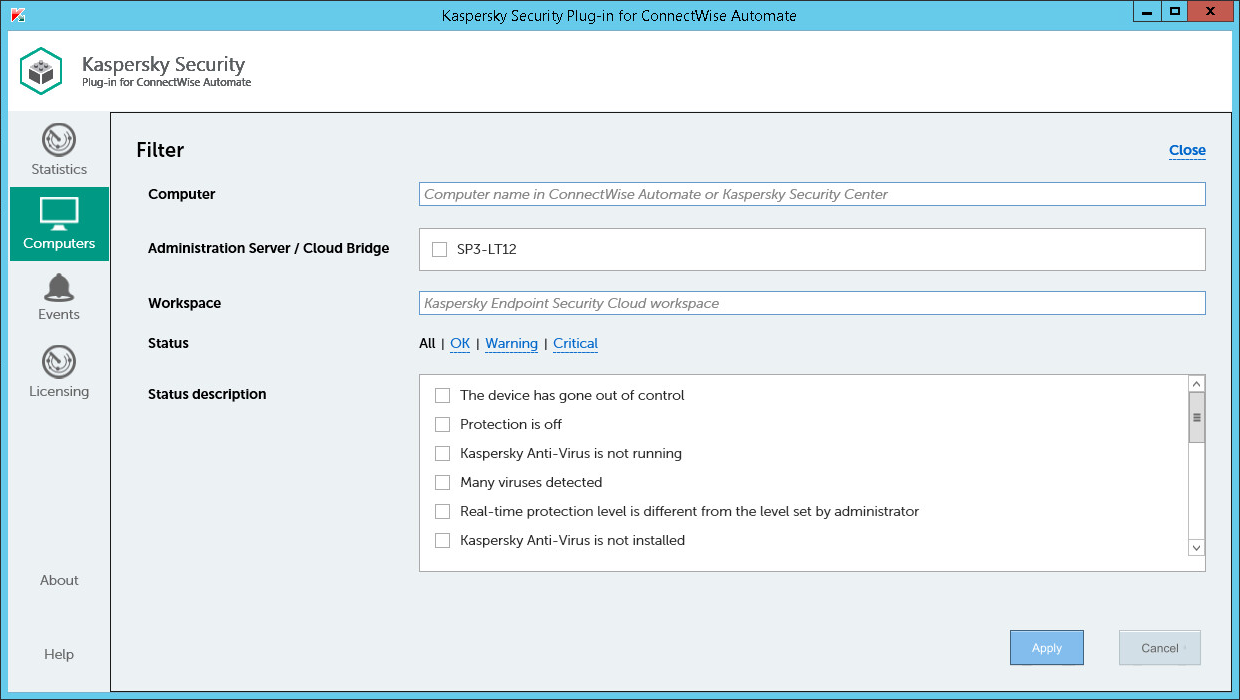
Advanced filter for computers
To apply advanced filter to the list of computers:
- Click the Computers tab.
- Click the value within the parentheses next to one of the field names in the Filter by section.
- In the Filter window specify the following criteria:
Field
How to set up a filter
Computer
To filter the list of computers by name, type any part of the computer name in this field; either the ConnectWise Automate computer name or a computer name in Kaspersky Security Center or Kaspersky Endpoint Security Cloud can be used.
Administration Server / Cloud Bridge
To filter the list of computers by Administration Server (if you use Kaspersky Security Center) or by Cloud Bridge (if you use Kaspersky Endpoint Security Cloud), select the check boxes next to the required Administration Servers or Cloud Bridges.
Workspace
To filter the list of computers by workspace (if you use Kaspersky Endpoint Security Cloud), type any part of the workspace name in this field.
Status
To filter the list of computers by protection status, click the required status. Click All to display the computers with all statuses.
Description
To filter the list of computers by protection status description, select one or more of the standard protection status descriptions.
- Click Apply.
Only the selected computers are displayed.
- On the Computers tab, click Reset filter to display all the computers.
Viewing event information
This section describes the Events tab and explains how to use it to view information about events that occur on managed computers.
About the Events tab
The Events tab displays a list of events that occurred on the managed computers.
Viewing event information
Click the Events tab to view additional information, obtained from the Kaspersky Lab product, about the security issues detected on a particular computer or group of computers.
In the top pane, you can configure filters to view only the events with selected properties. You can filter events by severity level, client, computer, or time of occurrence. To restrict your event selection and view only those events with selected properties, apply several filters at the same time. Every time you open the Events tab, the previously used filter settings are restored—there is no need to set up filters again.
Information on the events is displayed as a table. You can sort information in the table by any of the table columns by clicking the column header. For each event, you can view the following information:
- Client—Name of a ConnectWise Automate client company. The computer on which the event occurred belongs to this client. This field is applicable if you use Kaspersky Security Center; it is blank if you use Kaspersky Endpoint Security Cloud.
- Severity—Severity level of the event according to Kaspersky Security Center or Kaspersky Endpoint Security Cloud.
- Time occurred—Time when the event occurred.
- Computer—Name of the computer on which the event occurred. The computer name can be different in ConnectWise Automate and in the Kaspersky Lab solution. The computer name for ConnectWise Automate is displayed on the first line of the entry and the name for Kaspersky Security Center or Kaspersky Endpoint Security Cloud on the second line. When you click the computer name, the Computer Management screen of ConnectWise Automate Control Center is displayed for this computer.
- Event—Name and description of the event.
- Administration Server / Workspace—The content of this field depends on the Kaspersky Lab product you use:
- If you use Kaspersky Security Center Administration Server, this field shows the computer name of the Administration Server that manages the computer on which the event occurred. The Administration Server computer name can be different in ConnectWise Automate and in Kaspersky Security Center. The Administration Server computer name for ConnectWise Automate is displayed on the first line of the entry and the name for Kaspersky Security Center on the second line. When you click the computer name, the Computer Management screen of ConnectWise Automate Control Center is displayed for this computer.
- If you use Kaspersky Endpoint Security Cloud, this field shows the name of the workspace, to which the computer on which the event occurred belongs.
When you select an event in the table, its properties are displayed in the pane on the right side of the screen. In addition to those in the table, the following event properties are displayed:
- Location—Name of the ConnectWise Automate location. The computer on which the event occurred belongs to this location. This field is displayed if you use Kaspersky Security Center; it is not displayed if you use Kaspersky Endpoint Security Cloud.
- Virtual Server—Name of the Kaspersky Security Center virtual server. The computer on which the event occurred is located on this server. This field is displayed if you use Kaspersky Security Center; it is not displayed if you use Kaspersky Endpoint Security Cloud.
- Kaspersky Security Center group—Name of a Kaspersky Security Center group. The computer on which the event occurred belongs to this group. This field is displayed if you use Kaspersky Security Center; it is not displayed if you use Kaspersky Endpoint Security Cloud.
- Application—Name of the application that the event is related to.
- Version—Version the application that the event is related to.
- Task—Name of the task that the event is related to. This field is displayed if you use Kaspersky Security Center; it is not displayed if you use Kaspersky Endpoint Security Cloud.
Sorting the list of events
Sorting the list of events is useful if, for example, you want to view events that have a specific severity level or that most recently appeared at the top of the list.
You can sort both filtered and unfiltered list of events.
To sort the list of events:
- Click the Events tab.
- Click the name of the column that you want to sort by. You can sort by any column of the list.
The list of events is sorted by the selected columns.
When you click the column name the first time, the values are sorted in ascending order. When you click the column name again, the values are sorted in descending order. The arrow next to the column name shows the sort direction.
Filtering events by severity level
Filtering the list of events by severity level is useful if, for example, you want to view only critical events in order to immediately respond to and solve a problem.
To filter the events by severity level:
- Click the Events tab.
- Click one of the following links in the Show events section:
Link
Action
Any
Displays all the events.
Info
Displays the events with Info severity level.
Warning
Displays the events with Warning severity level.
Error
Displays the events with Error severity level.
Critical
Displays the events with Critical severity level.
Only the events with the selected severity level are displayed.
- Click Reset filter to display all the events.
Advanced filter of events
Advanced filter enables you to filter the list of events and to search for events that match specific criteria. For example, you can view only events that occurred during the last day, or events that occurred on a particular computer, or that occurred at a particular client company.

Advanced filter for events
To apply advanced filter to the list of events:
- Click the Events tab.
- Click the value within the parentheses next to one of the field names in the Filter by section.
- In the Filter window specify the following criteria:
Field
How to set up a filter
Client
To filter the list of events by client, type any part of the client name in this field.
Computer
To filter the list of events by computer name, type any part of the computer name in this field; either the ConnectWise Automate computer name or a computer name in Kaspersky Security Center or Kaspersky Endpoint Security Cloud can be used.
Administration Server / Cloud Bridge
To filter the list of events by Administration Server (if you use Kaspersky Security Center), or by Cloud Bridge (if you use Kaspersky Endpoint Security Cloud), select the check boxes next to the required Administration Servers or Cloud Bridges.
Virtual server / Workspace
To filter the list of events by virtual server (if you use Kaspersky Security Center), or the workspace (if you use Kaspersky Endpoint Security Cloud), type any part of the virtual server or workspace name in this field.
Event name
To filter the list of events by name, type any part of the event name or description in this field.
Occurred
To filter the list of events by occurrence time, click one of the occurrence intervals. Click Anytime to display all the events.
- Click Apply.
Only the selected events are displayed.
- On the Events tab, click Reset filter to display all the events.
Viewing licensing information
This section describes the Licenses tab and explains how to use it to view information about license keys used on devices integrated with ConnectWise Automate.
About the Licensing tab
The Licensing tab displays information on all the keys used on devices—managed by any Administration Server or connected to any Kaspersky Endpoint Security Cloud workspace—that are integrated with ConnectWise Automate.
Key usage statistics are aggregated and displayed on the chart. The chart helps you to find out which keys are used on the managed computers in your network. The chart also helps you to manage the state of licensing on your network by allowing you to check how many of the keys have exceeded limits or are used over 90%. A license key exceeds limits if the number of computers that use the key divided by the number of computers to which the license key can be assigned is greater than 1. A license key is used over 90% if the number of computers that use the key divided by the number of computers to which the license key can be assigned is greater than 0.9.
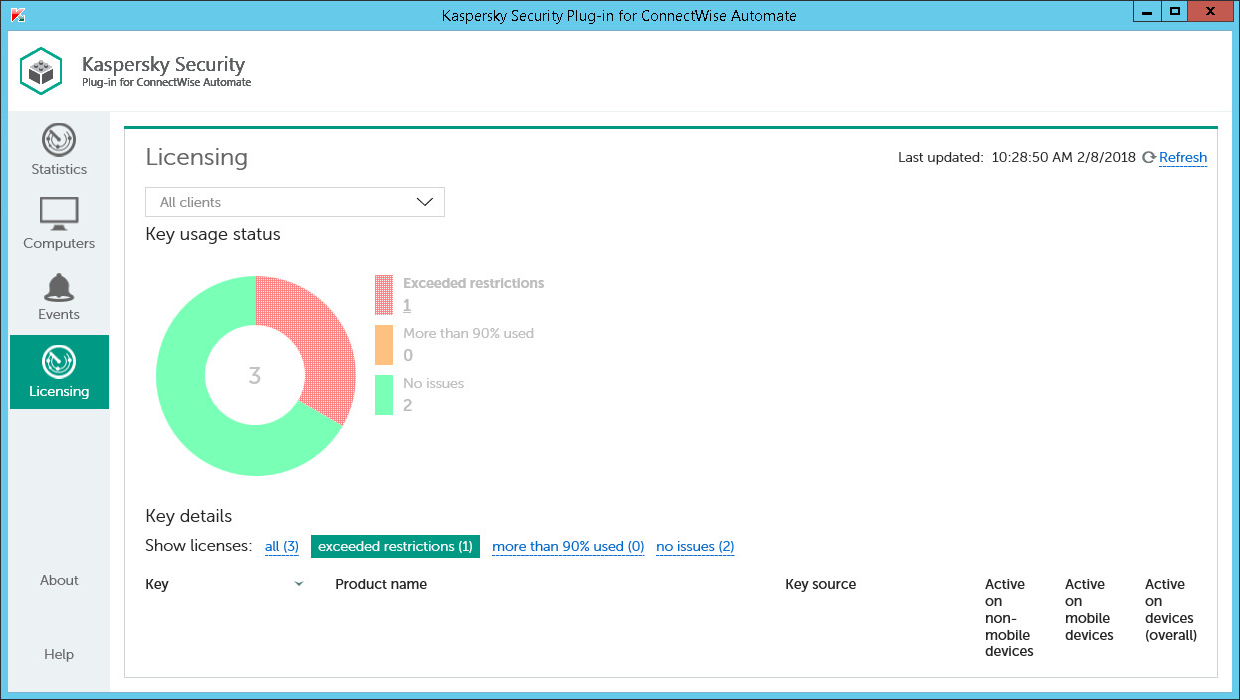
Viewing licensing information
The Key details section displays information, provided by Kaspersky Security Center or Kaspersky Endpoint Security Cloud, about the keys used on the devices in your network, or stored in the main or virtual Administration Server storage or at the workspace. You can use filters to quickly find information about the required keys, for example, those used on devices installed at a specific client company or in a specific location, or keys with a specific status. You can apply several filters at the same time. Every time you open the Licensing tab, the previously used filter settings are restored—there is no need to set up filters again.
Information about the keys is displayed as a table. You can sort information in the table by any of the table columns by clicking the column header. For each key you can find the following information:
- Key—Serial number of the key. Click the key number to view information on the devices, where this key is used as active.
- Product name—Name of the product that uses this key. This column also may show additional information on the key, such as product version and validity period.
- Key source—Source that the key was received from. Kaspersky Security Plug-in for ConnectWise Automate may receive the key from the Administration Server, from a virtual server, or from a Kaspersky Endpoint Security Cloud workspace. If several managed devises use the same key, each of them may receive this key from a different source. This column displays the first few key sources. To view all key sources for the selected key, click the Show details link.
- Active on non-mobile devices—Number of non-mobile devices on which this key is active.
- Active on mobile devices—Number of mobile devices on which this key is active.
- Active on devices (overall)—Total number of devices on which this key is active.
- Expiration date—Date when the key expires.
You can filter information displayed in the charts by client and location.
To filter information displayed,
In the All clients drop-down list, select a client or location to view only licenses that are used on the computers for this particular client or location.
Viewing key details
One key can be used by multiple managed devices. This window shows detailed information on all the devices, where the selected key is active.
- Show only devices managed by ConnectWise Automate—Select this check box to view key usage information only for devices managed by ConnectWise Automate. If this check box is cleared, all the devices that use this key are displayed, including those not managed by ConnectWise Automate.
- Client—Name of the ConnectWise Automate client that the device belongs to.
- Device—Name of the device that uses this key. When you click a device name, the Computer Management screen of ConnectWise Automate Control Center is displayed for the device.
- Application name—Name of the application that uses this key.
- Application version—Version of the application that uses this key.
Sorting the list of keys
Sorting the list of keys is useful if, for example, you want to view the keys for a specific application or keys with the nearest expiration date at the top of the list.
You can sort both filtered and unfiltered list of keys.
To sort the list of keys:
- Click the Licensing tab.
- Click the name of the column you want to sort by. You can sort by any column of the list.
The list of keys is sorted by the columns you select.
When you click a column name for the first time, the values are sorted in ascending order. When you click the column name again, the values are sorted in descending order. The arrow next to the column name shows the sort direction.
Filtering keys by status
Filtering the list of keys by status is useful if, for example, you want to view only keys that have exceeded restrictions in order to respond immediately and solve a problem.
To filter the keys by status:
- Click the Licensing tab.
- Click one of the following links in the Show keys section:
Link
Action
All
Displays all the keys.
Exceeded restrictions
Displays the keys with Exceeded restrictions status.
A license key exceeds restrictions if the number of computers that use the key divided by the number of computers to which the license key can be assigned is greater than 1.
More than 90% used
Displays the keys with More than 90% used status.
A license key is used over 90% if the number of computers that use the key divided by the number of computers to which the license key can be assigned is greater than 0.9.
OK
Displays the keys with OK status.
Only keys with the selected status are displayed.
- Click Reset filter to display all the keys.
Running Kaspersky Lab management commands
To keep a network of your clients' computers secure, run the Kaspersky Lab management commands for all computers on the network. Kaspersky Security Plug-in for ConnectWise Automate provides two commands: scan computers for viruses and update anti-virus databases.
You can run the commands directly from the Kaspersky Security Plug-in for ConnectWise Automate dashboard. This method is useful as it allows you to respond to dashboard information immediately. For example, you can run the virus scan command on a computer that has not been scanned in a long time or you can run the update command on a computer with outdated anti-virus databases.
These security commands can be run for managed computers, that is, for computers that have Network Agent installed. You can also run the security commands on a group of computers. You save time by not running commands on individual computers.
Running virus scan command
Run the virus scan command to check computers for viruses and other malware. In the Kaspersky dashboard, accessible from the ConnectWise Automate toolbar, you can view the time when the computer was last scanned for viruses. When an infected object is found during virus scanning, the default actions are either to disinfect the object, or, if disinfection is impossible, to skip the object during the scan process.
The virus scan command can only be run on computers that have Kaspersky Endpoint Security or Kaspersky Security for Windows Server installed.
When you perform the virus scan command, all exclusions configured in the "Exclusions and trusted zone" section of the security policies are retained.
To scan computers:
- In the Kaspersky dashboard, select the Computers tab.
- In the list of computers displayed on the Computers tab, select one or more computers for which you want to run the virus scan command.
To select several individual computers use the Ctrl key, to select a range of computers use the Shift key, or just drag the pointer. To select all the displayed computers, click Select → Select all on the top command bar.
- Start the computer scanning process in one of the following ways:
- On the top command bar, click Run scan.
- In the right pane, in the Computer statistics and actions section, click Scan computers.
The scan command is run for the selected computers, which are protected by Kaspersky Endpoint Security for Windows or Kaspersky Security for Windows Server.
You can view the status and results of the scan command for each computer on the Computer Management screen of ConnectWise Automate.
To view the scan results:
- Open the Computer Management screen for the required computer.
- On the Computer Management screen, click the Commands tab and view the command status.
Running anti-virus database update command
Run the update command to update the anti-virus database on computers. In the Kaspersky dashboard, you can view the time when the anti-virus databases were updated.
The update command can be run only for the computers that have Kaspersky Endpoint Security or Kaspersky Security for Windows Server installed.
To enable execution of the local update command on remote agents through ConnectWise Automate Control Center, perform the following setup in Kaspersky Security Center: open the policy and in the Policy properties window select Advanced Settings → Application settings, and then select the Allow local tasks to be displayed and managed (except custom scan) check box. By default, this check box is cleared, so any local commands except virus scan are denied by policy.
To update anti-virus databases on the computers:
- In the Kaspersky dashboard, select the Computers tab.
- In the list of computers displayed on the Computers tab, select one or more computers for which you want to run the anti-virus database update procedure.
To select several individual computers use the Ctrl key, to select a range of computers use the Shift key, or just drag the pointer. To select all the displayed computers, click Select → Select all on the top command bar.
- Start the anti-virus database updating process in one of the following ways:
- On the top command bar, click Run update.
- In the right pane, in the Computer statistics and actions section, click Update virus bases.
The update command is run for the selected computers, which are protected by Kaspersky Endpoint Security for Windows or Kaspersky Security for Windows Server. After the command is successfully completed, click Refresh to update the Database issued field on the Computers tab of the Kaspersky dashboard.
You can view the status and results of the update command for each computer in the Computer Management screen of ConnectWise Automate.
To view the anti-virus database update results:
- Open the Computer Management screen for the desired computer.
- In the Computer Management screen, click the Commands tab and view the command status.
Monitoring and alerting
After you install and enable Kaspersky Security Plug-in for ConnectWise Automate, new internal monitors are created in ConnectWise Automate Control Center. Monitoring and alerting functionality is intended to manage different computer statuses in Kaspersky Security Center or Kaspersky Endpoint Security Cloud and to apply appropriate actions to draw your attention to a problem, automatically resolve an issue, or perform maintenance.
The monitors work and raise alerts only for the managed computers.
You can view the monitors by opening the Monitors tab on the ConnectWise Automate Control Center toolbar. The Kaspersky Security Center or Kaspersky Endpoint Security Cloud monitors are displayed in the list of monitors on the Internal Monitors tab.
Each monitor runs with the specified frequency. The monitors check for specific computer statuses or status descriptions and raise appropriate alerts or perform predefined actions. Depending on the computer status, a monitor can result in different actions: raising an alert, creating a ticket, or performing virus scanning or anti-virus database updates. Automatic virus scanning or anti-virus database updates, initiated by the monitors, help save you time.
The following Kaspersky Lab monitors are available in ConnectWise Automate Control Center:
Kaspersky Lab monitors available in ConnectWise Automate Control Center
Monitor name |
Monitor frequency |
Status / status description |
Actions |
|---|---|---|---|
Kaspersky – Critical Computers |
6 minutes |
Status: Critical |
|
Kaspersky – Warning Computers |
6 minutes |
Status: Warning |
Alert is created. |
Kaspersky – Scan |
4 hours |
Status description: Virus scan has not been performed for a long time |
Virus scan is started. |
Kaspersky – Update |
4 hours |
Status description: Databases are out of date |
Anti-virus database update is started. |
Deploying Kaspersky products from the Control Center
With Kaspersky Security Plug-in for ConnectWise Automate, you can install Kaspersky products on computers using a ConnectWise Automate script. The script enables you to install only Kaspersky Security Center Network Agent, or both Network Agent and Kaspersky Endpoint Security products on the remote agents, depending on your needs. After installing these products, the computers are considered protected and managed.
Before running the installation script, use Kaspersky Security Center or Kaspersky Endpoint Security Cloud tools to create and save a stand-alone installation package containing Kaspersky Security Center Network Agent or both Kaspersky Security Center Network Agent and Kaspersky Endpoint Security. The script then deploys this package and installs the products on the selected computers.
The script that installs Kaspersky products can be run only for the Windows operating system.
The script can be run at different levels: for a client, a location or an individual computer.
The procedures below explain how to install Kaspersky products on computers from ConnectWise Automate Control Center.
Creating stand-alone installation package
A stand-alone installation package is an executable file that you can save on a computer, a removable drive, or a shared resource in order to enable the script to use for stand-alone installation. The Kaspersky Install script, included in Kaspersky Security Plug-in for ConnectWise Automate, then runs the created file locally on the client's computers to install Kaspersky Lab applications.
Creation of a stand-alone installation package differs depending on the Kaspersky Lab product you use: Kaspersky Security Center Administration Server or Kaspersky Endpoint Security Cloud. Refer to one of the following sections for instructions on creating a stand-alone installation package.
Installation package in Kaspersky Security Center
Kaspersky Security Center allows you to create stand-alone installation packages for applications. The Kaspersky Install script then runs the created file locally on the clients' computers to install an application, without involving Kaspersky Security Center.
To create a stand-alone installation package from Kaspersky Security Center:
- Connect to Kaspersky Security Center Administration Server.
- In the Remote installation folder of the Kaspersky Security Center console tree, select the Installation packages subfolder.
- In the workspace, select the installation package of the required application: Kaspersky Endpoint Security or Kaspersky Security Center Network Agent.
- Start the process of creating a stand-alone installation package using one of the following methods:
- In the context menu of the installation package, select Create stand-alone installation package.
- In the workspace of the installation package, click the Create stand-alone installation package link.
This will start the Stand-alone Installation Package Creation Wizard. Follow the Wizard instructions.
- At the final step of the Wizard, select the Open folder option to view the created stand-alone installation package in the folder.
Next, proceed to the Running installation script procedure.
Installation package in Kaspersky Endpoint Security Cloud
Kaspersky Endpoint Security Cloud allows you to download distribution packages of security applications. The Kaspersky Install script then runs the downloaded file locally on the clients' computers to install an application, without involving Kaspersky Endpoint Security Cloud.
To download a distribution package in Kaspersky Endpoint Security Cloud:
- On a server or workstation, run the browser and open Kaspersky Endpoint Security Cloud Management Console.
- Select the Distribution packages section.
The Distribution packages section contains distribution packages of security applications available for download.
- Select a distribution package and click the Download button.
If your company uses a proxy server, click Proxy server and define the proxy server settings (address, port, user name and password). If you defined the proxy server settings when you connected the company to Kaspersky Endpoint Security Cloud at the stage of proceeding to the client company's workspace, those settings will affect the distribution package download.
The distribution package starts downloading to the computer.
- When the download is complete, open the folder containing the distribution package or copy the distribution package to a removable drive (such as a flash drive) for subsequent usage by the installation script.
Then proceed to the Running installation script procedure.
Running installation script
To deploy Kaspersky products from ConnectWise Automate Control Center:
- Locate the setup.exe file, created during the Creating stand-alone installation package procedure, in the folder where it was saved.
- Create the Kaspersky subfolder of the LTShare\Transfer\Software folder, on the ConnectWise Automate server.
- Place the generated stand-alone installation package (setup.exe file) to the LTShare\Transfer\Software\Kaspersky folder.
- Confirm that the setup.exe file can be downloaded through the browser.
Check the download link, for example, http://<yourFQDN.com>/labtech/transfer/software/kaspersky/setup.exe, where <yourFQDN.com> is the web address of your web server.
- In the ConnectWise Automate navigation tree, right-click the client, location, or group for which you want to run the installation script, and then select Scripts → Anti-Virus → Kaspersky Lab → Kaspersky Install.
The Run Script dialog box opens.
- In the Run Script dialog box, specify the script target and then select Once in the Schedule section.
- Click OK to start the script.
The script is started. The script copies and executes the setup.exe file on the client's computers. Installation is run in silent mode.
- To view the status and results of the installation script execution for an individual computer, open the Computer Management screen and proceed to the Scripts tab.
Viewing and editing installation script
You can view and if necessary edit or change the settings of the script, which installs Kaspersky products on the computers.
Although you can use the ConnectWise Automate Script window to inspect and modify the script, doing so is not recommended, because making incorrect changes can cause the script to damage the computer system.
To view or modify the installation script:
- In the ConnectWise Automate navigation tree, click the Scripts node.
- Select Scripts → Anti-Virus → Kaspersky Lab and double-click Kaspersky Install.
The Script window opens, where you can view or edit the script.
- After editing the script, click Save to save your changes, and then Close.
Plug-in modifications to ConnectWise Automate configuration
After you install Kaspersky Security Plug-in for ConnectWise Automate, it adds its own items to the existing ConnectWise Automate entities.
The table below shows the items added by Kaspersky Security Plug-in for ConnectWise Automate.
Kaspersky Security Plug-in for ConnectWise Automate items added to ConnectWise Automate entities
ConnectWise Automate entity |
Item added by Kaspersky Security Plug-in for ConnectWise Automate |
Description |
|---|---|---|
Role definitions |
Kaspersky Security Center Administration Server Kaspersky Security Center Administration Server Kaspersky Security Center Network Agent |
These role definitions are used by ConnectWise Automate to determine whether Kaspersky Security Center Administration Server or Network Agent is installed on the computer. The computers with Administration Server installed have both roles: Kaspersky Security Center Administration Server and Kaspersky Security Center Network Agent. The computers with Network Agent installed have only one role: Kaspersky Security Center Network Agent. You can view the roles for each computer on the Detected Roles tab of the Computer Management screen. |
Kaspersky Endpoint Security Cloud Kaspersky Endpoint Security Cloud Bridge |
This role definition is used by ConnectWise Automate to determine whether the computer is used as a 'bridge' between Kaspersky Endpoint Security Cloud and ConnectWise Automate. The computer with the 'bridge' role interacts with Kaspersky Endpoint Security Cloud connecting it with ConnectWise Automate like a bridge. You can view the roles for each computer on the Detected Roles tab of the Computer Management screen. |
|
Anti-virus definitions |
Kaspersky Endpoint Security 10 Service Pack 1 for Windows Kaspersky Endpoint Security 10 Service Pack 2 for Windows Kaspersky Endpoint Security 11 for Windows Kaspersky Security 10 for Windows Server Kaspersky Security 10 Service Pack 1 for Windows Server |
The anti-virus definitions contain information on Kaspersky Lab products and are used by ConnectWise Automate. Anti-virus definitions enable ConnectWise Automate internal anti-virus monitors to work properly for these products, that is, to alert users if the anti-virus program is not running, virus definitions are out of date, or the anti-virus is not installed. You can find information about Kaspersky Lab anti-virus products on the Antivirus Dashboard of ConnectWise Automate Control Center. |
Internal Monitors |
Kaspersky – Critical Computers Kaspersky – Warning Computers Kaspersky – Scan Kaspersky – Update |
The monitors raise appropriate alerts or perform predefined actions basing on specific computer statuses or status descriptions. You can view the monitors on the Monitors tab on the ConnectWise Automate Control Center. The Kaspersky monitors are displayed on the Internal Monitors tab. |
Scripts → Anti-Virus folder |
Kaspersky Lab |
The Kaspersky Lab subfolder is added to the Scripts → Anti-Virus folder of the ConnectWise Automate console tree. This folder stores the Kaspersky Install script. |
Scripts |
Kaspersky Install Kaspersky Scan |
Kaspersky Security Plug-in for ConnectWise Automate adds its own Kaspersky Install and Kaspersky Scan scripts to the existing ConnectWise Automate scripts. The Kaspersky Install script silently installs Kaspersky Lab products on the client company's computers. The Kaspersky Scan script initiates a procedure of scanning for viruses and other malware on the client company's computers. |
Extra Data Fields |
plugin_kaspersky_encryptionPublicKey plugin_kaspersky_kesCloudBridgeProxy plugin_kaspersky_kesCloudBridgeProxyPassword plugin_kaspersky_kesCloudBridgeProxyUser plugin_kaspersky_kesCloudBridgeUseProxy plugin_kaspersky_kesCloudIntegrationId plugin_kaspersky_kesCloudPassword plugin_kaspersky_kesCloudUser plugin_kaspersky_password plugin_kaspersky_user |
|
Enabling and disabling tracing
You may need to save traces of Kaspersky Security Plug-in for ConnectWise Automate, for example, if you contact Technical Support and are asked to provide the traces for diagnostics and troubleshooting. It is recommended to disable tracing when the issue is resolved, as tracing requires additional resources and additional memory to store trace files. It is also recommended to remove the trace files from your computer, when the issue, which required tracing, is resolved, because the trace files may contain personal and confidential data.
The trace files are saved to the %windir%\temp\KasperskyPluginLogs\ folder.
By default, tracing is disabled. You can enable and disable tracing using the Microsoft Windows Registry.
To enable or disable tracing:
Before editing the Microsoft Windows Registry, it is recommended that you back up the Registry.
- Click the Start button.
- In the Start menu, either in the Run box or the Search box, type regedit and press Enter.
The Registry Editor window opens.
If you have restricted access to the Windows computer you are logged in to, you might not be able to access the Windows Registry.
- In the Registry Editor window, navigate to the Kaspersky Security Plug-in for LabTech registry key. It is available by one of the following paths:
- HKEY_LOCAL_MACHINE\SOFTWARE\KasperskyLab\Kaspersky Security Plug-in for Labtech
- HKEY_LOCAL_MACHINE\SOFTWARE\Wow6432Node\KasperskyLab\Kaspersky Security Plug-in for Labtech
- Edit the value of the EnableTraces parameter as follows:
- 1—To enable tracing.
- 0—To disable tracing.
- Click OK in the Edit window to save your changes.
- Close the Registry Editor window.
Glossary
Administration Server
A component of Kaspersky Security Center that centrally stores information about all Kaspersky Lab applications that are installed within the corporate network. Administration Server can also be used to manage these applications.
Administration Server client (Client computer)
A computer, server, or workstation on which Network Agent and managed Kaspersky Lab applications are running.
Anti-virus databases
Databases that contain information about computer security threats known to Kaspersky Lab as of when the anti-virus databases are released. Entries in anti-virus databases allow malicious code to be detected in scanned objects. Anti-virus databases are created by Kaspersky Lab specialists and updated hourly.
Kaspersky Lab update servers
HTTP servers at Kaspersky Lab from which Kaspersky Lab applications download database and application module updates.
Managed computer
Computer with Network Agent installed; this computer is managed by Kaspersky Security Center.
Network Agent
A Kaspersky Security Center component that enables interaction between the Administration Server and Kaspersky Lab applications that are installed on a specific network node (workstation or server).
Notification
A message with information about an event (or events), which is sent by the application via other notification delivery systems (for example, via email) to the specified addresses.
Protection state
Current protection status, which defines the level of computer security.
Protocol
A clearly defined and standardized set of rules governing the interaction between a client and a server. Well-known protocols and the services associated with them include HTTP, FTP, and NNTP.
Remote install
Installation of Kaspersky Lab applications by using the services provided by Kaspersky Security for Windows Server 10.1.
Update
A function performed by a Kaspersky Lab application that enables it to keep computer protection up-to-date. During the update, an application downloads updates for its databases and modules from Kaspersky Lab update servers and automatically installs and applies them.
Virus
A program that infects other ones, by adding its code to them in order to gain control when infected files are run. This simple definition allows identifying the main action performed by any virus: infection.
Workspace
Virtual Administration Server by Kaspersky Lab that is designed to manage a security software suite on devices connected to Kaspersky Endpoint Security Cloud, as well as store individual settings of Kaspersky Endpoint Security Cloud and the registration data of a company using this product.
Contact Technical Support
This section describes how to get technical support and the terms on which it is available.
How to get technical support
If you cannot find a solution to your issue in the Kaspersky Security Integrations for MSP documentation or in any of the sources of information about Kaspersky Security Integrations for MSP, contact Technical Support. Technical Support specialists will answer all your questions about configuring and using Kaspersky Security Integrations for MSP.
Before contacting Technical Support, please read the support rules.
You can contact Technical Support in one of the following ways:
- By visiting the Technical Support website
- By sending a request to Technical Support from the Kaspersky CompanyAccount portal
Technical Support via Kaspersky CompanyAccount
Kaspersky CompanyAccount is a portal for companies that use Kaspersky Lab applications. The Kaspersky CompanyAccount portal is designed to facilitate interaction between users and Kaspersky Lab specialists through online requests. You can use Kaspersky CompanyAccount to track the status of your online requests and store a history of them as well.
You can register all of your organization's employees under a single account on Kaspersky CompanyAccount. A single account lets you centrally manage electronic requests from registered employees to Kaspersky Lab and also manage the privileges of these employees via Kaspersky CompanyAccount.
The Kaspersky CompanyAccount portal is available in the following languages:
- English
- Spanish
- Italian
- German
- Polish
- Portuguese
- Russian
- French
- Japanese
To learn more about Kaspersky CompanyAccount, visit the Technical Support website.
Page top
AO Kaspersky Lab
Kaspersky Lab is a world-renowned vendor of systems protecting computers against digital threats, including viruses and other malware, unsolicited email (spam), and network and hacking attacks.
In 2008, Kaspersky Lab was rated among the world’s top four leading vendors of information security software solutions for end users (IDC Worldwide Endpoint Security Revenue by Vendor). Kaspersky Lab is the preferred vendor of computer protection systems for home users in Russia (IDC Endpoint Tracker 2014).
Kaspersky Lab was founded in Russia in 1997. It has since grown into an international group of companies with 38 offices in 33 countries. The company employs more than 3,000 skilled professionals.
Products. Kaspersky Lab products provide protection for all systems, from home computers to large corporate networks.
The personal product range includes security applications for desktop, laptop, and tablet computers, smartphones and other mobile devices.
The company offers protection and control solutions and technologies for workstations and mobile devices, virtual machines, file and web servers, mail gateways, and firewalls. The company's portfolio also features specialized products providing protection against DDoS attacks, protection for industrial control systems, and prevention of financial fraud. Used in conjunction with centralized management tools, these solutions ensure effective automated protection for companies and organizations of any size against computer threats. Kaspersky Lab products are certified by major test laboratories, compatible with software from diverse vendors, and optimized to run on many hardware platforms.
Kaspersky Lab virus analysts work around the clock. Every day they uncover hundreds of thousands of new computer threats, create tools to detect and disinfect them, and include their signatures in databases used by Kaspersky Lab applications.
Technologies. Many technologies that are now part and parcel of modern anti-virus tools were originally developed by Kaspersky Lab. It is no coincidence that many other developers use the Kaspersky Anti-Virus engine in their products, including: Alcatel-Lucent, Alt-N, Asus, BAE Systems, Blue Coat, Check Point, Cisco Meraki, Clearswift, D-Link, Facebook, General Dynamics, H3C, Juniper Networks, Lenovo, Microsoft, NETGEAR, Openwave Messaging, Parallels, Qualcomm, Samsung, Stormshield, Toshiba, Trustwave, Vertu, and ZyXEL. Many of the company’s innovative technologies are patented.
Achievements. Over the years, Kaspersky Lab has won hundreds of awards for its services in combating computer threats. Following tests and research conducted by the reputed Austrian test laboratory AV-Comparatives in 2014, Kaspersky Lab ranked among the top two vendors by the number of Advanced+ certificates earned and was ultimately awarded the Top Rated certificate. But Kaspersky Lab's main achievement is the loyalty of its users worldwide. The company’s products and technologies protect more than 400 million users, and its corporate clients number more than 270,000.
Kaspersky Lab website: |
|
Virus encyclopedia: |
|
Virus Lab: |
https://virusdesk.kaspersky.com (for analyzing suspicious files and websites) |
Kaspersky Lab’s web forum: |
Page top
Information about third-party code
Information about third-party code is contained in the file legal_notices.txt.
Page top
Trademark notices
Registered trademarks and service marks are the property of their respective owners.
Microsoft, Windows, and Windows Server are registered trademarks of Microsoft Corporation in the United States and other countries.
Kaspersky Security Integration with ConnectWise Manage
This section describes the purpose, functions, and distribution kit of Kaspersky Security Integration with ConnectWise Manage, and provides hardware and software requirements for Kaspersky Security Integration with ConnectWise Manage.
About Kaspersky Security Integration with ConnectWise Manage
Integration is the process of bringing together components into a single system. Kaspersky Security Integration with ConnectWise Manage integrates Kaspersky Lab solutions (Kaspersky Security Center or Kaspersky Endpoint Security Cloud) and ConnectWise Manage to provide a powerful combination of monitoring and management tools, such as automated billing and ticket creation for client accounts.
In terms of Kaspersky Security Integration with ConnectWise Manage, integration is a set of parameters and interaction rules that can be set up and configured. First, you create an integration between your Kaspersky Lab solution and ConnectWise Manage; then you can manage and configure your integrations, and view and edit integration parameters. When configuring an integration, you set up mapping between the entities of the Kaspersky Lab solution and ConnectWise Manage entities, and define rules that determine how your Kaspersky Lab solution interacts with ConnectWise Manage.
Kaspersky Security Integration with ConnectWise Manage consists of two applications: Kaspersky Security Integration Tool for MSP and Kaspersky Security Integration Service for MSP (Managed Service Providers).
- Kaspersky Security Integration Tool for MSP provides a graphical user interface (GUI) to configure integration. The tool is used to configure connection between the Kaspersky Lab solution that you use and ConnectWise Manage. The tool is also used to configure mapping between the Kaspersky Lab solution entities and ConnectWise Manage entities. Kaspersky Lab solution entities are virtual servers, if you use Kaspersky Security Center, or workspaces, if you use Kaspersky Endpoint Security Cloud. ConnectWise Manage entities are Companies and Products.
- Kaspersky Security Integration Service for MSP is a Microsoft Windows service application that is installed on the computer that has Kaspersky Security Center Administration Server installed. Kaspersky Security Integration Service for MSP synchronizes data in Kaspersky Security Center and ConnectWise Manage. It is a service application only, with no user interface.
About data provision
Kaspersky Security Integration with ConnectWise Manage is designed for integration of Kaspersky Lab solutions for administration of security applications with ConnectWise Manage within the framework of the functionality described in this Help document.
To use Kaspersky Security Integration with ConnectWise Manage, you must install the integration components and connect them to the Kaspersky Lab solution you use, create an integration with ConnectWise Manage, specify connection parameters and integration settings and select your customers’ virtual servers / workspaces for the integration.
By using the product, you agree that the said product may receive data from ConnectWise Manage and the connected virtual servers / workspaces, as well as store, process, and display information that is intended for ensuring the product functionality.
By creating an integration and connecting ConnectWise Manage and virtual servers / workspaces to the product, you thus confirm that you are the sole owner of any data you provide or that you are entitled to provide any data.
Any information provided is protected and processed in accordance with the Kaspersky Lab Privacy Policy.
For the purpose of integration of Kaspersky Security Center / Kaspersky Endpoint Security Cloud and ConnectWise Manage, Kaspersky Security Integration with ConnectWise Manage may receive, store, and process the following types of data:
- Data required to connect to the integrated software:
- Parameters for connecting to Kaspersky Security Center Administration Server, including an account.
- Account for connecting to Kaspersky Endpoint Security Cloud.
- Account for accessing ConnectWise Manage.
- Data about Kaspersky Security Center / Kaspersky Endpoint Security Cloud events and about assigning the Critical and Warning statuses to computers managed by Kaspersky Security Center / Kaspersky Endpoint Security Cloud. This data is required for automatic creation of tickets or similar entities.
- Data about usage of licenses for Kaspersky Lab products by computers managed by Kaspersky Security Center / Kaspersky Endpoint Security Cloud (the number of computers that use a certain license). This data is required for automatic generation of invoices for your customers.
- Data about the state of a managed Kaspersky Security Center virtual server / Kaspersky Endpoint Security Cloud workspace (the number of managed computers, the number of protected computers, the number of created and closed tickets of various types, the number of threats and malicious objects detected on the computers, the number of problematic computers, and the number of infected computers). This data is required for report generation.
- Data about licenses used at Kaspersky Security Center virtual servers / Kaspersky Endpoint Security Cloud workspaces and about attributes of these licenses. This data is required for report generation.
- Integration settings:
- Type of integrated platform (ConnectWise Manage).
- Set of integrated virtual servers / workspaces.
- List of Kaspersky Endpoint Security Cloud administrators (their aliases and email addresses) who are also granted administrative privileges in the integration.
- Rules for mapping objects of Kaspersky Security Center / Kaspersky Endpoint Security Cloud to those of ConnectWise Manage (virtual servers / workspaces to companies and Kaspersky Lab products to ConnectWise Manage products).
- Rules for creating objects in ConnectWise Manage, such as tickets, agreement additions, and configuration items.
For integrations with Kaspersky Endpoint Security Cloud, the received data may be stored and processed within the Kaspersky Endpoint Security Cloud infrastructure according to the Kaspersky Endpoint Security Cloud data provision. For details, refer to section "About data provision" in Kaspersky Endpoint Security Cloud Online Help.
All received data is used by the MSP administrators and technicians. Kaspersky Lab Technical Support specialists may also use the above data when an MSP administrator contacts Technical Support.
Page top
Features of Kaspersky Security Integration with ConnectWise Manage
Kaspersky Security Integration with ConnectWise Manage helps you to integrate Kaspersky Lab solutions with ConnectWise Manage to provide ticketing, straightforward monitoring, issue tracking, automated billing, and reporting in the customer environment.
Kaspersky Security Integration with ConnectWise Manage provides the following features:
- Connection
With Kaspersky Security Integration with ConnectWise Manage, you can connect Kaspersky Lab solutions to ConnectWise Manage with a few clicks to enable automated billing, ticketing, and other processes. You do not need any additional tools or consoles: you can access everything from your ConnectWise Manage console.
- Automatic ticketing
Kaspersky Security Integration with ConnectWise Manage simplifies multi-tenancy management by enabling automation of ticket creation and workflow for each of your client companies. You can select an Agreement with your client and map it to the corresponding Kaspersky Lab solution.
The tickets are automatically created and assigned to a Service Board, which reduces the time you spend monitoring your managed companies and increases the number of clients that a single technician can manage. For additional resource efficiency, assign business impacts and severities to tickets to streamline their prioritization.
- Billing setup
Kaspersky Security Integration with ConnectWise Manage provides easy access to pricing of Kaspersky Lab products from ConnectWise Manage, which significantly simplifies and automates customer billing and reporting.
- Report generation
You can generate service reports on Kaspersky Security Center virtual servers or Kaspersky Endpoint Security Cloud workspaces and license reports directly from ConnectWise Manage. Service reports include statistics on protection services provided to the client over the last 30 days and the last 7 days. License reports provide information about license keys, including their usage and availability.
- Compatibility
With Kaspersky Security Integration with ConnectWise Manage, it is easy to create solutions based on customer needs and requirements: ConnectWise Manage works with both on-premises and cloud-based Kaspersky Lab solutions. Use Kaspersky Lab cloud-based security to avoid additional overhead, or keep everything inside the perimeter and make the most of your existing hardware investment with an on-premises solution.
Distribution kit
Kaspersky Security Integration with ConnectWise Manage is delivered free of charge as a distribution package that contains installation files for Kaspersky Security Integration Tool for MSP and Kaspersky Security Integration Service for MSP.
You can download the distribution kit from the Kaspersky Lab website.
No license is required for Kaspersky Security Integration with ConnectWise Manage.
Software requirements
Basic software requirements for integration setup:
- ConnectWise Manage 2016.1–2016.6, 2017.1–2017.6, and 2018.1-2018.3.
- Kaspersky Security Center Administration Server 10 Service Pack 2 Maintenance Release 1 and later, or Kaspersky Endpoint Security Cloud.
Software requirements for Kaspersky Security Integration Tool for MSP:
- Microsoft Windows 7 and later.
- Microsoft .NET Framework 4.5.2.
- Kaspersky Security Center Administration Server 10 Service Pack 2 Maintenance Release 1 and later, or Kaspersky Security Center Administration Console 10 Service Pack 2 Maintenance Release 1 and later—for an on-premises solution only.
Software requirements for Kaspersky Security Integration Service for MSP:
- Supported operating systems are the same as those supported by Kaspersky Security Center 10 Service Pack 2 Maintenance Release 1 and later. Refer to Kaspersky Security Center documentation for details.
- Administration Server component of Kaspersky Security Center 10 Service Pack 2 Maintenance Release 1 and later.
- Microsoft .NET Framework 4.5.2.
Deployment schemas of Kaspersky Security Integration with ConnectWise Manage
This section describes the deployment schemas of Kaspersky Security Integration with ConnectWise Manage. The schemas include the two components of Kaspersky Security Integration with ConnectWise Manage:
- Kaspersky Security Integration Tool for MSP—Used to configure connection between the Kaspersky Lab solution you use and Autotask and to configure mapping between the Kaspersky Lab solution entities and Autotask entities.
- Kaspersky Security Integration Service for MSP—Synchronizes data in Kaspersky Security Center and Autotask. It is a service application only, with no user interface.
The deployment schema that suits your integration depends on the Kaspersky Lab solution you use and on your integration model. There are three deployment schemas:
- For an on-premises version of a Kaspersky Lab solution—Kaspersky Security Center.
- For an on-premises version of a Kaspersky Lab solution—Kaspersky Security Center with slave Administration Servers.
- For a cloud-based version of a Kaspersky Lab solution—Kaspersky Endpoint Security Cloud.
This section describes the deployment schemas in detail.
Deployment schema for on-premises solution
Deploy Kaspersky Security Integration with ConnectWise Manage based on this schema if you use an on-premises version of a Kaspersky Lab solution—Kaspersky Security Center—and if you do not have slave Administration Servers in your managed company infrastructure.
The components of Kaspersky Security Integration with ConnectWise Manage are shown as orange rectangles in the following figure.
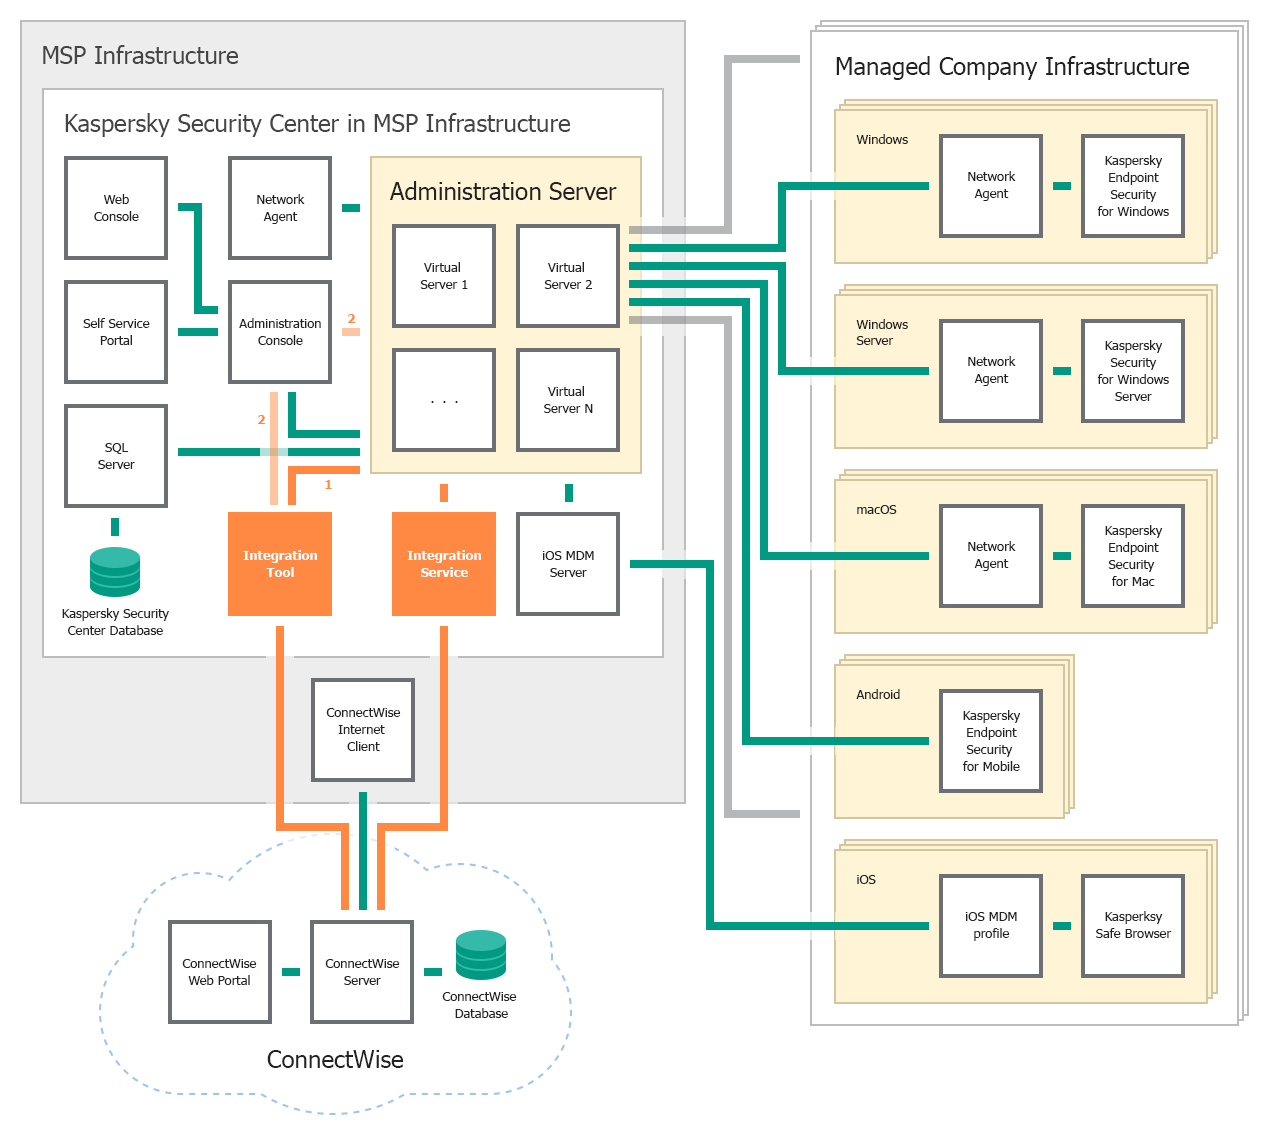
Deployment schema for on-premises solution
The following list describes deployment prerequisites and data flow:
- Kaspersky Security Integration Service for MSP must be installed on the computer on which Kaspersky Security Center Administration Server is installed.
- Kaspersky Security Integration Tool for MSP must be installed on the computer on which either Administration Console or Administration Server is installed and deployed.
- In Kaspersky Security Center, virtual servers must be created for each of the ConnectWise Manage companies. These virtual servers are then mapped to the companies, allowing you to integrate Kaspersky Security Center and ConnectWise Manage.
- In your managed environment, you may have many different Kaspersky Lab programs installed. Data on the number of programs is used by Kaspersky Security Integration with ConnectWise Manage for automatic billing. Events and computer status changes sent from Kaspersky Lab programs to Kaspersky Security Center are received by Kaspersky Security Integration Service for MSP and tickets are created based on them.
Deployment schema for on-premises solution and slave servers
Deploy Kaspersky Security Integration with ConnectWise Manage based on this schema if you use an on-premises version of a Kaspersky Lab solution—Kaspersky Security Center—and if you use slave Administration Servers in your managed company infrastructure.
The components of Kaspersky Security Integration with ConnectWise Manage are shown as orange rectangles in the following figure.
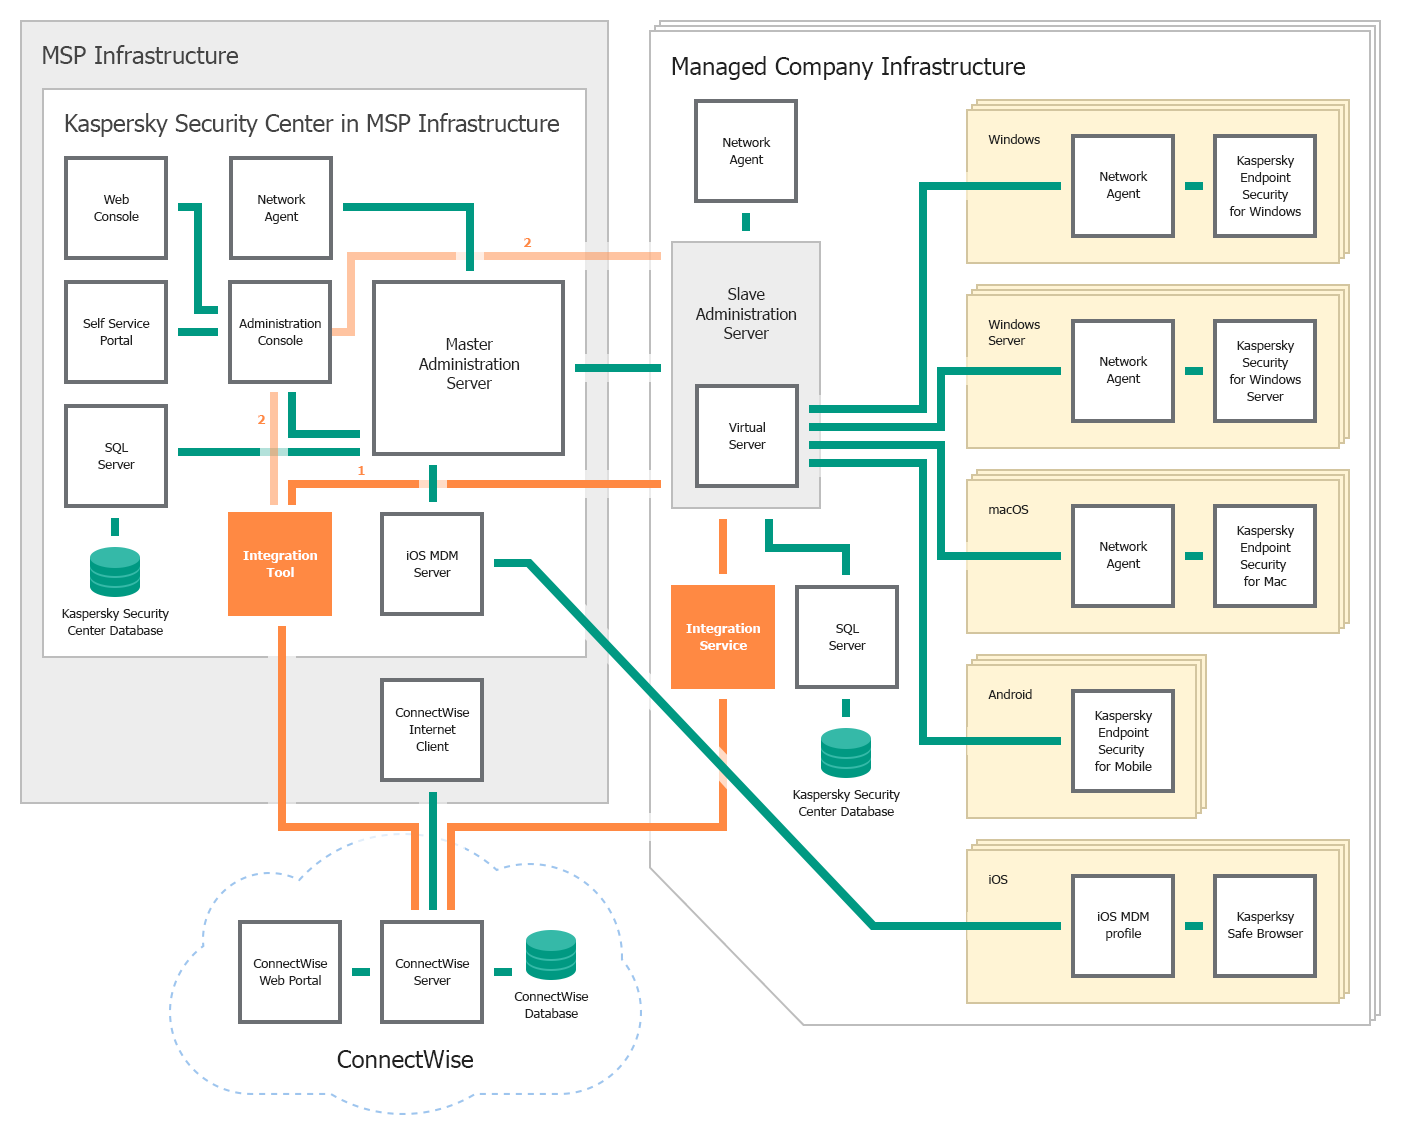
Deployment schema for on-premises solution and slave servers
The following list describes deployment prerequisites and data flow:
- One or more Administration Servers are used in the client's infrastructure. These Administration Servers are slave Administration Servers relative to the Administration Server that is installed in the MSP infrastructure. The Administration Server installed in the MSP infrastructure is the master Administration Server. You can use this type of deployment to decrease load on your master Administration Server.
- Kaspersky Security Integration Service for MSP must be installed on the computer on which the slave Administration Server is installed in the client's infrastructure.
- Kaspersky Security Integration Tool for MSP must be installed on the computer on which either Administration Console or the master Administration Server is installed and deployed.
- In your slave Administration Server, virtual servers must be created for each of the managed accounts. These virtual servers are then mapped to ConnectWise Manage companies, allowing you to integrate Kaspersky Security Center and ConnectWise Manage.
- In your managed environment, you may have many different Kaspersky Lab programs installed. Data on the number of programs is used by Kaspersky Security Integration with ConnectWise Manage for automatic billing. Events and computer status changes sent from Kaspersky Lab programs to Kaspersky Security Center are received by Kaspersky Security Integration Service for MSP and tickets are created based on them.
Deployment schema for cloud-based solution
Deploy Kaspersky Security Integration with ConnectWise Manage based on this schema if you use the cloud-based version of a Kaspersky Lab solution—Kaspersky Endpoint Security Cloud.
The components of Kaspersky Security Integration with ConnectWise Manage are shown as orange rectangles in the following figure.
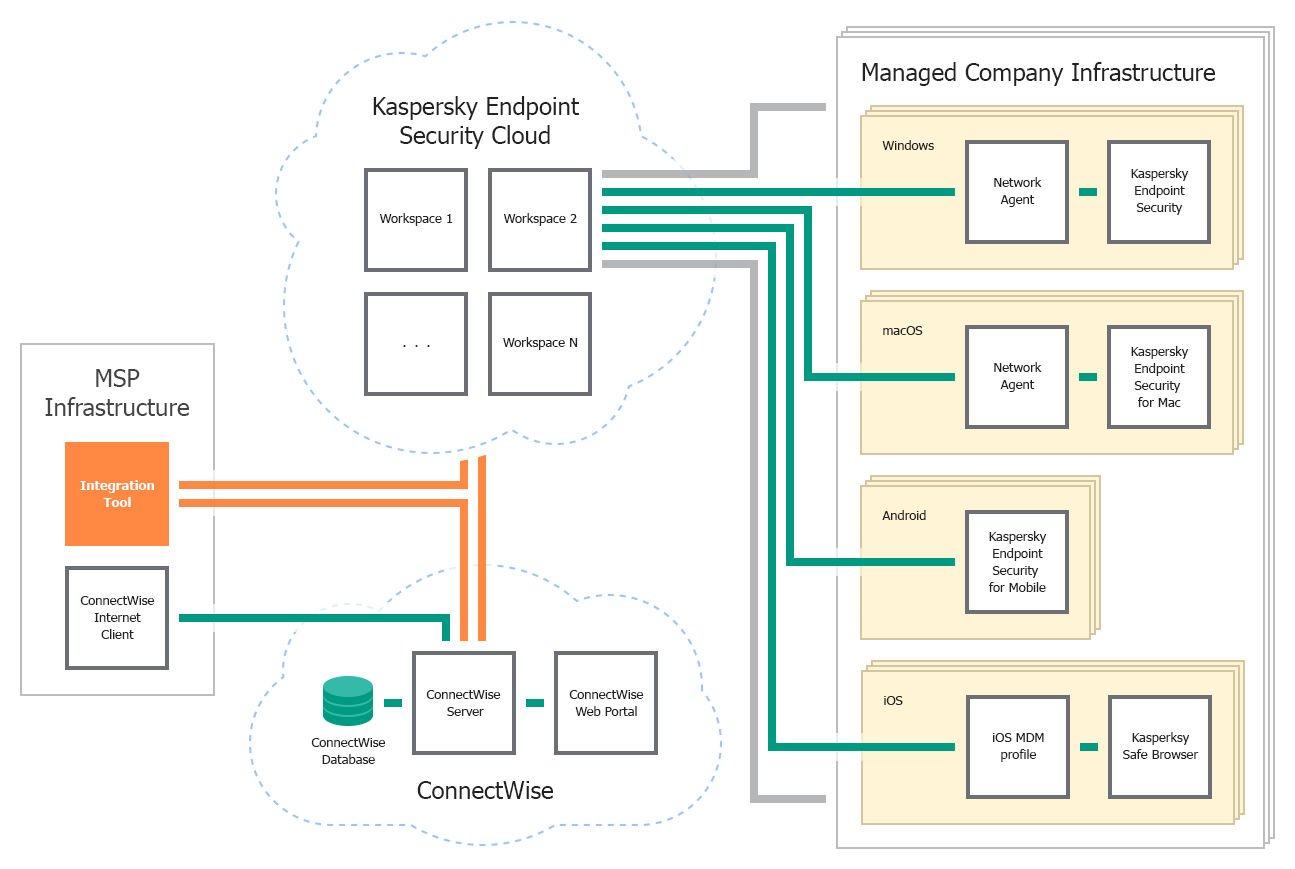
Deployment schema for cloud-based solution
The following list describes deployment prerequisites and data flow:
- In this deployment schema, only Kaspersky Security Integration Tool for MSP is used. Kaspersky Security Integration Service for MSP is not used.
- Kaspersky Security Integration Tool for MSP must be installed in your infrastructure, and not in the client infrastructure.
- In your Kaspersky Endpoint Security Cloud solution, workspaces must be created for each of the ConnectWise Manage companies. These workspaces are then mapped to the companies, allowing you to integrate Kaspersky Endpoint Security Cloud and ConnectWise Manage.
- In your managed environment, you may have many different Kaspersky Lab programs installed. Data on the number of programs is used by Kaspersky Security Integration with ConnectWise Manage for automatic billing. Events and computer status changes sent from Kaspersky Lab programs to Kaspersky Endpoint Security Cloud are received and tickets are created based on them.
Integration scenario
This topic describes the overall sequence of actions that you perform to integrate your Kaspersky Lab solution (Kaspersky Security Center or Kaspersky Endpoint Security Cloud) with ConnectWise Manage by means of Kaspersky Security Integration with ConnectWise Manage.
- Installing Kaspersky Security Integration with ConnectWise Manage.
Download Kaspersky Security Integration with ConnectWise Manage from the Kaspersky Lab web site and install it by using a standard Windows installation procedure.
- Preparing information for setting up integration.
Check the connection settings and additional prerequisites to successfully integrate your Kaspersky Lab solution with ConnectWise Manage. You will have to provide these parameters in the next scenario steps.
- Connecting Kaspersky Security Integration with ConnectWise Manage to your Kaspersky Lab solution.
Provide the parameters to connect Kaspersky Security Integration with ConnectWise Manage to your Kaspersky Lab solution:
- For Kaspersky Security Center, provide user credentials and server parameters.
- For Kaspersky Endpoint Security Cloud, provide the account credentials.
- Creating integration with ConnectWise Manage.
Provide the parameters for the new integration with ConnectWise Manage that is created during initial configuration. The integration parameters are the same for Kaspersky Security Center and for Kaspersky Endpoint Security Cloud.
- Adding virtual servers or workspaces to your integration.
Select virtual servers or workspaces to be integrated with ConnectWise Manage:
- For Kaspersky Security Center, select virtual servers to be mapped to ConnectWise Manage companies.
- For Kaspersky Endpoint Security Cloud, select workspaces to be mapped to ConnectWise Manage companies.
- Checking integration.
After you perform step 1 through step 5, Kaspersky Security Integration with ConnectWise Manage will be installed and set up. To verify the installation, open the Companies tab and make sure that your virtual servers / workspaces are displayed in the first column and that your ConnectWise Manage companies are available for selection in the second column.
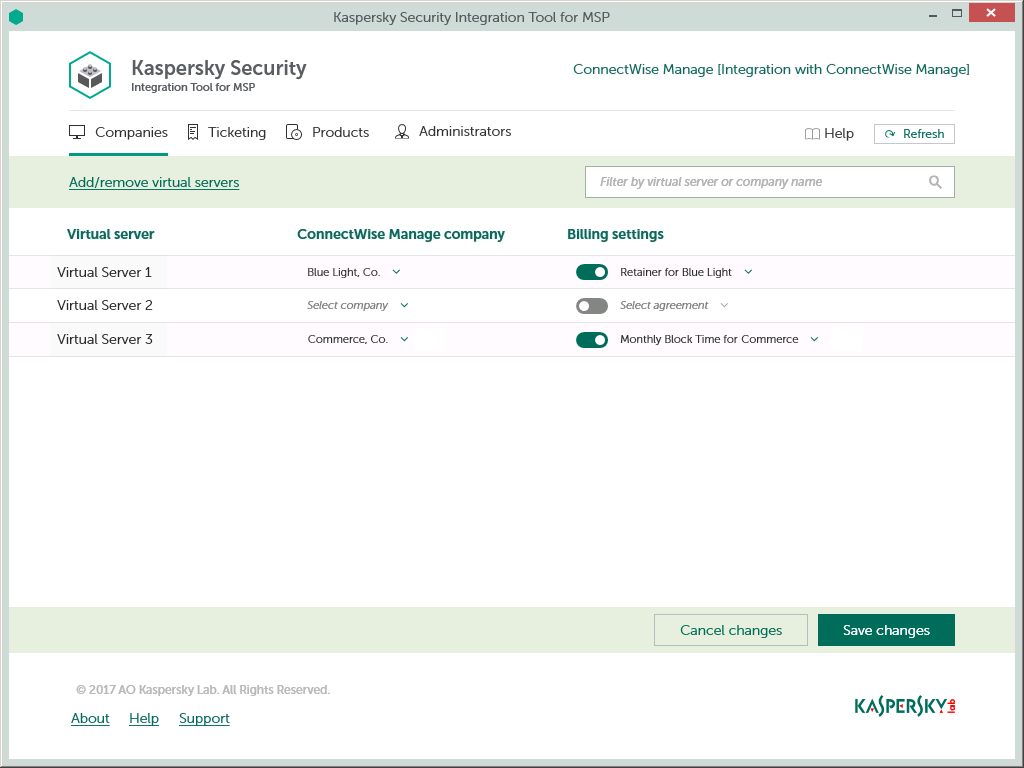
Kaspersky Security Integration Tool for MSP main window
Installing and removing Kaspersky Security Integration with ConnectWise Manage
Kaspersky Security Integration with ConnectWise Manage is delivered as a distribution package that contains two applications: Kaspersky Security Integration Tool for MSP and Kaspersky Security Integration Service for MSP.
This section contains step-by-step instructions for installing and removing Kaspersky Security Integration with ConnectWise Manage.
Installing Kaspersky Security Integration with ConnectWise Manage
After you download the distribution package for Kaspersky Security Integration with ConnectWise Manage, install the components of Kaspersky Security Integration with ConnectWise Manage by using a standard Windows installation procedure.
Kaspersky Security Integration Service must be installed if you use Kaspersky Security Center. If you use Kaspersky Endpoint Security Cloud, you do not have to install Kaspersky Security Integration Service.
Install Kaspersky Security Integration Service for MSP on the computer on which Kaspersky Security Center Administration Server is installed. Install Kaspersky Security Integration Tool for MSP on the computer on which either Administration Console or Administration Server is installed and deployed.
Install both components of Kaspersky Security Integration with ConnectWise Manage—Kaspersky Security Integration Tool for MSP and Kaspersky Security Integration Service for MSP—in the same manner. The steps below describe the installation process for each component.
Before you install the components of Kaspersky Security Integration with ConnectWise Manage, it is strongly recommended to check their digital signatures to make sure that they are issued by Kaspersky Lab.
To check the digital signature for a component of Kaspersky Security Integration with ConnectWise Manage:
- Locate the installation application (msp_setup.exe file) for the Kaspersky Security Integration with ConnectWise Manage component.
- Right-click the installation application and select Properties.
- In the Properties window that opens, click the Digital Signatures tab and check that the installation application has Kaspersky Lab signatures.
- Close the Properties window.
After you check the digital signatures of the Kaspersky Security Integration with ConnectWise Manage components, install each of the components.
You can install Kaspersky Security Integration with ConnectWise Manage either in interactive mode or in silent mode.
Installation in interactive mode
To install a component of Kaspersky Security Integration with ConnectWise Manage in interactive mode:
- On the machine where you want to install Kaspersky Security Integration with ConnectWise Manage, double-click the installation application (msp_setup.exe file) for the component.
- Follow the wizard steps to install the component.
- Accept the terms of the license agreement to continue installation.
- When installing Kaspersky Security Integration Tool for MSP, accept the terms of the privacy policy to continue installation.
- If required, change the installation folder for the component. The folder you select must have about 25 MB of free space to install both components of Kaspersky Security Integration with ConnectWise Manage.
- Click Finish on the last page of the wizard.
Kaspersky Security Integration Tool for MSP and Kaspersky Security Integration Service for MSP are installed. Kaspersky Security Integration Tool for MSP is added to the Start menu.
Installation in silent mode
To install Kaspersky Security Integration Tool for MSP in silent mode:
- Read the license agreement and the privacy policy stored in license.txt file next to the installation application (msp_setup.exe file). Proceed only if you accept the terms of the license agreement and the privacy policy.
- At the command prompt, type
msp_setup.exe /s /v"EULA=1 PRIVACYPOLICY=1 INSTALLDIR=\"<installation path>\""
Here,
EULA=1means that you accept the terms of the license agreement.If you specify another value or if you do not specify this parameter, Kaspersky Security Integration Tool for MSP will not be installed.
PRIVACYPOLICY=1means that you accept the terms of the privacy policy.If you specify another value or if you do not specify this parameter, Kaspersky Security Integration Tool for MSP will not be installed.
INSTALLDIR=\"<installation path>\"is the path to the Kaspersky Security Integration Tool for MSP installation folder.If you do not specify this parameter, Kaspersky Security Integration Tool for MSP will be installed to %PROGRAMFILES%\Kaspersky Lab\Kaspersky Security Integration Tool for MSP (in 32-bit versions of Windows) or %PROGRAMFILES(x86)%\Kaspersky Lab\Kaspersky Security Integration Tool for MSP (in 64-bit versions of Windows).
Kaspersky Security Integration Tool for MSP is installed and is added to the Start menu.
To install Kaspersky Security Integration Service for MSP in silent mode:
- Read the license agreement stored in license.txt file next to the installation application (msp_setup.exe file). Proceed only if you accept the terms of the license agreement.
- At the command prompt, type
msp_setup.exe /s /v"EULA=1 INSTALLDIR=\"<installation path>\""
Here,
EULA=1means that you accept the terms of the license agreement.If you specify another value or if you do not specify this parameter, Kaspersky Security Integration Service for MSP will not be installed.
INSTALLDIR=\"<installation path>\"is the path to the Kaspersky Security Integration Service for MSP installation folder.If you do not specify this parameter, Kaspersky Security Integration Service for MSP will be installed to %PROGRAMFILES%\Kaspersky Lab\Kaspersky Security Integration Service for MSP (in 32-bit versions of Windows) or to %PROGRAMFILES(x86)%\Kaspersky Lab\Kaspersky Security Integration Service for MSP (in 64-bit versions of Windows).
Kaspersky Security Integration Service for MSP is installed.
Known issue
Kaspersky Security Integration Service for MSP cannot connect to ConnectWise Manage if Kaspersky Security Center and Kaspersky Security Integration Service for MSP are deployed in the client's network instead of the managed service provider's network, and there is an authentication proxy server between Kaspersky Security Integration Service for MSP and ConnectWise Manage.
To enable Kaspersky Security Integration Service for MSP to connect to ConnectWise Manage over the Internet through the proxy with authentication:
- Launch Services Microsoft Management Console (MMC) by selecting Start → Control panel → Administrative Tools → Services.
- Right-click Kaspersky Security Integration Service for MSP and select Properties.
- In the service properties window that opens, click the Log On tab and specify the following settings:
- In the Log on as section, select the This account option.
- Specify the account credentials for connection to the Internet by Kaspersky Security Integration Service for MSP.
- Click OK in the service properties window to save your changes.
Removing Kaspersky Security Integration with ConnectWise Manage
You can remove the components of Kaspersky Security Integration with ConnectWise Manage by using a standard Windows installation / uninstallation procedure.
To remove a component of Kaspersky Security Integration with ConnectWise Manage:
- On the Start menu, select Control Panel and then click Programs and Features.
- In the list of installed programs, select Kaspersky Security Integration Tool for MSP or Kaspersky Security Integration Service for MSP.
- Right-click the selected application and select Uninstall.
The selected application is removed. Repeat these steps for the other component of Kaspersky Security Integration with ConnectWise Manage.
As an alternative, you can remove the components of Kaspersky Security Integration with ConnectWise Manage in silent mode.
To remove Kaspersky Security Integration Tool for MSP in silent mode:
Run Command Prompt as an administrator and type
msiexec.exe /x {E58E13CA-6745-4C60-BE0B-FE6DD416FCB0} REBOOT=ReallySuppress /qn /l*v %temp%\msp_service_uninstall_log.txt
To remove Kaspersky Security Integration Service for MSP in silent mode:
Run Command Prompt as an administrator and type
msiexec.exe /x {7EF14DEE-606A-4147-94FD-3FB0E1FA9D69} REBOOT=ReallySuppress /qn /l*v %temp%\msp_tool_uninstall_log.txt
Removing user.config file
When you uninstall Kaspersky Security Integration Tool for MSP, the user.config files are not removed. These files are automatically created for every user who has ever connected to a Kaspersky Lab solution (either on-premises or Cloud) using Kaspersky Security Integration Tool for MSP. The user.config files contain encrypted information about the user's connection settings for Kaspersky Security Center and Kaspersky Endpoint Security Cloud.
If necessary, you can manually remove the user.config file for every user. The user.config file is stored in the AppData folder of a user.
For example, for Windows 7 and Administrator user, the path to the user.config files is as follows: C:\Users\Administrator\AppData\Local\AO_Kaspersky_Lab\IntegrationUI.exe_Url_nrmo2y4axdcnfumknnua4kzhxvafmxmb\1.0.0.0\user.config.
Updating Kaspersky Security Integration with ConnectWise Manage
It is recommended to update Kaspersky Security Integration with ConnectWise Manage to the latest version.
To successfully migrate Kaspersky Security Integration with ConnectWise Manage:
- Update Kaspersky Security Integration with ConnectWise Manage.
- Check the settings. If you are not satisfied with the results of their migration, re-configure the integration.
Updating Kaspersky Security Integration with ConnectWise Manage
The sequence of actions required to update Kaspersky Security Integration with ConnectWise Manage depends on the Kaspersky Lab solution that you use.
- If you use Kaspersky Security Center, update both components of Kaspersky Security Integration with ConnectWise Manage (Kaspersky Security Integration Service for MSP and all instances of Kaspersky Security Integration Tool for MSP) to the latest version before you start using the new version of Kaspersky Security Integration with ConnectWise Manage. If you use several instances of Kaspersky Security Integration Tool for MSP when working with a single Kaspersky Security Integration Service for MSP, make sure that all these instances are updated.
If one or more components of Kaspersky Security Integration with ConnectWise Manage is not updated (either Kaspersky Security Integration Service for MSP or one of the Kaspersky Security Integration Tool for MSP instances), Kaspersky Security Integration with ConnectWise Manage will not operate properly.
- If you use Kaspersky Endpoint Security Cloud, update all instances of Kaspersky Security Integration Tool for MSP to the latest version.
Reconfiguring ticketing
Ticketing in Kaspersky Security Integration with ConnectWise Manage version Maintenance Release 2 and later differs significantly from ticketing in version Maintenance Release 1 and earlier. When you update Kaspersky Security Integration with ConnectWise Manage to Maintenance Release 2 or later, it is recommended to reconfigure ticketing in Kaspersky Security Integration Tool for MSP. For information about how to configure ticketing, refer to Setting up ticketing.
All other settings that you configured in a previous version of Kaspersky Security Integration Tool for MSP, such as integration parameters, companies, and product mappings, remain the same when you migrate Kaspersky Security Integration with ConnectWise Manage to the latest version.
Page top
Interface of Kaspersky Security Integration with ConnectWise Manage
Kaspersky Security Integration with ConnectWise Manage consists of two applications: Kaspersky Security Integration Tool for MSP and Kaspersky Security Integration Service for MSP.
- Kaspersky Security Integration Tool for MSP provides a graphical user interface to configure integration.
- Kaspersky Security Integration Service for MSP is a service application for Microsoft Windows that synchronizes data in Kaspersky Security Center and ConnectWise Manage. It does not have a user interface.
Kaspersky Security Integration Tool for MSP consists of one window with several nested tabs. Depending on the type of Kaspersky Lab solution that you use—on-premises or cloud-based—Kaspersky Security Integration Tool for MSP may have three or four nested tabs. On these tabs, you can configure mapping between the Kaspersky Lab solution entities, such as virtual servers / workspaces, and products and ConnectWise Manage entities, such as companies and products. You can also configure ticketing, and if you use the cloud-based version of the solution you can manage workspace administrators.
Kaspersky Security Integration Tool for MSP main window
The Kaspersky Security Integration Tool for MSP window has the following tabs:
- Companies—Use this tab to set up and modify mapping between managed companies in ConnectWise Manage and virtual servers or workspaces in your Kaspersky Lab solution, and to add or remove virtual servers or workspaces to your integration. On the Companies tab, you can also enable automatic billing for your managed companies.
- Ticketing—Use this tab to set up ticketing rules for enabling automatic creation and assignment of tickets in ConnectWise Manage. You can configure creation and assignment of tickets depending on the event severity or when a computer status changes in Kaspersky Lab products.
Ticketing is one of the most important features of your integration. If you do not configure ticketing, ConnectWise Manage cannot generate tickets on the basis of events and computer status changes and cannot process corresponding issues.
- Products—Use this tab to set up mapping between ConnectWise Manage products and Kaspersky Lab products so that usage information about Kaspersky Lab products appears in ConnectWise Manage as Agreement Additions. You can modify the existing product mapping as well.
- Administrators—This tab is available for cloud-based solution only. Use this tab to manage the administrators related to the integration with Kaspersky Endpoint Security Cloud. You can add existing Kaspersky Endpoint Security Cloud administrators to your integration or remove administrators from the integration if you do not want them to work with the integration.
Getting started
After you install Kaspersky Security Integration with ConnectWise Manage, you establish a connection between it and ConnectWise Manage. The connection enables you to configure integration using Kaspersky Security Integration Tool for MSP and enables Kaspersky Security Integration Service for MSP to send Service Tickets and license usage information to ConnectWise Manage. To establish connection, create a new integration using Kaspersky Security Integration Tool for MSP.
The integration process varies depending on which Kaspersky Lab product you use. This section describes how to configure integration with Kaspersky Security Center and with Kaspersky Endpoint Security Cloud.
Prerequisites
When configuring integration, you must specify the parameters of the Kaspersky Lab solution you integrate with: Kaspersky Security Center parameters or Kaspersky Endpoint Security Cloud parameters and ConnectWise Manage connection parameters. It is recommended that you check these parameters in advance in order to prepare for setting up integration.
Kaspersky Security Center parameters
Check the following parameters:
- Address of the computer on which Kaspersky Security Center Administration Server is installed.
- Credentials: user name and password for the computer on which Administration Server is installed.
- If you establish connection to the Administration Server through a proxy server, check the proxy server parameters: network address or domain name and credentials for the proxy server.
Kaspersky Endpoint Security Cloud parameters
Check the credentials of your Kaspersky Endpoint Security Cloud account: email address and password.
ConnectWise Manage parameters
Check the following parameters:
- Web address of the site that hosts the ConnectWise Manage Server.
- Name of your company in ConnectWise Manage, that is, the company name you use to log in to ConnectWise Manage.
- Public and private keys generated by ConnectWise Manage. Note that the private key is available only at the time the key is created.
For details on how to generate the keys, see Setting up public and private keys in ConnectWise Manage.
Additional prerequisites
During the integration process, it is required to add virtual servers or workspaces to your integration. These virtual servers or workspaces are then mapped to ConnectWise Manage companies.
For each client company in ConnectWise Manage, create and assign a separate Kaspersky Security Center virtual server / Kaspersky Endpoint Security Cloud workspace prior to integration.
One-to-one mapping is supported, so the number of virtual servers or workspaces must not be more than the number of your managed companies.
Page top
Setting up public and private keys in ConnectWise Manage
To create integration between ConnectWise Manage and Kaspersky Security Integration with ConnectWise Manage, you have to provide API keys. API keys are public and private keys that are generated by ConnectWise Manage for an integration account.
To create API keys in ConnectWise Manage:
- In ConnectWise Manage, click System → Members and either select an existing member or create a new one.
Make sure that the member you selected has all the rights necessary to set up the integration.
- On the Member Maintenance screen, click the API Keys tab and then click the New Item button.
- In the Description field, type the description for the newly created keys (for example, Kaspersky Integration).
- Click the Save button to save the new item.
The two API keys are generated and displayed in the Public Key and Private Key fields.
The private key is displayed only at the time it is created.
Make a note of both keys or copy them to the Clipboard because there is no way to recover the private key after the API Keys tab is closed.
You will have to specify these keys when you configure integration with ConnectWise Manage.
Page top
Integrating with Kaspersky Security Center
This section describes how to create and configure integration between ConnectWise Manage and Kaspersky Security Center by using Kaspersky Security Integration Tool for MSP.
To successfully create integration, connect to Kaspersky Security Center Administration Server and perform the steps described in the following sections.
Connecting to Kaspersky Security Center Administration Server
When you start Kaspersky Security Integration Tool for MSP, the connection settings window opens. In this window, specify the settings to connect to Kaspersky Security Center Administration Server.
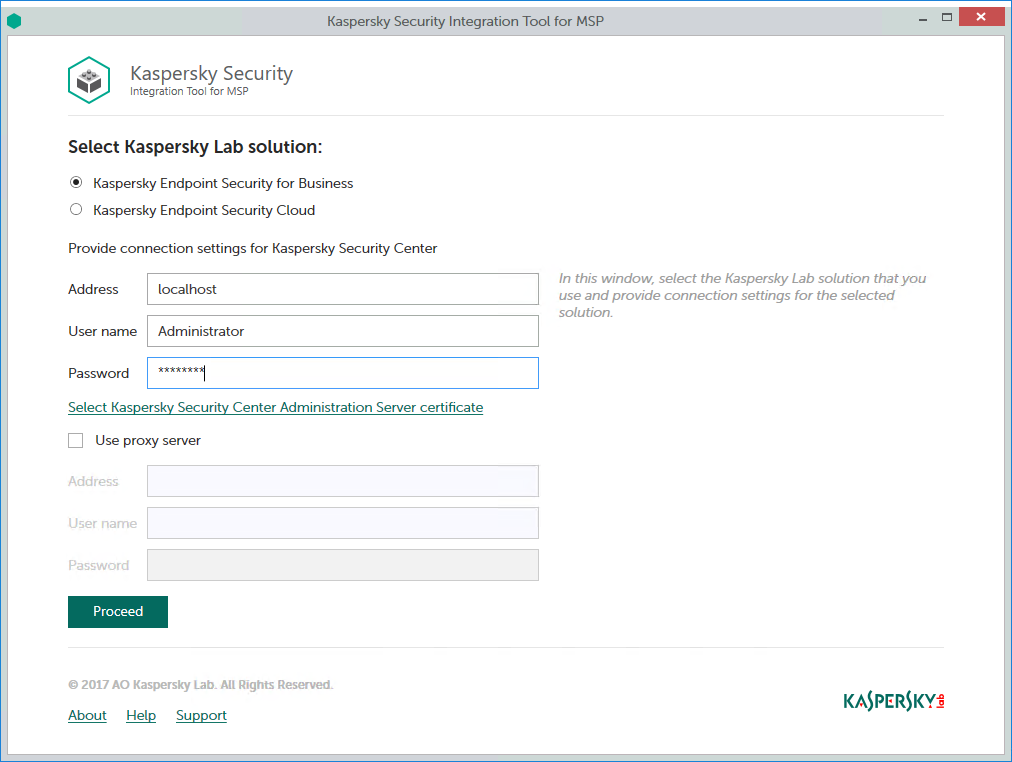
Connecting to Kaspersky Security Center Administration Server
To connect to Kaspersky Security Center Administration Server:
- In the Start menu, select Kaspersky Security Integration Tool for MSP.
- In the window that opens, select the Kaspersky Endpoint Security for Business solution to connect to Kaspersky Security Center Administration Server.
- You can connect to Kaspersky Security Center Administration Server in one of the following ways:
- By providing the connection parameters for the computer on which the Administration Server is installed.
If you selected this method of connection, specify the following connection settings. None of the fields can be blank.
- Address—Address of the computer on which the Administration Server is installed. You can specify this value as an IP address or as a domain name of the computer.
- User name—User name to connect to the computer on which the Administration Server is installed, that is, to the computer whose address you specified in the Address field.
- Password—Password to connect to the computer, on which the Administration Server is installed, that is, to the computer whose address you specified in the Address field.
- By selecting the Administration Server certificate.
In this case, you do not have to provide the connection parameters for the computer on which the Administration Server is installed. Kaspersky Security Integration Tool for MSP uses the certificate of Kaspersky Security Center Administration Server to connect to this Administration Server. Usage of the certificate guarantees that Kaspersky Security Integration Tool for MSP connects to the Administration Server from which the certificate was downloaded.
The Administration Server certificate is created automatically during installation of the Administration Server and is stored in the %ProgramData%\Application Data\KasperskyLab\adminkit\1093\cert folder on the computer that has Administration Server installed. Before starting to use the Administration Server certificate for authentication, copy the certificate file, klserver.cer, to the computer on which Kaspersky Security Integration Tool for MSP is installed.
- By providing the connection parameters for the computer on which the Administration Server is installed.
To use Administration Server certificate:
- Click the Select Kaspersky Security Center Administration Server certificate link.
- In the dialog box displayed, select the Use Server certificate check box and navigate to the certificate file.
- Click OK to start using the selected certificate for connection.
- If you want to establish the connection to the Administration Server through a proxy server, select the Use proxy server check box. By default, this check box is cleared.
If you selected the Use proxy server check box, provide the following proxy-server settings:
- Address—Network address of the proxy server. Provide the address as a full domain name of the proxy server.
- User name—User name to connect to the proxy server.
- Password—Password to connect to the proxy server.
- Click the Proceed button to connect to the Administration Server using the specified settings.
The system validates the provided settings and connects to the Administration Server.
Creating a Kaspersky Security Center integration with ConnectWise Manage
After you connect to the Administration Server, the integration settings window opens, where you can create an integration between ConnectWise Manage and Kaspersky Security Center by means of Kaspersky Security Integration Tool for MSP.
Creation of an integration between ConnectWise Manage and Kaspersky Security Center is required only when you launch Kaspersky Security Integration Tool for MSP for the first time.
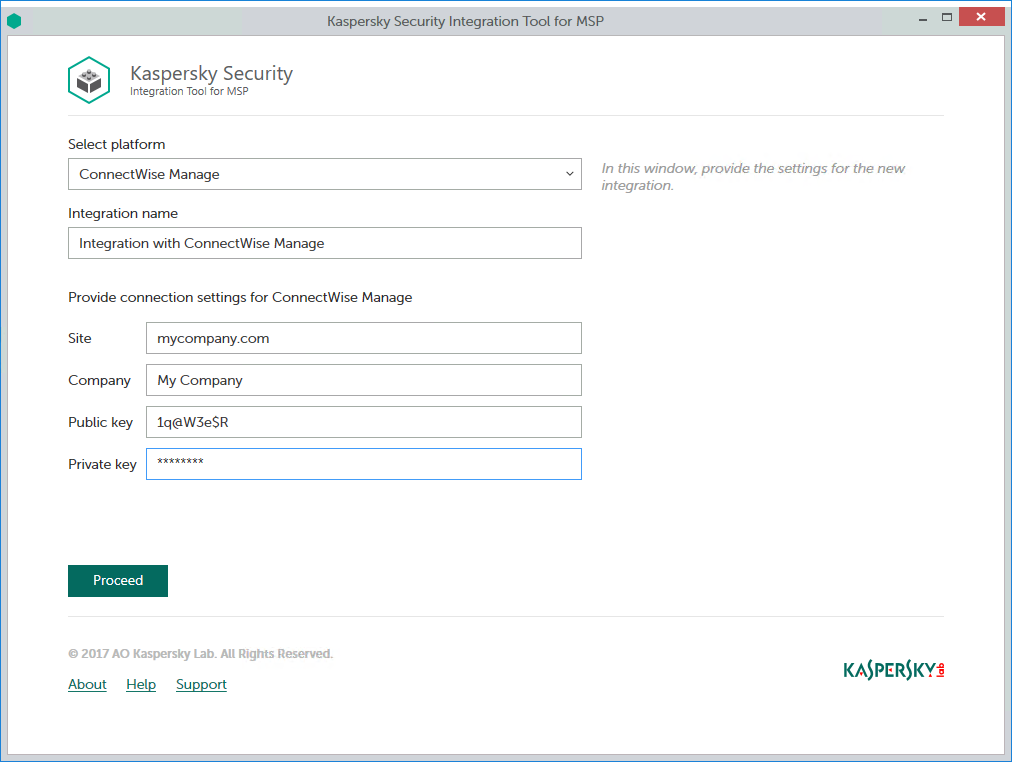
Specifying ConnectWise Manage integration settings
To create integration with ConnectWise Manage:
- In the integration settings window that opens after you connect to the Administration Server, specify the following settings for the newly created integration:
- Select platform—Select the integration platform from the drop-down list. The list contains the names of all the platforms that Kaspersky Security Center can be integrated with. For integration with ConnectWise Manage, select ConnectWise Manage.
- Integration name—Name of the new integration. This field cannot be blank. By default, the integration name is Integration with ConnectWise Manage. The integration name is displayed in the Kaspersky Security Integration Tool for MSP window as a link that allows you to view and access the integration properties.
For an integration with Kaspersky Endpoint Security Cloud, click the View integration ID link under the integration name to view the identifier of the integration. You may have to provide this ID to Kaspersky Lab Technical Support for diagnostics and troubleshooting.
- Site—Web address of the site that hosts the ConnectWise Manage Server. This field cannot be blank.
When you set up integration with ConnectWise Manage Cloud, specify the web address of the site that hosts the ConnectWise Manage Server with the ‘api-' prefix. Use one of the following sites based on your location:
- North American Cloud:
api-na.myconnectwise.net - European Cloud:
api-eu.myconnectwise.net - South African Cloud:
api-za.myconnectwise.net - Australian Cloud:
api-au.myconnectwise.net
- North American Cloud:
- Company—Name of your company in ConnectWise Manage. It is the company name you use to log in to ConnectWise Manage. This field cannot be blank.
- Public key—Public key generated by ConnectWise Manage. This field cannot be blank.
- Private key—Private key generated by ConnectWise Manage. This field cannot be blank. The private key is available only at the time the key is created.
ConnectWise Manage generates both public and private keys. For details on how to generate the keys, see section Setting up public and private keys in ConnectWise Manage.
- Click the Proceed button when you have finished specifying the integration settings.
The system validates the ConnectWise Manage integration settings. If the settings you provide are correct, they are saved and then used by Kaspersky Security Integration with ConnectWise Manage to gain access to ConnectWise Manage.
Kaspersky Security Center is now integrated with ConnectWise Manage.
Adding virtual servers to the integration
After an integration with ConnectWise Manage is created, a window opens where you can add Kaspersky Security Center virtual servers to the integration. Kaspersky Security Center virtual servers are then mapped to the ConnectWise Manage companies.
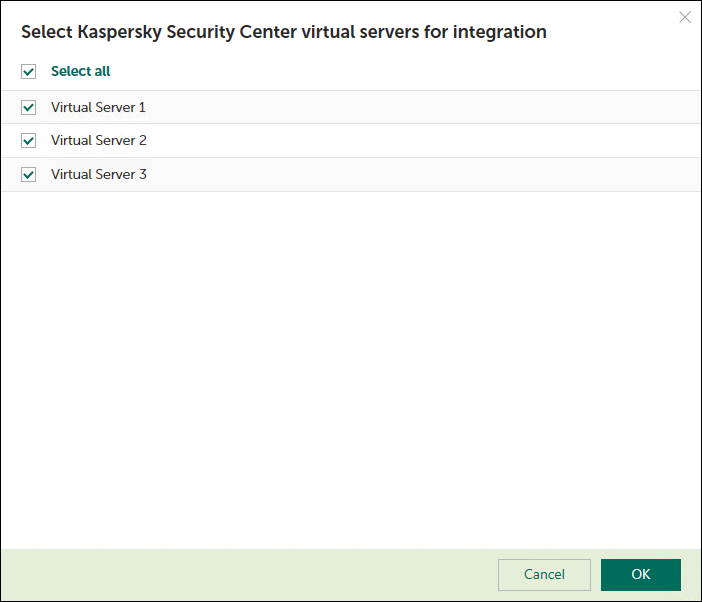
Adding virtual servers to the integration
To add Kaspersky Security Center virtual servers to the integration:
- In the window, which lists Kaspersky Security Center virtual servers, select the check boxes next to the existing virtual servers to add them to the integration.
If you want to add all virtual servers to the integration, select the Select all check box.
- Click Proceed.
You will now be able to map these virtual servers to ConnectWise Manage companies.
Each virtual server can be added to one integration only. That is, if a virtual server is added to an integration, it is not displayed in a list of virtual servers available for another integration.
Integrating with Kaspersky Endpoint Security Cloud
This section describes how to create and configure integration between ConnectWise Manage and Kaspersky Endpoint Security Cloud by means of Kaspersky Security Integration Tool for MSP.
To successfully create integration, connect to Kaspersky Endpoint Security Cloud and perform the steps described in the following sections.
Connecting to Kaspersky Endpoint Security Cloud
When you start Kaspersky Security Integration Tool for MSP, the connection settings window opens. In this window, specify the settings to connect to Kaspersky Endpoint Security Cloud.
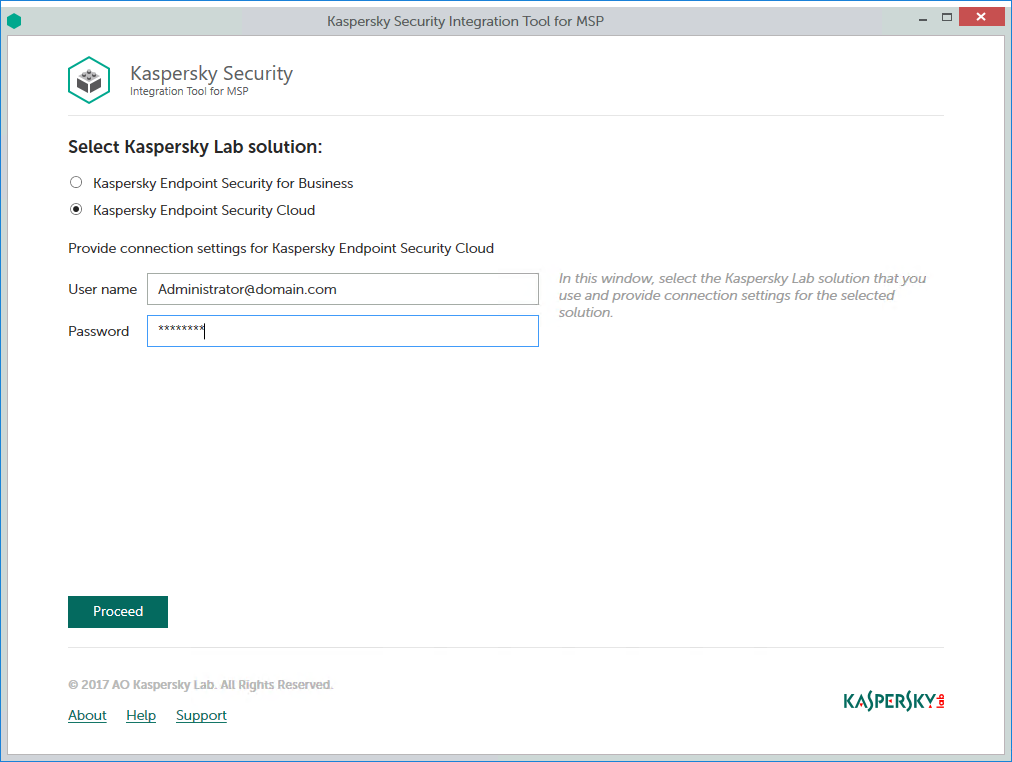
Connecting to Kaspersky Endpoint Security Cloud
To connect to Kaspersky Endpoint Security Cloud:
- In the Start menu, select Kaspersky Security Integration Tool for MSP.
- In the window that opens, select the Kaspersky Endpoint Security Cloud solution to connect to Kaspersky Endpoint Security Cloud.
- Specify the following connection settings:
- User name—Email address used for your Kaspersky Endpoint Security Cloud account. This field cannot be blank.
- Password—Password to connect to Kaspersky Endpoint Security Cloud. This field cannot be blank.
- Click the Proceed button to connect to Kaspersky Endpoint Security Cloud using the specified settings.
The system validates the provided settings and establishes connection to Kaspersky Endpoint Security Cloud.
Creating a Kaspersky Endpoint Security Cloud integration with ConnectWise Manage
After you connect to the Kaspersky Endpoint Security Cloud, the integration settings window opens, where you can create an integration between ConnectWise Manage and Kaspersky Endpoint Security Cloud by means of Kaspersky Security Integration Tool for MSP.
Creation of an integration between ConnectWise Manage and Kaspersky Endpoint Security Cloud is required only when you launch Kaspersky Security Integration Tool for MSP for the first time.
Specifying ConnectWise Manage integration settings
To create integration with ConnectWise Manage:
- In the integration settings window that opens after you connect to the Kaspersky Endpoint Security Cloud, specify the following settings for the newly created integration:
- Select platform—Select the integration platform from the drop-down list. The list contains the names of all platforms that Kaspersky Endpoint Security Cloud can be integrated with. For integration with ConnectWise Manage, select ConnectWise Manage.
- Integration name—Name of the new integration. This field cannot be blank. By default, the integration name is Integration with ConnectWise Manage. The integration name is displayed in the Kaspersky Security Integration Tool for MSP window as a link that allows you to view and access the integration properties.
For an integration with Kaspersky Endpoint Security Cloud, click the View integration ID link under the integration name to view the identifier of the integration. You may have to provide this ID to Kaspersky Lab Technical Support for diagnostics and troubleshooting.
- Site—Web address of the site that hosts the ConnectWise Manage Server. This field cannot be blank.
When you set up integration with ConnectWise Manage Cloud, specify the web address of the site that hosts the ConnectWise Manage Server with the ‘api-' prefix. Use one of the following sites based on your location:
- North American Cloud:
api-na.myconnectwise.net - European Cloud:
api-eu.myconnectwise.net - South African Cloud:
api-za.myconnectwise.net - Australian Cloud:
api-au.myconnectwise.net
- North American Cloud:
- Company—Name of your company in ConnectWise Manage. It is the company name you use to log in to ConnectWise Manage. This field cannot be blank.
- Public key—Public key generated by ConnectWise Manage. This field cannot be blank.
- Private key—Private key generated by ConnectWise Manage. This field cannot be blank. The private key is available only at the time the key is created.
ConnectWise Manage generates both public and private keys. For details on how to generate the keys, see section Setting up public and private keys in ConnectWise Manage.
- Click the Proceed button when you have finished specifying the integration settings.
The system validates the ConnectWise Manage integration settings. If the settings you provide are correct, they are saved and then used by Kaspersky Security Integration with ConnectWise Manage to gain access to ConnectWise Manage.
Kaspersky Endpoint Security Cloud is now integrated with ConnectWise Manage.
Adding workspaces to the integration
After an integration with ConnectWise Manage is created, a window opens where you can add Kaspersky Endpoint Security Cloud workspaces to the integration. Kaspersky Endpoint Security Cloud workspaces are then mapped to the ConnectWise Manage companies.
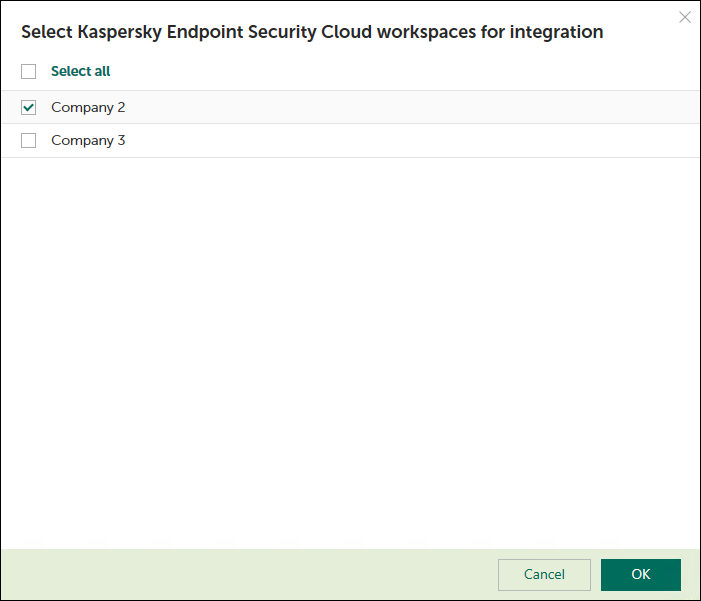
Adding workspaces to the integration
To add Kaspersky Endpoint Security Cloud workspaces to the integration:
- In the window, which lists Kaspersky Endpoint Security Cloud workspaces, select the check boxes next to the existing workspaces to add them to the integration.
If you want to add all workspaces to the integration, select the Select all check box.
- Click Proceed.
You will now be able to map these workspaces to ConnectWise Manage companies.
Each workspace can be added to one integration only. That is, if a workspace is added to an integration, it is not displayed in a list of workspaces available for another integration.
Supplementary parameter
The parameter that indicates the type of Kaspersky Endpoint Security Cloud server to which Kaspersky Security Integration Tool for MSP connects may be included in the .config file (IntegrationUI.exe.config) of Kaspersky Security Integration Tool for MSP.
The parameter name is KESCloudServer; and its possible values are:
- production—Kaspersky Security Integration Tool for MSP works with the Production server.
- beta—Kaspersky Security Integration Tool for MSP works with the Beta server.
- test—Kaspersky Security Integration Tool for MSP works with the Test server.
You are strongly urged not to modify the KESCloudServer parameter unless you receive clear instructions from Kaspersky Lab.
The IntegrationUI.exe.config file is stored in the installation folder of Kaspersky Security Integration Tool for MSP. The default path is C:\Program Files (x86)\Kaspersky Lab\Kaspersky Security Integration Tool for MSP\IntegrationUI.exe.config.
By default, the KESCloudServer parameter is not displayed in the .config file of Kaspersky Security Integration Tool for MSP.
The KESCloudServer parameter can be specified as follows:
<appSettings>
<add key="KESCloudServer" value="production" />
</appSettings>
Managing integrations
This section describes how to edit or delete an existing integration and how to create a new integration. For example, you may have to edit, delete, or create an integration when you change the vendor of your Professional Services Automation system.
Creating a new integration
You can create a new integration in the Kaspersky Security Integration Tool for MSP window.
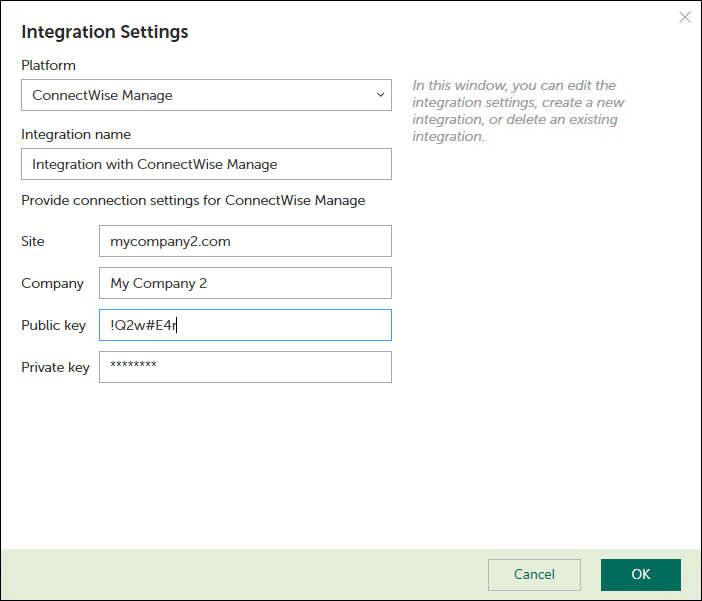
Creating a new integration
To create a new integration with ConnectWise Manage:
- In the top pane of the Kaspersky Security Integration Tool for MSP window, click the name of the current integration.
- In the Integration Settings window that opens, click the New integration button.
A new Integration Settings window opens. The fields for the connection settings are blank.
- Specify the values for the following settings of the integration:
- Platform—Select the integration platform. The list contains the names of all platforms, Kaspersky Security Center or Kaspersky Endpoint Security Cloud can be integrated with. For integration with ConnectWise Manage, select ConnectWise Manage.
- Integration name—Name of the new integration. This field cannot be blank. By default, the integration name is Integration with ConnectWise Manage. The integration name is displayed in the Kaspersky Security Integration Tool for MSP window as a link that allows you to view and access the integration properties.
For an integration with Kaspersky Endpoint Security Cloud, click the View integration ID link under the integration name to view the identifier of the integration. You may have to provide this ID to Kaspersky Lab Technical Support for diagnostics and troubleshooting.
- Site—Web address of the site that hosts the ConnectWise Manage Server. This field cannot be blank.
When you set up integration with ConnectWise Manage Cloud, specify the web address of the site that hosts the ConnectWise Manage Server with the ‘api-' prefix. Use one of the following sites based on your location:
- North American Cloud:
api-na.myconnectwise.net - European Cloud:
api-eu.myconnectwise.net - South African Cloud:
api-za.myconnectwise.net - Australian Cloud:
api-au.myconnectwise.net
- North American Cloud:
- Company—Name of your company in ConnectWise Manage. It is the company name you use to log in to ConnectWise Manage. This field cannot be blank.
- Public key—Public key generated by ConnectWise Manage. This field cannot be blank.
- Private key—Private key generated by ConnectWise Manage. This field cannot be blank. The private key is available only at the time the key is created.
ConnectWise Manage generates both public and private keys. For details on how to generate the keys, see section Setting up public and private keys in ConnectWise Manage.
- Click OK when you have finished specifying the integration settings.
The system validates the ConnectWise Manage integration settings. If the settings you provide are correct, they are saved and then used by Kaspersky Security Integration with ConnectWise Manage to gain access to ConnectWise Manage.
A new integration with ConnectWise Manage is created.
Page top
Editing and viewing an existing integration
You can view and edit settings of an existing integration in the Kaspersky Security Integration Tool for MSP window.
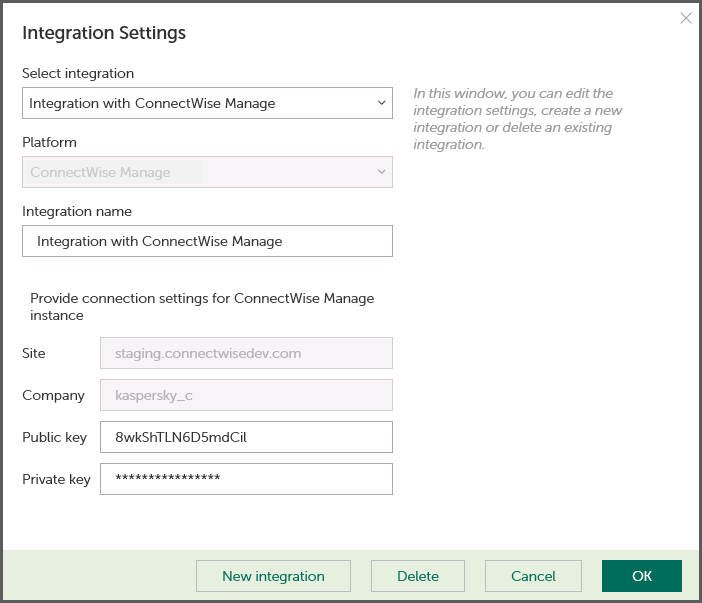
Editing an integration
To view and edit integration with ConnectWise Manage:
- In the top pane of the window, click the name of the integration whose settings you want to view or modify.
- In the Integration Settings window that opens, in the Select integration drop-down list select the required integration.
- Modify the following settings of the selected integration:
- Integration name—Name of the selected integration. By default, the integration name is Integration with ConnectWise Manage. You can edit this field, however, it cannot be blank.
For an integration with Kaspersky Endpoint Security Cloud, click the View integration ID link under the integration name to view the identifier of the integration. You may have to provide this ID to Kaspersky Lab Technical Support for diagnostics and troubleshooting.
- Public key—Public key generated by ConnectWise Manage. This field cannot be blank.
- Private key—Private key generated by ConnectWise Manage. This field cannot be blank. The private key is available only at the time the key is created.
ConnectWise Manage generates both public and private keys. For details on how to generate the keys, see section Setting up public and private keys in ConnectWise Manage.
The Site and Company settings cannot be modified. If you have to change these settings, create a new integration.
- Integration name—Name of the selected integration. By default, the integration name is Integration with ConnectWise Manage. You can edit this field, however, it cannot be blank.
- Click OK when you have finished editing the integration settings.
The system validates the ConnectWise Manage integration settings. If the settings you provide are correct, they are saved and then used by Kaspersky Security Integration with ConnectWise Manage to gain access to ConnectWise Manage.
The integration with ConnectWise Manage is modified and saved.
Page top
Deleting an existing integration
You can delete an existing integration in the Kaspersky Security Integration Tool for MSP window.
When you delete an integration, all virtual servers or workspaces that were linked to the integration are unbound from the integration but continue to exist in Kaspersky Security Center or Kaspersky Endpoint Security Cloud. All administrators of the deleted integration receive notifications that the integration was deleted, but they can continue to administer Kaspersky Endpoint Security Cloud workspaces that were linked to this integration.
All Kaspersky Security Center virtual servers or Kaspersky Endpoint Security Cloud workspaces that are unbound from the deleted integration can be added to other integrations.
To delete integration with ConnectWise Manage:
- In the top pane of the Kaspersky Security Integration Tool for MSP window, click the name of the integration that you want to delete.
- In the integration window that opens, click Delete to delete the integration.
- Click Yes to confirm deletion.
The integration settings are cleared, indicating that the integration is deleted.
Configuring integration in Kaspersky Security Integration with ConnectWise Manage
The purpose of Kaspersky Security Integration Tool for MSP is to configure integration between ConnectWise Manage and the Kaspersky Lab solution you use: Kaspersky Security Center or Kaspersky Endpoint Security Cloud.
Using Kaspersky Security Integration Tool for MSP, you can do the following:
- Map ConnectWise Manage companies to Kaspersky Security Center virtual servers or to Kaspersky Endpoint Security Cloud workspaces.
- Configure ticketing in ConnectWise Manage.
- Map Kaspersky Lab products to existing ConnectWise Manage products.
- Configure automated billing.
Mapping companies and enabling automatic billing
Use the Companies tab in the Kaspersky Security Integration Tool for MSP window to set up and modify mapping between managed companies in ConnectWise Manage and virtual servers or workspaces in your Kaspersky Lab solution. To set up mapping, companies must be created in ConnectWise Manage, while virtual servers must be added to Kaspersky Security Center Administration Server or workspaces must be created in Kaspersky Endpoint Security Cloud.
On the Companies tab, you can also enable automatic billing for your managed companies. This means that information about the number of license units for Kaspersky Lab products provided during the current billing period can be updated regularly and automatically in ConnectWise Manage. Timely updating lets you prepare customer invoices more quickly and easily.
When you click the Companies tab, a list is displayed, showing virtual servers or workspaces and their corresponding ConnectWise Manage companies. You can add existing virtual servers or workspaces to the integration and map ConnectWise Manage companies to them. You can also delete mapping between a virtual server or workspace and its corresponding company. In this case, neither the virtual server / workspace nor the company is deleted; instead, the link between them is broken.
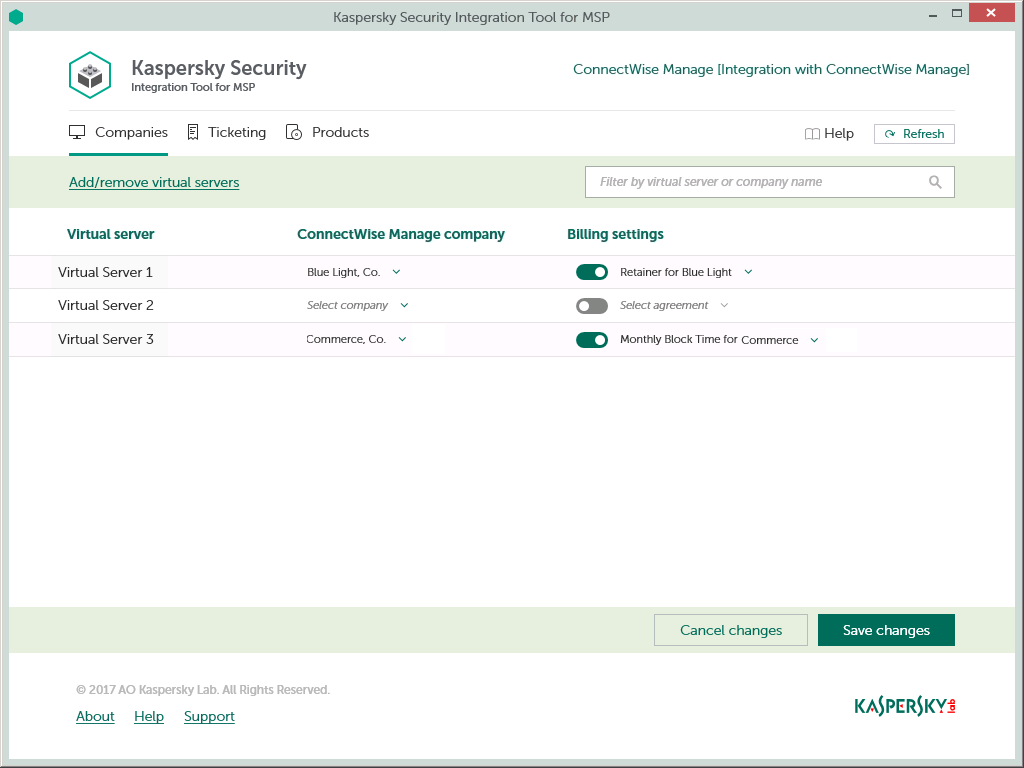
Mapping companies and enabling automatic billing
The following sections explain how to add or remove virtual servers or workspaces to / from the integration and how to configure automatic billing.
Adding and removing virtual servers or workspaces
You can add existing virtual servers or workspaces to the integration or remove them from the integration.
To add or remove virtual servers or workspaces to / from the integration:
- In the Kaspersky Security Integration Tool for MSP window, click the Companies tab.
- Click the Add / remove virtual servers link if you use Kaspersky Security Center, or the Add / remove workspaces link if you use Kaspersky Endpoint Security Cloud, and then do one of the following:
- Select check boxes next to existing virtual servers or workspaces to add them to the integration. Then you can match these virtual servers or workspaces to ConnectWise Manage companies.
- Clear check boxes next to virtual servers or workspaces to remove them from the integration. This action does not remove the virtual servers from Kaspersky Security Center or workspaces from Kaspersky Endpoint Security Cloud; it only deletes the mapping between the virtual servers or workspaces and the companies.
- Click OK.
Each virtual server or workspace can be added to one integration only. That is, if a virtual server or a workspace is added to an integration, it is not displayed in a list of virtual servers or workspaces available for another integration.
Setting up automatic billing
You can map virtual servers or workspaces to ConnectWise Manage companies and configure automatic billing for the selected companies.
To set up mapping between virtual servers or workspaces and companies, and edit billing settings:
- In the Kaspersky Security Integration Tool for MSP window, click the Companies tab.
- In the Virtual server column (if you use Kaspersky Security Center) or in the Workspace column (if you use Kaspersky Endpoint Security Cloud), locate the virtual servers or workspaces to which to map the ConnectWise Manage company.
If you have a long list of virtual servers or workspaces, use the search box located above the table, on the right, to find the required virtual server or workspace. Type any part of the virtual server or workspace name in the search box and click the Search button. Only the virtual servers or workspaces whose names contain the string you entered are displayed.
- In the ConnectWise Manage company column, click the drop-down arrow and select the ConnectWise Manage company you want to map to the virtual server or workspace.
One-to-one mapping is supported. You can map one virtual server or one workspace to a single ConnectWise Manage company.
- Turn automatic billing on or off for your company by using the toggle button in the Billing settings column.
To use automatic billing, you must create mapping between Kaspersky Lab products and their ConnectWise Manage equivalents. For details, see Mapping products.
- Click the Select agreement drop-down arrow in the Billing settings column and select one of the available Agreements associated with the company you selected in the ConnectWise Manage company column.
An Agreement must exist for the selected company in ConnectWise Manage in order for automatic billing to be set up successfully. Agreements for a company are created and managed in ConnectWise Manage. You can view the Agreements for the selected company in ConnectWise Manage.
The Agreement Additions for the products used by the company will be automatically created in ConnectWise Manage during the daily synchronization.
- If necessary, repeat steps 2 to 5 for each pair: virtual server-company or workspace-company.
- Click the Save changes button to save your mapping.
After the companies are mapped to the virtual servers or workspaces, Service Tickets and Agreement Additions for the licensed Kaspersky Lab products are automatically created for these companies in ConnectWise Manage.
Page top
How automatic billing works
You can configure automatic billing to enable Kaspersky Security Integration with ConnectWise Manage to create, and update daily, the ConnectWise Manage Agreement Additions for Kaspersky Lab products. When automatic billing is configured, information about usage of Kaspersky Lab products on managed computers is transferred to ConnectWise Manage automatically, allowing faster periodic generation of invoices for your customers. For information about enabling and configuring automatic billing, refer to Setting up automatic billing.
Automatic billing works according to the following rules:
- Kaspersky Security Integration Service for MSP runs automated billing daily, so that you have up-to-date usage information in ConnectWise Manage any time you have to generate an invoice for a client.
- Kaspersky Security Integration Service for MSP creates Agreement Additions for Kaspersky Lab products only if these products are mapped to the ConnectWise Manage products. For details, refer to Mapping products.
- To get usage information for a particular company, Kaspersky Security Integration Tool for MSP calculates how many of the company's devices use the licenses that are added to the Kaspersky Security Center virtual server / Kaspersky Endpoint Security Cloud workspace associated with the company. Only unexpired and active commercial keys and subscriptions are counted. Servers and workstations are counted separately if the Bill devices by categories option is selected when Kaspersky Lab products and ConnectWise Manage products are mapped.
To differentiate the pricing policy for two types of devices (servers and workstations), a separate billing feature is available. Kaspersky Security Integration Tool for MSP supports two billing configurations:
- Associates a single licensed Kaspersky Lab product with a single ConnectWise Manage product.
- Associates a single licensed Kaspersky Lab product with three different ConnectWise Manage products: one for servers, a second for workstations, and a third for non-Windows devices.
In this case, ConnectWise Manage analyzes the type of client device (server or workstation) that uses the Kaspersky Lab license. Data about each Kaspersky Lab product license used by the device is associated with the ConnectWise Manage product mapped to this Kaspersky Lab product.
For example, if a client company uses Kaspersky Endpoint Security for Business Advanced on 100 devices, where 90 of them are workstations and 10 are servers, Kaspersky Security Integration Service for MSP does the following:
- Creates an Agreement Addition on 90 devices for the ConnectWise Manage product for workstations.
- Creates an Agreement Addition on 10 devices for the ConnectWise Manage product for servers.
Setting up ticketing
This section explains how to set up ticketing for your managed companies.
About setting up ticketing
Tickets allow timely responses to different types of events or to changes in computer status that occur on the company network. Automated ticketing allows you to reduce significantly the time spent monitoring and managing your companies.
You must establish ticketing rules to enable automatic creation and assignment of tickets in ConnectWise Manage. You can set up creation and assignment of tickets depending on the event severity or when a computer status changes to Critical or Warning in Kaspersky Lab products.
Ticket creation settings from the previous versions of Kaspersky Security Integration with ConnectWise Manage (Maintenance Release 1 and earlier) are not compatible with versions Maintenance Release 2 and later. After you update Kaspersky Security Integration with ConnectWise Manage to Maintenance Release 2 or later, you have to reconfigure ticketing in Kaspersky Security Integration Tool for MSP.
Tickets created on the basis of computer status changes are automatically closed when the corresponding issue is resolved and the status description that triggered the ticket creation is no longer relevant. For example, when a computer's status becomes Warning because a "Databases are out of date" status description is assigned, a corresponding ticket is created. When the databases are updated, the status description "Databases are out of date" is no longer relevant, and the ticket is automatically closed. However, the computer status might remain Warning because of other status descriptions, for example, "Many viruses detected".
Tickets created on the basis of events are not closed automatically, so you must close these tickets manually.
You can create and modify ticketing rules for your managed companies. Ticketing rules are applicable to all managed companies that are mapped to Kaspersky Security Center virtual servers or Kaspersky Endpoint Security Cloud workspaces. Ticketing rules can be configured individually for events and for computer statuses.
Page top
Ticketing for events
In the Events section of the Ticketing tab, you can configure ticketing rules for events that occur in Kaspersky Security Center. You can edit ticketing settings either for an individual event, or for several events at the same time.
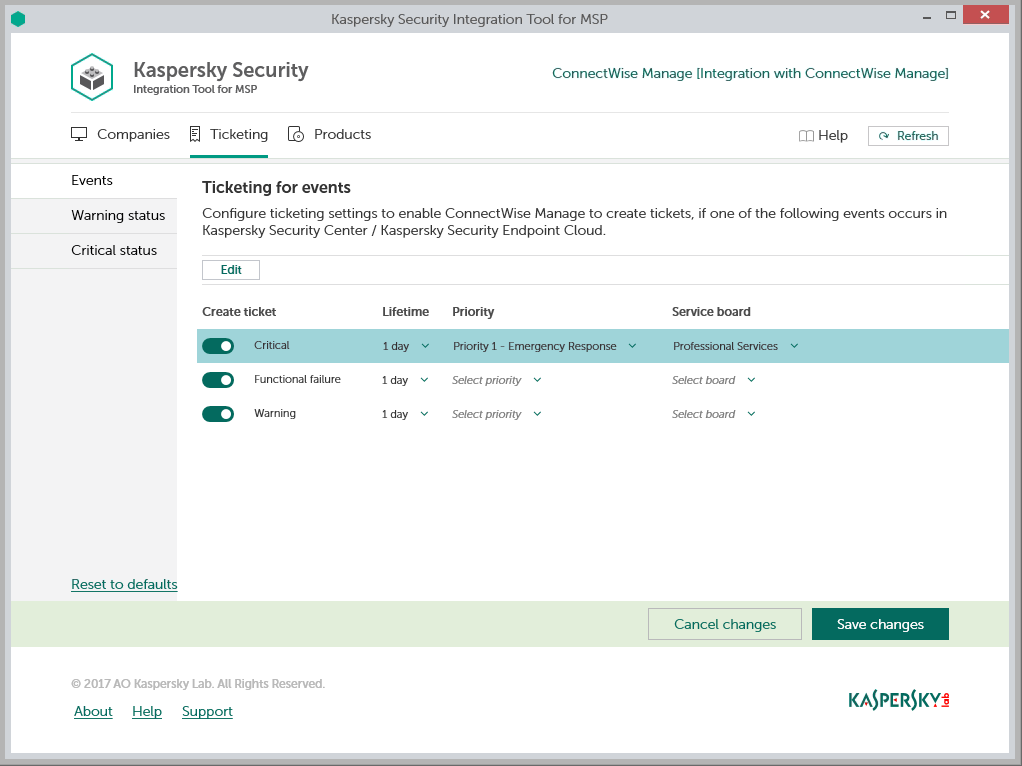
Configuring ticketing for events
To set up ticketing for events:
- In the Kaspersky Security Integration Tool for MSP window, click the Ticketing tab.
- In the left pane, select Events to configure ticketing for events.
- In the Create ticket column, use the toggle buttons to enable or disable ticket creation for the corresponding event severities.
By default, ticketing is disabled for all event severities. There are three possible event severities: Critical, Functional failure, and Warning.
- Edit the ticketing settings.
You can edit the main ticketing settings, which are displayed in the main screen. Additional ticketing settings appear in the Ticketing settings for events window.
- To edit the main ticketing settings, select the line with the event severity that you want. In the Lifetime, Priority, and Service Board columns, edit the settings as required.
- To edit both the main and additional ticketing settings, select one or more lines that contain the event severities and click the Edit button above the table. The Ticketing settings for events window opens, where you can modify additional settings.
Editing ticketing settings for multiple event severities is useful if you want to assign the same ticketing settings to these event severities. If you want the ticketing settings to be different, edit them individually for each event severity.
You can edit the following ticketing settings:
- Lifetime—In this column, select the period, in days, during which the events are still relevant. The default value is 1 day.
This value is used to determine whether to create a ticket for an event in ConnectWise Manage. If the connection between ConnectWise Manage and Kaspersky Security Center or Kaspersky Endpoint Security Cloud has been broken and events have not been sent for some time, only events more recent than the specified period are sent to ConnectWise Manage as tickets. A different relevance period can be set for different event severities.
- Priority—Select the priority level for the tickets created in ConnectWise Manage. Assigning priority levels to events is used to prioritize corresponding ConnectWise Manage tickets. The ticket priority allows you to respond to the issues in order of their importance, so that more urgent problems can be resolved sooner.
- Service Board—Select the ConnectWise Manage Service Board to assign the ticket to. Service Boards are configured in ConnectWise Manage. Make sure that the Service Board has the default status and team; otherwise, it is not possible to create Service Tickets by means of this Service Board.
- Type—Select the ConnectWise Manage ticket type to be assigned to the ticket. Ticket types, available for selection, depend on the selected Service Board.
- Subtype—Select the ConnectWise Manage ticket subtype to be assigned to the ticket. Ticket subtypes, available for selection, depend on the selected Type.
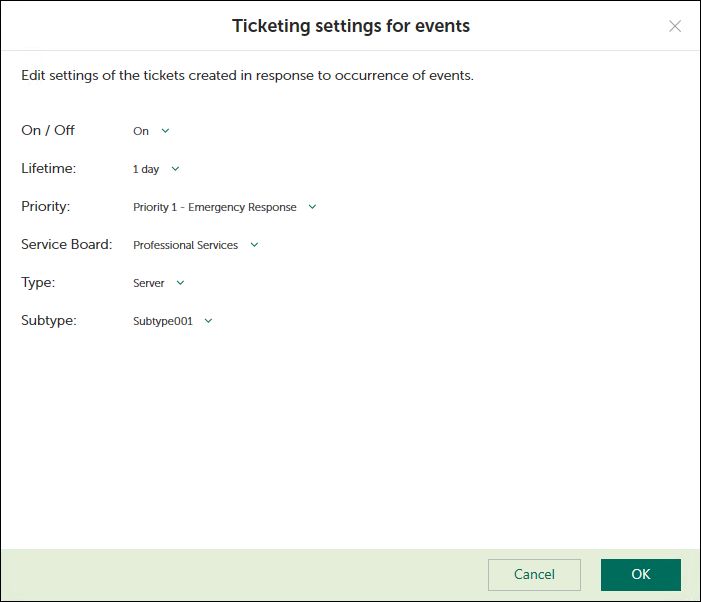
Ticketing settings for events window
- When you finish configuring ticketing for events, click the Save changes button to save the ticketing settings.
Ticketing for events is configured and ConnectWise Manage tickets will be created in accordance with the specified rules.
Kaspersky Security Integration Service for MSP can create Service Tickets in ConnectWise Manage for a company only if its status allows saving changes. Therefore, make sure that the Disallow Saving check box is cleared for your company on the Company Status tab.
You can cancel changes and reset ticketing settings to their last saved values.
To cancel changes of ticketing settings for events and restore last saved values:
- Open the Ticketing tab and in the left pane select the Events section.
- Click the Cancel changes button.
You can also reset ticketing settings to their default values.
To reset ticketing settings for events to their default values:
- Open the Ticketing tab and in the left pane select the Events section.
- Click the Reset to defaults link.
Ticketing for computer statuses
In the Warning status and Critical status sections of the Ticketing tab, you can configure ticketing rules for the computer statuses. This allows tickets to be created in ConnectWise Manage when the computer status in Kaspersky Security Center changes to Warning or Critical. You can edit ticketing settings either for an individual computer status, or for several statuses at the same time.
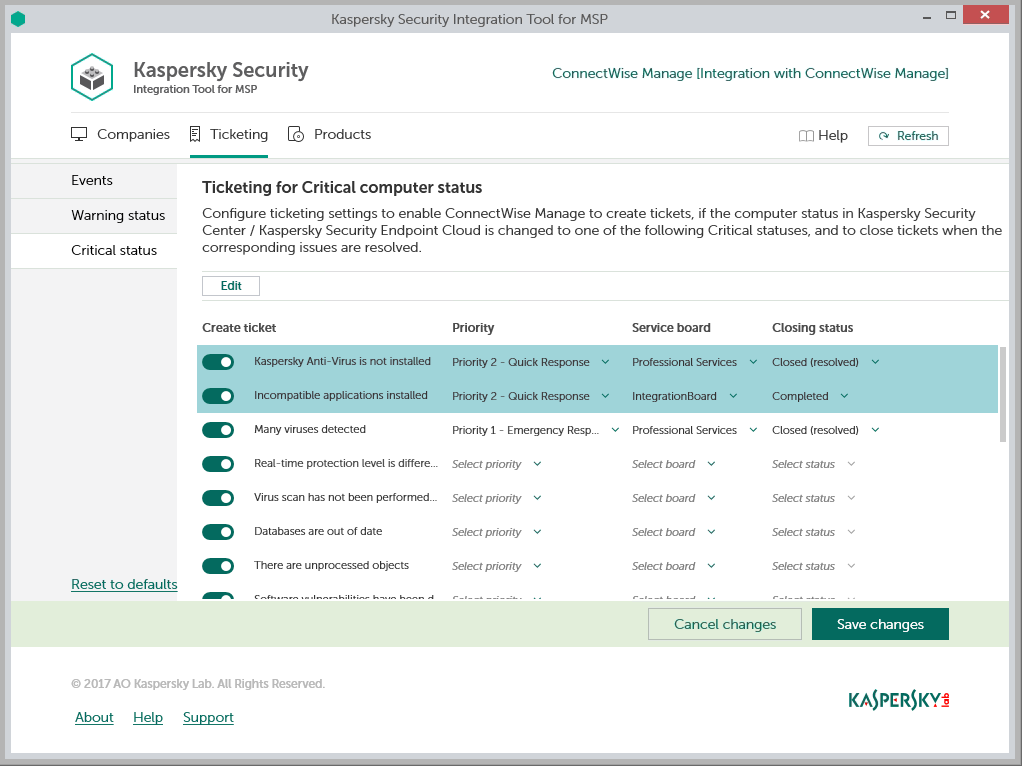
Configuring ticketing for computer statuses
To set up ticketing for computer status:
- In the Kaspersky Security Integration Tool for MSP window, click the Ticketing tab.
- In the left pane, select the Warning status or Critical status section to configure ticketing for computer statuses.
- In the Create ticket column, use the toggle buttons to enable or disable ticket creation for the corresponding status descriptions.
By default, ticketing is disabled for all computer status descriptions.
- Edit the ticketing settings.
You can edit the main ticketing settings, which are displayed on the main screen. Additional ticketing settings appear in the Ticketing settings for computer status window.
- To edit the main ticketing settings, select the line with the status description that you want. In the Priority, Service Board, and Closing status columns, edit the settings as required.
- To edit both the main and additional ticketing settings, select one or more lines that contain the computer statuses and click the Edit button above the table. The Ticketing settings for computer status window opens, where you can modify additional settings.
- Editing ticketing settings for multiple computer statuses is useful if you want to assign the same ticketing settings to these computer statuses. If you want the ticketing settings to be different, edit them individually for each computer status.
You can edit the following ticketing settings:
- Priority—Select the priority level for the tickets created in ConnectWise Manage. Assigning priority levels to events is used to prioritize corresponding ConnectWise Manage tickets. The ticket priority allows you to respond to the issues in order of their importance, so that more urgent problems can be resolved sooner.
- Service Board—Select the ConnectWise Manage Service Board to assign the ticket to. Service Boards are configured in ConnectWise Manage. Make sure that the Service Board has the default status and team; otherwise, it is not possible to create Service Tickets by means of this Service Board.
- Closing status—Select the status to be assigned to the Service Tickets in ConnectWise Manage when they are automatically closed. Tickets created on the basis of computer status change are automatically closed when the issue that triggered this computer status is resolved.
- Type—Select the ConnectWise Manage ticket type to be assigned to the ticket. Ticket types, available for selection, depend on the selected Service Board.
- Subtype—Select the ConnectWise Manage ticket subtype to be assigned to the ticket. Ticket subtypes, available for selection, depend on the selected Type.

Ticketing settings for computer status
- When you finish configuring ticketing for computer statuses, click the Save changes button to save the ticketing settings.
Ticketing for computer statuses is configured and ConnectWise Manage tickets will be created in accordance with the specified rules.
Kaspersky Security Integration Service for MSP can create Service Tickets in ConnectWise Manage for a company only if its status allows saving changes. Therefore, make sure that the Disallow Saving check box is cleared for your company on the Company Status tab.
You can cancel changes and reset ticketing settings to their last saved values.
To cancel changes of ticketing settings for computer status and restore last saved values:
- Open the Ticketing tab and in the left pane select the Warning status or Critical status section.
- Click the Cancel changes button.
You can also reset ticketing settings to their default values.
To reset ticketing settings for computer status to their default values:
- Open the Ticketing tab and in the left pane select the Warning status or Critical status section.
- Click the Reset to defaults link.
Mapping products
Set up mapping between Kaspersky Lab products and ConnectWise Manage products, so that usage information about Kaspersky Lab products appears in ConnectWise Manage as Agreement Additions.
On the Products tab of the Kaspersky Security Integration Tool for MSP window, you can match Kaspersky Lab products with their equivalents in ConnectWise Manage. You can edit the existing product mapping as well.
The list of available products differs depending on which Kaspersky Lab solution you use: Kaspersky Security Center or Kaspersky Endpoint Security Cloud.
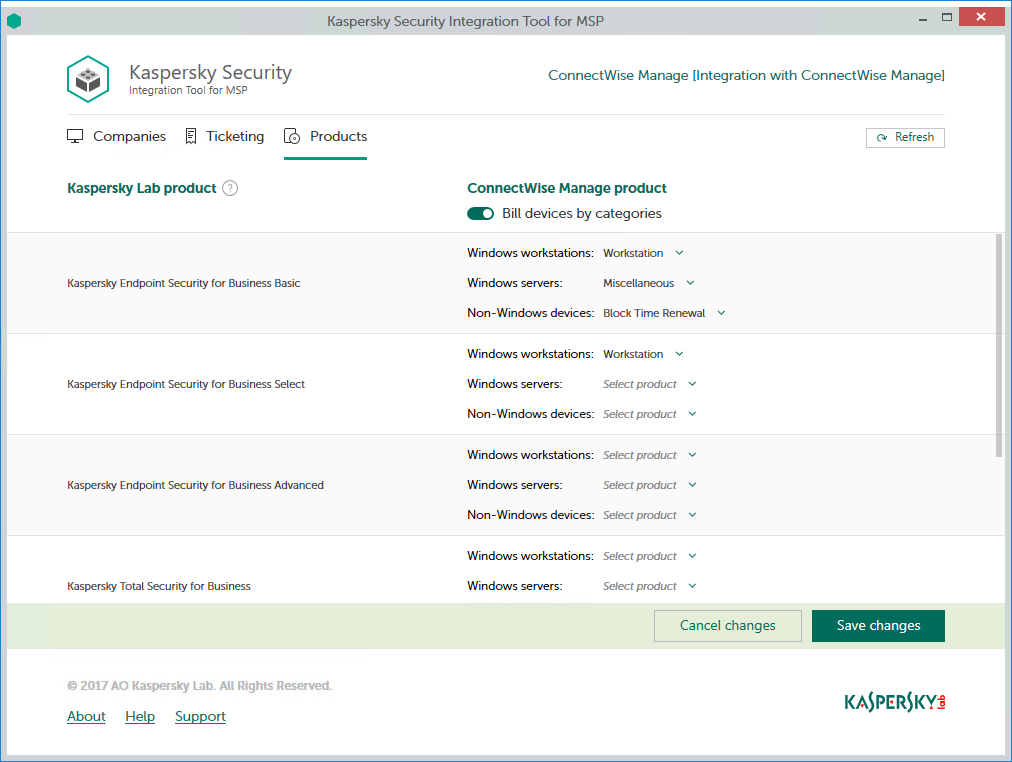
Mapping Kaspersky Lab and ConnectWise Manage products
To set up product mapping:
- In the Kaspersky Security Integration Tool for MSP window, click the Products tab.
- To differentiate the pricing policy for two types of devices (servers and workstations), use the Bill devices by categories toggle button to turn on this feature.
- Map Kaspersky Lab products in the Kaspersky Lab product column to their equivalents in the ConnectWise Manage product column.
If the Bill devices by categories feature is disabled, each Kaspersky Lab product can be mapped to one ConnectWise Manage product only. Otherwise, map each Kaspersky Lab product to three ConnectWise Manage products:
- In the Windows workstations drop-down list, select a ConnectWise Manage product. The price of this product will be used during billing for all of the workstations that use the license for the corresponding Kaspersky Lab product.
- In the Windows servers drop-down list, select a ConnectWise Manage product. The price of this product will be used during billing for all of the servers that use the license for the corresponding Kaspersky Lab product.
- In the Non-Windows devices drop-down list, select a ConnectWise Manage product. The price of this product will be used during billing for all of the non-Windows devices that use the license for the corresponding Kaspersky Lab product.
- When you have finished product mapping, click the Save changes button to save the mapping.
Viewing companies not integrated with Kaspersky Lab products
When configuring integration with ConnectWise Manage, it is useful to check whether all ConnectWise Manage companies are connected to Kaspersky Security Center virtual servers / Kaspersky Endpoint Security Cloud workspaces, or whether you accidentally skipped one or more companies. For this purpose, you can use ConnectWise Manage reports that allow you to display all existing companies together with the virtual servers or workspaces to which they are mapped.
Kaspersky Security Integration with ConnectWise Manage adds its own fields to the ConnectWise Manage configuration. You can use these fields in different custom reports. For example, using standard ConnectWise Manage functionality, you can select companies that are not integrated with Kaspersky Security Center or with Kaspersky Endpoint Security Cloud, that is, the companies that do not have a corresponding virtual server or workspace. Then, using filters, you can manually exclude from your selection the companies that do not use Kaspersky Lab products.
To view ConnectWise Manage companies that are not mapped to virtual servers or workspaces:
- Log in to ConnectWise Manage with your credentials.
- In ConnectWise Manage, create a report, using ConnectWise Report Writer. Your report must include the following fields:
- Company name.
- Corresponding virtual server / workspace name.
Refer to ConnectWise Manage documentation for details on creating reports.
- Filter your report data by the name of the virtual server or workspace.
If the name of the virtual server or workspace is empty, the company is not mapped to any virtual server or workspace.
Managing administrators
You can manage the administrators related to the integration with Kaspersky Endpoint Security Cloud. You can add the accounts of existing Kaspersky Endpoint Security Cloud users as administrators of your integration. You can also remove administrators from the integration if you do not want them to work with the integration.
You can manage administrators within the integration only if Kaspersky Endpoint Security Cloud solution is used. For Kaspersky Security Center solution, this functionality is unavailable.
When you add administrators to the integration, they have the same rights as existing administrators: they can administer all workspaces bound to this integration and manage the integration settings.
When you remove administrators from the integration, these administrators can no longer manage this integration and cannot administer its workspaces. You may have to remove administrators, for example, if they stop working for your company or move to new positions within the company and are no longer allowed to manage integrations.
All remaining administrators who have access to the integration can add or remove administrators to / from this integration.
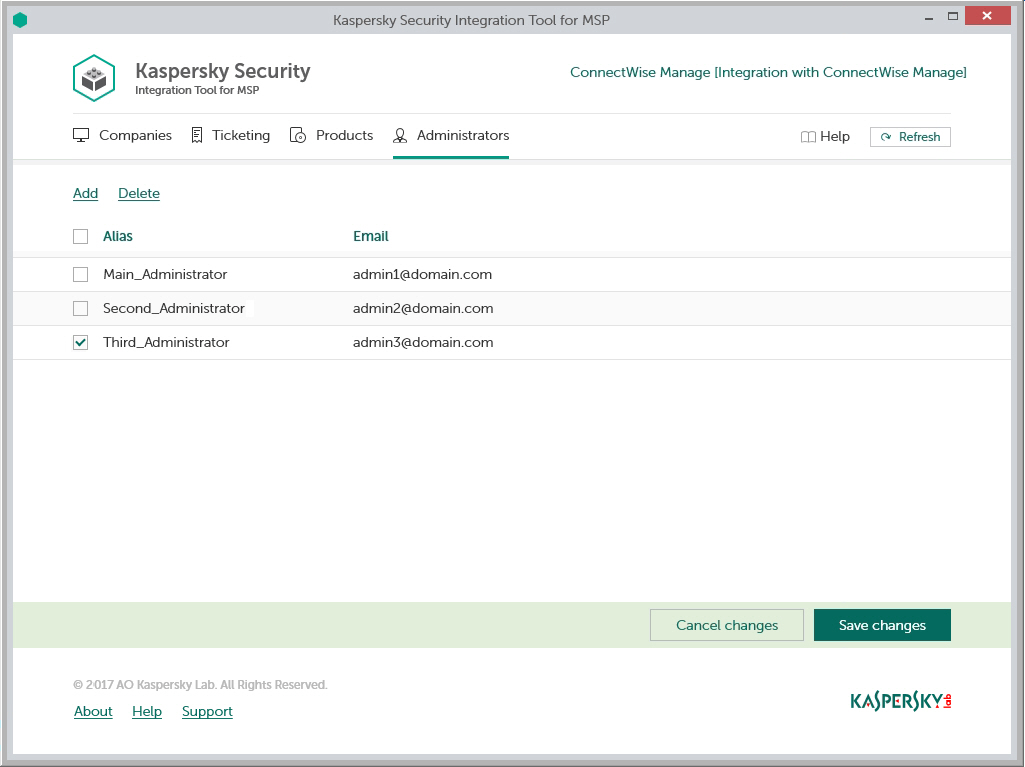
Managing administrators
The following sections explain how to add or remove an administrator to / from the integration.
Adding administrators
When you add administrators to an integration, they have the same rights as existing administrators: they can administer all Kaspersky Endpoint Security Cloud workspaces bound to this integration and manage the integration settings.
To add administrators:
- In the Kaspersky Security Integration Tool for MSP window, click the Administrators tab.
- Click the Add link to add administrators.
- In the Add administrators dialog box that opens, specify the email addresses and aliases associated with the Kaspersky Lab accounts of the users that you want to add as new administrators. You can add several administrators at a time.
- Use a semicolon to separate the email address and alias of an administrator.
- Type the data for each administrator in a new line.
Only users registered in Kaspersky Endpoint Security Cloud can be added to the integration.
- Click Next and check the data that you provided. If everything is correct, click Finish to add the administrators to the integration. If you want to change the information you provided, click Back.
- After you perform all the actions with administrators' accounts, click the Save changes button.
The new administrators are added to the integration and gain access to all workspaces within this integration.
Removing administrators
When you remove administrators from an integration, they can no longer manage the integration. However, the administrators' Kaspersky Lab accounts are not deleted; they are merely unbound from the integration, so that the administrators cannot manage the integration or administer its workspaces.
To remove administrators:
- In the Kaspersky Security Integration Tool for MSP window, click the Administrators tab.
- Select the check boxes next to the names of administrators you want removed from the integration.
If you want to select all administrators, select the check box in the column header.
You cannot remove all administrators from the integration. An integration must have at least one administrator.
- Click the Delete link to remove the selected administrators.
- After you perform all the actions with the administrators' accounts, click the Save changes button.
The selected administrators are removed from the integration and lose their rights to administer workspaces bound to the integration.
Enabling and disabling tracing
The following sections explain how to enable and disable tracing for Kaspersky Security Integration with ConnectWise Manage components.
You may have to save traces of Kaspersky Security Integration with ConnectWise Manage, for example, if you contact Technical Support and they ask you to provide the traces for diagnostics and troubleshooting. It is recommended to disable tracing when an issue is resolved, as tracing requires additional resources and additional memory to store trace files. It is also recommended to remove trace files from your computer after the issue that required tracing is resolved, because the trace files may contain personal and confidential data.
By default, tracing is disabled.
There are two ways of enabling and disabling tracing for Kaspersky Security Integration with ConnectWise Manage components:
- Using the Microsoft Windows registry.
- In the .config files of Kaspersky Security Integration with ConnectWise Manage components.
Enabling and disabling tracing using the registry
You can enable and disable tracing using the Microsoft Windows registry.
To enable or disable tracing:
Before editing the Windows registry, it is recommended that you back up the registry.
- Click the Start button.
- In the Start menu, either in the Run box or the Search box, type regedit and press Enter.
The Registry Editor window opens.
If you have restricted access to the Windows computer you are logged into, you might not be able to access the registry.
- In the Registry Editor window, navigate to the Kaspersky Security Integration Service for MSP or Kaspersky Security Integration Tool for MSP registry key. They are available by one of the following paths:
- Kaspersky Security Integration Service for MSP
- HKEY_LOCAL_MACHINE\SOFTWARE\KasperskyLab\Kaspersky Security Integration Service for MSP
- HKEY_LOCAL_MACHINE\SOFTWARE\Wow6432Node\KasperskyLab\Kaspersky Security Integration Service for MSP
- Kaspersky Security Integration Tool for MSP
If the Kaspersky Security Integration Tool for MSP registry key is not displayed, either run Kaspersky Security Integration Tool for MSP as administrator (by right-clicking the application icon and selecting Run as administrator), or create the registry key manually.
- HKEY_LOCAL_MACHINE\SOFTWARE\KasperskyLab\Kaspersky Security Integration Tool for MSP
- HKEY_LOCAL_MACHINE\SOFTWARE\Wow6432Node\KasperskyLab\Kaspersky Security Integration Tool for MSP
- Kaspersky Security Integration Service for MSP
- Edit the value of the EnableTraces parameter as follows:
- 1—To enable tracing.
- 0—To disable tracing.
- Click OK in the Edit window to save your changes.
- Close the Registry Editor window.
The trace files are saved to the .log files in the application installation folder:
- For Kaspersky Security Integration Tool for MSP the file is IntegrationUI.log, by default saved to the C:\Program Files (x86)\Kaspersky Lab\Kaspersky Security Integration Tool for MSP folder.
- For Kaspersky Security Integration Service for MSP the file is IntegrationServer.log, by default stored in the C:\Program Files (x86)\Kaspersky Lab\Kaspersky Security Integration Service for MSP folder.
When you uninstall Kaspersky Security Integration Tool for MSP and Kaspersky Security Integration Service for MSP, the trace files are removed together with the application.
Enabling and disabling tracing using the .config files
You can enable and disable tracing in the .config files of Kaspersky Security Integration Tool for MSP and Kaspersky Security Integration Service for MSP. The files are stored in the installation folders of the corresponding products.
To enable or disable tracing:
- Navigate to the .config file of the Kaspersky Security Integration with ConnectWise Manage component for which you want to enable or disable tracing. The .config file is stored in the installation folder. By default, the navigation paths are:
- For Kaspersky Security Integration Tool for MSP the file is IntegrationUI.exe.config, by default stored in the C:\Program Files (x86)\Kaspersky Lab\Kaspersky Security Integration Tool for MSP folder.
- For Kaspersky Security Integration Service for MSP the file is IntegrationServer.exe.config, by default stored in the C:\Program Files (x86)\Kaspersky Lab\Kaspersky Security Integration Service for MSP folder.
- Open the .config file with any text editor and change the value of the minlevel attribute of the logger element as follows:
- To enable tracing, set the value of the minlevel attribute to Debug.
<logger name="MSPIntegration.*" writeTo="fileTarget" minlevel="Debug" /> - To disable tracing, set the value of the minlevel attribute to Off.
<logger name="MSPIntegration.*" writeTo="fileTarget" minlevel="Off" />
- To enable tracing, set the value of the minlevel attribute to Debug.
- Save and close the modified .config file.
The trace files are saved to the .log files in the application installation folder:
- For Kaspersky Security Integration Tool for MSP the file is IntegrationUI.log, by default saved to the C:\Program Files (x86)\Kaspersky Lab\Kaspersky Security Integration Tool for MSP folder.
- For Kaspersky Security Integration Service for MSP the file is IntegrationServer.log, by default stored in the C:\Program Files (x86)\Kaspersky Lab\Kaspersky Security Integration Service for MSP folder.
When you uninstall Kaspersky Security Integration Tool for MSP and Kaspersky Security Integration Service for MSP, the trace files are removed together with the application.
Reporting
This section describes how to create different types of reports for managed Kaspersky Endpoint Security Cloud workspaces or Kaspersky Security Center virtual servers in ConnectWise Manage.
Service report
You can create a regular service report for a representative of a managed company. This report includes statistics on protection services provided to the client. You can view this report for the last 30 days and the last 7 days. Kaspersky Security Integration with ConnectWise Manage updates statistics daily.
A report can be built for a particular managed company linked to Kaspersky Endpoint Security Cloud workspace or Kaspersky Security Center virtual server, by using the standard ConnectWise Report Writer. The name of a service report configuration item in ConnectWise Manage contains the report period, the report starting date and ending date, and the name of the Kaspersky Security Center virtual server. (If you use Kaspersky Endpoint Security Cloud, the name of the Kaspersky Endpoint Security Cloud workspace will not be included). If the name of a service report configuration item is more than 100 characters long, its length is reduced.
A generated report includes statistics on tickets processed during the report period and on the state of managed computers in the customer infrastructures.
A service report includes the following data:
- Report period—Either 7 days or 30 days.
- Report starting date
- Report ending date
- Managed computers—Number of computers of the managed company that are connected to the Kaspersky Endpoint Security Cloud workspace or Kaspersky Security Center virtual server.
- Protected computers—Number of computers on which a real-time protection application is installed.
- New critical tickets—Number of tickets based on critical events or computer statuses that were created by Kaspersky Security Integration with ConnectWise Manage during the report period (regardless of whether or not these tickets were closed during the report period). Tickets based on events are created according to the rules that you set as described in Ticketing for events. Tickets based on computer statuses are created according to the rules that you set as described in Ticketing for computer statuses.
- Closed critical tickets—Number of tickets based on critical events or computer statuses that were resolved and closed by Kaspersky Security Integration with ConnectWise Manage during the report period (regardless of whether or not these tickets were created during the report period).
- New warning tickets—Number of tickets based on warning events or computer statuses that were created by Kaspersky Security Integration with ConnectWise Manage during the report period (regardless of whether or not these tickets were closed during the report period).
- Closed warning tickets—Number of tickets based on warning events or computer statuses that were resolved and closed by Kaspersky Security Integration with ConnectWise Manage during the reporting period (regardless of whether or not these tickets were created during the report period).
- New functional failure tickets—Number of tickets based on functional failure events that were created by Kaspersky Security Integration with ConnectWise Manage during the reporting period (regardless of whether or not these tickets were closed during the report period).
- Closed functional failure tickets—Number of tickets for functional failure events that were resolved and closed by Kaspersky Security Integration with ConnectWise Manage during the report period (regardless of whether or not these tickets were created during the report period).
- Problem computers—Number of computers whose status is other than OK at the moment the configuration item is created.
License report
You can create a license report for a client company to provide information about license keys for the Kaspersky Lab products, including key usage and availability.
The name of a license report configuration item in ConnectWise Manage contains the last update date of the configuration item and the name of the product to which the license applies. If the name of a license report configuration item is longer than 100 characters, it is cut.
A license report includes the following data for each license key:
- Report date—Last update date of the configuration item.
- License ID
- Product name
- License period
- License expiration date
- License restriction—Number of computers to which the license key can be assigned.
- Number of company's computers using the license—Number of computers to which the license key is assigned. These computers belong to the selected client company.
- Total number of computers using the license—Number of computers to which the license key is assigned. These computers belong to all client companies of the MSP or to the MSP itself.
- Key is more than 90% used—If the total number of computers that use the license key divided by the license restriction is greater than 0.9, the value is Yes. Otherwise, the value is No.
- Key exceeded restriction—If the total number of computers that use the license key divided by the license restriction is greater than 1, the value is Yes. Otherwise, the value is No.
- License information—Additional information about the license key.
- Support information—Information about Technical Support contacts.
Generating a report in ConnectWise Manage
A service report is provided in ConnectWise Manage as configuration items of a special Kaspersky report type. A license report is represented as configuration items of the Kaspersky license report type.These items are also linked to managed company profiles according to the mapping to workspaces or virtual servers.
To generate a report for a managed company in ConnectWise Manage:
- On the left navigation menu, point to System, and then click Report Writer.
- Click the New button.
- On the Data Sources tab that opens, select the v_rpt_Configuration check box.
- Click the Fields tab, and then add the following fields:
- Question
- Answer
These fields will be names of columns in the report.
- Click the Filters tab, and then add the following filters:
- Filter: Company_Name; Operator: Equals (Select); Value(s): in the drop-down list, select the managed company for which you want to view the report.
- Filter: Config_Name; Operator: Equals (Select); Value(s): in the drop-down list, select the configuration item that corresponds to the required report type (Kaspersky report or Kaspersky license report) and—for a service report—period (start date and end date).
- If you want the report to display additional information, add other fields and filters. For more details, refer to the ConnectWise Manage documentation at https://docs.connectwise.com/ConnectWise_Documentation/090/070.
- Click the Preview button to preview the report.
- Click the Save button to save the report.
- Export the report, print it, or send it by email to your client.
You can export the report to a CSV file, a Microsoft Excel spreadsheet, a Microsoft Word document, or an XML document. You can also save the SQL query that matches the specified report parameters to a text file.
Custom fields in ConnectWise Manage
Kaspersky Security Integration with ConnectWise Manage provides easy access to valuable integration-specific information on ConnectWise Manage companies directly from the ConnectWise Manage GUI. You can view this information in each ConnectWise Manage company profile and use this information in ConnectWise Manage reports.
The following custom fields are available for the ConnectWise Manage companies:
- If you use Kaspersky Security Center
- Kaspersky virtual server—Name of the virtual server mapped to this company in Kaspersky Security Integration Tool for MSP.
- If you use Kaspersky Endpoint Security Cloud:
- Kaspersky workspace—Name of the workspace mapped to this company in Kaspersky Security Integration Tool for MSP.
- Kaspersky workspace URL—Link to open your Kaspersky Endpoint Security Cloud workspace from the ConnectWise Manage company profile.
If you accidentally deleted the custom fields created by the integration, you can restore them by using the following workaround. However, this workaround works only the first time you save changes in parameter values after Kaspersky Security Integration Tool for MSP starts.
To restore the custom fields:
- Start or restart Kaspersky Security Integration Tool for MSP.
- Change the value for any parameter on any tab (Companies, Ticketing, or Products) to activate the Save changes button.
- Click the Save changes button.
The custom fields are displayed after you save changes to your integration.
- Set the parameter that you changed in step 2 to the original value, and then save your settings.
The custom fields are now available in the ConnectWise Manage company profile.
Page topGlossary
Administration Server
A component of Kaspersky Security Center that centrally stores information about all Kaspersky Lab applications that are installed within the corporate network. Administration Server can also be used to manage these applications.
Administration Server client (Client computer)
A computer, server, or workstation on which Network Agent and managed Kaspersky Lab applications are running.
Anti-virus databases
Databases that contain information about computer security threats known to Kaspersky Lab as of when the anti-virus databases are released. Entries in anti-virus databases allow malicious code to be detected in scanned objects. Anti-virus databases are created by Kaspersky Lab specialists and updated hourly.
Network Agent
A Kaspersky Security Center component that enables interaction between the Administration Server and Kaspersky Lab applications that are installed on a specific network node (workstation or server).
Virus
A program that infects other ones, by adding its code to them in order to gain control when infected files are run. This simple definition allows identifying the main action performed by any virus: infection.
Workspace
Virtual Administration Server by Kaspersky Lab that is designed to manage a security software suite on devices connected to Kaspersky Endpoint Security Cloud, as well as store individual settings of Kaspersky Endpoint Security Cloud and the registration data of a company using this product.
Contact Technical Support
This section describes how to get technical support and the terms on which it is available.
How to get technical support
If you cannot find a solution to your issue in the Kaspersky Security Integrations for MSP documentation or in any of the sources of information about Kaspersky Security Integrations for MSP, contact Technical Support. Technical Support specialists will answer all your questions about configuring and using Kaspersky Security Integrations for MSP.
Before contacting Technical Support, please read the support rules.
You can contact Technical Support in one of the following ways:
- By visiting the Technical Support website
- By sending a request to Technical Support from the Kaspersky CompanyAccount portal
Technical Support via Kaspersky CompanyAccount
Kaspersky CompanyAccount is a portal for companies that use Kaspersky Lab applications. The Kaspersky CompanyAccount portal is designed to facilitate interaction between users and Kaspersky Lab specialists through online requests. You can use Kaspersky CompanyAccount to track the status of your online requests and store a history of them as well.
You can register all of your organization's employees under a single account on Kaspersky CompanyAccount. A single account lets you centrally manage electronic requests from registered employees to Kaspersky Lab and also manage the privileges of these employees via Kaspersky CompanyAccount.
The Kaspersky CompanyAccount portal is available in the following languages:
- English
- Spanish
- Italian
- German
- Polish
- Portuguese
- Russian
- French
- Japanese
To learn more about Kaspersky CompanyAccount, visit the Technical Support website.
Page top
AO Kaspersky Lab
Kaspersky Lab is a world-renowned vendor of systems protecting computers against digital threats, including viruses and other malware, unsolicited email (spam), and network and hacking attacks.
In 2008, Kaspersky Lab was rated among the world’s top four leading vendors of information security software solutions for end users (IDC Worldwide Endpoint Security Revenue by Vendor). Kaspersky Lab is the preferred vendor of computer protection systems for home users in Russia (IDC Endpoint Tracker 2014).
Kaspersky Lab was founded in Russia in 1997. It has since grown into an international group of companies with 38 offices in 33 countries. The company employs more than 3,000 skilled professionals.
Products. Kaspersky Lab products provide protection for all systems, from home computers to large corporate networks.
The personal product range includes security applications for desktop, laptop, and tablet computers, smartphones and other mobile devices.
The company offers protection and control solutions and technologies for workstations and mobile devices, virtual machines, file and web servers, mail gateways, and firewalls. The company's portfolio also features specialized products providing protection against DDoS attacks, protection for industrial control systems, and prevention of financial fraud. Used in conjunction with centralized management tools, these solutions ensure effective automated protection for companies and organizations of any size against computer threats. Kaspersky Lab products are certified by major test laboratories, compatible with software from diverse vendors, and optimized to run on many hardware platforms.
Kaspersky Lab virus analysts work around the clock. Every day they uncover hundreds of thousands of new computer threats, create tools to detect and disinfect them, and include their signatures in databases used by Kaspersky Lab applications.
Technologies. Many technologies that are now part and parcel of modern anti-virus tools were originally developed by Kaspersky Lab. It is no coincidence that many other developers use the Kaspersky Anti-Virus engine in their products, including: Alcatel-Lucent, Alt-N, Asus, BAE Systems, Blue Coat, Check Point, Cisco Meraki, Clearswift, D-Link, Facebook, General Dynamics, H3C, Juniper Networks, Lenovo, Microsoft, NETGEAR, Openwave Messaging, Parallels, Qualcomm, Samsung, Stormshield, Toshiba, Trustwave, Vertu, and ZyXEL. Many of the company’s innovative technologies are patented.
Achievements. Over the years, Kaspersky Lab has won hundreds of awards for its services in combating computer threats. Following tests and research conducted by the reputed Austrian test laboratory AV-Comparatives in 2014, Kaspersky Lab ranked among the top two vendors by the number of Advanced+ certificates earned and was ultimately awarded the Top Rated certificate. But Kaspersky Lab's main achievement is the loyalty of its users worldwide. The company’s products and technologies protect more than 400 million users, and its corporate clients number more than 270,000.
Kaspersky Lab website: |
|
Virus encyclopedia: |
|
Virus Lab: |
https://virusdesk.kaspersky.com (for analyzing suspicious files and websites) |
Kaspersky Lab’s web forum: |
Page top
Information about third-party code
Information about third-party code is contained in the file legal_notices.txt, in the application installation folder.
Page top
Trademark notices
Registered trademarks and service marks are the property of their respective owners.
Microsoft and Windows are registered trademarks of Microsoft Corporation in the United States and other countries.
Page top
Kaspersky Security Integration with Autotask
This section describes the purpose, functions, and distribution kit of Kaspersky Security Integration with Autotask, and provides hardware and software requirements for Kaspersky Security Integration with Autotask.
About Kaspersky Security Integration with Autotask
Integration is the process of bringing together components into a single system. Kaspersky Security Integration with Autotask integrates Kaspersky Lab solutions (Kaspersky Security Center or Kaspersky Endpoint Security Cloud) and Autotask to provide a powerful combination of monitoring and management tools, such as automated billing and ticket creation for client accounts.
In terms of Kaspersky Security Integration with Autotask, integration is a set of parameters and interaction rules that can be set up and configured. First, you create an integration between your Kaspersky Lab solution and Autotask; then you can manage and configure your integrations, and view and edit integration parameters. When configuring an integration, you set up mapping between the entities of the Kaspersky Lab solution and Autotask entities, and define rules that determine how your Kaspersky Lab solution interacts with Autotask.
Kaspersky Security Integration with Autotask consists of two applications: Kaspersky Security Integration Tool for MSP and Kaspersky Security Integration Service for MSP (Managed Service Providers).
- Kaspersky Security Integration Tool for MSP provides a graphical user interface (GUI) to configure integration. The tool is used to configure connection between the Kaspersky Lab solution that you use and Autotask. The tool is also used to configure mapping between the Kaspersky Lab solution entities and Autotask entities. Kaspersky Lab solution entities are virtual servers, if you use Kaspersky Security Center, or workspaces, if you use Kaspersky Endpoint Security Cloud. Autotask entities are Accounts and Services.
- Kaspersky Security Integration Service for MSP is a Microsoft Windows service application that is installed on the computer that has Kaspersky Security Center Administration Server installed. Kaspersky Security Integration Service for MSP synchronizes data in Kaspersky Security Center and Autotask. It is a service application only, with no user interface.
About data provision
Kaspersky Security Integration with Autotask is designed for integration of Kaspersky Lab solutions for administration of security applications with Autotask within the framework of the functionality described in this Help document.
To use Kaspersky Security Integration with Autotask, you must install the integration components and connect them to the Kaspersky Lab solution you use, create an integration with Autotask, specify connection parameters and integration settings and select your customers’ virtual servers / workspaces for the integration.
By using the product, you agree that the said product may receive data from Autotask and the connected virtual servers / workspaces, as well as store, process, and display information that is intended for ensuring the product functionality.
By creating an integration and connecting Autotask and virtual servers / workspaces to the product, you thus confirm that you are the sole owner of any data you provide or that you are entitled to provide any data.
Any information provided is protected and processed in accordance with the Kaspersky Lab Privacy Policy.
For the purpose of integration of Kaspersky Security Center / Kaspersky Endpoint Security Cloud and Autotask, Kaspersky Security Integration with Autotask may receive, store, and process the following types of data:
- Data required to connect to the integrated software:
- Parameters for connecting to Kaspersky Security Center Administration Server, including an account.
- Account for connecting to Kaspersky Endpoint Security Cloud.
- Account for accessing Autotask.
- Data about Kaspersky Security Center / Kaspersky Endpoint Security Cloud events and about assigning the Critical and Warning statuses to computers managed by Kaspersky Security Center / Kaspersky Endpoint Security Cloud. This data is required for automatic creation of tickets or similar entities.
- Data about usage of licenses for Kaspersky Lab products by computers managed by Kaspersky Security Center / Kaspersky Endpoint Security Cloud (the number of computers that use a certain license). This data is required for automatic generation of invoices for your customers.
- Data about the state of a managed Kaspersky Security Center virtual server / Kaspersky Endpoint Security Cloud workspace (the number of managed computers, the number of protected computers, the number of created and closed tickets of various types, the number of threats and malicious objects detected on the computers, the number of problematic computers, and the number of infected computers). This data is required for report generation.
- Data about licenses used at Kaspersky Security Center virtual servers / Kaspersky Endpoint Security Cloud workspaces and about attributes of these licenses. This data is required for report generation.
- Integration settings:
- Type of integrated platform (Autotask).
- Set of integrated virtual servers / workspaces.
- List of Kaspersky Endpoint Security Cloud administrators (their aliases and email addresses) who are also granted administrative privileges in the integration.
- Rules for mapping objects of Kaspersky Security Center / Kaspersky Endpoint Security Cloud to those of Autotask (virtual servers / workspaces to accounts and Kaspersky Lab products to Autotask services).
- Rules for creating objects in Autotask, such as tickets, contract service adjustments, and configuration items.
For integrations with Kaspersky Endpoint Security Cloud, the received data may be stored and processed within the Kaspersky Endpoint Security Cloud infrastructure according to the Kaspersky Endpoint Security Cloud data provision. For details, refer to section "About data provision" in Kaspersky Endpoint Security Cloud Online Help.
All received data is used by the MSP administrators and technicians. Kaspersky Lab Technical Support specialists may also use the above data when an MSP administrator contacts Technical Support.
Page top
Features of Kaspersky Security Integration with Autotask
Kaspersky Security Integration with Autotask helps you to integrate Kaspersky Lab solutions with Autotask to provide ticketing, straightforward monitoring, issue tracking, automated billing, and reporting in the customer environment.
Kaspersky Security Integration with Autotask provides the following features:
- Connection
With Kaspersky Security Integration with Autotask, you can connect Kaspersky Lab solutions to Autotask in a few clicks to enable automated billing, ticketing, and other processes. You do not need any additional tools or consoles: you can access everything from Autotask.
- Automatic ticketing
Kaspersky Security Integration with Autotask simplifies multi-tenancy management by enabling automation of ticket creation and workflow for each of your client accounts. You can select an Autotask account of your client and map it to the corresponding Kaspersky Lab virtual server / workspace.
The tickets are automatically created in Autotask, which reduces the time you spend monitoring your managed client account and increases the number of clients that a single technician can manage. For additional resource efficiency, assign priorities and queues to tickets to streamline their prioritization.
- Billing setup
Kaspersky Security Integration with Autotask provides easy access to information on usage of Kaspersky Lab products from Autotask, which significantly simplifies and automates customer billing and reporting.
- Report generation
You can generate service reports on Kaspersky Security Center virtual servers or Kaspersky Endpoint Security Cloud workspaces and license reports directly from Autotask. Service reports include statistics on protection services provided to the client over the last 30 days and the last 7 days. License reports provide information about license keys, including their usage and availability.
- Compatibility
With Kaspersky Security Integration with Autotask, it is easy to create solutions based on your customers’ needs and requirements: Autotask works with both on-premises and cloud-based Kaspersky Lab solutions. Use Kaspersky Lab cloud-based security to avoid additional overhead, or keep everything inside the perimeter and make the most of your existing hardware investment with an on-premises solution.
Page top
Distribution kit
Kaspersky Security Integration with Autotask is delivered free of charge as a distribution package that contains installation files for Kaspersky Security Integration Tool for MSP and Kaspersky Security Integration Service for MSP.
You can download the distribution kit from the Kaspersky Lab website.
No license is required for Kaspersky Security Integration with Autotask.
Page top
Software requirements
Basic software requirements for integration setup:
- Kaspersky Security Center Administration Server 10 Service Pack 2 Maintenance Release 1 and later, or Kaspersky Endpoint Security Cloud.
Software requirements for Kaspersky Security Integration Tool for MSP:
- Microsoft Windows 7 and later.
- Microsoft .NET Framework 4.5.2.
- Kaspersky Security Center Administration Server 10 Service Pack 2 Maintenance Release 1 and later, or Kaspersky Security Center Administration Console 10 Service Pack 2 Maintenance Release 1 and later—for an on-premises solution only.
Software requirements for Kaspersky Security Integration Service for MSP:
- Supported operating systems are the same as those supported by Kaspersky Security Center 10 Service Pack 2 Maintenance Release 1 and later. Refer to Kaspersky Security Center documentation for details.
- Administration Server component of Kaspersky Security Center 10 Service Pack 2 Maintenance Release 1 and later.
- Microsoft .NET Framework 4.5.2.
Deployment schemas of Kaspersky Security Integration with Autotask
This section describes the deployment schemas of Kaspersky Security Integration with Autotask. The schemas include the two components of Kaspersky Security Integration with Autotask:
- Kaspersky Security Integration Tool for MSP—Used to configure connection between the Kaspersky Lab solution you use and Autotask, and to configure mapping between the Kaspersky Lab solution entities and Autotask entities.
- Kaspersky Security Integration Service for MSP—Synchronizes data in Kaspersky Security Center and Autotask. It is a service application only, with no user interface.
The deployment schema that suits your integration depends on the Kaspersky Lab solution you use and on your integration model. There are three deployment schemas:
- For an on-premises version of a Kaspersky Lab solution—Kaspersky Security Center.
- For an on-premises version of a Kaspersky Lab solution—Kaspersky Security Center with slave Administration Servers.
- For a cloud-based version of a Kaspersky Lab solution—Kaspersky Endpoint Security Cloud.
This section describes the deployment schemas in detail.
Deployment schema for on-premises solution
Deploy Kaspersky Security Integration with Autotask based on this schema if you use an on-premises version of a Kaspersky Lab solution—Kaspersky Security Center—and if you do not have slave Administration Servers in your managed company infrastructure.
The components of Kaspersky Security Integration with Autotask are shown as orange rectangles in the following figure.
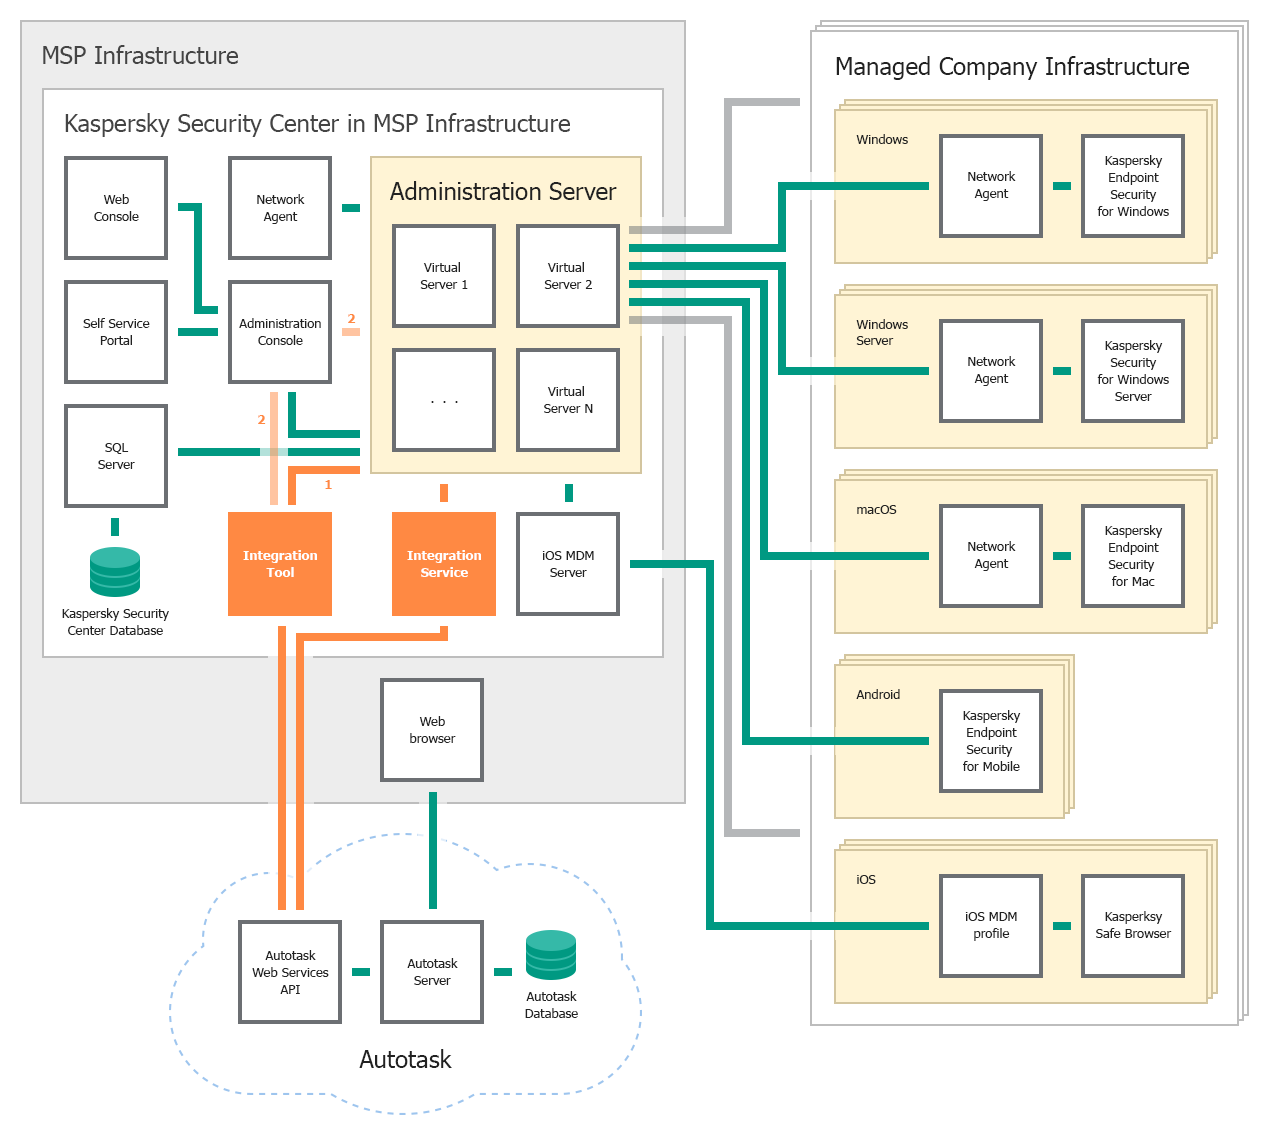
Deployment schema for on-premises solution
The following list describes deployment prerequisites and data flow:
- Kaspersky Security Integration Service for MSP must be installed on the computer on which Kaspersky Security Center Administration Server is installed.
- Kaspersky Security Integration Tool for MSP must be installed on the computer on which either Administration Console or Administration Server is installed and deployed.
- In Kaspersky Security Center, virtual servers must be created for each of the managed Autotask accounts. These virtual servers are than mapped to Autotask accounts, allowing you to integrate Kaspersky Security Center and Autotask.
- In your managed environment, you may have many different Kaspersky Lab programs installed. Data on the number of programs is used by Kaspersky Security Integration with Autotask for automatic billing. Events and computer status changes sent from Kaspersky Lab programs to Kaspersky Security Center are received by Kaspersky Security Integration Service for MSP and tickets are created based on them.
Deployment schema for on-premises solution and slave servers
Deploy Kaspersky Security Integration with Autotask based on this schema if you use an on-premises version of a Kaspersky Lab solution—Kaspersky Security Center—and if you use slave Administration Servers in your managed company infrastructure.
The components of Kaspersky Security Integration with Autotask are shown as orange rectangles in the following figure.
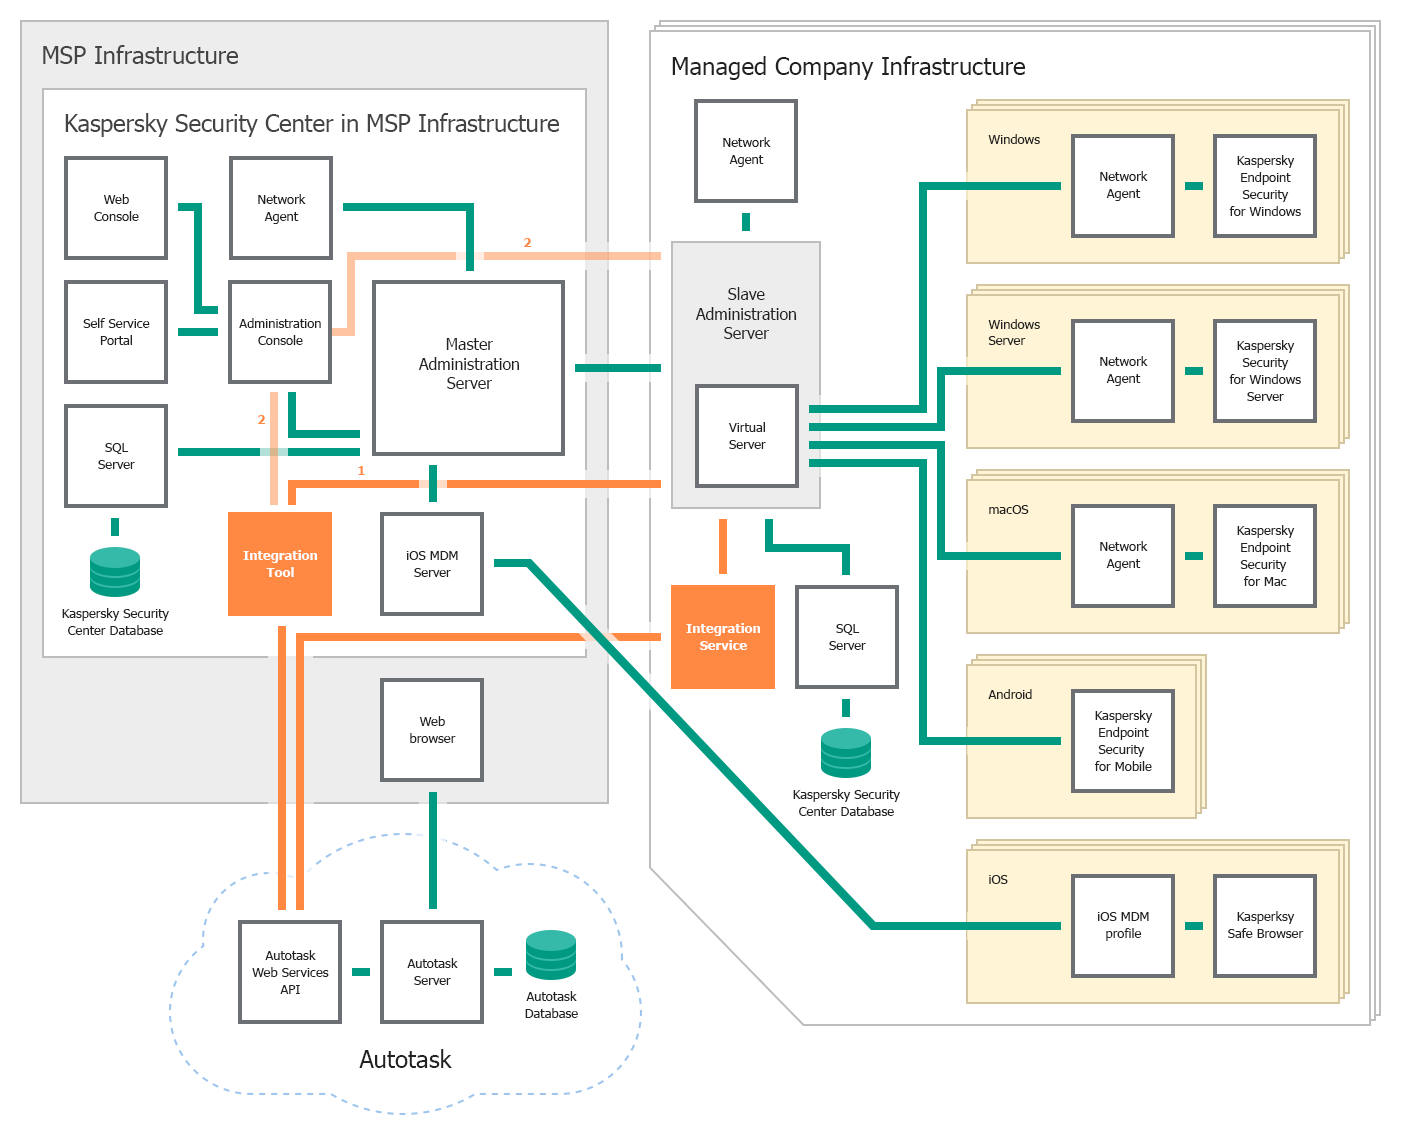
Deployment schema for on-premises solution and slave servers
The following list describes deployment prerequisites and data flow:
- One or more Administration Servers are used in the client's infrastructure. These Administration Servers are slave Administration Servers relative to the Administration Server that is installed in the MSP infrastructure. The Administration Server installed in the MSP infrastructure is the master Administration Server. You can use this type of deployment to decrease load on your master Administration Server.
- Kaspersky Security Integration Service for MSP must be installed on the computer on which the slave Administration Server is installed in the client's infrastructure.
- Kaspersky Security Integration Tool for MSP must be installed on the computer on which either Administration Console or the master Administration Server is installed and deployed.
- On your slave Administration Server, virtual servers must be created for each of the managed accounts. These virtual servers are then mapped to Autotask accounts, allowing you to integrate Kaspersky Security Center and Autotask.
- In your managed environment, you may have many different Kaspersky Lab programs installed. Data on the number of programs is used by Kaspersky Security Integration with Autotask for automatic billing. Events and computer status changes sent from Kaspersky Lab programs to Kaspersky Security Center are received by Kaspersky Security Integration Service for MSP and tickets are created based on them.
Deployment schema for cloud-based solution
Deploy Kaspersky Security Integration with Autotask based on this schema if you use the cloud-based version of a Kaspersky Lab solution—Kaspersky Endpoint Security Cloud.
The components of Kaspersky Security Integration with Autotask are shown as orange rectangles in the following figure.
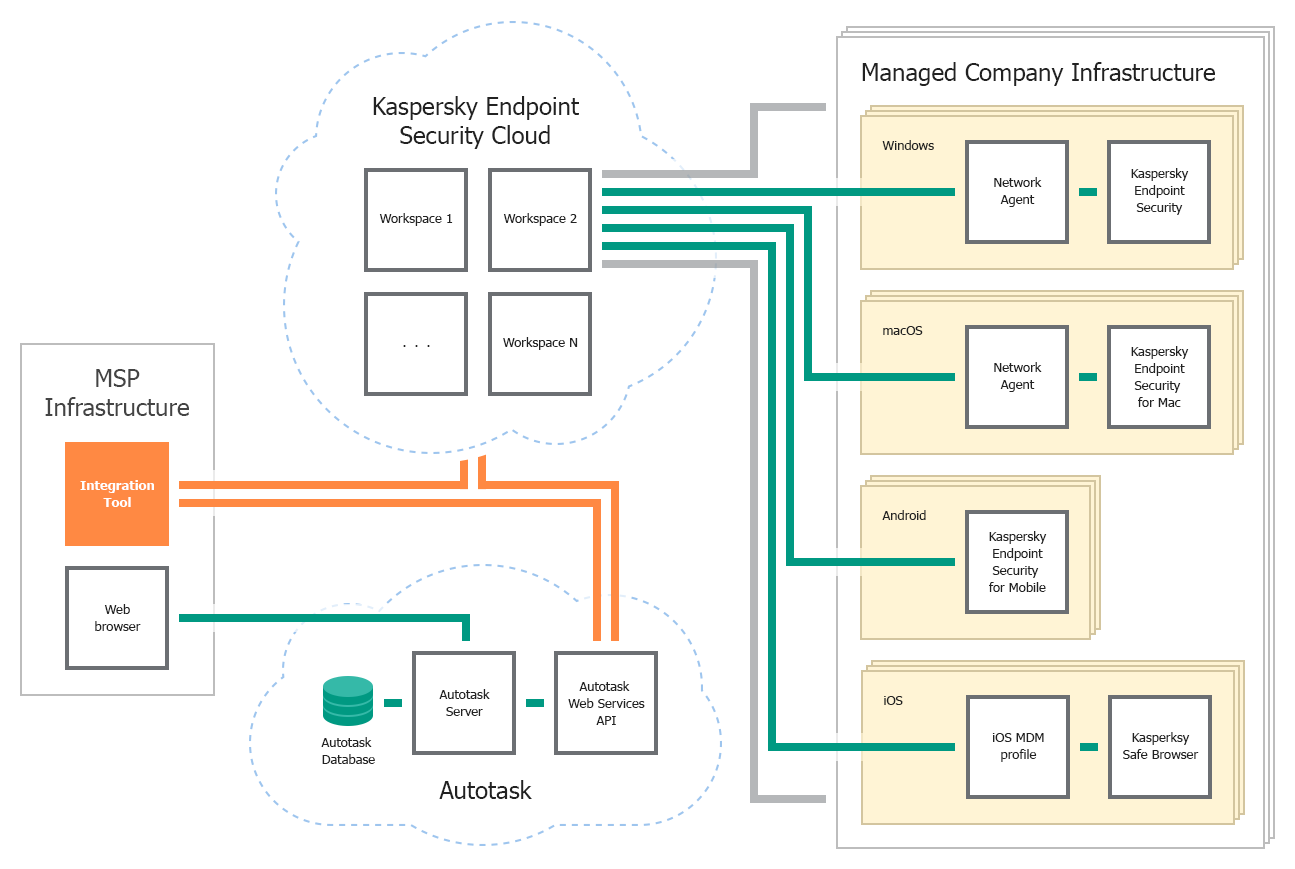
Deployment schema for cloud-based solution
The following list describes deployment prerequisites and data flow:
- In this deployment schema, only Kaspersky Security Integration Tool for MSP is used. Kaspersky Security Integration Service for MSP is not used.
- Kaspersky Security Integration Tool for MSP must be installed in your infrastructure, and not in the client infrastructure.
- In your Kaspersky Endpoint Security Cloud solution, workspaces must be created for each of the managed Autotask accounts. These workspaces are than mapped to Autotask accounts, allowing you to integrate Kaspersky Endpoint Security Cloud and Autotask.
- In your managed environment, you may have many different Kaspersky Lab programs installed. Data on the number of programs is used by Kaspersky Security Integration with Autotask for automatic billing. Events and computer status changes sent from Kaspersky Lab programs to Kaspersky Endpoint Security Cloud are received and tickets are created based on them.
Integration scenario
This topic describes the overall sequence of actions that you perform to integrate your Kaspersky Lab solution (Kaspersky Security Center or Kaspersky Endpoint Security Cloud) with Autotask by means of Kaspersky Security Integration with Autotask.
- Installing Kaspersky Security Integration with Autotask.
Download Kaspersky Security Integration with Autotask from the Kaspersky Lab web site and install it by using a standard Windows installation procedure.
- Preparing information for setting up integration.
Check the connection settings and additional prerequisites to successfully integrate your Kaspersky Lab solution with Autotask. You will have to provide these parameters in the next scenario steps.
- Connecting Kaspersky Security Integration with Autotask to your Kaspersky Lab solution.
Provide the parameters to connect Kaspersky Security Integration with Autotask to your Kaspersky Lab solution:
- For Kaspersky Security Center, provide user credentials and server parameters.
- For Kaspersky Endpoint Security Cloud, provide the account credentials.
- Creating integration with Autotask.
Provide the parameters for the new integration with Autotask that is created during initial configuration. The integration parameters are the same for Kaspersky Security Center and for Kaspersky Endpoint Security Cloud.
- Adding virtual servers or workspaces to your integration.
Select virtual servers or workspaces to be integrated with Autotask:
- For Kaspersky Security Center, select virtual servers to be mapped to Autotask accounts.
- For Kaspersky Endpoint Security Cloud, select workspaces to be mapped to Autotask accounts.
- Checking integration.
After you perform step 1 through step 5, Kaspersky Security Integration with Autotask will be installed and configured. To verify the installation, open the Accounts tab and make sure that your virtual servers / workspaces are displayed in the first column and that your Autotask accounts are available for selection in the second column.
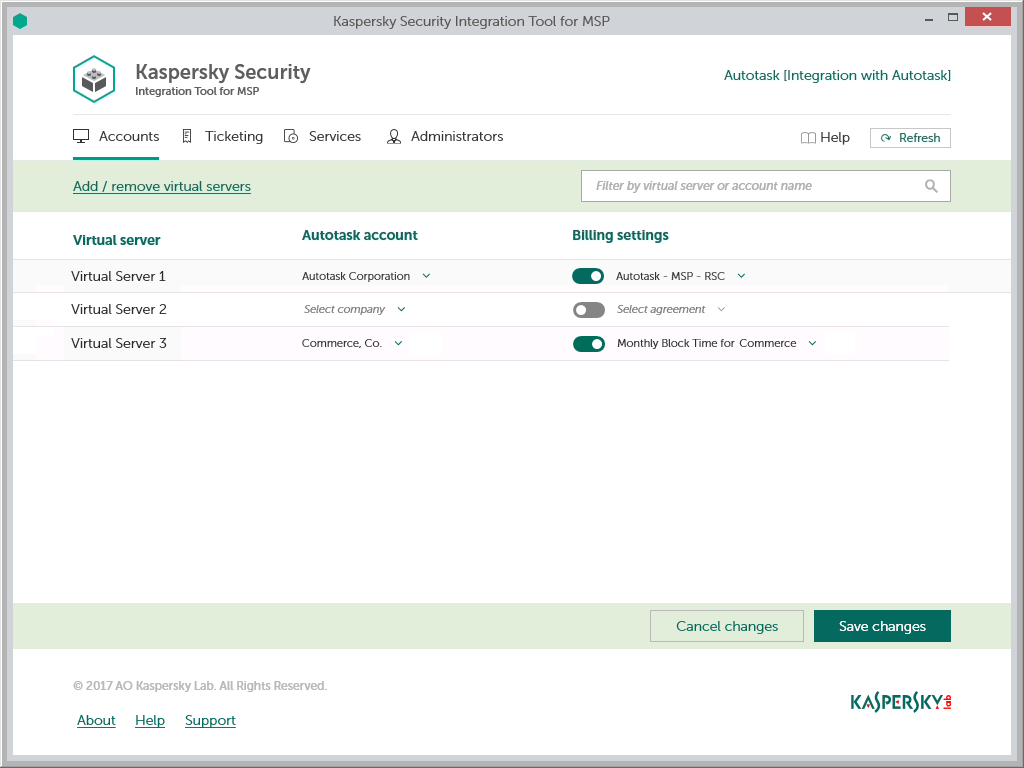
Kaspersky Security Integration Tool for MSP main window
Installing and removing Kaspersky Security Integration with Autotask
Kaspersky Security Integration with Autotask is delivered as a distribution package that contains two applications: Kaspersky Security Integration Tool for MSP and Kaspersky Security Integration Service for MSP.
This section contains step-by-step instructions for installing and removing Kaspersky Security Integration with Autotask.
Installing Kaspersky Security Integration with Autotask
After you download the distribution package for Kaspersky Security Integration with Autotask, install the components of Kaspersky Security Integration with Autotask by using a standard Windows installation procedure.
Kaspersky Security Integration Service must be installed if you use Kaspersky Security Center. If you use Kaspersky Endpoint Security Cloud, you do not have to install Kaspersky Security Integration Service.
Install Kaspersky Security Integration Service for MSP on the computer on which Kaspersky Security Center Administration Server is installed. Install Kaspersky Security Integration Tool for MSP on the computer on which either Administration Console or Administration Server is installed and deployed.
Install both components of Kaspersky Security Integration with Autotask—Kaspersky Security Integration Tool for MSP and Kaspersky Security Integration Service for MSP—in the same manner. The steps below describe the installation process for each component.
Before you install the components of Kaspersky Security Integration with Autotask, it is strongly recommended to check their digital signatures to make sure that they are issued by Kaspersky Lab.
To check the digital signature for a component of Kaspersky Security Integration with Autotask:
- Locate the installation application (msp_setup.exe file) for the Kaspersky Security Integration with Autotask component.
- Right-click the installation application and select Properties.
- In the Properties window that opens, click the Digital Signatures tab and check that the installation application has Kaspersky Lab signatures.
- Close the Properties window.
After you check the digital signatures of the Kaspersky Security Integration with Autotask components, install each of the components.
You can install Kaspersky Security Integration with Autotask either in interactive mode or in silent mode.
Installation in interactive mode
To install a component of Kaspersky Security Integration with Autotask in interactive mode:
- On the machine where you want to install Kaspersky Security Integration with Autotask, double-click the installation application (msp_setup.exe file) for the component.
- Follow the wizard steps to install the component.
- Accept the terms of the license agreement to continue installation.
- When installing Kaspersky Security Integration Tool for MSP, accept the terms of the privacy policy to continue installation.
- If required, change the installation folder for the component. The folder you select must have about 25 MB of free space to install both components of Kaspersky Security Integration with Autotask.
- Click Finish on the last page of the wizard.
Kaspersky Security Integration Tool for MSP and Kaspersky Security Integration Service for MSP are installed. Kaspersky Security Integration Tool for MSP is added to the Start menu.
Installation in silent mode
To install Kaspersky Security Integration Tool for MSP in silent mode:
- Read the license agreement and the privacy policy stored in license.txt file next to the installation application (msp_setup.exe file). Proceed only if you accept the terms of the license agreement and the privacy policy.
- At the command prompt, type
msp_setup.exe /s /v"EULA=1 PRIVACYPOLICY=1 INSTALLDIR=\"<installation path>\""
Here,
EULA=1means that you accept the terms of the license agreement.If you specify another value or if you do not specify this parameter, Kaspersky Security Integration Tool for MSP will not be installed.
PRIVACYPOLICY=1means that you accept the terms of the privacy policy.If you specify another value or if you do not specify this parameter, Kaspersky Security Integration Tool for MSP will not be installed.
INSTALLDIR=\"<installation path>\"is the path to the Kaspersky Security Integration Tool for MSP installation folder.If you do not specify this parameter, Kaspersky Security Integration Tool for MSP will be installed to %PROGRAMFILES%\Kaspersky Lab\Kaspersky Security Integration Tool for MSP (in 32-bit versions of Windows) or %PROGRAMFILES(x86)%\Kaspersky Lab\Kaspersky Security Integration Tool for MSP (in 64-bit versions of Windows).
Kaspersky Security Integration Tool for MSP is installed and is added to the Start menu.
To install Kaspersky Security Integration Service for MSP in silent mode:
- Read the license agreement stored in license.txt file next to the installation application (msp_setup.exe file). Proceed only if you accept the terms of the license agreement.
- At the command prompt, type
msp_setup.exe /s /v"EULA=1 INSTALLDIR=\"<installation path>\""
Here,
EULA=1means that you accept the terms of the license agreement.If you specify another value or if you do not specify this parameter, Kaspersky Security Integration Service for MSP will not be installed.
INSTALLDIR=\"<installation path>\"is the path to the Kaspersky Security Integration Service for MSP installation folder.If you do not specify this parameter, Kaspersky Security Integration Service for MSP will be installed to %PROGRAMFILES%\Kaspersky Lab\Kaspersky Security Integration Service for MSP (in 32-bit versions of Windows) or to %PROGRAMFILES(x86)%\Kaspersky Lab\Kaspersky Security Integration Service for MSP (in 64-bit versions of Windows).
Kaspersky Security Integration Service for MSP is installed.
Known issue
Kaspersky Security Integration Service for MSP cannot connect to Autotask if Kaspersky Security Center and Kaspersky Security Integration Service for MSP are deployed in the client's network instead of the managed service provider's network and there is an authentication proxy server between Kaspersky Security Integration Service for MSP and Autotask.
To enable Kaspersky Security Integration Service for MSP to connect to Autotask over the Internet through the proxy with authentication:
- Launch Services Microsoft Management Console (MMC) by selecting Start → Control panel → Administrative Tools → Services.
- Right-click Kaspersky Security Integration Service for MSP and select Properties.
- In the service properties window that opens, click the Log On tab and specify the following settings:
- In the Log on as section, select the This account option.
- Specify the account credentials for connection to the Internet by Kaspersky Security Integration Service for MSP.
- Click OK in the service properties window to save your changes.
Removing Kaspersky Security Integration with Autotask
You can remove the components of Kaspersky Security Integration with Autotask by using a standard Windows installation / uninstallation procedure.
To remove a component of Kaspersky Security Integration with Autotask:
- On the Start menu, select Control Panel and then click Programs and Features.
- In the list of installed programs, select Kaspersky Security Integration Tool for MSP or Kaspersky Security Integration Service for MSP.
- Right-click the selected application and select Uninstall.
The selected application is removed. Repeat these steps for the other component of Kaspersky Security Integration with Autotask.
As an alternative, you can remove the components of Kaspersky Security Integration with Autotask in silent mode.
To remove Kaspersky Security Integration Tool for MSP in silent mode:
Run Command Prompt as an administrator and type
msiexec.exe /x {E58E13CA-6745-4C60-BE0B-FE6DD416FCB0} REBOOT=ReallySuppress /qn /l*v %temp%\msp_service_uninstall_log.txt
To remove Kaspersky Security Integration Service for MSP in silent mode:
Run Command Prompt as an administrator and type
msiexec.exe /x {7EF14DEE-606A-4147-94FD-3FB0E1FA9D69} REBOOT=ReallySuppress /qn /l*v %temp%\msp_tool_uninstall_log.txt
Removing user.config file
When you uninstall Kaspersky Security Integration Tool for MSP, the user.config files are not removed. These files are automatically created for every user who has ever connected to a Kaspersky Lab solution (either on-premises or Cloud) using Kaspersky Security Integration Tool for MSP. The user.config files contain encrypted information about the user's connection settings for Kaspersky Security Center and Kaspersky Endpoint Security Cloud.
If necessary, you can manually remove the user.config file for every user. The user.config file is stored in the AppData folder of a user.
For example, for Windows 7 and Administrator user, the path to the user.config files is as follows: C:\Users\Administrator\AppData\Local\AO_Kaspersky_Lab\IntegrationUI.exe_Url_nrmo2y4axdcnfumknnua4kzhxvafmxmb\1.0.0.0\user.config.
Page top
Updating Kaspersky Security Integration with Autotask
It is recommended to update Kaspersky Security Integration with Autotask to the latest version:
- If you use Kaspersky Security Center, update both components of Kaspersky Security Integration with Autotask (Kaspersky Security Integration Service for MSP and all instances of Kaspersky Security Integration Tool for MSP) to the latest version before you start using the new version of Kaspersky Security Integration with Autotask. If you use several instances of Kaspersky Security Integration Tool for MSP when working with a single Kaspersky Security Integration Service for MSP, make sure that all these instances are updated.
If one or more components of Kaspersky Security Integration with Autotask is not updated (either Kaspersky Security Integration Service for MSP or one of the Kaspersky Security Integration Tool for MSP instances), Kaspersky Security Integration with Autotask will not operate properly.
- If you use Kaspersky Endpoint Security Cloud, update all instances of Kaspersky Security Integration Tool for MSP to the latest version.
All settings that you configured in a previous version of Kaspersky Security Integration Tool for MSP, such as integration parameters, accounts, and product mappings, remain the same when you migrate Kaspersky Security Integration with Autotask to the latest version.
Page top
Interface of Kaspersky Security Integration with Autotask
Kaspersky Security Integration with Autotask consists of two applications: Kaspersky Security Integration Tool for MSP and Kaspersky Security Integration Service for MSP.
- Kaspersky Security Integration Tool for MSP provides a graphical user interface to configure integration.
- Kaspersky Security Integration Service for MSP is a service application for Microsoft Windows that synchronizes data in Kaspersky Security Center and Autotask. It does not have a user interface.
Kaspersky Security Integration Tool for MSP consists of one window with several nested tabs. Depending on the type of Kaspersky Lab solution that you use—on-premises or cloud-based—Kaspersky Security Integration Tool for MSP may have three or four nested tabs. On these tabs, you can configure mapping between the Kaspersky Lab solution entities, such as virtual servers / workspaces, and products and Autotask entities, such as accounts and services. You can also configure ticketing, and if you use the cloud-based version of the solution you can manage workspace administrators.
Kaspersky Security Integration Tool for MSP main window
The Kaspersky Security Integration Tool for MSP window has the following tabs:
- Accounts—Use this tab to set up and modify mapping between company accounts in Autotask and virtual servers or workspaces in your Kaspersky Lab solution, and to add or remove virtual servers or workspaces to your integration. On the Accounts tab, you can also enable automatic billing.
- Ticketing—Use this tab to set up ticketing rules for enabling automatic creation and assignment of tickets in Autotask. You can configure creation and assignment of tickets depending on the event severity or when a computer status changes in Kaspersky Lab products.
Ticketing is one of the most important features of your integration. If you do not configure ticketing, Autotask cannot generate tickets on the basis of events and computer status changes and cannot process corresponding issues.
- Services—Use this tab to set up mapping between Autotask services and Kaspersky Lab products so that usage information about Kaspersky Lab products appears in Autotask. You can modify the existing mapping of services and products as well.
- Administrators—This tab is available for cloud-based solutions only. Use this tab to manage the administrators related to the integration with Kaspersky Endpoint Security Cloud. You can add existing Kaspersky Endpoint Security Cloud administrators to your integration or remove administrators from the integration if you do not want them to work with the integration.
Getting started
After you install Kaspersky Security Integration with Autotask, you establish a connection between it and Autotask. The connection enables you to configure integration using Kaspersky Security Integration Tool for MSP and enables Kaspersky Security Integration Service for MSP to send Service Tickets and license usage information to Autotask. To establish connection, create a new integration using Kaspersky Security Integration Tool for MSP.
The integration process varies depending on which Kaspersky Lab product you use. This section describes how to configure integration with Kaspersky Security Center and with Kaspersky Endpoint Security Cloud.
Prerequisites
When configuring integration, you must specify the parameters of the Kaspersky Lab solution that you integrate with: Kaspersky Security Center parameters or Kaspersky Endpoint Security Cloud parameters, and Autotask connection parameters. It is recommended that you check these parameters in advance in order to prepare for setting up integration.
Kaspersky Security Center parameters
Check the following parameters:
- Address of the computer on which Kaspersky Security Center Administration Server is installed.
- Credentials: user name and password for the computer on which Administration Server is installed.
- If you establish connection to the Administration Server through a proxy server, check the proxy server parameters: network address or domain name and credentials for the proxy server.
Kaspersky Endpoint Security Cloud parameters
Check the credentials of your Kaspersky Endpoint Security Cloud account: email address and password.
Autotask parameters
Credentials used to log in to Autotask: user name and password.
It is recommended to create and use a separate dedicated user with the API User security level rather than providing the credentials that you use to log in to Autotask. This security level must be set as Not required to change password. Because the API User security level does not allow logging in through the user interface, it eliminates many potential security risks associated with using an integration.
To set the "Not required to change password" security level:
- In Autotask, select Admin → Features & Settings, expand the Resources/Users node, and then click Resources/Users.
- Right-click a user name in the Resource Name column and select Edit Resource.
- In the Resource Management window that opens, select the Security tab, and in the Security Level drop-down list select API User.
- Click the Save & Close button.
- Select Admin → Features & Settings, expand the Resources/Users node, and then click Security Levels.
- In the Security Levels window that opens, click the Pencil icon next to the API User value in the Name column.
- In the Security Level window that opens, expand the Other node and select the Not required to change password (password does not expire) check box.
- Click Save & Close.
Additional prerequisites
During the integration process, it is required to add virtual servers or workspaces to your integration. These virtual servers or workspaces are then mapped to Autotask accounts.
For each client company represented by an account in Autotask, create and assign a separate Kaspersky Security Center virtual server / Kaspersky Endpoint Security Cloud workspace prior to integration.
One-to-one mapping is supported, and therefore the number of virtual servers or workspaces must not be more than the number of your managed accounts.
Page top
Integrating with Kaspersky Security Center
This section describes how to create and configure integration between Autotask and Kaspersky Security Center by using Kaspersky Security Integration Tool for MSP.
To successfully create integration, connect to Kaspersky Security Center Administration Server and perform the steps described in the following sections.
Connecting to Kaspersky Security Center Administration Server
When you start Kaspersky Security Integration Tool for MSP, the connection settings window opens. In this window, specify the settings to connect to Kaspersky Security Center Administration Server.
Connecting to Kaspersky Security Center Administration Server
To connect to Kaspersky Security Center Administration Server:
- In the Start menu, select Kaspersky Security Integration Tool for MSP.
- In the window that opens, select the Kaspersky Endpoint Security for Business solution to connect to Kaspersky Security Center Administration Server.
- You can connect to Kaspersky Security Center Administration Server in one of the following ways:
- By providing the connection parameters for the computer on which the Administration Server is installed.
If you selected this method of connection, specify the following connection settings. None of the fields can be blank.
- Address—Address of the computer on which the Administration Server is installed. You can specify this value as an IP address or as a domain name of the computer.
- User name—User name to connect to the computer on which the Administration Server is installed, that is, to the computer whose address you specified in the Address field.
- Password—Password to connect to the computer, on which the Administration Server is installed, that is, to the computer whose address you specified in the Address field.
- By selecting the Administration Server certificate.
In this case, you do not have to provide the connection parameters for the computer on which the Administration Server is installed. Kaspersky Security Integration Tool for MSP uses the certificate of Kaspersky Security Center Administration Server to connect to this Administration Server. Usage of the certificate guarantees that Kaspersky Security Integration Tool for MSP connects to the Administration Server from which the certificate was downloaded.
The Administration Server certificate is created automatically during installation of the Administration Server and is stored in the %ProgramData%\Application Data\KasperskyLab\adminkit\1093\cert folder on the computer that has Administration Server installed. Before starting to use the Administration Server certificate for authentication, copy the certificate file, klserver.cer, to the computer on which Kaspersky Security Integration Tool for MSP is installed.
- By providing the connection parameters for the computer on which the Administration Server is installed.
To use Administration Server certificate:
- Click the Select Kaspersky Security Center Administration Server certificate link.
- In the dialog box displayed, select the Use Server certificate check box and navigate to the certificate file.
- Click OK to start using the selected certificate for connection.
- If you want to establish the connection to the Administration Server through a proxy server, select the Use proxy server check box. By default, this check box is cleared.
If you selected the Use proxy server check box, provide the following proxy-server settings:
- Address—Network address of the proxy server. Provide the address as a full domain name of the proxy server.
- User name—User name to connect to the proxy server.
- Password—Password to connect to the proxy server.
- Click the Proceed button to connect to the Administration Server using the specified settings.
The system validates the provided settings and connects to the Administration Server.
Creating a Kaspersky Security Center integration with Autotask
After you connect to the Administration Server, the integration settings window opens, where you can create an integration between Autotask and Kaspersky Security Center by means of Kaspersky Security Integration Tool for MSP.
Creation of an integration between Autotask and Kaspersky Security Center is required only when you launch Kaspersky Security Integration Tool for MSP for the first time.

Specifying Autotask integration settings
To create integration with Autotask:
- In the integration settings window that opens after you connect to the Administration Server, specify the following settings for the newly created integration:
- Select platform—Select the integration platform from the drop-down list. The list contains the names of all platforms that Kaspersky Security Center can be integrated with. For integration with Autotask, select Autotask.
- Integration name—Name of the new integration. This field cannot be blank. By default, the integration name is Integration with Autotask. The integration name is displayed in the Kaspersky Security Integration Tool for MSP window as a link that allows you to view and access the integration properties.
For an integration with Kaspersky Endpoint Security Cloud, click the View integration ID link under the integration name to view the identifier of the integration. You may have to provide this ID to Kaspersky Lab Technical Support for diagnostics and troubleshooting.
- User name—User name to be used to log in to Autotask.
- Password—Password for the user name to be used to log in to Autotask.
It is recommended to create and use a separate dedicated user with the API User security level rather than providing the credentials that you use to log in to Autotask. Refer to section Prerequisites for details.
- Click the Proceed button when you have finished specifying the integration settings.
The system validates the Autotask integration settings and permission level for the specified credentials. These settings are saved and then used by Kaspersky Security Integration with Autotask to gain access to Autotask.
The permission level of the credentials you provided must be high enough to perform all operations in Kaspersky Security Integration Tool for MSP; otherwise, an error occurs, and integration for the user with these credentials cannot be created. For example, integration cannot be created for a user lacking permissions for editing tickets in Autotask.
Kaspersky Security Center is now integrated with Autotask.
Adding virtual servers to the integration
After an integration with Autotask is created, a window opens where you can add Kaspersky Security Center virtual servers to the integration. Kaspersky Security Center virtual servers are then mapped to the Autotask accounts.
Adding virtual servers to the integration
To add Kaspersky Security Center virtual servers to the integration:
- In the window, which lists Kaspersky Security Center virtual servers, select the check boxes next to the existing virtual servers to add them to the integration.
If you want to add all virtual servers to the integration, select the Select all check box.
- Click Proceed.
You will now be able to map these virtual servers to Autotask accounts.
Each virtual server can be added to one integration only. That is, if a virtual server is added to an integration, it is not displayed in a list of virtual servers available for another integration.
Integrating with Kaspersky Endpoint Security Cloud
This section describes how to create and configure integration between Autotask and Kaspersky Endpoint Security Cloud by means of Kaspersky Security Integration Tool for MSP.
To successfully create integration, connect to Kaspersky Endpoint Security Cloud and perform the steps described in the following sections.
Connecting to Kaspersky Endpoint Security Cloud
When you start Kaspersky Security Integration Tool for MSP, the connection settings window opens. In this window, specify the settings to connect to Kaspersky Endpoint Security Cloud.
Connecting to Kaspersky Endpoint Security Cloud
To connect to Kaspersky Endpoint Security Cloud:
- In the Start menu, select Kaspersky Security Integration Tool for MSP.
- In the window that opens, select the Kaspersky Endpoint Security Cloud solution to connect to Kaspersky Endpoint Security Cloud.
- Specify the following connection settings:
- User name—Email address used for your Kaspersky Endpoint Security Cloud account. This field cannot be blank.
- Password—Password to connect to Kaspersky Endpoint Security Cloud. This field cannot be blank.
- Click the Proceed button to connect to Kaspersky Endpoint Security Cloud using the specified settings.
The system validates the provided settings and establishes connection to Kaspersky Endpoint Security Cloud.
Creating a Kaspersky Endpoint Security Cloud integration with Autotask
After you connect to the Kaspersky Endpoint Security Cloud, the integration settings window opens, where you can create an integration between Autotask and Kaspersky Endpoint Security Cloud by means of Kaspersky Security Integration Tool for MSP.
Creation of an integration between Autotask and Kaspersky Endpoint Security Cloud is required only when you launch Kaspersky Security Integration Tool for MSP for the first time.
Specifying Autotask integration settings
To create integration with Autotask:
- In the integration settings window that opens after you connect to the Kaspersky Endpoint Security Cloud, specify the following settings for the newly created integration:
- Select platform—Select the integration platform from the drop-down list. The list contains the names of all platforms that Kaspersky Endpoint Security Cloud can be integrated with. For integration with Autotask, select Autotask.
A window with the text of a statement about additional data processing opens. Accept the terms of the statement to continue.
- Integration name—Name of the new integration. This field cannot be blank. By default, the integration name is Integration with Autotask. The integration name is displayed in the Kaspersky Security Integration Tool for MSP window as a link that allows you to view and access the integration properties.
For an integration with Kaspersky Endpoint Security Cloud, click the View integration ID link under the integration name to view the identifier of the integration. You may have to provide this ID to Kaspersky Lab Technical Support for diagnostics and troubleshooting.
- User name—User name to be used to log in to Autotask.
- Password—Password for the user name to be used to log in to Autotask.
It is recommended to create and use a separate dedicated user with the API User security level rather than providing the credentials that you use to log in to Autotask. Refer to section Prerequisites for details.
- Select platform—Select the integration platform from the drop-down list. The list contains the names of all platforms that Kaspersky Endpoint Security Cloud can be integrated with. For integration with Autotask, select Autotask.
- Click the Proceed button when you have finished specifying the integration settings.
The system validates the Autotask integration settings and permission level for the specified credentials. These settings are saved and then used by Kaspersky Security Integration with Autotask to gain access to Autotask.
The permission level of the credentials you provided must be high enough to perform all operations in Kaspersky Security Integration Tool for MSP; otherwise, an error occurs, and integration for the user with these credentials cannot be created. For example, integration cannot be created for a user lacking permissions for editing tickets in Autotask.
Kaspersky Endpoint Security Cloud is now integrated with Autotask.
Adding workspaces to the integration
After an integration with Autotask is created, a window opens where you can add Kaspersky Endpoint Security Cloud workspaces to the integration. Kaspersky Endpoint Security Cloud workspaces are then mapped to the Autotask accounts.
Adding workspaces to the integration
To add Kaspersky Endpoint Security Cloud workspaces to the integration:
- In the window, which lists Kaspersky Endpoint Security Cloud workspaces, select the check boxes next to the existing workspaces to add them to the integration.
If you want to add all workspaces to the integration, select the Select all check box.
- Click Proceed.
You will now be able to map these workspaces to Autotask accounts.
Each workspace can be added to one integration only. That is, if a workspace is added to an integration, it is not displayed in a list of workspaces available for another integration.
Supplementary parameter
The parameter that indicates the type of Kaspersky Endpoint Security Cloud server to which Kaspersky Security Integration Tool for MSP connects may be included in the .config file (IntegrationUI.exe.config) of Kaspersky Security Integration Tool for MSP.
The parameter name is KESCloudServer; and its possible values are:
- production—Kaspersky Security Integration Tool for MSP works with the Production server.
- beta—Kaspersky Security Integration Tool for MSP works with the Beta server.
- test—Kaspersky Security Integration Tool for MSP works with the Test server.
You are strongly urged not to modify the KESCloudServer parameter unless you receive clear instructions from Kaspersky Lab.
The IntegrationUI.exe.config file is stored in the installation folder of Kaspersky Security Integration Tool for MSP. The default path is C:\Program Files (x86)\Kaspersky Lab\Kaspersky Security Integration Tool for MSP\IntegrationUI.exe.config.
By default, the KESCloudServer parameter is not displayed in the .config file of Kaspersky Security Integration Tool for MSP.
The KESCloudServer parameter can be specified as follows:
<appSettings>
<add key="KESCloudServer" value="production" />
</appSettings>
Managing integrations
This section describes how to edit or delete an existing integration and how to create a new integration. For example, you may have to edit, delete, or create an integration when you change the vendor of your Professional Services Automation system.
Creating a new integration
You can create a new integration in the Kaspersky Security Integration Tool for MSP window.

Creating a new integration
To create a new integration with Autotask:
- In the top pane of the Kaspersky Security Integration Tool for MSP window, click the name of the current integration.
- In the Integration Settings window that opens, click the New integration button.
A new Integration Settings window opens. The fields for the connection settings are blank.
- Specify the values for the following settings of the integration:
- Platform—Select the integration platform from the drop-down list. The list contains the names of all platforms, Kaspersky Security Center or Kaspersky Endpoint Security Cloud can be integrated with. For integration with Autotask, select Autotask.
If you integrate Autotask with Kaspersky Endpoint Security Cloud and if this is the first integration with either Autotask or Tigerpaw, a window with the text of a statement about additional data processing opens. Accept the terms of the statement to continue.
- Integration name—Name of the new integration. This field cannot be blank. By default, the integration name is Integration with Autotask. The integration name is displayed in the Kaspersky Security Integration Tool for MSP window as a link that allows you to view and access the integration properties.
For an integration with Kaspersky Endpoint Security Cloud, click the View integration ID link under the integration name to view the identifier of the integration. You may have to provide this ID to Kaspersky Lab Technical Support for diagnostics and troubleshooting.
- User name—User name to be used to log in to Autotask.
- Password—Password for the user name to be used to log in to Autotask.
- Platform—Select the integration platform from the drop-down list. The list contains the names of all platforms, Kaspersky Security Center or Kaspersky Endpoint Security Cloud can be integrated with. For integration with Autotask, select Autotask.
- Click OK when you have finished specifying the integration settings.
The system validates the Autotask integration settings. If the settings you provide are correct, they are saved and then used by Kaspersky Security Integration with Autotask to gain access to Autotask.
A new integration with Autotask is created.
Page top
Editing and viewing an existing integration
You can view and edit settings of an existing integration in the Kaspersky Security Integration Tool for MSP window.
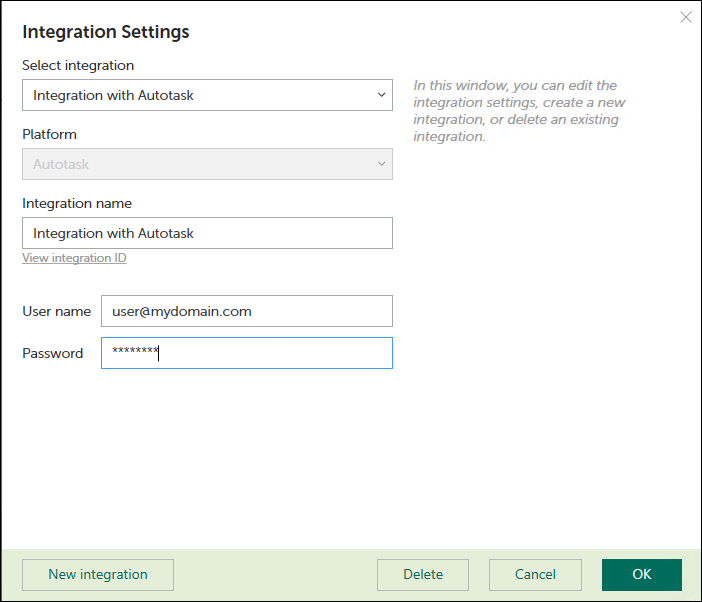
Editing an integration
To view and edit integration with Autotask:
- In the top pane of the window, click the name of the integration whose settings you want to view or modify.
- In the Integration Settings window that opens, in the Select integration drop-down list select the required integration.
- Modify the following settings of the selected integration:
- Integration name—Name of the selected integration. By default, the integration name is Integration with Autotask. You can edit this field, however, it cannot be blank.
For an integration with Kaspersky Endpoint Security Cloud, click the View integration ID link under the integration name to view the identifier of the integration. You may have to provide this ID to Kaspersky Lab Technical Support for diagnostics and troubleshooting.
- User name—User name to log in to Autotask.
- Password—Password for the user name, specified to log in to Autotask.
- Integration name—Name of the selected integration. By default, the integration name is Integration with Autotask. You can edit this field, however, it cannot be blank.
- Click OK when you have finished editing the integration settings.
The system validates the Autotask integration settings. If the settings you provide are correct, they are saved and then used by Kaspersky Security Integration with Autotask to gain access to Autotask.
The integration with Autotask is modified and saved.
Page top
Deleting an existing integration
You can delete an existing integration in the Kaspersky Security Integration Tool for MSP window.
When you delete an integration, all virtual servers or workspaces that were linked to the integration are unbound from the integration but continue to exist in Kaspersky Security Center or Kaspersky Endpoint Security Cloud. All administrators of the deleted integration receive notifications that the integration was deleted, but they can continue to administer Kaspersky Endpoint Security Cloud workspaces that were linked to this integration.
All Kaspersky Security Center virtual servers or Kaspersky Endpoint Security Cloud workspaces that are unbound from the deleted integration can be added to other integrations.
To delete integration with Autotask:
- In the top pane of the Kaspersky Security Integration Tool for MSP window, click the name of the integration that you want to delete.
- In the integration window that opens, click Delete to delete the integration.
- Click Yes to confirm deletion.
The integration settings are cleared, indicating that the integration is deleted.
Configuring integration in Kaspersky Security Integration with Autotask
The purpose of Kaspersky Security Integration Tool for MSP is to configure integration between Autotask and the Kaspersky Lab solution you use: Kaspersky Security Center or Kaspersky Endpoint Security Cloud.
Using Kaspersky Security Integration Tool for MSP, you can do the following:
- Map Autotask accounts to Kaspersky Security Center virtual servers or to Kaspersky Endpoint Security Cloud workspaces.
- Configure ticketing in Autotask.
- Map Kaspersky Lab products to existing Autotask services.
- Configure automated billing.
Mapping accounts and enabling automatic billing
Use the Accounts tab in the Kaspersky Security Integration Tool for MSP window to set up and modify mapping between accounts in Autotask and virtual servers or workspaces in your Kaspersky Lab solution. To set up mapping, accounts must be created in Autotask, while virtual servers must be added to Kaspersky Security Center Administration Server or workspaces must be created in Kaspersky Endpoint Security Cloud.
On the Accounts tab, you can also enable automatic billing for your Autotask accounts. This means that information about the number of licenses for Kaspersky Lab products provided during the current billing period can be updated regularly and automatically in Autotask. Timely updating lets you prepare customer invoices more quickly and easily.
When you click the Accounts tab, a list is displayed, showing virtual servers or workspaces and their corresponding Autotask accounts. You can add existing virtual servers or workspaces to the integration and map Autotask accounts to them. You can also delete mapping between a virtual server or workspace and its corresponding account. In this case, neither the virtual server / workspace nor the account is deleted; instead, the link between them is broken.
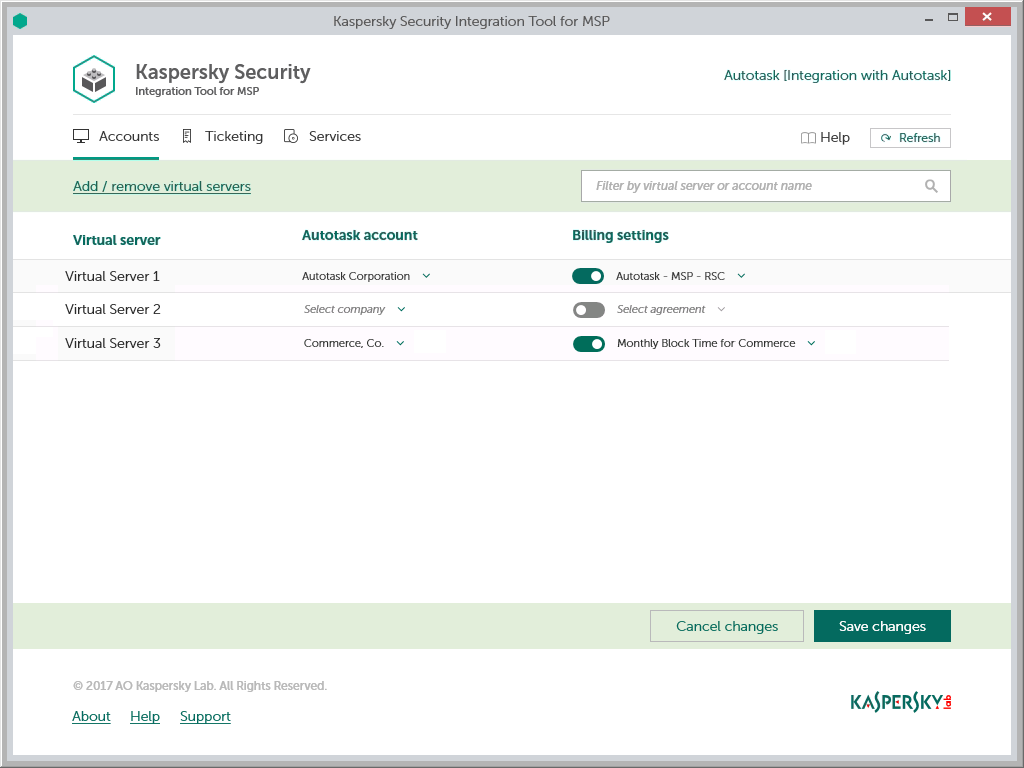
Mapping accounts and enabling automatic billing
The following sections explain how to add or remove virtual servers or workspaces to / from the integration and how to configure automatic billing.
Adding and removing virtual servers or workspaces
You can add existing virtual servers or workspaces to the integration or remove them from the integration.
To add or remove virtual servers or workspaces to / from the integration:
- In the Kaspersky Security Integration Tool for MSP window, click the Accounts tab.
- Click the Add / remove virtual servers link if you use Kaspersky Security Center, or the Add / remove workspaces link if you use Kaspersky Endpoint Security Cloud, and then do one of the following:
- Select check boxes next to existing virtual servers or workspaces to add them to the integration. Then you can match these virtual servers or workspaces to Autotask accounts.
- Clear check boxes next to virtual servers or workspaces to remove them from the integration. This action does not remove the virtual server from Kaspersky Security Center or workspace from Kaspersky Endpoint Security Cloud; it only deletes the mapping between the virtual servers or workspaces and the Autotask accounts.
- Click OK.
Each virtual server or workspace can be added to one integration only. That is, if a virtual server or a workspace is added to an integration, it is not displayed in a list of virtual servers or workspaces available for another integration.
Setting up automatic billing
You can map virtual servers or workspaces to Autotask accounts and configure automatic billing for the selected accounts.
To set up mapping between virtual servers or workspaces and Autotask accounts, and edit billing settings:
- In the Kaspersky Security Integration Tool for MSP window, click the Accounts tab.
- In the Virtual server column (if you use Kaspersky Security Center) or in the Workspace column (if you use Kaspersky Endpoint Security Cloud), locate the virtual servers or workspaces to which to map the Autotask account.
If you have a long list of virtual servers or workspaces, use the search box located above the table, on the right, to find the required virtual server or workspace. Type any part of the virtual server or workspace name in the search box and click the Search button. Only the virtual servers or workspaces whose names contain the string you entered are displayed.
- In the Autotask account column, click the drop-down arrow and select the account you want to map to the virtual server or workspace.
One-to-one mapping is supported. You can map one virtual server or one workspace to a single Autotask account.
- Turn automatic billing on or off for your Autotask account by using the toggle button in the Billing settings column.
To use automatic billing, you must create mapping between Kaspersky Lab products and their Autotask equivalents—services. For details, see Mapping Autotask services to products.
- Click the Select contract drop-down arrow in the Billing settings column and select one of the available Contracts associated with the account you selected in the Autotask account column.
A contract of the Recurring Service type must exist for the selected account in Autotask in order for automatic billing to be set up successfully. Contracts for an account are created and managed in Autotask. You can view the contracts for the selected account in Autotask.
For details on automatic billing, see How automatic billing works.
- If necessary, repeat steps 2 to 5 for each pair: virtual server-account or workspace-account.
- Click the Save changes button to save your mapping.
After the accounts are mapped to the virtual servers or workspaces and automatic billing is configured, the Contract Service Adjustments for the licensed Kaspersky Lab products are automatically created for these accounts in Autotask.
Page top
How automatic billing works
You can configure automatic billing to enable Kaspersky Security Integration with Autotask to create, and update daily, the Contract Service Adjustments for accounts in Autotask. When automatic billing is configured, information about usage of Kaspersky Lab products on managed computers is transferred to Autotask automatically, allowing faster periodic generation of invoices for your customers. For the information about enabling and configuring automatic billing, refer to Setting up automatic billing.
Automatic billing works according to the following rules:
- Kaspersky Security Integration Service for MSP runs automatic billing daily, so that you have up-to-date usage information in Autotask any time you have to generate an invoice for a client.
- Kaspersky Security Integration Service for MSP creates Service Adjustments to Autotask Contracts only for those Kaspersky Lab products that are mapped to Autotask Services. For details, refer to Mapping Autotask services to products.
- For each account with a specified Contract that is mapped to a virtual server or a workspace, Kaspersky Security Integration Service for MSP calculates how many devices managed by this virtual server or belonging to this workspace utilize licenses for Kaspersky Lab products. Only unexpired and active commercial keys and subscriptions are counted. Servers and workstations are counted separately if the Bill devices by categories option is selected when Kaspersky Lab products and Autotask services are mapped.
- Every time the number of devices that utilize licenses for Kaspersky Lab products changes, Kaspersky Security Integration Service for MSP generates a Service Adjustment for the Contract associated with the account. This Service Adjustment contains information on how usage of the Kaspersky Lab products changed.
To differentiate the pricing policy for two types of devices (servers and workstations), a separate billing feature is available. Kaspersky Security Integration Tool for MSP supports two billing configurations:
- Associates a single licensed Kaspersky Lab product with a single Autotask service.
- Associates a single licensed Kaspersky Lab product with three different Autotask services: one for servers, a second for workstations, and a third for non-Windows devices.
In this case, Autotask analyzes the type of client device (server or workstation) that uses the Kaspersky Lab license. Data about each Kaspersky Lab product license used by the device is associated with the Autotask service mapped to this Kaspersky Lab product.
For example, if a client company uses Kaspersky Endpoint Security for Business Advanced on 100 devices, where 90 of them are workstations and 10 are servers, Kaspersky Security Integration Service for MSP does the following:
- Creates a Contract Service Adjustment on 90 devices for the Autotask service for workstations.
- Creates a Contract Service Adjustment on 10 devices for the Autotask service for servers.
Setting up ticketing
This section explains how to set up ticketing for your Autotask accounts.
About setting up ticketing
Tickets allow timely responses to different types of events or changes in computer status that occur on the network. Automated ticketing allows you to reduce significantly the time spent monitoring and managing your Autotask accounts.
You must establish ticketing rules to enable automatic creation and assignment of tickets in Autotask. You can set up creation and assignment of tickets depending on the event severity or when a computer status changes to Critical or Warning in Kaspersky Lab products.
Tickets created on the basis of computer status changes are automatically closed when the corresponding issue is resolved and the status description that triggered the ticket creation is no longer relevant. For example, when a computer's status becomes Warning because a "Databases are out of date" status description is assigned, a corresponding ticket is created. When the databases are updated, the status description "Databases are out of date" is no longer relevant, and the ticket is automatically closed. However, the computer status might remain Warning because of other status descriptions, for example, "Many viruses detected".
Tickets created on the basis of events are not closed automatically, so you must close these tickets manually.
You can create and modify ticketing rules for your Autotask accounts. Ticketing rules are applicable to all accounts that are mapped to Kaspersky Security Center virtual servers or Kaspersky Endpoint Security Cloud workspaces. Ticketing rules can be configured individually for events and for computer statuses.
Page top
General ticketing settings
In the General section of the Ticketing tab, you can configure general ticketing settings. General settings are applicable to all tickets that have been automatically created in Autotask as a result of events or computer status changes that occur in Kaspersky Lab products. General settings provide the required initial values to the ticket attributes so that tickets are created correctly in Autotask.
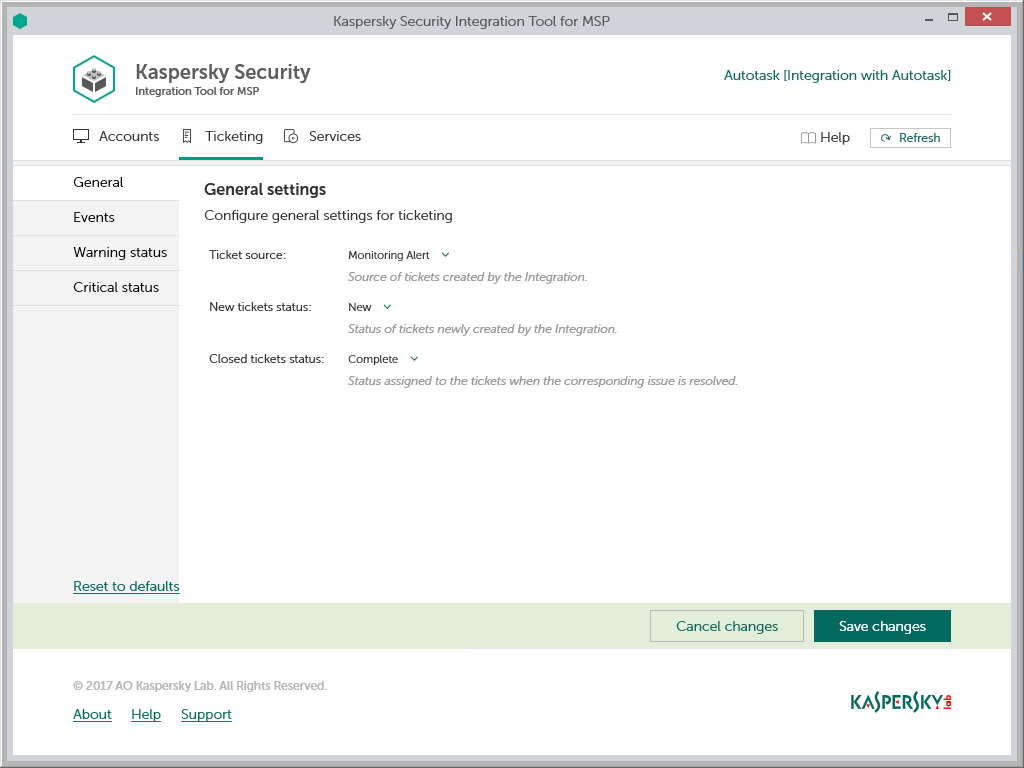
Configuring general ticketing settings
To configure general ticketing settings:
- In the Kaspersky Security Integration Tool for MSP window, click the Ticketing tab.
- In the left pane, select the General section.
The General Settings right pane allows you to configure general settings for ticketing.
- Edit the following settings:
- Ticket source—In the Monitoring alert drop-down list, select the source to be assigned to new tickets that are automatically created in Autotask when an event is triggered or a change in computer status occurs. This value is optional; it is displayed in the ticket properties in Autotask.
- New ticket status—In the New drop-down list, select the status to be assigned to new tickets that are automatically created in Autotask when an event is triggered or a change in computer status occurs. By default, these tickets are assigned the New status. This value is required.
- Closed ticket status—In the Complete drop-down list, select the status to be assigned to tickets when they are automatically closed. This status is assigned to tickets that are created based on a computer status change and then are automatically closed by Kaspersky Security Integration Service for MSP after the corresponding issue has been resolved. By default, these tickets are assigned the Complete status. This value is required.
- When you finish configuring general ticketing settings, click the Save changes button to save the ticketing settings.
General ticketing settings are configured and Autotask tickets are created in accordance with the specified rules.
You can cancel changes and reset general ticketing settings to their last saved values.
To cancel changes to general ticketing settings and restore last saved values:
- Open the Ticketing tab and in the left pane select the General section.
- Click the Cancel changes button.
You can also reset general ticketing settings to their default values.
To reset general ticketing settings to their default values:
- Open the Ticketing tab and in the left pane select the General section.
- Click the Reset to defaults link.
Ticketing for events
In the Events section of the Ticketing tab, you can configure ticketing rules for events that occurred in Kaspersky Security Center. You can edit ticketing settings either for an individual event, or for several events at the same time.
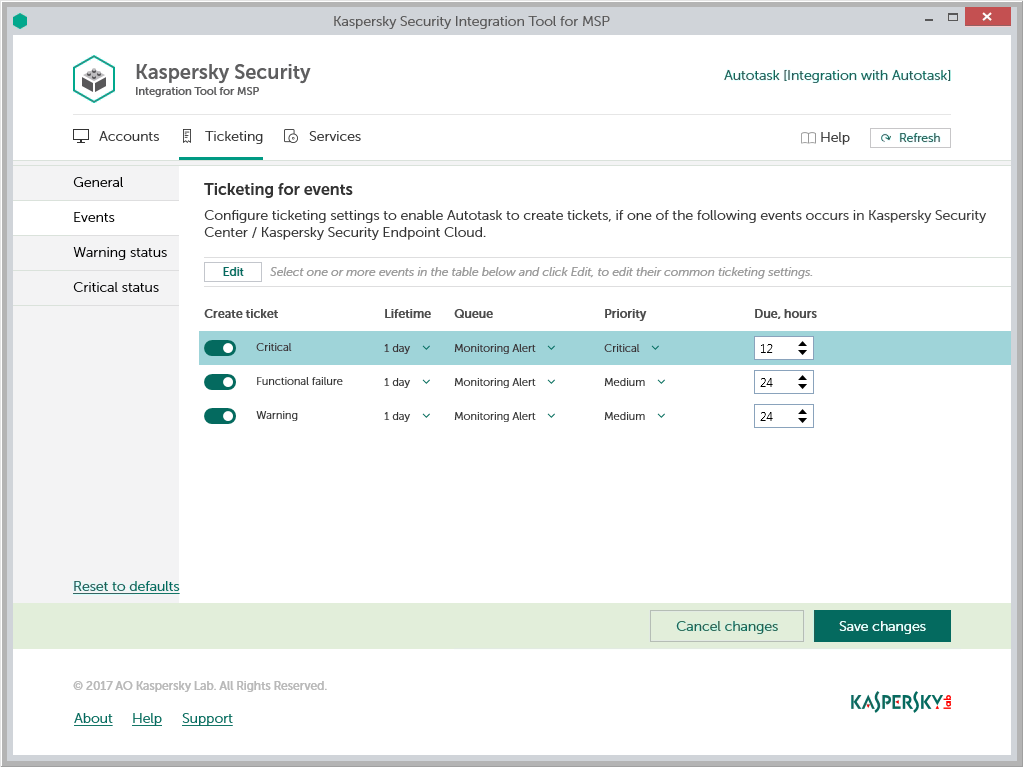
Configuring ticketing for events
To set up ticketing for events:
- In the Kaspersky Security Integration Tool for MSP window, click the Ticketing tab.
- In the left pane, select Events to configure ticketing for events.
- In the Create ticket column, use the toggle buttons to enable or disable ticket creation for the corresponding event severities.
By default, ticketing is disabled for all event severities. There are three possible event severities: Critical, Functional failure, and Warning.
- Edit the ticketing settings.
You can edit the main ticketing settings, which are displayed in the main screen. Additional ticketing settings appear in the Ticketing settings for events window.
- To edit the main ticketing settings, select the line with the event severity that you want. In the Lifetime, Queue, Priority, and Due, hours columns, edit the settings as required.
- To edit both the main and additional ticketing settings, select one or more lines that contain the event severities and click the Edit button above the table. The Ticketing settings for events window opens, where you can modify additional settings.
Editing ticketing settings for multiple event severities is useful if you want to assign the same ticketing settings to these event severities. If you want the ticketing settings to be different, edit them individually for each event severity.
You can edit the following ticketing settings:
- Lifetime—In this column, select the period, in days, during which the events are still relevant. The default value is 1 day.
This value is used to determine whether to create a ticket for an event in Autotask. If the connection between Autotask and Kaspersky Security Center or Kaspersky Endpoint Security Cloud has been broken and events have not been sent for some time, only events more recent than the specified period are sent to Autotask as tickets. A different relevance period can be set for different event severities.
- Queue—Select the queue in which to put the created ticket. The drop-down list contains the names of the Autotask queues. By default, tickets are put in the Monitoring Alert queue. This setting is required.
- Priority—Select the priority level for the tickets created in Autotask. Assigning priority levels is used to prioritize corresponding Autotask tickets. The ticket priority allows you to respond to the issues in order of their importance, so that more urgent problems can be resolved sooner. The default priority for Critical events is Critical, and for Warning and Functional Failure events it is Medium. If one of these basic priority values is deleted in Autotask, the default value is blank. This setting is required.
- Due—Specify the time interval, in hours, during which the ticket issue must be resolved and the ticket must be closed.
- Work type—Select the work type to be assigned to the ticket.
- Issue type—Select the Autotask issue type to be assigned to the ticket.
- Issue subtype—Select the Autotask issue subtype to be assigned to the ticket.
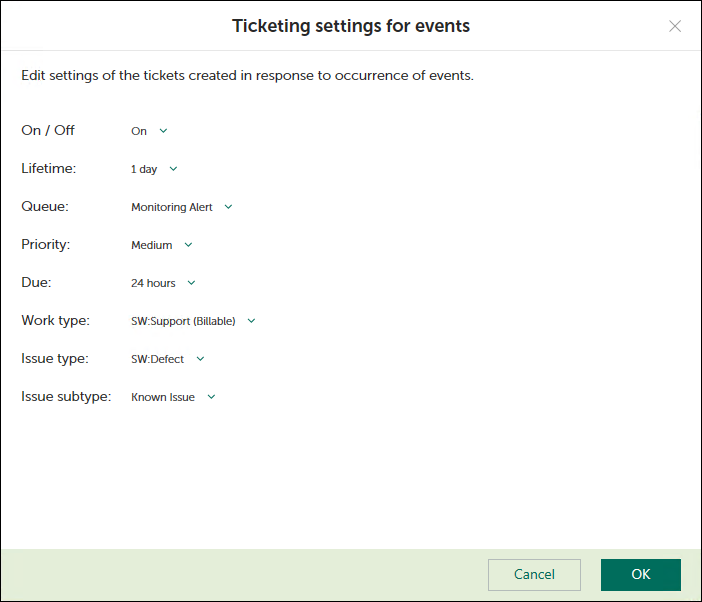
Ticketing settings for events window
- When you finish configuring ticketing for events, click the Save changes button to save the ticketing settings.
Ticketing for events is configured and Autotask tickets will be created in accordance with the specified rules.
Kaspersky Security Integration Service for MSP can create Tickets only for active Autotask accounts. Therefore, make sure that the Active check box is selected in the account properties.
You can cancel changes and reset ticketing settings to their last saved values.
To cancel changes of ticketing settings for events and restore last saved values:
- Open the Ticketing tab and in the left pane select the Events section.
- Click the Cancel changes button.
You can also reset ticketing settings to their default values.
To reset ticketing settings for events to their default values:
- Open the Ticketing tab and in the left pane select the Events section.
- Click the Reset to defaults link.
Ticketing for computer statuses
In the Warning status and Critical status sections of the Ticketing tab, you can configure ticketing rules for the computer statuses. This allows tickets to be created in Autotask when the computer status in Kaspersky Security Center changes to Warning or Critical. You can edit ticketing settings either for an individual computer status, or for several statuses at the same time.
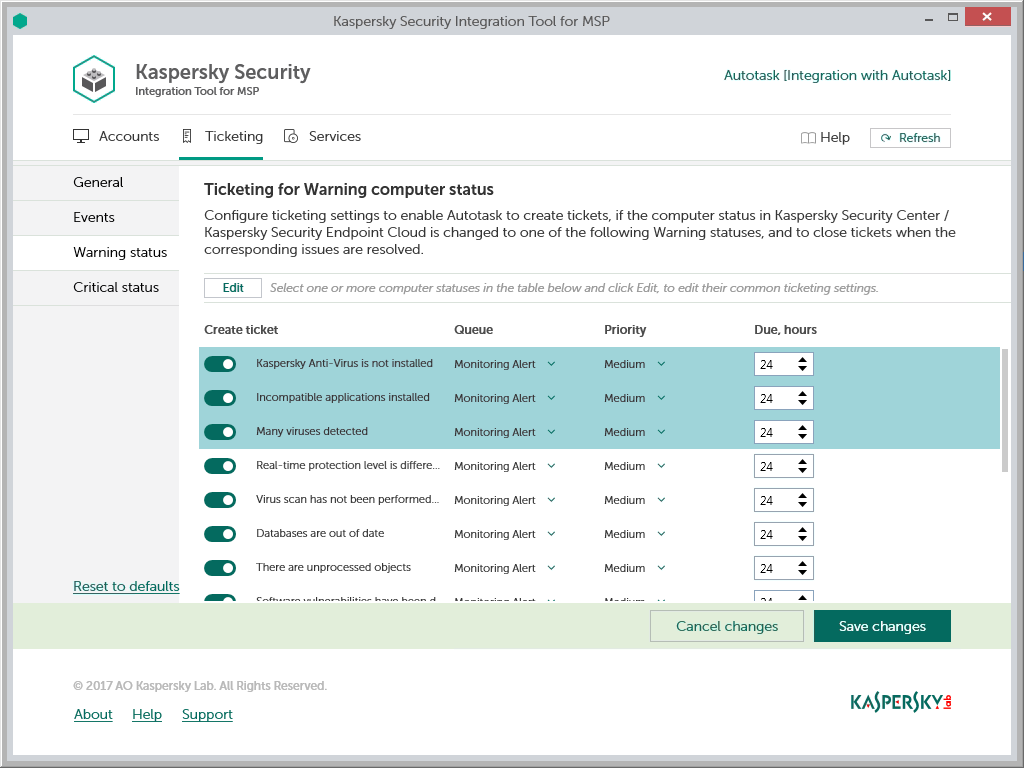
Configuring ticketing for computer statuses
To set up ticketing for computer status:
- In the Kaspersky Security Integration Tool for MSP window, click the Ticketing tab.
- In the left pane, select the Warning status or Critical status section to configure ticketing for computer statuses.
- In the Create ticket column, use the toggle buttons to enable or disable ticket creation for the corresponding status descriptions.
By default, ticketing is disabled for all computer status descriptions.
- Edit the ticketing settings.
You can edit the main ticketing settings, which are displayed on the main screen. Additional ticketing settings appear in the Ticketing settings for computer status window.
- To edit the main ticketing settings, select the line with the status description that you want. In the Queue, Priority, and Due, hours columns, edit the settings as required.
- To edit both the main and additional ticketing settings, select one or more lines that contain the computer statuses and click the Edit button above the table. The Ticketing settings for computer status window opens, where you can modify additional settings.
- Editing ticketing settings for multiple computer statuses is useful if you want to assign the same ticketing settings to these computer statuses. If you want the ticketing settings to be different, edit them individually for each computer status.
You can edit the following ticketing settings:
- Queue—Select the queue in which to put the created ticket. The drop-down list contains the names of the Autotask queues. By default, the tickets are put in the Monitoring Alert queue. This setting is required.
- Priority—Select the priority level for the tickets created in Autotask. Assigning priority levels to the tickets created for computer status change is used to prioritize corresponding Autotask tickets. The ticket priority allows you to respond to the issues in order of their importance, so that more urgent problems can be resolved sooner. The default priority for Critical computer statuses is Critical, and for Warning computer statuses it is Medium. If one of these basic priority values is deleted in Autotask, the default value is blank. This setting is required.
- Due—Specify the time interval, in hours, during which the ticket issue must be resolved and the ticket must be closed.
- Work type—Select the work type to be assigned to the ticket.
- Issue type—Select the Autotask issue type to be assigned to the ticket.
- Issue subtype—Select the Autotask issue subtype to be assigned to the ticket.
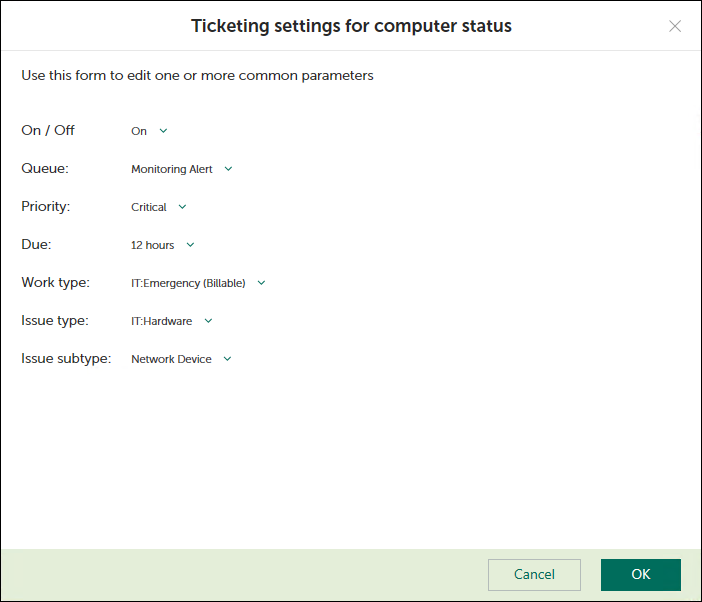
Ticketing settings for computer status window
- When you finish configuring ticketing for computer statuses, click the Save changes button to save the ticketing settings.
Ticketing for computer statuses is configured and Autotask tickets will be created in accordance with the specified rules.
Kaspersky Security Integration Service for MSP can create Tickets only for active Autotask accounts. Therefore, make sure that the Active check box is selected in the account properties.
You can cancel changes and reset ticketing settings to their last saved values.
To cancel changes of ticketing settings for computer status and restore last saved values:
- Open the Ticketing tab and in the left pane select the Warning status or Critical status section.
- Click the Cancel changes button.
You can also reset ticketing settings to their default values.
To reset ticketing settings for computer status to their default values:
- Open the Ticketing tab and in the left pane select the Warning status or Critical status section.
- Click the Reset to defaults link.
Mapping Autotask services to products
Set up mapping between Kaspersky Lab products and Autotask services, so that usage information about Kaspersky Lab products appears in Autotask as Service Adjustments to existing contracts.
On the Services tab of the Kaspersky Security Integration Tool for MSP window, you can map Kaspersky Lab products to Autotask services. You can edit the existing mapping between products and services as well.
The list of available products differs depending on which Kaspersky Lab solution you use: Kaspersky Security Center or Kaspersky Endpoint Security Cloud.
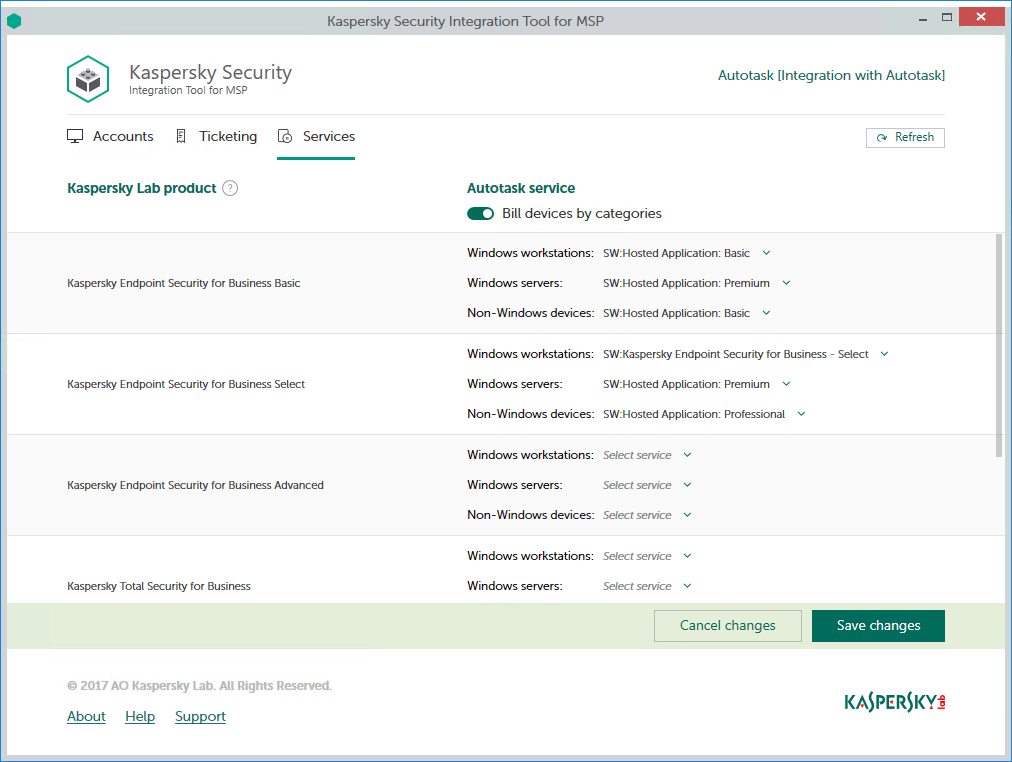
Mapping Kaspersky Lab products to Autotask services
To set up mapping between products and Autotask services:
- In the Kaspersky Security Integration Tool for MSP window, click the Services tab.
- To differentiate the pricing policy for two types of devices (servers and workstations), use the Bill devices by categories toggle button to turn on this feature.
- Map Kaspersky Lab products in the Kaspersky Lab product column to their equivalents in the Autotask service column.
If the Bill devices by categories feature is disabled, each Kaspersky Lab product can be mapped to one Autotask service only. Otherwise, map each Kaspersky Lab product to three Autotask services:
- In the Windows workstations drop-down list, select an Autotask service. The price of this service will be used during billing for all of the workstations that use the license for the corresponding Kaspersky Lab product.
- In the Windows servers drop-down list, select an Autotask service. The price of this service will be used during billing for all of the servers that use the license for the corresponding Kaspersky Lab product.
- In the Non-Windows devices drop-down list, select an Autotask service. The price of this service will be used during billing for all of the non-Windows devices that use the license for the corresponding Kaspersky Lab product.
- When you have finished with mapping, click the Save changes button to save the mapping.
Viewing accounts not integrated with Kaspersky Lab products
When configuring integration with Autotask, it is useful to check whether all Autotask accounts are connected to Kaspersky Security Center virtual servers / Kaspersky Endpoint Security Cloud workspaces, or whether you accidentally skipped one or more accounts. For this purpose, you can use Autotask reports that allow you to display all existing Autotask accounts together with the virtual servers or workspaces to which they are mapped.
Kaspersky Security Integration with Autotask adds its own fields to the Autotask configuration. You can use these fields in different reports. For example, using standard Autotask functionality, you can select clients that are not integrated with Kaspersky Security Center or with Kaspersky Endpoint Security Cloud, that is, the clients whose accounts do not have a corresponding virtual server or workspace. Then you can manually, using filters, exclude the accounts that do not use Kaspersky Lab products from your selection.
To view Autotask accounts that are not mapped to virtual servers or workspaces:
- Log in to Autotask with your user name and password.
- In Autotask, create a report, using Autotask LiveReports Designer. Your report must include the following fields:
- Autotask account name.
- Corresponding virtual server / workspace name.
Refer to Autotask documentation for details on creating reports.
- Filter your report data by the name of the virtual server or workspace.
If the name of the virtual server or workspace is empty, the account is not mapped to any virtual server or workspace.
Managing administrators
You can manage the administrators related to the integration with Kaspersky Endpoint Security Cloud. You can add the accounts of existing Kaspersky Endpoint Security Cloud users as administrators of your integration. You can also remove administrators from the integration if you do not want them to work with the integration.
You can manage administrators within the integration only if Kaspersky Endpoint Security Cloud solution is used. For Kaspersky Security Center solution, this functionality is unavailable.
When you add administrators to the integration, they have the same rights as existing administrators: they can administer all workspaces bound to this integration and manage the integration settings.
When you remove administrators from the integration, these administrators can no longer manage this integration and cannot administer its workspaces. You may have to remove administrators, for example, if they stop working for your company or move to new positions within the company and are no longer allowed to manage integrations.
All remaining administrators who have access to the integration can add or remove administrators to / from this integration.

Managing administrators
The following sections explain how to add or remove an administrator to / from the integration.
Adding administrators
When you add administrators to an integration, they have the same rights as existing administrators: they can administer all Kaspersky Endpoint Security Cloud workspaces bound to this integration and manage the integration settings.
To add administrators:
- In the Kaspersky Security Integration Tool for MSP window, click the Administrators tab.
- Click the Add link to add administrators.
- In the Add administrators dialog box that opens, specify the email addresses and aliases associated with the Kaspersky Lab accounts of the users that you want to add as new administrators. You can add several administrators at a time.
- Use a semicolon to separate the email address and alias of an administrator.
- Type the data for each administrator in a new line.
Only users registered in Kaspersky Endpoint Security Cloud can be added to the integration.
- Click Next and check the data that you provided. If everything is correct, click Finish to add the administrators to the integration. If you want to change the information you provided, click Back.
- After you perform all the actions with administrators' accounts, click the Save changes button.
The new administrators are added to the integration and gain access to all workspaces within this integration.
Removing administrators
When you remove administrators from an integration, they can no longer manage the integration. However, the administrators' Kaspersky Lab accounts are not deleted; they are merely unbound from the integration, so that the administrators cannot manage the integration or administer its workspaces.
To remove administrators:
- In the Kaspersky Security Integration Tool for MSP window, click the Administrators tab.
- Select the check boxes next to the names of administrators you want removed from the integration.
If you want to select all administrators, select the check box in the column header.
You cannot remove all administrators from the integration. An integration must have at least one administrator.
- Click the Delete link to remove the selected administrators.
- After you perform all the actions with the administrators' accounts, click the Save changes button.
The selected administrators are removed from the integration and lose their rights to administer workspaces bound to the integration.
Enabling and disabling tracing
The following sections explain how to enable and disable tracing for Kaspersky Security Integration with Autotask components.
You may have to save traces of Kaspersky Security Integration with Autotask, for example, if you contact Technical Support and they ask you to provide the traces for diagnostics and troubleshooting. It is recommended to disable tracing when an issue is resolved, as tracing requires additional resources and additional memory to store trace files. It is also recommended to remove trace files from your computer after the issue that required tracing is resolved, because the trace files may contain personal and confidential data.
By default, tracing is disabled.
There are two ways of enabling and disabling tracing for Kaspersky Security Integration with Autotask components:
- Using the Microsoft Windows registry.
- In the .config files of Kaspersky Security Integration with Autotask components.
Enabling and disabling tracing using the registry
You can enable and disable tracing using the Microsoft Windows registry.
To enable or disable tracing:
Before editing the Windows registry, it is recommended that you back up the registry.
- Click the Start button.
- In the Start menu, either in the Run box or the Search box, type regedit and press Enter.
The Registry Editor window opens.
If you have restricted access to the Windows computer you are logged into, you might not be able to access the registry.
- In the Registry Editor window, navigate to the Kaspersky Security Integration Service for MSP or Kaspersky Security Integration Tool for MSP registry key. They are available by one of the following paths:
- Kaspersky Security Integration Service for MSP
- HKEY_LOCAL_MACHINE\SOFTWARE\KasperskyLab\Kaspersky Security Integration Service for MSP
- HKEY_LOCAL_MACHINE\SOFTWARE\Wow6432Node\KasperskyLab\Kaspersky Security Integration Service for MSP
- Kaspersky Security Integration Tool for MSP
If the Kaspersky Security Integration Tool for MSP registry key is not displayed, either run Kaspersky Security Integration Tool for MSP as administrator (by right-clicking the application icon and selecting Run as administrator), or create the registry key manually.
- HKEY_LOCAL_MACHINE\SOFTWARE\KasperskyLab\Kaspersky Security Integration Tool for MSP
- HKEY_LOCAL_MACHINE\SOFTWARE\Wow6432Node\KasperskyLab\Kaspersky Security Integration Tool for MSP
- Kaspersky Security Integration Service for MSP
- Edit the value of the EnableTraces parameter as follows:
- 1—To enable tracing.
- 0—To disable tracing.
- Click OK in the Edit window to save your changes.
- Close the Registry Editor window.
The trace files are saved to the .log files in the application installation folder:
- For Kaspersky Security Integration Tool for MSP the file is IntegrationUI.log, by default saved to the C:\Program Files (x86)\Kaspersky Lab\Kaspersky Security Integration Tool for MSP folder.
- For Kaspersky Security Integration Service for MSP the file is IntegrationServer.log, by default stored in the C:\Program Files (x86)\Kaspersky Lab\Kaspersky Security Integration Service for MSP folder.
When you uninstall Kaspersky Security Integration Tool for MSP and Kaspersky Security Integration Service for MSP, the trace files are removed together with the application.
Enabling and disabling tracing using the .config files
You can enable and disable tracing in the .config files of Kaspersky Security Integration Tool for MSP and Kaspersky Security Integration Service for MSP. The files are stored in the installation folders of the corresponding products.
To enable or disable tracing:
- Navigate to the .config file of the Kaspersky Security Integration with Autotask component for which you want to enable or disable tracing. The .config file is stored in the installation folder. By default, the navigation paths are:
- For Kaspersky Security Integration Tool for MSP the file is IntegrationUI.exe.config, by default stored in the C:\Program Files (x86)\Kaspersky Lab\Kaspersky Security Integration Tool for MSP folder.
- For Kaspersky Security Integration Service for MSP the file is IntegrationServer.exe.config, by default stored in the C:\Program Files (x86)\Kaspersky Lab\Kaspersky Security Integration Service for MSP folder.
- Open the .config file with any text editor and change the value of the minlevel attribute of the logger element as follows:
- To enable tracing, set the value of the minlevel attribute to Debug.
<logger name="MSPIntegration.*" writeTo="fileTarget" minlevel="Debug" /> - To disable tracing, set the value of the minlevel attribute to Off.
<logger name="MSPIntegration.*" writeTo="fileTarget" minlevel="Off" />
- To enable tracing, set the value of the minlevel attribute to Debug.
- Save and close the modified .config file.
The trace files are saved to the .log files in the application installation folder:
- For Kaspersky Security Integration Tool for MSP the file is IntegrationUI.log, by default saved to the C:\Program Files (x86)\Kaspersky Lab\Kaspersky Security Integration Tool for MSP folder.
- For Kaspersky Security Integration Service for MSP the file is IntegrationServer.log, by default stored in the C:\Program Files (x86)\Kaspersky Lab\Kaspersky Security Integration Service for MSP folder.
When you uninstall Kaspersky Security Integration Tool for MSP and Kaspersky Security Integration Service for MSP, the trace files are removed together with the application.
Reporting
This section describes how to create different types of reports for managed Kaspersky Endpoint Security Cloud workspaces or Kaspersky Security Center virtual servers in Autotask.
Service report
You can create a regular service report for a representative of a managed company. This report includes statistics on protection services provided to the client. You can view this report for the last 30 days and the last 7 days. Kaspersky Security Integration with Autotask updates statistics daily.
A report can be built for a particular managed company linked to Kaspersky Endpoint Security Cloud workspace or Kaspersky Security Center virtual server, by using the standard Autotask LiveReports Designer.
A generated report includes statistics on tickets processed during the report period and on the state of managed computers in the customers’ infrastructure.
A service report includes the following data:
- Report period—Either 7 days or 30 days.
- Report starting date
- Report ending date
- Managed computers—Number of computers of the managed company that are connected to the Kaspersky Endpoint Security Cloud workspace or Kaspersky Security Center virtual server.
- Protected computers—Number of computers on which a real-time protection application is installed.
- New critical tickets—Number of tickets based on critical events or computer statuses that were created by Kaspersky Security Integration with Autotask during the report period (regardless of whether or not these tickets were closed during the report period). Tickets based on events are created according to the rules that you set as described in Ticketing for events. Tickets based on computer statuses are created according to the rules that you set as described in Ticketing for computer statuses.
- Closed critical tickets—Number of tickets based on critical events or computer statuses that were resolved and closed by Kaspersky Security Integration with Autotask during the report period (regardless of whether or not these tickets were created during the report period).
- New warning tickets—Number of tickets based on warning events or computer statuses that were created by Kaspersky Security Integration with Autotask during the report period (regardless of whether or not these tickets were closed during the report period).
- Closed warning tickets—Number of tickets based on warning events or computer statuses that were resolved and closed by Kaspersky Security Integration with Autotask during the reporting period (regardless of whether or not these tickets were created during the report period).
- New functional failure tickets—Number of tickets based on functional failure events that were created by Kaspersky Security Integration with Autotask during the reporting period (regardless of whether or not these tickets were closed during the report period).
- Closed functional failure tickets—Number of tickets for functional failure events that were resolved and closed by Kaspersky Security Integration with Autotask during the report period (regardless of whether or not these tickets were created during the report period).
- Problem computers—Number of computers whose status is other than OK at the moment the configuration item is created.
License report
You can create a license report for a client company to provide information about license keys for the Kaspersky Lab products, including key usage and availability.
A license report includes the following data for each license key:
- Report date—Last update date of the configuration item.
- License ID
- Product name
- License period
- License expiration date
- License restriction—Number of computers to which the license key can be assigned.
- Number of company's computers using the license—Number of computers to which the license key is assigned. These computers belong to the selected client company.
- Total number of computers using the license—Number of computers to which the license key is assigned. These computers belong to all client companies of the MSP or to the MSP itself.
- Key is more than 90% used—If the total number of computers that use the license key divided by the license restriction is greater than 0.9, the value is Yes. Otherwise, the value is No.
- Key exceeded restriction—If the total number of computers that use the license key divided by the license restriction is greater than 1, the value is Yes. Otherwise, the value is No.
- License information—Additional information about the license key.
- Support information—Information about Technical Support contacts.
Generating a report in Autotask
A service report is provided in Autotask as configuration items of a special Kaspersky report type. A license report is represented as configuration items of the Kaspersky license report type.These items are also linked to accounts according to the mapping to workspaces or virtual servers.
To generate a report for a managed company in Autotask:
- Point to the Autotask logo (
 ), point to Reports, and then click LiveReports Designer.
 - Point to the Create a New Report (
 ) button, and then click Express Report.
 - On the Name tab that opens, enter the report name and select the folder that you want to save the report to.
- Select the Categories tab, expand CRM - Configuration Item, click *Configuration Item, and then click the Add (
 ) button.
 - Select the Filters tab, and then add the following filters by selecting each filter name in the list and clicking the Add () button:
- Account—In the drop-down list to the right of Equal To, select the managed company for which you want to view the report.
- Configuration Item Type—In the drop-down list to the right of Equal To, select Kaspersky report for a service report or Kaspersky license report for a license report.
- Click the Layout tab, and then add the required user-defined fields. Their names start with UDF Kaspersky.
- If you want the report to display additional information, add other filters. For more details, refer to the Autotask documentation at https://ww2.autotask.net/Help/Content/Reporting/LiveReports/AddLiveReport/CreateLiveReport.htm.
- Click the Save & Close (
 ) button to save the report.
 - In the reports tree on the left, right-click the created report, and then select Run report.
- Export the report to print it or send the report by email to your client.
You can export the report to a Microsoft Excel spreadsheet, a PDF file, an RTF file, or a CSV file.
User-defined fields in Autotask
Kaspersky Security Integration with Autotask provides easy access to valuable integration-specific information on Autotask accounts directly from the Autotask graphical user interface (GUI). You can view this information on each Autotask account page in the User-defined fields section and use this information in Autotask reports.
The following user-defined fields are available for the Autotask accounts:
- If you use Kaspersky Security Center
- Kaspersky virtual server—Name of the virtual server mapped to this account in Kaspersky Security Integration Tool for MSP.
- If you use Kaspersky Endpoint Security Cloud:
- Kaspersky workspace—Name of the workspace mapped to this account in Kaspersky Security Integration Tool for MSP.
- Kaspersky workspace URL—Link to open your Kaspersky Endpoint Security Cloud workspace in Autotask account page.
If you accidentally deleted the User-defined fields section created by the integration, you can restore it by using the following workaround. However, this workaround works only the first time you save changes in parameter values after Kaspersky Security Integration Tool for MSP starts.
To restore the User-defined fields section:
- Start or restart Kaspersky Security Integration Tool for MSP.
- Change the value for any parameter on any tab (Accounts, Ticketing, or Services) to activate the Save changes button.
- Click the Save changes button.
The User-defined fields section is displayed after you save changes to your Integration.
- Set the parameter that you changed in step 2 to the original value, and then save your settings.
The User-defined fields section is now available on the Autotask account page.
Contact Technical Support
This section describes how to get technical support and the terms on which it is available.
How to get technical support
If you cannot find a solution to your issue in the Kaspersky Security Integrations for MSP documentation or in any of the sources of information about Kaspersky Security Integrations for MSP, contact Technical Support. Technical Support specialists will answer all your questions about configuring and using Kaspersky Security Integrations for MSP.
Before contacting Technical Support, please read the support rules.
You can contact Technical Support in one of the following ways:
- By visiting the Technical Support website
- By sending a request to Technical Support from the Kaspersky CompanyAccount portal
Technical Support via Kaspersky CompanyAccount
Kaspersky CompanyAccount is a portal for companies that use Kaspersky Lab applications. The Kaspersky CompanyAccount portal is designed to facilitate interaction between users and Kaspersky Lab specialists through online requests. You can use Kaspersky CompanyAccount to track the status of your online requests and store a history of them as well.
You can register all of your organization's employees under a single account on Kaspersky CompanyAccount. A single account lets you centrally manage electronic requests from registered employees to Kaspersky Lab and also manage the privileges of these employees via Kaspersky CompanyAccount.
The Kaspersky CompanyAccount portal is available in the following languages:
- English
- Spanish
- Italian
- German
- Polish
- Portuguese
- Russian
- French
- Japanese
To learn more about Kaspersky CompanyAccount, visit the Technical Support website.
Page top
AO Kaspersky Lab
Kaspersky Lab is a world-renowned vendor of systems protecting computers against digital threats, including viruses and other malware, unsolicited email (spam), and network and hacking attacks.
In 2008, Kaspersky Lab was rated among the world’s top four leading vendors of information security software solutions for end users (IDC Worldwide Endpoint Security Revenue by Vendor). Kaspersky Lab is the preferred vendor of computer protection systems for home users in Russia (IDC Endpoint Tracker 2014).
Kaspersky Lab was founded in Russia in 1997. It has since grown into an international group of companies with 38 offices in 33 countries. The company employs more than 3,000 skilled professionals.
Products. Kaspersky Lab products provide protection for all systems, from home computers to large corporate networks.
The personal product range includes security applications for desktop, laptop, and tablet computers, smartphones and other mobile devices.
The company offers protection and control solutions and technologies for workstations and mobile devices, virtual machines, file and web servers, mail gateways, and firewalls. The company's portfolio also features specialized products providing protection against DDoS attacks, protection for industrial control systems, and prevention of financial fraud. Used in conjunction with centralized management tools, these solutions ensure effective automated protection for companies and organizations of any size against computer threats. Kaspersky Lab products are certified by major test laboratories, compatible with software from diverse vendors, and optimized to run on many hardware platforms.
Kaspersky Lab virus analysts work around the clock. Every day they uncover hundreds of thousands of new computer threats, create tools to detect and disinfect them, and include their signatures in databases used by Kaspersky Lab applications.
Technologies. Many technologies that are now part and parcel of modern anti-virus tools were originally developed by Kaspersky Lab. It is no coincidence that many other developers use the Kaspersky Anti-Virus engine in their products, including: Alcatel-Lucent, Alt-N, Asus, BAE Systems, Blue Coat, Check Point, Cisco Meraki, Clearswift, D-Link, Facebook, General Dynamics, H3C, Juniper Networks, Lenovo, Microsoft, NETGEAR, Openwave Messaging, Parallels, Qualcomm, Samsung, Stormshield, Toshiba, Trustwave, Vertu, and ZyXEL. Many of the company’s innovative technologies are patented.
Achievements. Over the years, Kaspersky Lab has won hundreds of awards for its services in combating computer threats. Following tests and research conducted by the reputed Austrian test laboratory AV-Comparatives in 2014, Kaspersky Lab ranked among the top two vendors by the number of Advanced+ certificates earned and was ultimately awarded the Top Rated certificate. But Kaspersky Lab's main achievement is the loyalty of its users worldwide. The company’s products and technologies protect more than 400 million users, and its corporate clients number more than 270,000.
Kaspersky Lab website: |
|
Virus encyclopedia: |
|
Virus Lab: |
https://virusdesk.kaspersky.com (for analyzing suspicious files and websites) |
Kaspersky Lab’s web forum: |
Page top
Information about third-party code
Information about third-party code is contained in the file legal_notices.txt, in the application installation folder.
Page top
Trademark notices
Registered trademarks and service marks are the property of their respective owners.
Microsoft and Windows are registered trademarks of Microsoft Corporation in the United States and other countries.
Page top
Kaspersky Security Integration with Tigerpaw
This section describes the purpose, functions, and distribution kit of Kaspersky Security Integration with Tigerpaw, and provides hardware and software requirements for Kaspersky Security Integration with Tigerpaw.
About Kaspersky Security Integration with Tigerpaw
Integration is the process of bringing together components into a single system. Kaspersky Security Integration with Tigerpaw integrates Kaspersky Lab solutions (Kaspersky Security Center or Kaspersky Endpoint Security Cloud) and Tigerpaw to provide a powerful combination of monitoring and management tools, such as automated billing and service order creation for client accounts.
In terms of Kaspersky Security Integration with Tigerpaw, integration is a set of parameters and interaction rules that can be set up and configured. First, you create an integration between your Kaspersky Lab solution and Tigerpaw; then you can manage and configure your integrations, and view and edit integration parameters. When configuring an integration, you set up mapping between the entities of the Kaspersky Lab solution and Tigerpaw entities, and define rules that determine how your Kaspersky Lab solution interacts with Tigerpaw.
Kaspersky Security Integration with Tigerpaw consists of two applications: Kaspersky Security Integration Tool for MSP and Kaspersky Security Integration Service for MSP (Managed Service Providers).
- Kaspersky Security Integration Tool for MSP provides a graphical user interface (GUI) to configure integration. The tool is used to configure connection between the Kaspersky Lab solution that you use and Tigerpaw. The tool is also used to configure mapping between the Kaspersky Lab solution entities and Tigerpaw entities. Kaspersky Lab solution entities are virtual servers, if you use Kaspersky Security Center, or workspaces, if you use Kaspersky Endpoint Security Cloud. Tigerpaw entities are accounts and price book items.
- Kaspersky Security Integration Service for MSP is a Microsoft Windows service application that is installed on the computer that has Kaspersky Security Center Administration Server installed. Kaspersky Security Integration Service for MSP synchronizes data in Kaspersky Security Center and Tigerpaw. It is a service application only, with no user interface.
About data provision
Kaspersky Security Integration with Tigerpaw is designed for integration of Kaspersky Lab solutions for administration of security applications with Tigerpaw within the framework of the functionality described in this Help document.
To use Kaspersky Security Integration with Tigerpaw, you must install the integration components and connect them to the Kaspersky Lab solution you use, create an integration with Tigerpaw, specify connection parameters and integration settings and select your customers’ virtual servers / workspaces for the integration.
By using the product, you agree that the said product may receive data from Tigerpaw and the connected virtual servers / workspaces, as well as store, process, and display information that is intended for ensuring the product functionality.
By creating an integration and connecting Tigerpaw and virtual servers / workspaces to the product, you thus confirm that you are the sole owner of any data you provide or that you are entitled to provide any data.
Any information provided is protected and processed in accordance with the Kaspersky Lab Privacy Policy.
For the purpose of integration of Kaspersky Security Center / Kaspersky Endpoint Security Cloud and Tigerpaw, Kaspersky Security Integration with Tigerpaw may receive, store, and process the following types of data:
- Data required to connect to the integrated software:
- Parameters for connecting to Kaspersky Security Center Administration Server, including an account.
- Account for connecting to Kaspersky Endpoint Security Cloud.
- Account for accessing Tigerpaw.
- Data about Kaspersky Security Center / Kaspersky Endpoint Security Cloud events and about assigning the Critical and Warning statuses to computers managed by Kaspersky Security Center / Kaspersky Endpoint Security Cloud. This data is required for automatic creation of tickets or similar entities.
- Data about usage of licenses for Kaspersky Lab products by computers managed by Kaspersky Security Center / Kaspersky Endpoint Security Cloud (the number of computers that use a certain license). This data is required for automatic generation of invoices for your customers.
- Data about the state of a managed Kaspersky Security Center virtual server / Kaspersky Endpoint Security Cloud workspace (the number of managed computers, the number of protected computers, the number of created and closed tickets of various types, the number of threats and malicious objects detected on the computers, the number of problematic computers, and the number of infected computers). This data is required for report generation.
- Data about licenses used at Kaspersky Security Center virtual servers / Kaspersky Endpoint Security Cloud workspaces and about attributes of these licenses. This data is required for report generation.
- Integration settings:
- Type of integrated platform (Tigerpaw).
- Set of integrated virtual servers / workspaces.
- List of Kaspersky Endpoint Security Cloud administrators (their aliases and email addresses) who are also granted administrative privileges in the integration.
- Rules for mapping objects of Kaspersky Security Center / Kaspersky Endpoint Security Cloud to those of Tigerpaw (virtual servers / workspaces to accounts and Kaspersky Lab products to Tigerpaw price book items).
- Rules for creating objects in Tigerpaw, such as service orders and additional charges.
For integrations with Kaspersky Endpoint Security Cloud, the received data may be stored and processed within the Kaspersky Endpoint Security Cloud infrastructure according to the Kaspersky Endpoint Security Cloud data provision. For details, refer to section "About data provision" in Kaspersky Endpoint Security Cloud Online Help.
All received data is used by the MSP administrators and technicians. Kaspersky Lab Technical Support specialists may also use the above data when an MSP administrator contacts Technical Support.
Page top
Features of Kaspersky Security Integration with Tigerpaw
Kaspersky Security Integration with Tigerpaw helps you to integrate Kaspersky Lab solutions with Tigerpaw to provide service order creation, straightforward monitoring, issue tracking, and automated billing in the customer environment.
Kaspersky Security Integration with Tigerpaw provides the following features:
- Connection
With Kaspersky Security Integration with Tigerpaw, you can connect Kaspersky Lab solutions to Tigerpaw with a few clicks to enable automated billing, service order creation, and other processes. You do not need any additional tools or consoles: you can access everything from Tigerpaw.
- Automatic service order creation
Kaspersky Security Integration with Tigerpaw simplifies multi-tenancy management by enabling automation of service order creation and workflow for each of your client accounts. You can select a Tigerpaw account of your client and map it to the corresponding Kaspersky Lab virtual server / workspace.
The service orders are automatically created in Tigerpaw, which reduces the time you spend monitoring your managed client account and increases the number of clients that a single technician can manage. For additional resource efficiency, assign priorities and types to service orders to streamline their prioritization.
- Billing setup
Kaspersky Security Integration with Tigerpaw provides easy access to information on usage of Kaspersky Lab products from Tigerpaw, which significantly simplifies and automates customer billing and reporting.
- Compatibility
With Kaspersky Security Integration with Tigerpaw, it is easy to create solutions based on customer needs and requirements: Tigerpaw works with both on-premises and cloud-based Kaspersky Lab solutions. Use Kaspersky Lab cloud-based security to avoid additional overhead, or keep everything inside the perimeter and make the most of your existing hardware investment with an on-premises solution.
Page top
Distribution kit
Kaspersky Security Integration with Tigerpaw is delivered free of charge as a distribution package that contains installation files for Kaspersky Security Integration Tool for MSP and Kaspersky Security Integration Service for MSP.
You can download the distribution kit from the Kaspersky Lab website.
No license is required for Kaspersky Security Integration with Tigerpaw.
Page top
Software requirements
Basic software requirements for integration setup:
- Tigerpaw 17.1 and later.
- Kaspersky Security Center Administration Server 10 Service Pack 2 Maintenance Release 1 and later, or Kaspersky Endpoint Security Cloud.
Software requirements for Kaspersky Security Integration Tool for MSP:
- Microsoft Windows 7 and later.
- Microsoft .NET Framework 4.5.2.
- Kaspersky Security Center Administration Server 10 Service Pack 2 Maintenance Release 1 and later, or Kaspersky Security Center Administration Console 10 Service Pack 2 Maintenance Release 1 and later—for an on-premises solution only.
Software requirements for Kaspersky Security Integration Service for MSP:
- Supported operating systems are the same as those supported by Kaspersky Security Center 10 Service Pack 2 Maintenance Release 1 and later. Refer to Kaspersky Security Center documentation for details.
- Administration Server component of Kaspersky Security Center 10 Service Pack 2 Maintenance Release 1 and later.
- Microsoft .NET Framework 4.5.2.
Integration scenario
This topic describes the overall sequence of actions that you perform to integrate your Kaspersky Lab solution (Kaspersky Security Center or Kaspersky Endpoint Security Cloud) with Tigerpaw by means of Kaspersky Security Integration with Tigerpaw.
- Installing Kaspersky Security Integration with Tigerpaw.
Download Kaspersky Security Integration with Tigerpaw from the Kaspersky Lab web site and install it by using a standard Windows installation procedure.
- Preparing information for setting up integration.
Check the connection settings and additional prerequisites to successfully integrate your Kaspersky Lab solution with Tigerpaw. You will have to provide these parameters in the next scenario steps.
- Connecting Kaspersky Security Integration with Tigerpaw to your Kaspersky Lab solution.
Provide the parameters to connect Kaspersky Security Integration with Tigerpaw to your Kaspersky Lab solution:
- For Kaspersky Security Center, provide user credentials and server parameters.
- For Kaspersky Endpoint Security Cloud, provide the account credentials.
- Creating integration with Tigerpaw.
Provide the parameters for the new integration with Tigerpaw that is created during initial configuration. The integration parameters are the same for Kaspersky Security Center and for Kaspersky Endpoint Security Cloud.
- Adding virtual servers or workspaces to your integration.
Select virtual servers or workspaces to be integrated with Tigerpaw:
- For Kaspersky Security Center, select virtual servers to be mapped to Tigerpaw accounts.
- For Kaspersky Endpoint Security Cloud, select workspaces to be mapped to Tigerpaw accounts.
- Checking integration.
After you perform step 1 through step 5, Kaspersky Security Integration with Tigerpaw will be installed and configured. To verify the installation, open the Accounts tab and make sure that your virtual servers / workspaces are displayed in the first column and that your Tigerpaw accounts are available for selection in the second column.
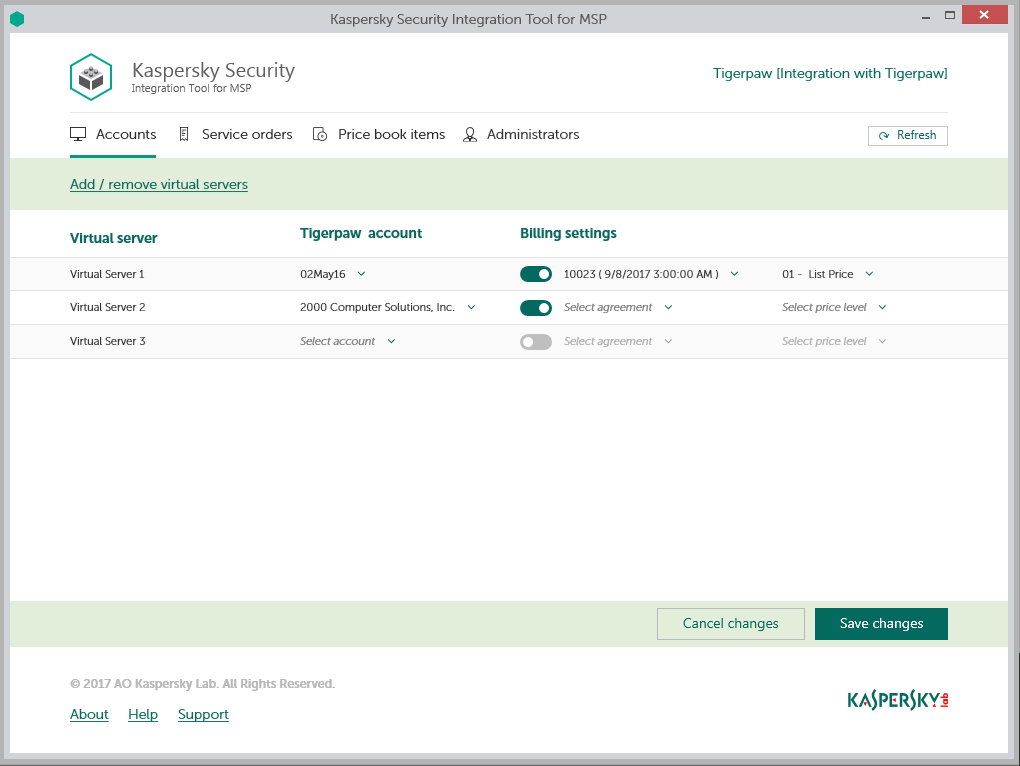
Kaspersky Security Integration Tool for MSP main window
Installing and removing Kaspersky Security Integration with Tigerpaw
Kaspersky Security Integration with Tigerpaw is delivered as a distribution package that contains two applications: Kaspersky Security Integration Tool for MSP and Kaspersky Security Integration Service for MSP.
This section contains step-by-step instructions for installing and removing Kaspersky Security Integration with Tigerpaw.
Installing Kaspersky Security Integration with Tigerpaw
After you download the distribution package for Kaspersky Security Integration with Tigerpaw, install the components of Kaspersky Security Integration with Tigerpaw by using a standard Windows installation procedure.
Kaspersky Security Integration Service must be installed if you use Kaspersky Security Center. If you use Kaspersky Endpoint Security Cloud, you do not have to install Kaspersky Security Integration Service.
Install Kaspersky Security Integration Service for MSP on the computer on which Kaspersky Security Center Administration Server is installed. Install Kaspersky Security Integration Tool for MSP on the computer on which either Administration Console or Administration Server is installed and deployed.
Install both components of Kaspersky Security Integration with Tigerpaw—Kaspersky Security Integration Tool for MSP and Kaspersky Security Integration Service for MSP—in the same manner. The steps below describe the installation process for each component.
Before you install the components of Kaspersky Security Integration with Tigerpaw, it is strongly recommended to check their digital signatures to make sure that they are issued by Kaspersky Lab.
To check the digital signature for a component of Kaspersky Security Integration with Tigerpaw:
- Locate the installation application (msp_setup.exe file) for the Kaspersky Security Integration with Tigerpaw component.
- Right-click the installation application and select Properties.
- In the Properties window that opens, click the Digital Signatures tab and check that the installation application has Kaspersky Lab signatures.
- Close the Properties window.
After you check the digital signatures of the Kaspersky Security Integration with Tigerpaw components, install each of the components.
You can install Kaspersky Security Integration with Tigerpaw either in interactive mode or in silent mode.
Installation in interactive mode
To install a component of Kaspersky Security Integration with Tigerpaw in interactive mode:
- On the machine where you want to install Kaspersky Security Integration with Tigerpaw, double-click the installation application (msp_setup.exe file) for the component.
- Follow the wizard steps to install the component.
- Accept the terms of the license agreement to continue installation.
- When installing Kaspersky Security Integration Tool for MSP, accept the terms of the privacy policy to continue installation.
- If required, change the installation folder for the component. The folder you select must have about 25 MB of free space to install both components of Kaspersky Security Integration with Tigerpaw.
- Click Finish on the last page of the wizard.
Kaspersky Security Integration Tool for MSP and Kaspersky Security Integration Service for MSP are installed. Kaspersky Security Integration Tool for MSP is added to the Start menu.
Installation in silent mode
To install Kaspersky Security Integration Tool for MSP in silent mode:
- Read the license agreement and the privacy policy stored in license.txt file next to the installation application (msp_setup.exe file). Proceed only if you accept the terms of the license agreement and the privacy policy.
- At the command prompt, type
msp_setup.exe /s /v"EULA=1 PRIVACYPOLICY=1 INSTALLDIR=\"<installation path>\""
Here,
EULA=1means that you accept the terms of the license agreement.If you specify another value or if you do not specify this parameter, Kaspersky Security Integration Tool for MSP will not be installed.
PRIVACYPOLICY=1means that you accept the terms of the privacy policy.If you specify another value or if you do not specify this parameter, Kaspersky Security Integration Tool for MSP will not be installed.
INSTALLDIR=\"<installation path>\"is the path to the Kaspersky Security Integration Tool for MSP installation folder.If you do not specify this parameter, Kaspersky Security Integration Tool for MSP will be installed to %PROGRAMFILES%\Kaspersky Lab\Kaspersky Security Integration Tool for MSP (in 32-bit versions of Windows) or %PROGRAMFILES(x86)%\Kaspersky Lab\Kaspersky Security Integration Tool for MSP (in 64-bit versions of Windows).
Kaspersky Security Integration Tool for MSP is installed and is added to the Start menu.
To install Kaspersky Security Integration Service for MSP in silent mode:
- Read the license agreement stored in license.txt file next to the installation application (msp_setup.exe file). Proceed only if you accept the terms of the license agreement.
- At the command prompt, type
msp_setup.exe /s /v"EULA=1 INSTALLDIR=\"<installation path>\""
Here,
EULA=1means that you accept the terms of the license agreement.If you specify another value or if you do not specify this parameter, Kaspersky Security Integration Service for MSP will not be installed.
INSTALLDIR=\"<installation path>\"is the path to the Kaspersky Security Integration Service for MSP installation folder.If you do not specify this parameter, Kaspersky Security Integration Service for MSP will be installed to %PROGRAMFILES%\Kaspersky Lab\Kaspersky Security Integration Service for MSP (in 32-bit versions of Windows) or to %PROGRAMFILES(x86)%\Kaspersky Lab\Kaspersky Security Integration Service for MSP (in 64-bit versions of Windows).
Kaspersky Security Integration Service for MSP is installed.
Known issue
Kaspersky Security Integration Service for MSP cannot connect to Tigerpaw if Kaspersky Security Center and Kaspersky Security Integration Service for MSP are deployed in the client's network instead of the managed service provider's network and there is an authentication proxy server between Kaspersky Security Integration Service for MSP and Tigerpaw.
To enable Kaspersky Security Integration Service for MSP to connect to Tigerpaw over the Internet through the proxy with authentication:
- Launch Services Microsoft Management Console (MMC) by selecting Start → Control panel → Administrative Tools → Services.
- Right-click Kaspersky Security Integration Service for MSP and select Properties.
- In the service properties window that opens, click the Log On tab and specify the following settings:
- In the Log on as section, select the This account option.
- Specify the account credentials for connection to the Internet by Kaspersky Security Integration Service for MSP.
- Click OK in the service properties window to save your changes.
Removing Kaspersky Security Integration with Tigerpaw
You can remove the components of Kaspersky Security Integration with Tigerpaw by using a standard Windows installation / uninstallation procedure.
To remove a component of Kaspersky Security Integration with Tigerpaw:
- On the Start menu, select Control Panel and then click Programs and Features.
- In the list of installed programs, select Kaspersky Security Integration Tool for MSP or Kaspersky Security Integration Service for MSP.
- Right-click the selected application and select Uninstall.
The selected application is removed. Repeat these steps for the other component of Kaspersky Security Integration with Tigerpaw.
As an alternative, you can remove the components of Kaspersky Security Integration with Tigerpaw in silent mode.
To remove Kaspersky Security Integration Tool for MSP in silent mode:
Run Command Prompt as an administrator and type
msiexec.exe /x {E58E13CA-6745-4C60-BE0B-FE6DD416FCB0} REBOOT=ReallySuppress /qn /l*v %temp%\msp_service_uninstall_log.txt
To remove Kaspersky Security Integration Service for MSP in silent mode:
Run Command Prompt as an administrator and type
msiexec.exe /x {7EF14DEE-606A-4147-94FD-3FB0E1FA9D69} REBOOT=ReallySuppress /qn /l*v %temp%\msp_tool_uninstall_log.txt
Removing user.config file
When you uninstall Kaspersky Security Integration Tool for MSP, the user.config files are not removed. These files are automatically created for every user who has ever connected to a Kaspersky Lab solution (either on-premises or Cloud) using Kaspersky Security Integration Tool for MSP. The user.config files contain encrypted information about the user's connection settings for Kaspersky Security Center and Kaspersky Endpoint Security Cloud.
If necessary, you can manually remove the user.config file for every user. The user.config file is stored in the AppData folder of a user.
For example, for Windows 7 and Administrator user, the path to the user.config files is as follows: C:\Users\Administrator\AppData\Local\AO_Kaspersky_Lab\IntegrationUI.exe_Url_nrmo2y4axdcnfumknnua4kzhxvafmxmb\1.0.0.0\user.config.
Page top
Interface of Kaspersky Security Integration with Tigerpaw
Kaspersky Security Integration with Tigerpaw consists of two applications: Kaspersky Security Integration Tool for MSP and Kaspersky Security Integration Service for MSP.
- Kaspersky Security Integration Tool for MSP provides a graphical user interface to configure integration.
- Kaspersky Security Integration Service for MSP is a service application for Microsoft Windows that synchronizes data in Kaspersky Security Center and Tigerpaw. It does not have a user interface.
Kaspersky Security Integration Tool for MSP consists of one window with several nested tabs. Depending on the type of Kaspersky Lab solution that you use—on-premises or cloud-based—Kaspersky Security Integration Tool for MSP may have three or four nested tabs. On these tabs, you can configure mapping between the Kaspersky Lab solution entities, such as virtual servers / workspaces, and products and Tigerpaw entities, such as accounts and price book items. You can also configure service order creation, and if you use the cloud-based version of the solution you can manage workspace administrators.
Kaspersky Security Integration Tool for MSP main window
The Kaspersky Security Integration Tool for MSP window has the following tabs:
- Accounts—Use this tab to set up and modify mapping between company accounts in Tigerpaw and virtual servers or workspaces in your Kaspersky Lab solution, and to add or remove virtual servers or workspaces to your integration. On the Accounts tab, you can also enable automatic billing.
- Service orders—Use this tab to set up service order creation rules for enabling automatic creation and assignment of service orders in Tigerpaw. You can configure creation and assignment of service orders depending on the event severity or when a computer status changes in Kaspersky Lab products.
Creation of service orders is one of the most important features of your integration. If you do not configure service order creation, Tigerpaw cannot generate service orders on the basis of events and computer status changes and cannot process corresponding issues.
- Price book items—Use this tab to set up mapping between Tigerpaw services and Kaspersky Lab products so that usage information about Kaspersky Lab products appears in Tigerpaw. You can modify the existing mapping of services and products as well.
- Administrators—This tab is available for cloud-based solutions only. Use this tab to manage the administrators related to the integration with Kaspersky Endpoint Security Cloud. You can add existing Kaspersky Endpoint Security Cloud administrators to your integration or remove administrators from the integration if you do not want them to work with the integration.
Getting started
After you install Kaspersky Security Integration with Tigerpaw, you establish a connection between it and Tigerpaw. The connection enables you to configure integration using Kaspersky Security Integration Tool for MSP and enables Kaspersky Security Integration Service for MSP to send Service Orders and license usage information to Tigerpaw. To establish connection, create a new integration using Kaspersky Security Integration Tool for MSP.
The integration process varies depending on which Kaspersky Lab product you use. This section describes how to configure integration with Kaspersky Security Center and with Kaspersky Endpoint Security Cloud.
Prerequisites
When configuring integration, you must specify the parameters of the Kaspersky Lab solution that you integrate with: Kaspersky Security Center parameters or Kaspersky Endpoint Security Cloud parameters, and Tigerpaw connection parameters. It is recommended that you check these parameters in advance in order to prepare for setting up integration.
Kaspersky Security Center parameters
Check the following parameters:
- Address of the computer on which Kaspersky Security Center Administration Server is installed.
- Credentials: user name and password for the computer on which Administration Server is installed.
- If you establish connection to the Administration Server through a proxy server, check the proxy server parameters: network address or domain name and credentials for the proxy server.
Kaspersky Endpoint Security Cloud parameters
Check the credentials of your Kaspersky Endpoint Security Cloud account: email address and password.
Tigerpaw parameters
To set up connection with Tigerpaw, you must provide Tigerpaw API connection parameters.
Kaspersky Security Integration with Tigerpaw uses the ASMX and REST APIs of Tigerpaw, and so you must specify both sets of connection parameters in Kaspersky Security Integration Tool for MSP. These parameters are used by Kaspersky Security Integration Tool for MSP and Kaspersky Security Integration Service for MSP to access Tigerpaw and to set up and synchronize integration data between your Kaspersky Lab solution and Tigerpaw. This is data such as accounts, service orders, agreements, price book items, and additional charge.
The following sections describe how to perform the setup:
Additional prerequisites
During the integration process, it is required to add virtual servers or workspaces to your integration. These virtual servers or workspaces are then mapped to Tigerpaw accounts.
For each client company represented by an account in Tigerpaw, create and assign a separate Kaspersky Security Center virtual server / Kaspersky Endpoint Security Cloud workspace prior to integration.
One-to-one mapping is supported and, therefore, the number of virtual servers or workspaces must not exceed the number of your managed accounts.
Page top
Configuring ASMX API connection parameters
This section describes how to create a new ASMX API user. This API user is used by the integration to access Tigerpaw ASMX API.
To create a new ASMX API user:
- Install the Tigerpaw API Users utility. For detailed instructions, refer to Tigerpaw documentation.
- In Tigerpaw add an external product for Kaspersky Security Integration with Tigerpaw:
- On the main menu select Edit → Master Tables.
- In the Table Maintenance window that opens, expand Account → External Products.
- Click New on the toolbar.
- Specify the name of the external product for Kaspersky Security Integration with Tigerpaw, and click OK.
- Start the tsiWS Users.exe utility (by default, it is located in the following folder: C:\Program Files (x86)\Tigerpaw Software\Tigerpaw API Tools).
- In tsiWS Users.exe create the API user for your integration:
- Specify the Name and Password. You will need these settings later when, establishing connection with Tigerpaw, you specify the SOAP user name and password in Kaspersky Security Integration Tool for MSP.
- Make sure that the Active and Allow user to list accounts via API check boxes are selected.
- In the Product drop-down list, select the external product you created in step 2.
For more details about how to configure API users, refer to the Tigerpaw documentation.
After you perform the steps above, the user is added and will be displayed in the table. Use this user name and password as the SOAP user name and password when you provide the integration settings.
Configuring REST API connection parameters
This section describes how to obtain the API public key and API private key for the REST API. Public and private keys are displayed in the rep properties screen in Tigerpaw. Rep records identify users in Tigerpaw. You can either create a new API rep or select an existing one for your integration.
To obtain REST API public and private keys:
- Start Tigerpaw.
- On the Tigerpaw main menu select Edit → Master Tables.
- In the Table Maintenance window that opens, in the tree view expand Rep → Account Reps.
- Select an existing account rep for your integration or create a new one.
For more details about rep records, refer to the Tigerpaw documentation.
The security role of the rep account that you select for your integration must provide enough rights to access all required Tigerpaw items. The items are:
- Accounts (get, update).
- Recurring agreements (get, create, update).
- Master tables (get, create, update).
- Price book items (get).
- Service orders (get, create, update)
- Custom folders and fields (get, create, update).
- View the properties of an existing account rep by double-clicking it in Rep Name column of the table, or create a new account rep for the REST API by clicking New on the toolbar in the Table Maintenance window.
- In the Account Rep Maintenance window that opens, click the Admin tab and in the REST API Security section view the public and private keys of the existing account rep or click the Generate button to create the public and private keys for a new account rep.
- Make a note of the public and private keys or copy them to the Clipboard. You will have to specify these keys when you configure integration with Tigerpaw.
Integrating with Kaspersky Security Center
This section describes how to create and configure integration between Tigerpaw and Kaspersky Security Center by using Kaspersky Security Integration Tool for MSP.
To successfully create integration, connect to Kaspersky Security Center Administration Server and perform the steps described in the following sections.
Connecting to Kaspersky Security Center Administration Server
When you start Kaspersky Security Integration Tool for MSP, the connection settings window opens. In this window, specify the settings to connect to Kaspersky Security Center Administration Server.
Connecting to Kaspersky Security Center Administration Server
To connect to Kaspersky Security Center Administration Server:
- In the Start menu, select Kaspersky Security Integration Tool for MSP.
- In the window that opens, select the Kaspersky Endpoint Security for Business solution to connect to Kaspersky Security Center Administration Server.
- You can connect to Kaspersky Security Center Administration Server in one of the following ways:
- By providing the connection parameters for the computer on which the Administration Server is installed.
If you selected this method of connection, specify the following connection settings. None of the fields can be blank.
- Address—Address of the computer on which the Administration Server is installed. You can specify this value as an IP address or as a domain name of the computer.
- User name—User name to connect to the computer on which the Administration Server is installed, that is, to the computer whose address you specified in the Address field.
- Password—Password to connect to the computer, on which the Administration Server is installed, that is, to the computer whose address you specified in the Address field.
- By selecting the Administration Server certificate.
In this case, you do not have to provide the connection parameters for the computer on which the Administration Server is installed. Kaspersky Security Integration Tool for MSP uses the certificate of Kaspersky Security Center Administration Server to connect to this Administration Server. Usage of the certificate guarantees that Kaspersky Security Integration Tool for MSP connects to the Administration Server from which the certificate was downloaded.
The Administration Server certificate is created automatically during installation of the Administration Server and is stored in the %ProgramData%\Application Data\KasperskyLab\adminkit\1093\cert folder on the computer that has Administration Server installed. Before starting to use the Administration Server certificate for authentication, copy the certificate file, klserver.cer, to the computer on which Kaspersky Security Integration Tool for MSP is installed.
- By providing the connection parameters for the computer on which the Administration Server is installed.
To use Administration Server certificate:
- Click the Select Kaspersky Security Center Administration Server certificate link.
- In the dialog box displayed, select the Use Server certificate check box and navigate to the certificate file.
- Click OK to start using the selected certificate for connection.
- If you want to establish the connection to the Administration Server through a proxy server, select the Use proxy server check box. By default, this check box is cleared.
If you selected the Use proxy server check box, provide the following proxy-server settings:
- Address—Network address of the proxy server. Provide the address as a full domain name of the proxy server.
- User name—User name to connect to the proxy server.
- Password—Password to connect to the proxy server.
- Click the Proceed button to connect to the Administration Server using the specified settings.
The system validates the provided settings and connects to the Administration Server.
Creating a Kaspersky Security Center integration with Tigerpaw
After you connect to the Administration Server, the integration settings window opens, where you can create an integration between Tigerpaw and Kaspersky Security Center by means of Kaspersky Security Integration Tool for MSP.
Creation of an integration between Tigerpaw and Kaspersky Security Center is required only when you launch Kaspersky Security Integration Tool for MSP for the first time.
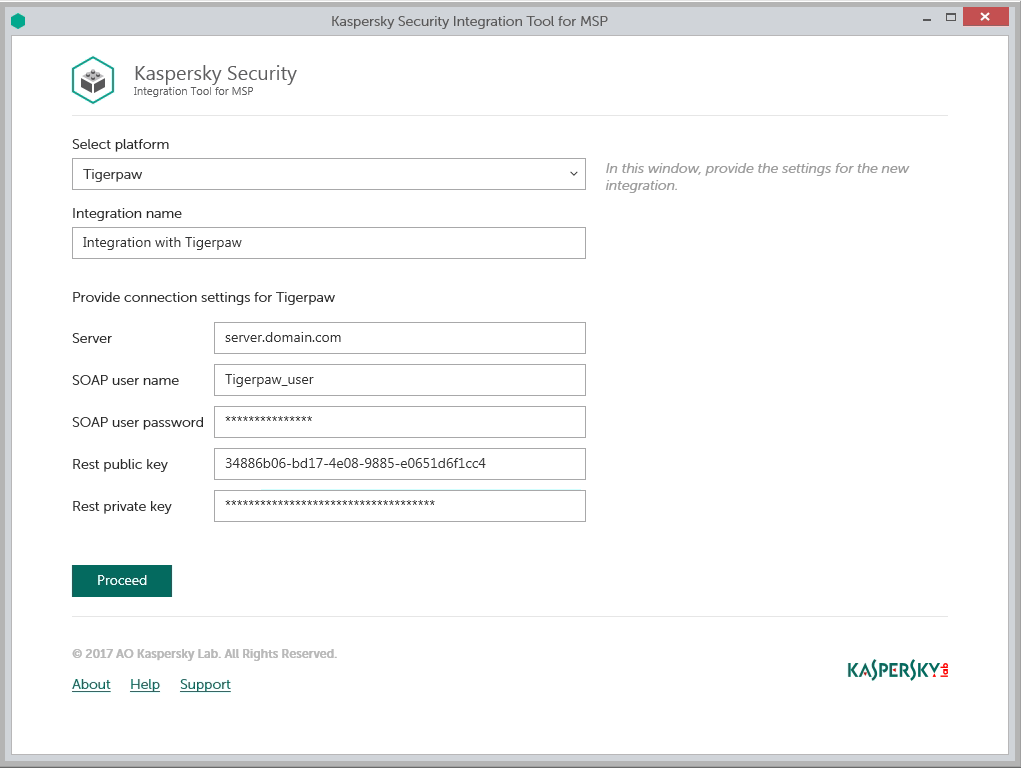
Specifying Tigerpaw integration settings
To create integration with Tigerpaw:
- In the integration settings window that opens after you connect to the Administration Server, specify the following settings for the newly created integration:
- Select platform—Select the integration platform from the drop-down list. The list contains the names of all platforms that Kaspersky Security Center can be integrated with. For integration with Tigerpaw, select Tigerpaw.
- Integration name—Name of the new integration. This field cannot be blank. By default, the integration name is Integration with Tigerpaw. The integration name is displayed in the Kaspersky Security Integration Tool for MSP window as a link that allows you to view and access the integration properties.
For an integration with Kaspersky Endpoint Security Cloud, click the View integration ID link under the integration name to view the identifier of the integration. You may have to provide this ID to Kaspersky Lab Technical Support for diagnostics and troubleshooting.
- Server—Address of the computer on which the Tigerpaw server is installed. This field cannot be blank.
- SOAP user name—ASMX API user name that you created for your integration. This field cannot be blank.
- SOAP password—Password for the ASMX API user that you created for your integration. This field cannot be blank.
For details about how to obtain the ASMX API user name and password, see Configuring ASMX API connection parameters.
- Rest public key—Public key generated by Tigerpaw for the rep account that you use for your integration. This field cannot be blank.
- Rest private key—Private key generated by Tigerpaw for the rep account that you use for your integration. This field cannot be blank.
Tigerpaw generates both public and private keys. For details about how to generate the keys, see Configuring REST API connection parameters.
- Click the Proceed button when you have finished specifying the integration settings.
These settings are saved and then used by Kaspersky Security Integration with Tigerpaw to gain access to Tigerpaw items.
Kaspersky Security Center is now integrated with Tigerpaw.
Adding virtual servers to the integration
After an integration with Tigerpaw is created, a window opens where you can add Kaspersky Security Center virtual servers to the integration. Kaspersky Security Center virtual servers are then mapped to the Tigerpaw accounts.
Adding virtual servers to the integration
To add Kaspersky Security Center virtual servers to the integration:
- In the window, which lists Kaspersky Security Center virtual servers, select the check boxes next to the existing virtual servers to add them to the integration.
If you want to add all virtual servers to the integration, select the Select all check box.
- Click Proceed.
You will now be able to map these virtual servers to Tigerpaw accounts.
Each virtual server can be added to one integration only. That is, if a virtual server is added to an integration, it is not displayed in a list of virtual servers available for another integration.
Integrating with Kaspersky Endpoint Security Cloud
This section describes how to create and configure integration between Tigerpaw and Kaspersky Endpoint Security Cloud by means of Kaspersky Security Integration Tool for MSP.
To successfully create integration, connect to Kaspersky Endpoint Security Cloud and perform the steps described in the following sections.
Connecting to Kaspersky Endpoint Security Cloud
When you start Kaspersky Security Integration Tool for MSP, the connection settings window opens. In this window, specify the settings to connect to Kaspersky Endpoint Security Cloud.
Connecting to Kaspersky Endpoint Security Cloud
To connect to Kaspersky Endpoint Security Cloud:
- In the Start menu, select Kaspersky Security Integration Tool for MSP.
- In the window that opens, select the Kaspersky Endpoint Security Cloud solution to connect to Kaspersky Endpoint Security Cloud.
- Specify the following connection settings:
- User name—Email address used for your Kaspersky Endpoint Security Cloud account. This field cannot be blank.
- Password—Password to connect to Kaspersky Endpoint Security Cloud. This field cannot be blank.
- Click the Proceed button to connect to Kaspersky Endpoint Security Cloud using the specified settings.
The system validates the provided settings and establishes connection to Kaspersky Endpoint Security Cloud.
Creating a Kaspersky Endpoint Security Cloud integration with Tigerpaw
After you connect to the Kaspersky Endpoint Security Cloud, the integration settings window opens, where you can create an integration between Tigerpaw and Kaspersky Endpoint Security Cloud by means of Kaspersky Security Integration Tool for MSP.
Creation of an integration between Tigerpaw and Kaspersky Endpoint Security Cloud is required only when you launch Kaspersky Security Integration Tool for MSP for the first time.
Specifying Tigerpaw integration settings
To create integration with Tigerpaw:
- In the integration settings window that opens after you connect to the Kaspersky Endpoint Security Cloud, specify the following settings for the newly created integration:
- Select platform—Select the integration platform from the drop-down list. The list contains the names of all platforms that Kaspersky Endpoint Security Cloud can be integrated with. For integration with Tigerpaw, select Tigerpaw.
A window with the text of a statement about additional data processing opens. Accept the terms of the statement to continue.
- Integration name—Name of the new integration. This field cannot be blank. By default, the integration name is Integration with Tigerpaw. The integration name is displayed in the Kaspersky Security Integration Tool for MSP window as a link that allows you to view and access the integration properties.
For an integration with Kaspersky Endpoint Security Cloud, click the View integration ID link under the integration name to view the identifier of the integration. You may have to provide this ID to Kaspersky Lab Technical Support for diagnostics and troubleshooting.
- Server—Address of the computer on which the Tigerpaw server is installed. This field cannot be blank.
- SOAP user name—ASMX API user name that you created for your integration. This field cannot be blank.
- SOAP password—Password for the ASMX API user that you created for your integration. This field cannot be blank.
For details about how to obtain the ASMX API user name and password, see Configuring ASMX API connection parameters.
- Rest public key—Public key generated by Tigerpaw for the rep account that you use for your integration. This field cannot be blank.
- Rest private key—Private key generated by Tigerpaw for the rep account that you use for your integration. This field cannot be blank.
Tigerpaw generates both public and private keys. For details about how to generate the keys, see Configuring REST API connection parameters.
- Select platform—Select the integration platform from the drop-down list. The list contains the names of all platforms that Kaspersky Endpoint Security Cloud can be integrated with. For integration with Tigerpaw, select Tigerpaw.
- Click the Proceed button when you have finished specifying the integration settings.
These settings are saved and then used by Kaspersky Security Integration with Tigerpaw to gain access to Tigerpaw items.
Kaspersky Endpoint Security Cloud is now integrated with Tigerpaw.
Adding workspaces to the integration
After an integration with Tigerpaw is created, a window opens where you can add Kaspersky Endpoint Security Cloud workspaces to the integration. Kaspersky Endpoint Security Cloud workspaces are then mapped to the Tigerpaw accounts.
Adding workspaces to the integration
To add Kaspersky Endpoint Security Cloud workspaces to the integration:
- In the window, which lists Kaspersky Endpoint Security Cloud workspaces, select the check boxes next to the existing workspaces to add them to the integration.
If you want to add all workspaces to the integration, select the Select all check box.
- Click Proceed.
You will now be able to map these workspaces to Tigerpaw accounts.
Each workspace can be added to one integration only. That is, if a workspace is added to an integration, it is not displayed in a list of workspaces available for another integration.
Supplementary parameter
The parameter that indicates the type of Kaspersky Endpoint Security Cloud server to which Kaspersky Security Integration Tool for MSP connects may be included in the .config file (IntegrationUI.exe.config) of Kaspersky Security Integration Tool for MSP.
The parameter name is KESCloudServer; and its possible values are:
- production—Kaspersky Security Integration Tool for MSP works with the Production server.
- beta—Kaspersky Security Integration Tool for MSP works with the Beta server.
- test—Kaspersky Security Integration Tool for MSP works with the Test server.
You are strongly urged not to modify the KESCloudServer parameter unless you receive clear instructions from Kaspersky Lab.
The IntegrationUI.exe.config file is stored in the installation folder of Kaspersky Security Integration Tool for MSP. The default path is C:\Program Files (x86)\Kaspersky Lab\Kaspersky Security Integration Tool for MSP\IntegrationUI.exe.config.
By default, the KESCloudServer parameter is not displayed in the .config file of Kaspersky Security Integration Tool for MSP.
The KESCloudServer parameter can be specified as follows:
<appSettings>
<add key="KESCloudServer" value="production" />
</appSettings>
Managing integrations
This section describes how to edit or delete an existing integration and how to create a new integration. For example, you may have to edit, delete, or create an integration when you change the vendor of your Professional Services Automation system.
Creating a new integration
You can create a new integration in the Kaspersky Security Integration Tool for MSP window.

Creating a new integration
To create a new integration with Tigerpaw:
- In the top pane of the Kaspersky Security Integration Tool for MSP window, click the name of the current integration.
- In the Integration Settings window that opens, click the New integration button.
A new Integration Settings window opens. The fields for the connection settings are blank.
- Specify the values for the following settings of the integration:
- Platform—Select the integration platform from the drop-down list. The list contains the names of all platforms that Kaspersky Security Center or Kaspersky Endpoint Security Cloud can be integrated with. For integration with Tigerpaw, select Tigerpaw.
If you integrate Tigerpaw with Kaspersky Endpoint Security Cloud and if this is the first integration with either Autotask or Tigerpaw, a window with the text of a statement about additional data processing opens. Accept the terms of the statement to continue.
- Integration name—Name of the new integration. This field cannot be blank. By default, the integration name is Integration with Tigerpaw. The integration name is displayed in the Kaspersky Security Integration Tool for MSP window as a link that allows you to view and access the integration properties.
For an integration with Kaspersky Endpoint Security Cloud, click the View integration ID link under the integration name to view the identifier of the integration. You may have to provide this ID to Kaspersky Lab Technical Support for diagnostics and troubleshooting.
- Server—Address of the computer on which the Tigerpaw server is installed. This field cannot be blank.
- SOAP user name—ASMX API user name that you created for your integration. This field cannot be blank.
- SOAP password—Password for the ASMX API user that you created for your integration. This field cannot be blank.
For details about how to obtain the ASMX API user name and password, see Configuring ASMX API connection parameters.
- Rest public key—Public key generated by Tigerpaw for the rep account that you use for your integration. This field cannot be blank.
- Rest private key—Private key generated by Tigerpaw for the rep account that you use for your integration. This field cannot be blank.
Tigerpaw generates both public and private keys. For details about how to generate the keys, see Configuring REST API connection parameters.
- Platform—Select the integration platform from the drop-down list. The list contains the names of all platforms that Kaspersky Security Center or Kaspersky Endpoint Security Cloud can be integrated with. For integration with Tigerpaw, select Tigerpaw.
- Click OK when you have finished specifying the integration settings.
The settings are saved and then used by Kaspersky Security Integration with Tigerpaw to gain access to Tigerpaw.
A new integration with Tigerpaw is created.
Page top
Editing and viewing an existing integration
You can view and edit settings of an existing integration in the Kaspersky Security Integration Tool for MSP window.
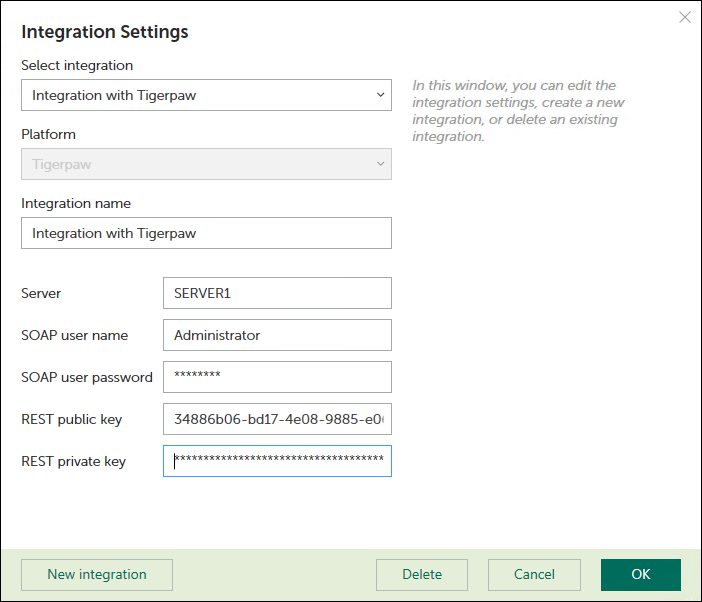
Editing an integration
To view and edit integration with Tigerpaw:
- In the top pane of the window, click the name of the integration whose settings you want to view or modify.
- In the Integration Settings window that opens, in the Select integration drop-down list select the required integration.
- Modify the following settings of the selected integration:
- Integration name—Name of the selected integration. By default, the integration name is Integration with Tigerpaw. You can edit this field, however, it cannot be blank.
For an integration with Kaspersky Endpoint Security Cloud, click the View integration ID link under the integration name to view the identifier of the integration. You may have to provide this ID to Kaspersky Lab Technical Support for diagnostics and troubleshooting.
- Server—Address of the computer on which the Tigerpaw server is installed. This field cannot be blank.
- SOAP user name—ASMX API user name that you created for your integration. This field cannot be blank.
- SOAP password—Password for the ASMX API user that you created for your integration. This field cannot be blank.
For details about how to obtain the ASMX API user name and password, see Configuring ASMX API connection parameters.
- Rest public key—Public key generated by Tigerpaw for the rep account that you use for your integration. This field cannot be blank.
- Rest private key—Private key generated by Tigerpaw for the rep account that you use for your integration. This field cannot be blank.
Tigerpaw generates both public and private keys. For details about how to generate the keys, see Configuring REST API connection parameters.
- Integration name—Name of the selected integration. By default, the integration name is Integration with Tigerpaw. You can edit this field, however, it cannot be blank.
- Click OK when you have finished editing the integration settings.
The settings are saved and then used by Kaspersky Security Integration with Tigerpaw to gain access to Tigerpaw.
The integration with Tigerpaw is modified and saved.
Page top
Deleting an existing integration
You can delete an existing integration in the Kaspersky Security Integration Tool for MSP window.
When you delete an integration, all virtual servers or workspaces that were linked to the integration are unbound from the integration but continue to exist in Kaspersky Security Center or Kaspersky Endpoint Security Cloud. All administrators of the deleted integration receive notifications that the integration was deleted, but they can continue to administer Kaspersky Endpoint Security Cloud workspaces that were linked to this integration.
All Kaspersky Security Center virtual servers or Kaspersky Endpoint Security Cloud workspaces that are unbound from the deleted integration can be added to other integrations.
To delete integration with Tigerpaw:
- In the top pane of the Kaspersky Security Integration Tool for MSP window, click the name of the integration that you want to delete.
- In the integration window that opens, click Delete to delete the integration.
- Click Yes to confirm deletion.
The integration settings are cleared, indicating that the integration is deleted.
Configuring integration in Kaspersky Security Integration with Tigerpaw
The purpose of Kaspersky Security Integration Tool for MSP is to configure integration between Tigerpaw and the Kaspersky Lab solution you use: Kaspersky Security Center or Kaspersky Endpoint Security Cloud.
Using Kaspersky Security Integration Tool for MSP, you can do the following:
- Map Tigerpaw accounts to Kaspersky Security Center virtual servers or to Kaspersky Endpoint Security Cloud workspaces.
- Configure service order creation in Tigerpaw.
- Map Kaspersky Lab products to existing Tigerpaw price book items.
- Configure automated billing.
Mapping accounts and enabling automatic billing
Use the Accounts tab in the Kaspersky Security Integration Tool for MSP window to set up and modify mapping between accounts in Tigerpaw and virtual servers or workspaces in your Kaspersky Lab solution. To set up mapping, accounts must be created in Tigerpaw, while virtual servers must be added to Kaspersky Security Center Administration Server or workspaces must be created in Kaspersky Endpoint Security Cloud.
On the Accounts tab, you can also enable automatic billing for your Tigerpaw accounts. This means that information about the number of licenses for Kaspersky Lab products provided during the current billing period can be updated regularly and automatically in Tigerpaw. Timely updating lets you prepare customer invoices more quickly and easily.
When you click the Accounts tab, a list is displayed, showing virtual servers or workspaces and their corresponding Tigerpaw accounts. You can add existing virtual servers or workspaces to the integration and map Tigerpaw accounts to them. You can also delete mapping between a virtual server or workspace and its corresponding account. In this case, neither the virtual server / workspace nor the account is deleted; instead, the link between them is broken.
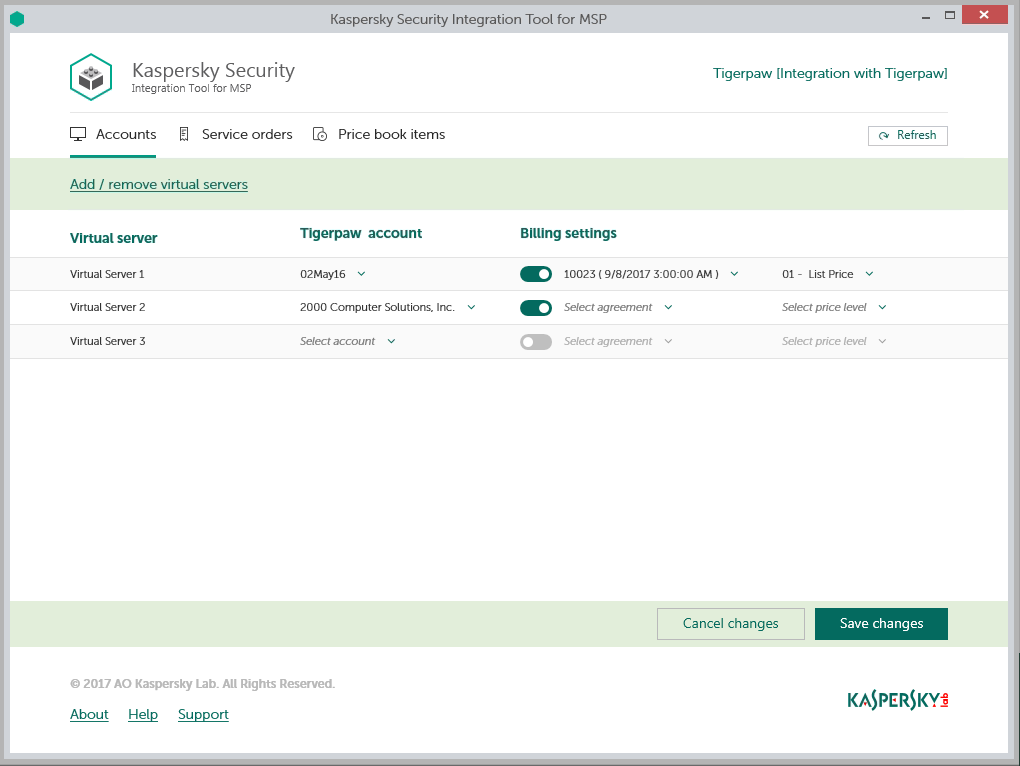
Mapping accounts and enabling automatic billing
The following sections explain how to add or remove virtual servers or workspaces to / from the integration and how to configure automatic billing.
Adding and removing virtual servers or workspaces
You can add existing virtual servers or workspaces to the integration or remove them from the integration.
To add or remove virtual servers or workspaces to / from the integration:
- In the Kaspersky Security Integration Tool for MSP window, click the Accounts tab.
- Click the Add / remove virtual servers link if you use Kaspersky Security Center, or the Add / remove workspaces link if you use Kaspersky Endpoint Security Cloud, and then do one of the following:
- Select check boxes next to existing virtual servers or workspaces to add them to the integration. Then you can match these virtual servers or workspaces to Tigerpaw accounts.
- Clear check boxes next to virtual servers or workspaces to remove them from the integration. This action does not remove the virtual servers from Kaspersky Security Center or workspaces from Kaspersky Endpoint Security Cloud; it only deletes the mapping between the virtual servers or workspaces and the Tigerpaw accounts.
- Click OK.
Each virtual server or workspace can be added to one integration only. That is, if a virtual server or a workspace is added to an integration, it is not displayed in a list of virtual servers or workspaces available for another integration.
Setting up automatic billing
You can map virtual servers or workspaces to Tigerpaw accounts and configure automatic billing for the selected accounts.
To set up mapping between virtual servers or workspaces and Tigerpaw accounts, and edit billing settings:
- In the Kaspersky Security Integration Tool for MSP window, click the Accounts tab.
- In the Virtual server column (if you use Kaspersky Security Center) or in the Workspace column (if you use Kaspersky Endpoint Security Cloud), locate the virtual servers or workspaces to which to map the Tigerpaw account.
If you have a long list of virtual servers or workspaces, use the search box located above the table, on the right, to find the required virtual server or workspace. Type any part of the virtual server or workspace name in the search box and click the Search button. Only the virtual servers or workspaces whose names contain the string you entered are displayed.
- In the Tigerpaw account column, click the drop-down arrow and select the account that you want to map to the virtual server or workspace.
One-to-one mapping is supported. You can map one virtual server or one workspace to a single Tigerpaw account.
- Turn automatic billing on or off for the Tigerpaw account by using the toggle button in the Billing settings column.
To use automatic billing, you must set up mapping between Kaspersky Lab products and their Tigerpaw equivalents—price book items. For details, see Mapping Tigerpaw price book items to products.
The Tigerpaw account, for which automatic billing is enabled, must be cross-referenced to the External Product associated with the API User credentials that you provided for the integration. For details, see the "Assign External Products to an Account" section in Tigerpaw online Help.
- Click the Select agreement drop-down arrow in the Billing settings column and select one of the available agreements associated with the account you selected in the Tigerpaw account column. Each agreement in the list has agreement number and start date.
A recurring agreement must exist for the account in Tigerpaw in order for automatic billing to be set up successfully. Recurring agreements for accounts are created and managed in Tigerpaw. For more details refer to Tigerpaw documentation.
- Click the Select price level drop-down arrow in the Billing settings column and select the appropriate price level for the client’s account. Price levels simplify support of multiple standard prices. For example, you may define one price level for standard price-list price, and another price level with a discount for special customers. The price level selected for the account is used by Kaspersky Security Integration Service for MSP when automatically setting up an additional charge price. This price is used when the client is billed for using Kaspersky Lab products. For details on price levels, refer to Tigerpaw documentation.
For details on automatic billing, refer to section How automatic billing works.
- If necessary, repeat steps 2 to 6 for each pair: virtual server-account or workspace-account.
- Click the Save changes button to save your mapping.
After the accounts are mapped to the virtual servers or workspaces and automatic billing is configured, the additional charges for usage of licensed Kaspersky Lab products are automatically created for these accounts in Tigerpaw. These additional charges are created for the specified agreements with price levels corresponding to the accounts.
How automatic billing works
You can configure automatic billing to enable Kaspersky Security Integration with Tigerpaw to create, and update daily, the Additional Charges for the Agreements associated with Tigerpaw accounts. When automatic billing is configured, information about usage of Kaspersky Lab products on managed computers is transferred to Tigerpaw automatically, allowing faster periodic generation of invoices for your customers. For information about enabling and configuring automatic billing, refer to Setting up automatic billing.
The Tigerpaw account, for which automatic billing is enabled, must be cross-referenced to the External Product associated with the API User credentials that you provided for the integration. For details, see the "Assign External Products to an Account" section in Tigerpaw online Help.
Automatic billing works according to the following rules:
- Kaspersky Security Integration Service for MSP runs automatic billing daily, so that you have up-to-date usage information in Tigerpaw any time you have to generate an invoice for a client.
- Kaspersky Security Integration Service for MSP creates additional charges to the agreements only for those Kaspersky Lab products that are mapped to Tigerpaw price book items. For details, refer to Mapping Tigerpaw price book items to products.
- To get usage information for a particular account, Kaspersky Security Integration Service for MSP calculates how many devices managed by the virtual server or connected to the workspace associated with this account utilize licenses for the Kaspersky Lab products. Only unexpired and active commercial keys and subscriptions are counted. Servers and workstations are counted separately if the Bill devices by categories option is selected when Kaspersky Lab products and Tigerpaw price book items are mapped
To differentiate the pricing policy for two types of devices (servers and workstations), a separate billing feature is available. Kaspersky Security Integration Tool for MSP supports two billing configurations:
- Associates a single licensed Kaspersky Lab product with a single Tigerpaw price book item.
- Associates a single licensed Kaspersky Lab product with three different Tigerpaw price book items: one for servers, a second for workstations, and a third for non-Windows devices.
In this case, Tigerpaw analyzes the type of client device (server or workstation) that uses the Kaspersky Lab license. Data about each Kaspersky Lab product license used by the device is associated with the Tigerpaw price book item mapped to this Kaspersky Lab product.
For example, if a client company uses Kaspersky Endpoint Security for Business Advanced on 100 devices, where 90 of them are workstations and 10 are servers, Kaspersky Security Integration Service for MSP does the following:
- Creates an Additional Charge on 90 devices for the Tigerpaw price book item for workstations.
- Creates an Additional Charge on 10 devices for the Tigerpaw price book item for servers.
Setting up service order creation
This section explains how to set up service order creation for your Tigerpaw accounts.
About service order creation
Service orders allow timely responses to different types of events or changes in computer status that occur on the network. Automated service order creation allows you to reduce significantly the time spent monitoring and managing your Tigerpaw accounts.
You must establish service order creation rules to enable automatic creation and assignment of service orders in Tigerpaw. You can set up creation and assignment of service orders depending on the event severity or when a computer status changes to Critical or Warning in Kaspersky Lab products.
Service orders created on the basis of computer status changes are automatically closed when the corresponding issue is resolved and the status description that triggered the service order creation is no longer relevant. For example, when a computer's status becomes Warning because a "Databases are out of date" status description is assigned, a corresponding service order is created. When the databases are updated, the status description "Databases are out of date" is no longer relevant, and the service order is automatically closed. However, the computer status might remain Warning because of other status descriptions, for example, "Many viruses detected".
Kaspersky Security Integration Service for MSP is not able to close a service order while it is being opened in the Tigerpaw graphical user interface, as Tigerpaw locks such service orders for editing through the API. After the user, who viewed the service order in Tigerpaw, leaves the Service Orders page, Kaspersky Security Integration Service for MSP automatically closes the service order shortly thereafter.
Service orders created on the basis of events are not closed automatically, so you must close these service orders manually.
You can create and modify service order creation rules for your Tigerpaw accounts. Service order creation rules are applicable to all accounts that are mapped to Kaspersky Security Center virtual servers or Kaspersky Endpoint Security Cloud workspaces. Service order creation rules can be configured individually for events and for computer statuses.
Page top
General service order creation settings
In the General section of the Service orders tab, you can configure general settings for service order creation. General settings are applicable to all service orders that have been automatically created in Tigerpaw as a result of events or computer status changes that occur in Kaspersky Lab products. General settings provide the required initial values to the service order attributes so that service orders are created correctly in Tigerpaw.
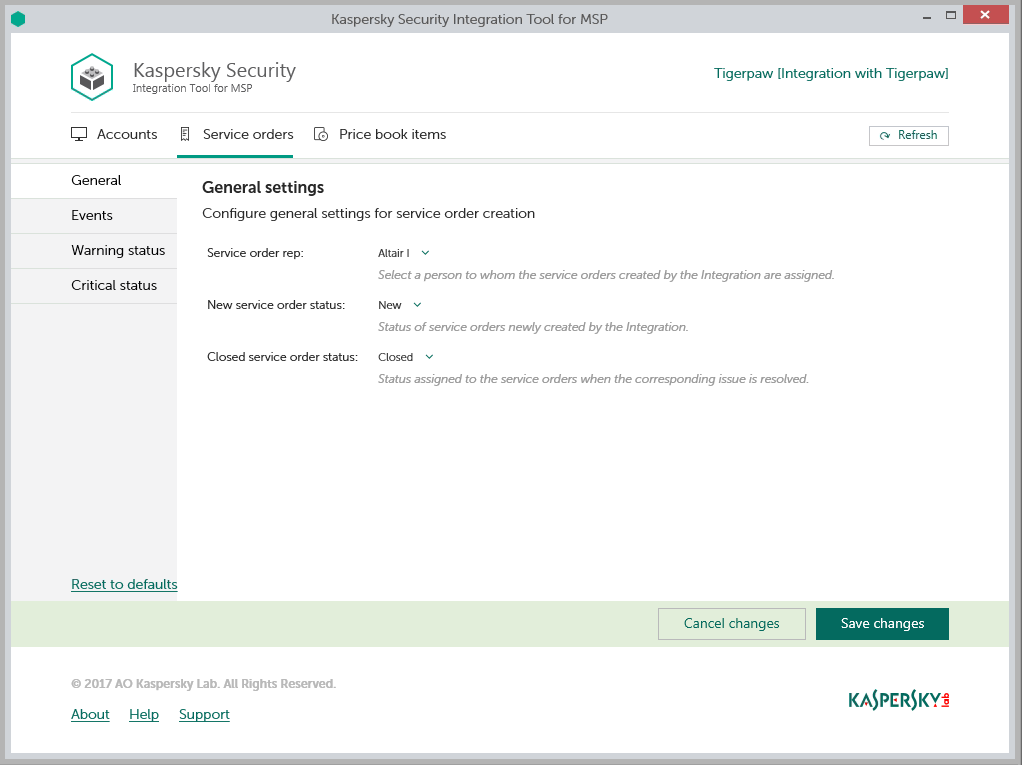
Configuring general service order creation settings
To configure general settings for service order creation:
- In the Kaspersky Security Integration Tool for MSP window, click the Service orders tab.
- In the left pane, select the General section.
The General Settings right pane allows you to configure general settings for service order creation.
- Edit the following settings:
- Service order rep—In the drop-down list, select the person to assign the newly created service orders to, when they are automatically created in Tigerpaw when an event is triggered or a change in computer status occurs. This value is required.
- New service order status—In the drop-down list, select the status to be assigned to new service orders that are automatically created in Tigerpaw as a result of an event occurrence or a change in computer status. This value is required.
- Closed service order status—In the drop-down list, select the status to be assigned to service orders when they are automatically closed. This status is assigned to service orders that are created based on a computer status change and then are automatically closed by Kaspersky Security Integration Service for MSP after the corresponding issue has been resolved. This value is required.
- When you finish configuring general service order creation settings, click the Save changes button to save the settings.
General service order creation settings are configured and service orders in Tigerpaw are created in accordance with the specified rules.
You can cancel changes and reset general service order creation settings to their last saved values.
To cancel changes to general service order creation settings and restore last saved values:
- Open the Service orders tab and in the left pane select the General section.
- Click the Cancel changes button.
You can also reset general service order creation settings to their default values.
To reset general service order creation settings to their default values:
- Open the Service orders tab and in the left pane select the General section.
- Click the Reset to defaults link.
Service orders for events
In the Events section of the Service orders tab, you can configure service order creation rules for events that occurred in Kaspersky Security Center. You can edit service order creation settings either for an individual event, or for several events at the same time.
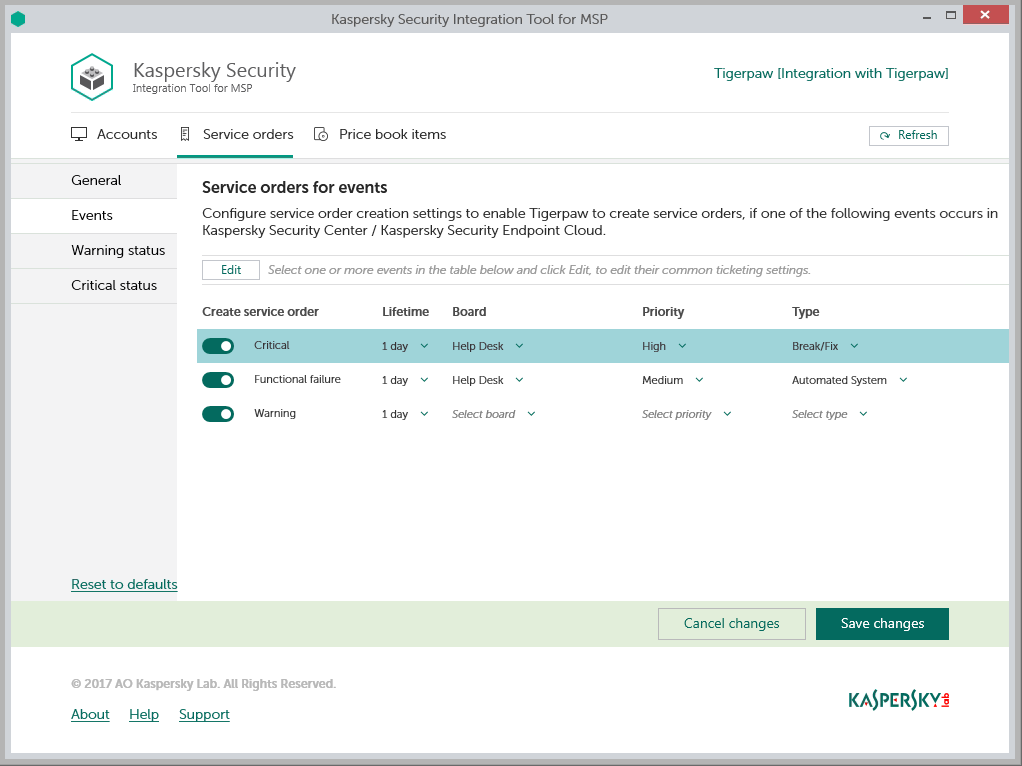
Configuring service order creation for events
To set up service order creation for events:
- In the Kaspersky Security Integration Tool for MSP window, click the Service orders tab.
- In the left pane, select the Events section to configure service order creation for events.
- In the Create service order column, use the toggle buttons to enable or disable service order creation for the corresponding event severities.
By default, service order creation is disabled for all event severities. There are three possible event severities: Critical, Functional failure, and Warning.
- Edit the service order creation settings.
You can edit the main service order creation settings, which are displayed in the main screen. Additional service order creation settings appear in the Service order settings for events window.
- To edit the main service order creation settings, select the line with the event severity that you want. In the Lifetime, Board, Priority, and Type columns, edit the settings as required. To edit both the main and additional service order creation settings, select one or more lines that contain the event severities and click the Edit button above the table. The Service order settings for events window opens, where you can modify additional settings.
Editing service order creation settings for multiple event severities is useful if you want to assign the same settings to these event severities. If you want the service order creation settings to be different, edit them individually for each event severity.
You can edit the following service order creation settings:
- Lifetime—Select the period, in days, during which the events are still relevant. The default value is 1 day.
This value is used to determine whether to create a service order for an event in Tigerpaw. If the connection between Tigerpaw and Kaspersky Security Center or Kaspersky Endpoint Security Cloud has been broken and events have not been sent for some time, only events more recent than the specified period are sent to Tigerpaw as service orders. A different relevance period can be set for different event severities.
- Board—Select the board to assign the service order to. Boards are configured in Tigerpaw.
- Priority—Select the priority for the service orders created in Tigerpaw. Assigning priorities to the service orders created for computer status change is used to prioritize corresponding service orders in Tigerpaw. The service order priority allows you to respond to the issues in order of their importance, so that more urgent problems can be resolved sooner. This setting is required.
- Type—Select the type to be assigned to the service order.
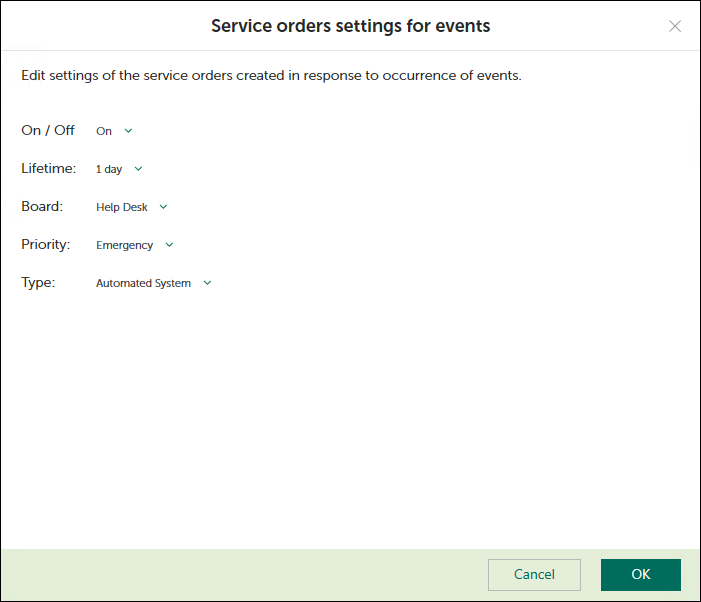
Service order settings for events window
- To edit the main service order creation settings, select the line with the event severity that you want. In the Lifetime, Board, Priority, and Type columns, edit the settings as required. To edit both the main and additional service order creation settings, select one or more lines that contain the event severities and click the Edit button above the table. The Service order settings for events window opens, where you can modify additional settings.
- When you finish configuring service order creation for events, click the Save changes button to save the settings.
Service order creation for events is configured and service orders in Tigerpaw will be created in accordance with the specified rules.
You can cancel changes and reset service order creation settings to their last saved values.
To cancel changes of service order creation settings for events and restore last saved values:
- Open the Service orders tab and in the left pane select the Events section.
- Click the Cancel changes button.
You can also reset service order creation settings to their default values.
To reset service order creation settings for events to their default values:
- Open the Service orders tab and in the left pane select the Events section.
- Click the Reset to defaults link.
Service orders for computer statuses
In the Warning status and Critical status sections of the Service orders tab, you can configure service order creation rules for the computer statuses. This allows service orders to be created in Tigerpaw when the computer status in Kaspersky Security Center changes to Warning or Critical. You can edit service order creation settings either for an individual computer status, or for several statuses at the same time.
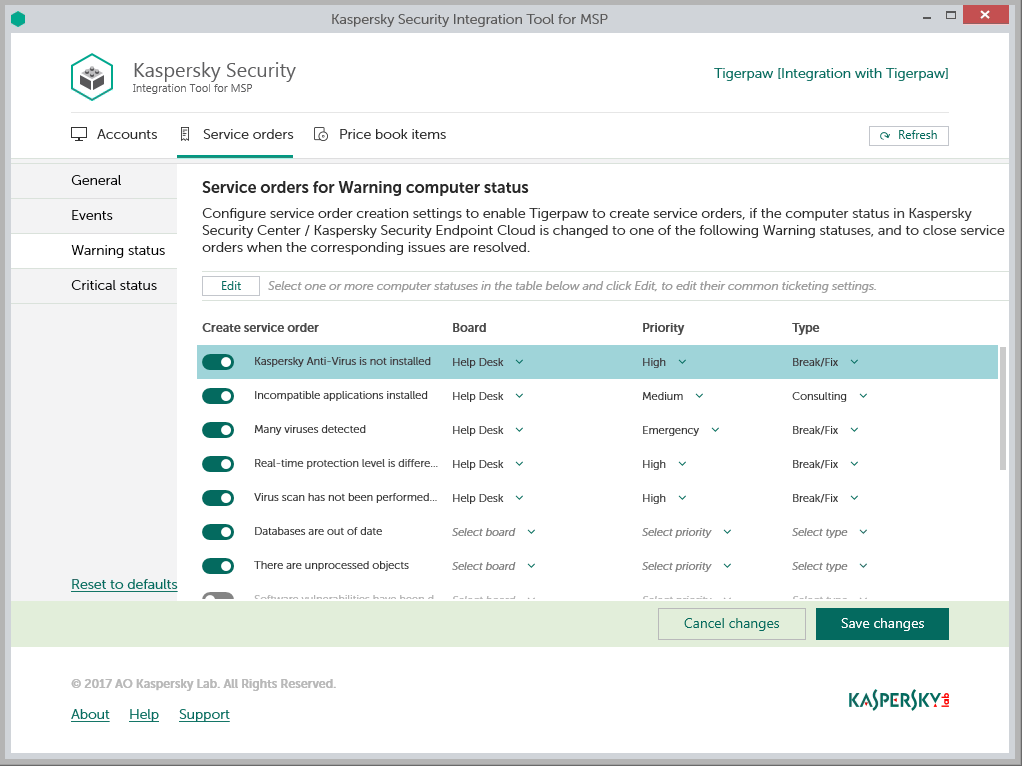
Configuring service order creation for computer statuses
To set up service order creation for computer status:
- In the Kaspersky Security Integration Tool for MSP window, click the Service orders tab.
- In the left pane, select the Warning status or Critical status section to configure service order creation for computer statuses.
- In the Create service order column, use the toggle buttons to enable or disable service order creation for the corresponding status descriptions.
By default, service order creation is disabled for all computer status descriptions.
- Edit the service order creation settings.
You can edit the main service order creation settings, which are displayed on the main screen. Additional service order creation settings appear in the Service order settings for computer status window.
- To edit the main service order creation settings, select the line with the status description that you want. In the Board, Priority, and Type columns, edit the settings as required.
- To edit both the main and additional service order creation settings, select one or more lines that contain the computer statuses and click the Edit button above the table. The Service order settings for computer status window opens, where you can modify additional settings.
Editing service order creation settings for multiple computer statuses is useful if you want to assign the same settings to these computer statuses. If you want the service order creation settings to be different, edit them individually for each computer status.
You can edit the following service order creation settings:
- Board—Select the board to assign the service order to. Boards are configured in Tigerpaw.
- Priority—Select the priority for the service orders created in Tigerpaw. Assigning priorities to the service orders created for computer status change is used to prioritize corresponding service orders in Tigerpaw. The service order priority allows you to respond to issues in order of their importance, so that more urgent problems can be resolved sooner. This setting is required.
- Type—Select the type to be assigned to the service order.
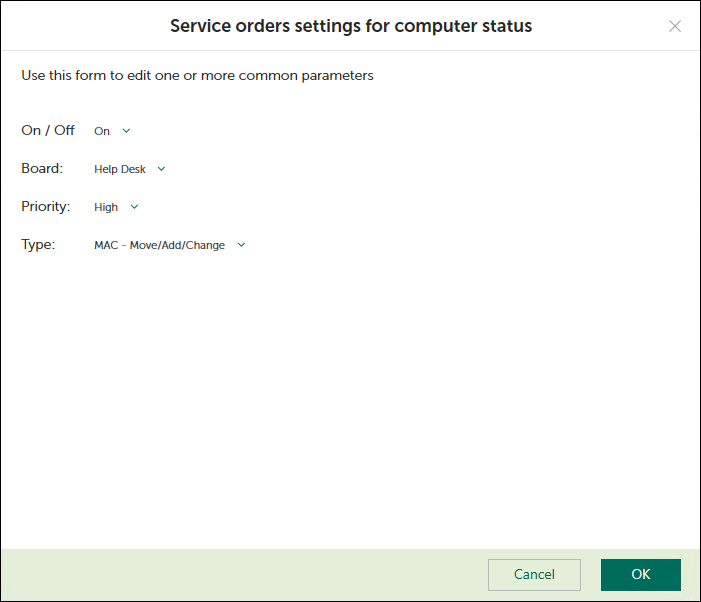
Service order settings for computer status window
- When you finish configuring service order creation for computer statuses, click the Save changes button to save the settings.
Service order creation for computer statuses is configured and service orders in Tigerpaw will be created in accordance with the specified rules.
You can cancel changes and reset service order creation settings to their last saved values.
To cancel changes of service order creation settings for computer statuses and restore last saved values:
- Open the Service orders tab and in the left pane select the Warning status or Critical status section.
- Click the Cancel changes button.
You can also reset service order creation settings to their default values.
To reset service order creation settings for computer statuses to their default values:
- Open the Service orders tab and in the left pane select the Warning status or Critical status section.
- Click the Reset to defaults link.
Mapping Tigerpaw price book items to products
Set up mapping between Kaspersky Lab products and Tigerpaw price book items, so that usage information about Kaspersky Lab products appears in Tigerpaw as additional charges to the agreements of the accounts.
On the Price book items tab of the Kaspersky Security Integration Tool for MSP window, you can map Kaspersky Lab products to Tigerpaw price book items. You can edit existing mapping between products and price book items as well.
The list of available products differs depending on which Kaspersky Lab solution you use—Kaspersky Security Center or Kaspersky Endpoint Security Cloud.
Create price book items in Tigerpaw for the Kaspersky Lab products that you provide to your clients before setting up mapping.
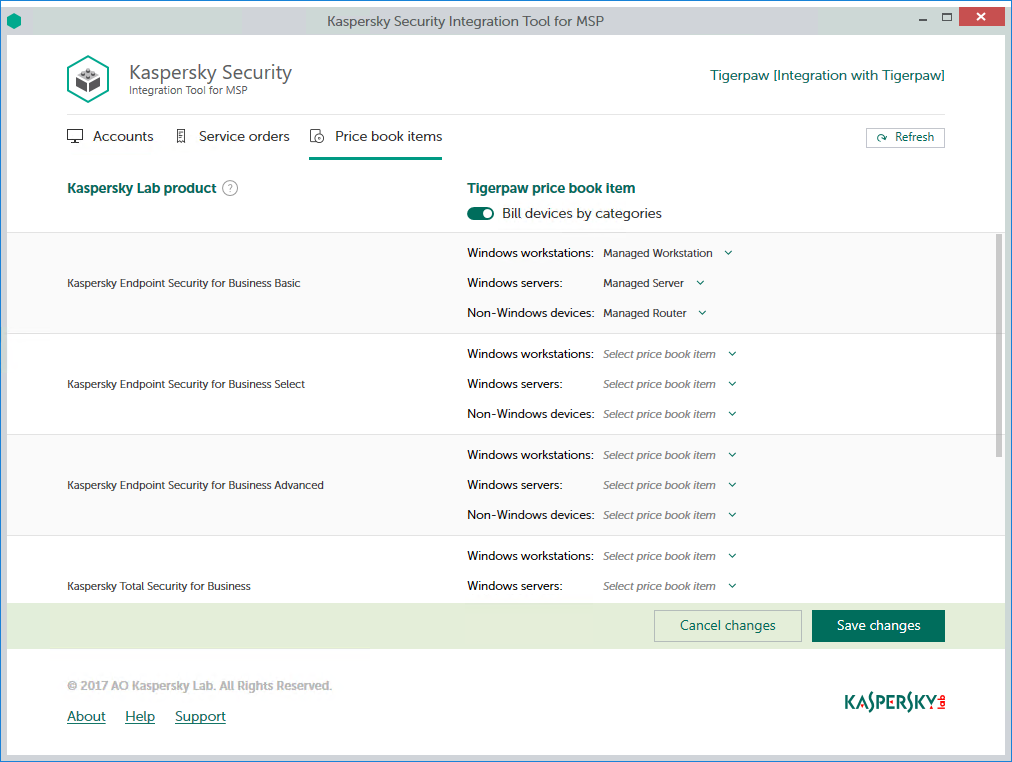
Mapping Kaspersky Lab products to Tigerpaw price book items
To set up mapping between Kaspersky Lab products and Tigerpaw price book items:
- In the Kaspersky Security Integration Tool for MSP window, click the Price book items tab.
- To differentiate the pricing policy for two types of devices (servers and workstations), use the Bill devices by categories toggle button to turn on this feature.
- Map Kaspersky Lab products in the Kaspersky Lab product column to Tigerpaw price book items in the Price book items column.
If the Bill devices by categories feature is disabled, each Kaspersky Lab product can be mapped to one Tigerpaw price book item only. Otherwise, map each Kaspersky Lab product to three Tigerpaw price book items:
- In the Windows workstations drop-down list, select a Tigerpaw price book item. The price of this price book item will be used during billing for all of the workstations that use the license for the corresponding Kaspersky Lab product.
- In the Windows servers drop-down list, select a Tigerpaw price book item. The price of this price book item will be used during billing for all of the servers that use the license for the corresponding Kaspersky Lab product.
- In the Non-Windows devices drop-down list, select a Tigerpaw price book item. The price of this price book item will be used during billing for all of the non-Windows devices that use the license for the corresponding Kaspersky Lab product.
- When you have finished with mapping, click the Save changes button to save the mapping.
Using integration-specific information on Tigerpaw accounts
When configuring integration with Tigerpaw it is useful to check whether all Tigerpaw accounts are connected to Kaspersky Security Center virtual servers / Kaspersky Endpoint Security Cloud workspaces, or whether you accidentally skipped one or more accounts. For this purpose, you can use Tigerpaw Matrix template views, which allow you to display all existing Tigerpaw accounts together with the virtual servers or workspaces to which they are mapped.
Kaspersky Security Integration with Tigerpaw adds its own fields to the Tigerpaw configuration. You can use these fields to create Accounts Matrix templates based on integration-specific information. For example, using standard Tigerpaw functionality, you can select clients that are not integrated with Kaspersky Security Center or with Kaspersky Endpoint Security Cloud—that is, the clients whose accounts do not have a corresponding virtual server or workspace. Then, using filters, you can manually exclude accounts that do not use Kaspersky Lab products from your selection.
To view Tigerpaw accounts that are mapped to virtual servers or workspaces:
- Log in to Tigerpaw with your credentials.
- In Tigerpaw, create a custom Accounts Matrix template and include the desired fields, for example:
- Acct. Name from the General section.
- Acct. No. from the General section.
- Acct. Type from the General section.
- Accounts Kaspersky virtual server or Accounts Kaspersky workspace from the Custom Fields section.
For details about the Matrix template, refer to Tigerpaw documentation.
- Filter the resulting information by the account type (for example, Customer) and by the name of the virtual server or workspace (for example, Is not empty).
If the name of the virtual server or workspace is empty, the account is not mapped to any virtual server or workspace.
Managing administrators
You can manage the administrators related to the integration with Kaspersky Endpoint Security Cloud. You can add the accounts of existing Kaspersky Endpoint Security Cloud users as administrators of your integration. You can also remove administrators from the integration if you do not want them to work with the integration.
You can manage administrators within the integration only if Kaspersky Endpoint Security Cloud solution is used. For Kaspersky Security Center solution, this functionality is unavailable.
When you add administrators to the integration, they have the same rights as existing administrators: they can administer all workspaces bound to this integration and manage the integration settings.
When you remove administrators from the integration, these administrators can no longer manage this integration and cannot administer its workspaces. You may have to remove administrators, for example, if they stop working for your company or move to new positions within the company and are no longer allowed to manage integrations.
All remaining administrators who have access to the integration can add or remove administrators to / from this integration.
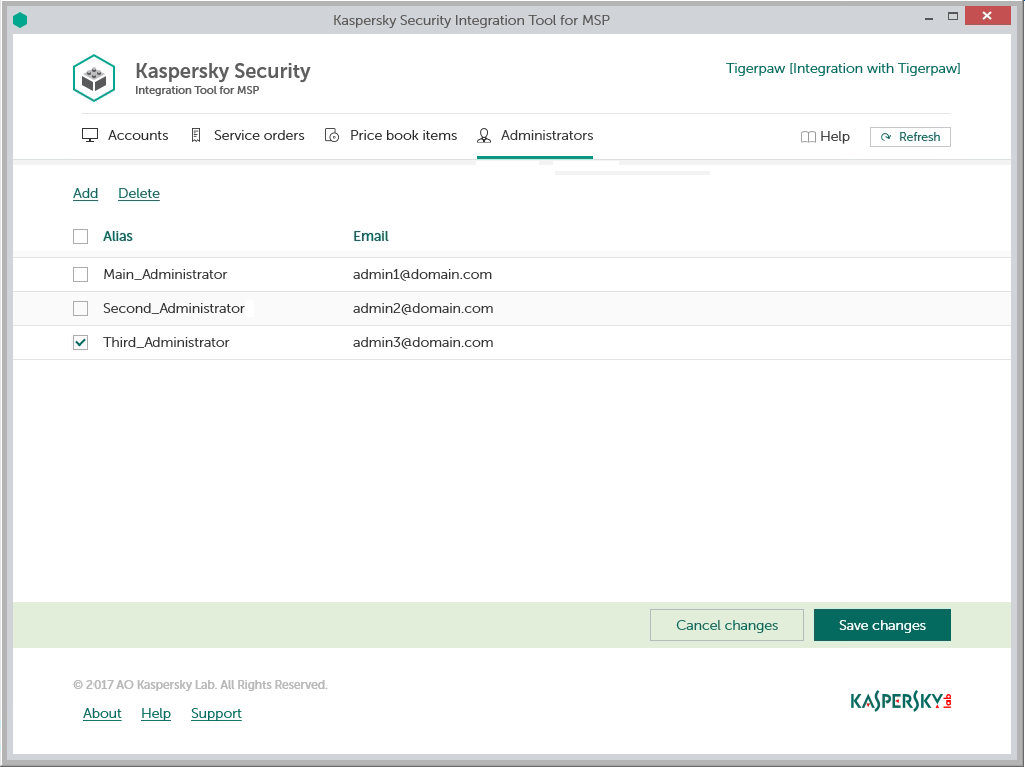
Managing administrators
The following sections explain how to add or remove an administrator to / from the integration.
Adding administrators
When you add administrators to an integration, they have the same rights as existing administrators: they can administer all Kaspersky Endpoint Security Cloud workspaces bound to this integration and manage the integration settings.
To add administrators:
- In the Kaspersky Security Integration Tool for MSP window, click the Administrators tab.
- Click the Add link to add administrators.
- In the Add administrators dialog box that opens, specify the email addresses and aliases associated with the Kaspersky Lab accounts of the users that you want to add as new administrators. You can add several administrators at a time.
- Use a semicolon to separate the email address and alias of an administrator.
- Type the data for each administrator in a new line.
Only users registered in Kaspersky Endpoint Security Cloud can be added to the integration.
- Click Next and check the data that you provided. If everything is correct, click Finish to add the administrators to the integration. If you want to change the information you provided, click Back.
- After you perform all the actions with administrators' accounts, click the Save changes button.
The new administrators are added to the integration and gain access to all workspaces within this integration.
Removing administrators
When you remove administrators from an integration, they can no longer manage the integration. However, the administrators' Kaspersky Lab accounts are not deleted; they are merely unbound from the integration, so that the administrators cannot manage the integration or administer its workspaces.
To remove administrators:
- In the Kaspersky Security Integration Tool for MSP window, click the Administrators tab.
- Select the check boxes next to the names of administrators you want removed from the integration.
If you want to select all administrators, select the check box in the column header.
You cannot remove all administrators from the integration. An integration must have at least one administrator.
- Click the Delete link to remove the selected administrators.
- After you perform all the actions with the administrators' accounts, click the Save changes button.
The selected administrators are removed from the integration and lose their rights to administer workspaces bound to the integration.
Enabling and disabling tracing
The following sections explain how to enable and disable tracing for Kaspersky Security Integration with Tigerpaw components.
You may have to save traces of Kaspersky Security Integration with Tigerpaw, for example, if you contact Technical Support and they ask you to provide the traces for diagnostics and troubleshooting. It is recommended to disable tracing when an issue is resolved, as tracing requires additional resources and additional memory to store trace files. It is also recommended to remove trace files from your computer after the issue that required tracing is resolved, because the trace files may contain personal and confidential data.
By default, tracing is disabled.
There are two ways of enabling and disabling tracing for Kaspersky Security Integration with Tigerpaw components:
- Using the Microsoft Windows registry.
- In the .config files of Kaspersky Security Integration with Tigerpaw components.
Enabling and disabling tracing using the registry
You can enable and disable tracing using the Microsoft Windows registry.
To enable or disable tracing:
Before editing the Windows registry, it is recommended that you back up the registry.
- Click the Start button.
- In the Start menu, either in the Run box or the Search box, type regedit and press Enter.
The Registry Editor window opens.
If you have restricted access to the Windows computer you are logged into, you might not be able to access the registry.
- In the Registry Editor window, navigate to the Kaspersky Security Integration Service for MSP or Kaspersky Security Integration Tool for MSP registry key. They are available by one of the following paths:
- Kaspersky Security Integration Service for MSP
- HKEY_LOCAL_MACHINE\SOFTWARE\KasperskyLab\Kaspersky Security Integration Service for MSP
- HKEY_LOCAL_MACHINE\SOFTWARE\Wow6432Node\KasperskyLab\Kaspersky Security Integration Service for MSP
- Kaspersky Security Integration Tool for MSP
If the Kaspersky Security Integration Tool for MSP registry key is not displayed, either run Kaspersky Security Integration Tool for MSP as administrator (by right-clicking the application icon and selecting Run as administrator), or create the registry key manually.
- HKEY_LOCAL_MACHINE\SOFTWARE\KasperskyLab\Kaspersky Security Integration Tool for MSP
- HKEY_LOCAL_MACHINE\SOFTWARE\Wow6432Node\KasperskyLab\Kaspersky Security Integration Tool for MSP
- Kaspersky Security Integration Service for MSP
- Edit the value of the EnableTraces parameter as follows:
- 1—To enable tracing.
- 0—To disable tracing.
- Click OK in the Edit window to save your changes.
- Close the Registry Editor window.
The trace files are saved to the .log files in the application installation folder:
- For Kaspersky Security Integration Tool for MSP the file is IntegrationUI.log, by default saved to the C:\Program Files (x86)\Kaspersky Lab\Kaspersky Security Integration Tool for MSP folder.
- For Kaspersky Security Integration Service for MSP the file is IntegrationServer.log, by default stored in the C:\Program Files (x86)\Kaspersky Lab\Kaspersky Security Integration Service for MSP folder.
When you uninstall Kaspersky Security Integration Tool for MSP and Kaspersky Security Integration Service for MSP, the trace files are removed together with the application.
Enabling and disabling tracing using the .config files
You can enable and disable tracing in the .config files of Kaspersky Security Integration Tool for MSP and Kaspersky Security Integration Service for MSP. The files are stored in the installation folders of the corresponding products.
To enable or disable tracing:
- Navigate to the .config file of the Kaspersky Security Integration with Tigerpaw component for which you want to enable or disable tracing. The .config file is stored in the installation folder. By default, the navigation paths are:
- For Kaspersky Security Integration Tool for MSP the file is IntegrationUI.exe.config, by default stored in the C:\Program Files (x86)\Kaspersky Lab\Kaspersky Security Integration Tool for MSP folder.
- For Kaspersky Security Integration Service for MSP the file is IntegrationServer.exe.config, by default stored in the C:\Program Files (x86)\Kaspersky Lab\Kaspersky Security Integration Service for MSP folder.
- Open the .config file with any text editor and change the value of the minlevel attribute of the logger element as follows:
- To enable tracing, set the value of the minlevel attribute to Debug.
<logger name="MSPIntegration.*" writeTo="fileTarget" minlevel="Debug" /> - To disable tracing, set the value of the minlevel attribute to Off.
<logger name="MSPIntegration.*" writeTo="fileTarget" minlevel="Off" />
- To enable tracing, set the value of the minlevel attribute to Debug.
- Save and close the modified .config file.
The trace files are saved to the .log files in the application installation folder:
- For Kaspersky Security Integration Tool for MSP the file is IntegrationUI.log, by default saved to the C:\Program Files (x86)\Kaspersky Lab\Kaspersky Security Integration Tool for MSP folder.
- For Kaspersky Security Integration Service for MSP the file is IntegrationServer.log, by default stored in the C:\Program Files (x86)\Kaspersky Lab\Kaspersky Security Integration Service for MSP folder.
When you uninstall Kaspersky Security Integration Tool for MSP and Kaspersky Security Integration Service for MSP, the trace files are removed together with the application.
Custom fields in Tigerpaw
Kaspersky Security Integration with Tigerpaw provides easy access to valuable integration-specific information on Tigerpaw accounts directly from the Tigerpaw GUI. You can view this information in the Account Details window by clicking the Custom Fields link in the Summary section, and use this information in Tigerpaw Matrix views.
The following custom fields are available for the Tigerpaw accounts in the Kaspersky custom category:
- If you use Kaspersky Security Center:
- Kaspersky virtual server—Name of the virtual server mapped to this account.
- If you use Kaspersky Endpoint Security Cloud:
- Kaspersky workspace—Name of the workspace mapped to this account.
- Kaspersky workspace URL—Link to open your Kaspersky Endpoint Security Cloud workspace.
If you accidentally deleted the custom fields created by the integration, you can restore them by using the following workaround. However, this workaround works only the first time you save changes in parameter values after Kaspersky Security Integration Tool for MSP starts.
To restore the Kaspersky custom category and its fields:
- Start or restart Kaspersky Security Integration Tool for MSP.
- Change the value for any setting on any tab (Accounts, Service orders, or Price book items) to activate the Save changes button.
- Click the Save changes button.
The Kaspersky section is displayed after you save changes to your integration.
- Set the parameter that you changed in step 2 to the original value, and then save your settings.
The Kaspersky custom category and its fields become available in each Tigerpaw account details window.
Contact Technical Support
This section describes how to get technical support and the terms on which it is available.
How to get technical support
If you cannot find a solution to your issue in the Kaspersky Security Integrations for MSP documentation or in any of the sources of information about Kaspersky Security Integrations for MSP, contact Technical Support. Technical Support specialists will answer all your questions about configuring and using Kaspersky Security Integrations for MSP.
Before contacting Technical Support, please read the support rules.
You can contact Technical Support in one of the following ways:
- By visiting the Technical Support website
- By sending a request to Technical Support from the Kaspersky CompanyAccount portal
Technical Support via Kaspersky CompanyAccount
Kaspersky CompanyAccount is a portal for companies that use Kaspersky Lab applications. The Kaspersky CompanyAccount portal is designed to facilitate interaction between users and Kaspersky Lab specialists through online requests. You can use Kaspersky CompanyAccount to track the status of your online requests and store a history of them as well.
You can register all of your organization's employees under a single account on Kaspersky CompanyAccount. A single account lets you centrally manage electronic requests from registered employees to Kaspersky Lab and also manage the privileges of these employees via Kaspersky CompanyAccount.
The Kaspersky CompanyAccount portal is available in the following languages:
- English
- Spanish
- Italian
- German
- Polish
- Portuguese
- Russian
- French
- Japanese
To learn more about Kaspersky CompanyAccount, visit the Technical Support website.
Page top
AO Kaspersky Lab
Kaspersky Lab is a world-renowned vendor of systems protecting computers against digital threats, including viruses and other malware, unsolicited email (spam), and network and hacking attacks.
In 2008, Kaspersky Lab was rated among the world’s top four leading vendors of information security software solutions for end users (IDC Worldwide Endpoint Security Revenue by Vendor). Kaspersky Lab is the preferred vendor of computer protection systems for home users in Russia (IDC Endpoint Tracker 2014).
Kaspersky Lab was founded in Russia in 1997. It has since grown into an international group of companies with 38 offices in 33 countries. The company employs more than 3,000 skilled professionals.
Products. Kaspersky Lab products provide protection for all systems, from home computers to large corporate networks.
The personal product range includes security applications for desktop, laptop, and tablet computers, smartphones and other mobile devices.
The company offers protection and control solutions and technologies for workstations and mobile devices, virtual machines, file and web servers, mail gateways, and firewalls. The company's portfolio also features specialized products providing protection against DDoS attacks, protection for industrial control systems, and prevention of financial fraud. Used in conjunction with centralized management tools, these solutions ensure effective automated protection for companies and organizations of any size against computer threats. Kaspersky Lab products are certified by major test laboratories, compatible with software from diverse vendors, and optimized to run on many hardware platforms.
Kaspersky Lab virus analysts work around the clock. Every day they uncover hundreds of thousands of new computer threats, create tools to detect and disinfect them, and include their signatures in databases used by Kaspersky Lab applications.
Technologies. Many technologies that are now part and parcel of modern anti-virus tools were originally developed by Kaspersky Lab. It is no coincidence that many other developers use the Kaspersky Anti-Virus engine in their products, including: Alcatel-Lucent, Alt-N, Asus, BAE Systems, Blue Coat, Check Point, Cisco Meraki, Clearswift, D-Link, Facebook, General Dynamics, H3C, Juniper Networks, Lenovo, Microsoft, NETGEAR, Openwave Messaging, Parallels, Qualcomm, Samsung, Stormshield, Toshiba, Trustwave, Vertu, and ZyXEL. Many of the company’s innovative technologies are patented.
Achievements. Over the years, Kaspersky Lab has won hundreds of awards for its services in combating computer threats. Following tests and research conducted by the reputed Austrian test laboratory AV-Comparatives in 2014, Kaspersky Lab ranked among the top two vendors by the number of Advanced+ certificates earned and was ultimately awarded the Top Rated certificate. But Kaspersky Lab's main achievement is the loyalty of its users worldwide. The company’s products and technologies protect more than 400 million users, and its corporate clients number more than 270,000.
Kaspersky Lab website: |
|
Virus encyclopedia: |
|
Virus Lab: |
https://virusdesk.kaspersky.com (for analyzing suspicious files and websites) |
Kaspersky Lab’s web forum: |
Page top
Information about third-party code
Information about third-party code is contained in the file legal_notices.txt, in the application installation folder.
Page top
Trademark notices
Registered trademarks and service marks are the property of their respective owners.
Tigerpaw is a registered trademark of Tigerpaw Software, Inc.
Microsoft and Windows are registered trademarks of Microsoft Corporation in the United States and other countries.
Page top