Contents
- Kaspersky Security Center Cloud Console Help
- What's new
- Kaspersky Security Center Cloud Console
- About Kaspersky Security Center Cloud Console
- Hardware and software requirements for Kaspersky Security Center Cloud Console
- Compatible Kaspersky applications and solutions
- Localization of Kaspersky Security Center Cloud Console
- Comparison of Kaspersky Security Center and Kaspersky Security Center Cloud Console
- Architecture and basic concepts
- Application licensing
- Licensing of Kaspersky Security Center Cloud Console
- About the trial mode of Kaspersky Security Center Cloud Console
- Using Kaspersky Marketplace to choose Kaspersky business solutions
- Licenses and the minimum number of devices for each license
- Events of the licensing limit exceeded
- Methods of distribution of the activation codes to the managed devices
- Adding an Administration Server license key
- Adding a license key to the Administration Server repository
- Deploying a license key to client devices
- Automatic distribution of a license key
- Viewing information about license keys in use in the Administration Server repository
- Viewing information about the license keys used for a specific Kaspersky application
- Removing an Administration Server license key
- Removing a license key from the repository
- Viewing the list of devices where a Kaspersky application is not activated
- Revoking consent with an End User License Agreement
- Renewing licenses for Kaspersky applications
- Use of Kaspersky Security Center Cloud Console after the license expiration
- Licensing definitions
- Data provision
- Hardening Guide
- Planning Kaspersky Security Center Cloud Console architecture
- Accounts and authentication
- Managing protection of client devices
- Configuring protection for managed applications
- Event transfer to third-party systems
- Security recommendations for third-party information systems
- Recommendations for using Kaspersky security applications
- Interface of Kaspersky Security Center Cloud Console
- Initial configuration of Kaspersky Security Center Cloud Console
- Workspace management
- About workspace management in Kaspersky Security Center Cloud Console
- Getting started with Kaspersky Security Center Cloud Console
- Opening your Kaspersky Security Center Cloud Console workspace
- Returning to the list of workspaces
- Signing out of Kaspersky Security Center Cloud Console
- Managing the company and the list of workspaces
- Managing access to the company and its workspaces
- Resetting your password
- Editing the settings of an account in Kaspersky Security Center Cloud Console
- Selecting the data centers used to store Kaspersky Security Center Cloud Console information
- Access to public DNS servers
- Scenario: Creating a hierarchy of Administration Servers managed through Kaspersky Security Center Cloud Console
- Migration to Kaspersky Security Center Cloud Console
- About migration from Kaspersky Security Center Web Console
- Methods of migration to Kaspersky Security Center Cloud Console
- Scenario: Migration without a hierarchy of Administration Servers
- Migration wizard
- Migration with a hierarchy of Administration Servers
- Scenario: Migration of devices running Linux or macOS operating systems
- Scenario: Reverse migration from Kaspersky Security Center Cloud Console to Kaspersky Security Center
- Migration with virtual Administration Servers
- About migration from Pro View to Expert View
- About migration from Kaspersky Security Center Web Console
- Quick start wizard
- About quick start wizard
- Starting quick start wizard
- Step 1. Selecting installation packages to download
- Step 2. Configuring a proxy server
- Step 3. Configuring Kaspersky Security Network
- Step 4. Configuring third-party update management
- Step 5. Creating a basic network protection configuration
- Step 6. Closing the quick start wizard
- Kaspersky applications initial deployment
- Scenario: Kaspersky applications initial deployment
- Creating installation packages for Kaspersky applications
- Distributing installation packages to secondary Administration Servers
- Creating a stand-alone installation packages for Network Agent
- Viewing the list of stand-alone installation packages
- Creating custom installation packages
- Requirements for a distribution point
- Network Agent installation package settings
- Virtual infrastructure
- Usage of Network Agent for Windows, Linux, and macOS: Comparison
- Specifying settings for remote installation on Unix devices
- Replacing third-party security applications
- Options for manual installation of applications
- Forced deployment through the remote installation task of Kaspersky Security Center Cloud Console
- Protection deployment wizard
- Step 1. Starting Protection deployment wizard
- Step 1. Selecting the installation package
- Step 2. Selecting Network Agent version
- Step 3. Selecting devices
- Step 4. Specifying the remote installation task settings
- Step 5. Restart management
- Step 6. Removing incompatible applications before installation
- Step 7. Moving devices to Managed devices
- Step 8. Selecting accounts to access devices
- Step 9. Starting installation
- Network settings for interaction with external services
- Preparing a device running Astra Linux in the closed software environment mode for installation of Network Agent
- Preparing a Linux device and installing Network Agent on a Linux device remotely
- Installing applications by using a remote installation task
- Starting and stopping Kaspersky applications
- Mobile Device Management
- Detection and response capabilities
- Discovering networked devices and creating administration groups
- Scenario: Discovering networked devices
- Network polling
- Adjustment of distribution points and connection gateways
- Calculating the number and configuration of distribution points
- Standard configuration of distribution points: Single office
- Standard configuration of distribution points: Multiple small remote offices
- Assigning distribution points manually
- Modifying the list of distribution points for an administration group
- Using a distribution point as a push server
- Using the "Do not disconnect from the Administration Server" option to provide continuous connectivity between a managed device and the Administration Server
- Creating administration groups
- Creating device moving rules
- Copying device moving rules
- Conditions for a device moving rule
- Adding devices to an administration group manually
- Moving devices or clusters to an administration group manually
- Configuring retention rules for unassigned devices
- Configuring network protection
- Scenario: Configuring network protection
- About device-centric and user-centric security management approaches
- Policy setup and propagation: Device-centric approach
- Policy setup and propagation: User-centric approach
- Network Agent policy settings
- Comparison of Network Agent policy settings by operating systems
- Manual setup of the Kaspersky Endpoint Security policy
- Manual setup of the group update task for Kaspersky Endpoint Security
- Tasks
- Managing client devices
- Settings of a managed device
- Device selections
- Viewing and configuring the actions when devices show inactivity
- About device statuses
- Configuring the switching of device statuses
- Changing the Administration Server for client devices
- Avoiding conflicts between multiple Administration Servers
- Creating Administration Server connection profiles
- About clusters and server arrays
- Properties of a cluster or server array
- Device tags
- Creating a device tag
- Renaming a device tag
- Deleting a device tag
- Viewing devices to which a tag is assigned
- Viewing tags assigned to a device
- Tagging devices manually
- Removing assigned tags from devices
- Viewing rules for tagging devices automatically
- Editing a rule for tagging devices automatically
- Creating a rule for tagging devices automatically
- Running rules for auto-tagging devices
- Deleting a rule for tagging devices automatically
- Quarantine and Backup
- Remote diagnostics of client devices
- Opening the remote diagnostics window
- Enabling and disabling tracing for applications
- Downloading trace files of an application
- Deleting trace files
- Downloading application settings
- Downloading system information from a client device
- Downloading event logs
- Starting, stopping, restarting the application
- Running the remote diagnostics of an application and downloading the results
- Running an application on a client device
- Generating a dump file for an application
- Remotely connecting to the desktop of a client device
- Connecting to devices through Windows Desktop Sharing
- Triggering of rules in Smart Training mode
- Managing administration groups
- Policies and policy profiles
- About policies
- About lock and locked settings
- Inheritance of policies and policy profiles
- Managing policies
- Viewing the list of policies
- Creating a policy
- Modifying a policy
- General policy settings
- Enabling and disabling a policy inheritance option
- Copying a policy
- Moving a policy
- Exporting a policy
- Importing a policy
- Viewing the policy distribution status chart
- Activating a policy automatically at the Virus outbreak event
- Forced synchronization
- Deleting a policy
- Managing policy profiles
- Data encryption and protection
- Users and user roles
- About user accounts
- Adding an account of an internal user
- About user roles
- Configuring access rights to application features. Role-based access control
- Assigning a role to a user or a security group
- Creating a user role
- Editing a user role
- Editing the scope of a user role
- Deleting a user role
- Associating policy profiles with roles
- Creating a security group
- Editing a security group
- Adding user accounts to an internal group
- Deleting a security group
- Configuring ADFS integration
- Configuring integration with Microsoft Entra ID
- Assigning a user as a device owner
- Assigning a user as a Linux device owner after installation of Network Agent
- Managing object revisions
- Kaspersky Security Network (KSN)
- Deletion of objects
- Updating Kaspersky databases and applications
- Scenario: Regular updating of Kaspersky databases and applications
- About updating Kaspersky databases, software modules, and applications
- Creating the task for downloading updates to the repositories of distribution points
- Configuring managed devices to receive updates only from distribution points
- Enabling and disabling automatic updating and patching for Kaspersky Security Center Cloud Console components
- Automatic installation of updates for Kaspersky Endpoint Security for Windows
- About update statuses
- Approving and declining software updates
- Using diff files for updating Kaspersky databases and software modules
- Updating Kaspersky databases and software modules on offline devices
- Updating Kaspersky Security for Windows Server databases
- Managing third-party applications on client devices
- Limitations of Vulnerability and patch management
- Availability of Vulnerability and patch management features in trial and commercial mode and under various licensing options
- About third-party applications
- Third-party software updates
- Scenario: Updating third-party software
- Installing third-party software updates
- Creating the Find vulnerabilities and required updates task
- Find vulnerabilities and required updates task settings
- Creating the Install required updates and fix vulnerabilities task
- Adding rules for update installation
- Creating the Install Windows Update updates task
- Viewing information about available third-party software updates
- Exporting the list of available software updates to a file
- Approving and declining third-party software updates
- Updating third-party applications automatically
- Finding and fixing software vulnerabilities
- Fixing software vulnerabilities
- Creating the Fix vulnerabilities task
- Creating the Install required updates and fix vulnerabilities task
- Adding rules for update installation
- Viewing information about software vulnerabilities detected on all managed devices
- Viewing information about software vulnerabilities detected on the selected managed device
- Viewing statistics of vulnerabilities on managed devices
- Exporting the list of software vulnerabilities to a file
- Ignoring software vulnerabilities
- Scenario: Finding and fixing software vulnerabilities
- Setting the maximum storage period for the information about fixed vulnerabilities
- Managing applications run on client devices
- Using Application Control to manage executable files
- Application Control modes and categories
- Obtaining and viewing a list of applications installed on client devices
- Obtaining and viewing a list of executable files installed on client devices
- Creating application category with content added manually
- Creating application category that includes executable files from selected devices
- Viewing the list of application categories
- Configuring Application Control in the Kaspersky Endpoint Security for Windows policy
- Adding event-related executable files to the application category
- Creating an installation package of a third-party application from the Kaspersky database
- Viewing and modifying the settings of an installation package of a third-party application from the Kaspersky database
- Settings of an installation package of a third-party application from the Kaspersky database
- Application tags
- Configuring Administration Server
- Creating a hierarchy of Administration Servers: adding a secondary Administration Server
- Configuring storage term of events concerning to the deleted devices
- Aggregate emails about events
- Limitations on management of secondary Administration Servers running on-premises through Kaspersky Security Center Cloud Console
- Viewing the list of secondary Administration Servers
- Deleting a hierarchy of Administration Servers
- Configuring the interface
- Managing virtual Administration Servers
- Monitoring and reporting
- Scenario: Monitoring and reporting
- About types of monitoring and reporting
- Dashboard and widgets
- Reports
- Events and event selections
- About events in Kaspersky Security Center Cloud Console
- Events of Kaspersky Security Center Cloud Console components
- Using event selections
- Creating an event selection
- Editing an event selection
- Viewing a list of an event selection
- Exporting an event selection
- Importing an event selection
- Viewing details of an event
- Exporting events to a file
- Viewing an object history from an event
- Logging information about events for tasks and policies
- Deleting events
- Deleting event selections
- Notifications and device statuses
- Kaspersky announcements
- Receiving license expiration warning
- Cloud Discovery
- Remote diagnostics of client devices
- Opening the remote diagnostics window
- Enabling and disabling tracing for applications
- Downloading trace files of an application
- Deleting trace files
- Downloading application settings
- Downloading system information from a client device
- Downloading event logs
- Starting, stopping, restarting the application
- Running the remote diagnostics of an application and downloading the results
- Running an application on a client device
- Generating a dump file for an application
- Running remote diagnostics on a Linux-based client device
- Exporting events to SIEM systems
- Configuring event export to SIEM systems
- Before you begin
- About event export
- Configuring an event export in a SIEM system
- Marking of events for export to SIEM systems in Syslog format
- About exporting events using Syslog format
- Configuring Kaspersky Security Center Cloud Console for export of events to a SIEM system
- Viewing export results
- Quick Start Guide for Managed Service Providers (MSPs)
- About Kaspersky Security Center Cloud Console
- Getting started with Kaspersky Security Center Cloud Console
- Recommendations on managing your customers' devices
- Typical deployment scheme for MSPs
- Scenario: Protection deployment (tenant management through virtual Administration Servers)
- Scenario: Protection deployment (tenant management through administration groups)
- Joint usage of Kaspersky Security Center on-premises and Kaspersky Security Center Cloud Console
- Licensing of Kaspersky applications for MSPs
- Monitoring and reporting capabilities for MSPs
- Working with Kaspersky Security Center Cloud Console in a cloud environment
- Licensing options in a cloud environment
- Preparing for work in a cloud environment through Kaspersky Security Center Cloud Console
- Cloud environment configuration wizard in Kaspersky Security Center Cloud Console
- Step 1. Checking the required plug-ins and installation packages
- Step 2. Selecting the application activation method
- Step 3. Selecting the cloud environment and authorization
- Step 4. Segment polling and configuring synchronization with Cloud
- Step 5. Selecting an application to create a policy and tasks for
- Step 6. Configuring Kaspersky Security Network for Kaspersky Security Center Cloud Console
- Step 7. Creating an initial configuration of protection
- Network segment polling via Kaspersky Security Center Cloud Console
- Adding connections for cloud segment polling via Kaspersky Security Center Cloud Console
- Deleting a connection for cloud segment polling
- Configuring the polling schedule via Kaspersky Security Center Cloud Console
- Viewing the results of cloud segment polling via Kaspersky Security Center Cloud Console
- Viewing the properties of cloud devices via Kaspersky Security Center Cloud Console
- Synchronization with Cloud: Configuring the moving rule
- Remote installation of applications to the Azure virtual machines
- Contact Technical Support
- Sources of information about the application
- Known issues
- Glossary
- Account on Kaspersky Security Center Cloud Console
- Active key
- Additional (or reserve) license key
- Administration group
- Administration Server
- Amazon EC2 instance
- Amazon Machine Image (AMI)
- Anti-virus databases
- Application tag
- Authentication Agent
- Available update
- AWS Application Program Interface (AWS API)
- AWS IAM access key
- AWS Management Console
- Broadcast domain
- Centralized application management
- Cloud Discovery
- Connection gateway
- Demilitarized zone (DMZ)
- Device owner
- Device tag
- Direct application management
- Distribution point
- Event repository
- Event severity
- Forced installation
- Group task
- Home Administration Server
- HTTPS
- IAM role
- IAM user
- Identity and Access Management (IAM)
- Incompatible application
- Installation package
- JavaScript
- Kaspersky Next Expert View
- Kaspersky Private Security Network (KPSN)
- Kaspersky Security Center Cloud Console Administrator
- Kaspersky Security Center Cloud Console Operator
- Kaspersky Security Network (KSN)
- Kaspersky update servers
- Key file
- License term
- Lightweight Nagent (LWNGT)
- Local installation
- Local task
- Managed device
- Management web plug-in
- Network Agent
- Network anti-virus protection
- Network Location Awareness (NLA)
- Network protection status
- Patch importance level
- Policy
- Policy profile
- Program settings
- Protection status
- Quarantine
- Remote installation
- Restoration
- SSL
- Task
- Task for specific devices
- Task settings
- UEFI protection device
- Update
- Virtual Administration Server
- Virus activity threshold
- Virus outbreak
- Vulnerability
- Workspace
- Information about third-party code
- Trademark notices
Kaspersky Security Center Cloud Console Help
|
Find out what's new in the latest application release. |
|
Configuring network protection Manage the security of an organization by configuring Kaspersky application policies and tasks in accordance with the organization's requirements. |
|
Hardware and software requirements Check which operating systems and application versions are supported. |
|
Kaspersky applications: regular updating databases and software modules Maintain the reliability of the protection system. |
|
Licensing of Kaspersky Security Center Cloud Console Learn details about Kaspersky Security Center Cloud Console working in trial mode and in the commercial mode. |
|
View your infrastructure, protection statuses of networked devices, and statistics to manage the current protection state of your organization. You can also use reports. |
|
Start working with your workspace, configure Kaspersky Security Center Cloud Console according to your needs. |
|
Vulnerability and patch management Find and fix vulnerabilities in third-party software. |
|
Migration to Kaspersky Security Center Cloud Console Migrate your existing administration groups and related objects from Kaspersky Security Center on-premises to Kaspersky Security Center Cloud Console. |
|
Exporting events to SIEM systems Configure exporting events to SIEM systems using the Syslog protocol. |
|
Discover the existing and new devices on your organization's network. |
|
Working in a cloud environment Protect virtual machines in cloud environments: Amazon Web Services, Microsoft Azure, Google Cloud Platform. |
|
Adjustment of distribution points and/or connection gateways Configure distribution points. |
|
Quick Start Guide for Managed Service Providers (MSPs) Learn how to work with Kaspersky Security Center Cloud Console, if you are an administrator of MSP. |
|
Kaspersky applications: centralized deployment Deploy Kaspersky applications. |
|
|

What's new
Update July, 2025
This update of Kaspersky Security Center Cloud Console includes the following improvements:
- Connection profiles for out-of-office users with Linux devices are now available. By using connection profiles, you can configure the rules for Network Agents on Linux devices to connect to the same or different Administration Servers, depending on the device location.
- Transmitting encryption keys between Administration Servers is now available.
- Some versions of Network Agent are no longer supported. Refer to the Application Support Lifecycle webpage and, if necessary, upgrade your Network Agent to the up-to-date version with the Full support or Limited support status.
- The Scan button is deleted from the Quarantine section.
- Kaspersky Security Center Cloud Console now supports the following Kaspersky applications:
- Kaspersky Endpoint Security 12.9 for Windows
- Kaspersky Endpoint Security 12.3 for Linux
- Kaspersky Endpoint Security 12.2 for Mac
Update April, 2025
This update of Kaspersky Security Center Cloud Console includes the following improvements:
- Kaspersky Security Center Cloud Console now supports the following Kaspersky applications:
- Kaspersky Embedded Systems Security 3.4 for Linux
- Kaspersky Endpoint Security 12.2 for Linux
- Kaspersky Endpoint Security 12.8 for Windows
- Upload and run an application (or script) for diagnostics on a managed device. You can now upload either the folder or archive containing the executable file, or the executable file itself. After the application is successfully executed, you can download the execution results.
- Information about the users currently logged in to the managed device is now displayed in the General → Sessions section of the device properties window.
- New language support: Kaspersky Security Center Cloud Console infrastructure is available in the Chinese Simplified language.
- User experience improvements:
- Available installation packages are displayed on one tab.
- You can change the home page settings via the new Quick links section. By default, the Home page settings tab of the Quick links section is set as the home page.
- Navigation through the administration groups is updated: you can go to the required subgroup by clicking the link with its name in the path to the administration group.
- The Pinned section of the main menu is now called Bookmarks. You can add sections of Kaspersky Security Center Cloud Console to bookmarks, to access them quickly.
Update February, 2025
This update of Kaspersky Security Center Cloud Console improves performance when opening and navigating the Web Console.
Update October, 2024
This update of Kaspersky Security Center Cloud Console includes the following improvements:
- We have improved the integration with Microsoft Entra ID. Now, when a user signs out of the Microsoft Entra ID account that was used for authentication in Kaspersky Security Center Cloud Console, the session also ends for Kaspersky Security Center Cloud Console and the user is automatically signed out of the console.
- You can now view and download policy revisions. Kaspersky Security Center Cloud Console allows you to view a report in the HTML format or save the revision to a JSON file.
- Kaspersky Security Center Cloud Console now displays the latest task status known to the Administration Server.
- The Report on network attacks now includes the MAC address and port of the attacking machine.
- You can now close the right panel by clicking any place outside the panel. If you make any changes to the panel and then try to close it by clicking outside the panel, a confirmation window appears.
- The table header now stays pinned at the top when you scroll the table.
Update September, 2024
This update of Kaspersky Security Center Cloud Console includes the following improvements:
- Kaspersky Endpoint Agent 4.0 is supported.
- A number of old browser versions are no longer supported (Chrome earlier than version 128, Edge earlier than version 128, Firefox ESR earlier than version 115, Safari earlier than version 17.6).
Update April, 2024
This update of Kaspersky Security Center Cloud Console includes the following new features and improvements:
- A new Cloud Discovery feature. This feature allows you to monitor the use of cloud services on managed devices running Windows and to block access to cloud services that you consider unwanted. Cloud Discovery tracks user attempts to gain access to these services through both browsers and desktop applications.
- Integration with Microsoft Entra ID to allow the users in your organization to sign in to Kaspersky Security Center Cloud Console with their Microsoft Entra ID account credentials. Note, this feature is not available in the Russian Federation.
- You can now create connection profiles for connecting Network Agent to Administration Server. The connection profiles allow out-of-office users of laptops to change the method of connecting to an Administration Server or to switch between Administration Servers, depending on the current location of the device on the enterprise network.
- You can now open the list of your workspaces right from the main menu of the application.
- Two new localization languages were added—Traditional Chinese and Simplified Chinese.
- The default event storage setting in the task settings was changed from Save all events to Save only task execution results. This option reduces space consumption in the workspace database. The change affects only tasks created for Kaspersky Security Center. This setting remains without modification in the tasks for Kaspersky security applications.
- Kaspersky Security Center Cloud Console now additionally notifies you about the planned deletion of your workspace, 7 and 30 days after the last license key is deleted from the workspace or expires. This will give you more time to purchase another license and add its license key to the workspace.
- Kaspersky Business Hub and Kaspersky Security Center Cloud Console infrastructure now support the Kaspersky Next licenses. The application logo is changed automatically in accordance with the license that you use.
- Kaspersky Security Center Cloud Console now supports the following Kaspersky applications:
- Kaspersky Endpoint Security for Windows version 12.4
- Kaspersky Endpoint Security 12.0 for Mac Patch A
- When you migrate from one Kaspersky security application to another and the current application is password-protected, you can specify the uninstallation password right in the remote installation task properties.
- You can now customize the main menu of the application by pinning or unpinning your favorite menu sections. The pinned sections are added to the Pinned area for quick access.
- Optimized application interface and user experience when you select the On completing another task option while scheduling a task.
- The report on hardware now can include information about macOS devices.
- You can now select one or more client devices in the list of devices, and then launch a previously created task for them.
Update February, 2024
This update of Kaspersky Security Center Cloud Console includes the following new features and improvements:
- From the managed devices list, you can now select a device or several devices, and then assign an existing task to run on the selected devices. The current device scope of the task will be replaced with the devices that you selected.
- You can now assign device tags to multiple devices or remove device tags from multiple devices at once. From the managed devices list, select the devices, and then specify which tags you want to assign to or remove from the selected devices.
- Optimized appearance and user experience of the managed devices list. Added a new column Tags and the ability to filter devices by device tags.
Update January, 2024
Kaspersky Security Center Cloud Console now supports Kaspersky Endpoint Security 12.4 for Windows.
Update December, 2023
This update of Kaspersky Security Center Cloud Console includes the following new features and improvements:
- You can now check the connection to a SIEM system.
- Kaspersky Security Center Cloud Console now supports polling of a Microsoft Active Directory domain controller and a Samba domain controller through a Linux-based distribution point.
- Remote diagnostics of Linux-based managed devices.
- Kaspersky Security Center Cloud Console now supports the following Kaspersky applications:
- Kaspersky Endpoint Security for Windows version 12.3 Patch A
- Kaspersky Endpoint Security 12.0 for Linux
- Kaspersky Endpoint Security 12.0 for Mac
- Kaspersky Endpoint Agent 3.16
- Kaspersky Embedded Systems Security 3.3 for Windows
- Two interface sections were hidden from the main menu as out of the scope of application functionality:
- Encryption events (Operations → Data encryption and protection → Encryption events)
- IP ranges (Discovery & deployment → Discovery → IP ranges)
- We have updated the text of the Data Processing Agreement for Kaspersky Security Center Cloud Console.
- A number of old browser versions are no longer supported (Firefox ESR earlier than version 102).
Update September, 2023
This update of Kaspersky Security Center Cloud Console includes the following new features and improvements:
- Kaspersky Security Center Cloud Console now supports Kaspersky Embedded Systems Security 3.3 for Linux.
- Kaspersky Security Center Cloud Console now supports Kaspersky Endpoint Security 12.2 for Windows.
- Optimization of user interface when working with the user list in the Assets (Devices) section.
Update June, 2023
This update of Kaspersky Security Center Cloud Console includes the following new features and improvements:
- A new Hardening Guide was released. We highly recommend that you carefully read the guide and follow the security recommendations for configuring Kaspersky Security Center Cloud Console and your network infrastructure.
- Kaspersky Security Center Cloud Console now supports Kaspersky Endpoint Security 11.3 for Mac.
- Kaspersky Security Center Cloud Console now supports Kaspersky Endpoint Security 11.4 for Linux.
- You can use Kaspersky Security Center Cloud Console to export event selections to a file, and then import the event selections to Kaspersky Security Center Windows or Kaspersky Security Center Linux.
- You can now use a distribution point as a push server for the devices managed by Network Agent. This feature allows you to make sure that continuous connectivity between a managed device and the Administration Server is established.
- Reorganization of the section with settings to integrate Kaspersky Security Center Cloud Console with other Kaspersky applications.
- Reorganization of the user interface of the Remote diagnostics section.
- You can now save information about all devices included in a device selection to a CSV file at once.
- A number of improvements in the user interface and usability, including the ability to select all items in a table.
Update March, 2023
This update of Kaspersky Security Center Cloud Console includes the following new features and improvements:
- Kaspersky Security Center Cloud Console now supports clusters and server arrays as managed devices. If a Kaspersky application is installed on a cluster node, Network Agent sends this information to Administration Server. In Web Console, clusters and server arrays are listed separately from other managed devices. You manage each cluster or server array as an individual, inseparable object.
- Kaspersky Security Center Cloud Console now supports Kaspersky Endpoint Security 12.0 for Windows.
- The maximum number of entries that a report can include was increased up to 2500 for a report in Web Console and up to 10,000 for a report that you export to a file.
- You can now choose whether or not you want to include the managed devices with the OK status in the Protection status report.
- You can now activate Kaspersky Security Center Cloud Console by using one of the following licenses or add the license keys of the listed licenses to an existing workspace:
- Kaspersky Symphony Security
- Kaspersky Symphony EDR
- Kaspersky Symphony MDR
- Kaspersky Symphony XDR
- A special edition of Network Agent for Windows XP was released.
- The updated Network Agent for Linux supports the KSN Proxy service. Along with Windows-based distribution points, you can now use Linux-based distribution points to forward Kaspersky Security Network (KSN) requests from the managed devices. This feature allows you to redistribute and optimize traffic on the network.
- The updated Network Agent for Linux supports the Applications registry feature. Network Agent can compile a list of applications installed on a Linux-based managed device, and then transmit this list to Administration Server.
- You can use Kaspersky Security Center Cloud Console to export policies and tasks to a file, and then import the policies and tasks to Kaspersky Security Center Windows or Kaspersky Security Center Linux.
Update November, 2022
This update of Kaspersky Security Center Cloud Console includes the following new features and improvements:
- Kaspersky Security Center Cloud Console now supports Kaspersky Endpoint Security 11.3 for Linux.
- Kaspersky Security Center Cloud Console now supports Kaspersky Managed Detection and Response 2.1.18.
- Kaspersky Security Center Cloud Console now supports updated versions of Kaspersky Endpoint Security for Mac 11.2 and 11.2.1, to support macOS 13.
- Videos in the Introduction & tutorials section have been updated.
Update October, 2022
This update of Kaspersky Security Center Cloud Console includes the following new features and improvements:
- We have updated the text of the Data Processing Agreement for Kaspersky Security Center Cloud Console.
- Kaspersky Security Center Cloud Console infrastructure now notifies you about a workspace that has no active license key and that may be deleted if you do not add a new license key.
- Kaspersky Security Center Cloud Console now supports Kaspersky Endpoint Security 11.11.0 for Windows.
- Kaspersky Security Center Cloud Console now supports Kaspersky Endpoint Detection and Response Optimum 2.3.
- Kaspersky Embedded Systems Security 3.2 for Windows is supported.
Update September, 2022
This update of Kaspersky Security Center Cloud Console includes the following new features and improvements:
- You can now assign dedicated administrators for virtual Administration Servers. You create a user account for an administrator, and then grant the administrator the access rights to a virtual Administration Server. The assigned administrator has access only to the selected virtual Administration Server and cannot connect to the primary Administration Server or other secondary Administration Servers, physical or virtual.
- Optimized user experience when you delete a license key for Kaspersky Security Center Cloud Console. The new mechanism prevents you from deleting your last active license key by accident.
- You can now use Linux-based distribution points to download anti-virus databases for Kaspersky security applications through the Download updates to the repositories of distribution points task.
- Network Agent is now available in Japanese localization.
- In the Kaspersky Security Center Cloud Console interface, the all uppercase style of the section names has been changed to sentence-style capitalization.
Update August, 2022
New language support: Kaspersky Security Center Cloud Console is fully available in the Japanese language.
Update July, 2022
This update of Kaspersky Security Center Cloud Console includes the following new features and improvements:
- New versions of supported Kaspersky applications:
- Kaspersky Endpoint Agent 3.13
- Kaspersky Endpoint Security 11.2.1 for Mac
- Kaspersky Security for iOS 1.0.0
- Kaspersky Endpoint Security 11.10.0 for Windows
- We have updated the text of the Agreement and Data Processing Agreement for Kaspersky Security Center Cloud Console.
- New language support: Kaspersky Security Center Cloud Console infrastructure is now available in Japanese. The support of the Japanese language inside Kaspersky Security Center Cloud Console workspaces is coming soon.
Update April, 2022
This update of Kaspersky Security Center Cloud Console includes the following new features and improvements:
- Kaspersky Security Center Cloud Console now supports Kaspersky Endpoint Security 11.9.0 for Windows.
- Kaspersky Security Center Cloud Console now supports the Japanese localization of Kaspersky Embedded Systems Security.
Update March 09, 2022
This update of Kaspersky Security Center Cloud Console includes the following new features and improvements:
- Integration with Kaspersky Endpoint Detection and Response Expert is implemented.
- Incident Response Platform (IRP) is implemented. Now you can manage security incidents via Kaspersky Security Center Cloud Console.
- Kaspersky Security Center Cloud Console now accepts license keys for Kaspersky Endpoint Detection and Response Expert. The minimum number of devices for the license is 50.
Update February 11, 2022
This update of Kaspersky Security Center Cloud Console includes the following new features and improvements:
- Licenses for Kaspersky Embedded Systems Security for Windows are now supported.
- Kaspersky Endpoint Security 11.8.0 for Windows is supported.
- You can install Kaspersky Endpoint Security 11.8.0 for Windows using a distribution package in Japanese.
- Kaspersky Endpoint Agent 3.12 is supported.
Update December 10, 2021
This update of Kaspersky Security Center Cloud Console includes the following new features and improvements:
- Work with internal users is improved:
- You can now add new internal users on the portal.
- The application now prevents you from decreasing your own rights.
Update October 18, 2021
This update of Kaspersky Security Center Cloud Console includes the following new features and improvements:
- Kaspersky Security Center Cloud Console now supports Kaspersky Endpoint Detection and Response Optimum 2.0.
- You can now manage mobile devices running Android by using Kaspersky Security Center Cloud Console.
- Kaspersky Marketplace is available as a new menu section: you can now search for a Kaspersky application by using Kaspersky Security Center Cloud Console.
- A new menu section, Kaspersky announcements, is available. Kaspersky announcements keep you informed by providing information related to the Kaspersky applications installed on the managed devices. Kaspersky Security Center Cloud Console periodically updates the information in the section.
- You can now manage secondary Administration Servers running under Linux operating systems via Kaspersky Security Center Cloud Console.
Update September 07, 2021
This update of Kaspersky Security Center Cloud Console includes the following new features and improvements:
- You can now use Active Directory Federation Services (AD FS) to log in to Kaspersky Security Center Cloud Console by using your Active Directory account, without creating a new user account.
- Kaspersky Security Center Cloud Console now works with the following cloud environments: Amazon Web Services, Microsoft Azure, and Google Cloud. To protect virtual machines (or instances) in a cloud environment, you need one of the Kaspersky Hybrid Cloud Security licenses. The Cloud Environment Configuration Wizard is available.
- The maximum number of devices per one workspace is now 25,000.
- Integration with SIEM systems now is available in Kaspersky Security Center Cloud Console. You can export events to SIEM systems by using the Syslog protocol.
- You can now create virtual Administration Servers. Each virtual Administration Server can have its own structure of administration groups, policies, tasks, reports, and events. You can use virtual Administration Servers for the management of client organizations with complicated workflows within your workspace. However, you cannot migrate virtual Administration Servers from Kaspersky Security Center running on-premises to Kaspersky Security Center Cloud Console.
- You can now adjust the width of columns in tables, and sort and search for data.
- We have improved the stability and availability of Kaspersky Business Hub and Kaspersky Security Center Cloud Console.
Update October 27, 2020
This update of Kaspersky Security Center Cloud Console includes the following new features and improvements:
- Kaspersky Security Center Cloud Console now supports Kaspersky Endpoint Security 11.6.0 for Windows, Kaspersky Endpoint Security 11.1 for Mac Patch A, and Kaspersky Endpoint Agent 3.10 (as part of Kaspersky Endpoint Detection and Response Optimum).
- You can now use the following licenses:
- Kaspersky Endpoint Detection and Response Optimum
- Kaspersky Endpoint Security for Business Advanced
- Kaspersky Total Security for Business
- The following features are implemented:
- The navigation menu is now vertical, which resembles the Microsoft Management Console-based interface of Kaspersky Security Center.
- Technical training videos are now available; they will help you to learn how the application works.
Update June 30, 2020
This update of Kaspersky Security Center Cloud Console includes the following new features and improvements:
- Kaspersky Security Center Cloud Console now supports Kaspersky Security 11 for Windows Server (starting from September, 2020).
- Kaspersky Security Center Cloud Console now supports Kaspersky Endpoint Agent 3.9 and Kaspersky Endpoint Security 11.4.0 for Windows.
- The Quick Start Wizard has been improved: some steps have been removed, the sequence of steps has been slightly changed, and some texts have been edited for usability.
- Kaspersky Security Center Cloud Console is now available in the Italian language.
- You can now revoke the End User License Agreement (EULA) for any managed Kaspersky application via the interface of Kaspersky Security Center Cloud Console. You must uninstall the selected application before revoking its EULA.
- You can now delete workspaces. If you mark a workspace for deletion, it is by default deleted automatically in seven days. However, you can force the deletion of the workspace, so that it is deleted immediately.
- Two-step verification for signing in to the console is implemented.
Kaspersky Security Center Cloud Console
The section contains information about the purpose of Kaspersky Security Center Cloud Console and its main features and components.
Kaspersky Security Center Cloud Console is an application hosted and maintained by Kaspersky. You do not have to install Kaspersky Security Center Cloud Console on your computer or server. Kaspersky Security Center Cloud Console enables the administrator to install Kaspersky security applications on devices on a corporate network, remotely run scan and update tasks, and manage the security policies of managed applications. The administrator can use a detailed dashboard that provides a snapshot of corporate device statuses, detailed reports, and granular settings in protection policies.
About Kaspersky Security Center Cloud Console
Kaspersky Security Center Cloud Console is an application aimed at corporate network administrators and employees responsible for protection of devices in a wide range of organizations.
Kaspersky Security Center Cloud Console enables you to do the following:
- Install Kaspersky applications on devices on your network and manage the installed applications.
- Create a hierarchy of administration groups to manage a selection of client devices as a whole.
- Create virtual Administration Servers and arrange them in a hierarchy.
- Protect your network devices, including workstations and servers:
- Manage an antimalware protection system built on Kaspersky applications.
- Use the detection and response (EDR and MDR) capabilities (a license for Kaspersky Endpoint Detection and Response and/or for Kaspersky Managed Detection and Response is required), including:
- Analyzing and investigating incidents
- Incident visualization through creating a threat development chain graph
- Accepting or rejecting responses manually or setting up the auto-accept of all responses
- Use Kaspersky Security Center Cloud Console as a multi-tenant application.
- Remotely manage Kaspersky applications installed on client devices.
- Perform centralized deployment of license keys for Kaspersky applications to client devices.
- Create and manage security policies for devices on your network.
- Create and manage user accounts.
- Create and manage user roles (RBAC).
- Create and manage tasks for applications installed on your network devices.
- View reports on the security system status for every client organization individually.
You manage Kaspersky Security Center Cloud Console by using a cloud-based Administration Console that ensures interaction between your device and Administration Server over a browser. Administration Server is an application designed for managing Kaspersky applications installed on your network devices. When you connect to Kaspersky Security Center Cloud Console by using your browser, the browser establishes a connection with Kaspersky Security Center Cloud Console Server.
The Administration Server and connected database management system (DBMS) are deployed in a cloud environment and provided to you as a service. Maintenance of both Administration Server and the DBMS is provided as part of the service. All software components of Kaspersky Security Center Cloud Console are kept up-to-date. The Administration Server and created objects (such as policies and tasks) are backed up regularly to keep them safe.
Kaspersky Security Center Cloud Console is a multi-language application. You can change the interface language at any time, without reopening the application.
Updates functionality (including providing anti-virus signature updates and codebase updates), as well as KSN functionality may not be available in the software in the U.S.
Hardware and software requirements for Kaspersky Security Center Cloud Console
Administration Console
For a client, the use of Kaspersky Security Center Cloud Console requires only a browser.
You can only use a single browser window or tab to work with Kaspersky Security Center Cloud Console.
The minimum screen resolution is 1366x768 pixels.
The hardware and software requirements for the device are identical to the requirements of the browser that is used with Kaspersky Security Center Cloud Console.
Browsers:
- Google Chrome 133.0.6943.53 or later
- Microsoft Edge 134.0.3124.66 or later
- Safari 17.6 on macOS
- Mozilla Firefox Extended Support Release 128.8.0 or later
Network Agent
Minimum hardware requirements:
- CPU with operating frequency of 1 GHz or higher. For a 64-bit OS, the minimum CPU frequency is 1.4 GHz.
- RAM: 512 MB.
- Available disk space: 1 GB.
Minimum hardware requirements for Vulnerability and patch management:
- CPU with operating frequency of 1.4 GHz or higher. A 64-bit OS is required.
- RAM: 8 GB.
- Available disk space: 1 GB.
Operating systems supported by Network Agent
Operating systems. Microsoft Windows workstations |
Microsoft Windows Embedded POSReady 2009 with latest Service Pack 32-bit Microsoft Windows Embedded 7 Standard with Service Pack 1 32-bit/64-bit Microsoft Windows Embedded 8.1 Industry Pro 32-bit/64-bit Microsoft Windows 10 Enterprise 2015 LTSB 32-bit/64-bit Microsoft Windows 10 Enterprise 2016 LTSB 32-bit/64-bit Microsoft Windows 10 IoT Enterprise 2015 LTSB 32-bit/64-bit Microsoft Windows 10 IoT Enterprise 2016 LTSB 32-bit/64-bit Microsoft Windows 10 Enterprise 2019 LTSC 32-bit/64-bit Microsoft Windows 10 IoT Enterprise version 1703, 1709, 1803, 1809 32-bit/64-bit Microsoft Windows 10 20H2, 21H2 IoT Enterprise 32-bit/64-bit Microsoft Windows 10 IoT Enterprise 32-bit/64-bit Microsoft Windows 10 IoT Enterprise version 1909 32-bit/64-bit Microsoft Windows 10 IoT Enterprise LTSC 2021 32-bit/64-bit Microsoft Windows 10 IoT Enterprise version 1607 32-bit/64-bit Microsoft Windows 10 TH1 (July 2015) Home/Pro/Pro for Workstations/Enterprise/Education 32-bit/64-bit Microsoft Windows 10 TH2 (November 2015) Home/Pro/Pro for Workstations/Enterprise/Education 32-bit/64-bit Microsoft Windows 10 RS1 (August 2016) Home/Pro/Pro for Workstations/Enterprise/Education 32-bit/64-bit Microsoft Windows 10 RS2 (April 2017) Home/Pro/Pro for Workstations/Enterprise/Education 32-bit/64-bit Microsoft Windows 10 RS3 (Fall Creators Update, v1709) Home/Pro/Pro for Workstations/Enterprise/Education 32-bit/64-bit Microsoft Windows 10 RS4 (April 2018 Update, 17134) Home/Pro/Pro for Workstations/Enterprise/Education 32-bit/64-bit Microsoft Windows 10 RS5 (October 2018) Home/Pro/Pro for Workstations/Enterprise/Education 32-bit/64-bit Microsoft Windows 10 RS6 (May 2019) Home/Pro/Pro for Workstations/Enterprise/Education 32-bit/64-bit Microsoft Windows 10 19H1, 19H2 Home/Pro/Pro for Workstations/Enterprise/Education 32-bit/64-bit Microsoft Windows 10 20H1 (May 2020 Update) Home/Pro/Pro for Workstations/Enterprise/Education 32-bit/64-bit Microsoft Windows 10 20H2 (October 2020 Update) Home/Pro/Pro for Workstations/Enterprise/Education 32-bit/64-bit Microsoft Windows 10 21H1 (May 2021 Update) Home/Pro/Pro for Workstations/Enterprise/Education 32-bit/64-bit Microsoft Windows 10 21H2 (October 2021 Update) Home/Pro/Pro for Workstations/Enterprise/Education 32-bit/64-bit Microsoft Windows 10 22H2 (October 2023 Update) Home/Pro/Pro for Workstations/Enterprise/Education 32-bit/64-bit Microsoft Windows 11 Home/Pro/Pro for Workstations/Enterprise/Education 64-bit Microsoft Windows 11 22H2 Home/Pro/Pro for Workstations/Enterprise/Education 64-bit Microsoft Windows 11 23H2 Home/Pro/Pro for Workstations/Enterprise/Education 64-bit Microsoft Windows 11 24H2 Home/Pro/Pro for Workstations/Enterprise/Education 64-bit Microsoft Windows 8.1 Pro/Enterprise 32-bit/64-bit Microsoft Windows 8 Pro/Enterprise 32-bit/64-bit Microsoft Windows 7 Home/Pro/Enterprise/Ultimate with Service Pack 1 and later 32-bit/64-bit Microsoft Windows XP Professional with Service Pack 3 and later 32-bit (supported by Network Agent version 14.0.0.20023) Microsoft Windows XP Professional for Embedded Systems with Service Pack 3 32-bit (supported by Network Agent version 14.0.0.20023) |
Operating systems. Microsoft Windows servers |
Microsoft Windows MultiPoint Server 2011 Standard/Premium 64-bit Microsoft Windows Server 2008 Standard/Enterprise/Datacenter/Foundation with Service Pack 2 32-bit/64-bit Microsoft Windows Server 2008 R2 Standard/Datacenter/Enterprise/Foundation with Service Pack 1 and later 64-bit Microsoft Windows Server 2012 Server Core/Datacenter/Essentials/Foundation/Standard 64-bit Microsoft Windows Server 2012 R2 Server Core/Datacenter/Essentials/Foundation/Standard 64-bit Microsoft Windows Server 2016 Server Core/Datacenter/Essentials/Standard (Installation Option) (LTSB) 64-bit Microsoft Windows Server 2019 Standard/Datacenter/Core 64-bit Microsoft Windows Server 2019 RS5 Essentials/Standard 64-bit Microsoft Windows Server 2022 Standard/Datacenter/Core 64-bit Microsoft Windows Server 2022 21H2 Standard/Datacenter 64-bit Microsoft Windows Server 2025 Standard/Datacenter/Core 64-bit Microsoft Windows Small Business Server 2011 Standard/Essentials/Premium Add-on 64-bit |
Operating systems. Linux |
Debian GNU/Linux 12 (Bookworm) 32-bit/64-bit Debian GNU/Linux 11.x (Bullseye) 32-bit/64-bit Ubuntu Server 24.04 LTS 64-bit Ubuntu Server 22.04 LTS 64-bit Ubuntu Server 20.04 LTS (Focal Fossa) 64-bit CentOS 7.x 64-bit CentOS Stream 8 64-bit CentOS Stream 9 64-bit Red Hat Enterprise Linux Server 9.x 64-bit Red Hat Enterprise Linux Server 8.x 64-bit Red Hat Enterprise Linux Server 7.x 64-bit openSUSE Leap 15 64-bit SUSE Linux Enterprise Server 15 (all Service Packs) 64-bit SUSE Linux Enterprise Server 12 (all Service Packs) 64-bit Oracle Linux 7 64-bit Oracle Linux 8 64-bit Oracle Linux 9 64-bit Linux Mint 21.x 64-bit Linux Mint 22.x 64-bit Alma Linux 8.x 64-bit Alma Linux 9.x 64-bit Rocky Linux 8.x 64-bit Rocky Linux 9.x 64-bit Amazon Linux 2 64-bit Kylin 10 64-bit |
Operating systems. macOS |
macOS Monterey (12.x) macOS Ventura (13.x) macOS Sonoma (14.x) macOS Sequoia (15.x) |
For Network Agent, the Apple Silicon (M1) architecture is also supported, as well as Intel.
The following virtualization platforms are supported:
- VMware vSphere 6.7
- VMware vSphere 7.0
- Citrix XenServer 7.1 LTSR
- Citrix XenServer 8.x
- Parallels Desktop 18
- Oracle VM VirtualBox 7.x
- Microsoft Hyper-V Server 2019 64-bit
- Microsoft Hyper-V Server 2022 64-bit
- Kernel-based Virtual Machine (all Linux operating systems supported by Network Agent)
In Microsoft Windows XP, Network Agent might not perform some operations correctly.
Compatible Kaspersky applications and solutions
Licenses for different products grant different sets of Kaspersky applications and solutions.
You can deploy and manage the following Kaspersky applications and solutions via Kaspersky Security Center Cloud Console:
- Kaspersky Security for Windows Server 11.0.1
- Kaspersky Endpoint Security 12.9 for Windows (only Lite encryption (AES56) is supported)
- Kaspersky Endpoint Security 12.3 for Linux
- Kaspersky Endpoint Security 12.2 for Mac
- Kaspersky Embedded Systems Security 3.4 for Windows
- Kaspersky Embedded Systems Security 3.4 for Linux
- Kaspersky Endpoint Agent 4.0
- Kaspersky Endpoint Security for Android
- Kaspersky Security for iOS
You can integrate the following solutions to view and process security incidents:
- Kaspersky Managed Detection and Response
- Kaspersky Endpoint Detection and Response Optimum
- Kaspersky Endpoint Detection and Response Expert
If you install a new application version on a managed device, but use an outdated policy for the new application version rather than update the policy, the application still provides data to Kaspersky Security Center Cloud Console, but Kaspersky Security Center Cloud Console cannot process this data as described in the Processed data of managed applications section of the documentation. For Kaspersky Security Center Cloud Console to process this data, you must create a new policy for the new version of the application.
Localization of Kaspersky Security Center Cloud Console
The interface and documentation of Kaspersky Security Center Cloud Console are available in the following languages:
- English
- French
- German
- Italian
- Japanese
- Portuguese (Brazil)
- Russian
- Simplified Chinese
- Spanish
- Spanish (LATAM)
- Traditional Chinese
Comparison of Kaspersky Security Center and Kaspersky Security Center Cloud Console
You can use Kaspersky Security Center in the following ways:
- As a cloud solution
Kaspersky Security Center is installed for you in cloud environment and Kaspersky gives you access to the Administration Server as a service. You manage the network security system through the cloud-based Administration Console named Kaspersky Security Center Cloud Console. This console has an interface similar to the interface of Kaspersky Security Center Web Console.
- As an on-premises solution (Windows-based or Linux-based)
You install Kaspersky Security Center on a local device and manage the network security system through the Microsoft Management Console-based Administration Console or Kaspersky Security Center Web Console.
In addition to the Windows-based application, Kaspersky Security Center Linux is also available. Kaspersky Security Center Linux is designed to deploy and manage protection of Linux devices by using Linux-based Administration Server to meet the requirements of pure Linux environments. The Windows-based Kaspersky Security Center and Kaspersky Security Center Linux have different sets of features.
The table below lets you compare the main features of Kaspersky Security Center and Kaspersky Security Center Cloud Console.
Feature comparison of Kaspersky Security Center running on-premises and as a cloud solution
Feature or property |
Kaspersky Security Center running on-premises |
Kaspersky Security Center Cloud Console |
|---|---|---|
Administration Server location |
On-premises |
Cloud |
Database management system (DBMS) location |
On-premises |
Cloud |
Web-based administration console |
|
|
Maintenance of Administration Server and DBMS |
Managed by customer |
Managed by Kaspersky |
Hierarchy of Administration Servers |
|
(Administration Server of Kaspersky Security Center Cloud Console can only act as a primary Administration Server in the hierarchy and can only be used for policies and tasks monitoring) |
Administration group hierarchy |
|
|
Migration of the managed devices and related objects from Kaspersky Security Center on-premises to Kaspersky Security Center Cloud Console |
|
|
Network polling |
|
(by distribution points only) |
Maximum number of managed devices |
100,000 |
|
Protection of Windows, Linux, and macOS managed devices |
|
|
Protection of mobile devices |
|
(only Kaspersky Endpoint Security for Android and Kaspersky Security for iOS are supported) |
|
|
|
|
|
|
Application policies |
|
|
Tasks for Kaspersky applications |
|
|
Kaspersky Security Network |
|
|
KSN proxy server |
|
(on distribution points only) |
Kaspersky Private Security Network |
|
|
Centralized deployment of license keys for Kaspersky applications |
|
|
Switching managed devices to another Administration Server |
|
(you must reinstall Network Agents on managed devices to switch them to another Administration Server) |
|
|
|
Installing third-party software updates and fixing third-party software vulnerabilities |
|
(to fix third-party software vulnerabilities, only recommended fixes can be installed) |
Notifications about events occurred on managed devices |
|
|
Creating and managing user accounts |
|
|
Maximum number of events in the database |
400,000 (can be increased up to 45,000,000) |
400,000 (depends on the number of managed devices) |
Integration with SIEM systems |
|
(by using the Syslog format and TLS over TCP protocol only) |
Using Administration Server as a WSUS server |
|
|
Monitoring the statuses of policies and tasks |
|
|
Support of clusters and server arrays in administration groups |
|
|
Remote installation of operating systems |
|
|
SNMP support |
|
|
Maximum number of virtual Servers |
500 |
200 |
Cloning the hard drive of a device |
|
|
Architecture and basic concepts
This section explains the application architecture and basic concepts related to Kaspersky Security Center Cloud Console.
Architecture
This section provides a description of the components of Kaspersky Security Center Cloud Console and their interaction.
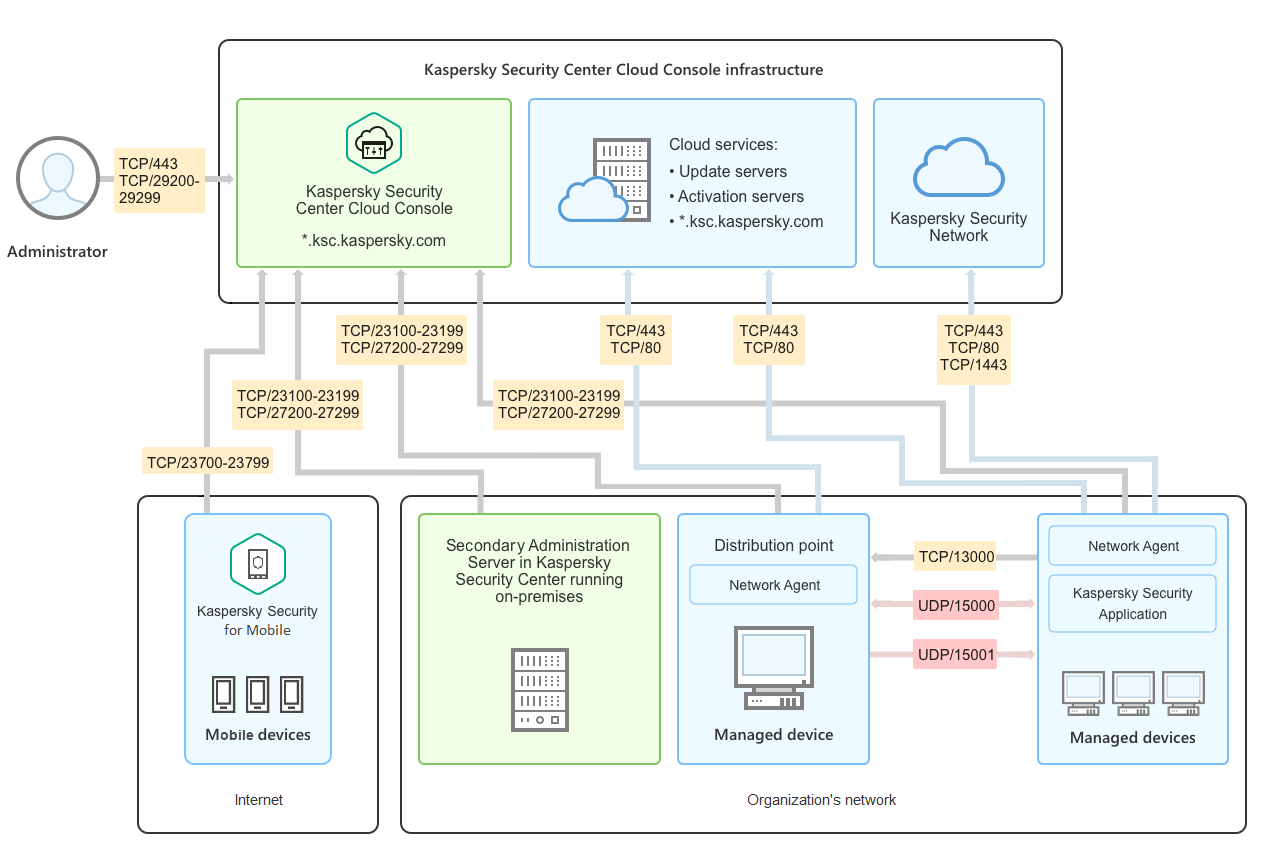
Kaspersky Security Center Cloud Console architecture
Kaspersky Security Center Cloud Console managed via the cloud-based console includes two main components: Kaspersky Security Center Cloud Console infrastructure and customer's infrastructure.
Kaspersky Security Center Cloud Console infrastructure consists of the following:
- Cloud-based Administration Console. Provides a web interface for creating and maintaining the protection system of a client organization's network that is managed by Kaspersky Security Center Cloud Console.
- Cloud services. Includes update servers and activation servers.
- Kaspersky Security Network (KSN). Servers that contain a Kaspersky database with continuously updated information about the reputation of files, web resources, and software. Kaspersky Security Network ensures faster responses by Kaspersky applications to threats, improves the performance of some protection components, and reduces the likelihood of false positives.
Customer's infrastructure may consist of the following:
- Distribution point. Computer that has Network Agent installed and is used for update distribution, network polling, remote installation of applications, getting information about computers in an administration group, and / or broadcasting domain. The administrator selects the appropriate devices and assigns them distribution points manually.
- Managed devices. Computers of customer's network protected through Kaspersky Security Center Cloud Console. Network Agent and a Kaspersky security application must be installed on each managed device.
- Secondary Administration Server running on-premises (optional). You can use an on-premises Administration Server to create a hierarchy of Administration Servers.
Ports used by Kaspersky Security Center Cloud Console
To use Kaspersky Security Center Cloud Console, which is part of the Kaspersky infrastructure, you must open the following ports on the client devices to allow the internet connection (see table below):
Ports that must be open on client devices to allow the internet connection
Port (or port range) |
Protocol |
Purpose of the port (or port range) |
|---|---|---|
23100-23199 |
TCP/TLS |
Receiving connections from Network Agents and secondary Administration Servers on Kaspersky Security Center Cloud Console Administration Server at *.ksc.kaspersky.com. The Kaspersky infrastructure can use any port within this range and any web address within this mask. The port and the web address can change from time to time. |
23700-23799 (only if you manage mobile devices) |
TCP/TLS |
Receiving connections from mobile devices. Connection to the Kaspersky Security Center Cloud Console Administration Server at *.ksc.kaspersky.com. The Kaspersky infrastructure can use any port within this range and any web address within this mask. The port and the web address can change from time to time. |
27200-27299 |
TCP/TLS |
Receiving connections for application activation from managed devices (except for mobile devices). Connection to the Kaspersky Security Center Cloud Console Administration Server at *.ksc.kaspersky.com. The Kaspersky infrastructure can use any port within this range and any web address within this mask. The port and the web address can change from time to time. |
29200-29299 |
TCP/TLS |
Tunneling connections to managed devices by using the klsctunnel utility through Kaspersky Security Center Cloud Console Administration Server at *.ksc.kaspersky.com. The Kaspersky infrastructure can use any port within this range and any web address within this mask. The port and the web address can change from time to time. |
443 |
HTTPS |
Connection to Kaspersky Security Center Cloud Console discovery service at *.ksc.kaspersky.com. The Kaspersky infrastructure can use any web address within this mask. |
1443 |
TCP |
Connection to Kaspersky Security Network |
80 |
TCP |
Connection is used to check validity of the Kaspersky Security Center certificates at *.digicert.com. The Kaspersky infrastructure can use any web address within this mask. |
The table below lists the ports that must be open on client devices where Network Agent is installed.
Ports that must be open on client devices
Port number |
Protocol |
Port purpose |
Scope |
|---|---|---|---|
15000
|
UDP |
Receiving data from connection gateways (if in use) |
Managing client devices |
15000 |
UDP broadcast |
Getting data about other Network Agents within the same broadcasting domain |
Delivering updates and installation packages |
15001 |
UDP |
Receiving multicast requests from a distribution point (if in use) |
Receiving updates and installation packages from a distribution point |
Please note that the klnagent process can also request free ports from the dynamic port range of an endpoint operating system. These ports are allocated to the klnagent process automatically by the operating system, so klnagent process can use some ports that are used by another software. If the klnagent process affects that software operations, change the port settings in this software, or change the default dynamic port range in your operating system to exclude the port used by the software affected.
Also take into account that recommendations on the compatibility of Kaspersky Security Center Cloud Console with third-party software are described for reference only and may not be applicable to new versions of third-party software. The described recommendations for configuring ports are based on the experiences of Technical Support and our best practices.
The table below lists the additional ports that must be open on client devices where Network Agent is installed as a distribution point.
Ports used by Network Agent functioning as distribution point
Port number |
Protocol |
Port purpose |
Scope |
|---|---|---|---|
13000 |
TCP/TLS |
Receiving connections from Network Agents |
Managing client devices and delivering updates and installation packages |
13111 |
TCP |
Receiving requests from managed devices to KSN proxy server |
KSN proxy server |
13295 |
TCP/TLS |
Sending push notifications to managed devices |
Distribution point used as a push server |
15111 |
UDP |
Receiving requests from managed devices to KSN proxy server |
KSN proxy server |
17111 |
HTTPS |
Receiving requests from managed devices to KSN proxy server |
KSN proxy server |
If you have one or more Administration Servers on your network and use them as secondary Administration Servers when the primary Administration Server is located in the Kaspersky infrastructure, please refer to the list of ports that are used by Kaspersky Security Center running on-premises. Use those ports for interaction between your secondary Administration Server (or secondary Administration Servers) and client devices.
Basic concepts
This section explains basic concepts related to Kaspersky Security Center Cloud Console.
Network Agent
Interaction between the Administration Server and devices is performed by the Network Agent component of Kaspersky Security Center Cloud Console. Network Agent must be installed on all devices on which Kaspersky Security Center Cloud Console is used to manage Kaspersky applications.
Network Agent is installed on a device as a service with the following set of attributes:
- With the name "Kaspersky Security Center Network Agent"
- Set to automatically start when the operating system starts
- Using the LocalSystem account
A device that has Network Agent installed is called a managed device or device. You can install Network Agent on a Windows, Linux, or Mac device.
The name of the process that Network Agent starts is klnagent.exe.
Network Agent synchronizes the managed device with the Administration Server. Kaspersky Security Center Cloud Console automatically synchronizes the Administration Server with the managed devices several times per hour. The Administration Server sets the synchronization interval (also referred to as the heartbeat) depending on the number of managed devices.
Administration groups
An administration group (hereinafter also referred to as group) is a logical set of managed devices combined on the basis of a specific trait for the purpose of managing the grouped devices as a single unit within Kaspersky Security Center Cloud Console.
All managed devices within an administration group are configured to do the following:
- Use the same application settings (which you can specify in group policies).
- Use a common operating mode for all applications through the creation of group tasks with specified settings. Examples of group tasks include creating and installing a common installation package, updating the application databases and modules, scanning the device on demand, and enabling real-time protection.
A managed device can belong to only one administration group.
You can create hierarchies that have any degree of nesting for Administration Servers and groups. A single hierarchy level can include secondary and virtual Administration Servers, groups, and managed devices. You can move devices from one group to another without physically moving them. For example, if a worker's position in the enterprise changes from that of accountant to developer, you can move this worker's computer from the Accountants administration group to the Developers administration group. Thereafter, the computer will automatically receive the application settings required for developers.
Hierarchy of Administration Servers
Administration Servers can be arranged in a "primary/secondary" hierarchy. Each Administration Server can have several secondary Administration Servers on different nesting levels of the hierarchy. The nesting level for secondary Administration Servers is unrestricted. The administration groups of the primary Administration Server will then include the client devices of all secondary Administration Servers.
Kaspersky Security Center Cloud Console Administration Server can only act as a primary Administration Server and can have as secondary servers only Administration Servers running on-premises.
When migrating from the Administration Server that runs on-premises to the Kaspersky Security Center Cloud Console Administration Server, you can arrange the Administration Servers in a hierarchy. Then, to mitigate the migration, you can shift only part of your managed devices to the management of the Kaspersky Security Center Cloud Console Administration Server. The rest of the managed devices remain under the management of the on-premises Administration Server. This enables you to test management features of Kaspersky Security Center Cloud Console on a limited number of managed devices. At the same time, you can configure policies, tasks, reports and other objects to test management and monitoring of your entire network. This lets you switch back to the objects configured on the on-premises Administration Server if necessary.
Each device included in the hierarchy of administration groups can be connected to one Administration Server only. You must independently monitor the connection of devices to Administration Servers. Use the feature for device search in administration groups of different Administration Servers based on network attributes.
Virtual Administration Server
Virtual Administration Server (also referred to as virtual Server) is a component of Kaspersky Security Center Cloud Console intended for managing anti-virus protection of the network of a client organization. Each virtual Administration Server can have its own structure of administration groups and its own means of management and monitoring, such as policies, tasks, reports, and events. The functional scope of virtual Administration Servers can be used by organizations with complicated workflows.
Virtual Administration Server has the following restrictions:
- Virtual Administration Servers are supported only in the commercial mode of Kaspersky Security Center Cloud Console.
- Virtual Administration Server does not support creation of secondary Administration Servers (including virtual Servers).
- You cannot migrate virtual Administration Servers from Kaspersky Security Center to Kaspersky Security Center Cloud Console.
- Virtual Administration Servers cannot be managed by dedicated administrators. By default, the administrator that manages the primary Administration Server also manages all of the virtual Administration Servers.
- Users created on a virtual Server cannot be assigned a role on the Administration Server.
- In the virtual Administration Server properties window, the number of sections is limited.
Distribution point
A distribution point is a device with Network Agent installed that is used for update distribution, remote installation of applications, and retrieval of information about networked devices.
The features and use cases of Network Agent installed on a device used as a distribution point vary depending on the operating system.
A distribution point can perform the following functions:
- Distribute updates and installation packages to client devices within the group (including distribution through multicasting using UDP). Updates can be received from Kaspersky update servers through an update task created for the distribution point.
Distribution point devices running macOS cannot download updates from Kaspersky update servers.
If one or more devices running macOS are within the scope of the Download updates to the repositories of distribution points task, the task completes with the Failed status, even if it has successfully completed on all Windows devices.
- Distribute policies and group tasks through multicasting using UDP.
- Act as a gateway for connection to the Administration Server for managed devices since a direct connection cannot be established in the cloud infrastructure.
- Poll the network to detect new devices and update information about existing ones.
- Perform remote installation of third-party software and Kaspersky applications through Microsoft Windows tools, including installation on client devices without Network Agent.
This feature enables you to remotely transfer Network Agent installation packages to client devices located on networks to which the Administration Server has no direct access.
- Act as a proxy server participating in the Kaspersky Security Network.
This feature is not supported by distribution point devices running Linux or macOS.
You can enable KSN proxy server on the distribution point side to make the device act as a KSN proxy server. In this case, the KSN proxy service (ksnproxy) is run on the device.
Files are transmitted from the Administration Server to a distribution point over HTTP or, if SSL connection is enabled, over HTTPS. Using HTTP or HTTPS results in a higher level of performance, compared to SOAP, through reducing traffic.
Devices with Network Agent installed must be assigned distribution points manually according to administration groups. The full list of distribution points for specified administration groups is displayed in the report about the list of distribution points.
The scope of a distribution point is the administration group to which it has been assigned by the administrator, as well as its subgroups of all levels of embedding. However, the device acting as the distribution point may not be included in the administration group to which it has been assigned. If multiple distribution points have been assigned in the hierarchy of administration groups, Network Agent on the managed device connects to the nearest distribution point in the hierarchy.
A network location can also be the scope of distribution points. The network location is used for manual creation of a set of devices to which the distribution point will distribute updates. Network location can be determined only for devices running a Windows operating system.
Kaspersky Security Center Cloud Console assigns each Network Agent a unique IP multicast address that differs from every other address. This enables you to avoid network overload that might occur due to IP overlaps.
If two or more distribution points are assigned to a single network area or to a single administration group, one of them becomes the active distribution point, and the rest become standby distribution points. The active distribution point downloads updates and installation packages directly from the Administration Server, while standby distribution points receive updates from the active distribution point only. In this case, files are downloaded once from the Administration Server and then are distributed among distribution points. If the active distribution point becomes unavailable for any reason, one of the standby distribution points becomes active. The Administration Server automatically assigns a distribution point to act as standby.
The distribution point status (Active/Standby) is displayed with a check box in the klnagchk report.
A distribution point requires at least 4 GB of free disk space. If the free disk space of the distribution point is less than 2 GB, Kaspersky Security Center Cloud Console creates a security issue with the Warning importance level. The security issue will be published in the device properties, in the Security issues section.
Running remote installation tasks on a device assigned as distribution point requires additional free disk space. The volume of free disk space must exceed the total size of all installation packages to be installed.
Running any updating (patching) tasks and vulnerability fix tasks on a device assigned as distribution point requires additional free disk space. The volume of free disk space must be at least twice the total size of all patches to be installed.
Devices functioning as distribution points must be protected, including physical protection, against any unauthorized access.
Management web plug-in
A special component—the management web plug-in—is used for remote administration of Kaspersky software by means of Kaspersky Security Center Cloud Console. Hereinafter, a management web plug-in is also referred to as a management plug-in. A management plug-in is an interface between Kaspersky Security Center Cloud Console and a specific Kaspersky application. With a management plug-in, you can configure tasks and policies for the application.
The management plug-in provides the following:
- Interface for creating and editing application tasks and settings
- Interface for creating and editing policies and policy profiles for remote and centralized configuration of Kaspersky applications and devices
- Transmission of events generated by the application
- Kaspersky Security Center Cloud Console functions for displaying operational data and events of the application, and statistics relayed from client devices
Policies
A policy is a set of Kaspersky application settings that are applied to an administration group and its subgroups. You can install several Kaspersky applications on the devices of an administration group. Kaspersky Security Center Cloud Console provides a single policy for each Kaspersky application in an administration group. A policy has one of the following statuses (see the table below):
The status of the policy
Status |
Description |
|---|---|
Active |
The current policy that is applied to the device. Only one policy may be active for a Kaspersky application in each administration group. Devices apply the settings values of an active policy for a Kaspersky application. |
Inactive |
A policy that is not currently applied to a device. |
Out-of-office |
If this option is selected, the policy becomes active when the device leaves the corporate network. |
Policies function according to the following rules:
- Multiple policies with different values can be configured for a single application.
- Only one policy can be active for the current application.
- You can activate an inactive policy when a specific event occurs. For example, you can enforce stricter anti-virus protection settings during virus outbreaks.
- A policy can have child policies.
Generally, you can use policies as preparations for emergency situations, such as a virus attack. For example, if there is an attack via flash drives, you can activate a policy that blocks access to flash drives. In this case, the current active policy automatically becomes inactive.
In order to prevent maintaining multiple policies, for example, when different occasions assume changing of several settings only, you may use policy profiles.
A policy profile is a named subset of policy settings values that replaces the settings values of a policy. A policy profile affects the effective settings formation on a managed device. Effective settings are a set of policy settings, policy profile settings, and local application settings that are currently applied for the device.
Policy profiles function according to the following rules:
- A policy profile takes an effect when a specific activation condition occurs.
- Policy profiles contain values of settings that differ from the policy settings.
- Activation of a policy profile changes the effective settings of the managed device.
- A policy can include a maximum of 100 policy profiles.
Policy profiles
Sometimes it may be necessary to create several instances of a single policy for different administration groups; you might also want to modify the settings of those policies centrally. These instances might differ by only one or two settings. For example, all the accountants in an enterprise work under the same policy—but senior accountants are allowed to use flash drives, while junior accountants are not. In this case, applying policies to devices only through the hierarchy of administration groups can be inconvenient.
To help you avoid creating several instances of a single policy, Kaspersky Security Center Cloud Console enables you to create policy profiles. Policy profiles are necessary if you want devices within a single administration group to run under different policy settings.
A policy profile is a named subset of policy settings. This subset is distributed on target devices together with the policy, supplementing it under a specific condition called the profile activation condition. Profiles only contain settings that differ from the "basic" policy, which is active on the managed device. Activation of a profile modifies the settings of the "basic" policy that were initially active on the device. The modified settings take values that have been specified in the profile.
How local application settings relate to policies
You can use policies to set identical values of the application settings for all devices in a group.
The values of the settings that a policy specifies can be redefined for individual devices in a group by using local application settings. You can set only the values of settings that the policy allows to be modified, that is, the unlocked settings.
The value of a setting that the application uses on a client device is defined by the lock position ( ) for that setting in the policy:
- If a setting modification is locked, the same value (defined in the policy) is used on all client devices.
- If a setting modification is unlocked, the application uses a local setting value on each client device instead of the value specified in the policy. The setting can then be changed in the local application settings.
This means that, when a task is run on a client device, the application applies settings that have been defined in two different ways:
- By task settings and local application settings, if the setting is not locked against changes in the policy.
- By the group policy, if the setting is locked against changes.
Local application settings are changed after the policy is first applied in accordance with the policy settings.
Application licensing
This section provides information related to the application licensing.
Licensing of Kaspersky Security Center Cloud Console
Following this scenario, you can start using Kaspersky Security Center Cloud Console and managed security applications under a license.
Kaspersky Security Center Cloud Console enables you to perform centralized distribution of license keys for Kaspersky applications on client devices, monitor their use, and renew licenses.
If you are already using Kaspersky Security Center Cloud Console, you can visit Kaspersky Marketplace to view the entire range of Kaspersky business solutions, select the ones you need, and proceed to the purchase at the Kaspersky website.
Checking out the features of Kaspersky Security Center Cloud Console in the trial mode before purchasing a license
You can first to try Kaspersky Security Center Cloud Console for free. To do this, create a trial workspace which will terminate in 30 days. If you want a commercial workspace that you can use as long as you want, you will have to purchase a license.
Trial mode does not allow you to subsequently switch to commercial mode. Any trial workspace will be automatically deleted with all its contents when the 30-day period expires.
Stages
The scenario proceeds in stages:
- Getting an activation code for licensing Kaspersky Security Center Cloud Console in the commercial mode. Purchasing a license (or licenses)
Different licenses grant the usage of different Kaspersky applications and services, so you might want to purchase more than one license.
Find out what licenses that you can purchase and the minimum number of devices for each license.
Kaspersky Security Center Cloud Console comes as part of several Kaspersky solutions. Choose what solution you want to use and purchase a license for it. You will need to contact Kaspersky or one of Kaspersky partners with a special request if you want to purchase a license that covers 10,000 or more devices.
If you want to use Kaspersky Security Center Cloud Console in a cloud environment such as Microsoft Azure, read about the licensing options for cloud environments.
If you are a Manage Service Provider (MSP), read about licensing of Kaspersky Security Center Cloud Console for MSPs.
- Activation of Kaspersky Security Center Cloud Console when creating the workspace
You specify your license key to activate Kaspersky Security Center Cloud Console when creating a workspace.
If you have more than one license key, specify any of them, and later you must add other license keys in Kaspersky Security Center Cloud Console to activate managed Kaspersky applications.
- Adding license keys for managed applications to the Administration Server repository
Before deployment of the license keys, you must add these license keys to the Administration Server repository.
The license key that you specified when creating the workspace is automatically added to the Administration Server repository.
If you have more than one license keys, add your license keys one by one to the Kaspersky Security Center Cloud Console Administration Server repository.
- Deploying license keys for managed applications
- Automatic deployment
If you use different managed applications and you have to deploy a specific activation code for applications, choose another way of deploying that activation code.
Kaspersky Security Center enables you to automatically deploy available license keys for managed applications. For example, three license keys are stored in the Administration Server repository. You have enabled the Automatically distribute license key to managed devices option for all three license keys. A Kaspersky security application—for example, Kaspersky Endpoint Security for Windows—is installed on the organization's devices. A new managed application on a device is discovered for which a license key must be deployed. For instance, two of the license keys from the repository can be deployed for the managed application on the device: license key named Key_1 and license key named Key_2. One of these license keys is deployed for the managed application. In this case, it cannot be predicted which of the two license keys will be deployed because automatic deployment of license keys does not provide for any administrator activity.
When a license key is deployed, the number of installations is recounted for that license key. You must make sure that the number of applications for which the license key was deployed does not exceed the license limit. If the number of installations exceeds the license limit, all devices that were not covered by the license will be assigned Critical status.
How-to instructions:
- Deployment through the Add license key task for a managed application
If you opt to use the Add license key task for a managed application, you can select the license key that must be deployed to devices, and then select the devices in any convenient way—for example, by selecting an administration group or a device selection.
How-to instructions:
- Adding an activation code or a key file manually to the devices
You can activate the installed Kaspersky application locally, by using the tools provided in the application interface. Please refer to the documentation of the installed application.
- Automatic deployment
- Checking on which devices the managed Kaspersky applications are activated
To make sure that the license keys are deployed correctly, view the list of the license keys that are used for an application.
- Configuring events related to the license expiration
Configure events so that you will be notified when your license keys are used up or about to expire:
About the trial mode of Kaspersky Security Center Cloud Console
The trial mode is a special mode of Kaspersky Security Center Cloud Console intended to acquaint the user with the features of Kaspersky Security Center Cloud Console. In this mode, you can perform activities within a workspace whose validity period is limited to 30 days. The trial mode is activated automatically as soon as you create a trial workspace. The set of features available in trial mode is identical to the scope under the standard Kaspersky Endpoint Security for Business Advanced license.
In Kaspersky Security Center Cloud Console, you do not have to license the Administration Server, because the features that require a special license are not supported. If you want to use Kaspersky Security Center Cloud Console in trial mode, you automatically get a trial license when you create your first workspace.
Trial mode does not allow you to subsequently switch to commercial mode. Any trial workspace will be automatically deleted with all its contents when the 30-day period expires.
The following restrictions are imposed on the use of the Kaspersky Security Center Cloud Console features in trial mode:
- You cannot create a hierarchy of Administration Servers. No virtual Administration Servers can be created.
- The Licensing section is available as read-only. All operations are prohibited in this section, including the addition and removal of license keys.
- You cannot create custom installation packages.
- You cannot create custom roles for users.
- The Virus outbreak feature is not available. Virus outbreak events are not stored, and no notifications are sent.
- The Deleted objects repository is not available.
- You cannot enable the addition of batched events (those published in large quantities) to the database.
- Migration of Administration Servers from on-premises mode to Cloud Console mode is not supported.
- KSN statistical information from the Administration Server components, such as Administration Server or Network Agent, is not sent to Kaspersky.
Some limits are also imposed on creation of some objects of the application (see the table below). If any of these limits are exceeded when an attempt is made to create such an object, the object creation will be blocked, and an error message about the limit will be displayed.
Limitations on creation of Kaspersky Security Center Cloud Console objects in trial mode
Type of limitation |
Value |
|---|---|
Policies |
8 |
Tasks |
17 |
License keys |
1 |
Installation packages |
5 |
Device selections (preset instances not included) |
5 |
Event selections (preset instances not included) |
5 |
Device moving rules |
3 |
Report templates of the same type |
10 |
Internal security groups |
20 |
Managed devices |
20 |
Using Kaspersky Marketplace to choose Kaspersky business solutions
Marketplace is a section in the main menu that enables you to view the entire range of Kaspersky business solutions, select the ones you need, and proceed to the purchase at the Kaspersky website. You can use filters to view only those solutions that fit your organization and the requirements for your information security system. When you select a solution, Kaspersky Security Center Cloud Console redirects you to the related webpage at the Kaspersky website to learn more about that solution. Each webpage enables you to proceed to the purchase or contains instructions on the purchase process.
In the Marketplace section, you can filter Kaspersky solutions by using the following criteria:
- Number of devices (endpoints, servers, and other types of assets) that you want to protect:
- 50–250
- 250–1000
- More than 1000
- Maturity level of your organization's information security team:
- Foundations
This level is typical for enterprises that only have an IT team. The maximum possible number of threats is blocked automatically.
- Optimum
This level is typical for enterprises that have a specific IT security function within the IT team. At this level, companies require solutions that enable them to counter commodity threats and threats that circumvent existing preventive mechanisms.
- Expert
This level is typical for enterprises with complex and distributed IT environments. The IT security team is mature or the company has an SOC (Security Operations Center) team. The required solutions enable the companies to counter complex threats and targeted attacks.
- Foundations
- Types of assets that you want to protect:
- Endpoints: workstations of employees, physical and virtual machines, embedded systems
- Servers: physical and virtual servers
- Cloud: public, private, or hybrid cloud environments; cloud services
- Network: local area network, IT infrastructure
- Service: security-related services provided by Kaspersky
To find and purchase a Kaspersky business solution:
- In the main menu, go to Marketplace.
By default, the section displays all available Kaspersky business solutions.
- To view only those solutions that suit your organization, select the required values in the filters.
- Click the solution that you want to purchase or you want to learn more about.
You will be redirected to the solution webpage. You can follow the on-screen instructions to proceed to the purchase.
Licenses and the minimum number of devices for each license
If you want to use Kaspersky Security Center Cloud Console in commercial mode, you must purchase a license before creating your first workspace. The table below shows the licenses that you can purchase and the minimum number of devices for each license (even if you want to protect fewer devices):
Licenses that grant the usage of Kaspersky Security Center Cloud Console
License |
Minimum number of devices (even if you want to protect a fewer number) |
|---|---|
For commercial licenses: 300 For commercial (subscription) licenses: 100 |
|
For commercial licenses: 300 For commercial (subscription) licenses: 100 |
|
300 |
|
For commercial licenses: 300 For commercial (subscription) licenses: 100 |
|
50 |
|
Kaspersky Hybrid Cloud Security, Desktop |
For commercial licenses: 300 For commercial (subscription) licenses: 100 |
Kaspersky Hybrid Cloud Security, Server |
50 |
20 |
|
20 |
|
For commercial licenses: 300 For commercial (subscription) licenses: 100 |
|
50 |
|
20 |
|
300 |
|
300 |
|
Kaspersky Symphony (currently only available in Russia) |
300 |
For commercial licenses: 300 users For commercial (subscription) licenses: 100 users Each user license can apply to 1 PC/Mac device and 2 mobile devices. |
|
For commercial licenses: 300 users For commercial (subscription) licenses: 100 users Each user license can apply to 1 PC/Mac device and 2 mobile devices. |
|
For commercial licenses: 300 users For commercial (subscription) licenses: 100 users Each user license can apply to 1 PC/Mac device and 2 mobile devices. |
|
250 users Each user license can apply to 1 PC/Mac device and 2 mobile devices. |
|
250 users Each user license can apply to 1 PC/Mac device and 2 mobile devices. |
If you want to protect more than 10,000 devices, you have to send a request to Kaspersky Technical Support and specify information about your company and the workspace that you want to create.
Events of the licensing limit exceeded
Kaspersky Security Center Cloud Console allows you to get information about events when some licensing limits are exceeded by Kaspersky applications installed on client devices.
The importance level of such events when a licensing limit is exceeded is defined according to the following rules:
- If the currently used units covered by a single license constitute 90% to 100% of the total number of units covered by the license, the event is published with the Info importance level.
- If the currently used units covered by a single license constitute 100% to 110% of the total number of units covered by the license, the event is published with the Warning importance level.
- If the number of currently used units covered by a single license exceeds 110% of the total number of units covered by the license, the event is published with the Critical event importance level.
Methods of distribution of the activation codes to the managed devices
The Kaspersky applications installed on managed devices must be licensed by applying an activation code to each of the applications. You cannot use key files for licensing of managed applications; only activation codes are accepted. An activation code can be deployed in the following ways:
- Automatic deployment
- The Add license key task for a managed application
- Manual activation of a managed application
Kaspersky applications can use more than one license key at the same time. For example, Kaspersky Endpoint Security for Windows can use two license keys—one for Kaspersky Endpoint Security for Windows and one for activation of the Endpoint Detection and Response functions.
In addition, Kaspersky applications can have not only an active license key, but also a reserve license key. A Kaspersky application uses an active key at the current moment and stores a reserve key to apply after the active key expires. You can add a new active or reserve license key by any of the methods listed above. The application for which you add a license key defines whether the key is active or reserve. The key definition does not depend on the method that you use to add a new license key.
Adding an Administration Server license key
To add an Administration Server license key:
- In the main menu, click the settings icon (
 ) next to the Administration Server.
The Administration Server properties window opens with the General tab selected.
- Go to the License keys section, and then click the Select button in one of the following sections:
- Current license, if you want to add an active license key.
- Reserve license key, if you want to add a reserve license key.
You can add a reserve license key only if an active license key has already been added.
- In the window that opens, select a required license key from the table.
If necessary, you can add a new license key by clicking the Add new license key button, and then entering the license key in the right pane that opens.
- Click the OK button.
The window is closed, the Administration Server license key is added, and information about the license key is displayed in the License keys section.
If necessary, you can change the selected license key by clicking the Change button and specifying another license key. Also, you can remove a license key.
Page top
Adding a license key to the Administration Server repository
When adding a license key using Kaspersky Security Center Cloud Console, the settings of the license key are saved on the Administration Server. Based on this information, the application generates a license key usage report and notifies the administrator of license expirations and violation of license restrictions that are set in the properties of license keys. You can configure notifications of the use of license keys within the Administration Server settings.
To add a license key to the Administration Server repository:
- In the main menu, go to Operations → Licensing → Kaspersky licenses.
- Click the Add button.
- Specify the activation code in the text field and click the Send button.
- Click the Close button.
The license key or several license keys are added to the Administration Server repository.
Deploying a license key to client devices
Kaspersky Security Center Cloud Console allows you to distribute a license key to client devices automatically or through the Application activation task. You can use the task to distribute keys to a specific device group. During distribution of a license key via the task, the licensing limit on the number of devices is not taken into account. Use the automatic key distribution to cease distribution of a license key automatically when the licensing limit is reached.
If you enable automatic distribution of a license key, do not create an Application activation task to distribute that key to client devices. Otherwise, the load on the Administration Server will increase due to frequent synchronization.
Before deployment, add the license key to the Administration Server repository.
To distribute a license key to client devices through the Application activation task:
- In the main menu, go to Assets (Devices) → Tasks.
- Click Add.
The New task wizard starts. Proceed through the wizard by using the Next button.
- In the Application drop-down list, select the application for which you want to add a license key.
- In the Task type list, select the Application activation task.
- In the Task name field, specify the name of the new task.
- Select the devices to which the task will be assigned.
- At the Selecting a license key step of the wizard, click the Add key link to add the license key.
- On the key adding pane, add the license key by using one of the following options:
You need to add the license key only if you did not add it to the Administration Server repository prior to creating the Application activation task.
- Select the Enter activation code option to enter an activation code, and then do the following:
- Specify the activation code, and then click the Send button.
Information about the license key appears in the key adding pane.
- Click the Save button.
If you want to distribute the license key to managed devices automatically, enable the Automatically distribute license key to managed devices option.
The key adding pane closes.
- Specify the activation code, and then click the Send button.
- Select the Add key file option to add a key file, and then do the following:
- Click the Select key file button.
- In the window that opens, select a key file, and then click the Open button.
Information about the license key appears in the license key adding pane.
- Click the Save button.
If you want to distribute the license key to managed devices automatically, enable the Automatically distribute license key to managed devices option.
The key adding pane closes.
- Select the Enter activation code option to enter an activation code, and then do the following:
- Select the license key in the table of keys.
- At the License information step of the wizard, clear the default Use as a reserve key check box if you want to replace the active license key.
For example, this is needed when the organization changes, and another organization's key is required on the device; or if the key was reissued, and a new license expires earlier than the current license. To avoid errors, you have to clear the Use as a reserve key check box.
If you want to find out more information about the issues that may occur when adding a license key to Kaspersky Security Center and the ways to resolve them, refer to the Kaspersky Security Center Knowledge Base.
- At the Finish task creation step of the wizard, enable the Open task details when creation is complete option to modify the default task settings.
If you do not enable this option, the task will be created with the default settings. You can modify the default settings later.
- Click the Finish button.
The wizard creates the task. If you enabled the Open task details when creation is complete option, the task properties window automatically opens. In this window, you can specify the general task settings and, if required, change the settings specified during task creation.
You can also open the task properties window by clicking the name of the created task in the list of tasks.
The task is created, configured, and displayed in the list of tasks.
- To run the task, select it in the task list, and then click the Start button.
You can also set a task start schedule on the Schedule tab of the task properties window.
For a detailed description of scheduled start settings, refer to the general task settings.
After the task is completed, the license key is deployed to the selected devices.
Automatic distribution of a license key
Kaspersky Security Center Cloud Console allows automatic distribution of license keys to managed devices if they are located in the license keys repository on the Administration Server.
To distribute a license key to managed devices automatically:
- In the main menu, go to Operations → Licensing → Kaspersky licenses.
- Click the name of the license key that you want to distribute to devices automatically.
- In the license key properties window that opens, switch the toggle button to Automatically distribute license key to managed devices.
- Click the Save button.
The license key will be automatically distributed to all compatible devices.
License key distribution is performed by means of Network Agent. No license key distribution tasks are created for the application.
During automatic distribution of a license key, the licensing limit on the number of devices is taken into account. The licensing limit is set in the properties of the license key. If the licensing limit is reached, distribution of this license key on devices ceases automatically.
Note that an automatically distributed license key may not be displayed in the virtual Administration Server repository in the following cases:
- The license key is not valid for the application.
- The virtual Administration Server does not have managed devices.
- The license key has already been used for devices managed by another virtual Administration Server and the limit on the number of devices has been reached.
If you specify the Automatically distribute license key to managed devices option for a subscription license key for activating any application on a managed device, and at the same time you have an active trial license key, then your trial license key will be automatically replaced by the subscription license key eight days before the expiration date.
Viewing information about license keys in use in the Administration Server repository
To view the list of the license keys added to the Administration Server repository,
In the main menu, go to Operations → Licensing → Kaspersky licenses.
The displayed list contains the activation codes added to the Administration Server repository.
To view detailed information about a license key:
- In the main menu, go to Operations → Licensing → Kaspersky licenses.
- Click the name of the required license key.
In the license key properties window that opens, you can view:
- On the General tab—The main information about the license key
- On the Devices tab—The list of client devices where the license key was used for activation of the installed Kaspersky application
Viewing information about the license keys used for a specific Kaspersky application
To learn what license keys are in use for a Kaspersky application:
- In the main menu, go to Assets (Devices) → Managed devices.
If the device belongs to the Unassigned devices group, go to Discovery & deployment → Unassigned devices instead.
- Click the name of the required device.
- In the device properties window that opens, select the Applications section.
- In the list of applications that opens, select the application whose license keys you want to view.
- In the application properties window that opens, on the General tab, select the License keys section.
The information is displayed in the workspace of this section.
Removing an Administration Server license key
To remove an Administration Server license key:
- In the main menu, click the settings icon () next to the Administration Server.
- In the Administration Server properties window that opens, select the License keys section.
- Click the Remove active license key or Remove reserve license key button depending on the license key that you want to remove, and then in the window that opens, confirm the operation.
This removes the license key.
If a reserve license key has been added, the reserve license key automatically becomes the active license key after the former active license key is removed.
After the active license key of Administration Server is removed, Vulnerability and patch management and Mobile Device Management become unavailable. You can add a removed license key again or add a new license key.
Removing a license key from the repository
You can remove a license key from the Administration Server repository. Note that Kaspersky Security Center Cloud Console automatically deletes your workspace after 90 days in the following cases:
- You remove the last license key (active, reserve, or not in use) added manually in the repository.
- The last license key expires.
If your workspace is deleted, you cannot manage the protection of your network by means of Kaspersky Security Center Cloud Console. You also permanently lose your data from Kaspersky Security Center Cloud Console. If necessary, you can delete your workspace manually. Otherwise, we recommend that you keep at least one license key in the Administration Server repository.
If you remove a license key and you added a reserve license key earlier, the reserve license key automatically becomes the active license key after the former active key is removed or expired.
When you remove the active license key that is deployed to a managed device, the application will continue working on the managed device.
To remove a license key from the Administration Server repository:
- Check that Administration Server does not use a license key that you want to remove. If the Administration Server does, you cannot remove the key. To perform the check:
- In the main menu, click the settings icon () next to the Administration Server.
The Administration Server properties window opens.
- On the General tab, select the License keys section.
- If the required license key is displayed in the section that opens, click the Remove active license key button, and then confirm the operation. After that, the Administration Server does not use the removed license key, but the key remains in the Administration Server repository. If the required license key is not displayed, the Administration Server does not use it.
- In the main menu, click the settings icon (
- In the main menu, go to Operations → Licensing → Kaspersky licenses.
- Select the required license key, and then click the Delete button.
- In the window that appears, select the I understand the risk and want to remove the license key check box. This means that if you remove the last license key, you are aware of the subsequent deletion of the workspace and loss of control over the managed devices. Next, click the Remove button.
As a result, the selected license key is removed from the repository.
You can add a removed license key again or add a new one. If you removed the last license key, you can also add a license key as long as your workspace is not deleted. Kaspersky Security Center Cloud Console notifies administrators of the workspace 30 days, 7 days, and 1 day prior to deletion.
Viewing the list of devices where a Kaspersky application is not activated
You can view the list of all the devices on which a Kaspersky application is installed but not activated (for example, a license is missing or has expired).
To view the devices where a Kaspersky application is not activated:
- In the main menu, go to Assets (Devices) → Tasks.
The list of tasks is displayed.
- Click the name of the Update task related to the Kaspersky application in question.
The task properties window is displayed with several named tabs.
- In the task properties window, select the Results section.
In the Device or secondary Server column are displayed the devices on which the task was successful.
- Sort the Device or secondary Server column.
In the Device or secondary Server column are displayed the devices on which the task was successful. The devices where the task failed because of a missing license are devices where the application is not activated.
Revoking consent with an End User License Agreement
If you decide to stop protecting some of your client devices, you can revoke the End User License Agreement (EULA) for any managed Kaspersky application. You must uninstall the selected application and its installation packages before revoking its EULA. The installation packages must be deleted from the Administration Server and its virtual Administration Servers.
The EULAs that were accepted on a virtual Administration Server can be revoked on the virtual Administration Server or on the primary Administration Server. The EULAs that were accepted on a primary Administration Server can be revoked only on the primary Administration Server.
To revoke a EULA for managed Kaspersky applications:
- In the main menu, click the settings icon () next to the name of the required Administration Server.
The Administration Server properties window opens.
- On the General tab of the Administration Server properties window, select the End User License Agreements section.
A list of EULAs—accepted upon creation of installation packages or at the seamless installation of updates—is displayed.
- In the list, select the EULA that you want to revoke.
You can view the following properties of the EULA:
- Date when the EULA was accepted
- Name of the user who accepted the EULA
- Whether or not the EULA can be revoked
- Click the acceptance date of any EULA to open its properties window that displays the following data:
- Name of the user who accepted the EULA
- Date when the EULA was accepted
- Unique identifier (UID) of the EULA
- Full text of the EULA
- List of objects (installation packages, seamless updates) linked to the EULA, and their respective names and types
- In the lower part of the EULA properties window, click the Revoke License Agreement button.
If the selected EULA can be revoked only by uninstalling the application or if this EULA can be revoked only on the primary Administration Server, a notification about this restriction is displayed instead of the Revoke License Agreement button.
If there exist any objects (installation packages and their respective tasks) that prevent the EULA from being revoked, the notification about it is displayed. You cannot proceed with revocation until you delete these objects.
In the window that opens, you are informed that you must first uninstall the Kaspersky application corresponding to the EULA.
- Click the button to confirm revocation.
The EULA is revoked. It is no longer displayed in the list of License Agreements in the End User License Agreements section. The EULA properties window closes; the application is no longer installed.
Renewing licenses for Kaspersky applications
You can renew a Kaspersky application license that has expired or is about to expire (in less than 30 days).
If the last license key is expired, Kaspersky Security Center Cloud Console automatically deletes your workspace after 90 days. As a result, you cannot manage the protection of your network by means of Kaspersky Security Center Cloud Console. You also permanently lose your data from Kaspersky Security Center Cloud Console. We recommend that you renew outdated license keys or add new ones to the Administration Server repository to keep your workspace.
To view a notification about an expired license or a license that is about to expire:
- Do either of the following:
- In the main menu, go to Operations → Licensing → Kaspersky licenses.
- In the main menu, go to Monitoring & reporting → Dashboard, and then click the View expiring licenses link next to a notification.
The Kaspersky licenses window opens, where you can view and renew the expiring and expired licenses.
- If you want to renew a license, click the Renew license link next to the required license.
By clicking a license renewal link, you agree to transfer the following data to Kaspersky: software ID, software version, software localization, license ID, and an attribute that shows if the license was provided by a partner company. The data is required to determine the renewal terms of your license.
- In the window of the license renewal service that opens follow the instructions to renew a license.
The expiring license is renewed.
In Kaspersky Security Center Cloud Console, the notifications are displayed when a license is about to expire, according to the following schedule:
- 30 days before the expiration
- 7 days before the expiration
- 3 days before the expiration
- 24 hours before the expiration
- When a license has expired
Use of Kaspersky Security Center Cloud Console after the license expiration
After the license expiration, Kaspersky might grant you the use of Kaspersky Security Center Cloud Console for up to 90 days without limitations. During this period, the Administration Server, Network Agent, and Kaspersky Security Center Cloud Console web interface work without limitations. Kaspersky Security Center Cloud Console also sends KSN statistics to Kaspersky in accordance with the current KSN access settings. The managed applications work with only limited functionality (for details, refer to the documentation for these applications).
When the license has been expired for 90 days, Kaspersky Security Center Cloud Console automatically deletes your workspace. If you want to keep the workspace, renew at least one expired license key or add a new one to the repository.
Page top
Licensing definitions
This section contains definitions for concepts related to licensing of Kaspersky applications managed via Kaspersky Security Center Cloud Console.
About the license
A license is a time-limited right to use Kaspersky Security Center Cloud Console, granted under the terms of the signed License Contract (End User License Agreement).
The scope of services and validity period depend on the license under which the application is used.
The following license types are provided:
- Trial
A free license intended for trying out the application. A trial license usually has a short term.
When a trial license expires, all Kaspersky Security Center Cloud Console features become disabled. To continue using the application, you need to purchase a commercial license.
You can use the application under a trial license for only one trial period.
- Commercial
A paid license.
When a commercial license expires, key features of the application become disabled. To continue using Kaspersky Security Center Cloud Console, you must renew your commercial license. After a commercial license expires, you cannot continue using the application and must remove it from your device.
We recommend renewing your license before it expires, to ensure uninterrupted protection against all security threats.
About the license certificate
A license certificate is a document that you receive along with a key file or an activation code.
A license certificate contains the following information about the license provided:
- License key or order number
- Information about the user who has been granted the license
- Information about the application that can be activated under the license provided
- Limit of the number of licensing units (e.g., devices on which the application can be used under the license provided)
- License validity start date
- License expiration date or license term
- License type
About the license key
A license key is a sequence of bits that you can apply to activate and then use the application in accordance with the terms of the End User License Agreement. License keys are generated by Kaspersky specialists.
You can add a license key to the application by entering an activation code. The license key is displayed in the application interface as a unique alphanumeric sequence after you add it to the application.
The license key may be blocked by Kaspersky in case the terms of the License Agreement have been violated. If the license key has been blocked, you need to add another one if you want to use the application.
A license key may be active or additional (or reserve).
An active license key is a license key that is currently used by the application. An active license key can be added for a trial or commercial license. The application cannot have more than one active license key.
An additional (or reserve) license key is a license key that entitles the user to use the application, but is not currently in use. The additional license key automatically becomes active when the license associated with the current active license key expires. An additional license key can be added only if an active license key has already been added.
A license key for a trial license can be added as an active license key. A license key for a trial license cannot be added as an additional license key.
Page top
About the activation code
Activation code is a unique sequence of 20 alphanumeric characters. You enter an activation code to add a license key that activates Kaspersky Security Center Cloud Console. You receive the activation code through the email address that you specified after purchasing Kaspersky Security Center Cloud Console or after ordering the trial version of Kaspersky Security Center Cloud Console.
To activate the application by using the activation code, you need internet access to establish connection with Kaspersky activation servers. If access to the servers using system DNS is not possible, the application uses public DNS servers.
If the application was activated with an activation code, the application in some cases sends regular requests to Kaspersky activation servers in order to check the current status of the license key. You must provide the application internet access to make it possible to send requests.
If you have lost your activation code after installing the application, contact the Kaspersky partner from whom you purchased the license.
You cannot use key files for activating managed applications; only activation codes are accepted.
About the subscription
Subscription to Kaspersky Security Center Cloud Console is an order for use of the application under the selected settings (subscription expiration date, number of protected devices). You can register your subscription to Kaspersky Security Center Cloud Console with your service provider (for example, your internet provider). A subscription can be renewed manually or in automatic mode; also, you can cancel it.
A subscription can be limited (for example, one-year) or unlimited (with no expiration date). To continue using Kaspersky Security Center Cloud Console after a limited subscription expires, you must renew it. An unlimited subscription is renewed automatically if it has been prepaid to the service provider in due dates.
When a limited subscription expires, you may be provided a grace period for renewal during which the application continues to function. The availability and duration of the grace period is defined by the service provider.
To use Kaspersky Security Center Cloud Console under subscription, you must apply the activation code received from the service provider.
You can apply a different activation code for Kaspersky Security Center Cloud Console only after your subscription expires or when you cancel it.
Depending on the service provider, the set of possible actions for subscription management may vary. The service provider might not provide a grace period for subscription renewal and so the application loses its functionality.
Activation codes purchased under subscription cannot be used for activating earlier versions of Kaspersky Security Center Cloud Console.
When the application is used under subscription, Kaspersky Security Center Cloud Console automatically attempts to access the activation server at specified time intervals until the subscription expires. If access to the server using system DNS is not possible, the application uses public DNS servers. You can renew your subscription on the service provider's website.
Page top
Data provision
Kaspersky Security Center Cloud Console enables the user to identify and control devices (and the device owners) connected to Kaspersky Security Center Cloud Console, by means of the features of managed applications.
Data provision methods:
- The User enters data in the Kaspersky Security Center Cloud Console interface.
- Network Agent receives data from the device and transfers it to Administration Server.
- Network Agent receives data retrieved by the Kaspersky managed application and transfers it to Administration Server. The list of data processed by Kaspersky managed applications is provided in the Help of the corresponding applications.
- Data is transferred from secondary Administration Servers running on-premises.
Kaspersky Security Center Cloud Console automatically deletes workspaces 30 days after the trial license term expires, 90 days after the commercial license term expires.
After the license term expires, Kaspersky saves User's data related to alerts and incidents in the User's workspaces for 30 days.
Under the current license, the storage term for alerts and for incidents is 360 days. After this period, the older alerts and the older incidents are automatically deleted.
The final deletion of the data listed in this section may take up to 24 hours.
Data sent to Kaspersky servers
Data sent during activation
When using the Activation Code to activate Software, in order to verify the legitimacy of using the software, the User agrees to periodically provide Kaspersky with the following information:
- Activation code
- Unique activation identifier for the current license
Kaspersky can also use this information to generate statistical information about the distribution and use of Kaspersky software.
Data sent during updating
Upon receipt of Updates from the Rightholder's update servers, in order to improve the quality of the update mechanism, the User agrees to periodically provide the following information to Kaspersky:
- Software ID received from the license
- Full version of the software
- Software license ID
- Software installation ID (PCID)
- ID of the software update startup
Kaspersky can also use this information to generate statistical information about the distribution and use of Kaspersky software.
Data for ensuring uninterrupted operation, efficient work, and verifying the legitimate use of Kaspersky Security Center Cloud Console
The following information can be used for the specified purpose:
- Names and versions of Kaspersky security applications connected to the workspace, as well as number of devices on which these security applications are installed.
- Number of devices with Kaspersky security applications installed that have been connected to all workspaces and distribution of these connected devices by type.
- Workspace identifier, company identifier, workspace country and region, and workspace creation date.
- Number of users in the workspace, date of the last authentication in the workspace.
- Details of the currently used license (license type, license limit on the number of devices, number of connected devices, and expiration date of the previously used license).
Data transferred when following the links in the interface of Kaspersky Security Center Cloud Console
Following the links in the Administration Console or Kaspersky Security Center Cloud Console, the User agrees to the automatic transfer of the following data:
- Kaspersky Security Center Cloud Console localization
- License ID
- Whether the license was purchased through a partner
The list of data provided via each link depends on the purpose and location of the link.
Page top
Data necessary for the functioning of the workspace
Kaspersky Security Center Cloud Console processes the following data:
- Details of devices detected on the organization's network
Network Agent receives the data listed below from the networked devices and transfers it to Administration Server:
- Technical specifications of the detected device and its components required for device identification that have been received by means of network polling:
- Active Directory polling:
Active Directory devices: distinguished name of the device; Windows domain name received from the domain controller; device name in the Windows environment; NetBIOS domain name; DNS domain and DNS name of the device; Security Account Manager (SAM) account (name for logging in to the system used for support of clients and servers running earlier operating system versions, such as Windows NT 4.0, Windows 95, Windows 98, and LAN Manager); distinguished name of the domain; distinguished names of the groups to which the device belongs; distinguished name of the user managing the device; and globally unique identifier (GUID) and parent GUID of the device.
When the Active Directory network is polled, the following types of data are also processed for the purpose of displaying information about the managed infrastructure and use of this information by the user, for example, during protection deployment:
- Active Directory organizational units: distinguished name of the organizational unit; distinguished name of the domain; GUID and parent GUID of the organizational unit.
- Active Directory domains: Windows domain name received from the domain controller; DNS domain; GUID of the domain.
- Active Directory users: display name of the user; distinguished name of the user; distinguished name of the domain; name of the user's organization; name of the department where the user works; distinguished name of another user acting as the user's manager; full name of the user; SAM account; Email address; alternate email address; main phone number; alternate phone number; mobile phone number; user's position name; distinguished names of the groups to which the user belongs; user globally unique identifier (GUID); user security identifier (SID) (unique binary value used to identify the user as a security principal); and user principal name (UPN)—internet-style login name for a user based on the Internet standard RFC 822. The UPN is shorter than the distinguished name and easier to remember. By convention, the UPN maps to the user email name.
- Active Directory groups: distinguished name of the group; email address; distinguished name of the domain; SAM account; distinguished names of other groups to which the group belongs; SID group; group GUID.
- Active Directory polling:
- Samba domain polling:
Samba devices: distinguished name of the device; domain name received from the domain controller; NetBIOS device name; NetBIOS domain name; DNS domain and DNS name of the device; Security Account Manager (SAM) account; distinguished name of the domain; distinguished names of the groups to which the device belongs; distinguished name of the user managing the device; globally unique identifier (GUID) and parent GUID of the device.
- Samba organization units: distinguished name of the organizational unit; distinguished name of the domain; GUID and parent GUID of the organizational unit.
- Samba domain: domain name received from the domain controller; DNS domain; GUID of the domain.
- Samba users: display name of the user; distinguished name of the user; name of the user's organization; name of the department where the user works; distinguished name of another user acting as the user's manager; full name of the user; SAM account; Email address; alternate email address; main phone number; alternate phone number; mobile phone number; user's position name; distinguished names of the groups to which the user belongs; user globally unique identifier (GUID); user security identifier (SID) (unique binary value used to identify the user as a security principal); user principal name (UPN)—internet-style login name for a user based on the Internet standard RFC 822. The UPN is shorter than the distinguished name and easier to remember. By convention, the UPN maps to the user email name.
- Samba groups: distinguished name of the group; email address; distinguished name of the domain; SAM account; distinguished names of other groups to which the group belongs; SID group; group GUID.
- Windows domain polling:
- Name of the Windows domain or workgroup
- Device NetBIOS name
- DNS domain and DNS name of the device
- Device name and description
- Device visibility on the network
- Device IP address
- Device type (workstation, server, SQL Server, domain controller, etc.)
- Type of operating system on the device
- Version of the device operating system
- Time the information about the device was last updated
- Time the device was last visible on the network
- IP range polling:
- Device IP address
- Device DNS name or NetBIOS name
- Device name and description
- Device MAC address
- Time the device was last visible on the network
- Technical specifications of the detected device and its components required for device identification that have been received by means of network polling:
- Details of managed devices.
Network Agent transfers the data listed below from the device to Administration Server. The user enters the display name and description of the device in the Kaspersky Security Center Cloud Console interface:
- Technical specifications of the managed device and its components required for device identification:
- Display name (generated on the basis of the NetBIOS name, can be modified manually) and description of the device (entered manually)
- Windows domain name and type (Windows NT domain / Windows workgroup)
- Device name in the Windows environment
- DNS domain and DNS name of the device
- Device IP address
- Device subnet mask
- Device network location
- Device MAC address
- Device serial number (if available)
- Type of operating system on the device
- Whether the device is a virtual machine together with hypervisor type
- Whether the device is a dynamic virtual machine as part of Virtual Desktop Infrastructure (VDI)
- Device GUID
- Network Agent instance ID
- Network Agent installation ID
- Network Agent permanent ID
- Other specifications of managed devices and their components required for audit of managed devices and for making decisions about whether specific patches and updates are applicable:
- Windows Update Agent (WUA) status
- Operating system architecture
- Operating system vendor
- Operating system build number
- Operating system release ID
- Operating system location folder
- If the device is a virtual machine—the virtual machine type
- Device response waiting time
- Whether Network Agent is running in stand-alone mode
- Detailed information about activity on managed devices:
- Date and time of the last update
- Date and time the device was last visible on the network
- Restart waiting status ("Restart is required.")
- Time the device was turned on
- Details of device user accounts and their work sessions
- Distribution point operation statistics if the device is a distribution point:
- Date and time the distribution point was created
- Work folder name
- Work folder size
- Number of synchronizations with the Administration Server
- Date and time the device last synchronized with the Administration Server
- Number and total size of transferred files
- Number and total size of files downloaded by clients
- Volume of data downloaded by clients using Transmission Control Protocol (TCP)
- Volume of data sent to clients using multicasting
- Volume of data downloaded by clients using multicasting
- Number of multicast distributions
- Total volume of multicast distribution
- Number of synchronizations with clients after the last synchronization with the Administration Server
- Name of the virtual Administration Server which manages the device
- Details of cloud devices:
- Cloud Region
- Virtual Private Cloud (VPC)
- Cloud availability zone
- Cloud subnet
- Cloud placement group
- Details of mobile devices. The managed application transfers this data from the mobile device to Administration Server. The full list of data is available in the documentation of the managed application.
- Technical specifications of the managed device and its components required for device identification:
- Details of Kaspersky applications installed on the device.
The managed application transfers data from the device to Administration Server through Network Agent:
- Kaspersky managed applications and Kaspersky Security Center Cloud Console components installed on the device
- Settings of Kaspersky applications installed on the managed device:
- Kaspersky application name and version
- Status
- Real-time protection status
- Last device scan date and time
- Number of threats detected
- Number of objects that failed to be disinfected
- Tasks for Kaspersky security application
- Availability and status of the application components
- Time of last update and version of anti-virus databases
- Details of Kaspersky application settings
- Information about the active license keys
- Information about the reserve license keys
- Application installation date
- Application installation ID
- Application operation statistics: events related to changes in the status of Kaspersky application components on the managed device and to performance of tasks initiated by the application components
- Device status defined by the Kaspersky application
- Tags assigned by the Kaspersky application
- Set of installed and applicable updates for the Kaspersky application:
- Display name, version, and language of the application
- Internal name of the application
- Application name and version from the registry key
- Application installation folder
- Patch version
- List of installed application autopatches
- Whether the application is supported by Kaspersky Security Center Cloud Console
- Whether the application is installed on a cluster
- Details of data encryption errors on devices: error ID, time of occurrence, operation type (encryption/decryption), error description, file path, description of encryption rule, device ID, and user name
- Events of Kaspersky Security Center Cloud Console components and Kaspersky managed applications.
Network Agent transfers data from the device to Administration Server.
The description of an event can contain the following data:
- Device name
- Device user name
- Name of the administrator who connected to the device remotely
- Name, version, and vendor of the application installed on the device
- Path to the application installation folder on the device
- Path to the file on the device and file name
- Application name and command-line parameters under which the application was run
- Patch name, patch file name, patch ID, level of the vulnerability fixed by the patch, description of the patch installation error
- Device IP address
- Device MAC address
- Device restart status
- Name of the task that published the event
- Whether the device switched to stand-alone mode and reason for switching
- Information about the security issue on the device: security issue type, security issue name, severity level, security issue description, security issue details transmitted by the Kaspersky application
- Size of free disk space on the device
- Whether the Kaspersky application is running in limited functionality mode, IDs of functional scopes
- Old and new value of the Kaspersky application setting
- Description of the error that occurred when the Kaspersky application or any of its components performed the operation
- Settings of Kaspersky Security Center Cloud Console components and Kaspersky managed applications presented in policies and policy profiles.
The user enters data in the Kaspersky Security Center Cloud Console interface.
- Task settings of Kaspersky Security Center Cloud Console components and Kaspersky managed applications
The user enters data in the Kaspersky Security Center Cloud Console interface.
- Data processed by the Vulnerability and patch management feature.
Network Agent transfers the data listed below from the device to Administration Server:
- Details of applications and patches installed on managed devices (Applications registry). Applications can be identified on the basis of information about executable files detected on managed devices by the Application Control feature:
- Application/patch ID
- Parent application ID (for a patch)
- Application/patch name and version
- Whether the application/patch is an .msi file of Windows Installer
- Application/patch vendor
- Localization language ID
- Application/patch installation date
- Application installation path
- Technical Support website of application/patch vendor
- Technical Support phone number
- ID of the installed application instance
- Comment
- Uninstallation key
- Key for installation in silent mode
- Patch classification
- Web address for additional information about the patch
- Registry key of the application
- Application build number
- User SID
- Operating system type (Windows, Unix)
- Information about the hardware detected on managed devices (Hardware registry):
- Device ID
- Device type (motherboard, CPU, RAM, mass storage device, video adapter, sound card, network interface controller, monitor, optical disc device)
- Device name
- Description
- Vendor
- Serial number
- Revision
- Information about the driver: developer, version, description, and release date
- Information about BIOS: developer, version, serial number, and release date
- Chipset
- Clock rate
- Number of CPU cores
- Number of CPU threads
- CPU platform
- Storage device rotation speed
- RAM: type, part number
- Video memory
- Sound card codec
- Details of vulnerabilities in third-party software detected on managed devices:
- Vulnerability identifier
- Vulnerability severity level (Warning, High, Critical)
- Vulnerability type (Microsoft, third-party)
- Web address of the page on which the vulnerability is described
- Time the vulnerability entry was created
- Vendor name
- Localized vendor name
- Vendor ID
- Application name
- Localized name of the application
- Application installation code
- Application version
- Application localization language
- List of CVE identifiers from the vulnerability description
- Kaspersky protection technologies blocking the vulnerability (File Threat Protection, Behavior Detection, Web Threat Protection, Mail Threat Protection, Host Intrusion Prevention, ZETA Shield)
- Path to the object file in which the vulnerability was detected
- Vulnerability detection time
- IDs of the Knowledge Base articles from the vulnerability description
- IDs of the security bulletins from the vulnerability description
- List of updates for the vulnerability
- Whether an exploit exists for the vulnerability
- Whether malware exists for the vulnerability
- Details of updates available for third-party applications installed on managed devices:
- Application name and version
- Vendor
- Application localization language
- Operating system
- List of patches according to installation sequence
- Original version of the application to which the patch is applied
- Application version after patch installation
- Patch ID
- Build number
- Installation flags
- License Agreements for the patch
- Whether the patch is a prerequisite for installation of other patches
- List of required installed applications and their updates
- Sources of information about the patch
- Additional information about the patch (addresses of web pages)
- Web address for patch download, file name, version, revision, and SHA256
- Details of Microsoft updates found by the WSUS feature:
- Update revision number
- Microsoft update type (Driver, Software, Category, Detectoid)
- Update importance level according to the Microsoft Security Response Center (MSRC) bulletin (Low, Medium, High, Critical)
- IDs of the MSRC bulletins related to the update
- IDs of articles in the MSRC Knowledge Base
- Update name (header)
- Update description
- Whether the update installer is interactive
- Installation flags
- Update classification (Critical Updates, Definition Updates, Drivers, Feature Packs, Security Updates, Service Packs, Tools, Update Rollups, Updates, Upgrade)
- Information about the application to which the update is applied
- End User License Agreement (EULA) ID
- EULA text
- Whether the EULA must be accepted for update installation
- Information about the associated updates (ID and revision number)
- Update ID (Global Microsoft Windows update identity)
- IDs of the superseded updates
- Whether the update is hidden
- Whether the update is mandatory
- Update installation status (Not applicable, Not assigned for installation, Assigned, Installing, Installed, Failed, Restart is required, Not assigned for installation (new version))
- CVE IDs for the update
- Company that released the update, or the "Company missing" value
- List of Microsoft updates found by the WSUS feature that must be installed on the device.
- Details of applications and patches installed on managed devices (Applications registry). Applications can be identified on the basis of information about executable files detected on managed devices by the Application Control feature:
- Information about executable files detected on managed devices by the Application Control feature (may be associated with information from the Applications registry). A full list of data is given in the section that describes data for devices managed through the corresponding application.
The managed application transfers data from the device to Administration Server through Network Agent.
- Information about files placed in Backup. A full list of data is given in the section that describes data for devices managed through the corresponding application.
The managed application transfers data from the device to Administration Server through Network Agent.
- Information about files requested by Kaspersky specialists for detailed analysis. A full list of data is given in the section that describes data for devices managed through the corresponding application.
The managed application transfers data from the device to Administration Server through Network Agent.
- Information about the status and triggering of Adaptive Anomaly Control rules. A full list of data is given in the section that describes data for devices managed through the corresponding application.
The managed application transfers data from the device to Administration Server through Network Agent.
- Information about devices (memory units, information transfer tools, information hardcopy tools, and connection buses) installed or connected to the managed device and detected by the Device Control feature. A full list of data is given in the section that describes data for devices managed through the corresponding application.
The managed application transfers data from the device to Administration Server through Network Agent.
- Data about alerts:
- Date and time of the first telemetry event in the alert
- Date and time of the last telemetry event in the alert
- Name of the triggered rule (the User enters this in the Kaspersky Security Center Cloud Console interface)
- Alert status
- Resolution (False Positive, True Positive, Low Priority)
- ID and name of the user who is assigned for the alert
- Unique ID in the Kaspersky Security Center Cloud Console database and the name of the device related to the events that are alert sources
- SID and name of the user of the device related to the events that are alert sources
- Observables, that is, observable data related to the events that are alert sources:
- IP address
- MD5 hash sum of the file and file path
- Web address
- Domain
- Additional details of the object related to the alert (received from the application)
- Comments to the alert:
- Date and time when the comment was added
- User who added the comment
- Text of the comment
- Alert changelog:
- Date and time of the change
- User who performed the change
- Change description
- Data about security issues:
- Date and time of the first event in the security issue
- Date and time of the last event in the security issue
- Security issue name (the user enters this in the Kaspersky Security Center Cloud Console interface)
- Brief description of the security issue
- Security issue priority
- Security issue status
- ID and name of the user assigned for the security issue
- Resolution (False Positive, True Positive, Low Priority, Merged)
- Comment to the security issue:
- Date and time when the comment was added
- User who added the comment
- Text of the comment
- Security issue changelog:
- Date and time of the change
- User who performed the change
- Change description
- Data processed by the data encryption feature of Kaspersky applications.
The managed application transfers the data listed below from the device to Administration Server through Network Agent. The user enters the description of the drive in the Kaspersky Security Center Cloud Console interface:
- List of drives on the devices:
- Drive name
- Encryption status
- Drive type (boot drive, disk drive)
- Drive serial number
- Description
- Details of data encryption errors on the devices:
- Date and time when the error occurred
- Operation type (encryption, decryption)
- Error description
- File path
- Rule description
- Device ID
- User name
- Error ID
- Data encryption settings of the Kaspersky application.
A full list of data is given in the section that describes data for devices managed through the corresponding application.
- List of drives on the devices:
- Details of the entered activation codes.
The User enters data in the Kaspersky Security Center Cloud Console interface.
- User accounts.
The User enters the data listed below in the Kaspersky Security Center Cloud Console interface:
- Name
- Description
- Full name
- Email address
- Main phone number
- Password
- One-time security code for two-step verification
- Data required for user authentication using Active Directory:
- Active Directory Federation Services (AD FS) settings:
- Main URL of the authentication provider
- Trusted root certificates for AD FS
- Client ID generated in AD FS
- Secret key for protection of access to AD FS
- Scope of the tokens
- Active Directory domain with which the integration is performed
- Name of the token field containing the user SID
- Name of the token field containing the array of SIDs of the user's groups
The User enters data in the Kaspersky Security Center Cloud Console interface.
- Active Directory Federation Services (AD FS) settings:
- Data required to authenticate users by using Microsoft Entra ID.
- Microsoft Entra ID integration settings:
- ID of the Microsoft Entra ID tenant
- Client ID generated in the Microsoft Entra ID tenant
- Client secret created in the Microsoft Entra ID tenant
The user enters data in the Kaspersky Security Center Cloud Console interface.
- Data about users and groups in the Microsoft Entra ID tenant, which Kaspersky Security Center Cloud Console receives as a result of the Microsoft Entra ID polling:
- Data about users in the Microsoft Entra ID tenant: user object identifier; user security identifier; user display name; name of the user's organization; name of the department in which the user works; user position; email address; primary phone number; mobile phone number; user login; names of groups to which the user belongs.
- Data about users created in Microsoft Entra ID as a result of synchronization with on-premises Active Directory: user security identifier in on-premises Active Directory; domain name in on-premises Active Directory; user login in on-premises Active Directory; SAM account of the user in on-premises Active Directory; distinguished user name in on-premises Active Directory.
- Data about groups in the Microsoft Entra ID tenant: group object identifier; group security identifier; group display name; email address; names of other groups to which the group belongs.
- Data about groups created in Microsoft Entra ID as a result of synchronization with on-premises Active Directory: the security identifier of the group in on-premises Active Directory; SAM account of the group in on-premises Active Directory.
- Microsoft Entra ID integration settings:
- Revision history of management objects: Administration Server, Administration group, Policy, Task, User / security group, Installation package.
- The User enters the data listed below in the Kaspersky Security Center Cloud Console interface:
- Administration Server
- Administration group
- Policy
- Task
- User / Security group
- Installation package
- IP address of the device on which the User created a revision. Administration Server detects the IP address automatically.
- The User enters the data listed below in the Kaspersky Security Center Cloud Console interface:
- Registry of deleted management objects.
The User enters data in the Kaspersky Security Center Cloud Console interface.
- Installation packages created from the file, as well as installation settings.
The User enters data in the Kaspersky Security Center Cloud Console interface.
- Data required for the display of Kaspersky announcements in Kaspersky Security Center Cloud Console:
- Information about managed Kaspersky applications used by the User: application ID, full version number.
- The User's localization of the Kaspersky Security Center Cloud Console interface.
- Information about the activation of the Software on the Device: Software license ID; Software license term; Software license expiration date and time; type of Software license used; Software subscription type; Software subscription expiration date and time; current status of the Software subscription; reason of current/changing status of Software subscription; ID of the price list item through which the Software license was purchased.
- Information about the legal agreement accepted by the User while using the Software: type of the legal agreement; version of the legal agreement; flag indicating whether the user has accepted the terms of the legal agreement.
- Information about the announcements received from the Rightholder: announcement ID; time of receipt of the announcement; status of receiving the announcement.
The User enters data in the Kaspersky Security Center Cloud Console interface.
- Kaspersky Security Center Cloud Console user settings.
The User enters the data listed below in the Kaspersky Security Center Cloud Console interface:
- User interface localization language
- User interface theme
- Display settings of the monitoring panel
- Information about the status of notifications: Already read / Not yet read
- Status of columns in spreadsheets: Show/Hide
- Tutorial progress
- Data received when using the Remote diagnostics feature on a managed device: trace files, system information, details of Kaspersky applications installed on the device, dump files, log files, results of running diagnostic scripts received from Technical Support.
- Data that the User enters in the Kaspersky Security Center Cloud Console interface:
- Administration group name when creating a hierarchy of administration groups
- Email address when configuring email notifications
- Tags for devices and tagging rules
- Tags for applications
- User categories of applications
- Role name when assigning a role to a user
- Information about subnets: subnet name, description, address, and mask
- Settings of reports and selections
- Any other data entered by the User
- Data received from a secondary Administration Server deployed on-premises.
The data processed by the Kaspersky Security Center Administration Server is described in Kaspersky Security Center Online Help.
When connecting a Kaspersky Security Center Administration Server deployed on-premises as a secondary in relation to Kaspersky Security Center Cloud Console, Kaspersky Security Center Cloud Console processes the following types of data from the secondary Administration Server:
- Information about the devices on the organization's network received as a result of device discovery in the Active Directory network or Windows network, or through scanning of IP intervals
- Information about the Active Directory organizational units, domains, users, and groups received as a result of Active Directory network polling
- Information about managed devices, their technical specifications, including those required for device identification, accounts of device users and their working sessions
- Information about mobile devices transferred by using the Exchange ActiveSync protocol
- Information about mobile devices transferred by using the iOS MDM protocol
- Details of Kaspersky applications installed on the device: settings, operation statistics, device status defined by the application, installed and applicable updates, tags
- Information transferred with event settings from Kaspersky Security Center components and Kaspersky managed applications
- Settings of Kaspersky Security Center components and Kaspersky managed applications presented in policies and policy profiles
- Task settings of Kaspersky Security Center components and Kaspersky managed applications
- Data processed by the Vulnerability and patch management feature: details of applications and patches; information about the hardware; details of vulnerabilities in third-party software detected on managed devices; details of updates available for third-party applications; details of Microsoft updates found by the WSUS feature
- User categories of applications
- Details of executable files detected on managed devices by the Application Control feature
- Details of files placed in Backup
- Details of files placed in Quarantine
- Details of files requested by Kaspersky specialists for detailed analysis
- Information about the status and triggering of Adaptive Anomaly Control rules
- Details of devices (memory units, information transfer tools, information hardcopy tools, and connection buses) installed or connected to the managed device and detected by the Application Control feature
- Encryption settings of the Kaspersky application: repository of encryption keys, device encryption status
- Information about the errors of data encryption performed on devices using the Data encryption feature of Kaspersky applications
- List of managed programmable logic controllers (PLCs)
- Details of the entered activation codes
- User accounts
- Revision history of management objects
- Registry of deleted management objects
- Installation packages created from the file, as well as installation settings
- Kaspersky Security Center Web Console user settings
- Any data that the user enters in the Administration Console or Kaspersky Security Center Cloud Console interface
- Certificate for secure connection of managed devices to the Kaspersky Security Center components
- Data required for Kaspersky Security Center Cloud Console integration with an SIEM system for event export:
- Data required for connection and authentication:
- SIEM system connection address and port
- SIEM server authentication certificate
- Trusted certificate and private key for client authentication of Kaspersky Security Center Cloud Console in the SIEM system
The User enters data in the Kaspersky Security Center Cloud Console interface.
- Data that Kaspersky Security Center Cloud Console receives from the SIEM system: public key of the SIEM server certificate for the SIEM server authentication.
- Data required for connection and authentication:
- Data required for Kaspersky Security Center Cloud Console interaction with cloud environment:
- Amazon Web Services (AWS):
- Access key ID of the IAM user account
- Secret key of the IAM user account
- Microsoft Azure:
- Azure Application ID
- Azure subscription ID
- Azure Application password
- Account name for Azure repository
- Account access key for Azure repository
- Google Cloud:
- Google client email
- Project ID
- Private key
The User enters data in the Kaspersky Security Center Cloud Console interface.
- Amazon Web Services (AWS):
- Data transferred by an unsupported Kaspersky application
When you install Network Agent on a device that has a Kaspersky application installed but not supported by Kaspersky Security Center Cloud Console, this Kaspersky application will still transfer data to Kaspersky Security Center Cloud Console. (The list of data is provided in the "About data provision" section of the Help system of the application.) However, Kaspersky Security Center Cloud Console will not be able to process the data transferred by the unsupported application in the way that the process is described for the main functionality of Kaspersky Security Center Cloud Console.
The list of supported Kaspersky applications is presented in Kaspersky Security Center Cloud Console Online Help.
- Statistical information about user attempts to gain access to cloud services.
A managed application transfers data from the device to Administration Server through Network Agent. For the full list of transferred data, refer to Help of the managed application.
- Data for creating a threat development chain.
A managed application transfers data from the device to Administration Server through Network Agent. For the full list of transferred data, refer to Help of the managed application.
- Data required for integration of Kaspersky Security Center with the Kaspersky Managed Detection and Response service.
Token for the integration initiation, integration token, and user session token. The User enters the token to initiate the integration in the Kaspersky Security Center Cloud Console interface. The Kaspersky Managed Detection and Response service transfers both the integration token and user session token through the MDR plug-in.
- Data required to integrate Kaspersky Security Center Cloud Console with Active Directory or Samba domain controllers.
The User enters the data into Kaspersky Security Center Cloud Console interface.
- Data required to integrate Kaspersky Security Center Cloud Console with Kaspersky Cloud Sandbox and Kaspersky Threat Intelligence Portal (requires installation of the appropriate plug-in for Kaspersky Security Center Cloud Console): an integration token, an authorization token.
The User enters a token for integration in the Kaspersky Security Center Cloud Console interface. Kaspersky Security Center Web Console transfers an authorization token in a request to the Kaspersky Cloud Sandbox API.
- Data required to integrate Kaspersky Security Center Cloud Console with the Kaspersky Automated Security Awareness Platform (KASAP) service: API token for accessing the KASAP Open API, URL (a link for accessing KASAP through Open API).
The User enters a token for integration in the Kaspersky Security Center Cloud Console interface. Kaspersky Security Center Web Console transfers an authorization token in a request to the Kaspersky Automated Security Awareness Platform API.
- Data sent to the Kaspersky Automated Security Awareness Platform service.
To assign a training course to an employee, Kaspersky Security Center Cloud Console transfers the following data to KASAP: user email, alternate user email (if available), user ID in KASAP, training group ID.
- Data sent to the Kaspersky Cloud Sandbox service.
To execute and detect malicious behavior automatically by using the Kaspersky Cloud Sandbox service, the managed Kaspersky application transfers quarantined objects and files created during the execution of the transferred objects from the Administration Server through the Network Agent, and then through Kaspersky Security Center Web Console to the Kaspersky Cloud Sandbox service.
Data necessary for the functioning of managed applications
The following managed applications transfer data from the device to Administration Server through Network Agent:
- Kaspersky Endpoint Security for Windows
- Kaspersky Endpoint Security for Linux
- Kaspersky Endpoint Security for Mac
- Kaspersky Endpoint Agent
- Kaspersky Security for Windows Server
- Kaspersky Security for Mobile
- Kaspersky Embedded Systems Security for Windows
- Kaspersky Embedded Systems Security for Linux
The list of processed data is published at https://ksc.kaspersky.com/Home/LegalDocuments, in the Kaspersky Security Center Cloud Console Data Processing Agreement. On the legal documents webpage, find the text block named Kaspersky Security Center Cloud Console Agreement, and then scroll down the text block to the Data for devices managed through the relevant managed application. You can also use your browser's standard Find function with the same purpose.
User data processed locally
The only Kaspersky Security Center component that can be deployed locally in a Kaspersky Security Center Cloud Console is Network Agent.
User data list processed locally:
- All data listed in the User Data section processed within the framework and infrastructure of Kaspersky, except for data that the administrator enters through the Kaspersky Security Center Cloud Console interface
- Kaspersky Event Log of Network Agent
- Traces of Network Agent
- Logs, including logs created by the Network Agent installer, Kaspersky Security Center utilities
The dump, log, and trace files of Network Agent contain random data and may contain personal data. Files are stored unencrypted on the device on which Network Agent is installed. Files are not transferred to Kaspersky automatically. The user can transfer this data to Kaspersky manually at the request of the Technical Support to solve problems in the operation of Kaspersky Security Center.
Page top
About legal documents of Kaspersky Security Center Cloud Console
To use Kaspersky Security Center Cloud Console, you must read and express your agreement with the terms and conditions of the legal documents specified on the Kaspersky Security Center Cloud Console website. You can view the terms and conditions of AO Kaspersky Lab Privacy Policy for websites when you sign in to Kaspersky Security Center Cloud Console to manage a workspace. You can read Kaspersky Security Center Cloud Console Agreement and Kaspersky Security Center Cloud Console Data Processing Agreement when you create a company workspace.
Please carefully read the texts of all the legal documents before you start using Kaspersky Security Center Cloud Console.
End User License Agreement for Kaspersky applications
The End User License Agreement (hereinafter also referred to as License Agreement or EULA) is a binding agreement between you and AO Kaspersky Lab stipulating the terms under which you may use the Kaspersky applications.
You can view the terms of the End User License Agreement by using the following methods:
- In the window which is displayed during Kaspersky application installation package creation.
- In the license.txt file, in the Kaspersky application installation folder, on the managed device.
You can revoke your acceptance of the End User License Agreement at any time.
If you do not accept the terms of the License Agreement for a Kaspersky application, you cannot use this application.
Page top
Hardening Guide
Kaspersky Security Center Cloud Console is an application hosted and maintained by Kaspersky. You do not have to install Kaspersky Security Center Cloud Console on your computer or server. Kaspersky Security Center Cloud Console enables the administrator to install Kaspersky security applications on devices on a corporate network, remotely run scan and update tasks, and manage the security policies of managed applications.
Kaspersky Security Center Cloud Console is designed for centralized execution of basic administration and maintenance tasks on an organization's network. The application provides the administrator access to detailed information about the organization's network security level. Kaspersky Security Center Cloud Console allows you to configure all components of protection built by using Kaspersky applications.
Kaspersky Security Center Cloud Console has full access to protection management of client devices and is the most important component of the organization's security system. Therefore, increased protection methods are required for Kaspersky Security Center Cloud Console.
The Hardening Guide describes recommendations and features of configuring Kaspersky Security Center Cloud Console and its components, aimed to reduce the risks of its compromise.
The Hardening Guide contains the following information:
- Configuring accounts to access Kaspersky Security Center Cloud Console
- Managing protection of client devices
- Configuring protection for managed applications
- Transferring information to third-party applications
Before you start to work with Kaspersky Security Center Cloud Console, you will be prompted to read the brief version of the Hardening Guide.
Note that you cannot use Kaspersky Security Center Cloud Console until you confirm that you have read the Hardening Guide.
To read the Hardening Guide:
- Open Kaspersky Security Center Cloud Console and log in to it. Kaspersky Security Center Cloud Console checks whether you have confirmed reading the current version of the Hardening Guide.
If you have not yet read the Hardening Guide, a window opens and displays a brief version of it.
- Do one of the following:
- If you want to view the brief version of the Hardening Guide as a text document, click the Open in new window link.
- If you want to view the full version of the Hardening Guide, click the Open the Hardening guide in Online Help link.
- After you read the Hardening Guide, select the I confirm that I have fully read and understand the Hardening guide check box, and then click the Accept button.
Now, you can work with Kaspersky Security Center Cloud Console.
When a new version of the Hardening Guide appears, Kaspersky Security Center Cloud Console will prompt you to read it.
Planning Kaspersky Security Center Cloud Console architecture
In general, the choice of a centralized management architecture depends on the location of protected devices, access from adjacent networks, delivery schemes of database updates, and so on.
At the initial stage of architecture development, we recommend getting acquainted with the Kaspersky Security Center Cloud Console components and their interaction with each other, as well as with schemas for data traffic and port usage.
Based on this information, you can form an architecture that specifies:
- Organization of the administrator's workspaces, and methods of connecting to Kaspersky Security Center Cloud Console
- Deployment methods for Network Agent and protection software
- Using distribution points
- Using virtual Administration Servers
- Using a hierarchy of Administration Servers
- Anti-virus database update scheme
- Other information flows
Accounts and authentication
Using two-step verification with Kaspersky Security Center Cloud Console
Kaspersky Security Center Cloud Console provides two-step verification for users.
Two-step verification can help you increase the security of your account in Kaspersky Security Center Cloud Console. When this feature is enabled, every time you sign in to Kaspersky Security Center Cloud Console with your email address and password, you enter an additional one-time security code. You can receive a one-time security code by SMS or by generating this code in your authenticator app (depending on the two-step verification method that you set up).
We strongly do not recommend installing the authenticator app on the same device from which the connection to Kaspersky Security Center Cloud Console is established. You can install an authenticator app on your mobile device.
Prohibition on saving the administrator password
If you use Kaspersky Security Center Cloud Console, we strongly do not recommend saving the administrator password in the browser installed on the user device.
If the browser is compromised, an intruder can gain access to the saved passwords. Also, if a user device with saved passwords is stolen or lost, an intruder can gain access to protected data.
Restricting the Main Administrator role membership
We recommend restricting the Main Administrator role membership.
By default, after a user creates a workspace, the Main Administrator role is assigned to this user. It is useful for management, but it is critical from a security point of view, because the Main Administrator role has an extensive range of privileges. The assignment of this role to users should be strictly regulated.
You can use the predefined user roles with a preconfigured set of rights to administer Kaspersky Security Center Cloud Console.
Configuring access rights to application features
We recommend using flexible configuration of access rights to the features of Kaspersky Security Center Cloud Console for each user or group of users.
Role-based access control allows the creation of standard user roles with a predefined set of rights and the assignment of those roles to users depending on their scope of duties.
The main advantages of the role-based access control model:
- Ease of administration
- Role hierarchy
- Least privilege approach
- Segregation of duties
You can assign built-in roles to certain employees based on their positions, or create completely new roles.
While configuring roles, pay attention to the privileges associated with changing the protection state of the Administration Server device and remote installation of third-party software:
- Managing administration groups.
- Operations with Administration Server.
- Remote installation.
- Changing the parameters for storing events and sending notifications.
This privilege allows you to set notifications that run a script or an executable module on the Administration Server device when an event occurs.
Separate account for remote installation of applications
In addition to the basic differentiation of access rights, we recommend restricting the remote installation of applications for all accounts (except for the Main Administrator or another specialized account).
We recommend using a separate account for remote installation of applications. You can assign a role or permissions to the separate account.
Page top
Managing protection of client devices
Automatic rules for moving devices between administration groups
We recommend restricting the use of automatic rules for moving devices between administration groups.
If you use automatic rules for moving devices, this may lead to propagation of policies that provide more privileges to the moved device than the device had before relocation.
Also, moving a client device to another administration group may lead to propagation of policy settings. These policy settings may be undesirable for distribution to guest and untrusted devices.
This recommendation does not apply for one-time initial allocation of devices to administration groups.
Security requirements for distribution points and connection gateways
Devices with Network Agent installed can act as a distribution point and perform the following functions:
- Distribute updates and installation packages received from Administration Server to client devices within the group.
- Perform remote installation of third-party software and Kaspersky applications on client devices.
- Poll the network to detect new devices and update information about existing ones.
- Act as a KSN proxy server for client devices.
Taking into account the available capabilities, we recommend protecting devices that act as distribution points from any type of unauthorized access (including physical).
Page top
Configuring protection for managed applications
Configuring network protection
Ensure that you have completed the Kaspersky Security Center Cloud Console initial configuration scenario. This scenario also includes performing the steps of the quick start wizard.
When the quick start wizard is running, policies and tasks with default parameters are created. These parameters may not be optimal or may even be prohibited in your organization. Therefore, we recommend configuring the created policies and tasks, and create additional policies and tasks if necessary for your organization network.
Specifying the password for disabling protection and uninstalling the application
To prevent intruders from disabling Kaspersky security applications, we strongly recommend enabling password protection for disabling protection and deinstallation of Kaspersky security applications. You can set the password, for example, for Kaspersky Endpoint Security for Windows, Kaspersky Security for Windows Servers, Network Agent, and other Kaspersky applications. After you enable password protection, we recommend locking these settings by closing the "lock."
Specifying the password for the klmover utility and removing Network Agent
We strongly recommend enabling password protection for running the klmover utility and removing Network Agent. To enable password protection, select the Use uninstallation password option in the Network Agent policy settings.
Enabling the Use uninstallation password option also enables password protection for the Cleaner tool (cleaner.exe).
The klmover utility is used only for moving managed devices under management of a virtual Administration Server. When Network Agent is installed on the managed device, the klmover utility is automatically copied to the Network Agent installation folder.
Using Kaspersky Security Network
In all policies of managed applications and in the properties of Kaspersky Security Center Cloud Console, we recommend enabling the use of Kaspersky Security Network (KSN) and accepting the KSN Statement. When you update or upgrade Kaspersky Security Center Cloud Console, you can accept the updated KSN Statement.
Discovering new devices
We recommend properly configuring device discovery settings: set up integration with Active Directory and specify IP address ranges for discovering new devices.
For security purposes, you can use the default administration group that includes all new devices and the default policies affecting this group.
Page top
Event transfer to third-party systems
Monitoring and reporting
For timely response to security issues, we recommend configuring the monitoring and reporting features.
Export of events to SIEM systems
For fast detection of security issues before significant damage occurs, we recommend using event export in a SIEM system.
Email notifications of audit events
For timely response to emergencies, we recommend configuring Kaspersky Security Center Cloud Console to send notifications about the audit events, critical events, failure events, and warnings that it publishes.
Since these events are intra-system events, a small number of them can be expected, which is quite applicable for mailing.
Page top
Security recommendations for third-party information systems
Security recommendations from CIS Benchmarks
When using versions of operating systems or virtualization platforms supported by Network Agent, we recommend applying the best information security practices from the Center for Internet Security (CIS), if any, to fine-tune these information systems.
Center for Internet Security (CIS) is a non-profit organization dedicated to improving security in the field of information technology. In particular, CIS develops and distributes safety standards such as CIS Controls and CIS Benchmarks. These standards are a set of recommendations and practices for ensuring the security of information systems.
The CIS portal contains recommendations for the versions of the following information systems supported by Network Agent:
- Operating systems of the following families:
- Windows for desktops
- Windows for servers
- Debian
- Ubuntu
- CentOS
- Oracle Linux
- Red Hat Enterprise Linux
- SUSE Linux Enterprise Server
- macOS
- VMware virtualization platforms
Security recommendations for the Astra Linux operating system
When using the Astra Linux operating system, you should follow the security recommendations described in the Red Book for the corresponding version of Astra Linux.
Page top
Recommendations for using Kaspersky security applications
Using the KLAdmin password in Kaspersky Endpoint Security for Windows
Multiple users with different levels of computer literacy can share a device with Kaspersky Endpoint Security for Windows installed. If users have unrestricted access to Kaspersky Endpoint Security for Windows and its settings, the overall level of device protection may be reduced. Password protection allows you to restrict users' access to Kaspersky Endpoint Security for Windows, according to the permissions granted to them (for example, permission to exit the application).
One of the ways to restrict access to Kaspersky Endpoint Security for Windows and its parameters is to use a KLAdmin account. The KLAdmin account is an administrator account with unrestricted access to Kaspersky Endpoint Security for Windows. The KLAdmin account has the right to perform any password-protected action in Kaspersky Endpoint Security for Windows. The permissions for the KLAdmin account cannot be revoked. You can set the password for the KLAdmin account in the properties of the Kaspersky Endpoint Security for Windows policy. The Kaspersky Endpoint Security for Windows administrator is fully responsible for the safe use of the password for the KLAdmin account. If your organization has its own password policy, follow the instructions of that policy.
Our recommendations for protecting the organization against theft of the KLAdmin password are as follows:
- General requirements
Do not use the account name or part of the name as the password.
- Minimum password length requirements
Create a password that is at least 10 characters in length.
- Requirements for using multiple character types
Set a complex password that contains characters from different categories: lowercase and uppercase letters, numbers, and special characters.
- Password expiration requirements
Set a minimum password expiration date of 90 days. A new password must not match any of the last 24 passwords.
Cyberthreat detection and response
To effectively protect an organization's IT infrastructure from complex cyberthreats, as well as to enable automatic detection and analysis of security incidents, we recommend using detection and response features of the following Kaspersky solutions that can be integrated into the Kaspersky Security Center Cloud Console interface:
- Kaspersky Endpoint Detection and Response Optimum
- Kaspersky Managed Detection and Response
- Kaspersky Endpoint Detection and Response Expert
Interface of Kaspersky Security Center Cloud Console
Kaspersky Security Center Cloud Console is managed through the web interface.
The application window contains the following items:
- Main menu in the left part of the window
- Work area in the right part of the window
Main menu
The main menu contains the following sections:
- Quick links. Contains the following tabs:
- Home page settings. Displays the main menu map. By default, the Home page settings tab of the Quick links section is set as a home page. You can change these settings.
- Introduction & tutorials. Contains videos on how to configure and use Kaspersky Security Center Cloud Console and security applications.
In Mozilla Firefox browser, if you play a video in the Introduction & tutorials section in the pop-up window, then open the video in the picture in picture mode, and then close the video in the pop-up window, the video in the picture in picture mode is closed as well.
- Administration Server. Displays the name of the Administration Server that you are currently connected to. Click the settings icon () to open the Administration Server properties.
- Monitoring & reporting. Provides an overview of your infrastructure, protection statuses, and statistics.
- Assets (Devices). Contains tools to manage client devices, as well as tasks and Kaspersky application policies.
- Users & roles. Allows you to manage users and roles, configure user rights by assigning roles to the users, and associate policy profiles with roles.
- Operations. Contains a variety of operations, including application licensing, patch management, and third-party application management. This also provides you access to application repositories.
- Discovery & deployment. Allows you to poll the network to discover client devices, and distribute the devices to administration groups manually or automatically. This also contains the quick start wizard and Protection deployment wizard.
- Marketplace. Contains information about the entire range of Kaspersky business solutions and allows you to select the ones you need, and then proceed to purchase those solutions at the Kaspersky website.
- Settings. Contains settings to integrate Kaspersky Security Center Cloud Console with other Kaspersky applications. It also contains your personal settings related to the interface appearance, such as interface language or theme.
- Your account menu. Contains a link to Online Help and information about Kaspersky Technical Support. It also allows you to sign out of Kaspersky Security Center Cloud Console.
Work area
The work area displays the information you choose to view in the sections of the application web interface window. It also contains control elements that you can use to configure how the information is displayed.
Page top
Changing the language of the Kaspersky Security Center Cloud Console interface
You can select the language of the Kaspersky Security Center Cloud Console interface.
To change the interface language:
- In the main menu, go to Settings → Language.
- Select one of the supported localization languages.
Changing the Kaspersky Security Center Cloud Console home page
The home page is displayed after you sign in to Kaspersky Security Center Cloud Console.
By default, the Home page settings tab of the Quick links section is set as the home page. If necessary, you can change the home page.
To change the home page:
- In the Quick links section, hover the mouse cursor over the item that you want to set as the home page.
- After the home (
 ) icon is displayed, click the icon.
The home page is changed, an appropriate message is displayed on the screen, and the item selected as a home page is marked with the home ( ) icon.
The Marketplace and Settings sections cannot be set as a home page.
Page top
Adding and removing bookmarks
You can add frequently used sections of Kaspersky Security Center Cloud Console to bookmarks to access them quickly from the Bookmarks section in the main menu.
If you did not add any section to bookmarks, the Bookmarks section is not displayed in the main menu.
You can add to bookmarks only the sections that display pages. For example, if you go to Assets (Devices) → Managed devices, a page with the table of devices opens, which means you can add the Managed devices section to bookmarks. If a window or no element is displayed after you select the section in the main menu, then you cannot add such a section to bookmarks.
To add a section to bookmarks:
- In the main menu, hover the mouse cursor over the section you want to add to bookmarks.
- After the bookmark (
 ) icon is displayed, click the icon.
The section is displayed in the Bookmarks section.
To remove a section from bookmarks:
- In the main menu, go to the Bookmarks section.
- Hover the mouse cursor over the section you want to remove, and then click the bookmark (
 ) icon.
The section is removed from bookmarks.
You can also add and remove elements from bookmarks in the Quick links section by hovering the mouse cursor over them and clicking the bookmark (![]() ) icon. The selected item will be marked with the bookmark (
) icon. The selected item will be marked with the bookmark (![]() ) icon and displayed in the Bookmarks section in the main menu. If you want to remove the item from the bookmarks, click the bookmark (
) icon and displayed in the Bookmarks section in the main menu. If you want to remove the item from the bookmarks, click the bookmark (![]() ) icon.
) icon.
The Bookmarks section is displayed only in the main menu. It is never displayed on the Quick links page.
Page top
Initial configuration of Kaspersky Security Center Cloud Console
This section outlines the main scenario for Kaspersky Security Center Cloud Console deployment starting with a workspace creation and finishing with the monitoring of the network protection status.
For information about deployment of Kaspersky Security Center running on-premises, refer to Kaspersky Security Center Online Help.
We recommend that you assign a minimum of one working day for completion of this scenario.
The scenario guides you through the following:
- Starting work with a of your company as an administrator
- Discovering devices on your network (if necessary, you will assign distribution points and manually install distribution packages on them)
- Deploying managed Kaspersky applications on the client devices; configuring tools for network protection, monitoring, and regular updates of Kaspersky databases, software modules, and applications
When you complete this scenario, the network protection based on Kaspersky applications will be configured. You will be able to proceed to monitoring of the network protection status.
Prerequisites
Before you start:
- View the architecture of Kaspersky Security Center Cloud Console to understand interaction between the main application components.
- Read information about the licensing of Kaspersky Security Center Cloud Console and managed applications.
- Make sure that you have a valid activation code for Kaspersky Security Center Cloud Console (if you are creating a commercial workspace).
Stages
Kaspersky Security Center Cloud Console configuration proceeds in stages:
- Configuring ports
Make sure that all necessary ports are open for interaction between your network and the Kaspersky infrastructure. Also, if you plan to use the hierarchy of Administration Servers, make sure that all necessary ports are open for interaction involving the secondary Administration Server (or secondary Administration Servers) and client devices.
- Creating the workspace for your company
Create an account, and then create a workspace for your company.
- Running quick start wizard
Open and sign in to Kaspersky Security Center Cloud Console. When you sign in for the first time, you are automatically prompted to run the quick start wizard. You can also start the quick start wizard manually at any time.
When the quick start wizard is complete, you will have installation packages of Network Agent and security applications. These installation packages are required for further deployment of Kaspersky Security Center Cloud Console.
- Deployment of Kaspersky applications
Install the nmap utility on your Linux-based assets. This utility is required to enable Network Location Awareness functionality.
Perform the scenario of initial deployment of Kaspersky applications. One of the scenario steps refers to the network polling operation. This operation is required to discover client devices of your network. Network polling and its settings are described in the scenario of discovering networked devices.
If you are deploying Kaspersky Security for Windows Server, make sure that the databases for this application are up to date.
- Licensing Kaspersky security applications
When Kaspersky security applications are deployed to the managed devices, the applications must be licensed by applying an activation code to each of the applications. Deploy your activation codes to the Kaspersky applications installed on the managed devices. You have several options to license Kaspersky security applications.
- Configuring network protection
Perform the network protection configuration to fine-tune the policies and tasks created through the quick start wizard.
- Regular updating of Kaspersky databases, software modules, and applications
To keep your network protected against viruses and other threats, you have to configure regular updates of Kaspersky databases, software modules, and applications.
- Updating third-party software and fixing third-party software vulnerabilities (optional)
Kaspersky Security Center Cloud Console enables you to manage updates of Microsoft applications installed on client devices. You can also fix vulnerabilities in Microsoft applications through installation of required updates.
- Configuring tools for monitoring the network protection status
Select and configure widgets, reports and other tools that allow you to monitor the network protection status.
When Kaspersky Security Center Cloud Console is deployed and configured, you can proceed to monitoring the network protection status.
Workspace management
This section describes how you can use accounts and workspaces in Kaspersky Security Center Cloud Console.
About workspace management in Kaspersky Security Center Cloud Console
Using Kaspersky Security Center Cloud Console, you can do the following:
- Create an account.
- Edit an account.
- Register a company and create a workspace.
- Edit information about the company and workspaces.
- Delete a workspace and a company.
- Delete an account.
Getting started with Kaspersky Security Center Cloud Console
This section describes how to sign up for and start using Kaspersky Security Center Cloud Console.
Signing up for Kaspersky Security Center Cloud Console consists of the following steps:
Page top
Creating an account
This article describes how to create an
.If you earlier registered on My Kaspersky, you can use the same login and password to sign in to Kaspersky Security Center Cloud Console. In this case, creating an account in Kaspersky Security Center Cloud Console is not needed, you can proceed to creating your workspace.
Your My Kaspersky account must be created directly on the website and not by using an external authentication provider (like Google). Otherwise, you will not be able to use Kaspersky Security Center Cloud Console.
To create an account in Kaspersky Security Center Cloud Console:
- In your browser, go to Kaspersky Security Center Cloud Console.
- Click the Create an account button on the start page of Kaspersky Security Center Cloud Console.
The Kaspersky Account portal opens.
- On the Sign up to enter Kaspersky Security Center Cloud Console page, enter the email address and password for your account (see the figure below).
Creating an account in Kaspersky Security Center Cloud Console
- Click the Privacy Policy link and carefully read the Privacy Policy text.
- If you are aware and agree that your data will be handled and transmitted (including to third countries) as described in the Privacy Policy and you confirm that you have fully read and understand the Privacy Policy, select the check box next to the text of consent to data processing in accordance with the Privacy Policy, and then click the Create button.
If you do not accept the Privacy Policy, do not use Kaspersky Security Center Cloud Console.
- A message from Kaspersky is sent to the email address that you specified. The message contains a one-time security code.
Open the email message, and then copy the one-time security code that it contains.
- Return to Kaspersky Account, and then paste the code to the entry field.
Creation of the account in Kaspersky Security Center Cloud Console is complete.
Registering a company and creating a workspace
Immediately after the account is created, you can register a company and create a workspace for it.
If you want to protect more than 10,000 devices, you do not have to register a company and create a workspace on Kaspersky Security Center Cloud Console as described below. Instead, send a request to Kaspersky Technical Support. In the request, specify information about your company and the workspace that you want to create.
Before you start, make sure that you know the following:
- The name of the company in which you intend to use the software solution.
- The country in which the company is located. If the company is located in Canada, you must also know the province.
- The total number of company computers and mobile devices that you want to protect.
To register a company and create a workspace in Kaspersky Security Center Cloud Console:
- In your browser, go to Kaspersky Security Center Cloud Console.
- Click the Sign in button on the start page of Kaspersky Security Center Cloud Console.
- Enter the email address and password that you specified when you created the account, and then click the Sign in button.
The Create a workspace wizard starts. Proceed through the wizard by using the Next button.
- On the Step 01: Terms of Use of Kaspersky Security Center Cloud Console page of the wizard, do the following:
- Carefully read the Agreement, the Privacy Policy, and the Data Processing Agreement for the software solution.
- If you agree to the terms and conditions of the Agreement and the Data Processing Agreement and if you are aware and agree that your data will be handled and transmitted (including to third countries) as described in the Privacy Policy, and you confirm that you have fully read and understand the Privacy Policy, select the check boxes next to the three listed documents and click the Accept button.
If you do not agree to the terms and conditions, do not use Kaspersky Security Center Cloud Console.
If you click the Decline button, the workspace creation process will be terminated.
- On the Step 02: Company information page of the wizard, specify the main details of your company.
Fill in the following fields:
- Name of your company (required)
Specify the name of the company in which you intend to use the software solution. You can enter a string up to 255 characters long. The string can contain upper- and lowercase characters, numerals, whitespaces, dots, commas, minuses, dashes, and underscores. The specified company name will be displayed in Kaspersky Security Center Cloud Console.
- Additional company description field (optional)
You may specify additional information about the company that you register. You can enter a string up to 255 characters long. The string can contain upper- and lowercase characters, numerals, whitespaces, dots, commas, minuses, dashes, and underscores.
- Name of your company (required)
- On the Step 03: Workspace information page of the wizard, specify the information about the workspace that you want to create for your company.
Fill in the following required fields:
- Workspace name. Specify the name of the workspace in which you intend to use the software solution. You can enter a string up to 255 characters long. The string can contain upper- and lowercase characters, numerals, whitespaces, dots, commas, minuses, dashes, and underscores. The specified workspace name will be displayed in Kaspersky Security Center Cloud Console.
- Country. In the drop-down list, select the country in which your workspace is located. If you select Canada, also specify the province in the State drop-down list that appears below this field.
- Number of devices. Enter the total number of computers and mobile devices that you want to protect in this workspace.
In the entry field, you can enter a number from 20 to 10,000. The exact minimum number of devices that you can protect depends on the license that you purchased.
- On the Step 04: License for new workspace page of the wizard, do either of the following:
- If you want to try Kaspersky Security Center Cloud Console, click the I want to request a trial workspace link.
We recommend that you connect your own devices to your trial workspace and test any modifications to the settings, noting the results.
You will not be able to switch a trial workspace to commercial mode by entering an activation code. To switch to commercial mode, you must delete the workspace and create it again.
- If you want to use Kaspersky Security Center Cloud Console in the commercial mode, enter the activation code and click the Verify button.
- If you want to try Kaspersky Security Center Cloud Console, click the I want to request a trial workspace link.
Registration of a company and creation of a workspace in Kaspersky Security Center Cloud Console is complete.
After the workspace is prepared, you receive an email message with the link to access the workspace.
Page top
Protecting more than 10,000 devices
If you want to protect more than 10,000 devices, you do not have to register a company and create a workspace. Instead, send a request to Kaspersky Technical Support. The maximum devices per one workspace is 25,000.
The request must contain the following information:
- User Email—The email address of the user registered on Kaspersky Security Center Cloud Console. This user is granted administrator rights on the created workspace.
After you create an account on Kaspersky Security Center Cloud Console, you do not have to register a company and create a workspace for it. Specify information about the company and the workspace in the request.
- Company Name—The name of the company in which you want to use Kaspersky Security Center Cloud Console.
- Company Country—The country in which the company is located.
- Workspace Name—The name of the workspace to be created for the company.
- Estimated Endpoints Count—The total number of client devices (including mobile devices) that you want to protect in the new workspace.
- Workspace Country—The country in which you want to locate your new workspace. This parameter affects the selection of the data center to store the workspace.
The Company Country and Workspace Country parameters may be the same.
- Activation Code—The activation code that you receive after you have purchased Kaspersky Security Center Cloud Console. Make sure that the license you want to buy covers all client devices that must be protected.
After you send the request, Kaspersky specialists register the specified company and create a workspace for it. When the workspace creation is completed, you will receive an email notification. You can log in to your account on Kaspersky Security Center Cloud Console to view the result.
Page top
Opening your Kaspersky Security Center Cloud Console workspace
Right after you create a workspace for Kaspersky Security Center Cloud Console, the workspace opens automatically. Later, you can open your workspace, as described in this section.
If you are an administrator of a virtual Administration Server, you have access only to the virtual Administration Server. After you sign in and open the workspace, Kaspersky Security Center Cloud Console provides you the interface of the virtual Administration Server. You cannot switch to the primary Administration Server or other secondary Administration Servers.
An administrator of a virtual Administration Server must have access to a single virtual Administration Server. If you do not have access rights on the primary Server and have access rights on multiple virtual Servers, you cannot sign in to Kaspersky Security Center Cloud Console.
To open your Kaspersky Security Center Cloud Console workspace:
- In your browser, go to Kaspersky Security Center Cloud Console.
- Sign in to your account on Kaspersky Security Center Cloud Console by specifying the user name and the password.
- If you set up two-step verification, enter the one-time security code that is either sent to you by SMS or generated in your authenticator app (depending on the two-step verification method that you set up).
The portal page displays the company for which you are an administrator and the list of its workspaces.
- Click the name of the required workspace or the Go to workspace link to proceed to the workspace.
Occasionally, a workspace may be unavailable due to maintenance. If this is the case, you will not be able to proceed to your Kaspersky Security Center Cloud Console workspace.
You cannot open a workspace that is marked for deletion.
- If any of the Kaspersky Security Center Cloud Console legal documents have been changed since you accepted their terms and conditions, the portal page displays the changed documents.
Do the following:
- Carefully read the displayed documents.
- If you agree to the terms and conditions of the displayed documents, select the check boxes next to the listed documents, and then click the I accept the terms button.
If you do not agree to the terms and conditions, stop using the selected Kaspersky software solution.
If you click the I decline button, the operation will be terminated.
Your Kaspersky Security Center Cloud Console workspace opens.
Page top
Returning to the list of workspaces
After you open your workspace, you can go back to the portal page that has the list of workspaces registered under your account in Kaspersky Security Center Cloud Console.
To return to the list of workspaces,
In the main menu, go to your account settings, and then select Manage workspaces.
The portal page displays the company for which you are an administrator and the list of its workspaces. If you have Kaspersky Security Center Cloud Console open on several tabs, you are signed out on all tabs.
Page top
Signing out of Kaspersky Security Center Cloud Console
When you have finished your work, you should securely close your current session by signing out of Kaspersky Security Center Cloud Console.
To sign out of Kaspersky Security Center Cloud Console,
In the main menu, go to your account settings, and then select Sign out.
Kaspersky Security Center Cloud Console is closed, and the account page is displayed. You can close this browser page, if necessary. All data from your workspace will be saved.
Managing the company and the list of workspaces
This section describes how to view the company information and the list of workspaces registered under your account in Kaspersky Security Center Cloud Console, change information about the company and workspaces, and delete a workspace and a company.
At present, you can register only one company and create one workspace. In future releases of Kaspersky Security Center Cloud Console, you will be able to create additional workspaces for your company. This will help you map your company structure to workspaces, by creating a separate workspace for each company branch.
Editing information about a company and a workspace
You can modify the information about a company and a workspace that you specified when you added the company to Kaspersky Security Center Cloud Console.
To modify information about a company and/or a workspace:
- In your browser, go to Kaspersky Security Center Cloud Console.
- Sign in to your account on Kaspersky Security Center Cloud Console by specifying the user name and the password.
- If you set up two-step verification, enter the one-time security code that is either sent to you by SMS or generated in your authenticator app (depending on the two-step verification method that you set up).
The portal page displays the company for which you are an administrator and a list of its workspaces.
- If you want to edit the company name and description, do the following:
- Click the Edit (
 ) icon in the area with the company information.
 - Modify the company name and/or description as you want.
- Click the Save button.
To cancel the changes, click the Cancel button.
- Click the Edit (
- If you want to edit the workspace name, do the following:
- Click the Edit () icon in the area with the workspace information.
- Modify the workspace name as you want.
- Click the Save button.
To cancel the changes, click the Cancel button.
- Click the Edit (
The modified information is displayed in Kaspersky Security Center Cloud Console.
Page top
Deleting a workspace and a company
A workspace of a company can be deleted either manually or automatically. After the last workspace is deleted, the company information is also deleted automatically.
Manual deletion
You can delete a workspace of a company if that company has decided to stop using the workspace.
After the workspace is deleted, all security applications will remain on the managed devices. Therefore, we recommend that before deleting the workspace you either disable password protection of all security applications or uninstall security applications from the managed devices.
To delete a workspace and a company:
- In your browser, go to Kaspersky Security Center Cloud Console.
- Sign in to your account on Kaspersky Security Center Cloud Console by specifying the user name and the password.
- If you set up two-step verification, enter the one-time security code that is either sent to you by SMS or generated in your authenticator app (depending on the two-step verification method that you set up).
The portal page displays the company for which you are an administrator and a list of its workspaces.
- Select the workspace that you want to delete.
- On the right, in the section containing the selected workspace, click the Delete (
 ) icon.
The Delete workspace window opens.
- In the Delete workspace window, confirm that you want to delete the workspace.
The workspace is marked for deletion. The information block for the workspace is highlighted with a red border.
The information block for the workspace is duplicated at the bottom of the page, in the Marked for deletion section.
You cannot go to a workspace that is marked for deletion and manage it.
If you have not been able to mark a workspace for deletion, contact Kaspersky Technical Support. After a Technical Support engineer at Kaspersky receives your request, the workspace and the company will be deleted.
Workspaces that are marked for deletion may remain in that status for a period of seven days after being marked. After seven days, they are automatically deleted.
During that period, you can forcibly delete a workspace that is marked for deletion or cancel deletion of a workspace.
To forcibly delete a workspace:
- In your browser, go to Kaspersky Security Center Cloud Console.
- Sign in to your account on Kaspersky Security Center Cloud Console by specifying the user name and the password.
- If you set up two-step verification, enter the one-time security code that is either sent to you by SMS or generated in your authenticator app (depending on the two-step verification method that you set up).
The portal page displays the company for which you are an administrator and a list of its workspaces.
- In the Marked for deletion section, in the information block for the workspace marked for deletion, click the Force deletion option.
The Delete workspace window opens.
- In the Delete workspace window, enter the ID of the workspace that you want to delete.
You are prompted to confirm the ID of the workspace to make sure that you are not mistakenly deleting the workspace. After a workspace is deleted, it cannot be restored.
The workspace ID is displayed in the workspace information section under its name.
- In the Delete workspace window, click OK.
The workspace is deleted. All data about users,
, and their settings, is deleted.Automatic deletion
Kaspersky Security Center Cloud Console automatically deletes a workspace:
- 30 days after the trial license expires.
- 90 days after all commercial or subscription licenses in the Administration Server repository expire.
- 90 days after you delete the last license key (active, reserve, or not in use) added manually in the repository.
Kaspersky Security Center Cloud Console notifies administrators of the workspace 30 days, 7 days, and 1 day prior to deletion.
Page top
Canceling deletion of a workspace
You can cancel the deletion of a workspace that has been marked for deletion.
You cannot cancel the deletion of a workspace that already has been deleted.
To cancel the deletion of a workspace:
- In your browser, go to Kaspersky Security Center Cloud Console.
- Sign in to your account on Kaspersky Security Center Cloud Console by specifying the user name and the password.
- If you set up two-step verification, enter the one-time security code that is either sent to you by SMS or generated in your authenticator app (depending on the two-step verification method that you set up).
The portal page displays the company for which you are an administrator and a list of its workspaces.
- In the Marked for deletion section, in the information block for the workspace marked for deletion, click the Cancel deletion link.
Workspace deletion is canceled. You can now go to the workspace and continue working with it.
Page top
Managing access to the company and its workspaces
This section contains information about granting and revoking access to your company and its workspaces.
Kaspersky Security Center Cloud Console provides you with two access levels:
- Administrator
A user with this access level can fully manage the company and its workspaces.
- User
A user with this access level can view the list of available workspaces and enter these workspaces.
Granting access to your company and its workspaces
You can grant access to your company and its workspaces if you want another user to be able to log in to your company and manage it according to the selected access level.
Before you can grant access to a user, the user must create an account in Kaspersky Security Center Cloud Console.
To grant access to your company and its workspaces:
- In your browser, go to Kaspersky Security Center Cloud Console.
- Sign in to your account on Kaspersky Security Center Cloud Console by specifying the user name and the password.
- If you set up two-step verification, enter the one-time security code that is either sent to you by SMS or generated in your authenticator app (depending on the two-step verification method that you set up).
The portal page displays the company for which you are an administrator and a list of its workspaces.
- Click the Show access control link.
The list of accounts with access to the company expands.
- Click the Grant access link.
- In the Email address field, specify the email address of the account to which you want to grant access.
- In the Access level list, select the access level that you want to assign to the entered account:
- Administrator
A user with this access level can fully manage the company and its workspaces.
- User
A user with this access level can view the list of available workspaces and enter these workspaces.
You cannot grant several access levels to the same account within the same company.
- Administrator
- Click the Grant button.
The specified account is granted access to your company and its workspaces. The user can log in to the company and manage it according to the selected access level.
If you have granted the User access level to the account, you must assign a role to the added user. Otherwise, the user will not be able to enter the workspace.
Page top
Revoking access to your company and its workspaces
You can revoke access to your company and its workspaces if you no longer want a user to be able to log in to your company and manage it (for example, after the user quits the company).
You cannot revoke your own access to the company.
To revoke access to your company and its workspaces:
- In your browser, go to Kaspersky Security Center Cloud Console.
- Sign in to your account on Kaspersky Security Center Cloud Console by specifying the user name and the password.
- If you set up two-step verification, enter the one-time security code that is either sent to you by SMS or generated in your authenticator app (depending on the two-step verification method that you set up).
The portal page displays the company for which you are an administrator and a list of its workspaces.
- Click the Show access control link.
The list of accounts with access to the company expands.
- Click the Revoke () icon next to the account whose access you want to revoke.
- In the Revoke access to company window that opens, click OK to confirm the operation.
The access of the selected account to your company and its workspaces is revoked. The user cannot log in to the company and manage it any more.
Page top
Resetting your password
If you forget your password for your Kaspersky Security Center Cloud Console account, you can restore access to your account by resetting your password.
To reset the account password:
- In your browser, go to Kaspersky Security Center Cloud Console.
- Click the Sign in button.
- In the Sign in to Kaspersky Security Center Cloud Console window of the Kaspersky Account portal that appears, click the Forgot your password? link.
- Enter the email address that you specified when creating your account.
- Click Next.
- A message from Kaspersky is sent to the email address that you specified. The message contains a one-time security code.
Open the email message, and then copy the one-time security code that it contains.
- Return to Kaspersky Account, and then paste the code to the entry field.
- If you configured a secret question, answer this question.
If you set up two-step verification, enter the one-time security code that is either sent to you by SMS or generated in your authenticator app (depending on the two-step verification method that you set up).
- In the window that opens, type a new password.
- Click Save.
The new password for signing in to Kaspersky Security Center Cloud Console is saved.
If you did not receive an email message, check the email address that you entered, your spam folder, and then try again. If you do not receive a message when you try again, the email address you specified is probably not registered on the website. Please contact Kaspersky Technical Support.
Page top
Editing the settings of an account in Kaspersky Security Center Cloud Console
This section provides instructions on how to edit and delete an account in Kaspersky Security Center Cloud Console.
Changing an email address
To change your email address in the settings of your account in Kaspersky Security Center Cloud Console:
- In Kaspersky Security Center Cloud Console, click the link containing your account name, and then select Manage user account.
The My Profile window of the Kaspersky Account portal opens.
- Click the Change your email address link (see the figure below).
Changing the email address in the settings of an account in Kaspersky Security Center Cloud Console
- In the New email address entry field, enter your new email.
Please enter the address carefully. If you enter an invalid address, you will not be able to proceed to your account and use Kaspersky Security Center Cloud Console.
- Click the Next button.
- In the Enter your current password window that opens, specify the password of your account in Kaspersky Security Center Cloud Console, and then click the Next button.
- A message from Kaspersky is sent to the email address that you specified. The message contains a one-time security code.
Open the email message, and then copy the one-time security code that it contains.
- Return to Kaspersky Account, and then paste the code to the entry field.
- Go back to Kaspersky Security Center Cloud Console by clicking the Go back to Kaspersky Security Center Cloud Console link or exit the portal by clicking the Account → Sign out link.
Your email address is now changed in the Kaspersky Security Center Cloud Console account settings and in the My Kaspersky account settings. A message is sent to your new email address to notify you that your email address for gaining access to the account has been changed. The next time you sign in to Kaspersky Security Center Cloud Console, you will have to specify your new email address.
Page top
Changing a password
To change your password in the settings of your account in Kaspersky Security Center Cloud Console:
- In Kaspersky Security Center Cloud Console, click the link containing your account name, and then select Manage user account.
The My Profile window of the Kaspersky Account portal opens.
- Click the Change password link (see the figure below).
Changing the account password in Kaspersky Security Center Cloud Console
- In the Password entry field, enter your new password.
Under the entry field, the requirements for the password are shown. You cannot save the new password until you comply with the requirements.
- Click the Save button.
- In the Enter your current password window that opens, specify the password of your account in Kaspersky Security Center Cloud Console, and then click the Next button.
- Select or clear the Automatically request password change every 180 days check box.
By default, this check box is selected.
- Go back to Kaspersky Security Center Cloud Console by clicking the Go back to Kaspersky Security Center Cloud Console link or exit the portal by clicking the Account → Sign out link.
Your password is now changed. You will have to enter the new password when signing in to Kaspersky Security Center Cloud Console and when signing in to My Kaspersky.
Page top
Using two-step verification
This section describes two-step verification, which can help you increase the security of your account in Kaspersky Security Center Cloud Console.
About two-step verification
Two-step verification can help you increase the security of your account in Kaspersky Security Center Cloud Console. When this feature is enabled, every time you sign in to Kaspersky Security Center Cloud Console with your email address and password, you enter an additional one-time security code. With two-step verification, criminals cannot sign in to your account if they steal or guess your password, they must have access to your mobile phone as well. Also, when two-step verification is enabled, you must enter an additional one-time security code if you forget your password.
After you set up two-step verification, you are responsible for keeping your mobile phone physically secure and for maintaining access to your phone number.
You can get a one-time security code in either of the following ways:
- A security code is sent by SMS to your mobile phone number.
In this case, if you lose access to your mobile phone, you are not able to sign in to your account in Kaspersky Security Center Cloud Console until you restore access to your phone number.
- A security code is generated in an authenticator app that is installed on your mobile phone.
We strongly recommend that you set up two-step verification by using an authenticator app. In this case, you can sign in to your account even if your mobile phone is not connected to the internet or a mobile network.
We have tested only Google Authenticator and Microsoft Authenticator for compatibility with Kaspersky Security Center Cloud Console, and these applications were free to use at that time. The interfaces of these applications may be unavailable in your preferred language. Please also check the GDPR compliance and privacy policies of the applications before using them. Kaspersky is in no way sponsored, endorsed by, or otherwise affiliated with any of the owners of these applications.
Microsoft Authenticator can be installed on mobile devices only.
We also recommend that you install an authenticator app on a device other than your mobile phone. This will allow you to sign in to your account if your mobile phone is ever lost or stolen.
In this case, if you lose access to your mobile phone and you do not have an authenticator app on another device, you are not able to sign in to your account in Kaspersky Security Center Cloud Console until you restore access to your phone number. After that, use the security code that is sent by SMS.
If you previously configured a secret question to restore your password if it is lost, the security question feature will be permanently disabled after you set up two-step verification.
Page top
Scenario: Setting up two-step verification
Two-step verification can help you increase the security of your account in Kaspersky Security Center Cloud Console. After you complete the scenario in this section, two-step verification of your account will be set up.
The scenario proceeds in stages:
- Adding your phone number
At this stage, you set up two-step verification by SMS.
- Installing and configuring an authenticator app
Install and configure an authenticator app.
We strongly recommend that you set up two-step verification by using an authenticator app. In this case, you can sign in to your account even if your mobile phone is not connected to the internet or a mobile network.
We also recommend that you install an authenticator app on a device other than your mobile phone. This will allow you to sign in to your account if your mobile phone is ever lost or stolen.
- Changing your phone number
If necessary, you can change the phone number that you use for two-step verification.
Setting up two-step verification by SMS
To set up two-step verification by SMS:
- In Kaspersky Security Center Cloud Console, click the link containing your account name, and then select Manage user account.
The My Profile window of the Kaspersky Account portal opens.
- If two-step verification is disabled, enable the Two-step verification is disabled toggle switch.
- In the No phone number provided window that appears, click the Confirm button.
- Under Enter your phone number, specify the mobile phone number that you want to use in two-step verification, and then click the Provide phone number button.
You can use the same phone number for up to five accounts.
A 6-digit security code is sent to the specified phone number.
- Under Enter the verification code that was sent to <phone number>, enter the received security code.
- In the Enter your current password window that opens, specify the password of your account in Kaspersky Security Center Cloud Console, and then click the Next button.
Two-step verification is set up. Now, every time you sign in with your email address and password, or if you forget your password, you will need to enter a one-time security code that you get by SMS to the specified phone number.
You can now install and configure an authenticator app, change your phone number, or disable two-step verification.
Page top
Setting up two-step verification by using an authenticator app
Authenticator apps cannot be used in Kaspersky Security Center Cloud Console as a standalone verification method. You must first set up two-step verification by SMS. If you disable two-step verification via your mobile phone number, verification via an authenticator app is turned off automatically. After you have set up both verification via SMS and via an app, you will be able to select a verification method on the sign-in page or if you forget your password.
To set up two-step verification by an authenticator app:
- Set up two-step verification by SMS.
- Download, install, and run the authenticator app that you want to use.
We have tested only Google Authenticator and Microsoft Authenticator for compatibility with Kaspersky Security Center Cloud Console, and these applications were free to use at that time. The interfaces of these applications may be unavailable in your preferred language. Please also check the GDPR compliance and privacy policies of the applications before using them. Kaspersky is in no way sponsored, endorsed by, or otherwise affiliated with any of the owners of these applications.
Microsoft Authenticator can be installed on mobile devices only.
If you want, you can use other apps at your own risk. The app that you use must support 6-digit security codes.
We also recommend that you install an authenticator app on a device other than your mobile phone. This will allow you to sign in to your account if your mobile phone is ever lost or stolen.
- In Kaspersky Security Center Cloud Console, click the link containing your account name, and then select Manage user account.
The My Profile window of the Kaspersky Account portal opens.
- If two-step verification is disabled, enable the Two-step verification is disabled toggle switch.
- Enable the Authenticator app is disabled toggle switch.
The portal page displays a QR code.
If you want to set up the authenticator app on a device that cannot scan QR codes, click the I can't scan it link. A 16-character secret key is displayed.
- In the authenticator app on each device, scan the QR code to create an account. Please refer to your app's documentation for more information.
If you want to set up the authenticator app on a device that cannot scan QR codes, create an account in the authenticator app, and then enter the displayed secret key.
A 6-digit security code is generated in your authenticator apps.
- Verify that the security codes generated in your apps are the same on each device.
- Return to the Kaspersky Account portal, and then click the Next button.
- Enter the generated security code.
- In the Enter your current password window that opens, specify the password of your account in Kaspersky Security Center Cloud Console, and then click the Next button.
Two-step verification by an authenticator app is set up. Now, every time you sign in with your email address and password, or if you forget your password, you will need to enter a one-time security code that is generated in your authenticator app.
You can now disable the use of an authenticator app or completely disable two-step verification.
Page top
Changing your mobile phone number
To change the mobile phone number that is used in two-step verification by SMS:
- In Kaspersky Security Center Cloud Console, click the link containing your account name, and then select Manage user account.
The My Profile window of the Kaspersky Account portal opens.
- If two-step verification is disabled, enable the Two-step verification is disabled toggle switch.
- Under Phone number, click the Change phone number link.
- Under Enter your phone number, specify the new mobile phone number that you want to use in two-step verification, and then click the Provide phone number button.
A 6-digit security code is sent to the specified phone number.
- Under Enter the verification code that was sent to <phone number>, enter the received security code.
Your mobile phone number is changed. Now, one-time security codes will be sent to the new phone number.
Page top
Disabling two-step verification
If you no longer want to use two-step verification, you can disable it, as described in this section.
Disabling two-step verification will decrease the security of your account. We strongly recommend that you continue using two-step verification.
If you set up two-step verification by SMS, you can disable two-step verification. If you set up two-step verification by an authenticator app, you can disable the use of the app or completely disable two-step verification.
To disable the use of an authenticator app:
- In Kaspersky Security Center Cloud Console, click the link containing your account name, and then select Manage user account.
The My Profile window of the Kaspersky Account portal opens.
- Disable the Authenticator app is enabled toggle switch.
- In the confirmation window that opens, click the Confirm button.
- In the Enter your current password window that opens, specify the password of your account in Kaspersky Security Center Cloud Console, and then click the Next button.
The use of an authenticator app is disabled. The settings of two-step verification by an authenticator app are deleted. You can now delete accounts in your authenticator apps.
Later, you can set up two-step verification by an authenticator app again.
To completely disable two-step verification:
- In Kaspersky Security Center Cloud Console, click the link containing your account name, and then select Manage user account.
The My Profile window of the Kaspersky Account portal opens.
- Disable the Two-step verification is enabled toggle switch.
- In the confirmation window that opens, click the Confirm button.
- In the Enter your current password window that opens, specify the password of your account in Kaspersky Security Center Cloud Console, and then click the Next button.
Two-step verification is disabled. If you used two-step verification by an authenticator app, the settings of two-step verification are deleted. You can now delete accounts in your authenticator apps.
Later, you can set up two-step verification again.
Page top
Deleting an account in Kaspersky Security Center Cloud Console
If you want to stop using Kaspersky Security Center Cloud Console, you can delete your account.
When deleting an account, all data associated with that account is lost.
After you delete your account, you can no longer gain access to your workspaces in Kaspersky Endpoint Security Cloud, Kaspersky Security for Microsoft Office 365, and Kaspersky Security Center Cloud Console. If you were the only administrator in a workspace, the workspace will be duly deleted. Additionally, you lose access to your My Kaspersky account.
To delete an account in Kaspersky Security Center Cloud Console:
- In Kaspersky Security Center Cloud Console, click the link containing your account name, and then select Manage user account.
The My Profile window of the Kaspersky Account portal opens.
- Click the Account → Delete link.
- In the Delete your account window that opens, read the information about the consequences of account deletion, and then click the Delete button to confirm the account deletion.
- In the Enter your current password window that opens, specify the password of your account in Kaspersky Security Center Cloud Console, and then click the Next button.
Your account is deleted.
Page top
Selecting the data centers used to store Kaspersky Security Center Cloud Console information
A workspace for Kaspersky Security Center Cloud Console is created by using servers from a network of global data centers based on a cloud platform. The selection of data centers to host a workspace depends on the country that you specified when you registered the workspace in Kaspersky Security Center Cloud Console (see the table below). The distribution packages of security applications are hosted on the same servers as workspaces.
Matching the company location with a data center region
Country in which the company is located |
Data center region |
|---|---|
Argentina |
Brazil |
Bolivia |
Brazil |
Brazil |
Brazil |
Chile |
Brazil |
Colombia |
Brazil |
Ecuador |
Brazil |
Guyana |
Brazil |
Peru |
Brazil |
Paraguay |
Brazil |
Suriname |
Brazil |
Uruguay |
Brazil |
Venezuela |
Brazil |
Antigua and Barbuda |
Mexico or Brazil |
Anguilla |
Mexico or Brazil |
Aruba |
Mexico or Brazil |
Barbados |
Mexico or Brazil |
Saint Barthelemy |
Mexico or Brazil |
Bonaire, Sint Eustatius and Saba |
Mexico or Brazil |
Belize |
Mexico or Brazil |
Costa Rica |
Mexico or Brazil |
Cuba |
Mexico or Brazil |
Curacao |
Mexico or Brazil |
Dominica |
Mexico or Brazil |
Dominican Republic |
Mexico or Brazil |
Grenada |
Mexico or Brazil |
Guadeloupe |
Mexico or Brazil |
Guatemala |
Mexico or Brazil |
Honduras |
Mexico or Brazil |
Haiti |
Mexico or Brazil |
Jamaica |
Mexico or Brazil |
Saint Kitts and Nevis |
Mexico or Brazil |
Cayman Islands |
Mexico or Brazil |
Saint Lucia |
Mexico or Brazil |
Saint Martin |
Mexico or Brazil |
Martinique |
Mexico or Brazil |
Montserrat |
Mexico or Brazil |
Nicaragua |
Mexico or Brazil |
Panama |
Mexico or Brazil |
Sint Maarten |
Mexico or Brazil |
Trinidad and Tobago |
Mexico or Brazil |
Saint Vincent and the Grenadines |
Mexico or Brazil |
British Virgin Islands |
Mexico or Brazil |
Japan |
Mexico or Ireland |
Canada (New Brunswick) |
Mexico or Brazil |
Canada (Newfoundland and Labrador) |
Mexico or Brazil |
Canada (Nova Scotia) |
Mexico or Brazil |
Canada (Ontario) |
Mexico or Brazil |
Canada (Prince Edward Island) |
Mexico or Brazil |
Canada (Quebec) |
Mexico or Brazil |
Albania |
Ireland |
Bosnia and Herzegovina |
Ireland |
Bulgaria |
Ireland |
Belarus |
Ireland |
Czech Republic |
Ireland |
Denmark |
Ireland |
Estonia |
Ireland |
Finland |
Ireland |
United Kingdom |
Ireland |
Greenland |
Ireland |
Greece |
Ireland |
Croatia |
Ireland |
Hungary |
Ireland |
Ireland |
Ireland |
Iceland |
Ireland |
Kyrgyzstan |
Ireland |
Kazakhstan |
Ireland |
Lithuania |
Ireland |
Latvia |
Ireland |
Moldova |
Ireland |
Montenegro |
Ireland |
Macedonia |
Ireland |
Mongolia |
Ireland |
Norway |
Ireland |
Poland |
Ireland |
Romania |
Ireland |
Serbia |
Ireland |
Russian Federation |
Ireland |
Sweden |
Ireland |
Slovenia |
Ireland |
Slovakia |
Ireland |
Tajikistan |
Ireland |
Turkmenistan |
Ireland |
Uzbekistan |
Ireland |
Canada (Alberta) |
Mexico or Brazil |
Canada (British Columbia) |
Mexico or Brazil |
Canada (Manitoba) |
Mexico or Brazil |
Canada (Northwest Territories) |
Mexico or Brazil |
Canada (Nunavut) |
Mexico or Brazil |
Canada (Yukon) |
Mexico or Brazil |
Canada (Saskatchewan) |
Mexico or Brazil |
Mexico |
Mexico or Brazil |
Other countries |
Ireland |
Access to public DNS servers
If access to Kaspersky servers by using the system DNS is not possible, Kaspersky Security Center Cloud Console can use the following public DNS servers, in the following order:
- Google Public DNS (8.8.8.8)
- Cloudflare DNS (1.1.1.1)
- Alibaba Cloud DNS (223.6.6.6)
- Quad9 DNS (9.9.9.9)
- CleanBrowsing (185.228.168.168)
Requests to these DNS servers may contain domain addresses and the public IP address of client devices, because Network Agent establishes a TCP/UDP connection to the DNS server. If Kaspersky Security Center Cloud Console is using a public DNS server, data processing is governed by the privacy policy of the relevant service.
Page top
Scenario: Creating a hierarchy of Administration Servers managed through Kaspersky Security Center Cloud Console
This scenario describes the actions that you must perform to create a hierarchy of Administration Servers managed through Kaspersky Security Center Cloud Console, which thus assumes the role of primary Administration Server. This hierarchy can be subsequently used for migration of managed devices and objects from Kaspersky Security Center to Kaspersky Security Center Cloud Console, as well as management of secondary Administration Servers and devices through Kaspersky Security Center Cloud Console.
Kaspersky Security Center Cloud Console can only act as primary Administration Server, while Administration Servers running on-premises can only act as secondary Administration Servers. Other hierarchical schemes are not available.
Prerequisites
Before you start, make sure that the following prerequisites are met:
- Upgrading Administration Server running on-premises to version 12 or later.
- Installing Kaspersky Security Center Web Console on the Administration Server running on-premises.
- Installing the web plug-ins for the applications that you intend to manage through Kaspersky Security Center Cloud Console.
- Upgrading the managed applications to versions supported by Kaspersky Security Center Cloud Console.
- Making sure that the Download updates to the Administration Server repository task on the Administration Server running on-premises does not have the primary Administration Server assigned as the update source; modifying the task settings accordingly, if necessary.
After the hierarchy is created, the policies and tasks that are effective in Kaspersky Security Center Cloud Console are applied on the secondary Administration Server, thus superseding its existing policies and tasks. If you want to avoid this behavior, delete all policies and tasks of Kaspersky Security Center Cloud Console before the hierarchy creation. Alternatively, you can change the status of each Kaspersky Security Center Cloud Console policy to Inactive in its settings and disable the Distribute to secondary and virtual Administration Servers option in the settings of each Kaspersky Security Center Cloud Console task.
You can delete your hierarchy of Administration Servers at any time, if necessary.
Stages of hierarchy creation
The basic scenario provides for a secondary Administration Server that cannot be accessed over the internet. However, the set of actions within some of the steps described below may vary if the secondary Administration Server is accessible over the internet. Also, some of the steps must be skipped in this case.
Creation of a hierarchy of Administration Servers comprises the following stages:
- Retrieving the certificate of the secondary Administration Server
If the secondary Administration Server is accessible over the internet, skip this step.
In Kaspersky Security Center Web Console running on-premises, open the Administration Server properties and on the General tab, open the General section. Click the View Administration Server certificate link. The certificate file, in the CER format, is automatically saved in the folder specified in your browser settings.
- Retrieving the connection settings and certificates from Kaspersky Security Center Cloud Console
If the secondary Administration Server is accessible over the internet, skip this step.
In Kaspersky Security Center Cloud Console, open the Administration Server properties and on the General tab open the Hierarchy of Administration Servers section. The following connection settings are displayed:
The section also contains two links:
Copy the connection settings manually—by using the clipboard or any other convenient way—and save them to a file of any convenient format. Click the View Administration Server certificate link and wait until the certificate file is downloaded. Click the HDS Root CA certificate link and wait until the file with the list of trusted root certificates issued by Certification Authorities is downloaded. Both files are saved to the folder specified in your browser settings.
- Selecting the secondary Administration Server for connection
In the Administration Server properties, proceed to the Administration servers tab. In the hierarchy of administration groups, select the check box next to the administration group that you want to contain the secondary Administration Server with all its managed devices. Click the Connect secondary Administration Server button.
On the page that opens, in the Secondary Administration Server display name field specify the name under which the secondary Administration Server must be displayed in the hierarchy. It is used for your convenience only and so it can differ from the actual secondary Administration Server name, if necessary. Click Next.
If the secondary Administration Server is accessible over the internet, you must also specify the address of the secondary Administration Server in the Secondary Administration Server address (optional) field.
On the next page, click the Browse button and specify the .pem file that you saved from the secondary Administration Server. Click Next.
- Enabling and configuring proxy server
The actions described in this step are optional. Perform them only if your connection requires the use of proxy server.
Click Next. On the Connection and authentication settings page, you can enable and configure the use of proxy server, if necessary. Select the Use proxy server check box and specify the following proxy settings:
- Specifying the authentication settings and adding the secondary Administration Server to the hierarchy
Click Next. On the Secondary Administration Server credentials page, specify the following settings:
Click Next and wait until the secondary Administration Server appears in the hierarchy.
If the secondary Administration Server is accessible over the internet, it connects to the primary Administration Server.
If the secondary Administration Server is accessible over the internet and the connection between the two Administration Servers is successfully established, skip all further steps.
If the secondary Administration Server cannot be accessed over the internet, it becomes visible but you must perform additional actions on the secondary Administration Server to gain control of it.
- Configuring the connection in Kaspersky Security Center Web Console running on-premises
In Kaspersky Security Center Web Console running on-premises, open the Administration Server properties and on the General tab, open the Hierarchy of Administration Servers section. Select the This Administration Server is secondary in the hierarchy check box. In the Type of primary Administration Server list, select the Kaspersky Security Center Cloud Console option.
Kaspersky Security Center Web Console checks whether the primary Administration Server is specified as the update source in the Download updates to the Administration Server repository task. If the primary Administration Server is specified as the update source, you get the corresponding warning message and a link to the task settings. You can modify the settings and then go back to the hierarchy creation, or you can skip this action and proceed with the hierarchy creation.
In the Settings to establish connection between secondary and primary Administration Servers group, specify the following settings:
- Adding the certificates to the secondary Administration Server
Click the Specify primary Administration Server certificate button and specify the certificate file that you saved from the Administration Server properties in Kaspersky Security Center Cloud Console.
Click the Specify Hosted Discovery Service certificates button and specify the .pem file that you saved from the Administration Server properties in Kaspersky Security Center Cloud Console.
If you have enabled the use of proxy server when connecting the secondary Administration Server in Kaspersky Security Center Cloud Console, select the Use proxy server check box and specify the same proxy settings as in Kaspersky Security Center Cloud Console.
You can also select the Connect primary Administration Server to secondary Administration Server in DMZ check box if the secondary Administration Server is in a
.The secondary Administration Server connects to the primary Administration Server.
Results
Upon performing the above steps, you can make sure that the hierarchy is created successfully:
- The active policies of the primary Administration Server become effective on the secondary Administration Server. The tasks of the primary Administration Server are distributed to the secondary Administration Server. If the Distribute to secondary and virtual Administration Servers option is enabled in the settings of a group task, every such task is also distributed to the secondary Administration Server.
- Policy settings that are locked against changes on the primary Administration Server are displayed as locked against changes in all policies on the secondary Administration Server.
- Policies applied by the primary Administration Server are displayed in the list of policies of the secondary Administration Server (Assets (Devices) → Policies & profiles).
- Group tasks distributed by the primary Administration Server are displayed in the list of tasks of the secondary Administration Server (Assets (Devices) → Tasks).
- Policies and tasks created on the primary Administration Server cannot be modified on the secondary Administration Server.
- In Kaspersky Security Center Cloud Console, in the structure of administration groups the secondary Administration Server is displayed within the group that you selected when you added this Administration Server.
Migration to Kaspersky Security Center Cloud Console
This section describes the process of migration to Kaspersky Security Center Cloud Console from:
- Kaspersky Security Center Web Console of version 12 (or later) running on-premises.
- Pro View.
The migration from Pro View is only available if you have Kaspersky Next license.
About migration from Kaspersky Security Center Web Console
This section describes the process of migration from Kaspersky Security Center Web Console of version 12 (or later) running on-premises to Kaspersky Security Center Cloud Console.
Methods of migration to Kaspersky Security Center Cloud Console
By using the migration feature, you can transfer your networked devices from Kaspersky Security Center under management by Kaspersky Security Center Cloud Console. Your managed devices will be switched without losing the principal settings, such as membership in administration groups; as well as the essential objects, such as policies and tasks related to the managed applications.
You can choose either of the two available methods to migrate your Administration Servers to Kaspersky Security Center Cloud Console:
- Migration without a hierarchy of Administration Servers:
- Enables transfer of managed devices and related objects to Kaspersky Security Center Cloud Console, even if the Administration Server on-premises is not secondary in regard to Kaspersky Security Center Cloud Console.
- May require transfer of files (on a removable drive, by email, through shared folders, or in any other convenient way) if Kaspersky Security Center Web Console and Kaspersky Security Center Cloud Console are opened on different physical devices.
You can also perform migration with virtual Administration Servers if your network includes them.
- Migration using a hierarchy of Administration Servers:
- Enables transfer of managed devices and related objects to Kaspersky Security Center Cloud Console by using only the interface of Kaspersky Security Center Cloud Console, so no physical transfer of files is needed.
- Requires that the Administration Server running on-premises act as secondary to Kaspersky Security Center Cloud Console. You can create such a hierarchy before starting migration.
For the full disk encryption, Kaspersky Security Center Cloud Console supports only BitLocker.
Scenario: Migration without a hierarchy of Administration Servers
This section describes the migration of the managed devices and related objects (such as policies, tasks, reports) from Kaspersky Security Center Web Console running on-premises to Kaspersky Security Center Cloud Console. You can include a single administration group in the migration scope to restore the same administration group in Kaspersky Security Center Cloud Console.
This group must contain the managed devices of a single operating system. If your network includes the devices of different operating systems or Linux distributives, allocate them in different administration groups, and then migrate each group separately.
After you finish the migration, all Network Agents within the migration scope are upgraded and managed by Kaspersky Security Center Cloud Console.
The steps listed in this section cover the migration process performed when no hierarchy of Administration Servers exists, that is, no connection has been established between Kaspersky Security Center Cloud Console and Kaspersky Security Center Web Console running on-premises.
Prerequisites
Before you start, do the following:
- Upgrade Administration Server running on-premises to version 14.2 or later.
- Install Kaspersky Security Center Web Console version 12.1 or later.
- Upgrade Network Agent on the managed devices to version 12 or later.
- On Windows devices, use Network Agent without an uninstallation password.
If the password has already been set, do one of the following in Kaspersky Security Center Web Console:
- Disable the Use uninstallation password option in the Network Agent policy settings.
- Uninstall Network Agent remotely by using the Uninstall application remotely task. In the Application to uninstall field of the task, select Kaspersky Security Center Network Agent. Do not forget to enter the uninstallation password.
- Upgrade the managed applications to the versions supported by Kaspersky Security Center Cloud Console.
- Make sure that you have policies for the latest versions of the managed applications. If you use outdated policies, create new ones for the application versions supported by Kaspersky Security Center Cloud Console.
- To use actual policies, upgrade the web plug-ins for the applications that you intend to manage through Kaspersky Security Center Cloud Console.
- Uninstall Kaspersky applications from managed devices if these applications are not supported by Kaspersky Security Center Cloud Console.
- Decrypt all the data (disk-level or file-level) that was encrypted by Kaspersky Endpoint Security for Windows on managed devices running the Windows operating system, and disable the encryption feature on the managed devices through the application policy or locally. For more information, see Help for Kaspersky Endpoint Security for Windows.
If the Windows device still stores any files or folders encrypted through Kaspersky Endpoint Security for Windows, the Network Agent upgrade will be canceled during the migration process. A notification will prompt you to decrypt all data on the device and disable the encryption feature.
Kaspersky Security Center Cloud Console allows for a maximum of 25,000 managed devices per one Administration Server.
Migration stages
Migration to Kaspersky Security Center Cloud Console comprises the following stages:
- Planning the migration scope and checking the prerequisites
Estimate the scope of the migration process, that is, review the administration group to export and assess the number of managed devices in it. Also, make sure that all the activities listed as migration prerequisites have been completed successfully.
- Exporting managed devices, objects, and settings from Kaspersky Security Center Web Console
Use the Migration wizard of Kaspersky Security Center Web Console running on-premises to export your managed devices together with their objects.
The maximum export file size is 4 GB.
- Importing the export file to Kaspersky Security Center Cloud Console
Transfer the information about your managed devices and objects to Kaspersky Security Center Cloud Console. For this purpose, use the Migration wizard of Kaspersky Security Center Cloud Console to import the export file and create a Network Agent stand-alone installation package.
- Re-installing Network Agent on managed devices
Go back to the Migration wizard in Kaspersky Security Center Web Console running on-premises to create a remote installation task. You will be able to use this task (immediately or later) to re-install Network Agent on your managed devices and complete the migration process.
Results
Upon finishing with the migration, you can make sure that it was successful:
- Network Agent is re-installed on all managed devices.
- All devices are managed through Kaspersky Security Center Cloud Console.
- All object settings that were effective before migration are preserved.
Migration wizard
This section provides information about the Migration wizard in Kaspersky Security Center Cloud Console and Kaspersky Security Center Web Console of version 12 or later.
Step 1. Exporting managed devices, objects, and settings from Kaspersky Security Center Web Console
Migration of managed devices from Kaspersky Security Center Web Console to Kaspersky Security Center Cloud Console requires that you first create an export file containing information about the hierarchy of administration groups that are on your current Administration Server running on-premises. The export file must also contain information about the objects and their settings. The export file will be used for subsequent import to Kaspersky Security Center Cloud Console.
The maximum export file size is 4 GB.
To export objects and their settings from Kaspersky Security Center Web Console:
- In the main menu of Kaspersky Security Center Web Console, go to Operations → Migration.
- On the welcome page of the Migration wizard, click Next. The Managed devices to export page opens, displaying the entire hierarchy of administration groups of the corresponding Administration Server.
- On the Managed devices to export page, click the chevron icon (
 ) next to the Managed devices group name to expand the hierarchy of administration groups. Select the administration group that you want to export.
 After migration from Kaspersky Security Center running on-premises to Kaspersky Security Center Cloud Console performed for two administration groups, the Remote installation tasks for these groups appear with the same name.
- Select the managed applications whose policies and tasks must be transferred to Kaspersky Security Center Cloud Console together with group objects. To select the managed applications whose objects are to be exported, select the check boxes next to their names in the list.
Although Kaspersky Security Center Administration Server is present on the list, selecting the corresponding check box does not result in the export of its policies.
To make sure that your managed applications are supported by Kaspersky Security Center Cloud Console, click the corresponding link. It will redirect you to the Online Help topic containing the list of applications managed by Kaspersky Security Center Cloud Console.
If you select applications that are not supported by Kaspersky Security Center Cloud Console, the policies and tasks of these applications will be exported anyway and then imported, but you will not be able to manage them in Kaspersky Security Center Cloud Console due to unavailability of the dedicated plug-ins.
- View the list of group objects exported by default and specify non-group objects to be exported together with the selected administration group, if necessary. Configure the export scope by including or excluding various objects, such as global tasks, custom device selections, reports, custom roles, internal users and security groups, and custom application categories. This page includes the following sections:
If you transfer devices of various operating systems to Kaspersky Security Center Cloud Console, non-group objects only need to be migrated once.
The Migration wizard checks the total number of managed devices included in the selected administration group. If this number exceeds 10,000, an error message appears. The Next button remains unavailable (dimmed) until the number of managed devices in the selected administration group falls within the limit.
- After you defined the migration scope, click Next to start the export process. The Creating the export file page opens, where you can view the export progress for each type of object that you included in the migration scope. Wait until the refresh icons (
 ) next to all items in the list of objects are replaced with green check marks (
 ). The export process finishes and the export file is automatically downloaded to the default download location defined in your browser settings. The name of the export file appears in the lower part of the browser window.
 - When the Export has completed successfully page is displayed, proceed to the next stage performed in Kaspersky Security Center Cloud Console.
If you use Kaspersky Security Center Web Console and Kaspersky Security Center Cloud Console on different devices, you will have to copy the export file to a removable drive or choose other ways of transferring the file.
Step 2. Importing the export file to Kaspersky Security Center Cloud Console
To transfer information about managed devices, objects, and their settings that you exported from Kaspersky Security Center Web Console, you must import it to Kaspersky Security Center Cloud Console deployed in your workspace. This enables you to create a stand-alone installation package and use it for re-installation of Network Agent on your managed devices.
Before you start the Migration wizard in Kaspersky Security Center Cloud Console, make sure its current localization language is the same as the Kaspersky Security Center Web Console language during the export process. Switch the language, if necessary.
If you have previously completed the quick start wizard in your Kaspersky Security Center Cloud Console workspace, the Managed devices group includes policies and tasks created with the default settings. Delete these policies and tasks before importing the ones that you exported from Kaspersky Security Center Web Console.
To import the export file to Kaspersky Security Center Cloud Console:
- In the main menu of Kaspersky Security Center Cloud Console, go to Operations → Migration.
- On the welcome page of the Migration wizard, click Import. In the File Explorer window that opens, select the export file by browsing to the folder where it was saved, and click Open. Wait until the refresh icon () next to the file uploading status is replaced with the green check mark ().
- Click Next. The next page opens, displaying the entire hierarchy of administration groups of the Administration Server in Kaspersky Security Center Cloud Console.
- Select the check box next to the target administration group to which the group objects must be restored and click Next. The Migration wizard displays a list of Network Agent installation packages available in Kaspersky Security Center Cloud Console.
- Select the installation package containing the relevant version and localization of Network Agent and click Next.
Select the Kaspersky Network Agent for Windows installation package only if you have previously completed the quick start wizard in your Kaspersky Security Center Cloud Console workspace and if you perform the migration of Windows devices.
Wait until the Migration wizard creates a stand-alone installation package. The maximum file size of the stand-alone installation package for Network Agent is 200 MB.
The file is unpacked and automatically downloaded to the default download location defined in your browser settings. The non-group objects and the group objects are restored to the target administration group.
When the import completes, the exported structure of administration groups, including the details of devices, appears under the target administration group that you selected. If the name of the object that you restore is identical to the name of an existing object, the restored object has an incremental suffix added.
If you have imported the entire Managed devices group, we recommend that you rename the newly imported subgroup to avoid confusion:
- Go to the Hierarchy of groups section.
- Click the name of the subgroup in the groups tree.
- In the properties window that opens, in the Name field enter a different name (for example, "Migrated devices").
We recommend that you check whether the objects (policies, tasks, and managed devices) included in the export scope have been successfully imported to Kaspersky Security Center Cloud Console. To do this, go to the Assets (Devices) section and view whether the imported objects appear on the lists in the Policies & profiles, Tasks, and Managed devices subsections.
You cannot minimize the Migration wizard and perform any concurrent operations during the import. Wait until the refresh icons (
) next to all items in the list of objects are replaced with green check marks () and the import finishes. After this, the devices start switching to Kaspersky Security Center Cloud Console. - Click Finish to close the Migration wizard window.
- If you want to find and download the stand-alone installation package again, go to Discovery & deployment → Deployment & assignment → Installation packages and click the View the list of stand-alone packages button. In the list that opens, select the stand-alone installation package that you have created and click the Download button.
If you use Kaspersky Security Center Web Console and Kaspersky Security Center Cloud Console on different devices, you must copy the stand-alone installation package to a removable drive or choose other ways of transferring the file.
Step 3. Re-installing Network Agent on devices managed through Kaspersky Security Center Cloud Console
After you create the Network Agent stand-alone installation package, you can proceed to creation of a remote installation task. Performing this task enables you to re-install Network Agent on all managed devices so that these devices are switched under management through Kaspersky Security Center Cloud Console.
To reduce the risk of data loss, we recommend that you first perform the actions for a small administration group counting up to 20 managed devices located within the corporate network and including no physical servers. After finishing with these actions, check whether re-installation completed successfully and proceed to the full reinstallation scope.
To create a remote installation task and re-install Network Agent:
- Go back to the Migration wizard in Kaspersky Security Center Web Console running on-premises.
We recommend using the Migration wizard to create a remote installation task to re-install Network Agent as described below. If it is necessary to use a custom remote installation task, you first need to manually create a custom installation package from the Network Agent stand-alone installation package. Please note that when creating a custom installation package, you must specify the "-s" key in the executable file command line. Otherwise, Network Agent reinstallation from this custom installation package completes with an error.
Depending on the current state of the Migration wizard, you can do one of the following:
- If you have not closed the Migration wizard after the export and your session has not expired, click the Go to Step 3 of the Migration wizard button. Select the Upload stand-alone installation package check box and click the Select stand-alone installation package button. In the browser window that opens, specify the Network Agent stand-alone installation package.
- If you have to start the Migration wizard again for any reason, select the Upload stand-alone installation package check box and click the Select stand-alone installation package button. In the browser window that opens, specify the Network Agent stand-alone installation package. After that, the Migration wizard again displays the hierarchy of administration groups of this Administration Server. Select the same group for which you created the export file and click Next.
The Migration wizard checks again the total number of managed devices included in the selected administration group. If this number exceeds 10,000, an error message appears. The Next button remains unavailable (dimmed) until the number of managed devices in the selected administration group falls within the limit.
- Wait until the stand-alone installation package is uploaded and click Next. The Migration wizard creates a custom installation package and a remote installation task for it. The task scope will include the administration group that you selected on the Managed devices to export page; the task startup schedule will be set to Manually by default. The Migration wizard displays the creation progress. Wait until the refresh icons () are replaced with the green check marks () and click Next.
- If necessary, select the Run newly created remote installation task check box (cleared by default) for the devices in the selected administration group of the Administration Server running on-premises and all of its subgroups. In this case, the devices will be switched under management of Kaspersky Security Center Cloud Console—but only after Network Agent installation completes. The full path will be displayed to the administration group in which the task will be run.
The task must only be started after the import to Kaspersky Security Center Cloud Console finishes. Otherwise, the device names may be duplicated in the list.
- Click Finish to close the Migration wizard and start the remote installation task for the following purposes:
- Upgrading the Network Agent instances
- Switching the Network Agent instances under management through Kaspersky Security Center Cloud Console
If you have left the Run newly created remote installation task check box cleared, you can start the task later manually, if necessary.
You can check that you can now manage the migrated Network Agent instances through Kaspersky Security Center Cloud Console. To do this, go to Assets (Devices) → Managed devices. Make sure that migrated managed devices have the confirmation icon ( ) in the Visible, Network Agent is installed, and Network Agent is running columns. Also, make sure that these devices do not have the Not connected for a long time status description.
Migration with a hierarchy of Administration Servers
This section describes the migration of managed devices and related objects from Kaspersky Security Center Web Console running on-premises to Kaspersky Security Center Cloud Console. The process involves a hierarchy: Kaspersky Security Center Web Console running on-premises acts as the secondary Administration Server and Kaspersky Security Center Cloud Console acts as the primary Administration Server.
Every administration group that you transfer to Kaspersky Security Center Cloud Console must contain the managed devices of a single operating system. If your network includes the devices of different operating systems, allocate them in different administration groups, and then migrate each group separately.
After you finish the migration, all Network Agents in the group within the migration scope are upgraded and managed through Kaspersky Security Center Cloud Console.
Before you start, do the following:
- Upgrade Administration Server running on-premises to version 14.2 or later.
- Install Kaspersky Security Center Web Console version 12.1 or later.
- Upgrade Network Agent on the managed devices to version 12 or later.
- On Windows devices, use Network Agent without an uninstallation password.
If the password has already been set, do one of the following in Kaspersky Security Center Web Console:
- Disable the Use uninstallation password option in the Network Agent policy settings.
- Uninstall Network Agent remotely by using the Uninstall application remotely task. In the Application to uninstall field of the task, select Kaspersky Security Center Network Agent. Do not forget to enter the uninstallation password.
- Upgrade the managed applications to the versions supported by Kaspersky Security Center Cloud Console.
- Make sure that you have policies for the latest versions of the managed applications. If you use outdated policies, create new ones for the application versions supported by Kaspersky Security Center Cloud Console.
- To use actual policies, upgrade the web plug-ins for the applications that you intend to manage through Kaspersky Security Center Cloud Console.
- Uninstall Kaspersky applications from managed devices if these applications are not supported by Kaspersky Security Center Cloud Console.
- Decrypt all the data (disk-level or file-level) that was encrypted by Kaspersky Endpoint Security for Windows on managed devices running the Windows operating system, and disable the encryption feature on the managed devices through the application policy or locally. For more information, see Help for Kaspersky Endpoint Security for Windows.
If the Windows device still stores any files or folders encrypted through Kaspersky Endpoint Security for Windows, the Network Agent upgrade will be canceled during the migration process. A notification will prompt you to decrypt all data on the device and disable the encryption feature.
Kaspersky Security Center Cloud Console allows for a maximum of 25,000 managed devices per one Administration Server.
To perform a migration to Kaspersky Security Center Cloud Console:
- Estimate the scope of the migration process, that is, review the administration group to export and assess the number of managed devices in it. Make sure that all the activities listed as migration prerequisites have been completed successfully.
- In Kaspersky Security Center Cloud Console, proceed to the secondary Administration Server for the managed devices that you want to migrate.
- In the main menu, go to Operations → Migration.
The welcome page of the Migration wizard opens.
- On the welcome page, click Next.
The Managed devices to export page opens, displaying the entire hierarchy of administration groups of the secondary Administration Server.
- On the Managed devices to export page, click the chevron icon (
 ) next to the Managed devices group name, and then expand the hierarchy of administration groups. Select the administration group that you want to export.
 The Migration wizard checks the total number of managed devices included in the selected administration group. If this number exceeds 10,000, an error message appears. The Next button remains unavailable (dimmed) until the number of managed devices in the selected administration group falls within the limit.
- Select the managed applications whose policies and tasks must be transferred to Kaspersky Security Center Cloud Console together with group objects. To select the managed applications whose objects are to be exported, select the check boxes next to their names in the list.
Although Kaspersky Security Center Administration Server is present on the list, selecting the corresponding check box does not result in the export of its policies.
To make sure that your managed applications are supported by Kaspersky Security Center Cloud Console, click the corresponding link. It will redirect you to the Online Help topic containing the list of applications managed by Kaspersky Security Center Cloud Console.
If you select applications that are not supported by Kaspersky Security Center Cloud Console, the policies and tasks of these applications will be migrated anyway, but you will not be able to manage them in Kaspersky Security Center Cloud Console, due to the unavailability of the dedicated plug-ins.
- View the list of group objects exported by default. You can also specify non-group objects to be exported together with the selected administration group, if necessary, such as global tasks, custom device selections, reports, custom roles, internal users and security groups, and custom application categories with content added manually. This page includes the following sections:
If you transfer devices of various operating systems to Kaspersky Security Center Cloud Console, non-group objects only need to be migrated once.
- After you defined the migration scope, click Next to start the export process. The Creating the export file page opens, where you can view the export progress for each type of object that you included in the migration scope. Wait until each refresh icon (), located next to each item in the list of objects, is replaced with a green check mark (). The export finishes and the export file is automatically saved to a temporary folder. The next page opens, displaying the entire hierarchy of administration groups in Kaspersky Security Center Cloud Console, which acts as the primary Administration Server.
- Select the check box next to the administration group to which the group objects must be imported, and then click Next. The file is unpacked, and the non-group objects and the group objects are restored to the target administration group.
If the name of the object that you restore is identical to the name of an existing object, the restored object has an incremental suffix added.
When the import completes, the exported structure of administration groups, including the details of devices, appears under the target administration group that you selected. The non-group objects are also imported.
You cannot minimize the Migration wizard and perform any concurrent operations during the import. Wait until each refresh icon (
), located next to each item in the list of objects, is replaced with a green check mark () and the import finishes. After this, the devices start switching to Kaspersky Security Center Cloud Console. - After the import completes, the Migration wizard displays a list of Network Agent installation packages available in Kaspersky Security Center Cloud Console for an appropriate operating system. Select the installation package containing the relevant version and localization of Network Agent.
Select the Kaspersky Network Agent for Windows installation package only if you have previously completed the quick start wizard in your Kaspersky Security Center Cloud Console workspace and if you perform the migration of Windows devices.
- Click Next.
The Migration wizard creates a new stand-alone installation package (or uses an existing one) and a custom installation package based on it, as well as the corresponding remote installation task. The task scope includes the administration group that you selected on the Managed devices to export page. The task startup schedule is set to Manually by default. The Migration wizard displays the creation progress.
- Wait until each refresh icon () is replaced with a green check mark (), and then click Next.
- If necessary, select the Run newly created remote installation task check box (cleared by default) for the devices in the selected administration group in Kaspersky Security Center Web Console running on-premises and all of its subgroups. After the Network Agent installation completes, you can manage the selected devices through Kaspersky Security Center Cloud Console. The full path is displayed to the administration group in which the task is to be run.
The remote installation task must only be started after the import to Kaspersky Security Center Cloud Console finishes. Otherwise, the devices may be duplicated.
- Click Finish to close the Migration wizard and start the remote installation task for the following purposes:
- Upgrading the Network Agent instances
- Managing the Network Agent instances through Kaspersky Security Center Cloud Console
If you have left the Run remote installation task check box cleared, you can start the task later manually, if necessary.
You can check that you can now manage the migrated Network Agent instances through Kaspersky Security Center Cloud Console. To do this, go to Assets (Devices) → Managed devices. Make sure that migrated managed devices have the confirmation icon () in the Visible, Network Agent is installed, and Network Agent is running columns. Also, make sure that these devices do not have the Not connected for a long time status description.
Scenario: Migration of devices running Linux or macOS operating systems
This section describes how to migrate devices running Linux or macOS operating systems from Kaspersky Security Center Web Console running on-premises to Kaspersky Security Center Cloud Console. The basic scenarios of migration without a hierarchy of Administration Servers and migration with such a hierarchy allow transferring all devices and related objects to Kaspersky Security Center Cloud Console. However, if your network includes devices running not only Windows, but also Linux or macOS, you need to transfer the devices of each operating system type separately. As a result, you have to perform the migration several times.
Prerequisites
Before you start, do the following:
- Upgrade Administration Server running on-premises to version 12 Patch A or later.
- Install Kaspersky Security Center Web Console of version 12.1 or later.
- Upgrade Network Agent on managed devices to version 12 or later.
- Upgrade the managed applications to the versions supported by Kaspersky Security Center Cloud Console.
- Make sure that you have policies for the latest versions of the managed applications. If you use outdated policies, create new ones for the application versions supported by Kaspersky Security Center Cloud Console.
- To use actual policies, upgrade the web plug-ins for the applications that you intend to manage through Kaspersky Security Center Cloud Console.
- Uninstall Kaspersky applications from managed devices if these applications are not supported by Kaspersky Security Center Cloud Console, and then replace the uninstalled applications with supported ones.
Kaspersky Security Center Cloud Console allows for a maximum of 25,000 managed devices per one Administration Server.
Migration stages
Migration to Kaspersky Security Center Cloud Console comprises the following stages:
- Grouping managed devices by their operating systems
If your network includes devices running different operating systems (Windows, Linux, or macOS), place the devices of each operating system in separate administration groups in Kaspersky Security Center Web Console. Also, create an administration group for each Linux distribution. For example, if you have Debian and Red Hat Linux devices, allocate them in different administration groups. This will allow you to perform the migration successfully because different Network Agent installation packages are required for various operating systems.
- Perform separately the migration of every administration group and its application objects
The managed devices of each operating system must migrate separately, to include their policies and tasks. For example, if you have Windows, macOS, Ubuntu, and CentOS devices, first, transfer the devices running the Windows operating system to Kaspersky Security Center Cloud Console, then macOS, then Ubuntu, and eventually, CentOS. You can transfer the managed devices in any order.
To do this, perform the migration without the hierarchy of Administration Servers or migration with such a hierarchy, depending on whether your network includes secondary Administration Servers. During the migration, use the Network Agent installation package corresponding to the operating system of the transferred devices. For example, select the Kaspersky Security Center 13.2 Network Agent for Linux devices to perform the migration successfully.
Note that non-group objects, such as global tasks, custom device selections, or reports, only need to be migrated once.
Results
Upon finishing with the migration, you can make sure that it was successful:
- The proper version of Network Agent is re-installed on each managed device running the Linux or macOS operating system.
- All Linux or macOS devices are managed through Kaspersky Security Center Cloud Console.
- All object settings that were effective before migration are preserved.
Scenario: Reverse migration from Kaspersky Security Center Cloud Console to Kaspersky Security Center
You may want to migrate the managed devices from Kaspersky Security Center Cloud Console to Kaspersky Security Center Administration Server. For example, this process can be used to roll back migration to Kaspersky Security Center Cloud Console.
Prerequisites
Before you start, make sure that the following prerequisites are met:
- Kaspersky Security Center Cloud Console is available and has managed devices connected.
- Kaspersky Security Center 14.2 (or later) Administration Server is available and has a Network Agent installation package of version 13 or later.
Reverse migration stages
Reverse migration comprises the following stages:
- Creating a Network Agent stand-alone installation package in Kaspersky Security Center Administration Server on-premises
In Kaspersky Security Center Administration Server running on-premises, create a Network Agent stand-alone installation package.
During the creation process, you can select the Move unassigned devices to this group option to specify an administration group to which you want to move Network Agents after installation. If you have specified the administration group, an automatic moving rule is created that will move to the target administration group all Network Agents installed with this stand-alone installation package.
To ensure correct reverse migration, make sure that you select the Network Agent version that is equal to or later than the version used in Kaspersky Security Center Cloud Console.
- Creating a custom installation package in Kaspersky Security Center Cloud Console
In Kaspersky Security Center Cloud Console, create a custom installation package based on the stand-alone installation package that you created and saved from Kaspersky Security Center Administration Server running on-premises.
To enable package installation in silent mode, in the Executable file command line field, specify the
-skey. - Creating a remote installation task
In Kaspersky Security Center Cloud Console, create a remote installation task using the custom installation package that you have created.
- Running the remote installation task
Start the remote installation task that you created. The task initiates the re-installation of all Network Agents in the specified administration group; and it also switches the Network Agents under management of Kaspersky Security Center Administration Server running on-premises by changing the connection address and modifying other connection settings.
If you did not specify any target administration group during creation of the stand-alone installation package, all devices are moved to the Unassigned devices group.
Results
Upon finishing with the migration, you can make sure that it was successful:
- All devices within the scope of the remote installation task that were previously managed through Kaspersky Security Center Cloud Console are now managed by Kaspersky Security Center Administration Server running on-premises.
- The devices are automatically moved to the administration group specified in the installation package settings.
The remote installation task in Kaspersky Security Center Cloud Console cannot be completed: it has no more target devices since all of them have modified connection settings. You have to stop the task manually after you make sure that the error icon ( ) has appeared in the Visible column of the Managed Devices list for all devices from the migration scope.
Migration with virtual Administration Servers
If you have virtual Administration Servers in your existing Kaspersky Security Center on-premises infrastructure, you cannot migrate from Kaspersky Security Center on-premises to Kaspersky Security Center Cloud Console by using the Migration wizard. Also, you will be able to migrate only your customers' devices. You will have to create policies, tasks, and reports manually.
You can perform one of the following migration scenarios:
- By moving your client devices from virtual Administration Servers to a primary Administration Server
- By performing manual migration from virtual Administration Servers
Scenario: Migration with virtual Administration Servers by moving devices
To perform the migration from Kaspersky Security Center Web Console running on-premises to Kaspersky Security Center Cloud Console, you can move your devices from virtual Administration Servers to a primary Administration Server.
Prerequisites
Before migration, you must perform a number of actions, including upgrading Administration Server running on-premises to version 12 or later and upgrading the managed applications to versions supported by Kaspersky Security Center Cloud Console.
Migration scenario
The scenario proceeds in stages:
- Creating an administration group for each of your virtual Administration Servers
You create the group in your Kaspersky Security Center running on-premises.
- Moving your customers' devices
In Kaspersky Security Center running on-premises, move your customers' devices from each virtual Administration Server to the respective administration group created at the previous stage.
- Migration
Perform migration as described for the network without a hierarchy of Administration Servers.
- Moving devices under management of virtual Administration Servers (optional step)
If you want to manage your customers through virtual Administration Servers, move the devices from the administration groups under management of virtual Administration Servers.
- Creating policies, tasks, and reports
Results
Upon finishing with the migration, you can make sure that it was successful:
- Network Agent is re-installed on all managed devices.
- All devices are managed through Kaspersky Security Center Cloud Console.
- All object settings that were effective before migration are preserved.
Scenario: Manual migration with virtual Administration Servers
You can migrate from Kaspersky Security Center Web Console running on-premises to Kaspersky Security Center Cloud Console manually.
Prerequisites
Before migration, you must perform a number of actions, including upgrading Administration Server running on-premises to version 12 or later and upgrading the managed applications to versions supported by Kaspersky Security Center Cloud Console.
Migration scenario
The scenario proceeds in stages:
- Creating an administration group for each of your virtual Administration Servers
In Kaspersky Security Center Cloud Console, create an administration group that corresponds to each of your virtual Administration Servers.
- Creating a stand-alone installation package for Network Agent
Create a stand-alone installation package for Network Agent. During creation, specify the administration group that you created at the previous stage. This means that you must create an individual stand-alone installation package for each administration group.
This stage occurs in your Kaspersky Security Center Cloud Console.
- Downloading the stand-alone installation packages
Download the stand-alone installation packages that you created at the previous stage. This stage occurs in your Kaspersky Security Center Cloud Console.
- Creating an archive with each stand-alone installation package
Available archive types are: ZIP, CAB, TAR, or TAR.GZ.
- Creating custom installation packages for Network Agent
Create custom installation packages for Network Agent. During creation, use archives that you created at the previous stage.
This stage occurs in your Kaspersky Security Center running on-premises.
- Creating remote installation tasks
Create remote installation tasks to install Network Agent from the created custom installation packages.
When creating a task, specify a corresponding administration group.
This stage occurs in your Kaspersky Security Center running on-premises.
- Running the created remote installation tasks
Network Agents are updated. The Kaspersky Security Center Cloud Console Administration Server takes over the management of them.
All devices are migrated to Kaspersky Security Center Cloud Console and are placed in administration groups that were specified when you created stand-alone installation packages for Network Agent.
- Moving devices under management of virtual Administration Servers (optional step)
If you want to manage your customers through virtual Administration Servers, move the devices from the administration groups under management of virtual Administration Servers.
- Creating policies, tasks, and reports
Results
Upon finishing with the migration, you can make sure that it was successful:
- Network Agent is re-installed on all managed devices.
- All devices are managed through Kaspersky Security Center Cloud Console.
All object settings that were effective before migration are preserved.
Scenario: Moving devices from administration groups under management of virtual Servers
You may want to manage your customers through virtual Administration Servers. If you migrated devices and other items from Kaspersky Security Center on-premises to Kaspersky Security Center Cloud Console, the devices are located in administration groups. To manage the customers' devices through virtual Administration Servers, you must move the devices from the administration groups under the management of virtual Administration Servers.
Prerequisites
You have created a virtual Administration Server for each of your customers.
All devices of each customer are located in an individual administration group.
Stages
The scenario proceeds in stages:
- Creating a stand-alone installation package for Network Agent
Switch to each of the created virtual Administration Server, then create a stand-alone installation package for Network Agent. You can switch Administration Servers in the main menu by clicking the chevron icon (
 ) to the right of the current Administration Server name, and then selecting the required Administration Server.
 - Downloading the stand-alone installation packages
Download the stand-alone installation packages that you created at the previous stage.
- Create an archive with each stand-alone installation package
Available archive types are: ZIP, CAB, TAR, or TAR.GZ.
- Creating custom installation packages for Network Agent
Create custom installation packages for Network Agent. During creation, use archives that you created at the previous stage.
This stage occurs on the primary Administration Server.
- Creating remote installation tasks
Create remote installation tasks to install Network Agent from the created custom installation packages.
When creating a task, specify a corresponding administration group.
This stage occurs on the primary Administration Server.
- Run the created remote installation tasks
Network Agents are updated. The devices are moved under management of virtual Administration Servers.
- Creating policies, tasks, and reports
Results
You can now manage the migrated customers' devices by using virtual Administration Servers.
Page top
About migration from Pro View to Expert View
The migration is only available if you have Kaspersky Next license.
For a detailed description of the migration procedure, refer to the Kaspersky Endpoint Security Cloud Help.
After the migration is finished, a new workspace is created in Expert View, and you receive a corresponding email notification. The new workspace has the same name as the workspace in Pro View.
Go to the new workspace and make sure that the objects are transferred:
- Kaspersky Next license is displayed in the Licensing section and in the Administration Server properties window.
- In the main menu, go to Assets (Devices) → Managed devices.
All the devices running Windows and macOS are displayed in the list of managed devices.
The transferred devices are automatically connected to the workspace created in Expert View. This may take a while.
- In the main menu, go to Assets (Devices) → Policies & profiles.
In the list of policies, the Network Agent policy is displayed with the password protection configured.
Quick start wizard
This section provides information about the Kaspersky Security Center Cloud Console quick start wizard.
About quick start wizard
The quick start wizard in Kaspersky Security Center Cloud Console enables you to create a minimum of necessary tasks and policies, adjust a minimum of settings, and start creating installation packages of Kaspersky applications. Using the wizard, you can make the following changes to Kaspersky Security Center Cloud Console:
- Initiate downloading of installation packages for managed Kaspersky applications.
- Create a Network Agent stand-alone installation package for devices running Windows, Linux, or macOS.
- Create Kaspersky Security Center Network Agent policy.
- Create the Download updates to the repositories of distribution points task.
- Create policies and tasks for managed Kaspersky applications.
- Configure interaction with .
After the quick start wizard has finished, installation packages for Network Agent and managed Kaspersky applications appear in the Discovery & deployment → Deployment & assignment → Installation packages list.
The quick start wizard creates policies for managed applications, such as Kaspersky Endpoint Security for Windows, unless such policies are created for the Managed devices group. The quick start wizard creates tasks if tasks with the same names do not exist for the Managed devices group.
Kaspersky Security Center Cloud Console automatically prompts you to run the quick start wizard after you have created a company workspace and have started Kaspersky Security Center Cloud Console for the first time. You can also start the quick start wizard manually at any time.
Page top
Starting quick start wizard
Kaspersky Security Center Cloud Console automatically prompts you to run the quick start wizard after you have created a company workspace and have started Kaspersky Security Center Cloud Console for the first time. You can also start the quick start wizard manually at any time.
If you start the quick start wizard again, tasks and policies created at the previous run of the wizard are not created again.
To start the quick start wizard manually:
- In the main menu, click the settings icon () next to the name of the Administration Server.
The Administration Server properties window opens.
- On the General tab, select the General section.
- Click Start quick start wizard.
Alternatively, you can start the quick start wizard by selecting Discovery & deployment → Deployment & assignment → Quick start wizard.
The wizard prompts you to perform initial configuration of Kaspersky Security Center Cloud Console. Follow the instructions of the wizard. Proceed through the wizard by using the Next button. Use the Back button to return to the previous step of the wizard.
Step 1. Selecting installation packages to download
In the list, select the Kaspersky applications to install on the client devices. Kaspersky Security Center Cloud Console will create installation packages for the selected applications. Afterwards, you will use the created installation packages to install the applications.
When selecting an installation package to download, pay attention to the language: installation packages are available in different languages.
Select the following applications:
- Kaspersky Security Center Network Agent
When selecting Network Agent installation packages, consider the following:
- Network Agent must be installed on every client device. Therefore, select a Network Agent appropriate for each operating system running on the client devices.
- Network Agent must be installed manually through a stand-alone installation package on a device that you select to act as a distribution point. Distribution points are required to perform network polling and remote installation of Kaspersky security applications on client devices. Therefore, you must select at least one installation package of Network Agent. While you proceed to the next steps of the wizard, Kaspersky Security Center Cloud Console creates the Network Agent stand-alone installation package.
Compared to Windows-based distribution points, Linux-based and macOS-based distribution points have limited functionality. It is strongly recommended that you select Windows-based computers to act as distribution points.
You can select Network Agents for Windows, Linux, and macOS. If you select Network Agent only for one operating system, for example, macOS, then a stand-alone installation package will be created for the selected operating system. If you select Network Agent for several operating systems, Kaspersky Security Center Cloud Console creates only one stand-alone installation package according to the following priorities: Windows is of the highest priority, then Linux, and then macOS. For example, if you select Network Agents for Linux and macOS, then Kaspersky Security Center Cloud Console creates a stand-alone installation package for Network Agent for Linux. You can create a Network Agent stand-alone installation package for any of these operating systems manually at any time.
- Kaspersky security applications
Select installation packages appropriate for the operating systems that are installed on client devices in your organization.
Step 2. Configuring a proxy server
If your organization uses a proxy server to connect to the internet, specify the proxy server settings at this step of the wizard. These settings are added to the Network Agent installation package. After installation, Network Agent automatically uses these settings on each client device.
Specify the following settings for proxy server connection:
- Use proxy server
- Address
- Port number
- Proxy server authentication
- User name
- Password
Step 3. Configuring Kaspersky Security Network
If at the first step of the wizard you downloaded the Kaspersky Endpoint Security for Windows installation package, the text of the KSN Statement for the following applications is displayed:
- Kaspersky Endpoint Security for Windows
- Kaspersky Security Center installed on local devices
- Kaspersky Security Center Cloud Console installed in the cloud environment
If you did not download the Kaspersky Endpoint Security for Windows installation package, the KSN Statement for this application is not displayed.
In trial mode, only the KSN Statement for Kaspersky Endpoint Security for Windows is displayed.
Carefully read the Kaspersky Security Network Statement. Select one of the following options:
By default, the use of KSN is disabled. Later, if you change your mind about using KSN, you can enable (or disable) the corresponding option in the Administration Server properties window, in the KSN Settings section.
Step 4. Configuring third-party update management
This step is not displayed if the Find vulnerabilities and required updates task already exists.
If you want to get a list of updates for the applications installed on the managed devices and a list of found vulnerabilities and recommended fixes for them, enable the Search for third-party software updates and vulnerability fixes option. If this option is enabled, Kaspersky Security Center Cloud Console creates the Find vulnerabilities and required updates task.
Step 5. Creating a basic network protection configuration
At this step of the wizard, click the Create button to create objects required for initial protection of your client devices.
Kaspersky Security Center Cloud Console performs two operations:
- Creating basic policies and tasks with default settings
The following policies are created:
- Kaspersky Security Center Network Agent policy
- Policies for managed Kaspersky applications
The following tasks are created:
- The Download updates to the repositories of distribution points task
- The Find vulnerabilities and required updates task
This task is only created if you enabled the Search for third-party software updates and vulnerability fixes option on the previous step of the wizard.
- Tasks for managed Kaspersky applications
- Creating a stand-alone installation package for Network Agent
You will use this package to install Network Agent on distribution points. Kaspersky Security Center Cloud Console creates the stand-alone installation package on the basis of the Network Agent installation package that you selected at the previous step of the wizard. During the package creation, you must read and accept the terms of EULA for Network Agent. When the stand-alone installation package is created, you will be prompted to download it to the device you are using at the moment.
Network Agent stand-alone installation package creation can take some time. You can proceed to the next step of the wizard. The process will continue in background mode. If necessary, you can track the installation package download status in the Package status column (Discovery & deployment → Deployment & assignment → Installation packages).
For authentication reasons, each stand-alone installation package is signed by using a certificate. The certificate is reissued every 3 months. After each procedure of certificate reissue, Kaspersky Security Center Cloud Console automatically updates the signatures of all created stand-alone installation packages. For downloaded stand-alone installation packages, an automatic signature update cannot be performed. Therefore, the certificate expires and a certificate error might occur while you install an application from a stand-alone installation package. In this case, download the stand-alone installation package again.
Also, you can view the certificate validity period in the properties of the stand-alone installation package file downloaded to your device. To do it, right-click the stand-alone installation package, and go to its details. On the Digital Signatures tab, you have to select the required certificate in the list, click the Details button, and then in the window that opens, click the View Certificate button.
Step 6. Closing the quick start wizard
On the quick start wizard completion page, read about the additional operations you must perform in order to deploy Kaspersky security applications on the client devices. Follow the stages provided in the scenario of Kaspersky applications initial deployment.
Kaspersky applications initial deployment
This section describes the initial deployment of Kaspersky applications on client devices in your organization.
Scenario: Kaspersky applications initial deployment
This scenario describes how to install Kaspersky applications on client devices in Kaspersky Security Center Cloud Console. First, you must deploy distribution points on your network. Then, by means of the distribution points, you must perform network polling and discover networked devices on your network. After that, you can deploy Kaspersky applications on networked devices.
When the scenario is complete, the Kaspersky applications are deployed on the selected client devices in your organization's network. You can manage all the devices with Kaspersky applications installed.
Prerequisites
Before you start, make sure that the following prerequisites are met:
- The quick start wizard has finished.
- Network Agent and security applications installation packages are created.
- Install the nmap utility on your Linux-based assets. This utility is required to enable Network Location Awareness functionality.
- The address https://aes.s.kaspersky-labs.com/endpoints/ is included in managed device firewall exceptions.
- You have information about internet settings for client devices in your organization, information about the gateway, and proxy server settings.
- Client devices in your organization are not encrypted.
Stages
The Kaspersky applications initial deployment proceeds in stages:
- Selecting a device to act as a distribution point
In Kaspersky Security Center Cloud Console, a distribution point is intended for:
- Network polling and device discovery
- Remote installation of Network Agent on client devices
- Connection of client devices to Administration Server (when a distribution point is acting as a connection gateway)
Select a device on your organization's network to act as a distribution point for an
. The selected device must meet the requirements for distribution point. Depending on the amount of client devices in your organization's network, select the correct number of devices to act as distribution points. - Creating a stand-alone installation package for Network Agent
Create a stand-alone installation package for Network Agent to install on the distribution point.
If your client devices do not have direct internet access to connect to Administration Server, in the Network Agent installation package settings, configure the connection gateway and proxy server settings.
- Installing Network Agent on the selected device to act as a distribution point
Deliver the stand-alone installation package for Network Agent to the selected device by any method. For example, you can copy the stand-alone installation package to a removable drive (such as a flash drive), or place it in a shared folder.
In the Properties window of the stand-alone installation package file, verify that the stand-alone installation package for Network Agent is signed by Kaspersky.
Run the installation of the stand-alone installation package for Network Agent on the selected device. Network Agent is now installed according to the settings of the Network Agent installation package and is connected to Administration Server. The device with Network Agent is placed in the administration group that was specified when the stand-alone installation package for Network Agent was created.
If you install Network Agent by using a stand-alone installation package on a device running Microsoft Windows XP Professional for Embedded Systems 32-bit, the installation fails. To resolve this issue, preliminarily install the update KB2868626 for Windows XP from the Microsoft website: https://www.catalog.update.microsoft.com/Search.aspx?q=KB2868626.
- Assigning the device with Network Agent installed to act as a distribution point
Assign the device with Network Agent installed to act as a distribution point.
- Configuring and performing network polling for the distribution point
Configure network polling for the distribution point with the Network Agent installed. As an option, you can configure network polling in the Network Agent policy.
After network polling according to schedule is complete, the client devices connected to your organization's network are discovered and placed in the Unassigned devices group.
- Creating installation packages for Network Agent and managed Kaspersky applications
If you did not start the quick start wizard, or skipped the step of creating installation packages, create installation packages for Kaspersky applications. You must create installation packages both for Network Agent and for managed Kaspersky applications appropriate for the operating system installed on client devices on your organization's network.
- Removing third-party security applications
If third-party security applications are installed on client devices on your organization's network, remove them before installing the Kaspersky application.
- Installing Kaspersky applications on client devices
Create tasks to install Network Agent and managed Kaspersky applications on client devices on your organization's network. When creating the tasks, use the Install application remotely task type. For the task to install Network Agent, use the Using operating system resources through distribution points option. For the task to install managed Kaspersky applications, use the Using Network Agent option. After the tasks are created, you can configure their settings. Make sure that the schedule for each task meets your requirements. First, the task to install Network Agent must be run. Then, after Network Agent is installed on client devices, the task to install managed Kaspersky applications must be run.
As an option, you can create one remote installation task to install Network Agent and managed Kaspersky applications on client devices on your organization's network. In this case, in the Installation packages block, use the Select installation package option and the Select Network Agent option; in the Force installation package download block, use the Using operating system resources through distribution points option.
You also can create several remote installation tasks to install managed Kaspersky applications for different administration groups or different device selections.
If you have client devices that are out of the network with distribution point, for example, laptops of remote users, you must create and deliver the Network Agent stand-alone installation package to those client devices by any method. Install Network Agent stand-alone installation package locally on those client devices. Then you can install managed Kaspersky applications on those remote users' devices following the same instructions as for other devices discovered by the distribution point.
Run the remote installation tasks.
As an option, to install Kaspersky applications, you can start the Protection deployment wizard.
- Installing Kaspersky Security for Mobile
If you plan to manage corporate mobile devices, follow the instructions provided in the Kaspersky Security for Mobile Help for information about deployment of Kaspersky Endpoint Security for Android.
- Verifying initial deployment of Kaspersky applications
Generate and view the Report on Kaspersky application versions. Make sure that the managed Kaspersky applications are installed on all client devices in your organization.
For the full disk encryption, Kaspersky Security Center Cloud Console supports only BitLocker.
Creating installation packages for Kaspersky applications
To deploy Kaspersky applications on networked devices in your organization, you must create installation packages of Kaspersky applications in Kaspersky Security Center Cloud Console.
To create a Kaspersky application installation package:
- Do one of the following:
- In the main menu, go to Discovery & deployment → Deployment & assignment → Installation packages.
- In the main menu, go to Operations → Repositories → Installation packages.
You can also view notifications about new packages in the list of onscreen notifications. If there are notifications about a new package, you can click the link next to the notification and proceed to the list of available installation packages.
A list of installation packages available on the Administration Server is displayed.
- Click Add.
The New package wizard starts. Proceed through the wizard by using the Next button.
- Select Create an installation package for a Kaspersky application.
A list of distribution packages available on Kaspersky web servers appears.
- Click the name of a distribution package, for example, Kaspersky Endpoint Security for Windows (<version number>).
A window opens with information about the distribution package.
- Read the information and click the Download and create installation package button.
If a distribution package cannot be automatically converted to an installation package, the Download distribution package button is displayed instead of the Download and create installation package button. In this case, download the distribution package, and then use the downloaded file to create a custom installation package.
The download of the installation package starts. You can close the wizard's window. In this case, the download process will continue in background mode. You can track the installation package download status as well as filter and sort the statuses in the Package status column.
If the download process stops and the download status switches to Accept EULA, then click the installation package name, and then proceed to step 6 of the instruction. By default, the installation packages with In progress and Accept EULA statuses are placed in the beginning of the list.
If you plan to perform migration from Kaspersky Security Center Web Console to Kaspersky Security Center Cloud Console and your organization's security regulations require the use of proxy when accessing the corporate network, this may affect the migration process. After you create a Network Agent installation package, you must specify the proxy settings to ensure connection between the Network Agent instances on managed devices and your Kaspersky Security Center Cloud Console workspace:
- Click the installation package name.
- In the installation package properties window that opens, go to the Settings tab.
- Open the Connection section.
- Select the Use proxy server option and fill in the Proxy server address and Proxy server port fields.
- For some Kaspersky applications, during the download process the Show EULA button is displayed. If it is displayed, do the following:
- Click the Show EULA button to read the End User License Agreement (EULA).
- Read the EULA, which is displayed on the screen, and click the Accept button.
The download continues after you accept the EULA. If you click Decline, the download is stopped.
- When the download is complete, click the Close button (
 ) to close the window with information about the distribution package.
The installation package is created. The installation package appears in the list of installation packages.
You cannot add an installation package with the same localization language several times. For example, if you already added the Kaspersky Endpoint Security for Windows (English) installation package, you can add Kaspersky Endpoint Security for Windows installation packages localized in other languages, except English.
Distributing installation packages to secondary Administration Servers
To distribute installation packages to secondary Administration Servers:
- Establish a connection with the Administration Server that controls the relevant secondary Administration Servers.
- Create a task of installation package distribution to secondary Administration Servers in one of the following ways:
- If you want to create a task for secondary Administration Servers in the selected administration group, launch the creation of a group task for this group.
- If you want to create a task for specific secondary Administration Servers, launch the creation of a task for specific devices.
The New task wizard starts. Follow the instructions of the wizard.
In the New task window of the New task wizard, in the Task type field select Distribute installation package. You can also edit the default name of the task in the Task name field.
At the next step, specify the secondary Administration Servers for the task scope and follow the instructions of the New task wizard. When you finish, the New task wizard will create the task of distributing the selected installation packages to specific secondary Administration Servers.
When you create the Distribute installation package task for secondary Administration Servers running on-premises, the distribution scope—aside from custom installation packages—will only include the installation packages of Kaspersky applications that are supported by Kaspersky Security Center Web Console running on-premises, regardless of which distribution option has been selected (All installation packages or Selected installation packages).
- Run the task manually or wait for it to launch according to the schedule you specified in the task settings.
The selected installation packages will be copied to the specific secondary Administration Servers.
Creating a stand-alone installation packages for Network Agent
You and device users in your organization can use stand-alone installation packages to install Network Agent on devices locally. Stand-alone installation packages can be created for devices running Windows, Linux, or macOS.
In Kaspersky Security Center Cloud Console, you can create stand-alone installation packages only for Network Agent.
A stand-alone installation package is an executable file that can be sent by email, or transferred to a client device by another method. The received file can be run locally on the client device to install Network Agent without involving Kaspersky Security Center Cloud Console.
For Network Agent for Linux and Network Agent for macOS, the stand-alone installation package is a script file with the .sh extension. When you run this file, the script unpacks the attached archive, which contains the installation package and its settings, and then starts the installation.
If you install Network Agent by using a stand-alone installation package on a device running Microsoft Windows XP Professional for Embedded Systems 32-bit, the installation fails. To resolve this issue, preliminarily install the update KB2868626 for Windows XP from the Microsoft website: https://www.catalog.update.microsoft.com/Search.aspx?q=KB2868626.
For authentication reasons, each stand-alone installation package is signed by using a certificate. The certificate is reissued every 3 months. After each procedure of certificate reissue, Kaspersky Security Center Cloud Console automatically updates the signatures of all created stand-alone installation packages. For downloaded stand-alone installation packages, an automatic signature update cannot be performed. Therefore, the certificate expires and a certificate error might occur while you install an application from a stand-alone installation package. In this case, download the stand-alone installation package again.
Also, you can view the certificate validity period in the properties of the stand-alone installation package file downloaded to your device. To do it, right-click the stand-alone installation package, and go to its details. On the Digital Signatures tab, you have to select the required certificate in the list, click the Details button, and then in the window that opens, click the View Certificate button.
To create a stand-alone installation package:
- Do one of the following:
- In the main menu, go to Discovery & deployment → Deployment & assignment → Installation packages.
- In the main menu, go to Operations → Repositories → Installation packages.
A list of installation packages is displayed. If the Network Agent installation package is not in the list, create this installation package manually.
- In the list of installation packages, click the name of the Network Agent installation package.
The properties window of the Network Agent installation package is displayed.
- Configure settings of the Network Agent installation package, if necessary, and close the properties window of the Network Agent installation package.
- In the list of installation packages, select an installation package and, above the list, click the Deploy button.
- Select the Using a stand-alone package option.
The Stand-alone installation package creation wizard starts. Proceed through the wizard by using the Next button.
- Make sure that the Install Network Agent together with this application option is enabled, if you want to install Network Agent together with the selected application.
By default, this option is enabled. It is recommended to enable this option if you are not sure whether Network Agent is installed on the device. If Network Agent is already installed on the device, after the stand-alone installation package with Network Agent is installed Network Agent will be updated to the newer version.
If you disable this option, Network Agent will not be installed on the device and the device will be unmanaged.
If a stand-alone installation package for the selected application already exists on Administration Server, the wizard informs you about this fact. In this case, you must select one of the following actions:
- Create stand-alone installation package. Select this option, for example, if you want to create a stand-alone installation package for a new application version and also want to retain a stand-alone installation package that you created for a previous application version. The new stand-alone installation package is placed in another folder.
- Use existing stand-alone installation package. Select this option if you want to use an existing stand-alone installation package. The process of package creation will not be started.
- Rebuild existing stand-alone installation package. Select this option if you want to create a stand-alone installation package for the same application again. The stand-alone installation package is placed in the same folder.
- On the Move to list of managed devices step, the Do not move devices option is selected by default. If you do not want to move the client device to any administration group after Network Agent installation, do not change choice of option.
If you want to move client device after Network Agent installation, select the Move unassigned devices to this group option and specify an administration group to which you want to move the client device. By default, the device is moved to the Managed devices group.
- Select the Open the list of stand-alone packages option if you want the list of stand-alone installation packages to be displayed after the wizard is finished.
- Click the Finish button.
The Stand-alone installation package creation wizard closes.
The Network Agent stand-alone installation package is created. The created stand-alone installation package is displayed in the list of stand-alone installation packages, which you can view.
Viewing the list of stand-alone installation packages
You can view the list of stand-alone installation packages and properties of each stand-alone installation package.
To view the list of stand-alone installation packages for all installation packages:
- Do one of the following:
- In the main menu, go to Discovery & deployment → Deployment & assignment → Installation packages.
- In the main menu, go to Operations → Repositories → Installation packages.
A list of installation packages is displayed.
- Above the list, click the View the list of stand-alone packages button.
A list of stand-alone installation packages is displayed.
In the list of stand-alone installation packages, their properties are displayed as follows:
- Package name. Stand-alone installation package name that is automatically formed as the application name included in the package and the application version.
- Network Agent installation package name.
- Network Agent version.
- Size. File size in megabytes (MB).
- Group. Name of the group to which the client device is moved after Network Agent installation.
- Created. Date and time of the stand-alone installation package creation.
- Modified. Date and time of the stand-alone installation package modification.
- File hash. The property is used to certify that the stand-alone installation package was not changed by third-party persons and a user has the same file that you created and transferred to the user.
To view the list of stand-alone installation packages for specific installation package:
Select the installation package in the list and, above the list, click the View the list of stand-alone packages button.
In the list of stand-alone installation packages, you can do the following:
- Remove a stand-alone installation package by clicking the Remove button.
- Download a stand-alone installation package to your device by clicking the Download button.
For authentication reasons, each stand-alone installation package is signed by using a certificate. The certificate is reissued every 3 months. After each procedure of certificate reissue, Kaspersky Security Center Cloud Console automatically updates the signatures of all created stand-alone installation packages. For downloaded stand-alone installation packages, an automatic signature update cannot be performed. Therefore, the certificate expires and a certificate error might occur while you install an application from a stand-alone installation package. In this case, download the stand-alone installation package again.
Also, you can view the certificate validity period in the properties of the downloaded stand-alone installation package. To do it, on the Digital Signatures tab, you have to select the required certificate in the list, click the Details button, and then in the window that opens, click the View Certificate button.
Creating custom installation packages
You can use custom installation packages for the following:
- To install any application (for example, a text editor) on a client device involving Kaspersky Security Center Cloud Console, for example by means of a task.
- To create a stand-alone installation package.
A custom installation package is a folder with a set of files, including an executable file. A source to create a custom installation package is an archive file. The archive file contains file or files that have to be included in the custom installation package. Creating a custom installation package, you can specify command-line options, for example, to install the application in a silent mode.
You cannot create custom installation packages in the trial mode of Kaspersky Security Center Cloud Console.
To create a custom installation package:
- Do one of the following:
- In the main menu, go to Discovery & deployment → Deployment & assignment → Installation packages.
- In the main menu, go to Operations → Repositories → Installation packages.
A list of installation packages available on the Administration Server is displayed.
- Click Add.
The New package wizard starts. Proceed through the wizard by using the Next button.
- Select Create an installation package from a file.
- Specify the installation package name and click the Browse button.
A standard Open window lets you choose an archive file to create the installation package.
- Select an archive file located on the available disks.
You can upload a ZIP, CAB, TAR, or TAR.GZ archive file. It is not possible to create an installation package from an SFX (self-extracting archive) file.
Files are downloaded to the Kaspersky Security Center Cloud Console Administration Server.
If Administration Server detects that the archive includes Kaspersky application, an error message is displayed. You can download installation packages for Kaspersky applications from Kaspersky Web Servers. This operation is available by selecting Operations → Kaspersky applications → Current application versions.
- If the selected archive file includes several executable files, select one executable file that has to be run to install the application using the created installation package.
- If you want, specify an executable file command-line parameters.
You can specify command-line parameters to install the application from the installation package in silent mode. Refer to the application vendor's documentation for details of the command-line parameters.
Creation of the installation package starts.
The wizard informs you when the process is finished.
If the installation package is not created, an error message is displayed.
In Kaspersky Security Center Cloud Console, the total size of all installation packages on the Administration Server is limited to 500 MB. If in the process of creating an installation package the total size limit is exceeded, delete the installation packages created earlier. The size of an installation package is displayed in its properties.
- Click the Finish button to close the wizard.
The created custom installation package is downloaded to the Administration Server. After downloading, the installation package appears in the list of installation packages.
In the list of installation packages, you can view the following properties of a custom installation package:
- Name. Custom installation package name.
- Package status. Installation package download status.
- Source. Application vendor name.
- Application. Application name packed into the custom installation package.
- Version. Application version.
- Language. Language of the application packed into the custom installation package.
- Size (MB). Size of the custom installation package.
- Operating system. Operating system for which the custom installation package is created.
- Created. Installation package creation date.
- Modified. Installation package modification date.
- Type. Kaspersky application or third-party application.
In the list of installation packages, by clicking the link with the name of a custom installation package, you can change command-line parameters and the custom installation package name.
Requirements for a distribution point
To handle up to 10,000 client devices, a distribution point must meet, at a minimum, the following requirements (a configuration for a test stand is provided):
- CPU: Intel Core i7-7700 CPU, 3.60 GHz 4 cores.
- RAM: 8 GB.
- Free storage space: 120 GB.
In addition, a distribution point must have internet access and must always be connected.
If any remote installation tasks are pending on the Administration Server, the device with the distribution point will also require an amount of free disk space that is equal to the total size of the installation packages to be installed.
If one or multiple instances of the task for update (patch) installation and vulnerability fix are pending on the Administration Server, the device with the distribution point will also require additional free disk space, equal to twice the total size of all patches to be installed.
Network Agent installation package settings
To configure a Network Agent installation package:
- Do one of the following:
- In the main menu, go to Discovery & deployment → Deployment & assignment → Installation packages.
- In the main menu, go to Operations → Repositories → Installation packages.
A list of installation packages available on the Administration Server is displayed.
- Click the link with the name of the Network Agent installation package.
The properties window of the Network Agent installation package opens. The information in the window is grouped on tabs and in sections.
General
The General section displays general information about the installation package:
- Installation package name
- Name and version of the application for which the installation package has been created
- Installation package size
- Installation package creation date
- Path to the installation package folder
Settings
This section presents the settings required to ensure proper functioning of Network Agent immediately after it is installed. The settings in this section are available only on devices running Windows.
In the Destination folder group of settings, you can select the client device folder in which Network Agent will be installed.
In the following group of settings, you can set a password for the Network Agent remote uninstallation task:
- Use uninstallation password
- Status
- Protect Network Agent service against unauthorized removal or termination, and prevent changes to the settings
- Automatically install applicable updates and patches for components that have the Undefined status
Connection
In this section, you can configure connection of Network Agent to the Administration Server:
- Use UDP port
- Open Network Agent ports in Microsoft Windows Firewall
- Do not use proxy server
- Use proxy server
Proxy server address
Proxy server port
- Proxy server authentication
For compatibility purposes, it is not recommended to specify proxy connection settings in the Network Agent installation package settings.
Advanced
In this section, you can configure how the connection gateway and virtual machine are used, as well as whether to register a user as a device owner:
- Connect to Administration Server by using a connection gateway
- Connection gateway address
- Enable dynamic mode for VDI
- Optimize settings for VDI
- Allow running the user registration utility after Network Agent installation
Additional components
In this section you can select additional components for concurrent installation with Network Agent.
Tags
The Tags section displays a list of keywords (tags) that can be added to client devices after Network Agent installation. You can add and remove tags from the list, as well as rename them.
If the check box is selected next to a tag, this tag is automatically added to managed devices during Network Agent installation.
If the check box is cleared next to a tag, the tag will not automatically be added to managed devices during Network Agent installation. You can manually add this tag to devices.
When removing a tag from the list, it is automatically removed from all devices to which it was added.
Revision history
In this section, you can view the history of the installation package revisions. You can compare revisions, view revisions, save revisions to a file, and add and edit revision descriptions.
Network Agent installation package settings available to a specific operating system are given in the table below.
Network Agent installation package settings
Property section |
Windows |
Mac |
Linux |
|---|---|---|---|
General |
|
|
|
Settings |
|
|
|
Connection |
|
* except the Open Network Agent ports in Microsoft Windows Firewall check box |
* except the Open Network Agent ports in Microsoft Windows Firewall check box |
Advanced |
|
|
|
Additional components |
|
|
|
Tags |
|
* except the automatic tagging rules |
* except the automatic tagging rules |
Revision history |
|
|
|
Virtual infrastructure
Kaspersky Security Center Cloud Console supports the use of virtual machines. To protect your virtual infrastructure, you need to install Network Agent on each virtual machine.
Tips on reducing the load on virtual machines
When installing Network Agent on a virtual machine, you are advised to consider disabling some Kaspersky Security Center Cloud Console features that seem to be of little use for virtual machines.
When installing Network Agent on a virtual machine or on a template intended for generation of virtual machines, we recommend the following actions:
- If you are running a remote installation, in the properties window of the Network Agent installation package, in the Advanced section, select the Optimize settings for VDI option.
- If you are running an interactive installation through a wizard, in the wizard window, select the Optimize the Network Agent settings for the virtual infrastructure option.
Selecting those options alters the settings of Network Agent so that the following features remain disabled by default (before a policy is applied):
- Retrieving information about software installed
- Retrieving information about hardware
- Retrieving information about vulnerabilities detected
- Retrieving information about updates required
Usually, those features are not necessary on virtual machines because they use uniform software and virtual hardware.
Disabling the features is invertible. If any of the disabled features is required, you can enable it through the policy of Network Agent, or through the local settings of Network Agent. The local settings of Network Agent are available through the context menu of the relevant device in Administration Console.
Support of dynamic virtual machines
Kaspersky Security Center Cloud Console supports dynamic virtual machines. If a virtual infrastructure has been deployed on the organization's network, dynamic (temporary) virtual machines can be used in certain cases. The dynamic VMs are created under unique names based on a template that has been prepared by the administrator. The user works on a VM for a while and then, after being turned off, this virtual machine will be removed from the virtual infrastructure. The virtual machine with installed Network Agent is also added to the Administration Server database. After you turn off this virtual machine, the corresponding entry must also be removed from the database of Administration Server.
To make functional the feature of automatic removal of entries on virtual machines, when installing Network Agent on a template for dynamic virtual machines, select the Enable dynamic mode for VDI option:
- For remote installation—In the properties window of the installation package of Network Agent (Advanced section)
- For interactive installation—In the Network Agent installation wizard
Avoid selecting the Enable dynamic mode for VDI option when installing Network Agent on physical devices.
If you want events from dynamic virtual machines to be stored on the Administration Server for a while after you remove those virtual machines, then, in the Administration Server properties window, in the Events repository section, select the Store events after devices are deleted option and specify the maximum storage term for events (in days).
Support of virtual machines copying
Kaspersky Security Center Cloud Console supports copying a virtual machine with installed Network Agent or creating one from a template with installed Network Agent.
Network Agent can automatically detect copying of virtual machines in the following cases:
- The Enable dynamic mode for VDI option was selected when Network Agent was installed—After each restart of the operating system, this virtual machine will be recognized as a new device, regardless of whether it has been copied or not.
- One of the following hypervisors is in use: VMware, HyperV, or Xen: Network Agent detects the copying of the virtual machine by the changed IDs of the virtual hardware.
Analysis of changes in virtual hardware is not absolutely reliable. Before applying this method widely, you must test it on a small pool of virtual machines for the version of the hypervisor currently used in your organization.
Usage of Network Agent for Windows, Linux, and macOS: Comparison
Network Agent for macOS and Linux has several functional limitations compared to Network Agent for Windows. The Network Agent policy and installation package settings also differ depending on the operating system. The table below compares Network Agent features and usage scenarios available for Windows, macOS, and Linux operating systems.
Network Agent feature comparison
Network Agent feature |
Windows |
Linux |
macOS |
|---|---|---|---|
Installation
|
|||
Automatic installation of updates and patches for Network Agent |
|
|
|
Automatic distributing of a key |
|
|
|
Installing manually, by running application installers on devices |
|
|
|
|
|
|
|
Distribution point
|
|||
|
|
|
|
|
|
|
|
|
|
Distribution point devices running macOS cannot download updates from Kaspersky update servers. If one or more devices running macOS are within the scope of the Download updates to the repositories of distribution points task, the task completes with the Failed status, even if it has successfully completed on all Windows devices. |
|
Push installation of applications
|
|
Restricted: it is not possible to perform push installation on Windows devices by using Linux distribution points.
|
Restricted: it is not possible to perform push installation on Windows devices by using macOS distribution points.
|
Handling third-party applications
|
|||
Remote installation of applications on devices
|
|
|
|
|
|
|
|
Configuring operating system updates in a Network Agent policy |
|
|
|
|
|
|
|
|
|
|
|
|
|
|
|
Virtual machines
|
|||
|
|
|
|
Optimization settings for virtual desktop infrastructure (VDI) |
|
|
|
|
|
|
|
Other
|
|||
Auditing actions on a remote client device by using Windows Desktop Sharing |
|
|
|
|
|
|
|
|
|
|
|
|
|
|
|
The following sections are displayed in the distribution point properties, but the corresponding features are not supported by Network Agent for macOS:
- Source of updates
- KSN proxy server
- Windows domains
- Active Directory
- IP ranges
- Advanced
- Statistics
Specifying settings for remote installation on Unix devices
When you install an application on a Unix device by using a remote installation task, you can specify Unix-specific settings for the task. These settings are available in the task properties after the task is created.
To specify Unix-specific settings for a remote installation task:
- In the main menu, go to Assets (Devices) → Tasks.
- Click the name of the remote installation task for which you want to specify the Unix-specific settings.
The task properties window opens.
- Go to Application settings → Unix-specific settings.
- Specify the following settings:
- Click the Save button.
The specified task settings are saved.
Replacing third-party security applications
Installation of Kaspersky security applications through Kaspersky Security Center Cloud Console may require removal of third-party software incompatible with the application being installed. Kaspersky Security Center Cloud Console provides several ways of removing the third-party applications.
Removing incompatible applications when configuring remote installation of an application
You can enable the Uninstall incompatible applications automatically option when you configure remote installation of a security application. You can find this option in the Protection deployment wizard. When this option is enabled, Kaspersky Security Center Cloud Console removes incompatible applications before installing a security application on a managed device.
Removing incompatible applications through a dedicated task
To remove incompatible applications through a task, use the Uninstall application remotely task. This task should be run on devices before the security application installation task. For example, in the installation task you can select On completing another task as the schedule type where the other task is Uninstall application remotely.
This method of uninstallation is useful when the security application installer cannot properly remove an incompatible application.
Options for manual installation of applications
You can install Network Agent on devices locally without involving Kaspersky Security Center Cloud Console. To do this, create a stand-alone installation package for Network Agent as described in the following topic: Creating stand-alone installation packages. Transfer the package to your client device and install it. Once the installation of the Network Agent is completed, you can use the device as a distribution point.
Page top
Forced deployment through the remote installation task of Kaspersky Security Center Cloud Console
To perform the initial deployment of Network Agent or other applications, you can force installation of selected installation packages by using the remote installation task of Kaspersky Security Center Cloud Console—provided that each device has a user account(s) with local administrator rights.
In case of initial deployment, Network Agent is not installed. Therefore, in the settings of the remote installation task, you cannot select distribution of files required for application installation by using Network Agent. You can only choose to distribute files by using operating system resources through distribution points.
You must specify an account that has access to the admin$ share in the settings of the remote installation task.
You can specify target devices either explicitly (with a list), by selecting the Kaspersky Security Center Cloud Console administration group to which they belong; or by creating a selection of devices based upon a specific criterion. The installation start time is defined by the task schedule. If the Run missed tasks setting is enabled in the task properties, the task can be run either immediately after target devices are turned on or when they are moved to the target administration group.
Forced installation consists of delivering installation packages to target devices, subsequent copying of files to the admin$ resource on each of the target devices, and remote registration of supporting services on those devices. Delivery of installation packages to target devices is performed through a Kaspersky Security Center Cloud Console feature that ensures network interaction. The following conditions must be met in this case:
- Target devices are accessible from the distribution point side.
- Name resolution for target devices functions properly on the network.
- The administrative shares (admin$) remain enabled on target devices.
- The following system services are running on target devices:
- Server (LanmanServer)
By default, this service is running.
- DCOM Server Process Launcher (DcomLaunch)
- RPC Endpoint Mapper (RpcEptMapper)
- Remote Procedure Call (RpcSs)
- Server (LanmanServer)
- Port TCP 445 is open on target devices to enable remote access through Windows Management Instrumentation.
TCP 139, UDP 137, and UDP 138 are used by older protocols and are no longer necessary for current applications.
Dynamic outbound access ports must be allowed on the firewall for connections from the distribution points to target devices.
- The Active Directory domain policy security settings are allowed to provide the operation of the NTLM protocol during the deployment of Network Agent.
- On target devices running Microsoft Windows XP, Simple File Sharing mode is disabled.
- On target devices, the access sharing and security model are set as Classic – local users authenticate as themselves. It can in no way be Guest only – local users authenticate as Guest.
- Target devices are members of the domain, or uniform accounts with administrator rights are created on target devices in advance.
To successfully deploy Network Agent or other applications to a device that is not joined to a Windows Server 2003 or later Active Directory domain, you must disable remote UAC on that device. Remote UAC is one of the reasons that prevent local administrative accounts from accessing admin$, which is necessary for forced deployment of Network Agent or other applications. Disabling remote UAC does not affect local UAC.
During installation on new devices that have not yet been allocated to any of the Kaspersky Security Center Cloud Console administration groups, you can open the remote installation task properties and specify the administration group to which devices will be moved after Network Agent installation.
When creating a group task, keep in mind that each group task affects all devices in all nested groups within a selected group. Therefore, you must avoid duplicating installation tasks in subgroups.
A simplified way to create tasks for forced installation of applications is automatic installation. To do this, you must open the administration group properties, open the list of installation packages, and then select the ones that must be installed on devices in this group. As a result, the selected installation packages will be automatically installed on all devices in this group and all of its subgroups. The time interval over which the packages will be installed depends on the network throughput and the total number of networked devices.
Devices acting as distribution points must meet the requirements for distribution points. You have to make sure that distribution points are present in each of the isolated subnets hosting target devices.
The free disk space in the partition with the %ALLUSERSPROFILE%\Application Data\KasperskyLab\adminkit folder must exceed, by many times, the total size of the distribution packages of installed applications.
Page top
Protection deployment wizard
To install Kaspersky applications, you can use the Protection deployment wizard. The Protection deployment wizard enables remote installation of applications either through specially created installation packages or directly from a distribution package.
The Protection deployment wizard performs the following actions:
- Downloads an installation package for application installation (if it was not created earlier). The installation package is located at Discovery & deployment → Deployment & assignment → Installation packages. You can use this installation package for the application installation in the future.
- Creates and runs a remote installation task for specific devices or for an administration group. The newly created remote installation task is stored in the Tasks section. You can later start this task manually. The task type is Install application remotely.
Step 1. Starting Protection deployment wizard
To start the Protection deployment wizard manually,
In the main menu, go to Discovery & deployment → Deployment & assignment → Protection deployment wizard.
The Protection deployment wizard starts. Proceed through the wizard by using the Next button.
Step 1. Selecting the installation package
Select the way you want to install the selected installation package:
- Remote installation by Kaspersky Security Center
- Remote installation by Microsoft Azure API
After that, select the installation package of the application that you want to install.
If the installation package of the required application is not listed, click the Add button and then select the application from the list.
Step 2. Selecting Network Agent version
If you selected the installation package of an application other than Network Agent, you also have to install Network Agent, which connects the application with Kaspersky Security Center Administration Server.
Select the latest version of Network Agent.
Step 3. Selecting devices
Specify a list of devices on which the application will be installed:
Step 4. Specifying the remote installation task settings
On the "Remote installation" task settings page, specify the settings for remote installation of the application.
In the Force installation package download settings group, specify how files that are required for the application installation are distributed to client devices:
Define the additional setting:
Do not re-install application if it is already installed
Password to uninstall the current Kaspersky application
Step 5. Restart management
Specify the action to be performed if the operating system must be restarted when you install the application:
- Do not restart the device
- Restart the device
- Prompt user for action
- Force closure of applications in blocked sessions
Step 6. Removing incompatible applications before installation
This step is only present if the application that you deploy is known to be incompatible with some other applications.
Select the option if you want Kaspersky Security Center Cloud Console to automatically remove applications that are incompatible with the application you deploy.
The list of incompatible applications is also displayed.
If you do not select this option, the application will only be installed on devices that have no incompatible applications.
Step 7. Moving devices to Managed devices
Specify whether devices must be moved to an administration group after Network Agent installation.
The Do not move devices option is selected by default. For security reasons, you might want to move the devices manually.
Step 8. Selecting accounts to access devices
If necessary, add the accounts that will be used to start the remote installation task:
Step 9. Starting installation
This page is the final step of the wizard. At this step, the Remote installation task has been successfully created and configured.
By default, the Run the task after the wizard finishes option is not selected. If you select this option, the Remote installation task will start immediately after you complete the wizard. If you do not select this option, the Remote installation task will not start. You can later start this task manually.
Click OK to complete the final step of the Protection deployment wizard.
Network settings for interaction with external services
Kaspersky Security Center Cloud Console uses the following network settings for interacting with external services.
Network settings
Network settings |
Address |
Description |
|---|---|---|
Port: 443 Protocol: HTTPS |
activation-v2.kaspersky.com/activationservice/activationservice.svc |
Application activation. |
Port: 443 Protocol: HTTPS |
https://s00.upd.kaspersky.com https://s01.upd.kaspersky.com https://s02.upd.kaspersky.com https://s03.upd.kaspersky.com https://s04.upd.kaspersky.com https://s05.upd.kaspersky.com https://s06.upd.kaspersky.com https://s07.upd.kaspersky.com https://s08.upd.kaspersky.com https://s09.upd.kaspersky.com https://s10.upd.kaspersky.com https://s11.upd.kaspersky.com https://s12.upd.kaspersky.com https://s13.upd.kaspersky.com https://s14.upd.kaspersky.com https://s15.upd.kaspersky.com https://s16.upd.kaspersky.com https://s17.upd.kaspersky.com https://s18.upd.kaspersky.com https://s19.upd.kaspersky.com https://cm.k.kaspersky-labs.com |
Updating Kaspersky databases, software modules, and applications. |
Port: 443 Protocol: HTTPS |
https://downloads.upd.kaspersky.com |
|
Port: 80 Protocol: HTTP |
http://p00.upd.kaspersky.com http://p01.upd.kaspersky.com http://p02.upd.kaspersky.com http://p03.upd.kaspersky.com http://p04.upd.kaspersky.com http://p05.upd.kaspersky.com http://p06.upd.kaspersky.com http://p07.upd.kaspersky.com http://p08.upd.kaspersky.com http://p09.upd.kaspersky.com http://p10.upd.kaspersky.com http://p11.upd.kaspersky.com http://p12.upd.kaspersky.com http://p13.upd.kaspersky.com http://p14.upd.kaspersky.com http://p15.upd.kaspersky.com http://p16.upd.kaspersky.com http://p17.upd.kaspersky.com http://p18.upd.kaspersky.com http://p19.upd.kaspersky.com http://downloads0.kaspersky-labs.com http://downloads1.kaspersky-labs.com http://downloads2.kaspersky-labs.com http://downloads3.kaspersky-labs.com http://downloads4.kaspersky-labs.com http://downloads5.kaspersky-labs.com http://downloads6.kaspersky-labs.com http://downloads7.kaspersky-labs.com http://downloads8.kaspersky-labs.com http://downloads9.kaspersky-labs.com http://downloads.kaspersky-labs.com http://cm.k.kaspersky-labs.com |
Updating Kaspersky databases, software modules, and applications. |
Port: 443 Protocol: HTTPS |
ds.kaspersky.com |
Using Kaspersky Security Network. |
Port: 443, 1443 Protocol: HTTPS |
ksn-a-stat-geo.kaspersky-labs.com ksn-file-geo.kaspersky-labs.com ksn-verdict-geo.kaspersky-labs.com ksn-url-geo.kaspersky-labs.com ksn-a-p2p-geo.kaspersky-labs.com ksn-info-geo.kaspersky-labs.com ksn-cinfo-geo.kaspersky-labs.com |
Using Kaspersky Security Network. |
Protocol: HTTPS |
click.kaspersky.com redirect.kaspersky.com |
Following links from the interface. |
Port: 80 Protocol: HTTP |
http://crl.kaspersky.com http://ocsp.kaspersky.com |
Public Key Infrastructure (PKI). |
Port: 443 Protocol: HTTPS |
https://ipm-klca.kaspersky.com |
Preparing a device running Astra Linux in the closed software environment mode for installation of Network Agent
Prior to the installation of Network Agent on a device running Astra Linux in the closed software environment mode, you must perform two preparation procedures—the one in the instructions below and general preparation steps for any Linux device.
Before you begin:
- Make sure that the device on which you want to install Network Agent for Linux is running one of the supported Linux distributions.
- Download the necessary Network Agent installation file from the Kaspersky website.
Run the commands provided in this instruction under an account with root privileges.
To prepare a device running Astra Linux in the closed software environment mode for installation of Network Agent:
- Open the
/etc/digsig/digsig_initramfs.conffile, and then specify the following setting:DIGSIG_ELF_MODE=1 - In the command line, run the following command to install the compatibility package:
apt install astra-digsig-oldkeys - Create a directory for the application key:
mkdir -p /etc/digsig/keys/legacy/kaspersky/ - Place the application key /opt/kaspersky/ksc64/share/kaspersky_astra_pub_key.gpg in the directory created in the previous step:
cp kaspersky_astra_pub_key.gpg /etc/digsig/keys/legacy/kaspersky/If the Kaspersky Security Center Cloud Console distribution kit does not include the kaspersky_astra_pub_key.gpg application key, you can download it by clicking the link: https://media.kaspersky.com/utilities/CorporateUtilities/kaspersky_astra_pub_key.gpg.
- Update the RAM disks:
update-initramfs -u -k allReboot the system.
- Perform the preparation steps common for any Linux device.
The device is prepared. You can now proceed to the installation of Network Agent.
Page top
Preparing a Linux device and installing Network Agent on a Linux device remotely
Network Agent installation comprises two steps:
- A Linux device preparation
- Network Agent remote installation
A Linux device preparation
To prepare a device running Linux for remote installation of Network Agent:
- Make sure that the following software is installed on the target Linux device:
- Sudo (for Ubuntu 10.04, Sudo version is 1.7.2p1 or later)
- Perl language interpreter version 5.10 or later
- Test the device configuration:
- Check whether you can connect to the device through an SSH client (such as PuTTY).
If you cannot connect to the device, open the
/etc/ssh/sshd_configfile and make sure that the following settings have the respective values listed below:PasswordAuthentication noChallengeResponseAuthentication yesDo not modify the /etc/ssh/sshd_config file if you can connect to the device with no issues; otherwise, you may encounter SSH authentication failure when running a remote installation task.
Save the file (if necessary) and restart the SSH service by using the
sudo service ssh restartcommand. - Disable the sudo password for the user account under which the device is to be connected.
- Use the
visudocommand in sudo to open the sudoers configuration file.In the file you have opened, add the following line to the end of the file: <
username> ALL = (ALL) NOPASSWD: ALL. In this case,<username>is the user account which is to be used for the device connection using SSH. If you are using the Astra Linux operating system, in the /etc/sudoers file, add the last line with the following text:%astra-admin ALL=(ALL:ALL) NOPASSWD: ALL - Save the sudoers file and then close it.
- Connect to the device again through SSH and make sure that the Sudo service does not prompt you to enter a password; you can do this using the
sudo whoamicommand.
- Check whether you can connect to the device through an SSH client (such as PuTTY).
- Open the
/etc/systemd/logind.conffile, and then do one of the following:- Specify 'no' as a value for the KillUserProcesses setting:
KillUserProcesses=no. - For the KillExcludeUsers setting, type the user name of the account under which the remote installation is to be performed, for example,
KillExcludeUsers=root.
If the target device is running Astra Linux, add
export PATH=/usr/local/sbin:/usr/local/bin:/usr/sbin:/usr/bin:/sbin:/binstring in the/home/<username>/.bashrcfile, where<username>is the user account which is to be used for the device connection using SSH.To apply the changed setting, restart the Linux device or execute the following command:
$ sudo systemctl restart systemd-logind.service - Specify 'no' as a value for the KillUserProcesses setting:
- If you want to install Network Agent on devices with the SUSE Linux Enterprise Server 15 operating system, install the insserv-compat package first to configure Network Agent.
- If you want to install Network Agent on devices with the Astra Linux operating system running in the closed software environment mode, perform additional steps to prepare Astra Linux devices.
- If you want to install Network Agent on devices that use the operating system RED OS 7.3.4 or later or MSVSPHERE 9.2 or later, install the libxcrypt-compat package for the correct function of Network Agent.
Network Agent remote installation
To install Network Agent on Linux devices remotely:
- Download and create an installation package:
- Before installing the package on the device, make sure that it already has all the dependencies (programs and libraries) installed for this package.
You can view the dependencies for each package on your own, using utilities that are specific for the Linux distribution on which the package is to be installed. For more details about utilities, refer to your operating system documentation.
- Download the Network Agent installation package by using the application interface or from the Kaspersky website.
- To create a remote installation package, use the following files:
- klnagent.kpd
- akinstall.sh
- .deb or .rpm package of Network Agent
- Before installing the package on the device, make sure that it already has all the dependencies (programs and libraries) installed for this package.
- Create a remote installation task with the following settings:
- On the Settings page of the New task wizard, select the Using operating system resources through Administration Server check box. Clear all other check boxes.
- On the Selecting an account to run the task page specify the settings of the user account that is used for device connection through SSH.
- Run the remote installation task. Use the option for the
sucommand to preserve the environment:-m, -p, --preserve-environment.
Installing applications by using a remote installation task
Kaspersky Security Center Cloud Console allows you to install applications on devices remotely, by using remote installation tasks. These tasks are created and assigned to devices through a dedicated wizard. To assign a task more quickly and easily, you can specify devices (up to 1000 devices) in the wizard window in one of the following ways:
- Select networked devices detected by Administration Server. In this case, the task is assigned to specific devices. The specific devices can include devices in administration groups, as well as unassigned devices.
- Specify device addresses manually or import addresses from a list. In this case, you can specify DNS names, IP addresses, and IP subnets of devices to which you want to assign the task.
- Assign task to a device selection. In this case, the task is assigned to devices included in a selection created earlier. You can specify the default selection or a custom one that you created.
- Assign task to an administration group. In this case, the task is assigned to devices included in an administration group created earlier.
To avoid issues that may occur during installation of the application on a client device without Network Agent installed, you must proceed as described in forced deployment through the remote installation task of Kaspersky Security Center Cloud Console.
Installing an application remotely
This article contains information on how to install an application remotely on devices in an administration group, devices with specific addresses, or a selection of devices.
To install an application on specific devices:
- In the main menu, go to Assets (Devices) → Tasks.
- Click Add.
The New task wizard starts.
- In the Task type field, select Install application remotely.
- Select one of the following options:
- Assign task to an administration group
- Specify device addresses manually or import addresses from a list
- Assign task to a device selection
The Install application remotely task is created for the specified devices. If you selected the Assign task to an administration group option, the task is a group one.
- At the Task scope step, specify an administration group, devices with specific addresses, or a device selection.
The available settings depend on the option selected at the previous step.
- At the Installation packages step, specify the following settings:
- Select how you want to install the selected application:
- Remote installation by Kaspersky Security Center
- Remote installation by Microsoft Azure API
For more information on how to install applications on Microsoft Azure virtual machines, refer to Remote installation of applications to Azure virtual machines.
- In the Select installation package field, select the installation package of an application that you want to install.
- In the Force installation package download settings group, specify how files that are required for the application installation are distributed to client devices:
- In the Maximum number of concurrent downloads field, specify the maximum allowed number of client devices to which Administration Server can simultaneously transmit the files.
- In the Maximum number of installation attempts field, specify the maximum allowed number of installer runs.
If the number of attempts specified in the parameter is exceeded, Kaspersky Security Center Cloud Console does not start the installer on the device anymore. To restart the Install application remotely task, increase the value of the Maximum number of installation attempts parameter, and then restart the task. Alternatively, you can create a new Install application remotely task.
- If you migrate from one Kaspersky application to another and your current application is password-protected, enter the password in the Password to uninstall the current Kaspersky application field. Note that during the migration, your current Kaspersky application will be uninstalled.
The Password to uninstall the current Kaspersky application field is only available if you have selected the Using Network Agent option in the Force installation package download settings group.
You can use the uninstall password only for the Kaspersky Security for Windows Server to Kaspersky Endpoint Security for Windows migration scenario when installing Kaspersky Endpoint Security for Windows by using the Install application remotely task. Using the uninstall password when installing other applications may cause installation errors.
To complete the migration scenario successfully, make sure that the following prerequisites are met:
- You are using Kaspersky Security Center Network Agent 14.2 for Windows or later.
- You are installing the application on devices running Windows.
- Define the additional options:
- Select on which devices you want to install the application:
- Specify whether devices must be moved to an administration group after installation:
- Do not move devices
- Move unassigned devices to the selected group (only a single group can be selected)
The Do not move devices option is selected by default. For security reasons, you might want to move the devices manually.
- Select how you want to install the selected application:
- At this step of the wizard, specify whether the devices must be restarted during installation of applications:
- If necessary, at the Select accounts to access devices step, add the accounts that will be used to start the Install application remotely task:
- At the Finish task creation step, click the Finish button to create the task and close the wizard.
If you enabled the Open task details when creation is complete option, the task settings window opens. In this window, you can check the task parameters, modify them, or configure a task start schedule, if necessary.
- In the task list, select the task you created, and then click Start.
Alternatively, wait for the task to launch according to the schedule that you specified in the task settings.
When the remote installation task is completed, the selected application is installed on the specified devices.
Installing applications on secondary Administration Servers
To install an application on secondary Administration Servers:
- Establish a connection with the Administration Server that controls the relevant secondary Administration Servers.
- Make sure that the installation package corresponding to the application being installed is available on each of the selected secondary Administration Servers. If you cannot find the installation package on any of the secondary Servers, distribute it. For this purpose, create a task with the Distribute installation package task type.
- Create a task for a remote application installation on secondary Administration Servers. Select the Install application on secondary Administration Server remotely task type.
The New task wizard creates a task for remote installation of the application selected in the wizard on specific secondary Administration Servers.
- Run the task manually or wait for it to launch according to the schedule that you specified in the task settings.
When the remote installation task is complete, the selected application is installed on the secondary Administration Servers.
Page top
Starting and stopping Kaspersky applications
You can use the Start or stop application task for starting and stopping Kaspersky applications on managed devices.
To create the Start or stop application task:
- In the main menu, go to Assets (Devices) → Tasks.
- Click Add.
The New task wizard starts. Proceed through the wizard by using the Next button.
- In the Application drop-down list, select the application for which you want to create the task.
- In the Task type list, select the Application activation task.
- In the Task name field, specify the name of the new task.
The task name cannot be more than 100 characters long and cannot include any special characters ("*<>?\:|).
- Select the devices to which the task will be assigned.
- In the Applications window, do the following:
- Select the check boxes next to the names of applications for which you want to create the task.
- Select the Start application or the Stop application option.
- If you want to modify the default task settings, enable the Open task details when creation is complete option at the Finish task creation step. If you do not enable this option, the task is created with the default settings. You can modify the default settings later, at any time.
- Click the Finish button.
The task is created and displayed in the list of tasks.
- Click the name of the created task to open the task properties window.
- In the task properties window, specify the general task settings according to your needs, and then save the settings.
The task is created and configured.
If you want to run the task, select it in the task list, and then click the Start button.
Page top
Mobile Device Management
Management of mobile device protection through Kaspersky Security Center Cloud Console is carried out by using the Mobile Device Management feature. If you are intending to manage mobile devices owned by employees in your organization, enable and configure Mobile Device Management.
Mobile Device Management enables you to manage Android devices of the employees. The protection is provided by the Kaspersky Security for Mobile app installed on the devices. This mobile app ensures protection of mobile devices against web threats, viruses, and other programs that pose threats.
iOS devices
Kaspersky Device Management for iOS ensures protection and control of mobile devices that are connected to Kaspersky Security Center Cloud Console.
The Kaspersky Security for iOS app offers the following key features:
- Web Protection. This component blocks malicious websites designed to spread malicious code. Web Protection also blocks fake (phishing) websites designed to steal confidential data of the user (for example, passwords for online banking or e-money systems) and access the user's financial info.
- Jailbreak detection. When Kaspersky Security for iOS detects a jailbreak, it displays a critical message and informs you about the issue.
For information about protection deployment and management of mobile devices, see Kaspersky Security for Mobile Help.
Detection and response capabilities
This section contains information about Kaspersky solutions that can be integrated into Kaspersky Security Center Cloud Console to add the detection and response capabilities to the console.
Page top
About detection and response capabilities
Kaspersky Security Center Cloud Console can integrate features of other Kaspersky solutions into the console interface. For example, you can add the detection and response features to the functionality of Kaspersky Security Center Cloud Console.
The detection and response solutions are designed to protect an organization's IT infrastructure from complex cyberthreats. The solutions' functionality combines automatic threat detection with the ability to respond to these threats to resist complex attacks, including new exploits, ransomware, fileless attacks, and methods that use legitimate system tools.
You can integrate the following solutions:
- Kaspersky Endpoint Detection and Response Optimum
After a Kaspersky Endpoint Protection Platform (also referred to as EPP) application detects a threat, Kaspersky Security Center Cloud Console adds a new alert to the alert list. An alert contains detailed information about the detected threat and enables you to analyze and investigate the threat. You can also visualize the threat by creating a threat development chain graph. The graph describes the deployment stages of the detected attack in time.
As a response, you can choose one of the predefined response actions, for example, isolate an untrusted object, isolate a compromised device from the network, or create an execution prevention rule for an untrusted object.
For information about the solution activation, see the Kaspersky Endpoint Detection and Response Optimum documentation.
- Kaspersky Managed Detection and Response
After a Kaspersky EPP application detects a threat, Kaspersky Security Center Cloud Console adds a new incident to the incident list. An incident contains detailed information about the detected threat. The MDR Security Operation Center (SOC) analysts of Kaspersky or a third-party company investigate the incidents and offer responses to solve the incidents. You can accept or reject the offered measures manually, or enable the option to auto-accept all of the responses.
For information about the solution activation, see the Kaspersky Managed Detection and Response documentation.
- Kaspersky Endpoint Detection and Response Expert
This is a solution for organizations that have a team of SOC analysts. The detected threats are registered as alerts or incidents that can be assigned to SOC analysts for investigation. Kaspersky Endpoint Detection and Response Expert provides you with detailed information on each alert or incident, as well as the tools for alert and incident management, threat hunting, and custom rules development. The SOC analysts or security officers can manually select the response actions, or the predefined automated response measures can be taken.
For information about the solution activation, see the Kaspersky Endpoint Detection and Response Expert documentation.
Interface changes after integrating the detection and response features
The following Kaspersky solutions provide detection and response features that can be integrated into the interface of Kaspersky Security Center Cloud Console:
- Kaspersky Endpoint Detection and Response (EDR) Optimum
- Kaspersky Managed Detection and Response (MDR)
- Kaspersky Endpoint Detection and Response (EDR) Expert
The table below lists the changes that the solutions make in the interface of Kaspersky Security Center Cloud Console after integration.
Interface changes made by integrated Kaspersky solutions
Solution |
Changes in Kaspersky Security Center Cloud Console |
|---|---|
Kaspersky EDR Optimum |
Adds the following elements:
|
Kaspersky MDR
|
Adds the following elements:
|
Kaspersky EDR Expert |
Adds the following elements:
|
Discovering networked devices and creating administration groups
This section describes search and discovery of networked devices, as well as creating administration groups for these devices.
Kaspersky Security Center Cloud Console enables you to find devices on the basis of specified criteria. You can save search results to a text file.
The search and discovery feature enables you to find the following devices:
- Managed devices in administration groups of Kaspersky Security Center Cloud Console Administration Server and its secondary Administration Servers.
- Unassigned devices managed by Kaspersky Security Center Cloud Console Administration Server and its secondary Administration Servers.
Scenario: Discovering networked devices
You must perform device discovery before the initial deployment of the security applications. When all networked devices are discovered, you can get information about them and manage them through policies. Regular network polls are needed to discover if there are any new devices and whether the previously discovered devices are still on the network.
When you complete the scenario, device discovery is set up and will be conducted according to the specified schedule.
Prerequisites
In Kaspersky Security Center Cloud Console, device discovery is performed by distribution points. Before you start, do the following:
- Decide which devices will act as distribution points.
- Install Network Agents on the devices that you chose.
- Manually assign the devices to act as distribution points.
Stages
The scenario proceeds in stages:
- Choosing types of discovery
Decide which type(s) of discovery you want to use regularly.
- Configuring polls
In the properties of each distribution point, enable and configure the types of network polling that you chose: Windows network polling, domain controller polling, or IP range polling. Make sure that the poll schedule meets the needs of your organization.
If networked devices are included in a domain, it is recommended to use domain controller polling.
- Setting up rules for adding discovered devices to administration groups (optional)
If new devices appear on your network, they are discovered during regular polls and are automatically included in the Unassigned devices group. If you want, you can set up the rules for automatically moving these devices to the Managed devices group. You can also establish retention rules.
If you skip this rule-setting step, all the newly discovered devices go to the Unassigned devices group and stay there. If you want, you can move these devices to the Managed devices group manually. If you move the devices to the Managed devices group manually, you can analyze information about each device and decide whether you want to move it to an administration group, and, if so, to which group.
When a network polling operation is complete, check that the newly discovered devices are arranged according to the configured rules. If no rules are configured, the devices stay in the Unassigned devices group.
Network polling
Information about the structure of the network and devices on this network is received by Kaspersky Security Center Cloud Console through regular polling of the Windows network, IP ranges, Microsoft Active Directory domain controller and a Samba domain controller. For a Samba domain controller, Samba 4 is used as an Active Directory domain controller. Network polling can be started either manually or automatically according to a schedule.
Based on the results of this polling, Kaspersky Security Center Cloud Console updates the list of unassigned devices. You can also configure rules for newly discovered devices to be moved automatically to administration groups.
Kaspersky Security Center Cloud Console uses the following methods of network polling:
- IP range polling. Kaspersky Security Center Cloud Console polls the specified IP ranges using Internet Control Message Protocol (ICMP) packets and compiles a complete set of data on devices within those IP ranges.
- Windows network polling. You can run either of the two Windows network polls: fast or full. During a fast poll, Kaspersky Security Center Cloud Console only retrieves information from the list of the NetBIOS names of devices in all network domains and work groups. During a full poll, the following information is requested from each device: operating system (OS) name, IP address, DNS name, and NetBIOS name.
- Domain controllers polling. Information about the Active Directory unit structure and about DNS names of the devices from Active Directory groups is recorded to the Kaspersky Security Center Cloud Console database.
Polling results are shown in the Discovery & deployment → Discovery section separately for the Windows network polling and the Domain controllers polling methods.
Polling results for the IP range polling method are shown in the Discovery & deployment → Unassigned devices section.
One device can be shown in more than one detection area. If a device is detected in the HQ domain and its address is 192.168.0.1, the device will appear in both the Windows domains section and the Unassigned devices section. You can modify network polling settings for each polling method. For example, you may want to modify the polling schedule or to set whether to poll the entire Active Directory forest or only a specific domain.
Windows network polling
About Windows network polling
During a quick poll, the Administration Server only retrieves information from the list of the NetBIOS names of devices in all network domains and workgroups. During a full poll, the following information is requested from each client device:
- Operating system name
- IP address
- DNS name
- NetBIOS name
Both quick polls and full polls require the following:
- Ports UDP 137/138, TCP 139 must be available on the network.
- The Microsoft Computer Browser service must be used, and the primary browser computer must be enabled on the distribution point.
- The Microsoft Computer Browser service must be used, and the primary browser computer must be enabled on the client devices:
- On at least one device, if the number of networked devices does not exceed 32.
- On at least one device for each 32 networked devices.
The full poll can run only if the quick poll has run at least once.
Viewing and modifying the settings for Windows network polling
To modify the properties of Windows network polling:
- In the main menu, click the settings icon () next to the name of the required Administration Server.
The Administration Server properties window opens.
- On the General tab, select the Distribution points section.
- Click the name of the distribution point that you want to use to poll the network.
The distribution point properties window opens.
- Select the Windows domains polling section.
- Enable or disable Windows network polling by using the Enable network polling toggle button.
- Configure the schedule for the quick polling and the full polling.
- Click the OK button.
The properties are saved and applied to all of the discovered Windows domains and workgroups.
Domain controller polling
Kaspersky Security Center Cloud Console supports polling of a Microsoft Active Directory domain controller and a Samba domain controller only by using a distribution point.
Kaspersky Security Center Cloud Console allows you to poll a Samba domain controller only by using a Linux distribution point. For a Samba domain controller, Samba 4 is used as an Active Directory domain controller.
When you poll a domain controller, a distribution point retrieves information about the domain structure, user accounts, security groups, and DNS names of the devices that are included in the domain. Domain controller polling is performed according to a schedule that you set.
Prerequisites
Before you poll a domain controller, ensure that the following protocols are enabled:
- Simple Authentication and Security Layer (SASL)
- Lightweight Directory Access Protocol (LDAP)
Ensure that the following ports are available on the domain controller device:
- 389 for SASL
- 636 for TLS
Domain controller polling by using a distribution point
You can also poll a domain controller by using a distribution point. A Windows- or Linux-based managed device can act as a distribution point.
For a Linux distribution point, polling of a Microsoft Active Directory domain controller and a Samba domain controller are supported.
For a Windows distribution point, only polling of a Microsoft Active Directory domain controller is supported.
Polling with a Mac distribution point is not supported.
To configure domain controller polling by using the distribution point:
- Open the distribution point properties.
- Select the Domain controller polling section.
- Select the Enable domain controller polling option.
- Select the domain controller that you want to poll.
If you use a Linux distribution point, in the Poll specified domains section, click Add, and then specify the address and user credentials of the domain controller.
If you use a Windows distribution point, you can select one of the following options:
- Poll current domain
- Poll entire domain forest
- Poll specified domains
- Click the Set polling schedule button to specify the polling schedule options if needed.
Polling starts only according to the specified schedule. Manual start of polling is not available.
After the polling is completed, the domain structure will be displayed in the Domain controllers section.
If you set up and enabled device moving rules, the newly discovered devices are automatically included in the Managed devices group. If no moving rules have been enabled, the newly discovered devices are automatically included in the Unassigned devices group.
The discovered user accounts can be used for domain authentication in Kaspersky Security Center Cloud Console.
Viewing the results of domain controller polling
To view the results of domain controller polling:
- In the main menu, go to Discovery & deployment → Discovery → Domain controllers.
The list of discovered organizational units is displayed.
- Select an organizational unit, and then click the Devices button.
The list of devices in the organizational unit is displayed.
You can search the list and filter the results.
IP range polling
Kaspersky Security Center Cloud Console attempts to perform reverse name resolution for every address from the specified range to a DNS name using standard DNS requests. If this operation succeeds, the server sends an ICMP ECHO REQUEST (the same as the ping command) to the received name. If the device responds, the information about it is added to the Kaspersky Security Center Cloud Console database. The reverse name resolution is necessary to exclude the network devices that can have an IP address but are not computers, for example, network printers or routers.
This polling method relies upon a correctly configured local DNS service. It must have a reverse lookup zone. If this zone is not configured, IP subnet polling will yield no results. On the networks where Active Directory is used, such a zone is maintained automatically. But on these networks, IP subnet polling does not provide more information than Active Directory polling. Moreover, administrators of small networks often do not configure the reverse lookup zone because it is not necessary for the work of many network services. For these reasons, IP subnet polling is disabled by default.
Initially, Kaspersky Security Center Cloud Console gets IP ranges for polling from the network settings of the distribution point device which is used for network polling. If the device address is 192.168.0.1 and the subnet mask is 255.255.255.0, Kaspersky Security Center Cloud Console includes the network 192.168.0.0/24 in the list of polling address automatically. Kaspersky Security Center Cloud Console polls all addresses from 192.168.0.1 to 192.168.0.254.
It is not recommended to use IP range polling if you use Windows network polling and/or Active Directory polling.
Viewing and modifying the settings for IP range polling
To view and modify the properties of IP range polling:
- In the main menu, click the settings icon () next to the name of the required Administration Server.
The Administration Server properties window opens.
- On the General tab, select the Distribution points section.
- Click the name of the distribution point that you want to use to poll the network.
The distribution point properties window opens.
- Select the IP range polling section.
- Enable or disable IP polling by using the Enable range polling toggle button.
- Configure the polling schedule. By default, IP polling runs every 420 minutes (seven hours).
- If necessary, add or modify IP ranges to poll.
When specifying the polling interval, make sure that this setting does not exceed the value of the IP address lifetime parameter. If an IP address is not verified by polling during the IP address lifetime, this IP address is automatically removed from the polling results. By default, the life span of the polling results is 24 hours, because dynamic IP addresses (assigned using Dynamic Host Configuration Protocol (DHCP)) change every 24 hours.
- Click the OK button.
The properties are saved and applied to all IP ranges.
Configuring a Samba domain controller
Kaspersky Security Center Cloud Console supports a Linux domain controller running only on Samba 4.
A Samba domain controller supports the same schema extensions as a Microsoft Active Directory domain controller. You can enable full compatibility of a Samba domain controller with a Microsoft Active Directory domain controller by using the Samba 4 schema extension. This is an optional action.
We recommend enabling full compatibility of a Samba domain controller with a Microsoft Active Directory domain controller. This will ensure the correct interaction between Kaspersky Security Center Cloud Console and the Samba domain controller.
To enable full compatibility of a Samba domain controller with a Microsoft Active Directory domain controller:
- Execute the following command to use the RFC2307 schema extension:
samba-tool domain provision --use-rfc2307 --interactive - Enable the schema update in a Samba domain controller. To do this, add the following line to the /etc/samba/smb.conf file:
dsdb:schema update allowed = trueIf the schema update completes with an error, you need to perform a full restore of the domain controller that acts as a schema master.
For all Linux-based hosts within a Samba domain controller, specify the netbios name and workgroup parameters in the /etc/samba/smb.conf file. Otherwise, polling results may contain duplicate hosts.
Adding and modifying an IP range
Initially, Kaspersky Security Center Cloud Console gets IP ranges for polling from the network settings of the distribution point device which is used for network polling. If the device address is 192.168.0.1 and the subnet mask is 255.255.255.0, Kaspersky Security Center Cloud Console includes the network 192.168.0.0/24 in the list of polling address automatically. Kaspersky Security Center Cloud Console polls all addresses from 192.168.0.1 to 192.168.0.254. You can modify the automatically defined IP ranges or add custom IP ranges.
To add a new IP range:
- In the main menu, click the settings icon () next to the name of the required Administration Server.
The Administration Server properties window opens.
- On the General tab, select the Distribution points section.
- Click the name of the distribution point that you want to use to poll the network.
The distribution point properties window opens.
- Select the IP range polling section.
- To add a new IP range, click the Add button.
- In the window that opens, specify the following settings:
- Click the OK button.
The new IP range is added to the list of IP ranges.
When the polling is complete, you can view the list of discovered devices by using the Devices button. By default, the life span of the polling results is 24 hours and it is equal to the IP address lifetime setting.
Adjustment of distribution points and connection gateways
A structure of administration groups in Kaspersky Security Center Cloud Console serves the following functions:
- Sets the scope of policies
There is an alternate way of applying relevant settings on devices, by using policy profiles. In this case, the scope of policies is set with tags, device locations in Active Directory organizational units, membership in Active Directory security groups, etc.
- Sets the scope of group tasks
There is an approach to defining the scope of group tasks that is not based on a hierarchy of administration groups: use of tasks for device selections and tasks for specific devices.
- Sets access rights to devices and secondary Administration Servers
- Assigns distribution points
When building the structure of administration groups, you must take into account the topology of the organization's network for the optimum assignment of distribution points. The optimum distribution of distribution points enables you to save traffic in the organization's network.
Depending on the organizational schema and network topology, the following standard configurations can be applied to the structure of administration groups:
- Single office
- Multiple small remote offices
Devices functioning as distribution points must be protected, including physical protection, against any unauthorized access.
Calculating the number and configuration of distribution points
The more client devices a network contains, the more distribution points it requires. Use the tables below to calculate the number of distribution points required for your network.
Make sure that the devices that you intend to use as distribution points have sufficient volume of free disk space, are not shut down regularly, and have Sleep mode disabled.
Number of exclusively assigned distribution points on a network that contains a single network segment, based on the number of networked devices
Number of client devices in the network segment |
Number of distribution points |
|---|---|
Less than 300 |
0 (Do not assign distribution points) |
More than 300 |
Acceptable: (N/10,000 + 1), recommended: (N/5000 + 2), where N is the number of networked devices |
Number of exclusively assigned distribution points on a network that contains multiple network segments, based on the number of networked devices
Number of client devices per network segment |
Number of distribution points |
|---|---|
Less than 10 |
0 (Do not assign distribution points) |
10... 100 |
1 |
More than 100 |
Acceptable: (N/10,000 + 1), recommended: (N/5000 + 2), where N is the number of networked devices |
Using standard client devices (workstations) as distribution points
If you plan to use standard client devices (that is, workstations) as distribution points, we recommend that you assign distribution points as shown in the tables below in order to avoid excessive load on the communication channels and on Administration Server:
Number of workstations functioning as distribution points on a network that contains a single network segment, based on the number of networked devices
Number of client devices in the network segment |
Number of distribution points |
|---|---|
Less than 300 |
0 (Do not assign distribution points) |
More than 300 |
(N/300 + 1), where N is the number of networked devices; there must be at least 3 distribution points |
Number of workstations functioning as distribution points on a network that contains multiple network segments, based on the number of networked devices
Number of client devices per network segment |
Number of distribution points |
|---|---|
Less than 10 |
0 (Do not assign distribution points) |
10... 30 |
1 |
31... 300 |
2 |
More than 300 |
(N/300 + 1), where N is the number of networked devices; there must be at least 3 distribution points |
If a distribution point is not available, update Kaspersky databases, software modules, and applications manually or directly from the Kaspersky update servers.
Standard configuration of distribution points: Single office
In a standard "single-office" configuration, all devices are on the organization's network so they can "see" each other. The organization's network may consist of a few separate parts (networks or network segments) linked by narrow channels.
The following methods of building the structure of administration groups are possible:
- Building the structure of administration groups taking into account the network topology. The structure of administration groups may not reflect the network topology with absolute precision. A match between the separate parts of the network and certain administration groups would be enough.
- Building the structure of administration groups, without taking the network topology into account. In this case, you must assign one or several devices to act as distribution points for a root administration group in each of the separate parts of the network, for example, for the Managed devices group. All distribution points will be at the same level and will feature the same scope spanning all devices in the organization's network. In this case, each Network Agent will connect to the distribution point that has the shortest route. The route to a distribution point can be traced with the tracert utility.
Standard configuration of distribution points: Multiple small remote offices
This standard configuration provides for a number of small remote offices, which may communicate with the head office over the internet. Each remote office is located behind the NAT, that is, connection from one remote office to another is not possible because offices are isolated from one another.
The configuration must be reflected in the structure of administration groups: a separate administration group must be created for each remote office (groups Office 1 and Office 2 in the figure below).
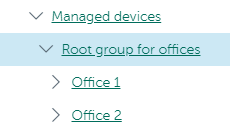
Remote offices are included in the administration group structure
One or multiple distribution points must be assigned to each administration group that correspond to an office. Distribution points must be devices at the remote office that have a sufficient amount of free disk space. Devices deployed in the Office 1 group, for example, will access distribution points assigned to the Office 1 administration group.
If some users move between offices physically, with their laptops, you must select two or more devices (in addition to the existing distribution points) in each remote office and assign them to act as distribution points for a top-level administration group (Root group for offices in the figure above).
Example: A laptop is deployed in the Office 1 administration group and then is moved physically to the office that corresponds to the Office 2 administration group. After the laptop is moved, Network Agent attempts to access the distribution points assigned to the Office 1 group, but those distribution points are unavailable. Then, Network Agent starts attempting to access the distribution points that have been assigned to the Root group for offices. Because remote offices are isolated from one another, attempts to access distribution points assigned to the Root group for offices administration group will only be successful when Network Agent attempts to access distribution points in the Office 2 group. That is, the laptop will remain in the administration group that corresponds to the initial office, but the laptop will use the distribution point of the office where it is physically located at the moment.
Assigning distribution points manually
Kaspersky Security Center Cloud Console enables you to manually assign devices to act as distribution points. We recommend that you calculate the number and configuration of distribution points required for your network.
Distribution point devices running macOS cannot download updates from Kaspersky update servers.
If one or more devices running macOS are within the scope of the Download updates to the repositories of distribution points task, the task completes with the Failed status, even if it has successfully completed on all Windows devices.
Devices functioning as distribution points must be protected, including physical protection, against any unauthorized access.
To manually assign a device to act as distribution point:
- In the main menu, click the settings icon () next to the name of the required Administration Server.
The Administration Server properties window opens.
- On the General tab, select the Distribution points section.
- Click the Assign button.
- Select the device that you want to make a distribution point.
When selecting a device, keep in mind the operation features of distribution points and the requirements set for the device that acts as distribution point.
- Select the administration group that you want to include in the scope of the selected distribution point.
- Click the Add button.
The distribution point that you have added will be displayed in the list of distribution points, in the Distribution points section.
- Select the newly added distribution point in the list to open its properties window.
- Configure the distribution point in the properties window:
- The General section contains the settings of interaction between the distribution point and client devices:
- In the Scope section, specify the scope to which the distribution point will distribute updates (administration groups and / or network location).
Only devices running a Windows operating system can determine their network location. Network location cannot be determined for devices running other operating systems.
- In the KSN Proxy section, you can configure the application to use the distribution point to forward KSN requests from the managed devices:
- Configure the polling of Windows domains, domain controller, and IP ranges by the distribution point:
- In the Advanced section, specify the folder that the distribution point must use to store distributed data:
- Click the OK button.
The selected devices act as distribution points.
Modifying the list of distribution points for an administration group
You can view the list of distribution points assigned to a specific administration group and modify the list by adding or removing distribution points.
To view and modify the list of distribution points assigned to an administration group:
- In the main menu, go to Assets (Devices) → Groups.
- In the administration group structure, select the administration group for which you want to view the assigned distribution points.
- Click the Distribution points tab.
- Add new distribution points for the administration group by using the Assign button or remove the assigned distribution points by using the Unassign button.
Depending on your modifications, the new distribution points are added to the list or existing distribution points are removed from the list.
Using a distribution point as a push server
In Kaspersky Security Center Cloud Console, a distribution point can work as a push server for Windows-based and Linux-based devices that are managed by Network Agent. A push server has the same scope of managed devices as the distribution point on which the push server is enabled. If you have several distribution points assigned for the same administration group, you can enable a push server on each of the distribution points. In this case, Administration Server balances the load between the distribution points.
You can use distribution points as push servers to ensure that continuous connectivity between a managed device and the Administration Server. Continuous connectivity is needed for some operations, such as running and stopping local tasks, receiving statistics for a managed application, or creating a tunnel. If you use a distribution point as a push server, you do not have to send packets to the UDP port of Network Agent.
To use a distribution point as a push server:
- In the main menu, click the settings icon () next to the name of the required Administration Server.
The Administration Server properties window opens.
- On the General tab, select the Distribution points section.
- Click the distribution point that you want to use as a push server.
- In the property list of the selected distribution point, go to the General section, and then enable the Run push server option.
The Push server port entry field becomes available.
- In the Push server port entry field, specify the port on the distribution point that client devices will use for connection. By default, port 13295 is used.
To establish connection between the distribution point acting as a push server and a managed device, you must manually add the specified push server port to the Microsoft Windows Firewall exclusion list.
- Click OK to exit the distribution point properties window, and then click Save to apply changes.
After you enable the Run push server option, the Do not disconnect from the Administration Server option is automatically enabled on the distribution point that acts as a push server. This option provides an early connection between Network Agent and the Administration Server.
- Open the Network Agent policy settings window.
- Go to Connectivity → Network, and then enable the Use distribution point to force connection to the Administration Server option. Close the lock for this option.
- Also in the Network subsection, you can disable the Use UDP port option. The configured push server will provide continuous connectivity between a managed device and the Administration Server instead of sending packets through the UDP port.
- Click OK to exit the window.
The distribution point starts acting as a push server. It can now send push notifications to client devices.
Using the "Do not disconnect from the Administration Server" option to provide continuous connectivity between a managed device and the Administration Server
If you do not use push servers, Kaspersky Security Center Cloud Console does not provide continuous connectivity between managed devices and the Administration Server. Network Agents on managed devices periodically establish connections and synchronize with the Administration Server. The interval between those synchronization sessions is defined in a Network Agent policy. If an early synchronization is required, the Administration Server (or a distribution point, if it is in use) sends a signed network packet over an IPv4 or IPv6 network to the UDP port of Network Agent. By default, the port number is 15000. If no connection through UDP is possible between the Administration Server and a managed device, synchronization will run at the next regular connection of Network Agent to the Administration Server within the synchronization interval.
Some operations cannot be performed without an early connection between Network Agent and the Administration Server, such as running and stopping local tasks, receiving statistics for a managed application, or creating a tunnel. To resolve this issue, if you are not using push servers, you can use the Do not disconnect from the Administration Server option to ensure continuous connectivity between a managed device and the Administration Server.
To provide continuous connectivity between a managed device and the Administration Server:
- Do one of the following:
- If the managed device accesses the Administration Server directly (that is, not via a distribution point):
- In the main menu, go to Devices → Managed devices.
- Click the name of the device with which you want to provide continuous connectivity.
The property window of the managed device opens.
- If the managed device accesses the Administration Server through a distribution point running in gateway mode, not directly:
- In the main menu, click the settings icon () next to the name of the required Administration Server.
The Administration Server properties window opens.
- On the General tab, select the Distribution points section.
- In the distribution point list, click the name of the required distribution point.
The properties window of the selected distribution point opens.
- In the main menu, click the settings icon (
- If the managed device accesses the Administration Server directly (that is, not via a distribution point):
- In the General section of the opened properties window, select the Do not disconnect from the Administration Server option.
Continuous connectivity is established between the managed device and the Administration Server.
The maximum total number of devices with the Do not disconnect from the Administration Server option selected is 300.
Creating administration groups
Initially, the hierarchy of administration groups contains the only administration group named Managed devices. When creating a hierarchy of administration groups, you can add devices and virtual machines to the Managed devices group and add subgroups. For each administration group, the properties window contains information about policies, tasks, and devices related to the group.
To create an administration group:
- In the main menu, go to Assets (Devices) → Hierarchy of groups.
- Select the check box next to the administration group for which you want to create a new subgroup.
- Click the Add button.
- Type a name for the new administration group.
- Click the Add button.
A new administration group with the specified name appears in the administration group hierarchy.
The application allows creation of a hierarchy of administration groups based on the structure of Active Directory or on the structure of the domain network. Also, you can create a structure of groups from a text file.
To create a structure of administration groups:
- In the main menu, go to Assets (Devices) → Hierarchy of groups.
- Click the Import button.
The New administration group structure wizard starts. Follow the instructions of the wizard.
Creating device moving rules
You can set up device moving rules, that is, rules that automatically allocate devices to administration groups.
To create a moving rule:
- In the main menu, go to Assets (Devices) → Moving rules.
- Click Add.
- In the window that opens, specify the following information on the General tab:
- On the Rule conditions tab, specify at least one criterion by which the devices are moved to an administration group.
- Click Save.
The moving rule is created. It is displayed in the list of moving rules.
The higher the position is on the list, the higher the priority of the rule. To increase or decrease the priority of a moving rule, move the rule up or down in the list, respectively, using the mouse.
If the Apply rule continuously option is selected, the moving rule is applied regardless of the priority settings. Such rules are applied according to the schedule which the Administration Server sets up automatically.
If the device attributes meet the conditions of multiple rules, the device is moved to the target group of the rule with the highest priority (that is, has the highest rank in the list of rules).
Copying device moving rules
You can copy moving rules, for example, if you want to have several identical rules for different target administration groups.
To copy an existing a moving rule:
- Do one of the following:
- In the main menu, go to Assets (Devices) → Moving rules.
- In the main menu, go to Discovery & deployment → Deployment & assignment → Moving rules.
The list of moving rules is displayed.
- Select the check box next to the rule you want to copy.
- Click Copy.
- In the window that opens, change the following information on the General tab—or make no changes if you only want to copy the rule without changing its settings:
- On the Rule conditions tab, specify at least one criterion for the devices that you want to be moved automatically.
- Click Save.
The new moving rule is created. It is displayed in the list of moving rules.
Conditions for a device moving rule
When you create or copy a rule to move client devices to administration groups, on the Rule conditions tab you set conditions for moving the devices. To determine which devices to move, you can use the following criteria:
- Tags assigned to client devices.
- Network parameters. For example, you can move devices with IP addresses from a specified range.
- Managed applications installed on client devices, for instance, Network Agent or Administration Server.
- Virtual machines, which are the client devices.
- Information about the Active Directory organizational unit (OU) with the client devices.
- Information about a cloud segment with the client devices.
Below, you can find the description on how to specify this information in a device moving rule.
If you specify several conditions in the rule, the AND logical operator works and all the conditions apply at the same time. If you do not select any options or keep some fields blank, such conditions do not apply.
Tags tab
On this tab, you can configure a device moving rule based on device tags that were previously added to the descriptions of client devices. To do this, select the required tags. Also, you can enable the following options:
Network tab
On this tab, you can specify the network data of devices that a device moving rule considers:
- Device name on the Windows network
- Windows domain
- DNS name of the device
- DNS domain
- IP range
- IP address for connection to Administration Server
- Device is in IP range
- Connection profile changed
- Managed by a different Administration Server
Applications tab
On this tab, you can configure a device moving rule based on the managed applications and operating systems installed on client devices:
- Network Agent is installed
- Applications
- Operating system version
- Operating system bit size
You can cull client devices by the operating system bit sizes. In the Operating system bit size field, you can select one of the following values:
- Unknown
- x86
- AMD64
- IA64
To check the operating system bit size of the client devices:
- In the main menu, go to the Assets (Devices) → Managed devices section.
- Click the Columns settings button (
 ) on the right.
 - Select the Operating system bit size option, and then click the Save button.
After that, the operating system bit size is displayed for every managed device.
- Operating system service pack version
- User certificate
- Operating system build
- Operating system release number
Virtual machines tab
On this tab, you can configure a device moving rule according to whether client devices are virtual machines or part of a virtual desktop infrastructure (VDI):
- This is a virtual machine
- Virtual machine type
- Part of Virtual Desktop Infrastructure
Domain controller tab
On this tab, you can specify that it is necessary to move devices included in the domain organizational unit. You can also move devices from all child organizational units of the specified domain organizational unit:
- Device is included in the following organizational unit
- Include child organizational units
- Move devices from child units to corresponding subgroups
- Create subgroups corresponding to containers of newly detected devices
- Delete subgroups that are not present in the domain
- Device is included in the following domain security group
Cloud segments tab
On this tab, you can specify that it is necessary to move devices that belong to specific cloud segments:
- Device is in a cloud segment
- Include child objects
- Move devices from nested objects to corresponding subgroups
- Create subgroups corresponding to containers of newly detected devices
- Delete subgroups for which no match is found in the cloud segments
- Device discovered by using the API
Adding devices to an administration group manually
You can move devices to administration groups automatically by creating device moving rules or manually by moving devices from one administration group to another or by adding devices to a selected administration group. This section describes how to manually add devices to an administration group.
To add manually one or more devices to a selected administration group:
- In the main menu, go to Assets (Devices) → Managed devices.
- Select the administration group to which you want to add the devices:
- For the root group:
In this case you can proceed to the next step.
- For a subgroup:
Click the Change scope button at the top of the page, and then, in the window that opens, click the name of the subgroup.
The path to the selected group is displayed at the top of the page. If necessary, you can click a link with the administration group name to go to the group. By default, the last link in the path is inactive.
- For the root group:
- Click the Add devices button.
The Move devices wizard starts.
- Make a list of the devices that you want to add to the administration group.
You can add only devices for which information has already been added to the Administration Server database either upon connection of the device or after device discovery.
Select how you want to add devices to the list:
- Click the Add devices button, and then specify the devices in one of the following ways:
- Select devices from the list of devices detected by the Administration Server.
- Specify a device IP address or an IP range.
- Specify the NetBIOS name or DNS name of a device.
The device name field must not contain space characters, backspace characters, or the following prohibited characters: , \ / * ' " ; : & ` ~ ! @ # $ ^ ( ) = + [ ] { } | < > %
- Click the Import devices from file button to import a list of devices from a .txt file. Each device address or name must be specified on a separate line.
The file must not contain space characters, backspace characters, or the following prohibited characters: , \ / * ' " ; : & ` ~ ! @ # $ ^ ( ) = + [ ] { } | < > %
- Click the Add devices button, and then specify the devices in one of the following ways:
- View the list of devices to be added to the administration group. You can edit the list by adding or removing devices.
- After making sure that the list is correct, click the Next button.
The wizard processes the device list and displays the result. The successfully processed devices are added to the administration group and are displayed in the list of devices under names generated by Administration Server.
Moving devices or clusters to an administration group manually
You can move devices from one administration group to another, or from the group of unassigned devices to an administration group.
You can also move clusters or server arrays from one administration group to another. When you move a cluster or server array to another group, all of its nodes move with it, because a cluster and any of its nodes always belong to the same administration group. When you select a single cluster node on the Devices tab, the Move to group button becomes unavailable.
To move one or several devices or clusters to a selected administration group:
- Open the administration group from which you want to move the devices. To do this, perform one of the following:
- To open an administration group, in the main menu, go to Assets (Devices) → Groups → <group name> → Managed devices.
- To open the Unassigned devices group, in the main menu, go to Discovery & deployment → Unassigned devices.
- If the administration group contains clusters or server arrays, the Managed devices section is divided into two tabs—the Devices tab and the Clusters and server arrays tab. Open the tab for the object that you want to move.
- Select the check boxes next to the devices or clusters that you want to move to a different group.
- Click the Move to group button.
- In the hierarchy of administration groups, select the check box next to the administration group to which you want to move the selected devices or clusters.
- Click the Move button.
The selected devices or clusters are moved to the selected administration group.
Configuring retention rules for unassigned devices
After Windows network polling is complete, the found devices are placed into subgroups of the Unassigned devices administration group. This administration group can be found at Discovery & deployment → Discovery → Windows domains. The Windows domains folder is the parent group. It contains child groups named after the corresponding domains and workgroups that have been found during the poll. The parent group may also contain the administration group of mobile devices. You can configure the retention rules of the unassigned devices for the parent group and for each of the child groups. The retention rules do not depend on the device discovery settings and work even if the device discovery is disabled.
The device retention rules do not affect the devices that have one or more drives encrypted with full disk encryption. Such devices are not deleted automatically—you can only delete them manually. If you need to delete a device with an encrypted drive, first decrypt the drive, and then delete the device.
To configure retention rules for unassigned devices:
- In the main menu, go to Discovery & deployment → Discovery → Windows domains.
- Do one of the following:
- To configure settings of the parent group, click the Properties button.
The Windows domain properties window opens.
- To configure settings of a child group, click its name.
The child group properties window opens.
- To configure settings of the parent group, click the Properties button.
- Define the following settings:
- Click the Accept button.
Your changes are saved and applied.
Page top
Configuring network protection
This section contains information about manual configuration of policies and tasks, about user roles, about building an administration group structure and hierarchy of tasks.
Scenario: Configuring network protection
The quick start wizard creates policies and tasks with the default settings. These settings may turn out to be sub-optimal or even disallowed by the organization. Therefore, we recommend that you fine-tune these policies and tasks and create other policies and tasks, if they are necessary for your network.
Prerequisites
Before you start, make sure that you have completed the Kaspersky Security Center Cloud Console initial configuration scenario, including the quick start wizard.
When the quick start wizard is running, the following policies and tasks are created in the Managed devices administration group:
- Policy of Kaspersky Endpoint Security
- Group task for updating Kaspersky Endpoint Security
- Policy of Network Agent
- Find vulnerabilities and required updates (task of Network Agent)
Stages
Configuring network protection proceeds in stages:
- Setup and propagation of Kaspersky application policies and policy profiles
To configure and propagate settings for Kaspersky applications installed on the managed devices, you can use two different security management approaches: device-centric or user-centric. You can also combine these two approaches.
- Configuring tasks for remote management of Kaspersky applications
Check the tasks created with the quick start wizard and fine-tune them, if necessary.
How-to instructions:
- Setting up the group task for updating Kaspersky Endpoint Security
- Creating the Find vulnerabilities and required updates task
If necessary, create additional tasks to manage the Kaspersky applications installed on the client devices.
- Evaluating and limiting the event load on the database
Information about events that occur during the operation of managed applications is transferred from a client device and registered in the Administration Server database. To reduce the load on the Administration Server, evaluate and limit the maximum number of events that can be stored in the database.
How-to instructions: Setting the maximum number of events.
Results
Upon completion of this scenario, your network will be protected by configuration of Kaspersky applications, tasks, and events received by the Administration Server:
- The Kaspersky applications are configured according to the policies and policy profiles.
- The applications are managed through a set of tasks.
- The maximum number of events that can be stored in the database is set.
When the network protection configuration is complete, you can proceed to configuring regular updates to Kaspersky databases and applications.
About device-centric and user-centric security management approaches
You can manage security settings from the standpoint of device features and from the standpoint of user roles. The first approach is called device-centric security management and the second is called user-centric security management. To apply different application settings to different devices you can use either or both types of management in combination.
Device-centric security management enables you to apply different security application settings to managed devices depending on device-specific features. For example, you can apply different settings to devices allocated in different administration groups. You can also differentiate the devices by usage of those devices in Active Directory, or their hardware specifications.
User-centric security management enables you to apply different security application settings to different user roles. You can create several user roles, assign an appropriate user role to each user, and define different application settings to the devices owned by users with different roles. For example, you may want to apply different application settings to devices of accountants and human resources (HR) specialists. As a result, when user-centric security management is implemented, each department—accounts department and HR department—has its own settings configuration for Kaspersky applications. A settings configuration defines which application settings can be changed by users and which are forcibly set and locked by the administrator.
By using user-centric security management you can apply specific application settings to individual users. This may be required when an employee has a unique role in the company or when you want to monitor security issues related to devices of a specific person. Depending on the role of this employee in the company, you can expand or limit the rights of this person to change application settings. For example, you might want to expand the rights of a system administrator who manages client devices in a local office.
You can also combine the device-centric and user-centric security management approaches. For example, you can configure a specific application policy for each administration group, and then create policy profiles for one or several user roles of your enterprise. In this case the policies and policy profiles are applied in the following order:
- The policies created for device-centric security management are applied.
- They are modified by the policy profiles according to the policy profile priorities.
- The policies are modified by the policy profiles associated with user roles.
Policy setup and propagation: Device-centric approach
This section provides a scenario for a device-centric approach to the centralized configuration of Kaspersky applications installed on managed devices. When you complete this scenario, the applications will be configured on all of the managed devices in accordance with the application policies and policy profiles that you define.
You might also want to consider user-centric security management as an alternative or additional option to the device-centric approach.
Process
The scenario of device-centric management of Kaspersky applications consists of the following steps:
- Configuring application policies
Configure settings for Kaspersky applications installed on the managed devices by creating a policy for each application. The set of policies will be propagated to the client devices.
When you configure the protection of your network in quick start wizard, Kaspersky Security Center Cloud Console creates the default policy for Kaspersky Endpoint Security for Windows. If you completed the configuration process by using this wizard, you do not have to create a new policy for this application. Proceed to the manual setup of Kaspersky Endpoint Security policy.
If you have a hierarchical structure of several administration groups, the child administration groups inherit the policies from the primary Administration Server by default. You can force the inheritance by the child groups to prohibit any modifications of the settings configured in the upstream policy. If you want only part of the settings to be forcibly inherited, you can lock them in the upstream policy. The remaining unlocked settings will be available for modification in the downstream policies. The created hierarchy of policies will allow you to effectively manage devices in the administration groups.
How-to instructions: Creating a policy
- Creating policy profiles (optional)
If you want devices within a single administration group to run under different policy settings, create policy profiles for those devices. A policy profile is a named subset of policy settings. This subset is distributed on target devices together with the policy, supplementing it under a specific condition called the profile activation condition. Profiles only contain settings that differ from the "basic" policy, which is active on the managed device.
By using profile activation conditions, you can apply different policy profiles, for example, to the devices located in a specific unit or security group of Active Directory, having a specific hardware configuration, or marked with specific tags. Use tags to filter devices that meet specific criteria. For example, you can create a tag called Windows, mark all devices running Windows operating system with this tag, and then specify this tag as an activation condition for a policy profile. As a result, Kaspersky applications installed on all devices running Windows will be managed by their own policy profile.
How-to instructions:
- Propagating policies and policy profiles to the managed devices
Kaspersky Security Center Cloud Console automatically synchronizes the Administration Server with the managed devices several times per hour. During the synchronization, the new or changed policies and policy profiles are propagated to the managed devices. You can circumvent auto-synchronization and run the synchronization manually by using the Force synchronization command. When synchronization is complete, the policies and policy profiles are delivered and applied to the installed Kaspersky applications.
You can check whether the policies and policy profiles were delivered to a device. Kaspersky Security Center Cloud Console specifies the delivery date and time in the properties of the device.
How-to instructions: Forced synchronization
Results
When the device-centric scenario is complete, the Kaspersky applications are configured according to the settings specified and propagated through the hierarchy of policies.
The configured application policies and policy profiles will be applied automatically to the new devices added to the administration groups.
Policy setup and propagation: User-centric approach
This section describes the scenario of user-centric approach to the centralized configuration of Kaspersky applications installed on the managed devices. When you complete this scenario, the applications will be configured on all of the managed devices in accordance with the application policies and policy profiles that you define.
You might also want to consider device-centric security management as an alternative or additional option to the user-centric approach. Learn more about two management approaches.
Process
The scenario of user-centric management of Kaspersky applications consists of the following steps:
- Configuring application policies
Configure settings for Kaspersky applications installed on the managed devices by creating a policy for each application. The set of policies will be propagated to the client devices.
When you configure the protection of your network in quick start wizard, Kaspersky Security Center Cloud Console creates the default policy for Kaspersky Endpoint Security. If you completed the configuration process by using this wizard, you do not have to create a new policy for this application. Proceed to the manual setup of Kaspersky Endpoint Security policy.
If you have a hierarchical structure of several administration groups, the child administration groups inherit the policies from the primary Administration Server by default. You can force the inheritance by the child groups to prohibit any modifications of the settings configured in the upstream policy. If you want only part of the settings to be forcibly inherited, you can lock them in the upstream policy. The remaining unlocked settings will be available for modification in the downstream policies. The created hierarchy of policies will allow you to effectively manage devices in the administration groups.
How-to instructions: Creating a policy
- Specifying owners of the devices
Assign the managed devices to the corresponding users.
How-to instructions: Assigning a user as a device owner
- Defining user roles typical for your enterprise
Think about different kinds of work that the employees of your enterprise typically perform. You must divide all employees in accordance with their roles. For example, you can divide them by departments, professions, or positions. After that you will need to create a user role for each group. Keep in mind that each user role will have its own policy profile containing application settings specific for this role.
- Creating user roles
Create and configure a user role for each group of employees that you defined at the previous step or use the predefined user roles. The user roles will contain set of rights of access to the application features.
How-to instructions: Creating a user role
- Defining the scope of each user role
For each of the created user roles, define users and/or security groups and administration groups. Settings associated with a user role apply only to devices that belong to users who have this role, and only if these devices belong to groups associated with this role, including child groups.
How-to instructions: Editing the scope of a user role
- Creating policy profiles
Create a policy profile for each user role in your enterprise. The policy profiles define which settings will be applied to the applications installed on users' devices depending on the role of each user.
How-to instructions: Creating a policy profile
- Associating policy profiles with the user roles
Associate the created policy profiles with the user roles. After that: the policy profile becomes active for a user that has the specified role. The settings configured in the policy profile will be applied to the Kaspersky applications installed on the user's devices.
How-to instructions: Associating policy profiles with roles
- Propagating policies and policy profiles to the managed devices
Kaspersky Security Center Cloud Console automatically synchronizes the Administration Server with the managed devices several times per hour. During the synchronization, the new or changed policies and policy profiles are propagated to the managed devices. You can circumvent auto-synchronization and run the synchronization manually by using the Force synchronization command. When synchronization is complete, the policies and policy profiles are delivered and applied to the installed Kaspersky applications.
You can check whether the policies and policy profiles were delivered to a device. Kaspersky Security Center Cloud Console specifies the delivery date and time in the properties of the device.
How-to instructions: Forced synchronization
Results
When the user-centric scenario is complete, the Kaspersky applications are configured according to the settings specified and propagated through the hierarchy of policies and policy profiles.
For a new user, you will have to create a new account, assign the user one of the created user roles, and assign the devices to the user. The configured application policies and policy profiles will be automatically applied to the devices of this user.
Network Agent policy settings
To configure the Network Agent policy:
- In the main menu, go to Assets (Devices) → Policies & profiles.
- Click the name of the Network Agent policy.
The properties window of the Network Agent policy opens.
See the comparison table detailing how the settings below apply depending on the type of operating system used.
General tab
On this tab you can modify the policy status and specify the inheritance of policy settings:
- In the Policy status block, you can select one of the policy modes:
- Active
- Inactive
- In the Settings inheritance settings group, you can configure the policy inheritance:
Event configuration tab
This tab allows you to configure event logging and event notification. Events are distributed according to importance level in the following sections on the Event configuration tab:
- Functional failure
- Warning
- Info
In each section, the event type list shows the types of events and the default event storage term on the Administration Server (in days). Clicking the Properties button lets you specify the settings of event logging and notifications about events selected in the list. By default, common notification settings specified for the entire Administration Server are used for all event types. However, you can change specific settings for required event types.
Application settings tab
Settings
In the Settings section, you can configure the Network Agent policy:
- Distribute files through distribution points only
- Maximum size of event queue, in MB
- Application is allowed to retrieve policy's extended data on device
- Protect Network Agent service against unauthorized removal or termination, and prevent changes to the settings
- Use uninstallation password
Repositories
In the Repositories section, you can select the types of objects whose details will be sent from Network Agent to Administration Server. If modification of some settings in this section is prohibited by the Network Agent policy, you cannot modify these settings:
- Details of installed applications
- Include information about patches
- Details of Windows Update updates
- Details of software vulnerabilities and corresponding updates
- Hardware registry details
Software updates and vulnerabilities
In the Software updates and vulnerabilities section, you can configure search of Windows updates, as well as enable scanning of executable files for vulnerabilities. The settings in the Software updates and vulnerabilities section are available only on devices running Windows:
- In the Windows Update search mode settings group, you can select the update search mode:
- Scan executable files for vulnerabilities when running them
Restart management
In the Restart management section, you can specify the action to be performed if the operating system of a managed device has to be restarted for correct use, installation, or uninstallation of an application:
- Do not restart the operating system
- Restart the operating system automatically, if necessary
- Prompt user for action
- Force closure of applications in blocked sessions
Windows Desktop Sharing
In the Windows Desktop Sharing section, you can enable and configure the audit of the administrator's actions performed on a remote device when desktop access is shared. The settings in the Windows Desktop Sharing section are available only on devices running Windows:
Manage patches and updates
In the Manage patches and updates section, you can configure download and distribution of updates, as well as installation of patches, on managed devices: enable or disable the Automatically install applicable updates and patches for components that have the Undefined status option.
Connectivity
The Connectivity section includes three subsections:
- Network
- Connection profiles
- Connection schedule
In the Network subsection, you can configure the connection to Administration Server, enable the use of a UDP port, and specify the UDP port number.
- In the Connection to Administration Server settings group, you can specify the following settings:
- Use UDP port
- UDP port number
- Use the distribution point to force a connection to Administration Server
In the Connection profiles subsection, no new items can be added to the Administration Server connection profiles list so the Add button is inactive. The preset connection profiles cannot be modified, either.
In the Connection schedule subsection, you can specify the time intervals during which Network Agent sends data to the Administration Server:
- Connect when necessary
- Connect at specified time intervals
In the Connection schedule subsection, you can specify the time intervals during which Network Agent sends data to the Administration Server:
Network polling by distribution points
In the Network polling by distribution points section, you can configure automatic polling of the network. The polling settings are available only on devices running Windows. You can use the following options to enable the polling and set its frequency:
Network settings for distribution points
In the Network settings for distribution points section, you can specify the internet access settings:
- Use proxy server
- Address
- Port number
- Bypass proxy server for local addresses
- Proxy server authentication
- User name
- Password
KSN Proxy (distribution points)
In the KSN Proxy (distribution points) section, you can configure the application to use the distribution point to forward KSN requests from the managed devices:
Comparison of Network Agent policy settings by operating systems
The table below shows which Network Agent policy settings you can use to configure Network Agent with a specific operating system.
Network Agent policy settings: comparison by operating systems
Policy section |
Windows |
macOS |
Linux |
|---|---|---|---|
General |
|
|
|
Event configuration |
|
|
|
Settings |
|
Except the Use uninstallation password check box. |
Except the Use uninstallation password check box. |
Repositories |
|
The Hardware registry details option is available. |
The following options are available:
|
Software updates and vulnerabilities |
|
|
|
Restart management |
|
|
|
Windows Desktop Sharing |
|
|
|
Manage patches and updates |
|
|
|
Connectivity → Network |
|
Except the Open Network Agent ports in Microsoft Windows Firewall check box. |
Except the Open Network Agent ports in Microsoft Windows Firewall check box. |
Connectivity → Connection schedule |
|
|
|
Network polling by distribution points |
The following options are available:
|
|
The following options are available:
|
Network settings for distribution points |
|
|
|
KSN Proxy (distribution points) |
|
|
|
Manual setup of the Kaspersky Endpoint Security policy
This section provides recommendations on how to configure the Kaspersky Endpoint Security policy. You can perform setup in the policy properties window. When you edit a setting, click the lock icon to the right of the relevant group of settings to apply the specified values to a workstation.
Configuring Kaspersky Security Network
Kaspersky Security Network (KSN) is the infrastructure of cloud services that has information about the reputation of files, web resources, and software. Kaspersky Security Network enables Kaspersky Endpoint Security for Windows to respond faster to different kinds of threats, enhances the performance of the protection components, and decreases the likelihood of false positives. For more information about Kaspersky Security Network, see the Kaspersky Endpoint Security for Windows Help.
You can configure the Kaspersky Security Network work in the policy properties window of Kaspersky Endpoint Security for Windows, in the Application settings → Advanced Threat Protection section.
To specify recommended KSN settings:
- In the main menu, go to Assets (Devices) → Policies & profiles.
- Click the policy of Kaspersky Endpoint Security for Windows.
The properties window of the selected policy opens.
- In the policy properties, go to Application settings → Advanced Threat Protection → Kaspersky Security Network.
- Make sure that the Use Administration Server as a KSN proxy server option is enabled. Using this option helps to redistribute and optimize traffic on the network.
If you use Managed Detection and Response, you must enable Kaspersky Security Network option for the distribution point and enable extended KSN mode.
- Enable use of KSN servers if the KSN proxy service is not available. To do this, enable the Use Kaspersky Security Network servers if the KSN proxy server is unavailable option.
KSN servers may be located either on the side of Kaspersky (when KSN is used) or on the side of third parties (when KPSN is used).
- Click OK.
The recommended KSN settings are specified.
Checking the list of the networks protected by Firewall
Make sure that Kaspersky Endpoint Security for Windows Firewall protects all your networks. By default, Firewall protects networks with the following types of connection:
- Public network. Security applications, firewalls, or filters do not protect devices in such a network.
- Local network. Access to files and printers is restricted for devices in this network.
- Trusted network. Devices in such a network are protected from attacks and unauthorized access to files and data.
If you configured a custom network, make sure that Firewall protects it. For this purpose, check the list of the networks in the Kaspersky Endpoint Security for Windows policy properties. The list may not contain all the networks.
For more information about Firewall, see the Kaspersky Endpoint Security for Windows Help.
To check the list of networks:
- In the main menu, go to Assets (Devices) → Policies & profiles.
- Click the policy of Kaspersky Endpoint Security for Windows.
The properties window of the selected policy opens.
- In the policy properties, go to Application settings → Essential Threat Protection → Firewall.
- Under Available networks, click the Network settings link.
The Network connections window opens. This window displays the list of networks.
- If the list has a missing network, add it.
Excluding software details from the Administration Server memory
We recommend that Administration Server does not save information about software modules that are started on the network devices. As a result, the Administration Server memory does not overrun.
You can disable saving this information in the Kaspersky Endpoint Security for Windows policy properties.
To disable saving information about installed software modules:
- In the main menu, go to Assets (Devices) → Policies & profiles.
- Click the policy of Kaspersky Endpoint Security for Windows.
The properties window of the selected policy opens.
- In the policy properties, go to Application settings → General Settings → Reports and Storage.
- Under Data transfer to Administration Server, disable the About started applications check box if it is still enabled in the top-level policy.
When this check box is selected, the Administration Server database saves information about all versions of all software modules on the networked devices. This information may require a significant amount of disk space in the Kaspersky Security Center Cloud Console database (dozens of gigabytes).
The information about installed software modules is no longer saved to the Administration Server database.
Configuring the registration of important policy events in the Administration Server database
To avoid Administration Server database overflow, we recommend that you save only important events to the database. For events that you consider unimportant, you can reduce or disable the storage period.
To configure the event storage settings:
- In the main menu, go to Assets (Devices) → Policies & profiles.
- Click the name of the required policy.
The properties window of the selected policy opens.
- Go to the Event configuration tab, and then click the name of the event type for which you want to configure the registration in the database.
- In the right pane that opens, do one of the following:
- If you want to change the storage period for the event type, make sure that the Store in the Administration Server database for (days) toggle button is turned on, and then enter the required number of days for the event type to be stored.
- If you do not want to store the event type in the in the Administration Server database, turn off the Store in the Administration Server database for (days) toggle button.
- Click OK, and then after the right pane is closed, click the Save button.
The policy properties window is closed, and the setting that you configured is applied.
Manual setup of the group update task for Kaspersky Endpoint Security
The optimal and recommended schedule option for Kaspersky Endpoint Security is When new updates are downloaded to the repository when the Use automatically randomized delay for task starts check box is selected.
About tasks
Kaspersky Security Center Cloud Console manages Kaspersky security applications installed on devices by creating and running tasks. Tasks are required for installing, launching, and stopping applications, scanning files, updating databases and software modules, and performing other actions on applications. Tasks can be performed on the Administration Server and on devices.
The following types of tasks are performed on devices:
- Local tasks—Tasks that are performed on a specific device
Local tasks can be modified either by the administrator, who uses administration tools, or by the user of a remote device (for example, through the security application interface). If a local task has been modified simultaneously by the administrator and the user of a managed device, the changes made by the administrator will take effect because they have a higher priority.
- Group tasks—Tasks that are performed on all devices of a specific group
Unless otherwise specified in the task properties, a group task also affects all subgroups of the selected group.
- Global tasks—Tasks that are performed on a set of devices, regardless of whether they are included in any group
For each application, you can create multiple group tasks, global tasks, or local tasks.
You can make changes to the settings of tasks, view the progress of tasks, and copy, export, import, and delete tasks.
A task is started on a device only if the application for which the task was created is running.
Execution results of tasks are saved in the OS event log on each device and in the Administration Server database.
Do not include private data in task settings. For example, avoid specifying the domain administrator password.
About task scope
The scope of a task is the set of devices on which the task is performed. The types of scope are as follows:
- For a local task, the scope is the device itself.
- For an Administration Server task, the scope is the Administration Server.
- For a group task, the scope is the list of devices included in the group.
When creating a global task, you can use the following methods to specify its scope:
- Specifying certain devices manually.
You can use an IP address (or IP range), NetBIOS name, or DNS name as the device address.
- Importing a list of devices from a TXT file with the device addresses to be added (each address must be placed on an individual line).
If you import a list of devices from a file or create a list manually, and if devices are identified by their names, the list can only contain devices for which information has already been entered into the Administration Server database. Moreover, the information must have been entered when those devices were connected or during device discovery.
- Specifying a device selection.
Over time, the scope of a task changes as the set of devices included in the selection change. A selection of devices can be made on the basis of device attributes, including software installed on a device, and on the basis of tags assigned to devices. Device selection is the most flexible way to specify the scope of a task.
Tasks for device selections are always run on a schedule by the Administration Server. These tasks cannot be run on devices that lack connection to the Administration Server. Tasks whose scope is specified by using other methods are run directly on devices and therefore do not depend on the device connection to the Administration Server.
Tasks for device selections are not run on the local time of a device; instead, they are run on the local time of the Administration Server. Tasks whose scope is specified by using other methods are run on the local time of a device.
Creating a task
You can create a task in the task list. Alternatively, you can select devices in the Managed devices list, and then create a new task assigned to the selected devices.
To create a task in the task list:
- In the main menu, go to Assets (Devices) → Tasks.
- Click Add.
The New task wizard starts. Follow its instructions.
- If you want to modify the default task settings, enable the Open task details when creation is complete option on the Finish task creation page. If you do not enable this option, the task is created with the default settings. You can modify the default settings later, at any time.
- Click the Finish button.
The task is created and displayed in the list of tasks.
To create a new task assigned to the selected devices:
In the main menu, go to Assets (Devices) → Managed devices.
The list of managed devices is displayed.
- In the list of managed devices, select the check boxes next to the devices to run the task for them. You can use the search and filter functions to find the devices you're looking for.
- Click the Run task button, and then select Create new task.
The New task wizard starts.
On the first step of the wizard, you can remove the devices selected to include in the task scope. Follow the wizard instructions.
- Click the Finish button.
The task is created for the selected devices.
Viewing the task list
You can view the list of tasks that are created in Kaspersky Security Center Cloud Console.
To view the list of tasks,
In the main menu, go to Assets (Devices) → Tasks.
The list of tasks is displayed. The tasks are grouped by the names of applications to which they are related. For example, the Uninstall application remotely task is related to the Administration Server, and the Find vulnerabilities and required updates task refers to the Network Agent.
To view properties of a task,
Click the name of the task.
The task properties window is displayed with several named tabs. For example, the Task type is displayed on the General tab, and the task schedule—on the Schedule tab.
Starting a task manually
The application starts tasks according to the schedule settings specified in the properties of each task. You can start a task manually at any time from the task list. Alternatively, you can select devices in the Managed devices list, and then start an existing task for them.
To start a task manually:
- In the main menu, go to Assets (Devices) → Tasks.
- In the task list, select the check box next to the task that you want to start.
- Click the Start button.
The task starts. You can check the task status in the Status column or by clicking the Result button.
Starting a task for selected devices
You can select one or more client devices in the list of devices, and then launch a previously created task for them. This allows you to run tasks created earlier for a specific set of devices.
This changes the devices to which the task was assigned to the list of devices that you select when you run the task.
To start a task for selected devices:
- In the main menu, go to Assets (Devices) → Managed devices. The list of managed devices is displayed.
In the list of managed devices, use the check boxes to select the devices to run the task for them. You can use the search and filter functions to find the devices you're looking for.
- Click the Run task button, and then select Apply existing task.
The list of the existing tasks is displayed. - The selected devices are displayed above the task list. If necessary, you can remove a device from this list. You can delete all but one device.
- Select the desired task in the list. You can use the search box above the list to search for the desired task by name. Only one task can be selected.
- Click Save and start task.
The selected task is immediately started for the selected devices. The scheduled start settings in the task are not changed.
General task settings and properties
This section contains the settings that you can view and configure for most of your tasks. The list of settings available depends on the task you are configuring.
Settings specified during task creation
You can specify the following settings when creating a task. Some of these settings can also be modified in the properties of the created task.
- Devices to which the task will be assigned:
- Account settings:
- Operating system restart settings:
Settings specified after task creation
You can specify the following settings only after a task is created.
- Group task settings:
- Task scheduling settings:
- Start task setting:
- Manually
- Once
- Immediately
- Every N minutes
- Every N hours
- Every N days
- By days of week
- Monthly
- Every month on specified days of selected weeks
- When new updates are downloaded to the repository
- On virus outbreak
- On completing another task
The scheduling settings may depend on the local time zone of the device operating system.
- Run missed tasks
- Use automatically randomized delay for task starts
- Use automatically randomized delay for task starts within an interval of
- Turn on devices by using the Wake-on-LAN function before starting the task
- Shut down the devices after completing the task
- Stop the task if it runs longer than
- Start task setting:
- Notifications:
- Store task history block:
- Save all events
- Save events related to task progress
- Save only task execution results
- Store in the Administration Server database for (days)
- Store in the OS event log on device
- Notify of errors only
- Notify by email
- Store task history block:
- Task scope settings
- Exclusions from scope
- Revision history
Exporting a task
Kaspersky Security Center Cloud Console allows you to save a task and its settings to a KLT file. You can use this KLT file to import the saved task both to Kaspersky Security Center Windows and Kaspersky Security Center Linux.
To export a task:
- In the main menu, go to Assets (Devices) → Tasks.
- Select the check box next to the task that you want to export.
You cannot export multiple tasks at the same time. If you select more than one task, the Export button will be disabled. Administration Server tasks are also unavailable for export.
- Click the Export button.
- In the opened Save as window, specify the task file name and path. Click the Save button.
The Save as window is displayed only if you use Google Chrome, Microsoft Edge, or Opera. If you use another browser, the task file is automatically saved in the Downloads folder.
Importing a task
Kaspersky Security Center Cloud Console allows you to import a task from a KLT file. The KLT file contains the exported task and its settings.
To import a task:
- In the main menu, go to Assets (Devices) → Tasks.
- Click the Import button.
- Click the Browse button to choose a task file that you want to import.
- In the opened window, specify the path to the KLT task file, and then click the Open button. Note that you can select only one task file.
The task processing starts.
- After the task is processed successfully, select the devices to which you want to assign the task. To do this, select one of the following options:
- Specify the task scope.
- Click the Complete button to finish the task import.
The notification with the import results appears. If the task is imported successfully, you can click the Details link to view the task properties.
After a successful import, the task is displayed in the task list. The task settings and schedule are also imported. The task will be started according to its schedule.
If the newly imported task has an identical name to an existing task, the name of the imported task is expanded with the (<next sequence number>) index, for example: (1), (2).
Page top
Viewing task run results stored on the Administration Server
Kaspersky Security Center Cloud Console allows you to view the results for group tasks, tasks for specific devices, and Administration Server tasks.
To view the task results:
- In the task properties window, select the General section.
- Click the Results link to open the Task results window.
Managing client devices
Kaspersky Security Center Cloud Console allows you to manage client devices:
- View settings and statuses of managed devices, including clusters and server arrays.
- Configure distribution points.
- Manage tasks.
You can use administration groups to combine client devices in a set that can be managed as a single unit. A client device can be included in only one administration group. Devices can be allocated to a group automatically based on Rule conditions:
You can use device selections to filter devices based on a condition. You can also tag devices for creating selections, for finding devices, and for distributing devices among administration groups.
Settings of a managed device
To view the settings of a managed device:
- In the main menu, go to Assets (Devices) → Managed devices.
The list of managed devices is displayed.
- In the list of managed devices, click the link with the name of the required device.
The properties window of the selected device is displayed.
The following tabs are displayed in the upper part of the properties window representing the main groups of the settings:
Page top
Device selections
Device selections are a tool for filtering devices according to specific conditions. You can use device selections to manage several devices: for example, to view a report about only these devices or to move all of these devices to another group.
Kaspersky Security Center Cloud Console provides a broad range of predefined selections (for example, Devices with Critical status, Protection is disabled, Active threats are detected). Predefined selections cannot be deleted. You can also create and configure additional user-defined selections.
In user-defined selections, you can set the search scope and select all devices, managed devices, or unassigned devices. Search parameters are specified in the conditions. In the device selection you can create several conditions with different search parameters. For example, you can create two conditions and specify different IP ranges in each of them. If several conditions are specified, a selection displays the devices that meet any of the conditions. By contrast, search parameters within a condition are superimposed. If both an IP range and the name of an installed application are specified in a condition, only those devices will be displayed where both the application is installed and the IP address belongs to the specified range.
Viewing the device list from a device selection
Kaspersky Security Center Cloud Console allows you to view the list of devices from a device selection.
To view the device list from the device selection:
- In the main menu, go to the Assets (Devices) → Device selections or Discovery & deployment → Device selections section.
- In the selection list, click the name of the device selection.
The page displays a table with information about the devices included in the device selection.
- You can group and filter the data of the device table as follows:
- Click the settings icon (
 ), and then select the columns to be displayed in the table.
 - Click the filter icon (
 ), and then specify and apply the filter criterion in the invoked menu.
 The filtered table of devices is displayed.
- Click the settings icon (
You can select one or several devices in the device selection and click the New task button to create a task that will be applied to these devices.
To move the selected devices of the device selection to another administration group, click the Move to group button, and then select the target administration group.
Page top
Creating a device selection
To create a device selection:
- In the main menu, go to Assets (Devices) → Device selections.
A page with a list of device selections is displayed.
- Click the Add button.
The Device selection settings window opens.
- Enter the name of the new selection.
- Specify the group that contains the devices to be included in the device selection:
- Find any devices—Searching for devices that meet the selection criteria and included in the Managed Devices or Unassigned devices group.
- Find managed devices—Searching for devices that meet the selection criteria and included in the Managed Devices group.
- Find unassigned devices—Searching for devices that meet the selection criteria and included in the Unassigned devices group.
You can enable the Include data from secondary Administration Servers check box to enable searching for devices that meet the selection criteria and managed by secondary Administration Servers.
- Click the Add button.
- In the window that opens, specify conditions that must be met for including devices in this selection, and then click the OK button.
- Click the Save button.
The device selection is created and added to the list of device selections.
Page top
Configuring a device selection
To configure a device selection:
- In the main menu, go to Assets (Devices) → Device selections.
A page with a list of device selections is displayed.
- Select the relevant user-defined device selection, and click the Properties button.
The Device selection settings window opens.
- On the General tab, click the New condition link.
- Specify conditions that must be met for including devices in this selection.
- Click the Save button.
The settings are applied and saved.
Below are descriptions of the conditions for assigning devices to a selection. Conditions are combined by using the OR logical operator: the selection will contain devices that comply with at least one of the listed conditions.
General
In the General section, you can change the name of the selection condition and specify whether that condition must be inverted:
Network infrastructure
In the Network subsection, you can specify the criteria that will be used to include devices in the selection according to their network data:
- Device name
- Domain
- Administration group
- Description
- IP range
- Managed by a different Administration Server
In the Active Directory subsection, you can configure criteria for including devices into a selection based on their Active Directory data:
- Device is in an Active Directory organizational unit
- Include child organizational units
- This device is a member of an Active Directory group
In the Network activity subsection, you can specify the criteria that will be used to include devices in the selection according to their network activity:
- Acts as a distribution point
- Do not disconnect from the Administration Server
- Connection profile switched
- Last connected to Administration Server
- New devices detected by network poll
- Device is visible
In the Cloud segments subsection, you can configure criteria for including devices in a selection according to their respective cloud segments:
Device statuses
In the Managed device status subsection, you can configure criteria for including devices into a selection based on the description of the devices status from a managed application:
In the Status of components in managed applications subsection, you can configure criteria for including devices in a selection according to the statuses of components in managed applications:
- Data Leakage Prevention status
- Collaboration servers protection status
- Anti-virus protection status of mail servers
- Endpoint Sensor status
In the Status-affecting problems in managed applications subsection, you can specify the criteria that will be used to include devices in the selection according to the list of possible problems detected by a managed application. If at least one problem that you select exists on a device, the device will be included in the selection. When you select a problem listed for several applications, you have the option to select this problem in all of the lists automatically.
You can select check boxes for descriptions of statuses from the managed application; upon receipt of these statuses, the devices will be included in the selection. When you select a status listed for several applications, you have the option to select this status in all of the lists automatically.
System details
In the Operating system section, you can specify the criteria that will be used to include devices in the selection according to their operating system type.
- Platform type
- Operating system service pack version
- Operating system bit size
- Operating system build
- Operating system release number
In the Virtual machines section, you can set up the criteria to include devices in the selection according to whether these are virtual machines or part of virtual desktop infrastructure (VDI):
In the Hardware registry subsection, you can configure criteria for including devices into a selection based on their installed hardware:
Ensure that the lshw utility is installed on Linux devices from which you want to fetch hardware details. Hardware details fetched from virtual machines may be incomplete depending on the hypervisor used.
- Device
- Vendor
- Device name
- Description
- Device vendor
- Serial number
- Inventory number
- User
- Location
- CPU clock rate, in MHz, from
- CPU clock rate, in MHz, to
- Number of virtual CPU cores, from
- Number of virtual CPU cores, to
- Hard drive volume, in GB, from
- Hard drive volume, in GB, to
- RAM size, in MB, from
- RAM size, in MB, to
Third-party software details
In the Applications registry subsection, you can set up the criteria to search for devices according to applications installed on them:
- Application name
- Application version
- Vendor
- Application status
- Find by update
- Name of incompatible security application
- Application tag
- Apply to devices without the specified tags
In the Vulnerabilities and updates subsection, you can specify the criteria that will be used to include devices in the selection according to their Windows Update source:
WUA is switched to Administration Server
Details of Kaspersky applications
In the Kaspersky applications subsection, you can configure criteria for including devices in a selection based on the selected managed application:
- Application name
- Application version
- Critical update name
- Select the period of the last update of modules
- Device is managed through Administration Server
- Security application is installed
In the Anti-virus protection subsection, you can set up the criteria for including devices in a selection based on their protection status:
The Application components subsection contains the list of components of those applications that have corresponding management plug-ins installed in Kaspersky Security Center Cloud Console.
In the Application components subsection, you can specify criteria for including devices in a selection according to the statuses and version numbers of the components that refer to the application that you select:
Tags
In the Tags section, you can configure criteria for including devices into a selection based on key words (tags) that were previously added to the descriptions of managed devices:
Apply if at least one specified tag matches
To add tags to the criterion, click the Add button, and select tags by clicking the Tag entry field. Specify whether to include or exclude the devices with the selected tags in the device selection.
Users
In the Users section, you can set up the criteria to include devices in the selection according to the accounts of users who have logged in to the operating system.
Page top
Exporting the device list from a device selection
Kaspersky Security Center Cloud Console allows you to save information about devices from a device selection and export it as a CSV or a TXT file.
To export the device list from the device selection:
- Open the table with the devices from the device selection.
- Use one of the following ways to select the devices that you want to export:
- To select particular devices, select the check boxes next to them.
- To select all devices from the current table page, select the check box in the device table header, and then select the Select all on current page check box.
- To select all devices from the table, select the check box in the device table header, and then select the Select all check box.
Click the Export to CSV or Export to TXT button. All information about the selected devices included in the table will be exported.
Note that if you applied a filter criterion to the device table, only the filtered data from the displayed columns will be exported.
Page top
Removing devices from administration groups in a selection
When working with a device selection, you can remove devices from administration groups right in this selection, without switching to the administration groups from which these devices must be removed.
To remove devices from administration groups:
- In the main menu, go to Assets (Devices) → Device selections or Discovery & deployment → Device selections.
- In the selection list, click the name of the device selection.
The page displays a table with information about the devices included in the device selection.
- Select the devices that you want to remove, and then click Delete.
The selected devices are removed from their respective administration groups.
Viewing and configuring the actions when devices show inactivity
If client devices within a group are inactive, you can get notifications about it. You can also automatically delete such devices.
To view or configure the actions when the devices in the group show inactivity:
- In the main menu, go to Assets (Devices) → Hierarchy of groups.
- Click the name of the required administration group.
The administration group properties window opens.
- In the properties window, go to the Settings tab.
- In the Inheritance section, enable or disable the following options:
- In the Device activity section, enable or disable the following options:
- Click Save.
Your changes are saved and applied.
Page top
About device statuses
Kaspersky Security Center Cloud Console assigns a status to each managed device. The particular status depends on whether the conditions defined by the user are met. In some cases, when assigning a status to a device, Kaspersky Security Center Cloud Console takes into consideration the device's visibility flag on the network (see the table below). If Kaspersky Security Center Cloud Console does not find a device on the network within two hours, the visibility flag of the device is set to Not Visible.
The statuses are the following:
- Critical or Critical/Visible
- Warning or Warning/Visible
- OK or OK/Visible
The table below lists the default conditions that must be met to assign the Critical or Warning status to a device, with all possible values.
Conditions for assigning a status to a device
Condition |
Condition description |
Available values |
|---|---|---|
Security application is not installed |
Network Agent is installed on the device, but a security application is not installed. |
|
Too many viruses detected |
Some viruses have been found on the device by a task for virus detection, for example, the Virus scan task, and the number of viruses found exceeds the specified value. |
More than 0. |
Real-time protection level differs from the level set by the Administrator |
The device is visible on the network, but the real-time protection level differs from the level set (in the condition) by the administrator for the device status. |
|
Malware scan has not been performed in a long time |
The device is visible on the network and a security application is installed on the device, but neither the Malware scan task nor a local scan task has been run within the specified time interval. The condition is applicable only to devices that were added to the Administration Server database 7 days ago or earlier. |
More than 1 day. |
Databases are outdated |
The device is visible on the network and a security application is installed on the device, but the anti-virus databases have not been updated on this device within the specified time interval. The condition is applicable only to devices that were added to the Administration Server database 1 day ago or earlier. |
More than 1 day. |
Not connected in a long time |
Network Agent is installed on the device, but the device has not connected to an Administration Server within the specified time interval, because the device was turned off. |
More than 1 day. |
Active threats are detected |
The number of unprocessed objects in the Active threats folder exceeds the specified value. |
More than 0 items. |
Restart is required |
The device is visible on the network, but an application requires the device restart longer than the specified time interval and for one of the selected reasons. |
More than 0 minutes. |
Incompatible applications are installed |
The device is visible on the network, but software inventory performed through Network Agent has detected incompatible applications installed on the device. |
|
Software vulnerabilities have been detected |
The device is visible on the network and Network Agent is installed on the device, but the Find vulnerabilities and required updates task has detected vulnerabilities with the specified severity level in applications installed on the device. |
|
License expired |
The device is visible on the network, but the license has expired. |
|
License expires soon |
The device is visible on the network, but the license will expire on the device in less than the specified number of days. |
More than 0 days. |
Check for Windows Update updates has not been performed in a long time |
The device is visible on the network, but the Perform Windows Update synchronization task has not been run within the specified time interval. |
More than 1 day. |
Invalid encryption status |
Network Agent is installed on the device, but the device encryption result is equal to the specified value. |
|
Mobile device settings do not comply with the policy |
The mobile device settings are other than the settings that were specified in the Kaspersky Endpoint Security for Android policy during the check of compliance rules. |
|
Unprocessed security issues detected |
Some unprocessed security issues have been found on the device. Security issues can be created either automatically, through managed Kaspersky applications installed on the client device, or manually by the administrator. |
|
Device status defined by application |
The status of the device is defined by the managed application. |
|
Device is out of disk space |
Free disk space on the device is less than the specified value or the device could not be synchronized with the Administration Server. The Critical or Warning status is changed to the OK status when the device is successfully synchronized with the Administration Server and free space on the device is greater than or equal to the specified value. |
More than 0 MB |
Device has become unmanaged |
During device discovery, the device was recognized as visible on the network, but more than three attempts to synchronize with the Administration Server failed. |
|
Protection is disabled |
The device is visible on the network, but the security application on the device has been disabled for longer than the specified time interval. In this case, the state of the security application is stopped or failure, and differs from the following: starting, running, or suspended. |
More than 0 minutes. |
Security application is not running |
The device is visible on the network and a security application is installed on the device but is not running. |
|
Kaspersky Security Center Cloud Console enables you to set up automatic switching of the status of a device in an administration group when specified conditions are met. When specified conditions are met, the client device is assigned one of the following statuses: Critical or Warning. When specified conditions are not met, the client device is assigned the OK status.
Different statuses may correspond to different values of one condition. For example, by default, if the Databases are outdated condition has the More than 3 days value, the client device is assigned the Warning status; if the value is More than 7 days, the Critical status is assigned.
When Kaspersky Security Center Cloud Console assigns a status to a device, for some conditions (see the Condition description column) the visibility flag is taken into consideration. For example, if a managed device was assigned the Critical status because the Databases are outdated condition was met, and later the visibility flag was set for the device, then the device is assigned the OK status.
Configuring the switching of device statuses
You can change conditions to assign the Critical or Warning status to a device.
To enable changing the device status to Critical:
- In the main menu, go to Assets (Devices) → Hierarchy of groups.
- In the list of groups that opens, click the link with the name of a group for which you want to change switching the device statuses.
- In the properties window that opens, select the Device status tab.
- In the left pane, select Critical.
- In the right pane, in the Set to Critical if these are specified section, enable the condition to switch a device to the Critical status.
You can change only settings that are not locked in the parent policy.
- Select the radio button next to the condition in the list.
- In the upper-left corner of the list, click the Edit button.
- Set the required value for the selected condition.
Values cannot be set for every condition.
- Click OK.
When specified conditions are met, the managed device is assigned the Critical status.
To enable changing the device status to Warning:
- In the main menu, go to Assets (Devices) → Hierarchy of groups.
- In the list of groups that opens, click the link with the name of a group for which you want to change switching the device statuses.
- In the properties window that opens, select the Device status tab.
- In the left pane, select Warning.
- In the right pane, in the Set to Warning if these are specified section, enable the condition to switch a device to the Warning status.
You can change only settings that are not locked in the parent policy.
- Select the radio button next to the condition in the list.
- In the upper-left corner of the list, click the Edit button.
- Set the required value for the selected condition.
Values cannot be set for every condition.
- Click OK.
When specified conditions are met, the managed device is assigned the Warning status.
Changing the Administration Server for client devices
You can change the Administration Server that manages client devices to a different Server using the Change Administration Server task. After the task completion, the selected client devices will be put under the management of the Administration Server that you specify. You can switch the device management between the following Administration Servers:
- Primary Administration Server and one of its virtual Administration Servers
- Two virtual Administration Servers of the same primary Administration Server
To change the Administration Server that manages client devices to a different Server:
- In the main menu, go to Assets (Devices) → Tasks.
- Click Add.
The New task wizard starts. Proceed through the wizard by using the Next button.
- At the New task settings step, specify the following settings:
- In the Application drop-down list, select Kaspersky Security Center Cloud Console.
- In the Task type field, select Change Administration Server.
- In the Task name field, specify the name for the task that you are creating.
A task name cannot be more than 100 characters long and cannot include any special characters ("*<>?\:|).
- Select devices to which the task will be assigned:
- At the Task scope step, specify an administration group, devices with specific addresses, or a device selection.
- At the next step, confirm that you agree to the terms of changing the Administration Server for client devices.
- At the next step, select the virtual Administration Server that you want to use to manage the selected devices.
- At the Selecting an account to run the task step, specify the account settings:
- If on the Finish task creation page you enable the Open task details when creation is complete option, you can modify the default task settings.
If you do not enable this option, the task is created with the default settings. You can modify the default settings later, at any time.
- Click the Finish button.
The task is created and displayed in the list of tasks.
- Click the name of the created task to open the task properties window.
- In the task properties window, specify the general task settings according to your needs.
- Click the Save button.
The task is created and configured.
- Run the created task.
After the task is complete, the client devices for which it was created are put under the management of the Administration Server specified in the task settings.
Avoiding conflicts between multiple Administration Servers
If you have more than one Administration Server on your network, they can see the same client devices. This may result, for example, of Administration Server installing an application that was already installed by another Administration Server, and other conflicts. To prevent an application from being installed on a device managed by another Administration Server, you must enable the Install only on devices managed through this Administration Server option in the Install application remotely task properties.
If you enable the Install only on devices managed through this Administration Server option, and then run the Install application remotely task, a check is performed to determine if the devices are managed by another Administration Server. For devices managed by another Administration Server, the Managed by a different Administration Server attribute value will be set to true. The Install application remotely task will not be applied to these devices.
The Managed by a different Administration Server attribute values are displayed in the Managed by a different Administration Server column in the list of managed devices and list of unassigned devices.
You can also use the Managed by a different Administration Server property as a criterion for the following purposes:
To reset the Managed by a different Administration Server attribute:
- In the main menu of Kaspersky Security Center Cloud Console, go to Discovery & deployment → Unassigned devices.
- Select the required device, and then click the Remove the Managed by a different Administration Server attribute button.
The Managed by a different Administration Server attribute is reset.
Page top
Creating Administration Server connection profiles
To allow out-of-office users to change the method of connecting Network Agent to Administration Server, you have to configure Administration Server connection profiles.
To create a connection profile:
- In the main menu, go to Assets (Devices), and do one of the following:
- If you want to create a connection profile for a group of managed devices, click Policies & profiles, and then click Kaspersky Security Center Network Agent.
- If you want to create a connection profile for a specific managed device, click Managed devices, and then click the name of the device. In the window that opens, go to the Applications tab, and then click Kaspersky Security Center Network Agent.
The properties window of the Network Agent policy opens.
- Go to the Application settings tab, and then go to the Connectivity section.
- In the Connection profiles section, click the Settings button.
The Administration Server connection profiles subsection displays the table of connection profiles.
You cannot view, modify, or delete the Home Administration Server and Offline mode connection profiles.
- Click the Add button, and then in the window that opens, specify the profile name.
The name must be unique. You cannot use the same name for several profiles.
- If necessary, select the check boxes in the following fields:
- Enable out-of-office mode when Administration Server is not available.
- Use proxy server.
If you select this option, do the following:
- Specify information in the Address and the Port number fields.
- If necessary, select the Proxy server authentication check box, and then specify the user name and the password in the corresponding fields.
- Click the Save button.
The new profile is displayed in the table of connection profiles. You can use it when configuring the Network location settings.
You can edit and delete connection profiles.
To edit a connection profile:
- In the table of connection profiles click the name of the connection profile that you want to edit.
- Make all necessary changes, and then click the Save button.
The changes are applied to the connection profile.
To delete a connection profile:
- In the table of connection profiles select the check boxes next to the connection profiles that you want to delete.
- Click the Delete button.
The selected connection profiles are deleted.
Page top
About clusters and server arrays
Kaspersky Security Center Cloud Console supports cluster technology. If Network Agent sends information to Administration Server confirming that an application installed on a client device is part of a server array, this client device becomes a cluster node.
If an administration group contains clusters or server arrays, the Managed devices page displays two tabs—one for individual devices, and one for clusters and server arrays. After the managed devices are detected as cluster nodes, the cluster is added as an individual object to the Clusters and server arrays tab.
The cluster or server array nodes are listed on the Devices tab, along with other managed devices. You can view properties of the nodes as individual devices and perform other operations, but you cannot delete a cluster node or move it to another administration group separately from its cluster. You can only delete or move an entire cluster.
You can perform the following operations with clusters or server arrays:
- View properties
- Move the cluster or server array to another administration group
When you move a cluster or server array to another group, all of its nodes move with it, because a cluster and any of its nodes always belong to the same administration group.
- Delete
It is reasonable to delete a cluster or server array only when the cluster or server array does not exist in the organization network any longer. If a cluster is still visible on your network and Network Agent and the Kaspersky security application are still installed on the cluster nodes, Kaspersky Security Center Cloud Console returns the deleted cluster and its nodes back to the list of managed devices automatically.
Properties of a cluster or server array
To view the settings of a cluster or server array:
- In the main menu, go to Assets (Devices) → Managed devices → Clusters and server arrays.
The list of clusters and server arrays is displayed.
- Click the name of the required cluster or server array.
The properties window of the selected cluster or server array is displayed.
General
The General section displays general information about the cluster or server array. Information is provided on the basis of data received during the last synchronization of the cluster nodes with the Administration Server:
- Name
- Description
- Windows domain
- NetBIOS name
- DNS name
Tasks
In the Tasks tab, you can manage the tasks assigned to the cluster or server array: view the list of existing tasks; create new ones; remove, start, and stop tasks; modify task settings; and view execution results. The listed tasks relate to the Kaspersky security application installed on the cluster nodes. Kaspersky Security Center Cloud Console receives the task list and the task status details from the cluster nodes. If a connection is not established, the status is not displayed.
Nodes
This tab displays a list of nodes included into the cluster or server array. You can click a node name to view the device properties window.
Kaspersky application
The properties window may also contain additional tabs with the information and settings related to the Kaspersky security application installed on the cluster nodes.
Device tags
Kaspersky Security Center Cloud Console enables you to tag devices. A tag is the label of a device that can be used for grouping, describing, or finding devices. Tags assigned to devices can be used for creating selections, for finding devices, and for distributing devices among administration groups.
You can tag devices manually or automatically. You may use manual tagging when you want to tag an individual device. Auto-tagging is performed by Kaspersky Security Center Cloud Console in accordance with the specified tagging rules.
Devices are tagged automatically when specified rules are met. An individual rule corresponds to each tag. Rules are applied to the network properties of the device, operating system, applications installed on the device, and other device properties. For example, if your network includes devices running Windows, Linux, and macOS, you can set up a rule that will assign the [Linux] tag to all Linux-based devices. Then, you can use this tag when creating a device selection; this will help you sort all Linux-based devices and assign them a task. A tag is automatically removed from a device in the following cases:
- When the device stops meeting conditions of the rule that assigns the tag.
- When the rule that assigns the tag is disabled or deleted.
The list of tags and the list of rules on each Administration Server are independent of all other Administration Servers, including a primary Administration Server or subordinate virtual Administration Servers. A rule is applied only to devices from the same Administration Server on which the rule is created.
Creating a device tag
To create a device tag:
- In the main menu, go to Assets (Devices) → Tags → Device tags.
- Click Add.
A new tag window opens.
- In the Tag field, enter the tag name.
- Click Save to save the changes.
The new tag appears in the list of device tags.
Page top
Renaming a device tag
To rename a device tag:
- In the main menu, go to Assets (Devices) → Tags → Device tags.
- Click the name of the tag that you want to rename.
A tag properties window opens.
- In the Tag field, change the tag name.
- Click Save to save the changes.
The updated tag appears in the list of device tags.
Page top
Deleting a device tag
To delete a device tag:
- In the main menu, go to Assets (Devices) → Tags → Device tags.
- In the list, select the device tag that you want to delete.
- Click the Delete button.
- In the window that opens, click Yes.
The device tag is deleted. The deleted tag is automatically removed from all of the devices to which it was assigned.
The tag that you have deleted is not removed automatically from auto-tagging rules. After the tag is deleted, it will be assigned to a new device only when the device first meets the conditions of a rule that assigns the tag.
The deleted tag is not removed automatically from the device if this tag is assigned to the device by an application or Network Agent. To remove the tag from your device, use the klscflag utility.
Page top
Viewing devices to which a tag is assigned
To view devices to which a tag is assigned:
- In the main menu, go to Assets (Devices) → Tags → Device tags.
- Click the View devices link next to the tag for which you want to view assigned devices.
You will be redirected to the Managed devices section of the main menu, with the devices filtered by the tag for which you clicked the View devices link.
- If you want to return to the list of device tags, click the Back button of your browser.
After you view the devices to which the tag is assigned, you can either create and assign a new tag or assign the existing tag to other devices. In this case, you have to remove the filter by tag, select the devices, and then assign the tag.
Page top
Viewing tags assigned to a device
To view tags assigned to a device:
- In the main menu, go to Assets (Devices) → Managed devices.
- Click the name of the device whose tags you want to view.
- In the device properties window that opens, select the Tags tab.
The list of tags assigned to the selected device is displayed. In the Tag assigned column you can view how the tag was assigned.
You can assign another tag to the device or remove an already assigned tag. You can also view all device tags that exist on the Administration Server.
You can also use the klscflag utility to view tags that were assigned to a device by an application.
To view tags assigned to a device by an application, run the following command:
klscflag -ssvget -pv 1103/1.0.0.0 -s KLNAG_SECTION_TAGS_INFO -n KLCONN_HOST_TAGS -svt ARRAY_T -ss "|ss_type = \"SS_PRODINFO\";"
Tagging devices manually
To assign a tag to a device:
- View tags assigned to the device to which you want to assign another tag.
- Click Add.
- In the window that opens, do one of the following:
- To create and assign a new tag, select Create new tag, and then specify the name of the new tag.
- To select an existing tag, select Assign existing tag, and then select the necessary tag in the drop-down list.
- Click OK to apply the changes.
- Click Save to save the changes.
The selected tag is assigned to the device.
To assign a tag to several devices:
- In the main menu, go to Assets (Devices) → Managed devices.
- Select the devices to which you want to assign a tag.
- Click Tags, and then select Assign from the drop-down list.
- In the window that opens, select a tag from the drop-down list.
If necessary, you can select several tags.
You can also do the following:
- Edit the name of a tag by clicking the Edit () icon.
Specify the new name of the tag, and then click the Save button.
Note that the tag will also be renamed in the list of device tags.
- Delete a tag by clicking the Delete () icon.
In the window that opens, click Delete.
Note that the tag will also be deleted from the Administration Server.
- Edit the name of a tag by clicking the Edit (
- Click the Save button.
The tags are assigned to the selected devices. You can remove the assigned tags.
Page top
Removing assigned tags from devices
The unassigned device tag is not deleted. If you want, you can delete it manually.
You cannot manually remove tags assigned to the device by applications or Network Agent. To remove these tags, use the klscflag utility.
To remove a tag from a device:
- In the main menu, go to Assets (Devices) → Managed devices.
- Click the name of the device whose tags you want to view.
- In the device properties window that opens, select the Tags tab.
- Select the check box next to the tag that you want to remove.
- At the top of the list, click the Unassign tag button.
- In the window that opens, click Yes.
The tag is removed from the device.
To remove tags from several devices:
- In the main menu, go to Assets (Devices) → Managed devices.
- Select the devices whose tags you want to remove.
- Click Tags, and then select Unassign from the drop-down list.
- In the window that opens, select the check boxes next to the tags that you want to remove.
The window displays all tags assigned to all the devices that you selected at step 2.
- Click the Save button.
The tags are removed from the devices.
Page top
Viewing rules for tagging devices automatically
To view rules for tagging devices automatically,
Do any of the following:
- In the main menu, go to Assets (Devices) → Tags → Auto-tagging rules.
- In the main menu, go to Assets (Devices) → Tags → Device tags, and then click the Set up auto-tagging rules link.
- View tags assigned to a device and then click the Settings button.
The list of rules for auto-tagging devices appears.
Page top
Editing a rule for tagging devices automatically
To edit a rule for tagging devices automatically:
- View rules for tagging devices automatically.
- Click the name of the rule that you want to edit.
A rule settings window opens.
- Edit the general properties of the rule:
- In the Rule name field, change the rule name.
The name cannot be more than 256 characters long.
- Do any of the following:
- Enable the rule by switching the toggle button to Rule enabled.
- Disable the rule by switching the toggle button to Rule disabled.
- In the Rule name field, change the rule name.
- Do any of the following:
- If you want to add a new condition, click the Add button, and specify the settings of the new condition in the window that opens.
- If you want to edit an existing condition, click the name of the condition that you want to edit, and then edit the condition settings.
- If you want to delete a condition, select the check box next to the name of the condition that you want to delete, and then click Delete.
- Click OK in the conditions settings window.
- Click Save to save the changes.
The edited rule is shown in the list.
Page top
Creating a rule for tagging devices automatically
To create a rule for tagging devices automatically:
- View rules for tagging devices automatically.
- Click Add.
A new rule settings window opens.
- Configure the general properties of the rule:
- In the Rule name field, enter the rule name.
The name cannot be more than 256 characters long.
- Do one of the following:
- Enable the rule by switching the toggle button to Rule enabled.
- Disable the rule by switching the toggle button to Rule disabled.
- In the Tag field, enter the new device tag name or select one of the existing device tags from the list.
The name cannot be more than 256 characters long.
- In the Rule name field, enter the rule name.
- In the conditions section, click the Add button to add a new condition.
A new condition settings window open.
- Enter the condition name.
The name cannot be more than 256 characters long. The name must be unique within a rule.
- Set up the triggering of the rule according to the following conditions. You can select multiple conditions.
- Network—Network properties of the device, such as the device name on the Windows network, or device inclusion in a domain or an IP subnet.
If case sensitive collation is set for the database that you use for Kaspersky Security Center Cloud Console, keep case when you specify a device DNS name. Otherwise, the auto-tagging rule will not work.
- Applications—Presence of Network Agent on the device, operating system type, version, and architecture.
- Virtual machines—Device belongs to a specific type of virtual machine.
- Active Directory—Presence of the device in an Active Directory organizational unit and membership of the device in an Active Directory group.
- Applications registry—Presence of applications of different vendors on the device.
- Network—Network properties of the device, such as the device name on the Windows network, or device inclusion in a domain or an IP subnet.
- Click OK to save the changes.
If necessary, you can set multiple conditions for a single rule. In this case, the tag will be assigned to a device if it meets at least one condition.
- Click Save to save the changes.
The newly created rule is enforced on devices managed by the selected Administration Server. If the settings of a device meet the rule conditions, the device is assigned the tag.
Later, the rule is applied in the following cases:
- Automatically and periodically, depending on the server workload
- After you edit the rule
- When you run the rule manually
- After the Administration Server detects a change in the settings of a device that meets the rule conditions or the settings of a group that contains such device
You can create multiple tagging rules. A single device can be assigned multiple tags if you have created multiple tagging rules and if the respective conditions of these rules are met simultaneously. You can view the list of all assigned tags in the device properties.
Page top
Running rules for auto-tagging devices
When a rule is run, the tag specified in properties of this rule is assigned to devices that meet conditions specified in properties of the same rule. You can run only active rules.
To run rules for auto-tagging devices:
- View rules for tagging devices automatically.
- Select check boxes next to active rules that you want to run.
- Click the Run rule button.
The selected rules are run.
Page top
Deleting a rule for tagging devices automatically
To delete a rule for tagging devices automatically:
- View rules for tagging devices automatically.
- Select the check box next to the rule that you want to delete.
- Click Delete.
- In the window that opens, click Delete again.
The selected rule is deleted. The tag that was specified in properties of this rule is unassigned from all of the devices that it was assigned to.
The unassigned device tag is not deleted. If you want, you can delete it manually.
Page top
Quarantine and Backup
Kaspersky anti-virus applications installed on client devices may place files in Quarantine or Backup during device scan.
Quarantine is a special repository for storing files that are probably infected with viruses and files that cannot be disinfected at the time when they are detected.
Backup is designed for storing backup copies of files that have been deleted or modified during the disinfection process.
Kaspersky Security Center Cloud Console creates a summarized list of files placed in Quarantine or Backup by Kaspersky applications on the devices. Network Agents on client devices transmit information about the files in Quarantine and Backup to the Administration Server.
Kaspersky Security Center Cloud Console does not copy files from repositories to Administration Server. All files are stored in repositories on the devices.
Downloading a file from repositories
Kaspersky Security Center Cloud Console enables you to download copies of files that a security application placed in Quarantine or Backup on a client device. Files are copied to the destination that you specify.
You can download files only if one of the following conditions is met: the Do not disconnect from the Administration Server option is enabled in the settings of the device, a push server is in use, or a connection gateway is in use. Otherwise, downloading is not possible.
The maximum total number of devices with the Do not disconnect from the Administration Server option selected is 300.
To save a copy of file from Quarantine or Backup to a hard drive:
- Do one of the following:
- If you want to save a copy of file from Quarantine, in the main menu, go to Operations → Repositories → Quarantine.
- If you want to save a copy of file from Backup, in the main menu, go to Operations → Repositories → Backup.
- In the window that opens, select a file that you want to download and click Download.
The download starts. A copy of the file that had been placed in Quarantine on the client device is saved to the specified folder.
Deleting files from repositories
To delete a file from Quarantine or Backup:
- Do one of the following:
- If you want to save a copy of file from Quarantine, in the main menu, go to Operations → Repositories → Quarantine.
- If you want to save a copy of file from Backup, in the main menu, go to Operations → Repositories → Backup.
- In the window that opens, select a file that you want to delete and click Delete.
- Confirm that you want to delete the file.
The security application on the client device that had placed files in the repository (Quarantine or Backup) deletes the same files from this repository.
Remote diagnostics of client devices
You can use remote diagnostics for remote execution of the following operations on Windows-based and Linux-based client devices:
- Enabling and disabling tracing, changing the tracing level, and downloading the trace file
- Downloading system information and application settings
- Downloading event logs
- Generating a dump file for an application
- Starting diagnostics and downloading diagnostics reports
- Starting, stopping, and restarting applications
You can use event logs and diagnostics reports downloaded from a client device to troubleshoot problems on your own. Also, if you contact Kaspersky Technical Support, a Technical Support specialist might ask you to download trace files, dump files, event logs, and diagnostics reports from a client device for further analysis at Kaspersky.
Opening the remote diagnostics window
To perform remote diagnostics on Windows-based and Linux-based client devices, you first have to open the remote diagnostics window.
To open the remote diagnostics window:
- To select the device for which you want to open the remote diagnostics window, perform one of the following:
- If the device belongs to an administration group, in the main menu, go to Assets (Devices) → Groups → <group name> → Managed devices.
- If the device belongs to the Unassigned devices group, in the main menu, go to Discovery & deployment → Unassigned devices.
- Click the name of the required device.
- In the device properties window that opens, select the Advanced tab.
- On the Advanced tab, click Remote diagnostics.
This opens the Remote diagnostics window of a client device. If connection between Administration Server and the client device is not established, the error message is displayed.
Alternatively, if you need to obtain all diagnostic information about a Linux-based client device at once, you can run the collect.sh script on this device.
Page top
Enabling and disabling tracing for applications
You can enable and disable tracing for applications, including Xperf tracing.
Enabling and disabling tracing
To enable or disable tracing on a remote device:
- Open the remote diagnostics window of a client device.
- In the remote diagnostics window, select the Kaspersky applications tab.
In the Application management section, the list of Kaspersky applications installed on the device displays.
- In the application list, select the application for which you want to enable or disable tracing.
The list of remote diagnostics options opens.
- If you want to enable tracing:
- In the Tracing section, click Enable tracing.
- In the Modify tracing level window that opens, we recommend that you keep the default values of the settings. When required, a Technical Support specialist will guide you through the configuration process. The following settings are available:
- Tracing level
- Rotation-based tracing
This setting is available for Kaspersky Endpoint Security only.
- Click Save.
The tracing is enabled for the selected application. In some cases, the security application and its task must be restarted in order to enable tracing.
On Linux-based client devices, tracing for the Updater of Kaspersky Security Agent component is regulated by the Network Agent settings. Therefore, the Enable tracing and Modify tracing level options are disabled for this component on client devices running Linux.
- If you want to disable tracing for the selected application, click Disable tracing.
The tracing is disabled for the selected application.
Enabling Xperf tracing
For Kaspersky Endpoint Security, a Technical Support specialist may ask you to enable Xperf tracing for information about the system performance.
To enable and configure Xperf tracing or disable it:
- Open the remote diagnostics window of a client device.
- In the remote diagnostics window, select the Kaspersky applications tab.
In the Application management section, the list of Kaspersky applications installed on the device displays.
- In the list of applications, select Kaspersky Endpoint Security for Windows.
The list of remote diagnostics options for Kaspersky Endpoint Security for Windows displays.
- In the Xperf tracing section, click Enable Xperf tracing.
If Xperf tracing is already enabled, the Disable Xperf tracing button is displayed instead. Click this button if you want to disable Xperf tracing for Kaspersky Endpoint Security for Windows.
- In the Change Xperf tracing level window that opens, depending on the request from the Technical Support specialist, do the following:
- Select one of the following tracing levels:
- Select one of the following Xperf tracing types:
You may also be asked to enable the Rotation file size, in MB option to prevent excessive increase in the size of the trace file. Then specify the maximum size of the trace file. When the file reaches the maximum size, the oldest tracing information is overwritten with new information.
- Define the rotation file size.
- Click Save.
Xperf tracing is enabled and configured.
- If you want to disable Xperf tracing for Kaspersky Endpoint Security for Windows, click Disable Xperf tracing in the Xperf tracing section.
Xperf tracing is disabled.
Downloading trace files of an application
You can download trace files from a client device only if one of the following conditions is met: the Do not disconnect from the Administration Server option is enabled in the settings of the device, a push server is in use, or a connection gateway is in use. Otherwise, downloading is not possible.
The maximum total number of devices with the Do not disconnect from the Administration Server option selected is 300.
To download a trace file of an application:
- Open the remote diagnostics window of a client device.
- In the remote diagnostics window, select the Kaspersky applications tab.
In the Application management section, the list of Kaspersky applications installed on the device displays.
- In the list of applications, select the application for which you want to download a trace file.
- In the Tracing section, click the Trace files button.
This opens the Device tracing logs window, where a list of trace files is displayed.
- In the list of trace files, select the file that you want to download.
- Do one of the following:
- Download the selected file by clicking the Download. You can select one or several files for downloading.
- Download a portion of the selected file:
- Click Download a portion.
You cannot download portions of several files at the same time. If you select more than one trace file, the Download a portion button will be disabled.
- In the window that opens, specify the name and the file portion to download, according to your needs.
For Linux-based devices, editing the file portion name is not available.
- Click Download.
- Click Download a portion.
The selected file, or its portion, is downloaded to the location that you specify.
Page top
Deleting trace files
You can delete trace files that are no longer needed.
To delete a trace file:
- Open the remote diagnostics window of a client device.
- In the remote diagnostics window that opens, select the Event logs tab.
- In the Trace files section, click Windows Update logs or Remote installation logs, depending on which trace files you want to delete.
This opens the Device tracing logs window, where a list of trace files is displayed.
- In the list of trace files, select one or several files that you want to delete.
- Click the Remove button.
The selected trace files are deleted.
Page top
Downloading application settings
You can download application settings from a client device only if one of the following conditions is met: the Do not disconnect from the Administration Server option is enabled in the settings of the device, a push server is in use, or a connection gateway is in use. Otherwise, downloading is not possible.
The maximum total number of devices with the Do not disconnect from the Administration Server option selected is 300.
To download application settings from a client device:
- Open the remote diagnostics window of a client device.
- In the remote diagnostics window, select the Kaspersky applications tab.
- In the Application settings section, click the Download button to download information about the settings of the applications installed on the client device.
The ZIP archive with information is downloaded to the specified location.
Page top
Downloading system information from a client device
You can download system information to your device from a client device only if one of the following conditions is met: the Do not disconnect from the Administration Server option is enabled in the settings of the device, a push server is in use, or a connection gateway is in use. Otherwise, downloading is not possible.
The maximum total number of devices with the Do not disconnect from the Administration Server option selected is 300.
To download system information from a client device:
- Open the remote diagnostics window of a client device.
- In the remote diagnostics window, select the System information tab.
- Click the Download button to download the system information about the client device.
The file with information is downloaded to the specified location.
Page top
Downloading event logs
You can download event logs to your device from a client device only if one of the following conditions is met: the Do not disconnect from the Administration Server option is enabled in the settings of the device, a push server is in use, or a connection gateway is in use. Otherwise, downloading is not possible.
The maximum total number of devices with the Do not disconnect from the Administration Server option selected is 300.
To download an event log from a remote device:
- Open the remote diagnostics window of a client device.
- In the remote diagnostics window, on the Event logs tab, click All device logs.
- In the All device logs window, select one or several relevant logs.
- Do one of the following:
- Download the selected log by clicking Download entire file.
- Download a portion of the selected log:
- Click Download a portion.
You cannot download portions of several logs at the same time. If you select more than one event log, the Download a portion button will be disabled.
- In the window that opens, specify the name and the log portion to download, according to your needs.
- Click Download.
- Click Download a portion.
The selected event log, or a portion of it, is downloaded to the specified location.
Page top
Starting, stopping, restarting the application
You can start, stop, and restart applications on a client device.
To start, stop, or restart an application:
- Open the remote diagnostics window of a client device.
- In the remote diagnostics window, select the Kaspersky applications tab.
In the Application management section, the list of Kaspersky applications installed on the device displays.
- In the list of applications, select the application that you want to start, stop, or restart.
- Select an action by clicking one of the following buttons:
- Stop application
This button is available only if the application is currently running.
- Restart application
This button is available only if the application is currently running.
- Start application
This button is available only if the application is not currently running.
- Stop application
Depending on the action that you have selected, the required application is started, stopped, or restarted on the client device.
If you restart the Network Agent, a message is displayed stating that the current connection of the device to the Administration Server will be lost.
Page top
Running the remote diagnostics of an application and downloading the results
To start diagnostics for an application on a remote device and download the results:
- Open the remote diagnostics window of a client device.
- In the remote diagnostics window, select the Kaspersky applications tab.
In the Application management section, the list of Kaspersky applications installed on the device displays.
- In the list of applications, select the application for which you want to run remote diagnostics.
The list of remote diagnostics options opens.
- In the Diagnostics report section, click the Run diagnostics button.
This starts the remote diagnostics process and generates a diagnostics report. When the diagnostics process is complete, the Download diagnostics report button becomes available.
- Click the Download diagnostics report button to download the report.
The report is downloaded to the specified location.
Page top
Running an application on a client device
You may have to run an application on the client device, if a Kaspersky support specialist requests it. You do not have to install the application on that device.
If you want to run a custom script on the client device, you can use the KLACDT_SAVE_SETTING environment variable to determine the path where the execution results will be saved. For example:
- For a Windows-based device:
@echo some result > %KLACDT_SAVE_SETTING%\res.log - For a Linux-based device:
echo some result > $KLACDT_SAVE_SETTING/res.log
To run an application on the client device:
- Open the remote diagnostics window of a client device.
- In the remote diagnostics window, select the Running a remote application tab.
- In the Object type field, select the type of object that you want to upload:
- Select File to upload the executable file.
- Select Folder to upload the folder containing the application that you want to run on the client device.
If you select this object type, the Name of the executable file to be run field appears. In this field, specify the name of the executable file in the folder. You can also specify the relative path to the file.
- Select Archive to upload the ZIP archive containing the application that you want to run on the client device.
If you select this object type, the Name of the executable file to be run field appears. In this field, specify the name of the executable file in the folder that you want to run on the client device. You can also specify the relative path to the file.
The ZIP archive must include the utility folder. This folder contains the executable file to be run on a remote device.
- Upload the object by selecting it in the system window, or dragging it to the upload field.
- If necessary, in the Command line arguments field, specify the command line arguments to be passed when running the executable file.
- Click the Upload and run button to run the selected application on a client device.
- After the application execution is completed successfully, download the execution results by clicking the Download application execution results button.
The application execution results are stored until you run a new diagnostic or close the window.
Remote diagnostics of the client device by using the application is completed.
Page top
Generating a dump file for an application
An application dump file allows you to view parameters of the application running on a client device at a point in time. This file also contains information about modules that were loaded for an application.
Generating dump files is available only for 32-bit processes running on Windows-based client devices. For client devices running Linux and for 64-bit processes this feature is not supported.
To create a dump file for an application:
- Open the remote diagnostics window of a client device.
- In the remote diagnostics window, select click the Running a remote application tab.
- In the Generating the process dump file section, specify the executable file of the application for which you want to generate a dump file.
- Click the Download button to save the dump file for the specified application.
If the specified application is not running on the client device, the error message will be displayed.
Remotely connecting to the desktop of a client device
You can obtain remote access to the desktop of a client device through a Network Agent installed on the device. Remote connection to a device through the Network Agent is possible even if the TCP and UDP ports of the client device are closed.
Upon establishing the connection with the device, you gain full access to information stored on this device and can manage applications installed on it.
Remote connection must be allowed in the operating system settings of the target managed device. For example, in Windows 10, this option is called Allow Remote Assistance connections to this computer (you can find this option at Control Panel → System and Security → System → Remote settings). If you have a license for the Vulnerability and patch management feature, you can enable this option forcibly when you establish connection to a managed device. If you do not have the license, enable this option locally on the target managed device. If this option is disabled, remote connection is not possible.
To establish remote connection to a device, you must have two utilities:
- Kaspersky utility named klsctunnel. This utility must be stored on your workstation. You use this utility for tunneling the connection between a client device and the Administration Server.
Kaspersky Security Center Cloud Console allows tunneling TCP connections from Administration Console via the Administration Server and then via Network Agent to a specified port on a managed device. Tunneling is designed for connecting a client application on a device with Administration Console installed to a TCP port on a managed device—if no direct connection is possible between Administration Console and the target device.
Connection tunneling between a remote client device and Administration Server is required if the port used for connection to Administration Server is not available on the device. The port on the device may be unavailable in the following cases:
- The remote device is connected to a local network that uses the NAT mechanism.
- The remote device is part of the local network of Administration Server, but its port is closed by a firewall.
- Standard Microsoft Windows component named Remote Desktop Connection. Connection to a remote desktop is established through the standard Windows utility mstsc.exe in accordance with the utility's settings.
Connection to the current remote desktop session of the user is established without the user's knowledge. Once you connect to the session, the device user is disconnected from the session without an advance notification.
To connect to the desktop of a client device, one of the following conditions must be met:
- Client device is a member of an administration group that has a distribution point with the Do not disconnect from the Administration Server option enabled.
- In the client device settings, the Do not disconnect from the Administration Server option is enabled.
The maximum total number of client devices with the Do not disconnect from the Administration Server option enabled is 300.
To connect to the desktop of a client device:
- In the main menu, go to Assets (Devices) → Managed devices.
- Select the check box next to the name of the device to which you want to obtain access.
- Click the Connect to Remote Desktop button.
The Connect to Remote Desktop window opens.
- Click the Download button to download the klsctunnel utility.
- Click the Copy to clipboard button to copy the text from the text field. This text is a Binary Large Object (BLOB) that contains settings required to establish connection between the Administration Server and the managed device.
A BLOB is valid for 3 minutes. If it has expired, reopen the Connect to Remote Desktop window to generate a new BLOB.
- Run the klsctunnel utility.
The utility window opens.
- Paste the copied text into the text field.
- If you use a proxy server, select the Use proxy server check box, and then specify the proxy server connection settings.
- Click the Open port button.
The Remote Desktop Connection login window opens.
- Specify the credentials of the account under which you are currently logged in to Kaspersky Security Center Cloud Console.
- Click the Connect button.
When connection to the device is established, the desktop is available in the Remote Desktop Connection window of Microsoft Windows.
Connecting to devices through Windows Desktop Sharing
You can obtain remote access to the desktop of a client device through a Network Agent installed on the device. Remote connection to a device through the Network Agent is possible even if the TCP and UDP ports of the client device are closed.
You can connect to an existing session on a client device without disconnecting the user in this session. In this case, you and the session user on the device share access to the desktop.
To establish remote connection to a device, you must have two utilities:
- Kaspersky utility named klsctunnel. This utility must be stored on your workstation. You use this utility for tunneling the connection between a client device and the Administration Server.
Kaspersky Security Center Cloud Console allows tunneling TCP connections from Administration Console via the Administration Server and then via Network Agent to a specified port on a managed device. Tunneling is designed for connecting a client application on a device with Administration Console installed to a TCP port on a managed device—if no direct connection is possible between Administration Console and the target device.
Connection tunneling between a remote client device and Administration Server is required if the port used for connection to Administration Server is not available on the device. The port on the device may be unavailable in the following cases:
- The remote device is connected to a local network that uses the NAT mechanism.
- The remote device is part of the local network of Administration Server, but its port is closed by a firewall.
- Windows Desktop Sharing. When connecting to an existing session of the remote desktop, the session user on the device receives a connection request from you. No information about remote activity on the device and its results will be saved in reports created by Kaspersky Security Center Cloud Console.
You can configure an audit of user activity on a remote client device. During the audit, the application saves information about files on the client device that have been opened and/or modified by the administrator.
To connect to the desktop of a client device through Windows Desktop Sharing, the following conditions must be met:
- Microsoft Windows Vista or later is installed on your workstation.
To check whether the Windows Desktop Sharing feature is included in your Windows edition, make sure that CLSID {32BE5ED2-5C86-480F-A914-0FF8885A1B3F} is included in the 32-bit registry.
- Microsoft Windows Vista or later is installed on the client device.
- Kaspersky Security Center Cloud Console uses a license for Vulnerability and patch management.
- The client device is a member of an administration group that has a distribution point with the Do not disconnect from the Administration Server option enabled, or this option is enabled in the client device settings.
Note that the maximum total number of client devices with the Do not disconnect from the Administration Server option enabled is 300.
To connect to the desktop of a client device through Windows Desktop Sharing:
- In the main menu, go to Assets (Devices) → Managed devices.
- Select the check box next to the name of the device to which you want to obtain access.
- Click the Windows Desktop Sharing button.
The Windows Desktop Sharing wizard opens.
- Click the Download button to download the klsctunnel utility, and wait for the download process to complete.
If you already have the klsctunnel utility, skip this step.
- Click the Next button.
- Select the session on the device to which you want to connect, and then click the Next button.
- On the target device, in the dialog box that opens, the user must allow a desktop sharing session. Otherwise, the session is not possible.
After the device user confirms the desktop sharing session, the next page of the wizard opens.
- Click the Copy to clipboard button to copy the text from the text field. This text is a Binary Large Object (BLOB) that contains settings required to establish connection between the Administration Server and the managed device.
A BLOB is valid for 3 minutes. If it has expired, generate a new BLOB.
- Run the klsctunnel utility.
The utility window opens.
- Paste the copied text into the text field.
- If you use a proxy server, select the Use proxy server check box, and then specify the proxy server connection settings.
- Click the Open port button.
Desktop sharing starts in a new window. If you want to interact with the device, click the menu icon (![]() ) in the upper-left corner of the window, and then select Interactive mode.
) in the upper-left corner of the window, and then select Interactive mode.
Triggering of rules in Smart Training mode
This section provides information about the detections performed by the Adaptive Anomaly Control rules in Kaspersky Endpoint Security for Windows on client devices.
The rules detect anomalous behavior on client devices and may block it. If the rules work in Smart Training mode, they detect anomalous behavior and send reports about every such occurrence to Kaspersky Security Center Cloud Console Administration Server. This information is stored as a list in the Rule triggers in Smart Training state subfolder of the Repositories folder. You can confirm detections as correct or add them as exclusions, so that this type of behavior is not considered anomalous anymore.
Information about detections is stored in the event log on the Administration Server (along with other events) and in the Adaptive Anomaly Control report.
For more information about Adaptive Anomaly Control, the rules, their modes and statuses, refer to Kaspersky Endpoint Security Help.
Viewing the list of detections performed using Adaptive Anomaly Control rules
To view the list of detections performed by Adaptive Anomaly Control rules:
- In the main menu, go to Operations → Repositories.
- Click the Rule triggers in Smart Training state link.
The list displays the following information about detections performed using Adaptive Anomaly Control rules:
To view properties of each information element:
- In the main menu, go to Operations → Repositories.
- Click the Rule triggers in Smart Training state link.
- In the window that opens, select the object that you want.
- Click the Properties link.
The properties window of the object opens and displays information about the selected element.
You can confirm or add to exclusions any element in the list of detections of Adaptive Anomaly Control rules.
To confirm an element,
Select an element (or several elements) in the list of detections and click the Confirm button.
The status of the element(s) will be changed to Confirming.
Your confirmation will contribute to the statistics used by the rules (for more information, refer to Kaspersky Endpoint Security for Windows documentation).
To add an element as an exclusion,
Select an element (or several elements) in the list of detections and click the Exclude button.
The Add exclusion wizard starts. Follow the instructions of the wizard.
If you reject or confirm an element, it will be excluded from the list of detections after the next synchronization of the client device with the Administration Server, and will no longer appear in the list.
Adding exclusions from the Adaptive Anomaly Control rules
The Add exclusion wizard enables you to add exclusions from the Adaptive Anomaly Control rules for Kaspersky Endpoint Security for Windows.
To start the Add exclusion wizard through the Adaptive Anomaly Control node:
- In the main menu, go to Operations → Repositories → Rule triggers in Smart Training state.
- In the window that opens, select an element (or several elements) in the list of detections, and then click the Exclude button.
You can add up to 1000 exclusions at a time. If you select more elements and try to add them to exclusions, an error message is displayed.
The Add exclusion wizard starts. Proceed through the wizard by using the Next button.
Managing administration groups
This section provides information about how to manage administration groups.
You can perform the following actions on administration groups:
- Add any number of nested groups at any level of hierarchy to administration groups.
- Add devices to administration groups.
- Change the hierarchy of administration groups by moving individual devices and entire groups to other groups.
- Remove nested groups and devices from administration groups.
- Add secondary and virtual Administration Servers to administration groups.
- Move devices from the administration groups of an Administration Server to those of another Server.
- Define which Kaspersky applications will be automatically installed on devices included in a group.
You can perform these actions only if you have the Modify permission in the Management of administration groups area for the administration groups you want to manage or for the Administration Server to which these groups belong.
Creating administration groups
Initially, the hierarchy of administration groups contains only one administration group called Managed devices group. You can add devices and subgroups into the Managed devices group.
To create an administration group:
- In the main menu, go to Assets (Devices) → Hierarchy of groups.
- In the hierarchy, select the administration group that is to include the new administration group.
- Click the Add button.
- In the window that opens, enter a name for the group and click Add.
A new administration group with the specified name appears in the administration group hierarchy.
The application allows creating a hierarchy of administration groups based on the structure of Active Directory or the domain network's structure. Also, you can create a structure of groups from a text file.
To create a structure of administration groups:
- In the main menu, go to Assets (Devices) → Hierarchy of groups.
- Click the Import button.
The New administration group structure wizard starts. Follow the instructions of the wizard.
Automatic installation of applications on devices in an administration group
You can specify which installation packages must be used for automatic remote installation of Kaspersky applications to client devices in an administration group.
To configure automatic installation of applications on the devices in an administration group:
- In the main menu, go to Assets (Devices) → Hierarchy of groups, and click the name of the required administration group.
- In the properties window that opens, go to the Automatic installation tab.
- Select the installation packages of the applications to be installed on the devices, and then click the Save button.
If you select several installation packages of the same application that differ only in their versions, the installation package with the latest version is saved.
After you select the installation packages, a group tasks for installation of the applications on the devices in the administration group is created for each of the application. These tasks are run on the client devices immediately after they are added to the administration group.
Page top
Moving administration groups
You can move nested administration groups within the groups hierarchy.
An administration group is moved together with all nested groups, secondary Administration Servers, devices, group policies, and tasks. The application applies to the group all the settings that correspond to its new position in the hierarchy of administration groups.
The name of the group must be unique within one level of the hierarchy. If a group with the same name already exists in the folder into which you move the administration group, you must change the name of the latter. If you have not changed the name of the moved group, an index in (<next sequence number>) format is automatically added to its name when it is moved, for example: (1), (2).
You cannot rename and move the Managed devices group.
To move an administration group to another level of the administration groups hierarchy:
- In the main menu, go to Assets (Devices) → Hierarchy of groups, and then select the check box next to the administration group that you want to move.
- On the toolbar, click the Move button.
- In the window that opens, select where you want to move the administration group, and then click the Move button.
The window is closed, and the administration group is moved to another level of the groups hierarchy.
Page top
Deleting administration groups
If you delete an administration group that contains secondary Administration Servers, nested groups, client devices, group tasks, or policies created for this group, all of them will also be deleted.
Before deleting an administration group, you must delete all secondary Administration Servers, nested groups, and client devices from that group.
To delete an administration group:
- In the main menu, go to Assets (Devices) → Hierarchy of groups, and then select the check box next to the administration group that you want to delete.
- On the toolbar, click the Delete button.
The administration group is deleted.
Page top
Policies and policy profiles
In Kaspersky Security Center Cloud Console, you can create policies for Kaspersky applications. This section describes policies and policy profiles, and provides instructions for creating and modifying them.
About policies
A policy is a set of Kaspersky application settings that are applied to an administration group and its subgroups. You can install several Kaspersky applications on the devices of an administration group. Kaspersky Security Center Cloud Console provides a single policy for each Kaspersky application in an administration group. A policy has one of the following statuses (see the table below):
The status of the policy
Status |
Description |
|---|---|
Active |
The current policy that is applied to the device. Only one policy may be active for a Kaspersky application in each administration group. Devices apply the settings values of an active policy for a Kaspersky application. |
Inactive |
A policy that is not currently applied to a device. |
Out-of-office |
If this option is selected, the policy becomes active when the device leaves the corporate network. |
Policies function according to the following rules:
- Multiple policies with different values can be configured for a single application.
- Only one policy can be active for the current application.
- You can activate an inactive policy when a specific event occurs. For example, you can enforce stricter anti-virus protection settings during virus outbreaks.
- A policy can have child policies.
Generally, you can use policies as preparations for emergency situations, such as a virus attack. For example, if there is an attack via flash drives, you can activate a policy that blocks access to flash drives. In this case, the current active policy automatically becomes inactive.
In order to prevent maintaining multiple policies, for example, when different occasions assume changing of several settings only, you may use policy profiles.
A policy profile is a named subset of policy settings values that replaces the settings values of a policy. A policy profile affects the effective settings formation on a managed device. Effective settings are a set of policy settings, policy profile settings, and local application settings that are currently applied for the device.
Policy profiles function according to the following rules:
- A policy profile takes an effect when a specific activation condition occurs.
- Policy profiles contain values of settings that differ from the policy settings.
- Activation of a policy profile changes the effective settings of the managed device.
- A policy can include a maximum of 100 policy profiles.
You cannot create an Administration Server policy.
About lock and locked settings
Each policy setting has a lock button icon (). The table below shows lock button statuses:
Lock button statuses
Status |
Description |
|---|---|
|
If an open lock is displayed next to a setting and the toggle button is disabled, the setting is not specified in the policy. A user can change these settings in the managed application interface. These type of settings are called unlocked. |
|
If a closed lock is displayed next to a setting and the toggle button is enabled, the setting is applied to the devices where the policy is enforced. A user cannot modify the values of these settings in the managed application interface. These type of settings are called locked. |


We highly recommend that you close locks for the policy settings that you want to apply on the managed devices. The unlocked policy settings can be reassigned by Kaspersky application settings on a managed device.
You can use a lock button for performing the following actions:
- Locking settings for an administration subgroup policy
- Locking settings of a Kaspersky application on a managed device
Thus, a locked setting is used for implementing effective settings on a managed device.
A process of effective settings implementation includes the following actions:
- Managed device applies settings values of Kaspersky application.
- Managed device applies locked settings values of a policy.
A policy and managed Kaspersky application contain the same set of settings. When you configure policy settings, the Kaspersky application settings change values on a managed device. You cannot adjust locked settings on a managed device (see the figure below):
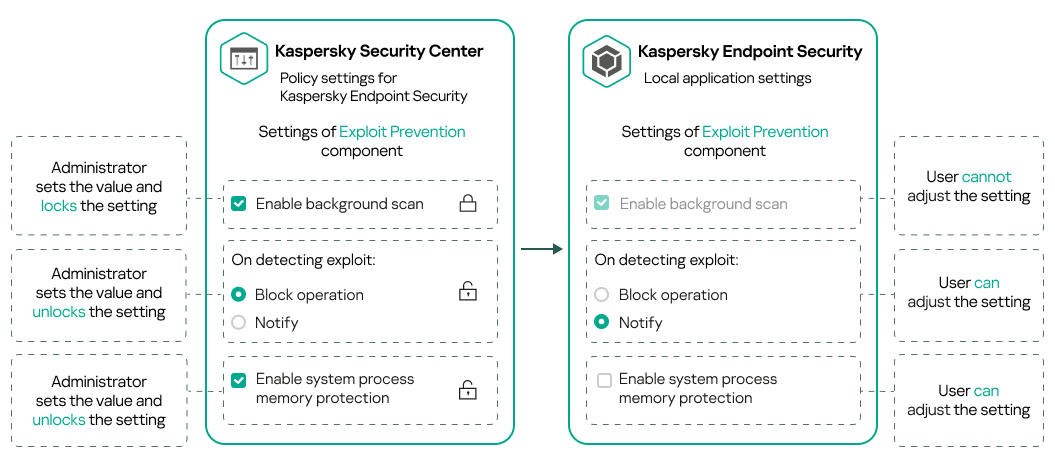
Locks and Kaspersky application settings
Inheritance of policies and policy profiles
This section provides information about the hierarchy and inheritance of policies and policy profiles.
Hierarchy of policies
If different devices need different settings, you can organize devices into administration groups.
You can specify a policy for a single administration group. Policy settings can be inherited. Inheritance means receiving policy settings values in subgroups (child groups) from a policy of a higher-level (parent) administration group.
Hereinafter, a policy for a parent group is also referred to as a parent policy. A policy for a subgroup (child group) is also referred to as a child policy.
By default, at least one managed devices group exists on Administration Server. If you want to create custom groups, they are created as subgroups (child groups) within the managed devices group.
Policies of the same application act on each other, according to a hierarchy of administration groups. Locked settings from a policy of a higher-level (parent) administration group will reassign policy settings values of a subgroup (see the figure below).
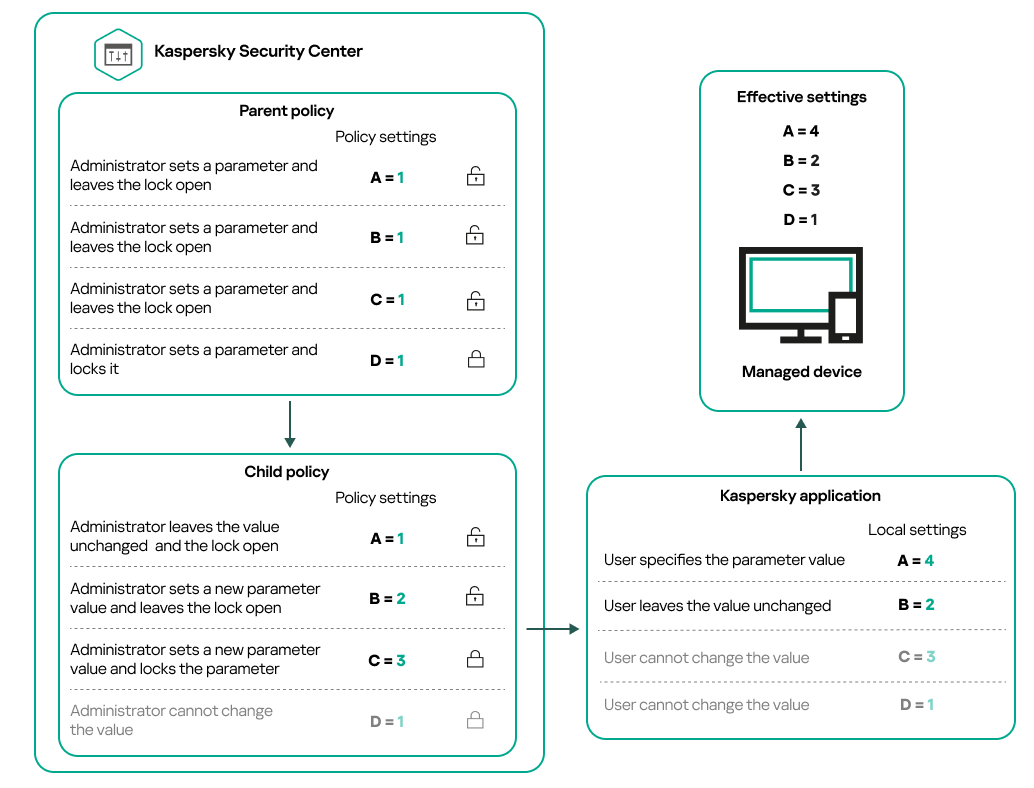
Hierarchy of policies
Page top
Policy profiles in a hierarchy of policies
Policy profiles have the following priority assignment conditions:
- A profile's position in a policy profile list indicates its priority. You can change a policy profile priority. The highest position in a list indicates the highest priority (see the figure below).
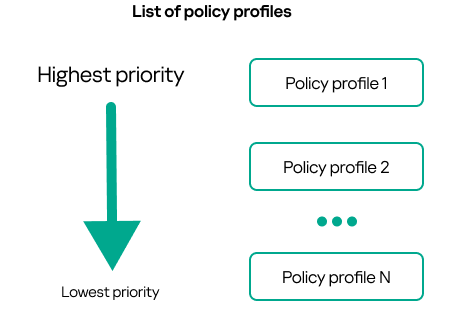
Priority definition of a policy profile
- Activation conditions of policy profiles do not depend on each other. Several policy profiles can be activated simultaneously. If several policy profiles affect the same setting, the device takes the setting value from the policy profile with the highest priority (see the figure below).

Managed device configuration fulfills activation conditions of several policy profiles
Policy profiles in a hierarchy of inheritance
Policy profiles from different hierarchy level policies comply with the following conditions:
- A lower-level policy inherits policy profiles from a higher-level policy. A policy profile inherited from a higher-level policy obtains higher priority than the original policy profile's level.
- You cannot change a priority of an inherited policy profile (see the figure below).
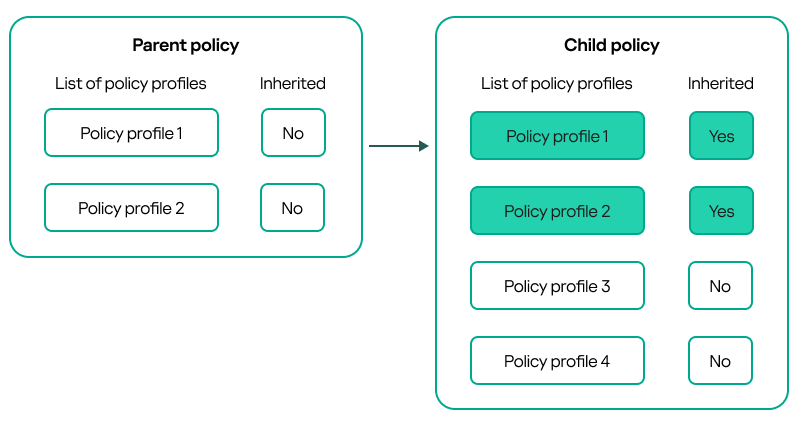
Inheritance of policy profiles
Policy profiles with the same name
If there are two policies with the same names in different hierarchy levels, these policies function according to the following rules:
- Locked settings and the profile activation condition of a higher-level policy profile changes the settings and profile activation condition of a lower-level policy profile (see the figure below).

Child profile inherits settings values from a parent policy profile
- Unlocked settings and the profile activation condition of a higher-level policy profile do not change the settings and profile activation condition of a lower-level policy profile.
How settings are implemented on a managed device
Implementation of effective settings on a managed device can be described as follows:
- The values of all settings that have not been locked are taken from the policy.
- Then they are overwritten with the values of managed application settings.
- And then the locked settings values from the effective policy are applied. Locked settings values change the values of unlocked effective settings.
Managing policies
This section describes managing policies and provides information about viewing the list of policies, creating a policy, modifying a policy, copying a policy, moving a policy, forced synchronization, viewing the policy distribution status chart, and deleting a policy.
Viewing the list of policies
You can view lists of policies created for the Administration Server or for any administration group.
To view a list of policies:
- In the main menu, go to Assets (Devices) → Hierarchy of groups.
- In the administration group structure, select the administration group for which you want to view the list of policies.
The list of policies appears in tabular format. If there are no policies, the table is empty. You can show or hide the columns of the table, change their order, view only lines that contain a value that you specify, or use search.
Creating a policy
You can create policies; you can also modify and delete existing policies.
You cannot create an Administration Server policy.
To create a policy:
- In the main menu, go to Assets (Devices) → Policies & profiles.
- Click Add.
The Select application window opens.
- Select the application for which you want to create a policy.
- Click Next.
The new policy settings window opens with the General tab selected.
- If you want, change the default name, default status, and default inheritance settings of the policy.
- Click the Application settings tab.
Or, you can click Save and exit. The policy will appear in the list of policies, and you can edit its settings later.
- On the Application settings tab, in the left pane select the category that you want and in the results pane on the right, edit the settings of the policy. You can edit policy settings in each category (section).
The application settings depend on the application for which you create a policy. For details, refer to the following:
- Administration Server configuration
- Network Agent policy settings
- Kaspersky Endpoint Security for Windows documentation
For details about settings of other security applications, refer to the documentation for the corresponding application.
When editing the settings, you can click Cancel to cancel the last operation.
- Click Save to save the policy.
The policy will appear in the list of policies.
Modifying a policy
To modify a policy:
- In the main menu, go to Assets (Devices) → Policies & profiles.
- Click the policy that you want to modify.
The policy settings window opens.
- Specify the general settings and settings of the application for which you create a policy. For details, refer to the following:
- Administration Server configuration
- Network Agent policy settings
- Kaspersky Endpoint Security for Windows documentation
For details about settings of other security applications, refer to the documentation for that application.
- Click Save.
The changes made to the policy will be saved in the policy properties, and will appear in the Revision history section.
General policy settings
General
On the General tab, you can modify the policy status and specify the inheritance of policy settings:
- In the Policy status block, you can select one of the policy modes:
- Active
- Out-of-office
- Inactive
- In the Settings inheritance settings group, you can configure the policy inheritance:
Event configuration
The Event configuration tab enables you to configure event logging and event notification. Events are distributed by importance level on the following tabs:
- Critical
The Critical section is not displayed in the Network Agent policy properties.
- Functional failure
- Warning
- Info
In each section, the list shows the types of events and the default event storage term on the Administration Server (in days). Clicking an event type lets you specify the following settings:
- Event registration
You can specify how many days to store the event and select where to store the event:
- Store in the Administration Server database for (days)
- Store in the OS event log on device
- Event notifications
You can select if you want to be notified about the event by email.
By default, the notification settings specified on the Administration Server properties tab (such as recipient address) are used. If you want, you can change these settings on the Email tab.
Also, the Event configuration tab displays a notification when new event types are added (for example, in a new version of the application), and enables you to apply the new settings by clicking the Save or Save and close button.
Revision history
The Revision history tab enables you to view the list of the policy revisions and roll back changes made to the policy, if necessary.
Enabling and disabling a policy inheritance option
To enable or disable the inheritance option in a policy:
- Open the required policy.
- Open the General tab.
- Enable or disable policy inheritance:
- If you enable Inherit settings from parent policy in a child policy and an administrator locks some settings in the parent policy, then you cannot change these settings in the child policy.
- If you disable Inherit settings from parent policy in a child policy, then you can change all of the settings in the child policy, even if some settings are locked in the parent policy.
- If you enable Force inheritance of settings in child policies in the parent group, this enables the Inherit settings from parent policy option for each child policy. In this case, you cannot disable this option for any child policy. All of the settings that are locked in the parent policy are forcibly inherited in the child groups, and you cannot change these settings in the child groups.
- Click the Save button to save changes or click the Cancel button to reject changes.
By default, the Inherit settings from parent policy option is enabled for a new policy.
If a policy has profiles, all of the child policies inherit these profiles.
Copying a policy
You can copy policies from one administration group to another.
To copy a policy to another administration group:
- In the main menu, go to Assets (Devices) → Policies & profiles.
- Select the check box next to the policy (or policies) that you want to copy.
- Click the Copy button.
On the right side of the screen, the tree of the administration groups appears.
- In the tree, select the target group, that is, the group to which you want to copy the policy (or policies).
- Click the Copy button at the bottom of the screen.
- Click OK to confirm the operation.
The policy (policies) will be copied to the target group with all its profiles. The status of each copied policy in the target group will be Inactive. You can change the status to Active at any time.
If a policy with the name identical to that of the newly moved policy already exists in the target group, the name of the newly moved policy is expanded with the (<next sequence number>) index, for example: (1).
Moving a policy
You can move policies from one administration group to another. For example, you want to delete a group, but you want to use its policies for another group. In this case, you may want move the policy from the old group to the new one before deleting the old group.
To move a policy to another administration group:
- In the main menu, go to Assets (Devices) → Policies & profiles.
- Select the check box next to the policy (or policies) that you want to move.
- Click the Move button.
On the right side of the screen, the tree of the administration groups appears.
- In the tree, select the target group, that is, the group to which you want to move the policy (or policies).
- Click the Move button at the bottom of the screen.
- Click OK to confirm the operation.
If a policy is not inherited from the source group, it is moved to the target group with all its profiles. The status of the policy in the target group is Inactive. You can change the status to Active at any time.
If a policy is inherited from the source group, it remains in the source group. It is copied to the target group with all its profiles. The status of the policy in the target group is Inactive. You can change the status to Active at any time.
If a policy with the name identical to that of the newly moved policy already exists in the target group, the name of the newly moved policy is expanded with the (<next sequence number>) index, for example: (1).
Exporting a policy
Kaspersky Security Center Cloud Console allows you to save a policy, its settings, and the policy profiles to a KLP file. You can use this KLP file to import the saved policy both to Kaspersky Security Center Windows and Kaspersky Security Center Linux.
To export a policy:
- In the main menu, go to Assets (Devices) → Policies & profiles.
- Select the check box next to the policy that you want to export.
You cannot export multiple policies at the same time. If you select more than one policy, the Export button will be disabled.
- Click the Export button.
- In the opened Save as window, specify the policy file name and path. Click the Save button.
The Save as window is displayed only if you use Google Chrome, Microsoft Edge, or Opera. If you use another browser, the policy file is automatically saved in the Downloads folder.
Importing a policy
Kaspersky Security Center Cloud Console allows you to import a policy from a KLP file. The KLP file contains the exported policy, its settings, and the policy profiles.
To import a policy:
- In the main menu, go to Assets (Devices) → Policies & profiles.
- Click the Import button.
- Click the Browse button to choose a policy file that you want to import.
- In the opened window, specify the path to the KLP policy file, and then click the Open button. Note that you can select only one policy file.
The policy processing starts.
- After the policy is processed successfully, select the administration group to which you want to apply the policy.
- Click the Complete button to finish the policy import.
The notification with the import results appears. If the policy is imported successfully, you can click the Details link to view the policy properties.
After a successful import, the policy is displayed in the policy list. The settings and profiles of the policy are also imported. Regardless of the policy status that was selected during the export, the imported policy is inactive. You can change the policy status in the policy properties.
If the newly imported policy has a name identical to that of an existing policy, the name of the imported policy is expanded with the (<next sequence number>) index, for example: (1), (2).
Page top
Viewing the policy distribution status chart
In Kaspersky Security Center Cloud Console, you can view the status of policy application on each device in a policy distribution status chart.
To view the policy distribution status on each device:
- In the main menu, go to Assets (Devices) → Policies & profiles.
- Select check box next to the name of the policy for which you want to view the distribution status on devices.
- In the menu that appears, click the Distribution link.
The <Policy name> distribution results window opens.
- In the <Policy name> distribution results window that opens, the Status description (if available) of the policy is displayed.
You can change number of results displayed in the list with policy distribution. The maximum number of devices is 100,000.
To change the number of devices displayed in the list with policy distribution results:
- In the main menu, go to your account settings, and then select Interface options.
- In the Maximum number of devices displayed in policy distribution results, enter the number of devices (up to 100,000).
By default, the number is 5000.
- Click Save.
The settings are saved and applied.
Activating a policy automatically at the Virus outbreak event
To make a policy perform automatic activation at a Virus outbreak event:
- In the main menu, click the settings icon () next to the name of the required Administration Server.
The Administration Server properties window opens, with the General tab selected.
- Select the Virus outbreak section.
- In the right pane, click the Configure policies to activate when a virus outbreak event occurs link.
The Policy activation window opens.
- In the section relating to the component that detects a virus outbreak—Anti-Virus for workstations and file servers, Anti-Virus for mail servers, or Anti-Virus for perimeter defense—select the option button next to the entry you want, and then click Add.
A window opens with the Managed devices administration group.
- Click the chevron icon () next to Managed devices.
A hierarchy of administration groups and their policies is displayed.
- In the hierarchy of administration groups and their policies, click the name of a policy or policies that are activated when a virus outbreak is detected.
To select all policies in the list or in a group, select the check box next to the required name.
- Click the Save button.
The window with the hierarchy of administration groups and their policies is closed.
The selected policies are added to the list of policies that are activated when a virus outbreak is detected. The selected policies are activated at the virus outbreak, independent whether they are active or inactive.
If a policy has been activated on the Virus outbreak event, you can return to the previous policy only by using the manual mode.
Forced synchronization
Although Kaspersky Security Center Cloud Console automatically synchronizes the status, settings, tasks, and policies for managed devices, in some cases you need to know for certain, at a given moment, whether synchronization has already been performed for a specified device.
Synchronizing a single device
To force synchronization between the Administration Server and a managed device:
- In the main menu, go to Assets (Devices) → Managed devices.
- Click the name of the device that you want to synchronize with the Administration Server.
A property window opens with the General section selected.
- Click the Force synchronization button.
The application synchronizes the selected device with the Administration Server.
Synchronizing multiple devices
To force synchronization between the Administration Server and multiple managed devices:
- Open the device list of an administration group or a device selection:
- In the main menu, go to Assets (Devices) → Managed devices → Groups, and then select the administration group that contains devices to synchronize.
- Run a device selection to view the device list.
- Select the check boxes next to the devices that you want to synchronize with the Administration Server.
- Click the Force synchronization button.
The application synchronizes the selected devices with the Administration Server.
- In the device list, check that the time of last connection to the Administration Server has changed, for the selected devices, to the current time. If the time has not changed, update the page content by clicking the Refresh button.
The selected devices are synchronized with the Administration Server.
Viewing the time of a policy delivery
After changing a policy for a Kaspersky application on the Administration Server, you can check whether the changed policy has been delivered to a specific managed device. A policy can be delivered during a regular synchronization or a forced synchronization.
To view the date and time that an application policy was delivered to a managed device:
- In the main menu, go to Assets (Devices) → Managed devices.
- Click the name of the device that you want to synchronize with the Administration Server.
A property window opens with the General section selected.
- Click the Applications tab.
- Select the application for which you want to view the policy synchronization date.
The application policy window opens with the General section selected and the policy delivery date and time displayed.
Deleting a policy
You can delete a policy if you do not need it anymore. You can delete only a policy that is not inherited in the specified administration group. If a policy is inherited, you can only delete it in the upper-level group for which it was created.
To delete a policy:
- In the main menu, go to Assets (Devices) → Policies & profiles.
- Select the check box next to the policy that you want to delete, and click Delete.
The Delete button becomes unavailable (dimmed) if you select an inherited policy.
- Click OK to confirm the operation.
The policy is deleted together with all its profiles.
Managing policy profiles
This section describes managing policy profiles and provides information about viewing the profiles of a policy, changing a policy profile priority, creating a policy profile, modifying a policy profile, copying a policy profile, creating a policy profile activation rule, and deleting a policy profile.
Viewing the profiles of a policy
To view profiles of a policy:
- In the main menu, go to Assets (Devices) → Policies & profiles.
- Click the name of the policy whose profiles you want to view.
The policy properties window opens with the General tab selected.
- Open the Policy profiles tab.
The list of policy profiles appears in tabular format. If the policy does not have profiles, an empty table appears.
Changing a policy profile priority
To change a policy profile priority:
- Proceed to the list of profiles of a policy that you want.
The list of policy profiles appears.
- On the Policy profiles tab, select the check box next to the policy profile for which you want to change priority.
- Set a new position of the policy profile in the list by clicking Prioritize or Deprioritize.
The higher a policy profile is located in the list, the higher its priority.
- Click the Save button.
Priority of the selected policy profile is changed and applied.
Creating a policy profile
To create a policy profile:
- Proceed to the list of profiles of the policy that you want.
The list of policy profiles appears. If the policy does not have profiles, an empty table appears.
- Click Add.
- If you want, change the default name and default inheritance settings of the profile.
- Select the Application settings tab.
Alternatively, you can click Save and exit. The profile that you have created appears in the list of policy profiles, and you can edit its settings later.
- On the Application settings tab, in the left pane, select the category that you want and in the results pane on the right, edit the settings for the profile. You can edit policy profile settings in each category (section).
When editing the settings, you can click Cancel to cancel the last operation.
- Click Save to save the profile.
The profile will appear in the list of policy profiles.
Modifying a policy profile
The capability to edit a policy profile is only available for policies of Kaspersky Endpoint Security for Windows.
To modify a policy profile:
- Proceed to the list of profiles of a policy that you want.
The list of policy profiles appears.
- On the Policy profiles tab, click the policy profile that you want to modify.
The policy profile properties window opens.
- Configure the profile in the properties window:
- If necessary, on the General tab, change the profile name and enable or disable the profile.
- Edit the profile activation rules.
- Edit the application settings.
For details about settings of security applications, please see the documentation of the corresponding application.
- Click Save.
The modified settings will take effect either after the device is synchronized with the Administration Server (if the policy profile is active), or after an activation rule is triggered (if the policy profile is inactive).
Copying a policy profile
You can copy a policy profile to the current policy or to another, for example, if you want to have identical profiles for different policies. You can also use copying if you want to have two or more profiles that differ in only a small number of settings.
To copy a policy profile:
- Proceed to the list of profiles of a policy that you want.
The list of policy profiles appears. If the policy does not have profiles, an empty table appears.
- On the Policy profiles tab, select the policy profile that you want to copy.
- Click Copy.
- In the window that opens, select the policy to which you want to copy the profile.
You can copy a policy profile to the same policy or to a policy that you specify.
- Click Copy.
The policy profile is copied to the policy that you selected. The newly copied profile gets the lowest priority. If you copy the profile to the same policy, the name of the newly copied profile will be expanded with the () index, for example: (1), (2).
Later, you can change the settings of the profile, including its name and its priority; the original policy profile will not be changed in this case.
Creating a policy profile activation rule
To create a policy profile activation rule:
- Proceed to the list of profiles of a policy that you want.
The list of policy profiles appears.
- On the Policy profiles tab, click the policy profile for which you need to create an activation rule.
If the list of policy profiles is empty, you can create a policy profile.
- On the Activation rules tab, click the Add button.
The window with policy profile activation rules opens.
- Specify a name for the rule.
- Select the check boxes next to the conditions that must affect activation of the policy profile that you are creating:
- General rules for policy profile activation
For this option, specify at the next step:
- Rules for specific device owner
For this option, specify at the next step:
- Rules for hardware specifications
For this option, specify at the next step:
- Rules for role assignment
For this option, specify at the next step:
- Rules for tag usage
For this option, specify at the next step:
- Rules for Active Directory usage
For this option, specify at the next step:
The number of additional pages of the wizard depends on the settings that you select at the first step. You can modify policy profile activation rules later.
- General rules for policy profile activation
- Check the list of the configured parameters. If the list is correct, click Create.
The profile will be saved. The profile will be activated on the device when activation rules are triggered.
Policy profile activation rules created for the profile are displayed in the policy profile properties on the Activation rules tab. You can modify or remove any policy profile activation rule.
Multiple activation rules can be triggered simultaneously.
Deleting a policy profile
To delete a policy profile:
- Proceed to the list of profiles of a policy that you want.
The list of policy profiles appears.
- On the Policy profiles tab, select the check box next to the policy profile that you want to delete, and click Delete.
- In the window that opens, click Delete again.
The policy profile is deleted. If the policy is inherited by a lower-level group, the profile remains in that group, but becomes the policy profile of that group. This is done to eliminate significant change in settings of the managed applications installed on the devices of lower-level groups.
Data encryption and protection
Data encryption reduces the risk of unintentional leakage in case your laptop or hard drive is stolen or lost, or upon access by unauthorized users and applications.
The following Kaspersky applications support encryption:
- Kaspersky Endpoint Security for Windows
- Kaspersky Endpoint Security for Mac
You can show or hide some of the interface elements related to the encryption management feature by using the user interface settings.
Encryption of data in Kaspersky Endpoint Security for Windows
You can manage the BitLocker Drive Encryption technology on devices running a Windows operating system for servers or workstations.
By using these components of Kaspersky Endpoint Security for Windows, you can, for example, enable or disable encryption, view the list of encrypted drives, or generate and view reports about encryption.
You configure encryption by defining policies of Kaspersky Endpoint Security for Windows in Kaspersky Security Center Cloud Console. Kaspersky Endpoint Security for Windows performs encryption and decryption according to the active policy. For detailed instructions on how to configure rules and a description of encryption features, see the Kaspersky Endpoint Security for Windows Help.
Encryption of data in Kaspersky Endpoint Security for Mac
You can use FileVault encryption on devices running macOS. While working with Kaspersky Endpoint Security for Mac, you can enable or disable this encryption.
You configure encryption by defining policies of Kaspersky Endpoint Security for Mac in Kaspersky Security Center Cloud Console. Kaspersky Endpoint Security for Mac performs encryption and decryption according to the active policy. For a detailed description of encryption features, see the Kaspersky Endpoint Security for Mac Help.
Viewing the list of encrypted drives
In Kaspersky Security Center Cloud Console, you can view details about encrypted drives and devices that are encrypted at the drive level. After the information on a drive is decrypted, the drive is automatically removed from the list.
To view the list of encrypted drives,
In the main menu, go to Operations → Data encryption and protection → Encrypted drives.
If the section is not on the menu, this means that it is hidden. In the user interface settings, enable the Show data encryption and protection option to display the section.
You can export the list of encrypted drives to a CSV or TXT file. To do this, click the Export to CSV or Export to TXT button.
Creating and viewing encryption reports
You can generate the following reports:
- Report on encryption status of managed devices. This report provides details about the data encryption of various managed devices. For example, the report shows the number of devices to which the policy with configured encryption rules applies. Also, you can find out, for instance, how many devices need to be rebooted. The report also contains information about the encryption technology and algorithm for every device.
- Report on encryption status of mass storage devices. This report contains similar information as the report on the encryption status of managed devices, but it provides data only for mass storage devices and removable drives.
- Report on rights to access encrypted drives. This report shows which user accounts have access to encrypted drives.
- Report on file encryption errors. This report contains information about errors that occurred when the data encryption or decryption tasks were run on devices.
- Report on blockage of access to encrypted files. This report contains information about blocking application access to encrypted files. This report is helpful if an unauthorized user or application tries to access encrypted files or drives.
You can generate any report in the Monitoring & reporting → Reports section. Alternatively, in the Operations → Data encryption and protection section, you can generate the following encryption reports:
- Report on encryption status of mass storage devices
- Report on rights to access encrypted drives
- Report on file encryption errors
To generate an encryption report in the Data encryption and protection section:
- Make sure that you enabled the Show data encryption and protection option in the Interface options.
- In the main menu, go to Operations → Data encryption and protection.
- Open the Encrypted drives section to generate the report on encryption status of mass storage devices or the report on rights to access encrypted drives.
- Click the name of the report that you want to generate.
The report generation starts.
Granting access to an encrypted drive in offline mode
A user can request access to an encrypted device, for example, when Kaspersky Endpoint Security for Windows is not installed on the managed device. After you receive the request, you can create an access key file and send it to the user. All of the use cases and detailed instructions are provided in the Kaspersky Endpoint Security for Windows Help.
To grant access to an encrypted drive in offline mode:
- Get a request access file from a user (a file with the FDERTC extension). Follow the instructions in the Kaspersky Endpoint Security for Windows Help to generate the file in Kaspersky Endpoint Security for Windows.
- In the main menu, go to Operations → Data encryption and protection → Encrypted drives.
A list of encrypted drives appears.
- Select the drive to which the user requested access.
- Click the Grant access to the device in offline mode button.
- In the window that opens, select the plug-in corresponding to the Kaspersky application that was used to encrypt the selected drive.
If a drive is encrypted with a Kaspersky application that is not supported by Kaspersky Security Center Cloud Console, use Microsoft Management Console-based Administration Console to grant the offline access.
- Follow the instructions provided in the Kaspersky Endpoint Security for Windows Help (see expanding blocks at the end of the section).
After that, the user applies the received file to access the encrypted drive and read data stored on the drive.
Transmitting encryption keys between Administration Servers
If the data encryption feature is enabled on a managed device, the encryption key is stored on the Administration Server. The encryption key is used to access encrypted data and to manage the encryption policy.
The encryption key must be transmitted to another Administration Server in the following cases:
- Reconfiguring Network Agent on a managed device to assign the device to another Administration Server. If this device contains encrypted data, the encryption key must be transmitted to the target Administration Server. Otherwise, the data cannot be decrypted.
- Encrypting a removable drive connected to a device D1 that is managed by the Administration Server S1, and then you connect this removable drive to a device D2 managed by the Administration Server S2. To access to the data on the removable drive, the encryption key must be transmitted from the Administration Server S1 to the Administration Server S2.
- Encrypting a file on a device D1 managed by the Administration Server S1, and then you try to access the file on a device D2 managed by the Administration Server S2. To access the file, the encryption key must be transmitted from the Administration Server S1 to the Administration Server S2.
You can transmit encryption keys the following ways:
- Automatically, by enabling the Use hierarchy of Administration Servers to obtain encryption keys option in the properties of two Administration Servers between which an encryption key must be transmitted. If this option is disabled for one of the Administration Servers, the automatic transmission of encryption keys is not possible.
When you enable the Use hierarchy of Administration Servers to obtain encryption keys option in an Administration Server properties, the Administration Server sends all of the encryption keys stored in its repository to the primary Administration Server (if any) one level up in the hierarchy.
When you try to access encrypted data, the Administration Server first searches the encryption key in its own repository. If the Use hierarchy of Administration Servers to obtain encryption keys option is enabled and the required encryption key has not been found in the repository, the Administration Server additionally sends a request to the primary Administration Servers (if any) to provide the required encryption key. The request will be sent to all of the primary Administration Servers up to the server on the highest level of the hierarchy.
- Manually from one Administration Server to another by exporting and importing the file containing the encryption keys.
The export and import of encryption keys are actions that are included in the Encryption key management feature. To perform these actions, configure the access rights to the feature for users of Kaspersky Security Center Cloud Console as follows:
- Grant the Read access right to the Encryption key management feature for a user that exports encryption keys from the secondary Administration Server.
- Grant the Write access right to the Encryption key management feature for a user that imports encryption keys to the target Administration Server.
To enable automatic transmission of encryption keys between Administration Servers within the hierarchy:
- In the main menu, click the settings icon () next to the name of the required Administration Server.
The Administration Server properties window opens.
- In the properties window, select the Encryption algorithm section.
- Enable the Use hierarchy of Administration Servers to obtain encryption keys option.
- Click OK to apply the changes.
The encryption keys will be transmitted to primary Administration Servers (if any) at the next synchronization (the heartbeat). This Administration Server will also provide, upon request, an encryption key from its repository to a secondary Administration Server.
To transmit encryption keys between Administration Servers manually:
- In the main menu, click the settings icon () next to the name of the Administration Server from which you want to export encryption keys.
The Administration Server properties window opens.
- In the properties window, select the Encryption algorithm section.
- Click the Export encryption keys from Administration Server.
Make sure that a user that exports encryption keys from the Server is granted the Read access right to the Encryption key management feature.
- In the Export encryption keys window:
- Click the Browse button, and then specify where to save the file.
- Specify a password to protect the file from unauthorized access.
Remember the password. A lost password cannot be retrieved. If the password is lost, you have to repeat the export procedure. Therefore, make a note of the password and keep it handy.
- Transmit the file to another Administration Server, for example, through a shared folder or removable drive.
- Click the settings icon () next to the name of the Administration Server to which you want to import the encryption keys.
The Administration Server properties window opens.
- In the properties window, select the Encryption algorithm section.
- Click Import encryption keys to Administration Server.
Make sure that a user that imports encryption keys to the Server is granted the Write access right to the Encryption key management feature.
- In the Import encryption keys window:
- Click the Browse button, and then select the file containing encryption keys.
- Specify the password.
- Click OK.
The encryption keys are transmitted to the target Administration Server.
Automatic transmission of encryption keys between Administration Servers does not work when the secondary Administration Server is in the demilitarized zone (DMZ). Use the manual method instead.
Page top
Users and user roles
This section describes users and user roles, and provides instructions for creating and modifying them, for assigning roles and groups to users, and for associating policy profiles with roles.
About user accounts
Kaspersky Security Center Cloud Console allows you to manage user accounts and groups of accounts. The application supports three types of accounts:
- Accounts of organization employees. Administration Server retrieves data of the accounts of those domain users when polling the organization's domain controller.
- Accounts of local users. Local accounts of managed devices, as well as the local accounts of the device on which Administration Server is installed.
- Accounts of internal users of Kaspersky Security Center Cloud Console. You can create accounts of internal users. These accounts are used only within Kaspersky Security Center Cloud Console.
To view tables of user accounts and security groups:
- In the main menu, go to Users & roles → Users & groups.
- Select the Users or the Groups tab.
The table of users or security groups opens. By default, the opened table is filtered by the Subtype and Has assigned roles columns. The table displays internal users or groups that have assigned roles.
If you want to view the table with only the accounts of local users, set the Subtype filter criteria to Local.
If you switch to a secondary Administration Server version 14.2 or earlier, and then open the list of users or security groups, the opened table will be filtered only by the Subtype column. The filter by the Has assigned roles column will not be applied by default. The filtered table will contain all internal users or security groups with the assigned role and without it.
Page top
Adding an account of an internal user
If you want, you can add internal users of your workspace on the portal. After you add an internal user, you can assign a role to him or her in the Kaspersky Security Center Cloud Console.
Page top
About user roles
A user role (also referred to as a role) is an object containing a set of rights and privileges. A role can be associated with settings of Kaspersky applications installed on a user device. You can assign a role to a set of users or to a set of security groups at any level in the hierarchy of administration groups, Administration Servers, or at the level of specific objects.
If you manage devices through a hierarchy of Administration Servers that includes virtual Administration Servers, note that you can create, modify, or delete user roles only from a physical Administration Server. Then, you can propagate the user roles to secondary Administration Servers, including virtual ones.
You can associate user roles with policy profiles. If a user is assigned a role, this user gets security settings necessary to perform job functions.
A user role can be associated with users of devices in a specific administration group.
User role scope
A user role scope is a combination of users and administration groups. Settings associated with a user role apply only to devices that belong to users who have this role, and only if these devices belong to groups associated with this role, including child groups.
Advantage of using roles
An advantage of using roles is that you do not have to specify security settings for each of the managed devices or for each of the users separately. The number of users and devices in a company may be quite large, but the number of different job functions that require different security settings is considerably smaller.
Differences from using policy profiles
Policy profiles are properties of a policy that is created for each Kaspersky application separately. A role is associated with many policy profiles created for different applications. Therefore, a role is a method of uniting settings for a certain user type in one place.
Configuring access rights to application features. Role-based access control
Kaspersky Security Center Cloud Console provides facilities for role-based access to the features of Kaspersky Security Center Cloud Console and of managed Kaspersky applications.
You can configure access rights to application features for Kaspersky Security Center Cloud Console users in one of the following ways:
- By configuring the rights for each user or group of users individually.
- By creating standard user roles with a predefined set of rights and assigning those roles to users depending on their scope of duties.
Application of user roles is intended to simplify and shorten routine procedures of configuring users' access rights to application features. Access rights within a role are configured in accordance with the standard tasks and the users' scope of duties.
User roles can be assigned names that correspond to their respective purposes. You can create an unlimited number of roles in the application.
You can use the predefined user roles with already configured set of rights, or create new roles and configure the required rights yourself.
Access rights to application features
The table below shows the Kaspersky Security Center Cloud Console features with the access rights to manage the associated tasks, reports, settings, and perform the associated user actions.
To perform the user actions listed in the table, a user has to have the right specified next to the action.
Read, Write, and Execute rights are applicable to any task, report, or setting. In addition to these rights, a user has to have the Perform operations on device selections right to manage tasks, reports, or settings on device selections.
The General features: Access objects regardless of their ACLs functional area is intended for audit purposes. When users are granted Read rights in this functional area, they get full Read access to all objects and are able to execute any created tasks on selections of devices connected to the Administration Server via Network Agent with local administrator rights (root for Linux). We recommend granting these rights carefully and to a limited set of users who need them to perform their official duties.
All tasks, reports, settings, and installation packages that are missing in the table belong to the General features: Basic functionality functional area.
Access rights to application features
Functional area |
Right |
User action: right required to perform the action |
Task |
Report |
Other |
|---|---|---|---|---|---|
General features: Management of administration groups |
Write |
|
None |
None |
None |
General features: Access objects regardless of their ACLs |
Read |
Get read access to all objects: Read |
None |
None |
Access is granted regardless of other rights, even if they prohibit read access to specific objects. |
General features: Basic functionality |
|
|
|
|
None |
General features: Deleted objects |
|
|
None |
None |
None |
General features: Event processing |
|
|
None |
None |
Settings:
|
General features: Kaspersky software deployment |
|
Approve or decline installation of the patch: Manage Kaspersky patches |
None |
|
Installation package: "Kaspersky" |
General features: License key management |
|
|
None |
None |
None |
General features: Enforced report management |
|
|
None |
None |
None |
General features: Hierarchy of Administration Servers |
Configure hierarchy of Administration Servers |
Register, update, or delete secondary Administration Servers: Configure hierarchy of Administration Servers |
None |
None |
None |
General features: User permissions |
Modify object ACLs |
|
None |
None |
None |
General features: Virtual Administration Servers |
|
|
None |
"Report on results of installation of third-party software updates" |
None |
General features: Encryption Key Management |
Write |
Import the encryption keys: Write |
None |
None |
None |
System management: Connectivity |
|
|
None |
"Report on device users" |
None |
System management: Hardware inventory |
|
|
None |
|
None |
System management: Network access control |
|
|
None |
None |
None |
System management: Operating system deployment |
|
|
"Create installation package upon reference device OS image" |
None |
Installation package: "OS Image" |
System management: Vulnerability and patch management
|
|
|
|
"Report on software updates" |
None |
System management: Remote installation |
|
|
None |
None |
Installation packages:
|
System management: Software inventory |
|
None |
None |
|
None |
Predefined user roles
User roles assigned to Kaspersky Security Center Cloud Console users provide them with sets of access rights to application features.
Users created on a virtual Server cannot be assigned a role on the Administration Server.
You can use the predefined user roles with already configured set of rights, or create new roles and configure the required rights yourself. Some of the predefined user roles available in Kaspersky Security Center Cloud Console can be associated with specific job positions, for example, Auditor, Security Officer, Supervisor (these roles are present in Kaspersky Security Center Cloud Console starting from the version 11). Access rights of these roles are pre-configured in accordance with the standard tasks and scope of duties of the associated positions. The table below shows how roles can be associated with specific job positions.
Examples of roles for specific job positions
Role |
Comment |
Auditor |
Permits all operations with all types of reports, all viewing operations, including viewing deleted objects (grants the Read and Write permissions in the Deleted objects area). Does not permit other operations. You can assign this role to a person who performs the audit of your organization. |
Supervisor |
Permits all viewing operations; does not permit other operations. You can assign this role to a security officer and other managers in charge of the IT security in your organization. |
Security Officer |
Permits all viewing operations, permits reports management; grants limited permissions in the System management: Connectivity area. You can assign this role to an officer in charge of the IT security in your organization. |
The table below shows the access rights assigned to each predefined user role.
Access rights of predefined user roles
Role |
Description |
|---|---|
Administration Server Administrator |
Permits all operations in the following functional areas:
Grants the Read and Write rights in the General features: Encryption key management functional area. |
Administration Server Operator |
Grants the Read and Execute rights in all of the following functional areas:
|
Auditor |
Permits all operations in the following functional areas, in General features:
You can assign this role to a person who performs the audit of your organization. |
Installation Administrator |
Permits all operations in the following functional areas:
Grants Read and Execute rights in the General features: Virtual Administration Servers functional area. |
Installation Operator |
Grants the Read and Execute rights in all of the following functional areas:
|
Kaspersky Endpoint Security Administrator |
Permits all operations in the following functional areas:
Grants the Read and Write rights in the General features: Encryption key management functional area. |
Kaspersky Endpoint Security Operator |
Grants the Read and Execute rights in all of the following functional areas:
|
Main Administrator |
Permits all operations in functional areas, except for the following areas in General features:
Grants the Read and Write rights in the General features: Encryption key management functional area. |
Main Operator |
Grants the Read and Execute (where applicable) rights in all of the following functional areas:
|
Mobile Device Management Administrator |
Permits all operations in the following functional areas:
|
Mobile Device Management Operator |
Grants the Read and Execute rights in the General features: Basic functionality functional area. Grants Read and Send only information commands to mobile devices in the Mobile Device Management: General functional area. |
Security Officer
|
Permits all operations in the following functional areas, in General features:
Grants the Read, Write, Execute, Save files from devices to the administrator's workstation, and Perform operations on device selections rights in the System management: Connectivity functional area. You can assign this role to an officer in charge of the IT security in your organization. |
Senior Security Analyst |
Grants the Read right in the General features: Basic functionality functional area. Grants the Read, Write, Execute, Save files from devices to the administrator's workstation, and Perform operations on device selections rights in the System management: Connectivity functional area. Grants the access rights to the Kaspersky Endpoint Detection and Response Expert solution. |
Self Service Portal User |
Permits all operations in the Mobile Device Management: Self Service Portal functional area. This feature is not supported in Kaspersky Security Center 11 and later. |
Supervisor |
Grants the Read right in the General features: Access objects regardless of their ACLs and General features: Enforced report management functional area. You can assign this role to a security officer and other managers in charge of the IT security in your organization. |
Vulnerability and patch management administrator |
Permits all operations in the General features: Basic functionality and System management (including all features) functional areas. |
Vulnerability and patch management operator |
Grants the Read and Execute (where applicable) rights in the General features: Basic functionality and System management (including all features) functional areas. |
Assigning access rights to specific objects
In addition to assigning access rights at the server level, you can configure access to specific objects, for example, to a specific task. The application allows you to specify access rights to the following object types:
- Administration groups
- Tasks
- Reports
- Device selections
- Event selections
To assign access rights to a specific object:
- Depending on the object type, in the main menu, go to the corresponding section:
- Assets (Devices) → Hierarchy of groups
- Assets (Devices) → Tasks
- Monitoring & reporting → Reports
- Assets (Devices) → Device selections
- Monitoring & reporting → Event selections
- Open the properties of the object to which you want to configure access rights.
To open the properties window of an administration group or a task, click the object name. Properties of other objects can be opened by using the button on the toolbar.
- In the properties window, open the Access rights section.
The user list opens. The listed users and security groups have access rights to the object. By default, if you use a hierarchy of administration groups or Servers, the list and access rights are inherited from the parent administration group or primary Server.
- To be able to modify the list, enable the Use custom permissions option.
- Configure access rights:
- Use the Add and Delete buttons to modify the list.
- Specify access rights for a user or security group. Do one of the following:
- If you want to specify access rights manually, select the user or security group, click the Access rights button, and then specify the access rights.
- If you want to assign a user role to the user or security group, select the user or security group, click the Roles button, and then select the role to assign.
- Click the Save button.
The access rights to the object are configured.
Assigning access rights to users and security groups
You can give users and security groups access rights to use different features of Administration Server, for example, Kaspersky Endpoint Security for Linux.
To assign access rights to a user or a security group:
- In the main menu, click the settings icon () next to the name of the required Administration Server.
The Administration Server properties window opens.
- On the Access rights tab, select the check box next to the name of the user or the security group to whom to assign rights, and then click the Access rights button.
You cannot select multiple users or security groups at the same time. If you select more than one item, the Access rights button will be disabled.
- Configure the set of rights for the user or group:
- Expand the node with features of Administration Server or other Kaspersky application.
- Select the Allow or Deny check box next to the feature or the access right that you want.
Example 1: Select the Allow check box next to the Application integration node to grant all available access rights to the Application integration feature (Read, Write, and Execute) for a user or group.
Example 2: Expand the Encryption key management node, and then select the Allow check box next to the Write permission to grant the Write access right to the Encryption key management feature for a user or group.
- After you configure the set of access rights, click OK.
The set of rights for the user or group of users will be configured.
The permissions of the Administration Server (or the administration group) are divided into the following areas:
- General features:
- Management of administration groups
- Access objects regardless of their ACLs
- Basic functionality
- Deleted objects
- Encryption Key Management
- Event processing
- Operations on Administration Server (only in the property window of Administration Server)
- Device tags
- Kaspersky application deployment
- License key management
- Application integration
- Enforced report management
- Hierarchy of Administration Servers
- User permissions
- Virtual Administration Servers
- Mobile Device Management:
- General
- Self Service Portal
- System Management:
- Connectivity
- Execute scripts remotely
- Hardware inventory
- Network Access Control
- Operating system deployment
- Vulnerability and patch management
- Remote installation
- Software inventory
If neither Allow nor Deny is selected for an access right, then the access right is considered undefined: it is denied until it is explicitly denied or allowed for the user.
The rights of a user are the sum of the following:
- User's own rights
- Rights of all the roles assigned to this user
- Rights of all the security group to which the user belongs
- Rights of all the roles assigned to the security groups to which the user belongs
If at least one of these sets of rights has Deny for a permission, then the user is denied this permission, even if other sets allow it or leave it undefined.
You can also add users and security groups to the scope of a user role to use different features of Administration Server. Settings associated with a user role will only apply only to devices that belong to users who have this role, and only if these devices belong to groups associated with this role, including child groups.
Page top
Assigning a role to a user or a security group
To assign a role to a user or a security group:
- In the main menu, go to Users & roles → Users & groups, and then select the Users or the Groups tab.
- Select the name of the user or the security group to whom to assign a role.
You can select multiple names.
- On the menu line, click the Assign role button.
The Role assignment wizard starts.
- Follow the instructions of the wizard: select the role that you want to assign to the selected users or security groups, and then select the scope of role.
A user role scope is a combination of users and administration groups. Settings associated with a user role apply only to devices that belong to users who have this role, and only if these devices belong to groups associated with this role, including child groups.
The role with a set of rights for working with Administration Server is assigned to the user (or users, or the security group). In the list of users or security groups, a check box appears in the Has assigned roles column.
Page top
Creating a user role
To create a user role:
- In the main menu, go to Users & roles → Roles.
- Click Add.
- In the New role name window that opens, enter the name of the new role.
- Click OK to apply the changes.
- In the role properties window that opens, change the settings of the role:
- On the General tab, edit the role name.
You cannot edit the name of a predefined role.
- On the Settings tab, edit the role scope and policies and profiles associated with the role.
- On the Access rights tab, edit the rights for access to Kaspersky applications.
- On the General tab, edit the role name.
- Click Save to save the changes.
The new role appears in the list of user roles.
Editing a user role
To edit a user role:
- In the main menu, go to Users & roles → Roles.
- Click the name of the role that you want to edit.
- In the role properties window that opens, change the settings of the role:
- On the General tab, edit the role name.
You cannot edit the name of a predefined role.
- On the Settings tab, edit the role scope and policies and profiles associated with the role.
- On the Access rights tab, edit the rights for access to Kaspersky applications.
- On the General tab, edit the role name.
- Click Save to save the changes.
The updated role appears in the list of user roles.
Editing the scope of a user role
A user role scope is a combination of users and administration groups. Settings associated with a user role apply only to devices that belong to users who have this role, and only if these devices belong to groups associated with this role, including child groups.
To add users, user groups, and administration groups to the scope of a user role, you can use either of the following methods:
Method 1:
- In the main menu, go to Users & roles → Users & groups, and then select the Users or the Groups tab.
- Select check boxes next to the users or user groups that you want to add to the user role scope.
- Click the Assign role button.
The Role assignment wizard starts. Proceed through the wizard by using the Next button.
- On the Select role step, select the user role that you want to assign.
- On the Define scope step, select the administration group that you want to add to the user role scope.
- Click the Assign role button to close the window.
The selected users or user groups and the selected administration group are added to the scope of the user role.
Method 2:
- In the main menu, go to Users & roles → Roles.
- Click the name of the role for which you want to define the scope.
- In the role properties window that opens, select the Settings tab.
- In the Role scope section, click Add.
The Role assignment wizard starts. Proceed through the wizard by using the Next button.
- On the Define scope step, select the administration group that you want to add to the user role scope.
- On the Select users step, select users and user groups that you want to add to the user role scope.
- Click the Assign role button to close the window.
- Close the role properties window.
The selected users or user groups and the selected administration group are added to the scope of the user role.
Method 3:
- In the main menu, click the settings icon () next to the name of the required Administration Server.
The Administration Server properties window opens.
- On the Access rights tab, select the check box next to the name of the user or the security group that you want to add to the user role scope, and then click the Roles button.
You cannot select multiple users or security groups at the same time. If you select more than one item, the Roles button will be disabled.
- In the Roles window, select the user role that you want to assign, and then click OK and save changes.
The selected users or security groups are added to the scope of the user role.
Deleting a user role
To delete a user role:
- In the main menu, go to Users & roles → Roles.
- Select the check box next to the name of the role that you want to delete.
- Click Delete.
- In the window that opens, click OK.
The user role is deleted.
Associating policy profiles with roles
You can associate user roles with policy profiles. In this case, the activation rule for this policy profile is based on the role: the policy profile becomes active for a user that has the specified role.
For example, the policy bars any GPS navigation software on all devices in an administration group. GPS navigation software is necessary only on a single device in the Users administration group—the device owned by a courier. In this case, you can assign a "Courier" role to its owner, and then create a policy profile allowing GPS navigation software to run only on the devices whose owners are assigned the "Courier" role. All the other policy settings are preserved. Only the user with the role "Courier" will be allowed to run GPS navigation software. Later, if another worker is assigned the "Courier" role, the new worker also can run navigation software on your organization's device. Running GPS navigation software will still be prohibited on other devices in the same administration group.
To associate a role with a policy profile:
- In the main menu, go to Users & roles → Roles.
- Click the name of the role that you want to associate with a policy profile.
The role properties window opens with the General tab selected.
- Select the Settings tab, and scroll down to the Policies & profiles section.
- Click Edit.
- To associate the role with:
- An existing policy profile—Click the chevron icon () next to the required policy name, and then select the check box next to the profile with which you want to associate the role.
- A new policy profile:
- Select the check box next to the policy for which you want to create a profile.
- Click New policy profile.
- Specify a name for the new profile and configure the profile settings.
- Click the Save button.
- Select the check box next to the new profile.
- An existing policy profile—Click the chevron icon (
- Click Assign to role.
The profile is associated with the role and appears in the role properties. The profile applies automatically to any device whose owner is assigned the role.
Creating a security group
To create a security group:
- In the main menu, go to Users & roles → Users & groups, and then select the Groups tab.
- Click New group.
- In the New group window, specify the following settings for the new security group:
- Name
- Description
- Click OK to save the changes.
A new security group is added to the security group list.
Editing a security group
To edit a security group:
- In the main menu, go to Users & roles → Users & groups, and then select the Groups tab.
- Click the name of the security group that you want to edit.
- In the group settings window that opens, change the settings of the security group:
- On the General tab, you can change the Name and Description settings. These settings are available only for internal security groups.
- On the Users tab, you can add users to the security group. This setting is available only for internal users and internal security groups.
- On the Roles tab, you can assign a role to the security group.
- Click Save to save the changes.
The changes are applied to the security group.
Adding user accounts to an internal group
You can add only accounts of internal users to an internal group.
To add user accounts to an internal group:
- In the main menu, go to Users & roles → Users & groups, and then select the Users tab.
- Select check boxes next to user accounts that you want to add to a group.
- Click the Assign group button.
- In the Assign group window that opens, select the group to which you want to add user accounts.
- Click the Assign button.
The user accounts are added to the group. You can also add internal users to a group by using the group settings.
Deleting a security group
You can delete only internal security groups.
To delete a user group:
- In the main menu, go to Users & roles → Users & groups, and then select the Groups tab.
- Select the check box next to the user group that you want to delete.
- Click Delete, and then confirm the deletion in the opened window.
The user group is deleted.
Configuring ADFS integration
To allow the users registered in Active Directory (AD) in your organization to sign in to Kaspersky Security Center Cloud Console, you must configure integration with Active Directory Federation Services (AD FS).
Kaspersky Security Center Cloud Console supports AD FS 3 (Windows Server 2016) or a later version. AD FS must be published and available on the internet. As the service communication certificate AD FS uses publicly trusted certificate.
To change AD FS integration settings, you must have the access right to change user permissions.
Before you proceed, make sure that you completed Active Directory polling.
To configure AD FS integration:
- In the main menu, click the settings icon () next to the name of the Administration Server.
The Administration Server properties window opens.
- On the General tab, select the AD FS integration settings section.
- Copy the callback URL.
You will need this URL to configure the integration in AD FS Management Console.
- In AD FS Management Console, add a new application group, and then add a new application by selecting the Server application template (the names of the Microsoft interface elements are provided in English.).
AD FS Management Console generates client ID for the new application. You will need the client ID to configure the integration in Kaspersky Security Center Cloud Console.
- As a redirect URI, specify the callback URL that you copied in the Administration Server properties window.
- Generate a client secret. You will need the client secret to configure the integration in Kaspersky Security Center Cloud Console.
- Save the properties of the added application.
- Add a new application to the created application group. This time select the Web API template.
- On the Identifiers tab, to the Relying party identifiers list, add the client ID of the server application that you added before.
- On the Client Permissions tab, in the Permitted scopes list, select the allatclaims and openid scopes.
- On the Issuance Transform Rules tab, add a new rule by selecting the Send LDAP Attributes as Claims template:
- Name the rule. For example, you can name it 'Group SID'.
- Select Active Directory as an attribute store, and then map Token-Groups as SIDs as a LDAP attribute to 'Group SID' as an outgoing claim type.
- On the Issuance Transform Rules tab, add a new rule by selecting the Send Claims Using a Custom Rule template:
- Name the rule. For example, you can name it 'ActiveDirectoryUserSID'.
- In the Custom rule field, type:
c:[Type == "http://schemas.microsoft.com/ws/2008/06/identity/claims/windowsaccountname", Issuer == "AD AUTHORITY"] => issue(store = "Active Directory", types = ("http://schemas.microsoft.com/ws/2008/06/identity/claims/primarysid"), query = ";objectSID;{0}", param = c.Value);
- In Kaspersky Security Center Cloud Console, open again the AD FS integration settings section.
- Switch the toggle button to the AD FS integration Enabled position.
- Click the Settings link, and then specify the file that contains the certificate or several certificates for the federation server.
- Click the AD FS integration settings link, and then specify the following settings:
- Click the Save button.
The integration with AD FS is complete. To sign in to Kaspersky Security Center Cloud Console with an AD account credentials, use the link provided in the AD FS integration settings section (Login link to Kaspersky Security Center Cloud Console with AD FS).
When you sign in to Kaspersky Security Center Cloud Console through AD FS for the first time, the console might respond with a delay.
Page top
Configuring integration with Microsoft Entra ID
You have to configure integration with Microsoft Entra ID to allow the users in your organization to sign in to Kaspersky Security Center Cloud Console with their Microsoft Entra ID account credentials.
Integration with Microsoft Entra ID is available for the primary Administration Server only. You cannot configure the integration for secondary or virtual Administration Servers.
To configure integration with Microsoft Entra ID:
- In the main menu, click the settings icon () next to the name of the Administration Server.
The Administration Server properties window opens.
- On the General tab, select the Microsoft Entra ID section.
- Turn on the Microsoft Entra ID integration toggle button.
- Copy the links from the following fields:
- Callback URL
- Front-channel logout URL
You will need these URLs to register Kaspersky Security Center Cloud Console in the Microsoft Entra ID tenant.
- Login URL
You will need this URL to allow users to sign in to the Kaspersky Security Center Cloud Console workspace with their Microsoft Entra ID credentials after the integration with Microsoft Entra ID is complete.
- Sign in to the Microsoft Entra admin center, and then select the tenant of your organization.
You must have the Global administrator or the Application administrator role in the tenant.
- In the main menu, go to Identity → Applications → App registrations, and then click the New registration button.
- In the window that opens, do the following:
- Specify a name for the Kaspersky Security Center Cloud Console application.
- In the Supported account types section, select the Accounts in this organizational directory only (<tenant_name> only - Single tenant) option.
- In the Redirect URI section, select Web from the drop-down list, and then enter the callback URL that you copied from Kaspersky Security Center Cloud Console at step 4.
- Click the Register button.
The Kaspersky Security Center Cloud Console application is registered in Microsoft Entra ID, and the application overview page opens.
- If necessary, add Kaspersky Security Center Cloud Console to the list of applications.
The users will be able to open Kaspersky Security Center Cloud Console by clicking its name in the list of applications in My Apps and Office 365 Launcher, without using the login URL.
- Copy the Application (client) ID and the Directory (tenant) ID, and save them in any convenient way.
You will need these IDs when filling in the mandatory fields in Kaspersky Security Center Cloud Console at step 14.
- In the menu of the Kaspersky Security Center Cloud Console application, go to the Authentication section, and then enter the URLs that you copied from Kaspersky Security Center Cloud Console at step 4:
- In the Web section, click the Add URI button, and then enter the login URL.
- In the Front-channel logout URL section, enter the front-channel logout URL.
- In the menu of the Kaspersky Security Center Cloud Console application, go to the Certificates & secrets section, and then do the following:
- Go to the Client secrets tab, and then click the New client secret button.
- In the window that opens, specify any description for the client secret, and then select the period after which the secret expires.
We recommend that you copy the date after which the secret expires, in any convenient way, to rotate the secrets in a timely manner.
- Click the Add button.
The created secret is displayed on the Client secrets tab.
- Copy the information from the Value column.
We strongly recommend that you copy the information immediately after creating the client secret.
- In the menu of the Kaspersky Security Center Cloud Console application, go to the Token configuration section, and then do the following:
- Add the onprem_sid optional claim:
- Click the Add optional claim button.
- In the window that opens, select the ID token type, and then in the Claim column, select the check box next to the onprem_sid.
- Click the Add button.
The onprem_sid optional claim is displayed on the Optional claims page.
- Add the preferred_username optional claim:
- Click the Add optional claim button.
- In the window that opens, select the Access token type, and then in the Claim column, select the check box next to the preferred_username.
- Click the Add button.
The preferred_username optional claim is displayed on the Optional claims page.
- Add the onprem_sid optional claim:
- In the menu of the Kaspersky Security Center Cloud Console application, go to the API permissions section, and then add the permissions:
- User.Read.All
- User.Export.All
- GroupMember.Read.All
- Directory.Read.All
To add a permission, do the following:
- Click the Add a permission button, and then select the Microsoft APIs tab.
- Select Microsoft Graph → Application permissions, and then select the permission you want to add.
- Click the Add permission button.
The four permissions are added and displayed on the Configured permissions page.
- Click the Grant admin consent for <tenant_name> button, and then in the window that opens, click Yes to confirm the granting of consent for the permissions you added.
- Go back to Kaspersky Security Center Cloud Console, and on the General tab, fill in the following mandatory fields:
- Tenant ID. The Directory (tenant) ID that you copy at step 10.
- Client ID. The Application (client) ID that you copy at step 10.
- Client secret. The value that you copy at step 12.
- Click the Check connection button to check if the settings are correct, and then after the Connected status is displayed, click the Save button.
The integration settings are saved, and the integration with Microsoft Entra ID is configured.
After you configure the integration with Microsoft Entra ID, you have to do the following:
- In the Kaspersky Security Center Cloud Console main menu, go to Users & roles → Users & groups to make sure that the users and groups from Microsoft Entra ID are added to Kaspersky Security Center Cloud Console.
If the users and groups in your Microsoft Entra ID tenant are synchronized from the Active Directory of your organization, and Active Directory polling is configured, then the users and groups are already added to Kaspersky Security Center Cloud Console as a result of Active Directory polling.
Otherwise, you have to enable and run Microsoft Entra ID polling to add the users and groups from your Microsoft Entra ID tenant to Kaspersky Security Center Cloud Console.
- Assign necessary roles to the users and groups.
When assigning roles to a user on a virtual Administration Server, in the main menu, go to Users & roles → Users & groups, and then select the Users tab. If you select the Groups tab, and then assign roles to the group where the user is a member, the user will not be able to log in to Kaspersky Security Center Cloud Console.
- Send the login URL that you copied at step 4 to the users. They will enter this URL to sign in to the Kaspersky Security Center Cloud Console workspace by using their Microsoft Entra ID credentials.
To sign in to Kaspersky Security Center Cloud Console with Microsoft Entra ID account credentials, users must be able to sign in to their Microsoft Entra ID account.
Page top
Enabling Microsoft Entra ID polling
You have to enable Microsoft Entra ID polling to add the users from your Microsoft Entra ID to Kaspersky Security Center Cloud Console.
To enable Microsoft Entra ID polling:
- In the main menu, click the settings icon () next to the name of the Administration Server.
The Administration Server properties window opens.
- On the General tab, select the Microsoft Entra ID section.
- In the User discovery section, turn on the Microsoft Entra ID polling toggle button.
- If you want to change the default polling schedule, click the Schedule settings button, specify the polling frequency and time in the window that opens, and then click the Save button.
Microsoft Entra ID polling will run according to the schedule that you configure.
- If you want to run Microsoft Entra ID polling immediately, click the Run now button.
The users are loading. When the users are loaded, the Microsoft Entra ID polling is finished.
- Click the Save button.
The Microsoft Entra ID polling is complete, and the users from your Microsoft Entra ID are added to Kaspersky Security Center Cloud Console.
Page top
Adding Kaspersky Security Center Cloud Console to the list of applications
You can allow users to open Kaspersky Security Center Cloud Console by clicking its name in the list of applications, without entering the login URL. The application list is available in My Apps and Office 365 Launcher.
To add Kaspersky Security Center Cloud Console to the list of applications:
- In the Microsoft Entra admin center main menu, go to Identity → Applications → App registrations, and then on the All applications tab, select the Kaspersky Security Center Cloud Console application that you have previously registered in Microsoft Entra ID.
- In the menu of Kaspersky Security Center Cloud Console, select the Branding & properties section, and then do the following:
- In the Home page URL field, enter the login URL.
- If necessary, in the Upload new logo field, add an image that will be used as the application icon in the list of applications.
- Click the Save button.
- In the Microsoft Entra admin center main menu, go to Identity → Applications → Enterprise applications, and then select Kaspersky Security Center Cloud Console.
The application overview page opens.
- In the menu of Kaspersky Security Center Cloud Console, select the Properties section, and then do the following:
- Set the following options to Yes:
- Enabled for users to sign-in?
This action is necessary only if the option is not set to Yes by default.
- Visible to users?
- Enabled for users to sign-in?
- Click the Save button.
- Set the following options to Yes:
- In the menu of Kaspersky Security Center Cloud Console, select the Users and groups section, and then do the following:
- Click the Add user/group button, and then click the link below Users and groups.
- In the window that opens, select users and groups, and then click the Save button.
The window is closed.
- Click the Assign button.
Kaspersky Security Center Cloud Console is available in My Apps and Office 365 Launcher for the selected users. The users can open Kaspersky Security Center Cloud Console by clicking its name in the list, without entering the login URL.
Page top
Assigning a user as a device owner
For information about assigning a user as a mobile device owner, see Kaspersky Security for Mobile Help.
To assign a user as a device owner:
- If you want to assign an owner of a device connected to a virtual Administration Server, first switch to the virtual Administration Server:
- In the main menu, click the chevron icon () to the right of the current Administration Server name.
- Select the required Administration Server.
- In the main menu, click the chevron icon (
- In the main menu, go to Users & roles → Users & groups, and then select the Users tab.
A user list opens. If you are currently connected to a virtual Administration Server, the list includes users from the current virtual Administration Server and the primary Administration Server.
- Click the name of the user account that you want to assign as a device owner.
- In the user settings window that opens, select the Devices tab.
- Click Add.
- From the device list, select the device that you want to assign to the user.
- Click OK.
The selected device is added to the list of devices assigned to the user.
You can perform the same operation at Assets (Devices) → Managed devices, by clicking the name of the device that you want to assign, and then clicking the Manage device owner link.
Assigning a user as a Linux device owner after installation of Network Agent
To allow the user to register as a Linux device owner:
- In the Kaspersky Security Center Cloud Console, go to Discovery & deployment → Deployment & assignment → Installation packages.
The list of installation packages opens.
- Click on the installation package of Network Agent.
The properties window of the installation package opens.
- In the installation package properties window, click Settings → Advanced.
- In the User registration as a device owner (Linux only) section, turn on the Allow running the user registration utility after Network Agent installation option and click Save.
The utility for registering the user as a device owner can be run via the command line on the client device.
To register a user as a Linux device owner on the client device:
- Execute the following command in the command line on the client device:
$ /opt/kaspersky/klnagent64/bin/nagregister -set_owner - Enter the login and password, if prompted.
If the login and the password are included in the answer file or installation package of Network Agent, execute the following command in the command line on the client device:
$ /opt/kaspersky/klnagent64/bin/nagregister -set_owner -unattended
If the user is included in an internal security group, the login must contain the user name.
If the user is included in an Active Directory security group, the login must contain the user name and domain name.
The user will be registered as a device owner.
Page top
Managing object revisions
This section contains information about object revision management. Kaspersky Security Center Cloud Console allows you to track object modification. Every time you save changes made to an object, a revision is created. Each revision has a number.
Objects that support revision management include:
- Administration Server properties
- Policies
- Tasks
- Administration groups
- User accounts
- Installation packages
You can perform the following actions on object revisions:
- View a selected revision (available only for policies)
- Roll back changes made to an object to a selected revision
- Save revisions as a JSON file (available only for policies)
In the properties window of any object that supports revision management, the Revision history section displays a list of object revisions with the following details:
- Revision—Object revision number.
- Time—Date and time the object was modified.
- User—Name of the user who modified the object.
- User device IP address—IP address of the device from which the object was modified.
- Web Console IP address—IP address of Kaspersky Security Center Cloud Console with which the object was modified.
- Action—Action performed on the object.
- Description—Description of the revision related to the change made to the object settings.
By default, the object revision description is blank. To add a description to a revision, select the relevant revision and click the Edit description button. In the opened window, enter some text for the revision description.
Rolling back changes
You can roll back changes made to an object, if necessary. For example, you may have to revert the settings of a policy to their state on a specific date.
To roll back changes made to an object:
- In the object's properties window, open the Revision history tab.
- In the list of object revisions, select the number of the revision to which you have to roll back changes.
- Click the Roll back button.
- Click OK to confirm the operation.
The object is now rolled back to the selected revision. The list of object revisions displays a record of the action that was taken. The revision description displays information about the number of the revision to which you reverted the object.
Adding a revision description
You can add a description for the revision to simplify the search for revisions in the list.
To add a description for a revision:
- In the object's properties window, open the Revision history tab.
- In the list of object revisions, select the revision for which you need to add a description.
- Click the Edit description button.
The Description window opens.
- In the Description window, enter some text for the revision description.
By default, the object revision description is blank.
- Save the revision description.
The description is added for the revision of the object.
Viewing and saving a policy revision
Kaspersky Security Center Cloud Console allows you to view which modifications were made to a policy over a certain period, as well as save information about these modifications in a file.
Viewing and saving a policy revision are available if the corresponding management web plug-in supports this functionality.
To view a policy revision:
- In the main menu, go to Assets (Devices) → Policies & profiles.
- Click the policy for the revision that you want to view, and then go to the Revision history section.
- In the list of policy revisions, click the number of the revision that you want to view.
If the revision size is more than 10 MB, you will not be able to view it by using Kaspersky Security Center Cloud Console. You will be prompted to save the selected revision to a JSON file.
If the revision size does not exceed 10 MB, a report in the HTML format with the settings of the selected policy revision is displayed. Since the report is displayed in a pop-up window, ensure that pop-ups are allowed in your browser.
To save a policy revision to a JSON file,
In the list of policy revisions, select the revision that you want to save, and then click Save to file.
The revision is saved to a JSON file.
Page top
Kaspersky Security Network (KSN)
This section describes how to use an online service infrastructure named Kaspersky Security Network (KSN). The section provides the details on KSN, as well as instructions on how to enable KSN, configure access to KSN, and view the statistics of the use of KSN proxy server.
Updates functionality (including providing anti-virus signature updates and codebase updates), as well as KSN functionality may not be available in the software in the U.S.
About KSN
Kaspersky Security Network (KSN) is an online service infrastructure that provides access to the online Knowledge Base of Kaspersky, which contains information about the reputation of files, web resources, and software. The use of data from Kaspersky Security Network ensures faster responses by Kaspersky applications to threats, improves the effectiveness of some protection components, and reduces the risk of false positives. KSN enables you to use Kaspersky reputation databases to retrieve information about applications installed on client devices.
If you participate in KSN, you agree to send to Kaspersky, in automatic mode, information about the operation of Kaspersky applications installed on client devices that are managed through Kaspersky Security Center Cloud Console. Information is transferred in accordance with the current KSN access settings. Kaspersky analysts additionally analyze received information, and include it in the reputation and statistical databases of Kaspersky Security Network.
The application prompts you to join KSN while running the Quick Start Wizard. You can start or stop using KSN at any moment when using the application.
You use KSN in accordance with the KSN Statement that you read and accept when you enable KSN. If the KSN Statement is updated, it is displayed to you when you update or upgrade Administration Server. You can accept the updated KSN Statement or decline it. If you decline it, you keep using KSN in accordance with the previous version of KSN Statement that you accepted before.
When KSN is enabled, Kaspersky Security Center Cloud Console checks if the KSN servers are accessible. If access to the servers using system DNS is not possible, the application uses public DNS servers. This is necessary to make sure the level of security is maintained for the managed devices.
Client devices managed by the Administration Server interact with KSN through KSN proxy server. KSN proxy server provides the following features:
- Client devices can send requests to KSN and transfer information to KSN even if they do not have direct access to the internet.
- The KSN proxy server caches processed data, thus reducing the load on the outbound channel and the time period spent for waiting for information requested by a client device.
You can enable KSN proxy server on the distribution point side to make the device act as a KSN proxy server. In this case, the KSN proxy service (ksnproxy) is run on the device.
Page top
Enabling and disabling KSN
To enable KSN:
- In the main menu, click the settings icon () next to the name of the required Administration Server.
The Administration Server properties window opens.
- On the General tab, select the KSN settings section.
- Switch the toggle button to the Use Kaspersky Security Network Enabled position.
KSN is enabled.
If the toggle button is enabled, client devices send patch installation results to Kaspersky. When enabling this toggle button, you should read and accept the terms of the KSN Statement.
- Click the Save button.
To disable KSN:
- In the main menu, click the settings icon () next to the name of the required Administration Server.
The Administration Server properties window opens.
- On the General tab, select the KSN settings section.
- Switch the toggle button to the Use Kaspersky Security Network Disabled position.
KSN is disabled.
If this toggle button is disabled, client devices will send no patch installation results to Kaspersky.
- Click the Save button.
Viewing the accepted KSN Statement
When you enable Kaspersky Security Network (KSN), you must read and accept the KSN Statement. You can view the accepted KSN Statement at any time.
To view the accepted KSN Statement:
- In the main menu, click the settings icon () next to the name of the Administration Server.
The Administration Server properties window opens.
- On the General tab, select the KSN settings section.
- Click the View Kaspersky Security Network Statement link.
In the window that opens, you can view the text of the accepted KSN Statement.
Page top
Accepting an updated KSN Statement
You use KSN in accordance with the KSN Statement that you read and accept when you enable KSN. If the KSN Statement is updated, it is automatically displayed when you open Kaspersky Security Center Cloud Console. You can accept the updated KSN Statement or decline it. If you decline it, you will continue using KSN in accordance with the version of the KSN Statement that you previously accepted. You can view and accept the updated KSN Statement later.
To view, and then accept or decline an updated KSN Statement:
- Click the View notifications link in the upper-right corner of the main application window.
The Notifications window opens.
- Click the View the updated KSN Statement link.
The Kaspersky Security Network Statement update window opens.
- Read the KSN Statement, and then make your decision by clicking one of the following buttons:
- I accept the updated KSN Statement
- Use KSN under the old Statement
Depending on your choice, KSN keeps working in accordance with the terms of the current or updated KSN Statement. You can view the text of the accepted KSN Statement in the properties of Administration Server at any time.
Page top
Checking whether the distribution point works as KSN proxy server
On a managed device assigned to work as a distribution point, you can enable KSN proxy server. A managed device works as KSN proxy server when the ksnproxy service is running on the device. You can check, turn on, or turn off this service on the device locally.
You can assign a Windows-based or a Linux-based device as a distribution point. The method of distribution point checking depends on the operating system of this distribution point.
To check whether the Windows-based distribution point works as KSN proxy server:
- On the distribution point device, in Windows, open Services (All Programs → Administrative Tools → Services).
- In the list of services, check whether the ksnproxy service is running.
If the ksnproxy service is running, then Network Agent on the device participates in Kaspersky Security Network and works as KSN proxy server for the managed devices included in the scope of the distribution point.
If you want, you may turn off the ksnproxy service. In this case, Network Agent on the distribution point stops participating in Kaspersky Security Network. This requires local administrator rights.
To check whether the Linux-based distribution point works as KSN proxy server:
- On the distribution point device, display the list of running processes.
- In the list of running processes, check whether the
/opt/kaspersky/ksc64/sbin/ksnproxyprocess is running.
If /opt/kaspersky/ksc64/sbin/ksnproxy process is running, then Network Agent on the device participates in Kaspersky Security Network and works as the KSN proxy server for the managed devices included in the scope of the distribution point.
Deletion of objects
You can delete objects, including the following:
- Policies
- Tasks
- Installation packages
- Virtual Administration Servers
- Users
- Security groups
- Administration groups
When you delete an object, information about it remains in the database. The storage term for information about the deleted objects is the same as the storage term for object revisions (the recommended term is 90 days). You can change the storage term only if you have the Modify permission in the Deleted objects area of rights.
About deletion of client devices
When you delete a managed device from an administration group, the application moves the device to the Unassigned devices group. After device deletion, the installed Kaspersky applications—Network Agent and any security application, for example Kaspersky Endpoint Security—remain on the device.
Kaspersky Security Center Cloud Console handles the devices in the Unassigned devices group according to the following rules:
- If you have configured device moving rules and a device meets the criteria of a moving rule, the device is automatically moved to an administration group according to the rule.
- The device is stored in the Unassigned devices group and automatically removed from the group according to the device retention rules.
The device retention rules do not affect the devices that have one or more drives encrypted with BitLocker Drive Encryption. Such devices are not deleted automatically—you can only delete them manually. If you need to delete a device with an encrypted drive, first decrypt the drive, and then delete the device.
When you delete a device with encrypted drive, the data required to decrypt the drive is also deleted. If you select the I understand the risk and want to delete device(s) check box in the confirmation window that opens when you delete such devices (either from the Unassigned devices or the Managed Devices group), it means that you are aware of the subsequent data deletion.
To decrypt the drive, the following conditions must be met:
- The device is reconnected to Administration Server to restore the data required to decrypt the drive.
- The device user remembers the decryption password.
- The security application that was used to encrypt the drive, for example Kaspersky Endpoint Security for Windows, is still installed on the device.
When you delete a device from the Unassigned devices group manually, the application removes the device from the list. After device deletion, the installed Kaspersky applications (if any) remain on the device. Then, if the device is still visible to Administration Server and you have configured regular network polling, Kaspersky Security Center Cloud Console discovers the device during the network polling and adds it back to the Unassigned devices group. Therefore, it is reasonable to delete a device manually only if the device is invisible to Administration Server.
Updating Kaspersky databases and applications
This section describes steps you must take to regularly update the following:
- Kaspersky databases and software modules
- Installed Kaspersky applications, including Kaspersky Security Center Cloud Console components and security applications
Updates functionality (including providing anti-virus signature updates and codebase updates), as well as KSN functionality may not be available in the software in the U.S.
Scenario: Regular updating of Kaspersky databases and applications
This section provides a scenario for regular updating of Kaspersky databases, software modules, and applications. After you complete the Configuring network protection scenario, you must maintain the reliability of the protection system. This maintenance ensures that protection of the managed devices remains firm against a range of threats, including viruses, network attacks, and phishing attacks.
There are several schemes that you can use to install updates to Kaspersky Security Center Cloud Console components and security applications. Choose one or more schemes that meet the requirements of your network best.
The scenario below describes the update scheme that implies downloading updates to the distribution point repositories. If the managed devices do not have a connection to the distribution points, consider updating Kaspersky databases, software modules, and applications manually or directly from the Kaspersky update servers.
When you complete this scenario, the following results occur:
- Kaspersky Security Center Cloud Console components are updated automatically or only when you designate the Approved status for the updates.
- Kaspersky security applications, Kaspersky databases, and software modules are updated according to the schedule that you specified. By default, Kaspersky security applications install only those updates that you approve.
You can configure the update process to download and install updates in either of two ways:
- Automatically
In this case you have to perform this scenario only once. You will have to schedule the Download updates to the repositories of distribution points task (if any) and the Update tasks for the Kaspersky security applications, and keep the default update settings that are in the Network Agent properties.
- Manually
You can configure the update process to run the Download updates to the repositories of distribution points task (if any) and the Update tasks for the Kaspersky security applications manually. You can also configure Network Agent to install updates for the Kaspersky Security Center Cloud Console components only when you designate the Approved status for the updates.
Prerequisites
Before you start, make sure that you have done the following:
- Deployed the Kaspersky security applications to the managed devices according to the scenario of deploying Kaspersky applications through Kaspersky Security Center Cloud Console. When performing that scenario, you assigned an appropriate amount of distribution points in accordance with the number of managed devices and the network topology.
- Created and configured all required policies, policy profiles, and tasks according to the scenario of configuring network protection.
Stages
Configuration of regular updating of Kaspersky databases and applications proceeds in stages:
- Creating the task for downloading updates to the repositories of distribution points
Create the Download updates to the repositories of distribution points task. When this task is run, Kaspersky Security Center Cloud Console downloads the updates to the distribution points directly from Kaspersky update servers.
How-to instructions: Creating the task for downloading updates to the repositories of distribution points
- Configuring distribution points
Make sure that the Deploy updates option is enabled in the properties of all required distribution points. When this option is disabled for a distribution point, the devices included in the scope of the distribution point can download updates only from a local resource or directly from Kaspersky update servers.
If you want the managed devices to receive updates only from the distribution points, enable the Distribute files through distribution points only option in the Network Agent policy.
- Optimizing the update process by using diff files (optional)
Enabling this feature results in decrease in the traffic between the distribution points and the managed devices. To use this feature, enable the Download diff files option in the properties of the Download updates to the repositories of distribution points task.
How-to instructions: Using diff files for updating Kaspersky databases and software modules
- Defining which updates to install
By default, the downloaded software updates have the Undefined status. Change the status to Approved or Declined to define if this update should be installed on networked devices. The approved updates are always installed. The undefined updates can only be installed on Network Agent and other Kaspersky Security Center Cloud Console components in accordance with the Network Agent policy settings. The updates for which you set Declined status will not be installed on devices.
How-to instructions:
- Configuring automatic installation of updates and patches for Kaspersky Security Center Cloud Console components
By default, the downloaded updates and patches for Network Agent and other Kaspersky Security Center Cloud Console components are installed automatically. If you have left the Automatically install applicable updates and patches for components that have the Undefined status option enabled in the Network Agent properties, then all updates will be installed automatically after they are downloaded to the repository (or several repositories). If this option is disabled, Kaspersky patches that have been downloaded and tagged with the Undefined status will be installed only after you change their status to Approved.
How-to instructions: Enabling and disabling automatic updating and patching for Kaspersky Security Center Cloud Console components
- Configuring automatic installation of updates for the security applications
Create the Update tasks for the managed applications to provide timely updates to the applications, software modules and Kaspersky databases, including anti-virus databases. We recommend that you select the When new updates are downloaded to the repository option when configuring the task schedule. This will ensure that new updates are installed as soon as possible.
By default, updates for the managed applications are installed only after you change the update status to Approved. For Kaspersky Endpoint Security for Windows, you can change the update settings in the Update task.
If an update requires reviewing and accepting the terms of the End User License Agreement, then you first need to accept the terms. After that the update can be propagated to the managed devices.
How-to instructions: Automatic installation of Kaspersky Endpoint Security updates on devices
- Approving and declining updates of managed Kaspersky applications
By default, the downloaded software updates have the Undefined status. You can change the status to Approved or Declined. The approved updates are always installed. If an update of a managed Kaspersky application requires reviewing and accepting the terms of the End User License Agreement, then you first need to accept the terms. After that the update can be propagated to the managed devices. The updates for which you set Declined status will not be installed on devices. If a declined update for a managed application was previously installed, Kaspersky Security Center Cloud Console will try to uninstall the update from all devices.
Approving and declining updates is available only for Network Agent and managed Kaspersky applications installed on the Windows-based and Linux-based client devices. Seamless updating of Administration Server, Kaspersky Security Center Cloud Console, and management web plug-ins is not supported.
How-to instructions: Approving and declining software updates
Upon completion of the scenario, you can proceed to monitoring the network status.
Page top
About updating Kaspersky databases, software modules, and applications
To be sure that the protection of your managed devices is up-to-date, you must provide timely updates of the following:
- Kaspersky databases and software modules
Before downloading Kaspersky databases and software modules, Kaspersky Security Center Cloud Console checks if Kaspersky servers are accessible. If access to the servers using system DNS is not possible, the application uses public DNS servers. This is necessary to make sure anti-virus databases are updated and the level of security is maintained for the managed devices.
- Installed Kaspersky applications, including Kaspersky Security Center Cloud Console components and security applications
Kaspersky Security Center Cloud Console allows you to update Network Agent and Kaspersky applications installed on Windows-based and Linux-based client devices automatically. Seamless updating of Administration Server, Kaspersky Security Center Cloud Console, and management web plug-ins is not supported. To update these components, you have to download the latest versions from the Kaspersky website, and then install them manually.
Depending on the configuration of your network, you can use the following schemes of downloading and distributing the required updates to the managed devices:
- Using the Download updates to the repositories of distribution points task
- Manually through a local folder, a shared folder, or an FTP server
- Directly from Kaspersky update servers to the security applications on the managed devices
Using the Download updates to the repositories of distribution points task
In this scheme, Kaspersky Security Center Cloud Console downloads updates through the Download updates to the repositories of distribution points task. The managed devices included in the scope of a distribution point download the updates from the repository of the distribution point (see figure below).
Distribution point devices running macOS cannot download updates from Kaspersky update servers.
If one or more devices running macOS are within the scope of the Download updates to the repositories of distribution points task, the task completes with the Failed status, even if it has successfully completed on all Windows devices.
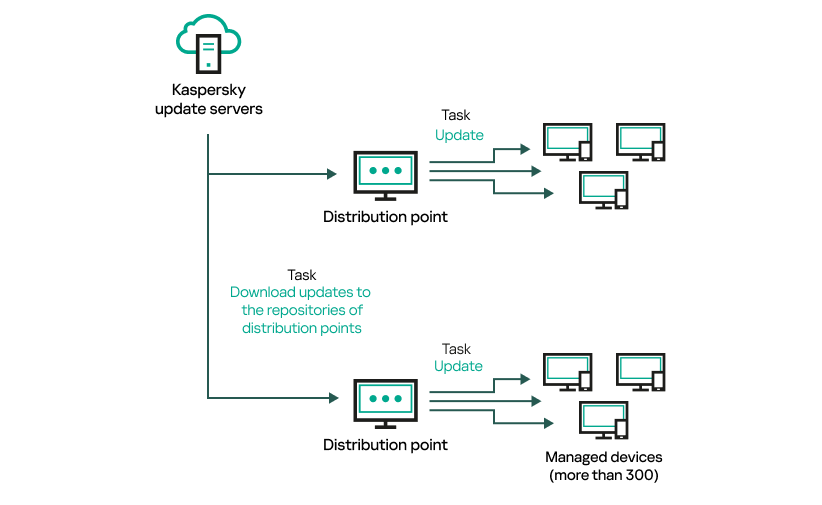
Updating by using the Download updates to the repositories of distribution points task
When the Download updates to the repositories of distribution points task is complete, the following updates are downloaded to the distribution point repository:
- Kaspersky databases and software modules for the security applications on the managed devices
These updates are installed through the Update task for Kaspersky Endpoint Security for Windows.
- Updates for the components of Kaspersky Security Center Cloud Console
By default, these updates are installed automatically. You can change the settings in the Network Agent policy.
- Updates for the security applications
By default, Kaspersky Endpoint Security for Windows installs only those updates that you approve. The updates are installed through the Update task and can be configured in the properties of this task.
Each Kaspersky application requests required updates from Administration Server. Administration Server aggregates these requests and downloads to the distribution point repositories only those updates that are requested by any application. This ensures that the same updates are not downloaded multiple times and that unnecessary updates are not downloaded at all. When running the Download updates to the repositories of distribution points task, Administration Server sends the following information to Kaspersky update servers automatically in order to ensure the downloading of relevant versions of Kaspersky databases and software modules:
- Application ID and version
- Application installation ID
- Active key ID
- Download task run ID
None of the transmitted information contains personal or other confidential data. AO Kaspersky Lab protects information in accordance with requirements established by law.
Manually through a local folder, a shared folder, or an FTP server
If the client devices do not have a connection to a distribution point, you can use a local folder or a shared resource as a source for updating Kaspersky databases, software modules, and applications. In this scheme, you have to copy required updates from a distribution point repository to a removable drive, and then copy the updates to the local folder or the shared resource specified as an update source in the settings of Kaspersky Endpoint Security for Windows (see figure below).
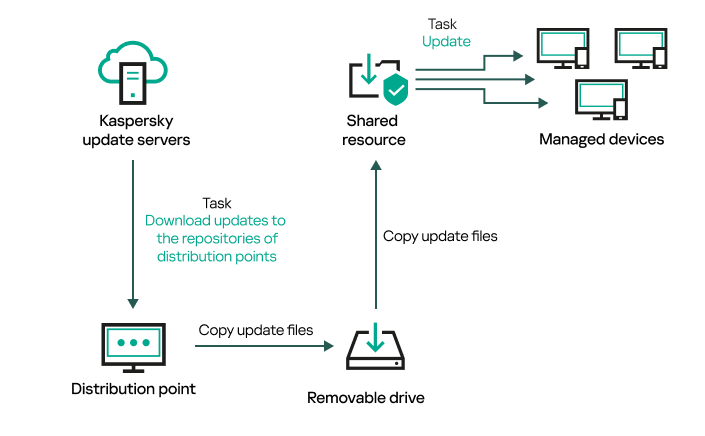
Updating through a local folder, a shared folder, or an FTP server
Directly from Kaspersky update servers to Kaspersky Endpoint Security for Windows on the managed devices
On the managed devices, you can configure Kaspersky Endpoint Security for Windows to receive updates directly from Kaspersky update servers (see figure below).
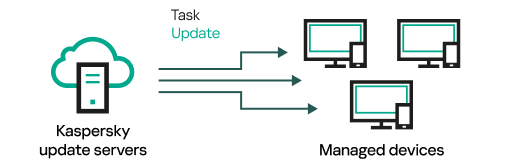
Updating security applications directly from Kaspersky update servers
In this scheme, the security application does not use the repositories provided by Kaspersky Security Center Cloud Console. To receive updates directly from Kaspersky update servers, specify Kaspersky update servers as an update source in the interface of the security application. For a full description of these settings, please refer to the Kaspersky Endpoint Security for Windows documentation.
Creating the task for downloading updates to the repositories of distribution points
Distribution point devices running macOS cannot download updates from Kaspersky update servers.
If one or more devices running macOS are within the scope of the Download updates to the repositories of distribution points task, the task completes with the Failed status, even if it has successfully completed on all Windows devices.
You can create the Download updates to the repositories of distribution points task for an administration group. This task will run for distribution points included in the specified administration group.
This task is required to download updates from Kaspersky update servers to the repositories of distribution points. The list of updates includes:
- Updates to databases and software modules for Kaspersky security applications
- Updates to Kaspersky Security Center Cloud Console components
- Updates to Kaspersky security applications
After the updates are downloaded, they can be propagated to the managed devices.
To create the Download updates to the repositories of distribution points task, for a selected administration group:
- In the main menu, go to Assets (Devices) → Tasks.
- Click the Add button.
The New task wizard starts. Follow the steps of the wizard.
- For the Kaspersky Security Center Cloud Console application, in the Task type field select Download updates to the repositories of distribution points.
- Specify the name for the task that you are creating. A task name cannot be more than 100 characters long and cannot include any special characters ("*<>?\:|).
- Select an option button to specify the administration group, the device selection, or the devices to which the task applies.
- At the Finish task creation step, if you enable the Open task details when creation is complete option, you can modify the default task settings. If you do not enable this option, the task is created with the default settings. You can modify the default settings later, at any time.
- Click the Create button.
The task is created and displayed in the list of tasks.
- Click the name of the created task to open the task properties window.
- On the Application settings tab of the task properties window, specify the following settings:
- Create a schedule for task start. If necessary, specify the following settings:
- Click the Save button.
The task is created and configured.
In addition to the settings that you specify during task creation, you can change other properties of a created task.
When the Download updates to the repositories of distribution points task is performed, updates for databases and software modules are downloaded from the update source and stored in the shared folder. Downloaded updates will only be used by distribution points that are included in the specified administration group and that have no update download task explicitly set for them.
Configuring managed devices to receive updates only from distribution points
Managed devices can retrieve updates of Kaspersky databases, software modules, and Kaspersky applications from various sources: directly from update servers, from distribution points, or from a local or network folder. You can specify distribution points as the only possible source of updates.
To configure managed devices to receive updates only from distribution points:
- In the main menu, go to Assets (Devices) → Policies & profiles.
- Click the Network Agent policy.
- In the policy properties window, open the Application settings tab.
- In the Settings section, turn on the Distribute files through distribution points only toggle button.
- Set the lock () for this toggle button.
- Click the Save button.
The policy will be applied to the selected devices, and the devices will receive updates only from distribution points.
Enabling and disabling automatic updating and patching for Kaspersky Security Center Cloud Console components
Automatic installation of updates and patches for Kaspersky Security Center Cloud Console components is enabled by default during Network Agent installation on the device. You can disable it during Network Agent installation, or you can disable it later by using a policy.
To disable automatic updating and patching for Kaspersky Security Center Cloud Console components during local installation of Network Agent on a device:
- Start local installation of Network Agent on the device.
- At the Advanced settings step, clear the Automatically install applicable updates and patches for components that have Undefined status check box.
- Follow the instructions of the wizard.
Network Agent with disabled automatic updating and patching for Kaspersky Security Center Cloud Console components will be installed on the device. You can enable automatic updating and patching later by using a policy.
To disable automatic updating and patching for Kaspersky Security Center Cloud Console components during Network Agent installation on the device through an installation package:
- In the main menu, go to Operations → Repositories → Installation packages.
- Click the Kaspersky Security Center Network Agent <version number> package.
- In the properties window, select the Settings tab.
- Turn off the Automatically install applicable updates and patches for components that have the Undefined status toggle button.
Network Agent with disabled automatic updating and patching for Kaspersky Security Center Cloud Console components will be installed from this package. You can enable automatic updating and patching later by using a policy.
If the check box in step 4 was selected (or cleared) during Network Agent installation on the device, you can subsequently enable (or disable) automatic updating by using the Network Agent policy.
To enable or disable automatic updating and patching for Kaspersky Security Center Cloud Console components by using the Network Agent policy:
- In the main menu, go to Assets (Devices) → Policies & profiles.
- Click the Network Agent policy.
- In the policy properties window, select the Application settings tab.
- In the Manage patches and updates section, turn on or off the Automatically install applicable updates and patches for components that have the Undefined status toggle button to enable or disable, respectively, automatic updating and patching.
- Make sure to set (Enforce) the lock () for this toggle button.
The policy will be applied to the selected devices, and automatic updating and patching for Kaspersky Security Center Cloud Console components will be enabled (or disabled) on these devices.
Automatic installation of updates for Kaspersky Endpoint Security for Windows
You can configure automatic updates of databases and software modules of Kaspersky Endpoint Security for Windows on client devices.
To configure download and automatic installation of updates of Kaspersky Endpoint Security for Windows on devices:
- In the main menu, go to Assets (Devices) → Tasks.
- Click the Add button.
The New task wizard starts. Follow the steps of the wizard.
- For the Kaspersky Endpoint Security for Windows application, select Update as the task subtype.
- Specify the name for the task that you are creating. A task name cannot be more than 100 characters long and cannot include any special characters ("*<>?\:|).
- Choose the task scope.
- Specify the administration group, the device selection, or the devices to which the task applies.
- At the Finish task creation step, if you enable the Open task details when creation is complete option, you can modify the default task settings. If you do not enable this option, the task is created with the default settings. You can modify the default settings later, at any time.
- Click the Create button.
The task is created and displayed in the list of tasks.
- Click the name of the created task to open the task properties window.
- On the Application settings tab of the task properties window, define the update task settings in local or mobile mode:
- Local mode: The settings on this tab define how the device receives updates when connection is established between the device and the Administration Server.
- Mobile mode: The settings on this tab define how the device receives updates when no connection is established between Kaspersky Security Center Cloud Console and the device (for example, when the device is not connected to the internet).
- Enable the update sources that you want to use to update databases and application modules for Kaspersky Endpoint Security for Windows. If required, change the positions of the sources in the list by using the Move up and Move down buttons. If several update sources are enabled, Kaspersky Endpoint Security for Windows tries to connect to them one after another, starting from the top of the list, and performs the update task by retrieving the update package from the first available source.
When Kaspersky Security Center Cloud Console is set as an update source, the updates are downloaded from a distribution point repository, not from the Administration Server repository. Ensure that you assigned distribution points and created the Download updates to the repositories of distribution points task.
- Enable the Install approved application module updates option to download and install software module updates together with the application databases.
If the option is enabled, Kaspersky Endpoint Security for Windows notifies the user about available software module updates and includes software module updates in the update package when running the update task. Kaspersky Endpoint Security for Windows installs only those updates for which you have set the Approved status; they will be installed locally through the application interface or through Kaspersky Security Center Cloud Console.
You can also enable the Automatically install critical application module updates option. If any updates are available for software modules, Kaspersky Endpoint Security for Windows automatically installs those that have Critical status; the remaining updates will be installed after you approve them.
If updating the software module requires reviewing and accepting the terms of the License Agreement and Privacy Policy, the application installs updates after the terms of the License Agreement and Privacy Policy have been accepted by the user.
- Select the Copy updates to folder check box in order for the application to save downloaded updates to a folder, and then specify the folder path.
- Schedule the task. To ensure timely updates, we recommend that you select the When new updates are downloaded to the repository option.
- Click Save.
When the Update task is running, the application sends requests to Kaspersky update servers.
Some updates require installation of the latest versions of management plug-ins.
About update statuses
Status is an attribute of software updates that defines whether a particular software update must be installed on a networked device.
An update can have the following statuses:
- Undefined
By default, the downloaded software updates have the Undefined status. The undefined updates can only be installed on Network Agent and other Kaspersky Security Center Cloud Console components in accordance with the Network Agent policy settings.
- Approved
The approved updates are always installed. If an update requires reviewing and accepting the terms of the End User License Agreement, then you first need to accept the terms.
- Declined
The updates for which you set Declined status will not be installed on devices.
You can change statuses of updates for the following software:
- Network Agent and other Kaspersky Security Center Cloud Console components
By default, the downloaded updates and patches for Kaspersky Security Center Cloud Console components are installed automatically. If you have left the Automatically install applicable updates and patches for components that have the Undefined status option enabled in the Network Agent properties, then all updates will be installed automatically after they are downloaded to the repository (or several repositories). If this option is disabled, Kaspersky patches that have been downloaded and tagged with the Undefined status will be installed only after you change their status to Approved.
Updates for Kaspersky Security Center Cloud Console components cannot be uninstalled, even if you set an update the Declined status.
- Kaspersky security applications
By default, updates for the managed applications are installed only after you change the update status to Approved. If a declined update for a security application was previously installed, Kaspersky Security Center Cloud Console will try to uninstall the update from all devices.
Approving and declining software updates
The settings of an update installation task may require approval of updates that are to be installed. You can approve updates that must be installed and decline updates that must not be installed.
For example, you may want to first check the installation of updates in a test environment and make sure that they do not interfere with the operation of devices, and only then allow the installation of these updates on client devices.
Approving and declining updates is available only for Network Agent and managed applications installed on the Windows-based and Linux-based client devices. Seamless updating of Administration Server, Kaspersky Security Center Cloud Console, and management web plug-ins is not supported. To update these components, you have to download the latest versions from the Kaspersky website, and then install them manually.
To approve or decline one or several updates:
- In the main menu, go to Operations → Kaspersky applications → Seamless updates.
A list of available updates appears.
Updates of managed applications may require a specific minimum version of Kaspersky Security Center to be installed. If this version is later than your current version, these updates are displayed but cannot be approved. Also, no installation packages can be created from such updates until you upgrade Kaspersky Security Center. You are prompted to upgrade your Kaspersky Security Center instance to the required minimum version.
- If necessary, accept EULA by clicking the View and accept License Agreements button.
- Select the updates that you want to approve or decline.
- Click Approve to approve the selected updates or Decline to decline the selected updates.
The default value is Undefined.
The updates to which you assign Approved status are placed in a queue for installation.
The updates to which you assign Declined status are uninstalled (if possible) from all devices on which they were previously installed. Also, they will not be installed on other devices in future.
Some updates for Kaspersky applications cannot be uninstalled. If you set Declined status for them, Kaspersky Security Center Cloud Console will not uninstall these updates from the devices on which they were previously installed. However, these updates will never be installed on other devices in future.
If you set Declined status for third-party software updates, these updates will not be installed on devices for which they were planned but have not yet been installed. Updates will remain on devices on which they were already installed. If you have to delete the updates, you can manually delete them locally.
Using diff files for updating Kaspersky databases and software modules
A diff file describes the differences between two versions of a file of a database or software module. The usage of diff files limits traffic on your company's network because diff files occupy less space than entire files of databases and software modules. If the Downloading diff files feature is enabled on a distribution point, the diff files are saved on this distribution point. As a result, devices that take updates from this distribution point can use the saved diff files to update their databases and software modules.
To optimize the usage of diff files, we recommend that you synchronize the update schedule of devices with the update schedule of the distribution point from which the devices take updates. However, the traffic can be saved even if devices are updated several times less often than is the distribution point from which the devices take updates.
Distribution points do not use IP multicasting for automatic distribution of diff files.
To enable the Downloading diff files feature:
- In the main menu, go to Assets (Devices) → Tasks.
- Click the Download updates to the repositories of distribution points task to open the task properties.
- On the Application settings tab, enable the Download diff files option.
- Click the Save button.
The Downloading diff files feature is enabled. Diff files of updates will be downloaded in addition to the update files each time the Download updates to the repositories of distribution points task is run.
To check that the Downloading diff files feature is successfully enabled, you can measure the internal traffic before and after you perform the scenario.
Updating Kaspersky databases and software modules on offline devices
Updating Kaspersky databases and software modules on managed devices is an important task for maintaining protection of the devices against viruses and other threats. Administrators usually configure regular updates through usage of the repositories of distribution points.
When you need to update databases and software modules on a device (or a group of devices) that is not connected to a distribution point or the internet, you have to use alternative sources of updates, such as an FTP server or a local folder. In this case you have to deliver the files of the required updates by using a mass storage device, such as a flash drive or an external hard drive.
You can copy the required updates from the following sources:
- Distribution point.
To be sure the distribution point repository contains the updates required for the security application installed on an offline device, at least one of the managed online devices in the scope of the distribution point must have the same security application installed. This application must be configured to receive the updates from the distribution point repository through the Download updates to the repositories of distribution points task.
- Any device that has the same security application installed and configured to receive the updates from a distribution point repository or directly from the Kaspersky update servers.
Below is an example of configuring updates of databases and software modules by copying them from a distribution point repository.
To update Kaspersky databases and software modules on offline devices:
- Connect the removable drive to the distribution point device.
- Copy the updates files to the removable drive.
By default, the updates are located at: %ALLUSERSPROFILE%\Application Data\KasperskyLab\adminkit\1103\Updates.
- On offline devices, configure the security application (for example, Kaspersky Endpoint Security for Windows) to receive updates from a local folder or a shared resource, such as an FTP server or a shared folder.
- Copy the updates files from the removable drive to the local folder or the shared resource that you want to use as an update source.
- On the offline device that requires update installation, start the update task of Kaspersky Endpoint Security for Windows.
After the update task is complete, the Kaspersky databases and software modules are up-to-date on the device.
Updating Kaspersky Security for Windows Server databases
You can install Kaspersky Security for Windows Server on managed devices and you might want to launch this application's Real-Time File Protection task. However, the application comes without the databases that are needed for it to work correctly. The databases are downloaded to the managed device only after the Download updates to the repositories of distribution points task has completed.
If you want to start the Real-Time File Protection task on a managed device right after Kaspersky Security for Windows Server is installed on it, you must make sure that the databases for that application are downloaded and are up to date. Otherwise, the task might work incorrectly.
To make sure that Kaspersky Security for Windows Server databases are up to date:
- Make sure that the Download updates to the repositories of distribution points task has completed on Administration Server.
- Do one of the following:
- In the settings of the Real-Time File Protection task, set the start to At application launch, and then restart the managed device.
- In the settings of the Real-Time File Protection task, manually set the start time to the time you want.
The Real-Time File Protection task in Kaspersky Security for Windows Server is ready to work correctly.
Managing third-party applications on client devices
This section describes the features of Kaspersky Security Center Cloud Console that are related to the management of third-party applications installed on client devices.
Limitations of Vulnerability and patch management
The Vulnerability and patch management feature has a number of limitations, depending on the license that you use and the mode in which Kaspersky Security Center Cloud Console is working.
The following licenses do not support Vulnerability and patch management:
- Kaspersky Endpoint Security for Business Select
- Kaspersky Hybrid Cloud Security
The following licenses support Vulnerability and patch management:
- Kaspersky Endpoint Security for Business Advanced
- Kaspersky Endpoint Detection and Response Optimum
- Kaspersky Total Security for Business
- Kaspersky Hybrid Cloud Security Enterprise
The table below compares limitations of Kaspersky Security Center Cloud Console in the trial mode, under licenses that do not support Vulnerability and patch management, and under licenses that support Vulnerability and patch management.
Limitations of Vulnerability and patch management
Limitation |
Trial mode |
Commercial mode: licenses that do not support Vulnerability and patch management |
Commercial mode: licenses that support Vulnerability and patch management |
Maximum number of the Install Windows Update updates tasks or the Fix vulnerabilities tasks |
4 |
4 |
0 (new tasks of these types cannot be created) |
Maximum number of the Install required updates and fix vulnerabilities tasks |
2 |
Not supported |
4 |
Maximum number of rules in all of the Install required updates and fix vulnerabilities tasks |
10 |
Not supported |
50 |
Maximum number of software updates that can have the Approved status at the same time, across all servers including virtual ones |
100 |
Not supported |
1000 |
Maximum number of software updates that can be manually added to a task, across all servers including virtual ones |
500 |
1000 |
1000 |
Maximum number of software vulnerabilities that can be manually added to a task, across all servers including virtual ones |
500 |
1000 |
1000 |
Availability of Vulnerability and patch management features in trial and commercial mode and under various licensing options
The availability of Vulnerability and patch management features in Kaspersky Security Center Cloud Console depends on whether you use it in trial or commercial mode, as well as on the licensing option that you selected. Use the table to check which Vulnerability and patch management features are available.
Availability of Vulnerability and patch management features
Vulnerability and patch management feature |
Trial mode |
Commercial mode: Kaspersky Endpoint Security for Business Select |
Commercial mode: Kaspersky Endpoint Security for Business Advanced, Kaspersky Endpoint Detection and Response Optimum, Kaspersky Total Security for Business |
Manual fixing of vulnerabilities in Microsoft software on managed devices that are running Windows Creating the Fix vulnerabilities task |
|
|
|
Manual installation of updates in Microsoft software on managed devices that are running Windows Installing third-party software updates through the Install Windows Update updates task |
|
|
|
Automatic rule-based installing third-party software updates and fixing of third-party software vulnerabilities Creating the Install required updates and fix vulnerabilities task and installing updates |
|
|
|
About third-party applications
Kaspersky Security Center Cloud Console can help you to update third-party software, installed on client devices, and fix the vulnerabilities of the third-party software. Kaspersky Security Center Cloud Console can update third-party software from the current version to the latest version only.
The list of third-party software can be updated and extended with new applications. You can check whether you can update the third-party software (installed on users' devices) with Kaspersky Security Center Cloud Console by viewing the list of available updates in Kaspersky Security Center Cloud Console.
The procedure outlined below is intended solely for viewing the list of third-party software that can be updated with Kaspersky Security Center Cloud Console. The steps are followed to access the relevant information without initiating any tasks.
To view the list of third-party software that you can update with Kaspersky Security Center Cloud Console:
- In the main menu, go to Assets (Devices) → Tasks.
- Click Add.
The New task wizard starts. Proceed through the wizard by using the Next button.
- At the New task settings step of the wizard, specify the following settings:
- In the Application drop-down list, select Kaspersky Security Center Cloud Console.
- In the Task type field, select Install required updates and fix vulnerabilities.
- At the Task scope step of the wizard, select the Managed Devices option.
- At the Specify rules for installing updates step of the wizard, click the Add button.
The Rule creation wizard starts. Proceed through the wizard by using the Next button.
- At the Select rule type step of the wizard, select the Rule for third-party updates option.
- At the General criteria step of the wizard, select the Install all updates (except declined) option, and then click Next.
The list of third-party software is displayed.
Third-party software updates
Kaspersky Security Center Cloud Console enables you to manage updates of third-party software installed on managed devices and fix vulnerabilities in Microsoft applications and other software makers' products through installation of required updates.
Kaspersky Security Center Cloud Console searches for updates through the Find vulnerabilities and required updates task. When this task is complete, Administration Server receives the lists of detected vulnerabilities and required updates for the third-party software installed on the devices that you specified in the task properties. After viewing information about available updates, you can install them on devices.
Kaspersky Security Center Cloud Console updates some applications by removing the previous version of the application and installing the new one.
A user interaction may be required when you update a third-party application or fix a vulnerability in a third-party application on a managed device. For example, the user may be prompted to close the third-party application if it is currently open.
For security reasons, any third-party software updates that you install by using the Vulnerability and patch management feature are automatically scanned for malware by Kaspersky technologies. These technologies are used for automatic file checks and include virus scanning, static analysis, dynamic analysis, behavior analysis in the sandbox environment, and machine learning.
Kaspersky experts do not perform manual analysis of third-party software updates that can be installed by using the Vulnerability and patch management feature. In addition, Kaspersky experts do not search for vulnerabilities (known or unknown) or undocumented features in such updates, nor do they perform other types of analysis of the updates other than those specified in the paragraph above.
Tasks for installation of third party software updates
When metadata of the third-party software updates is downloaded to the repository, you can install the updates on client devices by using the following tasks:
- The Install required updates and fix vulnerabilities task
This task is used to install updates for Microsoft applications, including the updates provided by the Windows Update service, and updates of other vendors' software.
When this task is complete, the updates are installed on the managed devices automatically. When metadata of new updates is downloaded to the Administration Server repository, Kaspersky Security Center Cloud Console checks whether the updates meet the criteria specified in the update rules. All new updates that meet the criteria will be downloaded and installed automatically at the next task run.
- The Install Windows Update updates task
This task can be used to install Windows Update updates only.
When this task is complete, only those updates that are specified in the task properties are installed. In future, if you want to install new updates, you must add the required updates to the list of updates in the existing task or create an Install Windows Update updates task.
The software update installation tasks have a number of limitations. These limitations depend on the license under which you are using Kaspersky Security Center Cloud Console and on the mode in which Kaspersky Security Center Cloud Console is working.
Scenario: Updating third-party software
This section provides a scenario for updating third-party software installed on the client devices. The third-party software includes applications from Microsoft and other software vendors. Updates for Microsoft applications are provided by the Windows Update service.
Stages
Updating third-party software proceeds in stages:
- Searching for required updates
To find the third-party software updates required for the managed devices, run the Find vulnerabilities and required updates task. When this task is complete, Kaspersky Security Center Cloud Console receives the lists of detected vulnerabilities and required updates for the third-party software installed on the devices that you specified in the task properties.
The Find vulnerabilities and required updates task is created automatically by the Administration Server quick start wizard. If you did not run the wizard, create the task or run the quick start wizard now.
How-to instructions:
- Analyzing the list of found updates
View the Software updates list and decide which updates you want to install. To view detailed information about each update, click the update name in the list. For each update in the list, you can view the statistics about the update installation on managed devices. For example, you can view the number of devices on which the selected update is not installed, will be installed, or on which the update installation has failed.
How-to instructions: Viewing information about available third-party software updates
- Configuring installation of updates
When Kaspersky Security Center Cloud Console received the list of the third-party software updates, you can install them on client devices by using the Install required updates and fix vulnerabilities task or the Install Windows Update updates task. Create one of these tasks. You can create these tasks on the Tasks tab or by using the Software updates list.
The Install required updates and fix vulnerabilities task is used to install updates for Microsoft applications, including the updates provided by the Windows Update service, and updates of other vendors' software.
The Install Windows Update updates task can be used to install Windows Update updates only.
The software update installation tasks have a number of limitations. These limitations depend on the license under which you are using Kaspersky Security Center Cloud Console and on the mode in which Kaspersky Security Center Cloud Console is working.
To install some software updates you must accept the End User License Agreement (EULA) for the installation software. If you decline the EULA, the software update will not be installed.
How-to instructions:
- Scheduling the tasks
To be sure that the update list is always up-to-date, schedule the Find vulnerabilities and required updates task to run the task automatically from time to time. The default frequency is once a week.
If you have created the Install required updates and fix vulnerabilities task, you can schedule it to run with the same frequency as the Find vulnerabilities and required updates task or less often. When scheduling the Install Windows Update updates task, note that for this task you must define the list of updates every time before starting this task.
When scheduling the tasks, make sure that a task to fix vulnerability starts after the Find vulnerabilities and required updates task is complete.
How-to instructions: General task settings
- Approving and declining software updates (optional)
If you have created the Install required updates and fix vulnerabilities task, you can specify rules for update installation in the task properties. If you have created the Install Windows Update updates task, skip this step.
For each rule, you can define the updates to install depending on the update status: Undefined, Approved or Declined. For example, you may want to create a specific task for servers and set a rule for this task to allow installation of only Windows Update updates and only those ones that have Approved status. After that you manually set the Approved status for those updates that you want to install. In this case the Windows Update updates that have the Undefined or Declined status will not be installed on the servers that you specified in the task.
By default, the downloaded software updates have the Undefined status. You can change the status to Approved or Declined in the Software updates list (Operations → Patch management → Software updates).
How-to instructions: Approving and declining third-party software updates
- Running an update installation task
Start the Install required updates and fix vulnerabilities task or the Install Windows Update updates task. When you start these tasks, updates are downloaded and installed on managed devices. After the task is complete, make sure that it has the Completed successfully status in the task list.
How-to instructions: Starting a task manually
- Create the report on results of update installation of third-party software (optional)
To make sure that the task is created and the updates are installed, create the Report on results of installation of third-party software updates and view detailed statistics on the update installation in this report.
How-to instructions: Generating and viewing a report
Installing third-party software updates
You can install third-party software updates on managed devices by creating and running one of the following tasks:
- Install required updates and fix vulnerabilities
You can use this task to install both Windows Update updates provided by Microsoft and updates of other vendors' software.
- Install Windows Update updates
You can use this task to install Windows Update updates only.
The software update installation tasks have a number of limitations. These limitations depend on the license under which you are using Kaspersky Security Center Cloud Console and on the mode in which Kaspersky Security Center Cloud Console is working.
A user interaction may be required when you update a third-party application or fix a vulnerability in a third-party application on a managed device. For example, the user may be prompted to close the third-party application if it is currently open.
As an option, you can create a task to install the required updates in the following ways:
- By opening the update list and specifying which updates to install.
As a result, a new task to install the selected updates is created. As an option, you can add the selected updates to an existing task.
- By running the Update installation wizard.
The availability of the Update installation wizard depends on the Kaspersky Security Center Cloud Console mode and your current license.
The wizard simplifies creation and configuration of an update installation task, and enables you to eliminate the creation of redundant tasks that contain the same updates to install.
Installing third-party software updates by using the update list
To install third-party software updates by using the list of updates:
- Open one of the lists of updates:
- To open the general update list, in the main menu, go to Operations → Patch management → Software updates.
- To open the update list for a managed device, in the main menu, go to Assets (Devices) → Managed devices → <device name> → Advanced → Available updates.
- To open the update list for a specific application, in the main menu, go to Operations → Third-party applications → Applications registry → <application name> → Available updates.
A list of available updates appears.
- Select the check boxes next to the updates that you want to install.
- Click the Install updates button.
To install some software updates, you must accept the End User License Agreement (EULA). If you decline the EULA, the software update will not be installed.
- Select one of the following options:
- New task
The New task wizard starts. The Install required updates and fix vulnerabilities task or the Install Windows Update updates task is preselected, depending on the Kaspersky Security Center Cloud Console mode and your current license. Follow the steps of the wizard to complete the task creation.
- Install update (add rule to specified task)
Select a task to which you want to add the selected updates. Select an Install required updates and fix vulnerabilities task or an Install Windows Update updates task. If you select an Install required updates and fix vulnerabilities task, a new rule to install the selected updates will be automatically added to the selected task. If you select an Install Windows Update updates task, the selected updates will be added to the task properties.
The task properties window opens. Click the Save button to save the changes.
- New task
If you have chosen to create a task, the task is created and displayed in the task list at Assets (Devices) → Tasks. If you have chosen to add the updates to an existing task, the updates are saved in the task properties.
To install third-party software updates, start the Install required updates and fix vulnerabilities task or the Install Windows Update updates task. You can start any of these tasks manually or specify schedule settings in the properties of the task that you start. When specifying the task schedule, make sure that the update installation task starts after the Find vulnerabilities and required updates task is complete.
Installing third-party software updates by using the Update installation wizard
The availability of this feature depends on the Kaspersky Security Center Cloud Console mode and your current license.
To create a task to install third-party software updates by using the Update installation wizard:
- In the main menu, go to Operations → Patch management → Software updates.
A list of available updates appears.
- Select the check box next to the update that you want to install.
- Click the Run Update installation wizard button.
The Update installation wizard starts. The Select the update installation task page displays the list of all existing tasks of the following types:
- Install required updates and fix vulnerabilities
- Install Windows Update updates
- Fix vulnerabilities
You cannot modify the tasks of the last two types to install new updates. To install new updates, you can only use the Install required updates and fix vulnerabilities tasks.
- If you want the wizard to display only those tasks that install the update that you selected, then enable the Show only tasks that install this update option.
- Choose what you want to do:
- To start a task, select the check box next to the task name, and then click the Start button.
- To add a new rule to an existing task:
- Select the check box next to the task name, and then click the Add rule button.
- On the page that opens, configure the new rule:
- Installation rule for updates of this importance level
- Installation rule for updates of this importance level according to MSRC (available only for Windows Update updates)
- Installation rule for updates by this vendor (available only for updates of third-party applications)
- Installation rule for updates of the type
- Installation rule for the selected update
- Approve selected updates
- Automatically install all previous application updates that are required to install the selected updates
- Click the Add button.
- To create a task:
- Click the New task button.
- On the page that opens, configure the new rule:
- Installation rule for updates of this importance level
- Installation rule for updates of this importance level according to MSRC (available only for Windows Update updates)
- Installation rule for updates by this vendor (available only for updates of third-party applications)
- Installation rule for updates of the type
- Installation rule for the selected update
- Approve selected updates
- Automatically install all previous application updates that are required to install the selected updates
- Click the Add button.
If you have chosen to start a task, you can close the wizard. The task will complete in background mode. No further actions are required.
If you have chosen to add a rule to an existing task, the task properties window opens. The new rule is already added to the task properties. You can view or modify the rule or other task settings. Click the Save button to save the changes.
If you have chosen to create a task, you continue to create the task in the New task wizard. The new rule that you added in the Update installation wizard is displayed in the New task wizard. When you complete the New task wizard, the Install required updates and fix vulnerabilities task is added to the task list.
Creating the Find vulnerabilities and required updates task
Through the Find vulnerabilities and required updates task, Kaspersky Security Center Cloud Console receives the lists of detected vulnerabilities and required updates for the third-party software installed on the managed devices.
The Find vulnerabilities and required updates task is created automatically when the quick start wizard is running. If you did not run the wizard, you can create the task manually.
To create the Find vulnerabilities and required updates task:
- In the main menu, go to Assets (Devices) → Tasks.
- Click Add.
The New task wizard starts. Follow the steps of the wizard.
- For the Kaspersky Security Center Cloud Console application, select the Find vulnerabilities and required updates task type.
- Specify the name for the task that you are creating. A task name cannot be more than 100 characters long and cannot include any special characters ("*<>?\:|).
- Select devices to which the task will be assigned.
- If you want to modify the default task settings, enable the Open task details when creation is complete option on the Finish task creation page. If you do not enable this option, the task is created with the default settings. You can modify the default settings later, at any time.
- Click the Create button.
The task is created and displayed in the list of tasks.
- Click the name of the created task to open the task properties window.
- In the task properties window, specify the general task settings.
- On the Application settings tab, specify the following settings:
- Search for vulnerabilities and updates listed by Microsoft
- Connect to the update server to update data
- Search for third-party vulnerabilities and updates listed by Kaspersky
- Specify paths for advanced search of applications across the file system
- Enable advanced diagnostics
- Maximum size, in MB, of advanced diagnostics files
- Click the Save button.
The task is created and configured.
If the task results contain a warning of the 0x80240033 "Windows Update Agent error 80240033 ("License terms could not be downloaded.")" error, you can resolve this issue through the Windows Registry.
Find vulnerabilities and required updates task settings
The Find vulnerabilities and required updates task is created automatically when the quick start wizard is running. If you did not run the wizard, you can create the task manually.
In addition to the general task settings, you can specify the following settings when creating the Find vulnerabilities and required updates task or later, when configuring the properties of the created task:
- Search for vulnerabilities and updates listed by Microsoft
- Connect to the update server to update data
- Search for third-party vulnerabilities and updates listed by Kaspersky
- Specify paths for advanced search of applications across the file system
- Enable advanced diagnostics
- Maximum size, in MB, of advanced diagnostics files
Recommendations on the task schedule
When scheduling the Find vulnerabilities and required updates task, make sure that two options—Run missed tasks and Use automatically randomized delay for task starts—are enabled.
By default, the Find vulnerabilities and required updates task is set to start manually. If the organization's workplace rules provide for shutting down all devices at this time, the Find vulnerabilities and required updates task will run after the devices are turned on again, that is, in the morning of the next day. Such activity may be undesirable because a vulnerability scan may increase the load on CPUs and disk subsystems. You must set up the most convenient schedule for the task based on the workplace rules adopted in the organization.
Creating the Install required updates and fix vulnerabilities task
The availability of the Install required updates and fix vulnerabilities task depends on the Kaspersky Security Center Cloud Console mode and your current license.
The Install required updates and fix vulnerabilities task is used to update and fix vulnerabilities in third-party software, including Microsoft software, installed on the managed devices. This task enables you to install multiple updates and fix multiple vulnerabilities according to certain rules.
To install updates or fix vulnerabilities by using the Install required updates and fix vulnerabilities task, you can do one of the following:
- Run the Update installation wizard or the Vulnerability fix wizard.
- Create an Install required updates and fix vulnerabilities task.
- Add a rule for update installation to an existing Install required updates and fix vulnerabilities task.
The software update installation tasks have a number of limitations. These limitations depend on the license under which you are using Kaspersky Security Center Cloud Console and on the mode in which Kaspersky Security Center Cloud Console is working.
To create the Install required updates and fix vulnerabilities task:
- In the main menu, go to Assets (Devices) → Tasks.
- Click Add.
The New task wizard starts. Follow the steps of the wizard.
- For the Kaspersky Security Center Cloud Console application, select the Install required updates and fix vulnerabilities task type.
- Specify the name for the task that you are creating. A task name cannot be more than 100 characters long and cannot include any special characters ("*<>?\:|).
- Select devices to which the task will be assigned.
- Specify the rules for update installation, and then specify the following settings:
- Start installation at device restart or shutdown
- Install the required general system components
- Allow installation of new application versions during updates
- Download updates to the device without installing them
- Download updates to
- Enable advanced diagnostics
- Maximum size, in MB, of advanced diagnostics files
- Specify operating system restart settings:
- If on the Finish task creation page you enable the Open task details when creation is complete option, you can modify the default task settings. If you do not enable this option, the task is created with the default settings. You can modify the default settings later, at any time.
- Click the Finish button.
The task is created and displayed in the list of tasks.
- Click the name of the created task to open the task properties window.
- In the task properties window, specify the general task settings according to your needs.
- Click the Save button.
The task is created and configured.
If the task results contain a warning of the 0x80240033 "Windows Update Agent error 80240033 ("License terms could not be downloaded.")" error, you can resolve this issue through the Windows Registry.
Adding rules for update installation
The availability of this feature depends on the Kaspersky Security Center Cloud Console mode and your current license.
When installing software updates or fixing software vulnerabilities by using the Install required updates and fix vulnerabilities task, you must specify rules for the update installation. These rules determine the updates to install and the vulnerabilities to fix.
The exact settings depend on whether you add a rule for all updates, for Windows Update updates, or for updates of third-party applications (applications made by software vendors other than Kaspersky and Microsoft). When adding a rule for Windows Update updates or updates of third-party applications, you can select specific applications and application versions for which you want to install updates. When adding a rule for all updates, you can select specific updates that you want to install and vulnerabilities that you want to fix by means of installing updates.
You can add a rule for update installation in the following ways:
- By adding a rule while creating a new Install required updates and fix vulnerabilities task.
- By adding a rule on the Application Settings tab in the properties window of an existing Install required updates and fix vulnerabilities task.
- Through the Update installation wizard or the Vulnerability fix wizard.
To add a new rule for all updates:
- Click the Add button.
The Rule creation wizard starts. Proceed through the wizard by using the Next button.
- On the Rule type page, select Rule for all updates.
- On the General criteria page, use the drop-down lists to specify the following settings:
- On the Updates page, select the updates to be installed:
- On the Vulnerabilities page, select vulnerabilities that will be fixed by installing the selected updates:
- On the Name page, specify the name for the rule that you are adding. You can later change this name in the Settings section of the properties window of the created task.
After the Rule creation wizard completes its operation, the new rule is added and displayed in the rule list in the New task wizard or in the task properties.
To add a new rule for Windows Update updates:
- Click the Add button.
The Rule creation wizard starts. Proceed through the wizard by using the Next button.
- On the Rule type page, select Rule for Windows Update.
- On the General criteria page, specify the following settings:
- On the Applications page, select the applications and application versions for which you want to install updates. By default, all applications are selected.
- On the Categories of updates page, select the categories of updates to be installed. These categories are the same as in Microsoft Update Catalog. By default, all categories are selected.
- On the Name page, specify the name for the rule that you are adding. You can later change this name in the Settings section of the properties window of the created task.
After the Rule creation wizard completes its operation, the new rule is added and displayed in the rule list in the New task wizard or in the task properties.
To add a new rule for updates of third-party applications:
- Click the Add button.
The Rule creation wizard starts. Proceed through the wizard by using the Next button.
- On the Rule type page, select Rule for third-party updates.
- On the General criteria page, specify the following settings:
- On the Applications page, select the applications and application versions for which you want to install updates. By default, all applications are selected.
- On the Name page, specify the name for the rule that you are adding. You can later change this name in the Settings section of the properties window of the created task.
After the Rule creation wizard completes its operation, the new rule is added and displayed in the rule list in the New task wizard or in the task properties.
Creating the Install Windows Update updates task
The Install Windows Update updates task enables you to install software updates provided by the Windows Update service on client devices.
The software update installation tasks have a number of limitations. These limitations depend on the license under which you are using Kaspersky Security Center Cloud Console and on the mode in which Kaspersky Security Center Cloud Console is working.
To create the Install Windows Update updates task:
- In the main menu, go to Assets (Devices) → Tasks.
- Click Add.
The New task wizard starts. Proceed through the wizard by using the Next button.
- For the Kaspersky Security Center Cloud Console application, select the Install Windows Update updates task type.
- Specify the name for the task that you are creating.
A task name cannot be more than 100 characters long and cannot include any special characters ("*<>?\:|).
- Select devices to which the task will be assigned.
- Click the Add button.
The list of updates opens.
- Select the Windows Update updates that you want to install, and then click OK.
- Specify the operating system restart settings:
- Specify the account settings:
- If you want to modify the default task settings, enable the Open task details when creation is complete option on the Finish task creation page. If you do not enable this option, the task is created with the default settings. You can modify the default settings later, at any time.
- Click the Finish button.
The task is created and displayed in the list of tasks.
- Click the name of the created task to open the task properties window.
- In the task properties window, specify the general task settings according to your needs.
- Click the Save button.
The task is created and configured.
Viewing information about available third-party software updates
You can view the list of available updates for third-party software, including Microsoft software, installed on client devices.
To view a list of available updates for third-party applications installed on client devices,
In the main menu, go to Operations → Patch management → Software updates.
A list of available updates appears.
You can specify a filter to view the list of software updates. Click the Filter icon (![]() ) in the upper right corner of the software updates list to manage the filter. You can also select one of preset filters from the Preset filters drop-down list above the software vulnerabilities list.
) in the upper right corner of the software updates list to manage the filter. You can also select one of preset filters from the Preset filters drop-down list above the software vulnerabilities list.
To view the properties of an update:
- Click the name of the required software update.
- The properties window of the update opens, displaying information grouped on the following tabs:
To view the statistics of an update installation:
- Select the check box next to the required software update.
- Click the Statistics of update installation statuses button.
The diagram of the update installation statuses is displayed. Clicking a status opens a list of devices on which the update has the selected status.
You can view information about available software updates for third-party software, including Microsoft software, installed on the selected managed device running Windows.
To view a list of available updates for third-party software installed on the selected managed device:
- In the main menu, go to Assets (Devices) → Managed devices.
The list of managed devices is displayed.
- In the list of managed devices, click the link with the name of the device for which you want to view third-party software updates.
The properties window of the selected device is displayed.
- In the properties window of the selected device, select the Advanced tab.
- In the left pane, select the Available updates section. If you want to view only installed updates, enable the Show installed updates option.
The list of available third-party software updates for the selected device is displayed.
Exporting the list of available software updates to a file
You can export the list of updates for third-party software, including Microsoft software, that is displayed at the moment to the CSV or TXT files. You can use these files, for example, to send them to your information security manager or to store them for purposes of statistics.
To export to a text file the list of available updates for third-party software installed on all managed devices:
- In the main menu, go to Operations → Patch management → Software updates.
The page displays a list of available updates for third-party software installed on all managed devices.
- Click the Export to TXT or Export to CSV button, depending on the format you prefer for export.
The file containing the list of available updates for third-party software, including Microsoft software, is downloaded to the device that you use at the moment.
To export to a text file the list of available updates for third-party software installed on the selected managed device:
- Open the list of available third-party software updates on the selected managed device.
- Select the software updates you want to export.
Skip this step if you want to export a complete list of software updates.
If you want to export a complete list of software updates, only updates displaying on the current page will be exported.
If you want to export only installed updates, select the Show installed updates check box.
- Click the Export to TXT or Export to CSV button, depending on the format you prefer for export.
The file containing the list of updates for third-party software, including Microsoft software, installed on the selected managed device is downloaded to the device you are using at the moment.
Approving and declining third-party software updates
When you configure the Install required updates and fix vulnerabilities task, you can create a rule that requires a specific status of updates that are to be installed. For example, an update rule can allow installation of the following:
- Only approved updates
- Only approved and undefined updates
- All updates irrespective of the update statuses
You can approve updates that must be installed and decline updates that must not be installed.
The usage of the Approved status to manage update installation is efficient for a small amount of updates. To install multiple updates, use the rules that you can configure in the Install required updates and fix vulnerabilities task. We recommend that you set the Approved status for only those specific updates that do not meet the criteria specified in the rules. When you manually approve a large amount of updates, performance of Administration Server decreases and may lead to Administration Server overload.
To approve or decline one or several updates:
- In the main menu, go to Operations → Patch management → Software updates.
A list of available updates appears.
- Select the updates that you want to approve or decline.
- Click Approve to approve the selected updates or Decline to decline the selected updates.
The default value is Undefined.
The selected updates have the statuses that you defined.
As an option, you can change the approval status in the properties of a specific update.
To approve or decline an update in its properties:
- In the main menu, go to Operations → Patch management → Software updates.
A list of available updates appears.
- Click the name of the update that you want to approve or decline.
The update properties window opens.
- In the General section, select a status for the update by changing the Update approval status option. You can select the Approved, Declined, or Undefined status.
- Click the Save button to save the changes.
The selected update has the status that you defined.
If you set Declined status for third-party software updates, these updates will not be installed on devices for which they were planned but have not yet been installed. Updates will remain on devices on which they were already installed. If you have to delete them, you can manually delete them locally.
Updating third-party applications automatically
Some third-party applications can be updated automatically. The application vendor defines whether or not the application supports the auto-update feature. If a third-party application installed on a managed device supports auto-update, you can specify the auto-update setting in the application properties. After you change the auto-update setting, Network Agents apply the new setting on each managed device on which the application is installed.
The auto-update setting is independent of the other objects and settings of the Vulnerability and patch management feature. For example, this setting does not depend on an update approval status or the update installation tasks, such as Install required updates and fix vulnerabilities, Install Windows Update updates, and Fix vulnerabilities.
To configure the auto-update setting for a third-party application:
- In the main menu, go to Operations → Third-party applications → Applications registry.
- Click the name of the application for which you want to change the auto-update setting.
To simplify the search, you can filter the list by the Automatic Updates status column.
The application properties window opens.
- In the General section, select a value for the following setting:
- Click the Save button to save the changes.
The auto-update setting is applied to the selected application.
Finding and fixing software vulnerabilities
Kaspersky Security Center Cloud Console detects and fixes software
on managed devices running Microsoft Windows families operating systems. Vulnerabilities are detected in the operating system and in third-party software, including Microsoft software.Updates functionality (including providing anti-virus signature updates and codebase updates), as well as KSN functionality may not be available in the software in the U.S.
Finding software vulnerabilities
To find software vulnerabilities Kaspersky Security Center Cloud Console uses characteristics from the database of known vulnerabilities and Windows Update Database. The database of known vulnerabilities is created and maintained by Kaspersky specialists. It contains information about vulnerabilities, such as vulnerability description, vulnerability detect date, vulnerability severity level. You can find the details of software vulnerabilities on Kaspersky website.
Kaspersky Security Center Cloud Console uses the Find vulnerabilities and required updates task to find software vulnerabilities.
Fixing software vulnerabilities
To fix software vulnerabilities, Kaspersky Security Center Cloud Console uses software updates issued by the software vendors. You can view the list of software vulnerabilities at any time. The software updates metadata is downloaded to the Administration Server repository automatically and to the repositories of distribution points as a result of the Download updates to the repositories of distribution points task run. You can create this task by the Kaspersky Security Center Cloud Console quick start wizard or manually.
Software updates to fix vulnerabilities can be represented as full distribution packages or patches. Software updates that fix software vulnerabilities are named fixes. In Kaspersky Security Center Cloud Console, you fix vulnerabilities by using recommended fixes. Recommended fixes are software updates that are recommended for installation by Kaspersky specialists.
Depending on the Kaspersky Security Center Cloud Console mode and your current license, you can use Install required updates and fix vulnerabilities task or the Fix vulnerabilities task to fix software vulnerabilities.
The Install required updates and fix vulnerabilities task automatically fixes multiple vulnerabilities installing recommended fixes. For this task, you can manually configure certain rules to fix multiple vulnerabilities.
By means of the Fix vulnerabilities task, you can fix vulnerabilities by installing recommended fixes for Microsoft software.
For security reasons, any third-party software updates that you install by using the Vulnerability and patch management feature are automatically scanned for malware by Kaspersky technologies. These technologies are used for automatic file checks and include virus scanning, static analysis, dynamic analysis, behavior analysis in the sandbox environment, and machine learning.
Kaspersky experts do not perform manual analysis of third-party software updates that can be installed by using the Vulnerability and patch management feature. In addition, Kaspersky experts do not search for vulnerabilities (known or unknown) or undocumented features in such updates, nor do they perform other types of analysis of the updates other than those specified in the paragraph above.
The software update installation tasks have a number of limitations. These limitations depend on the license under which you are using Kaspersky Security Center Cloud Console and on the mode in which Kaspersky Security Center Cloud Console is working.
A user interaction may be required when you update a third-party application or fix a vulnerability in a third-party application on a managed device. For example, the user may be prompted to close the third-party application if it is currently open.
To fix some software vulnerabilities, you must accept the End User License Agreement (EULA) for installing the software if EULA acceptance is requested. If you decline EULA, the software vulnerability cannot be fixed.
The information about each fixed vulnerability is stored on the Administration Server for 90 days. After this time, it is automatically deleted.
Fixing software vulnerabilities
After you obtain the software vulnerabilities list, you can fix software vulnerabilities on managed devices that are running Windows. You can fix software vulnerabilities in the operating system and in third-party software, including Microsoft software, by creating and running the Fix vulnerabilities task or the Install required updates and fix vulnerabilities task.
The software update installation tasks have a number of limitations. These limitations depend on the license under which you are using Kaspersky Security Center Cloud Console and on the mode in which Kaspersky Security Center Cloud Console is working.
A user interaction may be required when you update a third-party application or fix a vulnerability in a third-party application on a managed device. For example, the user may be prompted to close the third-party application if it is currently open.
As an option, you can create a task to fix software vulnerabilities in the following ways:
- By opening the vulnerability list and specifying which vulnerabilities to fix.
As a result, a new task to fix software vulnerabilities is created. As an option, you can add the selected vulnerabilities to an existing task.
- By running the Vulnerability fix wizard.
The availability of this feature depends on the Kaspersky Security Center Cloud Console mode and your current license.
The wizard simplifies creation and configuration of a vulnerability fix task and enables you to eliminate the creation of redundant tasks that contain the same updates to install.
Fixing software vulnerabilities by using the vulnerability list
To fix software vulnerabilities:
- Open one of the lists of vulnerabilities:
- To open the general vulnerability list, in the main menu, go to Operations → Patch management → Software vulnerabilities.
- To open the vulnerability list for a managed device, in the main menu, go to Assets (Devices) → Managed devices → <device name> → Advanced → Software vulnerabilities.
- To open the vulnerability list for a specific application, in the main menu, go to Operations → Third-party applications → Applications registry → <application name> → Vulnerabilities.
A page with a list of vulnerabilities in the third-party software is displayed.
- Select one or more vulnerabilities in the list, and then click the Fix vulnerability button.
If a recommended software update to fix one of the selected vulnerabilities is absent, an informative message is displayed.
To fix some software vulnerabilities, you must accept the End User License Agreement (EULA) for installing the software if EULA acceptance is requested. If you decline the EULA, the software vulnerability is not fixed.
- Select one of the following options:
- New task
The New task wizard starts. Depending on the Kaspersky Security Center Cloud Console mode and your current license, the Install required updates and fix vulnerabilities task or the Fix vulnerabilities task is preselected. Follow the steps of the wizard to complete the task creation.
- Fix vulnerability (add rule to specified task)
Select a task to which you want to add the selected vulnerabilities. Depending on the Kaspersky Security Center Cloud Console mode and your current license, select an Install required updates and fix vulnerabilities task or a Fix vulnerabilities task. If you select an Install required updates and fix vulnerabilities task, a new rule to fix the selected vulnerabilities will be automatically added to the selected task. If you select a Fix vulnerabilities task, the selected vulnerabilities will be added to the task properties.
The task properties window opens. Click the Save button to save the changes.
- New task
If you have chosen to create a task, the task is created and displayed in the task list at Assets (Devices) → Tasks. If you have chosen to add the vulnerabilities to an existing task, the vulnerabilities are saved in the task properties.
To fix the third-party software vulnerabilities, start the Install required updates and fix vulnerabilities task or the Fix vulnerabilities task. If you have created the Fix vulnerabilities task, you must manually specify the software updates to fix the software vulnerabilities listed in the task settings.
Fixing software vulnerabilities by using the Vulnerability fix wizard
The availability of the Vulnerability fix wizard depends on the license that you use and the mode in which Kaspersky Security Center Cloud Console is working.
To fix software vulnerabilities by using the Vulnerability fix wizard:
- In the main menu, go to Operations → Patch management → Software vulnerabilities.
A page with a list of vulnerabilities in the third-party software installed on managed devices is displayed.
- Select the check box next to the vulnerability that you want to fix.
- Click the Run Vulnerability fix wizard button.
The Vulnerability fix wizard starts. The Select the vulnerability fix task page displays the list of all existing tasks of the following types:
- Install required updates and fix vulnerabilities
- Install Windows Update updates
- Fix vulnerabilities
You cannot modify the last two types of tasks to install new updates. To install new updates, you can only use the Install required updates and fix vulnerabilities task.
- If you want the wizard to display only those tasks that fix the vulnerability that you selected, then enable the Show only tasks that fix this vulnerability option.
- Choose what you want to do:
- To start a task, select the check box next to the task name, and then click the Start button.
- To add a new rule to an existing task:
- Select the check box next to the task name, and then click the Add rule button.
- On the page that opens, configure the new rule:
- Rule for fixing vulnerabilities of this severity level
- Rule for fixing vulnerabilities by means of updates of the same type as the update defined as recommended for the selected vulnerability (available only for Microsoft software vulnerabilities)
- Rule for fixing vulnerabilities in applications from the selected vendor (available only for third-party software vulnerabilities)
- Rule for fixing a vulnerability in all versions of the selected application (available only for third-party software vulnerabilities)
- Rule for fixing the selected vulnerability
- Approve updates that fix this vulnerability
- Click the Add button.
- To create a task:
- Click the New task button.
- On the page that opens, configure the new rule:
- Rule for fixing vulnerabilities of this severity level
- Rule for fixing vulnerabilities by using updates of the type (available only for Microsoft software vulnerabilities)
- Rule for fixing vulnerabilities in applications from the selected vendor (available only for third-party software vulnerabilities)
- Rule for fixing a vulnerability in all versions of the selected application (available only for third-party software vulnerabilities)
- Rule for fixing the selected vulnerability
- Approve updates that fix this vulnerability
- Click the Add button.
If you have chosen to start a task, you can close the wizard. The task will complete in background mode. No further actions are required.
If you have chosen to add a rule to an existing task, the task properties window opens. The new rule is already added to the task properties. You can view or modify the rule or other task settings. Click the Save button to save the changes.
If you have chosen to create a task, you continue to create the task in the New task wizard. The new rule that you added in the Vulnerability fix wizard is displayed in the New task wizard. When you complete the New task wizard, the Install required updates and fix vulnerabilities task is added to the task list.
Creating the Fix vulnerabilities task
The Fix vulnerabilities task enables you fix vulnerabilities in Microsoft software on managed devices that are running Windows.
The availability of this feature depends on the Kaspersky Security Center Cloud Console mode and your current license. We recommend that you use the Install required updates and fix vulnerabilities task instead of the Fix vulnerabilities task. The Install required updates and fix vulnerabilities task enables you to install multiple updates and fix multiple vulnerabilities automatically, according to the rules that you define.
The software update installation tasks have a number of limitations. These limitations depend on the license under which you are using Kaspersky Security Center Cloud Console and on the mode in which Kaspersky Security Center Cloud Console is working.
A user interaction may be required when you update a third-party application or fix a vulnerability in a third-party application on a managed device. For example, the user may be prompted to close the third-party application if it is currently open.
To create the Fix vulnerabilities task:
- In the main menu, go to Assets (Devices) → Tasks.
- Click Add.
The New task wizard starts. Proceed through the wizard by using the Next button.
- For the Kaspersky Security Center Cloud Console application, select the Fix vulnerabilities task type.
- Specify the name for the task that you are creating.
A task name cannot be more than 100 characters long and cannot include any special characters ("*<>?\:|).
- Select devices to which the task will be assigned.
- Click the Add button.
The list of vulnerabilities opens.
- Select the vulnerabilities that you want to fix, and then click OK.
- Specify the operating system restart settings:
- Specify the account settings:
- If on the Finish task creation page you enable the Open task details when creation is complete option, you can modify the default task settings. If you do not enable this option, the task is created with the default settings. You can modify the default settings later, at any time.
- Click the Finish button.
The task is created and displayed in the list of tasks.
- Click the name of the created task to open the task properties window.
- In the task properties window, specify the general task settings according to your needs.
- Click the Save button.
The task is created and configured.
Creating the Install required updates and fix vulnerabilities task
The availability of the Install required updates and fix vulnerabilities task depends on the Kaspersky Security Center Cloud Console mode and your current license.
The Install required updates and fix vulnerabilities task is used to update and fix vulnerabilities in third-party software, including Microsoft software, installed on the managed devices. This task enables you to install multiple updates and fix multiple vulnerabilities according to certain rules.
To install updates or fix vulnerabilities by using the Install required updates and fix vulnerabilities task, you can do one of the following:
- Run the Update installation wizard or the Vulnerability fix wizard.
- Create an Install required updates and fix vulnerabilities task.
- Add a rule for update installation to an existing Install required updates and fix vulnerabilities task.
The software update installation tasks have a number of limitations. These limitations depend on the license under which you are using Kaspersky Security Center Cloud Console and on the mode in which Kaspersky Security Center Cloud Console is working.
To create the Install required updates and fix vulnerabilities task:
- In the main menu, go to Assets (Devices) → Tasks.
- Click Add.
The New task wizard starts. Follow the steps of the wizard.
- For the Kaspersky Security Center Cloud Console application, select the Install required updates and fix vulnerabilities task type.
- Specify the name for the task that you are creating. A task name cannot be more than 100 characters long and cannot include any special characters ("*<>?\:|).
- Select devices to which the task will be assigned.
- Specify the rules for update installation, and then specify the following settings:
- Start installation at device restart or shutdown
- Install the required general system components
- Allow installation of new application versions during updates
- Download updates to the device without installing them
- Download updates to
- Enable advanced diagnostics
- Maximum size, in MB, of advanced diagnostics files
- Specify operating system restart settings:
- If on the Finish task creation page you enable the Open task details when creation is complete option, you can modify the default task settings. If you do not enable this option, the task is created with the default settings. You can modify the default settings later, at any time.
- Click the Finish button.
The task is created and displayed in the list of tasks.
- Click the name of the created task to open the task properties window.
- In the task properties window, specify the general task settings according to your needs.
- Click the Save button.
The task is created and configured.
If the task results contain a warning of the 0x80240033 "Windows Update Agent error 80240033 ("License terms could not be downloaded.")" error, you can resolve this issue through the Windows Registry.
Adding rules for update installation
The availability of this feature depends on the Kaspersky Security Center Cloud Console mode and your current license.
When installing software updates or fixing software vulnerabilities by using the Install required updates and fix vulnerabilities task, you must specify rules for the update installation. These rules determine the updates to install and the vulnerabilities to fix.
The exact settings depend on whether you add a rule for all updates, for Windows Update updates, or for updates of third-party applications (applications made by software vendors other than Kaspersky and Microsoft). When adding a rule for Windows Update updates or updates of third-party applications, you can select specific applications and application versions for which you want to install updates. When adding a rule for all updates, you can select specific updates that you want to install and vulnerabilities that you want to fix by means of installing updates.
You can add a rule for update installation in the following ways:
- By adding a rule while creating a new Install required updates and fix vulnerabilities task.
- By adding a rule on the Application Settings tab in the properties window of an existing Install required updates and fix vulnerabilities task.
- Through the Update installation wizard or the Vulnerability fix wizard.
To add a new rule for all updates:
- Click the Add button.
The Rule creation wizard starts. Proceed through the wizard by using the Next button.
- On the Rule type page, select Rule for all updates.
- On the General criteria page, use the drop-down lists to specify the following settings:
- On the Updates page, select the updates to be installed:
- On the Vulnerabilities page, select vulnerabilities that will be fixed by installing the selected updates:
- On the Name page, specify the name for the rule that you are adding. You can later change this name in the Settings section of the properties window of the created task.
After the Rule creation wizard completes its operation, the new rule is added and displayed in the rule list in the New task wizard or in the task properties.
To add a new rule for Windows Update updates:
- Click the Add button.
The Rule creation wizard starts. Proceed through the wizard by using the Next button.
- On the Rule type page, select Rule for Windows Update.
- On the General criteria page, specify the following settings:
- On the Applications page, select the applications and application versions for which you want to install updates. By default, all applications are selected.
- On the Categories of updates page, select the categories of updates to be installed. These categories are the same as in Microsoft Update Catalog. By default, all categories are selected.
- On the Name page, specify the name for the rule that you are adding. You can later change this name in the Settings section of the properties window of the created task.
After the Rule creation wizard completes its operation, the new rule is added and displayed in the rule list in the New task wizard or in the task properties.
To add a new rule for updates of third-party applications:
- Click the Add button.
The Rule creation wizard starts. Proceed through the wizard by using the Next button.
- On the Rule type page, select Rule for third-party updates.
- On the General criteria page, specify the following settings:
- On the Applications page, select the applications and application versions for which you want to install updates. By default, all applications are selected.
- On the Name page, specify the name for the rule that you are adding. You can later change this name in the Settings section of the properties window of the created task.
After the Rule creation wizard completes its operation, the new rule is added and displayed in the rule list in the New task wizard or in the task properties.
Viewing information about software vulnerabilities detected on all managed devices
After you have scanned software on managed devices for vulnerabilities, you can view the list of software vulnerabilities detected on all managed devices. If you run the task for the hierarchy of Administration Servers, you can view the list of managed devices with detected vulnerabilities only for the selected Administration Server.
To view the list of software vulnerabilities detected on all managed devices,
In the main menu, go to Operations → Patch management → Software vulnerabilities.
The page displays the list of software vulnerabilities detected on client devices.
You can also generate and view a Report on vulnerabilities.
You can specify a filter to view the list of software vulnerabilities. Click the Filter icon (![]() ) in the upper right corner of the software vulnerabilities list to manage the filter. You can also select one of preset filters from the Preset filters drop-down list above the software vulnerabilities list.
) in the upper right corner of the software vulnerabilities list to manage the filter. You can also select one of preset filters from the Preset filters drop-down list above the software vulnerabilities list.
You can obtain detailed information about any vulnerability from the list.
To obtain information about a software vulnerability:
In the list of software vulnerabilities, click the link with the name of the vulnerability.
The properties window of the software vulnerability opens.
Viewing information about software vulnerabilities detected on the selected managed device
You can view information about software vulnerabilities detected on the selected managed device running Windows.
To view the list of software vulnerabilities detected on the selected managed device:
- In the main menu, go to Assets (Devices) → Managed devices.
The list of managed devices is displayed.
- In the list of managed devices, click the link with the name of the device for which you want to view detected software vulnerabilities.
The properties window of the selected device is displayed.
- In the properties window of the selected device, select the Advanced tab.
- In the left pane, select the Software vulnerabilities section.
The list of software vulnerabilities detected on the selected managed device is displayed.
To view the properties of the selected software vulnerability,
Click the link with the name of the software vulnerability in the list of software vulnerabilities.
The properties window of the selected software vulnerability is displayed.
Viewing statistics of vulnerabilities on managed devices
You can view statistics for each software vulnerability on managed devices. Statistics are represented as a diagram. The diagram displays the number of devices with the following statuses:
- Ignored on: <number of devices>. This status is assigned if, in the vulnerability properties, you have manually set the option to ignore the vulnerability.
- Fixed on: <number of devices>. This status is assigned if the task to fix the vulnerability has successfully completed.
- Fix scheduled on: <number of devices>. This status is assigned if you have created the task to fix the vulnerability, but the task is not performed yet.
- Patch applied on: <number of devices>. This status is assigned if you have manually selected a software update to fix the vulnerability, but this software update has not fixed the vulnerability.
- Fix required on: <number of devices>. This status is assigned if the vulnerability was fixed only on some managed devices, and the vulnerability is required to be fixed on more managed devices.
To view the statistics of a vulnerability on managed devices:
- In the main menu, go to Operations → Patch management → Software vulnerabilities.
The page displays a list of vulnerabilities in applications detected on managed devices.
- Select the check box next to the required vulnerability.
- Click the Statistics of vulnerability on devices button.
A diagram of the vulnerability statuses is displayed. Clicking a status opens a list of devices on which the vulnerability has the selected status.
Exporting the list of software vulnerabilities to a file
You can export the displayed list of vulnerabilities to the CSV or TXT files. You can use these files, for example, to send them to your information security manager or to store them for purposes of statistics.
To export the list of software vulnerabilities detected on all managed devices to a text file:
- In the main menu, go to Operations → Patch management → Software vulnerabilities.
The page displays a list of vulnerabilities in applications detected on managed devices.
- Click the Export to TXT or Export to CSV button, depending on the format you prefer for export.
The file containing the list of software vulnerabilities is downloaded to the device that you use at the moment.
To export the list of software vulnerabilities detected on selected managed device to a text file:
- Open the list of software vulnerabilities detected on selected managed device.
- Select the software vulnerabilities you want to export.
Skip this step if you want to export a complete list of software vulnerabilities detected on the managed device.
If you want to export complete list of software vulnerabilities detected on the managed device, only vulnerabilities displaying on the current page will be exported.
- Click the Export to TXT or Export to CSV button, depending on the format you prefer for export.
The file containing the list of software vulnerabilities detected on the selected managed device is downloaded to the device you are using at the moment.
Ignoring software vulnerabilities
You can ignore software vulnerabilities to be fixed. The reasons to ignore software vulnerabilities might be, for example, the following:
- You do not consider the software vulnerability to be critical to your organization.
- You understand that the software vulnerability fix can damage data related to the software that required the vulnerability fix.
- You are sure that the software vulnerability is not dangerous for your organization's network because you use other measures to protect your managed devices.
You can ignore a software vulnerability on all managed devices or only on selected managed devices.
To ignore a software vulnerability on all managed devices:
- In the main menu, go to Operations → Patch management → Software vulnerabilities.
The page displays the list of software vulnerabilities detected on managed devices.
- In the list of software vulnerabilities, click the link with the name of the software vulnerability you want to ignore.
The software vulnerability properties window opens.
- On the General tab, enable the Ignore vulnerability option.
- Click the Save button.
The software vulnerability properties window closes.
The software vulnerability is ignored on all managed devices.
To ignore a software vulnerability on the selected managed device:
- In the main menu, go to Assets (Devices) → Managed devices.
The list of managed devices is displayed.
- In the list of managed devices, click the link with the name of the device on which you want to ignore a software vulnerability.
The device properties window is opened.
- In the device properties window, select the Advanced tab.
- In the left pane, select the Software vulnerabilities section.
The list of software vulnerabilities detected on the device is displayed.
- In the list of software vulnerabilities, select the vulnerability you want to ignore on the selected device.
The software vulnerability properties window opens.
- In the software vulnerability properties window, on the General tab, enable the Ignore vulnerability option.
- Click the Save button.
The software vulnerability properties window closes.
- Close the device properties window.
The software vulnerability is ignored on the selected device.
The ignored software vulnerability will not be fixed after the completion of the Fix vulnerabilities task or Install required updates and fix vulnerabilities task. You can exclude ignored software vulnerabilities from the list of vulnerabilities by using a filter.
Scenario: Finding and fixing software vulnerabilities
This section provides a scenario for finding and fixing vulnerabilities on the managed devices running Windows. You can find and fix software vulnerabilities in the operating system and in third-party software, including Microsoft software.
Prerequisites
- Kaspersky Security Center Cloud Console is deployed in your organization.
- There are managed devices running Windows in your organization.
Stages
Finding and fixing software vulnerabilities proceeds in stages:
- Scanning for vulnerabilities in the software installed on the client devices
To find vulnerabilities in the software installed on the managed devices, run the Find vulnerabilities and required updates task. When this task is complete, Kaspersky Security Center Cloud Console receives the lists of detected vulnerabilities and required updates for the third-party software installed on the devices that you specified in the task properties.
The Find vulnerabilities and required updates task is created automatically by Kaspersky Security Center Cloud Console quick start wizard. If you did not run the wizard, start it now or create the task manually.
How-to instructions: Creating the Find vulnerabilities and required updates task
- Analyzing the list of detected software vulnerabilities
View the Software vulnerabilities list and decide which vulnerabilities are to be fixed. To view detailed information about each vulnerability, click the vulnerability name in the list. For each vulnerability in the list, you can also view the statistics on the vulnerability on managed devices.
How-to instructions:
- Configuring vulnerabilities fix
When the software vulnerabilities are detected, you can fix the software vulnerabilities on the managed devices by using the Install required updates and fix vulnerabilities task or the Fix vulnerabilities task.
The Install required updates and fix vulnerabilities task is used to update and fix vulnerabilities in third-party software, including Microsoft software, installed on the managed devices. This task enables you to install multiple updates and fix multiple vulnerabilities according to certain rules. Availability of this task depends on the Kaspersky Security Center Cloud Console mode and your current license. To fix software vulnerabilities, the Install required updates and fix vulnerabilities task uses recommended software updates.
The Fix vulnerabilities task uses recommended fixes for Microsoft software.
You can start Vulnerability fix wizard that creates one of these tasks automatically, or you can create one of these tasks manually.
How-to instructions: Fixing vulnerabilities in third-party software, Creating the Install required updates and fix vulnerabilities
- Scheduling the tasks
To be sure that the vulnerabilities list is always up-to-date, schedule the Find vulnerabilities and required updates task to run it automatically from time to time. The recommended average frequency is once a week.
If you have created the Install required updates and fix vulnerabilities task, you can schedule it to run with the same frequency as the Find vulnerabilities and required updates task or less often. When scheduling the Fix vulnerabilities task, note that you have to select fixes for Microsoft software every time before starting the task.
When scheduling the tasks, make sure that a task to fix vulnerability starts after the Find vulnerabilities and required updates task is complete.
- Ignoring software vulnerabilities (optional)
If you want, you can ignore software vulnerabilities to be fixed on all managed devices or only on the selected managed devices.
How-to instructions: Ignoring software vulnerabilities
- Running a vulnerability fix task
Start the Install required updates and fix vulnerabilities task or the Fix vulnerabilities task. After the task is complete, make sure that it has the Completed successfully status in the task list.
- Create the report on results of fixing software vulnerabilities (optional)
To view detailed statistics on the vulnerabilities fix, generate the Report on vulnerabilities. The report displays information about software vulnerabilities that are not fixed. Thus you can have an idea about finding and fixing vulnerabilities in third-party software, including Microsoft software, in your organization.
How-to instructions: Generating and viewing a report
- Checking configuration of finding and fixing vulnerabilities in third-party software
Make sure of the following:
- The list of software vulnerabilities on managed devices is not empty.
- A task to fix vulnerabilities is in the task list.
- The tasks to find and to fix software vulnerabilities are scheduled so that they start sequentially. View the properties of these tasks and compare their schedule.
- The task to fix software vulnerabilities was successfully completed. View information on the Results tab of the task properties window.
Results
If you have created and configured the Install required updates and fix vulnerabilities task, the vulnerabilities are fixed on the managed devices automatically. When the task is run, it correlates the list of available software updates to the rules specified in the task settings. All software updates that meet the criteria in the rules will be downloaded to the repositories of distribution points and will be installed to fix software vulnerabilities, except for Windows Updates. To install Windows Updates, you have to ensure the access to Microsoft Updates public servers on your managed devices.
If you have created the Fix vulnerabilities task, only software vulnerabilities in Microsoft software are fixed.
Page top
Setting the maximum storage period for the information about fixed vulnerabilities
To set the maximum storage period in the database for the information about the vulnerabilities that have already been fixed on managed devices:
- In the main menu, click the settings icon () next to the name of the required Administration Server.
The Administration Server properties window opens.
- On the page that opens, proceed to the Events repository tab.
- Specify the maximum storage period for the information about the fixed vulnerabilities in the database.
By default, the storage period is 7 days in the trial mode and 60 days in the commercial mode. The maximum limit is 14 days in the trial mode and 365 days in the commercial mode.
- Click Save.
The maximum storage period for the information about the fixed vulnerabilities is limited to the specified number of days.
Page top
Managing applications run on client devices
This section describes the features of Kaspersky Security Center Cloud Console related to the management of applications run on client devices.
Using Application Control to manage executable files
You can use the Application Control component to allow or block startup of executable files on user devices. The Application Control component supports Windows-based and Linux-based operating systems.
For Linux-based operating systems, Application Control component is available starting from Kaspersky Endpoint Security 11.2 for Linux.
Prerequisites
- Kaspersky Security Center Cloud Console is deployed in your organization.
- The policy of Kaspersky Endpoint Security for Windows or Kaspersky Endpoint Security for Linux is created and is active.
Stages
Application Control usage scenario proceeds in stages:
- Forming and viewing the list of executable files on client devices
This stage helps you find out what executable files are found on managed devices. View the list of executable files and compare it with the lists of allowed and prohibited executable files. The restrictions on executable files usage can be related to the information security polices in your organization.
How-to instructions: Obtaining and viewing a list of executable files installed on client devices
- Creating categories for the executable files used in your organization
Analyze the lists of executable files stored on managed devices. Based on the analysis, create categories for executable files. It is recommended to create a "Work applications" category that covers the standard set of executable files that are used at your organization. If different security groups use their own sets of executable files in their work, a separate category can be created for each security group.
How-to instructions: Creating application category with content added manually, Creating application category that includes executable files from selected devices
- Configuring Application Control in the Kaspersky Endpoint Security for Windows policy
Configure the Application Control component in Kaspersky Endpoint Security for Windows policy using the categories you have created on the previous stage.
How-to instructions: Configuring Application Control in the Kaspersky Endpoint Security for Windows policy
- Turning on Application Control component in test mode
To ensure that Application Control rules do not block executable files required for user's work, it is recommended to enable testing of Application Control rules and analyze their operation after creating new rules. When testing is enabled, Kaspersky Endpoint Security for Windows will not block executable files whose startup is forbidden by Application Control rules, but will instead send notifications about their startup to the Administration Server.
When testing Application Control rules, it is recommended to perform the following actions:
- Determine the testing period. Testing period can vary from several days to two months.
- Examine the events resulting from testing the operation of Application Control.
How-to instructions: Configuring Application Control component in the Kaspersky Endpoint Security for Windows policy. Follow this instruction and enable the test mode in configuration process.
- Changing the categories settings of Application Control component
If necessary, make changes to the Application Control settings. Based on the test results, you can add executable files related to events of the Application Control component to an application category with content added manually.
How-to instructions: Adding event-related executable files to the application category
- Applying the rules of Application Control in operation mode
After Application Control rules are tested and configuration of categories is complete, you can apply the rules of Application Control in operation mode.
How-to instructions: Configuring Application Control component in the Kaspersky Endpoint Security for Windows policy. Follow this instruction and disable the test mode in configuration process.
- Verifying Application Control configuration
Make sure of the following:
- The list of categories for executable files is not empty. View the list of categories and make sure it contains the categories you have configured.
- Application Control is configured using created categories for executable files. View the settings of the Kaspersky Endpoint Security for Windows policy and make sure you have configured Application Control in the Application settings → Security Controls → Application Control.
- The rules of Application Control are applied in operation mode. Check the mode in the Kaspersky Endpoint Security for Windows policy and make sure you have disabled the Test mode in the Application settings → Security Controls → Application Control.
Results
When the scenario is complete, startup of executable files on managed devices is controlled. The users can run only those executable files that are allowed in your organization and cannot run executable files that are prohibited in your organization.
For detailed information about Application Control, refer to the following Help topics:
- Kaspersky Endpoint Security for Windows Online Help
- Kaspersky Endpoint Security for Linux Online Help
Application Control modes and categories
The Application Control component monitors users' attempts to start executable files. You can use Application Control rules to control the startup of executable files.
Application Control component is available for Kaspersky Endpoint Security for Windows and for Kaspersky Endpoint Security for Linux (version 11.2 and later). All the instructions in this section describe configuration of Application Control for Kaspersky Endpoint Security.
Startup of executable files whose settings do not match any of the Application Control rules is regulated by the selected operating mode of the component:
- Denylist. The mode is used if you want to allow the startup of all executable files except those specified in block rules. Denylist mode is selected by default.
- Allowlist. The mode is used if you want to block the startup of all executable files except those specified in allow rules.
The Application Control rules are implemented through categories for executable files. In Kaspersky Security Center Cloud Console there are two types of categories:
- Category with content added manually. You define conditions, for example, file metadata, file hashcode, file certificate, KL category, file path, to include executable files in the category.
- Category that includes executable files from selected devices. You specify a device whose executable files are automatically included in the category.
For detailed information about Application Control, refer to the following Help topics:
- Kaspersky Endpoint Security for Windows Online Help
- Kaspersky Endpoint Security for Linux Online Help
Obtaining and viewing a list of applications installed on client devices
Kaspersky Security Center Cloud Console inventories all software installed on managed client devices running Linux and Windows.
Network Agent compiles a list of applications installed on a device, and then transmits this list to Administration Server. It takes about 10-15 minutes for the Network Agent to update the application list.
For Windows-based client devices, Network Agent receives most of the information about installed applications from the Windows registry. For Linux-based client devices, package managers provide information about installed applications to Network Agent.
To view the list of applications installed on managed devices:
- In the main menu, go to Operations → Third-party applications → Applications registry.
The page displays a table with the applications that are installed on managed devices. Select the application to view its properties, for example, vendor name, version number, list of executable files, list of devices on which the application is installed, list of available software updates, and list of detected software vulnerabilities.
- You can group and filter the data of the table with installed applications as follows:
- Click the settings icon (
 ) in the upper-right corner of the table.
In the invoked Columns settings menu, select the columns to be displayed in the table. To view the operating system type of the client devices on which the application is installed, select the Operating system type column.
- Click the filter icon () in the upper-right corner of the table, and then specify and apply the filter criterion in the invoked menu.
The filtered table of installed applications is displayed.
- Click the settings icon (
To view the list of applications installed on a specific managed device,
In the main menu, go to Devices → Managed devices → <device name> → Advanced → Applications registry. In this menu, you can export the list of applications to a CSV file or TXT file.
For detailed information about Application Control, refer to the following Help topics:
- Kaspersky Endpoint Security for Windows Online Help
- Kaspersky Endpoint Security for Linux Online Help
Obtaining and viewing a list of executable files installed on client devices
You can obtain the list of executable files stored on client devices in one of the following ways:
- Enabling notifications about applications startup in Kaspersky Endpoint Security policy.
- Creating an inventory task.
Enabling notifications about applications startup in Kaspersky Endpoint Security policy
To enable notifications about applications startup:
- Open the Kaspersky Endpoint Security policy settings, and then go to General settings → Reports and Storage.
- In the Data transfer to Administration Server settings group, select the About started applications check box, and save the changes.
When a user attempts to start executable files, information about these files is added to the list of executable files on a client device. Kaspersky Endpoint Security sends this information to Network Agent, and then Network Agent sends it to Administration Server.
Creating an inventory task
The feature of inventorying executable files is available for the following applications:
- Kaspersky Endpoint Security for Windows
- Kaspersky Endpoint Security for Linux (version 11.2 and later)
You can reduce load on the database while obtaining information about the installed applications. To do this, we recommend that you run an inventory task on reference devices on which a standard set of software is installed. The preferable number of devices is 1-3.
We strongly do not recommend running the inventory task when using the following databases: MySQL, PostgreSQL, SQL Server Express Edition, MariaDB (all editions).
To create an inventory task for executable files on client devices:
- In the main menu, go to Assets (Devices) → Tasks.
The list of tasks is displayed.
- Click the Add button.
The New task wizard starts. Follow the steps of the wizard.
- On the New task settings page, in the Application drop-down list, select Kaspersky Endpoint Security for Windows or Kaspersky Endpoint Security for Linux, depending on the operating system type of the client devices.
- In the Task type drop-down list, select Inventory.
- On the Finish task creation page, click the Finish button.
After the New task wizard is complete, the Inventory task is created and configured. If you want, you can change the settings for the created task. The newly created task is displayed in the list of tasks.
For a detailed description of the inventory task, refer to the following Helps:
After the Inventory task is performed, the list of executable files installed on managed devices is formed and you can view the list.
During inventory, the following formats of executable files can be detected (depending on the option that you select in the inventory task properties): MZ, COM, PE, NE, SYS, CMD, BAT, PS1, JS, VBS, REG, MSI, CPL, DLL, JAR, and HTML.
Viewing the list of executable files stored on managed devices
To view the list of executable files stored on client devices,
In the main menu, go to Operations → Third-party applications → Executable files.
The page displays the list of executable files installed on client devices.
If necessary, you can send the executable file of the managed device to the device where your Kaspersky Security Center Cloud Console is open.
To send an executable file:
- In the main menu, go to Operations → Third-party applications → Executable files.
- Click the link of the executable file that you want to send.
- In the window that opens, go to the Devices section, and then select the check box of the managed device from which you want to send the executable file.
Before you send the executable file, make sure that the managed device has a direct connection to the Administration Server, by selecting the Do not disconnect from the Administration Server check box. The maximum total number of devices with the Do not disconnect from the Administration Server option selected is 300.
- Click the Send button.
The selected executable file is downloaded for further sending to the device where your Kaspersky Security Center Cloud Console is open.
Creating application category with content added manually
You can specify a set of criteria as a template of executable files for which you want to allow or block a start in your organization. On the basis of executable files corresponding to the criteria, you can create an application category and use it in the Application Control component configuration.
To create an application category with content added manually:
- In the main menu, go to Operations → Third-party applications → Application categories.
The page with a list of application categories is displayed.
- Click the Add button.
The New category wizard starts. Proceed through the wizard by using the Next button.
- On the Select category creation method step, select the Category with content added manually. Data of executable files is manually added to the category option.
- On the Conditions step, click the Add button to add a condition criterion to include files in the creating category.
- On the Condition criteria step, select a rule type for the creation of category from the list:
- From KL category
- Select certificate from repository
- Specify path to application (masks supported)
- Removable drive
- Hash, metadata, or certificate:
The selected criterion is added to the list of conditions.
You can add as many criteria for the creating application category as you need.
- On the Exclusions step, click the Add button to add an exclusive condition criterion to exclude files from the category that is being created.
- On the Condition criteria step, select a rule type from the list, in the same way that you selected a rule type for category creation.
When the wizard finishes, the application category is created. It is displayed in the list of application categories. You can use the created application category when you configure Application Control.
For detailed information about Application Control, refer to the following Help topics:
- Kaspersky Endpoint Security for Windows Online Help
- Kaspersky Endpoint Security for Linux Online Help
Creating application category that includes executable files from selected devices
You can use executable files from selected devices as a template of executable files that you want to allow or block. Based on executable files from selected devices, you can create a category and use it in the Application Control component configuration.
To create a category that includes executable files from selected devices:
- In the main menu, go to Operations → Third-party applications → Application categories.
The page with a list of categories for executable files is displayed.
- Click the Add button.
The New category wizard starts. Proceed through the wizard by using the Next button.
- On the Select category creation method step, specify the category name and select the Category that includes executable files from selected devices. These executable files are processed automatically and their metrics are added to the category option.
- Click Add.
- In the window that opens, select a device or devices whose executable files will be used to create the category.
- Specify the following settings:
When the wizard finishes, the category for executable files is created. It is displayed in the list of categories. You can use the created category when you configure Application Control.
Viewing the list of application categories
You can view the list of configured application categories and the settings of each application category.
To view the list of application categories,
In the main menu, go to Operations → Third-party applications → Application categories.
The page with a list of application categories is displayed.
To view properties of an application category,
Click the name of the application category.
The properties window of the application category is displayed. The properties are grouped on several tabs.
Configuring Application Control in the Kaspersky Endpoint Security for Windows policy
After you create Application Control categories, you can use them for configuring Application Control in Kaspersky Endpoint Security for Windows policies.
To configure Application Control in the Kaspersky Endpoint Security for Windows policy:
- In the main menu, go to Assets (Devices) → Policies & profiles.
A page with a list of policies is displayed.
- Click Kaspersky Endpoint Security for Windows policy.
The policy settings window opens.
- Go to Application settings → Security Controls → Application Control.
The Application Control window with Application Control settings is displayed.
- The Application Control option is enabled by default. Switch the toggle button Application Control DISABLED to disable the option.
- In the Application Control Settings block settings, enable the operation mode to apply the Application Control rules and allow Kaspersky Endpoint Security for Windows to block startup of applications.
If you want to test the Application Control rules, in the Application Control Settings section, enable test mode. In test mode, Kaspersky Endpoint Security for Windows does not block startup of applications, but logs information about triggered rules in the report. Click the View report link to view this information.
- Enable the Control DLL modules load option if you want Kaspersky Endpoint Security for Windows to monitor the loading of DLL modules when applications are started by users.
Information about the module and the application that loaded the module will be saved to a report.
Kaspersky Endpoint Security for Windows monitors only the DLL modules and drivers loaded after the Control DLL modules load option is selected. Restart the computer after selecting the Control DLL modules load option if you want Kaspersky Endpoint Security for Windows to monitor all DLL modules and drivers, including those loaded before Kaspersky Endpoint Security for Windows is started.
- (Optional) In the Message templates block, change the template of the message that is displayed when an application is blocked from starting and the template of the email message that is sent to you.
- In the Application Control Mode block settings, select the Denylist or Allowlist mode.
By default, the Denylist mode is selected.
- Click the Rules Lists Settings link.
The Denylists and allowlists window opens to let you add an application category. By default, the Denylist tab is selected if the Denylist mode is selected, and the Allowlist tab is selected if the Allowlist mode is selected.
- In the Denylists and allowlists window, click the Add button.
The Application Control rule window opens.
- Click the Please choose a category link.
The Application Category window opens.
- Add the application category (or categories) that you created earlier.
You can edit the settings of a created category by clicking the Edit button.
You can create a new category by clicking the Add button.
You can delete a category from the list by clicking the Delete button.
- After the list of application categories is complete, click the OK button.
The Application Category window closes.
- In the Application Control rule window, in the Subjects and their rights section, create a list of users and groups of users to apply the Application Control rule.
- Click the OK button to save the settings and to close the Application Control rule window.
- Click the OK button to save the settings and to close the Denylists and allowlists window.
- Click the OK button to save the settings and to close the Application Control window.
- Close the window with the Kaspersky Endpoint Security for Windows policy settings.
Application Control is configured. After the policy is propagated to the client devices, the startup of executable files is managed.
For detailed information about Application Control, refer to the following Help topics:
- Kaspersky Endpoint Security for Windows Online Help
- Kaspersky Endpoint Security for Linux Online Help
Adding event-related executable files to the application category
After you configure Application Control in the Kaspersky Endpoint Security for Windows policies, the following events will be displayed in the list of events:
- Application startup prohibited (Critical event). This event is displayed if you have configured Application Control to apply rules.
- Application startup prohibited in test mode (Info event). This event is displayed if you have configured Application Control to test rules.
- Message to administrator about application startup prohibition (Warning event). This event is displayed if you have configured Application Control to apply rules and a user has requested access to the application that is blocked at startup.
It is recommended to create event selections to view events related to Application Control operation.
You can add executable files related to Application Control events to an existing application category or to a new application category. You can add executable files only to an application category with content added manually.
To add executable files related to Application Control events to an application category:
- In the main menu, go to Monitoring & reporting → Event selections.
The list of event selections is displayed.
- Select the event selection to view events related to Application Control and start this event selection.
If you have not created event selection related to Application Control, you can select and start a predefined selection, for example, Recent events.
The list of events is displayed.
- Select the events whose associated executable files you want to add to the application category, and then click the Assign to category button.
The New category wizard starts. Proceed through the wizard by using the Next button.
- On the wizard page, specify the relevant settings:
- In the Action on executable file related to the event section, select one of the following options:
- In the Rule type section, select one of the following options:
- Rules for adding to inclusions
- Rules for adding to exclusions
- In the Parameter used as a condition section, select one of the following options:
- Click OK.
When the wizard finishes, executable files related to the Application Control events are added to the existing application category or to a new application category. You can view settings of the application category that you have modified or created.
For detailed information about Application Control, refer to the following Help topics:
- Kaspersky Endpoint Security for Windows Online Help
- Kaspersky Endpoint Security for Linux Online Help
Creating an installation package of a third-party application from the Kaspersky database
Kaspersky Security Center Web Console allows you to perform remote installation of third-party applications by using installation packages. Such third-party applications are included in a dedicated Kaspersky database.
Creating installation packages of third-party applications from the Kaspersky database is only available under the Vulnerability and patch management license.
To create an installation package of a third-party application from the Kaspersky database:
- In the main menu, go to Discovery & deployment → Deployment & assignment → Installation packages.
- Click the Add button.
- On the New package wizard page that opens, select the Select an application from the Kaspersky database to create an installation package option, and then click Next.
- In the list of applications that opens, select the relevant application, and then click Next.
- Select the relevant localization language in the drop-down list, and then click Next.
This step is only displayed if the application offers multiple language options.
- If you are prompted to accept a License Agreement for the installation, on the End User License Agreement page that opens, click the link to read the License Agreement on the vendor's website, and then select the I confirm that I have fully read, understand, and accept the terms and conditions of this End User License Agreement check box.
- On the Name of the new installation package page that opens, in the Package name field, enter the name for the installation package, and then click Next.
Wait until the newly created installation package is uploaded to Administration Server. When the New package wizard displays the message informing you the package creation process was successful, click Finish.
The newly created installation package appears on the list of installation packages. You can select this package when creating or reconfiguring the Install application remotely task.
Viewing and modifying the settings of an installation package of a third-party application from the Kaspersky database
If you have previously created any installation packages of third-party applications listed in the Kaspersky database, you can subsequently view and modify the settings of these packages.
Modifying the settings of an installation package of a third-party application from the Kaspersky database is only available under the Vulnerability and patch management license.
To view and modify the settings of an installation package of a third-party application from the Kaspersky database:
- In the main menu, go to Discovery & deployment → Deployment & assignment → Installation packages.
- In the list of installation packages that opens, click the name of the relevant package.
- On the properties page that opens, modify the settings, if necessary.
- Click the Save button.
The settings that you modified are saved.
Settings of an installation package of a third-party application from the Kaspersky database
The settings of an installation package of a third-party application are grouped on the following tabs:
Only a part of the settings listed below are displayed by default so you can add the corresponding columns by clicking the Filter button and selecting relevant column names from the list.
- General tab:
- Entry field that contains the name of the installation package that can be edited manually
- Application
- Version
- Size
- Created
- Path
- Installation procedure tab:
- Install the required general system components
- Table that displays the update properties and containing the following columns:
- Name
- Description
- Source
- Type
- Category
- Importance level according to MSRC
- Importance level
- Patch importance level
- Article
- Bulletin
- Not assigned for installation (new version)
- To be installed
- Installing
- Installed
- Failed
- Restart is required
- Registered
- Installed in interactive mode
- Revoked
- Update approval status
- Revision
- Update ID
- Application version
- Superseded
- Superseding
- You must accept the terms of the License Agreement
- Description URL
- Application family
- Application
- Localization language
- Not assigned for installation (new version)
- Requires prerequisites installation
- Download mode
- Is a patch
- Not installed
- Settings tab that displays the installation package settings—with their names, descriptions, and values—used as command-line parameters during installation. If the package provides no such settings, the corresponding message is displayed. You can modify the values of these settings.
- Revision history tab that displays the installation package revisions and containing the following columns:
- Revision—The revision number of the installation packages.
- Time—Date and time the installation package settings were modified.
- User—Name of the user who modified the installation package settings.
- Action—Action performed on the installation package within the revision.
- Description—Description of the revision related to the change made to the installation package settings.
By default, the revision description is blank. To add a description to a revision, select the relevant revision, and then click the Edit description button. In the opened window, enter some text for the revision description.
Application tags
Kaspersky Security Center Cloud Console enables you to tag the applications from applications registry. A tag is the label of an application that can be used for grouping or finding applications. A tag assigned to applications can serve as a condition in device selections.
For example, you can create the [Browsers] tag and assign it to all browsers such as Microsoft Internet Explorer, Google Chrome, Mozilla Firefox.
Creating an application tag
To create an application tag:
- In the main menu, go to Operations → Third-party applications → Application tags.
- Click Add.
A new tag window opens.
- Enter the tag name.
- Click OK to save the changes.
The new tag appears in the list of application tags.
Renaming an application tag
To rename an application tag:
- In the main menu, go to Operations → Third-party applications → Application tags.
- Select the check box next to the tag that you want to rename, and then click Edit.
A tag properties window opens.
- Change the tag name.
- Click OK to save the changes.
The updated tag appears in the list of application tags.
Assigning tags to an application
To assign one or several tags to an application:
- In the main menu, go to Operations → Third-party applications → Applications registry.
- Click the name of the application to which you want to assign tags.
- Select the Tags tab.
The tab displays all application tags that exist on the Administration Server. For tags assigned to the selected application, the check box in the Tag assigned column is selected.
- For tags that you want to assign, select check boxes in the Tag assigned column.
- Click Save to save the changes.
The tags are assigned to the application.
Removing assigned tags from an application
To remove one or several tags from an application:
- In the main menu, go to Operations → Third-party applications → Applications registry.
- Click the name of the application from which you want to remove tags.
- Select the Tags tab.
The tab displays all application tags that exist on the Administration Server. For tags assigned to the selected application, the check box in the Tag assigned column is selected.
- For tags that you want to remove, clear check boxes in the Tag assigned column.
- Click Save to save the changes.
The tags are removed from the application.
The removed application tags are not deleted. If you want, you can delete them manually.
Deleting an application tag
To delete an application tag:
- In the main menu, go to Operations → Third-party applications → Application tags.
- In the list, select the application tag that you want to delete.
- Click the Delete button.
- In the window that opens, click OK.
The application tag is deleted. The deleted tag is automatically removed from all of the applications to which it was assigned.
Configuring Administration Server
This section describes the configuration process and properties of Kaspersky Security Center Administration Server.
Creating a hierarchy of Administration Servers: adding a secondary Administration Server
You can make an Administration Server running on-premises function as a secondary Administration Server, thus establishing a "primary/secondary" hierarchy on your network. For the Administration Server that is in the Kaspersky infrastructure, both primary and secondary Administration Servers on your network are secondary Servers. You can add a Windows-based Administration Server as well as a Linux-based Administration Server.
To add a secondary Administration Server that is available for connection:
- Make sure that the future secondary Administration Server has Kaspersky Security Center Web Console installed.
- On the future secondary Administration Server, download the Administration Server certificate and save it so you can add it to the primary Administration Server during one of the steps of the Add secondary Administration Server wizard.
- Perform the following actions via the Kaspersky Security Center Web Console on the future Secondary Administration Server (alternatively, you can prompt the administrator of the future Secondary Administration Server to perform these actions):
- In the main menu, click the settings icon () next to the name of the future secondary Administration Server.
- On the properties page that opens, proceed to the Hierarchy of Administration Servers section of the General tab.
- Select the This Administration Server is secondary in the hierarchy option.
- Select Cloud Console as the type of the primary Administration Server.
The fields for settings to establish connection between secondary and primary Administration Servers become available.
- In the HDS server address (from primary Administration Server on Cloud Console) and HDS server ports fields, enter the address and port of the Kaspersky Security Center Cloud Console primary Administration Server.
You can find HDS Server address and HDS Server port in the Kaspersky Security Center Cloud Console Administration Server, in the Hierarchy of Administration Servers section of the General tab of the properties window. You can copy and paste this data into the fields in the window of the secondary Administration Server.
- Click the Specify primary Administration Server certificate button, and then select the certificate.
You can download this certificate from Kaspersky Security Center Cloud Console Administration Server, in the Hierarchy of Administration Servers section of the General tab of the properties window, by clicking the View Administration Server certificate button.
- Click the Specify Hosted Discovery Service certificates button, and then select the certificate.
You can download this certificate from Kaspersky Security Center Cloud Console Administration Server, in Hierarchy of Administration Servers section of the General tab of the properties window, by clicking the HDS root CA certificate button.
- If you use a proxy server to connect to the Kaspersky Security Center Cloud Console Administration Server (that is, the primary Server in the hierarchy that you have built), specify this and enter the proxy server credentials.
- Select the Connect primary Administration Server to secondary Administration Server in DMZ option if the secondary Administration Server is in a demilitarized zone.
- Click Save to save the changes and exit the window.
- In the main menu, click the settings icon (
- In the main menu, click the settings icon () next to the name of the future primary Administration Server.
- On the properties page that opens, click the Administration Servers tab.
- Select the check box next to the name of the administration group to which you want to add the secondary Administration Server.
- On the menu line, click Connect secondary Administration Server.
The Add secondary Administration Server wizard starts. Proceed through the wizard by using the Next button.
- Fill in the following fields:
- If you use a proxy server to connect to the Kaspersky Security Center Cloud Console Administration Server (that is, the future primary Server), specify this and enter the proxy server credentials.
- Follow the further instructions of the wizard.
After the wizard finishes, the "primary/secondary" hierarchy is built. The primary Administration Server starts receiving connection from the secondary Administration Server through port 13000. The tasks and policies from the primary Administration Server are received and applied. The secondary Administration Server is displayed on the primary Administration Server, in the administration group to which it was added.
Configuring storage term of events concerning to the deleted devices
In Kaspersky Security Center Cloud Console, events are stored in an event repository. You cannot configure how many events to store in the event repository.
In the Events repository section of the Administration Server properties window, you can configure the maximum storage term of events concerning to the deleted devices. The maximum storage term is 1000 days.
To configure the number of days to store events relating to the deleted devices:
- In the main menu, click the settings icon () next to the Kaspersky Security Center Cloud Console Administration Server.
The Administration Server properties window opens.
- On the General tab, select the Events repository section.
- Enable Store events after devices are deleted option.
- In the Maximum storage period (days) edit box specify the number of days to store events relating to the deleted devices.
The number of days to store events concerning to the deleted devices is limited by the specified value.
Additionally, you can change the settings of any task to save events related to the task progress, or save only task execution results. In doing so, you will reduce the number of events in the database, increase the speed of execution of scenarios associated with analysis of the event table in the database, and lower the risk that critical events will be overwritten by a large number of events.
Aggregate emails about events
During the operation, Kaspersky Security Center Cloud Console and managed Kaspersky applications generate events. Each event is attributed to a certain type and level of severity (Critical, Functional failure, Warning, or Info). Depending on the conditions under which an event occurred, Kaspersky Security Center Cloud Console can assign different levels of severity to events of the same type.
Kaspersky Security Center Cloud Console automatically sends, by email, notifications about events. Kaspersky Security Center Cloud Console sends notifications about events listed in the Administration Server properties window, on the Event configuration tab. Common notification settings are used for all event types.
To limit the number of emails that have to be sent, Kaspersky Security Center Cloud Console, during specific periods, aggregates events with the same severity level. Values of the periods are managed by Kaspersky specialists. As a result, recipients get aggregated email messages according to the following template: "<Number> <Severity_level> (and lower-level) events have occurred".
Limitations on management of secondary Administration Servers running on-premises through Kaspersky Security Center Cloud Console
After you switch to a secondary Administration Server running on-premises by using the corresponding option in Kaspersky Security Center Cloud Console, the application imposes specific limitations on management of this secondary Administration Server. The following settings related to the Kaspersky Security Center Cloud Console operation become unavailable for the user:
- In the settings of Network Agent policies and Administration Server policies, the Event configuration and Application settings tabs are unavailable; no new policies can be created.
- In the settings of Network Agent tasks and Administration Server tasks, the Event configuration and Application settings tabs are unavailable; no new tasks can be created.
- Management of Network Agent and Administration Server is unavailable, as well as the properties window of the secondary Administration Server.
- The quick start wizard is unavailable.
- The storage and notification settings for Network Agent and Administration Server events cannot be modified.
- The Current application versions section is unavailable.
- The Installation packages section is unavailable.
Viewing the list of secondary Administration Servers
To view the list of the secondary (including virtual) Administration Servers:
In the main menu, click the name of the Administration Server, which is next to the settings icon (![]() ).
).
The drop-down list of the secondary (including virtual) Administration Servers is displayed.
You can proceed to any of these Administration Servers by clicking its name.
Deleting a hierarchy of Administration Servers
If you no longer want to have a hierarchy of Administration Servers, you can disconnect them from this hierarchy.
To delete a hierarchy of Administration Servers:
- In the main menu, click the settings icon () next to the name of the primary Administration Server.
- On the page that opens, proceed to the Administration Servers tab.
- In the administration group from which you want to delete the secondary Administration Server, select the secondary Administration Server.
- On the menu line, click Delete.
- In the window that opens, click OK to confirm that you want to delete the secondary Administration Server.
The former primary Administration Server and the former secondary Administration Server are now independent of each other. The hierarchy no longer exists.
Configuring the interface
You can configure the Kaspersky Security Center Cloud Console interface to display and hide sections and interface elements, depending on the features that you use.
To configure the Kaspersky Security Center Cloud Console interface in accordance with the currently used set of features:
- In the main menu, go to your account settings, and then select Interface options.
- In the Interface options window that opens, enable or disable the options:
- Set the number of devices that Kaspersky Security Center Cloud Console displays in policy distribution results.
- Click Save.
The console interface settings are configured according to your preferences.
Page top
Managing virtual Administration Servers
This section describes the following actions to manage virtual Administration Servers:
- Create virtual Administration Servers
- Enable and disable virtual Administration Servers
- Assign an administrator for a virtual Administration Server
- Change the Administration Server for client devices
- Delete virtual Administration Servers
Creating a virtual Administration Server
You can create virtual Administration Servers and add them to administration groups.
To create and add a virtual Administration Server:
- In the main menu, click the settings icon () next to the name of the required Administration Server.
- On the page that opens, proceed to the Administration Servers tab.
- Select the administration group to which you want to add a virtual Administration Server.
- On the menu line, click New virtual Administration Server.
- On the page that opens, define the Name of virtual Administration Server.
- Click Save.
The new virtual Administration Server is created, added to the administration group and displayed on the Administration Servers tab.
Page top
Enabling and disabling a virtual Administration Server
When you create a new virtual Administration Server, it is enabled by default. You can disable or enable it again at any time. Disabling or enabling a virtual Administration Server is equal to switching off or on a physical Administration Server.
To enable or disable a virtual Administration Server:
- In the main menu, click the settings icon () next to the name of the required Administration Server.
- On the page that opens, proceed to the Administration Servers tab.
- Select the virtual Administration Server that you want to enable or disable.
- On the menu line, click the Enable / disable virtual Administration Server button.
The virtual Administration Server state is changed to enabled or disabled, depending on its previous state. The updated state is displayed next to the Administration Server name.
Assigning an administrator for a virtual Administration Server
When you use virtual Administration Servers in your organization, you might want to assign a dedicated administrator for each virtual Administration Server. For example, this might be useful when you create virtual Administration Servers to manage separate offices or departments of your organization, or if you are an MSP provider and you manage your tenants through virtual Administration Servers.
When you create a virtual Administration Server, it inherits the user list and all of the user rights of the primary Administration Server. If a user has access rights to the primary Server, this user has access rights to the virtual Server as well. After creation, you configure the access rights to the Servers independently. If you want to assign an administrator for a virtual Administration Server only, make sure that the administrator is not included in the Access rights list in the properties of the primary Administration Server.
You assign an administrator for a virtual Administration Server by granting the administrator access rights to the virtual Administration Server. You can grant the required access rights in one of the following ways:
- Configure access rights for the administrator manually
- Assign one or more user roles for the administrator
When you assign an administrator, make sure that you grant access to a single virtual Administration Server. An administrator with access to multiple virtual Administration Servers cannot sign in to Kaspersky Security Center Cloud Console.
An administrator of a virtual Administration Server signs in to Kaspersky Security Center Cloud Console the same way as signing in to the primary Administration Server. Kaspersky Security Center Cloud Console authenticates the administrator and opens the virtual Administration Server to which the administrator has access rights. The administrator cannot switch between Administration Servers.
Prerequisites
Before you start, ensure that the following conditions are met:
- The virtual Administration Server is created.
- On the primary Administration Server, you have created an account for the administrator that you want to assign for the virtual Administration Server.
- The created account of the virtual Server administrator is not included in the Access rights lists in the properties of any Servers—primary or secondary.
- You have the Modify object ACLs right in the General features → User permissions functional area.
Configuring access rights manually
To assign an administrator for a virtual Administration Server:
- In the main menu, switch to the required virtual Administration Server:
- Click the chevron icon () to the right of the current Administration Server name.
- Select the required Administration Server.
- Click the chevron icon (
- In the main menu, click the settings icon () next to the name of the Administration Server.
The Administration Server properties window opens.
- On the Access rights tab, click the Add button.
A unified list of users of the primary Administration Server and the current virtual Administration Server opens.
- From the list of users, select the account of the administrator that you want to assign for the virtual Administration Server, and then click the OK button.
The application adds the selected user to the user list on the Access rights tab.
- Select the check box next to the added account, and then click the Access rights button.
- Configure the rights that the administrator will have on the virtual Administration Server.
For successful authentication, at minimum, the administrator must have the following rights:
- Read right in the General features → Basic functionality functional area
- Read right in the General features → Virtual Administration Servers functional area
The application saves the modified user rights to the administrator account.
Configuring access rights by assigning user roles
Alternatively, you can grant the access rights to a virtual Administration Server administrator through user roles. For example, this might be useful if you want to assign several administrators on the same virtual Administration Server. If this is the case, you can assign the administrators' accounts the same one or more user roles instead of configuring the same user rights for several administrators.
To assign an administrator for a virtual Administration Server by assigning user roles:
- On the primary Administration Server, create a new user role, and then specify all of the required access rights that an administrator must have on the virtual Administration Server. You can create several roles, for example, if you want to separate access to different functional areas.
- In the main menu, switch to the required virtual Administration Server:
- Click the chevron icon () to the right of the current Administration Server name.
- Select the required Administration Server.
- Click the chevron icon (
- Assign the new role or several roles to the administrator account.
When assigning roles to a user, in the main menu, go to Users & roles → Users & groups, and then select the Users tab. If you select the Groups tab, and then assign roles to the group where the user is a member, the user will not be able to log in to Kaspersky Security Center Cloud Console.
The application assigns the new role to the administrator account.
Configuring access rights at the object level
In addition to assigning access rights at the functional area level, you can configure access to specific objects on the virtual Administration Server, for example, to a specific administration group or a task. To do this, switch to the virtual Administration Server, and then configure the access rights in the object's properties.
Deleting a virtual Administration Server
When you delete a virtual Administration Server, all of the objects created on the Administration Server, including policies and tasks, will be deleted as well. The managed devices from the administration groups that were managed by the virtual Administration Server will be removed from the administration groups. To return the devices under management of Kaspersky Security Center Cloud Console, run the network polling, and then move the found devices from the Unassigned devices group to the administration groups.
To delete a virtual Administration Server:
- In the main menu, click the settings icon () next to the name of the Administration Server.
- On the page that opens, proceed to the Administration Servers tab.
- Select the virtual Administration Server that you want to delete.
- On the menu line, click the Delete button.
The virtual Administration Server is deleted.
Monitoring and reporting
This section describes the monitoring and reporting capabilities of Kaspersky Security Center Cloud Console. These capabilities give you an overview of your infrastructure, protection statuses, and statistics.
After Kaspersky Security Center Cloud Console deployment or during the operation, you can configure the monitoring and reporting features to best suit your needs.
Scenario: Monitoring and reporting
This section provides a scenario for configuring the monitoring and reporting feature in Kaspersky Security Center Cloud Console.
Prerequisites
After you deploy Kaspersky Security Center Cloud Console on an organization's network you can start to monitor it and generate reports on its functioning.
Stages
Configuring monitoring and reporting on an organization's network proceeds in stages:
- Configuring the switching of device statuses
Get acquainted with the settings for device statuses depending on specific conditions. By changing these settings, you can change the number of events with Critical or Warning importance levels. When configuring the switching of device statuses, be sure of the following:
- New settings do not conflict with the information security policies of your organization.
- You are able react to important security events on your organization's network in a timely manner.
- Configuring notifications about events on client devices
How-to instructions: Configure notification (by email) of events on client devices
- Changing the response of your security network to the Virus outbreak event
You can change the specific thresholds in the Administration Server properties. You can also create a stricter policy that will be activated or create a task that will be run at the occurrence of this event.
- Reviewing the security status of your organization's network
How-to instructions:
- Locating client devices that are not protected
How-to instructions:
- Checking protection of client devices
How-to instructions:
- Reviewing license information
How-to instructions:
Results
Upon completion of the scenario, you are informed about protection of your organization's network and, thus, can plan actions for further protection.
About types of monitoring and reporting
Information on security events on an organization's network is stored in the Administration Server database. Based on the events, Kaspersky Security Center Cloud Console provides the following types of monitoring and reporting on your organization's network:
- Dashboard
- Reports
- Event selections
Dashboard
The dashboard allows you to monitor security trends on your organization's network by providing you with a graphical display of information.
Reports
The Reports feature allows you to get detailed numerical information about the security of your organization's network, save this information to a file, send it by email, and print it.
Event selections
Event selections provide an onscreen view of named sets of events that are selected from the Administration Server database. These sets of events are grouped according to the following categories:
- By importance level—Critical events, Functional failures, Warnings, and Info events
- By time—Recent events
- By type—User requests and Audit events
You can create and view user-defined event selections based on the settings available, in the Kaspersky Security Center Cloud Console interface, for configuration.
Dashboard and widgets
This section contains information about the dashboard and the widgets that the dashboard provides. The section includes instructions on how to manage widgets and configure widget settings.
Using the dashboard
The dashboard allows you to monitor security trends on your organization's network by providing you with a graphical display of information.
The dashboard is available in the Kaspersky Security Center Cloud Console, in the Monitoring & reporting section, by clicking Dashboard.
The dashboard provides widgets that can be customized. You can choose a large number of different widgets, presented as pie charts or donut charts, tables, graphs, bar charts, and lists. The information displayed in widgets is automatically updated, the update period is one to two minutes. The interval between updates varies for different widgets. You can refresh data on a widget manually at any time by means of the settings menu.
By default, widgets include information about all events stored in the database of Administration Server.
Kaspersky Security Center Cloud Console has a default set of widgets for the following categories:
- Protection status
- Deployment
- Updating
- Threat statistics
- Other
Some widgets have text information with links. You can view detailed information by clicking a link.
When configuring the dashboard, you can add widgets that you need, hide widgets that you do not need, change the size or appearance of widgets, move widgets, and change their settings.
Adding widgets to the dashboard
To add widgets to the dashboard:
- In the main menu, go to Monitoring & reporting → Dashboard.
- Click the Add or restore widget button.
- In the list of available widgets, select the widgets that you want to add to the dashboard.
Widgets are grouped by category. To view the list of widgets included in a category, click the chevron icon (
) next to the category name. - Click the Add button.
The selected widgets are added at the end of the dashboard.
You can now edit the representation and parameters of the added widgets.
Hiding a widget from the dashboard
To hide a displayed widget from the dashboard:
- In the main menu, go to Monitoring & reporting → Dashboard.
- Click the settings icon (
 ) next to the widget that you want to hide.
 - Select Hide widget.
- In the Warning window that opens, click OK.
The selected widget is hidden. Later, you can add this widget to the dashboard again.
Moving a widget on the dashboard
To move a widget on the dashboard:
- In the main menu, go to Monitoring & reporting → Dashboard.
- Click the settings icon () next to the widget that you want to move.
- Select Move.
- Click the place to which you want to move the widget. You can select only another widget.
The places of the selected widgets are swapped.
Changing the widget size or appearance
For widgets that display a graph, you can change its representation—a bar chart or a line chart. For some widgets, you can change their size: compact, medium, or maximum.
To change the widget representation:
- In the main menu, go to Monitoring & reporting → Dashboard.
- Click the settings icon () next to the widget that you want to edit.
- Do one of the following:
- To display the widget as a bar chart, select Chart type: Bars.
- To display the widget as a line chart, select Chart type: Lines.
- To change the area occupied by the widget, select one of the values:
- Compact
- Compact (bar only)
- Medium (donut chart)
- Medium (bar chart)
- Maximum
The representation of the selected widget is changed.
Changing widget settings
To change settings of a widget:
- In the main menu, go to Monitoring & reporting → Dashboard.
- Click the settings icon () next to the widget that you want to change.
- Select Show settings.
- In the widget settings window that opens, change the widget settings as required.
- Click Save to save the changes.
The settings of the selected widget are changed.
The set of settings depends on the specific widget. Below are some of the common settings:
- Widget scope (the set of objects for which the widget displays information)—for example, an administration group or device selection.
- Select task (the task for which the widget displays information).
- Time interval (the time interval during which the information is displayed in the widget)—between the two specified dates; from the specified date to the current day; or from the current day minus the specified number of days to the current day.
- Set to Critical if these are specified and Set to Warning if these are specified (the rules that determine the color of a traffic light).
After you change the widget settings, you can refresh data on the widget manually.
To refresh data on a widget:
- In the main menu, go to Monitoring & reporting → Dashboard.
- Click the settings icon () next to the widget that you want to move.
- Select Refresh.
The data on the widget is refreshed.
About the Dashboard-only mode
You can configure the Dashboard-only mode for employees who do not manage the network but who want to view the network protection statistics in Kaspersky Security Center Cloud Console (for example, a top manager). When a user has this mode enabled, only a dashboard with a predefined set of widgets is displayed to the user. Thus, he or she can monitor the statistics specified in the widgets, for example, the protection status of all managed devices, the number of recently detected threats, or the list of the most frequent threats in the network.
When a user works in the Dashboard-only mode, the following restrictions are applied:
- The main menu is not displayed to the user, so he or she cannot change the network protection settings.
- The user cannot perform any actions with widgets, for example, add or hide them. Therefore, you need to put all widgets required for the user on the dashboard and configure them, for instance, set the rule of counting objects or specify the time interval.
You cannot assign the Dashboard-only mode to yourself. If you want to work in this mode, contact a system administrator, Managed Service Provider (MSP), or a user with the Modify object ACLs right in the General features: User permissions functional area.
Configuring the Dashboard-only mode
Before you begin to configure the Dashboard-only mode, make sure that the following prerequisites are met:
- You have the Modify object ACLs right in the General features: User permissions functional area. If you do not have this right, the tab for configuring the mode will be missing.
- The user has the Read right in the General features: Basic functionality functional area.
If a hierarchy of Administration Servers is arranged in your network, for configuring the Dashboard-only mode go to the Server where the user account is available on the Users tab of the Users & roles → Users & groups section. It can be a primary server or physical secondary server. It is not possible to adjust the mode on a virtual server.
To configure the Dashboard-only mode:
- In the main menu, go to Users & roles → Users & groups, and then select the Users tab.
- Click the user account name for which you want to adjust the dashboard with widgets.
- In the account settings window that opens, select the Dashboard tab.
On the tab that opens, the same dashboard is displayed for you as for the user.
- If the Display the console in Dashboard-only mode option is enabled, switch the toggle button to disable it.
When this option is enabled, you are also unable to change the dashboard. After you disable the option, you can manage widgets.
- Configure the dashboard appearance. The set of widgets prepared on the Dashboard tab is available for the user with the customizable account. He or she cannot change any settings or size of the widgets, add, or remove any widgets from the dashboard. Therefore, adjust them for the user, so he or she can view the network protection statistics. For this purpose, on the Dashboard tab you can perform the same actions with widgets as in the Monitoring & reporting → Dashboard section:
- Add new widgets to the dashboard.
- Hide widgets that the user doesn't need.
- Move widgets into a specific order.
- Change the size or appearance of widgets.
- Change the widget settings.
- Switch the toggle button to enable the Display the console in Dashboard-only mode option.
After that, only the dashboard is available for the user. He or she can monitor statistics but cannot change the network protection settings and dashboard appearance. As the same dashboard is displayed for you as for the user, you are also unable to change the dashboard.
If you keep the option disabled, the main menu is displayed for the user, so he or she can perform various actions in Kaspersky Security Center Cloud Console, including changing security settings and widgets.
- Click the Save button when you finish configuring the Dashboard-only mode. Only after that will the prepared dashboard be displayed to the user.
- If the user wants to view statistics of supported Kaspersky applications and needs access rights to do so, configure the rights for the user. After that, Kaspersky applications data is displayed for the user in the widgets of these applications.
Now the user can log in to Kaspersky Security Center Cloud Console under the customized account and monitor the network protection statistics in the Dashboard-only mode.
Page top
Reports
This section describes how to use reports, manage custom report templates, use report templates to generate new reports, and create report delivery tasks.
Using reports
The Reports feature allows you to get detailed numerical information about the security of your organization's network, save this information to a file, send it by email, and print it.
Reports are available in the Kaspersky Security Center Cloud Console, in the Monitoring & reporting section, by clicking Reports.
By default, reports include information for the last 30 days.
Kaspersky Security Center Cloud Console has a default set of reports for the following categories:
- Protection status
- Deployment
- Updating
- Threat statistics
- Other
You can create custom report templates, edit report templates, and delete them.
You can create reports that are based on existing templates, export reports to files, and create tasks for report delivery.
Creating a report template
To create a report template:
- In the main menu, go to Monitoring & reporting → Reports.
- Click Add.
The New report template wizard starts. Proceed through the wizard by using the Next button.
- Enter the report name and select the report type.
- On the Scope step of the wizard, select the set of client devices (administration group, device selection, selected devices, or all networked devices) whose data will be displayed in reports that are based on this report template.
- On the Reporting period step of the wizard, specify the report period. Available values are as follows:
- Between the two specified dates
- From the specified date to the report creation date
- From the report creation date, minus the specified number of days, to the report creation date
This page may not appear for some reports.
- Click OK to close the wizard.
- Do one of the following:
- Click the Save and run button to save the new report template and to run a report based on it.
The report template is saved. The report is generated.
- Click the Save button to save the new report template.
The report template is saved.
- Click the Save and run button to save the new report template and to run a report based on it.
You can use the new template for generating and viewing reports.
Viewing and editing report template properties
You can view and edit basic properties of a report template, for example, the report template name or the fields displayed in the report.
To view and edit properties of a report template:
- In the main menu, go to Monitoring & reporting → Reports.
- Select the check box next to the report template whose properties you want to view and edit.
As an alternative, you can first generate the report, and then click the Edit button.
- Click the Open report template properties button.
The Editing report <Report name> window opens with the General tab selected.
- Edit the report template properties:
- General tab:
- Report template name
- Maximum number of entries to display
- Group
Click the Settings button to change the set of client devices for which the report is created. For some types of the reports, the button may be unavailable. The actual settings depend on the settings specified during creation of the report template.
- Time interval
Click the Settings button to modify the report period. For some types of the reports, the button may be unavailable. Available values are as follows:
- Between the two specified dates
- From the specified date to the report creation date
- From the report creation date, minus the specified number of days, to the report creation date
- Include data from secondary and virtual Administration Servers
- Up to nesting level
- Data wait interval (min)
- Cache data from secondary Administration Servers
- Cache update frequency (h)
- Transfer detailed information from secondary Administration Servers
- Fields tab
Select the fields that will be displayed in the report, and use the Move up button and Move down button to change the order of these fields. Use the Add button or Edit button to specify whether the information in the report must be sorted and filtered by each of the fields.
In the Filters of Details fields section, you can also click the Convert filters button to start using the extended filtering format. This format enables you to combine filtering conditions specified in various fields by using the logical OR operation. After you click the button, the Convert filters panel opens on the right. Click the Convert filters button to confirm conversion. You can now define a converted filter with conditions from the Details fields section that are applied by using the logical OR operation.
Conversion of a report to the format supporting complex filtering conditions will make the report incompatible with the previous versions of Kaspersky Security Center (11 and earlier). Also, the converted report will not contain any data from secondary Administration Servers running such incompatible versions.
- General tab:
- Click Save to save the changes.
- Close the Editing report <Report name> window.
The updated report template appears in the list of report templates.
Exporting a report to a file
You can save one or multiple reports as XML, HTML, or as a PDF. Kaspersky Security Center Cloud Console allows you to export up to 10 reports to files of the specified format at the same time.
To export a report to a file:
- In the main menu, go to Monitoring & reporting → Reports.
- Choose the reports that you want to export.
If you choose more than 10 reports, the Export report button will be disabled.
- Click the Export report button.
- In the opened window, specify the following export parameters:
- File name.
If you select one report to export, specify the report file name.
If you select more than one report, the report file names will coincide with the name of the selected report templates.
- Maximum number of entries.
Specify the maximum number of entries included in the report file. The default value is 10,000.
- File format.
Select the report file format: XML, HTML, or PDF. If you export multiple reports, all selected reports are saved in the specified format as separate files.
- File name.
- Click the Export report button.
The report is saved to a file in the specified format.
Generating and viewing a report
To create and view a report:
- In the main menu, go to Monitoring & reporting → Reports.
- Click the name of the report template that you want to use to create a report.
A report using the selected template is generated and displayed.
Report data is displayed only in English, other localizations are not available.
The report displays the following data:
- On the Summary tab:
- The name and type of report, a brief description and the reporting period, as well as information about the group of devices for which the report is generated.
- Graph chart showing the most representative report data.
- Consolidated table with calculated report indicators.
- On the Details tab, a table with detailed report data is displayed.
Creating a report delivery task
You can create a task that will deliver selected reports.
To create a report delivery task:
- In the main menu, go to Monitoring & reporting → Reports.
- Select the check boxes next to the report templates for which you want to create a report delivery task.
- Click the Create delivery task button.
The New task wizard starts. Proceed through the wizard by using the Next button.
- At the New task settings step of the wizard, enter the task name.
The default name is Deliver reports. If a task with this name already exists, a sequence number (<N>) is added to the task name.
- At the Report configuration step of the wizard, specify the following settings:
- Report templates to be delivered by the task.
- The report format: HTML, XLS, or PDF.
The wkhtmltopdf tool is required to convert a report to PDF. When you select the PDF option, Administration Server checks whether the wkhtmltopdf tool is installed on the device. If the tool is not installed, the application displays a message about the necessity to install the tool on the Administration Server device. Install the tool manually, and then proceed to the next step.
- Whether the reports are to be sent by email, together with email notification settings.
You can specify up to 20 email addresses. To separate email addresses, press Enter. You can also paste a comma-separated list of email addresses, and then press Enter.
- At the Configure task schedule step of the wizard, select the task start schedule.
The following task schedule options are available:
- At this step of the wizard, configure other task schedule settings:
- In the Task schedule section, check or reconfigure the previously selected schedule and set the time interval, days of the month or week, set the virus outbreak condition or completing another task as a trigger to start the task. A start time can also be specified in this section if an applicable schedule is selected.
- In the Additional settings section, specify the following settings:
- At the Selecting an account to run the task step of the wizard, specify the credentials of the user account that is used to run the task.
- If you want to modify other task settings after the task is created, at the Finish task creation step of the wizard, enable the Open task details when creation is complete option (by default, this option is enabled).
- Click the Finish button to create the task and close the wizard.
The report delivery task is created. If the Open task details when creation is complete option is enabled, the task settings window opens.
Deleting report templates
To delete one or several report templates:
- In the main menu, go to Monitoring & reporting → Reports.
- Select check boxes next to the report templates that you want to delete.
- Click the Delete button.
- In the window that opens, click OK to confirm your selection.
The selected report templates are deleted. If these report templates were included in the report delivery tasks, they are also removed from the tasks.
Events and event selections
This section provides information about events and event selections, about the types of events that occur in Kaspersky Security Center Cloud Console components, and about managing frequent events blocking.
About events in Kaspersky Security Center Cloud Console
Kaspersky Security Center Cloud Console allows you to receive information about events that occur during the operation of Administration Server and Kaspersky applications installed on managed devices. Information about events is saved in the Administration Server database. You can export this information to external SIEM systems. Exporting event information to external SIEM systems enables administrators of SIEM systems to promptly respond to security system events that occur on managed devices or groups of devices.
Events by type
In Kaspersky Security Center Cloud Console, there are the following types of events:
- General events. These events occur in all managed Kaspersky applications. An example of a general event is Virus outbreak. General events have strictly defined syntax and semantics. General events are used, for instance, in reports and dashboards.
- Managed Kaspersky applications-specific events. Each managed Kaspersky application has its own set of events.
Events by source
You can view the full list of the events that can be generated by an application on the Event configuration tab in the application policy. For Administration Server, you can additionally view the event list in the Administration Server properties.
Events can be generated by the following applications:
- Kaspersky Security Center Cloud Console components:
- Managed Kaspersky applications
For details about the events generated by Kaspersky managed applications, please refer to the documentation of the corresponding application.
Events by importance level
Each event has its own importance level. Depending on the conditions of its occurrence, an event can be assigned various importance levels. There are four importance levels of events:
- A critical event is an event that indicates the occurrence of a critical problem that may lead to data loss, an operational malfunction, or a critical error.
- A functional failure is an event that indicates the occurrence of a serious problem, error or malfunction that occurred during operation of the application or while performing a procedure.
- A warning is an event that is not necessarily serious, but nevertheless indicates a potential problem in the future. Most events are designated as warnings if the application can be restored without loss of data or functional capabilities after such events occur.
- An info event is an event that occurs for the purpose of informing about successful completion of an operation, proper functioning of the application, or completion of a procedure.
Each event has a defined storage term, during which you can view or modify it in Kaspersky Security Center Cloud Console. Some events are not saved in the Administration Server database by default because their defined storage term is zero. Only events that will be stored in the Administration Server database for at least one day can be exported to external systems.
Events of Kaspersky Security Center Cloud Console components
Each Kaspersky Security Center Cloud Console component has its own set of event types. This section lists types of events that occur in Kaspersky Security Center Cloud Console Administration Server and Network Agent. Types of events that occur in Kaspersky applications are not listed in this section.
For each event that can be generated by an application, you can specify notification settings and storage settings on the Event configuration tab in the application policy. For Administration Server, you can additionally view and configure the event list in the Administration Server properties. If you want to configure notification settings for all the events at once, configure general notification settings in the Administration Server properties.
Data structure of event type description
For each event type, its display name, identifier (ID), alphabetic code, description, and the default storage term are provided.
- Event type display name. This text is displayed in Kaspersky Security Center Cloud Console when you configure events and when they occur.
- Event type ID. This numerical code is used when you process events by using third-party tools for event analysis.
- Event type (alphabetic code). This code is used when you browse and process events by using public views that are provided in the Kaspersky Security Center Cloud Console database.
- Description. This text contains the situations when an event occurs and what you can do in such a case.
- Default storage term. This is the number of days during which the event is stored in the Administration Server database and is displayed in the list of events on Administration Server. After this period elapses, the event is deleted. If the event storage term value is 0, such events are detected but are not displayed in the list of events on Administration Server.
Administration Server events
This section contains information about the events related to the Administration Server.
Administration Server critical events
The table below shows the events of Kaspersky Security Center Cloud Console Administration Server that have the Critical importance level.
For each event that can be generated by an application, you can specify notification settings and storage settings on the Event configuration tab in the application policy. For Administration Server, you can additionally view and configure the event list in the Administration Server properties. If you want to configure notification settings for all the events at once, configure general notification settings in the Administration Server properties.
Administration Server critical events
Event type display name |
Event type ID |
Event type |
Description |
Default storage term |
|---|---|---|---|---|
License limit has been exceeded |
4099 |
KLSRV_EV_LICENSE_CHECK_MORE_110 |
Once a day Kaspersky Security Center Cloud Console checks whether a license limit is exceeded. Events of this type occur when Administration Server detects that some licensing limits are exceeded by Kaspersky applications installed on client devices and if the number of currently used licensing units covered by a single license exceeds 110% of the total number of units covered by the license. Even when this event occurs, client devices are protected. You can respond to the event in the following ways:
Kaspersky Security Center Cloud Console determines the rules to generate events when a license limit is exceeded. |
180 days |
Virus outbreak |
26 (for File Threat Protection) |
GNRL_EV_VIRUS_OUTBREAK |
Events of this type occur when the number of malicious objects detected on several managed devices exceeds the threshold within a short period. You can respond to the event in the following ways:
|
180 days |
Virus outbreak |
27 (for Mail Threat Protection) |
GNRL_EV_VIRUS_OUTBREAK |
Events of this type occur when the number of malicious objects detected on several managed devices exceeds the threshold within a short period. You can respond to the event in the following ways:
|
180 days |
Virus outbreak |
28 (for firewall) |
GNRL_EV_VIRUS_OUTBREAK |
Events of this type occur when the number of malicious objects detected on several managed devices exceeds the threshold within a short period. You can respond to the event in the following ways:
|
180 days |
Device has become unmanaged |
4111 |
KLSRV_HOST_OUT_CONTROL |
Events of this type occur if a managed device is visible on the network but has not connected to Administration Server for a specific period. Find out what prevents the proper functioning of Network Agent on the device. Possible causes include network issues and removal of Network Agent from the device. |
180 days |
Device status is Critical |
4113 |
KLSRV_HOST_STATUS_CRITICAL |
Events of this type occur when a managed device is assigned the Critical status. You can configure the conditions under which the device status is changed to Critical. |
180 days |
Limited functionality mode |
4130 |
KLSRV_EV_LICENSE_SRV_LIMITED_MODE |
Events of this type occur when Kaspersky Security Center Cloud Console starts to operate with basic functionality, without Vulnerability and patch management and without Mobile Device Management features. Following are causes of, and appropriate responses to, the event:
|
180 days |
License expires soon |
4129 |
KLSRV_EV_LICENSE_SRV_EXPIRE_SOON |
Events of this type occur when the commercial license expiration date is approaching. Once a day Kaspersky Security Center checks whether a license expiration date is approaching. Events of this type are published 30 days, 15 days, 5 days and 1 day before the license expiration date. This number of days cannot be changed. If the Administration Server is turned off on the specified day before the license expiration date, the event will not be published until the next day. When the commercial license expires, Kaspersky Security Center Cloud Console provides only basic functionality. You can respond to the event in the following ways:
|
180 days |
MDM certificate has expired |
4132 |
KLSRV_CERTIFICATE_EXPIRED |
Events of this type occur when the Administration Server certificate for Mobile Device Management expires. You need to update the expired certificate. |
180 days |
Updates for Kaspersky application modules have been revoked |
4142 |
KLSRV_SEAMLESS_UPDATE_REVOKED |
Events of this type occur if seamless updates have been revoked (Revoked status is displayed for these updates) by Kaspersky technical specialists; for example, they must be updated to a newer version. The event concerns Kaspersky Security Center Cloud Console patches and does not concern modules of Kaspersky managed applications. The event provides the reason that the seamless updates are not installed. |
180 days |
Audit: Export to SIEM failed |
5130 |
KLAUD_EV_SIEM_EXPORT_ERROR |
Events of this type occur when exporting events to the SIEM system failed due to a connection error with the SIEM system. |
180 days |
Administration Server functional failure events
The table below shows the events of Kaspersky Security Center Cloud Console Administration Server that have the Functional failure importance level.
For each event that can be generated by an application, you can specify notification settings and storage settings on the Event configuration tab in the application policy. For Administration Server, you can additionally view and configure the event list in the Administration Server properties. If you want to configure notification settings for all the events at once, configure general notification settings in the Administration Server properties.
Administration Server functional failure events
Event type display name |
Event type ID |
Event type |
Description |
Default storage term |
|---|---|---|---|---|
Limit of installations has been exceeded for one of the licensed applications groups |
4126 |
KLSRV_INVLICPROD_EXCEDED |
Administration Server generates events of this type periodically (every hour). Events of this type occur if in Kaspersky Security Center Cloud Console you manage license keys of third-party applications and if the number of installations has exceeded the limit set by the license key of the third-party application. You can respond to the event in the following ways:
You can manage license keys of third-party applications using the functionality of licensed applications groups. A licensed applications group includes third-party applications that meet criteria set by you. |
180 days |
Failed to poll the cloud segment |
4143 |
KLSRV_KLCLOUD_SCAN_ERROR |
Events of this type occur when Administration Server fails to poll a network segment in a cloud environment. Read the details in the event description and respond accordingly. |
Not stored |
Administration Server warning events
The table below shows the events of Kaspersky Security Center Cloud Console Administration Server that have the Warning importance level.
For each event that can be generated by an application, you can specify notification settings and storage settings on the Event configuration tab in the application policy. For Administration Server, you can additionally view and configure the event list in the Administration Server properties. If you want to configure notification settings for all the events at once, configure general notification settings in the Administration Server properties.
Administration Server warning events
Event type display name |
Event type ID |
Event type |
Description |
Default storage term |
|---|---|---|---|---|
License limit has been exceeded |
4098 |
KLSRV_EV_LICENSE_CHECK_100_110 |
Once a day Kaspersky Security Center Cloud Console checks whether a license limit is exceeded. Events of this type occur when Administration Server detects that some licensing limits are exceeded by Kaspersky applications installed on client devices and if the number of currently used licensing units covered by a single license constitute 100% to 110% of the total number of units covered by the license. Even when this event occurs, client devices are protected. You can respond to the event in the following ways:
Kaspersky Security Center Cloud Console determines the rules to generate events when a license limit is exceeded. |
90 days |
Device has remained inactive on the network for a long time |
4103 |
KLSRV_EVENT_HOSTS_NOT_VISIBLE |
Events of this type occur when a managed device shows inactivity for some time. Most often, this happens when a managed device is decommissioned. You can respond to the event in the following ways:
|
90 days |
Conflict of device names |
4102 |
KLSRV_EVENT_HOSTS_CONFLICT |
Events of this type occur when Administration Server considers two or more managed devices as a single device. Although cloning is not supported in Kaspersky Security Center Cloud Console, this event may occur if you perform cloning using a third-party tool. To avoid the event, when copying the image of a device with Network Agent installed, you have to meet the following recommendations:
The klmover utility is included in the installation package of Network Agent. If you capture the image of a device without Network Agent installed, perform image deployment on target devices and then deploy Network Agent. You have to provide access to the network folder with stand-alone installation packages from a device. |
90 days |
Device status is Warning |
4114 |
KLSRV_HOST_STATUS_WARNING |
Events of this type occur when a managed device is assigned the Warning status. You can configure the conditions under which the device status is changed to Warning. |
90 days |
Limit of installations will soon be reached for one of the licensed applications groups |
4127 |
KLSRV_INVLICPROD_FILLED |
Events of this type occur when the number of installations for third-party applications included in a licensed applications group reaches 90% of the maximum allowed value specified in the license key properties. You can respond to the event in the following ways:
You can manage license keys of third-party applications using the functionality of licensed applications groups. |
90 days |
Certificate has been requested |
4133 |
KLSRV_CERTIFICATE_REQUESTED |
Events of this type occur when a certificate for Mobile Device Management fails to be automatically reissued. Following might be the causes and appropriate responses to the event:
|
90 days |
Certificate has been removed |
4134 |
KLSRV_CERTIFICATE_REMOVED |
Events of this type occur when an administrator removes any type of certificate (General, Mail, VPN) for Mobile Device Management. After removing a certificate, mobile devices connected via this certificate will fail to connect to Administration Server. This event might be helpful when investigating malfunctions associated with the management of mobile devices. |
90 days |
APNs certificate has expired |
4135 |
KLSRV_APN_CERTIFICATE_EXPIRED |
Events of this type occur when an APNs certificate expires. You need to manually renew the APNs certificate and install it on an iOS MDM Server. |
90 days |
APNs certificate expires soon |
4136 |
KLSRV_APN_CERTIFICATE_EXPIRES_SOON |
Events of this type occur when there are fewer than 14 days left before the APNs certificate expires. When the APNs certificate expires, you need to manually renew the APNs certificate and install it on an iOS MDM Server. We recommend that you schedule the APNs certificate renewal in advance of the expiration date. |
90 days |
Failed to send the FCM message to the mobile device |
4138 |
KLSRV_GCM_DEVICE_ERROR |
Events of this type occur when Mobile Device Management is configured to use Google Firebase Cloud Messaging (FCM) for connecting to managed mobile devices with an Android operating system and FCM Server fails to handle some of the requests received from Administration Server. It means that some of the managed mobile devices will not receive a push notification. Read the HTTP code in the details of the event description and respond accordingly. For more information on the HTTP codes received from FCM Server and related errors, please refer to the Google Firebase service documentation (see chapter "Downstream message error response codes"). |
90 days |
HTTP error sending the FCM message to the FCM server |
4139 |
KLSRV_GCM_HTTP_ERROR |
Events of this type occur when Mobile Device Management is configured to use Google Firebase Cloud Messaging (FCM) for connecting managed mobile devices with the Android operating system and FCM Server reverts to the Administration Server a request with a HTTP code other than 200 (OK). Following might be the causes and appropriate responses to the event:
|
90 days |
Failed to send the FCM message to the FCM server |
4140 |
KLSRV_GCM_GENERAL_ERROR |
Events of this type occur due to unexpected errors on the Administration Server side when working with the Google Firebase Cloud Messaging HTTP protocol. Read the details in the event description and respond accordingly. If you cannot find the solution to an issue on your own, we recommend that you contact Kaspersky Technical Support. |
90 days |
Connection to the secondary Administration Server has been interrupted |
4116 |
KLSRV_EV_SLAVE_SRV_DISCONNECTED |
Events of this type occur when a connection to the secondary Administration Server is interrupted. Read the operating system log on the device where the secondary Administration Server is installed and respond accordingly. |
90 days |
Connection to the primary Administration Server has been interrupted |
4118 |
KLSRV_EV_MASTER_SRV_DISCONNECTED |
Events of this type occur when a connection to the primary Administration Server is interrupted. Read the operating system log on the device where the primary Administration Server is installed and respond accordingly. |
90 days |
Audit: Test connection to SIEM server failed |
5120 |
KLAUD_EV_SIEM_TEST_FAILED |
Events of this type occur when an automatic connection test to the SIEM server failed. |
90 days |
Administration Server informational events
The table below shows the events of Kaspersky Security Center Cloud Console Administration Server that have the Info importance level.
For each event that can be generated by an application, you can specify notification settings and storage settings on the Event configuration tab in the application policy. For Administration Server, you can additionally view and configure the event list in the Administration Server properties. If you want to configure notification settings for all the events at once, configure general notification settings in the Administration Server properties.
Administration Server informational events
Event type display name |
Event type ID |
Event type |
Description |
Default storage term |
|---|---|---|---|---|
Over 90% of the license key is used up |
4097 |
KLSRV_EV_LICENSE_CHECK_90 |
Events of this type occur when Administration Server detects that some licensing limits are close to being exceeded by Kaspersky applications installed on client devices and if the number of currently used licensing units covered by a single license constitute over 90% of the total number of units covered by the license. Even when a licensing limit is exceeded, client devices are protected. You can respond to the event in the following ways:
Kaspersky Security Center Cloud Console determines the rules to generate events when a licensing limit is exceeded. |
30 days |
New device has been detected |
4100 |
KLSRV_EVENT_HOSTS_NEW_DETECTED |
Events of this type occur when new networked devices have been discovered. |
30 days |
Device has been automatically moved according to a rule |
4101 |
KLSRV_EVENT_HOSTS_NEW_REDIRECTED |
Events of this type occur when devices have been assigned to a group according to device moving rules. |
30 days |
Device has been removed from the group: inactive on the network for a long time |
4104 |
KLSRV_INVISIBLE_HOSTS_REMOVED |
Events of this type occur when devices have been automatically removed from a group for inactivity. |
30 days |
Limit of installations will soon be exceeded (more than 90% is used up) for one of the licensed applications groups |
4128 |
KLSRV_INVLICPROD_EXPIRED_SOON |
Events of this type occur when the number of installations for third-party applications included in a licensed applications group reaches 90% of the maximum allowed value specified in the license key properties. You can respond to the event in the following ways:
You can manage license keys of third-party applications using the functionality of licensed applications groups. |
30 days |
Files have been found to send to Kaspersky for analysis |
4131 |
KLSRV_APS_FILE_APPEARED |
|
30 days |
FCM Instance ID has changed on this mobile device |
4137 |
KLSRV_GCM_DEVICE_REGID_CHANGED |
Events of this type occur when the Firebase Cloud Messaging token has changed on the device. For information on the FCM token rotation, please refer to the Firebase service documentation. |
30 days |
Updates have been successfully copied to the specified folder |
4122 |
KLSRV_UPD_REPL_OK |
Events of this type occur when the Download updates to the Administration Server repository task finishes copying files to a specified folder. |
30 days |
Connection to the secondary Administration Server has been established |
4115 |
KLSRV_EV_SLAVE_SRV_CONNECTED |
Refer to the following topic for details: Creating a hierarchy of Administration Servers: adding a secondary Administration Server. |
30 days |
Connection to the primary Administration Server has been established |
4117 |
KLSRV_EV_MASTER_SRV_CONNECTED |
|
30 days |
Databases have been updated (In Kaspersky Security Center Cloud Console, this event type is available only for a secondary Administration Server.) |
4144 |
KLSRV_UPD_BASES_UPDATED |
Events of this type occur when the Download updates to the Administration Server repository task finishes updating databases. |
30 days |
KSN Proxy has started; KSN availability check has completed successfully |
7718 |
KSNPROXY_STARTED_CON_CHK_OK |
|
30 days |
KSN Proxy has stopped |
7720 |
KSNPROXY_STOPPED |
|
30 days |
Audit: Connection to the Administration Server has been established |
4147 |
KLAUD_EV_SERVERCONNECT |
|
30 days |
Audit: Object has been modified |
4148 |
KLAUD_EV_OBJECTMODIFY |
This event tracks changes in the following objects:
|
30 days |
Audit: Object status has changed |
4150 |
KLAUD_EV_TASK_STATE_CHANGED |
For example, this event occurs when a task has failed with an error. |
30 days |
Audit: Group settings have been modified |
4149 |
KLAUD_EV_ADMGROUP_CHANGED |
Events of this type occur when a security group has been edited. |
30 days |
Audit: Encryption keys have been imported or exported from Administration Server |
5100 |
KLAUD_EV_DPEKEYSEXPORT |
|
30 days |
Audit: Test connection to SIEM server succeeded |
5110 |
KLAUD_EV_SIEM_TEST_SUCCESS |
|
30 days |
Network Agent events
This section contains information about the events related to Network Agent.
Network Agent functional failure events
The table below shows the events of Kaspersky Security Center Network Agent that have the Functional failure severity level.
For each event that can be generated by an application, you can specify notification settings and storage settings on the Event configuration tab in the application policy. If you want to configure notification settings for all the events at once, configure general notification settings in the Administration Server properties.
Network Agent functional failure events
Event type display name |
Event type ID |
Event type |
Description |
Default storage term |
|---|---|---|---|---|
Update installation error |
7702 |
KLNAG_EV_PATCH_INSTALL_ERROR |
Events of this type occur if automatic updating and patching for Kaspersky Security Center Cloud Console components was not successful. The event does not concern updates of the managed Kaspersky applications. Read the event description. A Windows issue on the Administration Server might be a reason for this event. If the description mentions any issue of Windows configuration, resolve this issue. |
30 days |
Failed to install the third-party software update |
7697 |
KLNAG_EV_3P_PATCH_INSTALL_ERROR |
Events of this type occur if Vulnerability and patch management and Mobile Device Management features are in use, and if update of third-party software was not successful. Check whether the link to the third-party software is valid. Read the event description. |
30 days |
Failed to install the Windows Update updates |
7717 |
KLNAG_EV_WUA_INSTALL_ERROR |
Events of this type occur if Windows Updates were not successful. Configure Windows Updates in a Network Agent policy. Read the event description. Look for the error in the Microsoft Knowledge Base. Contact Microsoft Technical Support if you cannot resolve the issue yourself. |
30 days |
Network Agent warning events
The table below shows the events of Kaspersky Security Center Network Agent that have the Warning severity level.
For each event that can be generated by an application, you can specify notification settings and storage settings on the Event configuration tab in the application policy. If you want to configure notification settings for all the events at once, configure general notification settings in the Administration Server properties.
Network Agent warning events
Event type display name |
Event type ID |
Event type |
Default storage term |
|---|---|---|---|
Warning has been returned during installation of the software module update |
7701 |
KLNAG_EV_PATCH_INSTALL_WARNING |
30 days |
Third-party software update installation has completed with a warning |
7696 |
KLNAG_EV_3P_PATCH_INSTALL_WARNING |
30 days |
Third-party software update installation has been postponed |
7698 |
KLNAG_EV_3P_PATCH_INSTALL_SLIPPED |
30 days |
Security issue has occurred |
549 |
GNRL_EV_APP_INCIDENT_OCCURED |
30 days |
KSN Proxy has started. Failed to check KSN for availability |
7718 |
KSNPROXY_STARTED_CON_CHK_FAILED |
30 days |
Network Agent informational events
The table below shows the events of Kaspersky Security Center Network Agent that have the Info severity level.
For each event that can be generated by an application, you can specify notification settings and storage settings on the Event configuration tab in the application policy. If you want to configure notification settings for all the events at once, configure general notification settings in the Administration Server properties.
Network Agent informational events
Event type display name |
Event type ID |
Event type |
Default storage term |
|---|---|---|---|
Update for software modules has been installed successfully |
7699 |
KLNAG_EV_PATCH_INSTALLED_SUCCESSFULLY |
30 days |
Installation of update for software modules has started |
7700 |
KLNAG_EV_PATCH_INSTALL_STARTING |
30 days |
Application has been installed |
7703 |
KLNAG_EV_INV_APP_INSTALLED |
30 days |
Application has been uninstalled |
7704 |
KLNAG_EV_INV_APP_UNINSTALLED |
30 days |
Monitored application has been installed |
7705 |
KLNAG_EV_INV_OBS_APP_INSTALLED |
30 days |
Monitored application has been uninstalled |
7706 |
KLNAG_EV_INV_OBS_APP_UNINSTALLED |
30 days |
Third-party application has been installed |
7707 |
KLNAG_EV_INV_CMPTR_APP_INSTALLED |
30 days |
New device has been added |
7708 |
KLNAG_EV_DEVICE_ARRIVAL |
30 days |
Device has been removed |
7709 |
KLNAG_EV_DEVICE_REMOVE |
30 days |
Device has been detected |
7710 |
KLNAG_EV_NAC_DEVICE_DISCOVERED |
30 days |
Device has been authorized |
7711 |
KLNAG_EV_NAC_HOST_AUTHORIZED |
30 days |
Windows Desktop Sharing: File has been read |
7712 |
KLUSRLOG_EV_FILE_READ |
30 days |
Windows Desktop Sharing: File has been modified |
7713 |
KLUSRLOG_EV_FILE_MODIFIED |
30 days |
Windows Desktop Sharing: Application has been started |
7714 |
KLUSRLOG_EV_PROCESS_LAUNCHED |
30 days |
Windows Desktop Sharing: Started |
7715 |
KLUSRLOG_EV_WDS_BEGIN |
30 days |
Windows Desktop Sharing: Stopped |
7716 |
KLUSRLOG_EV_WDS_END |
30 days |
Third-party software update has been installed successfully |
7694 |
KLNAG_EV_3P_PATCH_INSTALLED_SUCCESSFULLY |
30 days |
Third-party software update installation has started |
7695 |
KLNAG_EV_3P_PATCH_INSTALL_STARTING |
30 days |
KSN Proxy has started. KSN availability check has completed successfully |
7719 |
KSNPROXY_STARTED_CON_CHK_OK |
30 days |
KSN Proxy has stopped |
7720 |
KSNPROXY_STOPPED |
30 days |
Using event selections
Event selections provide an onscreen view of named sets of events that are selected from the Administration Server database. These sets of events are grouped according to the following categories:
- By importance level—Critical events, Functional failures, Warnings, and Info events
- By time—Recent events
- By type—User requests and Audit events
You can create and view user-defined event selections based on the settings available, in the Kaspersky Security Center Cloud Console interface, for configuration.
Event selections are available in the Kaspersky Security Center Cloud Console, in the Monitoring & reporting section, by clicking Event selections.
By default, event selections include information for the last seven days.
Kaspersky Security Center Cloud Console has a default set of event (predefined) selections:
- Events with different importance levels:
- Critical events
- Functional failures
- Warnings
- Informational messages
- User requests (events of managed applications)
- Recent events (over the last week)
- Audit events
In Kaspersky Security Center Cloud Console, audit events related to service operations in your workspace are displayed. These events are conditioned by actions of Kaspersky specialists. These events, for example include the following: Administration Server ports changing; Administration Server database backup; creation, modification, and deletion of user accounts.
You can also create and configure additional user-defined selections. In user-defined selections, you can filter events by the properties of the devices they originated from (device names, IP ranges, and administration groups), by event types and severity levels, by application and component name, and by time interval. It is also possible to include task results in the search scope. You can also use a simple search field where a word or several words can be typed. All events that contain any of the typed words anywhere in their attributes (such as event name, description, component name) are displayed.
Both for predefined and user-defined selections, you can limit the number of displayed events or the number of records to search. Both options affect the time it takes Kaspersky Security Center Cloud Console to display the events. The larger the database is, the more time-consuming the process can be.
You can do the following:
- Edit properties of event selections
- Generate event selections
- View details of event selections
- Delete event selections
- Delete events from the Administration Server database
Creating an event selection
To create an event selection:
- In the main menu, go to Monitoring & reporting → Event selections.
- Click Add.
- In the New event selection window that opens, specify the settings of the new event selection. Do this in one or more of the sections in the window.
- Click Save to save the changes.
The confirmation window opens.
- To view the event selection result, keep the Go to selection result check box selected.
- Click Save to confirm the event selection creation.
If you kept the Go to selection result check box selected, the event selection result is displayed. Otherwise, the new event selection appears in the list of event selections.
Editing an event selection
To edit an event selection:
- In the main menu, go to Monitoring & reporting → Event selections.
- Select the check box next to the event selection that you want to edit.
- Click the Properties button.
An event selection settings window opens.
- Edit the properties of the event selection.
For predefined event selections, you can edit only the properties on the following tabs: General (except for the selection name), Time, and Access rights.
For user-defined selections, you can edit all properties.
- Click Save to save the changes.
The edited event selection is shown in the list.
Viewing a list of an event selection
To view an event selection:
- In the main menu, go to Monitoring & reporting → Event selections.
- Select the check box next to the event selection that you want to start.
- Do one of the following:
- If you want to configure sorting in the event selection result, do the following:
- Click the Reconfigure sorting and start button.
- In the displayed Reconfigure sorting for event selection window, specify the sorting settings.
- Click the name of the selection.
- Otherwise, if you want to view the list of events as they are sorted on the Administration Server, click the name of the selection.
- If you want to configure sorting in the event selection result, do the following:
The event selection result is displayed.
Exporting an event selection
Kaspersky Security Center Cloud Console allows you to save an event selection and its settings to a KLO file. You can use this KLO file to import the saved event selection both to Kaspersky Security Center Windows and Kaspersky Security Center Linux.
Note that you can export only user-defined event selections. Event selections from the default set of Kaspersky Security Center Cloud Console (predefined selections) cannot be saved to a file.
To export an event selection:
- In the main menu, go to Monitoring & reporting → Event selections.
- Select the check box next to the event selection that you want to export.
You cannot export multiple event selections at the same time. If you select more than one selection, the Export button will be disabled.
- Click the Export button.
- In the opened Save as window, specify the event selection file name and path, and then click the Save button.
The Save as window is displayed only if you use Google Chrome, Microsoft Edge, or Opera. If you use another browser, the event selection file is automatically saved in the Downloads folder.
Importing an event selection
Kaspersky Security Center Cloud Console allows you to import an event selection from a KLO file. The KLO file contains the exported event selection and its settings.
To import an event selection:
- In the main menu, go to Monitoring & reporting → Event selections.
- Click the Import button, and then choose an event selection file that you want to import.
- In the opened window, specify the path to the KLO file, and then click the Open button. Note that you can select only one event selection file.
The event selection processing starts.
The notification with the import results appears. If the event selection is imported successfully, you can click the View import details link to view the event selection properties.
After a successful import, the event selection is displayed in the selection list. The settings of the event selection are also imported.
If the newly imported event selection has a name identical to that of an existing event selection, the name of the imported selection is expanded with the (<next sequence number>) index, for example: (1), (2).
Page top
Viewing details of an event
To view details of an event:
- Start an event selection.
- Click the time of the required event.
The Event properties window opens.
- In the displayed window, you can do the following:
- View the information about the selected event
- Go to the next event and the previous event in the event selection result
- Go to the device on which the event occurred
- Go to the administration group that includes the device on which the event occurred
- For an event related to a task, go to the task properties
Exporting events to a file
Kaspersky Security Center Cloud Console allows you to save events from an event selection to a TXT file.
To export events to a file:
- Start an event selection.
- Select the check box next to the required event.
You can also select several events or the entire event selection.
- Click the Export to file button.
The selected event is exported to a TXT file.
Viewing an object history from an event
From an event of creation or modification of an object that supports revision management, you can switch to the revision history of the object.
To view an object history from an event:
- Start an event selection.
- Select the check box next to the required event.
- Click the Revision history button.
The revision history of the object is opened.
Logging information about events for tasks and policies
This section offers recommendations on how to minimize the number of events for tasks and policies stored in the database of Kaspersky Security Center Cloud Console. By default, every 1000 devices have 100,000 events. If this limit is exceeded, new events overwrite old ones. As a result, critical events may disappear. Also, the Administration Server warning event named The limit on the number of events in the database is exceeded, the events have been deleted may occur. In these cases, we recommend that you follow the instructions in this section.
As a result, you will increase the speed of executing scenarios associated with the analysis of the events. Also, these recommendations help you lower the risk that critical events will be overwritten by a large number of events.
By default, the properties of each task and policy provide for storing all events related to task execution and policy enforcement. However, if a task is run frequently (for example, more than once per week), the number of events may turn out to be too large and the events may flood the database. In this case, we recommend selecting one of two options in the task settings:
- Save events related to task progress. In this case, Kaspersky Security Center Cloud Console stores only information about task launch, progress, and completion (successful, with a warning, or with an error) from each device on which the task is run.
- Save only task execution results. In this case, Kaspersky Security Center Cloud Console stores only information about task completion (successful, with a warning, or with an error) from each device on which the task is run.
If a policy has been defined for a fairly large number of devices (for example, more than 10,000), the number of events may also turn out to be large, and the events may flood the database. In this case, we recommend selecting only the most critical events in the policy settings and enabling their logging. You are advised to disable the logging of all other events.
You can also reduce the storage term for events associated with a task or a policy. The default period is 7 days for task-related events and 30 days for policy-related events. When changing the event storage term, consider the work procedures in place at your organization and the amount of time that the system administrator can devote to analyzing each event.
It is advisable to modify the event storage settings if events about changes in the intermediate statuses of group tasks and events about applying policies occupy a large share of all events in the Kaspersky Security Center Cloud Console database.
Page top
Deleting events
To delete one or several events:
- Start an event selection.
- Select the check boxes next to the required events.
- Click the Delete button.
The selected events are deleted and cannot be restored.
Deleting event selections
You can delete only user-defined event selections. Predefined event selections cannot be deleted.
To delete one or several event selections:
- In the main menu, go to Monitoring & reporting → Event selections.
- Select the check boxes next to the event selections that you want to delete.
- Click Delete.
- In the window that opens, click OK.
The event selection is deleted.
Notifications and device statuses
This section contains information on how to view notifications, configure notification delivery, use device statuses, and enable changing device statuses.
About notifications
Kaspersky Security Center Cloud Console provides the capability to monitor your organization's network by sending notifications about any event that you consider important. For any event you can configure notifications by email.
Upon receiving notifications by email, you can decide on your response to an event. This response has to be one that is the most appropriate for your organization's network.
Configuring the switching of device statuses
You can change conditions to assign the Critical or Warning status to a device.
To enable changing the device status to Critical:
- In the main menu, go to Assets (Devices) → Hierarchy of groups.
- In the list of groups that opens, click the link with the name of a group for which you want to change switching the device statuses.
- In the properties window that opens, select the Device status tab.
- In the left pane, select Critical.
- In the right pane, in the Set to Critical if these are specified section, enable the condition to switch a device to the Critical status.
You can change only settings that are not locked in the parent policy.
- Select the radio button next to the condition in the list.
- In the upper-left corner of the list, click the Edit button.
- Set the required value for the selected condition.
Values cannot be set for every condition.
- Click OK.
When specified conditions are met, the managed device is assigned the Critical status.
To enable changing the device status to Warning:
- In the main menu, go to Assets (Devices) → Hierarchy of groups.
- In the list of groups that opens, click the link with the name of a group for which you want to change switching the device statuses.
- In the properties window that opens, select the Device status tab.
- In the left pane, select Warning.
- In the right pane, in the Set to Warning if these are specified section, enable the condition to switch a device to the Warning status.
You can change only settings that are not locked in the parent policy.
- Select the radio button next to the condition in the list.
- In the upper-left corner of the list, click the Edit button.
- Set the required value for the selected condition.
Values cannot be set for every condition.
- Click OK.
When specified conditions are met, the managed device is assigned the Warning status.
Configuring notification delivery
You can configure email notification about events occurring in Kaspersky Security Center Cloud Console.
To configure notification delivery of events occurring in Kaspersky Security Center Cloud Console:
- In the main menu, click the settings icon () next to the name of the required Administration Server.
The Administration Server properties window opens with the General tab selected.
- Click the Notification section, and in the right pane define the email notification settings:
- Click the Send test message button to check whether you configured notifications properly: the application sends a test notification to the email addresses that you specified.
- Click the OK button to close Administration Server properties window.
The saved notification delivery settings are applied to all events that occur in Kaspersky Security Center Cloud Console.
You can override notification delivery settings for certain events in the Event configuration section of the Administration Server settings, of a policy's settings, or of an application's settings.
Kaspersky announcements
This section describes how to use, configure, and disable Kaspersky announcements.
About Kaspersky announcements
The Kaspersky announcements section (Monitoring & reporting → Kaspersky announcements) keeps you informed by providing information related to Kaspersky Security Center Cloud Console and the managed applications installed on the managed devices. Kaspersky Security Center Cloud Console periodically updates the information in the section by removing outdated announcements and adding new information.
Kaspersky Security Center Cloud Console shows only those Kaspersky announcements that are related to the currently connected Administration Server and the Kaspersky applications installed on the managed devices of this Administration Server. The announcements are shown individually for any type of Administration Server—primary, secondary, or virtual.
If several administrators use Kaspersky Security Center Cloud Console and they set different interface languages, Kaspersky Security Center Cloud Console displays Kaspersky announcements in every language used by the administrators. When you change the interface language, Kaspersky announcements in the selected language are added to the section automatically after you sign out of the console and then sign in again.
The announcements include information of the following types:
- Security-related announcements
Security-related announcements are intended to keep the Kaspersky applications installed in your network up-to-date and fully functional. The announcements may include information about critical updates for Kaspersky applications, fixes for found vulnerabilities, and ways to fix other issues in Kaspersky applications. Security-related announcements are enabled by default. If you do not want to receive the announcements, you can disable this feature.
You cannot disable the security-related announcements in the trial mode of Kaspersky Security Center Cloud Console.
To show you the information that corresponds to your network protection configuration, Kaspersky Security Center Cloud Console sends data to Kaspersky cloud servers and receives only those announcements that relate to the Kaspersky applications installed in your network. The data set that can be sent to the servers is described in the Kaspersky Security Center Cloud Console Agreement that you accept when you create a company workspace.
- Marketing announcements
Marketing announcements include information about special offers for your Kaspersky applications, advertisements, and news from Kaspersky. Marketing announcements are disabled by default. You receive this type of announcements only if you enabled Kaspersky Security Network (KSN). You can disable marketing announcements by disabling KSN.
To show you only relevant information that might be helpful in protecting your network devices and in your everyday tasks, Kaspersky Security Center Cloud Console sends data to Kaspersky cloud servers and receives the appropriate announcements. The data set that can be sent to the servers is described in the Processed Data section of the KSN Statement.
New information is divided into the following categories, according to importance:
- Critical info
- Important news
- Warning
- Info
When new information appears in the Kaspersky announcements section, Kaspersky Security Center Cloud Console displays a notification label that corresponds to the importance level of the announcements. You can click the label to view this announcement in the Kaspersky announcements section.
Disabling Kaspersky announcements
The Kaspersky announcements section (Monitoring & reporting → Kaspersky announcements) keeps you informed by providing information related to your version of Kaspersky Security Center Cloud Console and managed applications installed on the managed devices. If you do not want to receive Kaspersky announcements, you can disable this feature.
The Kaspersky announcements include two types of information: security-related announcements and marketing announcements. You can disable the announcements of each type separately.
You cannot disable the security-related announcements in the trial mode of Kaspersky Security Center Cloud Console.
To disable security-related announcements:
- In the main menu, click the settings icon () next to the name of the Administration Server.
The Administration Server properties window opens.
- On the General tab, select the Kaspersky announcements section.
- Switch the toggle button to the Security-related announcements Disabled position.
- Click the Save button.
Kaspersky announcements are disabled.
Marketing announcements are disabled by default. You receive marketing announcements only if you enabled Kaspersky Security Network (KSN). You can disable this type of announcement by disabling KSN.
To disable marketing announcements:
- In the main menu, click the settings icon () next to the name of the Administration Server.
The Administration Server properties window opens.
- On the General tab, select the KSN settings section.
- Disable the I agree to use Kaspersky Security Network option.
- Click the Save button.
Marketing announcements are disabled.
Receiving license expiration warning
To add a Kaspersky Endpoint Security for Business Select license key to the Administration Server:
- In the main menu, click the settings icon () next to the name of the Administration Server.
The Administration Server properties window opens.
- On the General tab, select the License keys section.
- Click Select.
- In the window that opens, select your license and click OK.
Alternatively, if no license is displayed, you can click Add new license key and use your activation code.
The license is added to the Administration Server repository. This makes the Administration Server generate a critical event License expires soon one day before the license term expires and a critical event Limited functionality mode after the license term expires. If you want, you can configure notification delivery.
If you add a Kaspersky Endpoint Security for Business Select license key to the Administration Server repository, then the license is considered used on one device.
Cloud Discovery
Kaspersky Security Center Cloud Console allows you to monitor the use of cloud services on managed devices running Windows and to block access to cloud services that you consider unwanted. Cloud Discovery tracks user attempts to gain access to these services through both browsers and desktop applications. It also tracks user attempts to gain access to cloud services over unencrypted connections (for example, using the HTTP protocol). This feature helps you to detect and halt the use of cloud services by shadow IT.
The Cloud Discovery feature is only available if you have purchased a Kaspersky Next license. For details, refer to Licenses and the minimum number of devices for each license.
You can enable the Cloud Discovery feature and select the security policies or profiles for which you want to enable the feature. You can also enable or disable the feature separately in each security policy or profile. You can block access to cloud services that you do not want users to access.
To be able to block access to unwanted cloud services, make sure that the following prerequisites are met:
- You use Kaspersky Endpoint Security 11.2 for Windows or later. Earlier versions of the security application only allow you to monitor the use of cloud services.
- You have purchased a Kaspersky Next license, which provides the ability to block access to unwanted cloud services. For details, refer to Kaspersky Next Help.
The Cloud Discovery widget and the Cloud Discovery reports display information about successful and blocked attempts to gain access to cloud services. The widget also displays the risk level of each cloud service. Kaspersky Security Center Cloud Console gets information about the use of cloud services from all of the managed devices that are protected only by the security policies or profiles that have the feature enabled.
Enabling Cloud Discovery by using the widget
The Cloud Discovery feature allows you to get information about the use of cloud services from all of the managed devices that are protected only by the security policies that have the feature enabled. You can enable or disable Cloud Discovery for the Kaspersky Endpoint Security for Windows policy only.
There are two ways to enable the Cloud Discovery feature:
- By using the Cloud Discovery widget.
- In the properties of the Kaspersky Endpoint Security for Windows policy.
For details on how to enable the Cloud Discovery feature in the Kaspersky Endpoint Security for Windows policy properties, refer to the Cloud Discovery section of Kaspersky Endpoint Security for Windows Help.
Note that you can disable the Cloud Discovery feature in the Kaspersky Endpoint Security for Windows policy parameters only.
To enable Cloud Discovery, you must have the Write right in the General features: Basic functionality functional area.
To enable the Cloud Discovery feature by using the Cloud Discovery widget:
- Go to Kaspersky Security Center Cloud Console.
- In the main menu, go to Monitoring & reporting → Dashboard.
- On the Cloud Discovery widget, click the Enable button.
- In the Enable Cloud Discovery window that opens, select the security policies for which you want to enable the feature, and then click the Enable button.
The following policy settings will be enabled automatically: Inject script into web traffic to interact with web pages, Web Session monitor, and Encrypted connections scan.
The Cloud Discovery feature is enabled and the widget is added to the dashboard.
Page top
Adding the Cloud Discovery widget to the dashboard
You can add the Cloud Discovery widget to the dashboard to monitor the use of cloud services on managed devices.
To add the Cloud Discovery widget to the dashboard, you must have the Write right in the General features: Basic functionality functional area.
To add the Cloud Discovery widget to the dashboard:
- Go to Kaspersky Security Center Cloud Console.
- In the main menu, go to Monitoring & reporting → Dashboard.
- Click the Add or restore widget button.
- In the list of available widgets, click the chevron icon () next to the Other category.
- Select the Cloud Discovery widget, and then click the Add button.
If the Cloud Discovery feature is disabled, follow the instructions in the Enabling Cloud Discovery by using the widget section.
The selected widget is added at the end of the dashboard.
Page top
Viewing information about the use of cloud services
You can view the Cloud Discovery widget that shows information about attempts to gain access to cloud services. The widget also displays the risk level of each cloud service. Kaspersky Security Center Cloud Console gets information about the use of cloud services from all of the managed devices that are protected only by the security policies that have the feature enabled.
Before viewing, make sure that:
- The Cloud Discovery widget is added to the dashboard.
- The Cloud Discovery feature is enabled.
- You have the Read right in the General features: Basic functionality functional area.
To view the Cloud Discovery widget:
- Go to Kaspersky Security Center Cloud Console.
- In the main menu, go to Monitoring & reporting → Dashboard.
The Cloud Discovery widget is displayed on the dashboard.
- On the left side of the Cloud Discovery widget, select a category of cloud services.
The table on the right side of the widget displays up to five services from the selected category, to which users most often try to gain access. Both successful and blocked attempts are counted.
- On the right side of the widget, select a specific service.
The table below displays up to ten devices that most often attempt to gain access to the service. In this table, you can generate two types of reports: report on successful access attempts and report on blocked access attempts.
In addition, in this table you can block access to the cloud service for a specific device.
The widget displays the requested information.
From the displayed widget, you can do the following:
- Proceed to the Monitoring & reporting → Reports section, to view the Cloud Discovery reports.
- Block or allow access to the selected cloud service.
The Cloud Discovery feature is only available if you have purchased a Kaspersky Next license. For details, refer to Licenses and the minimum number of devices for each license.
Page top
Risk level of a cloud service
For each cloud service, Cloud Discovery provides you with a risk level. The risk level helps you determine which services do not fit the security requirements of your organization. For example, you may want to take the risk level into account when deciding whether to block access to a certain service.
The risk level is an estimated index and does not say anything about the quality of a cloud service or about the service manufacturer. The risk level is simply a recommendation from Kaspersky experts.
Risk levels of cloud services are displayed in the Cloud Discovery widget and in the list of all monitored cloud services.
Page top
Blocking access to unwanted cloud services
You can block access to cloud services that you do not want users to access. You can also allow access to cloud services that were previously blocked.
Among other considerations, you may want to take the risk level into account when deciding whether to block access to a certain service.
You can block or allow access to cloud services for a security policy or profile.
There are two ways to block access to unwanted cloud services:
- By using the Cloud Discovery widget.
In this case, you can block access to the services one by one.
- In the properties of the Kaspersky Endpoint Security for Windows policy.
In this case, you can block access to the services one by one or block an entire category at once.
For details on how to enable the Cloud Discovery feature in the Kaspersky Endpoint Security for Windows policy properties, refer to the Cloud Discovery section of Kaspersky Endpoint Security for Windows Help.
To block or allow access to a cloud service by using the widget:
- Open the Cloud Discovery widget, and then select the required cloud service.
- In the Top 10 devices that use the service pane, find the security policy or profile for which you want to block or allow the service.
- On the required line, in the Access status in policy or profile column, do any of the following:
- To block the service, select Blocked in the drop-down list.
- To allow the service, select Allowed in the drop-down list.
- Click the Save button.
Access to the selected service is blocked or allowed for the security policy or profile.
Page top
Remote diagnostics of client devices
You can use remote diagnostics for remote execution of the following operations on Windows-based and Linux-based client devices:
- Enabling and disabling tracing, changing the tracing level, and downloading the trace file
- Downloading system information and application settings
- Downloading event logs
- Generating a dump file for an application
- Starting diagnostics and downloading diagnostics reports
- Starting, stopping, and restarting applications
You can use event logs and diagnostics reports downloaded from a client device to troubleshoot problems on your own. Also, if you contact Kaspersky Technical Support, a Technical Support specialist might ask you to download trace files, dump files, event logs, and diagnostics reports from a client device for further analysis at Kaspersky.
Opening the remote diagnostics window
To perform remote diagnostics on Windows-based and Linux-based client devices, you first have to open the remote diagnostics window.
To open the remote diagnostics window:
- To select the device for which you want to open the remote diagnostics window, perform one of the following:
- If the device belongs to an administration group, in the main menu, go to Assets (Devices) → Groups → <group name> → Managed devices.
- If the device belongs to the Unassigned devices group, in the main menu, go to Discovery & deployment → Unassigned devices.
- Click the name of the required device.
- In the device properties window that opens, select the Advanced tab.
- On the Advanced tab, click Remote diagnostics.
This opens the Remote diagnostics window of a client device. If connection between Administration Server and the client device is not established, the error message is displayed.
Alternatively, if you need to obtain all diagnostic information about a Linux-based client device at once, you can run the collect.sh script on this device.
Page top
Enabling and disabling tracing for applications
You can enable and disable tracing for applications, including Xperf tracing.
Enabling and disabling tracing
To enable or disable tracing on a remote device:
- Open the remote diagnostics window of a client device.
- In the remote diagnostics window, select the Kaspersky applications tab.
In the Application management section, the list of Kaspersky applications installed on the device displays.
- In the application list, select the application for which you want to enable or disable tracing.
The list of remote diagnostics options opens.
- If you want to enable tracing:
- In the Tracing section, click Enable tracing.
- In the Modify tracing level window that opens, we recommend that you keep the default values of the settings. When required, a Technical Support specialist will guide you through the configuration process. The following settings are available:
- Tracing level
- Rotation-based tracing
This setting is available for Kaspersky Endpoint Security only.
- Click Save.
The tracing is enabled for the selected application. In some cases, the security application and its task must be restarted in order to enable tracing.
On Linux-based client devices, tracing for the Updater of Kaspersky Security Agent component is regulated by the Network Agent settings. Therefore, the Enable tracing and Modify tracing level options are disabled for this component on client devices running Linux.
- If you want to disable tracing for the selected application, click Disable tracing.
The tracing is disabled for the selected application.
Enabling Xperf tracing
For Kaspersky Endpoint Security, a Technical Support specialist may ask you to enable Xperf tracing for information about the system performance.
To enable and configure Xperf tracing or disable it:
- Open the remote diagnostics window of a client device.
- In the remote diagnostics window, select the Kaspersky applications tab.
In the Application management section, the list of Kaspersky applications installed on the device displays.
- In the list of applications, select Kaspersky Endpoint Security for Windows.
The list of remote diagnostics options for Kaspersky Endpoint Security for Windows displays.
- In the Xperf tracing section, click Enable Xperf tracing.
If Xperf tracing is already enabled, the Disable Xperf tracing button is displayed instead. Click this button if you want to disable Xperf tracing for Kaspersky Endpoint Security for Windows.
- In the Change Xperf tracing level window that opens, depending on the request from the Technical Support specialist, do the following:
- Select one of the following tracing levels:
- Select one of the following Xperf tracing types:
You may also be asked to enable the Rotation file size, in MB option to prevent excessive increase in the size of the trace file. Then specify the maximum size of the trace file. When the file reaches the maximum size, the oldest tracing information is overwritten with new information.
- Define the rotation file size.
- Click Save.
Xperf tracing is enabled and configured.
- If you want to disable Xperf tracing for Kaspersky Endpoint Security for Windows, click Disable Xperf tracing in the Xperf tracing section.
Xperf tracing is disabled.
Downloading trace files of an application
You can download trace files from a client device only if one of the following conditions is met: the Do not disconnect from the Administration Server option is enabled in the settings of the device, a push server is in use, or a connection gateway is in use. Otherwise, downloading is not possible.
The maximum total number of devices with the Do not disconnect from the Administration Server option selected is 300.
To download a trace file of an application:
- Open the remote diagnostics window of a client device.
- In the remote diagnostics window, select the Kaspersky applications tab.
In the Application management section, the list of Kaspersky applications installed on the device displays.
- In the list of applications, select the application for which you want to download a trace file.
- In the Tracing section, click the Trace files button.
This opens the Device tracing logs window, where a list of trace files is displayed.
- In the list of trace files, select the file that you want to download.
- Do one of the following:
- Download the selected file by clicking the Download. You can select one or several files for downloading.
- Download a portion of the selected file:
- Click Download a portion.
You cannot download portions of several files at the same time. If you select more than one trace file, the Download a portion button will be disabled.
- In the window that opens, specify the name and the file portion to download, according to your needs.
For Linux-based devices, editing the file portion name is not available.
- Click Download.
- Click Download a portion.
The selected file, or its portion, is downloaded to the location that you specify.
Page top
Deleting trace files
You can delete trace files that are no longer needed.
To delete a trace file:
- Open the remote diagnostics window of a client device.
- In the remote diagnostics window that opens, select the Event logs tab.
- In the Trace files section, click Windows Update logs or Remote installation logs, depending on which trace files you want to delete.
This opens the Device tracing logs window, where a list of trace files is displayed.
- In the list of trace files, select one or several files that you want to delete.
- Click the Remove button.
The selected trace files are deleted.
Page top
Downloading application settings
You can download application settings from a client device only if one of the following conditions is met: the Do not disconnect from the Administration Server option is enabled in the settings of the device, a push server is in use, or a connection gateway is in use. Otherwise, downloading is not possible.
The maximum total number of devices with the Do not disconnect from the Administration Server option selected is 300.
To download application settings from a client device:
- Open the remote diagnostics window of a client device.
- In the remote diagnostics window, select the Kaspersky applications tab.
- In the Application settings section, click the Download button to download information about the settings of the applications installed on the client device.
The ZIP archive with information is downloaded to the specified location.
Page top
Downloading system information from a client device
You can download system information to your device from a client device only if one of the following conditions is met: the Do not disconnect from the Administration Server option is enabled in the settings of the device, a push server is in use, or a connection gateway is in use. Otherwise, downloading is not possible.
The maximum total number of devices with the Do not disconnect from the Administration Server option selected is 300.
To download system information from a client device:
- Open the remote diagnostics window of a client device.
- In the remote diagnostics window, select the System information tab.
- Click the Download button to download the system information about the client device.
The file with information is downloaded to the specified location.
Page top
Downloading event logs
You can download event logs to your device from a client device only if one of the following conditions is met: the Do not disconnect from the Administration Server option is enabled in the settings of the device, a push server is in use, or a connection gateway is in use. Otherwise, downloading is not possible.
The maximum total number of devices with the Do not disconnect from the Administration Server option selected is 300.
To download an event log from a remote device:
- Open the remote diagnostics window of a client device.
- In the remote diagnostics window, on the Event logs tab, click All device logs.
- In the All device logs window, select one or several relevant logs.
- Do one of the following:
- Download the selected log by clicking Download entire file.
- Download a portion of the selected log:
- Click Download a portion.
You cannot download portions of several logs at the same time. If you select more than one event log, the Download a portion button will be disabled.
- In the window that opens, specify the name and the log portion to download, according to your needs.
- Click Download.
- Click Download a portion.
The selected event log, or a portion of it, is downloaded to the specified location.
Page top
Starting, stopping, restarting the application
You can start, stop, and restart applications on a client device.
To start, stop, or restart an application:
- Open the remote diagnostics window of a client device.
- In the remote diagnostics window, select the Kaspersky applications tab.
In the Application management section, the list of Kaspersky applications installed on the device displays.
- In the list of applications, select the application that you want to start, stop, or restart.
- Select an action by clicking one of the following buttons:
- Stop application
This button is available only if the application is currently running.
- Restart application
This button is available only if the application is currently running.
- Start application
This button is available only if the application is not currently running.
- Stop application
Depending on the action that you have selected, the required application is started, stopped, or restarted on the client device.
If you restart the Network Agent, a message is displayed stating that the current connection of the device to the Administration Server will be lost.
Page top
Running the remote diagnostics of an application and downloading the results
To start diagnostics for an application on a remote device and download the results:
- Open the remote diagnostics window of a client device.
- In the remote diagnostics window, select the Kaspersky applications tab.
In the Application management section, the list of Kaspersky applications installed on the device displays.
- In the list of applications, select the application for which you want to run remote diagnostics.
The list of remote diagnostics options opens.
- In the Diagnostics report section, click the Run diagnostics button.
This starts the remote diagnostics process and generates a diagnostics report. When the diagnostics process is complete, the Download diagnostics report button becomes available.
- Click the Download diagnostics report button to download the report.
The report is downloaded to the specified location.
Page top
Running an application on a client device
You may have to run an application on the client device, if a Kaspersky support specialist requests it. You do not have to install the application on that device.
If you want to run a custom script on the client device, you can use the KLACDT_SAVE_SETTING environment variable to determine the path where the execution results will be saved. For example:
- For a Windows-based device:
@echo some result > %KLACDT_SAVE_SETTING%\res.log - For a Linux-based device:
echo some result > $KLACDT_SAVE_SETTING/res.log
To run an application on the client device:
- Open the remote diagnostics window of a client device.
- In the remote diagnostics window, select the Running a remote application tab.
- In the Object type field, select the type of object that you want to upload:
- Select File to upload the executable file.
- Select Folder to upload the folder containing the application that you want to run on the client device.
If you select this object type, the Name of the executable file to be run field appears. In this field, specify the name of the executable file in the folder. You can also specify the relative path to the file.
- Select Archive to upload the ZIP archive containing the application that you want to run on the client device.
If you select this object type, the Name of the executable file to be run field appears. In this field, specify the name of the executable file in the folder that you want to run on the client device. You can also specify the relative path to the file.
The ZIP archive must include the utility folder. This folder contains the executable file to be run on a remote device.
- Upload the object by selecting it in the system window, or dragging it to the upload field.
- If necessary, in the Command line arguments field, specify the command line arguments to be passed when running the executable file.
- Click the Upload and run button to run the selected application on a client device.
- After the application execution is completed successfully, download the execution results by clicking the Download application execution results button.
The application execution results are stored until you run a new diagnostic or close the window.
Remote diagnostics of the client device by using the application is completed.
Page top
Generating a dump file for an application
An application dump file allows you to view parameters of the application running on a client device at a point in time. This file also contains information about modules that were loaded for an application.
Generating dump files is available only for 32-bit processes running on Windows-based client devices. For client devices running Linux and for 64-bit processes this feature is not supported.
To create a dump file for an application:
- Open the remote diagnostics window of a client device.
- In the remote diagnostics window, select click the Running a remote application tab.
- In the Generating the process dump file section, specify the executable file of the application for which you want to generate a dump file.
- Click the Download button to save the dump file for the specified application.
If the specified application is not running on the client device, the error message will be displayed.
Running remote diagnostics on a Linux-based client device
Kaspersky Security Center Cloud Console allows you to download the basic diagnostic information from a client device. Alternatively, you can obtain the diagnostic information about a Linux-based device by using the collect.sh script by Kaspersky. This script is run on the Linux-based client device that needs to be diagnosed, and then it generates a file with the diagnostic information, the system information about this device, trace files of applications, device logs, and a dump file for emergency-terminated applications.
We recommend that you use the collect.sh script to obtain all diagnostic information about the Linux-based client device at once. If you download the diagnostic information remotely through Kaspersky Security Center Cloud Console, you will need to go through all sections of the remote diagnostics interface. Also the diagnostic information for a Linux-based device will probably not be obtained completely.
If you need to send the generated file with the diagnostic information to the Kaspersky Technical Support, delete all confidential information before sending the file.
To download the diagnostic information from a Linux-based client device by using the collect.sh script:
- Download the collect.sh script packed in the collect.tar.gz archive.
- Copy the downloaded archive to the Linux-based client device that needs to be diagnosed.
- Run the following command to unpack the collect.tar.gz archive:
# tar -xzf collect.tar.gz - Run the following command to specify the script execution rights:
# chmod +x collect.sh - Run the collect.sh script by using an account with administrator rights:
# ./collect.sh
A file with the diagnostic information is generated and saved to the /tmp/$HOST_NAME-collect.tar.gz folder.
Page top
Exporting events to SIEM systems
This section describes how to configure export of events to the SIEM systems.
Configuring event export to SIEM systems
This section provides a scenario for configuring the export of events from Administration Server to external SIEM systems. Exporting information about events to external SIEM systems enables administrators of SIEM systems to respond promptly to security system events that occur on a managed device or groups of devices.
Prerequisites
Before you start configuring the export of events in the Kaspersky Security Center Cloud Console:
- Learn more about the methods of event export.
- Make sure that you know the values of the system settings.
You can perform the steps of this scenario in any order.
Stages
The process of the export of events to a SIEM system consists of the following stages:
- Configuring the SIEM system to receive events from Kaspersky Security Center Cloud Console
You have to configure receiving events from Kaspersky Security Center Cloud Console in the SIEM system.
- Marking events for export
You have to mark which events you want to export to the SIEM system. First of all, mark the general events that occur in all managed Kaspersky applications. Additionally, you can mark the events for specific managed Kaspersky applications.
- Configuring Kaspersky Security Center Cloud Console for export of events to a SIEM system
You have to configure Kaspersky Security Center Cloud Console to start export of events to a SIEM system.
Results
After configuring the export of events to a SIEM system, you can view the export results if you selected events that you want to export.
Before you begin
When setting up the automatic export of events in the Kaspersky Security Center Cloud Console, you must specify some of the SIEM system settings. It is recommended that you check these settings in advance in order to prepare for setting up Kaspersky Security Center Cloud Console.
To successfully configure automatic sending of events to a SIEM system, you must know the following settings:
About event export
Kaspersky Security Center Cloud Console allows you to receive information about events that occur during the operation of Administration Server and Kaspersky applications installed on managed devices. Information about events is saved in the Administration Server database.
You can use event export within centralized systems that deal with security issues on an organizational and technical level, provide security monitoring services, and consolidate information from different solutions. These are SIEM systems, which provide real-time analysis of security alerts and events generated by network hardware and applications, or Security Operation Centers (SOCs).
These systems receive data from many sources, including networks, security, servers, databases, and applications. SIEM systems also provide functionality to consolidate monitored data in order to help you avoid missing critical events. In addition, the systems perform automated analysis of correlated events and alerts in order to notify the administrators of immediate security issues. Alerting can be implemented through a dashboard or can be sent through third-party channels such as email.
The process of exporting events from Kaspersky Security Center Cloud Console to external SIEM systems involves two parties: an event sender, Kaspersky Security Center Cloud Console, and an event receiver, a SIEM system. To successfully export events, you must configure this in your SIEM system and in the Kaspersky Security Center Cloud Console. It does not matter which side you configure first. You can either configure the transmission of events in the Kaspersky Security Center Cloud Console, and then configure the receipt of events by the SIEM system, or vice versa.
Syslog format of event export
You can send events in the Syslog format to any SIEM system. Using the Syslog format, you can relay any events that occur on the Administration Server and in Kaspersky applications that are installed on managed devices. When exporting events in the Syslog format, you can select exactly which types of events will be relayed to the SIEM system.
Receipt of events by the SIEM system
The SIEM system must receive and correctly parse the events received from Kaspersky Security Center Cloud Console. For these purposes, you must properly configure the SIEM system. The configuration depends on the specific SIEM system utilized. However, there are a number of general steps in the configuration of all SIEM systems, such as configuring the receiver and the parser.
Page top
Configuring an event export in a SIEM system
The process of exporting events from Kaspersky Security Center Cloud Console to external SIEM systems involves two parties: an event sender, Kaspersky Security Center Cloud Console, and an event receiver, a SIEM system. You must configure the export of events in your SIEM system and in the Kaspersky Security Center Cloud Console.
The settings that you specify in the SIEM system depend on the particular system that you are using. Generally, for all SIEM systems you must set up a receiver and, optionally, a message parser to parse received events.
Setting up the receiver
To receive events sent by Kaspersky Security Center Cloud Console, you must set up the receiver in your SIEM system. In general, the following settings must be specified in the SIEM system:
- Port
Specify the port number to connect to Kaspersky Security Center Cloud Console. This port must be the same as the port you specify in Kaspersky Security Center Cloud Console during configuration with a SIEM system.
- Message protocol or source type
Specify the Syslog format.
Depending on the SIEM system used, you may have to specify some additional receiver settings.
Message parsers
Exported events are passed to SIEM systems as messages. These messages must be properly parsed so that information on the events can be used by the SIEM system. Message parsers are a part of the SIEM system—they are used to split the contents of the message into the relevant fields, such as event ID, severity, description, parameters, and so on. This enables the SIEM system to process events received from Kaspersky Security Center Cloud Console so that they can be stored in the SIEM system database.
Marking of events for export to SIEM systems in Syslog format
After enabling automatic export of events, you must select which events will be exported to the external SIEM system.
You can configure export of events in the Syslog format to an external system based on one of the following conditions:
- Marking general events. If you mark events to export in a policy, in the settings of an event, or in the Administration Server settings, the SIEM system will receive the marked events that occurred in all applications managed by the specific policy. If exported events were selected in the policy, you will not be able to redefine them for an individual application managed by this policy.
- Marking events for a managed application. If you mark events to export for a managed application installed on a managed device, the SIEM system will receive only the events that occurred in this application.
Marking events of a Kaspersky application for export in the Syslog format
If you want to export events that occurred in a specific managed application installed on the managed devices, mark the events for export in the application policy. In this case, the marked events are exported from all of the devices included in the policy scope.
To mark events for export for a specific managed application:
- In the main menu, go to Assets (Devices) → Policies & profiles.
- Click the policy of the application for which you want to mark events.
The policy settings window opens.
- Go to the Event configuration section.
- Select the check boxes next to the events that you want to export to a SIEM system.
- Click the Mark for export to SIEM system by using Syslog button.
You can also mark an event for export to a SIEM system in the Event registration section, which opens by clicking the link of the event.
- A check mark (
 ) appears in the Syslog column of the event or events that you marked for export to the SIEM system.
 - Click the Save button.
The marked events from the managed application are ready to be exported to a SIEM system.
You can mark which events to export to a SIEM system for a specific managed device. If previously exported events were marked in an application policy, you will not be able to redefine the marked events for a managed device.
To mark events for export for a managed device:
- In the main menu, go to Assets (Devices) → Managed devices.
The list of managed devices is displayed.
- Click the link with the name of the required device in the list of managed devices.
The properties window of the selected device is displayed.
- Go to the Applications section.
- Click the link with the name of the required application in the list of applications.
- Go to the Event configuration section.
- Select the check boxes next to the events that you want to export to SIEM.
- Click the Mark for export to SIEM system by using Syslog button.
Also, you can mark an event for export to a SIEM system in the Event registration section, that opens by clicking the link of the event.
- A check mark () appears in the Syslog column of the event or events that you marked for export to the SIEM system.
From now on, Administration Server sends the marked events to the SIEM system if export to the SIEM system is configured.
Marking general events for export in Syslog format
You can mark general events that Administration Server will export to SIEM systems by using the Syslog format.
To mark general events for export to a SIEM system:
- Do one of the following:
- In the main menu, click the settings icon () next to the name of the required Administration Server.
- In the main menu, go to Assets (Devices) → Policies & profiles, and then click a link of a policy.
- In the main menu, click the settings icon (
- In the window that opens, go to the Event configuration tab.
- Click Mark for export to SIEM system by using Syslog.
Also, you can mark an event for export to SIEM system in the Event registration section, that opens by clicking the link of the event.
- A check mark () appears in the Syslog column of the event or events that you marked for export to the SIEM system.
From now on, Administration Server sends the marked events to the SIEM system if export to the SIEM system is configured.
About exporting events using Syslog format
You can use the Syslog format to export to SIEM systems the events that occur in Administration Server and other Kaspersky applications installed on managed devices.
Syslog is a standard for message logging protocol. It permits separation of the software that generates messages, the system that stores them, and the software that reports and analyzes them. Each message is labeled with a facility code, indicating the software type that generates the message, and is assigned a severity level.
The Syslog format is defined by Request for Comments (RFC) documents published by the Internet Engineering Task Force (internet standards). The RFC 5424 standard is used to export the events from Kaspersky Security Center Cloud Console to external systems.
In Kaspersky Security Center Cloud Console, you can configure export of the events to the external systems using the Syslog format.
The export process consists of two steps:
- Enabling automatic event export. At this step, Kaspersky Security Center Cloud Console is configured so that it sends events to the SIEM system. Kaspersky Security Center Cloud Console starts sending events immediately after you enable automatic export.
- Selecting the events to be exported to the external system. At this step, you select which event to export to the SIEM system.
Configuring Kaspersky Security Center Cloud Console for export of events to a SIEM system
To export events to a SIEM system, you have to configure the process of export in Kaspersky Security Center Cloud Console.
To configure export to SIEM systems in the Kaspersky Security Center Cloud Console:
- In the main menu, click the settings icon () next to the name of the required Administration Server.
The Administration Server properties window opens.
- On the General tab, select the SIEM section.
- Click the Settings link.
The Export settings section opens.
- Specify the settings in the Export settings section:
- If you want, you can export archived events from the Administration Server database and set the start date from which you want to start the export of archived events:
- Click the Set the export start date link.
- In the section that opens, specify the start date in the Date to start export from field.
- Click the OK button.
- Switch the option to the Automatically export events to SIEM system database Enabled position.
- To check that the SIEM system connection is configured, click the Check connection button.
The connection status will be displayed.
- Click the Save button.
Export to a SIEM system is configured. From now on, if you configured the receiving of events in a SIEM system, Administration Server exports the marked events to a SIEM system. If you set the start date of export, Administration Server also exports the marked events stored in the Administration Server database from the specified date.
Viewing export results
You can control for successful completion of the event export procedure. To do this, check whether messages with export events are received by your SIEM system.
If the events sent from Kaspersky Security Center Cloud Console are received and properly parsed by your SIEM system, configuration on both sides is done properly. Otherwise, check the settings you specified in Kaspersky Security Center Cloud Console against the configuration in your SIEM system.
The figure below shows the events exported to ArcSight. For example, the first event is a critical Administration Server event: "Device status is Critical".
The representation of export events in the SIEM system varies according to the SIEM system you use.
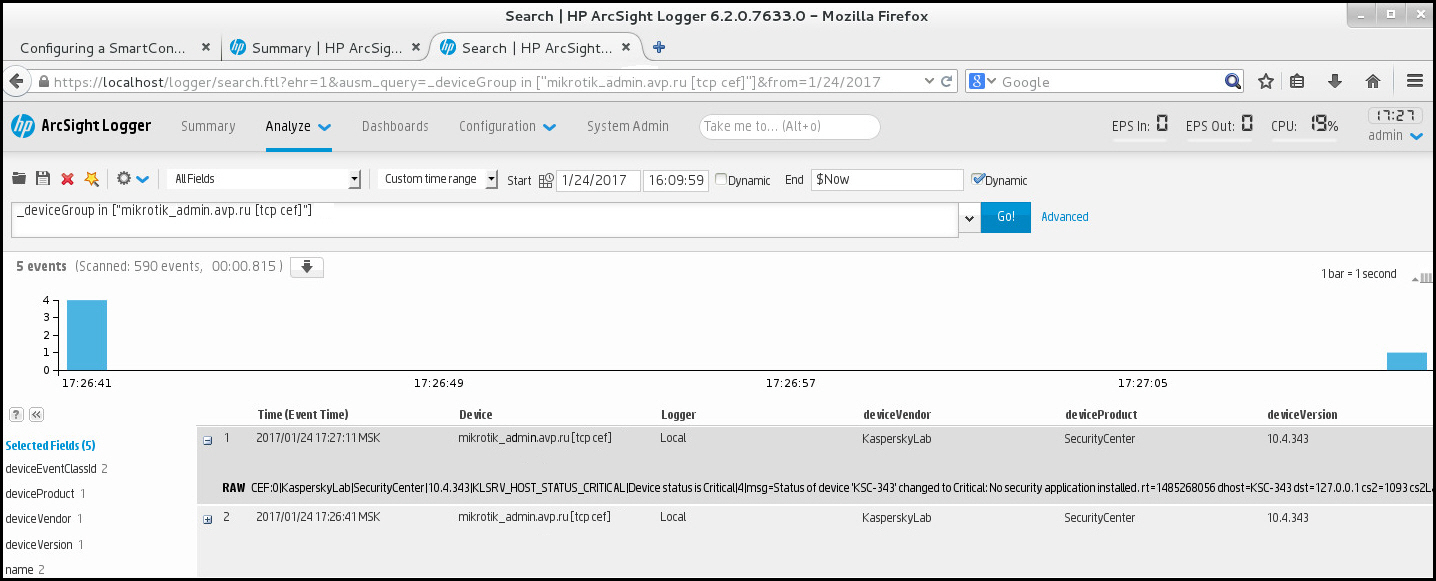
Example of events
Quick Start Guide for Managed Service Providers (MSPs)
This Quick Start Guide is intended for administrators of Managed Service Providers (MSPs).
Kaspersky Security Center Cloud Console supports multitenancy. The Guide contains tips and best practices for managing accounts of your customers (tenants) and installing security applications on their devices.
About Kaspersky Security Center Cloud Console
Kaspersky Security Center Cloud Console is an application hosted and maintained by Kaspersky. You do not have to install Kaspersky Security Center Cloud Console on your computer or server. Kaspersky Security Center Cloud Console enables the administrator to install Kaspersky security applications on devices on a corporate network, remotely run scan and update tasks, and manage the security policies of managed applications. The administrator can use a detailed dashboard that provides a snapshot of corporate device statuses, detailed reports, and granular settings in protection policies.
Key features of Kaspersky Security Center Cloud Console
Kaspersky Security Center Cloud Console enables you to do the following:
- Install Kaspersky applications on devices on your network and manage the installed applications.
- Create a hierarchy of administration groups to manage a selection of client devices as a whole.
- Create virtual Administration Servers and arrange them in a hierarchy.
- Protect your network devices, including workstations and servers:
- Manage an antimalware protection system built on Kaspersky applications.
- Use the detection and response (EDR and MDR) capabilities (a license for Kaspersky Endpoint Detection and Response and/or for Kaspersky Managed Detection and Response is required), including:
- Analyzing and investigating incidents
- Incident visualization through creating a threat development chain graph
- Accepting or rejecting responses manually or setting up the auto-accept of all responses
- Use Kaspersky Security Center Cloud Console as a multi-tenant application.
- Remotely manage Kaspersky applications installed on client devices.
- Perform centralized deployment of license keys for Kaspersky applications to client devices.
- Create and manage security policies for devices on your network.
- Create and manage user accounts.
- Create and manage user roles (RBAC).
- Create and manage tasks for applications installed on your network devices.
- View reports on the security system status for every client organization individually.
About licensing of Kaspersky Security Center Cloud Console for MSPs
When you start using Kaspersky Security Center Cloud Console, you can either request a trial workspace (in this case, you are granted a 30-day trial license that is embedded in your workspace) or enter an activation code for a commercial license.
You cannot convert a trial workspace into a commercial one. To continue using Kaspersky Security Center Cloud Console after the trial license expires, you must delete the trial workspace and create another one with a commercial license.
Later, you can add one or several commercial license keys to the Administrator Server repository.
Page top
About detection and response capabilities for MSPs
Kaspersky Security Center Cloud Console can integrate features of other Kaspersky applications into the console interface. For example, you can add the detection and response features to the functionality of Kaspersky Security Center Cloud Console by integrating the following applications:
- Kaspersky Endpoint Detection and Response Optimum
Kaspersky Endpoint Detection and Response Optimum is a solution designed to protect an organization's IT infrastructure from complex cyberthreats. The solution's functionality combines automatic threat detection with the ability to respond to these threats to resist complex attacks, including new exploits, ransomware, fileless attacks, and methods that use legitimate system tools.
After a Kaspersky Endpoint Protection Platform (EPP) application detects a security incident, a detailed card with important data about the security incident is generated in Kaspersky Security Center Cloud Console. The incident card is generated by one of the following applications:
- Kaspersky Endpoint Agent which is installed together with a Kaspersky EPP application
- Kaspersky Endpoint Security 11.7.0 for Windows or later which has built-in EDR Optimum functionality and does not require additional installation of Kaspersky Endpoint Agent
An incident card enables you to analyze and investigate the incident. Also, you can visualize the incident by creating a threat development chain graph. The graph describes the deployment stages of the detected attack in time. The created graph includes information about the modules involved in the attack and the actions performed by these modules.
You can also initiate a chain of response actions: create an execution prevention rule for an untrusted object; search for similar incidents in the device group, based on the selected indicators of compromise (IOC); isolate an untrusted object; isolate a compromised device from the network.
For information about the application activation, see the Kaspersky Endpoint Detection and Response Optimum documentation.
If integrated, this application adds the Alerts section to the interface of Kaspersky Security Center Cloud Console (Monitoring & reporting → Alerts).
- Kaspersky Managed Detection and Response
Kaspersky Managed Detection and Response delivers round-the-clock protection from the growing volume of threats that circumvent automated security barriers to organizations who struggle to find the expertise and staff, or for those with limited in-house resources. The MDR SOC analysts of Kaspersky or a third-party company investigate the incidents and offer responses to solve the incidents. You can accept or reject the offered measures manually, or enable the option to auto-accept all of the responses.
For information about the application activation, see the Kaspersky Managed Detection and Response documentation.
If integrated, this application adds the Incidents section to the interface of Kaspersky Security Center Cloud Console (Monitoring & reporting → Incidents).
You can show or hide the interface elements that refer to the Kaspersky Endpoint Detection and Response or Kaspersky Managed Detection and Response features at any time in the Interface options section of Kaspersky Security Center Cloud Console.
Page top
Getting started with Kaspersky Security Center Cloud Console
After you complete the scenario in this section, Kaspersky Security Center Cloud Console is ready to use.
Getting started scenario
The scenario proceeds in stages:
- Create an account
To start using Kaspersky Security Center Cloud Console, you need an account.
To create an account:
- Open your browser and enter the following address: https://ksc.kaspersky.com.
- Click the Create an account button.
- Follow the onscreen instructions.
- Create a workspace
After you create the account, you can register your company and create your workspace.
When you start using Kaspersky Security Center Cloud Console, you can either request a trial workspace (in this case, you are granted a 30-day trial license that is embedded in your workspace) or enter an activation code for a commercial license.
You cannot convert a trial workspace into a commercial one. To continue using Kaspersky Security Center Cloud Console after the trial license expires, you must delete the trial workspace and create another one with a commercial license.
To register a company and create a workspace:
- Open your browser and enter the following address: https://ksc.kaspersky.com.
- Click the Sign in button.
- Follow the onscreen instructions.
- Perform initial setup of Kaspersky Security Center Cloud Console
When you enter the created workspace for the first time, you are automatically prompted to run the quick start wizard. The quick start wizard guides you to create a minimum of necessary tasks and policies, adjust a minimum of settings, and start creating installation packages of Kaspersky applications. Follow the onscreen instructions.
When initial setup is complete, Kaspersky Security Center Cloud Console is ready to use.
Page top
Recommendations on managing your customers' devices
This section contains recommendations for organizing the customer devices that you want to protect.
Recommendations depend on whether you are using Kaspersky Security Center for the first time or have already used the on-premises version:
- If you have never used Kaspersky Security Center before, you have two options:
- Create a virtual Administration Server for the devices of each customer (recommended option). In this case, the devices of each customer can be managed through a dedicated virtual Administration Server independently from other customers. At the same time, you can use the primary Administration Server to create common policies and tasks for all of the customers. The reports generated on the primary Administration Server can include data from all of the virtual Administration Servers.
- Create an administration group for the devices of each customer. If you want to divide customer devices further, you can create a hierarchy of subordinate administration groups under each parent group. For example, you may need subordinate groups if you want to use different protection settings for devices of employees who work in different departments.
- If you have already used Kaspersky Security Center running on-premises, you can migrate your existing administration groups and related objects from Kaspersky Security Center on-premises to Kaspersky Security Center Cloud Console.
You cannot migrate virtual Administration Servers. After migrating the administration groups and other objects, you can create virtual Administration Servers in Kaspersky Security Center Cloud Console.
Proceed to configuring migration.
The administrator of a virtual Administration Server can only proceed to this virtual Server from the primary Administration Server. All the objects created on the primary Administration Server are available for reading to the administrator of a virtual Administration Server (for example, widgets, reports, or the user roles).
Page top
Typical deployment scheme for MSPs
This section provides a description of the deployment scheme typically used by MSPs to manage multiple tenants. The scheme is based on management through virtual Administration Servers individually created for each tenant.
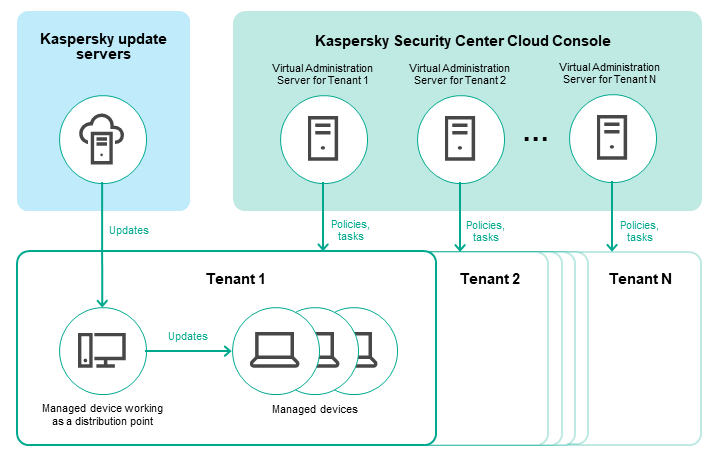
Typical deployment scheme for MSPs
The scheme comprises the following main components:
- Kaspersky Security Center Cloud Console. Provides a user interface to the administration services of your workspace. You use Kaspersky Security Center Cloud Console to deploy, manage, and maintain the protection system of a client organization's network.
- Kaspersky update servers. HTTP(S) servers at Kaspersky from which Kaspersky applications download database and application module updates.
- Virtual Administration Servers. An MSP administrator typically creates a virtual Administration Server for each tenant to deploy, manage, and maintain the protection system of the corresponding client organization's network.
- Tenants. Client organizations whose devices are to be protected.
- Managed devices. Client company's devices protected by Kaspersky Security Center Cloud Console. Each device that has to be protected must have Network Agent and one of the Kaspersky security applications installed.
- Managed device working as a distribution point. Computer that has Network Agent installed and is used for update distribution, network polling, remote installation of applications, getting information about computers in an administration group, and / or broadcasting domain. The administrator selects the appropriate devices and assigns them distribution points manually.
Scenario: Protection deployment (tenant management through virtual Administration Servers)
If you have never used Kaspersky Security Center and you want to manage your tenants through virtual Administration Servers, proceed as described in this section. After you complete this scenario, your customers' devices will be protected.
If you manage several tenants, then perform the scenario for each of the tenants separately.
The scenario proceeds in stages:
- Creating a virtual Administration Server
Create a virtual Administration Server for your customer. The new virtual Administration Server appears in the hierarchy of Administration Servers:
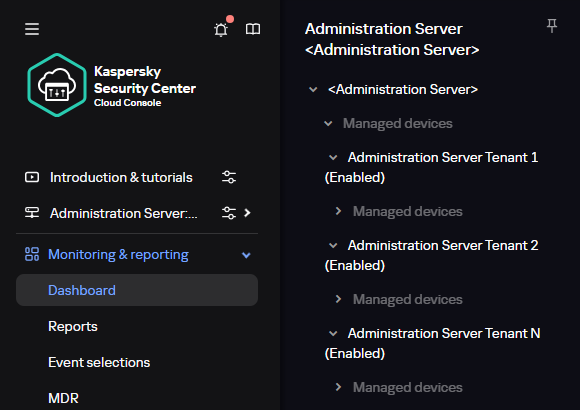
Virtual Administration Servers in the hierarchy of Administration Servers
- Selecting a device to act as a distribution point
Among the devices of the customer, decide which device will act as a
.You cannot have more than 100 distribution points within one workspace.
- Creating a stand-alone installation package for Network Agent
Switch to the created virtual Administration Server, and then create a stand-alone installation package for Network Agent. You can switch Administration Servers in the main menu by clicking the chevron icon (
) to the right of the current Administration Server name, and then selecting the required Administration Server. During creation of the stand-alone installation package, specify the Managed devices administration group to move the device to. - Installing Network Agent on the selected device to act as a distribution point
You can use any method that is suitable for you:
- Manual installation
To deliver the stand-alone installation package to the device, you can, for example, copy it to a removable drive (such as a flash drive) or place it in a shared folder.
- Deployment by using Active Directory
- Deployment by using your remote monitoring and management (RMM) software solution
- Manual installation
- Assigning a distribution point
Assign the device with Network Agent installed to act as a distribution point.
- Network polling
Configure and perform network polling through the distribution point.
Kaspersky Security Center Cloud Console provides the following methods of network polling:
- IP range polling
- Windows network polling
- Active Directory polling
After network polling according to schedule is complete, your customers' devices are discovered and placed in the Unassigned devices group.
- Moving the discovered devices to the administration groups
Set up the rules for automatically moving the discovered devices to the required administration groups; or move these devices to the required administration groups manually. If you plan to manage the customer's devices in a single administration group, you can move the devices to the Managed devices group.
- Creating installation packages for Network Agent and managed Kaspersky applications
- Removing third-party security applications
If third-party security applications are installed on your customers' devices, remove them before installing Kaspersky applications.
- Installing Kaspersky applications on client devices
Create remote installation tasks to install Network Agent and managed Kaspersky applications on your customers' devices.
If necessary, you can create several remote installation tasks to install managed Kaspersky applications for different administration groups or different device selections.
After the tasks are created, you can configure their settings. Make sure that the schedule for each task meets your requirements. First, the task to install Network Agent must be run. After Network Agent is installed on your customers' devices, the task to install managed Kaspersky applications must be run.
- Verifying initial deployment of Kaspersky applications
Generate and view the Report on Kaspersky application versions. Make sure that the managed Kaspersky applications are installed on all of the devices of your customer.
- Creating policies for Kaspersky applications
Create a policy for the required Kaspersky application. If you want to create a universal policy for all your customers, switch the current virtual Administration Server to the primary Administration Server, and then create a policy for the required Kaspersky application.
Scenario: Protection deployment (tenant management through administration groups)
If you have never used Kaspersky Security Center and you want to manage your tenants through administration groups, proceed as described in this section. After you complete this scenario, your customers' devices will be protected.
The scenario proceeds in stages:
- Creating administration groups
Create an administration group for each of your customers.
- Planning the distribution points structure
Among the devices of each customer, decide which device will act as a distribution point.
You cannot have more than 100 distribution points within one workspace.
- Creating a stand-alone installation package for Network Agent
Create a stand-alone installation package for Network Agent.
- Installation of Network Agent on the selected devices to act as distribution points
Install Network Agent on the selected devices that will act as distribution points.
You can use any method that is suitable for you:
- Manual installation
To deliver the stand-alone installation package to the devices, you can, for example, copy it to a removable drive (such as a flash drive) or place it in a shared folder.
- Deployment by using Active Directory
- Deployment by using your remote monitoring and management (RMM) software solution
- Manual installation
- Assigning distribution points
Assign the devices with Network Agent installed to act as distribution points.
- Network polling
Configure and perform network polling through the distribution point.
Kaspersky Security Center Cloud Console provides the following methods of network polling:
- IP range polling
- Windows network polling
- Active Directory polling
After network polling according to schedule is complete, your customers' devices are discovered and placed in the Unassigned devices group.
- Moving the discovered devices to the administration groups
Set up the rules for automatically moving the discovered devices to the required administration groups; or move these devices to the required administration groups manually.
- Creating installation packages for Network Agent and managed Kaspersky applications
If you did not start the quick start wizard, or skipped the step of creating installation packages, create installation packages for Kaspersky applications.
- Removing third-party security applications
If third-party security applications are installed on your customers' devices, remove them before installing Kaspersky applications.
- Installing Kaspersky applications on your customers' devices
Create remote installation tasks to install Network Agent and managed Kaspersky applications on your customers' devices.
If necessary, you can create several remote installation tasks to install managed Kaspersky applications for different administration groups or different device selections.
After the tasks are created, you can configure their settings. Make sure that the schedule for each task meets your requirements. First, the task to install Network Agent must be run. After Network Agent is installed on your customers' devices, the task to install managed Kaspersky applications must be run.
- Verifying initial deployment of Kaspersky applications
Generate and view the Report on Kaspersky application versions. Make sure that the managed Kaspersky applications are installed on all of the devices of your customers.
- Creating policies for Kaspersky applications
Go to the Assets (Devices) → Groups menu; if you want to create a universal policy for all your customers, select Administration Server. If you want to create a specific policy for an individual customer, select the administration group corresponding to that customer. Create a policy for the required Kaspersky application.
Joint usage of Kaspersky Security Center on-premises and Kaspersky Security Center Cloud Console
If you have already used Kaspersky Security Center running on-premises, you can convert your existing Administration Servers running on-premises into secondary Administration Servers of your new Kaspersky Security Center Cloud Console Administration Server, as described in this section.
If you configure joint usage of Kaspersky Security Center on-premises and Kaspersky Security Center Cloud Console, you will not be able to migrate from Kaspersky Security Center on-premises to Kaspersky Security Center Cloud Console unless you remove the hierarchy of Administration Servers.
To create a hierarchy of Administration Servers,
Add your existing Administration Servers running on-premises as secondary Administration Servers.
Page top
Licensing of Kaspersky applications for MSPs
Kaspersky Security Center Cloud Console enables you to perform centralized distribution of license keys for Kaspersky applications on your customers' devices, monitor their use, and renew licenses.
If you manage several tenants, you can distribute license keys in the following ways:
- One license key for all of the tenants.
- An individual license key for each tenant.
To distribute license keys to your customers' devices:
- Add the required license keys to the Administration Server repository.
- Do one of the following:
- Configure automatic distribution of a license key.
In this case, Kaspersky Security Center Cloud Console selects one of the applicable license keys and automatically deploys it every time a new device is discovered.
- Configure the Add a key task to distribute a license key to devices.
When configuring the task, you select the license key that must be deployed to devices and select the administration group that contains the required devices.
One task can distribute only one license key. This means that if you want to distribute several license keys, you must create a task for each of them.
- Configure automatic distribution of a license key.
The Kaspersky applications installed on your customers' devices are activated.
Adding an active license key to the primary Administration Server is mandatory. Otherwise, the associated workspace will be deleted in 90 days, regardless of the status of license keys on other Administration Servers within that workspace.
Page top
Monitoring and reporting capabilities for MSPs
Kaspersky Security Center Cloud Console provides you with monitoring and reporting capabilities. These capabilities give you an overview of your organization infrastructure, protection statuses, and statistics.
When you have deployed Kaspersky Security Center Cloud Console, you can configure the monitoring and reporting features to best suit your needs.
Kaspersky Security Center Cloud Console provides the following types features of monitoring and reporting:
- Dashboard
- Reports
- Event selections
- Email notifications
Dashboard
The dashboard allows you to monitor security trends on your organization's network by providing you with a graphical display of information. (See the figure below.)
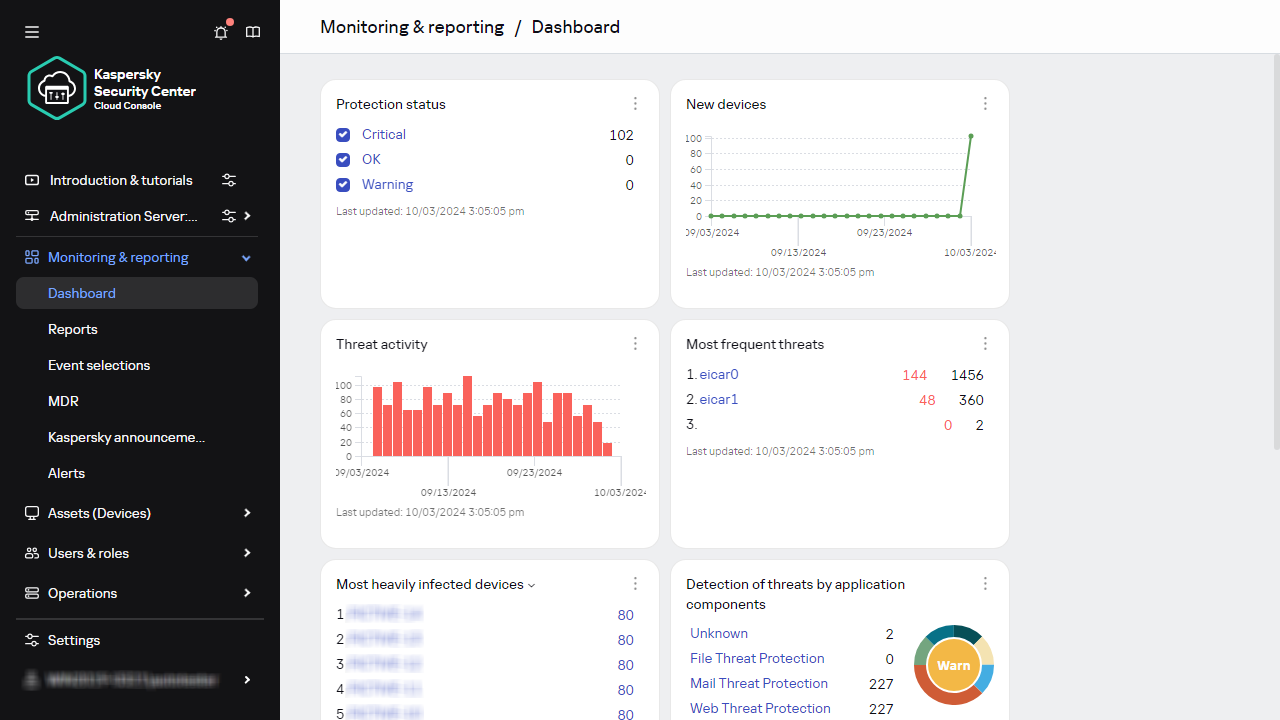
The Dashboard section
Reports
The Reports feature allows you to get detailed numerical information about the security of your organization's network, save this information to a file, send it by email, and print it. You can also schedule report delivery by email (see the figure below).
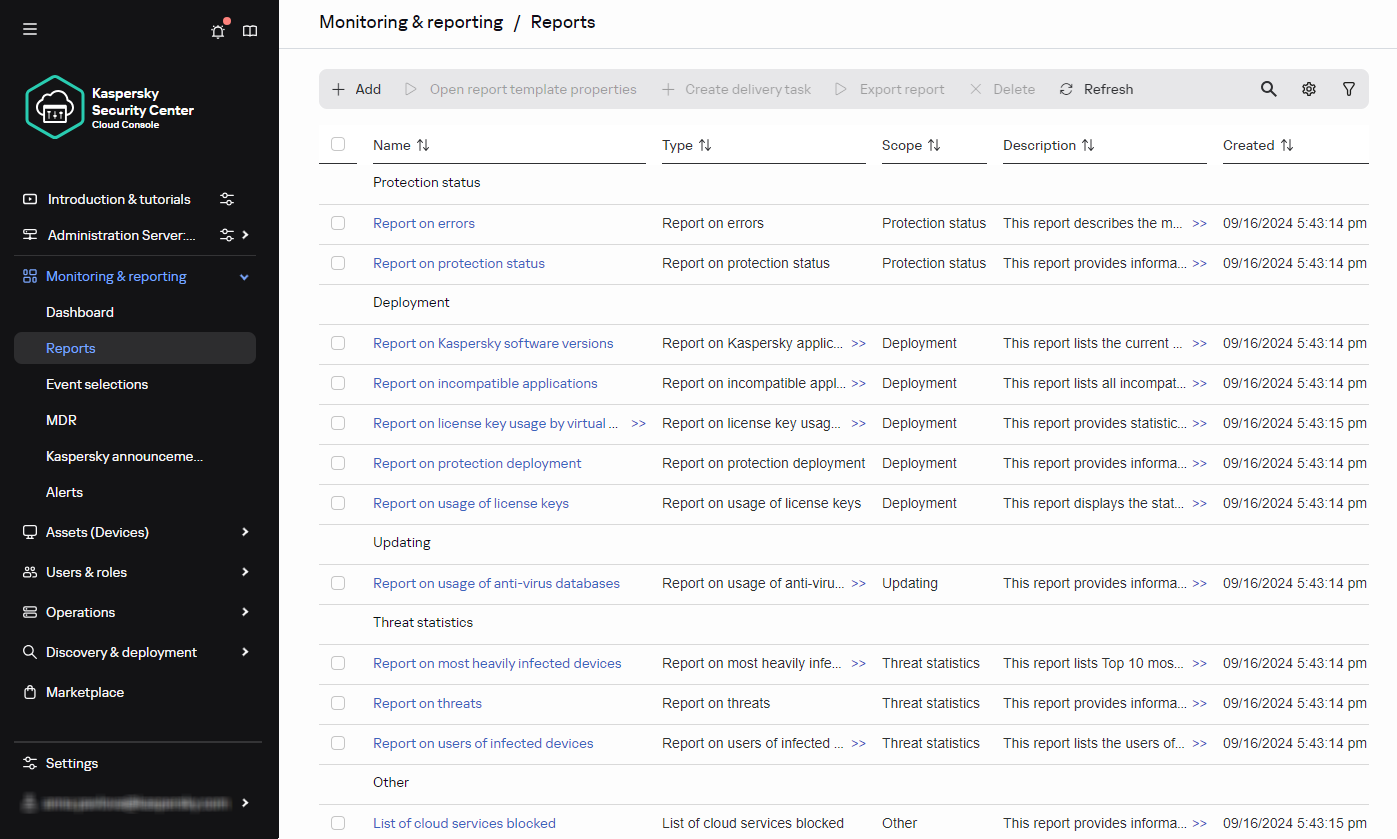
The Reports section
Event selections
Event selections provide an onscreen view of named sets of events that are selected from the Administration Server database. Kaspersky Security Center Cloud Console contains a number of predefined event selections (for example, Recent events and Critical events). Also, you can create custom event selections.
Email notifications
You can configure email notification about events occurring in Kaspersky Security Center Cloud Console and on your customers' devices.
Page top
Working with Kaspersky Security Center Cloud Console in a cloud environment
This section provides information about Kaspersky Security Center Cloud Console features related to the operation and maintenance of Kaspersky Security Center Cloud Console in cloud environments, such as Amazon Web Services, Microsoft Azure, or Google Cloud.
To work within a cloud environment, you need a special license. If you do not have such a license, the interface elements related to cloud devices are not operable.
Updates functionality (including providing anti-virus signature updates and codebase updates), as well as KSN functionality may not be available in the software in the U.S.
Licensing options in a cloud environment
Work in a cloud environment is possible both in trial mode and in commercial mode of Kaspersky Security Center Cloud Console:
- In trial mode, all cloud environment features are available within the entire validity period of your workspace. No license is required.
- In commercial mode, the cloud environment features are available only if a Kaspersky Hybrid Cloud Security license key has been added as active in the Administration Server properties.
In both cases, Vulnerability and patch management is automatically activated.
If an error occurs when trying to activate the feature Support of the cloud environment using the license for Kaspersky Hybrid Cloud Security, use the key file.
Page top
Preparing for work in a cloud environment through Kaspersky Security Center Cloud Console
This section tells you how to prepare for working with Kaspersky Security Center Cloud Console in the following cloud environments:
- Amazon Web Services
- Microsoft Azure
- Google Cloud
Working in Amazon Web Services cloud environment
This section tells you how to prepare for working with Kaspersky Security Center Cloud Console in Amazon Web Services.
The addresses of web pages cited in this document are correct as of the Kaspersky Security Center Cloud Console release date.
About work in Amazon Web Services cloud environment
To work with the AWS platform and, in particular, to create instances, you need an Amazon Web Services account. You can create a free account at https://aws.amazon.com. You can also use an existing Amazon account.
To learn more about an AMI and how AWS Marketplace works, please visit the AWS Marketplace Help page. For more information about working with the AWS platform, using instances, and related concepts, please refer to the Amazon Web Services documentation.
The addresses of web pages cited in this document are correct as of the Kaspersky Security Center Cloud Console release date.
Page top
Creating IAM user accounts for Amazon EC2 instances
This section describes the actions that must be performed to ensure correct operation of Kaspersky Security Center Cloud Console. These actions include work with the AWS Identity and Access Management (IAM) user accounts. Also described are the actions that must be taken on client devices to install Network Agent on them and then install Kaspersky Security for Windows Server and Kaspersky Endpoint Security for Linux.
Ensuring that Kaspersky Security Center Cloud Console has the permissions to work with AWS
To operate in the Amazon Web Services cloud environment using Kaspersky Security Center Cloud Console, you must create an IAM user account, that will be used by Kaspersky Security Center Cloud Console to work with AWS services. Before starting to work with the Administration Server, create an IAM user account with an AWS IAM access key (hereinafter also referred to as IAM access key).
Creation of an IAM user account requires the AWS Management Console. To work with the AWS Management Console, you will need a user name and password from an account in AWS.
Page top
Creating an IAM user account for work with Kaspersky Security Center Cloud Console
An IAM user account is required for working with Kaspersky Security Center Cloud Console. You can create one IAM user account with all the necessary permissions, or you can create two separate user accounts.
An IAM access key that you will need to provide to Kaspersky Security Center Cloud Console during initial configuration is automatically created for the IAM user. An IAM access key consists of an access key ID and a secret key. For more details about the IAM service, please refer to the following AWS reference pages:
- https://docs.aws.amazon.com/IAM/latest/UserGuide/introduction.html.
- https://docs.aws.amazon.com/IAM/latest/UserGuide/IAM_UseCases.html#UseCase_EC2.
To create an IAM user account with the necessary permissions:
- Open the AWS Management Console and sign in under your account.
- In the list of AWS services, select IAM.
A window opens containing a list of user names and a menu that lets you work with the tool.
- Navigate through the areas of the console dealing with user accounts, and add a new user name or names.
- For the user(s) you add, specify the following AWS properties:
- Access type: Programmatic Access.
- Permissions boundary not set.
- Permission: ReadOnlyAccess.
After you add the permission, view it for accuracy. In case of a mistaken selection, go back to the previous screen and make the selection again.
- After you create the user account, a table appears containing the IAM access key of the new IAM user. The access key ID is displayed in the Access key ID column. The secret key is displayed as asterisks in the Secret access key column. To view the secret key, click Show.
The newly created account is displayed in the list of IAM user accounts that corresponds to your account in AWS.
The addresses of web pages cited in this document are correct as of the Kaspersky Security Center Cloud Console release date.
Page top
Working in Microsoft Azure cloud environment
This section provides information about Kaspersky Security Center Cloud Console operation and maintenance in a cloud environment provided by Microsoft Azure, as well as details of protection deployment on virtual machines in this cloud environment.
About work in Microsoft Azure
To work with the Microsoft Azure platform and, in particular, to purchase apps at the Azure Marketplace and create virtual machines, you will need an Azure subscription. Before starting to work with Microsoft Azure in Kaspersky Security Center Cloud Console, create an Azure Application ID with permissions required for installation of applications on virtual machines.
Page top
Creating a subscription, Application ID, and password
To work with Kaspersky Security Center Cloud Console in the Microsoft Azure environment, you need an Azure subscription, Azure Application ID, and Azure Application password. You can use an existing subscription, if you already have one.
An Azure subscription grants its owner access to the Microsoft Azure Platform Management Portal and to Microsoft Azure services. The owner can use the Microsoft Azure Platform to manage services such as Azure SQL and Azure Storage.
To create a Microsoft Azure subscription,
Go to https://learn.microsoft.com/en-us/azure/cost-management-billing/manage/create-subscription and follow the instructions there.
More information about creating a subscription is available on the Microsoft website. You will get a subscription ID, which you will later provide to Kaspersky Security Center Cloud Console together with Application ID and password.
To create and save Azure Application ID and password:
- Go to https://portal.azure.com and make sure that you are logged in.
- Following the instructions on the reference page, create your Application ID.
- Go to the Keys section of the application settings.
- In the Keys section, fill in the Description and Expires fields and leave the Value field empty.
- Click Save.
When you click Save, the system automatically fills the Value field with a long sequence of characters. This sequence is your Azure Application password (for example, yXyPOy6Tre9PYgP/j4XVyJCvepPHk2M/UYJ+QlfFvdU=). The description is displayed as you entered it.
- Copy the password and save it, so that you can later provide the Application ID and password to Kaspersky Security Center Cloud Console.
You can copy the password only when it has been created. Later, the password will no longer be displayed and you cannot restore it.
The addresses of web pages cited in this document are correct as of the Kaspersky Security Center Cloud Console release date.
Page top
Assigning a role to the Azure Application ID
If you only want to detect virtual machines using device discovery, your Azure Application ID must have the Reader role. If you want not only to detect virtual machines, but also to deploy protection by means of the Azure API, your Azure Application ID must have the Virtual Machine Contributor role.
Follow the instructions on the Microsoft website to assign a role to your Azure Application ID.
Page top
Working in Google Cloud
This section provides information about work with Kaspersky Security Center Cloud Console in a cloud environment provided by Google.
You can use the Google API to work with Kaspersky Security Center Cloud Console in Google Cloud Platform. A Google account is required. Please refer to the Google documentation at https://cloud.google.com for more information.
You will need to create and provide Kaspersky Security Center Cloud Console with the following credentials:
Page top
Cloud environment configuration wizard in Kaspersky Security Center Cloud Console
To configure Kaspersky Security Center Cloud Console using this wizard, you must have the following:
- Specific credentials for a cloud environment:
- An IAM user account that has been granted the right to poll the cloud segment (for work with Amazon Web Services)
- Azure Application ID, password, and subscription (for work with Microsoft Azure)
- Google client email, Project ID, and private key (for work with Google Cloud)
- Installation packages:
- Network Agent for Windows
- Network Agent for Linux
- Kaspersky Endpoint Security for Linux
- Web plug-in for Kaspersky Endpoint Security for Linux
- At least one of the following:
- Installation package and web plug-in for Kaspersky Endpoint Security for Windows (recommended)
- Installation package and web plug-in for Kaspersky Security for Windows Server
The Cloud environment configuration wizard starts automatically at the first connection to Kaspersky Security Center Cloud Console if your workspace was created by using the Kaspersky Hybrid Cloud Security license. You can also start the Cloud environment configuration wizard manually at any time.
To start the Cloud environment configuration wizard manually,
In the main menu, go to Discovery & deployment → Deployment & assignment → Configure cloud environment.
The wizard starts.
An average work session with this wizard lasts about 15 minutes.
Step 1. Checking the required plug-ins and installation packages
This step is not displayed if you have all of the required web plug-ins and installation packages listed below.
To configure a cloud environment, you must have the following components:
- Installation packages:
- Network Agent for Windows
- Network Agent for Linux
- Kaspersky Endpoint Security for Linux
- Web plug-in for Kaspersky Endpoint Security for Linux
- At least one of the following:
- Installation package and web plug-in for Kaspersky Endpoint Security for Windows (recommended)
- Installation package and web plug-in for Kaspersky Security for Windows Server
We recommend that you use Kaspersky Endpoint Security for Windows instead of Kaspersky Security for Windows Server.
Kaspersky Security Center Cloud Console automatically detects the components that you already have and lists only ones that are missing. Download the listed components by clicking the Select applications to download button, and then selecting the required plug-ins and installation packages. After you download a component, you can use the Refresh button to update the list of missing components.
Step 2. Selecting the application activation method
This step is displayed only if you used a license other than Kaspersky Hybrid Cloud Security during the workspace creation and never added a Kaspersky Hybrid Cloud Security license key to the activation field of Administration Server. In this case, you must activate Administration Server by using a Kaspersky Hybrid Cloud Security license.
Step 3. Selecting the cloud environment and authorization
Specify the following settings:
Enter your credentials to receive authorization in the cloud environment that you specified.
AWS
If you selected AWS as the cloud segment type, use an AWS IAM access key for further polling of the cloud segment. Enter the following key data:
- Access key ID
- Secret key
To see the characters that you entered, click and hold the Show button.
Azure
If you selected Azure as the cloud segment type, specify the following settings for the connection that will be used for further polling of the cloud segment:
- Azure Application ID
- Azure Subscription ID
- Azure Application password
To see the characters that you entered, click and hold the Show button.
- Azure storage account name
- Azure storage access key
To see the characters that you entered, click and hold the Show button.
Google Cloud
If you selected Google Cloud as the cloud segment type, specify the following settings for the connection that will be used for further polling the cloud segment:
- Client email address
- Project ID
- Private key
To see the characters that you entered, click and hold the Show button.
The connection that you specified is saved in the application settings.
The Cloud environment configuration wizard enables you to specify only one segment. Later, you can specify more connections to manage other cloud segments.
Click Next to proceed.
Step 4. Segment polling and configuring synchronization with Cloud
At this step, cloud segment polling starts and a special administration group for cloud devices is automatically created. The devices found during polling are placed into this group. The cloud segment polling schedule is configured every five minutes by default (you can change this setting later).
A Synchronize with Cloud automatic moving rule is also created. For each subsequent scan of the cloud network, virtual devices that are detected will be moved to the corresponding subgroup within the Managed devices\Cloud group.
Define the Synchronize administration groups with cloud structure setting.
If this option is enabled, the Cloud group is automatically created within the Managed devices group and a cloud device discovery is started. The instances and virtual machines detected during each cloud network scan are placed into the Cloud group. The structure of the administration subgroups within this group matches the structure of your cloud segment (in AWS, availability zones and placement groups are not represented in the structure; in Azure, subnets are not represented in the structure). Devices that have not been identified as instances in the cloud environment are in the Unassigned devices group. This group structure enables you to use group installation tasks to install anti-virus applications on instances, as well as set up different policies for different groups.
If this option is disabled, the Cloud group is also created and the cloud device discovery is also started; however, subgroups matching the cloud segment structure are not created within the group. All detected instances are in the Cloud administration group so they are displayed in a single list. If your work with Kaspersky Security Center Cloud Console requires synchronization, you can modify the properties of the Synchronize with Cloud rule and enforce it. Enforcing this rule alters the structure of subgroups in the Cloud group so that it matches the structure of your cloud segment.
By default, this option is disabled.
Click Next to proceed.
Step 5. Selecting an application to create a policy and tasks for
This step is only displayed if you have installation packages and plug-ins for both Kaspersky Endpoint Security for Windows and Kaspersky Security for Windows Server. If you have a plug-in and an installation package for only one of those applications, this step is skipped and Kaspersky Security Center Cloud Console creates a policy and tasks for the existing application.
Select an application for which you want to create a policy and tasks:
- Kaspersky Endpoint Security for Windows
- Kaspersky Security for Windows Server
Step 6. Configuring Kaspersky Security Network for Kaspersky Security Center Cloud Console
This step is skipped when running Kaspersky Security Center Cloud Console in trial mode or on a virtual Administration Server.
Specify the settings for relaying information about Kaspersky Security Center Cloud Console operations to the Kaspersky Security Network (KSN) knowledge base. Select one of the following options:
Kaspersky recommends participation in Kaspersky Security Network.
KSN agreements for managed applications may also be displayed. If you agree to use Kaspersky Security Network, the managed application will send data to Kaspersky. If you do not agree to participate in Kaspersky Security Network, the managed application will not send data to Kaspersky. You can change this setting later in the application policy.
Click Next to proceed.
Page top
Step 7. Creating an initial configuration of protection
You can check a list of policies and tasks that are created.
Wait for the creation of policies and tasks to complete, and then click Next to proceed. On the last page of the wizard, click the Finish button to exit.
Page top
Network segment polling via Kaspersky Security Center Cloud Console
Information about the structure of the network (and devices in it) is received through regular polling of cloud segments by using the AWS API, Azure API, or Google API tools. Kaspersky Security Center Cloud Console uses this information to update the contents of the Unassigned devices and Managed devices folders. If you have configured devices to be moved to administration groups automatically, detected devices are included in administration groups.
To allow the polling of cloud segments, you must have the corresponding rights that are provided with an IAM user account (in AWS); with an Application ID and password (in Azure); or with a Google client email, Google project ID, and private key (in Google Cloud).
You can add and delete connections, as well as set the polling schedule, for each cloud segment.
Adding connections for cloud segment polling via Kaspersky Security Center Cloud Console
To add a connection for cloud segment polling to the list of available connections:
- In the main menu, go to Discovery & deployment → Discovery → Cloud.
- In the window that opens, click Properties.
- In the Settings window that opens, click Add.
The Cloud segment settings window opens.
- Specify the name of the cloud environment for the connection that will be used for further polling of the cloud segment:
- Enter your credentials to receive authorization in the cloud environment that you specified.
- If you selected AWS, specify the following:
- Access key ID
- Secret key
To see the characters that you entered, click and hold the Show button.
- If you selected Azure, specify the following settings:
- Azure Application ID
- Azure Subscription ID
- Azure Application password
To see the characters that you entered, click and hold the Show button.
- Azure storage account name
- Azure storage access key
To see the characters that you entered, click and hold the Show button.
If you selected Google Cloud, specify the following settings:
- Client email address
- Project ID
- Private key
To see the characters that you entered, click and hold the Show button.
- If you selected AWS, specify the following:
- If you want, click Set polling schedule and change the default settings.
The connection is saved in the application settings.
After the new cloud segment is polled for the first time, the subgroup corresponding to that segment appears in the Managed devices\Cloud administration group.
If you specify incorrect credentials, no instances will be found during cloud segment polling and a new subgroup will not appear in the Managed devices\Cloud administration group.
Page top
Deleting a connection for cloud segment polling
If you no longer have to poll a specific cloud segment, you can delete the connection corresponding to it from the list of available connections. You can also delete a connection if, for example, permissions to poll a cloud segment have been transferred to another user who has different credentials.
To delete a connection:
- In the main menu, go to Discovery & deployment → Discovery → Cloud.
- In the window that opens, click Properties.
- In the Settings window that opens, click the name of the segment that you want to delete.
- Click Delete.
- In the window that opens, click the OK button to confirm your selection.
The connection is deleted. The devices in the cloud segment corresponding to this connection are automatically deleted from the administration groups.
Page top
Configuring the polling schedule via Kaspersky Security Center Cloud Console
Cloud segment polling is performed according to schedule. You can set the polling frequency.
The polling frequency is automatically set at five minutes by the Cloud environment configuration wizard. You can change this value at any time and set a different schedule. However, it is not recommended to configure polling to run more frequently than every five minutes, because this could lead to errors in the API operation.
To configure a cloud segment polling schedule:
- In the main menu, go to Discovery & deployment → Discovery → Cloud.
- In the window that opens, click Properties.
- In the Settings window that opens, click the name of the segment for which you want to configure a polling schedule.
The Cloud segment settings window opens.
- In the Cloud segment settings window, click the Set polling schedule button.
The Schedule window opens.
- In the Schedule window, define the following settings:
- Scheduled start
Polling schedule options:
- Start interval (days)
- Starting from
- Run missed tasks
- Scheduled start
- Click Save to save the changes.
The polling schedule for the segment is configured and saved.
Page top
Viewing the results of cloud segment polling via Kaspersky Security Center Cloud Console
You can view the results of cloud segment polling, that is, view the list of cloud devices managed by the Administration Server.
To view the results of cloud segment polling,
In the main menu, go to Discovery & deployment → Discovery → Cloud.
The cloud segments available for polling are displayed.
Page top
Viewing the properties of cloud devices via Kaspersky Security Center Cloud Console
You can view the properties of each cloud device.
To view the properties of a cloud device:
- In the main menu, go to Assets (Devices) → Managed devices.
- Click the name of the device whose properties you want to view.
A properties window opens with the General section selected.
- If you want to view the properties specific for cloud devices, select the System section in the properties window.
The properties are displayed depending on the cloud platform of the device.
For devices in AWS, the following properties are displayed:
- Device discovered using API (value: AWS)
- Cloud region
- Cloud VPC
- Cloud availability zone
- Cloud subnet
- Cloud placement group (this unit is only displayed if the instance belongs to a placement group; otherwise, it is not displayed)
For devices in Azure, the following properties are displayed:
- Device discovered using API (value: Microsoft Azure)
- Cloud region
- Cloud subnet
For devices in Google Cloud, the following properties are displayed:
- Device discovered using API (value: Google Cloud)
- Cloud region
- Cloud VPC
- Cloud availability zone
- Cloud subnet
Synchronization with Cloud: Configuring the moving rule
During the Cloud environment configuration wizard operation, the Synchronize with Cloud rule is created automatically. This rule enables you to automatically move devices detected in each poll from the Unassigned devices group to the Managed devices\Cloud group, to make these devices available for centralized management. By default, the rule is active after it is created. You can disable, modify, or enforce the rule at any time.
To edit the properties of the Synchronize with Cloud rule and/or enforce the rule:
- In the main menu, go to Discovery & deployment → Deployment & assignment → Moving rules.
A list of moving rules opens.
- In the list of moving rules, select Synchronize with cloud.
The rule properties window opens.
- If necessary, specify the following settings in the Rule conditions tab, in the Cloud segments tab:
- Device is in a cloud segment
- Include child objects
- Move devices from nested objects to corresponding subgroups
- Create subgroups corresponding to containers of newly detected devices
- Delete subgroups for which no match is found in the cloud segments
If you enabled the Synchronize administration groups with cloud structure option when using the Cloud environment configuration wizard, the Synchronize with cloud rule is created with the Create subgroups corresponding to containers of newly detected devices and Delete subgroups for which no match is found in the cloud segments options enabled.
If you did not enable the Synchronize administration groups with cloud structure option, the Synchronize with cloud rule is created with these options disabled (cleared). If your work with Kaspersky Security Center Cloud Console requires that the structure of subgroups in the Managed devices\Cloud subgroup matches the structure of cloud segments, enable the Create subgroups corresponding to containers of newly detected devices and Delete subgroups for which no match is found in the cloud segments options in the rule properties, and then enforce the rule.
- In the Device discovered by using the API drop-down list, select one of the following values:
- No. The device cannot be detected by using the AWS, Azure, or Google API, that is, it is either outside the cloud environment, or it is in the cloud environment but for some reason it cannot be detected by using an API.
- AWS. The device is discovered by using the AWS API, that is, the device is definitely in the AWS cloud environment.
- Azure. The device is discovered by using the Azure API, that is, the device is definitely in the Azure cloud environment.
- Google Cloud. The device is discovered by using the Google API, that is, the device is definitely in the Google cloud environment.
- No value. This criterion cannot be applied.
- If necessary, set up other rule properties in the other sections.
The moving rule is configured.
Remote installation of applications to the Azure virtual machines
You must have a valid license to install applications on Microsoft Azure virtual machines.
Kaspersky Security Center Cloud Console supports the following scenarios:
- A client device is discovered by means of Azure API; the installation is also performed by means of an API. Using the Azure API means that you can only install the following applications:
- Kaspersky Endpoint Security for Linux
- Kaspersky Endpoint Security for Windows
- Kaspersky Security for Windows Server
- A client device is discovered by means of Azure API; the installation is performed by means of a distribution point or, if there are no distribution points, manually by using standalone installation packages. You can install any application supported by Kaspersky Security Center Cloud Console in this way.
To create a task for remote installation of an application on Azure virtual machines:
- In the main menu, go to Assets (Devices) → Tasks.
- Click Add.
The New task wizard starts.
- Follow the instructions of the wizard:
- Select Install application remotely as the task type.
- On the Installation packages page, select Remote installation by Microsoft Azure API.
- When selecting the account to access devices, use an existing Azure account, or click Add and enter the credentials of your Azure account:
- Select the relevant devices from the Managed devices\Cloud group.
After the wizard finishes, the task for remote installation of the application appears in the list of tasks.
Contact Technical Support
This section describes how to get technical support and the terms on which it is available.
How to get technical support
If you can't find a solution to your issue in the Kaspersky Security Center Cloud Console documentation or in any of the sources of information about Kaspersky Security Center Cloud Console, contact Kaspersky Technical Support. Technical Support specialists will answer all your questions about installing and using Kaspersky Security Center Cloud Console.
Kaspersky provides support of Kaspersky Security Center Cloud Console during its lifecycle (see the application support lifecycle page). Before contacting Technical Support, please read the support rules.
You can contact Technical Support in one of the following ways:
- By visiting the Technical Support website
- By sending a request to Technical Support from the Kaspersky CompanyAccount portal
Technical support via Kaspersky CompanyAccount
Kaspersky CompanyAccount is a portal for companies that use Kaspersky applications. The Kaspersky CompanyAccount portal is designed to facilitate interaction between users and Kaspersky specialists through online requests. You can use Kaspersky CompanyAccount to track the status of your online requests and store a history of them as well.
You can register all of your organization's employees under a single account on Kaspersky CompanyAccount. A single account lets you centrally manage electronic requests from registered employees to Kaspersky and also manage the privileges of these employees via Kaspersky CompanyAccount.
The Kaspersky CompanyAccount portal is available in the following languages:
- English
- Spanish
- Italian
- German
- Polish
- Portuguese
- Russian
- French
- Japanese
To learn more about Kaspersky CompanyAccount, visit the Technical Support website.
Page top
Information required for Kaspersky Technical Support specialists
When you contact Kaspersky Technical Support specialists, they may ask you to provide the following information:
- General information about Kaspersky Security Center Cloud Console
- Workspace ID
- License information
- Number of installed applications
- Tenant ID and status
You can find this information in the Your account menu → Technical Support section. Copy and share this information to get help on your issue.
Sources of information about the application
Kaspersky Security Center Cloud Console page on the Kaspersky website
On the Kaspersky Security Center Cloud Console page on the Kaspersky website, you can view general information about the application, its functions, and features.
Kaspersky Security Center Cloud Console page in the Knowledge Base
The Knowledge Base is a section on the Kaspersky Technical Support website.
On the Kaspersky Security Center Cloud Console page in the Knowledge Base, you can read articles that provide useful information, recommendations, and answers to frequently asked questions on how to buy, install, and use the application.
Articles in the Knowledge Base may provide answers to questions that relate both to Kaspersky Security Center Cloud Console as well as to other Kaspersky applications. Articles in the Knowledge Base may also contain Technical Support news.
Discuss Kaspersky applications with the community
If your question does not require an immediate answer, you can discuss it with Kaspersky experts and other users on our Forum.
On the Forum, you can view discussion topics, post your comments, and create new discussion topics.
An internet connection is required to access website resources.
If you cannot find a solution to your problem, contact Technical Support.
Page top
Known issues
Kaspersky Security Center Cloud Console has a number of limitations that are not critical to operation of the application:
- You cannot add an installation package with the same localization language several times. For example, if you already added the Kaspersky Endpoint Security for Windows (English) installation package, you can add Kaspersky Endpoint Security for Windows installation packages localized in other languages, except English.
- When you try to activate the Kaspersky MDR solution, an error occurs if the MDR services are unavailable.
- In the Kaspersky Endpoint Security for Mac policy, in the Advanced Threat Protection section, if you click the KSN Statement button several times, the window containing KSN Statement opens as many times as you have clicked the button.
- In the Alert details window, if you click any link that opens another section, and then try to return and click the Back button of your browser (or press Alt+Left), the Alert details window loads indefinitely.
- When you try to remove the last license key in the Kaspersky licenses section, the Remove button in the confirmation window is not visible if the dark interface theme of Web Console is enabled.
- In the Kaspersky Endpoint Security for Mac policy, if you enable the integration with KATA and you do not specify the server address and certificate, an attempt to enable the Web Control feature returns an error.
- When you import the Download updates to the repositories of distribution points or Update verification task the Select devices to which the task will be assigned option is enabled. These tasks cannot be assigned to a device selection or specific devices. If you assign the Download updates to the repositories of distribution points or Update verification task to specific devices, the task will be imported incorrectly.
- After the Inventory scan task is complete for a Linux device, an attempt to send the received files to Kaspersky for analysis returns an error.
- If you make an attempt to log in to Kaspersky Security Center Cloud Console by using Active Directory Federation Services (AD FS), but the required permissions are missing, Kaspersky Security Center Cloud Console still returns the "Invalid credentials" error instead of warning the user of missing permissions.
- The Manage devices task does not work correctly for devices running macOS.
- In the Remote diagnostics window, clicking the Download entire file button might not result in correct downloading.
- An ignored third-party vulnerability (not including Microsoft software) is not shown on the Statistics of vulnerability on devices diagram.
- Automatic transmission of encryption keys between Administration Servers does not work when the secondary Administration Server is in the demilitarized zone (DMZ). Use the manual method instead.
Glossary
Account on Kaspersky Security Center Cloud Console
An account that you must have to configure Kaspersky Security Center Cloud Console by, for example, adding and removing user accounts, and configuring security profiles (security policies). This account lets you use the My Kaspersky service. You create this account when you start using Kaspersky Security Center Cloud Console.
Active key
A key that is currently used by the application.
Additional (or reserve) license key
A key that certifies the right to use the application but is not currently being used.
Administration group
A set of devices grouped by function and by installed Kaspersky applications. Devices are grouped as a single entity for the convenience of management. A group can include other groups. Group policies and group tasks can be created for each installed application in the group.
Administration Server
A component of Kaspersky Security Center Cloud Console that centrally stores information about all Kaspersky applications that are installed on the corporate network. It can also be used to manage these applications.
Amazon EC2 instance
A virtual machine created based on an AMI image using Amazon Web Services.
Amazon Machine Image (AMI)
The template containing the software configuration necessary for running the virtual machine. Multiple instances can be created based on a single AMI.
Anti-virus databases
Databases that contain information about computer security threats known to Kaspersky as of when the anti-virus databases are released. Entries in anti-virus databases allow malicious code to be detected in scanned objects. Anti-virus databases are created by Kaspersky specialists and updated hourly.
Application tag
A label for third-party applications that can be used for grouping or finding applications. A tag assigned to applications can serve as a condition in device selections.
Authentication Agent
Interface that lets you complete authentication to access encrypted hard drives and load the operating system after the bootable hard drive has been encrypted.
Available update
A set of updates for Kaspersky application modules, including critical updates accumulated over a certain period of time.
AWS Application Program Interface (AWS API)
The application programming interface of the AWS platform that is used by Kaspersky Security Center Cloud Console. Specifically, AWS API tools are used for cloud segment polling.
AWS IAM access key
A combination consisting of the key ID (which looks like "AKIAIOSFODNN7EXAMPLE") and secret key (which looks like "wJalrXUtnFEMI/K7MDENG/bPxRfiCYEXAMPLEKEY"). This pair belongs to the IAM user and is used to obtain access to AWS services.
AWS Management Console
The web interface for viewing and managing AWS resources. AWS Management Console is available on the web at https://aws.amazon.com/console/.
Broadcast domain
A logical area of a network in which all nodes can exchange data using a broadcasting channel at the level of OSI (Open Systems Interconnection Basic Reference Model).
Centralized application management
Remote application management using the administration services provided in Kaspersky Security Center Cloud Console.
Cloud Discovery
Cloud Discovery is a component of the Cloud Access Security Broker (CASB) solution that protects the cloud infrastructure of an organization. Cloud Discovery manages user access to cloud services. Cloud services include, for example, Microsoft Teams, Salesforce, Microsoft Office 365. Cloud services are grouped in categories, for example, Data exchange, Messengers, Email.
Connection gateway
A connection gateway is a Network Agent acting in a special mode. A connection gateway accepts connections from other Network Agents and tunnels them to the Administration Server through its own connection with the Server. Unlike an ordinary Network Agent, a connection gateway waits for connections from the Administration Server rather than establishes connections to the Administration Server.
Demilitarized zone (DMZ)
Demilitarized zone is a segment of a local network that contains servers, which respond to requests from the global Web. In order to ensure the security of an organization's local network, access to the LAN from the demilitarized zone is protected with a firewall.
Device owner
Device owner is a user whom the administrator can contact when the need arises to perform certain operations on a device.
Device tag
A label of a device that can be used for grouping, describing, or finding devices.
Direct application management
Application management through a local interface.
Distribution point
Computer that has Network Agent installed and is used for update distribution, network polling, remote installation of applications, getting information about computers in an administration group, and / or broadcasting domain. The administrator selects the appropriate devices and assigns them distribution points manually.
Event repository
A part of the Administration Server database dedicated to storage of information about events that occur in Kaspersky Security Center Cloud Console.
Event severity
Property of an event encountered during the operation of a Kaspersky application. There are the following severity levels:
- Critical event
- Functional failure
- Warning
- Info
Events of the same type can have different severity levels depending on the situation in which the event occurred.
Forced installation
Method for remote installation of Kaspersky applications that allows you to install software on specific client devices. For successful forced installation, the account used for the task must have sufficient rights to start applications remotely on client devices. This method is recommended for installing applications on devices that are running Microsoft Windows operating systems and that support this functionality.
Group task
A task defined for an administration group and performed on all client devices included in that administration group.
Home Administration Server
Home Administration Server is the Administration Server that was specified during Network Agent installation. The home Administration Server can be used in settings of Network Agent connection profiles.
HTTPS
Secure protocol for data transfer, using encryption, between a browser and a web server. HTTPS is used to gain access to restricted information, such as corporate or financial data.
IAM role
Set of rights for making requests to AWS-based services. IAM roles are not linked to a specific user or group; they provide access rights without AWS IAM access keys. You can assign an IAM role to IAM users, EC2 instances, and AWS-based applications or services.
IAM user
The user of AWS services. An IAM user may have the rights to perform cloud segment polling.
Identity and Access Management (IAM)
The AWS service that enables management of user access to other AWS services and resources.
Incompatible application
An anti-virus application from a third-party developer or a Kaspersky application that does not support management through Kaspersky Security Center Cloud Console.
Installation package
A set of files created for remote installation of a Kaspersky application by using the Kaspersky Security Center Cloud Console remote administration system. The installation package contains a range of settings needed to install the application and get it running immediately after installation. Settings correspond to application defaults. The installation package is created using files with the .kpd and .kud extensions included in the application distribution kit.
JavaScript
A programming language that expands the performance of web pages. Web pages created using JavaScript can perform functions (for example, change the view of interface elements or open additional windows) without refreshing the web page with new data from a web server. To view pages created by using JavaScript, enable JavaScript support in the configuration of your browser.
Kaspersky Next Expert View
An application designed for the centralized execution of basic administration and maintenance tasks on an organization's network. Kaspersky Next Expert View is hosted and maintained by Kaspersky. The application is a part of the Kaspersky Next cloud solution. Within this solution, you can also use Kaspersky Next Pro View.
Kaspersky Private Security Network (KPSN)
Kaspersky Private Security Network is a solution that gives users of devices with Kaspersky applications installed access to reputation databases of Kaspersky Security Network and other statistical data—without sending data from their devices to Kaspersky Security Network. Kaspersky Private Security Network is designed for corporate customers who are unable to participate in Kaspersky Security Network for any of the following reasons:
- Devices are not connected to the internet.
- Transmission of any data outside the country or the corporate LAN is prohibited by law or corporate security policies.
Kaspersky Security Center Cloud Console Administrator
The person managing application operations through the Kaspersky Security Center Cloud Console remote centralized administration system.
Kaspersky Security Center Cloud Console Operator
A user who monitors the status and operation of a protection system managed with Kaspersky Security Center Cloud Console.
Kaspersky Security Network (KSN)
An infrastructure of cloud services that provides access to the Kaspersky database with constantly updated information about the reputation of files, web resources, and software. Kaspersky Security Network ensures faster responses by Kaspersky applications to threats, improves the performance of some protection components, and reduces the likelihood of false positives.
Kaspersky update servers
HTTP(S) servers at Kaspersky from which Kaspersky applications download database and application module updates.
Key file
A file in xxxxxxxx.key format that makes it possible to use a Kaspersky application under a trial or commercial license.
License term
A time period during which you have access to the application features and rights to use additional services. The services you can use depend on the type of the license.
Lightweight Nagent (LWNGT)
A protocol for interaction with Kaspersky Endpoint Security on mobile devices. The LWNGT (also called Mobile protocol) functions as Network Agent without actually installing Network Agent on mobile devices.
Local installation
Installation of a security application on a device on a corporate network that presumes manual installation startup from the distribution package of the security application or manual startup of a published installation package that was pre-downloaded to the device.
Local task
A task defined and running on a single client computer.
Managed device
A computer with Network Agent installed or a mobile device with a Kaspersky security application installed.
Management web plug-in
A special component that is used for remote administration of Kaspersky software by means of Kaspersky Security Center Cloud Console. A management plug-in is an interface between Kaspersky Security Center Cloud Console and a specific Kaspersky application. With a management plug-in, you can configure tasks and policies for the application.
Network Agent
A Kaspersky Security Center Cloud Console component that enables interaction between the Administration Server and Kaspersky applications that are installed on a specific network node (workstation or server). This component is common to all of the company's applications for Microsoft Windows. Separate versions of Network Agent exist for Kaspersky applications developed for Unix-like OS and macOS.
Network anti-virus protection
A set of technical and organizational measures that lower the risk of allowing viruses and spam to penetrate the network of an organization, and that prevent network attacks, phishing, and other threats. Network security increases when you use security applications and services and when you apply and adhere to the corporate data security policy.
Network Location Awareness (NLA)
A Windows service that helps an operating system identify the current network. NLA detects network changes and adjusts the security configuration of the device.
Network protection status
Current protection status, which defines the safety of corporate networked devices. The network protection status includes such factors as installed security applications, usage of license keys, and number and types of threats detected.
Patch importance level
Attribute of the patch. There are five importance levels for Microsoft patches and third-party patches:
- Critical
- High
- Medium
- Low
- Unknown
The importance level of a third-party patch or Microsoft patch is determined by the least favorable severity level among the vulnerabilities that the patches should fix.
Policy
A policy determines an application's settings and manages the ability to configure that application on computers within an administration group. An individual policy must be created for each application. You can create multiple policies for applications installed on computers in each administration group, but only one policy can be applied at a time to each application within an administration group.
Policy profile
A named subset of policy settings. This subset is distributed on target devices together with the policy, supplementing it under a specific condition called the profile activation condition.
Program settings
Application settings that are common to all types of tasks and govern the overall operation of the application, such as application performance settings, report settings, and backup settings.
Protection status
Current protection status, which reflects the level of computer security.
Quarantine
A special repository for storing files that are probably infected with viruses and files that cannot be disinfected at the time when they are detected.
Remote installation
Installation of Kaspersky applications by using the services provided by Kaspersky Security Center Cloud Console.
Restoration
Relocation of the original object from Quarantine or Backup to its original folder where the object had been stored before it was quarantined, disinfected or deleted, or to a user-defined folder.
SSL
A data encryption protocol used on the internet and local networks. The Secure Sockets Layer (SSL) protocol is used in web applications to create a secure connection between a client and server.
Task
Functions performed by the Kaspersky application are implemented as tasks, such as: Real-time file protection, Full computer scan, and Database update.
Task for specific devices
A task assigned to a set of client devices from arbitrary administration groups and performed on those devices.
Task settings
Application settings that are specific for each task type.
UEFI protection device
Device with a Kaspersky solution or application for UEFI integrated at the BIOS level. Integrated protection ensures device security from the moment the system starts, while protection on devices without integrated software begins functioning only after the security application starts.
Update
The procedure of replacing or adding new files (databases or application modules) retrieved from the Kaspersky update servers.
Virtual Administration Server
A component of Kaspersky Security Center Cloud Console, designed for management of the protection system of a client organization's network.
Virtual Administration Server is a particular case of a secondary Administration Server and has the following restrictions as compared with a physical Administration Server:
- Virtual Administration Servers can work only as secondary Administration Servers.
- Virtual Administration Server does not support creation of secondary Administration Servers (including virtual Servers).
Virus activity threshold
Maximum allowed number of events of the specified type within a limited time; when this number is exceeded, it is interpreted as increased virus activity and as a threat of a virus outbreak. This feature is important during periods of virus outbreaks because it enables administrators to respond in a timely manner to virus attack threats.
Virus outbreak
A series of deliberate attempts to infect a device with a virus.
Vulnerability
A flaw in an operating system or an application that may be exploited by malware makers to penetrate the operating system or application, and corrupt its integrity. The presence of a large number of vulnerabilities in an operating system makes it unreliable, because viruses that penetrate the operating system may cause disruptions in the operating system itself and in installed applications.
Workspace
An instance of Kaspersky Security Center Cloud Console created for a specific company. When a customer creates a workspace, Kaspersky creates and configures the infrastructure and cloud-based Administration Console that are required to manage security applications installed on the devices of the company.
Page top
Information about third-party code
Information about third-party code is contained in the file legal_notices.txt.
The file legal_notices.txt is also located in the installation folder of Network Agent for Windows and Network Agent for Linux.
For additional information about third-party code used for the workspaces, refer to the Kaspersky Endpoint Security Cloud documentation.
Page top
Trademark notices
Registered trademarks and service marks are the property of their respective owners.
Adobe, Acrobat, Flash, PostScript, Reader, Shockwave are either registered trademarks or trademarks of Adobe in the United States and/or other countries.
AMD64 is a trademark or registered trademark of Advanced Micro Devices, Inc.
Amazon, Amazon EC2, Amazon Web Services, AWS and AWS Marketplace are trademarks of Amazon.com, Inc. or its affiliates.
Apache is either a registered trademark or a trademark of the Apache Software Foundation.
Apple, App Store, AppleScript, FileVault, iPhone, iTunes, Mac, Mac OS, macOS, OS X, Safari, and QuickTime are trademarks of Apple Inc.
Arm is a registered trademark of Arm Limited (or its subsidiaries) in the US and/or elsewhere.
The Bluetooth word, mark and logos are owned by Bluetooth SIG, Inc.
Ubuntu, LTS are registered trademarks of Canonical Ltd.
Cisco, IOS, Cisco Jabber are registered trademarks or trademarks of Cisco Systems, Inc. and/or its affiliates in the United States and certain other countries.
Citrix, XenServer are either registered trademarks or trademarks of Cloud Software Group, Inc., and/or its subsidiaries in the United States and/or other countries.
Cloudflare, the Cloudflare logo, and Cloudflare Workers are trademarks and/or registered trademarks of Cloudflare, Inc. in the United States and other jurisdictions.
Corel, and CorelDRAW are trademarks or registered trademarks of Corel Corporation and/or its subsidiaries in Canada, the United States and/or other countries.
Dropbox is a trademark of Dropbox, Inc.
Radmin is a registered trademark of Famatech.
Firebird is a registered trademark of the Firebird Foundation.
Foxit is a registered trademark of Foxit Corporation.
FreeBSD is a registered trademark of The FreeBSD Foundation.
Google, Android, Chrome, Dalvik, Firebase, Google Chrome, Google Earth, Google Maps, Google Play, Google Public DNS are trademarks of Google LLC.
HUAWEI, EulerOS, HUAWEI CLOUD are trademarks of Huawei Technologies Co., Ltd.
Intel and Core are trademarks of Intel Corporation or its subsidiaries.
IBM, QRadar are trademarks of International Business Machines Corporation, registered in many jurisdictions worldwide.
Node.js is a trademark of Joyent, Inc.
Linux is the registered trademark of Linus Torvalds in the U.S. and other countries.
Logitech is either a registered trademark or trademark of Logitech in the United States and/or other countries.
Microsoft, Active Directory, ActiveSync, ActiveX, BitLocker, Excel, Hyper-V, InfoPath, Internet Explorer, Microsoft Edge, MS-DOS, MultiPoint, Office 365, OneNote, Outlook, PowerPoint, PowerShell, Segoe, Skype, SQL Server, Tahoma, Visio, Win32, Windows, Windows Azure, Windows Media, Windows Mobile, Windows Phone, Windows Server, and Windows Vista are trademarks of the Microsoft group of companies.
CVE is a registered trademark of The MITRE Corporation.
Mozilla, Firefox, Thunderbird are trademarks of the Mozilla Foundation in the U.S. and other countries.
Novell is a registered trademark of Novell Enterprises Inc. in the United States and other countries.
NetWare is a registered trademark of Novell Inc. in the United States and other countries.
OpenVPN is a registered trademark of OpenVPN, Inc.
Oracle, Java, JavaScript are registered trademarks of Oracle and/or its affiliates.
Parallels, the Parallels logo, and Coherence are trademarks or registered trademarks of Parallels International GmbH.
Python is a trademark or registered trademark of the Python Software Foundation.
Red Hat, Red Hat Enterprise Linux, CentOS, Fedora are trademarks or registered trademarks of Red Hat, Inc. or its subsidiaries in the United States and other countries.
BlackBerry is owned by Research In Motion Limited and is registered in the United States and may be pending or registered in other countries.
SAMSUNG is a trademark of SAMSUNG in the United States or other countries.
Debian is a registered trademark of Software in the Public Interest, Inc.
Splunk is a trademark and registered trademark of Splunk Inc. in the United States and other countries.
SUSE is a registered trademark of SUSE LLC in the United States and other countries.
Symbian trademark is owned by the Symbian Foundation Ltd.
OpenAPI is a trademark of The Linux Foundation.
Rocky Linux is a trademark of The Rocky Enterprise Software Foundation.
UNIX is a registered trademark in the United States and other countries, licensed exclusively through X/Open Company Limited.
Page top