Contents
- Workspace management
- About workspace management in Kaspersky Security Center Cloud Console
- Getting started with Kaspersky Security Center Cloud Console
- Opening your Kaspersky Security Center Cloud Console workspace
- Returning to the list of workspaces
- Signing out of Kaspersky Security Center Cloud Console
- Managing the company and the list of workspaces
- Managing access to the company and its workspaces
- Resetting your password
- Editing the settings of an account in Kaspersky Security Center Cloud Console
- Selecting the data centers used to store Kaspersky Security Center Cloud Console information
- Access to public DNS servers
Workspace management
This section describes how you can use accounts and workspaces in Kaspersky Security Center Cloud Console.
About workspace management in Kaspersky Security Center Cloud Console
Using Kaspersky Security Center Cloud Console, you can do the following:
- Create an account.
- Edit an account.
- Register a company and create a workspace.
- Edit information about the company and workspaces.
- Delete a workspace and a company.
- Delete an account.
Getting started with Kaspersky Security Center Cloud Console
This section describes how to sign up for and start using Kaspersky Security Center Cloud Console.
Signing up for Kaspersky Security Center Cloud Console consists of the following steps:
Page topCreating an account
This article describes how to create an
.As an alternative, you can create an account on My Kaspersky, and then use it to sign in to Kaspersky Security Center Cloud Console and create your workspace.
Your My Kaspersky account must be created directly on the website and not by using an external authentication provider (like Google). Otherwise, you will not be able to use Kaspersky Security Center Cloud Console.
To create an account in Kaspersky Security Center Cloud Console:
- In your browser, go to Kaspersky Security Center Cloud Console.
- Click the Create an account button on the start page of Kaspersky Security Center Cloud Console.
The Kaspersky Account portal opens.
- On the Sign up to enter Kaspersky Security Center Cloud Console page, enter the email address and password for your account (see the figure below).
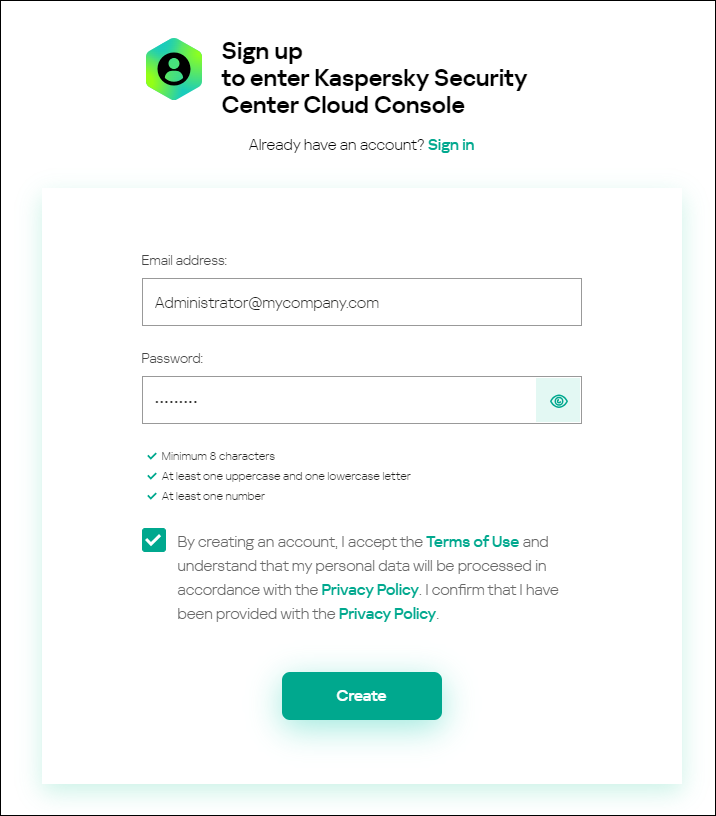
Creating an account in Kaspersky Security Center Cloud Console
- Click the Privacy Policy link and carefully read the Privacy Policy text.
- If you are aware and agree that your data will be handled and transmitted (including to third countries) as described in the Privacy Policy and you confirm that you have fully read and understand the Privacy Policy, select the check box next to the text of consent to data processing in accordance with the Privacy Policy, and then click the Create button.
If you do not accept the Privacy Policy, do not use Kaspersky Security Center Cloud Console.
- A message from Kaspersky is sent to the email address that you specified. The message contains a one-time security code.
Open the email message, and then copy the one-time security code that it contains.
- Return to Kaspersky Account, and then paste the code to the entry field.
Creation of the account in Kaspersky Security Center Cloud Console is complete.
Registering a company and creating a workspace
Immediately after the account is created, you can register a company and create a workspace for it.
If you want to protect more than 10,000 devices, you do not have to register a company and create a workspace on Kaspersky Security Center Cloud Console as described below. Instead, send a request to Kaspersky Technical Support. In the request, specify information about your company and the workspace that you want to create.
Before you start, make sure that you know the following:
- The name of the company in which you intend to use the software solution.
- The country in which the company is located. If the company is located in Canada, you must also know the province.
- The total number of company computers and mobile devices that you want to protect.
To register a company and create a workspace in Kaspersky Security Center Cloud Console:
- In your browser, go to Kaspersky Security Center Cloud Console.
- Click the Sign in button on the start page of Kaspersky Security Center Cloud Console.
- Enter the email address and password that you specified when you created the account, and then click the Sign in button.
The Create a workspace wizard starts. Proceed through the wizard by using the Next button.
- On the Step 01: Terms of Use of Kaspersky Security Center Cloud Console page of the wizard, do the following:
- Carefully read the Agreement, the Privacy Policy, and the Data Processing Agreement for the software solution.
- If you agree to the terms and conditions of the Agreement and the Data Processing Agreement and if you are aware and agree that your data will be handled and transmitted (including to third countries) as described in the Privacy Policy, and you confirm that you have fully read and understand the Privacy Policy, select the check boxes next to the three listed documents and click the Accept button.
If you do not agree to the terms and conditions, do not use Kaspersky Security Center Cloud Console.
If you click the Decline button, the workspace creation process will be terminated.
- On the Step 02: Company information page of the wizard, specify the main details of your company.
Fill in the following fields:
- Name of your company (required)
Specify the name of the company in which you intend to use the software solution. You can enter a string up to 255 characters long. The string can contain upper- and lowercase characters, numerals, whitespaces, dots, commas, minuses, dashes, and underscores. The specified company name will be displayed in Kaspersky Security Center Cloud Console.
- Additional company description field (optional)
You may specify additional information about the company that you register. You can enter a string up to 255 characters long. The string can contain upper- and lowercase characters, numerals, whitespaces, dots, commas, minuses, dashes, and underscores.
- Name of your company (required)
- On the Step 03: Workspace information page of the wizard, specify the information about the workspace that you want to create for your company.
Fill in the following required fields:
- Workspace name. Specify the name of the workspace in which you intend to use the software solution. You can enter a string up to 255 characters long. The string can contain upper- and lowercase characters, numerals, whitespaces, dots, commas, minuses, dashes, and underscores. The specified workspace name will be displayed in Kaspersky Security Center Cloud Console.
- Country. In the drop-down list, select the country in which your workspace is located. If you select Canada, also specify the province in the State drop-down list that appears below this field.
- Number of devices. Enter the total number of computers and mobile devices that you want to protect in this workspace.
In the entry field, you can enter a number from 20 to 10,000. The exact minimum number of devices that you can protect depends on the license that you purchased.
- On the Step 04: License for new workspace page of the wizard, do either of the following:
- If you want to try Kaspersky Security Center Cloud Console, click the I want to request a trial workspace link.
We recommend that you connect your own devices to your trial workspace and test any modifications to the settings, noting the results.
You will not be able to switch a trial workspace to commercial mode by entering an activation code. To switch to commercial mode, you must delete the workspace and create it again.
- If you want to use Kaspersky Security Center Cloud Console in the commercial mode, enter the activation code and click the Verify button.
- If you want to try Kaspersky Security Center Cloud Console, click the I want to request a trial workspace link.
Registration of a company and creation of a workspace in Kaspersky Security Center Cloud Console is complete.
After the workspace is prepared, you receive an email message with the link to access the workspace.
Page topOpening your Kaspersky Security Center Cloud Console workspace
Right after you create a workspace for Kaspersky Security Center Cloud Console, the workspace opens automatically. Later, you can open your workspace, as described in this section.
If you are an administrator of a virtual Administration Server, you have access only to the virtual Administration Server. After you sign in and open the workspace, Kaspersky Security Center Cloud Console provides you the interface of the virtual Administration Server. You cannot switch to the primary Administration Server or other secondary Administration Servers.
An administrator of a virtual Administration Server must have access to a single virtual Administration Server. If you do not have access rights on the primary Server and have access rights on multiple virtual Servers, you cannot sign in to Kaspersky Security Center Cloud Console.
To open your Kaspersky Security Center Cloud Console workspace:
- In your browser, go to Kaspersky Security Center Cloud Console.
- Sign in to your account on Kaspersky Security Center Cloud Console by specifying the user name and the password.
- If you set up two-step verification, enter the one-time security code that is either sent to you by SMS or generated in your authenticator app (depending on the two-step verification method that you set up).
The portal page displays the company for which you are an administrator and the list of its workspaces.
- Click the name of the required workspace or the Go to workspace link to proceed to the workspace.
Occasionally, a workspace may be unavailable due to maintenance. If this is the case, you will not be able to proceed to your Kaspersky Security Center Cloud Console workspace.
You cannot open a workspace that is marked for deletion.
- If any of the Kaspersky Security Center Cloud Console legal documents have been changed since you accepted their terms and conditions, the portal page displays the changed documents.
Do the following:
- Carefully read the displayed documents.
- If you agree to the terms and conditions of the displayed documents, select the check boxes next to the listed documents, and then click the I accept the terms button.
If you do not agree to the terms and conditions, stop using the selected Kaspersky software solution.
If you click the I decline button, the operation will be terminated.
Your Kaspersky Security Center Cloud Console workspace opens.
Page topReturning to the list of workspaces
After you open your workspace, you can go back to the portal page that has the list of workspaces registered under your account in Kaspersky Security Center Cloud Console.
To return to the list of workspaces,
In the main menu, go to your account settings, and then select Manage workspaces.
The portal page displays the company for which you are an administrator and the list of its workspaces. If you have Kaspersky Security Center Cloud Console open on several tabs, you are signed out on all tabs.
Page topSigning out of Kaspersky Security Center Cloud Console
When you have finished your work, you should securely close your current session by signing out of Kaspersky Security Center Cloud Console.
To sign out of Kaspersky Security Center Cloud Console,
In the main menu, go to your account settings, and then select Sign out.
Kaspersky Security Center Cloud Console is closed, and the account page is displayed. You can close this browser page, if necessary. All data from your workspace will be saved.
Managing the company and the list of workspaces
This section describes how to view the company information and the list of workspaces registered under your account in Kaspersky Security Center Cloud Console, change information about the company and workspaces, and delete a workspace and a company.
At present, you can register only one company and create one workspace. In future releases of Kaspersky Security Center Cloud Console, you will be able to create additional workspaces for your company. This will help you map your company structure to workspaces, by creating a separate workspace for each company branch.
Editing information about a company and a workspace
You can modify the information about a company and a workspace that you specified when you added the company to Kaspersky Security Center Cloud Console.
To modify information about a company and/or a workspace:
- In your browser, go to Kaspersky Security Center Cloud Console.
- Sign in to your account on Kaspersky Security Center Cloud Console by specifying the user name and the password.
- If you set up two-step verification, enter the one-time security code that is either sent to you by SMS or generated in your authenticator app (depending on the two-step verification method that you set up).
The portal page displays the company for which you are an administrator and a list of its workspaces.
- If you want to edit the company name and description, do the following:
- Click the Edit (
 ) icon in the area with the company information.
 - Modify the company name and/or description as you want.
- Click the Save button.
To cancel the changes, click the Cancel button.
- Click the Edit (
- If you want to edit the workspace name, do the following:
- Click the Edit () icon in the area with the workspace information.
- Modify the workspace name as you want.
- Click the Save button.
To cancel the changes, click the Cancel button.
- Click the Edit (
The modified information is displayed in Kaspersky Security Center Cloud Console.
Page topDeleting a workspace and a company
A
of a company can be deleted either manually or automatically. After the last workspace is deleted, the company information is also deleted automatically.Manual deletion
You can delete a workspace of a company if that company has decided to stop using the workspace.
After the workspace is deleted, all security applications will remain on the managed devices. Therefore, we recommend that before deleting the workspace you either disable password protection of all security applications or uninstall security applications from the managed devices.
To delete a workspace and a company:
- In your browser, go to Kaspersky Security Center Cloud Console.
- Sign in to your account on Kaspersky Security Center Cloud Console by specifying the user name and the password.
- If you set up two-step verification, enter the one-time security code that is either sent to you by SMS or generated in your authenticator app (depending on the two-step verification method that you set up).
The portal page displays the company for which you are an administrator and a list of its workspaces.
- Select the workspace that you want to delete.
- On the right, in the section containing the selected workspace, click the Delete (
 ) icon.
The Delete workspace window opens.
- In the Delete workspace window, confirm that you want to delete the workspace.
The workspace is marked for deletion. The information block for the workspace is highlighted with a red border.
The information block for the workspace is duplicated at the bottom of the page, in the Marked for deletion section.
You cannot go to a workspace that is marked for deletion and manage it.
If you have not been able to mark a workspace for deletion, contact Kaspersky Technical Support. After a Technical Support engineer at Kaspersky receives your request, the workspace and the company will be deleted.
Workspaces that are marked for deletion may remain in that status for a period of seven days after being marked. After seven days, they are automatically deleted.
During that period, you can forcibly delete a workspace that is marked for deletion or cancel deletion of a workspace.
To forcibly delete a workspace:
- In your browser, go to Kaspersky Security Center Cloud Console.
- Sign in to your account on Kaspersky Security Center Cloud Console by specifying the user name and the password.
- If you set up two-step verification, enter the one-time security code that is either sent to you by SMS or generated in your authenticator app (depending on the two-step verification method that you set up).
The portal page displays the company for which you are an administrator and a list of its workspaces.
- In the Marked for deletion section, in the information block for the workspace marked for deletion, click the Force deletion option.
The Delete workspace window opens.
- In the Delete workspace window, enter the ID of the workspace that you want to delete.
You are prompted to confirm the ID of the workspace to make sure that you are not mistakenly deleting the workspace. After a workspace is deleted, it cannot be restored.
The workspace ID is displayed in the workspace information section under its name.
- In the Delete workspace window, click OK.
The workspace is deleted. All data about users,
, and their settings, is deleted.Automatic deletion
Kaspersky Security Center Cloud Console automatically deletes a workspace:
- 30 days after the trial license expires.
- 90 days after all commercial or subscription licenses in the Administration Server repository expire.
- 90 days after you delete the last license key (active, reserve, or not in use) added manually in the repository.
Kaspersky Security Center Cloud Console notifies administrators of the workspace 30 days, 7 days, and 1 day prior to deletion.
Page topCanceling deletion of a workspace
You can cancel the deletion of a workspace that has been marked for deletion.
You cannot cancel the deletion of a workspace that already has been deleted.
To cancel the deletion of a workspace:
- In your browser, go to Kaspersky Security Center Cloud Console.
- Sign in to your account on Kaspersky Security Center Cloud Console by specifying the user name and the password.
- If you set up two-step verification, enter the one-time security code that is either sent to you by SMS or generated in your authenticator app (depending on the two-step verification method that you set up).
The portal page displays the company for which you are an administrator and a list of its workspaces.
- In the Marked for deletion section, in the information block for the workspace marked for deletion, click the Cancel deletion link.
Workspace deletion is canceled. You can now go to the workspace and continue working with it.
Page topManaging access to the company and its workspaces
This section contains information about granting and revoking access to your company and its workspaces.
Kaspersky Security Center Cloud Console provides you with two access levels:
- Administrator
A user with this access level can fully manage the company and its workspaces.
- User
A user with this access level can view the list of available workspaces and enter these workspaces.
Granting access to your company and its workspaces
You can grant access to your company and its workspaces if you want another user to be able to log in to your company and manage it according to the selected access level.
Before you can grant access to a user, the user must create an account in Kaspersky Security Center Cloud Console.
To grant access to your company and its workspaces:
- In your browser, go to Kaspersky Security Center Cloud Console.
- Sign in to your account on Kaspersky Security Center Cloud Console by specifying the user name and the password.
- If you set up two-step verification, enter the one-time security code that is either sent to you by SMS or generated in your authenticator app (depending on the two-step verification method that you set up).
The portal page displays the company for which you are an administrator and a list of its workspaces.
- Click the Show access control link.
The list of accounts with access to the company expands.
- Click the Grant access link.
- In the Email address field, specify the email address of the account to which you want to grant access.
- In the Access level list, select the access level that you want to assign to the entered account:
- Administrator
A user with this access level can fully manage the company and its workspaces.
- User
A user with this access level can view the list of available workspaces and enter these workspaces.
You cannot grant several access levels to the same account within the same company.
- Administrator
- Click the Grant button.
The specified account is granted access to your company and its workspaces. The user can log in to the company and manage it according to the selected access level.
If you have granted the User access level to the account, you must assign a role to the added user. Otherwise, the user will not be able to enter the workspace.
Page topRevoking access to your company and its workspaces
You can revoke access to your company and its workspaces if you no longer want a user to be able to log in to your company and manage it (for example, after the user quits the company).
You cannot revoke your own access to the company.
To revoke access to your company and its workspaces:
- In your browser, go to Kaspersky Security Center Cloud Console.
- Sign in to your account on Kaspersky Security Center Cloud Console by specifying the user name and the password.
- If you set up two-step verification, enter the one-time security code that is either sent to you by SMS or generated in your authenticator app (depending on the two-step verification method that you set up).
The portal page displays the company for which you are an administrator and a list of its workspaces.
- Click the Show access control link.
The list of accounts with access to the company expands.
- Click the Revoke () icon next to the account whose access you want to revoke.
- In the Revoke access to company window that opens, click OK to confirm the operation.
The access of the selected account to your company and its workspaces is revoked. The user cannot log in to the company and manage it any more.
Page topResetting your password
If you forget your password for your Kaspersky Security Center Cloud Console account, you can restore access to your account by resetting your password.
To reset the account password:
- In your browser, go to Kaspersky Security Center Cloud Console.
- Click the Sign in button.
- In the Sign in to Kaspersky Security Center Cloud Console window of the Kaspersky Account portal that appears, click the Forgot your password? link.
- Enter the email address that you specified when creating your account.
- Click Next.
- A message from Kaspersky is sent to the email address that you specified. The message contains a one-time security code.
Open the email message, and then copy the one-time security code that it contains.
- Return to Kaspersky Account, and then paste the code to the entry field.
- If you configured a secret question, answer this question.
If you set up two-step verification, enter the one-time security code that is either sent to you by SMS or generated in your authenticator app (depending on the two-step verification method that you set up).
- In the window that opens, type a new password.
- Click Save.
The new password for signing in to Kaspersky Security Center Cloud Console is saved.
If you did not receive an email message, check the email address that you entered, your spam folder, and then try again. If you do not receive a message when you try again, the email address you specified is probably not registered on the website. Please contact Kaspersky Technical Support.
Page topEditing the settings of an account in Kaspersky Security Center Cloud Console
This section provides instructions on how to edit and delete an account in Kaspersky Security Center Cloud Console.
Changing an email address
To change your email address in the settings of your account in Kaspersky Security Center Cloud Console:
- In Kaspersky Security Center Cloud Console, click the link containing your account name, and then select Manage user account.
The My Profile window of the Kaspersky Account portal opens.
- Click the Change your email address link (see the figure below).
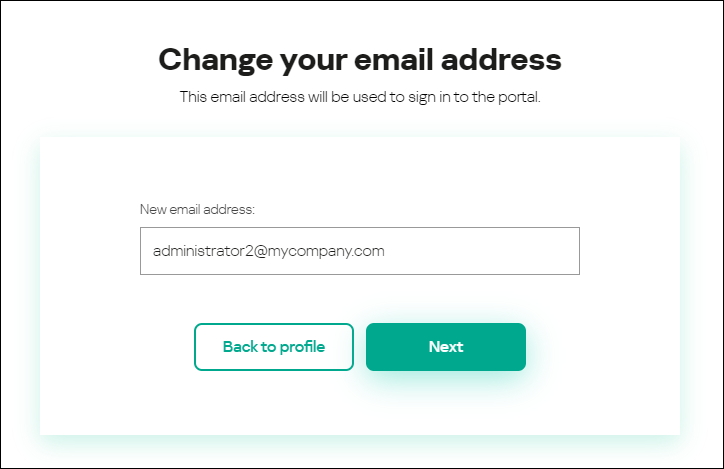
Changing the email address in the settings of an account in Kaspersky Security Center Cloud Console
- In the New email address entry field, enter your new email.
Please enter the address carefully. If you enter an invalid address, you will not be able to proceed to your account and use Kaspersky Security Center Cloud Console.
- Click the Next button.
- In the Enter your current password window that opens, specify the password of your account in Kaspersky Security Center Cloud Console, and then click the Next button.
- A message from Kaspersky is sent to the email address that you specified. The message contains a one-time security code.
Open the email message, and then copy the one-time security code that it contains.
- Return to Kaspersky Account, and then paste the code to the entry field.
- Go back to Kaspersky Security Center Cloud Console by clicking the Go back to Kaspersky Security Center Cloud Console link or exit the portal by clicking the Account → Sign out link.
Your email address is now changed in the Kaspersky Security Center Cloud Console account settings and in the My Kaspersky account settings. A message is sent to your new email address to notify you that your email address for gaining access to the account has been changed. The next time you sign in to Kaspersky Security Center Cloud Console, you will have to specify your new email address.
Page topChanging a password
To change your password in the settings of your account in Kaspersky Security Center Cloud Console:
- In Kaspersky Security Center Cloud Console, click the link containing your account name, and then select Manage user account.
The My Profile window of the Kaspersky Account portal opens.
- Click the Change password link (see the figure below).
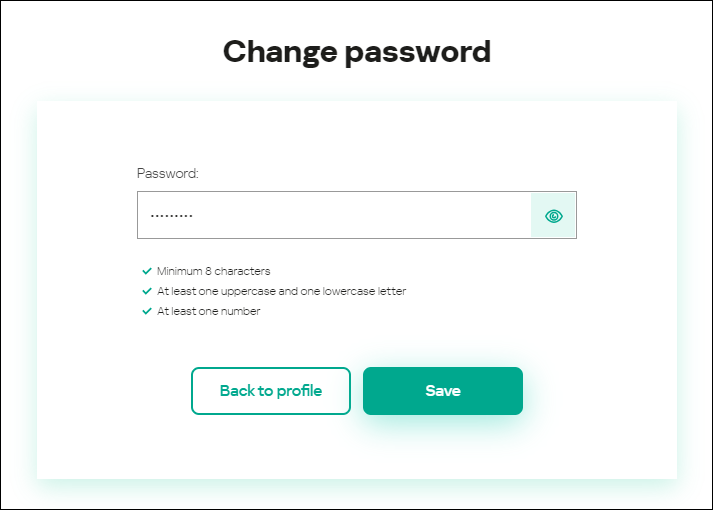
Changing the account password in Kaspersky Security Center Cloud Console
- In the Password entry field, enter your new password.
Under the entry field, the requirements for the password are shown. You cannot save the new password until you comply with the requirements.
- Click the Save button.
- In the Enter your current password window that opens, specify the password of your account in Kaspersky Security Center Cloud Console, and then click the Next button.
- Select or clear the Automatically request password change every 180 days check box.
By default, this check box is selected.
- Go back to Kaspersky Security Center Cloud Console by clicking the Go back to Kaspersky Security Center Cloud Console link or exit the portal by clicking the Account → Sign out link.
Your password is now changed. You will have to enter the new password when signing in to Kaspersky Security Center Cloud Console and when signing in to My Kaspersky.
Page topUsing two-step verification
This section describes two-step verification, which can help you increase the security of your account in Kaspersky Security Center Cloud Console.
About two-step verification
Two-step verification can help you increase the security of your account in Kaspersky Security Center Cloud Console. When this feature is enabled, every time you sign in to Kaspersky Security Center Cloud Console with your email address and password, you enter an additional one-time security code. With two-step verification, criminals cannot sign in to your account if they steal or guess your password, they must have access to your mobile phone as well. Also, when two-step verification is enabled, you must enter an additional one-time security code if you forget your password.
After you set up two-step verification, you are responsible for keeping your mobile phone physically secure and for maintaining access to your phone number.
You can get a one-time security code in either of the following ways:
- A security code is sent by SMS to your mobile phone number.
In this case, if you lose access to your mobile phone, you are not able to sign in to your account in Kaspersky Security Center Cloud Console until you restore access to your phone number.
- A security code is generated in an authenticator app that is installed on your mobile phone.
We strongly recommend that you set up two-step verification by using an authenticator app. In this case, you can sign in to your account even if your mobile phone is not connected to the internet or a mobile network.
We have tested only Google Authenticator and Microsoft Authenticator for compatibility with Kaspersky Security Center Cloud Console, and these applications were free to use at that time. The interfaces of these applications may be unavailable in your preferred language. Please also check the GDPR compliance and privacy policies of the applications before using them. Kaspersky is in no way sponsored, endorsed by, or otherwise affiliated with any of the owners of these applications.
Microsoft Authenticator can be installed on mobile devices only.
We also recommend that you install an authenticator app on a device other than your mobile phone. This will allow you to sign in to your account if your mobile phone is ever lost or stolen.
In this case, if you lose access to your mobile phone and you do not have an authenticator app on another device, you are not able to sign in to your account in Kaspersky Security Center Cloud Console until you restore access to your phone number. After that, use the security code that is sent by SMS.
If you previously configured a secret question to restore your password if it is lost, the security question feature will be permanently disabled after you set up two-step verification.
Page topScenario: Setting up two-step verification
Two-step verification can help you increase the security of your account in Kaspersky Security Center Cloud Console. After you complete the scenario in this section, two-step verification of your account will be set up.
The scenario proceeds in stages:
- Adding your phone number
At this stage, you set up two-step verification by SMS.
- Installing and configuring an authenticator app
Install and configure an authenticator app.
We strongly recommend that you set up two-step verification by using an authenticator app. In this case, you can sign in to your account even if your mobile phone is not connected to the internet or a mobile network.
We also recommend that you install an authenticator app on a device other than your mobile phone. This will allow you to sign in to your account if your mobile phone is ever lost or stolen.
- Changing your phone number
If necessary, you can change the phone number that you use for two-step verification.
Setting up two-step verification by SMS
To set up two-step verification by SMS:
- In Kaspersky Security Center Cloud Console, click the link containing your account name, and then select Manage user account.
The My Profile window of the Kaspersky Account portal opens.
- If two-step verification is disabled, enable the Two-step verification is disabled toggle switch.
- In the No phone number provided window that appears, click the Confirm button.
- Under Enter your phone number, specify the mobile phone number that you want to use in two-step verification, and then click the Provide phone number button.
You can use the same phone number for up to five accounts.
A 6-digit security code is sent to the specified phone number.
- Under Enter the verification code that was sent to <phone number>, enter the received security code.
- In the Enter your current password window that opens, specify the password of your account in Kaspersky Security Center Cloud Console, and then click the Next button.
Two-step verification is set up. Now, every time you sign in with your email address and password, or if you forget your password, you will need to enter a one-time security code that you get by SMS to the specified phone number.
You can now install and configure an authenticator app, change your phone number, or disable two-step verification.
Page topSetting up two-step verification by using an authenticator app
Authenticator apps cannot be used in Kaspersky Security Center Cloud Console as a standalone verification method. You must first set up two-step verification by SMS. If you disable two-step verification via your mobile phone number, verification via an authenticator app is turned off automatically. After you have set up both verification via SMS and via an app, you will be able to select a verification method on the sign-in page or if you forget your password.
To set up two-step verification by an authenticator app:
- Set up two-step verification by SMS.
- Download, install, and run the authenticator app that you want to use.
We have tested only Google Authenticator and Microsoft Authenticator for compatibility with Kaspersky Security Center Cloud Console, and these applications were free to use at that time. The interfaces of these applications may be unavailable in your preferred language. Please also check the GDPR compliance and privacy policies of the applications before using them. Kaspersky is in no way sponsored, endorsed by, or otherwise affiliated with any of the owners of these applications.
Microsoft Authenticator can be installed on mobile devices only.
If you want, you can use other apps at your own risk. The app that you use must support 6-digit security codes.
We also recommend that you install an authenticator app on a device other than your mobile phone. This will allow you to sign in to your account if your mobile phone is ever lost or stolen.
- In Kaspersky Security Center Cloud Console, click the link containing your account name, and then select Manage user account.
The My Profile window of the Kaspersky Account portal opens.
- If two-step verification is disabled, enable the Two-step verification is disabled toggle switch.
- Enable the Authenticator app is disabled toggle switch.
The portal page displays a QR code.
If you want to set up the authenticator app on a device that cannot scan QR codes, click the I can't scan it link. A 16-character secret key is displayed.
- In the authenticator app on each device, scan the QR code to create an account. Please refer to your app's documentation for more information.
If you want to set up the authenticator app on a device that cannot scan QR codes, create an account in the authenticator app, and then enter the displayed secret key.
A 6-digit security code is generated in your authenticator apps.
- Verify that the security codes generated in your apps are the same on each device.
- Return to the Kaspersky Account portal, and then click the Next button.
- Enter the generated security code.
- In the Enter your current password window that opens, specify the password of your account in Kaspersky Security Center Cloud Console, and then click the Next button.
Two-step verification by an authenticator app is set up. Now, every time you sign in with your email address and password, or if you forget your password, you will need to enter a one-time security code that is generated in your authenticator app.
You can now disable the use of an authenticator app or completely disable two-step verification.
Page topChanging your mobile phone number
To change the mobile phone number that is used in two-step verification by SMS:
- In Kaspersky Security Center Cloud Console, click the link containing your account name, and then select Manage user account.
The My Profile window of the Kaspersky Account portal opens.
- If two-step verification is disabled, enable the Two-step verification is disabled toggle switch.
- Under Phone number, click the Change phone number link.
- Under Enter your phone number, specify the new mobile phone number that you want to use in two-step verification, and then click the Provide phone number button.
A 6-digit security code is sent to the specified phone number.
- Under Enter the verification code that was sent to <phone number>, enter the received security code.
Your mobile phone number is changed. Now, one-time security codes will be sent to the new phone number.
Page topDisabling two-step verification
If you no longer want to use two-step verification, you can disable it, as described in this section.
Disabling two-step verification will decrease the security of your account. We strongly recommend that you continue using two-step verification.
If you set up two-step verification by SMS, you can disable two-step verification. If you set up two-step verification by an authenticator app, you can disable the use of the app or completely disable two-step verification.
To disable the use of an authenticator app:
- In Kaspersky Security Center Cloud Console, click the link containing your account name, and then select Manage user account.
The My Profile window of the Kaspersky Account portal opens.
- Disable the Authenticator app is enabled toggle switch.
- In the confirmation window that opens, click the Confirm button.
- In the Enter your current password window that opens, specify the password of your account in Kaspersky Security Center Cloud Console, and then click the Next button.
The use of an authenticator app is disabled. The settings of two-step verification by an authenticator app are deleted. You can now delete accounts in your authenticator apps.
Later, you can set up two-step verification by an authenticator app again.
To completely disable two-step verification:
- In Kaspersky Security Center Cloud Console, click the link containing your account name, and then select Manage user account.
The My Profile window of the Kaspersky Account portal opens.
- Disable the Two-step verification is enabled toggle switch.
- In the confirmation window that opens, click the Confirm button.
- In the Enter your current password window that opens, specify the password of your account in Kaspersky Security Center Cloud Console, and then click the Next button.
Two-step verification is disabled. If you used two-step verification by an authenticator app, the settings of two-step verification are deleted. You can now delete accounts in your authenticator apps.
Later, you can set up two-step verification again.
Page topDeleting an account in Kaspersky Security Center Cloud Console
If you want to stop using Kaspersky Security Center Cloud Console, you can delete your account.
When deleting an account, all data associated with that account is lost.
After you delete your account, you can no longer gain access to your workspaces in Kaspersky Endpoint Security Cloud, Kaspersky Security for Microsoft Office 365, and Kaspersky Security Center Cloud Console. If you were the only administrator in a workspace, the workspace will be duly deleted. Additionally, you lose access to your My Kaspersky account.
To delete an account in Kaspersky Security Center Cloud Console:
- In Kaspersky Security Center Cloud Console, click the link containing your account name, and then select Manage user account.
The My Profile window of the Kaspersky Account portal opens.
- Click the Account → Delete link.
- In the Delete your account window that opens, read the information about the consequences of account deletion, and then click the Delete button to confirm the account deletion.
- In the Enter your current password window that opens, specify the password of your account in Kaspersky Security Center Cloud Console, and then click the Next button.
Your account is deleted.
Page topSelecting the data centers used to store Kaspersky Security Center Cloud Console information
A workspace for Kaspersky Security Center Cloud Console is created by using servers from a network of global data centers based on a cloud platform. The selection of data centers to host a workspace depends on the country that you specified when you registered the workspace in Kaspersky Security Center Cloud Console (see the table below). The distribution packages of security applications are hosted on the same servers as workspaces.
Matching the company location with a data center region
Country in which the company is located |
Data center region |
|---|---|
Argentina |
Brazil |
Bolivia |
Brazil |
Brazil |
Brazil |
Chile |
Brazil |
Colombia |
Brazil |
Ecuador |
Brazil |
Guyana |
Brazil |
Peru |
Brazil |
Paraguay |
Brazil |
Suriname |
Brazil |
Uruguay |
Brazil |
Venezuela |
Brazil |
Antigua and Barbuda |
Mexico or Brazil |
Anguilla |
Mexico or Brazil |
Aruba |
Mexico or Brazil |
Barbados |
Mexico or Brazil |
Saint Barthelemy |
Mexico or Brazil |
Bonaire, Sint Eustatius and Saba |
Mexico or Brazil |
Belize |
Mexico or Brazil |
Costa Rica |
Mexico or Brazil |
Cuba |
Mexico or Brazil |
Curacao |
Mexico or Brazil |
Dominica |
Mexico or Brazil |
Dominican Republic |
Mexico or Brazil |
Grenada |
Mexico or Brazil |
Guadeloupe |
Mexico or Brazil |
Guatemala |
Mexico or Brazil |
Honduras |
Mexico or Brazil |
Haiti |
Mexico or Brazil |
Jamaica |
Mexico or Brazil |
Saint Kitts and Nevis |
Mexico or Brazil |
Cayman Islands |
Mexico or Brazil |
Saint Lucia |
Mexico or Brazil |
Saint Martin |
Mexico or Brazil |
Martinique |
Mexico or Brazil |
Montserrat |
Mexico or Brazil |
Nicaragua |
Mexico or Brazil |
Panama |
Mexico or Brazil |
Sint Maarten |
Mexico or Brazil |
Trinidad and Tobago |
Mexico or Brazil |
Saint Vincent and the Grenadines |
Mexico or Brazil |
British Virgin Islands |
Mexico or Brazil |
Japan |
Mexico or Ireland |
Canada (New Brunswick) |
Mexico or Brazil |
Canada (Newfoundland and Labrador) |
Mexico or Brazil |
Canada (Nova Scotia) |
Mexico or Brazil |
Canada (Ontario) |
Mexico or Brazil |
Canada (Prince Edward Island) |
Mexico or Brazil |
Canada (Quebec) |
Mexico or Brazil |
Albania |
Ireland |
Bosnia and Herzegovina |
Ireland |
Bulgaria |
Ireland |
Belarus |
Ireland |
Czech Republic |
Ireland |
Denmark |
Ireland |
Estonia |
Ireland |
Finland |
Ireland |
United Kingdom |
Ireland |
Greenland |
Ireland |
Greece |
Ireland |
Croatia |
Ireland |
Hungary |
Ireland |
Ireland |
Ireland |
Iceland |
Ireland |
Kyrgyzstan |
Ireland |
Kazakhstan |
Ireland |
Lithuania |
Ireland |
Latvia |
Ireland |
Moldova |
Ireland |
Montenegro |
Ireland |
Macedonia |
Ireland |
Mongolia |
Ireland |
Norway |
Ireland |
Poland |
Ireland |
Romania |
Ireland |
Serbia |
Ireland |
Russian Federation |
Ireland |
Sweden |
Ireland |
Slovenia |
Ireland |
Slovakia |
Ireland |
Tajikistan |
Ireland |
Turkmenistan |
Ireland |
Uzbekistan |
Ireland |
Canada (Alberta) |
Mexico or Brazil |
Canada (British Columbia) |
Mexico or Brazil |
Canada (Manitoba) |
Mexico or Brazil |
Canada (Northwest Territories) |
Mexico or Brazil |
Canada (Nunavut) |
Mexico or Brazil |
Canada (Yukon) |
Mexico or Brazil |
Canada (Saskatchewan) |
Mexico or Brazil |
Mexico |
Mexico or Brazil |
Other countries |
Ireland |
Access to public DNS servers
If access to Kaspersky servers by using the system DNS is not possible, Kaspersky Security Center Cloud Console can use the following public DNS servers, in the following order:
- Google Public DNS (8.8.8.8)
- Cloudflare DNS (1.1.1.1)
- Alibaba Cloud DNS (223.6.6.6)
- Quad9 DNS (9.9.9.9)
- CleanBrowsing (185.228.168.168)
Requests to these DNS servers may contain domain addresses and the public IP address of client devices, because Network Agent establishes a TCP/UDP connection to the DNS server. If Kaspersky Security Center Cloud Console is using a public DNS server, data processing is governed by the privacy policy of the relevant service.
Page top