Contents
- Getting started
- Using a Docker container
- Installation and removal
- Configuring the development environment
- KasperskyOS SDK Extension for Visual Studio Code
- Building and running examples
Getting started
This section tells you what you need to know to start working with KasperskyOS Community Edition.
Using a Docker container
To install and use KasperskyOS Community Edition, you can use a Docker container in which an image of one of the supported operating systems is deployed.
To use a Docker container for installing KasperskyOS Community Edition:
- Make sure that the Docker software is installed and running.
- To download the official Docker image of the Ubuntu GNU/Linux 22.04 (Jammy Jellyfish) operating system from the public Docker Hub repository, run the following command:
docker pull ubuntu:22.04 - To run the image, run the following command:
docker run --net=host --user root --privileged -it --rm ubuntu:22.04 bash - Copy the deb package for installation of KasperskyOS Community Edition into the container.
- Install KasperskyOS Community Edition.
Installation and removal
Installation
KasperskyOS Community Edition is distributed as a deb package. It is recommended to use the apt package installer to install KasperskyOS Community Edition.
To deploy the package using apt, run the following command:
The package will be installed in /opt/KasperskyOS-Community-Edition-<version>.
To conveniently work with tools provided in the KasperskyOS Community Edition SDK, the path to the executable files of these tools in /opt/KasperskyOS-Community-Edition-<version>/toolchain/bin must be added to the PATH environment variable. To avoid having to do this each time you log in to a user session, run the script /opt/KasperskyOS-Community-Edition-<version>/common/set_env.sh, log out and log in to a session again.
Syntax of the command for calling the set_env.sh script:
Parameters:
-dCancels the action of the script.
-h,--helpDisplays the Help text.
In addition to changing the PATH environment variable, the script defines the KOSCEVER and KOSCEDIR environment variables that contain the version and absolute path to the KasperskyOS Community Edition SDK, respectively. Use of these environment variables allows the build system to determine the SDK installation path at startup, and to verify that the solution version matches the SDK version.
Removal
Prior to removing KasperskyOS Community Edition, cancel the action of the set_env.sh script if you ran this script after installing the SDK.
To remove KasperskyOS Community Edition, run the following command:
After running this command, all installed files in the /opt/KasperskyOS-Community-Edition-<version> directory will be deleted.
Configuring the development environment
This section provides brief instructions on configuring the development environment and adding the header files included in KasperskyOS Community Edition to a development project.
Configuring the code editor
Before getting started, you should do the following to simplify your development of KasperskyOS-based solutions:
- Install code editor extensions and plugins for your programming language (C, C++ and/or Rust).
- Add the header files included in KasperskyOS Community Edition to the development project.
The header files are located in the directory:
/opt/KasperskyOS-Community-Edition-<version>/sysroot-*-kos/include.
Example of how to configure Visual Studio Code
KasperskyOS Community Edition includes the KasperskyOS SDK Extension for Visual Studio Code, which integrates KasperskyOS Community Edition with the source code editor known as Visual Studio Code.
Instead of installing the extension, you can also manually add the header files included in KasperskyOS Community Edition to the development project.
To more conveniently navigate the project code, including the system API:
- Create a new workspace or open an existing workspace in Visual Studio Code.
A workspace can be opened implicitly by using the
File>Open foldermenu options. - Make sure the C/C++ for Visual Studio Code extension is installed.
- In the
Viewmenu, select theCommand Paletteitem. - Select the
C/C++: Edit Configurations (UI)item. - In the
Include pathfield, enter/opt/KasperskyOS-Community-Edition-<version>/sysroot-*-kos/include. - Close the
C/C++ Configurationswindow.
KasperskyOS SDK Extension for Visual Studio Code
The KasperskyOS SDK Extension for Visual Studio Code (hereinafter also referred to as the KasperskyOS SDK Extension) integrates KasperskyOS Community Edition with the source code editor known as Visual Studio Code.
Installing and removing the extension
Installing dependencies
Extension dependencies are automatically installed from the Visual Studio Code Extension Marketplace. If your computer has access to the Visual Studio Code Extension Marketplace, you can skip the steps for setting dependencies below and instead proceed to the "Installing the extension" section.
Otherwise, you will need to manually set the dependencies for the extension. To set the dependencies of the KasperskyOS SDK Extension for Visual Studio Code:
- On another computer that can access the Visual Studio Code Extension Marketplace, open the address https://marketplace.visualstudio.com/vscode in a browser.
- Find and download the relevant extensions:
cpptoolsis required for working with the debugger.clangdis required for static analysis of source code.devcontainersis required for Docker support.
- Copy the received VSIX files to the computer where you need to install the KasperskyOS SDK Extension.
- Open the Visual Studio Code development environment.
- Press F1.
- Run the
Extensions: Install from VSIX...command in the command line that opens in the upper part of the window. - Install the extensions that you downloaded at step 2.
Installing the extension
To install KasperskyOS SDK Extension, do the following:
- Open the Visual Studio Code development environment.
- Press F1.
- Run the
Extensions: Install from VSIX...command in the command line that opens in the upper part of the window. - Select the
kos-extension-<version>.vsixextension file located in the directory/opt/KasperskyOS-Community-Edition-<version>/dev_tools/ide_integration/vscode/.During installation of the KasperskyOS SDK Extension, its dependencies are automatically set.
Removing the extension
To remove the extension, press the key combination CTRL+SHIFT+X, find the extension in the list, and select the Uninstall command from the context menu of the extension.
Page topExtension functions
The extension automatically detects a KasperskyOS project in the open workspace and starts. The detection parameter is the presence of the .vscode/kos_project.json file or einit directory in the workspace. If the extension has not automatically activated in the directory but you are certain that it is a KasperskyOS project, run the command KOS: Activate extension in this directory. This command activates the extension and creates an empty .vscode/kos_project.json file in the project directory. To cancel manual activation, delete this file.
After startup, the extension adds the following buttons to the lower panel of the Visual Studio Code editor:
 – select the build target.
 – start the project in QEMU.
 – start the selected target with debugging.
 – build all targets.
 – build the selected target.
 – clear the build directory.
 – switch the build type.
 – enable/disable the project build with tests.
 – select the target platform for the build.
 – select the device or QEMU emulator.
 – display the SDK version.
Functions that provide buttons can also be called from the command line of the code editor, which can be opened by pressing F1. All commands have the KOS: prefix.
Working with a basic KasperskyOS image
The extension lets you avoid having to completely build a KasperskyOS-based solution after making changes to application code. Instead, you can use the following scenario:
- Running a basic KasperskyOS-based solution image, included in the SDK, in the QEMU emulator. The basic image contains all the system programs required to run and debug programs packaged in KPA packages.
- Build an application and package it into a KPA package. You must use the
CMakecommands of the kpa library to pack a program into a KPA package. - Install a program from a KPA package into the solution image that was run at step 1 and start it under KasperskyOS.
- Make changes to the application code.
- Repeat steps 2–5.
- With the extension, you can also debug a program that is running in a basic KasperskyOS image. For more details, refer to Debugging programs that are part of a KPA package.
Create a basic solution security policy description
The extension lets you automatically create basic solution security policy descriptions for a project.
To create a basic security policy description:
- Make sure that the KasperskyOS SDK Extension is installed and active.
- Press F1.
- Run the command
KOS: Generate policy file for current project. - Select the type of basic policy description that you want to create:
Grant all permissions: create a basic solution security policy description that allows all interactions between different processes of any class and between these processes and the KasperskyOS kernel, and that also allows any process to initialize the startup of processes.Grant necessary permissions: create a basic solution security policy description that allows all interactions between different processes of any class and between these processes and the KasperskyOS kernel, and that also determines the necessary permissions for initializing the startup of processes based on the init.yaml.in file within the project.
- Enter the file name for saving the created security policy description.
These policies can be used only as stubs during the early stages of development of a KasperskyOS-based solution so that the Kaspersky Security Module does not interfere with interactions. It would be unacceptable to apply such policies in a real-world KasperskyOS-based solution.
Running tests
After the extension is activated, the Testing tab ( ) appears on the side panel of Visual Studio Code. When you select the Testing tab, the code editor window displays a tree of tests created using the Google Test library and found in files in the
 test/ directory.
To run the tests, tap the  button. All detected tests are run by default. However, you can select specific tests on the tabs containing the source code of the tests, or you can select specific groups of tests by selecting them from the tree of all tests. You can only run tests that are added to
 CMakeLists.txt files for building programs using the kl_kos_add_small_test() or generate_kos_test() CMake commands from the TestGenerator CMake library included in the SDK.
The test results and log files are located in the directory <build_directory>/bin/tests/output.
Starting solution security policy tests
The extension lets you run solution security policy tests for a project if they were created based on the solution security policy description.
To build and run solution security policy tests:
- Make sure that the solution security policy description contains the solution security policy tests.
- Make sure that the
CMakecommands for building solution security policy tests have been added to one of theCMakeLists.txtfiles of the project. - Make sure that the KasperskyOS SDK Extension is installed and active.
- Build all targets by clicking the button in the lower panel.
- Click the build target selection button and select the target named
kos-qemu-image-PalTest<N>-sim(N refers to the PSL file index within the list of PSL files containing solution security policy tests). - Click the button to build the selected target.
Starting a basic KasperskyOS-based solution image
The basic KasperskyOS-based solution image is included in the SDK and contains all the system programs required to run and debug programs packaged in KPA packages.
To start a basic KasperskyOS-based solution image from Visual Studio Code:
- Make sure that the KasperskyOS SDK Extension is installed and active.
- Click the device selection button on the lower panel or press
F1and run the commandKOS: Select Device. - Select Create new emulator.
- Select kos_base-dev.
- In the opened field, enter the additional QEMU flags and press Enter, or immediately press Enter to use the default flags.
- In the opened field, enter the name of the new emulator and press Enter, or immediately press Enter to use the automatically generated name.
- Wait until the previous command completes.
- In the notification about the new emulator being created, click the Start button.
- Wait for the emulator to finish loading.
Building programs in Visual Studio Code
To build a program in Visual Studio Code:
- Open the program project directory in Visual Studio Code.
- Make sure that the project was correctly identified based on the appearance of additional extension buttons in the lower panel. If the buttons do not appear, manually activate the solution by running the command KOS: Activate extension in this directory.
- Select the build architecture by clicking the button for selecting the target platform for the build .
- Build all targets by clicking the button in the lower panel.
Starting programs in a basic solution image
If a program that you want to start uses file systems (via the VFS component), the following is required before starting the program:
- Use the menu to open the extension settings window: File → Preferences → Settings, then select Extensions → KasperskyOS.
- Set the
client:kl.VfsSdCardFsvalue for theVFS_FILESYSTEM_BACKENDenvironment variable in theApplication Environment Variablesparameter.
To start a program in a basic solution image:
- Open the program project directory in Visual Studio Code.
- Make sure that the project was correctly identified based on the appearance of additional extension buttons in the lower panel. If the buttons do not appear, manually activate the solution by running the command KOS: Activate extension in this directory.
- Make sure that the basic solution image is started according to the instructions provided in the Starting a basic KasperskyOS-based solution image section.
- Click the button for selecting the device or QEMU emulator in the lower panel.
- Select the previously started basic solution image.
- Build the program according to the instructions provided in the Building a program in Visual Studio Code section.
- Make sure that the program has been packed into a KPA package.
You must use the
CMakecommands of the kpa library to pack a program into a KPA package. - Click the target selection button . In the drop-down list, select the built program KPA package that is signed as
[application]in the list. - Click the start button . The program will be installed to the selected basic image and will automatically start.
Debugging a program that is part of a KPA package
Unlike debugging programs in a KasperskyOS-based solution, debugging a program in a KPA package means you don’t have to rebuild the entire KasperskyOS-based solution after updating the application code.
The scenario for debugging a program that is part of a KPA package looks as follows:
- Install the KasperskyOS SDK Extension.
- Build an application and package it into a KPA package. You must use the
CMakecommands of the kpa library to pack a program into a KPA package. - Run a basic KasperskyOS image from KasperskyOS Community Edition with a GDB server built into the kernel.
- Connect the debugger to the GDB server of the kernel. The debugger can be connected at program startup or while the program is running. Details:
- Debugging a program using the Visual Studio Code graphical user interface. For more details, refer to the Visual Studio Code documentation: https://code.visualstudio.com/docs/editor/debugging .
Connecting a debugger when starting a program in a basic image
To connect a debugger to the GDB server of the kernel while starting a program in QEMU using the Visual Studio Code extension:
- Set a breakpoint in the program source code before the fragment to be debugged.
- Build the program. You must use the
CMakecommands of the kpa library to pack a program into a KPA package. - Run a basic KasperskyOS image from KasperskyOS Community Edition.
- Wait for the basic image to finish loading and install the program by running the command
KOS: Install package. - On the side bar of Visual Studio Code, click Run and debug > create a launch.json file and then select KasperskyOS Debugger.
This will create a debug configuration file named
launch.json. - In the
launch.jsonfile, in the field of the configuration named(kos/gdb) Launch & debug application, specify the path to the binary file of your program resulting from the build, and the program name. In theeiidfield, you need to specify thekl.Kdsvalue. - Start debugging by clicking the
(kos/gdb) Launch & debug applicationbutton on the lower pane. - In the drop-down list, select the configuration named
(kos/gdb) Launch & debug application. - The debug console will show a message stating that the program is ready for debugging. Click Continue, and program execution will be stopped at the breakpoint that you selected at step 1.
Connecting a debugger while a program is running from a basic image
To connect a debugger to the GDB server of the kernel while the program is running in QEMU using the Visual Studio Code extension:
- Add an infinite loop to the
mainfunction of the program. This enables the debugger to connect to the running program. - Set a breakpoint in the program source code before the fragment to be debugged.
- Build the program. You must use the
CMakecommands of the kpa library to pack a program into a KPA package. - Run a basic KasperskyOS image from KasperskyOS Community Edition.
- On the side bar of Visual Studio Code, click Run and debug > create a launch.json file and then select KasperskyOS Debugger.
This will create a debug configuration file named
launch.json. - In the
launch.jsonfile, in the field of the configuration named(kos/gdb) Attach to process, specify the path to the binary file of your program resulting from the build. - Start the program in the basic image.
- Start debugging by clicking the
(kos/gdb) Attach to processbutton on the lower pane. - In the drop-down list, select the configuration named
(kos/gdb) Attach to processand select the name of the program to debug. - The debug console will show a message stating that the program is ready for debugging. Click Continue, and program execution will be stopped at the breakpoint that you selected at step 2.
Extension settings
The extension settings are located in the Visual Studio Code storage, which can be called through the menu as follows: File → Preferences → Settings, then Extensions → KasperskyOS.
Extension settings
Application Arguments- List of command-line arguments for applications started with the extension.
Application Environment Variables- List of environment variables for applications started with the extension.
Auto_update- Enable/disable automatic updates of the extension when the
SDK Pathparameter is modified. Build Threads Num- Select the quantity of processor threads used during the build. All available threads are used by default.
Cmake Build Flags- Additional CMake flags for the build.
Cmake Config Flags- Additional configuration flags for running CMake.
Auto Open Log Tab- Enable/disable automatic opening of the tab containing the command execution log.
Force Clean- The Clean button deletes the build directory.
Gdbinit File- Path to the
gdbinitfile containing the GDB commands that are executed when the debugger is started. Run No Graphic- Enable/disable enforced startup of the emulator without a graphical user interface.
SDK Path- Path to the installed KasperskyOS Community Edition.
- If the extension does not detect the correct SDK in the
SDK Pathat startup, you will be prompted to select an SDK from the list of detected SDKs. To avoid having to do this for each workspace, it is recommended to set theSDK Pathfor the User settings. Set Build Dir- Project build directory. The
./builddirectory is used by default. Shell Export Variables- Additional variables that are set before starting
CMake. Suppress Extensions Recommendations- Enable/disable the reminder that you need to set the dependencies of the KasperskyOS SDK Extension.
Test Failures Num- Number of failed tests displayed in the log.
Test Failures Only- Enable/disable display of only failed tests in the log.
Test Files Pattern- Mask for searching for files containing the source code of project tests.
Test No Skipped- Enable/disable display of skipped tests in the log.
Test Skip Details- Enable/disable display of skipped and failed tests in the log.
Test Threads Num- Select the quantity of processor threads used when running tests. All available threads are used by default. However, single tests will use one thread each.
Test Timeout- Time limit for running each test (in seconds). When this value is set to
0, the limits from the test configurations are applied. Test Verbose- Enable/disable display of debug information about tests in the log.
Trace: Server- Select the level of logging detail for the Visual Studio Code LSP client when working with the LSP server built into the SDK for the IDL/CDL/EDL languages. You can view the LSP client log by selecting the
nk-lspchannel in the Visual Studio Code output window. User SDKs- Additional paths to SDKs for displaying the SDK selection menu
Building the examples
The examples are built using the CMake build system that is included in KasperskyOS Community Edition.
The code of the examples and build scripts are available at the following path:
/opt/KasperskyOS-Community-Edition-<version>/examples
You need to build the examples in a directory in which you have write access. For example, you can do so by copying the directory containing the example into the home directory.
Building the examples to run on QEMU
To build an example, go to the directory with the example and run this command:
Running the cross-build.sh script creates a KasperskyOS-based solution image that includes the example, and initiates startup of the example in QEMU. The kos-qemu-image solution image is located in the <name of example>/build/einit directory.
Building the examples to run on Raspberry Pi 4 B or Radxa ROCK 3A
To build an example, go to the directory with the example and run this command:
The type of image that is created by the cross-build.sh script depends on the value that you choose for the target parameter:
kos-imageThis creates a KasperskyOS-based solution image that includes the example. The
kos-imagesolution image is located in the<name of example>/build/einitdirectory.sd-imageThis creates a file system image for a bootable SD card. The following is loaded into the file system image:
kos-image, U-Boot bootloader that starts the example, and the firmware for Raspberry Pi 4 B or Radxa ROCK 3A. The source code for the U-Boot bootloader and firmware can be downloaded from the website https://github.com. The file system image filehdd.imgis saved in the directory <example name>/build.
Before running the examples on Radxa ROCK 3A, you also need to build the drivers provided as a source code in the SDK. Instructions for building drivers can be found in the descriptions of examples (README.md files).
Running examples on QEMU
Running examples on QEMU on Linux with a graphical shell
You need to run the examples in a build directory in which you have write access.
An example is run on QEMU on Linux with a graphical shell using the cross-build.sh script, which also builds the example. To run the script, go to the folder with the example and run the command:
Running examples on QEMU on Linux without a graphical shell
To run an example on QEMU on Linux without a graphical shell, go to the directory with the example, build the example and run the following commands:
Preparing Raspberry Pi 4 B to run examples
Connecting a computer and Raspberry Pi 4 B
To see the output from Raspberry Pi 4 B on a computer and to have debug capabilities, do the following:
- Connect the pins of the FT232 USB-UART converters to the corresponding GPIO pins of Raspberry Pi 4 B (see the figure below). If debugging is not necessary, all you need to do is connect one USB-UART converter for output.
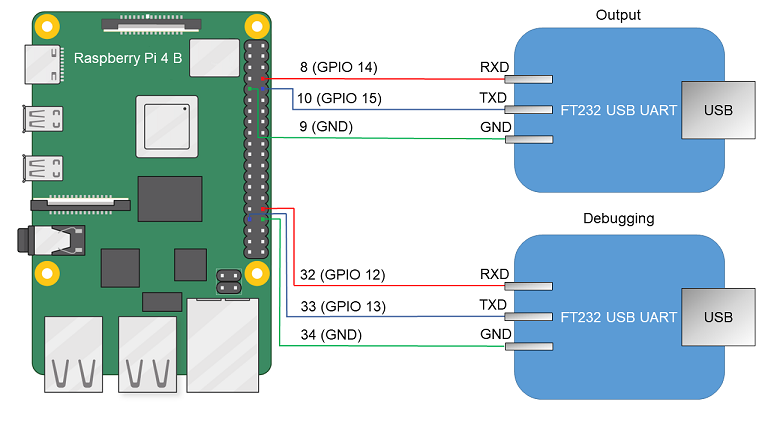
Diagram for connecting USB-UART converters and Raspberry Pi 4 B
- Connect the computer's USB ports and the USB-UART converters.
- Install PuTTY or another equivalent program. Configure the settings as follows:
bps = 115200,data bits = 8,stop bits = 1,parity = none,flow control = none. Define the USB port connected to the USB-UART converter used for receiving output from Raspberry Pi 4 B.
To allow a computer and Raspberry Pi 4 B to interact through Ethernet:
- Connect the network cards of the computer and Raspberry Pi 4 B to a switch or to each other.
- Configure the computer's network card so that its IP address is in the same subnet as the IP address of the Raspberry Pi 4 B network card (the settings of the Raspberry Pi 4 B network card are defined in the
dhcpcd.conffile, which is found at the path<example name>/resources/...).
Preparing a bootable SD card for Raspberry Pi 4 B
If the hdd.img image was created when building the example, all you have to do is write the resulting image to the SD card. To do this, connect the SD card to the computer and run the following command:
If kos-image was created when building the example, the SD card requires additional preparations before you can write the image to it. A bootable SD card for Raspberry Pi 4 B can be prepared automatically or manually. After preparing the SD card, you must copy the kos-image file from the directory <example name>/build/einit to the bootable area (FAT32 partition) of the prepared SD card.
To automatically prepare the bootable SD card, connect the SD card to the computer and run the following commands:
To manually prepare the bootable SD card:
- If a Docker container is used when working with KasperskyOS Community Edition, it must be granted access to devices in the
/devdirectory on the host system. To do so when starting the Docker container, add the following parameter to the startup command:-v /dev:/dev - Build the U-Boot bootloader for ARMv8, which will automatically run the example. To do this, run the following commands:$ sudo apt install git build-essential libssl-dev bison flex unzip parted gcc-aarch64-linux-gnu udev dosfstools pv -y $ git clone --depth 1 --branch v2022.01 https://github.com/u-boot/u-boot.git u-boot-armv8 $ cd u-boot-armv8 $ make ARCH=arm CROSS_COMPILE=aarch64-linux-gnu- rpi_4_defconfig $ echo 'CONFIG_SERIAL_PROBE_ALL=y' > ./.custom_config $ echo 'CONFIG_BOOTCOMMAND="fatload mmc 0 ${loadaddr} kos-image; bootelf ${loadaddr} ${fdt_addr}"' >> ./.custom_config $ echo 'CONFIG_PREBOOT="pci enum;"' >> ./.custom_config $ ./scripts/kconfig/merge_config.sh '.config' '.custom_config' $ make ARCH=arm CROSS_COMPILE=aarch64-linux-gnu- u-boot.bin
- Prepare the image containing the file system for the SD card.# Image will contain a boot partition of 1 GB in fat32 and three partitions of 350 MB each in ext2, ext3 and ext4, respectively. $ fs_image_name=sdcard.img $ dd if=/dev/zero of=${fs_image_name} bs=1024k count=2048 $ sudo parted ${fs_image_name} mklabel msdos $ loop_device=$(sudo losetup --find --show --partscan ${fs_image_name}) $ sudo parted ${loop_device} mkpart primary fat32 8192s 50% $ sudo parted ${loop_device} mkpart extended 50% 100% $ sudo parted ${loop_device} mkpart logical ext2 50% 67% $ sudo parted ${loop_device} mkpart logical ext3 67% 84% $ sudo parted ${loop_device} mkpart logical ext4 84% 100% $ sudo parted ${loop_device} set 1 boot on $ sudo mkfs.vfat ${loop_device}p1 $ sudo mkfs.ext2 ${loop_device}p5 $ sudo mkfs.ext3 ${loop_device}p6 $ sudo mkfs.ext4 -O ^64bit,^extent ${loop_device}p7
- Copy the U-Boot bootloader and embedded software (firmware) for Raspberry Pi 4 B to the received file system image by running the following commands:# In the following commands, the path ~/mnt/fat32 is just an example. # You can use a different path. $ mount_temp_dir=~/mnt/fat32 $ mkdir -p ${mount_temp_dir} $ sudo mount ${loop_device}p1 ${mount_temp_dir} $ git clone --depth 1 --branch 1.20220331 https://github.com/raspberrypi/firmware.git firmware $ sudo cp u-boot.bin ${mount_temp_dir}/u-boot.bin $ sudo cp -r firmware/boot/. ${mount_temp_dir}
- Fill in the configuration file for the U-Boot bootloader in the image by using the following commands:$ sudo sh -c "echo '[all]' > ${mount_temp_dir}/config.txt" $ sudo sh -c "echo 'arm_64bit=1' >> ${mount_temp_dir}/config.txt" $ sudo sh -c "echo 'enable_uart=1' >> ${mount_temp_dir}/config.txt" $ sudo sh -c "echo 'kernel=u-boot.bin' >> ${mount_temp_dir}/config.txt" $ sudo sh -c "echo 'dtparam=i2c_arm=on' >> ${mount_temp_dir}/config.txt" $ sudo sh -c "echo 'dtparam=i2c=on' >> ${mount_temp_dir}/config.txt" $ sudo sh -c "echo 'dtparam=spi=on' >> ${mount_temp_dir}/config.txt" $ sudo sh -c "echo 'device_tree_address=0x2eff5b00' >> ${mount_temp_dir}/config.txt" $ sudo sh -c "echo 'device_tree_end=0x2f0f5b00' >> ${mount_temp_dir}/config.txt" $ sudo sh -c "echo 'dtoverlay=uart5' >> ${mount_temp_dir}/config.txt" $ sudo umount ${mount_temp_dir} $ sudo losetup -d ${loop_device}
- Write the resulting image to an SD card. To do this, connect the SD card to the computer and run the following command:# In the following command, [X] is the last symbol in the name of the block device for the SD card. $ sudo pv -L 32M ${fs_image_name} | sudo dd bs=64k of=/dev/sd[X] conv=fsync
- After preparing the SD card, you must copy the
kos-imagefile from the directory<example name>/build/einitto the bootable area (FAT32 partition) of the prepared SD card.
Preparing Radxa ROCK 3A to run examples
Switching for a computer and Radxa ROCK 3A
To see the output from Radxa ROCK 3A on a computer and to have debug capabilities, do the following:
- Connect the pins of the USB-UART converters to the corresponding GPIO pins of the Radxa ROCK 3A (see the figure below). If debugging is not necessary, all you need to do is connect one USB-UART converter for output.
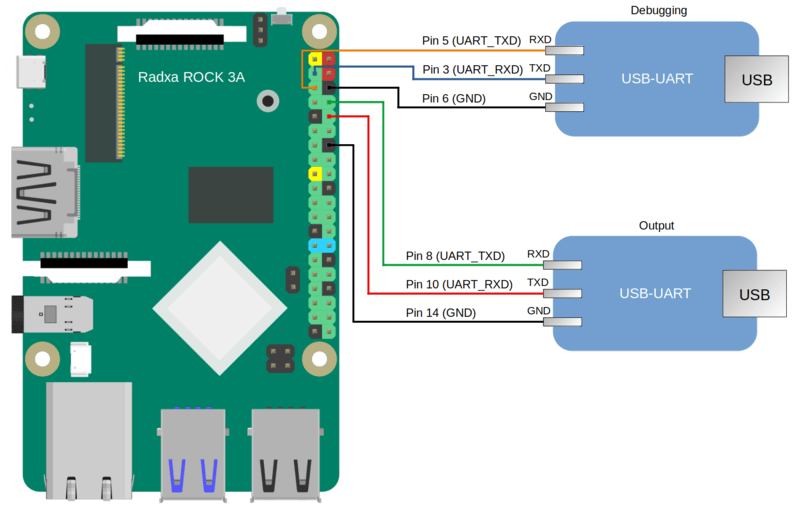
Diagram for connecting USB-UART converters and Radxa ROCK 3A
- Connect the computer's USB ports and the USB-UART converters.
- Install PuTTY or another equivalent program. Configure the settings as follows:
bps = 1500000, data bits = 8, stop bits = 1, parity = none, flow control = none. Define the USB port connected to the USB-UART converter used for receiving output from Radxa ROCK 3A.
To allow a computer and Radxa ROCK 3A to interact through Ethernet, perform the following actions:
- Connect the network cards of the computer and Radxa ROCK 3A to a switch or to each other.
- Configure the computer's network card so that its IP address is in the same subnet as the IP address of the Radxa ROCK 3A network card (the settings of the Radxa ROCK 3A network card are defined in the
dhcpcd.conffile, which is found at the path<example name>/resources/...).
Debugging programs for Radxa ROCK 3A
To debug programs running on the Radxa ROCK 3A, you must do the following:
- Include a second USB-UART converter (see the figure above).
- In the home directory of the user, create the
.gdbinitfile and add the following strings to it:set sysroot /opt/KasperskyOS-Community-Edition-<version>/sysroot-aarch64-kos add-symbol-file <path_to_debuggee>/build/einit/EinitQemu-kss/ksm.module set follow-fork-mode parent set follow-exec-mode same set detach-on-fork off set schedule-multiple on set serial baud 115200 target extended-remote /dev/ttyUSB[n] - In the
CmakeLists.txtfile in the<path_to_debuggee>/einitdirectory, add theGDBSTUB_KERNELparameter to thebuild_kos_hw_image ()command call. - Build the program. After startup and initialization, the entry
[KDBG ] Waiting for GDB connection infinitelywill appear in the output. The application will stop while it waits for the debugger to connect. - To connect the debugger, you must run gdb from the SDK:
/opt/KasperskyOS-Community-Edition-<version>/toolchain/bin/aarch64-kos-gdb. - After the debugger starts, the entry
[KDBG ] Connection to GDB was establishedwill appear in the output.For more details, refer to Preparations for debugging on the hardware platform and Initial steps of debugging on the hardware platform.
Preparing a bootable SD card for Radxa ROCK 3A
If the hdd.img image was created when building the example, all you have to do is write the resulting image to the SD card. To do this, connect the SD card to the computer and run the following command:
If kos-image was created when building the example, the SD card requires additional preparations before you can write the image to it. A bootable SD card for Radxa ROCK 3A can be prepared automatically or manually. After preparing the SD card, you must copy the kos-image file from the directory <example name>/build/einit to the bootable area (FAT32 partition) of the prepared SD card.
To automatically prepare the bootable SD card, connect the SD card to the computer and run the following commands:
Clearing the Radxa ROCK 3A flash memory
In some editions of the Radxa ROCK 3A, the flash memory may contain a bootloader that is incompatible with the card that you have prepared according to the instructions provided above.
If you see the message "SPL: failed to boot from all boot devices" when running examples on the Radxa ROCK 3A, you must clear the Radxa ROCK 3A flash memory before running the examples.
To clear the Radxa ROCK 3A flash memory:
- Download and install the tool named
rkdeveloptool.Instructions on installing this tool are provided in the documentation: https://docs.radxa.com/en/rock3/rock3a/low-level-dev/rkdeveloptool?host-os=debian#installation-for-rkdeveloptool
- Download the bootloader for interacting with the Radxa ROCK 3A: https://dl.radxa.com/rock3/images/loader/rk356x_spl_loader_ddr1056_v1.12.109_no_check_todly.bin
- Switch the Radxa ROCK 3A to
Maskrommode:- Power it off.
- Extract the SD card (and the eMMC module if present).
- Connect the computer's USB port to the ROCK 3A OTG port (upper USB 3.0 port).
- Connect the Radxa ROCK 3A pins as shown on the figure below and power on the Radxa ROCK 3A.
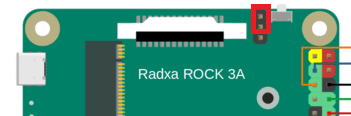
- Disconnect the pins that were connected at the previous step.
- Make sure that the Radxa ROCK 3A is in
Maskrommode by running the following command in the terminal:$: rkdeveloptool ld DevNo=1 Vid=0x2207,Pid=0x350a,LocationID=104 Maskrom
- Copy the bootloader for RAM initialization and firmware environment preparation to the Radxa ROCK 3A by running the following command in the terminal:rkdeveloptool db rk356x_spl_loader_ddr1056_v1.12.109_no_check_todly.bin
- Clear the Radxa ROCK 3A flash memory by running the following commands in the terminal:rkdeveloptool ef rkdeveloptool rd
Running examples on Raspberry Pi 4 B or Radxa ROCK 3A
To run an example on a Raspberry Pi 4 B or Radxa ROCK 3A:
- Go to the directory with the example and build the example.
- Make sure that Raspberry Pi 4 B or Radxa ROCK 3A and the bootable SD card are prepared to run examples.
- Connect the bootable SD card to the Raspberry Pi 4 B or Radxa ROCK 3A.
- Supply power to the Raspberry Pi 4 B or Radxa ROCK 3A and wait for the example to run.
The output displayed on the computer connected to Raspberry Pi 4 B or Radxa ROCK 3A indicates that the example started.
Before running the examples on Radxa ROCK 3A, you also need to build the drivers provided as a source code in the SDK. Instructions for building drivers can be found in the descriptions of examples (README.md files).
If you see the message "SPL: failed to boot from all boot devices" when running examples on the Radxa ROCK 3A, you must clear the Radxa ROCK 3A flash memory before running the examples. For more details, refer to Preparing Radxa ROCK 3A to run examples.