Preparing Radxa ROCK 3A to run examples
Switching for a computer and Radxa ROCK 3A
To see the output from Radxa ROCK 3A on a computer and to have debug capabilities, do the following:
- Connect the pins of the USB-UART converters to the corresponding GPIO pins of the Radxa ROCK 3A (see the figure below). If debugging is not necessary, all you need to do is connect one USB-UART converter for output.
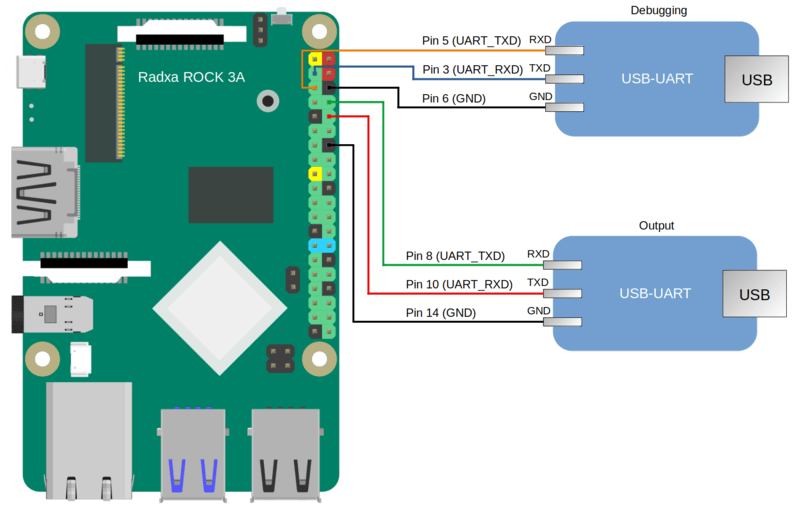
Diagram for connecting USB-UART converters and Radxa ROCK 3A
- Connect the computer's USB ports and the USB-UART converters.
- Install PuTTY or another equivalent program. Configure the settings as follows:
bps = 1500000, data bits = 8, stop bits = 1, parity = none, flow control = none. Define the USB port connected to the USB-UART converter used for receiving output from Radxa ROCK 3A.
To allow a computer and Radxa ROCK 3A to interact through Ethernet, perform the following actions:
- Connect the network cards of the computer and Radxa ROCK 3A to a switch or to each other.
- Configure the computer's network card so that its IP address is in the same subnet as the IP address of the Radxa ROCK 3A network card (the settings of the Radxa ROCK 3A network card are defined in the
dhcpcd.conffile, which is found at the path<example name>/resources/...).
Debugging programs for Radxa ROCK 3A
To debug programs running on the Radxa ROCK 3A, you must do the following:
- Include a second USB-UART converter (see the figure above).
- In the home directory of the user, create the
.gdbinitfile and add the following strings to it:set sysroot /opt/KasperskyOS-Community-Edition-<version>/sysroot-aarch64-kos
add-symbol-file <path_to_debuggee>/build/einit/EinitQemu-kss/ksm.module
set follow-fork-mode parent
set follow-exec-mode same
set detach-on-fork off
set schedule-multiple on
set serial baud 115200
target extended-remote /dev/ttyUSB[n]
- In the
CmakeLists.txtfile in the<path_to_debuggee>/einitdirectory, add theGDBSTUB_KERNELparameter to thebuild_kos_hw_image ()command call. - Build the program. After startup and initialization, the entry
[KDBG ] Waiting for GDB connection infinitelywill appear in the output. The application will stop while it waits for the debugger to connect. - To connect the debugger, you must run gdb from the SDK:
/opt/KasperskyOS-Community-Edition-<version>/toolchain/bin/aarch64-kos-gdb. - After the debugger starts, the entry
[KDBG ] Connection to GDB was establishedwill appear in the output.For more details, refer to Preparations for debugging on the hardware platform and Initial steps of debugging on the hardware platform.
Preparing a bootable SD card for Radxa ROCK 3A
If the hdd.img image was created when building the example, all you have to do is write the resulting image to the SD card. To do this, connect the SD card to the computer and run the following command:
# In the following command, path_to_img is the path to the image file
# [X] is the final character in the name of the SD card block device.
$ sudo pv -L 32M path_to_img | sudo dd bs=64k of=/dev/sd[X] conv=fsync
If kos-image was created when building the example, the SD card requires additional preparations before you can write the image to it. A bootable SD card for Radxa ROCK 3A can be prepared automatically or manually. After preparing the SD card, you must copy the kos-image file from the directory <example name>/build/einit to the bootable area (FAT32 partition) of the prepared SD card.
To automatically prepare the bootable SD card, connect the SD card to the computer and run the following commands:
# To create a bootable drive image file (*.img),
# run the script:
$ sudo /opt/KasperskyOS-Community-Edition-<version>/common/radxa_prepare_sdcard_image.sh
# In the following command, path_to_img is the path to the image file
# of the bootable drive (this path is displayed upon completion
# of the previous command), [X] is the final character
# in the name of the SD card block device.
$ sudo pv -L 32M path_to_img | sudo dd bs=64k of=/dev/sd[X] conv=fsync
Clearing the Radxa ROCK 3A flash memory
In some editions of the Radxa ROCK 3A, the flash memory may contain a bootloader that is incompatible with the card that you have prepared according to the instructions provided above.
If you see the message "SPL: failed to boot from all boot devices" when running examples on the Radxa ROCK 3A, you must clear the Radxa ROCK 3A flash memory before running the examples.
To clear the Radxa ROCK 3A flash memory:
- Download and install the tool named
rkdeveloptool.Instructions on installing this tool are provided in the documentation: https://docs.radxa.com/en/rock3/rock3a/low-level-dev/rkdeveloptool?host-os=debian#installation-for-rkdeveloptool
- Download the bootloader for interacting with the Radxa ROCK 3A: https://dl.radxa.com/rock3/images/loader/rk356x_spl_loader_ddr1056_v1.12.109_no_check_todly.bin
- Switch the Radxa ROCK 3A to
Maskrommode:- Power it off.
- Extract the SD card (and the eMMC module if present).
- Connect the computer's USB port to the ROCK 3A OTG port (upper USB 3.0 port).
- Connect the Radxa ROCK 3A pins as shown on the figure below and power on the Radxa ROCK 3A.
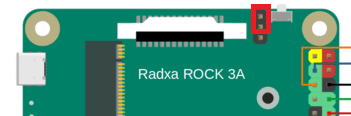
- Disconnect the pins that were connected at the previous step.
- Make sure that the Radxa ROCK 3A is in
Maskrommode by running the following command in the terminal:$: rkdeveloptool ld
DevNo=1 Vid=0x2207,Pid=0x350a,LocationID=104 Maskrom
- Copy the bootloader for RAM initialization and firmware environment preparation to the Radxa ROCK 3A by running the following command in the terminal:
rkdeveloptool db rk356x_spl_loader_ddr1056_v1.12.109_no_check_todly.bin
- Clear the Radxa ROCK 3A flash memory by running the following commands in the terminal:
rkdeveloptool ef
rkdeveloptool rd