Contents
- What's new
- About KasperskyOS Community Edition
- KasperskyOS: overview
- Getting started
- Part 1. Simple application (POSIX)
- Part 2. Interaction between entities
- Part 3. Solution security policy
- General information about a solution security policy description
- PSL language syntax
- Security models
- Pred security model
- Bool security model
- Math security model
- Struct security model
- Base security model
- Regex security model
- HashSet security model
- StaticMap security model
- StaticMap security model object
- StaticMap security model init rule
- StaticMap security model fini rule
- StaticMap security model set rule
- StaticMap security model commit rule
- StaticMap security model rollback rule
- StaticMap security model get expression
- StaticMap security model get_uncommited expression
- Flow security model
- ping example
- Testing a solution security policy based on the Policy Assertion Language (PAL)
- KasperskyOS API
- Security patterns for development under KasperskyOS
- Appendices
- Additional examples
- net_with_separate_vfs example
- net2_with_separate_vfs example
- embedded_vfs example
- embed_ext2_with_separate_vfs example
- multi_vfs_ntpd example
- multi_vfs_dns_client example
- multi_vfs_dhcpcd example
- mqtt_publisher example
- mqtt_subscriber example
- gpio_input example
- gpio_output example
- gpio_interrupt example
- gpio_echo example
- Additional examples
- Licensing the application
- Data provision
- Information about third-party code
- Trademark notices
What's new
KasperskyOS Community Edition 1.0 has the following new capabilities and refinements:
- Added support for the Raspberry Pi 4 Model B hardware platform.
- Added SD card support for the Raspberry Pi 4 Model B hardware platform.
- Added Ethernet support for the Raspberry Pi 4 Model B hardware platform.
- Added GPIO port support for the Raspberry Pi 4 Model B hardware platform.
- Added network services for DHCP, DNS, and NTP and usage examples.
- Added library for working with the MQTT protocol and usage examples.
About KasperskyOS Community Edition
KasperskyOS Community Edition (CE) is a publicly available version of KasperskyOS that is designed to help you master the main principles of application development under KasperskyOS. KasperskyOS Community Edition will let you see how the concepts rooted in KasperskyOS actually work in practical applications. KasperskyOS Community Edition includes sample applications with source code, detailed explanations, and instructions and tools for building applications.
KasperskyOS Community Edition will help you:
- Learn the principles and techniques of "secure by design" development based on practical examples.
- Explore KasperskyOS as a potential platform for implementing your own projects.
- Make prototypes of solutions (primarily Embedded/IoT) based on KasperskyOS.
- Port applications/components/drivers to KasperskyOS.
- Explore security issues in software development.
You can download KasperskyOS Community Edition here.
In addition to this documentation, we also recommend that you explore the materials provided in the specific KasperskyOS website section for developers.
Page top
About this Guide
The KasperskyOS Community Edition Developer's Guide is intended for specialists involved in the development of secure solutions based on KasperskyOS.
The Guide is designed for specialists who know the C/C++ programming languages, have experience developing for POSIX-compatible systems, and are familiar with GNU Binary Utilities (binutils).
You can use the information in this Guide to:
- Install and remove KasperskyOS Community Edition.
- Use KasperskyOS Community Edition.
Basic concepts
Frequently used terms related to KasperskyOS Community Edition are presented below:
- KasperskyOS is a microkernel operating system used for building secure software/hardware systems.
- Kaspersky Security System is a technology that lets you create a declarative description of a solution security policy and generate the Kaspersky Security Module based on this description.
- The Kaspersky Security Module is a kernel module that either allows or denies each IPC interaction in a solution.
- A solution consists of the KasperskyOS kernel, Kaspersky Security Module, and applications and system software integrated for operation within a software/hardware system.
- An entity is an application running in KasperskyOS.
- A service is a set of logically related methods available via the IPC mechanism (for example, a kernel service for allocating memory or a driver entity service for working with a block device).
- A handle is an identifier of a resource (for example, a memory area, port or network interface). This handle is used to access the specific resource.
- IPC (InterProcess Communication) is the mechanism used by entities to interact with each other and with the kernel.
- A solution security policy provides the logic for managing IPC interactions in a solution and is implemented by the Kaspersky Security Module.
System requirements
To install KasperskyOS Community Edition and run examples on QEMU, the following is required:
- Operating system: Debian GNU/Linux "Buster" version 10.7 x64.
- Processor: x86-64 architecture (support for hardware virtualization is required for higher performance).
- RAM: it is recommended to have at least 4 GB of RAM for convenient use of the build tools.
- Disk space: at least 3 GB of free space in the
/optpartition (depending on the solution being developed).
To run examples based on the Raspberry Pi platform, you must use Raspberry Pi 4 Model B with a RAM volume equal to 2, 4, or 8 GB.
Page top
Distribution kit
The distribution kit of KasperskyOS Community Edition includes the following:
- DEB package for installation of KasperskyOS Community Edition, including:
- Image of the KasperskyOS kernel
- Components of KasperskyOS Community Edition
- Set of tools for solution development (NK compiler, GCC compiler, GDB debugger, binutils toolset, QEMU emulator, and accompanying tools)
- End User License Agreement
- Information about third-party code (Legal Notices)
- Release Notes
- KasperskyOS Community Edition Developer's Guide (Online Help)
The following components included in the KasperskyOS Community Edition distribution kit are the Runtime Components as defined by the terms of the License Agreement:
- Image of the KasperskyOS kernel.
All the other components of the distribution kit are not the Runtime Components. Terms and conditions of the use of each component can be additionally defined in the section "Information about third-party code".
Page top
Included third-party libraries and applications
To simplify the application development process, KasperskyOS Community Edition also includes the following third-party libraries and applications:
- Boost (v.1.71) is a set of class libraries that utilize C++ language functionality and provide a convenient cross-platform, high-level interface for concise coding of various everyday programming subtasks (such as working with data, algorithms, files, threads, and more).
Documentation: https://www.boost.org/doc/
- Arm Mbed TLS (v.2.16) implements the TLS and SSL protocols as well as the corresponding encryption algorithms and necessary support code.
Documentation: https://tls.mbed.org/kb
- Civetweb (v.1.11) is an easy-to-use, powerful, embeddable web server based on C/C++ with additional support for CGI, SSL and Lua.
Documentation: http://civetweb.github.io/civetweb/UserManual.html
- Eclipse Mosquitto (v1.6.4) is a message broker that implements the MQTT protocol.
Documentation: https://mosquitto.org/documentation/
See also Information about third-party code.
Page top
Limitations and known issues
Because the KasperskyOS Community Edition is intended for educational purposes only, it includes several limitations:
- Symmetric multiprocessing (SMP) is not supported. Only one processor kernel is used.
- Dynamically loaded libraries are not supported.
- The maximum supported number of running applications (entities) is 32.
- When an entity is terminated through any method (for example, return from the main execution thread), resources allocated by the entity are not released, and the entity goes to sleep. Entities cannot be started repeatedly.
- You cannot start two or more entities with the same EDL description.
- The system stops if no running entities remain, or if one of the driver entity threads has been terminated, normally or abnormally.
Basic concepts of KasperskyOS
KasperskyOS-based solution
A KasperskyOS-based solution consists of a kernel, security module, and applications and system software integrated for operation within a software/hardware system. In KasperskyOS, processes are called entities. The kernel guarantees that entities are isolated and can interact only through the kernel (using system calls). Each entity in a solution has a static description, which defines the interfaces available to other entities. The specialized languages EDL, CDL and IDL are used to describe interfaces.
Cyber immune approach
A cyber immune approach is used to develop secure KasperskyOS-based solutions. This approach relies on choosing a way to divide the system into entities and setting certain rules governing their interactions (a solution security policy). A security policy is implemented by the Kaspersky Security Module, which is included in the solution.
The cyber immune approach lets you protect trusted components of the system and minimize its attack surface. Even if one component in such a system is compromised, the remaining components will continue to perform security functions.
Details about the cyber immune approach
Kaspersky Security System
Kaspersky Security System technology lets you develop and implement various security policies. Moreover, you can combine several security models, add your own models, and flexibly configure the rules for entity interactions. The specialized language PSL is used to formally describe a solution security policy. A Kaspersky Security Module for use in a specific solution is generated based on the PSL description.
KasperskyOS Community Edition
KasperskyOS Community Edition contains tools for developing secure KasperskyOS-based solutions, including:
- Image of the KasperskyOS kernel
- The NK compiler which is designed to generate the Kaspersky Security Module and auxilliary transport code
- Other tools for solution development (GCC compiler, GDB debugger, binutils toolset, QEMU emulator, and accompanying tools)
- A set of libraries that provide partial compatibility with the POSIX standard
- Components of KasperskyOS Community Edition
- Documentation
- Examples of basic KasperskyOS-based solutions
Cyber immunity
The idea of cyber immunity is based on the following concepts:
- Security goals and prerequisites
- MILS concepts (security domain, separation kernel, reference monitor)
- Trusted computing base (TCB)
These concepts are considered below. Then definitions of a cyber immune system and cyber immune approach are given.
Security goals and prerequisites
Information system security is not a universal abstract concept. Whether a system is secure or not depends on chosen security goals and prerequisites.
Security goals are requirements placed on an information system, which if achieved, ensure the secure operation of the information system in every possible scenario, taking into account the security prerequisites. Example of a security goal: ensure that data is kept confidential while using a communication channel.
Security prerequisites are additional limitations placed on the conditions in which the system is used, which if satisfied, will achieve the security goals. Example of a security prerequisite: cybercriminals must not have physical access to the hardware.
MILS concepts
In the MILS (Multiple Independent Levels of Security) model, a secure information system consists of isolated security domains and a separation kernel that controls the interactions between domains. The separation kernel isolates domains and controls the information flows between them.
Each attempted interaction between security domains is checked for compliance with certain rules, which are specified by the solution security policy. If an interaction is forbidden by the current policy, then it is not allowed (it is blocked). In a MILS architecture, a separate component (reference monitor) implements the security policy. For each security domain interaction, the reference monitor returns a decision (a boolean value) regarding whether the interaction complies with the security policy. The separation kernel calls the monitor each time one domain references another.
Trusted computing base (TCB)
Trusted Computing Base (TCB) is the set of all programming code, which if vulnerable will prevent an information system from achieving its specified security goals. In the MILS model, the separation kernel and reference monitor underpin the trusted computing base.
The trusted computing base's reliability plays a key role in ensuring the security of an information system.
Cyber immune system
An information system is cyber immune (or possesses cyber immunity) if it is separated into isolated security domains, all interactions between which are independently controlled, and is:
- a description of its security goals and prerequisites;
- guarantees of the reliability of the entire trusted computing base, including an execution environment and mechanisms for interaction control;
- guarantees that security goals will be achieved in all possible use scenarios, given the specified prerequisites and an uncompromised trusted computing base.
Cyber immune approach
The cyber immune approach is a way to build cyber immune systems.
The cyber immune approach is based on:
- dividing the system into isolated security domains;
- independent control of all interactions between security domains in accordance with the specified security policy;
- ensuring the reliability of the trusted computing base.
The specific method of dividing the system into security domains and the choice of a security policy depend on the security goals and prerequisites, the level of trust and integrity of individual components, as well as other factors.
Advantages of the cyber immune approach
The cyber immune approach lets you:
- reduce the security properties of a system as a whole to the security properties of its separate components;
- provide guarantees that a system's security goals will be achieved even if any of its untrusted components is compromised;
- reduce requirements on one or more system components relative to the requirements on the system as a whole;
- minimize damage to the system as a whole if any one of its component is compromised;
- simplify the process of system certification.
Isolation and interaction between entities
A cyber immune system consists of isolated parts (security domains in MILS terms) that can interact with one another only through a separation kernel, i.e. in a controlled manner. In KasperskyOS, security domains are implemented as entities.
Entities
In KasperskyOS, each process is a subject in a solution security policy. When a process starts, the KasperskyOS kernel associates with it the context necessary for its execution, and with the Kaspersky Security Module – the security context necessary to control its interactions with other processes.
To emphasize each process's link with the security policy, processes in KasperskyOS are called entities.
From the perspective of the KasperskyOS kernel, an entity is a process that has a separate address space and one or more threads of execution. The kernel guarantees isolation of the address spaces of entities. An entity can implement interfaces, and other entities can call the methods of these interfaces through the kernel.
From the perspective of the Kaspersky Security Module, an entity is a subject that other subjects (entities) can interact with. The types of interactions that are possible are specified by a description of the entity's interfaces that must match the implementation. Interface descriptions let the security module check each interaction for compliance with the solution security policy.
Additional information regarding entities
For the Kaspersky Security Module, the kernel is a subject just like an entity. Entities can call kernel methods, and these interactions are controlled like calls to methods of other entities. Accordingly, we will subsequently say that the kernel is a separate entity from the perspective of the Kaspersky Security Module.
Page top
Communication of entities (IPC)
KasperskyOS has only one way for entities to interact – through synchronous exchange of IPC messages: via a request and a response. In each interaction, there are two separate roles: client (the entity that initiates the interaction) and server (the entity that handles the request). Additionally, an entity that acts as a client in one interaction can act as a server in another.
The client and server use three system calls: Call(), Recv() and Reply():
- The client sends a request to the server. To do this, one of the client's threads calls
Call()and blocks until a response is received from the server or kernel (in the event of an error, for example). - A server thread calls
Recv()and waits for messages. When a request is received, this thread unblocks, handles the request, and sends a response by callingReply(). - When a response is received (or an error occurs), the client thread unblocks and continues execution.
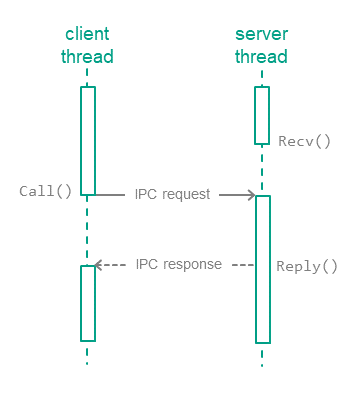
Thus, in terms of the MILS model, the KasperskyOS kernel is a separation kernel, because all entity interactions happen through it.
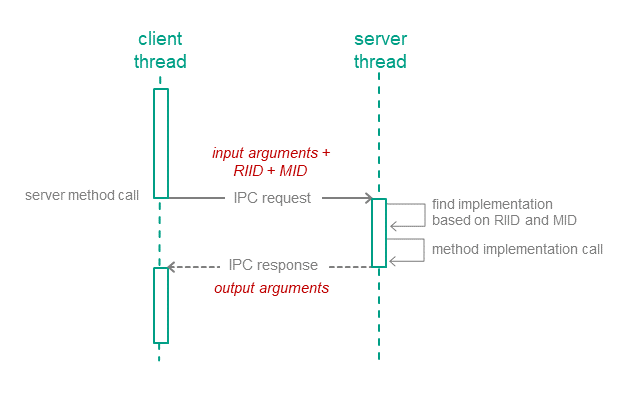
Exchanging messages as method calls
An entity's IPC request to a server is a call to one of the interfaces implemented by the server. The IPC request contains input arguments for the called method, the ID of the interface implementation (RIID), and the ID of the called method (MID). Upon receiving a request, the server entity uses these identifiers to find the method's implementation. The server calls the method's implementation, passing in the input arguments from the IPC request. After handling the request, the server entity sends the client a response that contains the method's output arguments.
The Kaspersky Security Module can analyze all components of an IPC message in order to decide whether the message complies with the system's security policy.
IPC channels
To enable two entities to exchange messages, an IPC channel, also referred to as a "channel" or "connection", must be established between them. The channel specifies the entities' roles, i.e. "client" and "server". Additionally, an entity can have several channels in which it is the client, and several channels in which it is the server.
KasperskyOS has two mechanisms for creating IPC channels:
- The static mechanism involves creating a channel when the entity is started (when the solution is started). Channels are created statically by the initializing Einit entity.
- The dynamic mechanism allows started entities to establish a channel between one another.
Describing entities' interfaces (EDL, CDL, IDL)
To control interactions between entities, the structure of the sent IPC messages must be transparent to the security module. In KasperskyOS, this is achieved using a static declaration of entities' interfaces. Special languages are used for this: Entity Definition Language (EDL), Component Definition Language (CDL) and Interface Definition Language (IDL). If an IPC message does not match an interface description, it will be rejected by the security module.
An entity's interface description defines the allowed IPC message structures. This creates a clear link between the implementation of each method and how that method is represented for the security module. Nearly every build tool uses entities' interface descriptions either explicitly or implicitly.
Types of static descriptions
A description of entities' interfaces is built using an "entity-component-interface" model:
- An IDL description declares an interface, as well as user types and constants (optional). Taken together, all of the IDL descriptions in a solution encompass all the interfaces implemented in the solution.
- A CDL description lists the interfaces implemented by a component. Components make it possible to group interface implementations. Components can include other components.
- An entity's EDL description declare instances of the components included in the entity. An entity may include no components.
Example
Below are static declarations of a solution consisting of a Client entity that does not implement a single interface, and a Server entity that implements the FileOps interface.
Client.edl
// The static description consists of only the entity's name
entity Client
Server.edl
// The Server entity contains an instance of the Operations component
entity Server
components {
OpsComp: Operations
}
Operations.cdl
// The Operations component implements the FileOps interface
component Operations
interfaces {
FileOpsImpl: FileOps
}
FileOps.idl
package FileOps
// Declaration of the String user type
typedef array <UInt8, 256> String;
// The FileOps interface contains a single Open method with a 'name' input argument and 'h' output argument
interface {
Open(in String name, out UInt32 h);
}
For more details, refer to Syntax of static declarations.
Page top
IPC transport
To implement entity interactions, we need transport code, which is responsible for properly creating, packing, sending, unpacking, and dispatching IPC messages. Developing solutions for KasperskyOS does not require writing your own transport code. Instead, you can use special tools and libraries included in KasperskyOS Community Edition.
Transport code for developed components
Someone developing new components for KasperskyOS can generate transport code based on static definitions of the components. To achieve this, KasperskyOS Community Edition includes the NK compiler. The NK compiler lets you generate transport methods and types for use by both clients and servers.
Transport code for included components
The functionality of most components included in KasperskyOS Community Edition may be used in a solution both locally (through static linking with the developed code) and via IPC.
The following transport libraries are used to separate a component into a server entity and use it via IPC:
- The component's client library converts local calls into IPC requests to the driver entity.
- The component's server library receives IPC requests to the driver entity and converts them into local calls.
To use a component via IPC, it's enough to link its implementation to the server library, and to link the client entity to the client library.
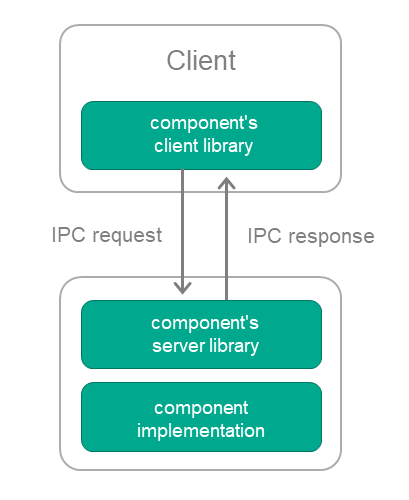
The client library interface does not differ from the interface of the component itself. This means that it is unnecessary to change the code of the client entity in order to switch to using a component via IPC (instead of static linking).
For more details, refer to IPC and transport.
Page top
Interaction control
In a cyber immune system, each attempted interaction between isolated parts of the system (security domains in MILS terms) is checked for compliance with certain rules that are specified by the system's security policy. If an interaction is forbidden by the current policy, then it is not allowed. Below we consider how this principle is implemented in KasperskyOS.
Kaspersky Security Module
For each developed solution, Kaspersky Security System technology lets you generate code for the Kaspersky Security Module that implements the specified security policy. The security module controls all interactions between entities, i.e. in MILS terms, it is a security monitor.
Controlling IPC messages
The kernel calls the Kaspersky Security Module each time one entity sends a message to another entity. The security module checks whether the message structure corresponds to the description of the called method. If so, then the security module calls all the rules associated with this message and makes a decision: "allowed" or "denied". The kernel enforces the resulting decision, i.e. delivers the message only if the decision is "allowed".
In this way, the code that makes decisions (Policy Decision Point) is separate from the code that enforces them (Policy Enforcement Point).
IPC responses are controlled just like IPC requests. This may be used, for example, to guarantee the integrity of responses.
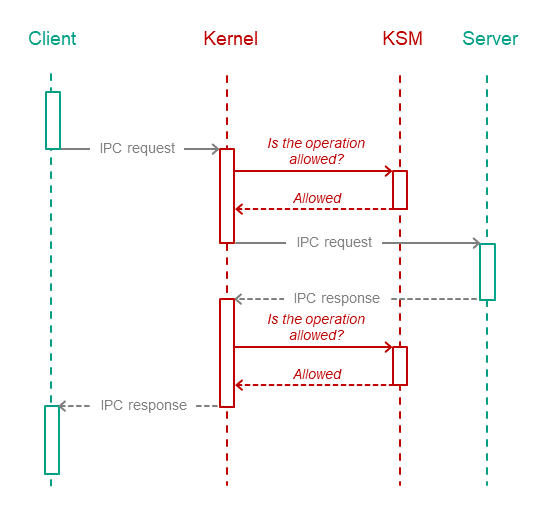
The kernel delivers the IPC message only if Kaspersky Security Module allows delivery
Controlling startup of entities
The kernel also calls the security module each time when an entity is started. This is usually used to initialize the entity's security context.
Security interface
Entities can directly query the Kaspersky Security Module using the security interface to report information about their state or the context of some event. Additionally, the security module enforces all rules associated with the called method of the security interface. Then the entity itself can use the decision received from the security module. The security interface is used, for example, to implement entities that control access to resources.
Page top
Policy Specification Language (PSL)
The most important part of Kaspersky Security System technology is the PSL language (Policy Specification Language). It lets you describe a solution security policy formally, close to the terms of the task itself. The resulting PSL description is used to generate the code of a Kaspersky Security Module for the specific solution. This is done by using the NK compiler provided in KasperskyOS Community Edition. Thus, a solution's PSL description is the connecting link between the informal description of a policy and its implementation.
The PSL language lets you use various data structures and combine several security models.
Page top
Managing access to resources
Types of resources
KasperskyOS has two types of resources:
- System resources, which are managed by the kernel. Some examples of these include processes, memory regions, and interrupts.
- User resources, which are managed by processes. Examples of user resources: files, input-output devices, data storage.
Handles
Both system resources and user resources are identified by handles. By receiving a handle, a process obtains access to the resource that is identified by this handle. Processes can transfer handles to other processes. The same resource can be identified by multiple handles used by different processes.
Security identifiers (SID)
The KasperskyOS kernel assigns security identifiers to system resources and user resources. A security identifier (SID) is a global unique ID of a resource (in other words, a resource can have only one SID but can have multiple handles). The Kaspersky Security Module identifies resources based on their SID.
When transmitting an IPC message containing handles, the kernel modifies the message so that it contains SID values instead of handles when the message is checked by the security module. When the IPC message is delivered to its recipient, it will contain the handles.
The kernel also has an SID like other resources.
Security context
Kaspersky Security System technology lets you employ security mechanisms that receive SID values as inputs. When employing these mechanisms, the Kaspersky Security Module distinguishes resources (and the KasperskyOS kernel) and binds security contexts to them. A security context consists of data that is associated with an SID and used by the security module to make decisions.
The contents of a security context depend on the security models being used. For example, a security context may contain the state of a resource and the levels of integrity of subjects and/or access objects. If a security context stores the state of a resource, this lets you allow certain actions to be taken on a resource only if the resource is in a specific state, for example.
The security module can modify a security context when it makes a decision. For example, it can modify information about the state of a resource (the security module used the security context to verify that a file is in the "not in use" state and allowed the file to be opened for write access and wrote a new state called "opened for write access" into the security context of this file).
Resource access management by the KasperskyOS kernel
The KasperskyOS kernel manages access to resources by using two mutually complementary methods at the same time: implementing the decisions of the Kaspersky Security Module and implementing a security mechanism based on object capabilities (OCap).
Each handle is associated with rights to access the resource identified by this handle, which means it is a capability in OCap terms. By receiving a handle, a process obtains the rights to access the resource that is identified by this handle. The kernel assigns rights to access system resources and verifies these rights when processes attempt to use the system resources. The kernel also prohibits the expansion of access rights when handles are transferred among processes (when a handle is transferred, access rights can only be restricted).
Resource access management by resource providers
Processes that manage user resources and manage access to those resources for other processes are referred to as resource providers. For example, drivers are resource providers. Resource providers manage access to resources by using two mutually complementary methods: implementing the decisions of the Kaspersky Security Module and using the OCap mechanism that is implemented by the KasperskyOS kernel.
If a resource is queried by its name (for example, to open it), the security module cannot be used to manage access to the resource without the involvement of the resource provider. This is because the security module identifies a resource by its SID, not by its name. In such cases, the resource provider finds the resource handle based on the resource name and forwards this handle (together with other data, such as the required state of the resource) to the security module via the security interface (the security module receives the SID corresponding to the transferred handle). The security module makes a decision and returns it to the resource provider. The resource provider implements the decision of the security module.
Processes that use the resources provided by resource providers or by the kernel are referred to as resource consumers. When a resource consumer opens a user resource, the resource provider sends the consumer the handle associated with the rights to access this resource. In addition, the resource provider decides which specific rights for accessing the resource will be granted to the resource consumer. Before actions are taken on a resource requested by a consumer, the resource provider verifies that the consumer has sufficient rights. If the consumer does not have sufficient rights, the resource provider rejects the request of the consumer.
Page top
TCB reliability
A cyber immune system must provide guarantees regarding the reliability of the entire trusted computing base (TCB). These guarantees can be provided only if the trusted computing base is sufficiently compact. Below we will consider how this requirement is achieved in KasperskyOS-based solutions.
Microkernel architecture
The foundation of any solution's trusted computing base is the kernel. The KasperskyOS kernel consists of just three system calls and performs only a small number of the most important functions, including the isolation and interaction of entities, scheduling, and memory management. As a result, the kernel is compact and has a small attack surface, which minimizes the number of potential vulnerabilities.
Moreover, device drivers and resource providers (for example, file system implementations) are user applications. Potential errors in them cannot affect the stability of the kernel. However, a KasperskyOS-based solution may have a potentially untrusted device driver or resource provider. This reduces the solution's trusted computing base and increases its reliability.
The combination of a microkernel architecture and security module makes it possible to control all interactions between a driver (or resource provider) and other entities, as well as all interactions with the kernel to ensure compliance with the specified solution security policy.
KasperskyOS kernel services (such as creating a thread or allocating memory) are called by using the same IPC mechanism and the same Call() system call as when calling methods of another entity. From this perspective, the KasperskyOS kernel serves as a separate entity that implements interfaces described in IDL.
Reliability of trusted components
A solution's trusted computing base may include various trusted components, in addition to the KasperskyOS microkernel and security module. Depending on the security goals and prerequisites, device drivers and resource provider may be trusted components. The KasperskyOS architecture and toolset lets you increase the reliability of trusted components.
Removing a trusted component into a separate entity
A solution developer can increase TCB reliability by reducing the size of trusted components. To achieve this, they should be separated from the remaining (untrusted) code, i.e. removed into separate entities. KasperskyOS Community Edition includes transport libraries and tools for generating transport code, which lets you implement nearly any component as a separate entity for which every interaction is controlled.
Creating duplicate components
Another way to raise TCB reliability is to limit the influence of untrusted components on trusted components by separating their threads. To do this, a component can be used independently in several entities. For example, the VFS component is responsible for implementing file systems and the network stack in KasperskyOS. If we include VFS instances in different entities, each of them will work with its own implementation of the file system and/or network stack. This is how separation of the threads of trusted and untrusted entities are separated and, accordingly, how TCB reliability is increased.
The method of separating user code into trusted and untrusted code depends on the security goals and prerequisites of the specific solution.
KasperskyOS-based solution image
The boot image of a final KasperskyOS-based solution contains the following:
- Image of the KasperskyOS kernel
- Security module
- Einit entity, which starts all other entities
- All entities included in the solution, including drivers, service entities, and entities that implement the business logic
All entities are contained in a ROM file system (ROMFS) image.
Building a solution image
A solution image is built using a specialized script that is provided in KasperskyOS Community Edition.
The KasperskyOS kernel image, service entities and driver entities are included in KasperskyOS Community Edition. A security module and Einit entity are built for each specific solution.
Starting a solution
A solution is started as follows:
- The bootloader loads the KasperskyOS kernel.
- The kernel finds the security module and loads it.
- The kernel starts the
Einitentity. - The
Einitentity starts all other entities that are part of the solution.
Getting started
This section tells you what you need to know to start working with KasperskyOS Community Edition.
Installation and removal
Installation
KasperskyOS Community Edition is distributed as a DEB package. It is recommended to use the gdebi package installer to install KasperskyOS Community Edition.
To deploy the package using gdebi, run the following command with root privileges:
$ gdebi <path-to-deb-package>
The package will be installed in /opt/KasperskyOS-Community-Edition-<version>.
For convenient operation, you can add the path to the KasperskyOS Community Edition tools binaries to the PATH variable. This will allow you to use the tools via the terminal from any folder:
$ export PATH=$PATH:/opt/KasperskyOS-Community-Edition-<version>/toolchain/bin
Removal
To remove KasperskyOS Community Edition, run the following command with root privileges:
$ sudo apt-get remove --purge kasperskyos-community-edition
All installed files in the /opt/KasperskyOS-Community-Edition-<version> directory will be deleted.
Configuring the development environment
This section provides brief instructions on configuring the development environment and adding the header files included in KasperskyOS Community Edition to a development project.
Configuring the code editor
Before getting started, you should do the following to simplify your development of solutions based on KasperskyOS:
- Install code editor extensions and plugins for your programming language (C and/or C++).
- Add the header files included in KasperskyOS Community Edition to the development project.
The header files are located in the directory:
/opt/KasperskyOS-Community-Edition-<version>/sysroot-arm-kos/include.
Example of how to configure Visual Studio Code
For example, during KasperskyOS development, you can work with source code in Visual Studio Code.
To more conveniently navigate the project code, including the system API:
- Create a new workspace or open an existing workspace in Visual Studio Code.
A workspace can be opened implicitly by using the
File>Open foldermenu options. - Make sure the C/C++ for Visual Studio Code extension is installed.
- In the
Viewmenu, select theCommand Paletteitem. - Select the
C/C++: Edit Configurations (UI)item. - In the
Include pathfield, enter/opt/KasperskyOS-Community-Edition-<version>/sysroot-arm-kos/include. - Close the
C/C++ Configurationswindow.
Building the examples
The examples are built using the CMake build system that is included in KasperskyOS Community Edition.
The code of the examples and build scripts are available at the following path:
/opt/KasperskyOS-Community-Edition-<version>/examples
Examples must be built in the home directory. For this reason, the directory containing the example that you need to build must be copied from /opt/KasperskyOS-Community-Edition-<version>/examples to the home directory.
Building the examples to run on QEMU
To build an example, go to the directory with the example and run this command:
$ sudo ./cross-build.sh
Running cross-build.sh creates a KasperskyOS-based solution image that includes the example. The kos-qemu-image solution image is located in the <name of example>/build/einit directory.
Building the examples to run on Raspberry Pi 4 B
To build an example:
- Go to the directory with the example.
- Open the
cross-build.shscript file in a text editor. - In the last line of the script file, replace the
make simcommand withmake kos-image. - Save the script file and then run the command:
$ sudo ./cross-build.sh
Running cross-build.sh creates a KasperskyOS-based solution image that includes the example. The kos-image solution image is located in the <name of example>/build/einit directory.
Running examples on QEMU
Running examples on QEMU on Linux with a graphical shell
An example is run on QEMU on Linux with a graphical shell using the cross-build.sh script, which also builds the example. To run the script, go to the folder with the example and run the command:
$ sudo ./cross-build.sh
Additional QEMU parameters must be used to run certain examples. The commands used to run these examples are provided in the descriptions of these examples.
Running examples on QEMU on Linux without a graphical shell
To run an example on QEMU on Linux without a graphical shell, go to the directory with the example, build the example and run the following commands:
$ cd build/einit
# Before running the following command, be sure that the path to
# the directory with the qemu-system-arm executable file is saved in
# the PATH environment variable. If it is not there,
# add it to the PATH variable.
$ qemu-system-arm -m 2048 -machine vexpress-a15 -nographic -monitor none -serial stdio -kernel kos-qemu-image
Running examples on Raspberry Pi 4 B
Connecting a computer and Raspberry Pi 4 B
To see the output of the examples on the computer:
- Connect the pins of the FT232 USB-UART converter to the corresponding GPIO pins of the Raspberry Pi 4 B (see the figure below).

Diagram for connecting the USB-UART converter and Raspberry Pi 4 B
- Connect the computer's USB port to the USB-UART converter.
- Install PuTTY or a similar program for reading data from a COM port. Configure the settings as follows:
bps = 115200,data bits = 8,stop bits = 1,parity = none,flow control = none.
To allow a computer and Raspberry Pi 4 B to interact through Ethernet:
- Connect the network cards of the computer and Raspberry Pi 4 B to a switch or to each other.
- Configure the computer's network card so that its IP address is in the same subnet as the IP address of the Raspberry Pi 4 B network card (the settings of the Raspberry Pi 4 B network card are defined in the
dhcpcd.conffile, which is found at the path<example name>/resources/...).
Preparing a bootable SD card for Raspberry Pi 4 B
A bootable SD card for Raspberry Pi 4 B can be prepared automatically or manually.
To automatically prepare the bootable SD card, connect the SD card to the computer and run the following commands:
# The following command creates an image file for the bootable
# drive (*.img).
$ sudo /opt/KasperskyOS-Community-Edition-<version>/examples/rpi4_prepare_fs_image.sh
# In the following command, path_to_img is the path to the image file
# of the bootable drive (this path is displayed upon completion
# of the previous command), [X] is the final character
# in the name of the SD card block device.
$ sudo dd bs=4M if=path_to_img of=/dev/sd[X] conv=fsync
To manually prepare the bootable SD card:
- Build the U-Boot bootloader for ARMv7, which will automatically run the example. To do this, run the following commands:
$ sudo apt install gcc-arm-linux-gnueabi gcc-arm-linux-gnueabihf git bison flex
$ git clone https://github.com/u-boot/u-boot.git u-boot-armv7
$ cd u-boot-armv7 && git checkout tags/v2020.10
$ make ARCH=arm CROSS_COMPILE=arm-linux-gnueabihf- rpi_4_32b_defconfig
# In the menu that appears when you run the following command, enable
# the 'Enable a default value for bootcmd' option. In the 'bootcmd value' field, enter
# fatload mmc 0 ${loadaddr} kos-image; bootelf ${loadaddr}.
# Then exit the menu after saving the settings.
$ make ARCH=arm CROSS_COMPILE=arm-linux-gnueabihf- menuconfig
$ make ARCH=arm CROSS_COMPILE=arm-linux-gnueabihf- u-boot.bin
- Format the SD card. To do this, connect the SD card to the computer and run the following commands:
$ wget https://downloads.raspberrypi.org/raspbian_lite_latest
$ unzip raspbian_lite_latest
# In the following command, [X] is the last symbol in the name of the block device
# for the SD card.
$ sudo dd bs=4M if=$(ls *raspbian*lite.img) of=/dev/sd[X] conv=fsync
- Copy the U-Boot bootloader to the SD card by running the following commands:
# In the following commands, the path ~/mnt/fat32 is just an example. You
# can use a different path.
$ mkdir -p ~/mnt/fat32
# In the following command, [X] is the last alphabetic character in the name of the block
# device for the partition on the formatted SD card.
$ sudo mount /dev/sd[X]1 ~/mnt/fat32/
$ sudo cp u-boot.bin ~/mnt/fat32/u-boot.bin
- Copy the configuration file for the U-Boot bootloader to the SD card. To do so, go to the directory
/opt/KasperskyOS-Community-Edition-<version>/examplesand run the following commands:$ sudo cp config.txt ~/mnt/fat32/config.txt
$ sync
$ sudo umount ~/mnt/fat32
Running an example on a Raspberry Pi 4 B
To run an example on a Raspberry Pi 4 B:
- Go to the directory with the example and build the example.
- Copy the KasperskyOS-based solution image to the bootable SD card. To do this, connect the bootable SD card to the computer and run the following commands:
# In the following command, [X] is the last alphabetic character in the name of the block
# device for the partition on the bootable SD card.
# In the following commands, the path ~/mnt/fat32 is just an example. You
# can use a different path.
$ sudo mount /dev/sd[X]1 ~/mnt/fat32/
$ sudo cp build/einit/kos-image ~/mnt/fat32/kos-image
$ sync
$ sudo umount ~/mnt/fat32
- Connect the bootable SD card to the Raspberry Pi 4 B.
- Supply power to the Raspberry Pi 4 B and wait for the example to run.
The output displayed on the computer indicates that the example started.
Part 1. Simple application (POSIX)
KasperskyOS Community Edition includes a set of libraries (libc, libm and libpthread) ensuring that the developed applications are partially compatible with the POSIX family of standards.
This part of the Guide illustrates the following:
- Printing a string to the screen by using
fprintf() - Using VFS component for working with a network and file systems
- Creating the
Einitinitializing entity - POSIX support limitations
To simplify the descriptions, the example in this part of the Guide is built without the ksm.module. For this reason, when example is started, a notification WARNING! Booting an insecure kernel! is displayed. The third part of the Guide examines a solution security policy, use of security policies, and building ksm.module.
hello example
In the software development world, learning a new technology traditionally starts with using that technology to greet the world. We will keep that tradition with KasperskyOS, so we begin with an example that displays Hello world! on the screen.
KasperskyOS lets you develop solutions in the C and C++ languages.
The hello.c code looks familiar and simple to a developer that uses C, and is fully compatible with POSIX:
hello.c
int main(int argc, const char *argv[])
{
fprintf(stderr,"Hello world!\n");
return EXIT_SUCCESS;
}
To run the Hello file in KasperskyOS, multiple additional actions are required.
Development of applications for KasperskyOS has the following specifics:
First of all, each entity (the term used to refer to applications and their associated processes in KasperskyOS) must be statically described. A description is contained in files with the EDL, CDL and IDL extensions, which are used for building a solution. The minimum possible description of an entity is an EDL file that indicates the name of the entity. All entities developed in the first part of the Guide have a minimum static description (only an EDL file with the entity name).
Secondly, all entities to be started must be contained in the KasperskyOS image being loaded. For this reason, each example in this Guide presents not just an individual entity but a ready-to-use KasperskyOS-based solution that includes an image of the kernel that initializes the entity and auxiliary entities, such as drivers.
EDL description of the Hello entity
A static description of the Hello entity consists of a single file named Hello.edl that must indicate the entity name:
Hello.edl
/* The entity name follows the reserved word "entity". */
entity Hello
The entity name must begin with an uppercase letter. The name of an EDL file must match the name of the entity that it describes.
The second part of the Guide shows examples of more complex EDL descriptions, and also presents CDL and IDL descriptions.
Creating the Einit initializing entity
When KasperskyOS is loaded, the kernel starts an entity named Einit. The Einit entity starts all other entities included in the solution, which means that it serves as the initializing entity.
The KasperskyOS Community Edition toolkit includes the einit tool, which lets you generate the code of the initializing entity (einit.c) based on the init description. In the example provided below, the file containing the init description is named init.yaml, but it can have any name.
For more details, refer to Entity startup.
If you want the Hello entity to start after the operating system is loaded, all you need to do is specify its name in the init.yaml file and build an Einit entity from it.
init.yaml
entities:
# Start the "Hello" entity.
- name: Hello
Build scheme for the hello example
The general build scheme for the hello example looks as follows:
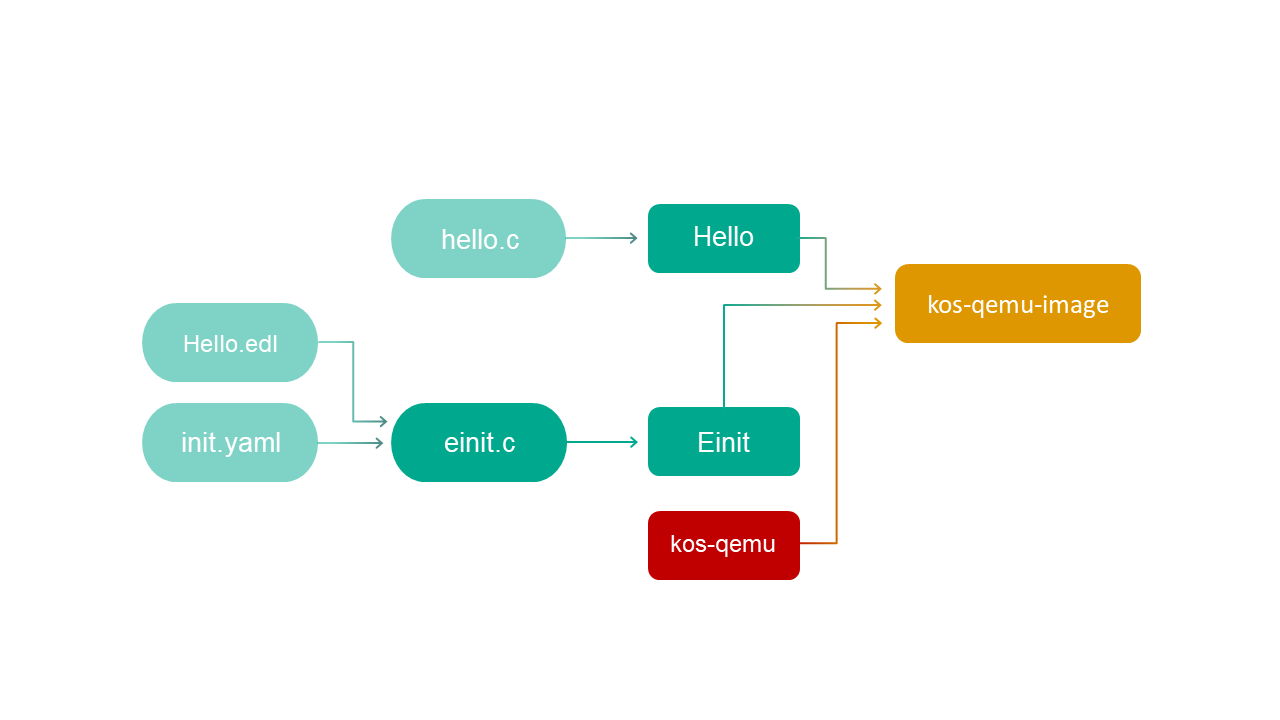
Building and running the hello example
See the Building and running examples section.
Page top
VFS: overview
The VFS component contains the implementations of file systems and the network stack. POSIX calls for working with file systems and the network are sent to the VFS component, which then calls the block device driver or network driver, respectively.

Multiple copies of the VFS component can be added to a solution to separate the data streams of different entities. Each VFS copy is built separately and can contain the entire VFS functionality or a specific part of it, for example:
- One or more file systems
- Network stack
- Network stack and network driver
The VFS component can be used either directly (through static linking) or via IPC (as a separate entity). Use of VFS functionality via IPC enables the solution developer to do the following:
- Use a solution security policy to control method calls that work with the network and file systems.
- Connect multiple client entities to one VFS entity.
- Connect one client entity to two VFS entities to separately work with the network and file systems.
Building a VFS entity
KasperskyOS Community Edition does not provide a ready-to-use image for an entity containing the VFS component. The solution developer can independently build one or more entities that each include the specific VFS functionality necessary for the solution.
Please also refer to the multi_vfs_dhcpcd, multi_vfs_dns_client and multi_vfs_ntpd examples provided in KasperskyOS Community Edition.
Building a network VFS
To build a "network" VFS entity containing a network driver, the file containing the main() function must be linked to the vfs_server, vfs_net and dnet_implementation libraries:
CMakeLists.txt (fragment)
target_link_libraries (Net1Vfs ${vfs_SERVER_LIB}
${vfs_NET_LIB}
${dnet_IMPLEMENTATION_LIB})
set_target_properties (Net1Vfs PROPERTIES ${blkdev_ENTITY}_REPLACEMENT "")
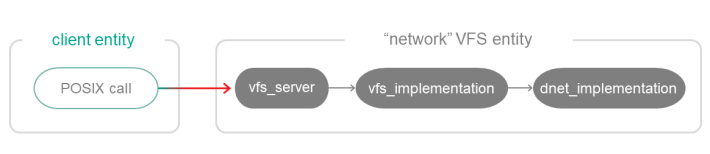
Using a "network" VFS entity linked to a network driver
To use a network driver via IPC (as a separate entity), the dnet_client library must be used instead of the dnet_implementation library:
CMakeLists.txt (fragment)
target_link_libraries (Net2Vfs ${vfs_SERVER_LIB}
${vfs_NET_LIB}
${dnet_CLIENT_LIB})
set_target_properties (Net2Vfs PROPERTIES ${blkdev_ENTITY}_REPLACEMENT "")

Using a "network" VFS entity and a network driver as a separate entity
File operations are used by some functions, including printing to stdout. For these functions to work correctly, the vfs_implementation library must be added instead of vfs_net during the build.
Building a file VFS
To build a "file" VFS entity, the file containing the main() function must be linked to the vfs_server and vfs_fs libraries and to the libraries for implementing file systems:
CMakeLists.txt (fragment)
target_link_libraries (VfsFs
${vfs_SERVER_LIB}
${LWEXT4_LIB}
${vfs_FS_LIB})
set_target_properties (VfsFs PROPERTIES ${blkdev_ENTITY}_REPLACEMENT ${ramdisk_ENTITY})
In this example, the VFS entity is prepared to connect to the ramdisk driver entity.
A block device driver cannot be linked to VFS and is always used via IPC:

Using a "file" VFS entity and a driver as a separate entity
If necessary, you can build a VFS entity containing the network stack and the file systems. To do so, use the vfs_server, vfs_implementation, and dnet_implementation libraries (or dnet_client), and the file system implementation libraries.
Env entity
The Env service entity allows running entities to pass arguments and environment variables. When started, each entity automatically sends a request to the Env entity and receives the necessary data.
By including the Env entity in the solution, you can mount file systems when VFS is started, connect one client entity to two VFS entities, and perform many other tasks.
To use the Env entity in your solution, the following is required:
1. Develop the code of the Env entity by using macros from env/env.h.
2. Build an image of the entity by linking it to the env_server library.
3. In the init description, indicate that the Env entity must be started and connected to the selected entities (Env acts a server in this case). The channel name is defined by the ENV_SERVICE_NAME macro declared in the env/env.h file.
4. Include the Env entity image in the solution image.
Env entity code
The code of the Env entity utilizes the following macros and functions declared in the env/env.h file:
ENV_REGISTER_ARGS(name,argarr)– arguments from theargarrarray will be passed to the entity namedname.ENV_REGISTER_VARS(name,envarr)– environment variables from theenvarrarray will be passed to the "name" entity.ENV_REGISTER_PROGRAM_ENVIRONMENT(name,argarr,envarr)– arguments and environment variables will be passed to the entity namedname.envServerRun()– initialize the server part of the entity so that it can respond to requests.
Example:
env.c
int main(int argc, char** argv)
{
const char* NetVfsArgs[] = {
"-l", "devfs /dev devfs 0",
"-l", "romfs /etc romfs 0"
};
ENV_REGISTER_ARGS("VFS", NetVfsArgs);
envServerRun();
return EXIT_SUCCESS;
}
Init.yaml example for use of the Env entity
In the next example, the Client entity will be connected to the Env entity whose image is located in the env folder:
init.yaml
entities:
- name: env.Env
- name: Client
connections:
- target: env.Env
id: {var: ENV_SERVICE_NAME, include: env/env.h}
Connecting a client entity to one or two VFS entities
Calls of network- and file POSIX functions can be forwarded to two separate VFS components by connecting a client entity to two different VFS entities. If such data stream separation is not required (for example, if the client only works with the network), connecting the client entity to a single VFS entity is enough.
Connecting to one VFS entity
The name of the IPC channel between the client entity and the VFS entity must be defined by the _VFS_CONNECTION_ID macro declared in the vfs/defs.h file. In this case, "network" calls and "file" calls will be sent to this VFS entity.
Example:
init.yaml
- name: ClientEntity
connections:
- target: VfsEntity
id: {var: _VFS_CONNECTION_ID, include: vfs/defs.h}
- name: VfsEntity
Connecting to two VFS entities
Let's examine a client entity that is connected to two different VFS entities. We will name them "network" VFS and "file" VFS.
The _VFS_NETWORK_BACKEND environment variable is used so that "network" calls from the client entity are sent only to the "network" VFS:
- For the "network" VFS entity:
_VFS_NETWORK_BACKEND=server:<name of the IPC channel to the "network" VFS> - For the client entity:
_VFS_NETWORK_BACKEND=client: <name of the IPC channel to the "network" VFS>
The analogous _VFS_FILESYSTEM_BACKEND environment variable is used to send "file" calls:
- For the "file" VFS entity:
_VFS_FILESYSTEM_BACKEND=server:<name of the IPC channel to the "file" VFS> - For the client entity:
_VFS_FILESYSTEM_BACKEND=client: <name of the IPC channel to the "file" VFS>
As a result, the functions for working with the network and files will be sent to two different VFS entities.
In the next example, the Client entity is connected to two VFS entities – the "network" VfsFirst entity and the "file" VfsSecond entity:
init.yaml
entities:
- name: Env
- name: Client
connections:
- target: Env
id: {var: ENV_SERVICE_NAME, include: env/env.h}
- target: VfsFirst
id: VFS1
- target: VfsSecond
id: VFS2
- name: VfsFirst
connections:
- target: Env
id: {var: ENV_SERVICE_NAME, include: env/env.h}
- name: VfsSecond
connections:
- target: Env
id: {var: ENV_SERVICE_NAME, include: env/env.h}
Env entity code:
env.c
int main(void)
{
const char* vfs_first_args[] = { "_VFS_NETWORK_BACKEND=server:VFS1" };
ENV_REGISTER_VARS("VfsFirst", vfs_first_args);
const char* vfs_second_args[] = { "_VFS_FILESYSTEM_BACKEND=server:VFS2" };
ENV_REGISTER_VARS("VfsSecond", vfs_second_args);
const char* client_envs[] = { "_VFS_NETWORK_BACKEND=client:VFS1", "_VFS_FILESYSTEM_BACKEND=client:VFS2" };
ENV_REGISTER_VARS("Client", client_envs);
envServerRun();
return EXIT_SUCCESS;
}
Please also refer to the multi_vfs_dhcpcd, multi_vfs_dns_client and multi_vfs_ntpd examples provided in KasperskyOS Community Edition.
Mounting file systems when VFS starts
By default, the VFS component provides access to the following:
- RAMFS file system. RAMFS is mounted to the root directory by default.
- ROMFS object storage. The storage contains non-executable files (including configuration files) that are added to the solution image during the build. The ROMFS file system is not mounted by default. However, the storage can be accessed indirectly through the
-fargument, for example.
If you need to mount other file systems, this can be done either by using the mount() call after the VFS starts or immediately when the VFS starts by passing the following arguments and environment variables to it:
-l <entry in fstab format>The
-largument lets you mount the file system.-f <path to fstab file>The
-fargument lets you pass the file containing entries in fstab format for mounting file systems. The ROMFS storage will be searched for the file. If theUMNAP_ROMFSvariable is defined, the file system mounted using theROOTFSvariable will be searched for the file.UNMAP_ROMFSIf the
UNMAP_ROMFSvariable is defined, the ROMFS storage will be deleted. This helps conserve memory and change behavior when using the-fargument.ROOTFS = <entry in fstab format>The
ROOTFSvariable lets you mount a file system to the root directory. In combination with theUNMAP_ROMFSvariable and the-fargument, it lets you search for the fstab file in the mounted file system instead of in the ROMFS storage.
Example:
env.c
int main(int argc, char** argv)
{
/* The devfs and romfs file systems will be mounted for the Vfs1 entity. */
const char* Vfs1Args[] = {
"-l", "devfs /dev devfs 0",
"-l", "romfs /etc romfs 0"
};
ENV_REGISTER_ARGS("Vfs1", Vfs1Args);
/* The file systems defined through the /etc/dhcpcd.conf file located in the ROMFS storage will be mounted for the Vfs2 entity. */
const char* Vfs2Args[] = { "-f", "/etc/dhcpcd.conf" };
ENV_REGISTER_ARGS("Vfs2", Vfs2Args);
/* The ext2 file system containing the /etc/fstab file used for mounting additional file systems will be mounted to the root directory for the Vfs3 entity. The ROMFS storage will be deleted. */
const char* Vfs3Args[] = { "-f", "/etc/fstab" };
const char* Vfs3Envs[] = {
"ROOTFS=ramdisk0,0 / ext2 0",
"UNMAP_ROMFS=1"
};
ENV_REGISTER_PROGRAM_ENVIRONMENT("Vfs3", Vfs3Args, Vfs3Envs);
envServerRun();
return EXIT_SUCCESS;
}
Please also refer to the net_with_separate_vfs, net2_with_separate_vfs, multi_vfs_dhcpcd, multi_vfs_dns_client and multi_vfs_ntpd examples provided in KasperskyOS Community Edition.
POSIX support limitations
KasperskyOS uses a limited POSIX interface oriented toward the POSIX.1-2008 standard (without XSI support). These limitations are primarily due to security precautions.
Limitations affect the following:
- Interaction between processes
- Interaction between threads via signals
- Standard input/output
- Asynchronous input/output
- Use of robust mutexes
- Terminal operations
- Shell usage
- Management of file handles
Limitations include:
- Unimplemented interfaces
- Interfaces that are implemented with deviations from the POSIX.1-2008 standard
- Stub interfaces that do not perform any operations except assign the
ENOSYSvalue to theerrnovariable and return the value-1
In KasperskyOS, signals cannot interrupt the Call(), Recv(), and Reply() system calls that support the operation of libraries that implement the POSIX interface.
The KasperskyOS kernel does not transmit signals.
Limitations on interaction between processes
Interface |
Purpose |
Implementation |
Header file based on the POSIX.1-2008 standard |
|---|---|---|---|
|
Create a new (child) process. |
Stub |
|
|
Register the handlers that are called before and after the child process is created. |
Not implemented |
|
|
Wait for the child process to stop or complete. |
Stub |
|
|
Wait for the state of the child process to change. |
Not implemented |
|
|
Wait for the child process to stop or complete. |
Stub |
|
|
Run the executable file. |
Stub |
|
|
Run the executable file. |
Stub |
|
|
Run the executable file. |
Stub |
|
|
Run the executable file. |
Stub |
|
|
Run the executable file. |
Stub |
|
|
Run the executable file. |
Stub |
|
|
Run the executable file. |
Stub |
|
|
Move the process to another group or create a group. |
Stub |
|
|
Create a session. |
Not implemented |
|
|
Get the group ID for the calling process. |
Not implemented |
|
|
Get the group ID. |
Stub |
|
|
Get the ID of the parent process. |
Not implemented |
|
|
Get the session ID. |
Stub |
|
|
Get the time values for the process and its descendants. |
Stub |
|
|
Send a signal to the process or group of processes. |
Only the |
|
|
Wait for a signal. |
Not implemented |
|
|
Check for received blocked signals. |
Not implemented |
|
|
Get and change the set of blocked signals. |
Stub |
|
|
Wait for a signal. |
Stub |
|
|
Wait for a signal from the defined set of signals. |
Stub |
|
|
Send a signal to the process. |
Not implemented |
|
|
Wait for a signal from the defined set of signals. |
Not implemented |
|
|
Wait for a signal from the defined set of signals. |
Not implemented |
|
|
Create an unnamed semaphore. |
You cannot create an unnamed semaphore for synchronization between processes. If a non-zero value is passed to the function through the |
|
|
Create/open a named semaphore. |
You cannot open a named semaphore that was created by another process. Named semaphores (like unnamed semaphores) are local, which means that they are accessible only to the process that created them. |
|
|
Define the mutex attribute that allows the mutex to be used by multiple processes. |
You cannot define the mutex attribute that allows the mutex to be used by multiple processes. If the |
|
|
Define the barrier attribute that allows the barrier to be used by multiple processes. |
You cannot define the barrier attribute that allows the barrier to be used by multiple processes. If the |
|
|
Define the conditional variable attribute that allows the conditional variable to be used by multiple processes. |
You cannot define the conditional variable attribute that allows the conditional variable to be used by multiple processes. If the |
|
|
Define the read/write lock object attribute that allows the read/write lock object attribute to be used by multiple processes. |
You cannot define the read/write lock object attribute that allows the read/write lock object attribute to be used by multiple processes. If the |
|
|
Create a spin lock. |
You cannot create a spin lock for synchronization between processes. If the |
|
|
Create or open a shared memory object. |
Not implemented |
|
|
Map to memory. |
You cannot perform memory mapping for interaction between processes. If the |
|
|
Define the memory access permissions. |
This function works as a stub by default. To use this function, define special settings for the KasperskyOS kernel. |
|
|
Create an unnamed channel. |
You cannot use an unnamed channel for data transfer between processes. Unnamed channels are local, which means that they are accessible only to the process that created them. |
|
|
Create a special FIFO file (named channel). |
Stub |
|
|
Create a special FIFO file (named channel). |
Not implemented |
|
Limitations on interaction between threads via signals
Interface |
Purpose |
Implementation |
Header file based on the POSIX.1-2008 standard |
|---|---|---|---|
|
Send a signal to an execution thread. |
You cannot send a signal to an execution thread. If a signal number is passed to the function through the |
|
|
Get and change the set of blocked signals. |
Stub |
|
|
Restore the state of the control thread and the signals mask. |
Not implemented |
|
|
Save the state of the control thread and the signals mask. |
Not implemented |
|
Standard input/output limitations
Interface |
Purpose |
Implementation |
Header file based on the POSIX.1-2008 standard |
|---|---|---|---|
|
Formatted print to file. |
Not implemented |
|
|
Use memory as a data stream. |
Not implemented |
|
|
Use dynamically allocated memory as a data stream. |
Not implemented |
|
|
Formatted print to file. |
Not implemented |
|
Asynchronous input/output limitations
Interface |
Purpose |
Implementation |
Header file based on the POSIX.1-2008 standard |
|---|---|---|---|
|
Cancel input/output requests that are waiting to be handled. |
Not implemented |
|
|
Receive an error from an asynchronous input/output operation. |
Not implemented |
|
|
Request the execution of input/output operations. |
Not implemented |
|
|
Request a file read operation. |
Not implemented |
|
|
Get the status of an asynchronous input/output operation. |
Not implemented |
|
|
Wait for the completion of asynchronous input/output operations. |
Not implemented |
|
|
Request a file write operation. |
Not implemented |
|
|
Request execution of a set of input/output operations. |
Not implemented |
|
Limitations on the use of robust mutexes
Interface |
Purpose |
Implementation |
Header file based on the POSIX.1-2008 standard |
|---|---|---|---|
|
Return a robust mutex to a consistent state. |
Not implemented |
|
|
Get a robust mutex attribute. |
Not implemented |
|
|
Define a robust mutex attribute. |
Not implemented |
|
Terminal operation limitations
Interface |
Purpose |
Implementation |
Header file based on the POSIX.1-2008 standard |
|---|---|---|---|
|
Get the path to the file of the control terminal. |
This function only returns or passes an empty string through the |
|
|
Define the terminal settings. |
The input speed, output speed, and other settings specific to hardware terminals are ignored. |
|
|
Wait for output completion. |
This function only returns the value |
|
|
Suspend or resume receipt or transmission of data. |
Suspending output and resuming suspended output are not supported. |
|
|
Clear the input queue or output queue, or both of these queues. |
This function only returns the value |
|
|
Break the connection with the terminal for a set time. |
This function only returns the value |
|
|
Get the path to the terminal file. |
This function only returns a null pointer. |
|
|
Get the path to the terminal file. |
This function only returns an error value. |
|
|
Get the ID of a group of processes using the terminal. |
This function only returns the value |
|
|
Define the ID for a group of processes using the terminal. |
This function only returns the value |
|
|
Get the ID of a group of processes for the leader of the session connected to the terminal. |
This function only returns the value |
|
Shell operation limitations
Interface |
Purpose |
Implementation |
Header file based on the POSIX.1-2008 standard |
|---|---|---|---|
|
Create a child process for command execution and a channel for this process. |
This function only assigns the |
|
|
Close the channel with the child process created by the |
This function cannot be used because its input parameter is the data stream handle returned by the |
|
|
Create a child process for command execution. |
Stub |
|
|
Perform a shell-like expansion of the string. |
Not implemented |
|
|
Free up the memory allocated for the results of calling the |
Not implemented |
|
Limitations on management of file handles
Interface |
Purpose |
Implementation |
Header file based on the POSIX.1-2008 standard |
|---|---|---|---|
|
Make a copy of the handle of an opened file. |
Handles of regular files, standard I/O streams, sockets and channels are supported. There is no guarantee that the lowest available handle will be received. |
|
|
Make a copy of the handle of an opened file. |
Handles of regular files, standard I/O streams, sockets and channels are supported. The handle of an opened file needs to be passed through the |
|
Part 2. Interaction between entities
The preceding part of the Guide shows how to configure interaction with the entities provided in KasperskyOS Community Edition. To do so, just add several strings to the init.yaml file and link the client library of the entity (vfs_remote).
But how do you create a server entity, or in other words, an application that provides functionality to other (client) entities? To do so, utilize IPC transport, auxiliary tools and libraries provided in KasperskyOS Community Edition.
This part of the Guide illustrates the following:
- Mechanism for interaction between entities in KasperskyOS
- Tools and libraries that implement transport
- Step-by-step actions for exchanging IPC messages
To simplify the descriptions, the examples in this part of the Guide are built without the ksm.module. For this reason, when examples are started, a notification WARNING! Booting an insecure kernel! is displayed. The third part of the Guide examines a solution security policy, use of security policies, and building ksm.module.
IPC transport tools
To set up interactions between entities, you do not have to implement the correct packaging and unpacking of messages from scratch. In addition, you do not have to write separate code for creating IPC channels.
To resolve these and other problems associated with IPC transport, KasperskyOS provides a special set of tools:
- NkKosTransport
- EDL, CDL and IDL descriptions
- NK compiler
- Init description and einit tool
- Service Locator
Combined use of these tools is shown in the echo example.
NkKosTransport
NkKosTransport is a convenient wrapper for the Call, Recv and Reply system calls. It lets you work separately with messages' constant parts and arenas.
The nk_transport_call(), nk_transport_recv() and nk_transport_reply() functions are used to call transport.
Example:
/* The nk_transport_recv () function executes the Recv system call.
* The request received from the client is inserted into req (constant part of the response) and
* req_arena (response arena). */
nk_transport_recv(&transport.base, (struct nk_message *)&req, &req_arena);
The NkKosTransport structure and methods for working with it are declared in the transport-kos.h file:
For more details about the constant part and the arena, refer to IPC message structure.
For more details about using NkKosTransport, refer to NkKosTransport.
EDL, CDL and IDL descriptions
The EDL, CDL and IDL languages are used to describe interfaces that implement server entities.
For more details, refer to Description of entities, components, and interfaces (EDL, CDL, IDL).
Description files (*.edl, *.cdl and *.idl) are processed by the NK compiler during the build. This results in the creation of the *.edl.h, *.cdl.h, and *.idl.h files, which contain the transport methods and types used on the client and on the server.
NK compiler
Based on the EDL-, CDL- and IDL descriptions, the NK compiler (nk-gen-c) generates a set of transport methods and types. The transport methods and types are needed for generating, sending, receiving and processing IPC messages.
Most important transport methods:
- Interface methods. When an interface method is called on the client, the server is sent an IPC request for calling the appropriate method.
- Dispatch methods (dispatchers). When receiving a request, the server calls the dispatcher, which in turn calls the implementation of the appropriate method.
Most important transport types:
- Types that define the structure of the constant part of a message. They are sent to interface methods, dispatchers and transport functions (
nk_transport_recv(),nk_transport_reply()). - Types of proxy objects. A proxy object is used as an argument in an interface method.
For more details, refer to Generated methods and types.
Init description and einit tool
The einit tool lets you automate the creation of code of the Einit initializing entity. This entity is the first to start when KasperskyOS is loaded. Then it starts the other entities and creates channels (connections) between them.
To enable the Einit entity to create a connection between entities A and B during startup, you need to specify the following in the init.yaml file:
init.yaml
# Start B
- name: B
# Start A
- name: A
connections:
# Create a connection with server entity B.
- target: B
# Name of the new connection: some_connection_to_B
id: some_connection_to_B
For more details, refer to Entity startup.
Service Locator
The Service Locator is a library containing the following functions:
ServiceLocatorConnect()lets you find out the client IPC handle of the channel with a specified name.ServiceLocatorRegister()lets you find out the server IPC handle of the channel with a specified name.ServiceLocatorGetRiid()lets you find out the RIID (Runtime Interface ID) using an interface implementation name.
The values of the IPC handle and RIID are used during NkKosTransport initialization.
To use Service Locator, you need to include the sl_api.h file in the entity code:
For more details, refer to Service Locator.
Page top
echo example
The echo example demonstrates the use of IPC transport.
It shows how to use the main tools that let you implement interaction between entities.
About the echo example
The echo example describes a basic case of interaction between two entities:
- The
Cliententity sends a number (value) to theServerentity. - The
Serverentity modifies this number and sends the new number (result) to theCliententity. - The
Cliententity prints theresultto the screen.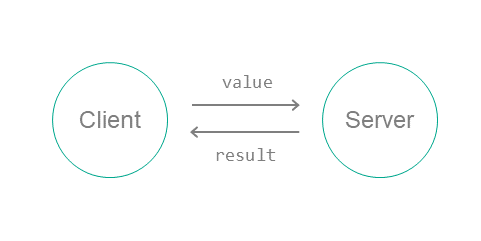
To set up this interaction between entities:
- Connect the
ClientandServerentities by using the init description. - On the server, implement an interface with a single
Pingmethod that has one input argument (the original number (value)) and one output argument (the modified number (result)).Description of the
Pingmethod in the IDL language:Ping(in UInt32 value, out UInt32 result);
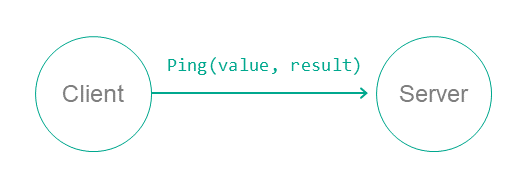
- Create static description files in the EDL, CDL and IDL languages. Use the NK compiler to generate files containing transport methods and types (proxy object, dispatchers, etc.).
- In the code of the
Cliententity, initialize all required objects (transport, proxy object, request structure, etc.) and call the interface method. - In the code of the
Serverentity, prepare all the required objects (transport, component dispatcher and entity dispatcher, etc.), accept the request from the client, process it and send a response.
The echo example consists of the following source files:
client/src/client.c– implementation of theCliententity.server/src/server.c– implementation of theServerentity.resources/Server.edl,resources/Client.edl,resources/Ping.cdl,resources/Ping.idl– static descriptions.init.yaml– init description.
Implementation of the Client entity in the echo example
The code of the Client entity uses the transport types and methods that will be generated during the solution build by the NK compiler based on the IDL description of the Ping interface.
However, to obtain the descriptions of types and signatures of methods required for implementing the entity, you can use the NK compiler immediately after creating an EDL description of the entity, CDL descriptions of components and IDL descriptions of the interfaces used for interaction. As a result, the required types and signatures of methods will be declared in the generated *.h files.
In the Client entity implementation, the following is required:
- Get the client IPC handle of the connection (channel) by using the
ServiceLocatorConnect()function.Input the name of the IPC
server_connectionpredefined in the init.yaml file. - Initialize
NkKosTransportby passing the obtained IPC handle to theNkKosTransport_Init()function. - Obtain the ID of the required interface (
RIID) by using theServiceLocatorGetRiid()function. - Input the full name of the
Pinginterface implementation. It consists of the names of the component instance (Echo.ping) and interface (ping) that were previously defined in Server.edl and Ping.cdl. - Initialize the proxy object by passing the transport and interface ID to the
Ping_proxy_init()function. - Prepare the request and response structures.
- Call the
Ping_Ping()interface method by passing the proxy object and the pointers to the request and response.
client.c
/* Files required for transport initialization. */
/* Description of the server interface used by the client entity. */
/* Client entity entry point. */
int main(int argc, const char *argv[])
{
NkKosTransport transport;
struct echo_Ping_proxy proxy;
int i;
fprintf(stderr, "Hello I'm client\n");
/* Get client IPC handle of
* "server_connection". */
Handle handle = ServiceLocatorConnect("server_connection");
assert(handle != INVALID_HANDLE);
/* Initialize IPC transport for interaction with the server entity. */
NkKosTransport_Init(&transport, handle, NK_NULL, 0);
/* Get Runtime Interface ID (RIID) for interface echo.Ping.ping.
* Here ping is the name of the echo.Ping component instance,
* echo.Ping.ping is the name of the Ping interface implementation. */
nk_iid_t riid = ServiceLocatorGetRiid(handle, "echo.Ping.ping");
assert(riid != INVALID_RIID);
/* Initialize proxy object by specifying transport (&transport)
* and ID of the server interface (riid). Each method
* of the proxy object will be implemented by sending a request to the server. */
echo_Ping_proxy_init(&proxy, &transport.base, riid);
/* Request and response structures */
echo_Ping_Ping_req req;
echo_Ping_Ping_res res;
/* Test loop. */
req.value = EXAMPLE_VALUE_TO_SEND;
for (i = 0; i < 10; ++i)
{
/* Call Ping interface method.
* Server will be sent a request for calling Ping interface method
* ping_comp.ping_impl with the value argument. Calling thread is locked
* until a response is received from the server. */
if (echo_Ping_Ping(&proxy.base, &req, NULL, &res, NULL) == rcOk)
{
/* Print "result" value from response
* (result is the output argument of the Ping method). */
fprintf(stderr, "result = %d\n", (int) res.result);
/* Include received "result" value into "value" argument
* to resend to server in next iteration. */
req.value = res.result;
}
else
fprintf(stderr, "Failed to call echo.Ping.Ping()\n");
}
return EXIT_SUCCESS;
}
Implementation of the Server entity in the echo example
The code of the Server entity uses the transport types and methods that will be generated during the solution build by the NK compiler based on the EDL description of the Server entity.
However, to obtain the types and signatures of methods required for implementing the entity, you can use the NK compiler immediately after creating an EDL description of the entity, CDL descriptions of components and IDL descriptions of the interfaces used for interaction. As a result, the required types and signatures of methods will be declared in the generated *.h files.
In the server entity implementation, the following is required:
- Implement the
Ping()method.The signature of the
Ping()method implementation must exactly match the signature of thePing_Ping()interface method that is declared in the Ping.idl.h file. - Get the server IPC handle of the connection (channel) by using the
ServiceLocatorRegister()function.Input the name of the IPC
server_connectionpredefined in the init.yaml file. - Initialize
NkKosTransportby passing the obtained IPC handle to theNkKosTransport_Init()function. - Prepare the request and response structures.
- Initialize the dispatch method (dispatcher) of the
Pingcomponent by using thePing_component_init()function. - Initialize the dispatch method (dispatcher) of the
Serverentity by using theServer_entity_init()function. - Receive a request by calling
nk_transport_recv(). - Process the received request by calling the
Server_entity_dispatch()dispatcher.The dispatcher calls the required implementation of the method based on the interface ID (
RIID) received from the client. - Send the response to the
Cliententity by callingnk_transport_reply().
server.c
/* Files required for transport initialization. */
/* Server entity descriptions in EDL. */
/* Type of interface implementing object. */
typedef struct IPingImpl {
struct echo_Ping base; // base interface of object
int step; // Additional parameters
} IPingImpl;
/* Implementation of the Ping method. */
static nk_err_t Ping_impl(struct echo_Ping *self,
const echo_Ping_req *req,
const struct nk_arena* req_arena,
echo_Ping_res* res,
struct nk_arena* res_arena)
{
IPingImpl *impl = (IPingImpl *)self;
/* Increment value in the client request by
* one step and include into result argument that will be
* sent to the client in the server response. */
res->Ping.result = req->Ping.value + impl->step;
return NK_EOK;
}
/* IPing object constructor.
* step is the number by which the input value is increased. */
static struct echo_Ping *CreateIPingImpl(int step)
{
/* Table of IPing interface method implementations. */
static const struct echo_Ping_ops ops = {
.Ping = Ping_impl
};
/* Object implementing the interface. */
static struct IPingImpl impl = {
.base = {&ops}
};
impl.step = step;
return &impl.base;
}
/* Server entry point. */
int main(void)
{
NkKosTransport transport;
ServiceId iid;
/* Get server IPC handle of "server_connection". */
Handle handle = ServiceLocatorRegister("server_connection", NULL, 0, &iid);
assert(handle != INVALID_HANDLE);
/* Initialize transport to client. */
NkKosTransport_Init(&transport, handle, NK_NULL, 0);
/* Prepare the structures of the request to the server entity: constant
* part and arena. Because none of the methods of the server entity has
* sequence type arguments, only constant parts are used
* request and response. Arenas are effectively unused. However, the valid
* arenas of the request and response must be passed to
* the server transport methods (nk_transport_recv, nk_transport_reply) and
* the dispatch method server_entity_dispatch. */
echo_Server_entity_req req;
char req_buffer[echo_Server_entity_req_arena_size];
struct nk_arena req_arena = NK_ARENA_INITIALIZER(req_buffer, req_buffer + sizeof(req_buffer));
/* Prepare response structures: constant part and arena. */
echo_Server_entity_res res;
char res_buffer[echo_Server_entity_res_arena_size];
struct nk_arena res_arena = NK_ARENA_INITIALIZER(res_buffer, res_buffer + sizeof(res_buffer));
/* Initialize ping component dispatcher. 3 is the value of the "step",
* which is the number by which the input value is increased. */
echo_Ping_component component;
echo_Ping_component_init(&component, CreateIPingImpl(3));
/* Initialize server entity dispatcher. */
echo_Server_entity entity;
echo_Server_entity_init(&entity, &component);
fprintf(stderr, "Hello I'm server\n");
/* Dispatch loop implementation. */
do
{
/* Reset request/response buffers. */
nk_req_reset(&req);
nk_arena_reset(&req_arena);
nk_arena_reset(&res_arena);
/* Wait for request from client entity. */
if (nk_transport_recv(&transport.base, &req.base_, &req_arena) != NK_EOK) {
fprintf(stderr, "nk_transport_recv error\n");
} else {
/* Process received request by calling Ping_impl implementation
* of the requested Ping interface method. */
echo_Server_entity_dispatch(&entity, &req.base_, &req_arena, &res.base_, &res_arena);
}
/* Send response. */
if (nk_transport_reply(&transport.base, &res.base_, &res_arena) != NK_EOK) {
fprintf(stderr, "nk_transport_reply error\n");
}
}
while (true);
return EXIT_SUCCESS;
}
Description files in the echo example
Description of the Client entity
The Client entity does not implement an interface, so all you need to do is declare the entity name in its EDL description:
Client.edl
/* Description of the Client entity. */
entity echo.Client
Server entity description
The description of the Server entity must contain information stating that it implements the Ping interface. Using static descriptions, you need to insert the implementation of the Ping interface into the new component (for example, Ping) and insert the instance of this component into the Server entity.
The Server entity contains an instance of the Ping component:
Server.edl
/* Description of the Server entity. */
entity echo.Server
/* Server is a named instance of the echo.Ping component. */
components {
Server: echo.Ping
}
The Ping component contains the implementation of the Ping interface:
Ping.cdl
/* Description of the Ping component. */
component echo.Ping
/* ping is the Ping interface implementation. */
interfaces {
ping: echo.Ping
}
The Ping package contains a declaration of the Ping interface:
Ping.idl
/* Description of the Ping package. */
package echo.Ping
interface {
Ping(in UInt32 value, out UInt32 result);
}
Init description
To enable the Client entity to call a method of the Server entity, a connection (IPC channel) must be created between them.
To do so, in the init description indicate that the Client and Server entities must be started and connect them:
init.yaml
entities:
- name: echo.Client
connections:
- target: echo.Server
id: server_connection
- name: Server
The Server entity is indicated as - target, so it will perform the server entity role, meaning it will accept requests from the Client entity and respond to them.
The created IPC channel is named server_connection. You can obtain the handle of this channel by using the Service Locator.
Building and running the echo example
See the Building and running examples section.
The build scheme for the echo example looks as follows:
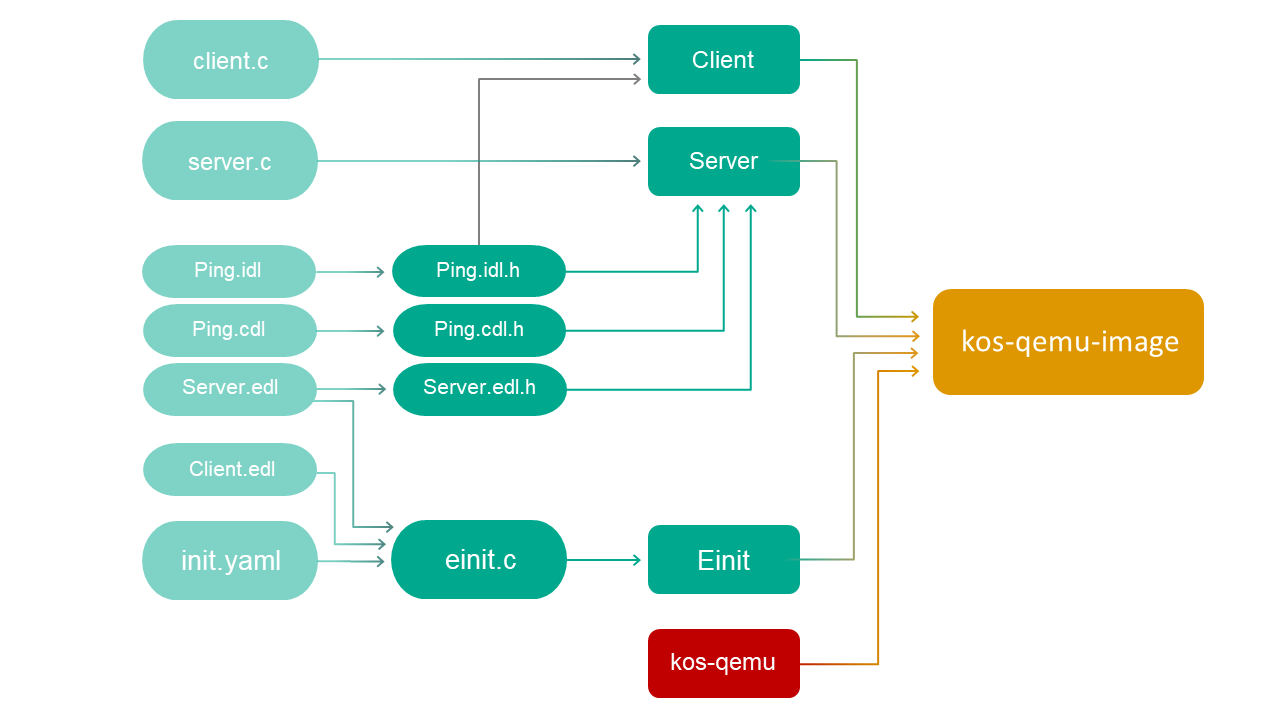
Part 3. Solution security policy
Preceding parts of the Guide show how to implement interaction between entities. For simplicity, all solutions were built without a security module (ksm.module), which is provided by Kaspersky Security System.
Kaspersky Security System is the subsystem that monitors queries sent between entities and other events. This means that you can divide a solution into entities, manage their interactions, and thereby enhance the security of the solution.
This part of the Guide illustrates the following:
- PSL language syntax
- Security models supported in Kaspersky Security System
- Example of a solution security policy
General information about a solution security policy description
In simplified terms, a solution security policy description consists of bindings that associate descriptions of security events with calls of methods provided by objects of security models. A security model object is an instance of a class whose definition is a formal representation of the security model (in a PSL file). Formal representations of security models contain signatures of methods of security models that determine the permissibility of interactions between different entities and between entities and the KasperskyOS kernel. These methods are divided into two types:
- Rules of security models are methods of security models that return a "granted" or "denied" result. Security model rules can change security contexts (for information about a security context, see "Managing access to resources").
- Expressions of security models are methods of security models that return values that can be used as input data for other methods of security models.
A security model object provides methods that are specific to one security model and stores the parameters used by these methods (for example, the initial state of a finite-state machine or the size of a container for specific data). The same object can be applied for multiple resources. However, this object will independently use the security contexts of these resources. Likewise, multiple objects of one or more security models can be applied for the same resource. In this case, different objects will use the security context of the same resource without any reciprocal influence.
Security events serve as signals indicating the initiation of interaction between different entities and between entities and the KasperskyOS kernel. Security events include the following events:
- Clients send IPC requests.
- Servers or the kernel send IPC responses.
- The kernel or entities initialize the startup of entities.
- The kernel starts.
- Entities query the Kaspersky Security Module via the security interface.
Security events are processed by the security module.
Security models
The KasperskyOS SDK provides PSL files that describe the following security models:
- Base – methods that implement basic logic.
- Pred – methods that implement comparison operations.
- Bool – methods that implement logical operations.
- Math – methods that implement integer arithmetic operations.
- Struct – methods that provide access to structural data elements (for example, access to parameters of interface methods transmitted in IPC messages).
- Regex – methods for text data validation based on regular expressions.
- HashSet – methods for working with one-dimensional tables associated with resources.
- StaticMap – methods for working with two-dimensional "key–value" tables associated with resources.
- Flow – methods for working with finite-state machines associated with resources.
Security event processing by the Kaspersky Security Module
The Kaspersky Security Module calls all methods (rules and expressions) of security models related to an occurring security event. If all rules returned the "granted" result, the security module returns the "granted" decision. If even one rule returned the "denied" result, the security module returns the "denied" decision.
If even one method related to an occurring security event cannot be correctly performed, the security module returns the "denied" decision.
If no rule is related to an occurring security event, the security module returns the "denied" decision. In other words, all interactions between solution components and between those components and the KasperskyOS kernel are denied by default (Default Deny principle) unless those interactions are explicitly allowed by the solution security policy.
Security audit
A security audit (hereinafter also referred to as an audit) is the following sequence of actions. The Kaspersky Security Module notifies the KasperskyOS kernel about decisions made by this module. Then the kernel forwards this data to the system program Klog, which decodes this information and forwards it to the system program KlogStorage (data is transmitted via IPC). The latter prints the received data via standard output or saves it to a file.
Security audit data (hereinafter referred to as audit data) refers to information about decisions made by the Kaspersky Security Module, which includes the actual decisions ("granted" or "denied"), descriptions of security events, results from calling methods of security models, and data on incorrect IPC messages.
Page top
PSL language syntax
Basic rules
- Declarations can be listed in any sequence in a file.
- One declaration can be written to one or multiple lines. The second and subsequent lines of the declaration must be written with indentations relative to the first line. The closing brace that completes the declaration can be written on the top line.
- A multi-line declaration utilizes different-sized indentations to reflect the nesting of constructs comprising this declaration. Lines of a multi-line construct enclosed in braces and the opening brace must be written with an indentation relative to the first line of this construct. The closing brace of a multi-line construct can be written with an indentation or on the first line of the construct.
- Single-line comments and multi-line comments are supported:
/* This is a comment
And this, too */
// Another comment
Types of declarations
The PSL language has the following types of declarations:
- Describing the global parameters of a solution security policy
- Including PSL files
- Including EDL files
- Creating objects of security models
- Binding methods of security models to security events
- Describing security audit profiles
Describing the global parameters of a solution security policy
Global parameters include the following parameters of a solution security policy:
- Execute interface used by the KasperskyOS kernel when querying the Kaspersky Security Module to notify it about kernel startup or about initiating the startup of entities by the kernel or other entities. To assign this interface, use the following declaration:
execute: kl.core.Execute
KasperskyOS currently supports only one
Executeinterface defined in the file namedkl/core/Execute.idl. (This interface consists of onemainmethod, which has no parameters and does not perform any actions. Themainmethod is reserved for potential future use.) - [Optional] Global security audit profile and initial security audit level. To define these parameters, use the following declaration:
audit default = <security audit profile name> <security audit level>
Example:
audit default = global 0
The default global profile is the
emptysecurity audit profile described in the file namedtoolchain/include/nk/base.pslfrom the KasperskyOS SDK, and the default security audit level is 0.
Including PSL files
To include a PSL file, use the following declaration:
use <link to PSL file._>
The link to the PSL file is the file path (without the extension and dot before it) relative to the directory that is included in the set of directories where the nk-psl-gen-c compiler searches for PSL-, IDL-, CDL-, and EDL files. (This set of directories is defined by parameters of the makekss script in the format "-I <path to files>".) A dot is used as a separator in a path description. A declaration is ended by the ._ character sequence.
Example:
use policy_parts.flow_part._
This declaration includes the flow_part.psl file, which is located in the policy_parts directory. The policy_parts directory must reside in one of the directories where the nk-psl-gen-c compiler searches for PSL-, IDL-, CDL-, and EDL files. For example, the policy_parts directory may reside in the same directory as the PSL file containing this declaration.
Including a PSL file containing a formal representation of a security model
To use the methods of a required security model, include a PSL file containing a formal representation of this model. PSL files containing formal representations of security models are located in the <KOS_KASPERSKY> SDK at the following path:
toolchain/include/nk
Example:
/* Include the base.psl file containing a formal representation of the
* Base security model */
use nk.base._
/* Include the flow.psl file containing a formal representation of the
* Flow security model */
use nk.flow._
/* The nk-psl-gen-c compiler must be configured to search for
* PSL-, IDL-, CDL-, and EDL files in the toolchain/include directory. */
Including EDL files
To include an EDL file for the KasperskyOS kernel, use the following declaration:
use EDL kl.core.Core
To include an EDL file for an application or system program (or for a driver), use the following declaration:
use EDL <link to EDL file>
The link to the EDL file is the file path (without the extension and dot before it) relative to the directory that is included in the set of directories where the nk-psl-gen-c compiler searches for PSL-, IDL-, CDL-, and EDL files. (This set of directories is defined by parameters of the makekss script in the format "-I <path to files>".) A dot is used as a separator in a path description.
Example:
/* Include the UART.edl file, which is located
* in the KasperskyOS SDK at the path sysroot-*-kos/include/kl/drivers. */
use EDL kl.drivers.UART
/* The nk-psl-gen-c compiler must be configured to search for
* PSL-, IDL-, CDL-, and EDL files in the sysroot-*-kos/include directory. */
The nk-psl-gen-c compiler finds IDL- and CDL files via EDL files because EDL files contain links to the corresponding CDL files, and the CDL files contain links to the corresponding CDL- and IDL files.
Creating objects of security models
To call the methods of a required security model, create an object for this security model.
To create a security model object, use the following declaration:
policy object <security model object name : security model name> {
[security model object parameters]
}
The parameters of a security model object are specific to the security model. A description of parameters and examples of creating objects of various security models are provided in the "Security models" section.
Page top
Binding methods of security models to security events
To bind methods of security models to a security event, use the following declaration:
<security event type> [security event selectors] {
[security audit profile]
<called security model rules>
}
Security event type
The following specifiers are used to define the security event type:
request– sending IPC requests.response–sending IPC responses.error– sending IPC responses containing information about errors.security– entities attempting to query the Kaspersky Security Module via the security interface.execute– initializing the startups of entities or the startup of the KasperskyOS kernel.
When entities interact with the security module, they use a mechanism that is different from IPC. However, when developing a solution security policy, queries sent by entities to the security module can be viewed as the transfer of IPC messages because entities actually transmit messages to the security module (the recipient is not indicated in these messages).
The IPC mechanism is not used to start entities. However, when the startup of an entity is initiated, the kernel queries the security module and provides information about the initiator of the startup and the started entity. For this reason, the author of a solution security policy can consider the startup of an entity to be analogous to sending an IPC message from the startup initiator to the started entity. When the kernel is started, this is analogous to the kernel sending an IPC message to itself.
Security event selectors
Security event selectors let you clarify the description of the defined type of security event. The following selectors are used:
src=<kernel/entity class name> – entities of the defined class or the KasperskyOS kernel are the sources of IPC messages.dst=<kernel/entity class name> – entities of the defined class or the kernel are the recipients of IPC messages.interface=<interface name>- Clients attempt to query servers or the kernel via the interface with the defined name.
- Entities query the Kaspersky Security Module via the security interface with the defined name.
- The kernel or servers send clients the results from processing queries via the interface with the defined name.
endpoint=<qualified service name> – describes the following security events:- Clients attempt to use the service of servers or the kernel with the defined name.
- The kernel or servers send clients the results from using the service with the defined name.
method=<method name> – describes the following security events:- Clients attempt to query servers or the kernel by calling the method of the service with the defined name.
- Entities query the security module by calling the method of the security interface with the defined name.
- The kernel or servers send clients the results from calling the method of the service with the defined name.
- The kernel notifies the security module about its startup by calling the method of the execute interface with the defined name.
- The kernel initiates the startup of entities by calling the method of the execute interface with the defined name.
- Entities initiate the startup of other entities, which results in the kernel calling the method of the execute interface with the defined name.
The qualified name of the service has the format <path to service.service name>. The path to the service is a sequence of component instance names (from the formal specification of the solution component) separated by dots. Among these component instances, each subsequent component instance is embedded into the previous one, and the last one provides the service with the defined name.
Entity classes, interfaces, services, and methods must be named the same as they are in the IDL, CDL, and EDL descriptions. The kernel must be named kl.core.Core.
If selectors are not specified, the participants of a security event are considered to be all events and the kernel (except security events in which the kernel is not involved).
You can use combinations of selectors. Selectors can be separated by commas.
There are restrictions on the use of selectors. The interface and endpoint selectors cannot be used for security events of the execute type. The dst and endpoint selectors cannot be used for security events of the security type.
There are also restrictions on combinations of selectors. For security events of the request, response and error types, the method selector can only be used together with one or both of the endpoint and interface selectors. (The method, endpoint and interface selectors must be consistent, which means that the method must correspond to the service or interface, and the service must correspond to the interface.) For security events of the request type, the endpoint selector can be used only together with the dst selector. For security events of the response and error types, the endpoint selector can be used only together with the src selector.
Security audit profile
A security audit profile is defined by the construct audit <security audit profile name>. If a security audit profile is not defined, the global security audit profile is used.
Called rules of security models
Called rules of security models are defined by a list from the following type of constructs:
[security model object name.]<security model rule name> <parameter>
Input data for security model rules may be values returned by expressions of security models. The following construct is used to call a security model expression:
[security model object name.]<security model expression name> <parameter>
Parameters of interface methods can also be used as input data for methods of security models (rules and expressions). (For details about obtaining access to parameters of interface methods, see "Struct security model"). In addition, input data for methods of security models can also be the SID values of entities and the KasperskyOS kernel that are defined by the src_sid and dst_sid reserved words. The first reserved word refers to the SID of the entity (or kernel) that is the source of the IPC message. The second reserved word refers to the SID of the entity (or kernel) that is the recipient of the IPC message (dst_sid cannot be used for queries to the Kaspersky Security Module).
You do not have to indicate the security model object name or use operators for calls of some rules and expressions of security models. For details about the methods of security models, see "Security models".
Embedded constructs for binding methods of security models to security events
In one declaration, you can bind methods of security models to different security events of the same type. To do so, use the match sections that consist of the following types of constructs:
match <security event selectors> {
[security audit profile]
<called security model rules>
}
Match sections can be embedded into another match section. A match section simultaneously uses its own security event selectors and the security event selectors at the level of the declaration and all match sections in which this match section is "wrapped". By default, a match section applies the security audit profile of its own container (match section of the preceding level or the declaration level), but you can define a separate security audit profile for the match section.
In one declaration, you can define different variants for processing a security event depending on the conditions in which this event occurred (for example, depending on the state of the finite-state machine associated with the resource). To do so, use the conditional sections that are elements of the following construct:
choice <call of the security model expression that verifies fulfillment of conditions> {
"<condition 1>" : [{] // Conditional section 1
[security audit profile]
<called security model rules>
[}]
"<condition 2>" : ... // Conditional section 2
...
_ : ... // Conditional section, if no condition is fulfilled.
}
The choice construct can be used within a match section. A conditional section uses the security event selectors and security audit profile of its own container, but you can define a separate security audit profile for a conditional section.
If multiple conditions described in the choice construct are simultaneously fulfilled when a security event is processed, only the one conditional section corresponding to the first matching condition on the list is triggered.
You can verify the fulfillment of conditions in the choice construct only by using the expressions that are specially intended for this purpose. Some security models contain these expressions (for more details, see "Security models").
Describing security audit profiles
To perform a security audit, you need to associate objects of security models with a security audit profile(s). A security audit profile (hereinafter also referred to as an audit profile) combines security audit configurations (hereinafter also referred to as audit configurations), each of which defines the objects of security models covered by the audit, and the audit completion conditions. You can define a global audit profile (for more details, see "Describing the global parameters of a solution security policy") and/or assign an audit profile(s) at the level of declarations for binding security model methods to security events, and/or assign an audit profile(s) at the level of match sections or choice sections (for more details, see "Binding methods of security models to security events").
Regardless of whether or not audit profiles are being used, audit data contains information about "denied" decisions that were made by the Kaspersky Security Module when IPC messages were invalid and when processing security events that are not associated with any security model rule.
To describe a security audit profile, use the following declaration:
audit profile <security audit profile name> =
{ <security audit level>:
// Description of the security audit configuration
{ <security model object name>:
{ kss: <security audit completion conditions linked to the results
from calls of security model rules>
[, security audit completion conditions specific to the security model]
}
[,]...
...
}
[,]...
...
}
Security audit level
The security audit level (hereinafter referred to as the audit level) is a global parameter of a solution security policy and consists of an unsigned integer that defines the active security audit configuration. (The word "level" here refers to the configuration variant and does not necessarily involve a hierarchy.) The audit level can be changed during operation of the Kaspersky Security Module. This is done by using a specialized method of the Base security model that is called when entities query the security module via the security interface (for more details, see "Base security model"). The initial audit level is assigned together with the global audit profile (for more details, see "Describing the global parameters of a solution security policy"). An empty audit profile can be explicitly assigned as the global audit profile.
You can define multiple audit configurations in an audit profile. In different configurations, different security model objects can be covered by the audit and different audit completion conditions can be applied. Audit configurations in a profile correspond to different audit levels. If a profile does not have an audit configuration corresponding to the current audit level, the security module will activate the configuration that corresponds to the next-lowest audit level. If a profile does not have an audit configuration for an audit level equal to or less than the current level, the security module will not use this profile (in other words, an audit will not be performed for this profile).
Audit levels can be used to regulate the level of detail of an audit, for example. The higher the audit level, the higher the level of detail. The higher the level of detail, the more security model objects are covered by the audit and/or the less restrictions are applied in the audit completion conditions.
Another example of applying audit levels is the capability to shift the audit from one subsystem to another subsystem (for example, shift an audit related to drivers to an audit related to applications, or shift an audit related to the network subsystem to an audit related to the graphic subsystem).
Name of the security model object
The security model object name is indicated so that the methods provided by this object can be covered by the audit. These methods will be covered by the audit whenever they are called, provided that the audit completion conditions are observed.
Information about the decisions of the Kaspersky Security Module contained in audit data includes the overall decision of the security module as well as the results from calling individual methods of security modules covered by the audit. To ensure that information about a security module decision is included in audit data, at least one method called during security event processing must be covered by the audit.
The names of security model objects and the names of methods provided by these objects are included in the audit data.
Security audit completion conditions
Security audit completion conditions are defined separately for each object of a security model.
To define audit completion conditions related to the results from calling rules of security models, use the following constructs:
["granted"]– the audit is performed if the called rule returned the "granted" result.["denied"]– the audit is performed if the called rule returned the "denied" result.["granted", "denied"]– the audit is performed if the called rule returned the "granted" or "denied" result.[]– the audit is not performed, regardless of the result returned by the called rule.
Audit completion conditions related to results from calling rules are not applied to expressions. These conditions must be defined (with any possible construct) even if the security model contains only expressions because this is required by the PSL language syntax.
Audit completion conditions specific to security models are defined by constructs specific to these models. These conditions are applied to rules and to expressions. For example, one of these conditions can be the state of a finite-state machine.
Security audit profile for a security audit route
A security audit route includes the kernel and the Klog and KlogStorage entities, which are connected by IPC channels based on the "kernel – Klog – KlogStorage" scenario. Security model methods that are associated with transmission of audit data via this route must not be covered by the audit. Otherwise, this will lead to an avalanche of audit data because any data transmission will give rise to new data.
To "suppress" an audit that was defined by a profile with a wider scope (for example, by a global profile or a profile at the level of a declaration for binding security model methods to security events), assign an empty audit profile at the level of the declaration for binding security model methods to security events or at the level of the match section or choice section.
PSL data types
The data types supported in the PSL language are presented in the table below.
PSL data types
Designations of types |
Description of types |
|---|---|
|
Unsigned integer |
|
Signed integer |
|
Boolean type The Boolean type includes two values: |
|
Text type |
|
The |
|
Text literal A text literal includes one immutable text value. Example definitions of text literals:
|
|
Integer literal An integer literal includes one immutable integer value. Example definitions of integer literals:
|
< |
Variant type A variant type combines two or more types and may perform the role of either of them. Examples of definitions of variant types:
|
|
Dictionary A dictionary consists of one or more types of fields. A dictionary cannot be blank. Examples of dictionary definitions:
|
|
Tuple A tuple consists of fields of one or more types in the order in which the types are listed. A tuple cannot be blank. Examples of tuple definitions:
|
|
Set A set includes zero or more unique elements of the same type. Examples of set definitions:
|
|
List A list includes zero or more elements of the same type. Examples of list definitions:
|
|
Associative array An associative array includes zero or more entries of the "key-value" type with unique keys. Example of defining an associative array:
|
|
Array An array includes a defined number of elements of the same type. Example of defining an array:
|
|
Sequence A sequence includes from zero to the defined number of elements of the same type. Example of defining a sequence:
|
Aliases of certain PSL types
The nk/base.psl file from the KasperskyOS SDK defines the data types that are used as the types of parameters (or structural elements of parameters) and returned values for methods of various security models. Aliases and definitions of these types are presented in the table below.
Aliases and definitions of certain data types in PSL
Type alias |
Type definition |
|---|---|
|
Unsigned integer
|
|
Signed integer
|
|
Integer
|
|
Scalar literal
|
|
Literal
|
|
Type of security identifier (SID)
|
|
Type of security identifier (SID)
|
|
Dictionary containing fields for the SID and handle permissions mask
|
|
Type of data received by expressions of security models called in the
|
|
Type of data defining the security audit completion conditions
|
Mapping IDL types to PSL types
Data types of the IDL language are used to describe the parameters of interface methods. The input data for security model methods have types from the PSL language. The set of data types in the IDL language differs from the set of data types in the PSL language. Parameters of interface methods transmitted in IPC messages can be used as input data for methods of security models, so the author of a solution security policy needs to understand which IDL types are mapped to PSL types.
Integer types of IDL are mapped to integer types of PSL and to variant types of PSL that combine these integer types (including with other types). For example, signed integer types of IDL are mapped to the Signed type in PSL, and integer types of IDL are mapped to the ScalarLiteral type in PSL.
The Handle type in IDL is mapped to the HandleDesc type in PSL.
Unions and structures of IDL are mapped to PSL dictionaries.
Arrays and sequences of IDL are mapped to arrays and sequences of PSL, respectively.
String buffers in IDL are mapped to the text type in PSL.
Byte buffers in IDL are not currently mapped to PSL types, so the data contained in byte buffers cannot be used as inputs for security model methods.
Page top
Example of a basic solution security policy
Below is a basic solution security policy in which "everything is allowed" for a solution consisting of Client and Server user entities, an Einit entity, and the KasperskyOS kernel provided by the kl.core.Core entity.
This policy allows the following:
- All interactions between entities (sending any requests and responses)
- Startup of all entities
Use of this security policy is unacceptable in real solutions. A more complex solution security policy is shown in the ping example.
security.psl
execute: kl.core.Execute
use nk.base._
use EDL Einit
use EDL kl.core.Core
use EDL Client
use EDL Server
/* Startup of entities is allowed */
execute {
grant ()
}
/* Sending and receiving requests, responses and errors is allowed.
This means that any entity can call the methods of other entities and the kernel. */
request {
grant ()
}
response {
grant ()
}
error {
grant ()
}
/* Whenever the Kaspersky Security Module is queried,
* the "allowed" decision will always be received. */
security {
grant ()
}
Pred security model
The Pred security model lets you perform comparison operations.
A PSL file containing a description of the Pred security model is located in the KasperskyOS SDK at the following path:
toolchain/include/nk/basic.psl
Pred security model object
The basic.psl file contains a declaration that creates a Pred security model object named pred. Consequently, inclusion of the basic.psl file into the solution security policy description will create a Pred security model object by default.
A Pred security model object does not have any parameters and cannot be covered by a security audit.
It is not necessary to create additional Pred security model objects.
Pred security model methods
A Pred security model contains expressions that perform comparison operations and return values of the Boolean type. To call these expressions, use the following comparison operators:
- <
ScalarLiteral>==<ScalarLiteral> – "equals". - <
ScalarLiteral>!=<ScalarLiteral> – "does not equal". - <
Number><<Number> – "is less than". - <
Number><=<Number> – "is less than or equal to". - <
Number>><Number> – "is greater than". - <
Number>>=<Number> – "is greater than or equal to".
The Pred security model also contains the empty expression that lets you determine whether data contains its own structural elements. This expression returns values of the Boolean type. If data does not contain its own structural elements (for example, a set is empty), the expression returns true, otherwise it returns false. To call the expression, use the following construct:
pred.empty <Text | Set | List | Map | ()>
Bool security model
The Bool security model lets you perform logical operations.
A PSL file containing a description of the Bool security model is located in the KasperskyOS SDK at the following path:
toolchain/include/nk/basic.psl
Bool security model object
The basic.psl file contains a declaration that creates a Bool security model object named bool. Consequently, inclusion of the basic.psl file into the solution security policy description will create a Bool security model object by default.
A Bool security model object does not have any parameters and cannot be covered by a security audit.
It is not necessary to create additional Bool security model objects.
Bool security model methods
The Bool security model contains expressions that perform logical operations and return values of the Boolean type. To call these expressions, use the following logical operators:
!<Boolean> – "logical NOT".- <
Boolean>&&<Boolean> – "logical AND". - <
Boolean>||<Boolean> – "logical OR". - <
Boolean>==><Boolean> – "implication" (!<Boolean>||<Boolean>).
The Bool security model also contains the all, any and cond expressions.
The expression all performs a "logical AND" for an arbitrary number of values of Boolean type. It returns values of the Boolean type. It returns true if an empty list of values ([]) is passed via the parameter. To call the expression, use the following construct:
bool.all <List<Boolean>>
The expression any performs a "logical OR" for an arbitrary number of values of Boolean type. It returns values of the Boolean type. It returns false if an empty list of values ([]) is passed via the parameter. To call the expression, use the following construct:
bool.any <List<Boolean>>
cond expression performs a ternary conditional operation. Returns values of the ScalarLiteral type. To call the expression, use the following construct:
bool.cond
{ if : <Boolean> // Condition
, then : <ScalarLiteral> // Value returned when the condition is true
, else : <ScalarLiteral> // Value returned when the condition is false
}
In addition to expressions, the Bool security model includes the assert rule that works the same as the rule of the same name included in the Base security model.
Math security model
The Math security model lets you perform integer arithmetic operations.
A PSL file containing a description of the Math security model is located in the KasperskyOS SDK at the following path:
toolchain/include/nk/basic.psl
Math security model object
The basic.psl file contains a declaration that creates a Math security model object named math. Consequently, inclusion of the basic.psl file into the solution security policy description will create a Math security model object by default.
A Math security model object does not have any parameters and cannot be covered by a security audit.
It is not necessary to create additional Math security model objects.
Math security model methods
The Math security model contains expressions that perform integer arithmetic operations. To call a part of these expressions, use the following arithmetic operators:
- <
Number>+<Number> – "addition". Returns values of theNumbertype. - <
Number>-<Number> – "subtraction". Returns values of theNumbertype. - <
Number>*<Number> – "multiplication". Returns values of theNumbertype.
The other expressions are as follows:
neg<Signed> – "change number sign". Returns values of theSingedtype.abs<Singed> – "get module of number". Returns values of theSingedtype.sum<List<Number>> – "add numbers from list". Returns values of theNumbertype. It returns0if an empty list of values ([]) is passed via the parameter.product<List<Number>> – "multiply numbers from list". Returns values of theNumbertype. It returns1if an empty list of values ([]) is passed via the parameter.
To call these expressions, use the following construct:
math.<expression name> <parameter>
Struct security model
The Struct security model lets you obtain access to structural data elements.
A PSL file containing a description of the Struct security model is located in the KasperskyOS SDK at the following path:
toolchain/include/nk/basic.psl
Struct security model object
The basic.psl file contains a declaration that creates a Struct security model object named struct. Consequently, inclusion of the basic.psl file into the solution security policy description will create a Struct security model object by default.
A Struct security model object does not have any parameters and cannot be covered by a security audit.
It is not necessary to create additional Struct security model objects.
Struct security model methods
The Struct security model contains expressions that provide access to structural data elements. To call these expressions, use the following constructs:
- <
{...}>.<field name> – "get access to dictionary field". the type of returned data corresponds to the type of dictionary field. - <
List | Set | Sequence | Array>.[<element number>]– "get access to data element". The type of returned data corresponds to the type of elements. The numbering of elements starts with zero. When out of bounds of dataset, the expression terminates with an error and the Kaspersky Security Module returns the "denied" decision. - <
HandleDesc>.handle– "get SID". Returns values of theHandletype. (For details on the correlation between handles and SID values, see "Managing access to resources"). - <
HandleDesc>.rights– "get handle permissions mask". Returns values of theUInt32type.
Parameters of interface methods are saved in a special dictionary named message. To obtain access to an interface method parameter, use the following construct:
message.<interface method parameter name>
The parameter name is specified in accordance with the IDL description.
To obtain access to structural elements of parameters, use the constructs corresponding to expressions of the Struct security model.
Page top
Base security model
The Base security model lets you implement basic logic.
A PSL file containing a description of the Base security model is located in the KasperskyOS SDK at the following path:
toolchain/include/nk/base.psl
Base security model object
The base.psl file contains a declaration that creates a Base security model object named base. Consequently, inclusion of the base.psl file into the solution security policy description will create a Base security model object by default. Methods of this object can be called without indicating the object name.
A Base security model object does not have any parameters.
A Base security model object can be covered by a security audit. There are no audit completion conditions specific to the Base security model.
It is necessary to create additional objects of the Base security model in the following cases:
- You need to configure a security audit differently for different objects of the Base security model (for example, you can apply different audit profiles or different audit configurations of the same profile for different objects).
- You need to distinguish between calls of methods provided by different objects of the Base security model (audit data includes the name of the security model method and the name of the object that provides this method, so you can verify that the method of a specific object was called).
Base security model methods
The Base security model contains the following rules:
grant ()It has a parameter of the
()type. It returns the "granted" result.Example:
/* A client of the foo class is allowed to query
* a server of the bar class. */
request src=foo dst=bar { grant () }
assert<Boolean>It returns the "granted" result if the
truevalue is passed via the parameter. Otherwise it returns the "denied" result.Example:
/* Any client in the solution will be allowed to query a server of the foo class
* by calling the Send method of the net.Net service if the port parameter of the Send method
* will be used to pass a value greater than 80. Otherwise any client in the solution
* will be prohibited from querying a server of the foo class by calling the Send method
* of the net.Net service. */
request dst=foo endpoint=net.Net method=Send { assert (message.port > 80) }
deny<Boolean | ()>It returns the "denied" result if the
trueor()value is passed via the parameter. Otherwise it returns the "granted" result.Example:
/* A server of the foo class is not allowed to respond
* to a client of the bar class. */
response src=foo dst=bar { deny () }
set_level<UInt8>It sets the security audit level equal to the value passed via this parameter. It returns the "granted" result. (For more details about the security audit level, see "Describing security audit profiles".)
Example:
/* An entity of the foo class will receive the "allowed" decision from the
* Kaspersky Security Module if it calls the SetAuditLevel security interface method
* to change the security audit level. */
security src=foo method=SetAuditLevel { set_level (message.audit_level) }
Regex security model
The Regex security model lets you implement text data validation based on statically defined regular expressions.
A PSL file containing a description of the Regex security model is located in the KasperskyOS SDK at the following path:
toolchain/include/nk/regex.psl
Regex security model object
The regex.psl file contains a declaration that creates a Regex security model object named re. Consequently, inclusion of the regex.psl file into the solution security policy description will create a Regex security model object by default.
A Regex security model object does not have any parameters.
A Regex security model object can be covered by a security audit. You can also define the audit completion conditions specific to the Regex security model. To do so, use the following constructs in the audit configuration description:
emit : ["match"]– the audit is performed if thematchmethod is called.emit : ["select"]– the audit is performed if theselectmethod is called.emit : ["match", "select"]– the audit is performed if thematchorselectmethod is called.emit : []– the audit is not performed.
It is necessary to create additional objects of the Regex security model in the following cases:
- You need to configure a security audit differently for different objects of the Regex security model (for example, you can apply different audit profiles or different audit configurations of the same profile for different objects).
- You need to distinguish between calls of methods provided by different objects of the Regex security model (audit data includes the name of the security model method and the name of the object that provides this method, so you can verify that the method of a specific object was called).
Regex security model methods
The Regex security model contains the following expressions:
match {text :<Text>, pattern :<Text>}Returns a value of the
Booleantype. If the specifiedtextmatches thepatternregular expression, it returnstrue. Otherwise it returnsfalse.Example:
assert (re.match {text : message.text, pattern : "^[0-9]*$"})
select {text :<Text>}It is intended to be used as an expression that verifies fulfillment of the conditions in the
choiceconstruct (for details on thechoiceconstruct, see "Binding methods of security models to security events"). It checks whether the specifiedtextmatches regular expressions. Depending on the results of this check, various options for security event processing can be performed.Example:
choice (re.select {text : "hello world"}) {
"^hello .*": grant ()
".*world$" : grant ()
_ : deny ()
}
HashSet security model
The HashSet security model lets you associate resources with one-dimensional tables of unique values of the same type, add or delete these values, and check whether a defined value is in the table. For example, an entity whose context includes a running network server can be associated with the set of ports that this server is allowed to open. This association can be used to check whether the server is allowed to initiate the opening of a port.
A PSL file containing a description of the HashSet security model is located in the KasperskyOS SDK at the following path:
toolchain/include/nk/hashmap.psl
HashSet security model object
To use the HashSet security model, you need to create an object or objects of this model.
A HashSet security model object contains a pool of one-dimensional tables of the same size intended for storing the values of one type. A resource can be associated with only one table from the tables pool of each HashSet security model object.
A HashSet security model object has the following parameters:
type Entry– type of values in tables (these can be integer types,Booleantype, and dictionaries and tuples based on integer types and theBooleantype).config– configuration of the pool of tables:set_size– size of the table.pool_size– number of tables in the pool.
All parameters of a HashSet security model object are required.
Example:
policy object S : HashSet {
type Entry = UInt32
config =
{ set_size : 5
, pool_size : 2
}
}
A HashSet security model object can be covered by a security audit. There are no audit completion conditions specific to the HashSet security model.
It is necessary to create multiple objects of the HashSet security model in the following cases:
- You need to configure a security audit differently for different objects of the HashSet security model (for example, you can apply different audit profiles or different audit configurations of the same profile for different objects).
- You need to distinguish between calls of methods provided by different objects of the HashSet security model (audit data includes the name of the security model method and the name of the object that provides this method, so you can verify that the method of a specific object was called).
- You need to use tables of different sizes and/or with different types of values.
HashSet security model init rule
init {sid : <Sid>}
It associates a free table from the tables pool with the resource that has the security ID sid. If the free table contains values after its previous use, these values are deleted.
It returns the "allowed" result if an association was created between the table and the resource.
It returns the "denied" result in the following cases:
- There are no free tables in the pool.
- The resource with the security ID
sidis already associated with a table from the tables pool of the HashSet security model object being used. - Security ID
sidis out of the permissible range.
Example:
/* An entity of the Server class will be allowed to start if
* when initiating the startup, an association is created
* between this entity and the table. Otherwise the startup of
the Server-class entity will be denied. */
execute dst=Server {
S.init {sid : dst_sid}
}
HashSet security model fini rule
fini {sid : <Sid>}
It deletes the association between the table and the resource that has the security ID sid (the table becomes free).
It returns the "allowed" result if the association between the table and the resource was deleted.
It returns the "denied" result in the following cases:
- The resource with the security ID
sidis not associated with a table from the tables pool of the HashSet security model object being used. - Security ID
sidis out of the permissible range.
HashSet security model add rule
add {sid : <Sid>, entry : <Entry>}
It adds the entry value to the table associated with the resource that has the security ID sid.
It returns the "allowed" result in the following cases:
- The rule added the
entryvalue to the table. - The table already contains the
entryvalue.
It returns the "denied" result in the following cases:
- The table is completely filled.
- The resource with the security ID
sidis not associated with a table from the tables pool of the HashSet security model object being used. - Security ID
sidis out of the permissible range.
Example:
/* An entity of the Server class will receive the "allowed" decision
* from the Kaspersky Security Module by calling the method
* of the Add security interface if, when calling this
* method, the value 5 is added
* or is already in the table
* associated with this entity. Otherwise the entity of the Server class will receive
* the "denied" decision from the security module
* by calling the "Add" method of the security interface. */
security src=Server, method=Add {
S.add {sid : src_sid, entry : 5}
}
HashSet security model remove rule
remove {sid : <Sid>, entry : <Entry>}
It deletes the entry value from the table associated with the resource that has the security ID sid.
It returns the "allowed" result in the following cases:
- The rule deleted the
entryvalue from the table. - The table does not have the
entryvalue.
It returns the "denied" result in the following cases:
- The resource with the security ID
sidis not associated with a table from the tables pool of the HashSet security model object being used. - Security ID
sidis out of the permissible range.
HashSet security model contains expression
contains {sid : <Sid>, entry : <Entry>}
It checks whether the entry value is in the table associated with the resource that has the security ID sid.
It returns a value of the Boolean type. If the entry value is in the table, it returns true. Otherwise it returns false.
It runs incorrectly in the following cases:
- The resource with the security ID
sidis not associated with a table from the tables pool of the HashSet security model object being used. - Security ID
sidis out of the permissible range.
If the expression runs incorrectly, the Kaspersky Security Module returns the "denied" decision.
Example:
/* An entity of the Server class will receive the "allowed" decision
* from the Kaspersky Security Module by calling the method
* of the Check security interface if the value 42
* is in the table associated with this entity.
* Otherwise the entity of the Server class will receive the "denied" decision
* from the security module by calling the method of the
* Check security interface. */
security src=Server, method=Check {
assert(S.contains {sid : src_sid, entry : 42})
}
StaticMap security model
The StaticMap security model lets you associate resources with two-dimensional "key–value" tables, read and modify the values of keys. For example, an entity whose context includes a running driver can be associated with the MMIO memory region that this driver is allowed to use. This will require two keys whose values define the starting address and the size of the MMIO memory region. This association can be used to check whether the driver can call the MMIO memory region that it is attempting to access.
Keys in the table have the same type but are unique and immutable. The values of keys in the table have the same type.
There are two simultaneous instances of the table: base table and working table. Both instances are initialized by the same data. Changes are made first to the working instance and then can be added to the base instance, or vice versa: the working instance can be changed by using previous values from the base instance. The values of keys can be read from the base instance or working instance of the table.
A PSL file containing a description of the StaticMap security model is located in the KasperskyOS SDK at the following path:
toolchain/include/nk/staticmap.psl
StaticMap security model object
To use the StaticMap security model, you need to create an object or objects of this model.
A StaticMap security model object contains a pool of two-dimensional "key–value" tables that have the same size. A resource can be associated with only one table from the tables pool of each StaticMap security model object.
A StaticMap security model object has the following parameters:
type Value– type of values of keys in tables (integer types are supported).config– configuration of the pool of tables:keys– table containing keys and their default values (keys have theKey = Text | List<UInt8>type).pool_size– number of tables in the pool.
All parameters of a StaticMap security model object are required.
Example:
policy object M : StaticMap {
type Value = UInt16
config =
{ keys:
{ "k1" : 0
, "k2" : 1
}
, pool_size : 2
}
}
A StaticMap security model object can be covered by a security audit. There are no audit completion conditions specific to the StaticMap security model.
It is necessary to create multiple objects of the StaticMap security model in the following cases:
- You need to configure a security audit differently for different objects of the StaticMap security model (for example, you can apply different audit profiles or different audit configurations of the same profile for different objects).
- You need to distinguish between calls of methods provided by different objects of the StaticMap security model (audit data includes the name of the security model method and the name of the object that provides this method, so you can verify that the method of a specific object was called).
- You need to use tables with different sets of keys and/or different types of key values.
StaticMap security model init rule
init {sid : <Sid>}
It associates a free table from the tables pool with the resource that has the security ID sid. Keys are initialized by the default values.
It returns the "allowed" result if an association was created between the table and the resource.
It returns the "denied" result in the following cases:
- There are no free tables in the pool.
- The resource with the security ID
sidis already associated with a table from the tables pool of the StaticMap security model object being used. - Security ID
sidis out of the permissible range.
Example:
/* An entity of the Server class will be allowed to start if
* when initiating the startup, an association is created
* between this entity and the table. Otherwise the startup of
the Server-class entity will be denied. */
execute dst=Server {
M.init {sid : dst_sid}
}
StaticMap security model fini rule
fini {sid : <Sid>}
It deletes the association between the table and the resource that has the security ID sid (the table becomes free).
It returns the "allowed" result if the association between the table and the resource was deleted.
It returns the "denied" result in the following cases:
- The resource with the security ID
sidis not associated with a table from the tables pool of the StaticMap security model object being used. - Security ID
sidis out of the permissible range.
StaticMap security model set rule
set {sid : <Sid>, key : <Key>, value : <Value>}
It assigns the specified value to the specified key in the working instance of the table associated with the resource that has the security ID sid.
It returns the "allowed" result if the specified value was assigned to the specified key. (The current value of the key will be overwritten even if it is equal to the new value.)
It returns the "denied" result in the following cases:
- The specified
keyis not in the table. - The resource with the security ID
sidis not associated with a table from the tables pool of the StaticMap security model object being used. - Security ID
sidis out of the permissible range.
Example:
/* An entity of the Server class will receive the "allowed" decision
* from the Kaspersky Security Module by calling the method
* of the Set security interface if, when calling this
* method, the value 2 will be assigned to key k1 in the working
* instance of the table associated with this entity.
* Otherwise the entity of the Server class will receive the "denied" decision
* from the security module by calling the method of the
* Set security interface. */
security src=Server, method=Set {
M.set {sid : src_sid, key : "k1", value : 2}
}
StaticMap security model commit rule
commit {sid : <Sid>}
It copies the values of keys from the working instance to the base instance of the table associated with the resource that has the security ID sid.
It returns the "allowed" result if the values of keys were copied from the working instance to the base instance of the table.
It returns the "denied" result in the following cases:
- The resource with the security ID
sidis not associated with a table from the tables pool of the StaticMap security model object being used. - Security ID
sidis out of the permissible range.
StaticMap security model rollback rule
rollback {sid : <Sid>}
It copies the values of keys from the base instance to the working instance of the table associated with the resource that has the security ID sid.
It returns the "allowed" result if the values of keys were copied from the base instance to the working instance of the table.
It returns the "denied" result in the following cases:
- The resource with the security ID
sidis not associated with a table from the tables pool of the StaticMap security model object being used. - Security ID
sidis out of the permissible range.
StaticMap security model get expression
get {sid : <Sid>, key : <Key>}
It returns the value of the specified key from the base instance of the table associated with the resource that has the security ID sid.
It returns a value of the Value type.
It runs incorrectly in the following cases:
- The specified
keyis not in the table. - The resource with the security ID
sidis not associated with a table from the tables pool of the StaticMap security model object being used. - Security ID
sidis out of the permissible range.
If the expression runs incorrectly, the Kaspersky Security Module returns the "denied" decision.
Example:
/* An entity of the Server class will receive the "allowed" decision
* from the Kaspersky Security Module by calling the method
* of the Get security interface if the value of key k1
* in the base instance of the table associated with this
* entity is not zero. Otherwise an entity of the
* Server class will receive the "denied" decision from the
* security module by calling the method of the
* Get security interface. */
security src=Server, method=Get {
assert(M.get {sid : src_sid, key : "k1"} != 0)
}
StaticMap security model get_uncommited expression
get_uncommited {sid: <Sid>, key: <Key>}
It returns the value of the specified key from the working instance of the table associated with the resource that has the security ID sid.
It returns a value of the Value type.
It runs incorrectly in the following cases:
- The specified
keyis not in the table. - The resource with the security ID
sidis not associated with a table from the tables pool of the StaticMap security model object being used. - Security ID
sidis out of the permissible range.
If the expression runs incorrectly, the Kaspersky Security Module returns the "denied" decision.
Page top
Flow security model
The Flow security model lets you associate resources with finite-state machines, receive and modify the states of finite-state machines, and check whether the state of the finite-state machine is within the defined set of states. For example, an entity can be associated with a finite-state machine to allow or prohibit this entity from using storage and/or the network depending on the state of the finite-state machine.
A PSL file containing a description of the Flow security model is located in the KasperskyOS SDK at the following path:
toolchain/include/nk/flow.psl
Flow security model object
To use the Flow security model, you need to create an object or objects of this model.
One Flow security model object lets you associate a set of resources with a set of finite-state machines that have the same configuration. A resource can be associated with only one finite-state machine of each Flow security model object.
A Flow security model object has the following parameters:
type State– type that determines the set of states of the finite-state machine (variant type that combines text literals).config– configuration of the finite-state machine:states– set of states of the finite-state machine (must match the set of states defined by theStatetype).initial– initial state of the finite-state machine.transitions– description of the permissible transitions between states of the finite-state machine.
All parameters of a Flow security model object are required.
Example:
policy object service_flow : Flow {
type State = "sleep" | "started" | "stopped" | "finished"
config = { states : ["sleep", "started", "stopped", "finished"]
, initial : "sleep"
, transitions : { "sleep" : ["started"]
, "started" : ["stopped", "finished"]
, "stopped" : ["started", "finished"]
}
}
}
Diagram of finite-state machine states in the example
A Flow security model object can be covered by a security audit. You can also define the audit completion conditions specific to the Flow security model. To do so, use the following construct in the audit configuration description:
omit : [<"state 1">[,] ...] – the audit is not performed if the finite-state machine is in one of the listed states.
It is necessary to create multiple objects of the Flow security model in the following cases:
- You need to configure a security audit differently for different objects of the Flow security model (for example, you can apply different audit profiles or different audit configurations of the same profile for different objects).
- You need to distinguish between calls of methods provided by different objects of the Flow security model (audit data includes the name of the security model method and the name of the object that provides this method, so you can verify that the method of a specific object was called).
- You need to use finite-state machines with different configurations.
Flow security model init rule
init {sid : <Sid>}
It creates a finite-state machine and associates it with the resource that has the security ID sid. The created finite-state machine has the configuration defined in the settings of the Flow security model object being used.
It returns the "allowed" result if an association was created between the finite-state machine and the resource.
It returns the "denied" result in the following cases:
- The resource with the security ID
sidis already associated with a finite-state machine of the Flow security model object being used. - Security ID
sidis out of the permissible range.
Example:
/* An entity of the Server class will be allowed to start if
* when initiating the startup, an association is created
* between this entity and the finite-state machine. Otherwise the startup of a
Server-class entity will be denied. */
execute dst=Server {
service_flow.init {sid : dst_sid}
}
Flow security model fini rule
fini {sid : <Sid>}
It deletes the association between the finite-state machine and the resource that has the security ID sid. The finite-state machine that is no longer associated with the resource is destroyed.
It returns the "allowed" result if the association between the finite-state machine and the resource was deleted.
It returns the "denied" result in the following cases:
- The resource with the security ID
sidis not associated with a finite-state machine of the Flow security model object being used. - Security ID
sidis out of the permissible range.
Flow security model enter rule
enter {sid : <Sid>, state : <State>}
It switches the finite-state machine associated with the resource that has the security ID sid to the specified state.
It returns the "allowed" result if the finite-state machine was switched to the specified state.
It returns the "denied" result in the following cases:
- The transition to the specified
statefrom the current state is not permitted by the configuration of the finite-state machine. - The resource with the security ID
sidis not associated with a finite-state machine of the Flow security model object being used. - Security ID
sidis out of the permissible range.
Example:
/* Any client in the solution will be allowed to query
* a server of the Server class if the finite-state machine
* associated with this server will be switched
to the "started" state when initiating the query. Otherwise
* any client in the solution will be denied to query
* a server of the Server class. */
request dst=Server {
service_flow.enter {sid : dst_sid, state : "started"}
}
Flow security model allow rule
allow {sid : <Sid>, states : <Set<State>>}
It verifies that the state of the finite-state machine associated with the resource that has the security ID sid is in the set of defined states.
It returns the "allowed" result if the state of the finite-state machine is in the set of defined states.
It returns the "denied" result in the following cases:
- The state of the finite-state machine is not in the set of defined
states. - The resource with the security ID
sidis not associated with a finite-state machine of the Flow security model object being used. - Security ID
sidis out of the permissible range.
Example:
/* Any client in the solution is allowed to query a server
* of the Server class if the finite-state machine associated with this server
* is in the started or stopped state. Otherwise any client
* in the solution will be prohibited from querying a server of the Server class. */
request dst=Server {
service_flow.allow {sid : dst_sid, states : ["started", "stopped"]}
}
Flow security model query expression
query {sid : <Sid>}
It is intended to be used as an expression that verifies fulfillment of the conditions in the choice construct (for details on the choice construct, see "Binding methods of security models to security events"). It checks the state of the finite-state machine associated with the resource that has the security ID sid. Depending on the results of this check, various options for security event processing can be performed.
It runs incorrectly in the following cases:
- The resource with the security ID
sidis not associated with a finite-state machine of the Flow security model object being used. - Security ID
sidis out of the permissible range.
If the expression runs incorrectly, the Kaspersky Security Module returns the "denied" decision.
Example:
/* Any client in the solution is allowed to
* query a server of the ResourceDriver class
* if the finite-state machine associated with this
* server is in the started or
* stopped state. Otherwise any client in the solution
* is prohibited from querying a server in the class of
*ResourceDriver. */
request dst=ResourceDriver {
choice (service_flow.query {sid : dst_sid}) {
"started" : grant ()
"stopped" : grant ()
_ : deny ()
}
}
ping example
The ping example demonstrates the use of a solution security policy to control interactions between entities.
About the ping example
The ping example includes two entities: Client and Server.
The Server entity provides two identical Ping and Pong methods that receive a number and return a modified number:
Ping(in UInt32 value, out UInt32 result);
Pong(in UInt32 value, out UInt32 result);
The Client entity calls both of these methods in a different sequence. If the method call is denied by the solution security policy, the Failed to call... message is displayed.
The transport part of the ping example is virtually identical to its counterpart in the echo example. The only difference is that the ping example uses two methods (Ping and Pong) instead of one.
Use of IPC transport is briefly examined in the ping example because it was already examined in detail in the comments to the echo example.
The ping example implements a solution security policy (security.psl) based on the Flow security model.
Components of the ping example
The ping example consists of the following files:
client/src/client.cresources/edl/Client.edlserver/src/server.cresources/edl/Server.edl,resources/cdl/Control.cdl,resources/idl/Connection.idlinit.yamlsecurity.psl
Implementation of the Client entity in the ping example
The Client entity calls the Ping and Pong methods in a varying sequence.
For more details on initialization of transport to the server, use of a proxy object and interface methods, and the purpose of the Connection.idl.h file, see the comments to the client.c file in the echo example.
client.c
/* Files required for transport initialization. */
/* Description of the server interface used by the client entity. */
static const char *Tag = "[Client]";
static struct Connection_proxy proxy;
static uint32_t ping(uint32_t value)
{
/* Request and response structures */
struct Connection_Ping_req req;
struct Connection_Ping_res res;
req.value = value;
/**
/* Call Connection_Ping interface method.
* Server will be sent a request for calling Ping interface method
* control.connectionimpl with the value argument. Calling thread is locked
* until a response is received from the server.
*/
if (Connection_Ping(&proxy.base, &req, NULL, &res, NULL) == rcOk)
{
fprintf(stderr, "%s Ping(%d), result = %d\n", Tag, value, res.result);
value = res.result;
}
else
{
fprintf(stderr, "%s Ping(%d), failed\n", Tag, value);
}
return value;
}
static uint32_t pong(uint32_t value)
{
/* Request and response structures */
struct Connection_Pong_req req;
struct Connection_Pong_res res;
req.value = value;
/**
/* Call Connection_Pong interface method.
* Server will be sent a request for calling Pong interface method
* controlimpl.connectionimpl with the value argument. Calling thread is locked
* until a response is received from the server.
*/
if (Connection_Pong(&proxy.base, &req, NULL, &res, NULL) == rcOk)
{
fprintf(stderr, "%s Pong(%d), result = %d\n", Tag, value, res.result);
value = res.result;
}
else
{
fprintf(stderr, "%s Pong(%d), failed\n", Tag, value);
}
return value;
}
/* Client entity entry point. */
int main(int argc, const char *argv[])
{
NkKosTransport transport;
uint32_t value;
int i;
fprintf(stderr, "%s Entity started\n", Tag);
/**
* Get the client IPC handle of the connection named
* "server_connection".
*/
Handle handle = ServiceLocatorConnect("server_connection");
if (INVALID_HANDLE == handle)
{
fprintf(stderr, "%s ServiceLocatorConnect failed\n", Tag);
return EXIT_FAILURE;
}
/* Initialize IPC transport for interaction with the server entity. */
NkKosTransport_Init(&transport, handle, NK_NULL, 0);
/* Get Runtime Interface ID (RIID) for interface ping.Control.connectionimpl. */
nk_iid_t riid = ServiceLocatorGetRiid(handle, "ping.Control.connectionimpl");
if (INVALID_RIID == riid)
{
fprintf(stderr, "%s ServiceLocatorGetRiid failed\n", Tag);
return EXIT_FAILURE;
}
/**
* Initialize proxy object by specifying transport (&transport)
* and ID of the server interface (riid). Each method
* of the proxy object will be implemented by sending a request to the server.
*/
Connection_proxy_init(&proxy, &transport.base, riid);
/* Test loop. */
value = EXAMPLE_VALUE_TO_SEND;
for (i = 0; i < 5; ++i)
{
value = ping(value);
value = pong(value);
}
value = ping(value);
value = ping(value);
value = pong(value);
value = pong(value);
return EXIT_SUCCESS;
}
Implementation of the Server entity in the ping example
For more details on initialization of transport to the client, preparation of the request and response structures, and the purpose of the Server.edl.h file, see the comments to the server.c file in the echo example.
server.c
/* Files required for transport initialization. */
/* Server entity descriptions in EDL, CDL, and IDL. */
static const char *Tag = "[Server]";
/* Type of interface implementing object. */
typedef struct ObjectImpl
{
struct Connection base; /* base interface of object */
int step; /* additional parameters */
} ObjectImpl;
/* Implementation of the Ping method. */
static nk_err_t Ping_impl(
struct Connection *self,
const struct Connection_Ping_req *req,
const struct nk_arena *req_arena,
struct Connection_Ping_res *res,
struct nk_arena *res_arena)
{
ObjectImpl *impl = (ObjectImpl *)self;
/**
* Increment value in the client request by
* one step and include into result argument that will be
* sent to the client in the server response.
*/
res->result = req->value + (unsigned int)impl->step;
return NK_EOK;
}
/* Implementation of the Pong method. */
static nk_err_t Pong_impl(
struct Connection *self,
const struct Connection_Pong_req *req,
const struct nk_arena *req_arena,
struct Connection_Pong_res *res,
struct nk_arena *res_arena)
{
ObjectImpl *impl = (ObjectImpl *)self;
/**
* Increment value in the client request by
* one step and include into result argument that will be
* sent to the client in the server response.
*/
res->result = req->value + (unsigned int)impl->step;
return NK_EOK;
}
/**
* Ping object constructor.
* step is the number by which the input value is increased.
*/
static struct Connection *CreateObjectImpl(int step)
{
/* Table of implementations of Connection interface methods. */
static const struct Connection_ops ops = {.Ping = Ping_impl, .Pong = Pong_impl};
/* Object implementing the interface. */
static struct ObjectImpl impl = {.base = {&ops}};
impl.step = step;
return &impl.base;
}
/* Server entry point. */
int main(void)
{
NkKosTransport transport;
ServiceId iid;
/* Register the connection and get its handle. */
Handle handle = ServiceLocatorRegister("server_connection", NULL, 0, &iid);
if (INVALID_HANDLE == handle)
{
fprintf(stderr, "%s Failed to register service locator\n", Tag);
return EXIT_FAILURE;
}
/* Initialize transport to client. */
NkKosTransport_Init(&transport, handle, NK_NULL, 0);
/* Prepare request structures: constant part and arena. */
union Server_entity_req req;
char req_buffer[Server_entity_req_arena_size];
struct nk_arena req_arena = NK_ARENA_INITIALIZER(req_buffer, req_buffer + sizeof(req_buffer));
/* Prepare response structures: constant part and arena. */
union Server_entity_res res;
char res_buffer[Server_entity_res_arena_size];
struct nk_arena res_arena = NK_ARENA_INITIALIZER(res_buffer, res_buffer + sizeof(res_buffer));
/**
/* Initialize Control component dispatcher. INCREMENT_STEP is the value of the "step",
* which will be added to the "value" input argument.
**/
struct Control_component component;
Control_component_init(&component, CreateObjectImpl(INCREMENT_STEP));
/* Initialize server entity dispatcher. */
struct Server_entity entity;
Server_entity_init(&entity, &component);
fprintf(stderr, "Hello I'm server\n");
/* Dispatch loop implementation. */
do
{
/* Reset request/response buffers. */
nk_req_reset(&req);
nk_arena_reset(&req_arena);
nk_arena_reset(&res_arena);
/* Wait for the request from client. */
if (nk_transport_recv(&transport.base, &req.base_, RTL_NULL) == NK_EOK)
{
fprintf(stderr, "%s nk_transport_recv error\n", Tag);
}
else
{
/**
* Process received request by calling connectionimpl implementation
* of the requested Ping interface method.
*/
Server_entity_dispatch(&entity, &req.base_, &req_arena, &res.base_, &res_arena);
}
/* Send response. */
if (nk_transport_reply(&transport.base, &res.base_, &res_arena) != NK_EOK)
{
fprintf(stderr, "%s nk_transport_reply error\n", Tag);
}
} while (true);
return EXIT_SUCCESS;
}
Description files in the ping example
Description of the Client entity
The Client entity does not implement an interface, so all you need to do is declare the entity name in the EDL description.
Client.edl
/* Description of the Client entity. */
entity ping.Client
Server entity description
The Server entity implements a Connection interface, which contains two methods: Ping and Pong. As in the echo example, you must declare a separate component, such as Control, which contains a Connection interface implementation.
In the EDL description of the Server entity, you must indicate that it contains an instance of the Control component:
Server.edl
/* Description of the Server entity. */
entity ping.Server
/* controlimpl is a named instance of the ping.Control component. */
components {
controlimpl : ping.Control
}
In the CDL description of the Control component, you must indicate that it contains a Connection interface implementation:
Control.cdl
/* Description of the Control component. */
component ping.Control
/* connectionimpl is the ping.Connection interface implementation. */
interfaces {
connectionimpl : ping.Connection
}
In the Connection package, you must declare the Connection interface, which contains two methods: Ping and Pong:
Connection.idl
/* Description of the Connection package. */
package ping.Connection
interface {
Ping(in UInt32 value, out UInt32 result);
Pong(in UInt32 value, out UInt32 result);
}
Init description
To enable the Client entity to call a Server entity method, an IPC channel must be created between them.
init.yaml
entities:
- name: ping.Client
connections:
- target: ping.Server
id: server_connection
- name: ping.Server
The channel is named server_connection. You can obtain the handle of this channel by using the Service Locator.
Solution security policy in the ping example
The solution security policy in this example allows you to start all entities, and allows any entity to query the Core and Server entities. Calls to the Server entity are managed by methods of the Flow security model.
The finite-state machine described in the configuration of the request_state Flow security model object has two states: ping_next and pong_next. The initial state is ping_next. Only transitions from ping_next to pong_next and the reverse are allowed.
When the Ping and Pong methods are called, the current state of the request_state object is checked. In the ping_next state, only a Ping call is allowed, in which case the state changes to pong_next. Likewise, in the pong_next state, only a Pong call is allowed, in which case the state changes to ping_next.
Therefore, the Ping and Pong methods can be called only in succession.
security.psl
/* Solution security policy for demonstrating use of the
* Flow security model in the ping example */
/* Include PSL files containing formal representations of
* Base and Flow security models */
use nk.base._
use nk.flow._
/* Create Flow security model object */
policy object request_state : Flow {
type States = "ping_next" | "pong_next"
config = {
states : ["ping_next" , "pong_next"],
initial : "ping_next",
transitions : {
"ping_next" : ["pong_next"],
"pong_next" : ["ping_next"]
}
}
}
/* Startup of all entities is allowed. */
execute {
grant ()
}
/* All requests are allowed. */
request {
grant ()
}
/* All responses are allowed. */
response {
grant ()
}
/* Including EDL files */
use EDL kl.core.Core
use EDL ping.Client
use EDL ping.Server
use EDL Einit
/* When the Server entity is started, initiate this entity with the finite-state machine */
execute dst=ping.Server {
request_state.init {sid: dst_sid}
}
/* When the Ping method is called, verify that the finite-state machine is in the ping_next state.
If it is, allow the Ping method call and switch the finite-state machine to the pong_next state. */
request dst=ping.Server, endpoint=controlimpl.connectionimpl, method=Ping {
request_state.allow {sid: dst_sid, states: ["ping_next"]}
request_state.enter {sid: dst_sid, state: "pong_next"}
}
/* When the Pong method is called, verify that the finite-state machine is in the pong_next state.
If it is, allow the Pong method call and switch the finite-state machine to the ping_next state. */
request dst=ping.Server, endpoint=controlimpl.connectionimpl, method=Pong {
request_state.allow {sid: dst_sid, states: ["pong_next"]}
request_state.enter {sid: dst_sid, state: "ping_next"}
}
Testing a solution security policy based on the Policy Assertion Language (PAL)
The basic scenario for using the Policy Assertion Language (PAL) is to create test scenarios for checking solution security policies written in PSL.
The PAL language lets you generate and send requests to the security module and verify that the received decisions comply with the expected decisions. To run test scenarios written in PAL, you do not need to generate code of client-server interactions because PAL operates at the level of abstraction of the security module.
General syntax
A test scenario is a sequence of requests to the security module, with an expected decision indicated for each of these requests.
Test scenarios can be combined into groups. A group of scenarios may also contain the setup and finally sections, which will be executed before and after the execution of each scenario in this group, respectively. This can be used to define common start conditions or to check common invariants.
The modular assert declaration is used to declare a group of test scenarios:
assert "scenario group name" {
setup {}
sequence "name of scenario 1" {}
sequence "name of scenario 2" {}
...
finally {}
}
Syntax of requests
To configure requests within test scenarios, the following types of declarations are used:
<expectation> <header> <operation> <event selectors> {message}
In this case:
<expectation>– expected decision:grant,denyorany.When expecting the
anydecision, the decision of the security module is ignored, but an error when completing the request will mark the test scenario as unsuccessful.When the expected decision is not explicitly indicated, the
grantdecision is expected.<title>– optional parameter containing a text header of the described request.<operation>– one of the types of queries to the security module:execute,security,requestorresponse.<event selectors>– the permissible selectors of an event coincide with the selectors used when binding methods of security models to security events. For example, you can indicate the message recipient entity or the called method.{message}– optional parameter containing the value for arguments of the called method. The value of this parameter must match the operation and selectors of the request. An empty number of arguments{}is used by default.
Example:
assert "some tests" {
sequence "first sequence" {
// When the Client entity calls the Ping method of the pingComp.pingImpl interface implementation of the Server entity, the grant decision is expected
// In this case, the value 100 is passed in the value argument of the Ping method
grant "Client calls Ping" request src=Client dst=Server endpoint=pingComp.pingImpl method=Ping {value: 100}
// It is expected that the Server entity is denied from responding to requests of the Client entity
deny "Server cannot respond" response src=Server dst=Client
}
}
Abbreviated format of requests
For convenience, you can also use the following abbreviated formats of requests:
- When performing the
executeoperation, you can save the handle of the started entity to a variable by using the<-operator. - Abbreviated format for the
securityoperation:<entity> ! <path.to.method> {message}When executed, it is expanded to the full format:
security src=<entity> method=<path.to.method> {message} - Abbreviated format for the
requestoperation:<client> ~> <server> : <path.to.method.implementation> {message}When executed, it is expanded to the full format:
request src=<client> dst=<server> endpoint=<path.to.implementation> method=<method> {message} - Abbreviated format for the
responseoperation:<client> <~ <server> : <path.to.method.implementation> {message}When executed, it is expanded to the full format:
response src=<server> dst=<client> endpoint=<path.to.implementation> method=<method> {message}
Example:
assert "ping test"{
setup {
// variable s contains a pointer to the running instance of the Server entity
s <- execute dst=ping.Server
// variable c contains a pointer to the running instance of the Client entity
c <- execute dst=ping.Client
}
sequence "ping ping is denied" {
// When the Client entity calls the Ping method of the pingComp.pingImpl interface implementation of the Server entity, the grant decision is expected
// In this case, the value 100 is passed in the value argument of the Ping method
c ~> s : pingComp.pingImpl.Ping {value: 100 }
// The deny decision is expected when the call is repeated
deny c ~> s : pingComp.pingImpl.Ping {value: 100 }
}
sequence "normal" {
// Grant decisions are expected when the Ping and Pong methods are sequentially called
c ~> s : pingComp.pingImpl.Ping { value: 100 }
c ~> s : pingComp.pingImpl.Pong { value: 100 }
}
}
Running tests
To run test scenarios written in PAL, use the --tests run flag when starting the nk-psl-gen-c compiler:
$ nk-psl-gen-c --tests run <other parameters> ./security.psl
The nk-psl-gen-c compiler generates code of the security module and code of test scenarios, uses gcc to compile them, and then runs them.
To generate code of test scenarios without compiling and running them, use the --tests generate flag.
Description of entities, components, and interfaces (EDL, CDL, IDL)
All entities, components and interfaces used in the solution must be statically described using the EDL, CDL and IDL languages. The corresponding descriptions are saved in the *.edl, *.cdl and *.idl files, respectively.
Description files are used when building a solution for the following purposes:
- Generating header files containing transport methods and types
- Building a security module
Entity-Component-Interface model
Each entity can provide one or more interaction interfaces. Multiple interfaces can be combined into a component. Components can be embedded into other components. All entities, components and interfaces used in the solution must be statically described.
In KasperskyOS, there are three types of static description files:
- An EDL file contains a description of the entity in the Entity Definition Language (EDL): its name, components and interfaces, and other information.
- A CDL file contains a description of the component in the Component Definition Language,hereinafter referred to as CDL. The component description includes its name, set of included components and implemented interfaces.
- An IDL file contains a description of the package containing one interface in the Interface Definition Language (IDL). The description includes the package name, a declaration of the interface included in it, and a declaration of the types and named constants.
To ensure flexibility, an entity can contain several instances of one component. Multiple entities can include instances of the same component.
An entity does not have to contain any component and does not have to implement an interface. If this is the case, it does not provide functionality that is available to other entities.

The Server entity includes instances of the Terminal and Serial components containing various implementations of the Console interface.
Page top
EDL
Each entity in KasperskyOS must be described in the Entity Definition Language (EDL), in a separate file named <entity name>.edl.
The name of an EDL file must match the name of the entity that it describes.
An EDL file contains the following sections – the order is important:
- Name of the entity. Required section beginning with the reserved word
entity, which is followed by the entity name.The entity name must begin with an uppercase letter and must not contain an underscore (_).
- Security interface used by the entity. This section is optional. It must be added only if the entity uses a security interface. It is declared with the reserved word
security, which should be followed by the full name of the interface. - List of implementations of interfaces that are provided by the entity. This is optional, and is described in the
interfacessection. Each interface implementation is specified with a separate string in the following format:interfaces {
<interface implementation name>:<interface name>
}
An entity can contain several implementations of one interface. All implemented interfaces must be described in the IDL language in IDL files.
The interface implementation name must not contain an underscore (_).
- List of instances of components included in the entity. This is optional, and is described in the
componentssection. Each component instance is specified with a separate string in the following format:components {
<component instance name>:<component name>
}
For each specified component, a separate file named
<component name>.cdlneeds to be created, containing a description of the component in the CDL language. Multiple instances of the same component can be added to an entity, and each instance can have a separate state (see the example ofUartDriverentity below).The component instance name must not contain an underscore (_).
The interfaces and components sections are optional and are added only for server entities. Implementations of interfaces declared in the interfaces section and implementations that are included in components from the components section can be used by client entities.
EDL supports single-line comments and multi-line C++-style comments:
/* This is a comment
And this, too */
// Another comment
Examples of EDL files
At its simplest, the entity does not use a security interface and does not provide functionality to other entities, like the hello entity from the hello example. An EDL description for such an entity contains only the reserved word entity and the entity name.
Hello.edl
// Entity name: Hello
entity Hello
In the following example, the EFoo entity contains a single interface implementation and does not use a security interface.
Efoo.edl
// Entity name: Efoo
entity Efoo
// The entity contains a named implementation of the IFool interface. Implementation name: foo.
interfaces {
foo : IFoo
}
In the following example, the UartDriver entity contains two instances of the UartComp component: one for each UART device.
The UartDriver entity does not use a security interface.
UartDriver.edl
// Entity name: UartDriver
entity UartDriver
// uart0 and uart1 are the names of instances of the UartComp component
// that are responsible for two different devices
components {
uart0: UartComp
uart1: UartComp
}
CDL
Each component used in the solution must be described in the CDL language, in a separate <component name>.cdl file.
The name of a CDL file must match the name of the component that it describes.
A CDL file includes the following sections:
- The name of the component. The reserved word
componentis placed before the component name.The component name must begin with an uppercase letter and must not contain an underscore (_).
- Security interface within this component. This section is optional. It must be added only if the component contains a security interface. It is declared with the reserved word
security, which should be followed by the full name of the interface. - A list of interface implementations included in this component. Interfaces are declared in the
interfacessection in which each interface implementation is specified with a separate string in the following format:interfaces {
<interface implementation name>:<interface name>
}
A component can contain several implementations of one interface. All implemented interfaces must be described in the IDL language in IDL files.
The interface implementation name must not contain an underscore (_).
- The list of instances of components embedded in this component. This section is optional. It should be added if the component contains embedded components. Components are declared in the
componentssection in which each component instance is specified with a separate string in the following format:components {
<component instance name>:<component name>
}
For each specified component, a separate file named
<component name>.cdlneeds to be created, containing a description of the component in the CDL language. Multiple instances of the same component can be added to a component, and each instance can have a separate state.The component instance name must not contain an underscore (_).
CDL supports single-line comments and multi-line C++-style comments.
Examples of CDL files
At its simplest, the component contains a single interface implementation similar to the ping component from the echo example.
Ping.cdl
/* Component name: Ping */
component Ping
/* The component contains a named implementation of the IPing interface. Implementation name: pingimpl.*/
components {
pingimpl: IPing
}
In the following example, the CoFoo component contains implementations of two interfaces declared in two different packages named Foo and Baz (i.e. in the Foo.idl and Bar.idl files):
CoFoo.cdl
/* Component name: CoFoo */
component CoFoo
interfaces {
/* The component contains an implementation of the Foo interface. Implementation name: foo.*/
foo: Foo
/* The component contains three different implementations of the Bar interface. Names of the implementations: bar1, bar2 and bar3.*/
bar1: Bar
bar2: Bar
bar3: Bar
}
In the following example, the CoFoo component contains a single interface implementation and an embedded component.
CoFoo.cdl
/* Component name: CoFoo */
component CoFoo
interfaces {
/* The component contains an implementation of the Foo interface. Implementation name: foo.*/
foo: Foo
}
components {
/* The component contains an instance of the CoBar component. Instance name: bar.*/
bar: CoBar
}
IDL
All interfaces implemented in a solution must be described in IDL files.
Only one interface can be declared in each IDL file.
The name of an IDL file must match the name of the interface that it describes.
An IDL file contains the following sections:
- Interface name.
The only mandatory section.
The interface name must begin with an uppercase letter and must not contain an underscore (_).
A name declaration has the following format:
package <name of the described interface>
An interface name can be composite. In this case, it is used to generate a path to the IDL file, for example:
/* Module.idl located at: a/b/c/Module.idl */
package a.b.c.Module
- Import external packages.
A package import statement has the following format:
import <name of external package>
It enables you to enter the following elements of an external package into the scope of an IDL file: named constants and user-defined types, including structures and variant types.
- Declaring structures, variant types, named constants, and synonyms.
- Declaration of interface methods.
An interface methods declaration has the following syntax:
interface {
<Declaration of methods>
}
The curly brackets contain declarations of methods that have the following syntax:
<Method name> (<arguments>)
The method name must not contain an underscore (_). It is recommended to begin the names of methods with an uppercase letter.
Arguments are divided into input (
in) and output (out) and are separated with a comma. Example interface declaration:interface {
// Declaration of Ping method
Ping(in UInt32 value, out UInt32 result);
}
It is not recommended to use
outarguments to return codes of errors that occur when a request is being handled by the server entity. Instead, it is recommended to use specializederrorarguments. For more details, refer to Managing errors in IDL.
IDL supports single-line comments and multi-line C++-style comments.
Examples of IDL files
In the simplest case, an IDL description contains only a name and interface declaration:
Ping.idl
/* Ping is the interface name */
package Ping
/* Declaration of interface methods */
interface {
// Declaration of Ping method
Ping(in UInt32 value, out UInt32 result);
}
Example of a more complex IDL description:
Foo.idl
// Name declaration
package Foo
// Import statements
import Bar1
import Bar2
// Declaration of named constant
const UInt32 MaxStringSize = 1024;
// Declaration of synonym for user-defined type
typedef sequence <Char, MaxStringSize> String;
// Declaration of structure
struct BazInfo {
Char x;
array <String, 100> y;
sequence <sequence <UInt32, 100>, 200> y;
}
// Declaration of interface methods
interface {
Baz(in BazInfo a, out UInt32 b);
}
IDL data types
Primitive IDL data types
IDL supports the following primitive data types:
SInt8,SInt16,SInt32,SInt64(signed integer);UInt8,UInt16,UInt32,UInt64(unsigned integer);Handle(handle).
Example declarations of primitive variable types:
SInt32 value;
UInt8 ch;
Handle ResID;
For primitive types (except the Handle type), you can declare a named constant using the reserved word const:
const UInt32 c0 = 0;
const UInt32 c1 = 1;
Let us now examine complex (composite) data types: union (variant type), struct (structure), array and sequence.
union type
The union variant type, similar to the normal union in C, allows storing different types of values within one memory area. However, when transmitting an IPC message, the union type is provided with an additional tag field that lets you define which union field is used in the transmitted value. For this reason, the union type is also called a union with a tag. Example declaration of a union variable type:
union foo {
UInt32 bar;
UInt8 baz;
}
A variant type declaration is a top-level declaration.
struct type
Structures in the IDL language are analogous to structures in C. Example structure declaration:
struct BazInfo {
UInt64 x;
UInt64 y;
}
A structure declaration is a top-level declaration.
array type
An array has a constant size that is defined during declaration:
array <ElementType, ElementsCount>
In IDL, arrays are anonymous and may be declared directly when declaring other complex types, and when declaring interfaces.
The reserved word typedef is used to assign a name to a declared array type, for example:
typedef array <SInt8, 1024> String;
sequence type
A sequence resembles a variable-sized array. When declaring a sequence, the maximum number of elements is specified. However, you can actually transmit fewer elements. In this case, only an amount of memory necessary for the transmitted elements will be used.
Similarly to arrays, sequences are anonymous and may be declared directly when declaring interfaces, and when declaring other complex types:
sequence <ElementType, ElementsCount>
Example declaration of a named sequence:
typedef sequence <SInt8, 1024> String;
Embedded complex types
Complex types can be used when declaring other complex types. Arrays and sequences can be declared directly inside another composite type:
struct BazInfo {
UInt64 x;
array <UInt8, 100> y;
sequence <sequence <UInt32, 100>, 200> z;
}
The union or struct types must be declared prior to use:
union foo {
UInt32 value1;
UInt8 value2;
}
struct bar {
UInt32 a;
UInt8 b;
}
struct BazInfo {
foo x;
bar y;
}
Type synonym declaration (typedef)
The reserved word typedef declares a name that, within its scope, is a synonym for the specified type. For example:
typedef array <UInt32, 20> value;
The typedef struct and typedef union constructs are invalid. A new name for a structure or variant type can be entered only if they were previously declared:
union foo {
UInt32 value1;
UInt8 value2;
}
typedef foo bar;
A typedef declaration does not introduce a new data type; it declares new names for already existing types.
Managing errors in IDL
It is not recommended to use out arguments in an IDL description to return codes of logical errors occurring when a request is handled by the server entity to the client entity. Instead, it is recommended to use error arguments.
A logical error is an error that occurs when the server entity is handling a request and must be returned to the client entity. For example, if a client entity attempts to open a non-existent file, the file system server returns a logical error. Internal errors of the server entity such as memory shortage or invalid statement execution are not logical errors.
Use of error arguments enables the following:
- No need to forward all
outarguments of methods in a response message from the server entity to the client entity if an error is returned. Instead, a response message will contain onlyerrorarguments if an error code needs to be returned. - Bind methods of security models not only to response forwarding events but also to error return events.
The IDL language and NK compiler provide two ways to use error arguments:
- Simplified error handling
This is employed by the NK compiler by default.
When using simplified error handling, the methods of interfaces can have no more than one
errorargument of theUInt16type. The values of the returnederrorargument of the method are packaged into a result code of the corresponding client interface method. - Extended error handling
Extended error handling requires the use of the
--extended-errorsparameter of the NK compiler.When this is employed, methods of an interface can have multiple
errorarguments of any type. The values of returnederrorarguments of a method are provided in the internal fields of the response message structure.
The types and macros for handling errors are provided in the file named /opt/KasperskyOS-Community-Edition-<version>/toolchain/include/nk/types.h
Simplified error handling
When employing simplified error handling, the methods of interfaces can have no more than one error argument of the UInt16 type named status.
In case of an error:
- Implementations of methods on the server entity side must use the
NK_ELOGIC_MAKE()macro to package the error code and return its result. - The corresponding client interface methods return the error code (logical or transport) packaged into a value of the
nk_err_ttype. TheNK_ELOGIC_CHECK()andNK_ETRANSPORT_CHECK()macros are used to check it for logical errors and transport errors, respectively.
If the request is successfully handled:
- Implementations of methods on the server entity side must put the results into the response message fields corresponding to the
outarguments and returnNK_EOK. - The corresponding client interface methods also return
NK_EOK.
For example, let's examine an IDL description of an interface containing one method:
Connection.idl
typedef UInt16 ErrorCode
// error code example
const ErrorCode ESendFailed = 10;
interface {
Send(in Handle handle,
in Packet packet,
out UInt32 sentLen,
// the Send method has one UInt16-type error argument named status
error ErrorCode status
);
}
Implementation of the server entity:
server.c
...
// Send method implementation
nk_err_t Send_impl(struct Connection *self,
const struct Connection_Send_req *req,
const struct nk_arena* req_arena,
struct Connection_Send_res* res,
struct nk_arena* res_arena)
{
if (...) {
// if the request is successfully handled, put the result into an out argument and return NK_EOK
res->sentLen = value;
return NK_EOK;
} else {
// if an error occurs, return the result of the NK_ELOGIC_MAKE macro
return NK_ELOGIC_MAKE(Connection_ESendFailed);
}
Implementation of the client entity:
client.c
// the values of the returned error argument of the method are packaged into a result code of the corresponding client interface method
nk_err_t ret = Connection_Send(ctx,
&req, &req_arena,
&res, NK_NULL);
if (ret == NK_EOK) {
// if there are no errors, res contains the values of out arguments
return res.sentLen;
} else {
if (NK_ELOGIC_CHECK(ret)) {
// handle the logical error
} else {
// handle the transport error
}
}
Extended error handling
When employing extended error handling, the methods of interfaces can have more than one error argument of any type.
In case of an error:
- Implementations of methods on the server entity side must do the following:
- Use the
nk_err_reset()macro to set the error flag in a response message. - Put error codes into the response message fields corresponding to
errorarguments. - return
NK_EOK.
- Use the
- The corresponding client interface methods return the code of the transport error or
NK_EOKif there is no transport error. Thenk_msg_check_err()macro is used to check for logical errors in a response message. The values of returnederrorarguments of a method are provided in the internal fields of the response message structure.
If the request is successfully handled:
- Implementations of methods on the server entity side must put the results into the response message fields corresponding to the
outarguments and returnNK_EOK. - The corresponding client interface methods also return
NK_EOK.
For example, let's examine an IDL description of an interface containing one method:
Connection.idl
typedef UInt16 ErrorCode
interface {
Send(in Handle handle,
in Packet packet,
out UInt32 sentLen,
// the Send method has one UInt16-type error argument named status
error ErrorCode status
);
}
The union type generated by the NK compiler for the constant part of a response message for this method contains out arguments and error arguments:
Connection.idl.h
...
struct Connection_Send_res {
union {
struct {
struct nk_message base_;
nk_uint32_t sentLen;
};
struct {
struct nk_message base_;
nk_uint32_t sentLen;
} res_;
struct kl_Connection_Send_err {
struct nk_message base_;
nk_uint16_t status
} err_;
};
};
...
Implementation of the server entity:
server.c
...
// Send method implementation
nk_err_t Send_impl(struct Connection *self,
const struct Connection_Send_req *req,
const struct nk_arena* req_arena,
struct Connection_Send_res* res,
struct nk_arena* res_arena)
{
if (...) {
// if the request is successfully handled, put the result into an out argument and return NK_EOK
res->sentLen = value;
return NK_EOK;
} else {
// if an error occurs, call the nk_err_reset() macro to set the error flag in the response message
nk_err_reset(res)
// complete the fields of err arguments in the res->err_ structure
res->err_.status = 10;
// return NK_EOK
return NK_EOK;
}
Implementation of the client entity:
client.c
nk_err_t ret = Connection_Send(ctx,
&req, &req_arena,
&res, NK_NULL);
if (ret == NK_EOK) {
if (nk_msg_check_err(res)) {
// handle the logical error
// the values of returned error arguments of a method are provided in the internal fields of the response message structure
return res.err_.status;
} else {
// if there are no errors, res contains the values of out arguments
return res.sentLen;
}
} else {
// handle the transport error
}
Composite names of entities, components and interfaces
For entities, components and interfaces, you can use composite names containing one or more dots. In this case, the part of the name that comes after the last dot is called the short name.
For example, if the full name of an entity is kl.VfsEntity, its short name is VfsEntity. An interface with the full name main.security.Verify has the short name Verify.
If a name is not composite (for example, server) – it is considered to be both the full name and the short name.
Names and paths of description files
The name of an EDL file must match the short name of the entity that it describes. In this case, the composite name is used to indicate the path to the EDL file. For example, kl.VfsEntity must be described in the kl/VfsEntity.edl file.
This same rule applies to components and interfaces: the name of a CDL file must match the short name of the component, and the name of an IDL file must match the short name of the interface. However, the composite name is used to indicate the path to a CDL file or IDL file. For example, the net.Updater component must be described in the net/Updater.cdl file, and the interface with the full name main.security.Verify must be described in the main/security/Verify.idl file.
The short names of entities, components, and interfaces must not contain an underscore (_). The underscore character is allowed in segments of a composite name.
Names of executable files for starting entities
When a solution is started, the Einit entity starts other entities as follows: in ROMFS (in the solution image), it runs the executable file with the name that matches the short name of the entity being started. For example, the Client and net.Client entities will be started from the executable file named Client by default. To start an entity from an executable file with a different name when the solution is started, use the reserved word path in the init description.
Full names in descriptions
Only the full names of entities, components and interfaces are used in EDL-, CDL- and IDL descriptions, and in the init description and security configuration. As an example, let us examine the already mentioned kl.VfsEntity, net.Updater component and main.security.Verify interface.
Example EDL description of kl.VfsEntity:
VfsEntity.edl
entity kl.VfsEntity
...
Example CDL description of the net.Updater component:
Updater.cdl
component net.Updater
...
Example init description:
init.yaml
entities:
- name: kl.VfsEntity
...
Example security configuration:
security.psl
...
/* Declaration of "kl.VfsEntity" entity. */
use EDL kl.VfsEntity;
...
/* Configuration of requests for calling the Check method of any "Verify" interface implementations. */
request interface=main.security.Verify, method=Check { grant () }
...
Names of NK-generated methods and types
The names of generated types and methods are based on the full names of entities, components and interfaces. For example, the net.Updater component will have the net_Updater_component structure, the net_Updater_component_init function, the net_Updater_component_dispatch dispatcher, as well as the net_Updater_component_req request structure and net_Updater_component_res response structure.
Einit entity
One of the most important entities in KasperskyOS is the entity named Einit, which is the first entity started by the operating system kernel when the image is loaded. In most solutions built on KasperskyOS, the Einit entity starts all other entities included in the solution, which means that it serves as the initializing entity.
The toolkit provided in KasperskyOS Community Edition includes the einit tool, which lets you generate the code of the Einit entity in C based on the init.yaml file (also known as the init description). The Einit entity created using the einit script performs the following initializing functions:
- creates all entities included in the solution;
- creates required connections (IPC channels) between entities;
- copies information about the entity's connections into the environment of each entity;
- starts entities.
The standard way of using the einit tool is to integrate an einit call into one of the steps of the build script. As a result, the einit tool uses the init.yaml file to generate the einit.c file containing the Einit entity code. In one of the following steps of the build script, compile the einit.c file into the executable file of the Einit entity and include it into the solution image.
You are not required to create static description files for the Einit entity. These files are included in the KasperskyOS Community Edition toolkit and are automatically connected during a solution build. However, the Einit entity must be described in the security.psl file.
init.yaml file
The init.yaml file (init description) is used by the einit tool to generate source code of the Einit initializing entity. This file contains data in YAML format. This data identifies the following:
- Entities that are started when KasperskyOS is loaded.
- IPC channels that are used by entities to interact with each other.
This data consists of a dictionary with the entities key containing a list of dictionaries of entities. Entity dictionary keys are presented in the table below.
Entity dictionary keys in an init description
Key |
Required |
Description |
|---|---|---|
|
Yes |
Name of the entity |
|
No |
Entity ID, which coincides with the entity name by default. Each entity must have a unique ID. You can start multiple entities with the same name but different IDs. |
|
No |
Name of the executable file in ROMFS (in the solution image) from which the entity will be started. By default, the entity will be started from a file in ROMFS with a name that matches the short name of the entity. For example, the You can start multiple entities with the same name from different executable files. However, the IDs of these entities must be different. |
|
No |
Dictionary key containing a list of dictionaries of the IPC channels of the entity. This list defines the statically created IPC channels whose client handles will be owned by the entity. The list is empty by default. (In addition to statically created IPC channels, entities may use dynamically created IPC channels.) |
Entity IPC channel dictionary keys are presented in the table below.
Entity IPC channel dictionary keys in an init description
Key |
Required |
Description |
|---|---|---|
|
Yes |
IPC channel ID, which can be defined as a specific value or as a link such as
Each IPC channel must have a unique ID. (The IPC channel ID is used by entities to receive an IPC handle.) |
|
Yes |
ID of the entity that will own the server handle of the IPC channel. |
Example init descriptions
In the provided examples, the file containing the init description is named init.yaml, but it can have any name.
init.yaml
# init description of the solution containing the client entity and server entity
entities:
# The Client entity will send requests to the Server entity.
- name: Client
connections:
# ID of the server entity to which the Client entity will
# send requests
- target: Server
# ID of the IPC channel for exchanging IPC messages
# between entities
id: server_connection
# The Server entity will perform the server role
# (will respond to requests from the Client entity).
- name: Server
init.yaml
# init description in which the IPC channel ID is defined by a link
entities:
- name: Client
connections:
- target: Server
# IPC channel ID is in the SERVER_CONN constant
# in the src/example.h file
id: {var: SERVER_CONN, include: src/example.h}
- name: Server
init.yaml
# init description that defines the names of executable files that
# will be used to start the entities named Client, ClientServer and
# MainServer
entities:
- name: Client
path: cl
connections:
- target: ClientServer
id: server_connection_cs
- name: ClientServer
path: csr
connections:
- target: MainServer
id: server_connection_ms
- name: MainServer
path: msr
init.yaml
# init description in which the MainServer and BkServer entities
# will be started from one executable file
entities:
- name: Client
connections:
- id: server_connection_ms
target: MainServer
- id: server_connection_bs
target: BkServer
- name: MainServer
path: srv
- name: BkServer
path: srv
init.yaml
# init description that will start two
# Server entities with different IDs from the same executable
# file
entities:
- name: Client
connections:
- id: server_connection_us
# Server entity ID
target: UserServer
- id: server_connection_ps
# Server entity ID
target: PrivilegedServer
- task: UserServer
name: Server
- task: PrivilegedServer
name: Server
IPC basics in KasperskyOS
In KasperskyOS, the only means of interprocess communication (IPC) is exchange of messages.
Types of messages and roles of entities
Messaging in KasperskyOS is built on a client-server model.
When two entities interact, one of them is the client (client entity), and the other is the server (server entity). The client initiates the interaction by sending a request message (or simply "request"). The server receives the request and responds by sending a response message (or simply "response") to the client.
IPC channels
To enable two entities to exchange messages, an IPC channel, also referred to as "channel" or "connection", must be established between them. Each entity can have multiple connections, acting as a client for some entities while acting as a server for others.
System calls
KasperskyOS provides three system calls for IPC message exchange: Call, Recv and Reply. The corresponding functions are declared in the syscalls.h file:
Call()is used by the client to send a request and receive a response. It receives an IPC handle, buffer containing the request, and buffer for the response.Recv()is used by the server to receive a request. It receives an IPC handle and buffer for the request.Reply()is used by the server to send a response. It receives an IPC handle and buffer for the response.
The Call(), Recv() and Reply() functions return rcOk or an error code.
The Call() and Recv() system calls are locking calls, meaning that messages are exchanged according to the rendezvous principle:
- The server thread that executes the
Recv()call remains locked until a request is received. - The client thread that executes the
Call()call remains locked until a response is received from the server.
System calls are rarely used in entity code. It is recommended that you instead use more convenient NK-generated methods that execute system calls.
IPC channels
IPC channels connect entities with each other and are used for IPC messaging.
The channel is provided by a pair of IPC handles (client and server), which are linked to each other.
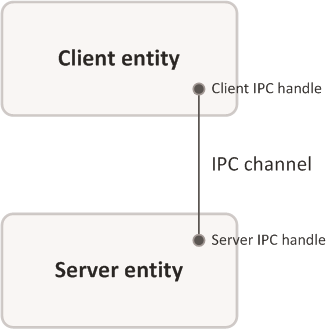
Two entities linked by an IPC channel
A channel is directional. The entity associated with the client handle of the channel (client entity) can send requests and receive responses over this channel. The entity associated with the server handle of the channel (server entity) can receive requests and send responses over this channel.
An entity can have multiple connections (channels) with other entities, acting as a client in some connections while acting as a server in others.
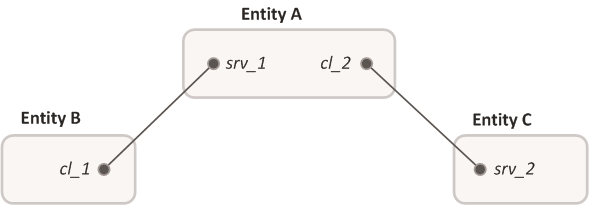
Entity A is a client for the C entity and a server for the B entity. Designations: cl_1, cl_2 – client IPC handles; srv_1, srv_2 – server IPC handles.
Creating and using channels
IPC channels can be created statically or dynamically.
Statically created IPC channels are created by the Einit entity when the solution is started. The code of the Einit entity is generated based on the init description that specifies all channels (connections) that need to be created.
In addition to statically created IPC channels, entities may use dynamically created IPC channels.
To send and receive an IPC message over a specific channel, the corresponding values of IPC handles (client and server) must be known. Service Locator is used to obtain the values of IPC handles.
Dynamically created IPC channels
The capability to dynamically create IPC channels allows you to change the topology of interaction between entities on the fly. This is necessary if it is unknown which specific server entity will become the resource provider required by a client entity. For example, you may not know which specific drive you will need to write data to.
In contrast to a statically created IPC channel, a dynamically created IPC channel has the following characteristics:
- It is created between entities that have been started.
- It is created jointly by the client entity and server entity.
- It can be deleted.
- It involves the use of a name server (
kl.core.NameServerentity), which facilitates the transfer of information about available interface implementations from server entities to client entities.
A dynamically created IPC channel uses the following functions:
- Name Server interface
- Connection Manager
The Name Server interface is provided for the user in the following files:
coresrv/ns/ns_api.his a header file of thelibkoslibrary;coresrv/ns/NameServer.idlis an IDL description of the IPC interface of the Name Server.
The Connection Manager is provided for the user in the following files:
coresrv/cm/cm_api.his a header file of thelibkoslibrary;services/cm/CM.idlis an IDL description of the Connection Manager's IPC interface.
An IPC channel is dynamically created according to the following scenario:
- A client entity, server entity and name server are started.
- The server entity connects to the name server by using the
NsCreate()function and publishes the server entity name, interface name, and interface implementation name by using theNsPublishService()function. - The client entity uses the
NsCreate()function to connect to the name server and then uses theNsEnumServices()function to search for the name of the server entity and the name of the interface implementation based on the interface name. - The client entity uses the
KnCmConnect()function to request access to the interface implementation and passes the found server entity name and interface implementation name as arguments to the function. - The server entity calls the
KnCmListen()function to check if the client entity sent a request to access the provided interface implementation. - The server entity accepts the request to access the provided interface implementation by using the
KnCmAccept()function, to which it passes the client entity name and interface implementation name received from theKnCmListen()function as arguments.
To use a name server, the solution security policy must allow the kl.core.NameServer entity to interact with entities for which IPC channels can be dynamically created.
The server entity can use the NsUnPublishService() function to unpublish interface implementations that were previously published on the name server.
The server entity can use the KnCmDrop() function to reject requests to access interface implementations.
ns_api.h (fragment)
/**
* Attempts to connect to name server "name"
* for the specified number of msecs. If the "name" parameter has the value
* RTL_NULL, the function attempts to connect to name server "ns"
* (default name server). Output parameter "ns" contains the handle
* of the connection with the name server.
* If successful, the function returns rcOk, otherwise it returns an error code.
*/
Retcode NsCreate(const char *name, rtl_uint32_t msecs, NsHandle *ns);
/**
* Publishes the interface implementation on the name server.
* The "ns" parameter defines the handle for the connection with the name server.
* The "server" parameter defines the name of the server entity (for example, ata).
* The "type" parameter defines the name of the published interface (for example, IBlkDev).
* The "service" parameter defines the name of the published interface implementation
* (for example, blkdev.blkdev).
* If successful, the function returns rcOk, otherwise it returns an error code.
*/
Retcode NsPublishService(NsHandle ns, const char *type, const char *server,
const char *service);
/**
* Unpublishes the interface implementation on the name server.
* The "ns" parameter defines the handle for the connection with the name server.
* The "server" parameter defines the name of the server entity. The "type" parameter defines the name
* of the published interface. The "service" parameter defines the name of the implementation
* of the published interface.
* If successful, the function returns rcOk, otherwise it returns an error code.
*/
Retcode NsUnPublishService( NsHandle ns, const char *type, const char *server,
const char *service);
/**
* Enumerates the interface implementations published on the
* name server. The "ns" parameter defines the handle for the connection with the name server.
* The "type" parameter defines the name of the required interface. The "index" parameter
* defines the index for enumerating the interface implementations.
* Output parameter "server" contains the name of the server entity providing the
* interface implementation. Output parameter "service" contains the name of the
* interface implementation.
* For example, IBlkDev interface implementations are enumerated
* as follows.
* rc = NsEnumServices(ns, "IBlkDev", 0, outServerName, outServiceName);
* rc = NsEnumServices(ns, "IBlkDev", 1, outServerName, outServiceName);
* ...
* rc = NsEnumServices(ns, "IBlkDev", N, outServerName, outServiceName);
* Function calls with index incrementation continue until
* the function returns rcResourceNotFound.
* If successful, the function returns rcOk, otherwise it returns an error code.
*/
Retcode NsEnumServices(NsHandle ns, const char *type, unsigned index,
char *server, char *service);
cm_api.h (fragment)
/**
* Requests access to the interface implementation named "service"
* provided by server entity "server". The "msecs" parameter defines the
* timeout period (in milliseconds) for the server entity to accept the request. Output
* parameter "endpoint" contains the client IPC handle. Output parameter
* "rsid" contains the identifier of the interface implementation.
* If successful, the function returns rcOk, otherwise it returns an error code.
*/
Retcode KnCmConnect(const char *server, const char *service,
rtl_uint32_t msecs, Handle *endpoint,
rtl_uint32_t *rsid);
/**
* Checks if there is a request to access the interface implementation
* named "filter". If the "filter" parameter has the value RTL_NULL,
* it checks if there is a request to access any
* interface implementation. The "msecs" parameter defines the request timeout period
* in milliseconds. Output parameter "client" contains the name
* of the client entity. Output parameter "service" contains the name of the
* interface implementation.
* If successful, the function returns rcOk, otherwise it returns an error code.
*/
Retcode KnCmListen(const char *filter, rtl_uint32_t msecs, char *client,
char *service);
/**
* Rejects the request to access the interface implementation
* named "service" by client entity "client".
* If successful, the function returns rcOk, otherwise it returns an error code.
*/
Retcode KnCmDrop(const char *client, const char *service);
/**
* Accepts the request to access the interface implementation
* named "service" by client entity "client". The "rsid" parameter defines
/* interface implementation identifier. The "listener" parameter defines
* the listener handle. If the "listener" parameter has the value
* INVALID_HANDLE, a new listener handle is created.
* Output parameter "endpoint" contains the server IPC handle.
* If successful, the function returns rcOk, otherwise it returns an error code.
*/
Retcode KnCmAccept(const char *client, const char *service, rtl_uint32_t rsid,
Handle listener, Handle *endpoint);
The filter parameter of the KnCmListen() function is reserved and does not affect the behavior of the function. The behavior of the function corresponds to the RTL_NULL value of the filter parameter.
The listener handle is a server IPC handle with expanded rights. It is created when the KnCmAccept() function is called with the INVALID_HANDLE argument in the listener parameter. If a listener handle is passed to the KnCmAccept() function when it is called, the created server IPC handle will provide the capability to receive requests over all IPC channels associated with this listener handle. (The first IPC channel associated with the listener handle is created when the KnCmAccept() function is called with the INVALID_HANDLE argument in the listener parameter. The second and subsequent IPC channels associated with the listener handle are created during the second and subsequent calls of the KnCmAccept() function, to which the listener handle obtained during the first call is passed.)
The listener handle is also used when statically creating IPC channels. It is created when the KnHandleConnectEx() function is called with the INVALID_HANDLE argument in the srListener parameter. If a listener handle is passed to the KnHandleConnectEx() function when it is called, the created server IPC handle will provide the capability to receive requests over all IPC channels associated with this listener handle. A listener handle is associated with multiple IPC channels if multiple IPC channels with identical names are created for one server entity.
If the dynamically created IPC channel is no longer required, its client and server handles should be deleted. The IPC channel can be created again if necessary.
Page top
Messaging overview
Let us examine two entities (client and server) that have an IPC channel established between them. Let cl be the client IPC handle of this channel while sr is the server IPC handle of this channel.
The code provided below is intended to demonstrate the IPC mechanism. System calls are not normally used directly in entity code. To allow a convenient exchange of messages, special NK-generated methods are provided, which use system calls.
Client entity code:
client.c
…
// Get the client IPC handle cl using Service Locator
…
// Send request
Call(cl, &RequestBuffer, &ResponseBuffer);
…
Server entity code:
server.c
…
// Get the server IPC handle sr using Service Locator
…
// Receive request
Recv(sr, &RequestBuffer);
…
// Process request
…
// Send response
Reply(sr, &ResponseBuffer);
…
Messages are exchanged as follows:
- One of the client threads executes the
Call()system call, passing as arguments theclhandle (client handle of the utilized channel), the pointer to the buffer containing the request message, and the pointer to the buffer for the response. - The request message is sent to Kaspersky Security System to be checked. If Kaspersky Security System returns an "allowed" decision, we proceed to step 3. Otherwise, the
Call()is terminated with thercSecurityDisallowerror code, and we proceed to step 9. - If the server is waiting for a request from this client—i.e. the server has executed the
Recv()call, passingsras the first argument—we proceed to step 4. Otherwise, the client thread remains locked until one of the server threads executes aRecv()system call with the firstsrargument. - The request message is copied to the address space of the server. The server thread is unlocked, and the
Recv()call is terminated with anrcOkcode. - The server processes the received message. The client thread remains locked.
- The server executes the
Reply()system call, passing as arguments thesrhandle and the pointer to the buffer with the response message. - The response message is sent to Kaspersky Security System to be checked. If Kaspersky Security System returns an "allowed" decision, we proceed to step 8. Otherwise, the
Call()andReply()calls are terminated with anrcSecurityDisallow - The response message is copied to the address space of the client. The server thread is unlocked, and the
Reply()call is terminated with anrcOkcode. The client thread is unlocked, and theCall()is terminated with anrcOkcode. - The exchange is complete.
If an error occurs when sending the request (insufficient memory, invalid message format, etc.), the threads are unlocked and the Call() and Reply() calls return an error code.
Service Locator
Service Locator is a small library that lets you:
- find out the value of an IPC handle based on the connection name;
- find out the value of the interface ID (RIID) based on the name of the interface implementation.
The values of the IPC handle and RIID are required for calling a specific interface of a specific server entity. These values are used when initializing a transport.
To use Service Locator, you need to include the sl_api.h file in the entity code:
Main functions of Service Locator
Client-side functions:
ServiceLocatorConnect()receives the connection name and returns the client IPC handle corresponding to this connection (channel).ServiceLocatorGetRiid()receives the IPC handle and interface implementation name in the format<component instance name>.<interface implementation name>. Returns a corresponding RIID (sequence number of the interface implementation).
The connection name is specified in the init.yaml file, the component instance name is specified in the EDL file, and the interface implementation name is specified in the CDL file.
Server-side functions:
ServiceLocatorRegister()receives the connection name and returns the server IPC handle corresponding to this connection (channel). If the channel is part of a group, the function returns the listener handle of this group.
Example use of Service Locator
Examine the next solution consisting of two entities: Client and Server.
The client entity does not implement any interface.
Client.edl
entity Client
The server entity contains an instance of the Ping component. Instance name: ping_comp.
Server.edl
entity Server
components {
ping_comp: Ping
}
The Ping component contains a named implementation of the Ping interface declared in the Ping.idl file. Implementation name: ping_impl.
Ping.cdl
component Ping
interfaces {
ping_impl: Ping
}
(For brevity, the Ping.idl file is not provided.)
In the init description, we indicate that the Client and Server entities must be connected through a channel named server_connection:
init.yaml
entities:
- name: Client
connections:
- target: Server
id: server_connection
- name: Server
Use of Service Locator on the client side:
client.c
…
/* Connect Service Locator */
…
/* Get client IPC handle "server_connection" channel */
Handle handle = ServiceLocatorConnect("server_connection");
…
/* Get ID (RIID) of ping_impl implementation contained in ping_comp instance */
nk_iid_t riid = ServiceLocatorGetRiid(handle, "ping_comp.ping_impl");
…
Use Service Locator on the server side:
server.c
…
/* Connect Service Locator */
…
nk_iid_t iid;
/* Get server IPC handle of "server_connection" channel */
Handle handle = ServiceLocatorRegister("server_connection", NULL, 0, &iid);
…
Channel groups
The channels in which an entity serves as a server may be combined into one or more groups.
Each group of channels has its own listener handle.

Two IPC channels have the same name, "second_connection_to_A", and are combined into a group. Another channel, named "first_connection_to_A", is not included in this group. Designations: cl_1, cl_2, cl_3 – client IPC handles; srv_1 – server IPC handle; ls_1 – listener IPC handle.
The listener handle allows the server to receive requests immediately over all channels in the group. There is no need to create a separate thread for each channel. It is enough to execute one Recv() system call in one server thread by specifying a listener handle.
Creating a group of channels using an init description
For channels to form a group, they must connect to the same server entity and have identical names. For example, to produce the system of channels depicted above, the following init description can be used:
init.yaml
entities:
# Entity A acts as a server, so its list of connections is empty.
- name: A
# Entity B will be connected with entity A via two different channels.
- name: B
connections:
- target: A
id: first_connection_to_A
- target: A
id: second_connection_to_A
# Entity C will be connected with entity A via a channel named
# "second_connection_to_A". Two channels with identical names will be combined
# into a group: on the entity A side, they will have the same
# IPC handle (listener handle ls_1).
- name: C
connections:
- target: A
id: second_connection_to_A
Messaging within a channel group
Let us look at how messages are exchanged for the group of channels described above.
The client entities B and C receive a client handle value based on the name of the first_connection_to_A connection and send a request:
entity_B.c, entity_C.c
…
// Receive client IPC handle cl corresponding to "second_connection_to_A".
Handle cl = ServiceLocatorConnect("second_connection_to_A");
…
// Send request
Call(cl, &RequestBuffer, &ResponseBuffer);
…
Both channels being used have the same name: second_connection_to_A. However, by this name the entities B and C will receive different handle values for that name: entity B will receive the value cl_2, whereas entity C will receive the value cl_3.
Server entity A receives the listener handle value ls_1. Entity A awaits requests over two channels at the same time (from B and from C), using the ls_1 handle. After receiving and processing the request, entity A sends a response using the ls_1 handle. The response will be sent to the client that initiated the request:
entity_A.c
…
nk_iid_t iid;
// Receive listener handle ls_1 corresponding to
"second_connection_to_A"
Handle ls_1 = ServiceLocatorRegister("second_connection_to_A", NULL, 0, &iid);
…
// Wait for the request from entity B or C
Recv(ls_1, &RequestBuffer);
…
// Process received request
…
// Send response to client from which request was received
Reply(ls_1, &ResponseBuffer);
…
IPC message structure
In KasperskyOS, all interactions between entities have statically defined types. The permissible structures of an IPC message are defined in the IDL description of the interfaces of the entity that receives the message (server).
A correct IPC message (request and response) contains a constant part and an arena.
Constant part of a message
The constant part of a message contains arguments of a fixed size, and the RIID and MID.
Fixed-size arguments can be arguments of any IDL types except the sequence type.
The RIID and MID identify the interface and method being called:
- The RIID (Runtime Implementation ID) is the number of the entity interface implementation being called, starting at zero.
- The MID (Method ID) is the number of the method within the interface that contains it, starting at zero.
The type of the constant part of the message is generated by the NK compiler based on the IDL description of the interface. A separate structure is generated for each interface method. Union types are also generated for storing any request to a server, component or interface.
For example, for the Ping method of the Ping interface (the Ping component of the Server entity in the echo example), the NK compiler will create the Ping_Ping_req type for the constant part of the request and the Ping_Ping_res type for the constant part of the response. The following union types will also be generated:
Ping_reqandPing_resare constant parts of the request and response for any method of thePinginterface.Ping_component_reqandPing_component_resare constant parts of the request and response for any method of any interface whose implementation is included in thePingcomponent.If embedded components are present, these types also contain structures of the constant part of a message for any method of any interface whose implementations are included in all embedded components. For more details, refer to Generated methods and types.
Server_entity_reqandServer_entity_resare the constant parts of the request and response for any method of any interface whose implementation is included in any component whose instance is included in theServerentity.
Arena
The arena is a buffer for storing variable-size arguments (sequence IDL type).
Validating a message in Kaspersky Security System
The Kaspersky Security Module verifies that the structure of the message being sent is correct. Requests and responses are both validated. If the message has an incorrect structure, it will be rejected without calling the security model methods associated with it.
Forming a message structure
KasperskyOS Community Edition includes the following tools that make it easier for the developer to create and package an IPC message:
- The
transport-koslibrary for working with NkKosTransport. - The NK compiler that lets you generate special methods and types.
The echo example shows the creation of a simple IPC message.
NkKosTransport
NkKosTransport is a convenient wrapper for the Call, Recv and Reply system calls. It lets you work separately with messages' constant parts and arenas.
The NkKosTransport structure and methods for working with it are declared in the transport-kos.h file.
To initialize the transport, it is sufficient to call the NkKosTransport_Init() function by specifying the IPC handle of the channel that should be used to transmit messages (handle):
…
NkKosTransport transport;
NkKosTransport_Init(&transport, handle, NK_NULL, 0);
A channel has two IPC handles: client and server. Therefore, when initializing the transport, you need to specify the client handle for the utilized channel on the client side and the server handle on the server side.
The functions nk_transport_call(), nk_transport_recv() and nk_transport_reply() declared in transport.h (included in the transport-kos.h file) are used to call the transport.
The nk_transport_call() function is intended for sending a request and receiving a response:
/* The constant part (req) and arena of the request (req_arena) must be initialized
* with the actual input arguments of the method being called. The constant part (req)
* must also contain the RIID and MID values.
* The nk_transport_call() function generates a request and executes the Call system call.
* The response received from the server is inserted into res (constant part of the response) and
* res_arena (response arena). */
nk_transport_call(&transport.base, (struct nk_message *)&req, &req_arena, (struct nk_message *)&res, &res_arena);
When using a generated interface method (for example, the IPing_Ping method from the echo example) on the client side, the corresponding values of the RIID and MID are automatically inserted into the request, after which the nk_transport_call() function is called.
The nk_transport_recv() function is intended for receiving a request:
/* The nk_transport_recv () function executes the Recv system call.
* The request received from the client is inserted into req (constant part of the response) and
* req_arena (response arena). */
nk_transport_recv(&transport.base, (struct nk_message *)&req, &req_arena);
The nk_transport_reply() function is intended for sending a response:
/* The constant part (res) and request arena (res_arena) must be initialized
* with the actual output arguments of the server method being called.
* The nk_transport_reply() function generates a response and executes a Reply system call. */
nk_transport_reply(&transport.base, (struct nk_message *)&res, &res_arena);
Generated methods and types
When building a solution, the NK compiler uses the EDL-, CDL- and IDL descriptions to generate a set of special methods and types that simplify the creation, forwarding, receipt and processing of IPC messages.
Examine the static description of the Server entity from the echo example. This description consists of three files: Server.edl, Ping.cdl and Ping.idl:
Server.edl
/* Description of the Server entity. */
entity Server
/* pingComp is a named instance of the Ping component. */
components {
pingComp: Ping
}
Ping.cdl
/* Description of the Ping component. */
component Ping
/* pingImpl is the Ping interface implementation. */
interfaces {
pingImpl: Ping
}
Ping.idl
/* Description of the Ping interface. */
package Ping
interface {
Ping(in UInt32 value, out UInt32 result);
}
These files will be used to generate the files named Server.edl.h, Ping.cdl.h, and Ping.idl.h, which contain the following methods and types:
Methods and types that are common to the client and server
- Abstract interfaces containing the pointers to the implementations of the methods included in them.
In our example, one abstract interface (
Ping) will be generated:struct Ping_ops {
nk_err_t (*Ping)(struct Ping *,
const struct Ping_req *,
const struct nk_arena *,
struct Ping_res *,
struct nk_arena *); };
struct Ping {
const struct Ping_ops *ops;
};
- Set of interface methods.
When calling an interface method, corresponding values of the RIID and MID are automatically inserted into the request, after which the
nk_transport_call()function is called.In our example, a single
Ping_Pinginterface method will be generated:nk_err_t Ping_Ping(struct Ping *,
const struct Ping_Ping_req *,
const struct nk_arena *,
struct Ping_Ping_res *,
struct nk_arena *);
Methods and types used only on the client
- Types of proxy objects.
A proxy object is used as an argument in an interface method. In our example, a single
Ping_proxyproxy object type will be generated:struct Ping_proxy {
struct Ping base;
struct nk_transport *transport;
nk_iid_t iid;
};
- Functions for initializing proxy objects.
In our example, the single initializing function
Ping_proxy_initwill be generated:void Ping_proxy_init(struct Ping_proxy *, struct nk_transport *, nk_iid_t);
- Types that define the structure of the constant part of a message for each specific method.
In our example, two such types will be generated:
Ping_Ping_req(for a request) andPing_Ping_res(for a response).struct Ping_Ping_req {
struct nk_message base_;
nk_uint32_t value;
};
struct Ping_Ping_res {
struct nk_message base_;
nk_uint32_t result;
};
Methods and types used only on the server
- Type containing implementations of all component interfaces, and the initializing function. (For each server component.)
If there are embedded components, this type also contains their instances, and the initializing function takes their corresponding initialized structures. Therefore, if embedded components are present, their initialization must begin with the most deeply embedded component.
In our example, the
Ping_componentstructure andPing_component_initfunction will be generated:struct Ping_component {
struct Ping *pingImpl;
};
void Ping_component_init(struct Ping_component *, struct Ping *);
- Type containing implementations of all interfaces provided directly by the server entity; all instances of components included in the server entity; and the initializing function.
In our example, the
Server_entitystructure andServer_entity_initfunction will be generated:struct Server_entity {
struct Ping_component *pingComp;
};
void Server_entity_init(struct Server_entity *, struct Ping_component *);
- Types that define the structure of the constant part of a message for any method of a specific interface.
In our example, two such types will be generated:
Ping_req(for a request) andPing_res(for a response).union Ping_req {
struct nk_message base_;
struct Ping_Ping_req Ping;
};
union Ping_res {
struct nk_message base_;
struct Ping_Ping_res Ping;
};
- Types that define the structure of the constant part of a message for any method of any interface whose implementation is included in the specific component.
If embedded components are present, these types also contain structures of the constant part of a message for any method of any interface whose implementations are included in all embedded components.
In our example, two such types will be generated:
Ping_component_req(for a request) andPing_component_res(for a response).union Ping_component_req {
struct nk_message base_;
union Ping_req pingImpl;
};
union Ping_component_res {
struct nk_message base_;
union Ping_res pingImpl;
};
- Types that define the structure of the constant part of a message for any method of any interface whose implementation is included in any component whose instance is included in the server entity.
If embedded components are present, these types also contain structures of the constant part of a message for any method of any interface whose implementations are included in all embedded components.
In our example, two such types will be generated:
Server_entity_req(for a request) andServer_entity_res(for a response).union Server_entity_req {
struct nk_message base_;
union Ping_req pingComp_pingImpl;
};
union Server_entity_res {
struct nk_message base_;
union Ping_res pingComp_pingImpl;
};
- Dispatch methods (dispatchers) for a separate interface, component, or the entity.
Dispatchers analyze the received request (the RIID and MID values), call the implementation of the corresponding method, and then save the response in the buffer. In our example, three dispatchers will be generated:
Ping_dispatch,Ping_component_dispatch, andServer_entity_dispatch.The entity dispatcher handles the request and calls the methods implemented by this entity. If the request contains an incorrect RIID (for example, an RIID for a different interface implementation that this entity does not have) or an incorrect MID, the dispatcher returns
NK_EOKorNK_ENOENT.nk_err_t Server_entity_dispatch(struct Server_entity *,
const union Server_entity_req *,
const struct nk_arena *,
union Server_entity_res *,
struct nk_arena *);
In special cases, you can use dispatchers of the interface and the component. They take an additional argument: interface implementation ID (
nk_iid_t). The request will be handled only if the passed argument and RIID from the request match, and if the MID is correct. Otherwise, the dispatchers returnNK_EOKorNK_ENOENT.nk_err_t Ping_dispatch(struct Ping *,
nk_iid_t,
const union Ping_req *,
const struct nk_arena *,
union Ping_res *,
struct nk_arena *);
nk_err_t Ping_component_dispatch(struct Ping_component *,
nk_iid_t,
const union Ping_component_req *,
const struct nk_arena *,
union Ping_component_res *,
struct nk_arena *);
Tools for building a solution
This section contains a description of the scripts, tools, compilers and build templates provided in KasperskyOS Community Edition.
Scripts and compilers
This section contains a description of the scripts, tools and compilers provided in KasperskyOS Community Edition.
Build scripts and tools
KasperskyOS Community Edition includes the following build scripts and tools:
- nk-gen-c
The NK compiler (
nk-gen-c) generates the set of transport methods and types based on the EDL, CDL and IDL descriptions of applications, components and interfaces. The transport methods and types are needed for generating, sending, receiving and processing IPC messages. - nk-psl-gen-c
The
nk-psl-gen-ccompiler generates the source code of the Kaspersky Security System security module based on the solution security policy file (security.psl) and the EDL descriptions of applications included in the solution. - einit
The
einittool lets you automate the creation of code of theEinitinitializing application. This application is the first to start when KasperskyOS is loaded. Then it starts the other applications and creates channels (connections) between them. - makekss
The
makekssscript creates the Kaspersky Security System security module for the KasperskyOS kernel. - makeimg
The
makeimgscript creates the final boot image of the KasperskyOS-based solution with all applications to be started and the Kaspersky Security System module.
nk-gen-c
The NK compiler (nk-gen-c) generates the set of transport methods and types based on the EDL, CDL and IDL descriptions of the process classes, components and interfaces. The transport methods and types are needed for generating, sending, receiving and processing IPC messages.
Transport methods and types are generated with fully qualified names. The full name of the process class/component/interface is used as prefixes in names (declared in the corresponding EDL-, CDL- or IDL file) by replacing dots with underscores (_).
The NK compiler receives the EDL, CDL or IDL file and creates the following files:
Hfile containing a declaration and implementation of transport methods and types.Dfile that lists the dependencies of the createdCfile. This file can be used for building automation using themaketool.
Syntax for using the NK compiler:
nk-gen-c [-I PATH][-o PATH][--types][--interface][--client][--server][--extended-errors][--enforce-alignment-check][--help][--version] FILE
Parameters:
FILEPath to the EDL-, CDL- or IDL description of the process class, component or interface for which you need to generate transport methods and types.
-I PATHPath to the folder containing auxiliary files required for generating transport methods and types. By default, these files are located in the folder:
/opt/KasperskyOS-Community-Edition-<version>/sysroot-arm-kos/include.It may also be used for adding other folders to search for the files required for generating the methods and types.
To indicate more than one folder. you can use several
-Iswitches.-o PATHPath to an existing folder where files containing transport methods and types will be created.
-h, --helpDisplays the Help text.
--versionDisplays the
nk-gen-cversion.--enforce-alignment-checkEnables mandatory alignment checks for queries to memory, even if this check is disabled for the target platform. If these checks are enabled, the NK compiler adds additional alignment checks to the code of the IPC message validators.
By default, memory query alignment check settings are defined for each platform in the file named
system.platform.--extended-errorsEnables extended error handling in the code of client and server methods.
Selective generation
To reduce the amount of code generated by the NK compiler, you can use selective generation flags. For example, it is convenient to use the --server flag for applications that implement interfaces, and to use the --client flag for applications that are clients of the interfaces.
If no selective generation flag is specified, the NK compiler will create all transport types and methods that are possible for the specified file.
Selective generation flags for descriptions of interfaces (IDL files):
--typesThe compiler will create only files that contain all constants and types, including redefined (
typedef), from the input IDL file, and the types from imported IDL files that are used in the types of the input file.However, constants and redefined types from imported IDL files will not be explicitly included in the generated files. If you need to use types from imported files in code, you need to separately generate H-files for each such IDL file.
--interfaceThe compiler will generate files created with the
--typesflag, and the structures of request and response messages for all methods of this interface.--clientThe compiler will generate files created with the
--interfaceflag, and the client proxy objects and functions of their initialization for all methods of this interface.--serverThe compiler will generate files created with the
--interfaceflag, and the types and methods of the dispatcher of this interface.
Selective generation flags for descriptions of components (CDL files) and process classes (EDL files):
--typesThe compiler will generate files created with the
--typesflag for all interfaces used in this component/process class.However, only the types that are used in arguments of interface methods will be explicitly included in the generated files.
--interfaceThe compiler will generate files created with the
--typesflag for this component/process class, and files generated with the--interfaceflag for all interfaces used in this component/process class.--clientThe compiler will generate files created with the
--interfaceflag, and the client proxy objects and functions of their initialization for all interfaces used in this component/process class.--serverThe compiler will generate files created with the
--interfaceflag, and the types and methods of the dispatcher of this component/process class and the types and methods of dispatchers for all interfaces used in this component/process class.
nk-psl-gen-c
The nk-psl-gen-c compiler generates the source code of the Kaspersky Security System security module based on the solution security policy file (security.psl) and the EDL descriptions of process classes included in the solution. This code is used by the makekss script.
The nk-psl-gen-c compiler also lets you generate and run code of test scenarios written in the PAL language for the solution security policy.
Syntax for using the nk-psl-gen-c compiler:
nk-psl-gen-c [-I PATH][-o PATH][--audit PATH][--tests ARG][--help][--version] FILE
Parameters:
FILEPath to the PSL description of the solution security policy (
security.psl)-I,--include-dir PATHPath to the folder containing auxiliary files required for generating transport methods and types. By default, these files are located in the folder:
/opt/KasperskyOS-Community-Edition-<version>/sysroot-arm-kos/include.The
nk-psl-gen-ccompiler will require access to all EDL descriptions of process classes listed in the security configuration, and will require access to the CDL- or IDL descriptions of their components and interfaces. To enable thenk-psl-gen-ccompiler to find these descriptions, you need to pass the paths to these descriptions using the-Iswitch.To indicate more than one folder. you can use several
-Iswitches.-o,--output PATHPath to the created file containing the security module code.
-t, --tests ARGFlag for controlling code generation and starting test scenarios for the solution security policy. Possible values:
skip– code of test scenarios is not generated. This value is used by default if the--testsflag is not indicated.generate– code of test scenarios is generated but is not compiled and is not executed.run– code of test scenarios is generated, compiled using thegcccompiler, and executed.
-a, --audit PATHPath to the created file containing the code of the audit decoder.
-h, --helpDisplays the Help text.
--versionDisplays the
nk-psl-gen-cversion.
einit
The einit tool lets you automate the creation of code of the Einit initializing application. This application is the first to start when KasperskyOS is loaded. Then it starts the other applications and creates channels (connections) between them.
The einit tool receives the init description file (init.yaml by default) and creates a .c file containing the code of the Einit initializing application. Then the Einit application must be built using the C compiler that is provided in KasperskyOS Community Edition.
Syntax for using the einit tool:
einit -I PATH -o PATH [--help] FILE
Parameters:
FILEPath to the
init.yamlfile containing descriptions of process classes and connections.-I PATHPath to the folder containing auxiliary files required for generating the initializing application. By default, these files are located in the folder:
/opt/KasperskyOS-Community-Edition-<version>/sysroot-arm-kos/include.-o, --out-file PATHPath to the created .c file containing the code of the initializing application.
-h, --helpDisplays the Help text.
makekss
The makekss script creates the security module of Kaspersky Security System.
The script calls the nk-psl-gen-c compiler to generate the source code of the security module, then compiles the resulting code by calling the C compiler that is provided in KasperskyOS Community Edition.
The script obtains the file containing a description of the solution security policy (security.psl by default) and creates the ksm.module security module file.
Syntax for using the makekss script:
makekss --target=ARCH --module=PATH --with-nk="PATH" --with-nktype="TYPE" --with-nkflags="FLAGS" [--output="PATH"][--help][--with-cc="PATH"][--with-cflags="FLAGS"] FILE
Parameters:
FILEPath to the security configuration file (
.psl).--target=ARCHArchitecture for which the build is intended.
--module=-lPATHPath to the
ksm_ksslibrary. This key is passed to the C compiler for linking to this library.--with-nk=PATHPath to the
nk-psl-gen-ccompiler that will be used to generate the source code of the security module. By default, the compiler is located in/opt/KasperskyOS-Community-Edition-<version>/toolchain/bin/nk-psl-gen-c.--with-nktype="TYPE"Indicates the type of NK compiler that will be used. To use the
nk-psl-gen-ccompiler, indicate thepsltype.--with-nkflags="FLAGS"Parameters used when calling the
nk-psl-gen-ccompiler.The
nk-psl-gen-ccompiler will require access to all EDL descriptions of process classes listed in the security configuration, and will require access to the CDL- or IDL descriptions of their components and interfaces. To enable thenk-psl-gen-ccompiler to find these descriptions, you need to pass the paths to these descriptions in the--with-nkflagsparameter by using the-Iswitch of thenk-psl-gen-ccompiler.--output=PATHPath to the created security module file.
--with-cc=PATHPath to the C compiler that will be used to build the security module. The compiler provided in KasperskyOS Community Edition is used by default.
--with-cflags=FLAGSParameters used when calling the C compiler.
-h, --helpDisplays the Help text.
makeimg
The makeimg script creates the final boot image of the KasperskyOS-based solution with all applications to be started and the Kaspersky Security System module.
The script receives a list of files, including the executable files of all applications that need to be added to ROMFS of the loaded image, and creates the following files:
- Solution image
- Solution image without character tables (
.stripped) - Solution image with debug character tables (
.dbg.syms)
Syntax for using the makeimg script:
makeimg --target=ARCH --sys-root=PATH --with-toolchain=PATH --ldscript=PATH --img-src=PATH --img-dst=PATH --with-init=PATH [--with-extra-asflags=FLAGS][--with-extra-ldflags=FLAGS][--help] FILES
Parameters:
FILESList of paths to files, including the executable files of all applications that need to be added to romfs.
The security module (
ksm.module) must be explicitly specified, or else it will not be included in the solution image. TheEinitapplication does not need to be indicated because it will be automatically included in the solution image.--target=ARCHArchitecture for which the build is intended.
--sys-root=PATHPath to the root directory sysroot. By default, this directory is located in
/opt/KasperskyOS-Community-Edition-<version>/sysroot-arm-kos/.--with-toolchain=PATHPath to the set of auxiliary tools required for the solution build. By default, these tools are located in
/opt/KasperskyOS-Community-Edition-<version>/toolchain/.--ldscript=PATHPath to the linker script required for the solution build. By default, this script is located in
/opt/KasperskyOS-Community-Edition-<version>/libexec/arm-kos/.--img-src=PATHPath to the precompiled KasperskyOS kernel not containing the romfs. By default, the kernel is located in
/opt/KasperskyOS-Community-Edition-<version>/libexec/arm-kos/.--img-dst=PATHPath to the created image file.
--with-init=PATHPath to the executable file of the
Einitinitializing application.--with-extra-asflags=FLAGSAdditional flags for the AS Assembler.
--with-extra-ldflags=FLAGSAdditional flags for the LD Linker.
-h, --helpDisplays the Help text.
Cross compilers
Properties of KasperskyOS cross compilers
The cross compilers included in KasperskyOS Community Edition support processors that have the arm architecture.
The KasperskyOS Community Edition toolchain includes the following tools for cross compilation:
- GCC:
arm-kos-gccarm-kos-g++
- Binutils:
- AS Assembler:
arm-kos-as - LD Linker:
arm-kos-ld
- AS Assembler:
In addition to standard macros, an additional macro __KOS__=1 is defined in GCC. Using this macro lets you simplify porting of the software code to KasperskyOS, and also simplifies development of platform-independent applications.
To view the list of standard macros of GCC, run the following command:
echo '' | arm-kos-gcc -dM -E -
Linker operation specifics
When building the executable file of an application, by default the linker links the following libraries in the specified order:
- libc – standard C library.
- libm – library that implements the mathematical functions of the standard C language library.
- libvfs_stubs – library that contains stubs of I/O functions (for example,
open,socket,read,write). - libkos – library consisting of two parts. The first part provides the C interface for accessing KasperskyOS kernel functions. It is available through the header files in the
coresrvfolder, for example:#include <coresrv/vmm/vmm_api.h>. The second part of the libkos library is a wrapper over the first part and contains additional synchronization functions:mutex,semaphore,event. Other libraries (including libc) interact with the kernel through the libkos library. - libenv – client library of the subsystem for configuring the environment of applications (environmental variables, arguments of the
mainfunction, and custom configurations). - libsrvtransport-u – internal library with the implementation of transport of interprocess communication between KasperskyOS kernel services.
Preparing the solution's boot image
To automate the process of preparing the solution's boot image, you need to configure a build system. You can base this system on the build system implemented in the examples.
This section describes various methods for configuring a build system to prepare a solution's boot image.
Using a Makefile template from the contents of KasperskyOS Community Edition
To simplify the process of preparing the solution's boot image using the make build system, you can use the build.mk template from KasperskyOS Community Edition. The template file is located at the following path:
/opt/KasperskyOS-Community-Edition-<version>/common/build.mk
To prepare a make build system using the build.mk template, do the following in the Makefile build script:
- Specify the value of the
targetsvariable. In the variable value, list all applications included in the solution, separating them with a space. You are not required to specify theEinitorkl.core.Coreapplications because they are processed separately. - For each application specified in the
targetsvariable, specify the values for the following variables:<application-name>-objects– list of object files of the application. You must list all object files.The names of object files are taken from the names of the entity source files according to the following rules:
*.c → *.o*.idl → *.idl.o*.cdl → *.cdl.o*.edl → *.edl.o
<application-name>-ldflags– list of flags passed to the linker. If the entity uses the virtual file system, you must pass the flags specified in theLIBVFS_REMOTEvariable.<application-name>-base– application load address in hexadecimal. If this variable is not specified, the address is assigned automatically. Use this variable for debugging the application.
This same address is passed to the debugger using the following command, which can be added to the .gdbinit file:
add-symbol-file <application-name> <application-load-address> - If the ROMFS partition must contain additional files, define the value for the
ROMFS-FILESvariable. In the variable value, list the files while separating them with blank spaces. If you are using the virtual file system, you must pass the file specified in theVFS_ENTITYvariable. - Add a statement for importing the build.mk template using the following command:
include /opt/KasperskyOS-Community-Edition-<version>/common/build.mk
The build.mk template file has the following build targets:
- sim (default target) – start the solution's boot image using the QEMU emulator.
When started, the QEMU emulator may capture the mouse and will indicate this in the title bar of the emulator window.
- Kos-image – build the solution's boot image to be started on the target hardware platform.
- gdbsim – start the solution's boot image with the capability for debugging. After QEMU emulation is started, it awaits the start of the debugger. For this, call the gdb target in a different command line.
Make sure that TCP/IP port 1234 is open by using the
netstat -anputcommand, for example.Port 1234 is monitored by the gdbserver program, which is used for remote debugging of applications and is part of the QEMU emulator.
When using the gdb debugger, you must use hardware breakpoints (hbreak). The QEMU emulator used in the examples is started with the
-enable-kvmkey, which makes it impossible to use regular breakpoints. - gdb – start the debugger. After starting the debugger for applications that require debugging, run the following commands:
add-symbol-file <application-name> <application-load-address>target remote localhost:1234
Example
This example uses the make build system. In addition to the actions executed in the build.mk template, in the build script you must specify the Hello application and the list of object files of this application. The load address is specified for solution debugging purposes.
Makefile
# List of applications for the build.
targets = hello
# List of object files of the Hello application
hello-objects = hello.o hello.edl.o
# Load address of the Hello entity (in hex)
hello-base = 800000
# Include template with general build rules.
include ../common/build.mk
To start the make build system, run the make hello command.
To run the hello example while in the folder /opt/KasperskyOS-Community-Edition-<version>/examples/hello, run the make command.
Using CMake from the contents of KasperskyOS Community Edition
The CMake build automation system supports cross compilation of applications. To perform cross compilation using CMake, specify the path to a file with the build system extension (toolchain.cmake).
To cross compile an application for KasperskyOS, define the value of the variable: DCMAKE_TOOLCHAIN_FILE=/opt/KasperskyOS-Community-Edition-<version>/toolchain/share/toolchain.cmake
KasperskyOS Community Edition includes the platform library containing a set of ready-to-use scripts for the CMake system.
To prepare an application for debugging:
- In the CMakeLists.txt file, define the
LINK_FLAGSparameter value for the application that you want to debug as follows:set_target_properties (<application-name> PROPERTIES LINK_FLAGS "-Ttext <text-section-address>")The script automatically creates .gdbinit files. The set of commands for the GDB debugger are contained within .gdbinit files. This set of commands determines which address the GDB debugger will use to load entities for debugging.
- Build the application.
Using your own build system
You can use other build systems or implement your own build system to prepare the solution's boot image.
To prepare the solution's boot image, the build system must include the following actions:
- Generate code of the transport methods and types used to create, send, receive and process IPC messages between entities that are included in the solution.
Use the NK compiler for this purpose. In command arguments, relay the path to the files containing EDL-, CDL- and IDL descriptions of entities, components and interfaces.
- Build all entities included in the solution.
To do so, use the cross compilers that are included in KasperskyOS Community Edition.
- Build an Einit initializing entity.
Use the einit tool to generate the code of the Einit entity. In the command arguments, pass the path to the init description file (
init.yamlby default).Then the
Einitentity must be built using the C compiler that is provided in KasperskyOS Community Edition. - Build the kernel module with Kaspersky Security System.
To do so, use the makekss script. In the command arguments, relay the path to the security configuration file (
security.pslby default). - Create an image of the solution.
To do so, use the makeimg script. In the command arguments, pass the executable ELF files of entities, the kernel module with Kaspersky Security System, the KasperskyOS kernel image, and any additional files.
Deploying the solution's boot image on target devices
To deploy the solution's boot image on the target device:
- Connect the data storage drive from which you plan to run the solution's boot image on target devices.
- Find the block device corresponding to the connected drive, for example, by using the following command:
fdisk -l - If required, on the storage drive, create a new partition on which the solution's boot image will be deployed by using the
fdisktool, for example. - If there is no file system on the partition, create one by using the
mkfstool, for example.You can use any file system that is supported by the GRUB 2 bootloader.
- Mount the data drive.
mkdir /mnt/kos_device && mount /dev/sdXY /mnt/kos_deviceHere,
/mnt/kos_deviceis the mount point,/dev/sdXYis the block device name,Xis the letter corresponding to the connected drive, andYis the partition number. - Install the GRUB 2 operating system bootloader on the drive.
To install GRUB 2, run the following command:
grub-install --force --removable \--boot-directory=/mnt/kos_device/boot /dev/sdXHere,
/mnt/kos_deviceis the mount point,/dev/sdXis the block device name, andXis the letter corresponding to the connected drive. - Copy the boot image of the solution to the root directory of the mounted drive.
- In the
/mnt/kos_device/boot/grub/grub.cfgfile, add themenuentrysection that points to the solution's boot image.menuentry "KasperskyOS" {multiboot /my_kasperskyos.imgboot} - Unmount the drive.
umount /mnt/kos_deviceHere,
/mnt/kos_deviceis the mount point.
After performing these actions, you can start KasperskyOS from this drive.
Page top
Security patterns for development under KasperskyOS
Each KasperskyOS-based solution has specific usage scenarios and is designed to counteract specific security threats. Nonetheless, there are some typical scenarios and threats encountered in many different solutions. This section describes the typical risks and threats, and contains a description of architectural patterns that can be employed to increase the security of a solution.
A security pattern (or template) describes a specific recurring security issue that arises in certain known contexts, and provides a well-proven, general scheme for resolving this kind of security issue. A pattern is not a finished project that can be converted directly into code. Instead, it is a solution to a general problem encountered in various projects.
A security pattern system is a set of security patterns together with instructions on their implementation, combination, and practical use when designing secure software systems.
Security patterns resolve security issues at different levels, beginning with patterns at the architectural level, including high-level design of the system, and ending with implementation-level patterns that contain recommendations on how to implement functions or methods.
This section describes the set of security patterns whose implementation examples are provided in KasperskyOS Community Edition.
Security patterns are described in a multitude of information security resources. Each pattern is accompanied by a list of the resources that were used to prepare its description.
Distrustful Decomposition pattern
Description
When using a monolithic application, a single process must be granted all the privileges necessary for the application to operate. This issue is resolved by the Distrustful Decomposition pattern.
The purpose of the Distrustful Decomposition pattern is to divide application functionality among individual processes that require different levels of privileges, and to control the interaction between these processes instead of creating a monolithic application.
Using the Distrustful Decomposition pattern reduces the following:
- Attack surface for each process.
- Functionality and data that a hacker will be able to access if one of the processes is compromised.
Alternate names
Privilege Reduction.
Context
Different functions of an application require different levels of privileges.
Problem
An unsophisticated implementation of an application combines many functions requiring different privileges into one component. This component would need to be run with the maximum level of privileges required for any one of these many functions.
Solution
The Distrustful Decomposition pattern divides functionality among individual processes and isolates potential vulnerabilities within a small subset of the system. A cybercriminal who conducts a successful attack will be able to use only the functionality and data of a single compromised component instead of the entire application.
Structure
This pattern divides one monolithic application into multiple applications that are run as individual processes that could potentially have different privileges. Each process implements a small, clearly defined set of functions of the application. Processes use interprocess communication mechanism to exchange data.
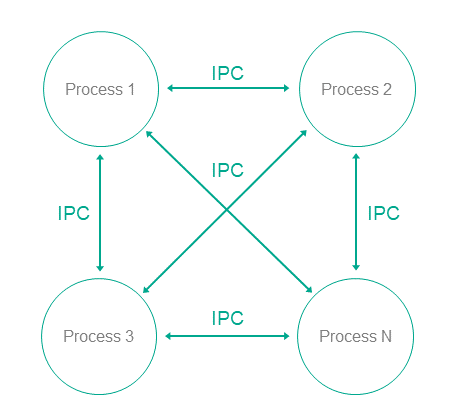
Operation
- In KasperskyOS, an application is divided into entities.
- Entities can exchange messages via IPC.
- A user or remote system connects to the process that provides the necessary functionality with the level of privileges sufficient to perform the requested functions.
Implementation recommendations
Interaction between processes can be unidirectional or bidirectional. It is recommended to always use unidirectional interaction whenever possible. Otherwise, the potential attack surface of individual components increases, which reduces the overall security of the entire system. If bidirectional IPC is used, processes should not trust bidirectional data exchange. For example, if a file system is used for IPC, file contents cannot be trusted.
Specialized implementation in KasperskyOS
In universal operating systems such as Linux or Windows, this pattern does not use anything except the standard process/privileges model that already exists in these operating systems. Each program is run in its own process space with potentially different privileges of the specific user in each process. However, an attack on the OS kernel would reduce the effectiveness of this pattern.
Use of this pattern when developing for KasperskyOS means that control over processes and IPC is entrusted to the microkernel, which is difficult to successfully attack. The Kaspersky Security Module is used for IPC control.
Use of KasperskyOS mechanisms ensures a high level of reliability of the software system with the same or less effort required from the developer when compared to the use of this pattern in programs running under universal operating systems.
In addition, KasperskyOS provides the capability for flexible configuration of security policies. Moreover, the process of defining and editing security policies is potentially independent of the process of developing the applications.
Linked patterns
Use of the Distrustful Decomposition pattern involves use of the Defer to Kernel and Policy Decision Point patterns.
Implementation examples
Examples of an implementation of the Distrustful Decomposition pattern:
Sources of information
The Distrustful Decomposition pattern is described in detail in the following resources:
- Chad Dougherty, Kirk Sayre, Robert C. Seacord, David Svoboda, Kazuya Togashi (JPCERT/CC), "Secure Design Patterns" (March-October 2009). Software Engineering Institute. https://resources.sei.cmu.edu/asset_files/TechnicalReport/2009_005_001_15110.pdf
- Dangler, Jeremiah Y., "Categorization of Security Design Patterns" (2013). Electronic Theses and Dissertations. Paper 1119. https://dc.etsu.edu/etd/1119
Secure Logger example
The Secure Logger example demonstrates use of the Distrustful Decomposition pattern for separating event log read/write functionality.
Example architecture
The security goal of the Secure Logger example is to prevent any possibility of distortion or deletion of information from the event log. This example utilizes the capabilities provided by KasperskyOS to achieve this security goal.
A logging system can be examined by distinguishing the following functional steps:
- Generate information to be written to the log.
- Save information to the log.
- Read entries from the log.
- Provide entries in a convenient format for the consumer.
Accordingly, the logging subsystem can be divided into four processes depending on the required functional capabilities of each process.
For this purpose, the Secure Logger example contains the following four entities: Application, Logger, Reader and LogViewer.
- The
Applicationentity initiates the creation of entries in the event log maintained by theLoggerentity. - The
Loggerentity creates entries in the log and writes them to the disk. - The
Readerentity reads entries from the disk to send them to theLogViewerentity. - The
LogViewerentity sends entries to the user.
The IPC interface provided by the Logger entity is intended only for writing to storage. The IPC interface of the Reader entity is intended only for reading from storage. The example architecture looks as follows:
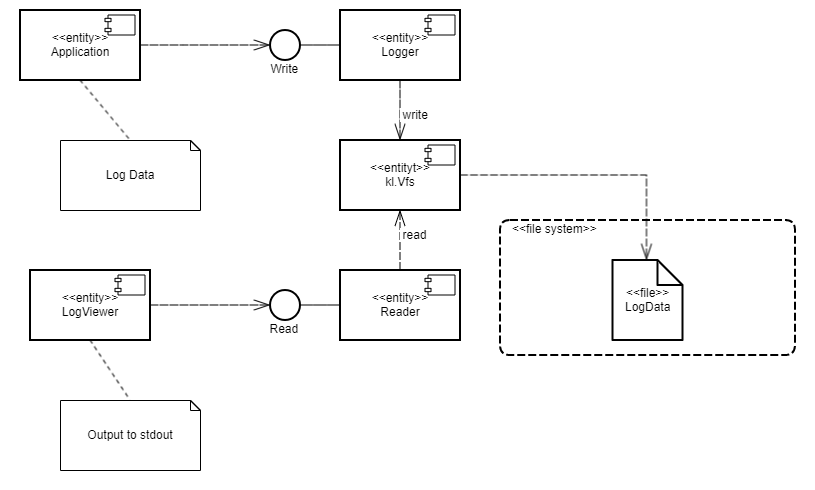
- The
Applicationentity uses the interface of theLoggerentity to save log entries. - The
LogViewerentity uses the interface of theReaderentity to read the log entries and present them to a user.
The LogViewer entity normally has external channels for interacting with a user (for example, to receive data write commands and to provide data to a user). Naturally, this entity is an untrusted component of the system, and therefore could potentially be used to conduct an attack. However, even if a successful attack results in the infiltration of unauthorized executable code into the LogViewer entity, information in the log cannot be distorted through this entity. This is because the entity can only utilize the data read interface, which cannot actually be used to distort or delete data. Moreover, the LogViewer entity does not have the capability to gain access to other IPC interfaces because this access is controlled by the security module.
A security policy in the Secure Logger example has the following characteristics:
- The
Applicationentity has the capability to query theLoggerentity to create a new entry in the event log. - The
LogViewerentity has the capability to query theReaderentity to read entries from the event log. - The
Applicationentity does not have the capability to query theReaderentity to read entries from the event log. - The
LogViewerentity does not have the capability to query theLoggerentity to create a new entry in the event log.
Example files
The code of the example and build scripts are available at the following path:
/opt/KasperskyOS-Community-Edition-<version>/examples/secure_logger
Building and running example
See the Building and running examples section.
Page top
Separate Storage example
The Separate Storage example demonstrates use of the Distrustful Decomposition pattern to separate data storage for trusted and untrusted applications.
Example architecture
The Separate Storage example contains two user entities: UserManager and CertificateManager.
These entities work with data located in the corresponding files:
- The
UserManagerentity works with data from theuserlist.txtfile. - The
CertificateManagerentity works with data from thecertificate.cerfile.
Each of these entities uses its own instance of the VFS entity to access a separate file system. Each VFS entity includes a block device driver linked to an individual logical drive partition. The UserManager entity does not have access to the file system of the CertificateManager entity, and vice versa.
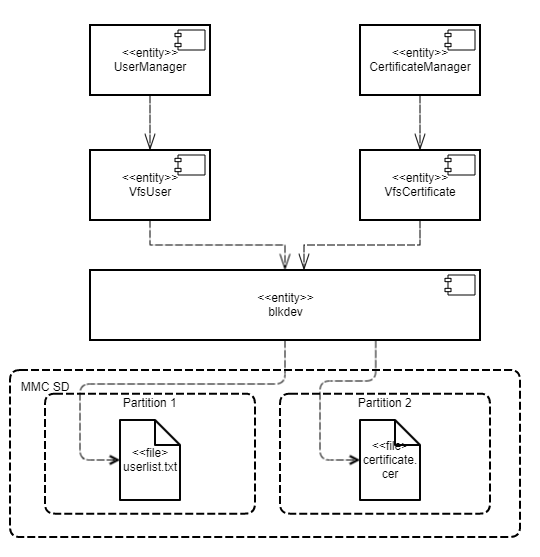
This architecture guarantees that if there is an attack or error in any of the UserManager and CertificateManager entities, the entity will not be able to access any file that was not intended for the specific entity's operations.
A security policy in the Separate Storage example has the following characteristics:
- The
UserManagerentity has access to the file system only through theVfsUserentity. - The
CertificateManagerentity has access to the file system only through theVfsCertificateentity.
Example files
The code of the example and build scripts are available at the following path:
/opt/KasperskyOS-Community-Edition-<version>/examples/separate_storage
Building and running example
To run an example on QEMU, go to the directory containing the example, build the example and run the following commands:
$ cd build/einit
# Before running the following command, be sure that the path to
# the directory with the qemu-system-arm executable file is saved in
# the PATH environment variable. If it is not there,
# add it to the PATH variable.
$ qemu-system-arm -m 2048 -machine vexpress-a15 -nographic -monitor none -sd hdd.img -kernel kos-qemu-image
See also Building and running examples section.
Preparing an SD card to run on Raspberry Pi 4 B
To run the Separate Storage example on Raspberry Pi 4 B, the following additional actions are necessary:
- The SD card must contain both a bootable partition with the solution image as well as 2 additional partitions with the
ext2orext3file systems. - The first additional partition must contain the
userlist.txtfile from the./resources/files/directory. - The second additional partition must contain the
certificate.cerfile from the./resources/files/directory.
To run the Separate Storage example on Raspberry Pi 4 B, you can use an SD card prepared for running the embed_ext2_with_separate_vfs example on Raspberry Pi 4 B, after copying the userlist.txt and certificate.cer files to the appropriate partitions.
Defer to Kernel pattern
Description
The Defer to Kernel pattern lets you take advantage of permission control at the OS kernel level.
The purpose of this pattern is to utilize mechanisms available at the OS kernel level to clearly separate the functionality requiring elevated privileges from the functionality that does not require elevated privileges. By using kernel mechanisms, we do not have to implement new tools for arbitrating security decisions at the user level.
Alternate names
Policy Enforcement Point (PEP), Protected System, Enclave.
Context
The Defer to Kernel pattern is applicable if the system has the following characteristics:
- The system has processes that run without elevated privileges, including user processes.
- Some system functions require elevated privileges that must be verified before processes are granted access to data.
- You need to verify not only the privileges of the requesting process, but also the overall permissibility of the requested operation within the operational context of the entire system and its overall security.
Problem
When functionality is divided among various processes with different levels of privileges, these privileges must be verified when a request is made from one process to another. These verifications must be carried out and their resulting permissions must be granted by trusted code that has a minimal risk of being compromised. The trustworthiness of application code is almost always questionable due to its sheer volume and due to its primary orientation toward implementation of functional requirements.
Solution
Clearly separate privileged functionality and data from non-privileged functionality and data at the process level, and give the OS kernel control of interprocess communication (IPC), including verification of access rights when there is a request for functionality or data requiring elevated privileges, and verification of the overall state of the system and the states of individual processes at the time of the request.
Structure
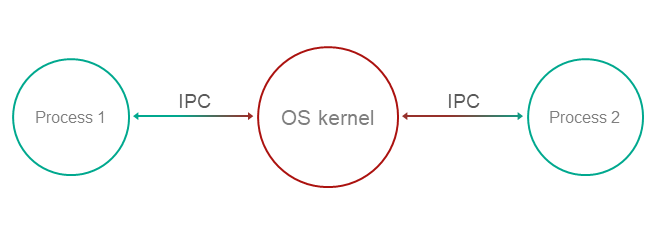
Operation
- Functionality and management of data with various privileges are compartmentalized among processes.
- The OS kernel ensures isolation of processes.
Process-1wants to request privileged functionality or data fromProcess-2using IPC.- The kernel controls IPC and allows or denies communication based on security policies and based on the available information regarding the operational context and state of
Process-1.
Implementation recommendations
To ensure that a specific implementation of a pattern operates securely and reliably, the following is required:
- Isolation
Complete and guaranteed isolation of processes must be ensured.
- Inability to bypass the kernel
Absolutely all IPC interactions must be controlled by the kernel.
- Kernel self-defense
The trustworthiness of the kernel must be ensured through its own means of protection against compromise.
- Provability
The kernel requires a certain level of guaranteed security and reliability.
- Capability for external computation of access permissions
Access permissions must be computed at the OS level, and must not be implemented in application code.
For this purpose, tools must be provided for describing access policies so that security policies are detached from the business logic.
Specialized implementation in KasperskyOS
The KasperskyOS kernel guarantees isolation of entities and serves as a Policy Enforcement Point (PEP).
Linked patterns
The Defer to Kernel pattern is a special case of the Distrustful Decomposition and Policy Decision Point patterns. The Policy Decision Point pattern defines the abstraction process that intercepts all requests to resources and verifies that they comply with the defined security policy. The distinctive feature of the Defer to Kernel pattern is that the verification process is performed by the OS kernel, which is a more reliable and portable solution that reduces the time spent on development and testing.
Impacts
By making the OS kernel responsible for applying the access policy, you separate the security policy from the business logic (which may be very complicated) and thereby simplify development and improve portability through the use of OS kernel functions.
This also makes it possible to prove the overall security of a solution by simply demonstrating that the kernel is operating correctly. The difficulty in proving correct execution of code grows nonlinearly as the size of the code increases. The Defer to Kernel pattern minimizes the amount of trusted code, provided that the OS kernel itself is not too large.
Implementation examples
Example of a Defer to Kernel pattern implementation: Defer to Kernel example.
Sources of information
The Defer to Kernel pattern is described in detail in the following resources:
- Chad Dougherty, Kirk Sayre, Robert C. Seacord, David Svoboda, Kazuya Togashi (JPCERT/CC), "Secure Design Patterns" (March-October 2009). Software Engineering Institute. https://resources.sei.cmu.edu/asset_files/TechnicalReport/2009_005_001_15110.pdf
- Dangler, Jeremiah Y., "Categorization of Security Design Patterns" (2013). Electronic Theses and Dissertations. Paper 1119. https://dc.etsu.edu/etd/1119
- Schumacher, Markus, Fernandez-Buglioni, Eduardo, Hybertson, Duane, Buschmann, Frank, and Sommerlad, Peter. "Security Patterns: Integrating Security and Systems Engineering" (2006).
Defer to Kernel example
The Defer to Kernel example demonstrates the use of Defer to Kernel and Policy Decision Point patterns.
The Defer to Kernel example contains three user entities: PictureManager, ValidPictureClient and NonValidPictureClient.
In this example, the ValidPictureClient and NonValidPictureClient entities query the PictureManager entity to receive information.
Only the ValidPictureClient entity is allowed to interact with the PictureManager entity.
The KasperskyOS kernel guarantees isolation of entities.
Control of interaction between entities in KasperskyOS is delegated to the Kaspersky Security Module. The subsystem analyzes each sent request and response and decides whether to allow or deny delivery based on the defined security policy.
A security policy in the Defer to Kernel example has the following characteristics:
- The
ValidPictureCliententity is explicitly allowed to interact with thePictureManagerentity. - The
NonValidPictureCliententity is explicitly not allowed to interact with thePictureManagerentity. This means that this interaction is denied (based on the Default Deny principle).
Dynamically created IPC channels
The example also demonstrates the capability to dynamically create IPC channels between entities. IPC channels are dynamically created by using a name server, which is a special kernel service provided by the NameServer entity. The capability to dynamically create IPC channels allows you to change the topology of interaction between entities on the fly.
Any entity that is allowed to interact with NameServer via IPC can register its own interfaces in the name server. Another entity can request the registered interfaces from the name server, and then connect to the relevant interface.
The security module is used to control interactions via IPC (even those that were created dynamically).
Example files
The code of the example and build scripts are available at the following path:
/opt/KasperskyOS-Community-Edition-<version>/examples/defer_to_kernel
Building and running example
See the Building and running examples section.
Page top
Policy Decision Point pattern
Description
The Policy Decision Point pattern encapsulates the computation of decisions based on security model methods into a separate system component that ensures that these security methods are performed in their full scope and correct sequence.
Alternate names
Check Point, Access Decision Function.
Context
The system has functions with different levels of privileges, and the security policy is complex (contains many security model methods bound to security events).
Problem
If security policy checks are divided among different system components, the following issues arise:
- You have to carefully make sure that all necessary checks are performed in all required cases.
- It is difficult to ensure that all checks are performed in the correct order.
- It is difficult to prove that the verification system is operating correctly, has no conflicts, and its integrity has not been compromised.
- The security policy is linked to the business logic. This means that any modification of the security policy requires changes to the business logic, which complicates support and increases the likelihood of errors.
Solution
All verifications of security policy compliance are conducted in a separate component called a Policy Decision Point (PDP). This component is responsible for ensuring that verifications are conducted in their correct sequence and scope. Policy checks are separated from the code that implements the business logic.
Structure

Operation
- A Policy Enforcement Point (PEP) receives a request to access functionality or data.
For example, the PEP may be the OS kernel. For more details, refer to Defer to Kernel pattern.
- The PEP gathers the request attributes required for making decisions on access control.
- The PEP requests an access control decision from the Policy Decision Point (PDP).
- The PDP computes a decision on whether to grant access based on the security policy and based on the information received in the request from the PEP.
- The PEP denies or allows interaction based on the decision of the PDP.
Implementation recommendations
Implementations must take into account the problem of "Verification time vs. Usage time". For example, if a security policy depends on the quickly changing status of a specific system object, a computed decision loses its relevance as quickly as the status changes. In a system that utilizes the Policy Decision Point pattern, you must take care to minimize the time interval between the access decision and the time when the request based on this decision is fulfilled.
Specialized implementation in KasperskyOS
The KasperskyOS kernel guarantees isolation of entities and serves as a Policy Enforcement Point (PEP).
Control of interaction between entities in KasperskyOS is delegated to the Kaspersky Security Module. This module analyzes each sent request and response and decides whether to allow or deny delivery based on the defined security policy. Therefore, the Kaspersky Security Module performs the role of the Policy Decision Point (PDP).
Impacts
This pattern lets you configure a security policy without making any modifications to the code that implements the business logic, and delegate system support involving information security.
Linked patterns
Use of the Policy Decision Point pattern involves use of the Distrustful Decomposition and Defer to Kernel patterns.
Implementation examples
Example of a Policy Decision Point pattern implementation: Defer to Kernel example.
Sources of information
The Policy Decision Point pattern is described in detail in the following resources:
- Chad Dougherty, Kirk Sayre, Robert C. Seacord, David Svoboda, Kazuya Togashi (JPCERT/CC), "Secure Design Patterns" (March-October 2009). Software Engineering Institute. https://resources.sei.cmu.edu/asset_files/TechnicalReport/2009_005_001_15110.pdf
- Dangler, Jeremiah Y., "Categorization of Security Design Patterns" (2013). Electronic Theses and Dissertations. Paper 1119. https://dc.etsu.edu/etd/1119
- Schumacher, Markus, Fernandez-Buglioni, Eduardo, Hybertson, Duane, Buschmann, Frank, and Sommerlad, Peter. "Security Patterns: Integrating Security and Systems Engineering" (2006).
- Bob Blakley, Craig Heath, and members of The Open Group Security Forum. "Security Design Patterns" (April 2004). The Open Group. https://pubs.opengroup.org/onlinepubs/9299969899/toc.pdf
Privilege Separation pattern
Description
The Privilege Separation pattern involves the use of non-privileged isolated system modules for interaction with clients (other modules or users) that do not have any privileges. The purpose of the Privilege Separation pattern is to reduce the amount of code that is executed with special privileges without impacting or restricting application functionality.
The Privilege Separation pattern is a special case of the Distrustful Decomposition pattern.
Example
An unauthenticated user connects to a system that has functions requiring elevated privileges.
Context
The system has components with a large attack surface due to their high number of connections with unsafe sources and/or a complicated, potentially error-prone implementation.
Problem
When a client with unknown privileges interacts with a privileged component of the system, there are risks that the data and functionality accessible to that component could be compromised.
Solution
Interactions with unsafe clients must be conducted only through specially allocated components that have no privileges. The Privilege Separation pattern does not modify system functionality. Instead, it merely separates functionality into components with different privileges.
Operation
Pattern operations can be divided into two phases:
- Pre-Authentication. The client is not yet authenticated. It sends a request to a privileged master process. The master process creates a child process with no privileges (and no access to the file system). This child process performs client authentication.
- Post-Authentication. The client is authenticated and authorized. The privileged master process creates a new child process that has privileges corresponding to the permissions of the client. This process is responsible for all subsequent interaction with the client.
Recommendations on implementation in KasperskyOS
At the Pre-Authentication phase, the master process can save the state of each non-privileged process in the form of a finite-state machine and change the state of the finite-state machine during authentication.
Requests from child processes to the master process are performed using standard IPC mechanisms. However, interaction control is conducted using the Kaspersky Security Module.
Impacts
If attackers gain control of a non-privileged process, they will not gain access to any privileged functions or data. If attackers gain control of an authorized process, they will obtain only the privileges of this process.
In addition, code that is organized in this manner is easier to check and test. You just have to pay special attention to the functionality that operates with elevated privileges.
Implementation examples
Example of a Privilege Separation pattern implementation: Device Access example.
Sources of information
The Privilege Separation pattern is described in detail in the following resources:
- Chad Dougherty, Kirk Sayre, Robert C. Seacord, David Svoboda, Kazuya Togashi (JPCERT/CC), "Secure Design Patterns" (March-October 2009). Software Engineering Institute. https://resources.sei.cmu.edu/asset_files/TechnicalReport/2009_005_001_15110.pdf
- Dangler, Jeremiah Y., "Categorization of Security Design Patterns" (2013). Electronic Theses and Dissertations. Paper 1119. https://dc.etsu.edu/etd/1119
Device Access example
The Device Access example demonstrates use of the Privilege Separation pattern.
Example architecture
The example contains the following three entities: Device, LoginManager and Storage.
In this example, the Device entity queries the Storage entity to receive information and queries the LoginManager entity for authorization.
The Device entity obtains access to the Storage entity after successful authorization.
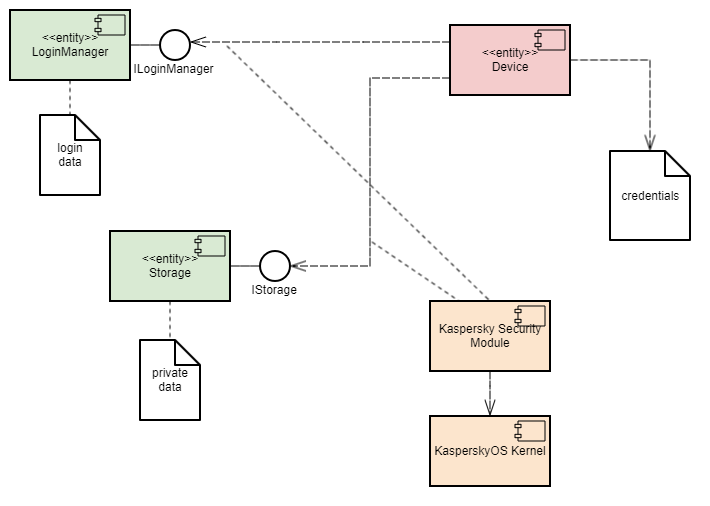
This example demonstrates the capability to separate the authorization logic and the data access logic into independent components. This separation guarantees that data access can be opened only after successful authorization. The security module monitors whether authorization was successfully completed. This architecture also enables independent development and testing of the authorization logic and the data access provision logic.
A security policy in the Device Access example has the following characteristics:
- The
Deviceentity has the capability to query theLoginManagerentity for authorization. - Calls of the
GetInfo()method of theStorageentity are managed by methods of the Flow security model:- The finite-state machine described in the
sessionobject configuration has two states:unauthenticatedandauthenticated. - The initial state is
unauthenticated. - Only transitions from
unauthenticatedtoauthenticatedand vice versa are allowed. - The
sessionobject is created when theDeviceentity is started. - When the
Deviceentity successfully calls theLogin()method of theLoginManagerentity, the state of thesessionobject changes toauthenticated. - When the
Deviceentity successfully calls theLogout()method of theLoginManagerentity, the state of thesessionobject changes tounauthenticated. - When the
Deviceentity calls theGetInfo()method of theStorageentity, the current state of thesessionobject is verified. The call is allowed only if the current state of the object isauthenticated.
- The finite-state machine described in the
Example files
The code of the example and build scripts are available at the following path:
/opt/KasperskyOS-Community-Edition-<version>/examples/device_access
Building and running example
See the Building and running examples section.
Page top
Information Obscurity pattern
Description
The purpose of the Information Obscurity pattern is to encrypt confidential data in otherwise unsafe environments and thereby protect against data theft.
Context
This pattern should be used when data is frequently transferred between parts of a system and/or between the system and other (external) systems.
Problem
Confidential data may be transmitted through an untrusted environment within one system (through untrusted components) or between different systems (through untrusted networks). If this environment is compromised, confidential data could be intercepted by a cybercriminal.
Solution
The security policy must separate individual data based on its specific level of confidentiality so that you can determine which data should be encrypted and which encryption algorithms should be used. Encryption and decryption may take a lot of time, therefore their use should be limited whenever possible. The Information Obscurity pattern resolves this issue by utilizing a specific confidentiality level to determine what exactly must be concealed with encryption.
Implementation examples
Example of an Information Obscurity pattern implementation: Secure Login example.
Sources of information
The Information Obscurity pattern is described in detail in the following resources:
- Dangler, Jeremiah Y., "Categorization of Security Design Patterns" (2013). Electronic Theses and Dissertations. Paper 1119. https://dc.etsu.edu/etd/1119
- Schumacher, Markus, Fernandez-Buglioni, Eduardo, Hybertson, Duane, Buschmann, Frank, and Sommerlad, Peter. "Security Patterns: Integrating Security and Systems Engineering" (2006).
Secure Login example
The Secure Login example demonstrates use of the Information Obscurity pattern. This example demonstrates the capability to transmit critical system information through an untrusted environment.
Example architecture
This example simulates the acquisition of remote access to an IoT device by sending user account credentials (user name and password) to this device. The untrusted environment within the IoT device is the web server that responds to requests from users. Practical experience has shown that this kind of web server is easy to detect and frequently attacked successfully because IoT devices do not have built-in tools for protection against intrusion and other attacks. Users also gain access to the IoT device through an untrusted network. Obviously, encryption algorithms must be used in these types of conditions to protect user account credentials from being compromised.
In terms of the architecture in these systems, the following objects can be distinguished:
- Data source: user's browser.
- Point of communication with the device: web server.
- Subsystem for processing information from the user: authentication subsystem.
To employ cryptographic protection, the following steps must be completed:
- Configure interaction between the data source and the device over the HTTPS protocol. This helps prevent unauthorized surveillance of HTTP traffic and MITM (man-in-the-middle) attacks.
- Generate a shared secret between the data source and the information processing subsystem.
- Use this secret to encrypt information on the data source side and to decrypt the information on the information processing subsystem side. This helps prevent data within the device from being compromised (at the point of communication).
The Secure Login example includes the following components:
Civetwebweb server (untrusted component,WebServerentity).- User authentication subsystem (trusted component,
AuthServiceentity). - TLS terminator (trusted component,
TlsEntityentity). This component supports the TLS (transport layer security) mechanism. Together with the web server, the TLS terminator supports the HTTPS protocol on the device side (the web server interacts with the browser through the TLS terminator).
The user authentication process occurs as follows:
- Using their browser, the user opens the page at
https://localhost:1106(when running the example on QEMU) or athttps://<Raspberry Pi IP address>:1106(when running the example on Raspberry Pi 4 B). HTTP traffic between the browser and TLS terminator will be transmitted in encrypted form, but the web server will work only with unencrypted HTTP traffic. (This example uses a self-signed certificate, so most up-to-date browsers will warn you that the connection is not secure. You need to agree to use this "insecure" connection, which will actually be encrypted despite the warning). - The
Civetwebweb server running in theWebServerentity displays theindex.htmlpage containing an authentication prompt. - The user clicks the
Log inbutton. - The
WebServerentity calls theAuthServiceentity via IPC to get the page containing the user name and password input form. - The
AuthServiceentity performs the following actions:- Generates a private key and public settings, and calculates the public key based on the Diffie-Hellman algorithm.
- Creates the
auth.htmlpage containing the user name and password input form (the page code contains the public settings and the public key). - Transfers the received page to the
WebServerentity via IPC.
- The
Civetwebweb server running in theWebServerentity displays theauth.htmlpage containing the user name and password input form. - The user completes the form and clicks the
Submitbutton (correct data for authentication is contained in the filesecure_login/auth_service/src/authservice.cpp). - The
auth.htmlpage code executed by the browser performs the following actions:- Generates a private key and calculates the public key and shared secret key based on the Diffie-Hellman algorithm.
- Encrypts the password by using the
XORoperation with the shared secret key. - Transmits the user name, encrypted password and public key to the web server.
- The
WebServerentity calls theAuthServiceentity via IPC to get the page containing the authentication result by transmitting the user name, encrypted password and public key. - The
AuthServiceentity performs the following actions:- Calculates the shared secret key based on the Diffie-Hellman algorithm.
- Decrypts the password by using the shared secret key.
- Returns the
result_err.htmlpage orresult_ok.htmlpage depending on the authentication result.
- The
Civetwebweb server running in theWebServerentity displays theresult_err.htmlpage or theresult_ok.htmlpage.
This way, confidential data is transmitted only in encrypted form through the network and web server. In addition, all HTTP traffic is transmitted through the network in encrypted form. Data is transferred between components via IPC interactions controlled by the Kaspersky Security Module.
Unit testing using the GoogleTest framework
In addition to the Information Obscurity pattern, the Secure Login example demonstrates use of the GoogleTest framework to conduct unit testing of applications developed for KasperskyOS (this framework is provided in KasperskyOS Community Edition).
The source code of the tests is located at the following path:
/opt/KasperskyOS-Community-Edition-<version>/examples/secure_login/tests
These unit tests are designed for verification of certain CPP modules of the authentication subsystem and web server.
To start testing:
- Go to the directory with the
Secure Loginexample. - Delete the
builddirectory containing the results of the previous build by running the following command:sudo rm -rf build/
- Open the
cross-build.shscript file in a text editor. - Add the
-D RUN_TESTS="y" \build flag to the script (for example, after the-D CMAKE_BUILD_TYPE:STRING=Release \build flag). - Save the script file and then run the command:
$ sudo ./cross-build.sh
Tests are conducted in TestEntity. The AuthService and WebServer entities are not started in this case. Therefore, the example cannot be used to demonstrate the Information Obscurity pattern when testing is being conducted.
After testing is finished, the results of the tests are displayed.
Example files
The code of the example and build scripts are available at the following path:
/opt/KasperskyOS-Community-Edition-<version>/examples/secure_login
Building and running example
To run an example on QEMU, go to the directory containing the example, build the example and run the following commands:
$ cd build/einit
# Before running the following command, be sure that the path to
# the directory with the qemu-system-arm executable file is saved in
# the PATH environment variable. If it is not there,
# add it to the PATH variable.
$ qemu-system-arm -m 2048 -machine vexpress-a15 -nographic -monitor none -net nic,macaddr=52:54:00:12:34:56 -net user,hostfwd=tcp::1106-:1106 -sd sdcard0.img -kernel kos-qemu-image
See also Building and running examples section.
Page top
Appendices
This section provides additional information to supplement the primary text of the document.
Additional examples
This section provides descriptions of additional examples that are included in KasperskyOS Community Edition.
net_with_separate_vfs example
This example presents a basic case of network interaction using Berkeley sockets.
The example consists of Client and Server entities linked by a TCP socket using a loopback interface. Standard POSIX functions are used in the code of the entities.
To connect entities using a socket through a loopback, they must use the same network stack instance. This means that they must interact with a "shared" VFS entity (in this example, this entity is called NetVfs).
To correctly connect the Client and Server entities to the NetVfs entity, the Env entity must also be included in the solution.
The CMake system, which is included with KasperskyOS Community Edition, is used to build and run the example.
Example files
The code of the example and build scripts are available at the following path:
/opt/KasperskyOS-Community-Edition-<version>/examples/net_with_separate_vfs
Building and running example
See the Building and running examples section.
Page top
net2_with_separate_vfs example
This example demonstrates the special features of a solution in which an entity uses standard POSIX functions to interact with an external server.
The net2_with_separate_vfs example is a modified net_with_separate_vfs example. In contrast to the net_with_separate_vfs example, in this example an entity interacts over the network with an external server rather than another entity.
This example consists of the Client entity running in KasperskyOS on QEMU and the Server program running in a Linux host operating system. The Client entity and Server process are bound by a TCP socket. Standard POSIX functions are used in the code of the Client entity.
To connect the Client entity and the Server process using a socket, the Client entity must interact with NetVfs entity. During the build, the NetVfs entity is linked to a network driver that supports interaction with the Server process running in Linux.
To correctly connect the Client entity to the NetVfs entity, the Env entity must also be included in the solution.
The CMake system, which is included with KasperskyOS Community Edition, is used to build and run the example.
Example files
The code of the example and build scripts are available at the following path:
/opt/KasperskyOS-Community-Edition-<version>/examples/net2_with_separate_vfs
Building and running example
See the Building and running examples section.
Page top
embedded_vfs example
This example demonstrates how to embed the virtual file system (VFS) provided in KasperskyOS Community Edition into an entity being developed.
In this example, the Client entity fully encapsulates the VFS implementation from KasperskyOS Community Edition. This lets you eliminate the use of IPC for all the standard I/O functions (stdio.h, socket.h, etc.) for debugging or performance improvement purposes, for example.
The Client entity tests the following operations:
- Create a folder.
- Create and delete a file.
- Read from a file and write to a file.
Supplied resources
The example includes the hdd.img image of a hard drive with the FAT32 file system.
This example does not contain an implementation of drivers of block devices used by the Client. These drivers (the ATA and SDCard entities) are provided in KasperskyOS Community Edition and are added in the build file ./CMakeLists.txt.
Example files
The code of the example and build scripts are available at the following path:
/opt/KasperskyOS-Community-Edition-<version>/examples/embedded_vfs
Building and running example
To run an example on QEMU, go to the directory containing the example, build the example and run the following commands:
$ cd build/einit
# Before running the following command, be sure that the path to
# the directory with the qemu-system-arm executable file is saved in
# the PATH environment variable. If it is not there,
# add it to the PATH variable.
$ qemu-system-arm -m 2048 -machine vexpress-a15 -nographic -monitor none -sd hdd.img -kernel kos-qemu-image
See also Building and running examples section.
Page top
embed_ext2_with_separate_vfs example
This example shows how to embed a new file system into the virtual file system (VFS) that is provided in KasperskyOS Community Edition.
In this example, the Client entity tests the operation of file systems (ext2, ext3, ext4) on block devices. To do so, the Client calls the file system driver (the FileVfs entity) via IPC, and FileVfs in turn calls the block device via IPC.
The ext2 and ext3 file systems work with the default settings. The ext4 file system works if you disable extent (mkfs.ext4 -O ^64bit,^extent /dev/foo).
Example files
The code of the example and build scripts are available at the following path:
/opt/KasperskyOS-Community-Edition-<version>/examples/embed_ext2_with_separate_vfs
Building and running example
To run an example on QEMU, go to the directory containing the example, build the example and run the following commands:
$ cd build/einit
# Before running the following command, be sure that the path to
# the directory with the qemu-system-arm executable file is saved in
# the PATH environment variable. If it is not there,
# add it to the PATH variable.
$ qemu-system-arm -m 2048 -machine vexpress-a15 -nographic -monitor none -sd hdd.img -kernel kos-qemu-image
See also Building and running examples section.
Preparing an SD card to run on Raspberry Pi 4 B
To run the embed_ext2_with_separate_vfs example on Raspberry Pi 4 B, the SD card needs to have both a bootable partition with the solution image as well as 3 additional partitions with the ext2, ext3 and ext4 file systems, respectively.
multi_vfs_ntpd example
This example shows how to use an external NTP server in KasperskyOS. The kl.Ntpd entity is included in KasperskyOS Community Edition and is an implementation of an NTP client, which gets time parameters from an external NTP servers in the background and passes them to the KasperskyOS kernel.
The example also demonstrates the use of various virtual file systems (VFS) in a single solution. The example uses different VFS to access the functions for working with the file system and functions for working with the network:
VfsNetis used for working with the network.VfsRamfsandVfsSdCardFsare used for working with the file system.
The Client entity uses standard libc library functions for getting time information, which are converted to calls to VFS entities via IPC.
The Env entity is used to pass environment variables and main function arguments to other entities.
The CMake system, which is included with KasperskyOS Community Edition, is used to build and run the example.
Supplied resources
The following configuration files are included in the example:
./resources/include/config.h.incontains a description of the backend file system that will be used in the solution:sdcardorramfs.Each backend in the solution also uses a separate VFS: respectively
VfsSdCardFsorVfsRamfs.- The
./resources/ramfs/etcand/resources/sdcard/etcdirectories contain configuration files for the VFS andNtpdentities.
Example files
The code of the example and build scripts are available at the following path:
/opt/KasperskyOS-Community-Edition-<version>/examples/multi_vfs_ntpd
Building and running example
To run an example on QEMU, go to the directory containing the example, build the example and run the following commands:
$ cd build/einit
# Before running the following command, be sure that the path to
# the directory with the qemu-system-arm executable file is saved in
# the PATH environment variable. If it is not there,
# add it to the PATH variable.
$ qemu-system-arm -m 2048 -machine vexpress-a15 -nographic -monitor none -sd sdcard0.img -kernel kos-qemu-image
See also Building and running examples section.
Page top
multi_vfs_dns_client example
This example shows how to use an external DNS server in KasperskyOS.
The example also demonstrates the use of various virtual file systems (VFS) in a single solution. The example uses different VFS to access the functions for working with the file system and functions for working with the network:
VfsNetis used for working with the network.VfsRamfsandVfsSdCardFsare used for working with the file system.
The Client entity uses standard libc library functions for accessing a DNS service, which are converted to calls to VFS entities via IPC.
The Env entity is used to pass environment variables and main function arguments to other entities.
The CMake system, which is included with KasperskyOS Community Edition, is used to build and run the example.
Supplied resources
The following configuration files are included in the example:
./resources/include/config.h.incontains a description of the backend file system that will be used in the solution:sdcardorramfs.Each backend in the solution also uses a separate VFS: respectively
VfsSdCardFsorVfsRamfs.- The
./resources/ramfs/etcand/resources/sdcard/etcdirectories contain configuration files for the VFS entities.
Example files
The code of the example and build scripts are available at the following path:
/opt/KasperskyOS-Community-Edition-<version>/examples/multi_vfs_dns_client
Building and running example
To run an example on QEMU, go to the directory containing the example, build the example and run the following commands:
$ cd build/einit
# Before running the following command, be sure that the path to
# the directory with the qemu-system-arm executable file is saved in
# the PATH environment variable. If it is not there,
# add it to the PATH variable.
$ qemu-system-arm -m 2048 -machine vexpress-a15 -nographic -monitor none -sd sdcard0.img -kernel kos-qemu-image
See also Building and running examples section.
Page top
multi_vfs_dhcpcd example
Example use of the kl.Dhcpcd entity.
The Dhcpcd entity is an implementation of a DHCP client, which gets network interface parameters from an external DHCP server in the background and passes them to a virtual file system (VFS) entity.
The example also demonstrates the use of different VFS in a single solution. The example uses different VFS to access the functions for working with the file system and functions for working with the network:
VfsNetis used for working with the network.VfsRamfsandVfsSdCardFsare used for working with the file system.
The Client entity uses standard libc library functions for getting information on network interfaces (ioctl), which are converted to calls to VFS entities via IPC.
The Env entity is used to pass environment variables and main function arguments to other entities.
The CMake system, which is included with KasperskyOS Community Edition, is used to build and run the example.
Supplied resources
The following configuration files are included in the example:
./resources/include/config.h.incontains a description of the backend file system that will be used in the solution:sdcardorramfs.Each backend in the solution also uses a separate VFS: respectively
VfsSdCardFsorVfsRamfs.- The
./resources/ramfs/etcand/resources/sdcard/etcdirectories contain configuration files for the VFS andDhcpcdentities.
Example files
The code of the example and build scripts are available at the following path:
/opt/KasperskyOS-Community-Edition-<version>/examples/multi_vfs_dhcpcd
Building and running example
To run an example on QEMU, go to the directory containing the example, build the example and run the following commands:
$ cd build/einit
# Before running the following command, be sure that the path to
# the directory with the qemu-system-arm executable file is saved in
# the PATH environment variable. If it is not there,
# add it to the PATH variable.
$ qemu-system-arm -m 2048 -machine vexpress-a15 -nographic -monitor none -sd sdcard0.img -kernel kos-qemu-image
See also Building and running examples section.
Page top
mqtt_publisher example
Example use of the MQTT protocol in KasperskyOS.
In this example, an MQTT subscriber must be started on the host operating system, and an MQTT publisher must be started on KasperskyOS. The Publisher entity is an implementation of an MQTT publisher that publishes the current time with a 5-second interval.
When the example starts and runs successfully, an MQTT subscriber started on the host operating system prints a "received PUBLISH" message with a "datetime" topic.
The example also demonstrates the use of various virtual file systems (VFS) in a single solution. The example uses different VFS to access the functions for working with the file system and functions for working with the network:
VfsNetis used for working with the network.VfsRamfsandVfsSdCardFsare used for working with the file system.
The Env entity is used to pass environment variables and main function arguments to other entities.
The CMake system, which is included with KasperskyOS Community Edition, is used to build and run the example.
Starting Mosquitto
To run this example, a Mosquitto MQTT broker must be installed and started on the host system. To install and start Mosquitto, run the following commands:
$ sudo apt install mosquitto mosquitto-clients
$ sudo /etc/init.d/mosquitto start
To start an MQTT subscriber on the host system, run the following command:
$ mosquitto_sub -d -t "datetime"
Supplied resources
The following configuration files are included in the example:
./resources/include/config.h.incontains a description of the backend file system that will be used in the solution:sdcardorramfs.Each backend in the solution also uses a separate VFS: respectively
VfsSdCardFsorVfsRamfs.- The
./resources/ramfs/etcand/resources/sdcard/etcdirectories contain configuration files for the VFS andNtpdentities.
Example files
The code of the example and build scripts are available at the following path:
/opt/KasperskyOS-Community-Edition-<version>/examples/mqtt_publisher
Building and running example
To run an example on QEMU, go to the directory containing the example, build the example and run the following commands:
$ cd build/einit
# Before running the following command, be sure that the path to
# the directory with the qemu-system-arm executable file is saved in
# the PATH environment variable. If it is not there,
# add it to the PATH variable.
$ qemu-system-arm -m 2048 -machine vexpress-a15 -nographic -monitor none -sd sdcard0.img -kernel kos-qemu-image
See also Building and running examples section.
Page top
mqtt_subscriber example
Example use of the MQTT protocol in KasperskyOS.
In this example, an MQTT publisher must be started on the host operating system, and an MQTT subscriber must be started on KasperskyOS. The Subscriber entity is an implementation of an MQTT subscriber.
When the example starts and runs successfully, an MQTT subscriber started on KasperskyOS prints a "Got message with topic: my/awesome/topic, payload: hello" message.
The example also demonstrates the use of various virtual file systems (VFS) in a single solution. The example uses different VFS to access the functions for working with the file system and functions for working with the network:
VfsNetis used for working with the network.VfsRamfsandVfsSdCardFsare used for working with the file system.
The Env entity is used to pass environment variables and main function arguments to other entities.
The CMake system, which is included with KasperskyOS Community Edition, is used to build and run the example.
Starting Mosquitto
To run this example, a Mosquitto MQTT broker must be installed and started on the host system. To install and start Mosquitto, run the following commands:
$ sudo apt install mosquitto mosquitto-clients
$ sudo /etc/init.d/mosquitto start
To start an MQTT publisher on the host system, run the following command:
$ mosquitto_pub -t "my/awesome/topic" -m "hello"
Supplied resources
The following configuration files are included in the example:
./resources/include/config.h.incontains a description of the backend file system that will be used in the solution:sdcardorramfs.Each backend in the solution also uses a separate VFS: respectively
VfsSdCardFsorVfsRamfs.- The
./resources/ramfs/etcand/resources/sdcard/etcdirectories contain configuration files for the VFS andNtpdentities.
Example files
The code of the example and build scripts are available at the following path:
/opt/KasperskyOS-Community-Edition-<version>/examples/mqtt_subscriber
Building and running example
To run an example on QEMU, go to the directory containing the example, build the example and run the following commands:
$ cd build/einit
# Before running the following command, be sure that the path to
# the directory with the qemu-system-arm executable file is saved in
# the PATH environment variable. If it is not there,
# add it to the PATH variable.
$ qemu-system-arm -m 2048 -machine vexpress-a15 -nographic -monitor none -sd sdcard0.img -kernel kos-qemu-image
See also Building and running examples section.
Page top
gpio_input example
Example use of the GPIO driver.
This example lets you verify the functionality of GPIO input pins. The "gpio0" port is used. All pins except those indicated in exceptionPinArr array are set for input by default. The voltage on the pins corresponds to the state of the registers of the pull-up resistors. The state of all pins, starting from GPIO0 (accounting for the pins indicated in the exceptionPinArr array), will be read in succession. Messages about the state of the pins will be displayed on the console. The delay between the readings of adjacent pins is determined by the DELAY_S macro (the time is indicated in seconds).
exceptionPinArr is an array of GPIO pin numbers that need to be excluded from the example. This may be necessary if some pins are already being used for other functions, e.g. if pins are being used for a UART connection during debugging.
If you build and run this example on QEMU, an error will occur. This is the expected behavior, because there is no GPIO driver for QEMU.
If you build and run this example on Raspberry Pi 4 B, an error will occur.
Example files
The code of the example and build scripts are available at the following path:
/opt/KasperskyOS-Community-Edition-<version>/examples/gpio_input
Building and running example
See the Building and running examples section.
Page top
gpio_output example
Example use of the GPIO driver.
This example lets you verify the functionality of GPIO output pins. The "gpio0" port is used. The initial state of all GPIO pins should correspond to a logical zero (no voltage on the pin). All pins other than those indicated in the exceptionPinArr array are configured for output. Each pin, starting with GPIO0 (accounting for those indicated in the exceptionPinArr array), will be sequentially changed to a logical one (voltage on the pin) and then to a logical zero. The delay between the changes of pin state is determined by the DELAY_S macro (the time is indicated in seconds). The pins are turned on/off from GPIO0 to GPIO27 and then back against to GPIO0.
exceptionPinArr is an array of GPIO pin numbers that need to be excluded from the example. This may be necessary if some pins are already being used for other functions, e.g. if pins are being used for a UART connection during debugging.
If you build and run this example on QEMU, an error will occur. This is the expected behavior, because there is no GPIO driver for QEMU.
If you build and run this example on Raspberry Pi 4 B, an error will occur.
Example files
The code of the example and build scripts are available at the following path:
/opt/KasperskyOS-Community-Edition-<version>/examples/gpio_output
Building and running example
See the Building and running examples section.
Page top
gpio_interrupt example
Example use of the GPIO driver.
This example lets you verify the functionality of GPIO pin interrupts. The "gpio0" port is used. In the pinsBitmap bitmask of the CallBackContext interrupt context, the pins from exceptionPinArr array are marked as handled so that the example can properly terminate later. All pins other than those indicated in the exceptionPinArr array are switched to the PINS_MODE state. An interrupt handler will be registered for all pins other than those indicated in the exceptionPinArr array.
In an endless loop, the example checks whether the pinsBitmap bitmask from the CallBackContext interrupt context is equal to the DONE_BITMASK bitmask (which corresponds to the condition when an interrupt has occurred on each GPIO pin). Additionally, the handler function for the latest interrupted pin is removed in the loop. When a pin is interrupted for the first time, the handler function is called, which marks the corresponding pin in the pinsBitmap bitmask in the CallBackContext interrupt context. The handler function for this pin is removed later.
Keep in mind how the example may be affected by the initial state of the registers of pull-up resistors for each pin.
Interrupts for the GPIO_EVENT_LOW_LEVEL and GPIO_EVENT_HIGH_LEVEL events are not supported.
exceptionPinArr is an array of GPIO pin numbers that need to be excluded from the example. This may be necessary if some pins are already being used for other functions, e.g. if pins are being used for a UART connection during debugging.
If you build and run this example on QEMU, an error will occur. This is the expected behavior, because there is no GPIO driver for QEMU.
If you build and run this example on Raspberry Pi 4 B, an error will occur.
Example files
The code of the example and build scripts are available at the following path:
/opt/KasperskyOS-Community-Edition-<version>/examples/gpio_interrupt
Building and running example
See the Building and running examples section.
gpio_echo example
Example use of the GPIO driver.
This example makes it possible to verify the functionality of GPIO pins as well as the operation of GPIO interrupts. The "gpio0" port is used. The output pin (GPIO_PIN_OUT) should be connected to the input pin (GPIO_PIN_IN). The output pin (the pin number is defined in the GPIO_PIN_OUT macro) as well as the input pin (GPIO_PIN_IN) are configured. Use of the input pin is configured in the IN_MODE macro. The interrupt handler for the input pin is registered. The state of the output pin changes several times. If the example works correctly, then when the state of the output pin changes the interrupt handler will be called and will display the state of the input pin. What's more, the state of the output pin and the input pin must match.
If you build and run this example on QEMU, an error will occur. This is the expected behavior, because there is no GPIO driver for QEMU.
If you build and run this example on Raspberry Pi 4 B, an error will occur.
Example files
The code of the example and build scripts are available at the following path:
/opt/KasperskyOS-Community-Edition-<version>/examples/gpio_echo
Building and running example
See the Building and running examples section.
Page top
Licensing the application
The terms of use of the application are set out in the End User License Agreement or a similar document under which the application is used.
Page top
Data provision
KasperskyOS Community Edition does not save, process, or ask you for any personal information or any other information whatsoever.
Page top
Information about third-party code
Information about third-party code is contained in the file named legal_notices.txt in the application installation folder.
Page top
Trademark notices
Registered trademarks and service marks are the property of their respective owners.
Arm and Mbed are registered trademarks or trademarks of Arm Limited (or its subsidiaries) in the US and/or elsewhere.
CentOS is a trademark of Red Hat, Inc.
Debian is a registered trademark of Software in the Public Interest, Inc.
Eclipse Mosquitto is a trademark of Eclipse Foundation, Inc.
GoogleTest is a trademark of Google, Inc.
Intel and Core are trademarks of Intel Corporation in the U.S. and/or other countries.
Linux is the registered trademark of Linus Torvalds in the U.S. and other countries.
Raspberry Pi is a trademark of the Raspberry Pi Foundation.
Ubuntu is a registered trademark of Canonical Ltd.
Visual Studio, Windows are registered trademarks of Microsoft Corporation in the United States and other countries.
Page top