Contents
- Kaspersky Thin Client Help
- About Kaspersky Thin Client
- Remote connection methods
- What's new
- Installing and updating Kaspersky Thin Client
- Kaspersky Thin Client interface
- Kaspersky Thin Client licensing
- Data provision
- Turning Kaspersky Thin Client on and off
- Restarting Kaspersky Thin Client
- Using certificates in Kaspersky Thin Client
- Configuring Kaspersky Thin Client
- Scenario: quick start for administrators
- Scenario: certificate assignment for a group of thin clients
- Scenario: thin client migration to a new Kaspersky Security Center Server
- Configuring general settings
- Configuring network settings
- Configuring settings for connecting Kaspersky Thin Client to Kaspersky Security Center
- Changing settings for connecting Kaspersky Thin Client to Kaspersky Security Center
- Configuring settings for connecting to a remote environment via RDP
- Configuring settings for connecting to a remote environment in the Basis.WorkPlace infrastructure
- Configuring power-saving settings
- Configuring monitors layout
- Managing access to Kaspersky Thin Client settings
- Configuring the date and time
- Resetting Kaspersky Thin Client settings
- Managing Kaspersky Thin Client in the thin client interface
- Connecting to a remote environment
- Using the connection panel
- Viewing information about Kaspersky Thin Client
- Viewing network status information
- Viewing Kaspersky Thin Client notifications
- Managing certificates in the thin client interface
- Closing a connection session
- Managing Kaspersky Thin Client using hotkeys
- Updating Kaspersky Thin Client in the thin client interface
- Managing Kaspersky Thin Client through the Kaspersky Security Center Web Console
- About the Kaspersky Security Management Suite web plug-in
- Restricting access to functions of the Kaspersky Security Management Suite web plug-in
- Logging in and out of the Web Console
- Adding a thin client to the managed devices group
- Managing policies
- Configuring Kaspersky Thin Client settings through the Web Console
- Configuring Kaspersky Thin Client basic settings through the Web Console
- Configuring a connection to a Basis.WorkPlace remote environment through the Web Console
- Configuring a connection to a remote environment via RDP through the Web Console
- Configuring a connection to a Web Access remote environment through the Web Console
- Configuring Kaspersky Thin Client power-saving settings through the Web Console
- Configuring the interface language and time zone of Kaspersky Thin Client through the Web Console
- Configuring synchronization between Kaspersky Thin Client and Kaspersky Security Center
- Configuring forwarding of Kaspersky Thin Client logs to a log server
- Confirming Kaspersky Thin Client user actions
- Managing Kaspersky Thin Client certificates through the Web Console
- About a certificate for connecting Kaspersky Thin Client to Kaspersky Security Center
- Reissuing a certificate for connecting Kaspersky Thin Client to Kaspersky Security Center using the Web Console
- Creating a certificate for connecting Kaspersky Thin Client to Kaspersky Security Center
- Uploading a certificate for connecting Kaspersky Thin Client to Kaspersky Security Center using the Web Console
- Adding new certificates in the Web Console
- Removing certificates from the Web Console
- Converting a certificate from PEM to DER format
- Updating a certificate when migrating to a new Kaspersky Security Center Server
- About a certificate for connecting Kaspersky Thin Client to Kaspersky Security Center
- Monitoring Kaspersky Thin Client events through the Kaspersky Security Center Web Console
- Troubleshooting
- Contacting Technical Support
- Glossary
- Information about third-party code
- Trademark notices
Kaspersky Thin Client Help
|
What's new Find out what's new in this version of Kaspersky Thin Client. |
|
Hardware and software requirements Check the requirements for remote environments and connected peripheral devices. |
|
Update |
|
Reset of settings and data |
|
Getting started Initial configuration and connecting to Kaspersky Security Center. |
|
Configuring and connecting to a remote environment |
|
Advanced capabilities |
|
Monitoring events Viewing and forwarding event and audit logs to a log server. Viewing Kaspersky Thin Client events through the Kaspersky Security Center Web Console.
|


About Kaspersky Thin Client
Kaspersky Thin Client version 2.0 (hereinafter also referred to as "Kaspersky Thin Client" or "the system") is an operating system for
based on the KasperskyOS operating system. Kaspersky Thin Client is designed to provide users with access to a remote desktop and serves as a substitute for a local workstation. Kaspersky Thin Client version 2.0 can be installed on TONK TN1200 or Centerm F620 thin clients only.
Core functions of Kaspersky Thin Client:
- Connect to remote and virtual desktops running Microsoft Windows operating systems via the Remote Desktop Protocol (RDP), and by using the Microsoft Remote Desktop Connection Broker with user name and password authorization.
- Connect to terminal servers running Microsoft Windows Server operating systems via the Remote Desktop Protocol (RDP), and by using the Microsoft Remote Desktop Connection Broker with user name and password authorization.
- Connect to remote and virtual desktops running Linux operating systems via the Remote Desktop Protocol (RDP) with user name and password authorization.
- Connect to virtual applications via RDP using the Microsoft Remote Desktop Connection Broker with user name and password authorization.
- Connect to virtual desktops deployed in the Basis.WorkPlace virtual desktop infrastructure with user name and password authorization.
- Connect to virtual desktops deployed in the Citrix Workspace or VMware Horizon infrastructure in the Web Access application.
- Transmit the remote desktop screen image to the monitor connected to Kaspersky Thin Client.
- Redirect a keyboard and mouse connected to Kaspersky Thin Client to a remote environment.
- Redirect USB drives, smart cards, USB tokens, printers, a microphone, and audio playback devices connected to Kaspersky Thin Client to the remote environment.
- Centrally manage, update, and monitor Kaspersky Thin Client via the Kaspersky Security Center Web Console version 14.2. The Kaspersky Security Management Suite web plug-in is used for communication between Kaspersky Thin Client and Kaspersky Security Center.
Distribution kit
Kaspersky Thin Client is delivered in one of the following formats:
- Kaspersky Thin Client image without a hardware platform (thin client).
- Partner-delivered hardware platform with Kaspersky Thin Client pre-installed.
The distribution kit for Kaspersky Thin Client without a hardware platform includes the following files:
- Archive containing the installation image for Kaspersky Thin Client: Kaspersky_Thin_Client_<version number>.tar.gz.
- Boot package: KTC_uboot_<version number>.tar.gz.
- Script for installation to the thin client: hw_install.sh.
- Text file containing information about third-party code: KTC_LegalNotices_en.txt.
- Text files describing new features and known limitations:
- ReleaseNotes_Kaspersky_Thin_Client_<version number>_EN.txt.
- ReleaseNotes_Kaspersky_Thin_Client_<version number>_ES.txt.
- ReleaseNotes_Kaspersky_Thin_Client_<version number>_PT_BR.txt.
- ReleaseNotes_Kaspersky_Thin_Client_<version number>_RU.txt.
- Kaspersky Thin Client End User License Agreement files:
- eula_en_ktc_<version number>.txt.
- eula_es_ktc_<version number>.txt.
- eula_pt_ktc_<version number>.txt.
- eula_ru_ktc_<version number>.txt.
The distribution kit for Kaspersky Security Management Suite version 2.0 encompasses the components listed below.
When unpacking the archive using automation tools, such as a script, you must read and accept the terms and conditions of the End User License Agreement before using Kaspersky Security Management Suite.
- Microsoft Windows archives containing the installation images and web plug-in signature files for the Kaspersky Security Center Web Console:
- Web_Plugin_Kaspersky_Security_Management_Suite_<plug-in version number>_en.exe.
- Web_Plugin_Kaspersky_Security_Management_Suite_<plug-in version number>_es.exe.
- Web_Plugin_Kaspersky_Security_Management_Suite_<plug-in version number>_pt_br.exe.
- Web_Plugin_Kaspersky_Security_Management_Suite_<plug-in version number>_ru.exe.
- Linux archives containing the installation images and web plug-in signature files for the Kaspersky Security Center Web Console:
- Web_Plugin_Kaspersky_Security_Management_Suite_<plug-in version number>_en.sh.
- Web_Plugin_Kaspersky_Security_Management_Suite_<plug-in version number>_es.sh.
- Web_Plugin_Kaspersky_Security_Management_Suite_<plug-in version number>_pt_br.sh.
- Web_Plugin_Kaspersky_Security_Management_Suite_<plug-in version number>_ru.sh.
- Text file containing information about third-party code for Kaspersky Security Management Suite: KSMS_LegalNotices_en.txt.
- Kaspersky Security Management Suite End User License Agreement files:
- eula_en_ksms_<version number>.txt.
- eula_es_ksms_<version number>.txt.
- eula_pt_ksms_<version number>.txt.
- eula_ru_ksms_<version number>.txt.
Operation of Kaspersky Thin Client
The standard operating scenario for Kaspersky Thin Client (see the figure below) involves the following:
- After Kaspersky Thin Client is installed to the appropriate hardware platform, it receives network settings from a DHCP server, or the administrator manually configures these settings.
- The administrator connects and configures interaction between Kaspersky Thin Client and Kaspersky Security Center.
- Kaspersky Thin Client receives the remote desktop or virtual application connection settings (hereinafter also referred to as the connection session), updates, trusted certificates, and the date and time together with the policy from Kaspersky Security Center.
- The user connects to a remote desktop or virtual application via RDP.
- The user connects to the remote desktop through the Basis.WorkPlace virtualization platform.
- The user connects to the remote environment in Web Access.
- In the Kaspersky Thin Client interface, the user sends audit and event logs to a recipient log server.
- Kaspersky Thin Client uses Kaspersky Security Center to receive software updates from the Kaspersky update server.
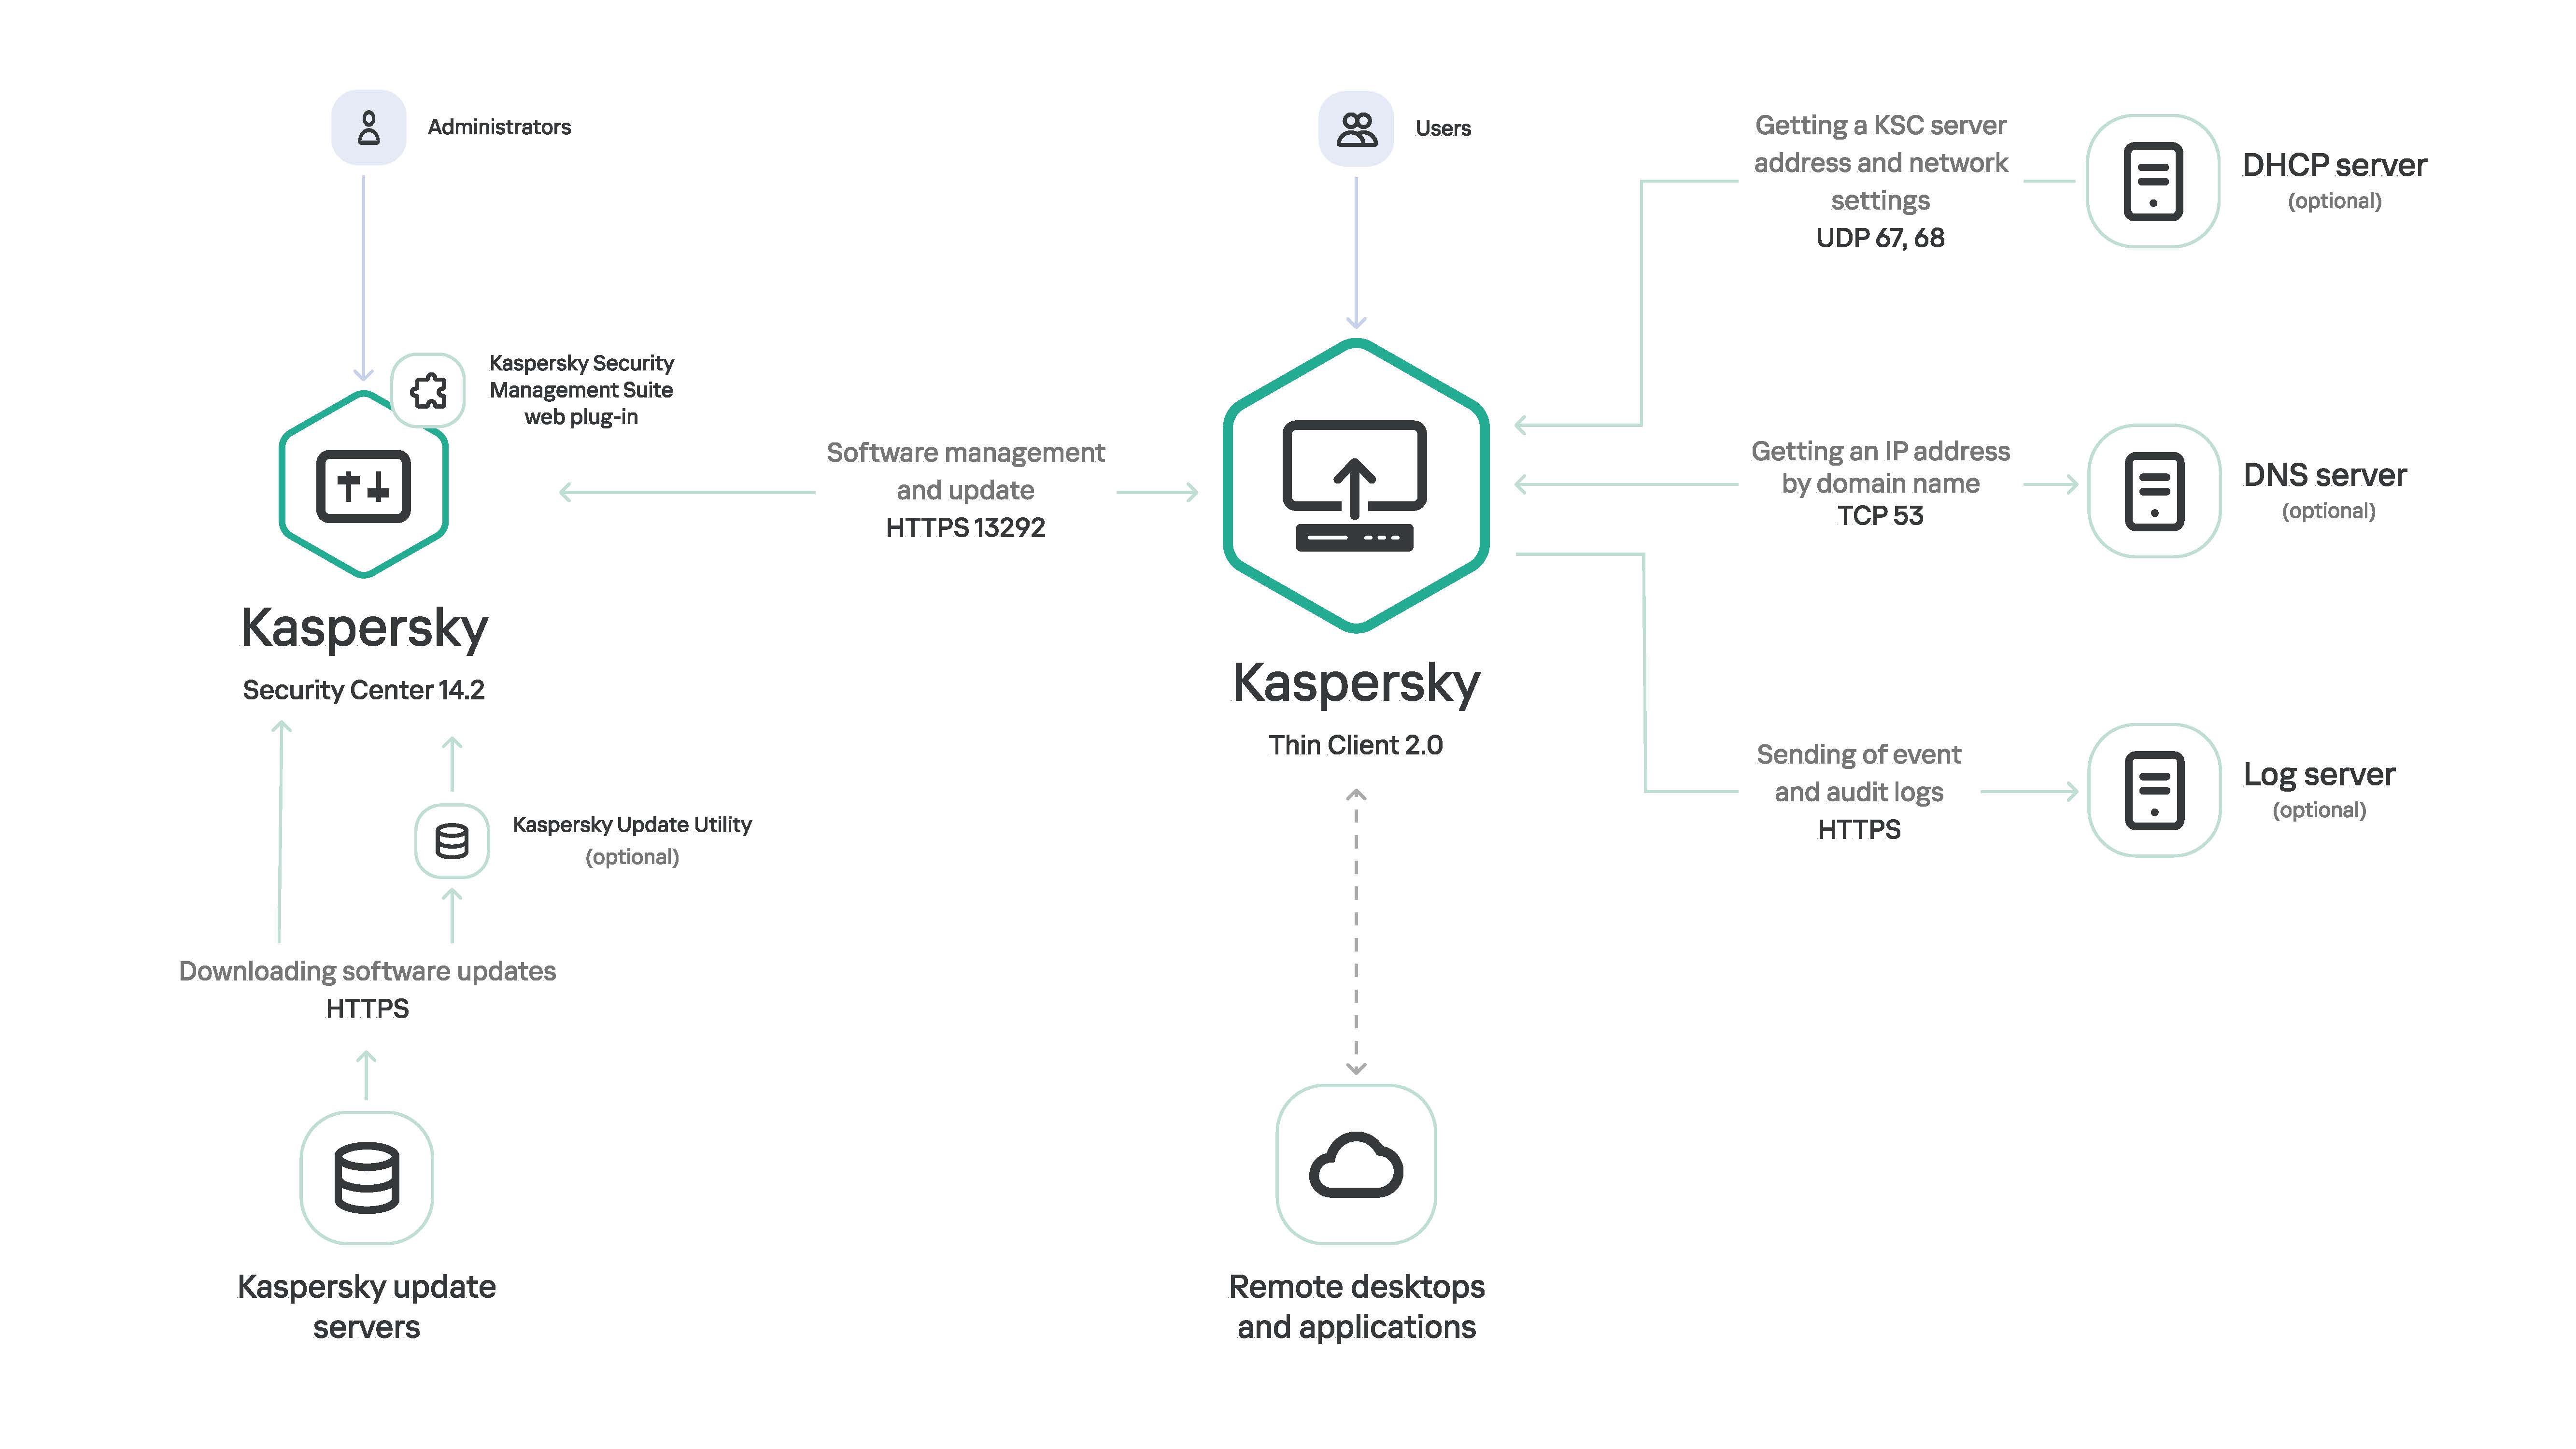
Standard operating scenario for Kaspersky Thin Client
The image below shows a diagram of communication between Kaspersky Thin Client and virtualization platforms.

Communication between Kaspersky Thin Client and virtualization platforms
Page top
Hardware and software requirements
This section describes the hardware and software requirements for Kaspersky Thin Client.
Requirements for monitors connected to Kaspersky Thin Client
Kaspersky Thin Client supports connection of two monitors.
Kaspersky Thin Client supports the following monitor resolutions:
- 1024x768
- 1280x800
- 1280x1024
- 1366x768
- 1440x900
- 1600x900
- 1680x1050
- 1920x1080
- 1920x1200. When connecting a monitor with this resolution, the actual resolution displayed will be no more than 1920x1080.
Kaspersky Thin Client supports the following connection interfaces:
- HDMI
- DisplayPort
Kaspersky Thin Client supports only True Color monitors.
Requirements for peripheral devices connected to Kaspersky Thin Client
Kaspersky Thin Client supports the following peripheral devices:
- Standard wired keyboard and mouses without multimedia functionality connected via USB ports.
- USB drives, and smart cards and tokens connected via USB ports.
- Printers connected via USB ports. The remote environment must have the installed driver for the printer that is connected to the thin client.
- Wired audio recording and playback devices connected via a mini-jack.
Requirements for remote desktops
You can connect to remote computers, virtual machines, and terminal servers that have one of the following operating systems installed:
- Microsoft Windows 7
- Microsoft Windows 10
- Microsoft Windows 11
- Microsoft Windows Server 2016
- Microsoft Windows Server 2019
- Microsoft Windows Server 2022
- Astra Linux Common Edition 2.12 (xRDP 0.9.21.1)
- Astra Linux Special Edition 1.7 (xRDP 0.9.21.1)
- ALT Linux 10 (xRDP 0.9.24)
- RED OS 7.3 (xRDP 0.9.23.1)
Requirements for Basis.WorkPlace remote desktops
Kaspersky Thin Client supports operation with Basis.WorkPlace virtualization platform version 1.96. You can use the Basis.WorkPlace broker to connect to remote desktops running one of the following operating systems:
- Microsoft Windows 10
- Microsoft Windows 11
- Microsoft Windows Server 2016
- Microsoft Windows Server 2019
- Microsoft Windows Server 2022
- Astra Linux Common Edition 2.12 (xRDP 0.9.21.1)
- Astra Linux Special Edition 1.7 (xRDP 0.9.21.1)
- ALT Linux 10 (xRDP 0.9.24)
- RED OS 7.3 (xRDP 0.9.23.1)
Network requirements
The network transmission speed must be at least 50 Mbit/s.
Requirements for Kaspersky Security Center and the Kaspersky Security Center Web Console
The Kaspersky Thin Client system is compatible with Kaspersky Security Center version 14.2. System and software requirements for the server where Kaspersky Security Center is deployed, are shown in the Kaspersky Security Center Online Help Guide.
Requirements for event logs servers
The log server that will receive the Kaspersky Thin Client audit and event logs is deployed in your enterprise infrastructure by the customer's experts.
The log server has the following requirements:
- Kaspersky Thin Client connects to the log server over HTTPS (port 443 is used by default).
- Kaspersky Thin Client connects to the log server only based on the security certificate.
- Kaspersky Thin Client sends audit and event logs to a recipient log server via the PUT method.
Remote connection methods
This section contains information about the remote access technologies and environments supported by Kaspersky Thin Client, as well as methods of connecting to such environments. This section provides information about which of the devices connected to Kaspersky Thin Client can be redirected to a remote environment.
Connection via RDP
In Kaspersky Thin Client, you can connect via RDP to a remote environment, such as Microsoft Remote Desktop Services (MS RDS). The table below describes the available connection methods and peripherals for Windows and Linux operating systems.
To redirect peripherals to a Linux remote desktop, install Kaspersky USB Redirector for the xRDP server in the guest operating system. Kaspersky USB Redirector is not included in the distribution kit. You can request the extension from Kaspersky.
Prior to connecting to a Linux remote desktop using an xRDP server that does not have the Kaspersky USB Redirector extension installed, first find out which xRDP server version is supported in a separate article.
Instructions for connecting to a remote environment are given in a separate article.
RDP: supported operating systems, connection methods, and peripherals
|
Windows Server 2016/2019/2022 |
Windows 7 |
Windows 10/11 |
Windows Server |
ALT Linux 10 Red OS 7.3 Astra Linux CE 2.12 |
Astra Linux SE 1.7 |
Connection to a virtual application |
|
|
|
|
|
|
Connection to a remote desktop |
||||||
|
|
|
|
|
|
|
|
|
|
|
|
|
|
|
|
|
|
|
|
|
Peripheral devices |
||||||
USB tokens |
|
|
|
|
|
|
Smart cards (USB) |
|
|
|
|
|
|
USB drives |
|
|
|
|
|
|
Printers (USB) |
|
|
|
|
|
|
Microphone (mini jack) |
|
|
|
|
|
|
Audio playback device |
|
|
|
|
|
|


Connection using Basis.WorkPlace
Kaspersky Thin Client can connect to a Basis.WorkPlace remote environment. The table below describes the available connection methods and peripherals for Windows and Linux operating systems.
To redirect peripherals to a Linux remote desktop, install Kaspersky USB Redirector for the xRDP server in the guest operating system. Kaspersky USB Redirector is not included in the distribution kit. You can request the extension from Kaspersky.
Prior to connecting to a Linux remote desktop using an xRDP server that does not have the Kaspersky USB Redirector extension installed, first find out which xRDP server version is supported in a separate article.
Instructions for connecting to a remote environment are given in a separate article.
Basis.WorkPlace: supported operating systems, connection methods, and peripherals
|
Windows 10/11 |
Windows Server |
Red OS 7.3 ALT Linux 10 Astra Linux CE 2.12 Astra Linux SE 1.7 |
Connection to a remote desktop |
|||
|
|
|
|
|
|
|
|
|
|
|
|
Peripheral devices |
|||
USB tokens |
|
|
|
Smart cards (USB) |
|
|
|
USB drives |
|
|
|
Printers (USB) |
|
|
|
Microphone (mini jack) |
|
|
|
Audio playback device |
|
|
|
Connection in the Web Access application
In the Web Access application, you can connect to a remote environment deployed in Citrix Workspace and VMware Horizon infrastructures. Web Access supports HTML5 and provides a secure HTTPS connection when connecting. The table below describes the specific connection methods and peripheral devices that are available for Windows operating systems.
Connection instructions are provided in a separate article.
Web Access: supported operating systems, connection methods, and peripherals
|
Microsoft Windows 10/11 |
Microsoft Windows Server |
Connection to a remote desktop |
||
|
|
|
|
|
|
|
|
|
Peripheral devices |
||
USB tokens |
|
|
Smart cards (USB) |
|
|
USB drives |
|
|
Printers (USB) |
|
|
Microphone (mini jack) |
|
|
Audio playback device |
|
|
The current version of Kaspersky Thin Client in the Web Access application does not support connection to remote desktops running Linux, as well as to virtual applications.
Page top
What's new
Kaspersky Thin Client version 2.0 has the following new capabilities and improvements:
- Connection to remote desktops and applications deployed in a Microsoft Remote Desktop Services infrastructure: added capability to connect to Microsoft Windows remote desktops and virtual applications via Microsoft Remote Desktop Connection Broker.
- Added capability to connect to virtual desktops deployed in a Citrix Workspace or VMware Horizon infrastructure over HTML5.
- Redirection of audio recording and playback devices connected to the thin client via a mini-jack, to the remote environment.
- Redirection of smart cards, USB drives, and printers to a Linux (Astra Linux CE/SE, ALT Linux, RED OS) remote desktop. To redirect peripheral devices, install Kaspersky USB Redirector for the xRDP server in the guest OS, including Basis.WorkPlace.
- Added support for the Centerm F620 thin client.
- Automatic connection after unexpected disconnection: added capability to automatically connect to a remote desktop via RDP if connection is lost.
- Expanded support for guest operating systems: added capability to connect to remote desktops running Microsoft Windows 11 or Microsoft Windows Server 2022 operating systems.
- Redirection of printers to a remote environment: added function for printing documents from a guest operating system (when connected via RDP, including a Basis.WorkPlace virtual desktop infrastructure) on a printer connected to the thin client.
- Support for a new configuration of TONK TN1200: added functionality to enable Kaspersky Thin Client to start and operate on TONK TN1200 devices with mSATA SSDs.
- Kaspersky Thin Client performance enhancements:
- Higher speeds of delivering a remote desktop and virtual applications to the thin client.
- Shorter thin client startup times.
- Higher speeds when connecting to remote desktops by domain name.
- Improved stability for thin clients managed via Kaspersky Security Center.
- Added support for Spanish and Brazilian Portuguese as user interface and input languages.
- Updated Kaspersky Thin Client UI design and text:
- Redesigned the connection panel in the remote environment.
- Added interactive notification panel.
Installing and updating Kaspersky Thin Client
The Kaspersky Thin Client installation procedure depends on the delivery format:
- A partner delivers a hardware platform with Kaspersky Thin Client pre-installed. In that case, installation of Kaspersky Thin Client on the hardware platform is done by TONK.
- Kaspersky Thin Client is delivered without a hardware platform (thin client). In this case, the software platform is installed according to the instructions provided in this section.
Preparing for installation
Prior to installing Kaspersky Thin Client, do the following:
- Prepare a bootable USB drive containing the Linux Ubuntu operating system (recommended version: Ubuntu 20.04).
- Copy the Kaspersky Thin Client installation files received in the distribution kit to a separate partition on the bootable USB drive or to a separate USB drive:
- KTC_uboot_<version number>.tar.gz—boot package.
- Kaspersky_Thin_Client_<version number>.tar.gz—installation image.
- hw_install.sh—Kaspersky Thin Client installation script.
To ensure security prior to installation of Kaspersky Thin Client, we recommend updating the BIOS on the thin client to the latest version, setting a password for BIOS configuration changes, and configuring the option to boot only from a local SSD device. These recommended measures will help prevent potential security risks, such as operating system substitution, replacement or deletion of remote server connection certificates, and unauthorized access to operating system settings.
Page top
Installing Kaspersky Thin Client
To install Kaspersky Thin Client on a thin client:
- Insert the prepared bootable USB drive into the appropriate port on the thin client.
- Turn on the thin client and boot the Ubuntu image from the bootable USB drive without installing the system on the thin client hard drive.
- After the operating system loads, go to the directory containing the Kaspersky Thin Client installation files.
- Run the following command using an account with root privileges:
sudo ./hw_install.sh –b KTC_uboot_<version number>.tar.gz –u Kaspersky_Thin_Client_<version number>.tar.gzwhere:
./hw_install.sh—path to the installation script.KTC_uboot_<version number>.tar.gz—boot package.Kaspersky_Thin_Client_<version number>.tar.gz—installation image.
The Installed OK! Remove USB drive and reboot message is displayed after successful installation.
- Turn off the thin client and extract the bootable USB drive.
The Kaspersky Thin Client system will be loaded the next time you turn on the thin client.
You can check the current OS version number in the Kaspersky Thin Client interface.
Page top
Updating Kaspersky Thin Client
To update Kaspersky Thin Client to version 2.0, you must obtain an archive containing the database updates from Kaspersky experts. Upload the obtained archive to the Kaspersky Security Center Web Console (hereinafter also referred to as Web Console), and then create, configure, and run a task to download updates to the Kaspersky Security Center Administration Server (hereinafter also referred to as Server) repository in the Web Console interface.
Kaspersky Thin Client can be updated only if the thin client is connected to Kaspersky Security Center.
One Kaspersky Security Center Administration Server can have only one active update task with one priority update source. For this reason, you are advised to use a separate Server for managing thin clients so that you can receive critical security patches from Kaspersky update servers.
To update Kaspersky Thin Client on the thin client using the Kaspersky Security Center Web Console:
- On the Kaspersky Security Center Server, unpack the archive containing the update databases received from Kaspersky experts.
- Grant all users in the system full access rights to the unpacked folder by performing the following actions:
- Right-click the unpacked folder and select Properties.
- In the menu that opens, select the Security tab and click Edit.
- In the window that opens, click Add, then select Advanced and in the window that opens, click Find now.
- In the list that appears, select the Everyone group and click OK, then click OK once again in the window that opens.
The Security tab appears, and the Everyone group appears in the Group or user names list.
- In the Permissions for Everyone section, select the check boxes for all parameters in the Allow column.
- Click OK and then click OK once again in the window that opens.
- Launch the Web Console and select the Devices section, then go to the Tasks tab.
- If the task Download updates to the Administration Server repository is available in the list, proceed to the next step of the instructions. If it is not available, add it by doing the following:
- On the Tasks tab, click Add.
- In the window that opens, in the Task type drop-down list, select Download updates to the Administration Server repository and click Next.
- Click Finish to complete creating the task.
- Select the Download updates to the Administration Server repository task and in the window that opens, go to the Application settings tab.
- In the Sources of updates group of settings, select the check box next to the Kaspersky update servers source and click Delete.
- In the same group of settings, click Add, then in the list that appears, select Local or network folder and specify the full path to the folder with the update files.
- Click Save to complete changing the update source.
- Go to the Schedule tab, then select the necessary value from the Scheduled start drop-down list.
Configure the other settings on this tab if necessary.
- Click Save to complete configuring the task.
- In the list of tasks, select the check box next to the Download updates to the Administration Server repository task and click Run.
The task execution starts. You can track the task progress in the task list, in the Status column.
- To view the result of a task for individual devices:
- In the task list, select Download updates to the Administration Server repository, and in the window that opens, go to the Results tab.
- To view detailed information about the task execution on a device, select the check box next to the required device and click Device history.
- After the update download task finishes, accept the End User License Agreement and approve the download of updates to the thin clients by completing the following steps:
- In the Web Console, go to Operations → Kaspersky applications and select Seamless updates from the drop-down list.
- In the list of updates that appears, click You must accept EULA next to the required update, and in the window that opens, read the text of the End User License Agreement.
- If you agree to the terms in the agreement, accept it by selecting the The terms and conditions of this EULA check box and confirming your choice. If you do not agree with the terms in the End User License Agreement and do not accept these, you will not be able to download updates to thin clients.
- In the list of updates, click the update name, and in the Update approval status section that appears, select Approved and confirm your choice.
For detailed information about approving update downloads, refer to Approving and declining software updates in the Kaspersky Security Center Online Help.
The update download request will be approved.
Once the request is approved, the updates are downloaded to thin clients connected to Kaspersky Security Center, including those not included in the
or managed devices groups.Detailed information on how to receive and install updates on thin clients is provided in a separate article.
Page top
Kaspersky Thin Client interface
The Kaspersky Thin Client interface contains the following elements:
- Main window of the Kaspersky Thin Client.
In the central part of the main window, you can select a remote connection option:
- RDP: connect to remote desktops or virtual applications via RDP.
- Basis.WorkPlace: connect to virtual desktops deployed in the Basis.WorkPlace infrastructure.
- Web Access: connect to a remote environment deployed in the Citrix Workspace or VMware Horizon infrastructure.
In the connection window, you can configure the RDP connection settings or the Basis.WorkPlace connection settings.
- Control panel of Kaspersky Thin Client. It contains the following items:
 — shutdown menu button. In this menu, you can shut down or restart Kaspersky Thin Client.
 — button for switching to the Settings and Tools sections:
In the Settings section, you can configure Kaspersky Thin Client.
In the Tools section, you can do the following:
- If Kaspersky Thin Client is part of an administration group and the administrator's contact details are specified in the general group settings, the contacts of the Kaspersky Security Center administrator are also displayed in the control panel.
- .
- Information on new notifications of Kaspersky Thin Client. You can view received notifications.
- Keyboard input language switch button.
- System date and time.
- Connection panel.
Displayed while you are connected to a remote environment.
The following are displayed in the connection panel while you are connected to a remote desktop:
- Connection name.
- Connection status.
- Disconnect from server button.
- The administrator's contacts, as long as these were provided when deploying the system.
- Network status icon.
The connection panel additionally displays the following while you are connected to a virtual application:
- Application icon.
- Current date set on the thin client.
- Current time set on the thin client.
- Language set on the thin client.
Kaspersky Thin Client licensing
The Kaspersky Thin Client terms of use are set forth in the End User License Agreement or a similar document regulating usage of the system.
The End User License Agreement is a legally binding agreement between you and AO Kaspersky Lab that stipulates the terms on which you can use Kaspersky Thin Client.
Carefully read the terms and conditions of the End User License Agreement before you start working with Kaspersky Thin Client.
You accept the terms and conditions of the End User License Agreement by confirming that you agree with the End User License Agreement text when the system starts for the first time. If you do not accept the terms and conditions of the End User License Agreement, you must cancel startup of Kaspersky Thin Client and stop using it. When Kaspersky Thin Client is updated, any changes to the terms and conditions of the End User License Agreement for the new version of Kaspersky Thin Client are accepted by the Kaspersky Security Center administrator.
If necessary, you can view the text of the End User License Agreement in the Kaspersky Thin Client interface.
To view the text of the End User License Agreement,
In the Kaspersky Thin Client control panel, click and select Tools → End User License Agreement in the menu that opens.
This opens a window showing the text of the End User License Agreement for the current version of Kaspersky Thin Client.
Page top
Data provision
Kaspersky Thin Client does not send any data to Kaspersky. Data is processed on the thin clients with Kaspersky Thin Client installed, and on the local infrastructure servers that interact with Kaspersky Thin Client.
Kaspersky Thin Client saves the following information on the thin client:
- Event log containing technical data on system operation and information about Kaspersky Thin Client events sent to the Kaspersky Security Center Administration Server.
- Audit log containing data on certificates uploaded to Kaspersky Thin Client and information on instances of enabling and disabling management of thin clients via Kaspersky Security Center.
- Thin client settings:
- Date and time when Kaspersky Thin Client was installed on the thin client.
- Thin client name.
- Currently installed version of Kaspersky Thin Client.
- Kaspersky Thin Client interface language.
- List of languages available when switching the keyboard input language.
- Primary and secondary monitors.
- Primary monitor ID.
- Location (coordinates) of the connection panel.
- The previous time certificates were used for authentication when connecting to brokers, remote desktops or virtual applications via RDP, Basis.WorkPlace remote desktops, Web Access remote environments, or a logging server.
- Kaspersky Security Center interaction settings:
- Address (name or IP address and port) of the Kaspersky Security Center Administration Server.
- Kaspersky Security Center connection method (manually or via DHCP).
- Set of Kaspersky Thin Client identifiers for connecting to Kaspersky Security Center.
- Synchronization period between Kaspersky Thin Client and Kaspersky Security Center in minutes.
- Number of certificates received from Kaspersky Security Center for authenticating Kaspersky Thin Client connections to brokers, remote desktops or virtual applications via RDP, Basis.WorkPlace remote desktops, Web Access remote environments, or a logging server.
- Current certificate fingerprint for authenticating Kaspersky Thin Client connection to Kaspersky Security Center.
- Thin client naming pattern set by the Kaspersky Security Center administrator (thin client name, ID, and additional details).
- Set of secrets for confirming user actions in the Kaspersky Thin Client interface: resetting data and settings, disconnecting the thin client from Kaspersky Security Center, and replacing the certificate for connecting the thin client to Kaspersky Security Center.
- Technical Support contact details.
- Certificate files for authenticating Kaspersky Thin Client connection to Kaspersky Security Center.
- Web Access connection settings:
- Server web address.
- Certificate files for connection authentication.
- Data required for working in the remote environment, including cookie files.
- Basis.WorkPlace connection settings:
- Address (name or IP address and port) of the Basis.WorkPlace connection manager.
- User name for connecting to the Basis.WorkPlace connection manager.
- Certificate files for authenticating the broker when connecting to a remote desktop managed by Basis.WorkPlace.
- ID of Kaspersky Thin Client.
- Number of reconnection attempts.
- Connection profile between Kaspersky Thin Client and the Basis.WorkPlace broker.
- Settings for redirecting peripherals to the remote desktop: enabling/disabling redirection of USB drives and smart cards.
- Whether use of two monitors is enabled or disabled.
- RDP server connection settings:
- Address (name or IP address and port) of the Remote Desktop Connection Broker server.
- Domain and user name for connecting to the Remote Desktop Connection Broker server.
- Remote Desktop Connection Broker collection ID.
- Application alias.
- Certificate files for authenticating the Remote Desktop Connection Broker server when connecting to a remote desktop or virtual application via RDP.
- Settings for redirecting peripheral devices to the remote desktop:
- Whether redirection of USB drives is enabled or disabled.
- Whether redirection of smart cards is enabled or disabled.
- Whether redirection of printers is enabled or disabled.
- Whether redirection of audio playback devices is enabled or disabled.
- Whether redirection of audio recording devices is enabled or disabled.
- Whether use of two monitors is enabled or disabled.
- Whether automatic connection to the remote desktop or virtual application after unexpected disconnection is enabled or disabled.
- Image quality settings:
- Whether font smoothing is enabled or disabled.
- Whether menu animation is enabled or disabled.
- Whether the desktop background is displayed.
- Whether window contents are showed while dragging.
- Whether Microsoft Windows themes are enabled or disabled.
- Network settings:
- Whether automatic network configuration via DHCP is enabled or disabled.
- Thin client IP address.
- Subnet mask.
- List of IP addresses of DNS servers.
- IP address of the network gateway.
- Power-saving settings: the number of minutes before the monitor turns off and the number of minutes before the thin client turns off when Kaspersky Thin Client is idle.
- Log server connection settings:
- Address (name or IP address and port) of the log server used for forwarding audit and event logs.
- Certificate files for authenticating the log server when Kaspersky Thin Client connects to this server.
- Date and time settings:
- Date and time received from the Administration Server during the last synchronization with Kaspersky Security Center.
- Time zone.
- Information about available and downloaded Kaspersky Thin Client updates:
- Update availability status.
- Update installation status.
- Update delivery status.
- Available update data: Kaspersky Thin Client version, release name, date and time, importance.
- Time of the last successful update check.
- Time of the last successful update installation.
- Information about Kaspersky Thin Client End User License Agreements:
- End User License Agreement IDs.
- End User License Agreements in Russian, English, Spanish, and Brazilian Portuguese.
- Information about whether or not the End User License Agreements were accepted.
- Information about the release dates of the End User License Agreements.
Any received information is protected by Kaspersky in accordance with the requirements established by law and in accordance with current Kaspersky regulations. Data is transmitted over encrypted communication channels.
Page top
Turning Kaspersky Thin Client on and off
Before you start working with Kaspersky Thin Client, you must connect a mouse, keyboard and monitor to the thin client via the corresponding ports on the back panel of the device. To start working with Kaspersky Thin Client, you need to turn on the thin client.
Kaspersky Thin Client lets you connect a mouse, keyboard and monitor to the thin client while the system is running. When a second monitor is connected, you will be prompted to configure the monitor layout.
To turn on Kaspersky Thin Client,
Click the on/off power button in the upper part of the front panel of the thin client.
As a result, Kaspersky Thin Client will start running on the thin client.
While Kaspersky Thin Client is starting, the monitor connected to the thin client sequentially displays the splash screen of the thin client vendor, the welcome screen of the bootloader, the boot logs, and the Kaspersky Thin Client dynamic splash screen. The appearance of the Kaspersky Thin Client main window on the screen indicates that the system is on.
When Kaspersky Thin Client is started for the first time, the End User License Agreement acceptance window is displayed. To continue working with Kaspersky Thin Client, you need to carefully read and accept the End User License Agreement.

Front and back panels of the TONK TN1200 thin client
After you finished working with Kaspersky Thin Client, you must turn it off.
To turn off Kaspersky Thin Client,
- In the main window of Kaspersky Thin Client, click the shutdown button on the control panel .
- In the menu that opens, select Shut down.
Kaspersky Thin Client will be turned off.
Page top
Restarting Kaspersky Thin Client
You can restart Kaspersky Thin Client if necessary. For example, you may need to restart Kaspersky Thin Client to apply your selected language for the Kaspersky Thin Client interface.
To restart Kaspersky Thin Client:
- In the main window of Kaspersky Thin Client, click the shutdown button on the control panel .
- In the menu that opens, select Restart.
Kaspersky Thin Client will be restarted.
Page top
Using certificates in Kaspersky Thin Client
The
ensures secure data transfer between a client and a server using SSL connection certificates. An SSL connection certificate (hereinafter referred to as an "SSL certificate" or simply "certificate") is a block of data containing information about the certificate owner, the owner's public key, and the start and end dates of certificate validity.In Kaspersky Thin Client, certificates are used for the following purposes:
- Connecting a thin client to Kaspersky Security Center.
- Connecting to a remote environment:
- Authentication of the Remote Desktop Connection Broker server when connecting to a remote desktop or virtual application.
- Authentication of the broker when connecting to a remote desktop managed by Basis.WorkPlace.
- Authentication of the server address when connecting to a remote environment in Web Access.
- Connecting to a log server.
If a thin client is not connected to Kaspersky Security Center and the administrator has not assigned certificates for it in the Web Console, a user can independently accept or reject a certificate in Kaspersky Thin Client when connecting to a remote environment or to a log server. All accepted certificates will be saved in the thin client certificate store. In this case, a user could also connect to nodes and use certificates that are not controlled by the administrator.
You are advised to configure the Kaspersky Thin Client connection to a log server and to a remote environment only using certificates that were assigned by the administrator in the Web Console. In this case, all certificates that were previously accepted by a user will be removed from the thin client certificate store. These measures will help prevent Kaspersky Thin Client from connecting to untrusted nodes.
You are advised to update the assigned certificates in the following cases:
- Current certificates have been compromised.
- Certificates have expired.
- Certificates need to be regularly updated in accordance with the information security requirements of your enterprise.
Kaspersky Thin Client does not check to see if the certificate is on the Certificate Revocation List.
Page top
Configuring Kaspersky Thin Client
This section describes how to configure Kaspersky Thin Client.
Scenario: quick start for administrators
This section describes the sequence of steps that must be performed by the administrator to configure Kaspersky Thin Client and Kaspersky Security Center, and to establish a connection between them.
Instructions on installing Kaspersky Thin Client to a thin client are provided in a separate article.
Before installation of Kaspersky Thin Client or prior to the first startup of a thin client on which a Kaspersky Thin Client system is pre-installed, you are advised to update the BIOS on the thin client to the latest version, set a password for BIOS configuration changes, and configure the option to boot only from a local SSD device. These recommended measures will help prevent potential security risks, such as operating system substitution, replacement or deletion of remote server connection certificates, and unauthorized access to operating system settings.
The scenario for initial configuration of Kaspersky Thin Client and Kaspersky Security Center, and for establishing a connection between them consists of the following steps:
- Installing Kaspersky Security Center
Download the Kaspersky Security Center distribution package and install the full version of Kaspersky Security Center on the server. The distribution package for the full version of Kaspersky Security Center includes the Kaspersky Security Center Web Console. We recommend selecting the standard installation. For details on installing Kaspersky Security Center, please refer to the Installation of Kaspersky Security Center section of the Kaspersky Security Center Online Help Guide.
- Configuring firewall rules
If you plan to use the default port to connect the thin client to Kaspersky Security Center, set the rules allowing TCP connections through port 13292 for the operating system firewall of the server on which Kaspersky Security Center is installed. If you plan to use a port other than 13292, set the permissions accordingly. For detailed information on configuring firewall rules, please refer to the relevant documentation on the operating system you are using.
- Installing the Kaspersky Security Management Suite web plug-in
In the Kaspersky Security Center Web Console, install the Kaspersky Security Management Suite web plug-in.
- Preparing ports
Kaspersky Thin Client uses a mobile protocol to connect to Kaspersky Security Center. On the Kaspersky Security Center Administration Server, enable use of the TCP port that you set up access to in step 2. For details on TCP port enabling on the Kaspersky Security Center Administration Server, see the Modifying the Mobile Device Management settings section of the Kaspersky Security Center Online Help Guide.
- Turning on Kaspersky Thin Client
Turn on Kaspersky Thin Client and wait for the system to load. Please read the terms and conditions of the End User License Agreement and accept the agreement.
- Configuring Kaspersky Thin Client settings
After turning on Kaspersky Thin Client and accepting the End User License Agreement, configure general settings and network connection settings.
- Configuring a connection between Kaspersky Thin Client and Kaspersky Security Center
In the Kaspersky Thin Client interface, configure the connection to Kaspersky Security Center.
- Adding Kaspersky Thin Client to the list of managed devices
Connect to the Kaspersky Security Center Web Console and add Kaspersky Thin Client to the list of managed devices in Kaspersky Security Center. Policies in the Kaspersky Security Center Web Console are applied only for managed devices.
- Creating an active Kaspersky Security Center policy for Kaspersky Thin Client
If you need to manage a group of devices, create an active policy for Kaspersky Thin Client.
- Assigning certificates for a group of devices
Assign certificates to connect a group of devices to a remote environment and to a log server. We also recommend adding a certificate for connecting Kaspersky Thin Client to Kaspersky Security Center.
When these actions are completed, the Kaspersky Thin Client system will be ready for operation. You will be able to control Kaspersky Thin Client through the Kaspersky Thin Client interface or through the Kaspersky Security Center Web Console, and monitor events of Kaspersky Thin Client.
Page top
Scenario: certificate assignment for a group of thin clients
If certificates are assigned for an administration group in the Kaspersky Security Center Web Console, a user of a thin client that is included in this group will be able to connect only to the servers for which certificates have been added in the Web Console.
Kaspersky Security Center must be installed and configured in advance.
The scenario for assigning certificates to a group of thin clients includes the following steps:
- Configuring a connection to Kaspersky Security Center
In the Kaspersky Thin Client interface, configure the connection to Kaspersky Security Center.
- Adding thin clients to managed devices
In the Web Console interface, add a thin client to the managed devices group if the thin client is still in the unassigned devices group.
- Creating an active Kaspersky Security Center policy for Kaspersky Thin Client
In the Web Console interface, create an active policy for the relevant group of devices.
- Adding certificates for connection to a remote environment and a log server
In the Kaspersky Security Center Web Console interface, add required certificates and move the toggle button in the right part of the page to the Enforced position. Wait for Kaspersky Thin Client to fully synchronize with Kaspersky Security Center. You can define the synchronization period when configuring Kaspersky Thin Client through the Kaspersky Security Center Web Console. After synchronization, devices will receive the Kaspersky Security Center Administration Server certificates.
If you remove all certificates that were assigned to a group of devices, the users of thin clients from this group will be able to connect to any server, including servers that have not been assigned any certificates.
Page top
Scenario: thin client migration to a new Kaspersky Security Center Server
This section describes the steps to be performed by the administrator when configuring devices running Kaspersky Thin Client for management via a new Kaspersky Security Center Administration Server (hereinafter also referred to as "the Server") if these devices were previously managed via a different Kaspersky Security Center Server.
The scenario for configuring Kaspersky Thin Client management when migrating thin clients to a new Kaspersky Security Center Server consists of the following steps:
- Installing a new Kaspersky Security Center Administration Server
Download the Kaspersky Security Center distribution package and install the full version of Kaspersky Security Center on the server. The distribution package for the full version of Kaspersky Security Center includes the Kaspersky Security Center Web Console. We recommend selecting the standard installation. For details on installing Kaspersky Security Center, please refer to the Installation of Kaspersky Security Center section of the Kaspersky Security Center Online Help Guide.
- Configuring firewall rules
If you plan to use the default port to connect the thin client to Kaspersky Security Center, set the rules allowing TCP connections through port 13292 for the operating system firewall of the server on which Kaspersky Security Center is installed. If you plan to use a port other than 13292, set the permissions accordingly. For detailed information on configuring firewall rules, please refer to the relevant documentation on the operating system you are using.
- Installing the Kaspersky Security Management Suite web plug-in
In the Web Console, install the Kaspersky Security Management Suite web plug-in for the new Kaspersky Security Center Administration Server.
- Preparing ports
Kaspersky Thin Client uses a mobile protocol to connect to Kaspersky Security Center. On the Kaspersky Security Center Administration Server, enable use of the TCP port that you set up access to in step 2. For details on TCP port enabling on the Kaspersky Security Center Administration Server, see the Modifying the Mobile Device Management settings section of the Kaspersky Security Center Online Help Guide.
- Turning on Kaspersky Thin Client
Turn on Kaspersky Thin Client and wait for the system to load.
- Creating an active Kaspersky Security Center policy for Kaspersky Thin Client
In the previously used Web Console, create an active policy for the group of devices that will be managed through the new Kaspersky Security Center Server.
- Updating the security certificate for connecting to Kaspersky Security Center
Issue a certificate, save it on the current Kaspersky Security Center Administration Server as a reserve one, and then use it on the new Server as the primary certificate.
- Configuring a connection between Kaspersky Thin Client and the new Kaspersky Security Center Server
If a DHCP server is deployed in your enterprise infrastructure and the settings for connecting Kaspersky Thin Client to Kaspersky Security Center are received automatically, use option 224 to define the IP address or domain name of the new Kaspersky Security Center Administration Server and wait for all devices running Kaspersky Thin Client to finish synchronizing with Kaspersky Security Center.
If a DHCP server is not deployed in your enterprise infrastructure, manually configure the connection to the new Kaspersky Security Center in the Kaspersky Thin Client interface.
Thin client administration groups are connected to the new Kaspersky Security Center Server, and you can manage them using the Web Console interface.
Page top
Configuring general settings
In the Kaspersky Thin Client interface, you can configure the general settings of the thin client. For example, you can specify the thin client name that will be displayed in the Kaspersky Thin Client taskbar and in the Kaspersky Security Center Web Console, and select the language of the Kaspersky Thin Client interface.
If the thin client is included in an administration group, the values of settings specified in this article may be enforced through the Web Console. If this is the case, you will not be able to configure these settings in the Kaspersky Thin Client interface.
The settings specified in this article may be hidden on the thin client.
To configure general settings of Kaspersky Thin Client:
- In the Kaspersky Thin Client control panel, click and select Settings in the menu that opens.
- In the window that opens, select the General section (see the figure below).
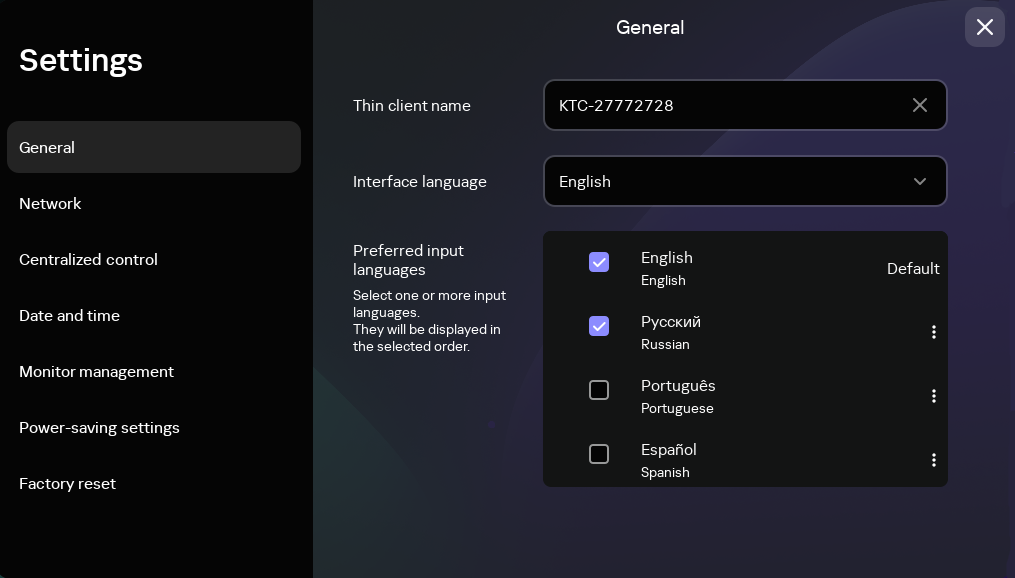
Settings. General section
- In the Thin client name field, enter the name that will be displayed for Kaspersky Thin Client in the Web Console. The name can contain uppercase and lowercase letters of the Latin and Cyrillic alphabets, numerals, and a hyphen. The length of the thin client name must not exceed 30 characters.
- In the Interface language list, select a user interface language. Kaspersky Thin Client supports the Russian, English, Spanish, and Brazilian Portuguese user interface languages.
- In the Preferred input languages drop-down list, select one or more languages. Kaspersky Thin Client supports the Russian, English, Spanish, and Brazilian Portuguese input languages. The selected languages are displayed in the Kaspersky Thin Client control panel in the order that you selected, and available when switching the keyboard input language.
Changes will be applied after the thin client restart.
Page top
Configuring network settings
In the Settings → Network section, you can configure the settings for connecting Kaspersky Thin Client to the network.
To configure the network settings:
- In the Kaspersky Thin Client control panel, click and select Settings in the menu that opens.
- In the window that opens, select the Network section (see the figure below).
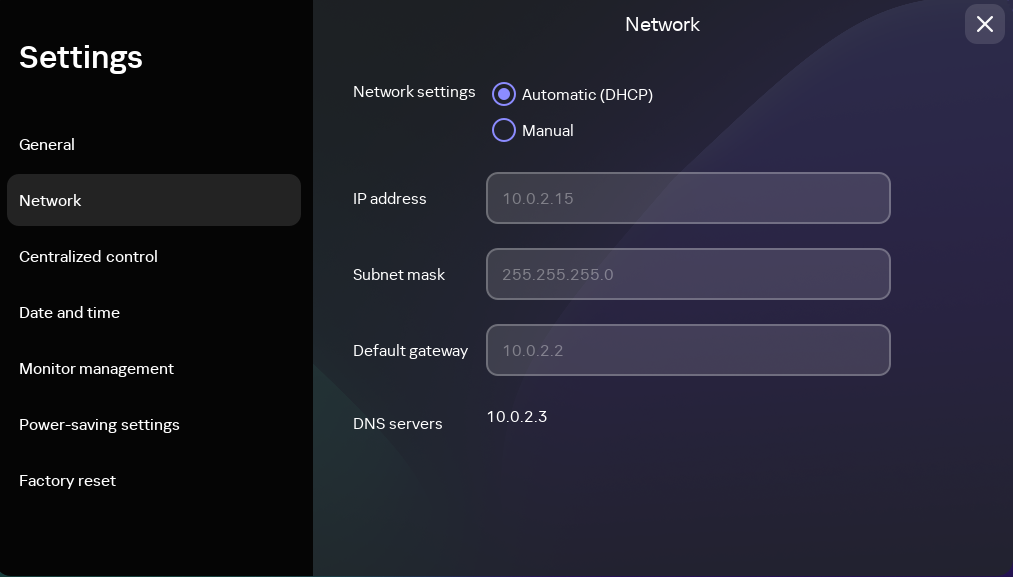
Settings. Network section
- Configure the settings for connecting Kaspersky Thin Client to the network:
- If you need to receive the network settings automatically via DHCP, select Automatic (DHCP) for the Network settings parameter. In this mode, the IP address, Subnet mask, Default gateway, and DNS servers fields are not accessible.
- If you need to manually specify the network settings, select Manual for the Network settings parameter and do the following:
- In the IP address field, enter the IP address of Kaspersky Thin Client in IPv4 format.
- In the Subnet mask field, enter the subnet mask.
- In the Default gateway field, enter the address of the network gateway.
- In the DNS servers field, enter the addresses of the DNS servers. You can enter no more than two addresses. This field is optional.
- Click Save in the lower part of the window to save the changes.
Configuring settings for connecting Kaspersky Thin Client to Kaspersky Security Center
To manage a thin client through the Web Console, you must configure settings for connecting Kaspersky Thin Client to the Kaspersky Security Center Administration Server.
Kaspersky Thin Client must be connected to the Kaspersky Security Center Server in a secure network segment. We advise to configure this connection with the help of one of your company's qualified experts who will be able to verify the authenticity of the accepted certificate.
We recommend using a separate Kaspersky Security Center Administration Server to manage thin clients in order to receive important security updates from the Kaspersky update servers. The reason for this is that one Kaspersky Security Center Administration Server can have only one active update task with one priority update source.
To configure settings for connecting Kaspersky Thin Client to the Kaspersky Security Center Administration Server:
- In the Kaspersky Thin Client control panel, click and select Settings in the menu that opens.
- In the window that opens, select the Centralized control section (see the figure below).

Settings. Centralized control section
- In the Centralized control window that opens, configure the following settings for connecting Kaspersky Thin Client to Kaspersky Security Center:
- If you want to use the DHCP protocol to automatically receive the settings for connecting Kaspersky Thin Client to Kaspersky Security Center, select Automatic (DHCP) in the Method for determining the server IP address block. In this mode, the IP address/server name field cannot be edited.
To use this connection option, a DHCP server must be deployed in the enterprise infrastructure and option 224 must be used to define the IP address or domain name of the Kaspersky Security Center Administration Server to which you plan to connect Kaspersky Thin Client. Kaspersky Thin Client receives string values in
IP address:Portformat orServer name:Portformat in option 224. For example,192.168.2.4orksc.example.com:12345. The port must be specified only if a port other than port 13292 is used for the connection.By default, use of DHCP is enabled to automatically receive the settings for connecting Kaspersky Thin Client to Kaspersky Security Center.
- If you want to manually define the settings for connecting Kaspersky Thin Client to Kaspersky Security Center, select Manual in the Method for determining the server IP address block and in the IP address/server name field enter the IP address or name of the Kaspersky Security Center Administration Server. If you are using a port other than port 13292, indicate it in
IP address:Portformat orServer name:Portformat.
- If you want to use the DHCP protocol to automatically receive the settings for connecting Kaspersky Thin Client to Kaspersky Security Center, select Automatic (DHCP) in the Method for determining the server IP address block. In this mode, the IP address/server name field cannot be edited.
- Activate the Connection to Kaspersky Security Center toggle button.
- If you are connecting to Kaspersky Security Center for the first time, check the settings of the certificate used for connecting Kaspersky Thin Client to Kaspersky Security Center in the Add certificate window and click the Add certificate button. The added certificate will be used for subsequent connections between Kaspersky Thin Client and Kaspersky Security Center.
If the certificate used for connecting Kaspersky Thin Client to Kaspersky Security Center has been changed in Kaspersky Security Center, you must confirm the certificate change to continue configuring the connection.
Kaspersky Thin Client will attempt to connect to Kaspersky Security Center. Following successful connection to Kaspersky Security Center, the Connected to Kaspersky Security Center status will be displayed.
Page top
Changing settings for connecting Kaspersky Thin Client to Kaspersky Security Center
If the thin client is included in an administration group, the values of settings specified in this article may be enforced through the Web Console. If this is the case, you will not be able to configure these settings in the Kaspersky Thin Client interface.
The settings specified in this article may be hidden on the thin client.
To change the settings for connecting Kaspersky Thin Client to Kaspersky Security Center:
- In the Kaspersky Thin Client control panel, click and select Settings in the menu that opens.
- In the window that opens, select the Centralized control section.
- Deactivate the Connection to Kaspersky Security Center toggle button.
- In the Confirm disconnection window that opens, view and memorize the confirmation code for disconnecting Kaspersky Thin Client from Kaspersky Security Center, then provide it to the Kaspersky Security Center administrator. The administrator contact details are provided in the Confirm disconnection window. The administrator should send you a confirmation code in response.
- Click Next.
- In the Confirmation code window that opens, enter the code provided by the Kaspersky Security Center administrator and click the Confirm button.
Kaspersky Thin Client will be disconnected from management through Kaspersky Security Center.
- In the Centralized control window, manually configure settings for connecting to Kaspersky Security Center.
- Activate the Connection to Kaspersky Security Center toggle button.
The thin client will attempt to connect to Kaspersky Security Center. Following successful connection to Kaspersky Security Center, the Connected to Kaspersky Security Center status will be displayed.
Page top
Configuring settings for connecting to a remote environment via RDP
Kaspersky Thin Client lets you configure settings for connecting to a virtual application or remote desktop via RDP.
Information about devices that are redirected to a remote environment is provided in a separate article.
To correctly redirect USB devices to a remote desktop in the Windows 10 operating system, you must enable Microsoft Remote Desktop Services and allow redirection of Plug and Play devices in the settings of Remote Desktop Services. For Microsoft Windows Server 2016 and Microsoft Windows Server 2019 operating systems, you must also allow a remote connection using Remote Desktop Services and allow remote control rules to be set for connection sessions in Microsoft Remote Desktop Services.
To configure settings for connecting to a remote desktop or virtual application via RDP:
- In the main window of Kaspersky Thin Client, click the RDP button.
- In the left part of the connection window that opens, click Settings.
This opens a window in which you can configure settings for connecting to a remote desktop (see the figure below).
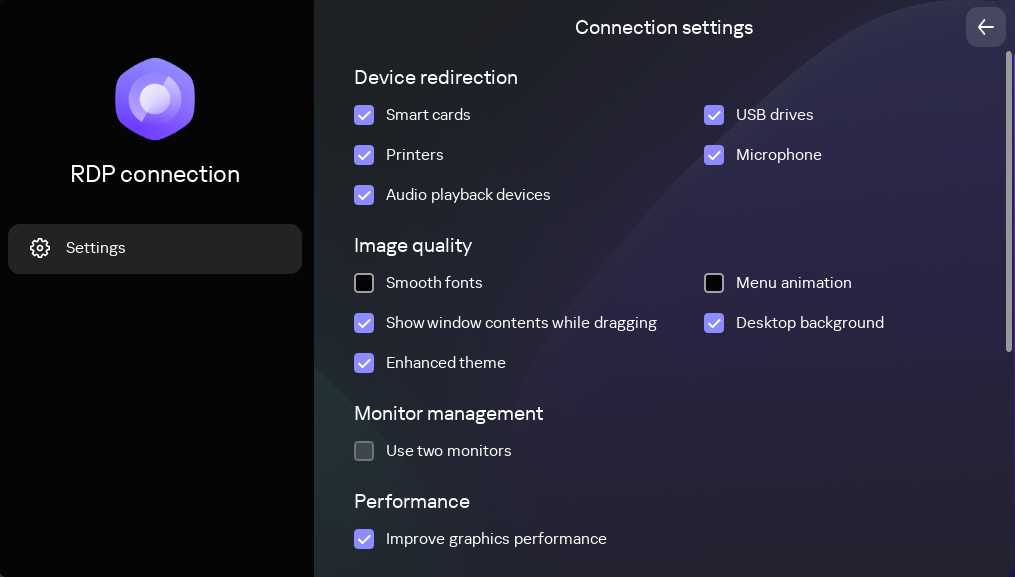
Window for configuring settings for connecting to a remote desktop via RDP
- In the Device redirection settings block, next to the required devices, select the following check boxes:
- Smart cards if you want to enable redirection of smart cards and tokens.
- USB drives if you want to enable redirection of USB drives.
- Printers if you want to enable redirection of printers.
The remote computer must have the installed driver for the printer that is connected to the thin client.
- Microphone if you want to enable redirection of audio recording devices.
Audio volume and other settings are managed from the remote computer.
- Audio playback devices if you want to enable redirection of headphones or speakers.
Kaspersky Thin Client supports both mono and stereo playback. Audio volume and other settings are managed from the remote environment.
- In the Image quality block, select the check boxes next to the remote desktop graphics settings that you need to use:
- Smooth fonts
- Menu animation
- Desktop background
- Show window contents while dragging
- Enhanced theme
Enabling remote desktop display settings may affect the speed of Kaspersky Thin Client operations.
- If two monitors are installed at your workstation and you want a remote desktop image to be displayed on both monitors, select the Use two monitors check box in the Monitor management block. If necessary, you can configure the layout of monitors.
- If you need to improve the display and ensure a smoother appearance of graphical elements when connected to a remote environment, select the Improve graphics performance check box in the Performance block.
If you need to connect to a Microsoft Windows 7 remote desktop, clear the Improve graphics performance check box. The feature is not supported for connections to Microsoft Windows 7 remote desktops.
- If you need to use the Microsoft Remote Desktop Connection Broker to connect to a remote desktop, use the Remote Desktop Connection Broker collection ID field to specify the collection ID in the format
tsv://MS Terminal Services Plugin.1.collection_id(collection_idrefers to the specific identifier of the collection).Specify a Remote Desktop Connection Broker collection ID to connect to a virtual application.
- If you need to start a virtual application, specify the application alias in the Application alias field.
- If you want to automatically restore a remote desktop connection that is unexpectedly disconnected, select the Connect again if connection is lost check box.
- Click the back arrow in the upper-right corner of the window to return to the connection session.
Configuring settings for connecting to a remote environment in the Basis.WorkPlace infrastructure
Kaspersky Thin Client lets you configure settings for connecting to a remote environment in the Basis.WorkPlace infrastructure.
Information about devices that are redirected to a remote environment is provided in a separate article.
To configure settings for connecting to a remote environment in the Basis.WorkPlace infrastructure:
- In the main window of Kaspersky Thin Client, click the Basis.WorkPlace button.
- In the remote desktop connection window that opens, click Settings in the left part of the window.
This opens a window in which you can configure settings for connecting to a remote desktop (see the figure below).
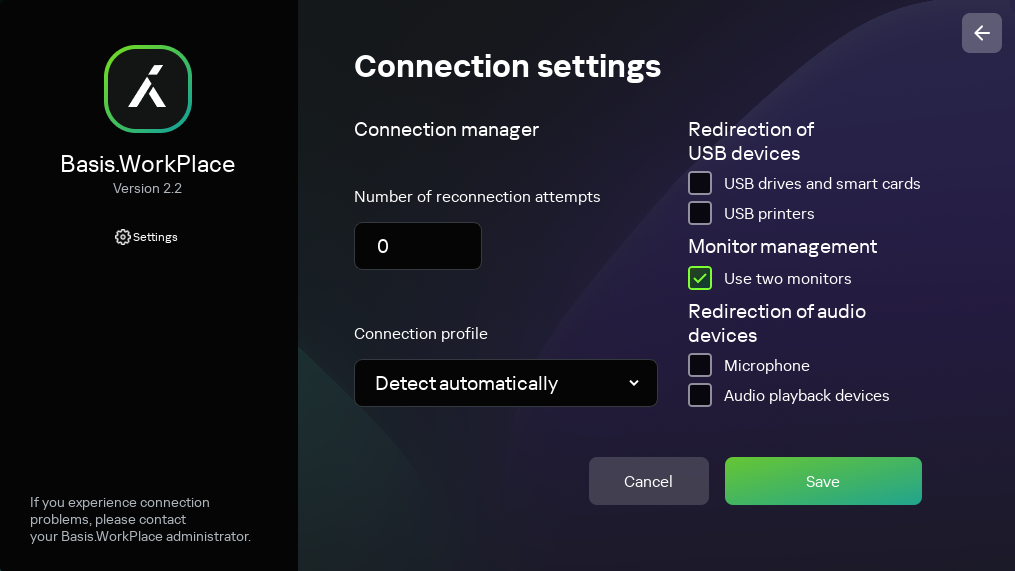
Window for configuring settings for connecting to a remote desktop managed by Basis.WorkPlace
- If you need to enable or disable redirection of devices to a remote environment, select or clear the appropriate check boxes in the Redirection of USB devices block.
Redirection of USB devices to a remote desktop managed by Basis.WorkPlace may be blocked by the Basis.WorkPlace administrator.
- In the Number of reconnection attempts field, enter the number of times that Kaspersky Thin Client should attempt to reconnect to the Basis.WorkPlace broker if disconnected. You can indicate no more than five attempts at reconnection.
- In the Connection profile drop-down list, select the type of connection between Kaspersky Thin Client and the Basis.WorkPlace broker. The type of connection depends on the connection speed. The following values are available:
- Detect automatically
- Modem
- Low-speed broadband connection
- Satellite
- High-speed broadband connection
- Wide area network
- Local area network
- If two monitors are installed at your workstation and you want a remote desktop image to be displayed on both monitors, select the Use two monitors check box in the Monitor management block. If necessary, you can configure the layout of monitors.
- Click Save in the lower part of the window to save the changes.
- Click the back arrow in the upper-right corner of the window to return to the remote desktop connection window.
Configuring power-saving settings
If the thin client is included in an administration group, the values of settings specified in this article may be enforced through the Web Console. If this is the case, you will not be able to configure these settings in the Kaspersky Thin Client interface.
The settings specified in this article may be hidden on the thin client.
You can configure an idle timeout period to turn off the monitor. The monitor will turn on automatically when you click your mouse, press a key on your keyboard, or move your mouse cursor. You can also configure a Kaspersky Thin Client inactivity period after which the thin client will be turned off. To resume operations of the thin client, you will have to turn it on.
To configure power-saving settings:
- In the Kaspersky Thin Client control panel, click and select Settings in the menu that opens.
- In the window that opens, select the Power-saving settings section (see the figure below).
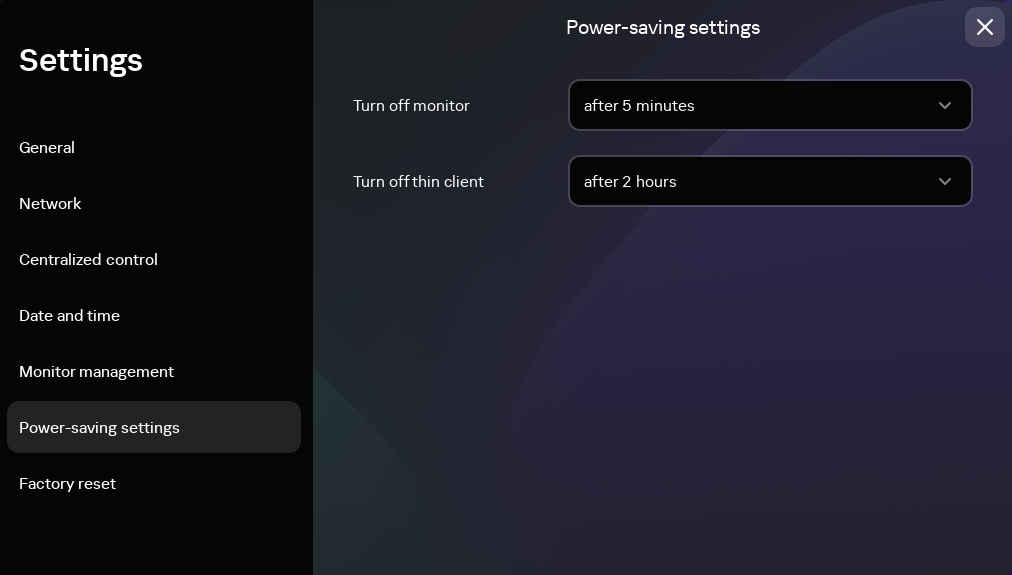
Settings. Power-saving settings section
- In the Turn off monitor drop-down list, select the system inactivity period after which the monitor will be turned off.
- In the Turn off thin client drop-down list, select the system inactivity period after which the thin client will be turned off.
You can also configure power-saving settings through the Kaspersky Security Center Web Console interface.
Page top
Configuring monitors layout
If two monitors are installed at your workstation, you can select which monitor will be used as the primary monitor and which one will be used as the secondary monitor when showing the remote desktop screen. When connected to the remote desktop, the connection panel is displayed in the upper part of the screen on the primary monitor.
To use two monitors, you must first enable dual monitors support in the settings for connecting to remote desktops either via RDP or managed by Basis.WorkPlace.
To change the layout of monitors for displaying the remote desktop:
- In the Kaspersky Thin Client control panel, click and select Settings in the menu that opens.
- In the window that opens, select the Monitor management section (see the figure below).
The window that opens displays the layout of monitors schematically. The primary monitor is always positioned on the left and labeled.
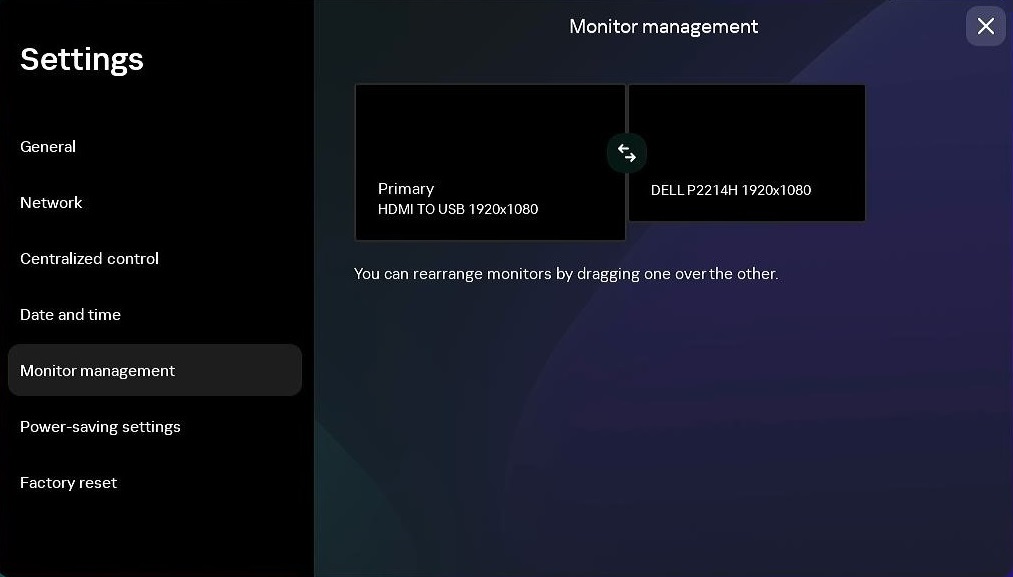
Settings. Monitor management section
- Change the position of monitors by clicking the
 button located between the monitors on the layout.
The layout of monitors for displaying the remote desktop will be changed.
Page top
Managing access to Kaspersky Thin Client settings
You can configure the Kaspersky Thin Client interface to display or hide settings that are configured only once and are no longer used in the core operating scenarios of the thin client.
If the thin client is included in an administration group, the values of settings may be enforced through the Web Console. These enforced settings will be blocked from editing in the Kaspersky Thin Client interface, and you will not be able to enable or disable their display.
To enable or disable the display of Kaspersky Thin Client settings:
- In the Kaspersky Thin Client control panel, click and select Tools in the menu that opens.
- In the window that opens, select the Access to settings section (see the figure below) and do one of the following:
- If you need to hide the settings, move the toggle button to the Access is blocked position.
All of the following settings will be hidden in the thin client interface:
- If you need to display the settings, move the toggle button to the Access is unblocked position.
The settings will be displayed. You will be able to define new values for these settings.
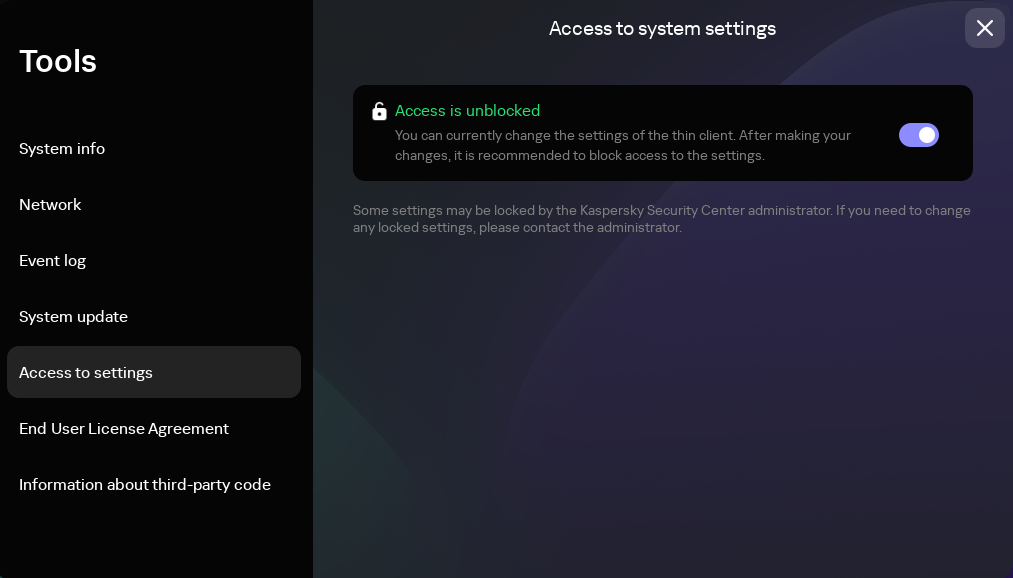
Tools. Access to settings section
- If you need to hide the settings, move the toggle button to the Access is blocked position.
Configuring the date and time
When a thin client is connected to Kaspersky Security Center, it receives the date and time from the Kaspersky Security Center Administration Server. You can manually change the date and time of Kaspersky Thin Client only if the system is not being managed via Kaspersky Security Center.
If the thin client is included in an administration group, the values of settings specified in this article may be enforced through the Web Console. If this is the case, you will not be able to configure these settings in the Kaspersky Thin Client interface.
The settings specified in this article may be hidden on the thin client.
To change the date and time of Kaspersky Thin Client:
- In the Kaspersky Thin Client control panel, click and select Settings in the menu that opens.
- In the window that opens, select the Date and time section (see the figure below).
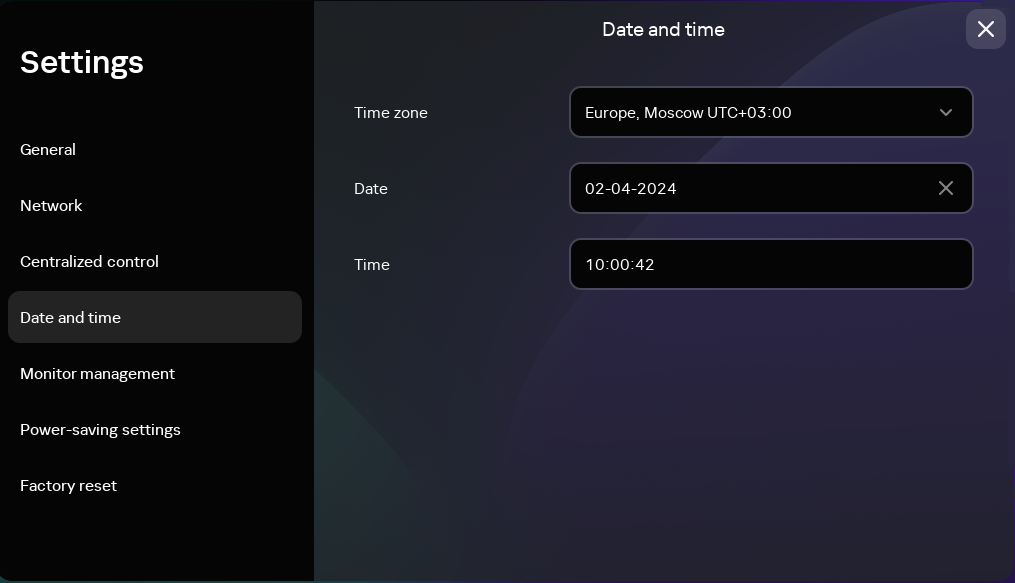
Settings. Date and time section
- Configure the date and time settings:
- Select the relevant time zone from the Time zone drop-down list.
- In the Date field, enter the current date in
DD-MM-YYYYformat. - In the Time field, enter the current time in
HH:MM:SSformat.
- Click Save in the lower part of the window to save the changes.
Resetting Kaspersky Thin Client settings
Reset will result in the loss of all defined settings and all data of Kaspersky Thin Client (except the audit log and system date), and will disconnect the device from Kaspersky Security Center. We recommend performing a reset only after approval with your company administrator.
If the thin client is included in an administration group, the values of settings specified in this article may be enforced through the Web Console. If this is the case, you will not be able to configure these settings in the Kaspersky Thin Client interface.
The settings specified in this article may be hidden on the thin client.
To perform a factory reset of a thin client that is not included in an administration group:
- In the Kaspersky Thin Client control panel, click and select Settings in the menu that opens.
- In the window that opens, select the Factory reset section (see the figure below).
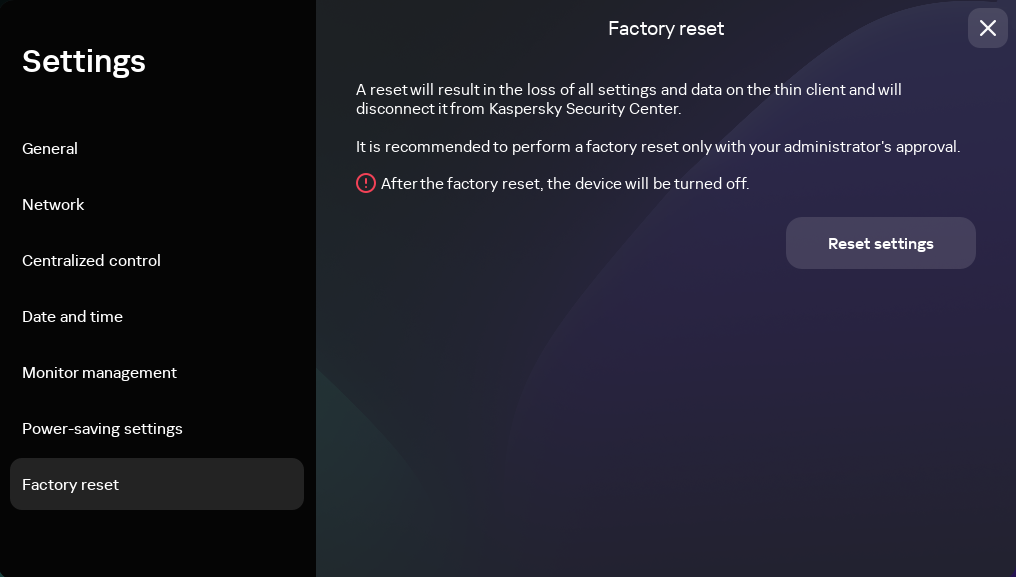
Settings. Factory reset section
As a result, all defined settings of Kaspersky Thin Client will be restored to their original values (default), all data on the device will be deleted (except the audit log and system date), and Kaspersky Thin Client will be disconnected from Kaspersky Security Center. After reset, the thin client turns off.
To perform a factory reset of a thin client that is included in an administration group:
- In the Kaspersky Thin Client control panel, click and select Settings in the menu that opens.
- In the window that opens, select the Factory reset section.
- In the window that opens, click the Reset settings button.
This opens the Confirm reset window showing a confirmation code.
- Provide the confirmation code to the Kaspersky Security Center administrator. The administrator contact details are provided in the Confirm reset window. The Kaspersky Security Center administrator sends you a confirmation code in response.
- Click Next.
- In the Confirmation code window that opens, enter the code provided by the Kaspersky Security Center administrator and click the Confirm button.
As a result, all defined settings of Kaspersky Thin Client will be restored to their original values (default), all data on the device will be deleted (except the audit log and system date), and Kaspersky Thin Client will be disconnected from Kaspersky Security Center. After reset, the thin client turns off.
Page top
Managing Kaspersky Thin Client in the thin client interface
This section describes the main Kaspersky Thin Client operating scenario and contains instructions for using Kaspersky Thin Client.
The main Kaspersky Thin Client operating scenario consists of the following steps:
- Preparing Kaspersky Thin Client for startup
Connect the peripherals to the thin client before starting it for the first time.
- Starting Kaspersky Thin Client
Turn on the thin client to get started.
- Connection session
Connect to a remote environment and start working.
- Locking the desktop and resuming operations
If you need to temporarily leave your workstation, lock your remote desktop. Resume operations when you return to your workstation. For detailed information about locking the remote desktop and resuming operations, see the manual of the operating system you are connecting to remotely.
- Closing a connection session
Close the connection to the remote environment before shutting down.
- Stopping Kaspersky Thin Client
Turn off the thin client at the end of the workday.
Connecting to a remote environment
You can use Kaspersky Thin Client to do the following:
- Connect to a remote desktop via RDP
To connect to a remote desktop via RDP:
- Turn on Kaspersky Thin Client.
- In the main window of Kaspersky Thin Client, click the RDP button.
- In the window that opens, specify the connection settings:
- In the Server field, specify the IP address or name of the Microsoft Remote Desktop Connection Broker server.
Kaspersky Thin Client saves the last entered server address with which a connection was successfully established, so you do not need to enter it again when reconnecting.
- In the User name field, enter the local or domain user name. You can specify the domain user name in
Domain\User nameformat or inUser nameformat.Kaspersky Thin Client saves the last entered user name that successfully connected to the server, so you do not need to enter it again when reconnecting.
- In the Password field, enter the user password.
The user password is not saved; the next time you connect, you will need to enter the password again.
- In the Server field, specify the IP address or name of the Microsoft Remote Desktop Connection Broker server.
- To configure settings for connecting to a remote desktop, click Settings in the left part of the window.
- Press Enter or click Connect.
If you are connecting to a remote desktop for the first time and Kaspersky Thin Client is not included in an
, check the settings of the added certificate in the opened Add certificate window and click the Add certificate button.If Kaspersky Thin Client was previously added to an administration group that is managed through the Kaspersky Security Center Web Console and the Kaspersky Security Center administrator added a server authentication certificate for this administration group, the connection is established automatically.
The server authentication certificate will be added to the system certificate store of Kaspersky Thin Client and will be used for subsequent connections.
- If you specified the Remote Desktop Connection Broker collection ID when configuring a remote desktop connection and multiple desktops are available to you, in the remote desktop selection window that opens, click the button with the name of the desktop to which you want to connect.
The remote desktop window opens and the connection session begins.
- Connect to a virtual application via RDP
To connect to a
via RDP:- Turn on Kaspersky Thin Client.
- In the main window of Kaspersky Thin Client, click the RDP button.
- In the window that opens, specify the connection settings:
- In the Server field, specify the IP address or name of the Microsoft Remote Desktop Connection Broker server.
Kaspersky Thin Client saves the last entered server address with which a connection was successfully established, so you do not need to enter it again when reconnecting.
- In the User name field, enter the local or domain user name. You can specify the domain user name in
Domain\User nameformat or inUser nameformat.Kaspersky Thin Client saves the last entered user name that successfully connected to the server, so you do not need to enter it again when reconnecting.
- In the Password field, enter the user password.
The user password is not saved; the next time you connect, you will need to enter the password again.
- In the Server field, specify the IP address or name of the Microsoft Remote Desktop Connection Broker server.
- Click Settings in the left part of the window.
- In the Remote Desktop Connection Broker collection ID field, specify the collection ID in the format
tsv://MS Terminal Services Plugin.1.collection_id(collection_idrefers to the specific identifier of the collection). - In the Application alias field, specify the alias of the virtual application that you want to open.
Kaspersky Thin Client saves the alias that you entered last, so you do not need to enter it again when reconnecting.
- Click the back arrow in the upper-right corner of the window to return to the connection window.
- In the connection window, press Enter or click Connect.
If you are connecting to the selected virtual application for the first time and Kaspersky Thin Client is not included in an administration group, check the settings of the added certificate in the opened Add certificate window and click the Add certificate button.
The certificate will be added to the system certificate store of Kaspersky Thin Client and will be used for subsequent connections.
If the Kaspersky Security Center administrator has already added Kaspersky Thin Client to an administration group and added a server authentication certificate for this group, the connection will be established automatically.
The window of the running virtual application opens and the connection session begins.
To switch to another window of a running virtual application,
Hover the mouse over the application icon in the connection panel in the upper part of the screen and select the relevant window from the drop-down list.
- Connect to a remote desktop managed by Basis.WorkPlace
- Connect to a remote environment in the Web Access application
Multiple simultaneously running connection sessions are not supported.
Kaspersky Thin Client uses TLS encryption to protect all connection sessions and to protect data from being intercepted or replaced.
Page top
Using the connection panel
The connection panel is displayed in the upper part of the screen after you successfully connect to a remote environment, and is used for managing the active connection session.
To manage a remote connection session with the help of the connection panel, do as follows:
- To close the remote connection session, click Disconnect from server.
- To change the thin client interface language, click the abbreviated name of the current language and select the relevant language form the drop-down list.
- To view Technical Support information, click
 .
.
The connection panel collapses automatically when out of keyboard or mouse focus.
To switch to another window of a running virtual application,
Click the application icon in the connection panel and select the relevant window from the drop-down list.
To collapse or restore the connection panel, do as follows:
- To restore the connection panel, click the collapsed panel or press Ctrl+Alt+Home.
- To collapse the connection panel with keyboard focus on it, press Esc.
- To collapse the connection panel without moving focus away from the remote session window, press Ctrl+Alt+Home.
You also can move a collapsed connection panel horizontally to the right or left.
To change the position of the connection panel,
Click the connection panel area that has no buttons and drag it with the mouse.
The position of the panel on the screen is saved for future connections, even after the thin client is restarted or shut down.
You also can control the connection panel and remote session with hotkeys.
Page top
Viewing information about Kaspersky Thin Client
You can view information about Kaspersky Thin Client under Tools → System info.
The System info section (see the figure below) shows the following data:
- Kaspersky Thin Client version number
- KasperskyOS version number
- Link to the Kaspersky Thin Client Online Help
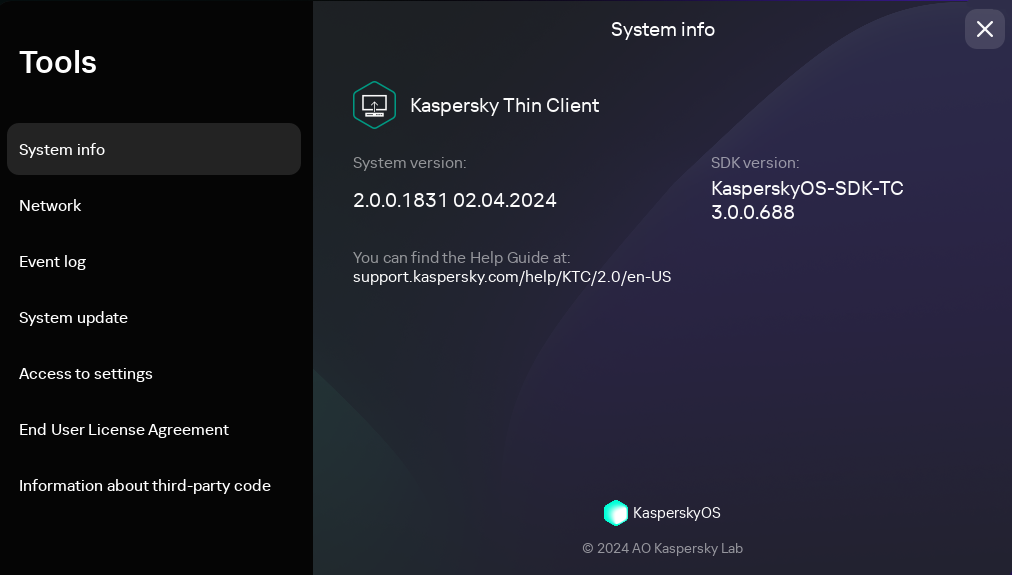
Tools. System info section
Viewing network status information
You can view Kaspersky Thin Client network connection settings and network status under Tools → Network. Information about Kaspersky Thin Client network connection settings is updated automatically at least once every second.
The Network section displays the following information about the settings for connecting Kaspersky Thin Client to the network (see the figure below):
- MAC address: MAC address of the device where Kaspersky Thin Client is installed.
- IP address: IP address of the device where Kaspersky Thin Client is installed.
- Subnet mask: subnet mask that contains the IP address of the device.
- Default gateway: address of the network gateway.
- DNS servers: addresses of DNS servers. To view all addresses (if there are more than three), hover the mouse over the setting value.
- Connection: status of the network connection of Kaspersky Thin Client and the connection speed.
- Sent: number and total size of network packets sent from Kaspersky Thin Client.
- Received: number and total size of network packets received by Kaspersky Thin Client.
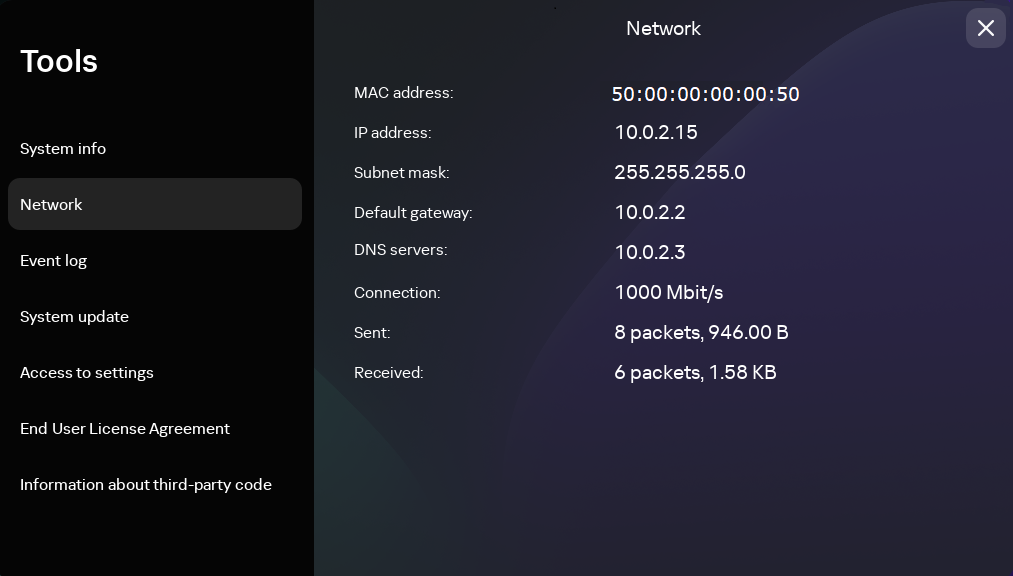
Tools. Network section
Viewing Kaspersky Thin Client notifications
The Kaspersky Thin Client interface displays the following types of notifications:
- Prompts to select an action by clicking a button, for example, run or defer an update. After some time, Kaspersky Thin Client will repeat any prompts that you closed without selecting an action. A prompt is considered to be resolved after you select an action.
- A prompt to go to another section of Kaspersky Thin Client to configure further settings. For example, the system prompts the user to set up monitor layout when you connect a second monitor. You can choose between going to the other system section by clicking the appropriate button or dismissing the prompt.
- Informational notifications. These notifications do not require you to take any action. Your only option is to close the notification after reviewing its contents.
If the cursor or keyboard focus are outside the notification area, unresolved and unread prompts are hidden, and the counter in the control panel displays their number.
During a connection session, update notifications are not automatically hidden. You can manually close these notifications or select the relevant action to close a notification.
To view a list of all Kaspersky Thin Client notifications,
In the Kaspersky Thin Client control panel, click  .
.
A list of notifications is displayed if new notifications are available (see fig. below).
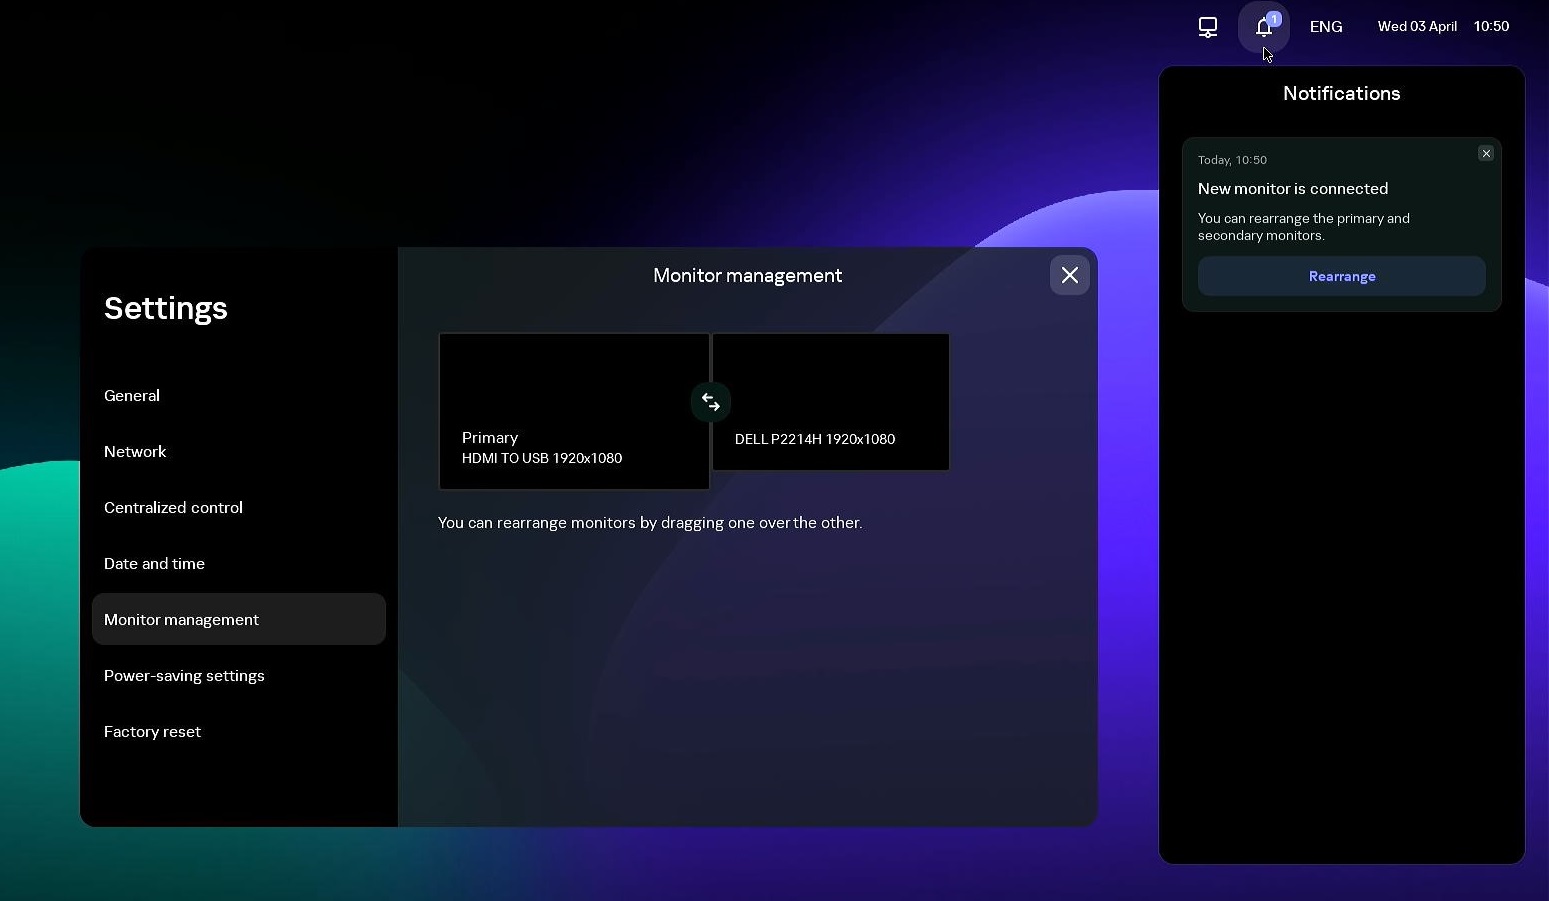
Kaspersky Thin Client notifications panel
Page top
Managing certificates in the thin client interface
Kaspersky Thin Client does not check to see if the certificate is on the Certificate Revocation List.
About certificates for connecting to Kaspersky Security Center
If the Kaspersky Security Center administrator replaces the certificate for connecting to Kaspersky Security Center, some cases may require confirmation of the certificate replacement. For example, this may be required if the thin client was turned off for a long time, has not synchronized with Kaspersky Security Center, and the certificate previously used to connect to Kaspersky Security Center has expired.
To confirm replacement of the mobile certificate for connecting to Kaspersky Security Center:
- Turn on Kaspersky Thin Client.
- In the Certificate must be replaced window that opens, view and memorize the confirmation code and provide it to the Kaspersky Security Center administrator. The administrator contact details are provided in the Certificate must be replaced window. The Kaspersky Security Center administrator sends you a certificate replacement code in response.
- Click Next.
- In the Certificate replacement code window that opens, enter the code provided by the Kaspersky Security Center administrator and click the Confirm button.
As a result, the new certificate for connecting to Kaspersky Security Center will be saved in the Kaspersky Thin Client certificate store and will be subsequently used to connect to Kaspersky Security Center.
About certificates used to connect to a remote environment and to a log server
If a thin client is not connected to Kaspersky Security Center and the administrator has not assigned certificates for it in the Web Console, a user could also connect to nodes and use certificates that are not controlled by the administrator. You are advised to configure the connection of a group of thin clients to a log server and to a remote environment only using certificates that were assigned by the administrator in the Web Console. These measures will help prevent Kaspersky Thin Client from connecting to untrusted nodes.
You can use or reject a certificate in the Kaspersky Thin Client interface in the following cases:
- When connecting Kaspersky Thin Client to Kaspersky Security Center for the first time.
- When connecting to a remote environment for the first time.
- When connecting to a log server for the first time.
Accepted certificates are saved in the system store of Kaspersky Thin Client.
If a thin client is included in an administration group and this group has been assigned certificates in the Web Console, you will not be able to manage the certificates in the Kaspersky Thin Client interface.
Page top
Closing a connection session
To close a remote connection session,
Restore the connection panel and click Disconnect from server in the panel.
The session closes, and a connection window is displayed.
Page top
Managing Kaspersky Thin Client using hotkeys
You can use dedicated hotkeys and key combinations when working with Kaspersky Thin Client and during the connection session. The table below lists all the available hotkeys and key combinations.
Hotkeys and key combinations for Kaspersky Thin Client
Keys and key combinations |
Actions |
|---|---|
Win |
Open or close the shut down menu. |
→ ← |
Switch between available connection options (RDP, Basis.WorkPlace, Web Access) in the Kaspersky Thin Client main window. |
↑ ↓ |
|
Tab |
Switch left to right or top to bottom between the following:
When switching, unavailable items, such as disabled fields, and inactive items are skipped. |
Shift+Tab |
Switch right to left or bottom to top between the following:
When switching, unavailable items, such as disabled fields, and inactive items are skipped. |
Space or Enter |
When switching, unavailable items, such as disabled fields, and inactive items are skipped. |
Esc |
|
Alt+Shift |
Change the keyboard language. |
Alt+Page down Alt+Page up |
Navigate to the next or previous section of the Settings or Tools window. When you switch between the sections, their state and the element in focus are preserved. For example, in the Settings window, when you switch from the General section to the Network section, the focus in the General section remains in the same field where it was when you switched to another section. |
Ctrl+Alt+Home |
Collapse or restore the connection panel. |
Ctrl+D |
Close a connection session. The shortcut only works on an expanded connection panel. |
Win+I |
Open Settings while in the Kaspersky Thin Client main window if access to the settings is unblocked. |
Win+U |
Open Tools while in the Kaspersky Thin Client main window. |
Win+Esc |
Shut down Kaspersky Thin Client while in the Kaspersky Thin Client main window. |
Win+F12 or Win+End |
Restart Kaspersky Thin Client while in the Kaspersky Thin Client main window. |
Win+A or Win+N |
Open the notifications panel while in the Kaspersky Thin Client main window. |
Win+↓ Win+↑ |
Collapse or restore a window while you are connected to a virtual application. |
Win+M |
Minimize all windows while you are connected to a virtual application. |
Win+Shift+M |
Restore all windows while you are connected to a virtual application. |
Updating Kaspersky Thin Client in the thin client interface
Kaspersky Thin Client can be updated only if the thin client is connected to Kaspersky Security Center.
After the updates are downloaded to the device, the Kaspersky Thin Client interface displays a notification with the time when the update will be applied.
You can install an update in one of the following ways:
- Directly from the notification about the available update
- When restarting or turning off the thin client
- In the Kaspersky Thin Client control panel, click the shutdown button .
- Depending on whether you plan to quit or continue working with Kaspersky Thin Client after the update, do one of the following:
- If you want to continue working, select Update and restart in the menu that opens.
The updates will be installed, and Kaspersky Thin Client will restart.
- If you want to quit working, select Update and shut down in the menu that opens.
The updates will be installed, and Kaspersky Thin Client will shut down.
- If you want to continue working, select Update and restart in the menu that opens.
- In the Kaspersky Thin Client control panel, click the shutdown button
- In the System update section
- In the Kaspersky Thin Client control panel, click and select Tools in the menu that opens.
- Select the System update section.
A window opens, displaying information about the current system version and downloaded updates (see the figure below).
Tools. System update section
- Click Install and restart. If no updates are available, the button is not displayed.
The updates will be installed, and Kaspersky Thin Client will restart.
- In the Kaspersky Thin Client control panel, click
If a Kaspersky Thin Client update has been downloaded but you have not yet restarted, the update will be installed automatically during the next restart or shutdown of the device.
Detailed information about centralized update of thin clients using the Web Console is provided in a separate article.
Page top
Managing Kaspersky Thin Client through the Kaspersky Security Center Web Console
The Kaspersky Security Center Web Console (hereinafter also referred to as simply "the Web Console") is a web application designed to let you centrally perform the main tasks for managing and maintaining the security system of an enterprise network. The Web Console is a Kaspersky Security Center component that provides a user interface. For detailed information about the Kaspersky Security Center Web Console, please refer to the Kaspersky Security Center Web Console Online Help Guide.
About the Kaspersky Security Management Suite web plug-in
The Kaspersky Security Management Suite web plug-in (hereinafter also referred to as "the web plug-in") is a specialized component that provides the capability to manage the operation of Kaspersky Thin Client through the Kaspersky Security Center Web Console.
The web plug-in lets you centrally perform the following operations:
- Manage Kaspersky Thin Client settings.
- Receive and view Kaspersky Thin Client events.
- Manage security certificates of Kaspersky Thin Client.
To enable interaction between Kaspersky Thin Client and Kaspersky Security Center, the following conditions must be met:
- When configuring Kaspersky Thin Client, you must specify the settings for connecting to Kaspersky Security Center.
- In the Kaspersky Security Center Web Console, you must install the Kaspersky Security Management Suite web plug-in.
Installing the Kaspersky Security Management Suite web plug-in
Kaspersky Security Management Suite, Kaspersky Security Center, and the Kaspersky Security Center Web Console are not included in the Kaspersky Thin Client distribution kit. They must be installed separately.
You can view the list of installed web plug-ins in the Web Console interface (Console settings → Web plug-ins).
The web plug-in functionality is available to all administrators with browser access to the Web Console. If required, you can set up access control for the Kaspersky Security Management Suite functionality.
If you plan to use the default port to connect the thin client to Kaspersky Security Center, port 13292 must be available on the Kaspersky Security Center Administration Server. If you plan to use a port other than 13292, you must set the permissions accordingly. For details on port enabling on a Kaspersky Security Center Administration Server, see the Modifying the Mobile Device Management settings section of the Kaspersky Security Center Online Help Guide.
To install the web plug-in in the Web Console:
- Open the relevant archive containing web plug-in installation images and signature files included in the Kaspersky Thin Client distribution kit.
The End User License Agreement is displayed.
- Read the End User License Agreement and accept it if you agree with the terms therein.
The relevant archive containing web plug-in installation images and signature files is unpacked automatically after you accept the agreement.
- In the menu of the Web Console, select Console settings → Web plug-ins.
A list of available Web Console management plug-ins is displayed.
- Click the Add from file button.
- In the panel that opens, add the files from the unpacked archive containing web plug-in installation images and signature files:
- ZIP archive containing the plug-in distribution package (plugin.zip), by clicking Upload ZIP file.
- Signature file (signature.txt), by clicking Upload signature.
- Click the Add button.
- When installation of the web plug-in is complete, click OK.
The Kaspersky Security Management Suite web plug-in will be loaded in the default configuration and appear in the list of Web Console management plug-ins.
Page top
Updating the Kaspersky Security Management Suite web plug-in
To update Kaspersky Security Management Suite, obtain an archive containing the web plug-in installation package and an archive digital signature from Kaspersky.
To update the web plug-in in the Web Console:
- Open the archive containing the web plug-in installation images and signature files that you received from Kaspersky.
The End User License Agreement is displayed.
- Read the End User License Agreement and accept it if you agree with the terms therein.
The relevant archive containing web plug-in installation images and signature files is unpacked automatically after you accept the agreement.
- In the Web Console menu, select Console settings → Web plug-ins.
- In the displayed list of Web Console plug-ins, find Kaspersky Security Management Suite and click it.
- In the window that opens, click the Update from file button.
- In the panel that opens, add the files from the unpacked archive containing web plug-in installation images and signature files:
- ZIP archive containing the plug-in distribution package (plugin.zip), by clicking Upload ZIP file.
- Digital signature file (signature.txt), by clicking Upload signature.
- Click Update.
- After the update is complete and you see a message confirming successful installation of the update, click OK.
The Kaspersky Security Management Suite web plug-in will be updated, and its version information and update time will be displayed in the table of plug-ins in the Web Console.
Page top
Removing the Kaspersky Security Management Suite web plug-in
The Kaspersky Security Management Suite web plug-in can be removed from the Web Console. After the web plug-in is removed, you will not be able to manage Kaspersky Thin Client through the Web Console interface.
Prior to removing the web plug-in, remove the device from the Managed devices group.
To remove the Kaspersky Security Management Suite web plug-in from the Web Console:
- In the menu of the Web Console interface, select Console settings → Web plug-ins.
A list of available Web Console plug-ins is displayed.
- In the list of plug-ins, select the check box next to the Kaspersky Security Management Suite web plug-in.
- Click the Delete button.
- In the plug-in removal confirmation window that opens, do one of the following:
- If you need to save a backup copy of the plug-in, click OK.
A backup copy of the plug-in will be created. The Kaspersky Security Management Suite web plug-in will be removed from the Web Console.
- If you do not need to save a backup copy of the plug-in, click the Skip backup button.
The Kaspersky Security Management Suite web plug-in will be removed from the Web Console.
- If you need to save a backup copy of the plug-in, click OK.
- In the window containing information about plug-in removal that opens, click OK.
Restricting access to functions of the Kaspersky Security Management Suite web plug-in
If a Kaspersky Security Center user is not granted sufficient rights to access application functions, or the standard Kaspersky Security Center role is not assigned, the user cannot work in Kaspersky Security Center Web Console.
You can configure Kaspersky Security Center user rights to access application functions in the following ways:
- Configure rights of each user or user group separately.
- Create standard Kaspersky Security Center roles with preconfigured sets of rights and assign these roles to users depending on their duties.
A role is a preconfigured set of rights to access Kaspersky Security Management Suite functions, which you can assign to users. We recommend configuring role access rights according to typical tasks and duties of users. Once a user has been assigned a role, they gain access to the functions they require to fulfill their duties.
For details on configuring role-based access, see the Configuring access rights to application features. Role-based access control section of the Kaspersky Security Center Online Help Guide.
In addition to the standard Kaspersky Security Center roles, you can also assign users the following standard roles for managing Kaspersky Thin Client functions:
- Security Officer. This role has permissions to view all sections of Kaspersky Security Management Suite and to manage Kaspersky Thin Client certificates. You can assign this role to an employee in charge of the information security in your enterprise.
- Administrator. This role has permissions to view all sections of Kaspersky Security Management Suite and manage remote desktop connection settings, general settings, system settings, and Kaspersky Thin Client data. You can assign this role to an employee responsible for supporting and administering information systems in your organization.
- Advanced administrator. This role has permissions to view and manage all sections of Kaspersky Security Management Suite and manage certificates, remote desktop connection settings, general settings, system settings, and Kaspersky Thin Client data. You can assign this role to an employee who is responsible for supporting and administering information systems in your organization, and is in charge of the information security in your organization.
The table below describes the functions available to a user depending on their assigned role for managing Kaspersky Thin Client. For functions marked with the ![]() icon, the corresponding Kaspersky Thin Client settings can be changed through the Web Console. All roles can view the Kaspersky Thin Client settings pertaining to all functions through the Web Console.
icon, the corresponding Kaspersky Thin Client settings can be changed through the Web Console. All roles can view the Kaspersky Thin Client settings pertaining to all functions through the Web Console.
Kaspersky Thin Client management functions available in the Web Console depending on the user role
Function |
Security Officer |
Administrator |
Advanced administrator |
|---|---|---|---|
Managing certificates in a Kaspersky Security Management Suite policy |
|
– |
|
Configuring settings for connecting to remote desktops in a Kaspersky Security Management Suite policy |
– |
|
|
Configuring general settings in a Kaspersky Security Management Suite policy |
– |
|
|
Managing system settings in a Kaspersky Security Management Suite policy |
– |
|
|
Managing Kaspersky Thin Client data in a Kaspersky Security Management Suite policy |
– |
|
|
Logging in and out of the Web Console
To log in to the Web Console, you need to ask the administrator for the web address of the Kaspersky Security Center Administration Server and the port number that were specified during installation (port 8080 is used by default). You must also enable JavaScript in your browser.
To log in to the Web Console:
- In your browser, go to
https://<Administration Server address>:<Port number>. For the Kaspersky Security Center Web Console browser requirements, please refer to the Hardware and software requirements section of the Kaspersky Security Center Web Console Online Help Guide.The login page opens.
- Log in using the user name and password of a local administrator.
If the Administration Server does not respond or you entered incorrect account credentials, an error message will be displayed.
After logging in, the dashboard appears displaying the last language and theme that were used. If you are logging in to the Web Console for the first time, the Quick Start Wizard starts. For additional information about how the Kaspersky Security Center Web Console works, please refer to the Kaspersky Security Center Web Console Online Help Guide.
To log out of the Web Console:
- In the lower-right corner of the screen, click the user name.
- In the menu that opens, select Sign out.
The Web Console closes, and the login page is displayed.
Page top
Adding a thin client to the managed devices group
In the Web Console, you can centrally control thin clients that are connected to Kaspersky Security Center. For example, you can add them to administration groups and apply necessary policies. To centrally control a thin client, you must first add it to a managed devices group.
To add a thin client to a managed devices group:
- In the main window of the Web Console, select Discovery & deployment → Unassigned devices.
The list of all detected unassigned devices will be displayed.
- Select the check box next to the name of the device that you want to add to the group of managed devices.
- Click the Move to group button.
The Move to group panel opens on the right. Select the check box next to the Managed devices administration group.
- Click the Move button.
The thin client will be added to the managed devices group.
Page top
Managing policies
A policy is a collection of Kaspersky Thin Client operating settings defined for an administration group. You can configure multiple policies with different values for one device. For different administration groups, the settings of the application may be different. Each administration group can have its own policy for the application. For more detailed information on using Kaspersky Security Center policies to manage the application, please refer to the Policies and policy profiles section of the Kaspersky Security Center Online Help Guide.
Policy settings are configured in the Kaspersky Security Center Web Console by using the web plug-in and are transmitted to Kaspersky Thin Client when the application synchronizes with Kaspersky Security Center. The synchronization period can be changed in the policy settings.
Active and inactive policy
A policy is intended for a group of managed devices and can be active or inactive. The settings of an active policy are saved on client devices during synchronization. You cannot simultaneously apply multiple policies to one device, therefore only one policy can be active in each group.
You can create an unlimited number of inactive policies. An inactive policy does not affect application settings on devices in the network. Inactive policies are intended as preparations for emergency situations, such as a virus attack. If there is an attack via USB drives, you can activate a policy that blocks access to USB drives. In this case, the active policy automatically becomes inactive.
Settings inheritance
Policies, like administration groups, have a hierarchy. By default, a child policy inherits the settings from the parent policy. A child policy is a policy for nested hierarchy levels. In other words, it is a policy for nested administration groups and secondary Administration Servers. You can turn off inheritance of settings from the parent policy.
Each policy setting has the ![]() attribute, which indicates if the settings can be modified in policies or in the local application settings. Depending on the status of this attribute, one of the following values is displayed next to a setting:
attribute, which indicates if the settings can be modified in policies or in the local application settings. Depending on the status of this attribute, one of the following values is displayed next to a setting:
 Undefined. If an open lock icon is displayed next to a setting and the toggle button is disabled, this setting is not defined in the policy. A user can change these settings in the local interface of the Kaspersky application. These settings are referred to as unlocked.
 Enforced. If a closed lock icon is displayed next to a setting and the toggle button is enabled, this setting is applied to devices on which the policy is applied. A user cannot change the values of these settings in the local interface of the Kaspersky application. These settings are referred to as locked.
The ![]() attribute applies for a child policy only if inheritance of the parent policy settings is enabled for the child policy.
attribute applies for a child policy only if inheritance of the parent policy settings is enabled for the child policy.
Policy creation
To manage a group of devices running Kaspersky Thin Client through the Web Console, you must create a policy.
To create a policy for a group of devices:
- In the main window of the Web Console, select Devices → Policies & profiles.
- Click the Add button.
- From the list of applications in the window that opens, select Kaspersky Security Management Suite and click Next.
- In the new policy configuration window, on the General tab, specify the following settings:
- In the Name field, enter the policy name. By default, the field displays the Kaspersky Thin Client management web plug-in name as Kaspersky Security Management Suite.
- In the Policy status block, select one of the following statuses: Active, Inactive, Out-of-office. The default status is Active.
- If you need to configure inheritance of policy settings, configure the following settings in the Settings inheritance block:
- Enable or disable the Inherit settings from parent policy option.
- Enable or disable the Force inheritance of settings in child policies option.
- Click the Save button in the lower part of the page.
The policy will be created and will appear in the list of policies of the Web Console.
Page top
Editing a policy
You can edit a previously created policy for a group of devices running Kaspersky Thin Client.
To change a policy:
- In the main window of the Web Console, select Devices → Policies & profiles.
- Select the policy that you need to edit.
- In the policy configuration window that opens, define the following settings on the General tab:
- If necessary, enter a new policy name in the Name field.
- If you need to change the policy status, use the Policy status block to select one of the following statuses: Active, Inactive, Out-of-office.
- If you need to configure inheritance of policy settings, configure the following settings in the Settings inheritance block:
- Enable or disable the Inherit settings from parent policy option.
- Enable or disable the Force inheritance of settings in child policies option.
- Click the Save button in the lower part of the page.
The changes made to the policy will be saved and displayed in the policy properties in the Revision history section.
Page top
Configuring Kaspersky Thin Client settings through the Web Console
This section contains information about configuring Kaspersky Thin Client settings through the Web Console.
Configuring Kaspersky Thin Client basic settings through the Web Console
In the Web Console, you can configure general settings for one device or for a group of devices running Kaspersky Thin Client.
How to configure the basic settings for one device
- In the main window of the Web Console, select Devices → Managed devices.
- Click the name of the thin client where Kaspersky Thin Client is running. You can view the device name in the Kaspersky Thin Client interface. If the thin client name is not on the list, add it to the Managed devices group.
If a managed device is added to an administration group and an enforced policy is configured for the settings of this group, the settings that were individually configured for this device will not be applied.
- In the window that opens, select the Applications tab.
- Click the name of the Kaspersky Security Management Suite web plug-in.
This opens a window containing information about Kaspersky Thin Client.
- Select the Application settings tab.
- Select the General section (see the figure below).
Window for configuring general settings through the Web Console for one device
- If you need to change the ID in the thin client name, click the Generate new ID button in the Device name block. The managed device for which you want to generate a new ID must be added to an administration group, and this group must have a configured and enforced policy for a group device naming rule.
The new ID in the thin client name will be created after the device is synchronized with Kaspersky Security Center.
- Click Save in the lower part of the window to save the changes.
How to configure the basic settings for a group of devices
- In the main window of the Web Console, select Devices → Policies & profiles.
- Click the policy name for the Kaspersky Security Management Suite web plug-in.
- In the window that opens, select the Application settings tab.
- Select the General section (see the figure below).
Window for configuring general settings through the Web Console for a group of devices
- If you need to specify a new name format for administration group devices, use the Group device naming rule block to indicate the new group name and additional information. You can use uppercase and lowercase letters of the Latin and Cyrillic alphabets, and special characters. A unique ID (eight characters) will be automatically generated for each device in the group. The number of characters in the device name must not exceed 30 characters.
- Move the toggle button located on the right in the Group device naming rule block to the Enforced position.
If the toggle button next to the name of a group of settings is in the Enforced position (
), the defined values of these settings are applied to devices on which the policy is applied, and these settings cannot be changed in the Kaspersky Thin Client interface. If the toggle button next to the name of a group of settings is in the Undefined position (), the defined values of these settings are not applied to devices on which the policy is applied, and these settings can be changed for managed devices in the Kaspersky Thin Client interface under Devices → Managed devices. - Add the contact details of the Kaspersky Security Center administrator in the Contact details field. You can specify the last name, first name, phone number, and email address of the administrator. The number of characters in this field must not exceed 80 characters.
The contact details of the Kaspersky Security Center administrator are visible to the user in the main window of Kaspersky Thin Client, in the windows for confirming a reset of Kaspersky Thin Client settings and data and confirming changes to Kaspersky Security Center connection settings, and when the certificate for connecting to Kaspersky Security Center is replaced.
- Move the toggle button located on the right in the Enterprise Technical Support (administrator) block to the Enforced position.
- Click Save in the lower part of the window to save the changes.
Configuring a connection to a Basis.WorkPlace remote environment through the Web Console
You can use the Web Console to configure settings for connecting to a remote environment deployed in a Basis.WorkPlace infrastructure for one device or group of devices running Kaspersky Thin Client.
Instructions for connecting to a remote environment are given in a separate article.
How to configure settings for connecting to a Basis.WorkPlace remote environment for one device
- In the main window of the Web Console, select Devices → Managed devices.
- Click the name of the thin client where Kaspersky Thin Client is running. You can view the device name in the Kaspersky Thin Client interface. If the thin client name is not on the list, add it to the Managed devices group.
If a managed device is added to an administration group and an enforced policy is configured for the settings of this group, the settings that were individually configured for this device will not be applied.
- In the window that opens, select the Applications tab.
- Click the name of the Kaspersky Security Management Suite web plug-in.
This opens a window containing information about Kaspersky Thin Client.
- Select the Application settings tab.
- Select Connections → Basis.WorkPlace.
This opens a window in which you can configure settings for connecting to a Basis.WorkPlace remote environment (see the figure below).
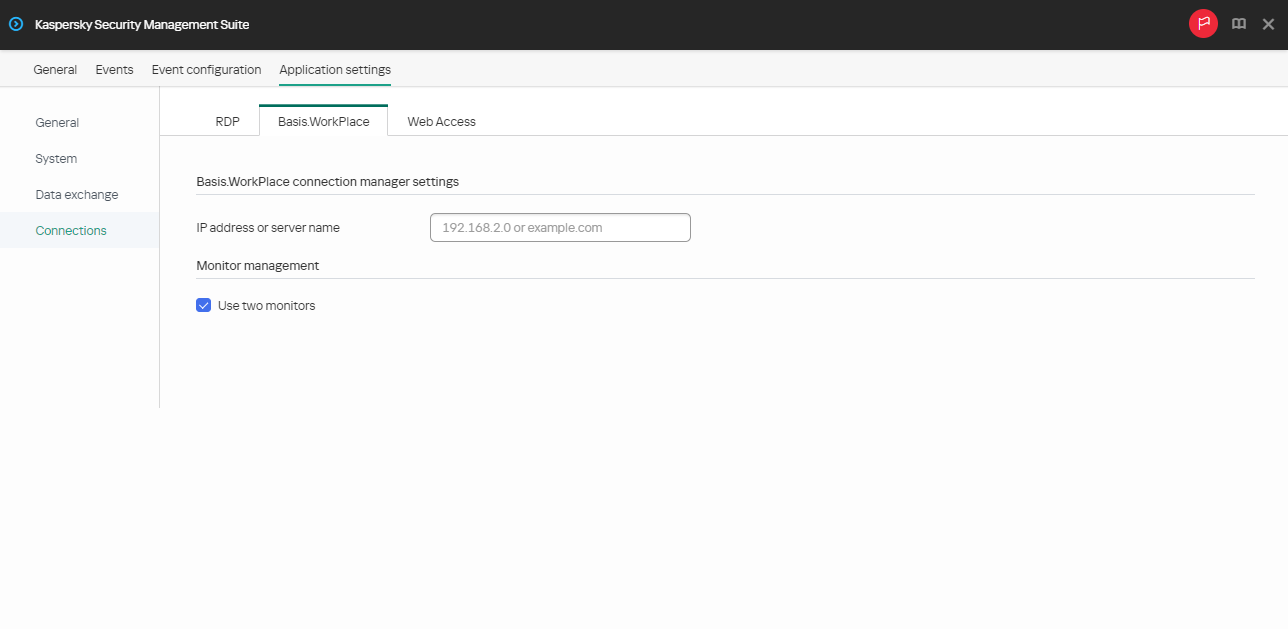
Window for configuring settings for connecting to a remote desktop managed by Basis.WorkPlace through the Web Console for one device
- In IP address or server name, enter the IP address or server name to connect to.
- If two monitors are installed at your workstation and you want a remote desktop image to be displayed on both monitors, select the Use two monitors check box in the Monitor management block.
- Click Save in the lower part of the window to save the changes.
- In the main window of the Web Console, select Devices → Policies & profiles.
- Click the policy name for the Kaspersky Security Management Suite web plug-in.
- In the window that opens, select the Application settings tab.
- Select Connections → Basis.WorkPlace.
This opens a window in which you can configure settings for connecting to a remote desktop managed by Basis.WorkPlace (see the figure below).
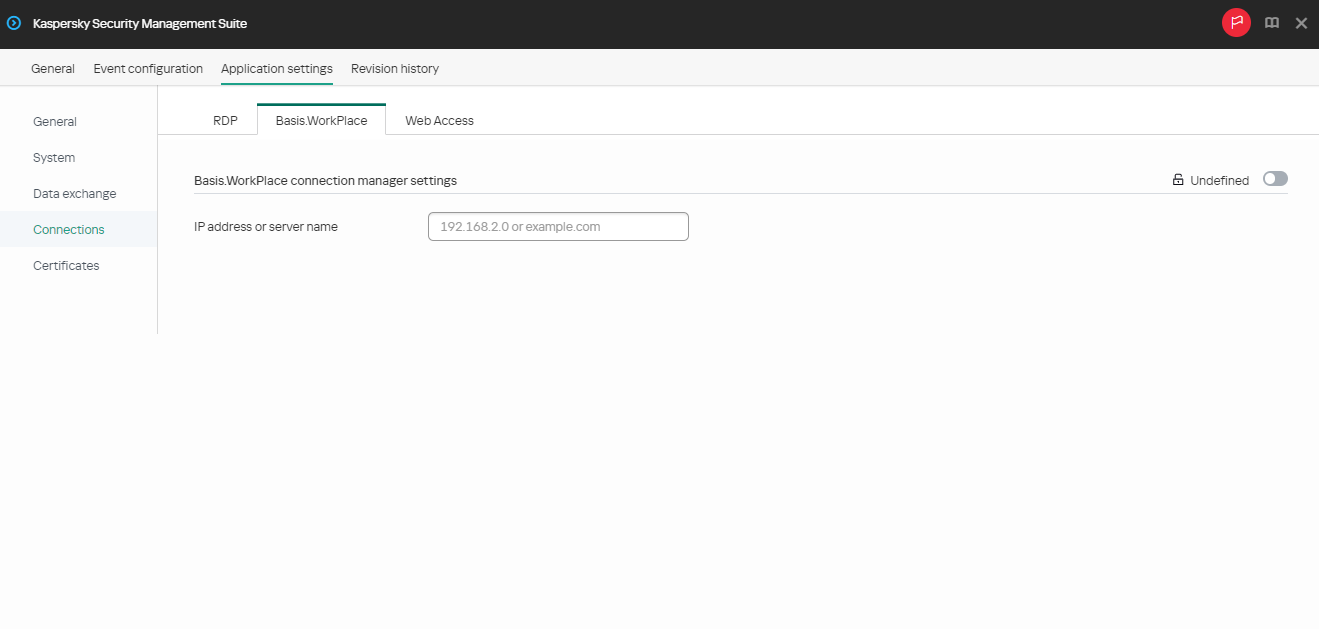
Window for configuring settings for connecting to a remote desktop managed by Basis.WorkPlace through the Web Console for a group of devices
- In IP address or server name, enter the IP address or server name to connect to.
- Click Save in the lower part of the window to save the changes.
If the toggle button next to the name of a group of settings is in the Enforced position (![]() ), the defined values of these settings are applied to devices on which the policy is applied, and these settings cannot be changed in the Kaspersky Thin Client interface. If the toggle button next to the name of a group of settings is in the Undefined position (
), the defined values of these settings are applied to devices on which the policy is applied, and these settings cannot be changed in the Kaspersky Thin Client interface. If the toggle button next to the name of a group of settings is in the Undefined position (![]() ), the defined values of these settings are not applied to devices on which the policy is applied, and these settings can be changed for managed devices in the Kaspersky Thin Client interface under Devices → Managed devices.
), the defined values of these settings are not applied to devices on which the policy is applied, and these settings can be changed for managed devices in the Kaspersky Thin Client interface under Devices → Managed devices.
When working with Kaspersky Thin Client via Basis.WorkPlace, the following limitations apply:
- Users cannot be authorized with smart cards in the Basis.WorkPlace connection manager.
- Users cannot initiate a password change in Kaspersky Thin Client.
- Simultaneous connection to multiple remote desktops managed by Basis.WorkPlace is not supported.
Configuring a connection to a remote environment via RDP through the Web Console
You can use the Web Console to configure settings for connecting to a remote desktop or virtual environment via RDP for one device or a group of devices running Kaspersky Thin Client.
Instructions for connecting to a remote environment are given in a separate article.
How to configure settings for connecting to a remote environment via RDP for one device
- In the main window of the Web Console, select Devices → Managed devices.
- Click the name of the thin client where Kaspersky Thin Client is running. You can view the device name in the Kaspersky Thin Client interface. If the thin client name is not on the list, add it to the Managed devices group.
If a managed device is added to an administration group and an enforced policy is configured for the settings of this group, the settings that were individually configured for this device will not be applied.
- In the window that opens, select the Applications tab.
- Click the name of the Kaspersky Security Management Suite web plug-in.
This opens a window containing information about Kaspersky Thin Client.
- Select the Application settings tab.
- Select Connections → RDP.
This opens a window in which you can configure settings for connecting to a remote desktop or virtual application via RDP (see the figure below).
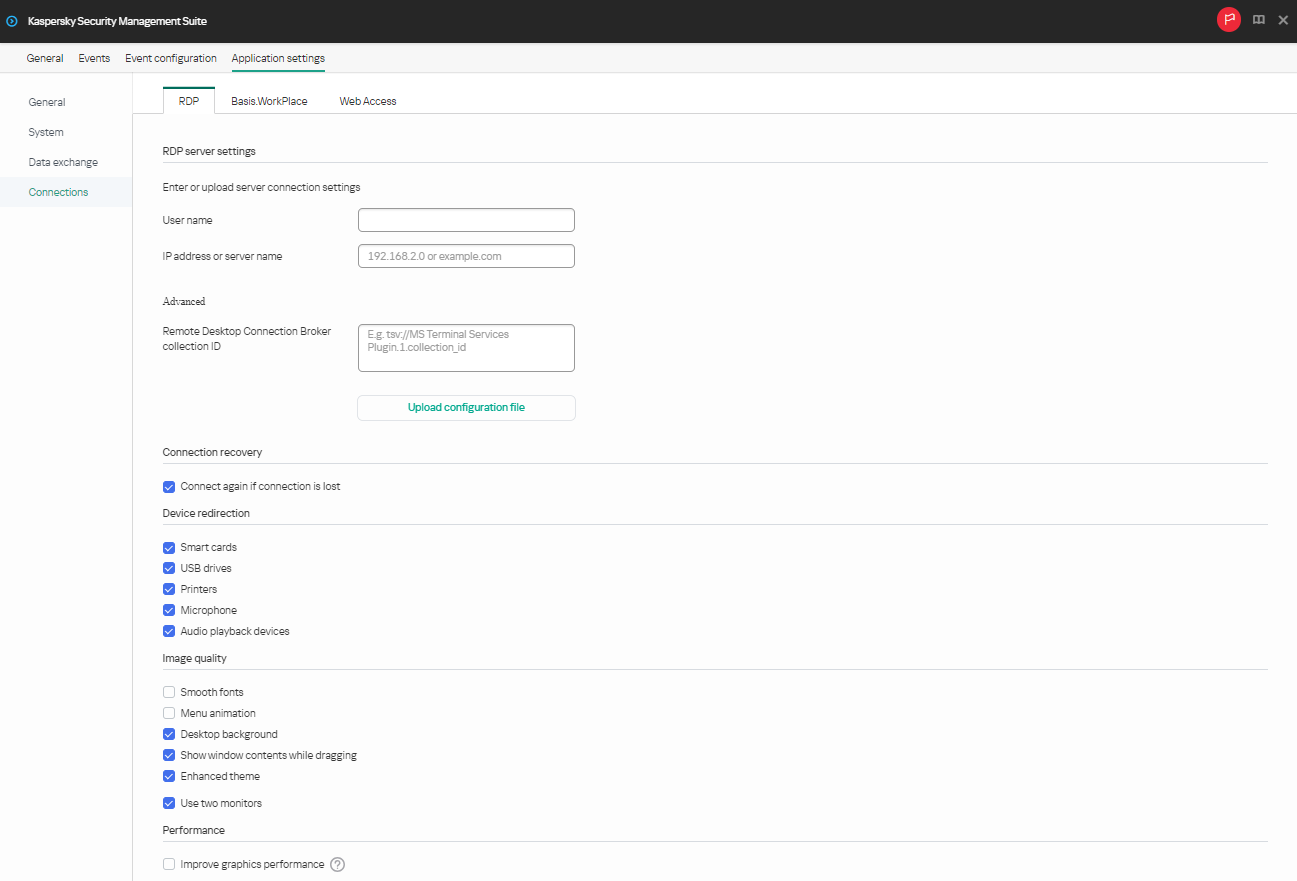
Window for configuring settings for connecting to a remote desktop via RDP through the Web Console for one device
- In the Server field, enter the IP address or name of the Microsoft Remote Desktop Connection Broker server.
- In the User name field, enter the name of the user account that will be used for connecting.
- If you need to use the Microsoft Remote Desktop Connection Broker to connect to a remote desktop, use the Remote Desktop Connection Broker collection ID field to specify the collection ID in the format
tsv://MS Terminal Services Plugin.1.collection_id(collection_idrefers to the specific identifier of the collection).Specify a Remote Desktop Connection Broker collection ID to connect to a virtual application.
- If you need to start a virtual application, specify the application alias in the Application alias field.
Specify a Remote Desktop Connection Broker collection ID to connect to a virtual application.
If you have a configuration file containing the settings for connecting to the Microsoft Remote Desktop Connection Broker and, if needed, the name of the application to open, upload the file by clicking Upload configuration file. In this case, you do not have to complete the Remote Desktop Connection Broker collection ID and Application fields.
- If you want to automatically restore a remote desktop connection that is unexpectedly disconnected, select the Connect again if connection is lost check box.
- In the Device redirection settings block, next to the required devices, select the following check boxes:
- Smart cards if you want to enable redirection of smart cards and tokens.
- USB drives if you want to enable redirection of USB drives.
- Printers if you want to enable redirection of printers.
The remote computer must have the installed driver for the printer that is connected to the thin client.
- Microphone if you want to enable redirection of audio recording devices.
Audio volume and other settings are managed from the remote computer.
- Audio playback devices if you want to enable redirection of headphones or speakers.
Kaspersky Thin Client supports both mono and stereo playback. Audio volume and other settings are managed from the remote environment.
- In the Image quality block, select the check boxes next to the remote desktop graphics settings that you need to use:
- Smooth fonts
- Menu animation
- Desktop background
- Show window contents while dragging
- Enhanced theme
Enabling remote desktop display settings may affect the speed of Kaspersky Thin Client operations.
- If two monitors are installed at your workstation and you want a remote desktop image to be displayed on both monitors, select the Use two monitors check box in the Monitor management block.
- To improve performance when connected to remote desktops or applications, in the Performance block, check Improve graphics performance.
If the user needs to connect to a Microsoft Windows 7 remote desktop, uncheck Improve graphics performance. The feature is not supported for connections to Microsoft Windows 7 remote desktops.
- Click Save in the lower part of the window to save the changes.
How to configure settings for connecting to a remote environment via RDP for a group of devices
- In the main window of the Web Console, select Devices → Policies & profiles.
- Click the policy name for the Kaspersky Security Management Suite web plug-in.
- In the window that opens, select the Application settings tab.
- Select Connections → RDP.
This opens a window in which you can configure settings for connecting to a remote desktop via RDP (see the figure below).
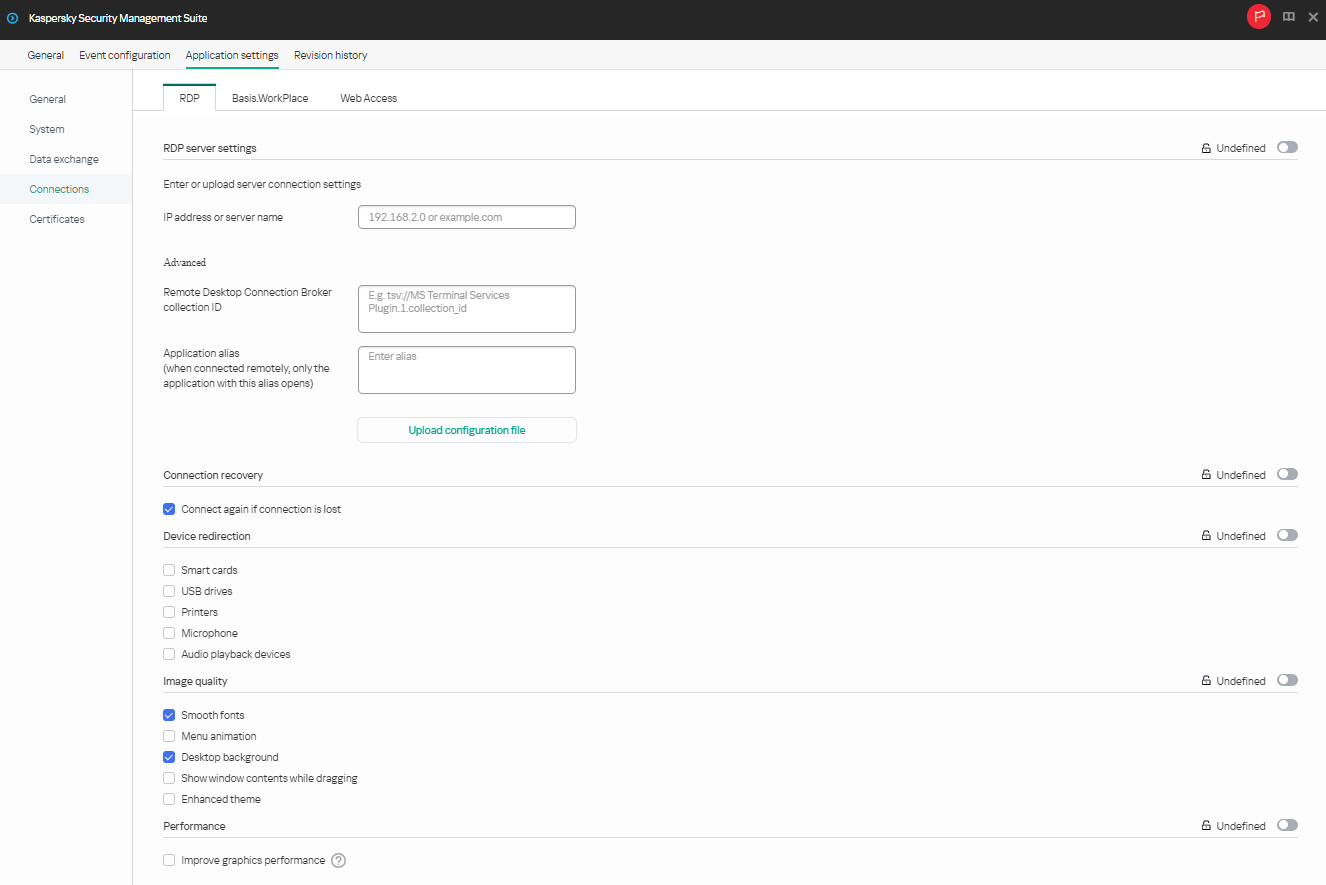
Window for configuring settings for connecting to a remote desktop via RDP through the Web Console for a group of devices
- In the Server field, enter the IP address or server name for connecting to a remote desktop via RDP.
- In the User name field, enter the name of the user account that will be used to connect to the remote desktop via RDP.
- If you need to use the Microsoft Remote Desktop Connection Broker to connect to a remote desktop, use the Remote Desktop Connection Broker collection ID field to specify the collection ID in the format
tsv://MS Terminal Services Plugin.1.collection_id(collection_idrefers to the specific identifier of the collection).Specify a Remote Desktop Connection Broker collection ID to connect to a virtual application.
- If you need to start a virtual application, specify the application alias in the Application alias field.
Specify a Remote Desktop Connection Broker collection ID to connect to a remote application.
If you have a configuration file containing the settings for connecting to the Microsoft Remote Desktop Connection Broker and, if needed, the name of the application to open, upload the file by clicking Upload configuration file. In this case, you do not have to complete the Remote Desktop Connection Broker collection ID and Application fields.
- If you want to automatically restore a remote desktop connection that is unexpectedly disconnected, select the Connect again if connection is lost check box.
- In the Device redirection settings block, next to the required devices, select the following check boxes:
- Smart cards if you want to enable redirection of smart cards and tokens.
- USB drives if you want to enable redirection of USB drives.
- Printers if you want to enable redirection of printers.
The remote computer must have the installed driver for the printer that is connected to the thin client.
- Microphone if you want to enable redirection of audio recording devices.
Audio volume and other settings are managed from the remote computer.
- Audio playback devices if you want to enable redirection of headphones or speakers.
Kaspersky Thin Client supports both mono and stereo playback. Audio volume and other settings are managed from the remote environment.
- In the Image quality block, select the check boxes next to the remote desktop graphics settings that you need to use:
- Smooth fonts
- Menu animation
- Desktop background
- Show window contents while dragging
- Enhanced theme
Enabling remote desktop display settings may affect the speed of Kaspersky Thin Client operations.
- To improve performance when connected to remote desktops or applications, in the Performance block, check Improve graphics performance.
If the user needs to connect to a Microsoft Windows 7 remote desktop, uncheck Improve graphics performance. The feature is not supported for connections to Microsoft Windows 7 remote desktops.
- Click Save in the lower part of the window to save the changes.
If the toggle button next to the name of a group of settings is in the Enforced position (![]() ), the defined values of these settings are applied to devices on which the policy is applied, and these settings cannot be changed in the Kaspersky Thin Client interface. If the toggle button next to the name of a group of settings is in the Undefined position (
), the defined values of these settings are applied to devices on which the policy is applied, and these settings cannot be changed in the Kaspersky Thin Client interface. If the toggle button next to the name of a group of settings is in the Undefined position (![]() ), the defined values of these settings are not applied to devices on which the policy is applied, and these settings can be changed for managed devices in the Kaspersky Thin Client interface under Devices → Managed devices.
), the defined values of these settings are not applied to devices on which the policy is applied, and these settings can be changed for managed devices in the Kaspersky Thin Client interface under Devices → Managed devices.
Configuring a connection to a Web Access remote environment through the Web Console
You can use Web Console to configure settings for connecting to a remote environment in the Web Access application for one device or a group of devices running Kaspersky Thin Client.
In the Web Access application, you can connect to a remote environment deployed in Citrix Workspace and VMware Horizon infrastructures. Web Access supports HTML5 and provides a secure HTTPS connection when connecting.
Instructions for connecting to a remote environment are given in a separate article.
How to configure settings for connecting to a remote environment in Web Access for one device
- In the main window of the Web Console, select Devices → Managed devices.
- Click the name of the thin client where Kaspersky Thin Client is running. You can view the device name in the Kaspersky Thin Client interface. If the thin client name is not on the list, add it to the Managed devices group.
If a managed device is added to an administration group and an enforced policy is configured for the settings of this group, the settings that were individually configured for this device will not be applied.
- In the window that opens, select the Applications tab.
- Click the name of the Kaspersky Security Management Suite web plug-in.
This opens a window containing information about Kaspersky Thin Client.
- Select the Application settings tab.
Select Connections → Web Access.
The window for configuring connection settings opens (see the figure below).
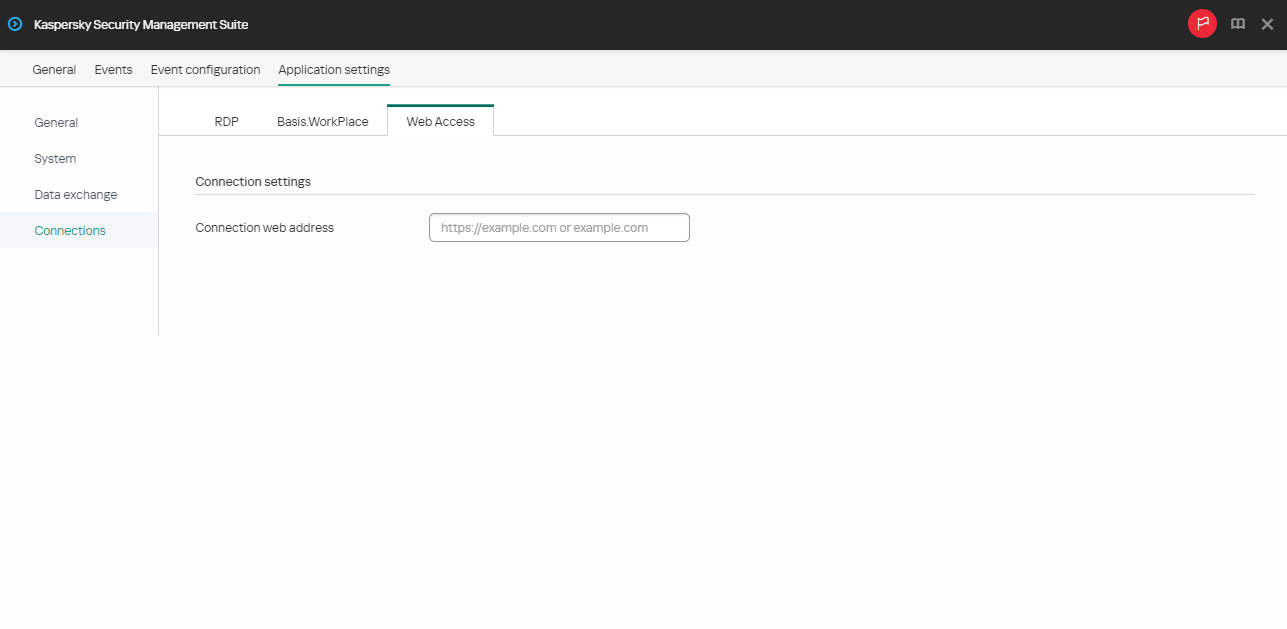
Configuration window for connecting to an environment in Web Access through the Web Console
- In the Connection web address field, enter the server web address for connecting to the required remote environment.
- Click Save in the lower part of the window to save the changes.
- In the main window of the Web Console, select Devices → Policies & profiles.
- Click the policy name for the Kaspersky Security Management Suite web plug-in.
- In the window that opens, select the Application settings tab.
- Select Connections → Web Access.
The window for configuring connection settings opens (see the figure below).
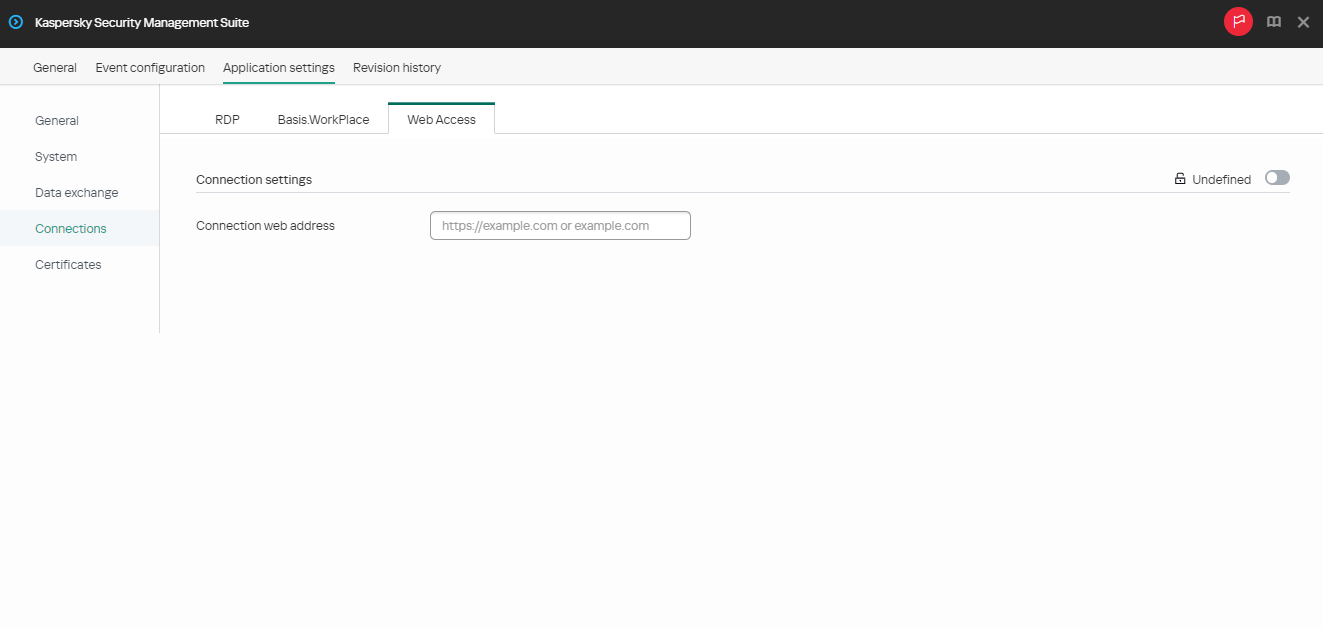
Configuration window for connecting to a remote environment in Web Access through the Web Console
- In the Connection web address field, enter the server web address for connecting to the required remote environment.
- Click Save in the lower part of the window to save the changes.
Kaspersky Thin Client support for Citrix Workspace remote desktops has the following limitations:
- File sharing between thin client and remote desktop is not supported.
- Clipboard sharing between thin client and remote desktop is not supported.
- Redirection of USB drives, smart cards, and USB tokens is not supported.
Configuring Kaspersky Thin Client power-saving settings through the Web Console
In the Web Console, you can configure power-saving settings for one device or for a group of devices running Kaspersky Thin Client.
How to configure power-saving settings for one device
- In the main window of the Web Console, select Devices → Managed devices.
- Click the name of the thin client where Kaspersky Thin Client is running. You can view the device name in the Kaspersky Thin Client interface. If the thin client name is not on the list, add it to the Managed devices group.
If a managed device is added to an administration group and an enforced policy is configured for the settings of this group, the settings that were individually configured for this device will not be applied.
- In the window that opens, select the Applications tab.
- Click the name of the Kaspersky Security Management Suite web plug-in.
This opens a window containing information about Kaspersky Thin Client.
- Select the Application settings tab.
- Select the System section (see the figure below).
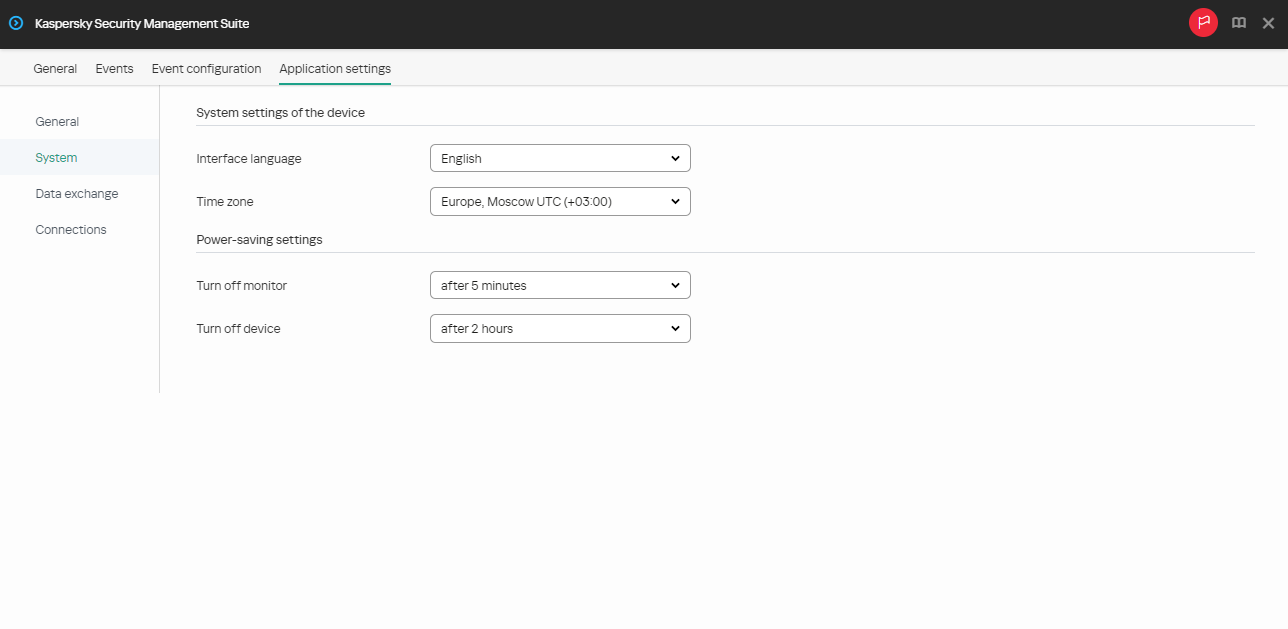
Window for configuring power-saving settings through the Web Console for one device
- In the Power-saving settings block, configure the following settings:
- In the Turn off monitor drop-down list, select the system inactivity period after which the monitor will be turned off.
- In the Turn off device drop-down list, select the system inactivity period after which the thin client will be turned off.
- Click Save in the lower part of the window to save the changes.
After Kaspersky Thin Client is synchronized with Kaspersky Security Center, the power-saving settings will be applied to Kaspersky Thin Client.
How to configure power-saving settings for a group of devices
- In the main window of the Web Console, select Devices → Policies & profiles.
- Click the policy name for the Kaspersky Security Management Suite web plug-in.
- In the window that opens, select the Application settings tab.
- Select the System section (see the figure below).
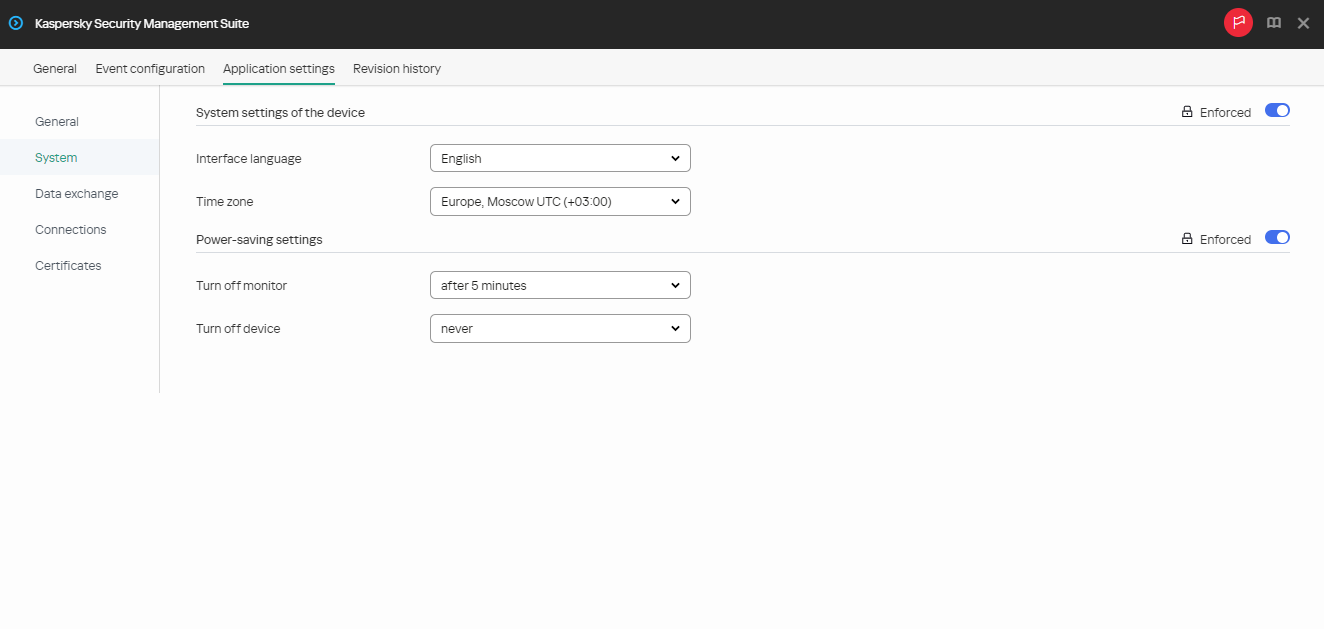
Window for configuring power-saving settings through the Web Console for a group of devices
- In the Power-saving settings block, configure the following settings:
- In the Turn off monitor drop-down list, select the system inactivity period after which the monitor will be turned off.
- In the Turn off device drop-down list, select the system inactivity period after which the thin client will be turned off.
- Click Save in the lower part of the window to save the changes.
After all devices of an administration group are synchronized with Kaspersky Security Center, the power-saving settings will be applied to all Kaspersky Thin Clients included in this group.
If the toggle button next to the name of a group of settings is in the Enforced position (![]() ), the defined values of these settings are applied to devices on which the policy is applied, and these settings cannot be changed in the Kaspersky Thin Client interface. If the toggle button next to the name of a group of settings is in the Undefined position (
), the defined values of these settings are applied to devices on which the policy is applied, and these settings cannot be changed in the Kaspersky Thin Client interface. If the toggle button next to the name of a group of settings is in the Undefined position (![]() ), the defined values of these settings are not applied to devices on which the policy is applied, and these settings can be changed for managed devices in the Kaspersky Thin Client interface under Devices → Managed devices.
), the defined values of these settings are not applied to devices on which the policy is applied, and these settings can be changed for managed devices in the Kaspersky Thin Client interface under Devices → Managed devices.
Configuring the interface language and time zone of Kaspersky Thin Client through the Web Console
In the Web Console, you can configure the interface language and time zone for one device or for a group of devices running Kaspersky Thin Client.
How to configure the interface language and time zone for one device
- In the main window of the Web Console, select Devices → Managed devices.
- Click the name of the thin client where Kaspersky Thin Client is running. You can view the device name in the Kaspersky Thin Client interface. If the thin client name is not on the list, add it to the Managed devices group.
If a managed device is added to an administration group and an enforced policy is configured for the settings of this group, the settings that were individually configured for this device will not be applied.
- In the window that opens, select the Applications tab.
- Click the name of the Kaspersky Security Management Suite web plug-in.
This opens a window containing information about Kaspersky Thin Client.
- Select the Application settings tab.
- Select the System section (see the figure below).
Window for configuring the interface language and time zone through the Web Console for one device
- In the System settings of the device block, select the relevant values from the Interface language and Time zone drop-down lists.
- Click Save in the lower part of the window to save the changes.
How to configure the interface language and time zone for a group of devices
- In the main window of the Web Console, select Devices → Policies & profiles.
- Click the policy name for the Kaspersky Security Management Suite web plug-in.
- In the window that opens, select the Application settings tab.
- Select the System section (see the figure below).
Window for configuring the interface language and time zone through the Web Console for a group of devices
- In the System settings of the device block, select the relevant values from the Interface language and Time zone drop-down lists.
- Click Save in the lower part of the window to save the changes.
If the toggle button next to the name of a group of settings is in the Enforced position (![]() ), the defined values of these settings are applied to devices on which the policy is applied, and these settings cannot be changed in the Kaspersky Thin Client interface. If the toggle button next to the name of a group of settings is in the Undefined position (
), the defined values of these settings are applied to devices on which the policy is applied, and these settings cannot be changed in the Kaspersky Thin Client interface. If the toggle button next to the name of a group of settings is in the Undefined position (![]() ), the defined values of these settings are not applied to devices on which the policy is applied, and these settings can be changed for managed devices in the Kaspersky Thin Client interface under Devices → Managed devices.
), the defined values of these settings are not applied to devices on which the policy is applied, and these settings can be changed for managed devices in the Kaspersky Thin Client interface under Devices → Managed devices.
Configuring synchronization between Kaspersky Thin Client and Kaspersky Security Center
In the Web Console, you can configure synchronization with Kaspersky Security Center only for a group of devices running Kaspersky Thin Client.
To configure synchronization between Kaspersky Thin Client and Kaspersky Security Center:
- In the main window of the Web Console, select Devices → Policies & profiles.
- Click the policy name for the Kaspersky Security Management Suite web plug-in.
- In the window that opens, select the Application settings tab.
- Select the Data exchange section (see the figure below).
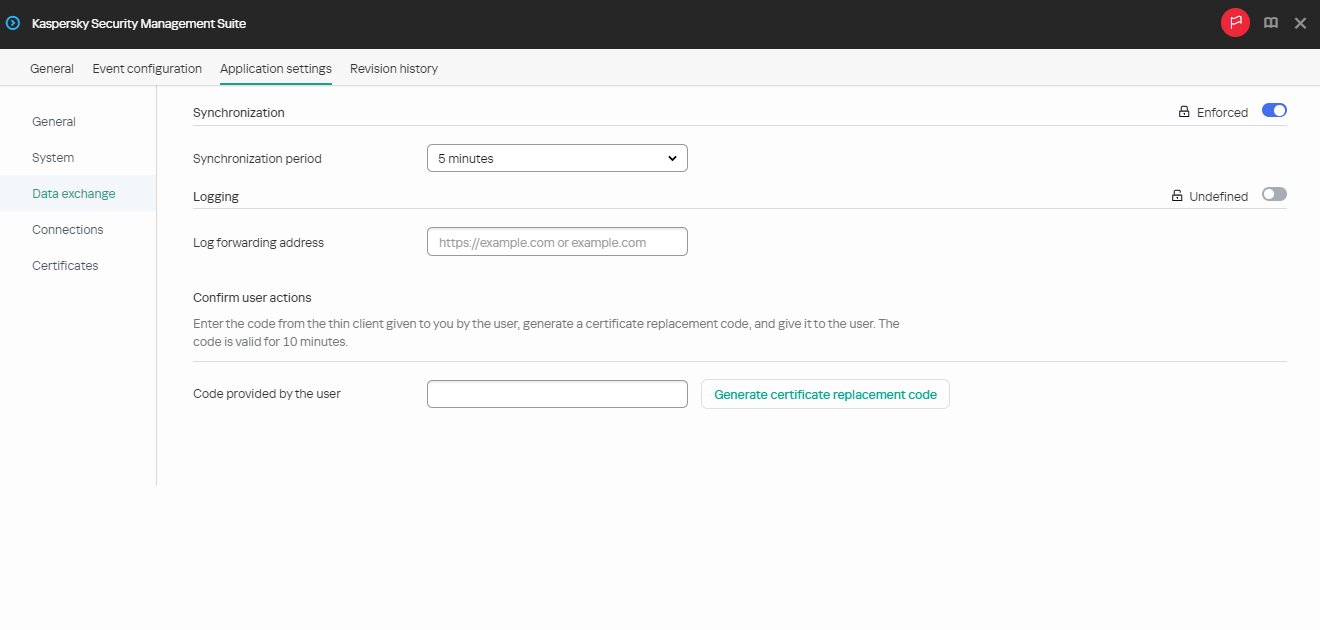
Window for configuring synchronization between Kaspersky Thin Client and Kaspersky Security Center
- In the Synchronization period field, specify the interval for synchronizing Kaspersky Thin Client with Kaspersky Security Center.
- Click Save in the lower part of the window to save the changes.
If the toggle button next to the name of a group of settings is in the Enforced position (![]() ), the defined values of these settings are applied to devices on which the policy is applied, and these settings cannot be changed in the Kaspersky Thin Client interface. If the toggle button next to the name of a group of settings is in the Undefined position (
), the defined values of these settings are applied to devices on which the policy is applied, and these settings cannot be changed in the Kaspersky Thin Client interface. If the toggle button next to the name of a group of settings is in the Undefined position (![]() ), the defined values of these settings are not applied to devices on which the policy is applied, and these settings can be changed for managed devices in the Kaspersky Thin Client interface under Devices → Managed devices.
), the defined values of these settings are not applied to devices on which the policy is applied, and these settings can be changed for managed devices in the Kaspersky Thin Client interface under Devices → Managed devices.
Configuring forwarding of Kaspersky Thin Client logs to a log server
In the Web Console, you can configure forwarding of Kaspersky Thin Client logs to a log server for one device or for a group of devices running Kaspersky Thin Client.
How to configure forwarding of logs for one device
- In the main window of the Web Console, select Devices → Managed devices.
- Click the name of the thin client where Kaspersky Thin Client is running. You can view the device name in the Kaspersky Thin Client interface. If the thin client name is not on the list, add it to the Managed devices group.
If a managed device is added to an administration group and an enforced policy is configured for the settings of this group, the settings that were individually configured for this device will not be applied.
- In the window that opens, select the Applications tab.
- Click the name of the Kaspersky Security Management Suite web plug-in.
This opens a window containing information about Kaspersky Thin Client.
- Select the Application settings tab.
- Select the Data exchange section (see the figure below).
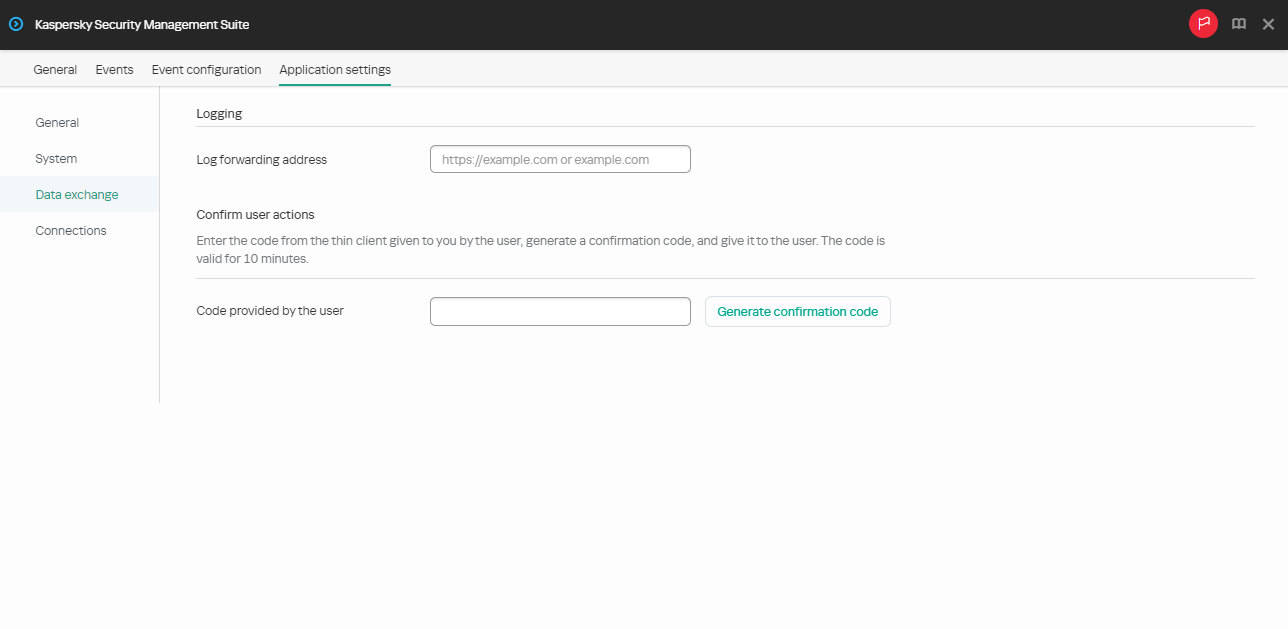
Window for configuring forwarding of Kaspersky Thin Client logs through the Web Console for one device
- In the Log forwarding address field, enter the address of the destination log server in the format https://<server address>. Make sure that a log server compliant with the requirements is deployed in the enterprise infrastructure.
- Click Save in the lower part of the window to save the changes.
How to configure forwarding of logs for a group of devices
- In the main window of the Web Console, select Devices → Policies & profiles.
- Click the policy name for the Kaspersky Security Management Suite web plug-in.
- In the window that opens, select the Application settings tab.
- Select the Data exchange section (see the figure below).
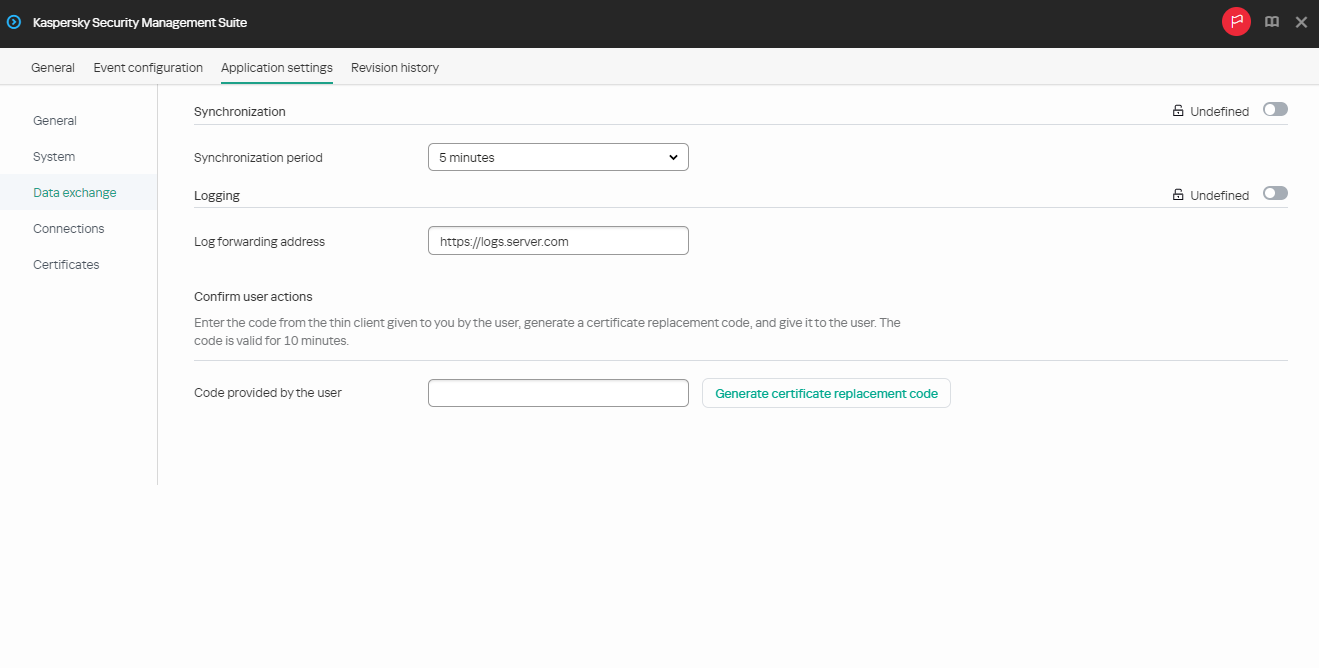
Window for configuring forwarding of Kaspersky Thin Client logs through the Web Console for a group of devices
- In the Log forwarding address field, enter the address of the destination log server in the format https://<server address>. Make sure that a log server compliant with the requirements is deployed in the enterprise infrastructure.
- Click Save in the lower part of the window to save the changes.
Confirming Kaspersky Thin Client user actions
The following user actions require confirmation from the Kaspersky Security Center administrator:
- Changing settings for connecting to Kaspersky Security Center
- Changing certificates for connecting to Kaspersky Security Center
- Resetting all settings and data of a thin client
If a thin client running Kaspersky Thin Client is not connected to Kaspersky Security Center or is connected but is not included in the managed devices group, this thin client will not send the administrator any requests to confirm the actions listed above. Add the thin client to the managed devices group to receive requests to confirm user actions.
To confirm the change of settings for connecting to Kaspersky Security Center or reset of all thin client settings:
- In the main window of the Web Console, select Devices → Managed devices.
- Click the name of the thin client where Kaspersky Thin Client is running. You can view the device name in the Kaspersky Thin Client interface. If the thin client name is not on the list, add it to the Managed devices group.
If a managed device is added to an administration group and an enforced policy is configured for the settings of this group, the settings that were individually configured for this device will not be applied.
- In the window that opens, select the Applications tab.
- Click the name of the Kaspersky Security Management Suite web plug-in.
This opens a window containing information about Kaspersky Thin Client.
- Select the Application settings tab.
- Select the Data exchange section.
- In the Confirm user actions block, enter the code from the Kaspersky Thin Client interface which the user sent you and click Generate confirmation code.
A confirmation code will be created and displayed in the Confirm user actions block.
- Send the confirmation code to the Kaspersky Thin Client user.
To confirm the change of the certificate for connecting to Kaspersky Security Center:
- In the main window of the Web Console, select Devices → Policies & profiles.
- Click the policy name for the Kaspersky Security Management Suite web plug-in.
- In the window that opens, select the Application settings tab.
- Select the Data exchange section.
- In the Confirm user actions block, enter the code from the Kaspersky Thin Client interface which the user sent you and click Generate certificate replacement code.
A certificate replacement code will be created and displayed in the Confirm user actions block.
- Send the certificate replacement code to the Kaspersky Thin Client user.
Managing Kaspersky Thin Client certificates through the Web Console
In Kaspersky Security Center, you can access certificate management functions to connect thin clients to a log server and to a remote environment. In the Kaspersky Security Center Web Console interface you can view, add, and delete such certificates.
You are advised to configure the connection of a group of thin clients to a log server or to a remote environment only using certificates that were assigned by the administrator in the Web Console. This will help prevent Kaspersky Thin Client from connecting to untrusted nodes.
This section also provides instructions on how to manage certificates for connecting Kaspersky Thin Client to Kaspersky Security Center.
Page top
About a certificate for connecting Kaspersky Thin Client to Kaspersky Security Center
Kaspersky Thin Client uses a user mobile certificate (hereinafter also referred to as "certificate") to connect to Kaspersky Security Center. For detailed information about this and other types of certificates used by Kaspersky Security Center, see the About certificates section of the Kaspersky Security Center Online Help.
The certificate is created using the Administration Server quick start wizard after installing Kaspersky Security Center. The default validity period of an issued certificate is one year.
User mobile certificates are not reissued automatically.
You can reissue the certificate in the Web Console or create a new certificate manually and upload it to the Web Console.
When migrating to a new Kaspersky Security Center Administration Server, create a new certificate manually in order to upload it to the current Server as a reserve certificate and then to the new Server as the primary certificate.
Page top
Reissuing a certificate for connecting Kaspersky Thin Client to Kaspersky Security Center using the Web Console
Kaspersky Thin Client uses a user mobile certificate to connect to Kaspersky Security Center. Certificates of this type are not automatically reissued.
To reissue a certificate for connecting Kaspersky Thin Client to Kaspersky Security Center in the Web Console interface:
- In the menu of the Kaspersky Security Center Web Console, click the
 icon next to the name of the Kaspersky Security Center Administration Server.
The Administration Server properties window opens.
- In the list of subsections, select Certificates.
- In the window that opens, in the Administration Server authentication by mobile devices section, select the required certificate and click Reissue.
- In the window that opens, specify the Server address and indicate when to activate the certificate. Confirm your choice.
- Click Save in the window that opens.
The certificate for connecting Kaspersky Thin Client to Kaspersky Security Center is reissued.
Managed devices and devices included in the administration group receive the reissued certificate for connecting to Kaspersky Security Center after Kaspersky Thin Client is synchronized with Kaspersky Security Center. The reissued certificate is saved to the Kaspersky Thin Client certificate storage and can be used as a reserve one to connect thin clients to Kaspersky Security Center when the currently used certificate expires.
You can also manually issue a new certificate to connect Kaspersky Thin Client to Kaspersky Security Center.
Page top
Creating a certificate for connecting Kaspersky Thin Client to Kaspersky Security Center
You can manually create a certificate for connecting Kaspersky Thin Client to Kaspersky Security Center. The created certificate can be used as a primary or a reserve one, for example, when migrating to a new Kaspersky Security Center Administration Server.
We recommend familiarizing yourself with the requirements for Kaspersky Security Center certificates stated in the Requirements for custom certificates used in Kaspersky Security Center section of the Kaspersky Security Center Online Help.
The created certificate must be uploaded to the Web Console.
To create a certificate for connecting Kaspersky Thin Client to Kaspersky Security Center using the OpenSSL tool:
- Start the console and go to the folder in which you want to create the certificate.
- In the console, start the OpenSSL tool and run the following command:
openssl req -x509 -newkey rsa:2048 -keyout key.pem -out server.pem -days 397 -subj '/CN=mydomain.ru/C=RU/L=Moscow/O=My Organization Name/OU=My Organization Unit Name' -addext "keyUsage = digitalSignature, keyEncipherment, dataEncipherment, cRLSign, keyCertSign" -addext "extendedKeyUsage = serverAuth, clientAuth"where:
-keyout key.pemis a name of the file in which the private key of the created certificate will be saved.-out server.pemis a name of the file in which the created certificate will be saved.-daysis a setting that defines the validity term of the created certificate, in days. We recommend setting a certificate validity term of no more than 397 days.-subj'/CN=mydomain.ru/C=RU/L=Moscow/O=My Organization Name/OU=My Organization Unit Name'is data of your organization: domain name, location, name.
- Enter and confirm the password for the private certificate key. This password will need to be entered when uploading the user certificate to the Web Console as a mobile certificate. Minimum password length: 8 characters.
As a result, the following two files will be created in the folder where you ran the command:
- server.pem is a certificate file for connecting Kaspersky Thin Client to Kaspersky Security Center.
- key.pem is a private key of the certificate for connecting Kaspersky Thin Client to Kaspersky Security Center.
If necessary, you can convert a certificate file from PEM to DER format.
Page top
Uploading a certificate for connecting Kaspersky Thin Client to Kaspersky Security Center using the Web Console
After you create a certificate to connect Kaspersky Thin Client to Kaspersky Security Center, upload this certificate to the Web Console for transfer to the managed thin clients.
It is recommended to familiarize yourself with the requirements for Kaspersky Security Center certificates in the Requirements for custom certificates used in Kaspersky Security Center section of the Kaspersky Security Center Online Help.
To upload a certificate to the Web Console for connecting Kaspersky Thin Client to Kaspersky Security Center:
- In the menu of the Kaspersky Security Center Web Console, click the icon next to the name of the Kaspersky Security Center Administration Server.
The Administration Server properties window opens.
- In the list of subsections, select Certificates.
- In the window that opens, in the Administration Server authentication by mobile devices block, select Other certificate and click the Manage certificate button.
- In the panel that opens on the right, click Browse and do the following:
- In the Certificate type drop-down list, select X.509 certificate.
- If the user certificate is protected with a password, enter the password.
- Select the user certificate file by clicking the Browse button in the Certificate block.
- Select the private key for the user certificate by clicking the Browse button in the Private key block.
- Click Save to save the certificate being added.
- Click Save to save the changes you made in the Certificates subsection.
The certificate for connecting Kaspersky Thin Client to Kaspersky Security Center will be uploaded to the Web Console. Managed devices and devices included in the administration group receive the new certificate after Kaspersky Thin Client is synchronized with Kaspersky Security Center.
Page top
Adding new certificates in the Web Console
For thin clients that are included in an administration group, you can add certificates to the Web Console for connecting to a remote environment or log server.
After adding a certificate for a thin client in the Web Console, all certificates that were previously accepted by a user will be removed from the device certificate store.
To add new certificates through the Web Console:
- In the main window of the Web Console, select Devices → Policies & profiles.
- Click the policy name for the Kaspersky Security Management Suite web plug-in.
- In the window that opens, select the Application settings tab.
- Select the Certificates section.
- In the Valid certificates table, click the Add button in the upper part of the table.
- In the panel that opens on the right, select all certificates that were previously uploaded and select the new certificates. The total size of the uploaded files must not exceed 1 MB. You can upload certificates only in DER format. Each certificate file must contain only one certificate. If necessary, you can convert certificates from PEM to DER format in advance.
- Click OK to confirm the upload of the selected certificates.
The selected certificates will be uploaded and information about them will be displayed in the Valid certificates table.
If the added certificate is a root certificate, the connection will be established based on the server domain name only.
Page top
Removing certificates from the Web Console
In the Web Console, you can remove certificates for thin clients that are included in an administration group.
If you remove all certificates that were assigned to a group of thin clients, the devices from this group will be able to connect to any server, including servers that have not been assigned any certificates.
To remove certificates:
- In the main window of the Web Console, select Devices → Policies & profiles.
- Click the policy name for the Kaspersky Security Management Suite web plug-in.
- In the window that opens, select the Application settings tab.
- Select the Certificates section.
- In the Valid certificates table, select the check boxes next to the certificates that you need to remove.
- Click Delete and confirm deletion.
The selected certificates will be removed.
Page top
Converting a certificate from PEM to DER format
Kaspersky Security Management Suite supports uploading of certificates only in DER format. You can convert a certificate file from PEM to DER format.
To carry out these instructions on the local computer, you must have the OpenSSL tool.
To convert a certificate file from PEM to DER format:
- Start the console on the local computer.
- Go to the folder containing the PEM certificate file and run the following file conversion command:
openssl x509 -outform der -in <certificate file name>.pem -out <certificate file name>.derwhere:
- <certificate file name>.pem is the original certificate file name in PEM format.
- <certificate file name>.der is the converted certificate file name in DER format.
The new certificate file in DER format will be generated in this same folder.
Page top
Updating a certificate when migrating to a new Kaspersky Security Center Server
To migrate thin clients to a new Kaspersky Security Center Administration Server, issue a certificate, save it on the current Kaspersky Security Center Server as a reserve one, and then use it on the new Server as the primary certificate.
To issue and prepare a new certificate:
- Start the console and go to the folder in which you want to create the certificate.
- Run the OpenSSL utility and issue the certificate using the following command:
openssl req -x509 -sha256 -nodes -days 397 -newkey rsa:2048 -keyout <key file name>.key -out <certificate file name>.crtThe generated certificate and key files are saved locally.
- Package the certificate and the key into a container using the following command:
openssl pkcs12 -export -out -<container name>.pfx -inkey <key file name>.key -in <certificate file name>.crt - Enter and repeat the password for the container. This password is required when uploading the certificate to the servers.
As a result, the container file in PFX format is saved locally.
To upload a certificate to the current Kaspersky Security Center Server as a reserve one:
- Go to the folder where Kaspersky Security Center is installed and launch the console.
- Run the klsetsrvcert utility and enter the following command:
klsetsrvcert -t MR -i <path to the container> -p <container password> -o NoCAYou do not need to download the klsetsrvcert utility. The utility is included in the Kaspersky Security Center distribution kit.
After the command execution, Kaspersky Security Center restarts.
The reserve certificate is uploaded to the Web Console.
To upload the certificate to a new Kaspersky Security Center Server as the main one:
In the console, start the klsetsrvcert utility and run the following command:
klsetsrvcert -t M -i <path to the container> -p <container password> -o NoCA
After execution of the instructions above, the certificate for connecting to the new Kaspersky Security Center Administration Server is updated.
Page top
Monitoring Kaspersky Thin Client events through the Kaspersky Security Center Web Console
This section contains instructions on monitoring events registered in Kaspersky Thin Client through the Kaspersky Security Center Web Console.
Configuring registration of Kaspersky Thin Client event notifications in the Kaspersky Security Center Web Console
Kaspersky Security Center lets you receive information about events that occur while Kaspersky Thin Client is running. In the Kaspersky Security Center Web Console interface, you can configure a notification regarding the registration of such events. Each event in Kaspersky Security Center has its own severity level. Depending on the conditions of its occurrence, an event can be assigned one of the following severity levels:
- A critical event is an event that indicates the occurrence of a critical problem that may lead to data loss, an operational malfunction, or a critical error.
- A functional failure is an event that indicates the occurrence of a serious problem, error or malfunction that occurred during operation of the application or while performing a procedure.
- A warning is an event that requires attention because it emphasizes important situations in the operation of Kaspersky Thin Client and may indicate a possible issue in the future. Most events are designated as warnings if the application can be restored without loss of data or functional capabilities after such events occur.
- An info is an event that informs about successful completion of an operation, proper functioning of the application, or completion of a procedure.
You can configure notifications about Kaspersky Thin Client events in the Kaspersky Security Center Web Console for one device or for a group of devices.
How to configure event notifications for one device
How to configure event notifications for a group of devices
For detailed information on configuring notifications for event registration in the Kaspersky Security Center Web Console, please refer to the Configuring notification delivery section of the Kaspersky Security Center Online Help Guide.
Page top
Viewing Kaspersky Thin Client events in the Web Console
You can view events registered by Kaspersky Thin Client in the Web Console.
To view events registered by Kaspersky Thin Client in the Web Console:
- In the main window of the Kaspersky Security Center Web Console, do one of the following:
- If the thin client is included in an administration group, select Devices → Managed devices.
- If the thin client has not been added to an administration group, select Discovery & deployment → Unassigned devices.
- Click the name of the relevant device. The device name is indicated in the Kaspersky Thin Client interface.
- In the window that opens, select the Events tab.
This opens a window displaying a table of registered events. The following information is displayed for each event:
- Time shows the date and time when the Web Console received the event registered on a device.
- Event shows a type of the event.
- Description shows a short description of the registered event.
- Application shows a name of the application for which the event was received in the Web Console.
- Version number shows a version of the application for which the event was received in the Web Console.
- Severity level shows severity of the event (Critical, Functional failure, Warning or Info).
- Task shows a name of the task to be run when the event is registered.
- Registered shows the date and time when the event was registered on the device.
Troubleshooting
If an error occurs, check the following:
- The thin client is turned on.
- The thin client is connected to the network.
- The correct IP address or server name, user name, and password were entered when connecting to the remote desktop.
If you are unable to resolve the error, please contact Technical Support. If necessary, Technical Support experts may ask you to provide system information and/or the event log.
Disconnecting from a remote desktop
If you encounter an error that causes Kaspersky Thin Client to disconnect from a remote desktop, a connection will be re-established automatically if this option is enabled in the remote environment connection settings.
If the connection is not restored during the re-connection attempt or if automatic connection is declined, the remote session screen closes and a message indicating the cause of the malfunction is displayed.
To resume operation on the remote desktop:
- Close the error message.
- Try to connect to the remote desktop.
- If the connection fails, restart the thin client and try to connect to the remote desktop again.
- If a connection still cannot be established, please contact your enterprise administrator to fix any physical issues that could be causing Kaspersky Thin Client to disconnect from the remote desktop.
- If the direct connection is established but you still cannot connect to the remote desktop, please contact Technical Support.
Testing the network connection
To test whether the thin client is connected to the network,
View the status of Kaspersky Thin Client network connection in the Kaspersky Thin Client control panel.
Page top
Contacting Technical Support
If you experience problems that you cannot resolve on your own when working with Kaspersky Thin Client, please contact Kaspersky Technical Support.
Before contacting Technical Support, please make sure to read the Technical Support rules.
When you contact Technical Support, experts may ask you to provide audit and event logs. In the Kaspersky Thin Client interface, you can forward logs to a log server deployed in your organization's infrastructure, from where Kaspersky experts can download them.
Page top
About Kaspersky Thin Client logs
Kaspersky Thin Client maintains two types of logs:
- Event log. This log saves all registered by Kaspersky Thin Client components. You can view the event log in the Kaspersky Thin Client interface, and forward it to a log server.
- Audit log. This log stores data on the certificates uploaded to Kaspersky Thin Client, and contains information on instances when Kaspersky Security Center was used to enable or disable management of thin clients. The audit log cannot be viewed in the Kaspersky Thin Client interface. You can forward the audit log file to a log server.
The Kaspersky Thin Client event log contains the following information:
- Date and time when the event occurred.
- Name of the Kaspersky Thin Client component that registered the event.
- Event severity. The following values are possible:
- Trace is all possible messages and warnings that occur during application operation.
- Debug is debug messages and all informational and important messages, and all warnings and messages about common and critical errors.
- Info is informational messages, important messages and all warnings, and messages about common and critical errors.
- Warn is all warnings and messages about ordinary and critical errors.
- Error is messages about errors and critical errors in application operation.
- Fatal is messages about critical errors in application operation.
- Debug information in <File>:<Line Number>,<Function> format, where:
- File is a file name.
- Line Number is a number of the line in the file.
- Function is debug information.
- Process ID and thread ID.
- Product version ID.
The Kaspersky Thin Client audit log contains the following information:
- Upload date and time of the certificate for connecting Kaspersky Thin Client to Kaspersky Security Center.
- Address of the Kaspersky Security Center Administration Server (IP address and/or domain server name).
- Kaspersky Security Center Administration Server port number.
- List of certificate attributes: issuer name, subject name, certificate fingerprint, validity start date and time, validity end date and time, thin client ID.
- Information about incidents when management of Kaspersky Thin Client via the Kaspersky Security Center Web Console was enabled or disabled.
Log forwarding
When you contact Technical Support, Kaspersky experts may ask you to provide event and audit logs. In the Kaspersky Thin Client interface, you can forward logs to a log server, from where the experts can download them.
The log server must first be deployed in your organization's infrastructure. For detailed information on server deployment, please refer to the Administrator's Guide for this server.
The maximum file sizes for the event log and audit log are 150 MB and 512 MB, respectively. When the file size of the event or audit log reaches its corresponding limit, Kaspersky Thin Client deletes the existing logs and starts to record new ones. Each time event and audit logs are updated, the current version of Kaspersky Thin Client is recorded at the beginning of the log.
To forward Kaspersky Thin Client audit and event logs:
- In the Kaspersky Thin Client control panel, click and select Tools in the menu that opens.
- In the window that opens, select the Event log section (see the figure below).
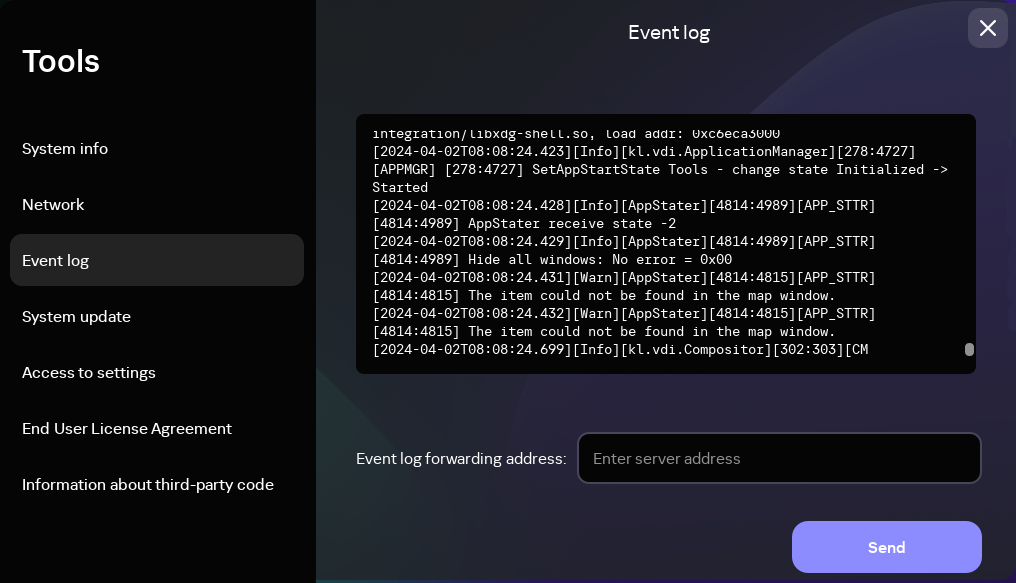
Tools. Event log section
This displays information about registered events of Kaspersky Thin Client.
- In the Event log forwarding address field, enter the address of the destination server that should receive audit and event logs, and click the Send button.
If Kaspersky Thin Client is a member of an administration group and is centrally controlled through the Web Console, and the Enforced function is enabled, the Event log forwarding address field will contain the value set by the Kaspersky Security Center administrator that cannot be changed.
We recommend verifying the correct address of the destination server to which you are sending logs. If the wrong address is indicated, logs could be sent to unauthorized third parties. If this is the case, the confidentiality of the data they contain could be compromised.
- In the window that opens, confirm that you want to forward audit and event logs.
If Kaspersky Thin Client is not included in an administration group and you are forwarding audit and event logs to a log server for the first time, check the settings of the certificate being added in the opened Add certificate window and click the Add certificate button. The certificate will be added to the system certificate store of Kaspersky Thin Client and will be used for subsequent connections.
Kaspersky Thin Client audit and event logs will be forwarded to the specified server.
Page topGlossary
Administration group
A set of devices combined according to the performed functions. Devices are grouped for easy management as a whole. A group may include other groups. Group policies can be created for each thin client added to a group.
Administration Server
A component of the Kaspersky Security Center application that provides centralized storage and management of information about Kaspersky applications installed in an enterprise's network.
Broker
Service that controls access and connections to remote desktops and applications (for example, Microsoft Remote Desktop Connection Broker).
Event
An entry containing records of changes made to the state or configuration of a thin client, or errors that require the attention of a system administrator.
Kaspersky Security Center administrator
A person who manages thin client operations through the remote centralized administration system known as Kaspersky Security Center.
Kaspersky Security Management Suite web plug-in
A specialized component that provides an interface for managing Kaspersky Thin Client settings through the Kaspersky Security Center Administration Console.
Kaspersky update servers
Kaspersky HTTP servers from which a Kaspersky application receives updates for databases and application modules.
Managed devices
Enterprise network devices that are included into an administration group.
Policy
A policy determines settings of Kaspersky Thin Client and defines access to configuration of Kaspersky Thin Client settings on devices within an administration group. You can create an unlimited number of different policies for Kaspersky Thin Client installed on devices in each administration group, but only one policy at a time can be applied to each Kaspersky Thin Client device within an administration group.
Remote desktop
An operating system that is either installed on a computer or deployed in a virtual environment. Remote access technologies are used to connect to this type of operating system.
Thin client
A compact personal computer used for connecting via a network to remote servers that provide data storage and have all necessary for an operation applications installed. Peripherals, such as a monitor, keyboard, and mouse, are connected to the thin client.
TLS
Secure protocol that uses encryption to transfer data in local networks and on the internet.
Update
A procedure for replacing/adding new files (Kaspersky Thin Client databases or modules) received from Kaspersky update servers.
Virtual application
Application that is deployed on a remote server and requires you to use remote access technologies to connect to it.
Web Access
Application for connecting to virtual desktops deployed in a Citrix Workspace and VMware Horizon infrastructure.
Page top
Information about third-party code
Information about third-party code is contained in the file named LegalNotices_en.txt, which is included in the distribution kit.
You can also view information about third-party code in the Kaspersky Thin Client interface.
To view information about third-party code,
In the Kaspersky Thin Client control panel, click and select Tools → Information about third-party code in the menu that opens.
This opens a window showing information about the use of third-party code in the current version of Kaspersky Thin Client.
Page top
Trademark notices
Registered trademarks and service marks are the property of their respective owners.
Ubuntu is a registered trademark of Canonical Ltd.
Citrix, Citrix Workspace are either registered trademarks or trademarks of Cloud Software Group, Inc., and/or its subsidiaries in the United States and/or other countries.
Linux is the registered trademark of Linus Torvalds in the U.S. and other countries.
Microsoft, RemoteFX, Windows, and Windows Server are trademarks of the Microsoft group of companies.
OpenSSL is a trademark owned by the OpenSSL Software Foundation.
JavaScript is the registered trademark of Oracle and/or its affiliates.
VMware Horizon is a registered trademark and/or trademark of VMware, Inc. in the United States and other countries.
Page top