Contents
- Kaspersky Next help
- What's new
- About Kaspersky Next
- Quick Start Guide
- Getting started with Kaspersky Next
- Kaspersky Next Management Console
- Initial setup of Kaspersky Next
- Interface of Kaspersky Next Management Console
- Deployment of security applications
- Upgrading Kaspersky Next
- Managing user accounts
- Managing devices
- Viewing the list of devices
- About device statuses
- Viewing the properties of a device
- Connecting Windows devices and Mac devices
- Renaming devices
- Assigning the owner of a Windows device or a Mac device
- Scenario: Creating, renewing, and uploading an APNs certificate
- Connecting mobile devices
- Sending commands to users' devices
- Deleting devices from the list of devices
- Starting and stopping anti-malware database updates and malware scans
- Updating the security application on devices running Windows and macOS
- Managing security profiles
- Endpoint Detection and Response
- About Endpoint Detection and Response
- About Indicators of Compromise
- Starting the use of Endpoint Detection and Response
- Scenario: Configuring and using Endpoint Detection and Response
- Configuring IoC scans for potential threats
- Configuring execution prevention
- Viewing information about Endpoint Detection and Response alerts
- Taking manual response measures
- Canceling network isolation of a Windows device
- Exporting information about Endpoint Detection and Response alerts
- Disabling Endpoint Detection and Response
- Root-Cause Analysis
- Adaptive Anomaly Control
- Data Discovery
- About Data Discovery
- Categories of information detected by Data Discovery
- Starting the use of Data Discovery
- Connecting an Office 365 organization to your workspace
- Viewing information about Data Discovery detections
- Example of analyzing a Data Discovery detection
- Exporting information about Data Discovery detections
- Disabling Data Discovery
- Cloud Discovery
- About Cloud Discovery
- Starting the use of Cloud Discovery
- Enabling and disabling Cloud Discovery in security profiles
- Viewing information about the use of cloud services
- Risk level of a cloud service
- Blocking access to unwanted cloud services
- Enabling and disabling the monitoring of internet connections on Windows devices
- Vulnerability Assessment and Patch Management
- Encryption Management
- Performing typical tasks
- Closing a Management Console session
- Viewing widgets
- Configuring protection
- Configuring protection components on Windows devices
- Selecting the types of detectable objects on Windows devices
- Configuring the File Threat Protection component on Windows devices
- Configuring the scanning of removable drives when they are connected to a computer
- Configuring the Mail Threat Protection component on Windows devices
- Configuring the Web Threat Protection component on Windows devices
- Configuring the Behavior Detection, Exploit Prevention, and Remediation Engine components on Windows devices
- Enabling and disabling AMSI Protection
- Configuring the BadUSB Attack Prevention component
- Configuring the Network Threat Protection component on Windows devices
- Configuring network ports exclusions
- Enabling and disabling Advanced Disinfection
- Configuring protection components on Mac devices
- Trusted zone
- Configuring anti-malware protection on Android devices
- Configuring protection components on Windows devices
- Configuring the Host Intrusion Prevention component on Windows devices
- Defining proxy server settings
- Managing the startup of applications on users' devices
- Compliance control of Android devices with corporate security requirements
- Configuring user access to device features
- Controlling network and storage devices on Windows devices
- Generating a list of trusted network and storage devices on Windows devices
- Configuring interaction of Kaspersky Endpoint Security for Windows with end users
- Configuring interaction of Kaspersky Endpoint Security for Mac with end users
- Controlling user access to the features of Android devices
- Controlling user access to the features of iOS and iPadOS devices
- Device hack detection (root access)
- Configuring password protection of Windows devices
- Configuring the unlock password for mobile devices
- Configuring Firewall on Windows devices
- Configuring user access to websites
- Configuring a proxy server
- Configuring an internet connection
- Configuring email on iOS and iPadOS devices
- Configuring CalDAV Calendar on iOS and iPadOS devices
- Protecting Kaspersky Endpoint Security for Android against removal
- Configuring notifications from Kaspersky Endpoint Security for Android
- Enabling and disabling performance features of Kaspersky Endpoint Security for Windows
- Configuring performance features of Kaspersky Endpoint Security for Mac
- Enabling and disabling the transmission of dump files and trace files to Kaspersky for analysis
- Viewing license details and entering an activation code
- Leaving feedback
- Reports on device protection
- List of reports on device protection
- Protection status report
- Threats report
- Status of anti-malware database updates report
- Network attacks report
- Vulnerabilities report
- Cloud Discovery reports
- Adaptive Anomaly Control reports
- Detections by Device Control component report
- Detections by Web Control component report
- Encryption status of devices report
- Kaspersky applications versions report
- Working with reports
- Configuring regular delivery of reports by email
- List of reports on device protection
- Viewing the event log and configuring event notifications
- Adjusting the general settings of Kaspersky Next
- Managing objects in Quarantine
- Kaspersky Security Network
- Kaspersky Business Hub
- About Kaspersky Business Hub
- Managing the list of companies on Kaspersky Business Hub
- Viewing the list of companies on Kaspersky Business Hub
- Viewing aggregated protection statistics
- Adding a new company to Kaspersky Business Hub
- Adding another workspace for a company registered on Kaspersky Business Hub
- Editing company information
- Deleting the workspace of a company
- Canceling deletion of a company workspace
- Viewing news and sending feedback
- Managing the list of licenses on Kaspersky Business Hub
- Taking cybersecurity training
- Selecting the data centers used to store Kaspersky Next information
- Resetting your password
- Editing the settings of an account in Kaspersky Business Hub
- Quick Start Guide for Managed Service Providers (MSPs)
- Kaspersky Next licensing
- Contact Technical Support
- Sources of information about the application
- Glossary
- Account on Kaspersky Business Hub
- Administration Server
- Anti-malware databases
- Apple Push Notification service (APNs) certificate
- Background scan
- Certificate Signing Request
- Compliance control
- Device owner
- File Threat Protection
- Host Intrusion Prevention (Application Privilege Control)
- Kaspersky Business Hub
- Kaspersky Next Management Console
- Kaspersky Security Network (KSN)
- Mail Threat Protection
- Malicious web addresses
- Malware
- Managed device
- Network Agent
- Network Threat Protection
- Patch
- Phishing
- Proxy server
- Quarantine
- Security application
- Security profile
- Supervised device
- Trusted device
- Trusted Platform Module (TPM)
- Trusted zone
- Update importance level
- User alias
- Vulnerability
- Vulnerability severity level
- Web Threat Protection
- Windows device name
- Workspace
- Information about third-party code
- Trademark notices
Kaspersky Next help
 New features
 Feature comparison
- Comparison of Kaspersky Next features in different editions
- Comparison of Kaspersky Next features for different Windows types
 How to start
 Monitoring and reporting
 Advanced features
Page top
What's new
This section contains information about the new features and improvements in each version of Kaspersky Next and Kaspersky Business Hub.
Updates functionality (including providing anti-malware signature updates and codebase updates), as well as KSN functionality may not be available in the software in the U.S.
VERSION 1.0
The first version of Kaspersky Next has been released.
Kaspersky Next is a software solution developed specifically for small, medium-sized, and large businesses. It lets you manage security for multiple endpoints, mobile devices, and file servers remotely, by using a cloud-based console.
Kaspersky Next has two views:
- Pro View
It provides easier GUI and less features. Recommended for small and medium-sized businesses.
- Expert View
It provides more complicated GUI and more features. Recommended for large-scale businesses.
By using Kaspersky Next, you can do the following:
- Install and update Kaspersky applications in a centralized way on the computers and mobile devices of your company employees that have been connected to Kaspersky Next.
- Manage device settings and protection by using security profiles.
- Manage and edit user account properties, create user groups, and grant various rights to users.
Kaspersky Next is hosted and maintained by Kaspersky. You do not have to install Kaspersky Next on your computer. You only need a browser and internet access to use Kaspersky Next.
Key features for devices running Windows and macOS include File Threat Protection, Mail Threat Protection, Network Threat Protection, Web Threat Protection, and Firewall.
Key mobile protection features include Web Control, Configurable password; Anti-Malware protection, App Control, and Compliance Control for Android; Configurable Wi-Fi network connection; and Management of embedded iOS features.
Page top
About Kaspersky Next
Kaspersky Next is a software solution developed specifically for small and medium-sized businesses. It lets you manage security for multiple endpoints, mobile devices, and file servers remotely, by using a cloud-based console.
By using Kaspersky Next, you can do the following:
- Install and update Kaspersky applications in a centralized way on the computers and mobile devices of your company employees that have been connected to Kaspersky Next.
- Manage device settings and protection by using security profiles.
- Manage and edit user account properties, create user groups, and grant various rights to users.
Kaspersky Next is hosted and maintained by Kaspersky. You do not have to install Kaspersky Next on your computer. You only need a browser and internet access to use Kaspersky Next.
Key features of Kaspersky Next
Kaspersky Next benefits are divided into three main sections.
Ease of use
Simple, intuitive, cloud-based console
Kaspersky Next is managed from a simple cloud-based console. It's available anytime, from any location, and does not require an administrator's device to be located in the same network as the managed devices. When the administrator logs in to the console, a dedicated Getting started page provides straightforward steps for protecting company devices. This page also indicates whether the security setup has reached the Required level, which is adequate most of the time, and how to reach the Recommended level.
After a
is opened three times, the Information panel → Monitoring page is displayed when the console starts, instead of the Information panel → Getting started page.Default preconfigured security profile
To save time setting up security, every Kaspersky Next workspace contains a default security profile (see the figure below). A workspace is configured to provide efficient protection for a typical environment. The default security profile is automatically applied on every device after it is connected to the Management Console component of Kaspersky Next. This design lets you save time on security configuration and provides out-of-the-box protection, even without the involvement of an administrator.
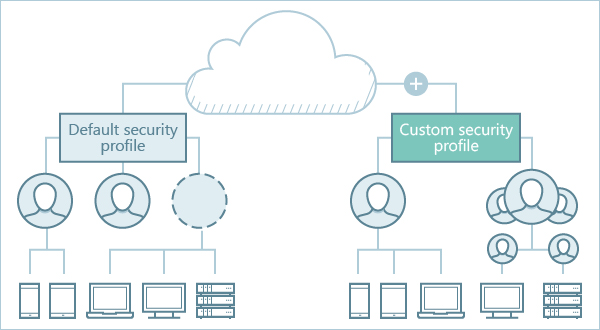
Default and custom security profiles
One security profile for all devices
Every security profile contains security settings for devices running Microsoft Windows, Apple macOS, Google Android, and Apple iOS and iPadOS. This arrangement allows you to set up and maintain a single security profile instead of four, assign the profile to users or user groups, and keep the security settings consistent for users.
Simple deployment
Because Kaspersky Next is managed through a browser, the only deployment required is that of security applications on corporate devices. This process consists of four easy steps:
- Enter the email addresses of employees, in Kaspersky Next.
- Send the employees an email message with instructions for installing security applications on user devices. The message contains links for downloading the applications.
- Make sure that employees install the applications on their devices.
- Match devices, which appear in the Devices section of Kaspersky Next Management Console, with users.
The email message that is generated and sent to employees by Kaspersky Next contains just one installation link. When an employee opens this link on a device, Kaspersky Next identifies the operating system and starts to download the correct installation package. This minimizes potential errors on the staff side.
Advanced security features
Some of the features mentioned in this section are available only if you activated Kaspersky Next under a Kaspersky Next EDR Optimum or XDR Expert license (please refer to the comparison of features for details).
Full set of endpoint protection features
The Kaspersky Endpoint Security components File Threat Protection, Mail Threat Protection, Network Threat Protection, and Web Threat Protection include technologies that shield users from malware, phishing, and other types of threats.
A firewall manages network activity and allows you to block potentially dangerous connections, such as remote desktop connections.
Protection against ransomware
Kaspersky Endpoint Security for Windows provides protection from ransomware for workstations running Windows operating systems and (starting from version 11) also protection from ransomware for file servers running Windows operating systems. The Kaspersky Endpoint Security components Behavior Detection, Exploit Prevention, and Remediation Engine monitor activity of applications on devices and block malicious actions.
Protection of mobile devices
In the corporate environment, mobile devices are becoming as important as wired computers: employees read corporate email, communicate with customers, and handle other crucial information. Kaspersky Next provides all core functionality for the protection and management of mobile devices, which includes the following:
- Password protection—Guards mobile devices against unauthorized access.
- Anti-theft protection for Android, iOS, and iPadOS devices—Protects a device from unauthorized access. If the device is lost or stolen, it can be locked remotely or all data can be wiped from it.
- Anti-malware protection for Android—Protects a device against infections in real time.
- Feature Control and Web Control—Help to ensure that mobile devices are used for corporate and not personal work.
Vulnerability Assessment and Patch Management
Vulnerability Assessment allows you to detect software
on user devices running Windows. Vulnerabilities are detected in the operating system and in applications made by Microsoft and third-party vendors.Patch Management allows you to manage updates for the applications installed on your users' devices running Windows, including
that fix software vulnerabilities detected on the devices.Cloud security features
Some of the features mentioned in this section are available only if you activated Kaspersky Next under a Kaspersky Next EDR Optimum or XDR Expert license (please refer to the comparison of features for details).
Cloud Discovery
Cloud Discovery allows you to monitor the use of cloud services on managed devices running Windows and to block access to cloud services that you consider unwanted. Cloud Discovery tracks user attempts to gain access to these services through both browsers and desktop applications. This feature helps you to detect and halt the use of cloud services by shadow IT.
Data Discovery
Data Discovery detects critical information in files that are located in Office 365 cloud storages. You can view the information about each detected file—its name, sharing type (private, within the company, or outside the company), and who edited it last.
Microsoft Office 365 protection
You can use your Kaspersky Next EDR Optimum or XDR Expert license to activate Kaspersky Security for Microsoft Office 365.
Kaspersky Security for Microsoft Office 365 protects your Office 365 corporate email, file sharing, communication, and collaboration services against malware, phishing, spam, and other threats. The available number of mailboxes that you can protect is 1.5 times greater than the number of users in your license limit (rounded up to the nearest integer).
For information about how to work with Kaspersky Security for Microsoft Office 365, please refer to Kaspersky Security for Microsoft Office 365 Help.
Management capabilities
Some of the features mentioned in this section are available only if you activated Kaspersky Next under a Kaspersky Next EDR Optimum or XDR Expert license (please refer to the comparison of features for details).
Web Control
Web Control allows you to manage user actions on the internet, thus improving employee productivity by restricting or blocking access to specific web resources.
Device Control
Device Control ensures the security of confidential data by restricting user access to devices that might be connected to the computer.
Encryption Management
Encryption Management allows you to configure encryption of managed devices running Windows and macOS. Encryption prevents other users from gaining unauthorized access to data stored on the user's device.
Devices running Windows are encrypted by using BitLocker Drive Encryption. Devices running macOS are encrypted by using the FileVault disk encryption feature.
Root-Cause Analysis
Root-Cause Analysis allows you to detect and root out advanced attacks, perform root-cause analysis with a visualized threat development chain graph, and drill down to details for further review.
Endpoint Detection and Response
Endpoint Detection and Response monitors and analyzes threat progression, and provides you with information about possible attacks, to facilitate a timely manual response; or performs the predefined automated response.
Page top
Comparison of Kaspersky Next editions
Kaspersky Next comes in three editions: Kaspersky Next EDR Foundations, Kaspersky Next EDR Optimum, and Kaspersky Next XDR Expert. The table below compares the features available in these editions.
Feature |
Kaspersky Next EDR Foundations |
Kaspersky Next EDR Optimum |
Kaspersky Next XDR Expert |
|---|---|---|---|
Security feature set |
|||
File Threat Protection |
|
|
|
Mail Threat Protection |
|
|
|
Web Threat Protection |
|
|
|
Network Threat Protection |
|
|
|
Firewall |
|
|
|
Behavior Detection, Exploit Prevention, and Remediation Engine |
|
|
|
Wiping data from a Windows device |
|
|
|
Scan removable drives on connection |
|
|
|
BadUSB Attack Prevention |
|
|
|
Advanced Disinfection |
|
|
|
Vulnerability Assessment |
|
|
|
Root-Cause Analysis |
|
(Within Endpoint Detection and Response) |
(Within Endpoint Detection and Response) |
Endpoint Detection and Response |
|
|
|
Data Discovery |
|
|
|
Cloud Discovery: Monitoring cloud services |
|
|
|
Manageability feature set |
|||
Cloud Discovery: Blocking access to cloud services |
|
|
|
Patch Management |
|
|
|
Encryption Management |
|
|
|
Host Intrusion Prevention |
|
|
|
Device Control |
|
|
|
Web Control |
|
|
|
Adaptive Anomaly Control |
|
|
|
Application Control |
|
|
|
Other features |
|||
Microsoft Office 365 protection |
|
|
|
Cybersecurity training |
|
|
|
Comparison of Kaspersky Next features for different Windows operating system types
The table below compares Kaspersky Next features available for different Windows operating system types (workstation or server) installed on managed devices.
|
Workstation |
Server |
|---|---|---|
Security feature set |
||
File Threat Protection |
|
|
Mail Threat Protection |
|
|
Web Threat Protection |
|
|
Network Threat Protection |
|
|
Firewall |
|
|
Behavior Detection, Exploit Prevention, and Remediation Engine |
|
|
Wiping data from a Windows device |
|
|
Scan removable drives on connection |
|
|
BadUSB Attack Prevention |
|
|
Advanced Disinfection |
|
|
Vulnerability Assessment |
|
|
Root-Cause Analysis |
|
|
Endpoint Detection and Response |
|
|
Data Discovery |
|
|
Cloud Discovery: Monitoring cloud services |
|
|
Manageability feature set |
||
Cloud Discovery: Blocking access to cloud services |
|
|
Patch Management |
|
|
Encryption Management |
|
|
Host Intrusion Prevention |
|
|
Device Control |
|
|
Web Control |
|
|
Adaptive Anomaly Control |
|
|
Application Control |
|
|
About per-user licensing
Kaspersky Next uses per-user licensing. For each user, Kaspersky Next can protect one desktop, laptop, or file server, and up to two Android, iOS, or iPadOS mobile devices.
A user considered as a licensing unit is not the same as a user added to the Management Console. An actual user can own more than the above-mentioned number of devices; or, there can be devices without assigned owners. In either case, these devices will be protected.
The number of users that use Kaspersky Next under a license is calculated by the number of protected devices. The number of users is the total number of protected desktops, laptops, and file servers, or half of the total number of Android, iOS, or iPadOS mobile devices—whichever is larger.
Examples:
- If you protect 10 desktops, laptops, or file servers, and 12 Android, iOS, or iPadOS mobile devices, the number of users that use the software under the license is 10 (which is the number of desktops, laptops, and file servers).
- If you protect 10 desktops, laptops, or file servers, and 32 Android, iOS, or iPadOS mobile devices, the number of users that use the software under the license is 16 (which is half of the number of mobile devices).
You can view the number of users that use the software under your licenses in Kaspersky Next Management Console or on Kaspersky Business Hub.
Page top
Hardware and software requirements
You need only a browser to use Kaspersky Next.
Kaspersky Next supports the following browsers:
- Google Chrome 133.0.6943.53 or later
- Microsoft Edge 134.0.3124.66 or later
- Safari 17.6 on macOS
- Yandex Browser 25.2.3.809 or later
- Mozilla Firefox Extended Support Release 128.8.0 or later
When running, Kaspersky Next uses the following Kaspersky applications:
- Kaspersky Endpoint Security 12.7 for Windows
Once you have prepared the distribution package of the latest version in Management Console, preparing the distribution package of a previous version will not be possible.
For hardware and software requirements of the security application, refer to Kaspersky Endpoint Security for Windows Help.
- Kaspersky Endpoint Security 12.1 for Mac
Once you have prepared the distribution package of the latest version in Management Console, preparing the distribution package of a previous version will not be possible.
For hardware and software requirements of the security application, refer to Kaspersky Endpoint Security for Mac Help.
Kaspersky Endpoint Security 10 for Mac does not support macOS 10.15 Catalina.
After the macOS upgrade to the above-mentioned version, the protection of your users' devices by Kaspersky Endpoint Security 10 for Mac is terminated.
To resume protection of devices, you must download the distribution package of Kaspersky Endpoint Security 11 for Mac, and then deliver it to your macOS users. Users must then install the new version of Kaspersky Endpoint Security for Mac on their devices. - Kaspersky Endpoint Security 10 for Android
For hardware and software requirements of the security application, refer to Kaspersky Security for Mobile Help.
Network ports used by Kaspersky Next
To perform various operations in Kaspersky Next, you must open certain ports in the Firewall or proxy server. The required ports are listed in the table below:
Network ports used by Kaspersky Next
Operation |
Ports |
|---|---|
Gaining access to Kaspersky Business Hub |
TCP 443 |
Managing Kaspersky Endpoint Security for Windows |
TCP 13000 |
Managing Kaspersky Endpoint Security for Mac |
TCP 13000 |
Managing Kaspersky Endpoint Security for Android |
TCP 13292 |
Managing iOS MDM |
TCP 9443 |
Downloading installation packages |
TCP 8081 |
Gaining access to Kaspersky Next Management Console |
TCP 443 |
Migrating from Pro View to Expert View
You can migrate your Kaspersky Next workspace from Pro View to Expert View. Expert View is a cloud-based solution that provides you with a much wider range of capabilities for managing the protection of your users' devices.
Migration is an irreversible action. If you decide to go back to Pro View, you will have to connect all devices and define all settings from scratch.
What is migrated and what is not
Migration affects the following objects:
- Users and user groups
- Devices running Windows and macOS
- Security profiles and their settings
- Settings of malware scan and anti-malware database update
- Settings of vulnerability detection and update installation
- IoC scan settings
The following objects are not migrated:
- Devices running Android, iOS, and iPadOS
- Distribution packages of Kaspersky Endpoint Security for Windows and Kaspersky Endpoint Security for Mac
- Endpoint Detection and Response alerts
- Event log
Which Pro View features are not supported by Expert View
Temporarily, Expert View does not support some features of Pro View. To continue using these features, you need to activate your workspace under a Kaspersky Next license during migration.
The following features are accessible in Pro View:
- Managing iOS and iPadOS devices
- Data Discovery
The following features are accessible on Kaspersky Business Hub:
- Creating a Kaspersky Security for Microsoft Office 365 workspace
- Taking cybersecurity training
Migration procedure
To migrate from Pro View to Expert View:
- Do either of the following:
- Enter the activation code of a Kaspersky Next license that provides automatic migration to Expert View.
- If the current license in Kaspersky Next provides manual migration to Expert View, go to Settings, and then click the Start migration link.
The wizard for migrating to Expert View starts.
- In the welcome window of the wizard, click the Start wizard button.
- At the Accept agreements of Expert View step of the wizard, read and accept the terms and conditions of the Agreement and Data Processing Agreement of Expert View.
If you do not accept the terms and conditions of these agreements, you will not be able to use Expert View.
- At the Accept End User License Agreements for Network Agents step of the wizard, read and accept the terms and conditions of the End User License Agreements for Network Agents to be installed on devices running Windows and macOS.
If you do not accept the terms and conditions of these agreements, you will not be able to use Expert View.
- If Network Agents on your users' devices are protected by a password, the Specify Network Agent password step of the wizard is displayed. Enter the password here, so that the devices are able to connect to Expert View.
- If your users' devices include devices running Windows and/or macOS, the Select operating system restart options step of the wizard is displayed. Select the required option:
- Restart devices manually
Managed devices are not restarted automatically after the operation. To complete the operation, users must restart their devices. This option is suitable for servers and other devices where continuous operation is critical.
- Restart devices automatically
Managed devices are always restarted automatically if a restart is required for completion of the operation. This option is useful for devices for which regular pauses in their operation (shutdown or restart) are acceptable.
- Prompt the user for action
The restart reminder is displayed on the screen of the managed device, prompting the user to restart it manually. You can change the text of the message for the user. This option is most suitable for workstations where users must be able to select the most convenient time for a restart.
If the Restart the device forcibly after (minutes) option is enabled, after prompting the user, the application forces a restart of the operating system upon expiration of the specified time interval. Otherwise, users must restart their devices manually. If necessary, change the default value of the time interval (30 minutes).
- Restart devices manually
- If you started the migration by entering an activation code, and if your users' devices include devices running iOS and iPadOS or Data Discovery is enabled in the workspace, the Activate this workspace under a new license step of the wizard is displayed. Select the check box if you want to continue using features that are not temporarily available in Expert View.
Click the Start migration button to continue.
- In the migration confirmation window, click the Start migration button to start migration.
Migration to Expert View starts. During migration, you cannot sign in to your Kaspersky Next workspace.
After migration
After migration completes, the Kaspersky Next workspace works as follows:
- Operation modes of the workspace in Pro View
If you activated your workspace under a Kaspersky Next license during migration, the mode in which your workspace in Pro View operates is called distributed mode. You can continue using features that are not temporarily available in Expert View only in distributed mode.
If you skipped activation, the mode is called post-migrated mode. In this case, all protection management is performed in Expert View.
After migration, you can activate your workspace in Pro View under a Kaspersky Next license as well.
- Devices running Windows and macOS
The software starts connecting these devices to Expert View automatically. In the Devices → Devices being migrated window in Pro View, you can find the list of devices that are being migrated and their migration status. When a device is successfully migrated, you may delete it from Pro View.
If the Kaspersky Endpoint Security for Windows version installed on the devices is 12.3 or less, you must update the security application on the devices from Expert View. Otherwise, some features may not work.
- Devices running Android
You must connect Android devices to Expert View manually. After that, you may delete them from Pro View.
- Devices running iOS and iPadOS
Temporarily, you can continue managing iOS and iPadOS devices in your workspace in Pro View that operates only in distributed mode.
- Distribution packages of Kaspersky Endpoint Security for Windows and Kaspersky Endpoint Security for Mac
You can create and download actual distribution packages in Expert View.
For detailed information about how to use Expert View, refer to the Expert View help.
Page top
Quick Start Guide
Read this Quick Start Guide to get started with Kaspersky Next. The Guide contains tips for managing the accounts of your users and installing security applications on their devices.
Quick start scenario
After you complete the scenario, the devices in your organization will be protected. The scenario proceeds in stages:
- Create an account
To start using Kaspersky Next, you need an account on Kaspersky Business Hub.
To create an account:
- Open your browser and enter the following URL: https://cloud.kaspersky.com.
- Click the Create an account button.
- Follow the onscreen instructions.
- Create a workspace
After you create the account, you can create your first workspace. We recommend that you first create one test workspace, connect your own devices to it, and then test any modifications to the settings, noting the results.
We recommend that you create a separate workspace for each company that you manage, even if a company has only a few users. By doing this, you will be able to do the following:
- Change settings for each company individually.
- Keep track of the license count, and the increase or decrease of the number of users in the company.
- Assign administrator rights to a user within the company, who can access only that company's workspace.
To create a company workspace:
- Open your browser and enter the following URL: https://cloud.kaspersky.com.
- Click the Sign in button.
- Follow the onscreen instructions.
- Perform initial setup of Kaspersky Next
After you create a company workspace, you must perform initial setup of Kaspersky Next. The initial setup begins automatically when you start Kaspersky Next Management Console for the first time. The Welcome to Kaspersky Next window is displayed. Follow the onscreen instructions.
When initial setup is complete, Kaspersky Next Management Console is ready to use.
- Deploy security applications on your users' devices
When your first workspace is prepared, follow the main setup steps provided in the Information panel → Getting started section. These steps include adding user accounts, connecting devices to Kaspersky Next, and creating a certificate for iOS and iPadOS devices.
These steps are divided into three groups:
- Preconfigured
You already took these steps when you created the workspace.
- Required
You must take this step to start protection of the devices.
Add users by providing their email addresses. An invitation is sent to the email address and it contains the download link to the security application. When the user clicks the link, Kaspersky Next recognizes the device operating system, thus ensuring that the proper software is downloaded.
As an alternative, you can simultaneously protect multiple devices that are running Windows. To do this, you can deploy security applications by using a Group Policy script.
- Recommended
We recommend that you take these steps to enhance the protection of devices.
- Once the software has been downloaded and installed on the device of the user, assign the user as the device owner.
- Create an Apple Push Notification service (APNs) certificate. The APNs certificate is created in one run. You must follow the steps for its creation without interruption, because the signing process has a time stamp that will expire if the creation process takes too long.
- Preconfigured
- Manage protection
After the security application is installed on a device, the device is assigned the Default security profile. This is the security profile with the default settings that are recommended by Kaspersky experts.
In the Security management → Security profiles section, you can create different security profiles. Every new security profile holds the default settings until you modify them. You can also copy existing security profiles.
Each security profile has a tab for each platform: Windows, macOS, Android, and iOS with iPadOS. Note that iOS and iPadOS are configured together.
When you assign a security profile to a user, the security profile is applied to all devices owned by the user. Only the Default security profile can be applied to devices without owners.
When creating a security profile, take into consideration the organizational structure of the company that you manage. For example, the security profile for a developer may differ from the one used for a sales representative or a human resources assistant. Name each security profile accordingly.
We recommend that you prevent users from modifying or deleting the security applications installed on their devices. Therefore, define the following settings:
- For Windows devices, do the following:
- On the Windows → Advanced → Interaction with end users tab, make sure that Password protection is enabled.
- Select the operations that a user will be allowed to perform only with the password.
- For Mac devices, do the following:
- On the Mac → Advanced → Interaction with end users tab, choose whether you want the Kaspersky Endpoint Security for Mac application icon visible on the menu bar or not.
- On each device in system preferences, use the macOS account type settings (admin or standard user) and the "lock" icon (
 ) to prevent the user from removing the software.
- For Android devices, do the following:
- On the Android → Security settings tab, make sure that Screen lock is enabled to protect the device from unauthorized access.
- On the Advanced tab, make sure that Kaspersky Endpoint Security for Android cannot be removed.
- For iOS and iPadOS devices: on the iOS → Security settings tab, make sure that Screen lock is enabled to protect the device from unauthorized access.
After defining the required settings of security profiles, you can assign security profiles to the intended users.
- For Windows devices, do the following:
- Specify licenses
After you have created a workspace, you are granted a 30-day trial license that is embedded in your workspace. To continue using Kaspersky Next after the trial license expires, you must purchase a commercial license or a subscription. Click Information panel → License, and then enter the activation code.
The activation code will be distributed automatically to the security applications, which may take 15 minutes, as the applications attempt to sync with the workspace every 15 minutes.
- Define other settings (optional)
You can define other optional settings.
- By default, is enabled for devices running Windows. Autorun objects, system memory, and the system partition are scanned when the device is idling for five or more minutes. If you want, you can click the Settings tab and set the schedule for the malware scan. From the Devices tab, you can start the malware scan task.
- The security applications mostly use the Kaspersky Security Network cloud service in their operation and to a lesser extent the application's anti-malware databases. If you want, you can click the Settings tab and set the schedule for the anti-malware database update. On the Devices tab, you can start the anti-malware database update task.
- On the Settings tab, you can configure which event notifications you want to view in your events overview.
The information about events is not aggregated. Each event is sent in a separate email message. If you want to configure the delivery of event notifications, be ready to receive a large number of email messages.
- On the Distribution packages tab, you can download the software directly and prepare new software when it is available. The newly prepared software will then be distributed to newly invited users.
Getting started with Kaspersky Next
This section describes how to sign up for Kaspersky Business Hub and start using Kaspersky Next.
Additional actions that you can perform in Kaspersky Business Hub are described in Help for Kaspersky Business Hub.
About Kaspersky Business Hub
Kaspersky Business Hub is a portal where you can manage company workspaces for the following Kaspersky software solutions:
- Kaspersky Next
- Kaspersky Security for Microsoft Office 365
Using Kaspersky Business Hub, you can do the following:
- Create an account.
- Edit an account.
- Create a company workspace for a supported Kaspersky software solution.
- Purchase and renew a license for a supported Kaspersky software solution.
- Edit information about companies.
- Take a demo training on malicious software.
- Leave feedback about the training.
- Leave feedback about the supported Kaspersky software solutions.
- Delete a company workspace.
- Delete an account.
Signing up for Kaspersky Next
Signing up for Kaspersky Next consists of the following steps:
- Creating and confirming an account in Kaspersky Business Hub.
- Creating a Kaspersky Next company workspace in Kaspersky Business Hub.
Creating an account
This article describes how to create an
.As an alternative, you can create an account on My Kaspersky, and then use it to sign in to Kaspersky Business Hub and create your workspace.
Your My Kaspersky account must be created directly on the website and not by using an external authentication provider (like Google). Otherwise, you will not be able to use Kaspersky Business Hub.
To create an account in Kaspersky Business Hub:
- In your browser, go to Kaspersky Business Hub.
- Click the Create an account button on the start page of Kaspersky Business Hub.
The Kaspersky Account portal opens.
- On the Sign up to enter Kaspersky Business Hub page, enter the email address and password for your account (see the figure below).
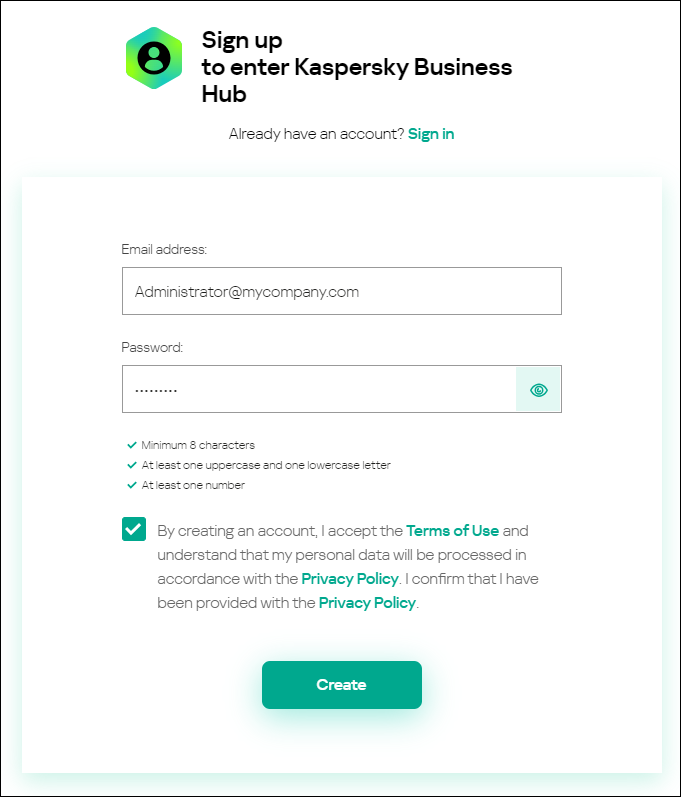
Creating an account in Kaspersky Business Hub
- Click the Privacy Policy link and carefully read the Privacy Policy text.
- If you are aware and agree that your data will be handled and transmitted (including to third countries) as described in the Privacy Policy and you confirm that you have fully read and understand the Privacy Policy, select the check box next to the text of consent to data processing in accordance with the Privacy Policy, and then click the Create button.
If you do not accept the Privacy Policy, do not use Kaspersky Business Hub.
- A message from Kaspersky is sent to the email address that you specified. The message contains a one-time security code.
Open the email message, and then copy the one-time security code that it contains.
- Return to Kaspersky Account, and then paste the code to the entry field.
Creation of the account in Kaspersky Business Hub is complete.
Page top
Creating a company workspace
Immediately after the account is created, you can create a company workspace for Kaspersky Next on Kaspersky Business Hub.
Before you start, make sure that you know the following:
- The name of the company in which you intend to use the software solution.
- The country in which the company is located. If the company is located in Canada, you must also know the province.
- The total number of company computers and mobile devices that you want to protect.
To create a company workspace on Kaspersky Business Hub:
- In your browser, go to Kaspersky Business Hub.
- Click the Sign in button on the start page of Kaspersky Business Hub.
- Enter the email address and password that you specified when you created the account, and then click the Sign in button.
The portal displays a page prompting you to accept the Terms of Use of Kaspersky Business Hub.
- Carefully read the Terms of Use of Kaspersky Business Hub.
- If you accept the Terms of Use, select the check box under the text of the Terms of Use, and then click the I accept the terms button.
If you do not accept the Terms of Use, do not use Kaspersky Business Hub.
If you click the I decline button, you will not be able to continue working with Kaspersky Business Hub and use the software solutions accessible on it.
After you click the I accept the terms button, the country selection page is displayed.
- Do any of the following:
- Select a country from the drop-down list, and then click the Confirm button.
This information is optional. It is requested only once. The information is required to display license prices in the correct currency. If you do not specify a country, license prices will be displayed in the default currency. You can change the country by contacting Technical Support.
- If you prefer not to specify a country, click the Skip button.
The Create a Workspace Wizard starts. Proceed through the Wizard by using the Next button.
- Select a country from the drop-down list, and then click the Confirm button.
- On the Step 01: Select a software solution page of the Wizard, select the Kaspersky software solution that you plan to use:
- Kaspersky Next, if you want to protect the computers and mobile devices of company employees.
- Kaspersky Security for Microsoft Office 365, if you want to protect the Exchange Online mailboxes, OneDrive files, and SharePoint Online sites of company employees.
If you opt to try the free version of a software solution on any Kaspersky promo page, you are redirected to the Create a Workspace Wizard in which this step of the software solution selection is skipped.
- On the Step 02: Terms of Use of Kaspersky Next page of the Wizard, do the following:
- Carefully read the Agreement, the Privacy Policy, and the Data Processing Agreement for the selected software solution.
- If you agree to the terms and conditions of the Agreement and the Data Processing Agreement, and if you are aware and agree that your data will be handled and transmitted (including to third countries) as described in the Privacy Policy, and you confirm that you have fully read and understand the Privacy Policy, select the check boxes next to the three listed documents, and then click the I accept the terms button.
If you do not agree to the terms and conditions, do not use the selected Kaspersky software solution.
If you click the I decline button, the workspace creation process on Kaspersky Business Hub will be terminated.
- On the Step 03: Workspace information page of the Wizard, specify the main details of your company:
- Fill in the following required fields:
- Name of your company. Specify the name of the company in which you intend to use the software solution. You can enter a string up to 255 characters long. The string can contain upper- and lowercase characters, numerals, whitespaces, dots, commas, minuses, dashes, and underscores. The specified company name will be displayed on Kaspersky Business Hub and in Kaspersky Next Management Console.
- Country. In the drop-down list, select the country in which your company is located. If you select Canada, also specify the province in the State drop-down list that appears below this field.
- Number of devices. Enter the total number of company computers and mobile devices that you want to protect.
In the entry field, you can enter a number from 5 to 999. In some regions, the maximum available number of devices may be different.
- Fill in the Additional company description field (optional).
It may be useful if you have more than one workspace on Kaspersky Business Hub. You can enter a string up to 255 characters long. The string can contain upper- and lowercase characters, numerals, whitespaces, dots, commas, minuses, dashes, and underscores.
- Fill in the following required fields:
- On the Step 04: Additional information page of the Wizard, enter your contact details.
This page of the Wizard is displayed only once, when you create your first workspace.
- Fill in the following fields:
- Your first name.
- Your last name.
- Your phone number.
- Email address. By default, this field displays the email address specified in the settings of your account on Kaspersky Business Hub. You can specify a different email address.
- Postal code (only for Austria, Ireland, Switzerland, Liechtenstein, Germany, and the United Kingdom).
- The other fields of the form on this page of the Wizard are filled automatically with the details that you specified when you entered the company information. Change them, if necessary.
- Name of your company.
- Country.
- Province (only for Canada).
- Number of devices.
- If you agree to provide your contact details for participation in surveys and to receive information about Kaspersky applications, select the check box next to the appropriate text.
Providing your contact information is optional. Kaspersky receives your data only if you select this check box.
This check box is cleared by default.
After you select this check box, Kaspersky Business Hub displays reCAPTCHA. Follow the onscreen instructions.
Creation of a company workspace on Kaspersky Business Hub is complete.
Kaspersky Business Hub displays a page prompting you to wait until the company workspace is ready.
- Fill in the following fields:
- In the workspace creation message, click the link to go to the list of companies.
- Click Go to workspace.
After several minutes, when the workspace is ready, Management Console will open. You can also open Management Console by clicking the link in the email message sent from Kaspersky. You receive this message at the email address that you specified when you created an account on Kaspersky Business Hub.
After Management Console opens, you must perform the initial setup of Kaspersky Next.
Opening Kaspersky Next Management Console
Right after you create a workspace for Kaspersky Next,
opens automatically. Later, you can open Kaspersky Next Management Console, as described in this section.To open Kaspersky Next Management Console:
- In your browser, go to Kaspersky Business Hub.
- Sign in to your account on Kaspersky Business Hub by specifying the user name and the password.
- If you set up two-step verification, enter the one-time security code that is either sent to you by SMS or generated in your authenticator app (depending on the two-step verification method that you set up).
The portal page displays a list of companies for which you are an administrator.
- Click the link with the company name (or the arrow icon to the left of it) to expand the node of the required company.
The portal page displays information about the selected company.
- Under the name of the selected company, click the Kaspersky Next link or the Go to workspace link to proceed to the workspace of the company.
Occasionally, a workspace may be unavailable due to maintenance. If this is the case, you will not be able to proceed to Kaspersky Next Management Console. If you try to open the Kaspersky Next workspace, a message appears stating that the server is under maintenance. The message includes the date and time when the server status will be refreshed. Sign in to the workspace after the indicated time.
You cannot open a workspace that is marked for deletion.
- If any of the Kaspersky Next legal documents have been changed since you accepted their terms and conditions, the portal page displays the changed documents.
Do the following:
- Carefully read the displayed documents.
- If you agree to the terms and conditions of the displayed documents, select the check boxes next to the listed documents, and then click the I accept the terms button.
If you do not agree to the terms and conditions, stop using the selected Kaspersky software solution.
If you click the I decline button, the operation will be terminated.
Kaspersky Next Management Console opens.
Migrating from Kaspersky Security Center to Kaspersky Next
If you want to stop using Kaspersky Security Center in your infrastructure and switch to Kaspersky Next, you can do this by using two scenarios:
- Manual migration
You only need to remotely uninstall Network Agent from your users' devices and remotely install Kaspersky Endpoint Security for Windows that you download from Kaspersky Next.
- Automated migration
We provide you with a script that automates some stages of the migration process.
Scenario: Manual migration from Kaspersky Security Center to Kaspersky Next
If you want to stop using Kaspersky Security Center in your infrastructure and switch to Kaspersky Next, you only need to remotely uninstall Network Agent from your users' devices and remotely install Kaspersky Endpoint Security for Windows that you download from Kaspersky Next. Protection will be enabled automatically on the devices, according to the
that are configured in Kaspersky Next.After you complete the scenario in this section, your users' devices will be moved from Kaspersky Security Center to Kaspersky Next.
The scenario proceeds in stages:
- Open Kaspersky Next Management Console
- Download a distribution package for Kaspersky Endpoint Security for Windows
- Archive the downloaded distribution package
Archive the package in any of the following formats: ZIP, CAB, TAR, or TAR.GZ.
Place the archived distribution package in a folder that is accessible from the computer on which Kaspersky Security Center is installed.
- In Kaspersky Security Center, create an installation package
Create a custom installation package from the file of the distribution package that you have archived.
In the installation package settings, specify the following command-line parameter:
-sFor detailed information about how to perform this stage, refer to the Kaspersky Security Center documentation.
- On the computer with Kaspersky Security Center, edit the executable_package.kpd file
The executable_package.kpd file is located in the root folder of the created package. You can find the path to the file in the installation package properties, on the General tab.
Make sure you have the permissions to edit the specified file.
- In Kaspersky Security Center, create and run a task for remote removal of Kaspersky Endpoint Security for Windows from your users' devices
For detailed information about how to perform this stage, refer to the Kaspersky Security Center documentation.
- In Kaspersky Security Center, create a task for remote removal of Network Agent from your users' devices
After the task is created, go to its settings. In the task schedule, select On completing another task, and then select the Kaspersky Endpoint Security for Windows removal task.
For detailed information about how to perform this stage, refer to the Kaspersky Security Center documentation.
- In Kaspersky Security Center, create a task for remote installation of Kaspersky Endpoint Security for Windows on your users' devices
When creating the task, define the following settings:
- In Application, select Kaspersky Security Center.
- In Task type, select Install application remotely.
- In Select installation package, select the package that you created earlier.
- Select the Using operating system resources through Administration Server check box.
- Clear the Using Network Agent check box.
After the task is created, go to its settings. In the task schedule, select On completing another task, and then select the Network Agent removal task.
For detailed information about how to perform this stage, refer to the Kaspersky Security Center documentation.
Automated migration from Kaspersky Security Center to Kaspersky Next
You can migrate your users' devices from Kaspersky Security Center to Kaspersky Next by using a script, as described in this section.
You can migrate automatically only devices running Windows.
Before starting the migration procedure, make sure that there is no password for uninstallation protection within the Kaspersky Endpoint Security for Windows and Network Agent policies.
For the time of migration, disable the uninstallation protection if it is enabled. When the devices are connected to Kaspersky Next, you will be able to turn this protection on again via the Kaspersky Next console.
As an alternative, you can view a video instruction for using the migration script. The video includes subtitles in all of the languages supported by Kaspersky Next.
To migrate to Kaspersky Next:
- On the Kaspersky Security Center server, create a folder.
- Go to your Kaspersky Next workspace.
If you do not have a workspace yet, create it.
- Go to the Distribution packages section.
- Download the distribution package for Kaspersky Endpoint Security for Windows to the created folder.
- In any text editor, create a file with the migration script:
- Save the script as a *.ps1 file to the created folder.
- Run PowerShell, and then drag and drop the created script there.
The script will automatically create the following Kaspersky Security Center tasks:
- Uninstallation of Kaspersky Endpoint Security for Windows from all devices in the Managed devices group, excluding the device with Kaspersky Security Center.
- Reinstallation of Kaspersky Endpoint Security for Windows on the devices, after which they will be connected to Kaspersky Next.
- Follow the instructions within the script:
- Specify whether the devices for migration are in the domain (
Are the devices for migration in the domain? Y/N):- If the devices for migration are not in the domain, type
Nand press Enter.You will be asked to type the Kaspersky Security Center Installation Administrator credentials, specify the path to the Kaspersky Next installation package, and then choose whether to perform a force restart of the devices (
Force Restart? Y/N). - If the devices for migration are in the domain, type
Yand press Enter.You will be asked to type the Kaspersky Security Center Installation Administrator credentials, specify the path to the Kaspersky Next installation package, specify credentials for a local administrator on the devices, and choose whether to perform a force restart of the devices (
Force Restart? Y/N).
When specifying the path to the Kaspersky Next installation package, you can drag and drop it to the PowerShell window or specify the path manually (but do not forget to add the *.exe extension).
For detailed information about user roles in Kaspersky Security Center, refer to the Kaspersky Security Center documentation.
- If the devices for migration are not in the domain, type
- Specify whether the devices must be forcibly restarted (
Force Restart? Y/N):- If you need to perform a force restart, type
Yand press Enter, specify the restart delay in minutes, and then choose whether to start the migration immediately (Do you want to start migration now? Y/N). - If you do not need to perform a force restart, type
Nand press Enter. In this case, you will have to run both uninstallation and reinstallation tasks manually from Kaspersky Security Center.
- If you need to perform a force restart, type
- Specify whether the migration must start immediately (
Do you want to start migration now? Y/N):- If you want the uninstallation task to run automatically, type
Yand press Enter. You will need to run only the reinstallation task manually from Kaspersky Security Center. - If you are going to run both uninstallation and reinstallation tasks manually from Kaspersky Security Center, type
Nand press Enter.
- If you want the uninstallation task to run automatically, type
- Specify whether the devices for migration are in the domain (
- Open the Kaspersky Security Center Administration Console.
- In the console tree, open the Tasks folder.
- If the uninstallation task was not started automatically according to the settings that you defined during the script execution, run the KSC to KES Cloud migration – Uninstall task.
- If you have configured the force restart of the devices, make sure that the devices rebooted successfully.
This is required for successful completion of the installation task. To determine that the reboot is successful, you may use the execution statistics of the uninstallation task (wait until it fully completes) and the fact that the Network Agent installation status on all of the devices in the Managed devices section is No.
Otherwise, restart the devices manually.
- If your users' devices are not in the domain, open the installation task, and then specify a local administrator account on the devices.
- Run the KSC to KES Cloud migration – Install KES Cloud task.
After the installation task completes successfully, your users' devices running Windows will be connected to Kaspersky Next (the connection may take up to 15 minutes). The Default security profile (configured by Kaspersky experts) will be automatically applied to each device.
Page top
Kaspersky Next Management Console
This section describes the operations that you can perform in Kaspersky Next Management Console.
Initial setup of Kaspersky Next
After you create a company workspace, you must perform the initial setup of Kaspersky Next. The initial setup begins automatically when you start Kaspersky Next Management Console for the first time. The Welcome to Kaspersky Next window is displayed. Proceed with the initial setup as described in this section.
Occasionally, a workspace may be unavailable due to maintenance. If this is the case, you will not be able to proceed to Kaspersky Next Management Console. If you try to open the Kaspersky Next workspace, a message appears stating that the server is under maintenance. The message includes the date and time when the server status will be refreshed. Sign in to the workspace after the indicated time.
To perform initial setup of Kaspersky Next:
- In the Welcome to Kaspersky Next window, click the Get started button.
The Agreements for Kaspersky Endpoint Security for Windows window opens.
This window displays the texts of the End User License Agreement for Kaspersky Endpoint Security for Windows, the End User License Agreement for Kaspersky Security Center Network Agent, the Supplemental Clauses regarding Data Processing for Kaspersky Endpoint Security for Windows and Network Agent, and the link to the Kaspersky Lab Products and Services Privacy Policy.
- Carefully read the text of each document.
If you agree to the terms and conditions of the agreements, and if you are aware and agree that your data will be handled and transmitted (including to third countries) as described in the Privacy Policy, and you confirm that you have fully read and understand the Privacy Policy, select the check boxes next to the listed documents, and then click the I accept the terms button.
If you do not agree to the terms and conditions, do not use the security applications. If only some of the check boxes are selected, you will not be able to manage Windows devices in Kaspersky Next. The Agreements for Kaspersky Endpoint Security for Windows window will close.
You can agree to the terms of the agreements later in the Distribution packages section when you prepare a distribution package of Kaspersky Endpoint Security for Windows.
The Agreements for Kaspersky Endpoint Security for Mac window opens.
This window displays the texts of the End User License Agreement for Kaspersky Endpoint Security for Mac, the End User License Agreement for Kaspersky Security Center Network Agent, and the link to the Kaspersky Lab Products and Services Privacy Policy.
- Carefully read the text of each document.
If you agree to the terms and conditions of the agreements, and if you are aware and agree that your data will be handled and transmitted (including to third countries) as described in the Privacy Policy, and you confirm that you have fully read and understand the Privacy Policy, select the check boxes next to the listed documents, and then click the I accept the terms button.
If you do not agree to the terms and conditions, do not use the security applications. If only some of the check boxes are selected, you will not be able to manage Mac devices in Kaspersky Next. The Agreements for Kaspersky Endpoint Security for Mac window will close.
You can agree to the terms of the agreements later in the Distribution packages section when you prepare a distribution package of Kaspersky Endpoint Security for Mac.
The Proxy server settings window opens.
- If necessary, define the proxy server settings, and then click Next.
The Use of Kaspersky Security Network window opens.
- Carefully read the Kaspersky Security Network Statement, and then click the I accept the terms button if you agree to them.
If you click the I decline button, the use of Kaspersky Security Network will be disabled. Other functions of Kaspersky Next will not be affected. If necessary, you can enable the use of Kaspersky Security Network in the Management Console at any time.
The Get the most out of Kaspersky Next window opens. The window lists the features that Kaspersky experts prompt you to use.
- If you want to configure these features, make the necessary changes, and then click OK. If configuring a feature requires additional steps, relevant windows open. Follow the onscreen instructions.
If you click the Later button, you will be able to configure these features at a later time.
The initial setup of Kaspersky Next for your company is complete. Kaspersky Next Management Console is ready to use.
Page top
Interface of Kaspersky Next Management Console
This section describes the primary elements of the application interface (see the figure below).
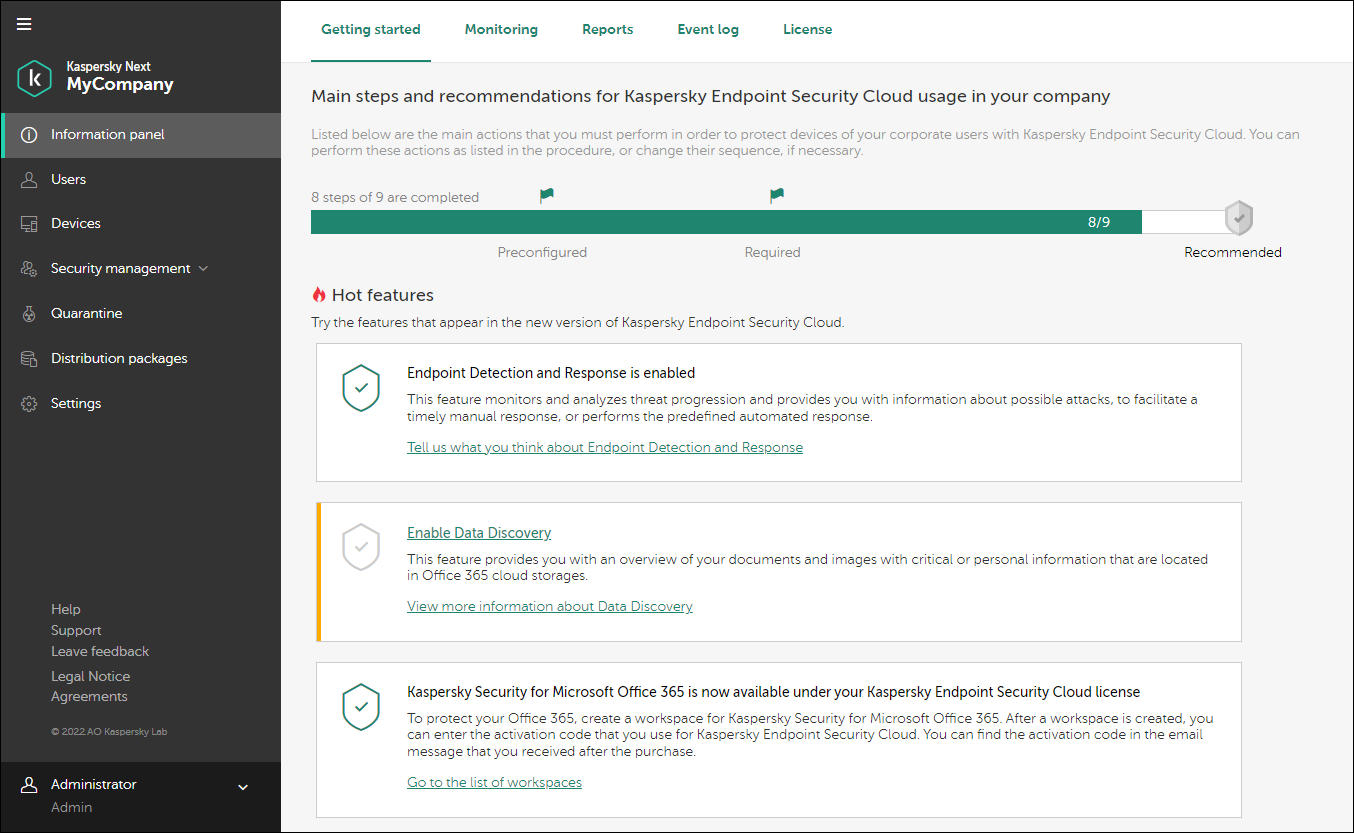
Kaspersky Next Management Console
The left part of the Management Console displays the navigation area.
The right part of the Management Console contains the section contents:
 Information panel
In this section, you can:
- On the Getting started tab—Configure Kaspersky Next and view video instructions for doing this.
- On the Monitoring tab—Monitor the status of mobile devices and computers.
- On the Reports tab—Generate and view reports on device protection.
- On the Event log tab—Monitor events in Kaspersky Next.
- On the License tab—View, add, or replace the Kaspersky Next license.
 Users
UsersIn this section, you can:
 Devices
This section displays a list of devices on which users installed security applications. In this section, you can:
 Security management
In this section, you can:
- In the Security profiles subsection—Manage security profiles (add, configure, and delete security profiles, as well as assign security profiles to users).
- In the Vulnerability Assessment and Patch Management subsection—View and manage software vulnerabilities that were detected on your users' devices running Windows and updates for the applications installed on the devices, including patches that fix detected vulnerabilities.
- In the Data Discovery subsection—View the table with the Data Discovery detections.
- In the Endpoint Detection and Response subsection (if you activated Kaspersky Next under a Kaspersky Next EDR Optimum or XDR Expert license)—View the table with the Endpoint Detection and Response alerts.
- In the Root-Cause Analysis subsection (if you activated Kaspersky Next under a Kaspersky Next EDR Foundations license)—View the table with the Root-Cause Analysis detections.
- In the Encryption subsection—Manage the encryption settings of devices running Windows and macOS.
 Quarantine
In this section, you can:
 Distribution packages
In this section, you can download the distribution packages of the security applications, to install those applications on devices later.
 Settings
In this section, you can:
- Define settings for updates of anti-malware databases, malware scans, and delivery of messages on various events occurring on or in Kaspersky Next.
- Enable and disable Endpoint Detection and Response (if you activated Kaspersky Next under a Kaspersky Next EDR Optimum or XDR Expert license).
- Enable and disable Root-Cause Analysis (if you activated Kaspersky Next under a Kaspersky Next EDR Foundations license).
- Enable and disable Data Discovery.
- Enable and disable Kaspersky Security Network.
The lower part of the left navigation area contains the following links:
- Help
Click this link to open Help for Kaspersky Next.
- Support
Click this link to view information about your workspace and your license. You need this information when contacting Kaspersky Technical Support.
- Leave feedback
Click this link to leave feedback on the Kaspersky Next operation.
- Agreements
Click this link to view the text of the Agreement and Data Processing Agreement that you accepted when you created your Kaspersky Next workspace.
The upper-left corner of Management Console shows the name of the company whose workspace you are currently in.
The Expand/Collapse (![]() ) button above the name of the company lets you expand and collapse names of the navigation area settings in the left part of Management Console. If your browser window is too narrow, the names of the navigation area settings and the Expand/Collapse (
) button above the name of the company lets you expand and collapse names of the navigation area settings in the left part of Management Console. If your browser window is too narrow, the names of the navigation area settings and the Expand/Collapse (![]() ) button are not displayed.
) button are not displayed.
In the lower-left corner of Management Console, clicking the Administrator (![]() ) icon and your name opens a drop-down list that allows you to do the following:
) icon and your name opens a drop-down list that allows you to do the following:
- Select the Management Console interface language.
- Manage your account settings on Kaspersky Business Hub.
- Proceed to the workspace of another company that you administer on Kaspersky Business Hub.
- Purchase and renew the license on Kaspersky Business Hub.
- Stop your activities and exit Kaspersky Next.
When some Management Console windows (for example, the security profile settings window or certain confirmation windows) open, the main window remains visible but darkened and in the background. When this happens, you can click the left area of the main window. The window that is open in the foreground closes.
Page top
Deployment of security applications
This section describes deployment of security applications on the devices of your company's users.
Before you start, make sure that you have an account on Kaspersky Business Hub, have created a workspace for your company, and have opened Kaspersky Next Management Console.
Deployment of security applications includes the following steps:
- You add users and send them email messages
- Users install security applications on their devices
- You view the result of the deployment
As an alternative, you can simultaneously protect multiple devices that are running Windows. To do this, you can deploy security applications by using a Group Policy script.
Page top
Adding users and sending email messages
To work with Kaspersky Next, you must add users (company employees) to Kaspersky Next Management Console. Users will be able to independently install
on their devices and connect their Windows devices, Mac devices, and mobile devices to Kaspersky Next. Kaspersky Next identifies users by their email addresses.To add users to Kaspersky Next Management Console and send them email messages:
- Open Kaspersky Next Management Console.
- Select the Users section.
The Users section contains a list of users and groups of users that have been added to Kaspersky Next.
At the beginning, the list displays the single user that has created the workspace.
- Click the Add users button above the list of users.
The Add users wizard starts. Proceed through the wizard by using the Next button.
- At the Enter email addresses step of the wizard, in the entry field, add the email addresses of users.
You can enter addresses manually, or copy and paste a list of addresses from a text file. Each email address must be typed on a new line or must be separated by a comma (
,), a semicolon (;), or a space (You can add no more than 999 email addresses of users. If your license permits it, you can add no more than 3000 email addresses of users.
- At the Check data step of the wizard, verify the data you have entered. The User alias column shows the name of a user mailbox by default.
If necessary, correct the user email addresses and aliases.
- At the Send instructions step of the wizard, decide whether you want to send the new users email messages with the instructions for installing a security application on their devices.
By using a received email message, the user can connect any number of devices running Windows or macOS, but only a single mobile device running Android, iOS, or iPadOS. If the user needs to connect multiple mobile devices, send the user multiple messages based on the number of devices.
For example, you may want to skip sending instructions when you add administrators who will help you manage users' devices.
If you activated Kaspersky Next under a trial license, a daily limit of sending email messages is set for the workspace. If this limit is approaching or is exceeded, Management Console warns you that you cannot send the messages to the added users. You can either skip sending instructions or decrease the number of users that you want to add.
- Click the Finish button to close the wizard.
- If you proceed through the wizard for the first five times and if you have selected to send instructions, Management Console displays a message with the information about your further actions. Click the OK button to close the message.
Later, this message will no longer be displayed.
The specified user accounts are added to Kaspersky Next.
If you have selected to send instructions, Kaspersky Next sends users an email message with the instructions for installing security applications on their devices and a link to the security application.
Later, you can send users an email message with instructions at any time by clicking the Send instructions button above the list of users.
Security application installation
After you send users an email message inviting them to connect their devices and a link to the security application, the users can install the security application on their devices.
To install the security application on a device, the user clicks the link in the email message. The download of the proper installation package starts immediately. When the download is complete, installation of the security application starts automatically.
The user can click the link in the message within 336 hours (two weeks) from the time the email message was sent. When this period expires, the user has to request a new email message containing an installation link.
Viewing results of deployment
After users install the security application on their devices, the following changes appear in Kaspersky Next Management Console:
- In the Users section, a list is displayed of the users that have been added, the number of devices connected by each user, and their respective statuses.
- In the Devices section, a list is displayed of the devices on which the users installed the security application. The devices are displayed in the list, with a 15-minute delay following the security application installation. An owner in the Device owner column is specified for all mobile devices. It is recommended to assign owners to all Windows and Mac devices.
Upgrading Kaspersky Next
After Kaspersky Next is upgraded to a new version, you must perform additional setup of the application. Additional setup begins automatically when you start Kaspersky Next Management Console for the first time after an upgrade. The Welcome to the new version of Kaspersky Next window is displayed.
At any time, you can close the additional setup window and skip the procedures described below, as well as reopen it by clicking the New version information link on the Monitoring tab in the Information panel section.
Updates functionality (including providing anti-malware signature updates and codebase updates), as well as KSN functionality may not be available in the software in the U.S.
To perform additional setup of Kaspersky Next:
- In the Welcome to the new version of Kaspersky Next window, click the Next button.
- If the new version of Kaspersky Next supports new versions of Kaspersky Endpoint Security for Windows or Kaspersky Endpoint Security for Mac, the New versions of Kaspersky Endpoint Security for Windows and Kaspersky Endpoint Security for Mac are available window opens.
Click the Prepare button if you want to prepare new distribution packages of the security applications.
Some time after the distribution package for Kaspersky Endpoint Security for Windows is prepared, the security application on managed devices is automatically updated to the new version. As soon as the automatic update starts, Kaspersky Next displays a notification in the Information panel section. Also, the Distribution packages section displays the status of the automatic update—Package pending (waiting for the distribution package preparation), Pending (waiting for Kaspersky), In progress, or Completed.
Click the Later button if you want to keep using old versions of the security applications.
- If obsolete versions of the security applications are installed on managed devices, the Obsolete Kaspersky Endpoint Security 10.0 for Windows is in use window opens.
Click the I agree button if you want to upgrade the old versions of the security applications to the new ones.
Click the Later button if you want to keep using old versions of the security applications.
The Agreements for <security application> window opens.
This window displays the texts of the End User License Agreement for the security application, the End User License Agreement for Kaspersky Security Center Network Agent, the Supplemental Clauses regarding Data Processing (only for Kaspersky Endpoint Security for Windows), and the link to the Kaspersky Lab Products and Services Privacy Policy.
- Carefully read the text of each document.
If you agree to the terms and conditions of the agreements, and if you are aware and agree that your data will be handled and transmitted (including to third countries) as described in the Privacy Policy, and you confirm that you have fully read and understand the Privacy Policy, select the check boxes next to the listed documents, and then click the I accept the terms button.
If you do not agree to the terms and conditions, do not use the security applications. If only some of the check boxes are selected, you will not be able to upgrade the security applications to the latest versions. The Agreements for <security application> window will close.
You can agree to the terms and conditions of the agreements later in the Distribution packages section when preparing a distribution package of Kaspersky Endpoint Security for Windows or Kaspersky Endpoint Security for Mac.
The Proxy server settings window opens.
- If necessary, define the proxy server settings, and then click Next.
The Manage features of Kaspersky Next window opens. The window lists the features that Kaspersky experts prompt you to use.
- If you want to configure these features, make the necessary changes, and then click OK. If configuring a feature requires additional steps, relevant windows open. Follow the onscreen instructions.
If you click the Later button, you will be able to configure these features at a later time.
The Use of Kaspersky Security Network window opens.
The window displays the texts of the Kaspersky Security Network Statement for the security applications that you chose to upgrade.
- Carefully read each Kaspersky Security Network Statement, and then select the corresponding check boxes if you agree to the described terms and conditions.
- Click the I accept the terms button.
If you click the I decline button, the use of Kaspersky Security Network will be disabled. Other functions of Kaspersky Next will not be affected. If necessary, you can enable the use of Kaspersky Security Network in the Management Console at any time.
Additional setup of Kaspersky Next for your company is complete. Kaspersky Next Management Console is ready to use.
Managing user accounts
This section contains information about how to manage user accounts in Kaspersky Next. You can take the following actions on user accounts:
- View and edit the list of users.
- Create groups of users and distribute users among these groups.
- Grant rights to users.
- Edit user information.
Viewing the list of users
The Users section of Kaspersky Next Management Console displays users and groups of users that have been added to the Management Console.
The list contains columns with the following details of users and their devices:
- Status. An icon reflects the protection status of the user's devices (computers and/or mobile devices that have been connected to Kaspersky Next), in descending order of severity:
 (Critical). A critical event occurred on at least one user's device.
 (Warning). An important event that must be attended to occurred on at least one user's device.
 (OK). No critical or important events occurred on user's devices.
 (No data yet). The user owns no devices that have been connected to Kaspersky Next or no data can be retrieved concerning the events that have occurred on such devices.
If the user owns several devices with different statuses, the most severe status is displayed. For example, if an important event and a critical event occur on different devices, the status corresponding to the critical one will be displayed.
- User / Group. This contains the user name and email address (for stand-alone users), or the group name and the number of users in the group (for groups of users). You can click the link with the name to go to the page with detailed information about the user or group of users.
- Number of devices. This contains the number of devices that are owned by the user or group of users and are connected to Kaspersky Next.
- Comment. This contains the comment that you typed when editing the user information or adding the group of users.
- Access rights. This contains the access rights that have been granted to the user. The Admin tag means that the user has been granted administrator rights. If the user has not been granted administrator rights, this column remains blank for this user.
- Security profile. This contains the security profile that has been assigned to the user account or group of users. If necessary, you can assign a different security profile by selecting one in the drop-down list. The security profile that you assigned is immediately applied to the user's devices.
You can filter the list of user accounts by status of the user's devices.
To filter the list of user accounts,
Next to Show users, click the link with the required status.
To remove the filter,
Click the All link.
You can sort the list of user accounts by column: Status, User / Group, Number of devices, Comment, or Access rights.
To sort the list,
Click the link containing the column name.
The column name is displayed in uppercase characters. Next to the name of the column, an up arrow (˄) indicates the sorting direction. To change the sorting direction, click one more time. Next to the name of the column, a down arrow (˅) appears.
The Search entry field is located above the list. You can use this field to quickly find and switch to an object in a long list.
Creating groups of users
You can create groups of users to quickly assign users security profiles that match their respective tasks and scope of duties.
You can create up to 50 groups of users.
To create a group of users:
- Open Kaspersky Next Management Console.
- Select the Users section.
The Users section contains a list of users and groups of users that have been added to Kaspersky Next.
- Click the Create group button above the list of users.
The Create a group window opens (see the figure below).
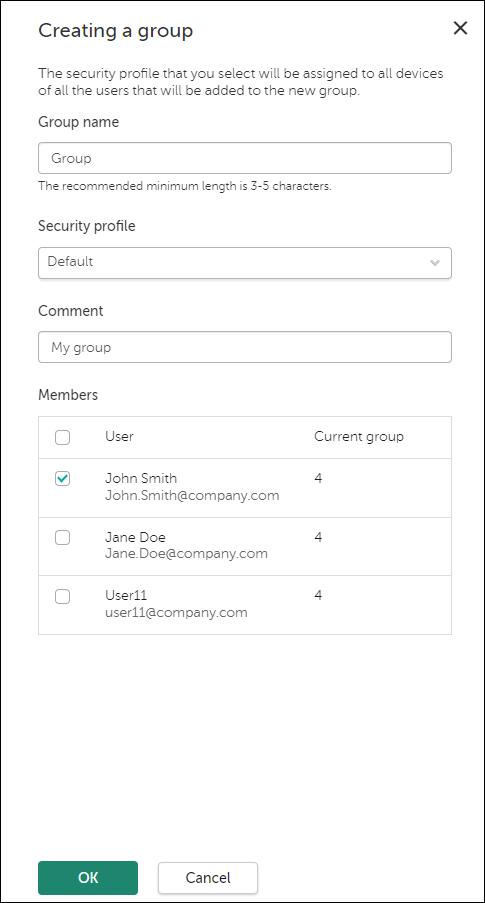
Creating a user group in Kaspersky Next
- In the Group name and Comment entry fields, enter the name of a user group and a comment.
You can enter a string up to 255 characters long. The string can contain upper- and lowercase characters, numerals, whitespaces, dots, commas, minuses, dashes, and underscores.
- In the Security profile drop-down list, select the security profile that you want to assign to the group.
The Default security profile is selected for each group by default. The Default security profile is configured by Kaspersky experts for devices running Windows, Mac, Android, iOS, and iPadOS.
- Under Members, select the check boxes next to the user accounts that you want to add to the group. If a user account is currently added to another group, it will be moved to the new one.
As an alternative, you can add users to the group after it is created.
- Click the OK button.
A newly created group appears in the list of users and groups of users (see the figure below).
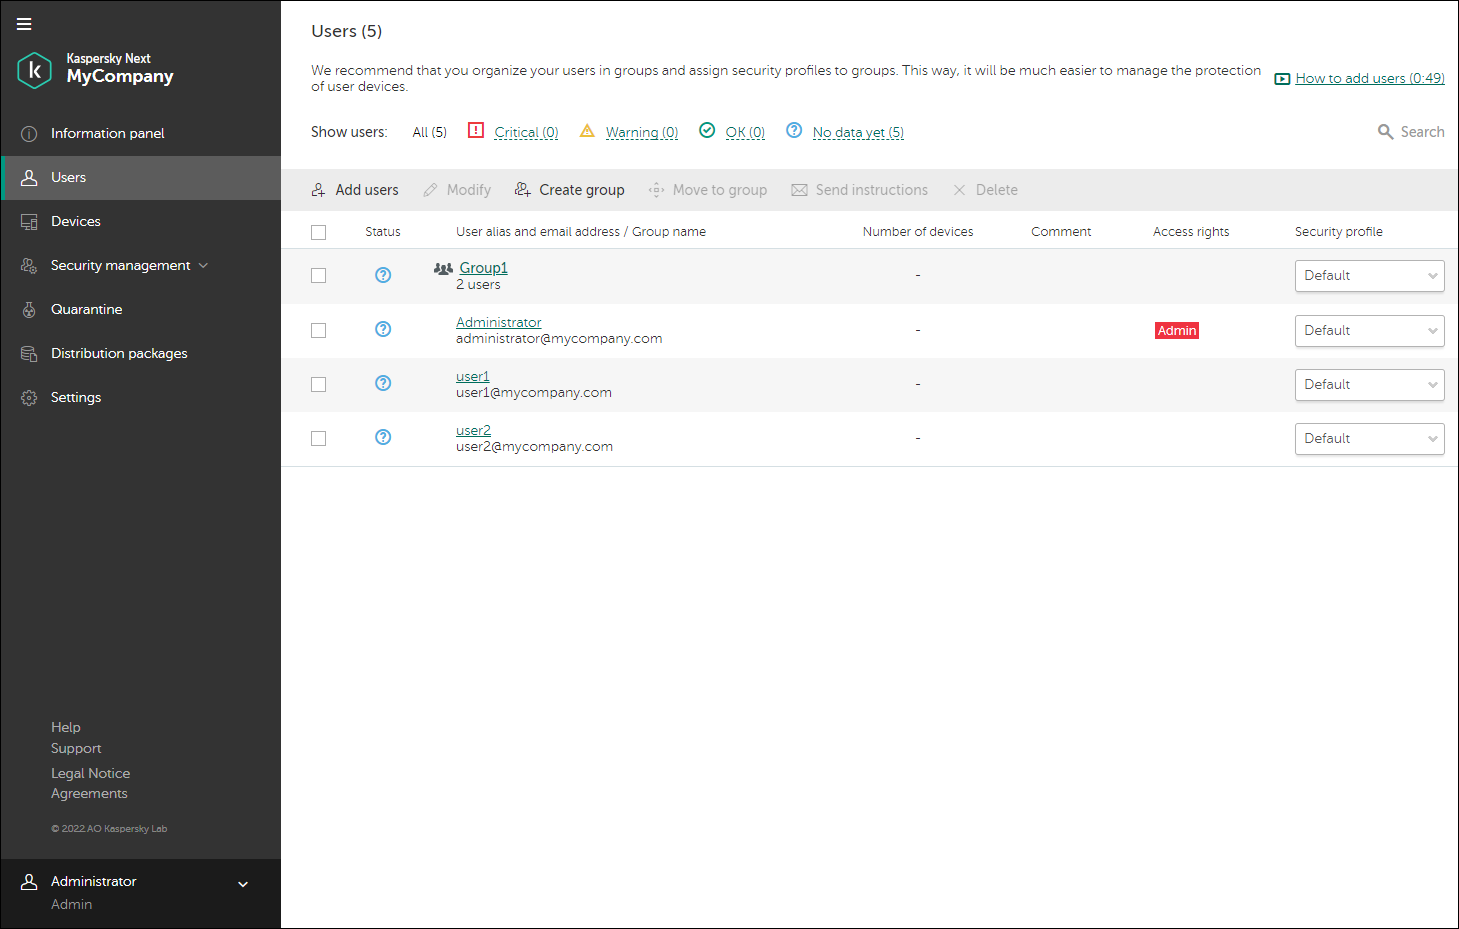
Newly created group in the list of Kaspersky Next users
Page top
Editing user information
To edit information about a user:
- Open Kaspersky Next Management Console.
- Select the Users section.
The Users section contains a list of users and groups of users that have been added to Kaspersky Next.
- In the list, select the check box next to the user whose information you want to edit.
- Click the Edit button above the list of users.
This opens a window containing detailed information about the user.
- Edit the user's information:
- User alias
- Email address
You cannot edit the email addresses of users that have been granted administrator rights. These users can edit their email addresses on their own in Kaspersky Business Hub.
- Comment
If you want to move users to a group, grant administrator rights to users (or revoke administrator rights), or send users instructions for installing a security application on their devices, click the corresponding buttons in the Commands section.
- Click the Save button.
You can also edit user information when opening a user window. To edit user information, click the link with the user account name, and then click Edit.
The information you edited is shown in the list of users and on the page with the user settings.
Page top
Adding users to a group
You can add user accounts to a previously created group, either from the list of users or from inside the group.
To add user accounts to a group from the list of users:
- Open Kaspersky Next Management Console.
- Select the Users section.
The Users section contains a list of users and groups of users that have been added to Kaspersky Next.
- In the list of users, select the check boxes next to the user accounts that you want to add to the group.
- Click the Move to group button above the list.
The Move to group button is available only if at least one group has been created.
The Move users to group window opens.
- In the drop-down list, select the name of the group to which you want to move the selected user accounts.
- Click the OK button.
User accounts are added to the group.
A user added to a group does not appear on the general list of users. The security profile that was assigned to the user is replaced with the security profile assigned to the group to which the user account has been added.
To add user accounts to a group from inside the group:
- Open Kaspersky Next Management Console.
- Select the Users section.
The Users section contains a list of users and groups of users that have been added to Kaspersky Next.
- Click the name of the group to which you want to add user accounts.
The group window appears.
- Click the Add users to group button.
The Add users to the <group name> group window appears.
- Select whether you want to add existing users or new users, and then click the Next button.
- If you have selected to add existing users, Kaspersky Next displays the list of user accounts. Select the check boxes next to the user accounts that you want to add to the group, and then click the Save button.
If you have selected to add new users, the Add users window opens. Further actions are the same as when you initially added users to Kaspersky Next.
User accounts are added to the group.
A user added to a group does not appear on the general list of users. The security profile that was assigned to the user is replaced with the security profile assigned to the group to which the user account has been added.
User roles and managing user rights
This section contains information about user roles in Kaspersky Next, granting administrator rights to a user, and revoking the administrator rights of a user.
About user roles in Kaspersky Next
A role in Kaspersky Next consists of a set of rights to perform certain actions with objects of Kaspersky Next.
In Kaspersky Next there are two roles:
- Administrator
Administrators can configure Kaspersky Next by, for example, adding users, adding computers and mobile devices, configuring security profiles, and providing administrator rights to users.
The users whose accounts are granted administrator rights in Kaspersky Next also acquire Kaspersky Business Hub administrator rights within an organization (including the Kaspersky Security for Microsoft Office 365 workspace for the same company).
- User
Users can install a security application on their devices (computers and mobile devices).
Granting administrator rights to a user
To grant administrator rights to a user:
- Open Kaspersky Next Management Console.
- Select the Users section.
The Users section contains a list of users and groups of users that have been added to Kaspersky Next.
- Proceed to the user information page by clicking the link with the user name.
- Click the Grant administrator rights button to grant the user administrator rights.
The specified user is granted administrator rights.
If the users do not have accounts on Kaspersky Business Hub, they receive an email message containing a registration link for Kaspersky Business Hub. If the users already have accounts on Kaspersky Business Hub, they receive an email message confirming their administrator role in their Kaspersky Next workspace.
On the page containing user information and in the list of user accounts, the Admin tag on the red background appears in the Access rights column next to the name of a user account. This tag indicates that the user has administrator rights.
Page top
Revoking the administrator rights of a user
To revoke a user's administrator rights:
- Open Kaspersky Next Management Console.
- Select the Users section.
The Users section contains a list of users and groups of users that have been added to Kaspersky Next.
- Click the link with the user name.
A window opens containing user information.
- Click the Revoke administrator rights button to revoke the user's administrator rights.
The user no longer has administrator rights.
An email message about the revocation of administrator rights is sent to the user.
The Admin tag (white letters on a red background) disappears from the window containing user information and, in the Users section, from the Access rights column next to the name of the account of this user.
Page top
Deleting user accounts
To delete user accounts from the list of users:
- Open Kaspersky Next Management Console.
- Select the Users section.
The Users section contains a list of users and groups of users that have been added to Kaspersky Next.
- If you want to delete user accounts that are added to a certain group, click the name of that group.
If you want to delete user accounts from the general list of users, skip this step.
- Select the check boxes next to the names of the user accounts that you want to delete.
You cannot delete user accounts and groups of users in one operation.
- Click the Delete button above the list.
After confirmation of user deletion, Kaspersky Next deletes the user accounts from the list.
If a selected user is an administrator, the user is sent an email message about revoking administrator rights. This user can no longer manage the workspace.
If a selected user owned managed devices running Windows and macOS, these devices become unassigned.
There are restrictions on the deletion of users:
- You cannot delete the account of a user that has managed mobile devices. In this case, you must first delete the devices owned by that user.
- You cannot delete your own account.
Deleting groups of users
To delete groups of users from the list of users:
- Open Kaspersky Next Management Console.
- Select the Users section.
The Users section contains a list of users and groups of users that have been added to Kaspersky Next.
- Select the check boxes next to the names of the groups of users that you want to delete.
You cannot delete user accounts and groups of users in one operation.
- Click the Delete button above the list.
Depending on the number of groups selected for deletion, the Delete group "<group name>" or Delete groups (<number of groups>) window opens.
- If at least one of the selected groups contains at least one user account, select what to do with these user accounts:
- Keep users and move to another group
Select this option if you want to keep user accounts from the groups that are being deleted.
Under Move users to group, select where to move these user accounts: another existing group or the general list of users.
- Delete users with a group
Select this option if you want to delete user accounts together with the groups that are being deleted.
- Keep users and move to another group
- Click the Delete button to confirm the group deletion.
If you selected to move user accounts, the groups of users are deleted.
If you selected to delete users together with groups, Kaspersky Next performs the same actions and has the same restrictions as when deleting user accounts. Groups that contained no users or contained only deletable users are deleted. Other groups are kept.
Page top
Managing devices
This section contains information about how to connect devices running various operating systems to Kaspersky Next, view the list of devices, rename devices, and remove devices.
Viewing the list of devices
The Devices section of Kaspersky Next Management Console displays a list of devices that are connected to the application. Those are the devices on which a security application is installed.
The list contains columns with the following information about devices and their owners:
- Status. An icon reflects the protection status of the device that has been connected to Kaspersky Next, in descending order of severity:
- (Critical). A critical event occurred on the device.
- (Warning). An important event that must be attended to occurred on the device.
- (OK). Neither critical nor important events occurred on the device.
- (No data yet). No data can be retrieved concerning the events that have occurred on the device.
- OS. Contains the name of the operating system installed on the device.
- Name. Contains the device name, and specifies the name and version of the operating system installed on the device. You can click the link with the name of a device to proceed to the page containing detailed information about the device.
- Device owner. Contains the user account name of the device owner and the email address of the device owner.
If the device does not have an assigned owner, Unassigned is displayed instead. If the device is running Windows, Kaspersky Next displays the View last signed-in link that leads to the device properties window. There, you can view the user alias of the last person who signed in on this device.
- Group name. Contains the name of the group to which the device owner belongs.
- Security profile. Contains the name of the security profile assigned to the device.
You can filter the list of devices by device status.
To filter the list of devices,
Next to Show devices, click the link with the required device status.
To remove the filter,
Click the All link.
You can sort the list of devices by column: Status, OS, Name, Device owner, or Group name.
To sort the list,
Click the link containing the column name.
The column name is displayed in uppercase characters. Next to the name of the column, an up arrow (˄) indicates the sorting direction. To change the sorting direction, click one more time. Next to the name of the column, a down arrow (˅) appears.
The Search entry field is located above the list. You can use this field to quickly find and switch to an object in a long list.
About device statuses
The Devices section of Kaspersky Next Management Console displays the protection statuses of managed devices. The Users section displays the protection statuses of the users' devices.
A device can have one of the following protection statuses:
- Critical
- Warning
- OK
- No data yet
The ![]() Critical and
Critical and ![]() Warning protection statuses are based on certain conditions and their values. These conditions and their values are configured by Kaspersky experts. You can find the condition that caused the protection status of a specific device in the properties of the device.
Warning protection statuses are based on certain conditions and their values. These conditions and their values are configured by Kaspersky experts. You can find the condition that caused the protection status of a specific device in the properties of the device.
The table below lists these conditions and the possible actions that you can perform to switch the protection status from ![]() Critical or
Critical or ![]() Warning to
Warning to ![]() OK:
OK:
Conditions that cause the ![]() Critical or
Critical or ![]() Warning device status, and possible actions
Warning device status, and possible actions
Condition |
Possible actions |
|
|
Security application is installed but real-time protection is disabled |
|
Anti-malware databases have not been updated in a long time |
|
The device has not connected to Administration Server in a long time |
|
Invalid encryption status of the device (An error has occurred during data encryption or decryption on the device.) |
Check the data encryption or decryption error on the device. |
License has expired |
|
Device status stated by the managed application |
Viewing the properties of a device
You can view the properties of any managed device, including a device that is marked for deletion.
To view the properties of a device,
Do any of the following:
- For any device: In the Devices section or in the Devices → Marked for deletion section, click the link with the device name.
- For a device that is running Windows and that is not assigned an owner: In the Devices section or in the Devices → Marked for deletion section, click the View last signed-in link.
The device properties window opens. Depending on the operating system of the device, this window can show the following details:
- Device status
Device protection status. These statuses are the same as those in the list of devices.
If the status is Critical or Warning, Kaspersky Next displays information about the problems with the device and, if available, recommendations from Kaspersky experts about how to fix the problems.
- Security application uninstallation status and detailed information (only for the devices that are marked for deletion). The uninstallation statuses are the same as those in the list of devices that are marked for deletion.
- Device type
Type of the device: Server or Workstation.
- NetBIOS name
Windows network name of the device.
- Device owner
Name and email address of the device owner.
If no owner is assigned to the device, Unassigned is displayed instead. You can assign an owner to the device.
If a device without an owner is running Windows, Kaspersky Next displays the user alias of the last person who signed in on this device. You can use this information when selecting the user that you want to assign as the device owner.
- Security profile
Name of the security profile applied to the device.
- Total number of threats detected
Total number of threats detected on the device since installation of the security application (first scan).
- Status of anti-malware databases
Information about whether the anti-malware databases on the device are up to date.
- Anti-malware databases last updated on
Date and time when the anti-malware databases on the device were last updated. If the device is running Windows, this field also takes into account updates of the Kaspersky Endpoint Security for Windows components on the device.
- Last connected to Server
Date and time Network Agent installed on the device last connected to the Administration Server.
- Operating system (for devices running Windows or macOS) or Device model and OS (for devices running Android, iOS, or iPadOS)
- IMEI
International Mobile Equipment Identity, a unique number to identify mobile devices.
- Unlock code
Code for unlocking the mobile device (if supported).
- Version of Kaspersky Endpoint Security for Windows or Version of Kaspersky Endpoint Security for Mac
- Encryption recovery key
Information about the recovery key (for encrypted devices running Windows or macOS). This data will allow you to help a user who has forgotten an encryption password.
- Device IP address
IP address of the device.
- Connection IP address
IP address of the network device (for example, a router) that the device uses to connect to the server. If a network device is not used, this field is not displayed.
- Event log
List of the latest events that occurred on the device.
In the device properties window, you can do the following:
- Rename the device.
- Assign the device owner, if the device is running Windows or macOS, and if an owner is not assigned yet.
- View and edit the security profile that is assigned to the device owner.
- Send commands to the device, if the device is running Windows, Android, iOS, or iPadOS.
- Start a malware scan on the device if the device is running macOS 11.3 or later, or Windows.
Connecting Windows devices and Mac devices
You can connect Windows devices and Mac devices to Kaspersky Next by using one of the following methods:
- When adding user accounts, send an email message with an automatically generated link to download a security application. A user that receives the message clicks the link in the message, and then installs an application on the device.
- Download the distribution package of the security application and install the downloaded application on the device.
This method can be used for adding devices that have no defined users (for example, servers).
- Copy a link to the distribution package of the security application and send it in any convenient way.
This method can be used if you want other users to add devices that have no defined users (for example, servers).
- Use a Group Policy script to deploy security applications on multiple devices.
During installation, Kaspersky Endpoint Security for Windows tries to uninstall an incompatible security application from a device.
After you install the security application by using any of the above methods, the device is displayed in Kaspersky Next Management Console.
Regardless of the method for connecting the Windows device or Mac device, it is recommended to assign the device owner.
Preparing the distribution package of a security application
You can download the distribution package of a security application or copy a link to the distribution package only if you first prepared the distribution package. Preparing a distribution package includes accepting the terms of the following documents for the security application: End User License Agreement (EULA), Privacy Policy, and Kaspersky Security Network Statement. If you accepted the terms of these documents when you first opened Kaspersky Next Management Console, the distribution packages are prepared.
To prepare a distribution package after the first opening of Management Console:
- Open Kaspersky Next Management Console.
- Select the Distribution packages section.
The Distribution packages section contains distribution packages of security applications for Windows and Mac devices.
- In the block of the required distribution package, click the Prepare button.
If the distribution package has already been prepared, the Download button is displayed on the right. No further actions are required.
- If an old version of the security application is found, the application prompts you to remove this version. Click the I agree button to remove the old version of the security application.
The Agreements for <security application> window opens.
This window displays the texts of the End User License Agreement for the security application, the End User License Agreement for Kaspersky Security Center Network Agent, the Supplemental Clauses regarding Data Processing (only for Kaspersky Endpoint Security for Windows), and the link to the Kaspersky Lab Products and Services Privacy Policy.
- Carefully read the text of each document.
If you agree to the terms and conditions of the agreements, and if you are aware and agree that your data will be handled and transmitted (including to third countries) as described in the Privacy Policy, and you confirm that you have fully read and understand the Privacy Policy, select the check boxes next to the listed documents, and then click the I accept the terms button.
If you do not agree to the terms and conditions, do not use the security applications. If only some of the check boxes are selected, you will not be able to download the distribution package. The Agreements for <security application> window will close.
The proxy server settings window opens.
- If necessary, define the proxy server settings, and then click Next.
The Use of Kaspersky Security Network window opens.
- Carefully read the Kaspersky Security Network Statement, and then click the I accept the terms button if you agree to them.
If you click the I decline button, the use of Kaspersky Security Network will be disabled. If you want, you can enable the use of Kaspersky Security Network in the Management Console at any time.
The distribution package is prepared.
You can now download the distribution package or copy the link to the distribution package.
Some time after the distribution package for Kaspersky Endpoint Security for Windows is prepared, the security application on managed devices is automatically updated to the new version. As soon as the automatic update starts, Kaspersky Next displays a notification in the Information panel section. Also, the Distribution packages section displays the status of the automatic update—Package pending (waiting for the distribution package preparation), Pending (waiting for Kaspersky), In progress, or Completed.
Users of macOS devices must install the new version of Kaspersky Endpoint Security for Mac on their devices manually.
Page top
Downloading distribution package of a security application
You must download the distribution package of a security application if you want to install the application on Windows devices or Mac devices that have no defined users (for example, on servers), or if you want to simultaneously protect multiple devices running Windows.
Also, after a new version of Kaspersky Endpoint Security for Mac is released, you must download and deliver the distribution package to your macOS users. Users can then install the new version of Kaspersky Endpoint Security for Mac on their devices. On devices with Kaspersky Endpoint Security for Windows, the security application is automatically updated to the new version.
A distribution package is valid for approximately 30 days. We recommend that you download the distribution package anew every time you plan to install the security application or deliver the distribution package to your users.
As an alternative, you can copy a link to a distribution package and send this link to another user in any convenient way. That user will download the distribution package by clicking the received link.
To download the distribution package of a security application:
- Open Kaspersky Next Management Console.
- Select the Distribution packages section.
The Distribution packages section contains distribution packages of security applications for Windows and Mac devices. Email messages that you send to users also include a link to these packages.
- If the required distribution package is not prepared, the Prepare button is displayed on the right. Click this button and prepare the distribution package.
- If necessary, click the Proxy server link below the required distribution package and define the proxy server settings.
- Next to the required distribution package, click the Download button.
The distribution package will be downloaded to the computer in the default folder that is configured for saving downloaded files.
To save the distribution package to a specific folder on the computer, you can select Save as in the context menu of the relevant distribution package. In the window that opens, specify the folder and file name.
The selected distribution package is downloaded.
Page top
Copying a link to a distribution package
As an alternative to downloading a distribution package from Management Console, you can copy a link to a distribution package and send this link in any convenient way. Use this method if you want another user to install the application on Windows devices or Mac devices that have no defined users (for example, on servers), or to simultaneously protect multiple devices running Windows.
Also, after a new version of Kaspersky Endpoint Security for Mac is released, you must deliver the link to the distribution package to your macOS users. Users can then install the new version of Kaspersky Endpoint Security for Mac on their devices. On devices with Kaspersky Endpoint Security for Windows, the security application is automatically updated to the new version.
The link is identical for the distribution packages of Kaspersky Endpoint Security for Windows and Kaspersky Endpoint Security for Mac. It means that if you need to download both security applications, you can copy the link only once.
A distribution package is valid for approximately 30 days. We recommend that you copy a link anew every time you want users to install the security application.
To copy a link to a distribution package:
- Open Kaspersky Next Management Console.
- Select the Distribution packages section.
The Distribution packages section contains distribution packages of security applications for Windows and Mac devices.
- If the required distribution package is not prepared, the Prepare button is displayed on the right. Click this button and prepare the distribution package.
- In the block of the required distribution package, click the vertical ellipsis, and then click Copy link.
The vertical ellipsis is available only if the most recent distribution package for the security application has been prepared.
The link to the distribution package is copied to the Clipboard. You can now send this link to another user in any convenient way.
Page top
Adding Windows devices and Mac devices without users
This section describes how to protect devices that have no defined users (for example, servers).
To add a Windows device or a Mac device to Kaspersky Next:
- Download the distribution package of the required security application.
- When the download is complete, open the folder with the distribution package, and then run installation of the distribution package, depending on the device's operating system.
You can copy the distribution package to a removable drive (such as a flash drive) for further installation on other Windows devices or Mac devices of the company.
After the security application is installed, the added Windows devices and Mac devices appear in the Devices list. The security profile named Default is applied to these devices.
Page top
Deploying security applications by using Active Directory
If Active Directory is used in your company, you can deploy Kaspersky Endpoint Security for Windows on multiple devices simultaneously.
The procedure in this section contains a pre-configured logon script. This script runs automatically every time a device starts up and checks whether Kaspersky Endpoint Security for Windows installation has been started on the device. If it has not been started, the script runs the installation in silent mode.
To deploy security applications on multiple Windows devices by using Active Directory:
- Download the distribution package of the required security application.
- Save the package to a shared folder that is accessible to the devices on which you want to deploy security applications.
We recommend that you select a folder for which the full path does not contain space characters.
If the package name contains spaces, remove them or change them to the underscore (_) character.
- Go to the folder with the downloaded package and create a .bat file with the following script:
set SHARE_PATH=<path to distribution package>set PACKAGE_NAME=<name of distribution package>set __KESCLOUD_ROOT_KEY="HKLM\Software\KasperskyLab\KESCloud"set __KESCLOUD_KEY_NAME="<name of registry entry>"set __KESCLOUD_PACKAGE_FULL_PATH="%SHARE_PATH%\%PACKAGE_NAME%"set __KESCLOUD_PACKAGE_ARGUMENTS=-sREG QUERY %__KESCLOUD_ROOT_KEY% /v %__KESCLOUD_KEY_NAME% | FIND "0x1"IF %ERRORLEVEL% == 1 GOTO INSTALLGOTO END:INSTALLREG ADD %__KESCLOUD_ROOT_KEY% /v %__KESCLOUD_KEY_NAME% /t REG_DWORD /f /D 1%__KESCLOUD_PACKAGE_FULL_PATH% %__KESCLOUD_PACKAGE_ARGUMENTS%:ENDHere:
<path to distribution package>stands for the actual path to the shared folder with the downloaded distribution package. We recommend that you avoid using quotation marks.<name of distribution package>stands for the actual name of the downloaded distribution package. We recommend that you avoid using quotation marks."<name of registry entry>"stands for the name of the registry entry that is used to confirm that the installation has been started. You can specify any name that contains numeric and Latin characters. We recommend that you use the Kaspersky Endpoint Security for Windows version number in quotation marks.
- Go to Control Panel → Administrative Tools, and then open Group Policy Management.
- Expand the node with the required domain, and then click Group Policy Objects.
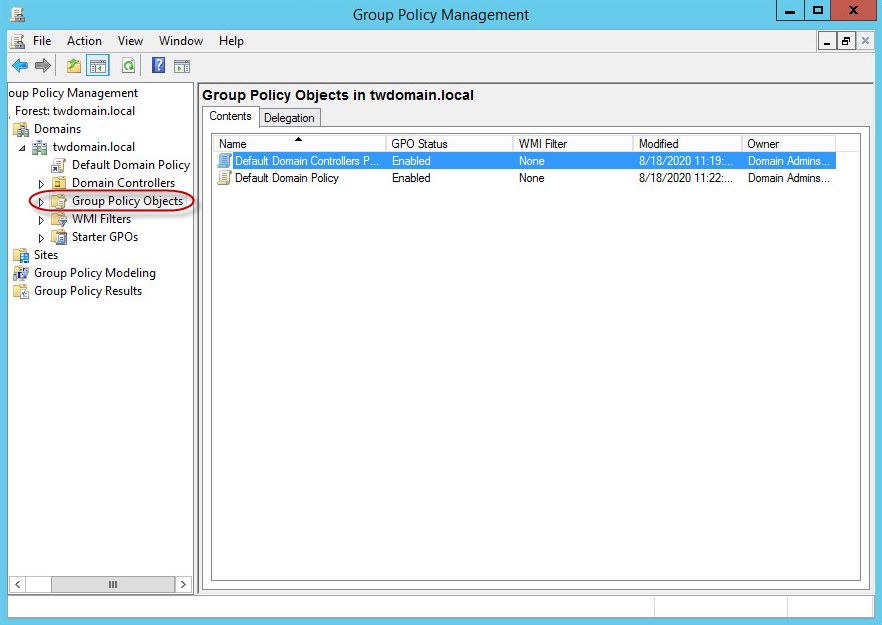
Group Policy Objects node in Group Policy Management window
- In the right pane, right-click the empty space, and then select New.
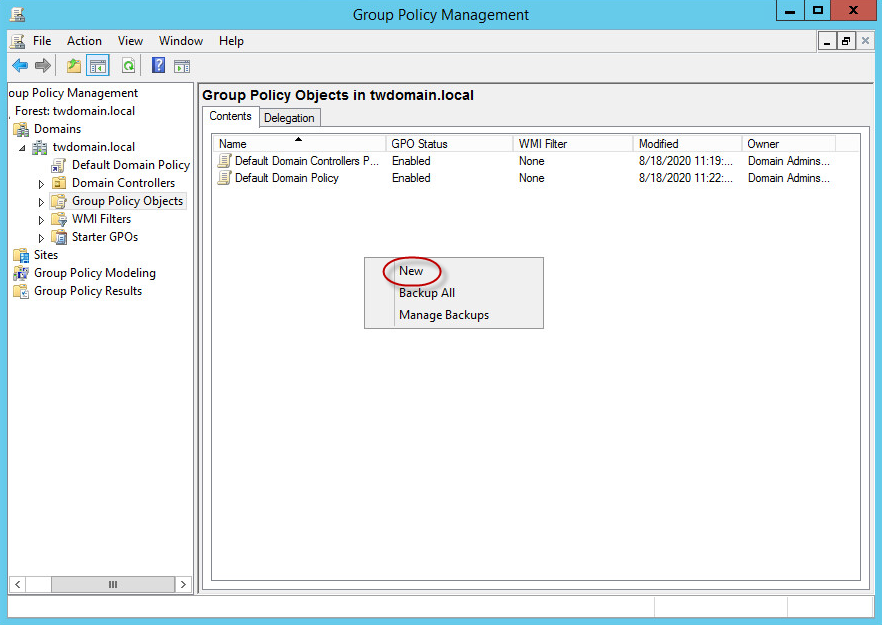
New context menu item in Group Policy Management window
- Name the new object as you like. Click OK to save the object.
- Right-click the created object, and then select Edit.
- Specify that you want Kaspersky Endpoint Security for Windows installed on the devices at the operating system startup. To do so:
- Expand the Computer Configuration → Policies → Windows Settings node, and then select Scripts (Startup/Shutdown).
- In the right pane, right-click Startup, and then select Properties.

Properties context menu item in Group Policy Management window
- In the Startup Properties window that opens, click Add.
- In the Add a Script window that opens, click Browse, and then select the file of the script that you have created. No script parameters are required.
- Click OK to close the Add a Script window.
- Click OK to close the Startup Properties window.
- Associate the created object with the devices to which Kaspersky Endpoint Security for Windows must be installed. The simplest method is to associate the object with the entire domain. To do so:
- Right-click the required domain, and then select Link an Existing GPO.
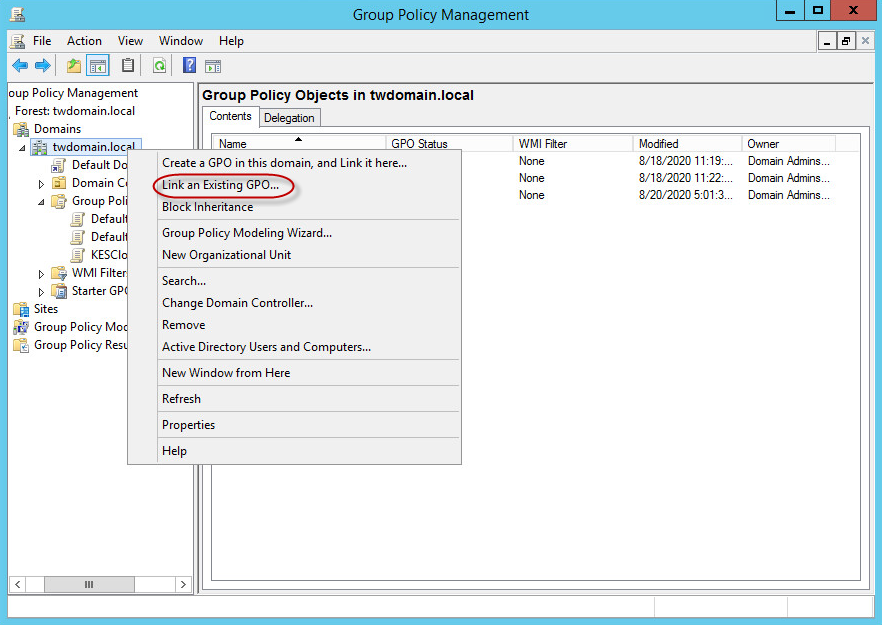
Link an Existing GPO context menu item in Group Policy Management window
- In the Select GPO window that opens, select the created object.
- Click OK to close the Select GPO window.
In a similar way, you can associate the created group policy object with an organizational unit or a site.
- Right-click the required domain, and then select Link an Existing GPO.
- Depending on the selected moment when you want Kaspersky Endpoint Security for Windows installed on the devices, do one of the following:
- If you selected to install Kaspersky Endpoint Security for Windows at the operating system startup, tell the users to restart their devices.
- If you selected to install Kaspersky Endpoint Security for Windows at the user logon, tell the users either to re-log on to their devices or to restart their devices.
After the security application is installed, the added Windows devices appear in the Devices list. The security profile named Default is applied to these devices.
Renaming devices
You can rename devices that are added to Kaspersky Next.
To rename one or several devices:
- Open Kaspersky Next Management Console.
- Select the Devices section.
The Devices section contains a list of devices that have been added to Kaspersky Next.
- Select the check boxes next to the names of the devices that you want to rename.
- Click the Rename button.
- In the displayed window, specify the new name of the selected devices.
If you selected several devices for renaming, the window displays the names of the owners of the selected devices. You can use these owner names to differentiate devices with identical names.
- Click OK.
The selected devices are renamed.
If you selected many devices, the renaming process takes some time. While a device is being renamed, the ![]() (Update) icon is displayed next to its name in the list of devices.
(Update) icon is displayed next to its name in the list of devices.
Assigning the owner of a Windows device or a Mac device
Assigning an
to a Windows device or a Mac device allows you to quickly define and change security settings of the device. You can use various security profiles to manage devices owned by various users and groups of users.The Default security profile is applied to a device that has no owner, for example, a server. You cannot assign a security profile configured by you to a device that lacks an owner.
You can assign the same owner to a group of devices. You can also assign an owner to an individual Windows device or Mac device.
To assign or change an owner of one or several Windows and Mac devices:
- Open Kaspersky Next Management Console.
- Select the Devices section.
The Devices section contains a list of devices that have been added to Kaspersky Next.
- Select the check boxes next to the names of the devices to which you want to assign an owner.
- Click the Assign owner button above the list of devices.
A list of users is displayed.
- If necessary, click the link containing the column name to sort the list of users or use the Search entry field to quickly switch to a user in a long list.
- Click the row of the user whom you want to assign as the device owner.
- Click the OK button in the list of users.
The list of users is closed.
The list of devices displays the assigned owners of the Windows and Mac devices. If a device had an owner before, the new owner replaces the old one.
To assign an owner to an individual Windows device or Mac device that has not been assigned an owner:
- View the properties of a device that is running Windows or Mac.
If a device without an owner is running Windows, Kaspersky Next displays the user alias of the last person who signed in on this device. You can use this information when selecting the user that you want to assign as the device owner.
- In the device properties window, click the Assign owner link.
A list of users is displayed.
- If necessary, click the link containing the column name to sort the list of users or use the Search entry field to quickly switch to a user in a long list.
- Click the row of the user whom you want to assign as the device owner.
- Click the OK button in the list of users.
The list of users is closed. You are returned to the device properties window.
The list of devices displays the owner assigned to the Windows or Mac device.
Page top
Scenario: Creating, renewing, and uploading an APNs certificate
To manage iOS and iPadOS mobile devices (by sending commands to devices or modifying device settings), an Apple Push Notification service certificate (APNs certificate) must be created and uploaded to Kaspersky Next Management Console. The activities of creating and uploading a certificate are performed once for each workspace.
Without an APNs certificate, it is not possible to manage iOS and iPadOS devices.
The scenario of creating, renewing, or uploading an APNs certificate proceeds in stages:
- In Kaspersky Next Management Console, you create a certificate signing request (CSR).
- On the Apple Inc. portal, you receive an APNs certificate by using the CSR you signed, and then save this certificate on your computer.
- You upload the APNs certificate that you received to Kaspersky Next Management Console.
Prerequisite
To create an APNs certificate, you must obtain an Apple ID. If you do not have an Apple ID, register on Apple Push Certificates Portal. We recommend that you avoid using your personal Apple ID.
Creating or renewing an APNs certificate
The procedures for creating a new APNs certificate and renewing an existing APNs certificate that has expired are similar.
If you have an active APNs certificate, you can upload it to Kaspersky Next Management Console without having to create or renew an APNs certificate. See the second procedure in this section.
The APNs certificate is created in one run. You must follow the steps for its creation without interruption, because the signing process has a time stamp that will expire if the creation process takes too long.
To create or renew an APNs certificate:
- In the Information panel section, on the Getting started tab, under Recommended, click the Create or update an APNs certificate link.
The Create, renew, or upload an Apple Push Notification service certificate (APNs certificate) Wizard starts with a page listing possible actions.
- Select the Create an APNs certificate or Renew an APNs certificate option, and then click Next.
This opens a page containing a list of steps to complete to obtain an APNs certificate.
If you only want to upload a prepared APNs certificate to Kaspersky Next Management Console, use the Uploading a previously prepared APNs certificate procedure below.
- In the list of steps on the Wizard page, click the Create a Certificate Signing Request (CSR) link.
The Create a CSR page opens.
- Fill in the following entry fields: Name, Company, Department, City, State or Province, and Country and region. In the Name field, specify your name.
By default, the Company field specifies the name of your company, and the Country and region field specifies the name of the country and the region where your company is located. All of these entry fields are required.
- Click the Create CSR button.
A CSR file is created. The CSR file you created is saved to a folder on your computer. By default, all downloaded files are saved in the Downloads folder.
The Request the public key of the APNs certificate page opens.
- Click the indicated link to sign in to the Apple Push Certificates Portal.
The new browser tab displays the Sign In window with the Apple ID and Password entry fields.
- Enter the Apple ID and Password of your company, and then click Sign In.
The Create a New Push Certificate window opens.
- Click Browse to select the signed CSR file on your computer, and then click Upload.
The Certificates for Third-Party Servers window opens, showing your certificate.
- In the data string of your certificate, click Download.
The APNs certificate is saved to the folder on your computer.
- In Kaspersky Next Management Console, on the Request the public key of the APNs certificate page of the Wizard, click Next.
- On the Upload a prepared APNs certificate to the Management Console page that opens, click the Browse button, and then select an APNs certificate file from the displayed list of files on your computer.
- Click Next.
This opens the Apple Push Notification service certificate details page that contains the name of the downloaded file, the name of the certification center, and the certificate validity start and end dates.
- Click Next.
This opens a page prompting you to create a password-protected backup copy of the APNs certificate on your computer hard drive.
- Select the action to take on the APNs certificate:
- Finish creating or renewing the APNs certificate without creating a backup copy.
- Create a password-protected copy of the APNs certificate on your computer's hard drive.
The Create a password-protected copy of the APNs certificate on your computer's hard drive option is selected by default.
- If you chose the option that includes creating a copy of the APNs certificate, enter the password for protecting the APNs certificate, confirm the password, and then click the Save protected copy of APNs certificate button.
- Click OK.
If you chose the option that includes creating a copy of the APNs certificate, a password-protected copy of the APNs certificate is saved on your computer's hard drive. The APNs Certificate Preparation Wizard closes.
The creation or renewal of the APNs certificate is complete. The APNs certificate is uploaded to Kaspersky Next Management Console.
At each step of the procedure for creating or renewing an APNs certificate, you can return to the previous step by clicking the Back button.
After the successful creation or renewal of an APNs certificate, you can connect iOS and iPadOS devices to Kaspersky Next, send commands to iOS and iPadOS devices, install apps on iOS and iPadOS devices, and configure these devices by using a security profile.
Uploading a previously prepared APNs certificate
To upload a previously prepared APNs certificate to Kaspersky Next Management Console:
- In the Information panel section, on the Getting started tab, under Recommended, click the Create or update an APNs certificate link.
The Create, renew, or upload an Apple Push Notification service certificate (APNs certificate) Wizard starts with a page listing possible actions.
- Select the Upload a prepared APNs certificate option, and then click Next.
This opens the Upload a previously prepared APNs certificate page.
- On the Upload a previously prepared APNs certificate page, click the Browse button, and then select an APNs certificate file from the displayed list of files on your computer.
- Click Next.
If the APNs certificate file is password-protected, a page with the password request opens.
- On the page with the password request, enter the password protecting the APNs certificate file, and then click Next.
This opens the Details of downloaded certificate file page that indicates the name of the downloaded file, the name of the certification center, and the certificate validity start and end dates.
If the APNs certificate file does not correspond to the workspace with which you are currently working, an error message is displayed.
- Click OK.
The APNs certificate is uploaded to Kaspersky Next Management Console.
At each step of the procedure for uploading an APNs certificate, you can return to the previous step by clicking the Back button.
After the successful upload of an APNs certificate, you can connect iOS and iPadOS devices to Kaspersky Next, send commands to iOS and iPadOS devices, install apps on iOS and iPadOS devices, and configure these devices by using a security profile.
Page top
Connecting mobile devices
The following is the process for connecting mobile devices to Kaspersky Next:
- By using Kaspersky Next Management Console, you send mobile device users a message to prompt them to connect their devices.
You can only send a message with instructions to users whose email addresses have been added to the Management Console.
Using a message containing instructions, a user can connect only a single device. To protect multiple devices owned by a single user, you must send the user a separate message for each device.
- The user clicks the link in the message or uses the attached QR code to download and install the security application on his or her device.
- Kaspersky Next detects the type of the operating system (whether it is Android, iOS, or iPadOS) on the device. It also checks the company workspace for an APNs certificate. Depending on the type of operating system and the availability of a certificate, Kaspersky Next prompts the user to download the necessary software to the device.
- Android device.
The installation proceeds as follows:
- Kaspersky Next redirects the user to the Kaspersky website.
- The user downloads and installs Kaspersky Endpoint Security for Android.
As an alternative, the user can download the app from Samsung Galaxy Store, Huawei AppGallery, RuStore, Xiaomi GetApps, or from the official Kaspersky website.
- When the app is run for the first time, in the first launch wizard, the user must copy the download link from the email message with the instructions, and then paste it in the Server field of the Connection Settings step.
When the configuration completes, the device connects to Kaspersky Next.
Kaspersky Next cannot manage an Android device if Kaspersky Endpoint Security for Android is installed via KNOX Mobile Enrollment or through third-party Enterprise Mobility Management (EMM) solutions. In this case, the user must remove Kaspersky Endpoint Security for Android, and then install it again, as described in this section.
- iOS or iPadOS device with an APNs certificate installed.
Kaspersky Next automatically downloads an iOS MDM profile. After that, the user must go to the settings on his or her device, and then install the downloaded profile. When the iOS MDM profile is installed, the iOS or iPadOS device connects to Kaspersky Next.
Without an APNs certificate, it is not possible to manage iOS and iPadOS devices.
After the applications are installed and run automatically, the device appears in the list of devices in Kaspersky Next Management Console.
- Android device.
To send users a message containing instructions for downloading and installing a security application:
- Open Kaspersky Next Management Console.
- Select the Users section.
The Users section contains a list of users and groups of users that have been added to Kaspersky Next.
- Select the check boxes next to the names of user accounts to which you intend to send a message containing instructions for installing security applications on devices.
- Above the list of user accounts, click the Send instructions button.
You can also send messages in the details window of a user, inviting that user to install a security application on the device. To send a message containing instructions, click the link with a user account name in the list of users, and then click the Send instructions to install button.
After the user installs the security applications and all the devices are connected to Kaspersky Next, information in the Devices and Users lists will be updated and expanded. The Devices list will show the connected devices. The Users list will show the number of devices that have been connected by the user and their respective statuses.
Sending commands to users' devices
This section describes how to send commands to your users' Windows devices and mobile devices.
Wiping data from a Windows device
From Kaspersky Next Management Console, you can send a command to remotely wipe data from a user's device that is running Windows.
This feature is available only if you activated Kaspersky Next under a Kaspersky Next EDR Optimum or XDR Expert license.
Depending on the data wipe settings, you can remotely wipe some or all of the following data:
- Documents
Files in the standard Documents folder of the operating system, and its subfolders.
- Cookies
Files in which the browser saves data from the websites visited by the user (such as user authorization data).
- Desktop
Files in the standard Desktop folder of the operating system, and its subfolders.
- Temporary Internet Explorer files
Temporary files related to the operation of Internet Explorer, such as copies of web pages, images, and media files.
- Temporary files
Temporary files related to the operation of applications installed on the computer. For example, Microsoft Office applications create temporary files containing backup copies of documents.
- Outlook files
Files related to the operation of the Outlook mail client: data files (PST), offline data files (OST), offline address book files (OAB), and personal address book files (PAB).
- User profile
Set of files and folders that store operating system settings for the local user account.
To wipe data from a device:
- Open Kaspersky Next Management Console.
- Select the Devices section.
The Devices section contains a list of devices that have been added to Kaspersky Next.
- Click the link with the device name.
This opens a page containing detailed information about the device. The left part of the page shows the Commands list, which contains buttons with the commands that are available for the device.
- Click the Wipe data button.
- In the Wipe data from <Device name> window that opens, define the data wipe settings:
- How to wipe:
- Completely
Files are overwritten with random data. It is practically impossible to restore data after it is deleted.
- Quickly
Files are deleted by using the operating system resources, as if you delete them manually to the recycle bin, and then empty the recycle bin.
- Completely
- What to wipe:
- All standard folders
All of the above-mentioned data is deleted.
- Custom folders
Select the specific data to be deleted.
- All standard folders
- How to wipe:
- Click the Wipe button.
- In the Wipe data window that opens, click the Confirm button to confirm the data wipe.
The specified data is wiped from the selected device.
Page top
Sending commands to mobile devices
From Kaspersky Next Management Console, you can send commands to connected mobile devices (for example, to locate or lock a device).
To send a command to a device:
- Open Kaspersky Next Management Console.
- Select the Devices section.
The Devices section contains a list of devices that have been added to Kaspersky Next.
- Select the check box in the list next to the name of the device to which you need to send a command.
- In the list of devices, click the link with the device name.
This opens a page containing detailed information about the device. The right part of the page shows a list of commands that were sent to the device, including the date and time the commands were sent. The left part of the page shows the Commands list, which contains buttons with the commands that are available for the device.
- Click the button with the name of the command.
The button name will change to Abort command <Name of selected command>. Execution of the command takes some time. Upon execution, the command is displayed in the list of executed commands in the right part of the page.
The set of supported commands depends on the operating system installed on the mobile device.
Set of supported commands for Android devices
Command |
Command execution result |
|---|---|
Lock |
The device is locked. The device can only be unlocked by using the 16-character code defined in the device properties. |
Unlock |
Device locking with a PIN code is disabled. The previously specified PIN code is reset. |
Reset to factory settings |
All data on the device is deleted. |
Locate |
The device location is determined. The device properties page displays a map with the device location. |
Alarm |
The device emits a sound signal. The device is locked. |
Synchronize |
The security profile is instantly applied to the device, and then the device transmits the details of all events to Kaspersky Next. |
Disable management |
The Wipe corporate data command is sent to the device. The user is prompted to manually remove Kaspersky Endpoint Security for Android from the device. In Kaspersky Next Management Console, the device is moved to the Marked for deletion list. |
Set of supported commands for iOS and iPadOS devices
Command |
Command execution result |
|---|---|
Lock |
The device is locked. |
Reset to factory settings |
All installed configuration profiles, provisioning profiles, and the iOS MDM profile are deleted. |
Wipe corporate data |
Corporate data such as corporate Wi-Fi settings, corporate contact details, and calendar are deleted. |
Synchronize |
The security profile is instantly applied to the device. |
Disable management |
The Wipe corporate data command is sent to the device. In Kaspersky Next Management Console, the device is moved to the Marked for deletion list. |
Deleting devices from the list of devices
When you delete devices from the list of devices, they are first moved to the list of devices that are marked for deletion. Further actions depend on the operating system that the devices are running and on the security application versions that are installed on the devices.
Before deleting devices running Windows or macOS, make sure the devices are decrypted. After deletion, you will not be able to decrypt the device from the console.
- For devices running Windows or macOS, the security application is uninstalled automatically or manually.
After the security application is uninstalled automatically, the device finally disappears from Kaspersky Next. After you uninstall the security application manually, you must permanently delete the device from the list of devices that are marked for deletion.
If you do not uninstall the security application from the device, the device will reconnect to Kaspersky Next and will appear in the list of managed devices.
After the device is finally deleted from Kaspersky Next, the security application license that the device uses is released.
- For devices running Android, iOS, or iPadOS, all corporate data is automatically wiped.
Users of devices running Android are prompted to manually remove Kaspersky Endpoint Security for Android from their devices. You can permanently delete devices from the list of devices that are marked for deletion at any time.
You cannot undo the deletion of devices. Later, you can connect the deleted devices again.
Marking devices for deletion
Marking devices for deletion is the first step in deleting them from the list of managed devices.
You cannot undo marking devices for deletion.
Before deleting devices running Windows or macOS, make sure the devices are decrypted. After deletion, you will not be able to decrypt the device from the console.
To mark devices for deletion:
- Open Kaspersky Next Management Console.
- Select the Devices section.
The Devices section contains a list of devices that have been added to Kaspersky Next.
- Select the check boxes next to the required devices.
- Above the list of devices, click the Delete button.
- In the Delete device window that opens, click the Delete button.
The devices are moved to the list of devices that are marked for deletion. To view the devices that are marked for deletion, you can click the Show marked for deletion button in the Devices section of the Management Console.
Page top
Viewing the list of devices that are marked for deletion
The Devices → Marked for deletion section of Kaspersky Next Management Console displays a list of devices that you plan to delete.
The list contains columns with the following information about devices and their owners:
- Progress. An icon reflects the status of the security application uninstallation from a device that has been connected to Kaspersky Next:
 (Scheduled). The security application uninstallation is scheduled or in progress.
 (Done). The security application has been successfully uninstalled. Devices with this status are automatically deleted from the list every 24 hours. If you do not want to wait, you can permanently delete the device manually.
 (Error). An error has occurred during uninstallation of the security application. You can find detailed information about the error on the page containing detailed information about the device.
 In this case, the security application must be uninstalled manually. After that, you can permanently delete the device from the list.
 (Manual). The security application must be uninstalled manually. After that, you can permanently delete the device from the list.
- OS. Contains the name of the operating system installed on the device.
- Name. Contains the device name, and specifies the name and version of the operating system installed on the device. You can click the link with the name of a device to proceed to the page containing detailed information about the device.
- Device owner. Contains the user account name and email address of the device owner.
If the device does not have an assigned owner, Unassigned is displayed instead. If the device is running Windows, Kaspersky Next displays the View last signed-in link that leads to the device properties window. There, you can view the user alias of the last person who signed in on this device.
- Group name. Contains the name of the group to which the device owner belongs.
- Security profile. Contains the name of the security profile assigned to the device.
You can filter the list of devices by uninstallation status.
To filter the list of devices,
Next to Show devices, click the link with the required uninstallation status.
To remove the filter,
Click the All link.
You can sort the list of devices by column: Progress, OS, Name, Device owner, or Group name.
To sort the list,
Click the link containing the column name.
The column name is displayed in uppercase characters. Next to the name of the column, an up arrow (˄) indicates the sorting direction. To change the sorting direction, click one more time. Next to the name of the column, a down arrow (˅) appears.
You cannot undo the deletion of devices. Later, you can connect the deleted devices again.
Uninstalling security applications from devices
Security applications are automatically uninstalled from devices that are marked for deletion in the following cases:
- A device is running Windows.
Automatic uninstallation of Kaspersky Endpoint Security for Windows is not available if Kaspersky Endpoint Security 10.0 for Windows is still in use in your workspace. We recommend that you prepare the distribution package of the latest version of Kaspersky Endpoint Security for Windows.
- A device is running macOS and the installed version of Kaspersky Endpoint Security for Mac is 11.0 or later.
In other cases, you must uninstall security applications manually.
Automatic uninstallation is scheduled to start every three hours. Other settings of automatic uninstallation can be changed.
Starting uninstallation forcibly
If you want, you can forcibly uninstall the security applications ahead of schedule.
To forcibly uninstall security applications:
- Open Kaspersky Next Management Console.
- Select the Devices section.
The Devices section contains a list of devices that have been added to Kaspersky Next.
- Click the Show marked for deletion button.
Management Console displays the list of devices that have been marked for deletion.
- Click the link with the name of any device with the (Scheduled) status.
The device properties window opens. At the top of the window, the security application uninstallation status with detailed information is displayed.
- Click the Run uninstallation now link in the detailed information.
- In the Run uninstallation now window that opens, click the Uninstall button.
Uninstallation of security applications starts on all of the devices on which uninstallation is scheduled.
Configuring automatic uninstallation of security applications
You can configure automatic uninstallation of security applications from devices that are marked for deletion.
To configure automatic uninstallation of security applications:
- Open Kaspersky Next Management Console.
- Select the Devices section.
The Devices section contains a list of devices that have been added to Kaspersky Next.
- Click the Show marked for deletion button.
Management Console displays the list of devices that have been marked for deletion.
- Click the Uninstallation settings link.
The Uninstallation settings window opens.
- Under Operating system restart option, select what to do if the uninstallation requires the restart of the device operating system:
- Do not restart the device
Managed devices are not restarted automatically after the operation. To complete the operation, users must restart their devices. This option is suitable for servers and other devices where continuous operation is critical.
- Restart the device
Managed devices are always restarted automatically if a restart is required for completion of the operation. This option is useful for devices for which regular pauses in their operation (shutdown or restart) are acceptable.
- Prompt the user for action
The restart reminder is displayed on the screen of the managed device, prompting the user to restart it manually. You can change the text of the message for the user. This option is most suitable for workstations where users must be able to select the most convenient time for a restart.
If the Restart the device after 180 minutes option is enabled, after prompting the user, the application forces a restart of the operating system upon expiration of the specified time interval. Otherwise, users must restart their devices manually.
- Do not restart the device
- If uninstallation of the security applications from devices running Windows is protected by password, specify access settings for the security applications:
- Under Access settings, select the check boxes next to the applications protected by password.
- If you select Kaspersky Endpoint Security for Windows, specify the user name and password that protect the application.
- If you select Network Agent, specify the password that protects the application.
If Network Agent is protected by the same password as Kaspersky Endpoint Security for Windows, it is enough to specify the settings only for Kaspersky Endpoint Security for Windows. Kaspersky Next will automatically use the specified password for uninstalling Network Agent.
- Click the OK button to save the changes.
The security applications are automatically uninstalled from the devices, according to the defined settings.
Page top
Permanently deleting devices that are marked for deletion
When you permanently delete a device that is marked for deletion, the information about the device is deleted from Kaspersky Next without the possibility of recovery. The security application license that the device uses is released for later use on another device.
Before deleting devices running Windows or macOS, make sure the devices are decrypted. After deletion, you will not be able to decrypt the device from the console.
After the security application is automatically uninstalled from a device running Windows or macOS, Kaspersky Next permanently deletes the device within 24 hours. We do not recommend that you permanently delete a device running Windows or macOS until the security application is uninstalled from the device.
If a device has the ![]() (Scheduled) status of security application uninstallation for more than 48 hours, you can check that the security application has been actually uninstalled from the device and then permanently delete the device.
(Scheduled) status of security application uninstallation for more than 48 hours, you can check that the security application has been actually uninstalled from the device and then permanently delete the device.
A device running Android, iOS, or iPadOS can be permanently deleted immediately after it is marked for deletion.
To permanently delete devices that are marked for deletion:
- Open Kaspersky Next Management Console.
- Select the Devices section.
The Devices section contains a list of devices that have been added to Kaspersky Next.
- Click the Show marked for deletion button.
The Management Console displays the list of devices that have been marked for deletion.
- Select the check boxes next to the required devices.
- Above the list of devices, click the Permanently delete button.
- In the Permanently delete device window that opens, click the Delete button.
The selected devices disappear from Kaspersky Next.
You cannot undo the deletion of devices. Later, you can connect the deleted devices again.
Starting and stopping anti-malware database updates and malware scans
Regardless of the settings of the anti-malware database update mode and malware scan task run mode, you can force a start of these tasks at any time. You may also have to force any of these tasks to stop. It may be necessary to start any of these tasks immediately if, for example, the task is configured for manual start but users have not run the task in a long time.
As an alternative, you can start a malware scan task on a single device.
You can start and stop an anti-malware database update and malware scan for Windows devices and Mac devices.
To force a start of an anti-malware database update or malware scan:
- Open Kaspersky Next Management Console.
- Select the Devices section.
The Devices section contains a list of devices that have been added to Kaspersky Next.
- Click More → Manage database update / Manage malware scan.
The Manage anti-malware database update / Manage malware scan window opens.
- If necessary, click the Database update settings / Scan start settings link, and then modify the database update settings / malware scan settings.
- Click the Start database update / Start scan button.
The database update or malware scan starts.
You can use a filter to view information about the status of the running task on all devices, on devices with outdated databases, or on devices with up-to-date databases. The All devices filter is enabled by default. You can also use the device search function.
To force a start of a malware scan on a single device:
- Open Kaspersky Next Management Console.
- Select the Devices section.
The Devices section contains a list of devices that have been added to Kaspersky Next.
- Click the link with the device name.
This opens a page containing detailed information about the device. The left part of the page shows the Commands list, which contains buttons with the commands that are available for the device.
- Click the Run scan button.
The malware scan starts.
To force a stop of an anti-malware database update or malware scan:
- Open Kaspersky Next Management Console.
- Select the Devices section.
The Devices section contains a list of devices that have been added to Kaspersky Next.
- Click More → Manage database update / Manage malware scan.
The Manage anti-malware database update / Manage malware scan window opens.
- Select the devices on which you want to stop the database update or stop the malware scan.
You can use a filter to view information about the status of the running task on all devices, on devices with outdated databases, or on devices with up-to-date databases. The All devices filter is enabled by default. You can also use the device search function.
- Click the Stop database update / Stop scan button.
The database update or malware scan stops.
Starting and stopping of tasks on devices occurs with a delay. This delay is necessary for the synchronization of devices with Kaspersky Next. Synchronization of devices with Kaspersky Next occurs automatically at a certain frequency or is performed manually on devices by sending the Synchronize command.
Page top
Updating the security application on devices running Windows and macOS
On devices running Windows
Kaspersky Endpoint Security for Windows is updated automatically on your users' devices. The Distribution packages section displays the status of the automatic update:
- Package pending
A new version of Kaspersky Endpoint Security for Windows is ready. You must prepare the distribution package of the new version.
- Pending
The distribution package of the new version is prepared and is waiting for Kaspersky. When the new version of Kaspersky Endpoint Security for Windows passes all the required procedures at our side, the automatic update starts.
As soon as the automatic update starts, Kaspersky Next displays a notification in the Information panel section.
- In progress
The automatic update has started on at least one of your users' devices.
- Completed
The automatic update has completed on all of your users' devices.
If a device restart is required, the security application prompts users to restart their devices.
In most cases, Network Agent is also updated automatically on a device. However, even if a previous version of Network Agent is installed on a device, the protection of the device is not affected.
On devices running macOS
To update Kaspersky Endpoint Security for Mac to a new version, you must download and deliver the prepared distribution package to your macOS users. Users can then install the new version of Kaspersky Endpoint Security for Mac on their devices.
Managing security profiles
This section describes the purpose of security profiles in Kaspersky Next, as well as how to create, configure, copy, apply, and delete security profiles.
About security profiles
Kaspersky Next lets you centrally protect and manage devices by using security profiles.
A security profile is a named collection of settings of Kaspersky applications. This collection of settings ensures security on computers and mobile devices added to Kaspersky Next. A single profile (see the figure below) contains the settings for Windows, Mac, Android, iOS, and iPadOS devices. After a security profile is applied to a device that has been added to Kaspersky Next, the settings of the Kaspersky application on the device are replaced with those specified in the profile.
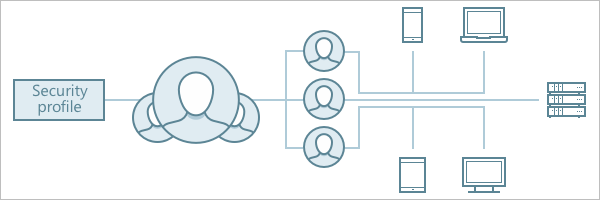
Single security profile
Using security profiles, you can perform the following actions:
- Create, define, and apply standard collections of settings for specific users and user groups in your company.
- Quickly change the values of specific settings or groups of settings, in case of urgency or if the users' working conditions have changed.
You can assign a security profile only to users and groups of users. The security profile assigned to the device owner is applied to the device.
Only one security profile can be assigned to a user or a group of users.
Kaspersky Next features the Default security profile configured by Kaspersky experts. The Default profile is automatically applied to a device after that device is added to the list of devices of Kaspersky Next, if the device owner has not been assigned a different profile.
Each security profile has a power. The security profile power shows how well the profile protects your users' devices. The profile power depends on whether the protection components are enabled in the profile settings and on whether you use Kaspersky Security Network in your workspace. You can manage the profile power on a single page.
Page top
Viewing the list of security profiles
To view the list of security profiles:
- Open Kaspersky Next Management Console.
- Select the Security management → Security profiles section.
The list of profiles is displayed as a table containing the following columns (see the figure below):
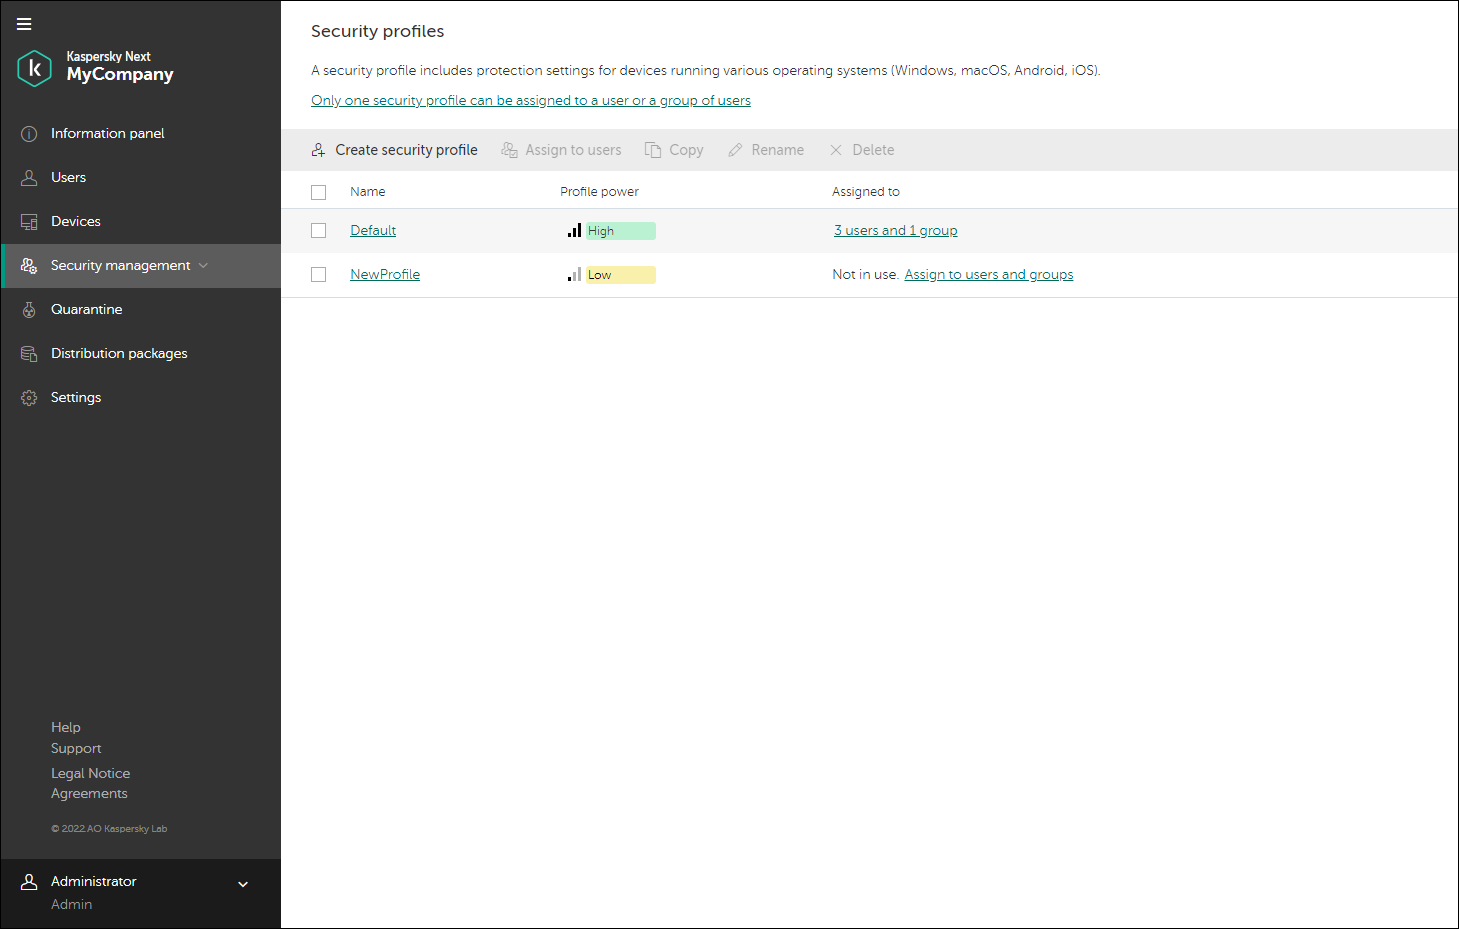
List of security profiles in Kaspersky Next Management Console
- Name. Clicking the link with the name of a profile allows you to proceed to the settings page of that profile.
- Profile power. The security profile power shows how well the profile protects your users' devices. The profile power can be Low, Optimal, or High.
- Assigned to. Clicking the link in this column allows you to view user accounts and groups of user accounts that have been assigned the profile.
You can sort the list of security profiles by the Name column.
To sort the list,
Click the link containing the column name.
The column name is displayed in uppercase characters. Next to the name of the column, an up arrow (˄) indicates the sorting direction. To change the sorting direction, click one more time. Next to the name of the column, a down arrow (˅) appears.
Creating a security profile
After initial setup of Kaspersky Next, the Default security profile is applied to devices of all users. You can create your own custom security profiles on the basis of the Default security profile.
You can create up to 20 security profiles.
To create a security profile:
- Open Kaspersky Next Management Console.
- Select the Security management → Security profiles section.
The Security profiles section contains a list of security profiles configured in Kaspersky Next.
- Above the list of security profiles, click the Add → Create button.
The Create a security profile window opens.
- In the Security profile name entry field, enter a name for the security profile.
You can enter a string up to 255 characters long. The string can contain upper- and lowercase characters, numerals, whitespaces, dots, commas, minuses, dashes, and underscores.
- Click the Create button.
A new security profile will be created, which will have the name you specified and the settings of the default profile. After the security profile is created, you can edit it as you like.
Page top
Editing a security profile
To edit a security profile:
- Open Kaspersky Next Management Console.
- Select the Security management → Security profiles section.
The Security profiles section contains a list of security profiles configured in Kaspersky Next.
- Click the link with the name of the security profile that you want to edit.
The profile properties page opens. The page contains information about the profile power and collections of security profile settings for managed devices. The security profile power shows how well the profile protects your users' devices. Collections of settings for devices running different operating systems are grouped into the Windows, Mac, iOS, and Android sections.
- If you want, increase the profile power in the Security profile audit section. To do so, enable the protection components (for example, click Enable File Threat Protection), and then enable the use of Kaspersky Security Network. As an alternative, you can click the Enable all components button to enable all of the disabled protection components and the use of Kaspersky Security Network at once.
The use of Kaspersky Security Network is enabled or disabled across the workspace. It means that if you enable the use of Kaspersky Security Network in one security profile, it is automatically enabled in all of your profiles.
If you have not prepared a distribution package of a Kaspersky security application (for example, Kaspersky Endpoint Security for Mac), the components in the corresponding area are excluded from the calculation of the security profile power. Also, you cannot enable or disable these components in the Security profile audit section. As soon as a distribution package is prepared, these components will be taken into account.
- Define the security profile settings as you like.
Use the detailed instructions on configuring security profiles for Windows devices, Mac devices, Android devices, iOS, and iPadOS devices.
The new values of the security profile settings will be applied to the devices of users to whose accounts this security profile was assigned.
Page top
Assigning a security profile to a user or group of users
A security profile (with the exception of the Default profile) can be assigned to no more than 50 groups of users or individual users.
To assign a security profile to a user or group of users:
- Open Kaspersky Next Management Console.
- Select the Security management → Security profiles section.
The Security profiles section contains a list of security profiles configured in Kaspersky Next.
- Select the check box next to the name of the security profile that you want to assign to a user or group of users.
- Click the Assign to users button above the list of security profiles or click the Assign to users link in the list of security profiles.
A window containing a list of users opens.
- Select the check boxes next to the users and groups of users to which you want to assign the security profile.
If you selected a security profile other than the Default one and the total number of selected groups of users and individual users exceeds 50, a warning is displayed. Clear extra check boxes to get rid of the warning.
- Click OK.
The security profile is assigned to the selected users and groups of users. The security profile that has been assigned to a user appears in the general list of users and on the page with the user information. The security profile that has been assigned to a group of users is applied to all users in that group. You cannot assign an individual security profile to a user that is part of a group of users.
Copying a security profile
If you need to configure a security profile whose settings mostly repeat the values of settings of a previously configured profile, you can reduce configuration time by copying the existing security profile. In the copy, you have to specify the portion of settings that must differ from the settings of the original security profile.
By default, the copied security profile is not assigned to any user account or group of user accounts.
To copy a security profile:
- Open Kaspersky Next Management Console.
- Select the Security management → Security profiles section.
The Security profiles section contains a list of security profiles configured in Kaspersky Next.
- Select the check box next to the name of the security profile that you want to copy.
- Above the list of security profiles, click the Copy button.
The Copy security profile <security profile name> window opens.
- In the entry field, enter a name for the new security profile.
You can enter a string up to 255 characters long. The string can contain upper- and lowercase characters, numerals, whitespaces, dots, commas, minuses, dashes, and underscores. The name of the new security profile must not match the name of an existing security profile.
- Click the Copy button.
If a security profile with the entered name already exists, the Copy button will not be available. To continue copying, enter a name that satisfies the requirements.
The copied security profile will be displayed in the list of security profiles. You can proceed to configure the security profile and assign this security profile to user accounts or groups of user accounts.
Page top
Exporting and importing security profiles
The export and import of security profiles allows you to transfer the security settings that you configure in one workspace to another workspace. You just export a security profile to a file, and then import it to another workspace in a few clicks.
When Kaspersky Next creates a file with the security settings, it encrypts the file. If you want, you can additionally protect the file by using a password. In this case, you must specify this password when importing the profile from the file.
Exporting a security profile to a file
You can export a security profile to a file, and then import it to another workspace in a few clicks.
To export a security profile to a file:
- Open Kaspersky Next Management Console.
- Select the Security management → Security profiles section.
The Security profiles section contains a list of security profiles configured in Kaspersky Next.
- Select the check box next to the profile that you want to export, and then click the Export button.
The Export a security profile window opens.
- Verify the workspace name and the security profile name that you selected.
- If you want to provide additional protection to the file, click the down arrow (˅) next to Additional parameters, and then specify and confirm the password.
- Click the Export button to start the export.
A file with the settings from the selected security profile is created and downloaded on your device. The file name has the following format: <profile name> (<workspace name>).sps.
You can now import the profile in another workspace.
Page top
Importing a security profile from a file
You can export a security profile to a file, and then import it to another workspace in a few clicks.
To import a security profile from a file:
- Open Kaspersky Next Management Console.
- Select the Security management → Security profiles section.
The Security profiles section contains a list of security profiles configured in Kaspersky Next.
- Above the list of security profiles, click the Add → Import button.
The button is not available if the workspace already contains 20 security profiles.
- Click the Browse button, and then select the file with the profile settings that you exported earlier.
- If you protected the file with a password during export, a field for entering the password appears. Specify the password, and then click the Submit button.
- Kaspersky Next analyzes the file and determines whether the file is valid, and whether the profile settings can be imported from it. Further actions depend on the analysis results:
- No error messages and no important notes appear.
The profile can be imported. Click the Import button to start import.
- One or several important notes appear (for example, a security profile with the same name as specified in the file exists in this workspace).
The profile can be imported. If you agree with the solutions described in the notes (for example, the imported profile will be automatically renamed), click the Import button to start import.
- There is a problem with the selected file or with the import in general (for example, the file was manually edited or you specified a wrong password).
The profile cannot be imported. Do as instructed by Kaspersky Next (for example, select another file or re-type your password).
- No error messages and no important notes appear.
The security profile is imported to the workspace.
Page top
Resetting a security profile
If you are not satisfied with how a security profile works, you can reset it to the predefined settings. These are the settings that are recommended by the Kaspersky experts and are defined when a new profile is created.
The operation cannot be undone.
To reset a security profile:
- Open Kaspersky Next Management Console.
- Select the Security management → Security profiles section.
The Security profiles section contains a list of security profiles configured in Kaspersky Next.
- In the list, select the security profile that you want to reset.
- In the Security profile audit section, click the Reset to predefined settings button.
- In the confirmation window that opens, click the Reset button.
Settings of the security profile are reset to the predefined values.
The use of Kaspersky Security Network is enabled or disabled across the workspace. It means that when you reset a security profile, the Kaspersky Security Network settings are not affected.
Page top
Deleting a security profile
The Default security profile cannot be deleted.
To delete a security profile:
- Open Kaspersky Next Management Console.
- Select the Security management → Security profiles section.
The Security profiles section contains a list of security profiles configured in Kaspersky Next.
- Select the check box next to the name of the security profile that you need to delete.
- Above the list of security profiles, click the Delete button.
The security profile will be deleted from the list of security profiles. User accounts that had been assigned the deleted security profile will be assigned the Default security profile.
Page top
Endpoint Detection and Response
This section contains information about Endpoint Detection and Response.
The Endpoint Detection and Response feature monitors and analyzes threat progression, and provides you with information about possible attacks, to facilitate a timely manual response; or performs the predefined automated response.
This feature is available only if you activated Kaspersky Next under a Kaspersky Next EDR Optimum or XDR Expert license.
If you activated Kaspersky Next under a Kaspersky Next EDR Foundations license, you have access to a limited functionality called Root-Cause Analysis.
To use this feature, you need Kaspersky Endpoint Security 11.8 for Windows or later.
About Endpoint Detection and Response
Kaspersky Next monitors and analyzes threat progression, and provides you with information about possible attacks, to facilitate a timely manual response; or performs the predefined automated response.
This feature is available only if you activated Kaspersky Next under a Kaspersky Next EDR Optimum or XDR Expert license.
If you activated Kaspersky Next under a Kaspersky Next EDR Foundations license, you have access to a limited functionality called Root-Cause Analysis.
To use this feature, you need Kaspersky Endpoint Security 11.8 for Windows or later.
Endpoint Detection and Response detects threats in the following types of objects:
- Process
- File
- Registry key
- Network connection
You can start using the Endpoint Detection and Response feature when you start Kaspersky Next Management Console for the first time or after Kaspersky Next is upgraded to a new version. If you did not start using Endpoint Detection and Response during the initial or additional setup of Kaspersky Next, you can do it later.
To use Endpoint Detection and Response in the automatic mode, you must first configure it.
The Endpoint Detection and Response widget and table display alerts that occur on your users' devices. The widget shows up to 10 alerts and the table shows up to 1000 alerts. From the table, you can export information about all of the current alerts to a CSV file.
While analyzing the alert details, you may want to take additional measures or fine-tune the Endpoint Detection and Response feature.
If you want to stop using the feature, you can disable it and later enable it again.
Page top
About Indicators of Compromise
An Indicator of Compromise (IoC) is a set of data about an object or activity that indicates unauthorized access to the device (compromise of data). For example, the path to a file in which a threat has been detected on one of your users' devices is an Indicator of Compromise for other devices.
Kaspersky Next can detect threats by using the following types of IoCs:
- File indicators:
- MD5 checksum of a file
- SHA256 checksum of a file
- Path to a file
- IP address of a remote computer
- Registry key
Starting the use of Endpoint Detection and Response
You can start using the Endpoint Detection and Response feature when you start Kaspersky Next Management Console for the first time or after Kaspersky Next is upgraded to a new version. If you did not start using Endpoint Detection and Response during the initial or additional setup of Kaspersky Next, you can do it as described in this section.
After you start using the feature, the distribution package of Kaspersky Endpoint Security for Windows (version 11.8 or later) is automatically prepared. Then, Kaspersky Endpoint Security for Windows is automatically upgraded on managed devices running Windows.
To start using Endpoint Detection and Response:
- Open Kaspersky Next Management Console.
- Do any of the following:
- In the Information panel section, select the Getting started tab.
- In the Information panel section, select the Monitoring tab.
- In the Settings section, click the Settings link below Use of Endpoint Detection and Response.
The Endpoint Detection and Response page opens.
- Click Enable Endpoint Detection and Response.
The Enable Use of Endpoint Detection and Response Wizard opens.
Some steps of the Wizard may be missing if you performed them during the initial or additional setup of Kaspersky Next.
The Agreements for Kaspersky Endpoint Security for Windows window opens.
This window displays the texts of the End User License Agreement for Kaspersky Endpoint Security for Windows, the End User License Agreement for Kaspersky Security Center Network Agent, the Supplemental Clauses regarding Data Processing for Kaspersky Endpoint Security for Windows and Network Agent, and the link to the Kaspersky Lab Products and Services Privacy Policy.
- Carefully read the text of each document.
If you agree to the terms and conditions of the agreements, and if you are aware and agree that your data will be handled and transmitted (including to third countries) as described in the Privacy Policy, and you confirm that you have fully read and understand the Privacy Policy, select the check boxes next to the listed documents, and then click the I accept the terms button.
If you do not agree to the terms and conditions, do not use the security applications. If only some of the check boxes are selected, you will not be able to use Endpoint Detection and Response. The Agreements for Kaspersky Endpoint Security for Windows window will close.
The Proxy server settings window opens.
- If necessary, define the proxy server settings, and then click Next.
Endpoint Detection and Response is enabled.
Later, you can disable the feature if you want to stop using it.
Page top
Scenario: Configuring and using Endpoint Detection and Response
To use Endpoint Detection and Response in the automatic mode, you must first configure it.
The scenario proceeds in stages:
- Configure IoC scans for potential threats
By using IoC scans, you can configure a regular search for Indicators of Compromise (IoCs) on devices and automatic response measures to be taken if IoCs are found.
- Configure execution prevention
You can define settings according to which Kaspersky Endpoint Security for Windows prevents the execution of certain objects (executable files and scripts) or the opening of Microsoft Office documents on your users' devices.
- View and analyze information about occurred alerts
- Take manual response measures
While analyzing details of an alert, you may want to take additional measures or fine-tune the Endpoint Detection and Response feature:
- Take manual response measures (for example, move the detected file to Quarantine or isolate the device on which the alert occurred).
- Add the found IoCs to the settings of regular IoC scans, to check other devices for the same threat.
- Add the detected object to the list of execution prevention rules, to prevent it from being executed in the future on the same and other devices.
Configuring IoC scans for potential threats
By using IoC scans, you can configure a regular search for Indicators of Compromise (IoCs) on devices and automatic response measures to be taken if IoCs are found.
You can define settings of three IoC scans:
- Proactive scan
If you find somewhere (for example, on the internet) that a certain threat is characterized by a set of IoCs, you can add these IoCs to this scan, to check your users' devices.
The scan scope is all of your users' devices running Windows. It cannot be modified. All new devices that are added in the future will be automatically included in the scan scope.
- Reactive scan
If Kaspersky Next detects a threat on one of your users' devices, you can add IoCs of that threat to this scan, to check other devices.
The scan scope is all of your users' devices running Windows. It cannot be modified. All new devices that are added in the future will be automatically included in the scan scope.
- Custom scan
You can add any threat to this scan, to check your users' devices.
The scan scope is a custom selection of your users' devices running Windows. All new devices that are added in the future will be automatically included in the scan scope.
Later, when analyzing alerts about Endpoint Protection Platform (EPP) detections on your users' devices, you may want to add the found IoCs to the settings of Reactive scan, to check other devices for the same threat.
To configure IoC scans:
- Open Kaspersky Next Management Console.
- Select the Security management → Endpoint Detection and Response section.
- Click the IoC scan button.
- In the IoC scan window that opens, define the settings of the required IoC scans.
- Click Close to close the IoC scan window.
IoC scans are configured.
Adding a threat to an IoC scan
When configuring regular scans for threats on devices or after a threat is already detected on one of your users' devices, you can add a threat to an IoC scan, so that it will check other devices for that threat.
To each IoC scan, you can add a maximum of 200 threats.
To add a threat to an IoC scan:
- Open Kaspersky Next Management Console.
- Select the Security management → Endpoint Detection and Response section.
- Click the IoC scan button.
- Add a threat in either of the following ways:
- To add a threat to Proactive scan, click the Add a threat button.
- To add a threat to any scan, click the View link on the respective tile, and then click the Add button.
The Add a threat window opens.
- Enter the threat name.
- If necessary, enter the threat description.
- Under Indicators of compromise (IoCs), specify IoCs of this threat:
- If you plan to specify two or more IoCs, in the Detection criteria list, select the detection criteria (the logical operator):
- Match ANY of the following, if you want an alert to occur if at least one of the IoCs is found on a device (the OR logical operator).
- Match ALL of the following, if you want an alert to occur only if all of the IoCs are found on a device simultaneously (the AND logical operator).
- Under Indicator 1, select the IoC type, and then specify its value.
When adding a registry key as an IoC, start from a registry hive (for example,
HKEY_LOCAL_MACHINE\Software\Microsoft).
When you add a registry key as an IoC, Kaspersky Endpoint Security for Windows scans only some of the registry keys. - If you want to add more IoCs to the threat, click + Add an indicator, and then specify another IoC.
To each threat, you can add a maximum of 100 IoCs.
- If you plan to specify two or more IoCs, in the Detection criteria list, select the detection criteria (the logical operator):
- Click Save to save the changes.
The threat is added to the selected IoC scan.
Page top
IoC scan scope in the registry
When scanning Registry for threats, Kaspersky Endpoint Security for Windows scans only those registry keys that are most vulnerable to attacks.
When you add a registry key as an IoC, Kaspersky Next checks the entered value and accepts only the registry keys that start with the following values:
HKEY_CLASSES_ROOT\htafile
HKEY_CLASSES_ROOT\batfile
HKEY_CLASSES_ROOT\exefile
HKEY_CLASSES_ROOT\comfile
HKEY_LOCAL_MACHINE\System\CurrentControlSet\Control\Lsa
HKEY_LOCAL_MACHINE\System\CurrentControlSet\Control\Print\Monitors
HKEY_LOCAL_MACHINE\System\CurrentControlSet\Control\NetworkProvider
HKEY_LOCAL_MACHINE\System\CurrentControlSet\Control\Class
HKEY_LOCAL_MACHINE\System\CurrentControlSet\Control\SecurityProviders
HKEY_LOCAL_MACHINE\System\CurrentControlSet\Control\Terminal Server
HKEY_LOCAL_MACHINE\System\CurrentControlSet\Control\Session Manager
HKEY_LOCAL_MACHINE\System\CurrentControlSet\Services
HKEY_LOCAL_MACHINE\Software\Classes\piffile
HKEY_LOCAL_MACHINE\Software\Classes\htafile
HKEY_LOCAL_MACHINE\Software\Classes\exefile
HKEY_LOCAL_MACHINE\Software\Classes\comfile
HKEY_LOCAL_MACHINE\Software\Classes\CLSID
HKEY_LOCAL_MACHINE\Software\Microsoft\Windows\CurrentVersion\Run
HKEY_LOCAL_MACHINE\Software\Microsoft\Windows\CurrentVersion\ShellServiceObjectDelayLoad
HKEY_LOCAL_MACHINE\Software\Microsoft\Windows\CurrentVersion\Policies\Explorer
HKEY_LOCAL_MACHINE\Software\Wow6432Node\Microsoft\Windows\CurrentVersion\Run
HKEY_LOCAL_MACHINE\SOFTWARE\Microsoft\Active Setup\Installed Components
HKEY_LOCAL_MACHINE\SOFTWARE\Microsoft\Windows NT\CurrentVersion\Windows
HKEY_LOCAL_MACHINE\Software\Microsoft\Windows NT\CurrentVersion\Image File Execution Options
HKEY_LOCAL_MACHINE\Software\Microsoft\Windows NT\CurrentVersion\Aedebug
HKEY_LOCAL_MACHINE\SOFTWARE\Microsoft\Windows NT\CurrentVersion\Winlogon
Defining IoC scan settings
When configuring regular scans for threats on devices, you can define the following scan settings: schedule, scope, and automatic response actions.
To define settings of an IoC scan:
- Open Kaspersky Next Management Console.
- Select the Security management → Endpoint Detection and Response section.
- Click the IoC scan button.
- On the tile of the required scan, point to the vertical ellipsis, and then click Define scan settings.
The Scan settings window opens.
- In the Schedule list, select the required value:
- Not specified (by default)
The IoC scan never runs.
- Every day
Specify the time when the IoC scan must run.
- Every week
Specify the day of week and the time when the IoC scan must run.
Custom scan will run at the specified time in the UTC±00:00 time zone. Proactive scan and Reactive scan will run at the specified time in the time zone of the device operating system. If a protected device is offline at the scheduled time, the task will run as soon as the device goes online.
- Not specified (by default)
- Under Scan scope, click the Edit link to specify the list of devices on which the IoC scan must run.
Select the check boxes next to the devices to be included and clear the check boxes next to the devices to be excluded. Click Save to save the changes.
This setting is available only for Custom scan. For other scans (Proactive scan and Reactive scan), the scope is all of your users' devices running Windows. It cannot be modified.
All new devices that are added in the future will be automatically included in the scan scope. So, if you want to exclude them from the scope of the custom scan, you must do it manually.
- Under Response actions, select the response actions to be taken if the specified threats are detected:
- Alert only
The event of detecting a threat is added to the Event log. No other actions are taken.
- Alert and response
The event of detecting a threat is added to the Event log. Additionally, the selected response actions are taken:
- Run scan of critical areas
Kaspersky Endpoint Security for Windows scans the kernel memory, running processes, and disk boot sectors of an affected device.
- Move copy to Quarantine and delete object
Kaspersky Endpoint Security for Windows first creates a backup copy of the malicious object found on the device, in case the object needs to be restored later. The backup copy is moved to Quarantine. Then, Kaspersky Endpoint Security for Windows deletes the object.
- Isolate device from the network
Kaspersky Endpoint Security for Windows isolates the device from the network, to prevent the threat from spreading or prevent a breach of sensitive information. To configure the isolation duration, click Settings, and then select the required value.
The isolation duration is common for all three IoC scans. If you change the value in the settings of one scan, it will be propagated to other scans.
As an alternative, you can configure the isolation duration by selecting the Security management → Endpoint Detection and Response section, and then clicking Response settings → Network isolation.
- Run scan of critical areas
- Alert only
- Click Save to save the changes.
The settings of the selected IoC scan are defined.
Page top
Resetting IoC scan settings to default values
If necessary, you can reset the settings of any regular scan for threats to the default values. You can reset the scan schedule, scope, and response actions. The set of threats that are scanned for is not changed.
To reset IoC scan settings to default values:
- Open Kaspersky Next Management Console.
- Select the Security management → Endpoint Detection and Response section.
- Click the IoC scan button.
- On the tile of the required scan, point to the vertical ellipsis, and then click Reset settings to default.
- In the Reset settings to default window that opens, click the Confirm button to confirm the action.
The settings of the selected IoC scan are reset to the default values.
Page top
Configuring execution prevention
You can define settings according to which Kaspersky Endpoint Security for Windows prevents the execution of certain objects (executable files and scripts) or the opening of Microsoft Office documents on your users' devices.
Later, when analyzing Endpoint Detection and Response alerts, you may want to add a detected object to the list of execution prevention rules, to prevent it from being executed in the future on the same and other devices.
Execution prevention has the following limitations:
- Prevention rules do not cover files on CDs, DVDs, or in ISO images. Kaspersky Endpoint Security for Windows does not block the execution or opening of these files.
- It is impossible to block the startup of a system-critical object (SCO). SCOs are files that the operating system and Kaspersky Endpoint Security for Windows require to be able to run.
- You can add up to 1000 execution prevention rules.
To configure execution prevention:
- Open Kaspersky Next Management Console.
- Select the Security management → Endpoint Detection and Response section.
- Click Response settings → Execution prevention.
- Set the toggle switch to Execution prevention is enabled.
- Under Action, select the action to be taken when the user tries to execute or open one of the specified unwanted objects:
- Block and add to Event log (by default)
The information about the detection is added to the Event log. The execution or opening of the object is blocked.
- Add to Event log only
The information about the detection is added to the Event log. No other actions are taken.
- Block and add to Event log (by default)
- Under Execution prevention rules, specify the list of objects that are controlled by Execution prevention.
Do any of the following:
- To add an execution prevention rule:
- Click the Add button.
- In the Add an execution prevention rule window that opens, define the rule settings, as described later in this section.
- Click Save to close the Add an execution prevention rule window.
- To enable or disable an added execution prevention rule, set the toggle switch next to that rule to the desired state:
- If the toggle switch is green, the rule is enabled. The execution or opening of the object specified in the rule settings is detected.
By default, a newly added rule is enabled.
- If the toggle switch is gray, the rule is disabled. The execution or opening of the object specified in the rule settings is ignored.
- If the toggle switch is green, the rule is enabled. The execution or opening of the object specified in the rule settings is detected.
- To edit an added execution prevention rule:
- Select the check box next to the required rule.
- Click the Edit button.
- In the Edit execution prevention rule window that opens, define the new settings of the rule, as described later in this section.
- Click Save to close the Edit execution prevention rule window.
- To delete execution prevention rules that were added:
- Select the check boxes next to the required rules.
- Click the Delete button.
- To add an execution prevention rule:
- Click Save to save the changes.
The list of execution prevention rules is updated.
To define the settings of an execution prevention rule:
- Start adding or editing a rule, as described earlier in this section.
- In the Rule name field, enter the name of the rule.
- Select the criteria according to which you want to specify the required object.
You can specify either of the following criteria:
- Path to object
If you want to specify the object by its path, select Use in the list, and then enter the value.
- Object checksum
If you want to specify the object by its MD5 or SHA256 checksum, select the required value in the list, and then enter the checksum value.
If you specify both criteria, the rule will be applied to objects that match both of them simultaneously.
- Path to object
- Click Save to save the changes.
The defined settings are saved.
Page top
Viewing information about Endpoint Detection and Response alerts
You can view information about Endpoint Detection and Response alerts in a widget and a table. The widget shows up to 10 alerts and the table shows up to 1000 alerts.
If you have configured notifications about the IoC found events, sometimes you may be notified about a detected IoC before the respective alert is displayed inside Kaspersky Next. This is because events occur when the IoC scan is still in progress, while an alert appears only after the scan ends.
Endpoint Detection and Response widget
To view the Endpoint Detection and Response widget:
- Open Kaspersky Next Management Console.
- In the Information panel section, click the Monitoring tab.
- If Endpoint Detection and Response is disabled, start using the feature.
The widget displays the requested information.
From the displayed widget, you can proceed to the following:
- Properties of the device on which a detection occurred.
- Alert details, depending on the technology that detected the alert:
- If the alert was detected by Endpoint Protection Platform (EPP)—threat development chain graph, to perform root-cause analysis of the attack and take response measures.
- If the alert was detected by Indicators of Compromise Scan (IoC Scan)—objects that have been detected by using IoCs and automatic response measures that have been taken.
- Table with the Endpoint Detection and Response alerts.
Endpoint Detection and Response table
To view the table with the Endpoint Detection and Response alerts:
- Open Kaspersky Next Management Console.
- Open the Endpoint Detection and Response alerts window in any of the following ways:
- In the Information panel section, click the Monitoring tab, and then click the Go to the list of alerts link in the Endpoint Detection and Response widget.
- Select the Security management → Endpoint Detection and Response section.
- If Endpoint Detection and Response is disabled, start using the feature.
The table displays the requested information.
- Filter the displayed records by selecting the required values in the drop-down lists:
- Detected on
The period over which alerts have occurred.
- Status
The status of alerts, depending on the technology that detected them:
- If an alert was detected by EPP—whether the detected objects have been treated or untreated (deleted).
- If an alert was detected by IoC scan—whether IoCs have been only detected or automatic response measures have been taken.
- Technology
The technology that detected alerts: EPP or IoC scan.
- Detected on
From the displayed table, you can proceed to the following:
- Properties of the device on which a detection occurred.
- Settings of the security profile that is assigned to the user who owns an affected device.
- Alert details, depending on the technology that detected the alert:
- If the alert was detected by Endpoint Protection Platform (EPP)—threat development chain graph, to perform root-cause analysis of the attack and take response measures.
- If the alert was detected by Indicators of Compromise Scan (IoC Scan)—objects that have been detected by using IoCs and automatic response measures that have been taken.
Also, you can export information about all of the current alerts to a CSV file.
Page top
Viewing a threat development chain graph
For each alert that has been detected by Endpoint Detection and Response by using the Endpoint Protection Platform (EPP) technology and that is displayed on a widget or in a table, you can view a threat development chain graph.
A threat development chain graph is a tool for analyzing the root cause of an attack. The graph provides visual information about the objects involved in the attack, for example, processes on a managed device, network connections, or registry keys.
While analyzing the threat development chain graph, you may want to take manual response measures or fine-tune the Endpoint Detection and Response feature.
To view a threat development chain graph:
- Proceed to the Endpoint Detection and Response widget or table.
- In the required line where the Technology column value is EPP, click Examine.
The Threat development chain graph window opens. The window contains a threat development chain graph and detailed information about the alert.
A threat development chain graph shows the following types of objects:
- Process
- File
- Network connection
- Registry key
A graph is generated according to the following rules:
- The central point of a graph is a process that meets either of the following rules:
- If the threat has been detected in a process, it is this process.
- If the threat has been detected in a file, it is the process that created this file.
- For the process that is mentioned in rule 1, the graph shows up to two parent processes. A parent process is the one that either generated or modified a child process.
- For the process that is mentioned in rule 1, the graph shows all other related objects: created files, created and modified child processes, organized network connections, and modified registry keys.
When you click any object on a graph, the area below shows detailed information about the selected object.
When you click a link in the SHA256, MD5, IP address, or URL fields in the detailed information about a file, you are taken to the Kaspersky Threat Intelligence Portal https://opentip.kaspersky.com/. The portal brings together all of the knowledge that Kaspersky has acquired about cyberthreats into a single web service. It allows you to check any suspicious threat indicator, whether it is a file, file hash, IP address, or web address.
Example of analyzing a threat development chain graph
This section contains an example of a threat development chain graph and how you can use it for analyzing an attack on your users' devices.
Let's consider an attack using a phishing email message that contains an attachment. The attachment is an executable file.
The user saves and runs the file on his or her device. Kaspersky Endpoint Security for Windows makes a detection of the Malicious object detected type.
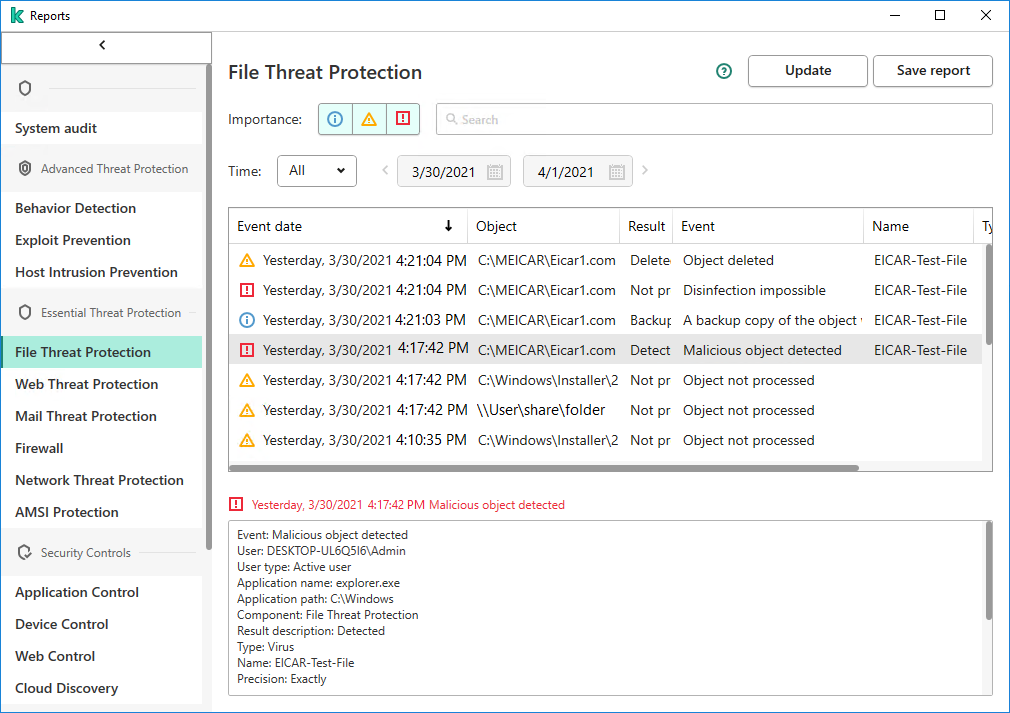
A detection in Kaspersky Endpoint Security for Windows
The Endpoint Detection and Response widget shows up to 10 alerts.
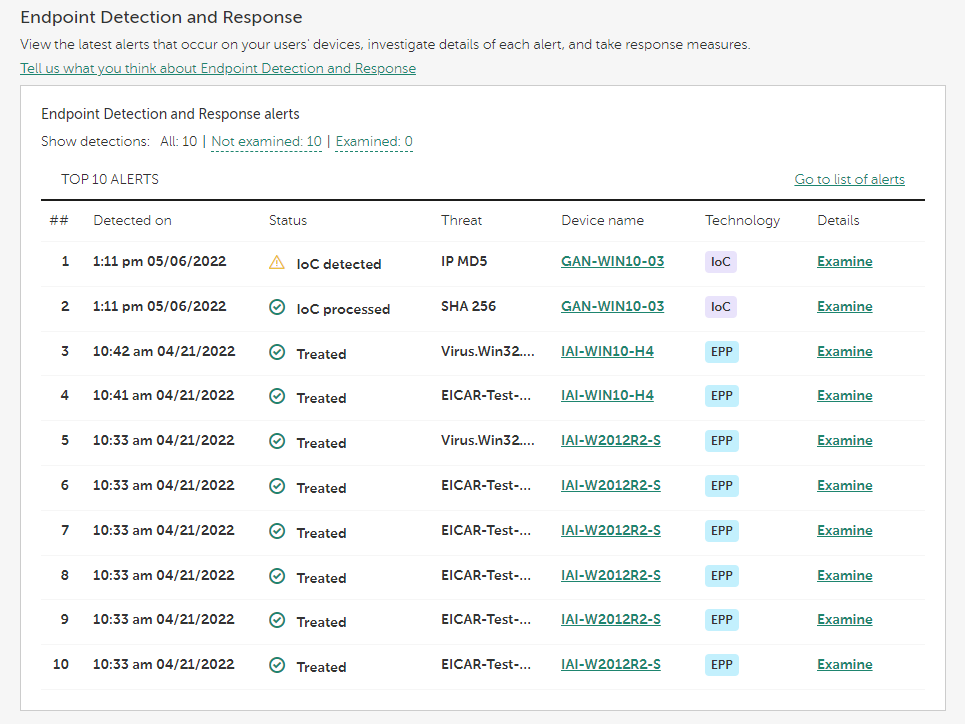
Endpoint Detection and Response widget
By clicking the Examine link in the required line of the widget, you can proceed to a threat development chain graph.

A threat development chain graph
The threat development chain graph provides you with information about the alert, for example: actions that occurred on the device during the alert, category of the detected threat, the file origin (in this example, an email), the user who downloaded the file (in this example, an administrator). Also, the chain graph shows that additional files were created on the device, that several network connections were established, and that some registry keys were changed.
Based on this information, you can do the following:
- Verify the settings of the mail server.
- Add the email message sender to the denylist (if the sender is external), or address him or her directly (if the sender is internal).
- Check whether other devices have connected to the same IP addresses.
- Add these IP addresses to the denylist.
When you click a link in the SHA256, MD5, IP address, or URL fields in the detailed information about a file, you are taken to the Kaspersky Threat Intelligence Portal https://opentip.kaspersky.com/. The Portal shows that the detected file is neither a threat nor a known file.
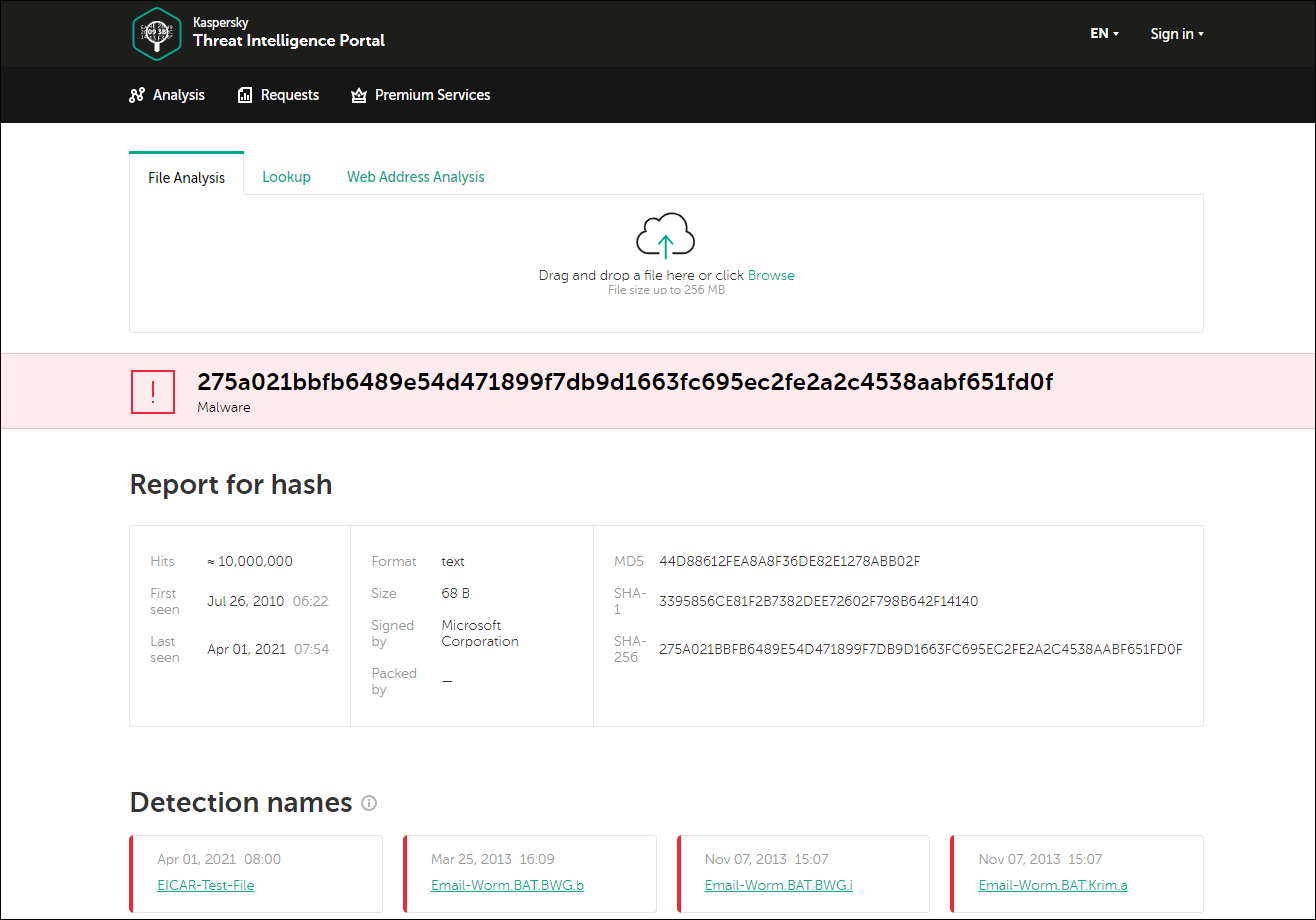
Kaspersky Threat Intelligence Portal
This example shows the importance of the Endpoint Detection and Response feature. The parent file of the detected file is untrusted, but it is not a malicious one. It means that it has not been detected by Kaspersky Endpoint Security for Windows. This file is still present on the device and within the organization. If the organization has devices on which some protection components are disabled (for example, Behavior Detection) or on which anti-malware databases are not up-to-date, the malicious activity of the parent file will not be detected and the criminals may have a chance to penetrate your organization's infrastructure.
Page top
Viewing IoC scan results
For each alert that has been detected by Endpoint Detection and Response by using the Indicators of Compromise Scan (IoC Scan) technology and that is displayed on a widget or in a table, you can view information about the objects that have been detected by using IoCs and the automatic response measures that have been taken.
While analyzing the IoC scan results, you may want to take manual response measures or fine-tune the Endpoint Detection and Response feature.
To view IoC scan results:
- Proceed to the Endpoint Detection and Response widget or table.
- In the required line where the Technology column value is IoC, click Examine.
The IoC scan results window opens. This window contains detailed information about the IoCs that have been found and the automatic response measures that have been taken.
Page top
Taking manual response measures
While analyzing alert details, you may want to take manual response measures or fine-tune the Endpoint Detection and Response feature.
You can take the following response measures:
- Isolate the affected device from the network.
- Add the Indicators of Compromise (IoCs) of the detected threat to a regular scan for threats on devices (applicable only to alerts detected by EPP).
- Prevent execution of the detected object.
- Move the copy of the detected object to Quarantine and delete the object.
To isolate a device from the network:
- In the message about the object detection and processing, point to the horizontal ellipsis, and then click Isolate device.
- Select the required isolation duration.
- Click the Isolate device button to isolate the device.
The device is isolated from the network.
This setting overrides the general isolation settings and is applied only to the current device. General isolation settings are not changed.
To add the IoCs of a detected threat to a regular scan for threats:
- In the section with detailed information about a detected object, either click the Add to IoC scan button or point to the horizontal ellipsis, and then click Add to IoC scan.
- If necessary, edit the threat name and description. By default, the threat is named "
[Threat Graph]<Threat name from the EPP alert>". - If necessary, edit the detection criteria (the logical operator):
- Match ANY of the following, if you want an alert to occur if at least one of the IoCs is found on a device (the OR logical operator).
- Match ALL of the following, if you want an alert to occur only if all of the IoCs are found on a device simultaneously (the AND logical operator).
- If necessary, edit the list of IoCs. The list of IoCs consists of two parts:
- New IoCs
IoCs that are taken from the alert.
- Previously added IoCs
IoCs that have been added to the same threat earlier (if any).
- New IoCs
- If necessary, remove any of the IoCs by clicking the Delete (
 ) icon next to it.
 - Click the Run scan button to save and run the IoC scan.
The IoC scan settings are changed. The scan has re-started on the devices.
To prevent execution of a detected object:
- Do either of the following:
- [For an alert detected by EPP] In the section with detailed information about a detected object, either click the Prevent execution button or point to the horizontal ellipsis, and then click Prevent execution.
- [For an alert detected by IoC Scan] In the section with detailed information about a detected IoC, next to Manual response, click Actions, and then select Prevent execution.
- Review the properties of the planned operation: the unwanted objects whose execution will be prevented and the action that will be taken upon execution or opening of these objects.
- Click Confirm to confirm the operation.
The detected object is added to the execution prevention rules.
To move the copy of a detected object to Quarantine and delete the object:
- Do either of the following:
- [For an alert detected by EPP] In the section with detailed information about a detected object, either click the Move to Quarantine button or point to the horizontal ellipsis, and then click Move to Quarantine.
- [For an alert detected by IoC Scan] In the section with detailed information about a detected IoC, next to Manual response, click Actions, and then select Move to Quarantine.
- Review the properties of the planned operation: the file that will be moved to Quarantine and the device on which this will happen.
- Click Move to confirm the operation.
Kaspersky Endpoint Security for Windows first creates a backup copy of the malicious object found on the device, in case the object needs to be restored later. The backup copy is moved to Quarantine. Then, Kaspersky Endpoint Security for Windows deletes the object.
Page top
Canceling network isolation of a Windows device
Depending on the settings of regular scans for threats or on your decision when analyzing occurred alerts, a device on which a threat has been detected may be isolated from the network for a certain period. When you are sure that the isolation is no longer needed (for example, you have stopped the threat spreading or data breach), you can send a command to cancel isolation of a device before the specified period elapses.
To cancel network isolation of a Windows device:
- Open Kaspersky Next Management Console.
- Select the Devices section.
The Devices section contains a list of devices that have been added to Kaspersky Next.
- Do either of the following:
- Select the check box next to the required isolated device, and then click the Cancel isolation button.
- Click the link with the device name.
This opens a page containing detailed information about the device. The left part of the page shows the Commands list, which contains buttons with the commands that are available for the device.
Click the Cancel isolation button.
The isolation cancelation command is sent to the device. Its execution takes some time.
Page top
Exporting information about Endpoint Detection and Response alerts
From the table with Endpoint Detection and Response alerts, you can export information about all of the current alerts to a CSV file. For example, you can use a file with alerts to prepare a report for your management.
To export information about Endpoint Detection and Response alerts:
- Proceed to the table with the Endpoint Detection and Response alerts.
- Click the Export alerts button.
The Export Endpoint Detection and Response alerts window opens.
- Click Export to confirm the export.
A file with Endpoint Detection and Response alerts is created and automatically downloaded. The file contains the same columns as the table with alerts.
Disabling Endpoint Detection and Response
If you want to stop using Endpoint Detection and Response, you can disable the feature as described in this section.
To disable Endpoint Detection and Response:
- Open Kaspersky Next Management Console.
- Select the Settings section.
The General settings of Kaspersky Next page is displayed.
- Click the Settings link in the Use of Endpoint Detection and Response section.
The Endpoint Detection and Response page opens.
- Click the Disable Endpoint Detection and Response button.
- In the confirmation window that opens, click the Disable button.
Endpoint Detection and Response is disabled.
Later, you can enable the feature again.
Page top
Root-Cause Analysis
This section contains information about Root-Cause Analysis.
The Root-Cause Analysis feature allows you to detect and root out advanced attacks, perform root-cause analysis with a visualized threat development chain graph, and drill down to details for further review.
This feature is available only if you activated Kaspersky Next under a Kaspersky Next EDR Foundations license.
If you activated Kaspersky Next under a Kaspersky Next EDR Optimum or XDR Expert license, you have access to the full-fledged Endpoint Detection and Response.
To use this feature, you need Kaspersky Endpoint Security 11.8 for Windows or later.
About Root-Cause Analysis
Kaspersky Next allows you to detect and root out advanced attacks, perform root-cause analysis with a visualized threat development chain graph, and drill down to details for further review.
This feature is available only if you activated Kaspersky Next under a Kaspersky Next EDR Foundations license.
If you activated Kaspersky Next under a Kaspersky Next EDR Optimum or XDR Expert license, you have access to the full-fledged Endpoint Detection and Response.
To use this feature, you need Kaspersky Endpoint Security 11.8 for Windows or later.
Root-Cause Analysis detects threats in the following types of objects:
- Process
- File
- Registry key
- Network connection
You can start using the Root-Cause Analysis feature when you start Kaspersky Next Management Console for the first time or after Kaspersky Next is upgraded to a new version. If you did not start using Root-Cause Analysis during the initial or additional setup of Kaspersky Next, you can do it later.
The Root-Cause Analysis widget and table display detections that occur on your users' devices and allow you to investigate a threat development chain graph for each detection. The widget shows up to 10 detections and the table shows up to 1000 detections.
From the Root-Cause Analysis table, you can export information about all of the current detections to a CSV file.
If you want to stop using the feature, you can disable it and later enable it again.
Page top
Starting the use of Root-Cause Analysis
You can start using the Root-Cause Analysis feature when you start Kaspersky Next Management Console for the first time or after Kaspersky Next is upgraded to a new version. If you did not start using Root-Cause Analysis during the initial or additional setup of Kaspersky Next, you can do it as described in this section.
After you start using the feature, the distribution package of Kaspersky Endpoint Security for Windows (version 11.8 or later) is automatically prepared. Then, Kaspersky Endpoint Security for Windows is automatically upgraded on managed devices running Windows.
To start using Root-Cause Analysis:
- Open Kaspersky Next Management Console.
- Do any of the following:
- In the Information panel section, select the Getting started tab.
- In the Information panel section, select the Monitoring tab.
- In the Settings section, click the Settings link below Use of Root-Cause Analysis.
The Root-Cause Analysis page opens.
- Click Enable Root-Cause Analysis.
The Enable Use of Root-Cause Analysis Wizard opens.
Some steps of the Wizard may be missing if you performed them during the initial or additional setup of Kaspersky Next.
The Agreements for Kaspersky Endpoint Security for Windows window opens.
This window displays the texts of the End User License Agreement for Kaspersky Endpoint Security for Windows, the End User License Agreement for Kaspersky Security Center Network Agent, the Supplemental Clauses regarding Data Processing for Kaspersky Endpoint Security for Windows and Network Agent, and the link to the Kaspersky Lab Products and Services Privacy Policy.
- Carefully read the text of each document.
If you agree to the terms and conditions of the agreements, and if you are aware and agree that your data will be handled and transmitted (including to third countries) as described in the Privacy Policy, and you confirm that you have fully read and understand the Privacy Policy, select the check boxes next to the listed documents, and then click the I accept the terms button.
If you do not agree to the terms and conditions, do not use the security applications. If only some of the check boxes are selected, you will not be able to use Root-Cause Analysis. The Agreements for Kaspersky Endpoint Security for Windows window will close.
The Proxy server settings window opens.
- If necessary, define the proxy server settings, and then click Next.
Root-Cause Analysis is enabled.
Later, you can disable the feature if you want to stop using it.
Page top
Viewing information about Root-Cause Analysis detections
You can view information about Root-Cause Analysis detections in a widget and a table. The widget shows up to 10 detections and the table shows up to 1000 detections.
Root-Cause Analysis widget
To view the Root-Cause Analysis widget:
- Open Kaspersky Next Management Console.
- In the Information panel section, click the Monitoring tab.
- If Root-Cause Analysis is disabled, start using the feature.
The widget displays the requested information.
From the displayed widget, you can proceed to the following:
- Properties of the device on which a detection occurred.
- Threat development chain graph, to perform root-cause analysis of the attack.
- Table with the Root-Cause Analysis detections.
Root-Cause Analysis table
To view the table with the Root-Cause Analysis detections:
- Open Kaspersky Next Management Console.
- Open the Root-Cause Analysis detections window in any of the following ways:
- In the Information panel section, click the Monitoring tab, and then click the Go to the list of detections link in the Root-Cause Analysis widget.
- Select the Security management → Root-Cause Analysis section.
- If Root-Cause Analysis is disabled, start using the feature.
The table displays the requested information.
- Filter the displayed records by selecting the required values in the drop-down lists:
- Detected on
The period over which detections have occurred.
- Status
Whether the detected objects have been treated or untreated (deleted).
- Detected on
From the displayed table, you can proceed to the following:
- Properties of the device on which a detection occurred.
- Settings of the security profile that is assigned to the user who owns an affected device.
- Threat development chain graph, to perform root-cause analysis of the attack.
Also, you can export information about all of the current detections to a CSV file.
Page top
Viewing a threat development chain graph
For each detection that has been made by Root-Cause Analysis and is displayed on a widget or in a table, you can view a threat development chain graph.
A threat development chain graph is a tool for analyzing the root cause of an attack. The graph provides visual information about the objects involved in the attack, for example, processes on a managed device, network connections, or registry keys.
To view a threat development chain graph:
- Proceed to the Root-Cause Analysis widget or table.
- In the required line, click Examine.
The Root-Cause Analysis detection details window opens. The window contains a threat development chain graph and detailed information about the detection.
A threat development chain graph shows the following types of objects:
- Process
- File
- Network connection
- Registry key
A graph is generated according to the following rules:
- The central point of a graph is a process that meets either of the following rules:
- If the threat has been detected in a process, it is this process.
- If the threat has been detected in a file, it is the process that created this file.
- For the process that is mentioned in rule 1, the graph shows up to two parent processes. A parent process is the one that either generated or modified a child process.
- For the process that is mentioned in rule 1, the graph shows all other related objects: created files, created and modified child processes, organized network connections, and modified registry keys.
When you click any object on a graph, the area below shows detailed information about the selected object.
When you click a link in the SHA256, MD5, IP address, or URL fields in the detailed information about a file, you are taken to the Kaspersky Threat Intelligence Portal https://opentip.kaspersky.com/. The portal brings together all of the knowledge that Kaspersky has acquired about cyberthreats into a single web service. It allows you to check any suspicious threat indicator, whether it is a file, file hash, IP address, or web address.
Example of analyzing a threat development chain graph
This section contains an example of a threat development chain graph and how you can use it for analyzing an attack on your users' devices.
Let's consider an attack using a phishing email message that contains an attachment. The attachment is an executable file.
The user saves and runs the file on his or her device. Kaspersky Endpoint Security for Windows makes a detection of the Malicious object detected type.
A detection in Kaspersky Endpoint Security for Windows
The Root-Cause Analysis widget shows up to 10 detections.
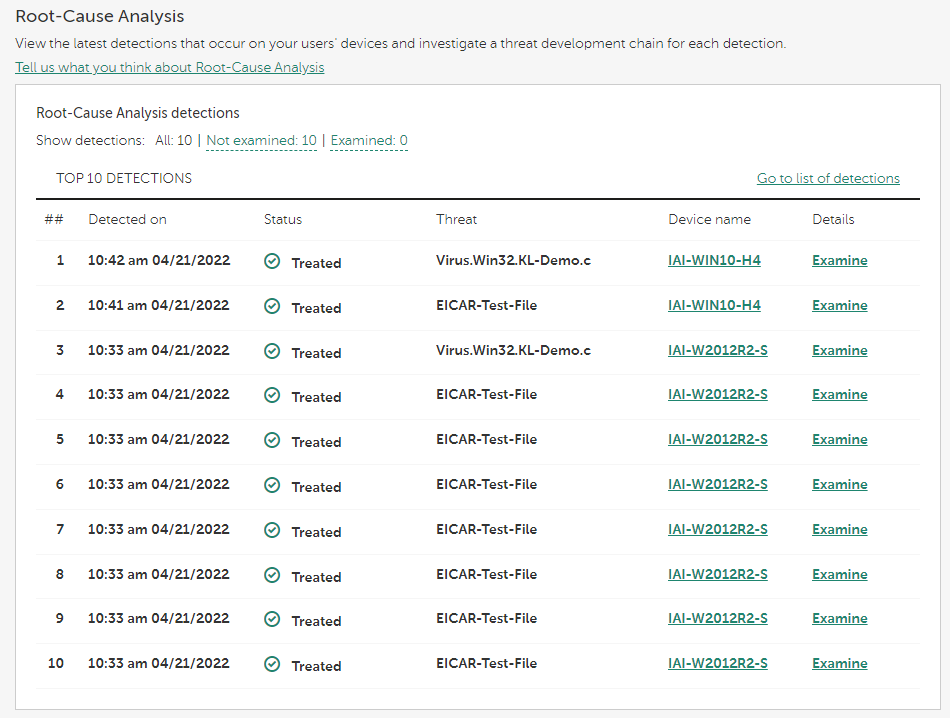
Root-Cause Analysis widget
By clicking the Examine link in the required line of the widget, you can proceed to a threat development chain graph.

A threat development chain graph
The threat development chain graph provides you with information about the detection, for example: actions that occurred on the device during the detection, category of the detected threat, the file origin (in this example, an email), the user who downloaded the file (in this example, an administrator). Also, the chain graph shows that additional files were created on the device, that several network connections were established, and that some registry keys were changed.
Based on this information, you can do the following:
- Verify the settings of the mail server.
- Add the email message sender to the denylist (if the sender is external), or address him or her directly (if the sender is internal).
- Check whether other devices have connected to the same IP addresses.
- Add these IP addresses to the denylist.
When you click a link in the SHA256, MD5, IP address, or URL fields in the detailed information about a file, you are taken to the Kaspersky Threat Intelligence Portal https://opentip.kaspersky.com/. The Portal shows that the detected file is neither a threat nor a known file.
Kaspersky Threat Intelligence Portal
This example shows the importance of the Root-Cause Analysis feature. The parent file of the detected file is untrusted, but it is not a malicious one. It means that it has not been detected by Kaspersky Endpoint Security for Windows. This file is still present on the device and within the organization. If the organization has devices on which some protection components are disabled (for example, Behavior Detection) or on which anti-malware databases are not up-to-date, the malicious activity of the parent file will not be detected and the criminals may have a chance to penetrate your organization's infrastructure.
Page top
Exporting information about Root-Cause Analysis detections
From the table with Root-Cause Analysis detections, you can export information about all of the current detections to a CSV file. For example, you can use a file with detections to prepare a report for your management.
To export information about Root-Cause Analysis detections:
- Proceed to the table with the Root-Cause Analysis detections.
- Click the Export detections button.
The Export Root-Cause Analysis detections window opens.
- Click Export to confirm the export.
A file with Root-Cause Analysis detections is created and automatically downloaded. The file contains the same columns as the table with detections.
Disabling Root-Cause Analysis
If you want to stop using Root-Cause Analysis, you can disable the feature as described in this section.
To disable Root-Cause Analysis:
- Open Kaspersky Next Management Console.
- Select the Settings section.
The General settings of Kaspersky Next page is displayed.
- Click the Settings link in the Use of Root-Cause Analysis section.
The Root-Cause Analysis page opens.
- Click the Disable Root-Cause Analysis button.
- In the confirmation window that opens, click the Disable button.
Root-Cause Analysis is disabled.
Later, you can enable the feature again.
Page top
Adaptive Anomaly Control
This section contains information about Adaptive Anomaly Control.
The Adaptive Anomaly Control feature monitors and blocks actions that are not typical of the Windows devices in a company's network.
This feature is available only if you activated Kaspersky Next under a Kaspersky Next EDR Optimum or XDR Expert license.
About Adaptive Anomaly Control
Kaspersky Next monitors and blocks actions that are not typical of the Windows devices in a company's network.
This feature is available only if you activated Kaspersky Next under a Kaspersky Next EDR Optimum or XDR Expert license.
Adaptive Anomaly Control uses a set of rules to track uncharacteristic behavior (for example, the Start of Microsoft PowerShell from office application rule). Rules are created by Kaspersky experts, based on typical scenarios of malicious activity. You can configure how Adaptive Anomaly Control handles each rule and, for example, allow the execution of PowerShell scripts that automate certain workflow tasks. Kaspersky Next updates the set of rules along with the application databases.
Each Adaptive Anomaly Control rule can be in one of the following modes:
- Notify
The detections made by this rule are only added to the Event log. No other actions are made.
- Block
The feature blocks all actions that are associated with the rule.
- Smart
First, you train the rule by selecting whether the detections made by it are actually uncharacteristic behavior or false positives. After the training period ends, the feature allows or blocks further actions according to the training results.
You can enable and configure Adaptive Anomaly Control. After the feature detects some uncharacteristic behavior, you can process the list of detections and either confirm them or add to exclusions, depending on whether a detection is actually anomalous behavior or not.
Kaspersky Next also provides you with two reports related to the feature.
Page top
Configuring Adaptive Anomaly Control
To configure Adaptive Anomaly Control:
- Open Kaspersky Next Management Console.
- Select the Security management → Security profiles section.
The Security profiles section contains a list of security profiles configured in Kaspersky Next.
- In the list, select the security profile for the devices on which you want to configure Adaptive Anomaly Control.
- Click the link with the profile name to open the security profile properties window.
The security profile properties window displays settings available for all devices.
- In the Windows group, select the Management settings section.
- Set the toggle switch to Adaptive Anomaly Control is enabled.
- Click the Settings link below the Adaptive Anomaly Control is enabled toggle switch.
The Adaptive Anomaly Control component settings page opens.
- Enable or disable the required Adaptive Anomaly Control rules:
- To enable a rule, enable the toggle switch in the Status column.
- To disable a rule, disable the toggle switch in the Status column.
- In the Action column, select the mode of each rule:
- Notify
The detections made by this rule are only added to the Event log. No other actions are made.
- Block
The feature blocks all actions that are associated with the rule.
- Smart
First, you train the rule by selecting whether the detections made by it are actually uncharacteristic behavior or false positives. After the training period ends, the feature allows or blocks further actions according to the training results.
- Notify
- If necessary, change exclusions to the rules.
- Click the Save button.
After the security profile is applied, the Adaptive Anomaly Control component is enabled and configured on Windows devices.
Page top
Changing exclusions to Adaptive Anomaly Control rules
You can add, modify, and delete exclusions to Adaptive Anomaly Control rules.
Adding exclusions
You can add exclusions in either of the following ways:
- When processing Adaptive Anomaly Control detections.
- When configuring Adaptive Anomaly Control, as described later in this section.
To add an exclusion to an Adaptive Anomaly Control rule:
- Proceed to the Adaptive Anomaly Control settings page.
- Select the check box next to required rule.
- Click the Edit button.
The Exclusions from rule <rule name> window opens.
- Click the Add button.
The Add an exclusion window opens.
- Define the exclusion settings:
- Source process and Source object
The object that performed the detected actions (for example, a file that the user opened).
- Target process and Target object
The object on which the detected actions were performed (for example, a browser that uses a library that is loaded into the computer memory as a result of opening the file).
- Source process and Source object
- Click OK to close the Add an exclusion window.
The added record appears in the list of exclusions in the Exclusions from rule <rule name> window.
Modifying exclusions
To modify an exclusion to an Adaptive Anomaly Control rule:
- Proceed to the Adaptive Anomaly Control settings page.
- Select the check box next to required rule.
- Click the Edit button.
The Exclusions from rule <rule name> window opens.
- Select the check box next to the required exclusion.
- Click the Edit button.
The Add an exclusion window opens. It contains details about the selected exclusion.
- Make the necessary changes.
- Click OK to close the Add an exclusion window.
The modified record is displayed in the list of exclusions in the Exclusions from rule <rule name> window.
Deleting exclusions
You may want to delete an exclusion from an Adaptive Anomaly Control rule if, for example, you added it by mistake.
To delete exclusions from an Adaptive Anomaly Control rule:
- Proceed to the Adaptive Anomaly Control settings page.
- Select the check box next to required rule.
- Click the Edit button.
The Exclusions from rule <rule name> window opens.
- Select the check boxes next to the required exclusions
- Click Delete.
The deleted exclusions disappear from the list of exclusions in the Exclusions from rule <rule name> window.
Page top
Scenario: Configuring Adaptive Anomaly Control rules in the Smart mode
Configuring the Adaptive Anomaly Control rules proceeds in stages:
- Training
After you enable Adaptive Anomaly Control, its rules are in the "Smart training" state. During the training, Adaptive Anomaly Control monitors detections made by the rule and sends detection events to the server.
If a rule is not triggered at all on a certain device during the training, Adaptive Anomaly Control considers the actions associated with this rule as non-typical. Kaspersky Next will block all actions associated with that rule on that device.
If a rule is triggered during the training, Kaspersky Next adds events to the detections report and to the Detections of Adaptive Anomaly Control rules repository of the Quarantine.
- Processing the list of detections
Analyze the list of detections in the Detections of Adaptive Anomaly Control rules repository. For each detection, perform one of the following actions:
- If the detection is not anomalous, add it to exclusions. As a result, this detection and all detections of the same object on other devices are removed from the list. Later, this object will not be detected again on any of your users' devices.
You can add up to 1000 exclusions for all rules.
- If the detection is actually anomalous, confirm it. As a result, the detection is removed from the list. Later, if this object is detected again on the same or any other device, it will re-appear in the list of detections.
- If the detection is not anomalous, add it to exclusions. As a result, this detection and all detections of the same object on other devices are removed from the list. Later, this object will not be detected again on any of your users' devices.
Each rule has its own training duration that is set by Kaspersky experts. Normally, the training lasts two weeks. The training time is counted separately for each device and only when Kaspersky Endpoint Security for Windows is working on the device. For example, if the training on a device has lasted for a week, and then the device is turned off during a month, the second training week starts only when the device is turned on again.
The training for a rule on a device ends when there are no unprocessed detections over the training duration. That is why we recommend that you process detections at least once a week.
Page top
Processing Adaptive Anomaly Control detections
During the training of Adaptive Anomaly Control rules in the Smart mode, events about detections are added to the Detections of Adaptive Anomaly Control rules repository of the Quarantine. When processing the list of detections, you can either confirm them or add to exclusions, depending on whether a detection is actually anomalous behavior or not.
We recommend that you process detections at least once a week. Otherwise, the training of the rules may never complete and the rules may not start blocking malicious activity on devices.
To process Adaptive Anomaly Control detections:
- Open Kaspersky Next Management Console.
- Select the Quarantine section.
The Quarantine section contains a list of objects belonging to the following categories: Quarantine and backup, Unprocessed files, and Detections of Adaptive Anomaly Control rules.
- In the File category drop-down list, select Detections of Adaptive Anomaly Control rules.
The page displays all active detections that have not been processed.
From the displayed table, you can proceed to the following:
- Properties of the device on which a detection occurred.
- Settings of the security profile that is assigned to the user who owns an affected device.
- Detailed information about the detection.
- Click the link in the Detected object column, to view detailed information about a detection.
The Detection details window opens.
- Analyze the detection details.
- Do either of the following:
- If the detection is not anomalous, add it to exclusions. As a result, this detection and all detections of the same object on other devices are removed from the list. Later, this object will not be detected again on any of your users' devices.
You can add up to 1000 exclusions for all rules.
- If the detection is actually anomalous, confirm it. As a result, the detection is removed from the list. Later, if this object is detected again on the same or any other device, it will re-appear in the list of detections.
- If the detection is not anomalous, add it to exclusions. As a result, this detection and all detections of the same object on other devices are removed from the list. Later, this object will not be detected again on any of your users' devices.
- If necessary, process another detection.
The detections are processed.
Page top
Data Discovery
This section contains information about Data Discovery.
The Data Discovery feature detects critical information in files that are located in Office 365 cloud storages.
This feature is available only if you activated Kaspersky Next under a Kaspersky Next EDR Optimum or XDR Expert license.
About Data Discovery
Kaspersky Next detects critical information in files that are located in Office 365 cloud storages. You can view the information about each detected file—its name, sharing type (private, within the company, or outside the company), and who edited it last.
This feature is available only if you activated Kaspersky Next under a Kaspersky Next EDR Optimum or XDR Expert license.
You can start using the Data Discovery feature when you start Kaspersky Next Management Console for the first time or after Kaspersky Next is upgraded to a new version. If you did not start using Data Discovery during the initial or additional setup of Kaspersky Next, you can do it later. After you start using the feature, connect your Office 365 organization to your workspace.
The Data Discovery widget and table display detections of critical information in files. The widget shows up to 10 detected files and the table shows up to 1000 detections.
From the Data Discovery table, you can export information about all of the current detections to a CSV file.
If you want to stop using the feature, you can disable it. Later, you can enable it again.
If you delete your workspace after starting the use of Data Discovery, or if you disable the feature and do not want to use it again, you must go to your Office 365 and manually revoke the permissions that you granted to the Kaspersky Next – DLP scanner application.
Page top
Categories of information detected by Data Discovery
Kaspersky Next detects the following categories of critical information:
- Credit/Debit Card Number
- Brazilian Personally Identifiable Information:
- Brazilian Driver's License (CNH)
- Brazilian Identity Card (RG)
- Brazilian Individual Taxpayer Registry (CPF)
- Brazilian Passport
- Chilean Personally Identifiable Information:
- Chilean Driver's License
- Chilean Identity Card
- Chilean Passport
- Chilean Unique Taxpayer Number
- Colombian Personally Identifiable Information:
- Colombian Driver's License
- Colombian Identity Card
- Colombian Passport
- Colombian Unique Taxpayer Number (NIT)
- French Personally Identifiable Information:
- French Driver's License
- French Identity Card
- French Passport
- French Social Security Number
- German Personally Identifiable Information:
- German Driver's License
- German Identity Card
- German Passport
- German Residence Permit
- German Social Insurance Number (SIN)
- German Tax Identification number (TIN)
- Italian Personally Identifiable Information:
- Italian Driver's License
- Italian Fiscal Code
- Italian Identity Card
- Italian Passport
- Mexican Personally Identifiable Information:
- Mexican Citizen Card (CURP)
- Mexican Individual Taxpayer Registry (RFC)
- Mexican Passport
- Mexican Social Security Number
- Portuguese Personally Identifiable Information:
- Portuguese Citizen Card
- Portuguese Driver's License
- Portuguese Passport
- Portuguese Social Security Number (NISS)
- Portuguese Tax Identification Number (NIF)
- Spanish Personally Identifiable Information:
- Spanish Identity Card
- Spanish National Insurance Number
- Spanish Passport
- Spanish Unique Taxpayer Reference
- UK Personally Identifiable Information:
- UK Driving License
- UK National Insurance Number
- UK Passport
- UK Residence Permit
- UK Unique Taxpayer Reference (UTR)
- USA Personally Identifiable Information:
- US Driver's License
- US Individual Taxpayer Identification Number (ITIN)
- US Passport
- US Social Security Number (SSN)
Starting the use of Data Discovery
You can start using the Data Discovery feature when you start Kaspersky Next Management Console for the first time or after Kaspersky Next is upgraded to a new version. If you did not start using Data Discovery during the initial or additional setup of Kaspersky Next, you can do it as described in this section.
To start using Data Discovery:
- Open Kaspersky Next Management Console.
- Do any of the following:
- In the Information panel section, select the Getting started tab.
- In the Information panel section, select the Monitoring tab.
- In the Settings section, click the Settings link below Use of Data Discovery for Microsoft Office 365.
The Data Discovery page opens.
- Click Enable Data Discovery.
The Data Discovery Agreement window opens.
- Carefully read the Limitation of Liability Agreement, select the check box under the agreement text, and click the I accept the terms button if you agree to them.
If you click the I decline button, you will not be able to use Data Discovery.
Data Discovery is enabled.
Next, you must connect your Office 365 organization to your workspace. After that, you will be able to view information about detections.
Later, you can disable the feature if you want to stop using it.
Page top
Connecting an Office 365 organization to your workspace
After you start using the Data Discovery feature, you must connect your Office 365 organization to your Kaspersky Next workspace, as described in this section. After that, you will be able to view the Data Discovery detections in Management Console.
To connect an Office 365 organization to your workspace:
- Open Kaspersky Next Management Console.
- Do any of the following:
- In the Information panel section, select the Getting started tab, and then click Connect Office 365 organization.
- In the Information panel section, select the Monitoring tab, and then click either the Connect Office 365 organization button or the Connect Office 365 organization link.
You are redirected to the Microsoft Online website.
- Specify the required Office 365 Global Administrator account and accept the granting of the requested permissions.
The Global Administrator account that you specify must belong to the same Office 365 organization about which you want to view the information. Note that Kaspersky Next does not store the Global Administrator credentials and uses the acquired consent only.
You are returned to the Kaspersky Next Management Console.
After the specified credentials are checked and verified, your Office 365 organization is connected to your Kaspersky Next workspace. Kaspersky Next starts the first scan of files that are located in Office 365 cloud storages.
After the scan completes, you can view the detections in the Data Discovery widget and table.
Page top
Viewing information about Data Discovery detections
You can view information about Data Discovery detections in a widget and a table. The widget shows up to 10 detected files and the table shows up to 1000 detections.
Data Discovery widget
To view the Data Discovery widget:
- Open Kaspersky Next Management Console.
- In the Information panel section, click the Monitoring tab.
- If Data Discovery is disabled, start using the feature.
The Data Discovery widget displays up to 10 detected files.
- Select or clear the Private, Company, and Public check boxes, to view up to 10 detected files shared to the selected audience (privately, within the company, or outside the company).
- Click the link in the Data categories or File name column, to view detailed information about a detected file.
The widget displays the requested information.
From the widget, you can proceed to the table with the Data Discovery detections.
Data Discovery table
To view the table with the Data Discovery detections:
- Open Kaspersky Next Management Console.
- Do any of the following:
- In the Information panel section, click the Monitoring tab, and then click the Go to the list of detections link in the Data Discovery widget.
- Select the Security management → Data Discovery section.
- If Data Discovery is disabled, start the use of the feature.
The table displays up to 1000 detected files.
- Filter the displayed records:
- By default, the quick filter is displayed. You can filter the displayed records by the Office 365 service that stores the detected files.
- Click Extended filter to use the extended filter.
- Select the required values in the drop-down lists:
- Last edited on—The period over which files are detected.
- Data categories—Categories of critical information that are detected in the files.
- Access type—The audience to which the files are shared (privately, within the company, or outside the company).
- Last edited by—If you select Custom, the Last edited by window opens. There, specify a text fragment to find accounts of the users who last edited the detected files.
- Service name—Office 365 service that stores the detected files.
- Click Quick filter to return to the quick filter.
- Click the link in the File name or Data categories column, to view detailed information about a detected file.
The table displays the requested information.
From the displayed table, you can export information about all of the current detections to a CSV file.
Page top
Example of analyzing a Data Discovery detection
This section contains an example of a Data Discovery detection and how you can analyze and process it.
Let's consider that you open the Data Discovery widget (see the figure below) and see a file that is accessible to everyone (the value in the Access type column is Public).
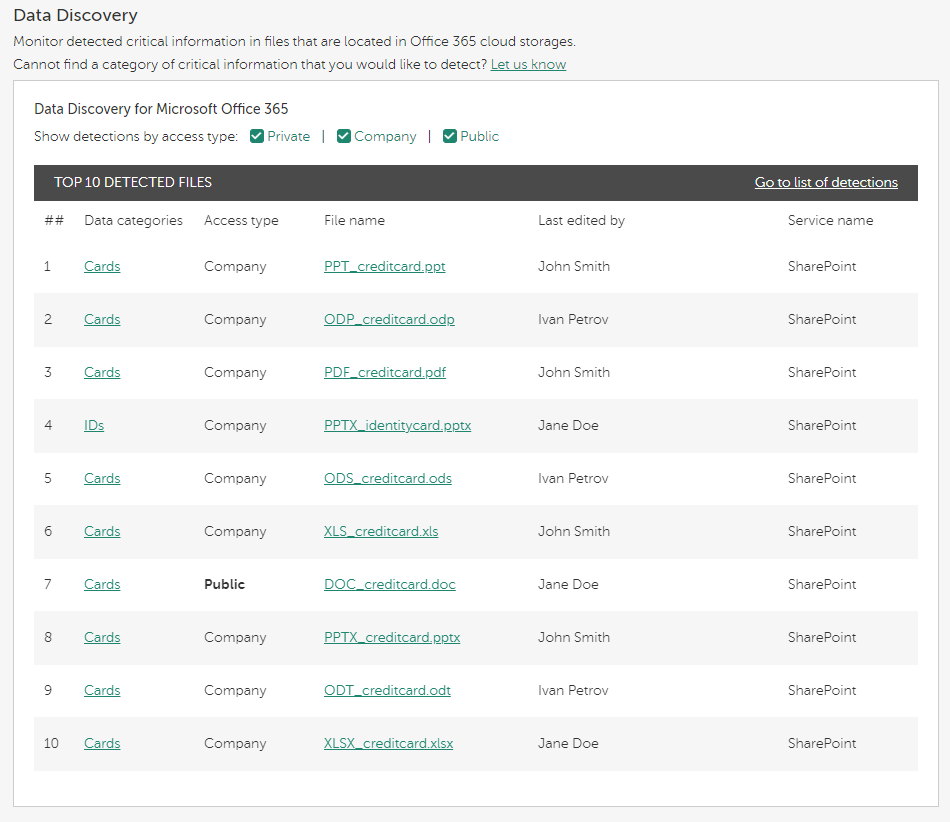
Data Discovery widget with a file that is accessible to everyone
From the value in the Data categories column, you conclude that the file contains credit card details. The value in the Last edited by column most often shows the user who configured the accessibility of the file.
By clicking the link in the Data categories or File name column, you can view detailed information about the detected file (see the figure below).
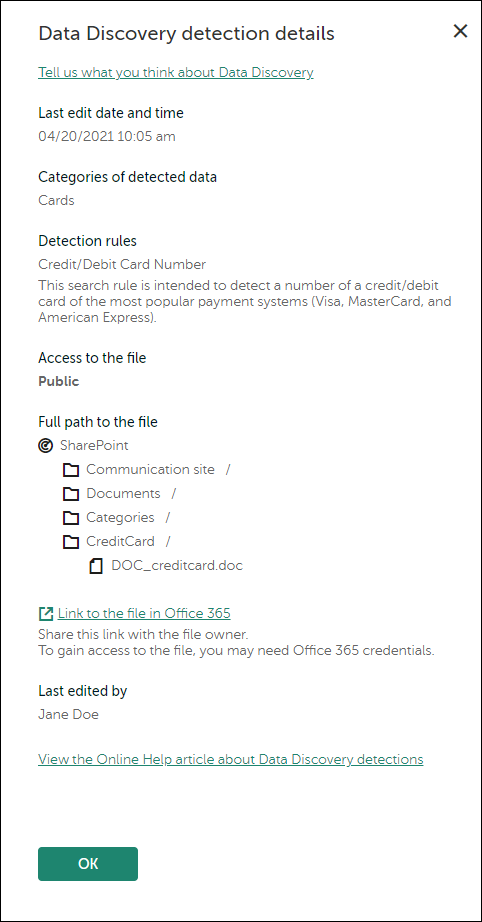
Data Discovery detection details
You can copy either the direct link to the file (Link to the file in Office 365) or the structure of the path to it (under Full path to the file).
Then you can address the user directly, show him or her the file, and explain that making a file with personal details accessible to everyone may lead to a data breach. Then, you can ask the user to reduce the file audience to the user himself or herself.
Some time later, after the user follows your advice, you can open the Data Discovery table, apply the filters (if necessary), and see the same document that is accessible only to its owner (see the figure below).
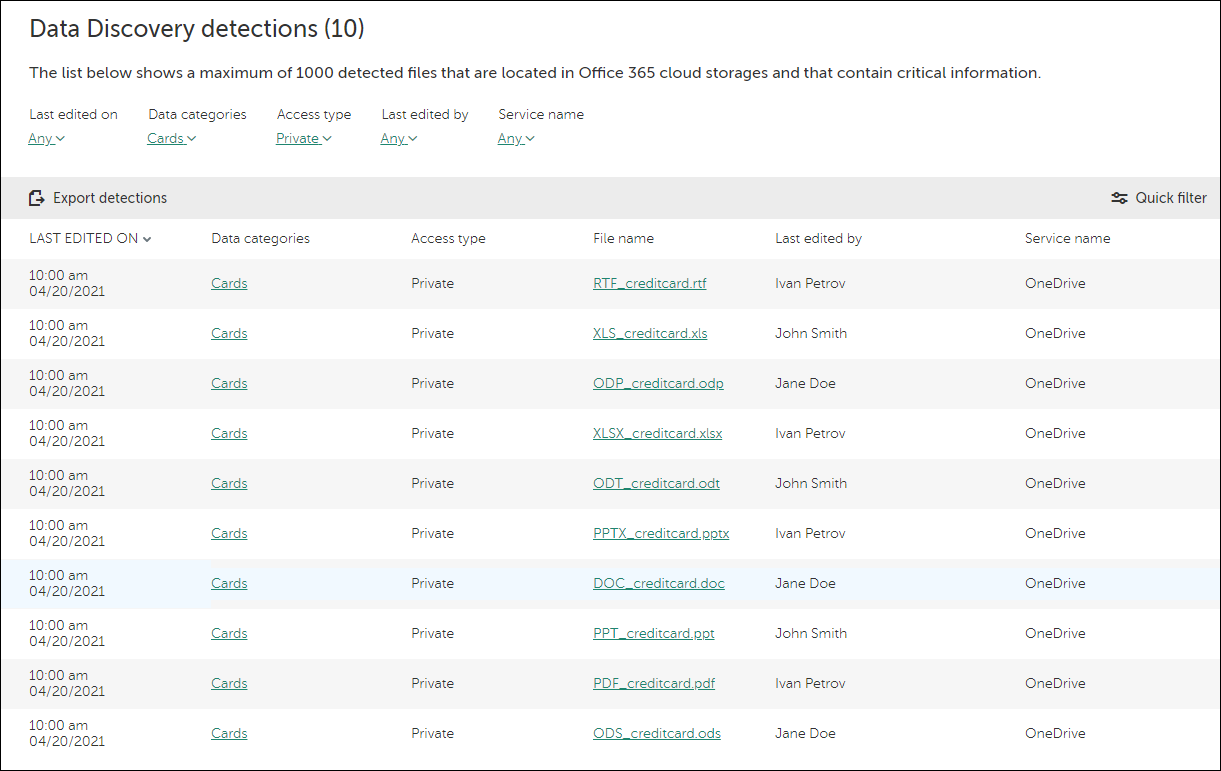
Data Discovery table with applied filters
Page top
Exporting information about Data Discovery detections
From the table with Data Discovery detections, you can export information about all of the current detections to a CSV file. For example, you can use a file with detections to prepare a report for your management.
To export information about Data Discovery detections:
- Proceed to the table with the Data Discovery detections.
- Click the Export detections button.
The Export Data Discovery detections window opens.
- Click Export to confirm the export.
A file with Data Discovery detections is created and automatically downloaded. The file contains the same columns as the table with detections.
Page top
Disabling Data Discovery
If you want to stop using Data Discovery, you can disable the feature as described in this section.
To disable Data Discovery:
- Open Kaspersky Next Management Console.
- Select the Settings section.
The General settings of Kaspersky Next page is displayed.
- Click the Settings link in the Use of Data Discovery for Microsoft Office 365 section.
The Data Discovery page opens.
- Click the Disable Data Discovery button.
- In the confirmation window that opens, click the Disable button.
Data Discovery is disabled.
Later, you can enable the feature again.
Page top
Cloud Discovery
This section contains information about Cloud Discovery.
The Cloud Discovery feature allows you to monitor the use of cloud services on managed devices running Windows and to block access to cloud services that you consider unwanted.
The blocking capability is available only if you activated Kaspersky Next under a Kaspersky Next EDR Optimum or XDR Expert license.
The blocking capability is available only if you use Kaspersky Endpoint Security 11.2 for Windows or later. Earlier versions of the security application only allow you to monitor the use of cloud services.
About Cloud Discovery
Kaspersky Next allows you to monitor the use of cloud services on managed devices running Windows and to block access to cloud services that you consider unwanted. Cloud Discovery tracks user attempts to gain access to these services through both browsers and desktop applications. This feature helps you to detect and halt the use of cloud services by shadow IT.
Cloud Discovery tracks user attempts to gain access to cloud services over unencrypted connections (for example, using the HTTP protocol). If you enable the Encrypted Connections Scan feature, Cloud Discovery also tracks attempts to gain access to cloud services over encrypted connections (for example, using the HTTPS protocol). You can also configure the list of trusted domains. The feature does not control or block encrypted connections made during visits to those domains.
You can start using the Cloud Discovery feature and select the security profiles for which you want to enable the feature. You can also enable or disable the feature separately in each security profile. You can block access to cloud services that you do not want users to access.
The Cloud Discovery widget and the Cloud Discovery reports display information about attempts to gain access to cloud services. The widget also displays the risk level of each cloud service. Kaspersky Next gets information about the use of cloud services from all of the managed devices that are protected only by the security profiles that have the feature enabled.
Starting the use of Cloud Discovery
You can start using the Cloud Discovery feature when you start Kaspersky Next Management Console for the first time or after Kaspersky Next is upgraded to a new version. If you did not start using Cloud Discovery during the initial or additional setup of Kaspersky Next, you can do it as described in this section.
To start using Cloud Discovery:
- Open Kaspersky Next Management Console.
- Do any of the following:
- In the Information panel section, select the Getting started tab, and then click Enable Cloud Discovery.
- In the Information panel section, select the Monitoring tab, and then click Enable Cloud Discovery in security profiles.
The Enable Cloud Discovery in security profiles window opens.
- Select the check boxes next to the security profiles for which you want to enable Cloud Discovery. To select all security profiles, select the check box in the table heading.
Kaspersky Next gets information about the use of cloud services from all of the managed devices that are protected only by the security profiles that have the feature enabled. Later, you will be able to enable and disable the feature separately in each security profile.
- Click the Enable Cloud Discovery button.
If you click the Later button, the Cloud Discovery feature will not be enabled in any security profiles.
Cloud Discovery is enabled in the selected security profiles.
Page top
Enabling and disabling Cloud Discovery in security profiles
When you start using the Cloud Discovery feature, you can select the security profiles for which you want to enable Cloud Discovery. Kaspersky Next gets information about the use of cloud services from all of the managed devices that are protected only by the security profiles that have the feature enabled. Later, you can enable and disable the feature separately in each security profile, as described in this section.
To enable or disable Cloud Discovery in a specific security profile:
- Open Kaspersky Next Management Console.
- Select the Security management → Security profiles section.
The Security profiles section contains a list of security profiles configured in Kaspersky Next.
- In the list, select the security profile for the devices on which you want to configure Cloud Discovery.
- Click the link with the profile name to open the security profile properties window.
The security profile properties window displays settings available for all devices.
- In the Cloud security group, select the Cloud Discovery section.
- To enable Cloud Discovery in the security profile, set the toggle switch to Cloud Discovery is enabled.
You can also click the Settings link below the Cloud Discovery is enabled toggle switch and block access to cloud services that you consider unwanted.
To disable Cloud Discovery in the security profile, set the toggle switch to Cloud Discovery is disabled.
- Click the Save button.
Cloud Discovery is enabled or disabled in the settings of the selected security profile.
Page top
Viewing information about the use of cloud services
You can view the Cloud Discovery widget that shows information about attempts to gain access to cloud services. The widget also displays the risk level of each cloud service. Kaspersky Next gets information about the use of cloud services from all of the managed devices that are protected only by the security profiles that have the feature enabled.
To view the Cloud Discovery widget:
- Open Kaspersky Next Management Console.
- In the Information panel section, click the Monitoring tab.
- On the left side of the Cloud Discovery information widget, select a category of cloud services.
The table on the right side of the widget displays up to five services, from the selected category, to which users most often try to gain access. Both successful and blocked attempts are counted.
- On the right side of the widget, select a specific service.
The table below displays up to ten users who most often attempt to gain access to the service.
The widget displays the requested information.
From the displayed widget, you can do the following:
- Proceed to the Information panel → Reports section to view the Cloud Discovery reports.
- Proceed to the settings of the security profile that is assigned to a user.
- Block or allow access to the selected cloud service in the settings of the security profile that is assigned to a user.
- If the selected cloud service has been blocked only in some security profiles, view the list of profiles in which the service is blocked and where it is allowed.
Risk level of a cloud service
For each cloud service, Cloud Discovery provides you with a risk level. The risk level helps you determine services that do not fit the security requirements of your organization. For example, you may want to take the risk level into account when deciding whether to block access to a certain service.
Disclaimer: The risk level is an estimated index and does not say anything about the quality of a cloud service or about the service manufacturer. The risk level is simply a recommendation from Kaspersky experts.
Risk levels of cloud services are displayed in the Cloud Discovery widget and in the list of all monitored cloud services.
Page top
Blocking access to unwanted cloud services
You can block access to cloud services that you do not want users to access. You can also allow access to cloud services that were previously blocked.
The blocking capability is available only if you activated Kaspersky Next under a Kaspersky Next EDR Optimum or XDR Expert license.
The blocking capability is available only if you use Kaspersky Endpoint Security 11.2 for Windows or later. Earlier versions of the security application only allow you to monitor the use of cloud services.
We recommend that you use Kaspersky Endpoint Security 11.7 for Windows or later to use the blocking capability. Otherwise, the list of cloud services that you can allow or block might differ from the list of cloud services that Kaspersky Endpoint Security for Windows detects.
Among other considerations, you may want to take the risk level into account when deciding whether to block access to a certain service.
You can block or allow access to cloud services from the Cloud Discovery widget or in the settings of a security profile.
To block or allow access to a cloud service from the Cloud Discovery widget:
- Open the Cloud Discovery widget and select the required cloud service.
- In the TOP 10 service users pane, find the user or the security profile for which you want to block or allow the service.
- On the required line, in the Access column, do any of the following:
- To block the service, select Block the service in the profile in the drop-down list.
- To allow the service, select Allow the service in the profile in the drop-down list.
Access to the selected service is blocked or allowed in the settings of the selected security profile.
To block or allow access to cloud services in a security profile:
- Open Kaspersky Next Management Console.
- Select the Security management → Security profiles section.
The Security profiles section contains a list of security profiles configured in Kaspersky Next.
- In the list, select the security profile for the devices on which you want to configure Cloud Discovery.
- Click the link with the profile name to open the security profile properties window.
The security profile properties window displays settings available for all devices.
- In the Cloud security group, select the Cloud Discovery section.
- Do any of the following:
- If you want to block access to an individual cloud service, select Block in the drop-down list next to the required service.
- If you want to allow access to an individual cloud service, select Allow in the drop-down list next to the required service.
- If you want to block access to all cloud services in a certain category, click the Block entire category button next to the name of the required category.
- If you want to allow access to all cloud services in a certain category, click the Allow entire category button next to the name of the required category.
- Click the Save button to save the changes.
Access to the selected services is blocked or allowed.
If you block access to a category of cloud services, all new services that appear in this category will also be blocked.
If you allow access to at least one service in a category, all new services that appear in this category will also be allowed.
Enabling and disabling the monitoring of internet connections on Windows devices
The monitoring of internet connections option injects a special script for interaction with web pages into web traffic. This script enables monitoring and registration of Cloud Discovery events.
Kaspersky experts recommend enabling this option to ensure correct operation of Cloud Discovery.
To enable or disable the monitoring of internet connections:
- Open Kaspersky Next Management Console.
- Select the Security management → Security profiles section.
The Security profiles section contains a list of security profiles configured in Kaspersky Next.
- In the list, select the security profile for the devices on which you want to configure the monitoring of internet connections.
- Click the link with the profile name to open the security profile properties window.
The security profile properties window displays settings available for all devices.
- In the Windows group, select the Advanced section.
- Click the Settings link in the Threat detection and exclusions section.
The Threat detection and exclusions window opens.
- Do either of the following:
- To enable the monitoring of internet connections, set the toggle switch to Monitoring of internet connections is enabled.
- To disable the monitoring of internet connections, set the toggle switch to Monitoring of internet connections is disabled.
By default, the option is enabled.
- Click the Save button.
The monitoring of internet connections is enabled or disabled in the settings of the selected security profile.
Page top
Vulnerability Assessment and Patch Management
This section contains information about detecting software vulnerabilities on your users' devices running Windows and about managing updates for the applications installed on the devices, including patches that fix detected vulnerabilities.
Information about updates is available only if you activated Kaspersky Next under a Kaspersky Next EDR Optimum or XDR Expert license.
Updates functionality (including providing anti-malware signature updates and codebase updates), as well as KSN functionality may not be available in the software in the U.S.
Viewing overall information about vulnerabilities and updates
The Security management → Vulnerability Assessment and Patch Management section of Kaspersky Next Management Console displays overall information about software vulnerabilities that were detected on your users' devices running Windows, and updates for the applications installed on the devices, including patches that fix detected vulnerabilities:
- Total number of vulnerabilities that have been detected but not fixed yet (their fixing has not started or is in progress)
- Total number of vulnerabilities that have already been fixed on all affected devices
- Total number of updates that have not been installed on devices yet or that are being installed
- Total number of updates that have already been installed on all affected devices
Information about updates is available only if you activated Kaspersky Next under a Kaspersky Next EDR Optimum or XDR Expert license.
Updates functionality (including providing anti-malware signature updates and codebase updates), as well as KSN functionality may not be available in the software in the U.S.
From this section, you can do the following:
- Configure detection of vulnerabilities
- View the list of vulnerabilities
- Configure installation of updates
- View the list of updates
- Go to the list of reports and view the Vulnerabilities report
Vulnerability Assessment
This section contains information about detecting software vulnerabilities on your users' devices running Windows.
About Vulnerability Assessment
Kaspersky Next allows you to detect software vulnerabilities on user devices running Windows. Vulnerabilities are detected in the operating system and in applications made by Microsoft and third-party vendors.
You can configure how often vulnerability detection is run on managed devices and view the list of detected vulnerabilities.
You can also view the report about detected vulnerabilities.
If you activated Kaspersky Next under a Kaspersky Next EDR Optimum or XDR Expert license, you can configure the installation of patches that fix the detected vulnerabilities.
Page top
Configuring vulnerability detection
To configure vulnerability detection:
- Open Kaspersky Next Management Console.
- Select the Security management → Vulnerability Assessment and Patch Management section.
- Under Vulnerabilities, click the Detection settings button.
The Vulnerability detection settings window opens.
- In the Vulnerability detection schedule list, select the required value:
- Disabled (by default)—Vulnerability detection never runs.
- Every week—Specify the day of week and the time when vulnerability detection must run.
The vulnerability detection will run at the specified time in the time zone of each protected device. If a protected device is offline at the scheduled time, the task will run as soon as the device goes online.
- Every day—Specify the time when vulnerability detection must run.
The vulnerability detection will run at the specified time in the time zone of each protected device. If a protected device is offline at the scheduled time, the task will run as soon as the device goes online.
- Click the OK button to save the changes.
Vulnerability detection is configured. If you activated Kaspersky Next under a Kaspersky Next EDR Optimum or XDR Expert license, the detection of applicable updates is also configured.
Page top
Viewing the list of vulnerabilities
The Vulnerability Assessment section of Kaspersky Next Management Console displays a list of software vulnerabilities detected on your users' devices running Windows.
To view the Vulnerability Assessment section:
- Open Kaspersky Next Management Console.
- Select the Security management → Vulnerability Assessment and Patch Management section.
- Under Vulnerabilities, click the View button.
The Vulnerability Assessment section is divided into two tabs:
- Not fixed
Vulnerabilities that have been detected but not fixed (their fixing has not started or is in progress).
- Fixed
Vulnerabilities that have already been fixed on all affected devices.
After a vulnerability is fixed, it is displayed here for a maximum of 30 days.
The list on each tab contains columns with the following information about vulnerabilities:
- Severity (Critical, High, or Medium).
- Fixing status
Displayed only on the Not fixed tab. The information about the fixing of the vulnerability on affected devices is as follows:
- Update installation disabled
The installation of updates is disabled. You can only fix the vulnerability manually.
- Not planned
This status could be displayed in different cases, for example: there are no updates that fix the vulnerability or an update exists but has not been approved.
You can find more detailed information about the fixing status on each of the affected devices by clicking the link in the Fixed instances column.
- In progress
The installation of updates that fix the vulnerability is in progress or is planned to start on some or all of the affected devices.
You can find more detailed information about the fixing status on each of the affected devices by clicking the link in the Fixed instances column.
- Update installation disabled
- Fixed on
Displayed only on the Fixed tab. Date and time when the vulnerability was last fixed on a device.
- Vulnerability
Vulnerability name.
After you click a link in this column, the console displays more detailed information about the vulnerability.
- Application
Name of the application in which the vulnerability has been detected.
- Fixed instances
On the Not fixed tab: Number of instances of this vulnerability that have already been fixed on your users' devices, and total number of detected vulnerability instances.
On the Fixed tab: Total number of instances of this vulnerability that have been fixed on your users' devices.After you click a link in this column, the console displays a list of affected devices. This list includes the detailed status of vulnerability fixing on each of the devices, and recommendations in case of any problems with fixing. You can filter the list of devices by the vulnerability fixing status.
You can filter the list of vulnerabilities by the following parameters:
- Severity level
- Fixing status (only on the Not fixed tab)
- Application type (vendor of the application in which a vulnerability is detected: Microsoft, third-party vendors, or all vendors)
You can sort the list of vulnerabilities by the Severity column.
To sort the list,
Click the link containing the column name.
The column name is displayed in uppercase characters. Next to the name of the column, an up arrow (˄) indicates the sorting direction. To change the sorting direction, click one more time. Next to the name of the column, a down arrow (˅) appears.
The Search entry field is located above the list. You can use this field to quickly find and switch to an object in a long list.
Patch Management
This section contains information about managing updates for the applications installed on your users' devices running Windows, including patches that fix software vulnerabilities detected on the devices.
This feature is available only if you activated Kaspersky Next under a Kaspersky Next EDR Optimum or XDR Expert license.
Updates functionality (including providing anti-malware signature updates and codebase updates), as well as KSN functionality may not be available in the software in the U.S.
About Patch Management
Kaspersky Next allows you to manage updates for the applications installed on your users' devices running Windows, including patches that fix software vulnerabilities detected on the devices.
This feature is available only if you activated Kaspersky Next under a Kaspersky Next EDR Optimum or XDR Expert license.
Updates functionality (including providing anti-malware signature updates and codebase updates), as well as KSN functionality may not be available in the software in the U.S.
Kaspersky Next starts searching for applicable updates only after you define a vulnerability detection schedule.
You can view the list of detected updates and configure update installation.
You can approve updates that must be installed and skip updates that must not be installed. You can also revoke an update approval, for example, if the update installation resulted in application malfunction.
If an update for an application cannot be installed because this application is currently running, the device user is prompted to close the software. Further actions depend on the user response:
- If the user closes the application, the update installation continues.
- If the user skips the prompt, the update installation continues as well, but the device may require restart.
- If the user cancels the prompt, the update installation fails and will be re-attempted during the next scheduled start.
Configuring update installation
To configure the update installation:
- Open Kaspersky Next Management Console.
- Select the Security management → Vulnerability Assessment and Patch Management section.
- Under Patches and updates, click the Installation settings button.
The Update installation settings window opens.
- In the Installation mode list, select the required value:
- Install approved updates only (by default).
You can approve updates that must be installed and skip updates that must not be installed.
For example, you first may want to check the installation of updates in a test environment and make sure that they do not interfere with the operation of devices, and only then approve the installation of these updates on managed devices.
- Install all updates
All updates are installed as soon as they are detected, according to other installation settings.
- Install approved updates only (by default).
- In the Installation scope list, select the devices on which you want to install updates:
- All devices
- Workstations only
- Servers only
- Specific devices
Select this value if you want to test installation of updates on a small amount of devices, or to exclude certain devices from the installation scope.
In this case, do the following:
- Click the Edit button.
The Installation scope window opens.
- Select the check boxes next to the devices on which you want to install updates, and clear the check boxes next to the devices that you want to exclude from the installation scope.
To select or deselect all devices, select or clear the check box in the table heading.
- Click the Save button to save the changes.
- Click the Edit button.
- In the Installation schedule list, select the required value:
- Disabled (by default)—The update installation never runs.
- Every week—Specify the day of week and the time (with the time zone) when the update installation must run.
If a protected device is offline at the scheduled time, the task will run as soon as the device goes online.
- Every day—Specify the time (with the time zone) when the update installation must run.
If a protected device is offline at the scheduled time, the task will run as soon as the device goes online.
- If the Start installation at device restart or shutdown option is enabled, updates are installed when the device is restarted or shut down. Otherwise, updates are installed according to the schedule.
Use this option if installing updates might affect the device performance.
- Under Operating system restart option, select what to do if the update installation requires the restart of the device operating system:
- Do not restart the device
Managed devices are not restarted automatically after the operation. To complete the operation, users must restart their devices. This option is suitable for servers and other devices where continuous operation is critical.
- Restart the device
Managed devices are always restarted automatically if a restart is required for completion of the operation. This option is useful for devices for which regular pauses in their operation (shutdown or restart) are acceptable.
- Prompt the user for action
The restart reminder is displayed on the screen of the managed device, prompting the user to restart it manually. You can change the text of the message for the user. This option is most suitable for workstations where users must be able to select the most convenient time for a restart.
If the Restart the device after option is enabled, after prompting the user, the application forces a restart of the operating system upon expiration of the specified time interval. Otherwise, users must restart their devices manually. If necessary, change the default value of the time interval (30 minutes).
- Do not restart the device
- Click the OK button to save the changes.
The update installation is configured.
You can also run the installation of all planned updates at any time by clicking the Settings button, and then selecting the Unscheduled parameter. Installation of the updates will be started at the optimal time estimated by the security application.
Page top
Viewing the list of updates
The Patch Management section of Kaspersky Next Management Console displays a list of updates for the applications installed on your users' devices running Windows, including patches that fix software vulnerabilities detected on the devices.
To view the Patch Management section:
- Open Kaspersky Next Management Console.
- Select the Security management → Vulnerability Assessment and Patch Management section.
- Under Patches and updates, click the View button.
- Under Patches and updates, click the View button.
The Patch Management section is divided into two tabs:
- Not installed
Updates that have not been installed on devices yet or that are being installed.
- Installed
Updates that have already been installed on all affected devices.
The list on each tab contains columns with the following information about updates:
- Installation status
Displayed only on the Not installed tab. The information about installation of the update on affected devices is as follows:
- Disabled
Installation of updates is disabled. To install updates, you must define an update installation schedule.
- License agreement pending
Installation of updates is enabled. To install this update, you must accept related license agreements.
- Approval pending
Installation of updates is enabled. To install this update, you must approve it.
- Planned
Installation of updates is enabled. Installation of this update on the devices is planned according to the defined settings, but has not started yet.
- In progress
Installation of updates is enabled. Installation of this update has been started on at least one device.
- Disabled
- Installed on
Displayed only on the Installed tab. Date and time when the update was last installed on a device.
- Update
Update name and type: Security patch (if the update fixes a vulnerability) or Software update (if there are no vulnerabilities that the update fixes).
After you click a link in this column, the console displays more detailed information about the update.
- Importance: Critical, High, or Medium for patches that fix software vulnerabilities; Low for other updates.
- Installed on devices
On the Not installed tab: Number of devices on which this update has already been installed and total number of affected devices.
On the Installed tab: Total number of devices on which this update has been installed.After you click a link in this column, the console displays a list of affected devices. This list includes the detailed status of update installation on each of the devices, and recommendations if the update cannot be installed on any of them. You can filter the list of devices by the update installation status.
You can filter the list of updates by the following parameters:
- Installation status (only on the Not installed tab)
- Importance level
- Application type (vendor of the application for which the update is issued: Microsoft, third-party vendors, or all vendors)
You can sort the list of updates by column: Installation status (on the Not installed tab) or Installed on (on the Installed tab).
To sort the list,
Click the link containing the column name.
The column name is displayed in uppercase characters. Next to the name of the column, an up arrow (˄) indicates the sorting direction. To change the sorting direction, click one more time. Next to the name of the column, a down arrow (˅) appears.
The Search entry field is located above the list. You can use this field to quickly find and switch to an object in a long list.
You can also configure the updates installation by clicking the Settings button above the updates list, and then selecting the following parameters:
- By schedule
Select this parameter and configure the scheduled installation settings of updates.
- Unscheduled
Installation of the updates will be started at the optimal time estimated by the security application.
Approving updates
Kaspersky Next allows you to select the updates that will be installed on managed devices.
You can approve updates that must be installed and skip updates that must not be installed. For example, you first may want to check the installation of updates in a test environment and make sure that they do not interfere with the operation of devices, and only then approve the installation of these updates on managed devices. You can also revoke an update approval, for example, if the update installation resulted in application malfunction.
You can approve updates only if the Installation mode value in the update installation settings is Install approved updates only, and the Installation schedule value is Every week or Every day.
You can approve a single update or several updates at once.
To approve one update:
- Open Kaspersky Next Management Console.
- Select the Security management → Vulnerability Assessment and Patch Management section.
- Under Patches and updates, click the View button.
- Click the name of the required update that has the Approval pending installation status. If necessary, you may first select the respective value in the Installation status filter.
The Update properties window opens.
- Click the Approve update link.
If installing an update requires accepting End User License Agreements, the End User License Agreements window opens.
- Carefully read the texts of the End User License Agreements listed in the window.
If you accept the terms of the End User License Agreements, select the check boxes next to the End User License Agreements, and then click the I accept the terms button. If you do not accept the terms of the End User License Agreements for an update, the update will not be approved.
The update is approved. Its installation status changes to Planned. The approved updates are installed on managed devices according to the update installation settings.
Sometimes, an approved update cannot be installed. For example, this can be because the update is applicable to servers but installation of updates is only allowed on workstations. Another example is when there are related updates for the same application; in this case you must find the other updates and approve them.
To approve several updates at once:
- Open Kaspersky Next Management Console.
- Select the Security management → Vulnerability Assessment and Patch Management section.
- Under Patches and updates, click the View button.
- Select the check boxes next to the required updates that have the Approval pending installation status. If necessary, you may first select the respective value in the Installation status filter.
- Click the Approve button.
If installing an update requires accepting End User License Agreements, the End User License Agreements window opens.
- Carefully read the texts of the End User License Agreements listed in the window.
If you accept the terms of the End User License Agreements, select the check boxes next to the End User License Agreements, and then click the I accept the terms button. If you do not accept the terms of the End User License Agreements for an update, the update will not be approved.
The selected updates are approved. Their installation status changes to Planned. The approved updates are installed on managed devices according to the update installation settings.
Sometimes, an approved update cannot be installed. For example, this can be because the update is applicable to servers but installation of updates is only allowed on workstations. Another example is when there are related updates for the same application; in this case you must find the other updates and approve them.
Revoking updates
Kaspersky Next allows you to select the updates that will be installed on managed devices.
You can approve updates that must be installed and skip updates that must not be installed. You can also revoke an update approval, for example, if the update installation resulted in application malfunction.
You can revoke updates only if the Installation mode value in the update installation settings is Install approved updates only, and the Installation schedule value is Every week or Every day.
You can revoke a single update or several updates at once.
To revoke one update:
- Open Kaspersky Next Management Console.
- Select the Security management → Vulnerability Assessment and Patch Management section.
- Under Patches and updates, click the View button.
- Click the name of the required update that has the Planned or In progress installation status. If necessary, you may first select the respective value in the Installation status filter.
The Update properties window opens.
- Click the Revoke approval link.
The update is revoked. Its installation status changes to Approval pending. Revoked updates are not installed on managed devices.
If an update has already been installed on some devices before it is revoked, the update is not uninstalled from the devices. It simply will not be installed on other devices in future.
To revoke several updates at once:
- Open Kaspersky Next Management Console.
- Select the Security management → Vulnerability Assessment and Patch Management section.
- Under Patches and updates, click the View button.
- Select the check boxes next to the required updates that have the Planned or In progress installation status. If necessary, you may first select the respective value in the Installation status filter.
- Click the Revoke button.
The selected updates are revoked. Their installation status changes to Approval pending. Revoked updates are not installed on managed devices.
If an update has already been installed on some devices before it is revoked, the update is not uninstalled from the devices. It simply will not be installed on other devices in future.
Accepting license agreements for updates
If the Installation mode value in update installation settings is Install all updates, installing some updates may require accepting End User License Agreements (EULAs) for the applications to which the updates apply.
You can accept EULAs only if the Installation schedule value is Every week or Every day.
You can accept EULAs for one update or for all updates at once.
To accept EULAs for one update:
- Open Kaspersky Next Management Console.
- Select the Security management → Vulnerability Assessment and Patch Management section.
- Under Patches and updates, click the View button.
- Click the name of the required update that has the License agreement pending installation status. If necessary, you may first select the respective value in the Installation status filter.
The Update properties window opens.
- Click the Accept license agreement link.
The End User License Agreements window opens.
- Carefully read the texts of the End User License Agreements listed in the window.
If you accept the terms of the End User License Agreements, select the check boxes next to the End User License Agreements, and then click the I accept the terms button. If you do not accept the terms of the End User License Agreements for an update, the update will not be installed.
EULAs for the update are accepted. The update installation status changes to Planned. The updates are installed on managed devices according to the update installation settings.
To accept EULAs for all available updates at once:
- Open Kaspersky Next Management Console.
- Select the Security management → Vulnerability Assessment and Patch Management section.
- Under Patches and updates, click the View button.
- Click the Accept license agreements button.
The End User License Agreements window opens.
- Carefully read the texts of the End User License Agreements listed in the window.
If you accept the terms of the End User License Agreements, select the check boxes next to the End User License Agreements, and then click the I accept the terms button. If you do not accept the terms of the End User License Agreements for an update, the update will not be installed.
EULAs for the updates are accepted. The update installation status changes to Planned. The updates are installed on managed devices according to the update installation settings.
Page top
Encryption Management
This section contains information about encryption of managed devices.
This feature is available only if you activated Kaspersky Next under a Kaspersky Next EDR Optimum or XDR Expert license.
About Encryption Management
Kaspersky Next allows you to configure encryption of managed devices running Windows and macOS. Encryption prevents other users from gaining unauthorized access to data stored on the user's device.
This feature is available only if you activated Kaspersky Next under a Kaspersky Next EDR Optimum or XDR Expert license.
Devices running Windows are encrypted by using BitLocker Drive Encryption. BitLocker is a technology that is part of the Windows operating system. Kaspersky Endpoint Security for Windows encrypts all logical partitions of hard drives of a device simultaneously. Recovery keys are stored in the Kaspersky Next infrastructure.
Encryption is supported in Kaspersky Endpoint Security for Windows, starting from version 10 Service Pack 2.
We do not recommend moving a hard drive from an encrypted device to another device. Otherwise, you may lose the ability to use the recovery key for gaining access if the user forgets the password.
Devices running macOS are encrypted by using the FileVault disk encryption feature. When you start FileVault encryption for a device by using Kaspersky Next, Kaspersky Endpoint Security for Mac prompts a user of this device to enter his or her credentials. Disk encryption only starts after the user provides the credentials and the device is restarted. Recovery keys are stored in the Kaspersky Next infrastructure.
Encryption is supported in Kaspersky Endpoint Security for Mac, starting from version 11.
You can enable encryption in several security profiles simultaneously and define identical encryption settings for them. Later, if necessary, you can edit encryption settings in each security profile separately; this includes encrypting or decrypting the devices. You can also view the report about encryption.
If a user has forgotten a password for accessing an encrypted device, you can help the user by sending him or her the recovery key.
You can decrypt some of your users' devices, without disabling the encryption management. If you do not need to manage encryption of your users' devices any longer, you can disable encryption.
Page top
Enabling encryption
You can enable encryption in several security profiles simultaneously and define identical encryption settings for them. The exact procedure depends on the operating system of the devices for which you want to enable encryption.
Enabling encryption of devices running Windows
The actual encryption of protected devices starts only after you complete the procedure described in this section.
To enable encryption of devices running Windows:
- Open Kaspersky Next Management Console.
- Select the Security management → Encryption section.
The displayed Using encryption on devices window allows you to enable and disable encryption in security profiles, and to go to the list of reports.
- Click the Enable encryption for Windows button.
The button is available only if there is at least one security profile in which encryption of devices running Windows has not yet been enabled.
The Enable Encryption Management for devices running Windows window opens.
- Select the check boxes next to the names of the security profiles in which you want to enable encryption.
The list contains only those security profiles in which encryption has not yet been enabled.
- Click the Enable Encryption Management button.
- Define the encryption settings:
- If you want to turn on the encryption module without sending the actual command to encrypt your users' devices, select the Decrypt devices option.
By default, the Encrypt devices option is selected.
- If you want to use hardware encryption, enable the Hardware encryption toggle switch. If this toggle switch is disabled, software encryption is used.
Hardware encryption lets you increase the speed of encryption and use fewer computer resources.
- If you want to enable authentication by using , enable the Authentication by using Trusted Platform Module (TPM) toggle switch.
- If you enabled the Authentication by using Trusted Platform Module (TPM) option during the previous step, click the Settings link below the Authentication by using Trusted Platform Module (TPM) section.
The Trusted Platform Module (TPM) authentication settings window opens.
- If you want to set a PIN code that will be requested when the user attempts to gain access to an encryption key, enable the Use PIN where available option. In the Minimum PIN length (digits) field, you can specify the minimum number of digits that a PIN code must contain.
A PIN code will be used to gain access to encryption keys that are stored in TPM, if TPM is available on the device.
- If you want to have access to encryption keys if TPM is not available on the device, enable the Authorization by using password option. In the Minimum password length (characters) field, you can specify the minimum number of characters that a password must contain.
Access to encryption keys will be protected by a password.
On devices running Windows 7 and Windows Server 2008 R2, only encryption that uses TPM is available. If the TPM module is not installed on such devices, they cannot be encrypted. Using a password is not supported on such devices.
- If you want to enable BitLocker authentication in the preboot environment on tablet computers, enable the Enable the use of BitLocker authentication on Windows tablets toggle switch.
The touchscreen of tablet computers is not available in the preboot environment. To complete BitLocker authentication on tablet computers, the user must, for example, connect a USB keyboard.
- If you want to turn on the encryption module without sending the actual command to encrypt your users' devices, select the Decrypt devices option.
- Click Next to continue.
- Check the list of security profiles in which you want to enable encryption, and the encryption settings that you defined.
- Click the Apply button.
Encryption is enabled in the selected security profiles with the defined settings.
Later, if necessary, you can edit encryption settings in each security profile separately.
The encryption and decryption of devices may take a long time. You can use the Encryption status of devices report to see the current encryption status.
Enabling encryption of devices running macOS
The actual encryption of protected devices starts only after you complete the procedure described in this section.
To enable encryption of devices running macOS:
- Open Kaspersky Next Management Console.
- Select the Security management → Encryption section.
The displayed Using encryption on devices window allows you to enable and disable encryption in security profiles, and to go to the list of reports.
- Click the Enable encryption for macOS button.
The button is available only if there is at least one security profile in which encryption of devices running macOS has not been enabled yet.
The Enable Encryption Management for devices running macOS window opens.
- Select the check boxes next to the names of the security profiles in which you want to enable encryption.
The list contains only those security profiles in which encryption has not been enabled yet.
- Click the Enable Encryption Management button.
- If you want to turn on the encryption module without sending the actual command to encrypt your users' devices, select the Decrypt devices option.
By default, the Encrypt devices option is selected.
- Click Next to continue.
- Check the list of security profiles in which you want to enable encryption, and the encryption settings that you defined.
- Click the Apply button.
Encryption is enabled in the selected security profiles with the defined settings.
Later, if necessary, you can edit encryption settings in each security profile separately.
The encryption and decryption of devices may take a long time. You can use the Encryption status of devices report to see the current encryption status.
Editing encryption settings
After you enable encryption in several security profiles simultaneously, you can edit encryption settings in each security profile separately, as described in this section.
Editing encryption of Windows devices
To edit encryption of devices running Windows:
- Open Kaspersky Next Management Console.
- Select the Security management → Security profiles section.
The Security profiles section contains a list of security profiles configured in Kaspersky Next.
- In the list, select the security profile for the devices on which you want to configure encryption.
- Click the link with the profile name to open the security profile properties window.
The security profile properties window displays settings available for all devices.
- In the Windows group, select the Management settings → Encryption section.
- If you want to turn the encryption module off without sending the actual command to encrypt or decrypt your users' devices, set the toggle switch to Encryption Management is disabled. This may be useful if you use a third-party encryption tool.
- Do either of the following:
- To encrypt your users' devices, select the Encrypt devices option.
- To decrypt your users' devices, select the Decrypt devices option.
- Click the Settings link.
- Edit the encryption settings, as required:
- If you want to use hardware encryption, enable the Hardware encryption toggle switch. If this toggle switch is disabled, software encryption is used.
Hardware encryption lets you increase the speed of encryption and use fewer computer resources.
- If you want to enable authentication by using Trusted Platform Module (TPM), enable the Authentication by using Trusted Platform Module (TPM) toggle switch.
- If you enabled the Authentication by using Trusted Platform Module (TPM) option during the previous step, click the Settings link below the Authentication by using Trusted Platform Module (TPM) section.
The Trusted Platform Module (TPM) authentication settings window opens.
- If you want to set a PIN code that will be requested when the user attempts to gain access to an encryption key, enable the Use PIN where available option. In the Minimum PIN length (digits) field, you can specify the minimum number of digits that a PIN code must contain.
A PIN code will be used to gain access to encryption keys that are stored in TPM, if TPM is available on the device.
- If you want to have access to encryption keys if TPM is not available on the device, enable the Authorization by using password option. In the Minimum password length (characters) field, you can specify the minimum number of characters that a password must contain.
Access to encryption keys will be protected by a password.
On devices running Windows 7 and Windows Server 2008 R2, only encryption that uses TPM is available. If the TPM module is not installed on such devices, they cannot be encrypted. Using a password is not supported on such devices.
- If you want to enable BitLocker authentication in the preboot environment on tablet computers, enable the Enable the use of BitLocker authentication on Windows tablets toggle switch.
The touchscreen of tablet computers is not available in the preboot environment. To complete BitLocker authentication on tablet computers, the user must, for example, connect a USB keyboard.
- If you want to use hardware encryption, enable the Hardware encryption toggle switch. If this toggle switch is disabled, software encryption is used.
- Click the Save button.
The specified encryption settings are saved.
The encryption and decryption of devices may take a long time. You can use the Encryption status of devices report to see the current encryption status.
Editing encryption of Mac devices
To edit encryption of devices running macOS:
- Open Kaspersky Next Management Console.
- Select the Security management → Security profiles section.
The Security profiles section contains a list of security profiles configured in Kaspersky Next.
- In the list, select the security profile for the devices on which you want to configure encryption.
- Click the link with the profile name to open the security profile properties window.
The security profile properties window displays settings available for all devices.
- In the Mac group, select the Management settings → Encryption section.
- If you want to turn the encryption module off without sending the actual command to encrypt or decrypt your users' devices, set the toggle switch to Encryption Management is disabled. This may be useful if you use a third-party encryption tool.
- Do either of the following:
- To encrypt your users' devices, select the Encrypt devices option.
- To decrypt your users' devices, select the Decrypt devices option.
- Click the Save button.
The specified encryption settings are saved.
The encryption and decryption of devices may take a long time. You can use the Encryption status of devices report to see the current encryption status.
Recovering access to an encrypted device
If a user has forgotten a password for accessing a Windows device encrypted by BitLocker or a macOS device encrypted by FileVault, you can help the user by sending him or her the recovery key.
To recover access to a device protected by BitLocker or FileVault:
- Ask the user to tell you the recovery key ID that is displayed on the recovery key request window.
- In Kaspersky Next, open the properties of the device to which the user wants to recover access.
The device properties window displays all of the recovery keys that are accessible for the device.
- Verify that the recovery key ID that is provided by the user matches the one that is displayed in the device properties.
- If the recovery key IDs are the same, tell the user the recovery key that is also displayed in the device properties.
The user enters the recovery key and gains access to the device.
Page top
Decrypting devices
You can decrypt some of your users' devices, without disabling the encryption management. For example, follow this procedure before deleting encrypted devices.
As an alternative, you can disable encryption. In this case, the devices will also be decrypted.
To decrypt devices:
- Create a separate security profile in which the encryption of devices is disabled. Or, you can edit an existing profile.
If such a security profile already exists, skip this step.
- Assign the security profile from the previous step to the users whose devices you want to decrypt.
Kaspersky Next starts decryption of the devices that are owned by the selected users.
The encryption and decryption of devices may take a long time. You can use the Encryption status of devices report to see the current encryption status.
Disabling encryption
If you do not need to manage encryption of your users' devices any longer, you can disable encryption, as described in this section. The devices will also be decrypted.
As an alternative, you can decrypt devices, without disabling encryption.
Disabling encryption by using the list of security profiles
To disable encryption by using the list of security profiles:
- Open Kaspersky Next Management Console.
- Select the Security management → Security profiles section.
The Security profiles section contains a list of security profiles configured in Kaspersky Next.
- In the list, select the required security profile.
- Click the link with the profile name to open the security profile properties window.
The security profile properties window displays settings available for all devices.
- Depending on the operating system of the devices for which you want to disable encryption, do either of the following:
- In the Windows group, select the Management settings → Encryption section.
- In the Mac group, select the Management settings → Encryption section.
- Select the Decrypt devices option.
- Set the toggle switch to Encryption Management is disabled.
- Click the Save button to save the changes.
- If necessary, repeat the steps above for another security profile.
Encryption is disabled in the selected security profiles. The decryption of your users' devices starts.
The encryption and decryption of devices may take a long time. You can use the Encryption status of devices report to see the current encryption status.
Disabling encryption by using the encryption management window
To disable encryption by using the encryption management window:
- Open Kaspersky Next Management Console.
- Select the Security management → Encryption section.
The displayed Using encryption on devices window allows you to enable and disable encryption in security profiles, and to go to the list of reports.
- Click the link next to Encryption Management is enabled in profiles.
The displayed Encryption status details window contains the list of security profiles in which encryption has been enabled for devices running Windows and/or macOS.
- Click Disable encryption next to the required security profile.
- If necessary, repeat the previous step for another security profile.
- Click the OK button to close the Encryption status details window.
Encryption is disabled in the selected security profiles. The decryption of your users' devices starts.
The encryption and decryption of devices may take a long time. You can use the Encryption status of devices report to see the current encryption status.
Performing typical tasks
This section describes the procedure for performing standard tasks when handling Kaspersky Next.
Closing a Management Console session
When you have finished your work, you should use the administrator menu to exit Management Console. If you just close the tab or the browser window, unauthorized persons may obtain access to Management Console.
To close a session in Kaspersky Next Management Console correctly,
In Kaspersky Next Management Console, click the link with your user account name, and then select Sign out.
The account page on Kaspersky Business Hub appears. You can close this browser page, if necessary. All data from your workspace will be saved.
Viewing widgets
Kaspersky Next allows you to monitor security trends in your organization's network by providing you with a graphical display of information. The information is displayed as a set of widgets, presented as donut charts, tables, and graphs. The information displayed in widgets is not updated automatically. You can use the refresh feature of your browser to update the widgets.
To view widgets:
- Open Kaspersky Next Management Console.
- Select the Information panel → Monitoring page.
After a workspace is opened three times, the Information panel → Monitoring page is displayed when the console starts, instead of the Information panel → Getting started page.
Each widget contains information about all of the managed devices in your organization. Unless otherwise specified in the name of a widget, widgets show information from the last 30 days.
Some widgets have text information with links. You can view detailed information by clicking a link. If you click a link in one of the widgets that display information about devices (for example, Protection status of devices), Management Console displays the list of devices, with information filtered according to your selection. The same applies to widgets that display information about users (for example, Users without devices) and about vulnerabilities (for example, Devices by severity level of vulnerabilities).
What you need to know about some of the widgets
- Protection status of devices. The widget displays the protection information about managed devices, except for those running iOS and iPadOS.
- TOP 10 infected devices during last 7 days. The widget displays the ten managed devices with the most number of threats detected over the last seven days.
- Threats detected during last 7 days. The widget displays the total number of threats detected on managed devices over the last seven days up to the present moment.
- Detection of threats during last 7 days. The widget displays the distribution of threat detections over the last seven days. Threats can be detected several times a day.
- Devices by severity level of vulnerabilities. The widget displays the number of managed devices, depending on the severity level of software vulnerabilities detected on the devices. The widget displays the actual information about managed devices running Windows. Managed devices running macOS and Android are always shown as having no vulnerabilities.
- Detection of vulnerabilities during last 7 days. The widget displays the distribution of vulnerability detections over the last seven days. The interval between vulnerability detections is specified in the vulnerability detection settings.
Managing the display of widgets
You can sort the groups of widgets, so that the widgets that you use most often are placed on top. You can also collapse or hide groups of widgets that you do not use.
To move a group of widgets up or down,
On the Monitoring page, click the vertical ellipsis next to the name of the required group of widgets, and then click Move up or Move down.
The group of widgets is moved up or down.
To expand or collapse a group of widgets,
On the Monitoring page, click the arrow next to the name of the required group of widgets.
The group of widgets is expanded or collapsed.
To hide a group of widgets,
On the Monitoring page, click the vertical ellipsis next to the name of the required group of widgets, and then click Hide.
The group of widgets is hidden.
To manage the display of several groups of widgets at once:
- On the Monitoring page, click the Manage widgets button.
- In the Manage widget groups window that opens, do any of the following:
- To move a group of widgets up or down, click the up arrow or down arrow next to the name of the required group of widgets.
- To show or hide a group of widgets, use the toggle switch next to the name of the required group of widgets.
- Click the Save button to save the changes.
The display of widgets is changed.
Page top
Configuring protection
This section contains instructions on how to configure protection components for devices running Windows and macOS, and how to configure anti-malware protection for devices running Android.
Configuring protection components on Windows devices
Security applications installed on Windows devices provide protection against various threats, and against network and phishing attacks.
Each threat type is processed by a dedicated component of the security application. You can enable, disable, and configure those components through Kaspersky Next Management Console.
Selecting the types of detectable objects on Windows devices
Objects detected by Kaspersky Endpoint Security are categorized based on various traits. The application always searches for viruses, worms, Trojans, and malicious tools. These programs can cause significant harm to your computer. To improve the security of your computer, you can expand the range of detectable objects by enabling the monitoring of the actions of adware and the monitoring of legitimate applications that intruders can use to compromise your users' devices or personal data.
Objects detected by Kaspersky Endpoint Security are divided into the following categories:
- Viruses, worms, Trojans, and malicious tools. This category includes all types of malware. The minimum necessary security level ensures protection against them. Based on the recommendations of Kaspersky experts, Kaspersky Endpoint Security always monitors objects in this category.
- Adware. This category includes software that can cause inconvenience to the user.
- Auto-dialers. This category includes programs that establish hidden telephone connections through a modem.
- Other software. This category includes legitimate applications that intruders can use to compromise your users' devices or personal data, such as remote administration applications.
To select the types of detected objects:
- Open Kaspersky Next Management Console.
- Select the Security management → Security profiles section.
The Security profiles section contains a list of security profiles configured in Kaspersky Next.
- In the list, select the security profile for the devices on which you want to configure the types of detected objects.
- Click the link with the profile name to open the security profile properties window.
The security profile properties window displays settings available for all devices.
- In the Windows group, select the Advanced section.
- Click the Settings link below the Threat detection and exclusions section.
The Threat detection and exclusions window opens.
- If you want to enable detecting applications included in the Other software category, set the toggle switch to Detection of other types of objects is enabled.
By default, the toggle switch is set to Detection of other types of objects is disabled.
- Click the Save button.
Kaspersky experts recommend that you do not disable protection against adware and auto-dialers. If Kaspersky Endpoint Security categorizes a program as malware but you are confident that it is not a dangerous program, you can add it to the trusted zone.
After the security profile is applied, detection of the specified types of objects will be enabled on Windows devices during malware scans.
Page top
Configuring the File Threat Protection component on Windows devices
The File Threat Protection component allows you to avoid infecting the file system on your computer and protects the computer's file system in real time by intercepting and analyzing attempts to access files. By default, this component starts when the security application is started on the device. File Threat Protection permanently resides in the computer's RAM and scans all files that are opened, saved, and run on the computer and on all connected drives. File Threat Protection intercepts every attempt to gain access to a file and scans that file for malware.
To configure the File Threat Protection component on Windows devices:
- Open Kaspersky Next Management Console.
- Select the Security management → Security profiles section.
The Security profiles section contains a list of security profiles configured in Kaspersky Next.
- In the list, select the security profile for the devices on which you want to configure the File Threat Protection component.
- Click the link with the profile name to open the security profile properties window.
The security profile properties window displays settings available for all devices.
- In the Windows group, select the Security settings section.
- Set the toggle switch to File Threat Protection is enabled.
- Click the Settings link below the File Threat Protection is enabled toggle switch.
The File Threat Protection component settings page opens.
- In the Security level section, select the security level that meets your requirements for device protection.
The settings of the security level selected will be displayed under the list of levels.
- If necessary, under Network drives scan, specify whether the protection scope must include network drives.
By default, network drives are included into the protection scope. For example, you may want to exclude them for the following reasons:
- To decrease the time that scanning takes. Scanning network drives in addition to hard drives and removable drives takes extra time that you may want to save.
- To decrease redundancy of File Threat Protection. If network drives are included into the protection scope, they are scanned together with every device that uses them. Also, if a Kaspersky security application is installed on a server to which these network drives are connected, these drives are also scanned as local drives of this server.
- Click the Save button.
After the security profile is applied, the File Threat Protection component is enabled on Windows devices. This component scans Windows devices according to the settings defined.
Page top
Configuring the scanning of removable drives when they are connected to a computer
The File Threat Protection component scans all files that the user runs or copies, even if the file is located on a removable drive. To prevent the spread of malware, you can additionally configure automatic scans of removable drives when they are connected to the computer.
To configure the scanning of removable drives when they are connected to a computer:
- Open Kaspersky Next Management Console.
- Select the Security management → Security profiles section.
The Security profiles section contains a list of security profiles configured in Kaspersky Next.
- In the list, select the security profile for the devices on which you want to configure the scanning of removable drives on connection.
- Click the link with the profile name to open the security profile properties window.
The security profile properties window displays settings available for all devices.
- In the Windows group, select the Security settings section.
- Set the toggle switch to Scan of removable drives is enabled.
- Click the Settings link below the Scan of removable drives is enabled toggle switch.
The settings page opens.
- Under Scan type, select the scan type:
- Full scan
When a removable drive is connected, Kaspersky Endpoint Security for Windows scans all files on the removable drive, including files nested in compound objects, archives, distribution packages, and files in Office formats. Kaspersky Endpoint Security for Windows does not scan files in mail formats or password-protected archives.
- Quick scan
When a removable drive is connected, Kaspersky Endpoint Security for Windows scans only files of specific formats that are most vulnerable to infection, and does not unpack compound objects.
- Full scan
- If necessary, enable the Block the user from stopping the scan task option.
If this option is enabled, the user cannot stop the removable drives scan task via the local interface of Kaspersky Endpoint Security for Windows.
- If necessary, enable the Specify maximum disk size limit option, and then specify the value.
You may want to enable this option to decrease the time that is required for scanning.
After the security profile is applied, the scanning of removable drives on connection is configured on Windows devices.
Page top
Configuring the Mail Threat Protection component on Windows devices
The Mail Threat Protection component scans incoming and outgoing email messages for malware and other threats. The Mail Threat Protection component starts when the Windows device security application is started. Mail Threat Protection permanently resides in the computer's RAM, scanning all messages sent or received via POP3, SMTP, IMAP, MAPI, and NNTP.
Mail Threat Protection intercepts and scans every message received or sent by the user. If no threats are detected in a message, it becomes available to the user.
To configure the Mail Threat Protection component on Windows devices:
- Open Kaspersky Next Management Console.
- Select the Security management → Security profiles section.
The Security profiles section contains a list of security profiles configured in Kaspersky Next.
- In the list, select the security profile for the devices on which you want to configure the Mail Threat Protection component.
- Click the link with the profile name to open the security profile properties window.
The security profile properties window displays settings available for all devices.
- In the Windows group, select the Security settings section.
- Set the toggle switch to Mail Threat Protection is enabled.
- Click the Settings link below the Mail Threat Protection is enabled toggle switch.
The Mail Threat Protection component settings page opens.
- In the Security level section, select the security level that meets your requirements for device protection.
The settings of the security level selected will be displayed under the list of levels.
- Click the Save button.
After the security profile is applied, the Mail Threat Protection component will be enabled on Windows devices. This component will scan all email messages for malware, in accordance with the current settings.
Page top
Configuring the Web Threat Protection component on Windows devices
The Web Threat Protection component protects incoming and outgoing data that is sent by using the HTTP and FTP protocols, to and from the computer. The component also checks URLs against the list of malicious or phishing web addresses.
If you enable the Encrypted Connections Scan feature, the Web Threat Protection component also protects data that is sent over encrypted connections (for example, by using the HTTPS protocol). You can also configure the list of trusted domains. The component will not control or process encrypted connections made during visits to those domains.
To configure the Web Threat Protection component on Windows devices:
- Open Kaspersky Next Management Console.
- Select the Security management → Security profiles section.
The Security profiles section contains a list of security profiles configured in Kaspersky Next.
- In the list, select the security profile for the devices on which you want to configure the Web Threat Protection component.
- Click the link with the profile name to open the security profile properties window.
The security profile properties window displays settings available for all devices.
- In the Windows group, select the Security settings section.
- Set the toggle switch to Web Threat Protection is enabled.
- Click the Settings link below the Web Threat Protection is enabled toggle switch.
The Web Threat Protection component settings page opens.
- In the Security level section, select the security level that meets your requirements for device protection.
- In the Action on threat detection section, select the action that the Web Threat Protection component will take on an infected object.
- In the Web Threat Protection exclusions section, click Settings.
The Exclusions window opens.
- Do any of the following:
- To add a URL that you want to be excluded from scanning:
- Click the Add button.
The New record window opens.
- In the entry field, specify the URL to be excluded.
When specifying the URL, you can use the
*(asterisk) character to take the place of any set of characters.For example, specify
example.comto exclude only this webpage or specify*.example.com/*to exclude all webpages of the website. - Click OK to close the New record window.
The added URL appears in the list of exclusions in the Exclusions window.
- Click the Add button.
- To modify a URL that is excluded from scanning:
- Select the check box next to the required URL.
- Click the Edit button.
The New record window opens. It contains the selected URL.
- Make the necessary changes.
- Click OK to close the New record window.
The modified URL is displayed in the list of exclusions in the Exclusions window.
- To delete a URL from the list of scanning exclusions:
- Select the check box next to the required URL.
- Click the Delete button.
The deleted URL disappears from the list of exclusions in the Exclusions window.
- To add a URL that you want to be excluded from scanning:
- Click Save to save the changes.
After the security profile is applied, the Web Threat Protection component is enabled on Windows devices. This component intercepts and analyzes webpages and files to which the user has gained access, scanning them for malware.
Page top
Configuring the Behavior Detection, Exploit Prevention, and Remediation Engine components on Windows devices
The Behavior Detection, Exploit Prevention, and Remediation Engine components obtain information about the actions of applications on the user's computer and provide this information to other components. Based on the information received by these components, when disinfecting malware the security application on a Windows device can also roll back the actions performed by malware in the operating system.
The Behavior Detection, Exploit Prevention, and Remediation Engine components provide proactive protection of the computer by using BSS (Behavior Stream Signatures, hereinafter also referred to as behavior templates). These templates contain sequences of actions performed by applications that have been classified as dangerous. If the activity of an application matches any of the behavior templates, the security application on the Windows device performs the specified action.
To configure the Behavior Detection, Exploit Prevention, and Remediation Engine components on Windows devices:
- Open Kaspersky Next Management Console.
- Select the Security management → Security profiles section.
The Security profiles section contains a list of security profiles configured in Kaspersky Next.
- In the list, select the security profile for the devices on which you want to configure the components.
- Click the link with the profile name to open the security profile properties window.
The security profile properties window displays settings available for all devices.
- In the Windows group, select the Security settings section.
- Use the corresponding toggle switch to enable or disable the Behavior Detection, Exploit Prevention, and Remediation Engine components.
- Click the Settings link below Behavior Detection, Exploit Prevention, and Remediation Engine are enabled.
The Behavior Detection window opens.
- Enable or disable the Protection of shared folders against external encryption option.
This option obtains and analyzes information about activity in shared folders. If this activity matches a behavior stream signature that is typical for external encryption, the selected action is performed.
By default, this option is enabled.
Kaspersky Next monitors operations performed only with those files that are stored on mass storage devices with the NTFS file system and that are not encrypted with EFS.
- Select the action to be performed upon detection of external encryption:
- Select Notify if you want the system to add an entry to the list of active threats.
- Select Block connection for (minutes) if you want the system to block network activity of the computer attempting the modification.
Specify the number of minutes for which the connection will be blocked.
- Enable or disable the System processes memory protection option.
This option blocks external processes that attempt to gain access to system processes.
By default, this option is enabled.
- Click the Save button.
After the security profile is applied, the Behavior Detection, Exploit Prevention, and Remediation Engine components are configured on Windows devices.
Page top
Enabling and disabling AMSI Protection
The AMSI Protection component is intended to support Antimalware Scan Interface from Microsoft. The Antimalware Scan Interface (AMSI) allows third-party applications that use AMSI to send objects to Kaspersky Next for an additional scan, and then receive the results from scanning these objects. Third-party applications may include, for example, Microsoft Office applications. For details on AMSI, please refer to the Microsoft documentation.
The AMSI Protection component can only detect a threat and notify a third-party application about the detected threat. After receiving a notification of a threat, a third-party application can prevent malicious actions. For example, if a third-party application accepts and executes a script, the application can request a scan of the script contents. Thus, the application can safely determine whether or not the script is malicious before executing it.
The AMSI Protection component can only scan objects not larger than 8 MB. It does not scan archives and distribution packages.
To enable or disable AMSI Protection on Windows devices:
- Open Kaspersky Next Management Console.
- Select the Security management → Security profiles section.
The Security profiles section contains a list of security profiles configured in Kaspersky Next.
In the list, select the security profile for the devices on which you want to configure the components.
- Click the link with the profile name to open the security profile properties window.
The security profile properties window displays settings available for all devices.
- In the Windows group, select the Security settings section.
- Use the corresponding toggle switch to enable or disable the AMSI Protection component.
By default, the AMSI Protection component is enabled.
- Click the Save button.
After the security profile is applied, AMSI Protection is enabled or disabled on Windows devices.
Page top
Configuring the BadUSB Attack Prevention component
Some malware modifies the firmware of USB devices (for example, a USB flash drive) to trick the operating system into detecting the USB device as a keyboard. As a result, when the device is connected to a computer, the malware may execute commands (for example, download other malware).
The BadUSB Attack Prevention component prevents infected USB devices emulating a keyboard from connecting to the computer.
When a USB device is connected to the computer and identified as a keyboard by the operating system, the application prompts the user to use this keyboard and enter a numerical code generated by the application. This procedure is known as keyboard authorization.
If the code has been entered correctly, the application saves the identification parameters—VID/PID of the keyboard and the number of the port to which it has been connected—in the list of authorized keyboards. Keyboard authorization does not need to be repeated when the keyboard is reconnected or after the operating system is restarted.
When the authorized keyboard is connected to a different USB port of the computer, the application shows a prompt for authorization of this keyboard again.
If the numerical code has been entered incorrectly, the application generates a new code. You can configure the number of attempts for entering the numerical code. If the numerical code is entered incorrectly several times or the keyboard authorization window is closed, the application blocks input from this keyboard. When the USB device blocking time elapses or the operating system is restarted, the application prompts the user to perform a keyboard authorization again.
The application allows use of an authorized keyboard and blocks a keyboard that has not been authorized.
To configure the BadUSB Attack Prevention component:
- Open Kaspersky Next Management Console.
- Select the Security management → Security profiles section.
The Security profiles section contains a list of security profiles configured in Kaspersky Next.
- In the list, select the security profile for the devices on which you want to configure the BadUSB Attack Prevention component.
- Click the link with the profile name to open the security profile properties window.
The security profile properties window displays settings available for all devices.
- In the Windows group, select the Security settings section.
- Set the toggle switch to BadUSB Attack Prevention is enabled.
- Click the Settings link below the BadUSB Attack Prevention is enabled toggle switch.
The BadUSB Attack Prevention component settings page opens.
- In Maximum number of keyboard authorization attempts (between 1 and 10), specify the maximum number of attempts that the user has to enter the numerical code generated by the application.
- In Timeout when reaching the maximum number of attempts (between 1 and 180 minutes), specify the number of minutes for which the application blocks a keyboard after the user enters the numerical code incorrectly the maximum number of times.
- Click the Save button.
After the security profile is applied, the BadUSB Attack Prevention component is enabled and configured on Windows devices.
Page top
Configuring the Network Threat Protection component on Windows devices
The Network Threat Protection component monitors inbound network traffic of the Windows device for activity that is typical of network attacks. Upon detecting an attempted network attack on a user's computer, Network Threat Protection blocks network activity from the attacking computer.
To configure the Network Threat Protection component on Windows devices:
- Open Kaspersky Next Management Console.
- Select the Security management → Security profiles section.
The Security profiles section contains a list of security profiles configured in Kaspersky Next.
- In the list, select the security profile for the devices on which you want to configure the Network Threat Protection component.
- Click the link with the profile name to open the security profile properties window.
The security profile properties window displays settings available for all devices.
- In the Windows group, select the Security settings section.
- Set the toggle switch to Network Threat Protection is enabled.
- Click the Settings link below the Network Threat Protection is enabled toggle switch.
The Network Threat Protection component settings page opens.
- In the Network Threat Protection settings section, set the toggle switch to Add the attacking computer to the list of blocked computers.
- In the Time to block attacking computer (min) field, specify a value for the number of minutes during which the network activity of the attacking computer will be blocked.
- In the Network Threat Protection exclusions section, click Settings.
The Exclusions window opens.
- Do any of the following:
- To add an IP address that you want to be excluded from scanning:
- Click the Add button.
The New record window opens.
- In the Protocol list, select the protocol of the IP address to be excluded.
- In the IP address field, enter the IP address to be excluded.
- If permitted by the Protocol value, enter the port or ports. You can specify a single port, a range of ports, or a comma-separated list of ports and ranges.
- Click OK to close the New record window.
The added IP address appears in the list of exclusions in the Exclusions window.
- Click the Add button.
- To modify an IP address that is excluded from scanning:
- Select the check box next to the required IP address.
- Click the Edit button.
The New record window opens. It contains the selected IP address.
- Make the necessary changes.
- Click OK to close the New record window.
The modified IP address is displayed in the list of exclusions in the Exclusions window.
- To delete an IP address from the list of scanning exclusions:
- Select the check box next to the required IP address.
- Click the Delete button.
The deleted IP address disappears from the list of exclusions in the Exclusions window.
- To add an IP address that you want to be excluded from scanning:
- Click the Save button.
After the security profile is applied, the Network Threat Protection component is enabled on Windows devices.
Page top
Configuring network ports exclusions
During the operation of Kaspersky Next, the Web Control, Mail Threat Protection, and Web Threat Protection components monitor data that is transmitted through specific open ports on users' devices. For example, the Mail Threat Protection component analyzes information transmitted via SMTP, while the Web Threat Protection component analyzes information transmitted via HTTP and FTP. This list of ports is configured by Kaspersky experts.
However, you can exclude any of the listed ports from monitoring, as described in this section.
Additionally, Kaspersky Next monitors all network ports that are required by certain applications. This list of applications is created by Kaspersky experts. If you exclude a certain port from monitoring but this port is used by an application from the list, Kaspersky Next will still monitor data that is transmitted through the excluded port by the listed application but will not monitor data that is transmitted by any other application.
To configure network ports exclusions:
- Open Kaspersky Next Management Console.
- Select the Security management → Security profiles section.
The Security profiles section contains a list of security profiles configured in Kaspersky Next.
- In the list, select the security profile for the devices on which you want to configure network ports exclusions.
- Click the link with the profile name to open the security profile properties window.
The security profile properties window displays settings available for all devices.
- In the Windows group, select the Advanced section.
- Click the Settings link below the Threat detection and exclusions section.
The Threat detection and exclusions window opens.
- Click the Settings link below the Network ports exclusions section.
The Network ports exclusions window opens.
- Do any of the following:
- To add network ports that you want to be excluded from monitoring:
- Click the Add button.
The Add ports to exclusions window opens. The window lists all network ports that are monitored by Kaspersky Next.
- Select the check boxes next to the network ports to be excluded.
- Click OK to close the Add ports to exclusions window.
The added network ports appear in the list of exclusions in the Network ports exclusions window.
- Click the Add button.
- To delete network ports from the list of monitoring exclusions:
- Select the check box next to the required network ports.
- Click the Delete button.
The deleted network ports disappear from the list of exclusions in the Network ports exclusions window.
- To add network ports that you want to be excluded from monitoring:
- Click the Save button to save the changes.
After the security profile is applied, the network ports exclusions are applied to Windows devices.
Page top
Enabling and disabling Advanced Disinfection
The Advanced Disinfection technology is aimed at purging the operating system of malware that has already started its processes in RAM and that prevents the security application from removing it by using other methods (for example, the Host Intrusion Prevention or Exploit Prevention component).
By default, Advanced Disinfection is disabled because this technology uses a significant amount of computing resources. Therefore, you can enable Advanced Disinfection only when you want to use it.
When an active infection is detected during a malware scan. Kaspersky Endpoint Security for Windows generates active infection events in local application reports and on the Kaspersky Next side. You can then enable the Advanced Disinfection feature and run the malware scan task again. This way, you can choose the appropriate time to do Advanced Disinfection and subsequently reboot your users' devices automatically.
To enable or disable Advanced Disinfection on Windows devices:
- Open Kaspersky Next Management Console.
- Select the Security management → Security profiles section.
The Security profiles section contains a list of security profiles configured in Kaspersky Next.
In the list, select the security profile for the devices on which you want to configure Advanced Disinfection.
- Click the link with the profile name to open the security profile properties window.
The security profile properties window displays settings available for all devices.
- In the Windows group, select the Advanced section.
- Click the Settings link below the Threat detection and exclusions section.
The Threat detection and exclusions window opens.
- Use the corresponding toggle switch to enable or disable Advanced Disinfection.
By default, the technology is disabled.
- Click the Save button.
After the security profile is applied, Advanced Disinfection is enabled or disabled on Windows devices.
Configuring protection components on Mac devices
Security applications installed on Mac devices provide protection against various threats, and against network and phishing attacks.
Each threat type is processed by a dedicated component of the security application. You can enable, disable, and configure those components through Kaspersky Next Management Console.
Selecting the types of detectable objects on Mac devices
Objects detected by Kaspersky Endpoint Security are categorized based on various traits. The application always searches for viruses, worms, Trojans, and malicious tools. These programs can cause significant harm to your computer. To improve the security of your computer, you can expand the range of detectable objects by enabling the monitoring of the actions of adware and the monitoring of legitimate applications that intruders can use to compromise your users' devices or personal data.
Objects detected by Kaspersky Endpoint Security are divided into the following categories:
- Viruses, worms, Trojans, and malicious tools. This category includes all types of malware. The minimum necessary security level ensures protection against them. Based on the recommendations of Kaspersky experts, Kaspersky Endpoint Security always monitors objects in this category.
- Adware. This category includes software that can cause inconvenience to the user.
- Auto-dialers. This category includes programs that establish hidden telephone connections through a modem.
- Other software. This category includes legitimate applications that intruders can use to compromise your users' devices or personal data, such as remote administration applications.
To select the types of detected objects:
- Open Kaspersky Next Management Console.
- Select the Security management → Security profiles section.
The Security profiles section contains a list of security profiles configured in Kaspersky Next.
- In the list, select the security profile for the devices on which you want to configure the types of detected objects.
- Click the link with the profile name to open the security profile properties window.
The security profile properties window displays settings available for all devices.
- In the Mac group, select the Advanced section.
- Click the Settings link below the Threat detection and exclusions section.
The Threat detection and exclusions window opens.
- If you want to enable detection of adware, auto-dialers, and applications in the Other software category, select the relevant check boxes in the Types of objects to be detected window.
- Click the Save button.
Kaspersky experts recommend that you do not disable protection against adware and auto-dialers. If Kaspersky Endpoint Security categorizes a program as malware but you are confident that it is not a dangerous program, you can add it to the trusted zone.
After the security profile is applied, detection of the specified types of objects will be enabled on users' Mac devices while File Threat Protection and Malware Scan are running.
Page top
Configuring the File Threat Protection component on Mac devices
The File Threat Protection component allows you to avoid infecting the file system on your computer and protects the computer's file system in real time by intercepting and analyzing attempts to access files. By default, this component starts when the security application is started on the device. File Threat Protection permanently resides in the computer's RAM and scans all files that are opened, saved, and run on the computer and on all connected drives. If the File Threat Protection component is disabled, it will not run when the application starts and you will have to manually enable it.
To configure the File Threat Protection component on Mac devices:
- Open Kaspersky Next Management Console.
- Select the Security management → Security profiles section.
The Security profiles section contains a list of security profiles configured in Kaspersky Next.
- In the list, select the security profile for the devices on which you want to configure the File Threat Protection component.
- Click the link with the profile name to open the security profile properties window.
The security profile properties window displays settings available for all devices.
- In the Mac group, select the Security settings section.
- Set the toggle switch to File Threat Protection is enabled.
- Click the Settings link below the File Threat Protection is enabled toggle switch.
The File Threat Protection component settings page opens.
- In the Security level section, select the security level whose settings meet your requirements for protection of Mac devices.
The settings of the security level selected will be displayed under the list of levels.
- Click the Save button to save the changes.
After the security profile is applied, File Threat Protection will be enabled on users' Mac devices. The component will protect the file system of the Mac device according to the specified settings.
Page top
Configuring the Web Threat Protection component on Mac devices
The Web Threat Protection component protects information received and sent by your computer via the HTTP and HTTPS protocols. Web Threat Protection also scans website links for signs of phishing and checks to see if they are categorized as malicious web addresses.
Web Threat Protection scans web traffic based on the settings recommended by Kaspersky. When a threat is detected, Web Threat Protection performs the action defined by you.
Scanning web addresses for signs of phishing and checking if they are included in the list of malicious web addresses helps avoid phishing attacks. Phishing attacks normally consist of email messages sent by hackers supposedly on behalf of financial organizations (for example, banks) with links to fake websites. In such email messages, hackers attempt to deceive a user into visiting a phishing website and providing confidential data (for example, a bank card number, or user name and password for an online bank account). For example, a phishing attack can be disguised as an email message supposedly from your bank with a link to the bank's official website. However, when clicking the link, you end up on an exact copy of the bank's official website that was created by hackers. Web Threat Protection scans web traffic to monitor attempts to gain access to a phishing website and blocks access to such websites.
To configure the Web Threat Protection component on Mac devices:
- Open Kaspersky Next Management Console.
- Select the Security management → Security profiles section.
The Security profiles section contains a list of security profiles configured in Kaspersky Next.
- In the list, select the security profile for the devices on which you want to configure the Web Threat Protection component.
- Click the link with the profile name to open the security profile properties window.
The security profile properties window displays settings available for all devices.
- In the Mac group, select the Security settings section.
- Set the toggle switch to Web Threat Protection is enabled.
- Click the Settings link below the Web Threat Protection is enabled toggle switch.
The Web Threat Protection component settings page opens.
- In the Security level section, select the security level whose settings meet your requirements for protection of Mac devices.
- In the Action on threat detection section, select the action that Web Threat Protection must take when it detects a dangerous object in web traffic.
- If you want the application to display a notification that prompts you to choose one of the available actions, select the Prompt the user for action option.
- If you want to automatically block access to a dangerous object detected in web traffic, select the Block automatically option.
- Click the Save button to save the changes.
After the security profile is applied, the Web Threat Protection component will be enabled on users' Mac devices. The component will scan all information received and sent by your computer via the HTTP and HTTPS protocols, and will scan website links for signs of phishing and will check to see if they are categorized as malicious web addresses.
Page top
Configuring the Network Threat Protection component on Mac devices
The Network Threat Protection component protects a computer against intrusions into the computer's operating system. The component protects against attacks by hackers (employing port scanning or password cracking) and also protects against the malware installed by hackers (including malware that sends personal data to criminals). The malware involved in network attacks includes certain Trojans, DoS attack tools, malicious scripts, and network worms.
When dangerous network activity is detected, Kaspersky Next automatically blocks the IP address of the attacking computer.
To configure the Network Threat Protection component on Mac devices:
- Open Kaspersky Next Management Console.
- Select the Security management → Security profiles section.
The Security profiles section contains a list of security profiles configured in Kaspersky Next.
- In the list, select the security profile for the devices on which you want to configure the Network Threat Protection component settings.
- Click the link with the profile name to open the security profile properties window.
The security profile properties window displays settings available for all devices.
- In the Mac group, select the Security settings section.
- Set the toggle switch to Network Threat Protection is enabled.
- Click the Settings link below the Network Threat Protection is enabled toggle switch.
The Network Threat Protection component settings page opens.
- In the Network Threat Protection settings section, in the Time to block attacking computer (min) field, specify the time period during which the IP address of the attacking computer will be blocked.
- Click the Save button to save the changes.
After the security profile is applied, the Network Threat Protection component will be enabled on users' Mac devices.
Page top
Trusted zone
The trusted zone contains files, folders, and objects that you consider safe. Kaspersky Next does not scan or monitor items from this zone.
This section describes the trusted zone and how to configure it on devices running Windows and macOS.
About the trusted zone
The trusted zone contains files, folders, and objects that you consider safe. Kaspersky Next does not scan or monitor items from this zone. In other words, the trusted zone is a set of scan exclusions.
Scan exclusions make it possible to safely use legitimate applications that intruders can use to compromise your users' devices or personal data, although such applications do not have any malicious functions. You may also need to add an item to the trusted zone if Kaspersky Next blocks access to an application even though you are absolutely sure that this application is harmless.
When an application is added to the trusted zone, its file activity and network activity is not monitored, even if such activity can raise concern. However, Kaspersky Next still scans the executable file and the process of the trusted application.
You can add items to the trusted zone by using the following methods:
- Specify the path to a file or folder (for example,
C:\Program Files\Radmin Viewer 3\RAdmin.exe).When using this method, you can use environment variables (for example, %ProgramFiles%). You can also use masks:
- The
*(asterisk) character takes the place of any set of characters, except for the\and/characters (delimiters of the names of files and folders in paths to files and folders).For example, the mask
C:\*\*.txtwill include all paths to files with the TXT extension located in first-level folders on drive C:, but not in subfolders. - Two consecutive
*characters take the place of any set of characters (including an empty set) in the file or folder name, including the\and/characters (delimiters of the names of files and folders in paths to files and folders).For example, the mask
C:\Folder\**\*.txtwill include all paths to files with the TXT extension located in the folder named Folder and all its subfolders. The mask must include at least one nesting level. The maskC:\**\*.txtis not a valid mask. - The
?(question mark) character takes the place of any single character, except for the\and/characters (delimiters of the names of files and folders in paths to files and folders).For example, the mask
C:\Folder\???.txtwill include paths to all files residing in the folder named Folder that have the TXT extension and a name consisting of three characters.
- The
- Enter the name of an object according to the classification of the Kaspersky IT Encyclopedia (for example,
Email-Worm,Rootkit, orRemoteAdmin).When using this method, you can use masks:
- The
*(asterisk) character takes the place of any set of characters.For example, the mask
*RemoteAdmin.*will include all kinds of software for remote administration. - The
?(question mark) character takes the place of any single character.
- The
You can use any or both of these methods in each exclusion. The following rules apply:
- If you specify only a file or folder in an exclusion, Kaspersky Next does not scan this file or folder.
- If you specify only an object in an exclusion, Kaspersky Next does not detect this object when scanning any files in any folders.
- If you specify a file or folder, and an object simultaneously in an exclusion, Kaspersky Next does not detect this object but still detects any other object when scanning this file or folder.
Configuring the trusted zone on Windows devices
This section describes how to configure the trusted zone for devices running Windows.
To configure the trusted zone on Windows devices:
- Open Kaspersky Next Management Console.
- Select the Security management → Security profiles section.
The Security profiles section contains a list of security profiles configured in Kaspersky Next.
- In the list, select the security profile for the devices on which you want to configure the trusted zone.
- Click the link with the profile name to open the security profile properties window.
The security profile properties window displays settings available for all devices.
- In the Windows group, select the Advanced section.
- Click the Settings link below the Threat detection and exclusions section.
The Threat detection and exclusions window opens.
- Define the required settings:
The trusted zone is updated.
After the security profile is applied on users' devices, Kaspersky Endpoint Security for Windows does not scan or monitor the objects that are added to exclusions. The objects that are deleted from exclusions are controlled.
Page top
Configuring the trusted zone on Mac devices
This section describes how to configure the trusted zone for devices running macOS.
To configure the trusted zone on Mac devices:
- Open Kaspersky Next Management Console.
- Select the Security management → Security profiles section.
The Security profiles section contains a list of security profiles configured in Kaspersky Next.
- In the list, select the security profile for the devices on which you want to configure the trusted zone.
- Click the link with the profile name to open the security profile properties window.
The security profile properties window displays settings available for all devices.
- In the Mac group, select the Advanced section.
- Click the Settings link below the Threat detection and exclusions section.
The Threat detection and exclusions window opens.
- Click the Settings link below the Malware scan exclusions section.
The Malware scan exclusions window opens.
- Do any of the following:
- To add a file, a folder, or an object to the list of scan exclusions:
- Click the Add button.
The New record window opens.
- By selecting or clearing the File or folder and Object name check boxes, select whether the exclusion must include a file or folder, an object, or both.
- In the Comment entry field, type a description of the exclusion being created.
- If the File or folder check box is selected, fill in the Name or name mask of file or folder field with the files or folders that you do not want to be scanned.
When specifying files or folders, you can use masks.
- If you want to exclude subfolders of the specified folder, select the Including subfolders check box.
- If the Object name check box is selected, fill in the Object name field with the objects that you do not want to be detected.
When specifying objects, you can use masks.
- By selecting or clearing the File Threat Protection and Malware scan check boxes, select the components to which the new exclusion will apply.
- Click the Save button to close the New record window.
The added record appears in the list of scan exclusions in the Malware scan exclusions window.
- Click the Add button.
- To modify a record in the list of scan exclusions:
- Select the check box next to the required record.
- Click the Edit button.
The Edit record window opens. It contains details about the selected scan exclusion.
- Make the necessary changes.
- Click the Save button to close the Edit record window.
The modified record is displayed in the list of exclusions in the Malware scan exclusions window.
- To delete a record from the list of scan exclusions:
- Select the check box next to the required record.
- Click the Delete button.
The deleted application disappears from the list of exclusions in the Malware scan exclusions window.
- To add a file, a folder, or an object to the list of scan exclusions:
The list of exclusions is updated.
After the security profile is applied on users' devices, Kaspersky Endpoint Security for Mac does not scan the specified files and folders, and does not detect the specified objects when the selected protection components are running.
Page top
Configuring anti-malware protection on Android devices
You can configure the anti-malware protection on an Android device through Anti-Malware. Anti-Malware is included in the Kaspersky Endpoint Security for Android app. Anti-Malware allows you to detect and eliminate threats on a device by using the application's anti-malware databases and the Kaspersky Security Network cloud service. Anti-Malware prevents the device from being infected in real-time mode.
To configure the anti-malware protection on an Android device:
- Open Kaspersky Next Management Console.
- Select the Security management → Security profiles section.
The Security profiles section contains a list of security profiles configured in Kaspersky Next.
- In the list, select the security profile for the devices on which you want to configure the anti-malware protection.
- Click the link with the profile name to open the security profile properties window.
The security profile properties window displays settings available for all devices.
- In the Android group, select the Security settings section.
- Set the toggle switch to Anti-Malware protection is enabled.
Anti-Malware will automatically scan all new applications.
- Click the Settings link below the Anti-Malware protection is enabled toggle switch.
The Anti-Malware protection settings page opens.
- In the Advanced section, define the settings of mobile device file system protection:
- To enable the advanced protection mode for a mobile device, set the toggle switch to Extended Anti-Malware protection is enabled.
Anti-Malware will scan all files that have been opened, modified, moved, copied, and saved by the user on this device.
- To block adware and apps that can be exploited by fraudsters to harm the device or user content, set the toggle switch to Protection against adware and autodialers is enabled.
- To enable the advanced protection mode for a mobile device, set the toggle switch to Extended Anti-Malware protection is enabled.
- In the Protection scope list, select the files that Anti-Malware will scan:
- Scan all files
- Scan executable files only
- In the The application always attempts... list, select an action to perform on objects detected by the scan:
- Remove an infected object
- Skip and add the information to Threats report
If threats have been skipped, Kaspersky Endpoint Security for Android warns the user about problems with device protection. Information about skipped threats is displayed in the app Status section. For each skipped threat, the app suggests actions that the user can perform to eliminate the threat. The list of skipped threats may change, for example, if a file was deleted or moved. To receive an up-to-date list of threats, run a full scan of the device. To ensure reliable protection of your data, eliminate all detected threats.
- Move an infected object to Quarantine on the device
- Click the Save button.
After the security profile is applied on the device, Kaspersky Next enables anti-malware protection.
Page top
Configuring the Host Intrusion Prevention component on Windows devices
The Host Intrusion Prevention component prevents applications from performing actions that may be dangerous for the operating system, and ensures control over access to operating system resources and personal data.
To configure the Host Intrusion Prevention component on Windows devices:
- Open Kaspersky Next Management Console.
- Select the Security management → Security profiles section.
The Security profiles section contains a list of security profiles configured in Kaspersky Next.
- In the list, select the security profile for the devices on which you want to configure the Host Intrusion Prevention component.
- Click the link with the profile name to open the security profile properties window.
The security profile properties window displays settings available for all devices.
- In the Windows group, select the Management settings section.
- Set the toggle switch to Host Intrusion Prevention is enabled.
- Click the OK button to save the changes.
- If needed, configure trusted applications that you consider safe. Kaspersky Endpoint Security for Windows will not monitor their activities.
The Host Intrusion Prevention component is configured.
After the security profile is applied, Host Intrusion Prevention is enabled on users' Windows devices.
Page top
Defining proxy server settings
If the settings of your network include the use of a proxy server to gain access to the internet, the same proxy server settings are required by Kaspersky Endpoint Security for Windows and Kaspersky Endpoint Security for Mac to connect to Kaspersky Next.
You can define the proxy server settings during the following operations:
- When you start Kaspersky Next Management Console for the first time or after Kaspersky Next is upgraded to a new version.
These settings apply to both Kaspersky Endpoint Security for Windows and Kaspersky Endpoint Security for Mac.
- When you prepare or download the distribution package of a security application.
These settings override the settings that you define when you start Kaspersky Next Management Console for the first time or after Kaspersky Next is upgraded to a new version. These settings apply only to the security application whose distribution package you are preparing or downloading.
Kaspersky Endpoint Security for Mac uses the specified proxy server to connect to Kaspersky Next. If a connection attempt using this proxy server is unsuccessful, Kaspersky Endpoint Security for Mac cannot connect to Kaspersky Next.
When Kaspersky Endpoint Security for Windows has to connect to Kaspersky Next, the security application tries to connect by using its list of connections. This list contains a record for the direct connection (connection without a proxy server), a record for the proxy server settings specified in the distribution package, and records for previously successful connections.
If any connection attempts by using records from the list are unsuccessful, Kaspersky Endpoint Security for Windows uses the auto-discovery feature to find the applicable proxy server. If auto-discovery is unsuccessful, Kaspersky Endpoint Security for Windows cannot connect to Kaspersky Next.
When you prepare or download the distribution package of Kaspersky Endpoint Security for Windows, use the procedure in this section only if you want to specify a preferred proxy server.
To define proxy server settings in distribution packages of security applications:
- Select the Specify proxy server check box.
- Specify the proxy server address and port.
- Specify the user name and password that will be used to connect to the specified proxy server.
You can click the Show button to view and check the specified password.
- Click Next.
The proxy server settings are defined. Depending on the operation during which you define these settings, they are applied to the distribution package of Kaspersky Endpoint Security for Windows, Kaspersky Endpoint Security for Mac, or both.
Page top
Managing the startup of applications on users' devices
This section provides instructions on how to manage the startup of applications on Windows devices and Android devices.
Managing the startup of applications on Windows devices
You can block applications from running on Windows devices if those applications do not meet your corporate security requirements. Application startup is restricted through Application Control.
To configure Application Control on Windows devices:
- Open Kaspersky Next Management Console.
- Select the Security management → Security profiles section.
The Security profiles section contains a list of security profiles configured in Kaspersky Next.
- In the list, select the security profile for the devices on which you want to configure Application Control.
- Click the link with the profile name to open the security profile properties window.
The security profile properties window displays settings available for all devices.
- In the Windows group, select the Application Control section.
The Application Control settings page opens.
- Set the toggle switch to Application Control is enabled.
- Under Application Control mode, select the global mode:
- Allow all applications, except
This mode is Default allow, which allows users to start an application unless it is on the list of blocked ones.
- Block all applications, except
This mode is Default deny, which prevents users from starting an application unless it is on the list of allowed ones.
- Allow all applications, except
- Specify a list of exceptions.
For each Application Control mode, you can add up to five exceptions.
Do any of the following:
- To add an Application Control exception:
- Click the Add button.
- In the Add a new Application Control exception window that opens, define the exception settings, as described later in this section.
- Click Apply to close the Add a new Application Control exception window.
- To enable or disable an added Application Control exception, set the toggle switch next to that exception to the desired state:
- If the toggle switch is green, the exception is enabled. Depending on the Application Control mode, the applications specified in the exception are either blocked or allowed.
By default, a newly added exception is enabled.
- If the toggle switch is gray, the exception is disabled. When the user attempts to start the applications specified in the exception, the software behavior is determined by the Application Control mode.
- If the toggle switch is green, the exception is enabled. Depending on the Application Control mode, the applications specified in the exception are either blocked or allowed.
- To edit an added Application Control exception:
You cannot edit the predefined exception Trusted installation packages that is displayed if the Application Control mode is Block all applications, except.
- Select the check box next to the required exception.
- Click the Edit button.
- In the Edit an Application Control exception window that opens, define the new settings of the exception, as described later in this section.
- Click Apply to close the Edit an Application Control exception window.
- To delete Application Control exceptions that were added:
You cannot delete the predefined exception Trusted installation packages that is displayed if the Application Control mode is Block all applications, except.
- Select the check boxes next to the required exceptions.
- Click the Delete button.
- In the confirmation window that opens, click the Delete button.
- To add an Application Control exception:
- Click Save to save the changes.
The list of Application Control exceptions is updated.
After the security profile is applied, Application Control is enabled on Windows devices. User access to applications is governed according to the currently defined settings.
To define the settings of an Application Control exception:
- Start adding or editing an exception, as described earlier in this section.
- In the Exception name field, enter the name of the exception.
- Select the criteria to be applied to applications.
You can specify either of the following criteria:
- Application categories
Kaspersky Next manages access to applications from the selected categories.
Do the following:
- Click the Settings link.
- In the Application categories window that opens, select the check boxes next to the required categories.
- Click OK to close the Application categories window.
- Individual applications
Kaspersky Next manages access only to the specified applications.
Do the following:
- Click the Settings link.
- In the Individual applications window that opens, specify the list of applications to be excluded.
You can use masks:
- The
*(asterisk) character takes the place of any set of characters. For example,C:\Users\User\Desktop\*.exe. - The
?(question mark) character takes the place of any single character. For example,C:\Users\User\Desktop\test?.exe.
- The
- Click OK to close the Individual applications window.
- All applications from removable drives
Kaspersky Next manages access to all applications that are stored on removable drives.
- Application categories
- Click Apply to save the changes.
The defined settings are saved.
Page top
Managing the startup of apps on Android devices
You can block apps from running on Android devices if those apps do not meet the corporate security requirements. App startup is restricted through App Control. You can also use App Control to prompt the user to install required and recommended apps on the device, or remove forbidden apps. App Control is based on lists of rules.
To make use of App Control on mobile devices running Android 5.0 or later, Kaspersky Endpoint Security for Android must be set as the Accessibility service. Kaspersky Endpoint Security for Android prompts the user to set the app as an Accessibility service through the Quick Start Wizard. The user can skip this step or disable the service through the device settings later. In this case, App Control is not running.
To configure App Control on Android devices:
- Open Kaspersky Next Management Console.
- Select the Security management → Security profiles section.
The Security profiles section contains a list of security profiles configured in Kaspersky Next.
- In the list, select the security profile for the devices on which you want to configure App Control.
- Click the link with the profile name to open the security profile properties window.
The security profile properties window displays settings available for all devices.
- In the Android group, select the Management settings section.
- In the App Control is not configured section, click the Settings link.
The App Control settings page opens.
- Set the toggle switch to Event generation during installation of applications is enabled.
After the security profile is applied, Kaspersky Next generates a report on the apps that have been installed on the device. You can view this report in the Management Console, in the mobile device properties. You will receive this report every time an app is installed on or removed from the device.
- In the Operation mode section, click the Settings link.
The App Control mode selection window opens, which also provides the advanced settings.
- Select the App Control mode:
- To allow the user to run all apps except for those blocked by the list of App Control rules, select the Block only forbidden apps mode.
- To allow the user to run only apps that have been marked as allowed, recommended, or required in the list of App Control rules, select the Block all apps except for allowed apps mode.
- Define the advanced settings of App Control:
- To allow Kaspersky Next to generate a report on prohibited apps installed on the user's mobile device without blocking those apps, select the Do not block forbidden apps, report only check box.
After the security profile is applied, Kaspersky Next generates a report on prohibited apps that have been installed on the device. You can view this report in the Management Console, in the mobile device properties.
- To allow Kaspersky Next to block system apps (such as the standard Android browser) in the Block all apps except for allowed apps mode, select the Block system apps check box.
Kaspersky experts recommend against blocking system apps because this could lead to failures in device operation.
- To allow Kaspersky Next to generate a report on prohibited apps installed on the user's mobile device without blocking those apps, select the Do not block forbidden apps, report only check box.
- Click OK.
- Create a list of App Control rules:
- Click Add.
The App Control Rule Creation Wizard starts.
- Follow the instructions of the App Control Rule Creation Wizard.
The rule that you created will be added to the list of App Control rules.
- Click Add.
- Click the Save button.
After the security profile is applied, App Control will be configured on Android devices. Depending on the App Control settings, the device user will be prompted either to remove forbidden apps or to install required and recommended apps. You can impose restrictions on user activity on a device on which blocked apps are installed or required apps are not installed (for example, lock the device). You can impose restrictions by using the Compliance Control component. To do so, in the scan rule settings, you must select the Forbidden apps are installed, Apps from forbidden categories are installed, or Not all required apps are installed criterion.
Page top
Compliance control of Android devices with corporate security requirements
The Compliance Control feature ensures that Android devices comply with corporate security requirements. Corporate security requirements regulate device usage. For example, real-time protection must be enabled on the device, anti-malware databases must be up-to-date, and the device password must be strong enough. Compliance Control is based on a list of rules. A compliance rule includes the following components:
- Device check criterion (for example, absence of prohibited apps on the device)
- Time interval allocated for the user to fix the noncompliance (for example, 24 hours)
- Action that will be taken on the device if the user does not fix the noncompliance within the time set (for example, device locking)
If the user does not fix the noncompliance within the specified time, the following actions are available:
- Block all apps launch. All applications on the user's mobile device are blocked from starting.
- Lock device. Mobile device is locked. To obtain access to data, you must unlock the device. If the reason for locking the device is not rectified after the device is unlocked, the device will be locked again after the specified time period.
- Reset to factory settings. All data is deleted from the mobile device and its settings revert to their factory values. After this action is completed, the device will no longer be a managed device. To connect the device to Kaspersky Next, you must reinstall Kaspersky Endpoint Security for Android.
To configure Compliance Control for Android devices:
- Open Kaspersky Next Management Console.
- Select the Security management → Security profiles section.
The Security profiles section contains a list of security profiles configured in Kaspersky Next.
- In the list, select the security profile for the devices on which you want to configure Compliance Control.
- Click the link with the profile name to open the security profile properties window.
The security profile properties window displays settings available for all devices.
- In the Android group, select the Management settings section.
- In the Compliance Control is not configured section, click the Settings link.
The Compliance Control settings page opens.
- Set the toggle switch to Administrator notification is enabled.
If a device does not meet the corporate security requirements, you will receive a notification.
- Set the toggle switch to User notification is enabled.
If a device does not meet the corporate security requirements, the device user will be prompted to fix the noncompliance.
- In the Compliance rules section, click Settings.
A page opens showing a list of device scan rules.
- Create a list of rules to check the device for compliance with the corporate security requirements:
- Click Add.
The Device Check Rule Creation Wizard starts.
- Select a check criterion, and then click the Next button.
- Select the time interval allocated for the user to fix the noncompliance and the action to be taken on the device if the noncompliance is not fixed.
You can create and enable multiple actions and time limits for a single rule by using check boxes. For example, if the noncompliance has not been fixed within one hour, access to corporate data will be blocked on the device. If the noncompliance has not been fixed within four hours, the device will be locked.
- Click OK.
The rule that you created will be added to the list of check rules on the device.
- Click Add.
- Click the Save button.
After the security profile is applied, the managed device will be controlled for compliance with the corporate security requirements at each synchronization with Kaspersky Next. If the managed device does not meet the corporate security requirements, the actions specified in the Compliance Control settings will be applied to the device.
Page top
Configuring user access to device features
This section provides instructions on how to manage user access to the features of mobile devices and Windows devices, how to configure the behavior of security applications on your users' devices, and actions that end users can perform.
Controlling network and storage devices on Windows devices
To ensure the security of data on Windows devices, you can restrict the access of Windows device users to network and storage devices (such as to a CD/DVD drive, Bluetooth, hard drives, and removable drives).
To configure user access to network and storage devices on Windows devices:
- Open Kaspersky Next Management Console.
- Select the Security management → Security profiles section.
The Security profiles section contains a list of security profiles configured in Kaspersky Next.
- In the list, select the security profile for the devices on which you want to configure access to devices.
- Click the link with the profile name to open the security profile properties window.
The security profile properties window displays settings available for all devices.
- In the Windows group, select the Management settings section.
- Set the toggle switch to Device Control is enabled.
- Click the Settings link below the Device Control is enabled toggle switch.
The Device Control settings page opens.
- Click the Settings link below the Rules for blocking device categories section.
The workspace displays a list of network and storage devices on Windows devices to which you can restrict access.
- In the drop-down list in the Access column, select Block next to the category of network or storage devices to which you want to restrict access.
- Click the Save button.
After the security profile is applied on Windows devices, Kaspersky Next will restrict the use of network or storage devices in accordance with the defined settings. Devices to which access has been blocked will be unavailable for Windows device users.
Additionally, you can define a list of trusted network and storage devices.
Page top
Generating a list of trusted network and storage devices on Windows devices
Trusted devices are network and storage devices that can be fully accessed at any time. Trusted devices are exclusions from blocked device categories.
When a user connects a network or storage device from a blocked category to his or her device, Kaspersky Endpoint Security for Windows blocks access to this device and notifies the user. An event about the network or storage device blocking is written to the event log of Kaspersky Next. The event contains the ID of the blocked device. By using the ID of the blocked device, you can add the device to the list of trusted devices.
To generate a list of trusted network and storage devices on Windows devices:
- Open Kaspersky Next Management Console.
- Select the Security management → Security profiles section.
The Security profiles section contains a list of security profiles configured in Kaspersky Next.
- In the list, select the security profile for the devices on which you want to configure a list of trusted network and storage devices.
- Click the link with the profile name to open the security profile properties window.
The security profile properties window displays settings available for all devices.
- In the Windows group, select the Management settings section.
- Set the toggle switch to Device Control is enabled.
- Click the Settings link below the Device Control is enabled toggle switch.
The Device Control settings page opens.
- Click the Settings link below the Exclusions from Device Control section.
The workspace displays a list of trusted network and storage devices.
- To add a network or storage device to the trusted list:
- Click Add.
This opens the Exclusions from Device Control window.
- In the Device type drop-down list, select the type of network or storage device that you want to add to the trusted list.
- In the Device ID mask field, enter the device ID mask for the device that you want to add to the trusted list.
To find a device ID, you can use the event about device blocking.
When specifying a device ID mask, you can use the asterisk (*), which stands for any number of characters. For example, the mask *disk* selects all devices with the "disk" fragment in any part of their IDs.
- If necessary, in the Comment field, specify any information about the devices being added.
- Click OK.
The added device will be displayed in the trusted list.
- Click Add.
- To edit the settings of a network or storage device that was previously added to the trusted list:
- Select the check box next to the device whose settings you want to modify.
- Click the Edit button.
This opens the Exclusions from Device Control window.
- Make the relevant changes.
- Click OK.
- If you want to delete a network or storage device that was previously added to the trusted list, select the check box next to the device, and then click the Delete button.
- Click the Save button.
After the security profile is applied on Windows devices, Kaspersky Next will not control user access to network or storage devices added to the trusted list.
Page top
Configuring interaction of Kaspersky Endpoint Security for Windows with end users
You can configure the behavior of Kaspersky Endpoint Security for Windows on your users' devices and actions that end users can perform.
To configure interaction of Kaspersky Endpoint Security for Windows with end users:
- Open Kaspersky Next Management Console.
- Select the Security management → Security profiles section.
The Security profiles section contains a list of security profiles configured in Kaspersky Next.
- In the list, select the security profile for the devices on which you want to configure interaction with end users.
- Click the link with the profile name to open the security profile properties window.
The security profile properties window displays settings available for all devices.
- In the Windows group, select the Advanced section.
- Click the Settings link below Interaction with end users.
The Interaction with end users page opens.
- Define the required settings:
- Whether Kaspersky Endpoint Security for Windows must start at the operating system startup of your users' devices.
If this option is enabled, a device is protected for the entire session.
If this option is disabled, a device is protected only after the user starts the application manually.
Enabled by default.
- Whether the Kaspersky Endpoint Security for Windows interface must be displayed to end users.
If this option is enabled, the main window of Kaspersky Endpoint Security for Windows and the icon in the Windows notification area are available. In the context menu of the icon, the user can perform operations with Kaspersky Endpoint Security for Windows. The application also displays notifications above its icon.
If this option is disabled, no signs of the Kaspersky Endpoint Security for Windows operation are displayed. The icon in the Windows notification area and notifications are not available.
Enabled by default.
- Whether end users are allowed to run a malware scan and anti-malware database update on their devices.
If this option is enabled, end users can run these tasks manually. However, they cannot change the settings that you define.
If this option is disabled, malware scan and anti-malware database update tasks are only run according to the settings and schedule that you define.
Enabled by default.
- Whether end users are allowed to run additional tasks on their devices.
We recommend that you enable this option only if you use Kaspersky Security Integrations for MSP.
If this option is enabled, Kaspersky Security Integrations for MSP and end users can run malware scan and anti-malware database update tasks, as well as other tasks, with custom parameters, regardless of the settings that you define.
- Whether Kaspersky Endpoint Security for Windows is protected by a password.
- Whether compatibility with remote administration software is enabled.
If you encounter problems with remote administration tools, enable the compatibility mode. This mode turns off the Secure Desktop functionality of Kaspersky Endpoint Security for Windows that confirms actions that can potentially lower the security level of the device. We do not recommend enabling the compatibility mode unless necessary.
- Whether Kaspersky Endpoint Security for Windows must start at the operating system startup of your users' devices.
- Click the Save button.
After the security profile is applied on the Windows device, the settings are changed as defined.
Page top
Configuring interaction of Kaspersky Endpoint Security for Mac with end users
You can configure the behavior of Kaspersky Endpoint Security for Mac on your users' devices and actions that end users can perform.
To configure interaction of Kaspersky Endpoint Security for Mac with end users:
- Open Kaspersky Next Management Console.
- Select the Security management → Security profiles section.
The Security profiles section contains a list of security profiles configured in Kaspersky Next.
- In the list, select the security profile for the devices on which you want to configure interaction with end users.
- Click the link with the profile name to open the security profile properties window.
The security profile properties window displays settings available for all devices.
- In the Mac group, select the Advanced section.
- Click the Settings link below Interaction with end users.
The Interaction with end users page opens.
- Define the required settings:
- Whether Kaspersky Endpoint Security for Mac must start at the operating system startup of your users' devices.
If this option is enabled, a device is protected for the entire session.
If this option is disabled, a device is protected only after the user starts the application manually.
Enabled by default.
- Whether the Kaspersky Endpoint Security for Mac icon must be displayed in the menu bar on your users' devices.
Enabled by default.
- Whether Kaspersky Endpoint Security for Mac must start at the operating system startup of your users' devices.
- Click the Save button.
After the security profile is applied on the Mac device, the settings are changed as defined.
Page top
Controlling user access to the features of Android devices
To ensure data security on Android devices, you can restrict user access to the camera, Wi-Fi, and Bluetooth.
To configure user access to the camera, Wi-Fi, and Bluetooth on Android devices:
- Open Kaspersky Next Management Console.
- Select the Security management → Security profiles section.
The Security profiles section contains a list of security profiles configured in Kaspersky Next.
- In the list, select the security profile for the devices on which you want to configure the use of device features.
- Click the link with the profile name to open the security profile properties window.
The security profile properties window displays settings available for all devices.
- In the Android group, select the Management settings section.
- Click the Settings link below the Feature Control section.
- Configure the use of device features:
- To block the user from using the camera on the device, set the toggle switch to Use of the camera is blocked.
- To block the user from using Wi-Fi on the device, set the toggle switch to Use of Wi-Fi is blocked.
- To block the user from using Bluetooth on the device, set the toggle switch to Use of Bluetooth is blocked.
- Click the Save button.
After the security profile is applied on the Android device, Kaspersky Next restricts the usage of the camera, Wi-Fi, and Bluetooth in accordance with the settings defined.
Page top
Controlling user access to the features of iOS and iPadOS devices
To set up user access to the features of iOS and iPadOS devices, an Apple Push Notification service certificate (APNs certificate) should be created and uploaded to Kaspersky Next Management Console.
To ensure data security on iOS and iPadOS devices, you can restrict user access to the device features (for example, access to AirDrop, iCloud, and the camera). Some of the restrictions imposed on features are only available on
.To configure user access to the features of iOS and iPadOS devices:
- Open Kaspersky Next Management Console.
- Select the Security management → Security profiles section.
The Security profiles section contains a list of security profiles configured in Kaspersky Next.
- In the list, select the security profile for the devices on which you want to configure the use of device features.
- Click the link with the profile name to open the security profile properties window.
The security profile properties window displays settings available for all devices.
- In the iOS group, select the Management settings section.
- Set the toggle switch to Feature Control is enabled.
- Click the Settings link below the Feature Control is enabled toggle switch.
A page opens, which allows you to configure access to the device features.
- Allow or block device features by selecting the respective check boxes.
- Click the Save button.
After the security profile is applied on the iOS or iPadOS device, Kaspersky Next restricts the device features in accordance with the settings defined.
Page top
Device hack detection (root access)
Kaspersky Next allows you to detect root access on a device. System files are unprotected on a hacked device, thus becoming available for modification. Moreover, third-party applications from unknown sources can be installed on hacked devices. Once you detect a hack attempt, we recommend that you immediately restore the proper functioning of your device (for example, by resetting the device to the factory settings).
Device hack detection is available only on Android devices.
When a device is hacked, you receive a notification after the mobile device is synchronized with Kaspersky Next. We do not recommend disabling notifications about hacks, but it is possible to do this in the event notification settings.
By using the Compliance Control feature, you can impose restrictions on the user's activity on the device if the device is hacked (for example, you can lock the device).
Page top
Configuring password protection of Windows devices
You can restrict user access to the management of functions and settings of Kaspersky Endpoint Security for Windows that is installed on their devices. To access the functions and settings, users must enter the credentials—user name and password—that you specify in the security profile settings.
Additionally, you can set password protection for Network Agent, to protect it from accidental removal from your users' devices and to maintain proper operation of Kaspersky Endpoint Security for Windows on the devices.
Configuring password protection of Kaspersky Endpoint Security for Windows
You can restrict user access to the management of functions and settings of Kaspersky Endpoint Security for Windows that is installed on their devices. To access the functions and settings, users must enter the credentials—user name and password—that you specify in the security profile settings.
To configure password protection of Kaspersky Endpoint Security for Windows on your users' devices:
- Open Kaspersky Next Management Console.
- Select the Security management → Security profiles section.
The Security profiles section contains a list of security profiles configured in Kaspersky Next.
- In the list, select the security profile for the devices on which you want to configure password protection.
- Click the link with the profile name to open the security profile properties window.
The security profile properties window displays settings available for all devices.
- In the Windows group, select Advanced → Interaction with end users.
- By default, password protection is disabled. To enable password protection, set the toggle switch to Password protection is enabled.
The Password protection window opens.
- Under Password, specify the user name and password that users must enter to access the protected functions and settings.
- Click the Save button.
After the security profile is applied, the functions and settings of Kaspersky Endpoint Security for Windows become password-protected.
Below are the lists of functions and settings of Kaspersky Endpoint Security for Windows that are password-protected.
If password protection is disabled, users can access the following functions and settings without specifying the credentials:
- Configuring application settings
- Exiting the application
- Removing the license key
- Viewing reports
- Restoring files from a backup
- Removing, modifying, or restoring the application
Some functions and settings of Kaspersky Endpoint Security for Windows are considered critical. If password protection is disabled, users do not have access to these functions and settings. The following functions and settings are critical:
- Disabling protection components
- Disabling control components
- Disabling the security profile
Additionally, you can set password protection for Network Agent, to protect it from accidental removal from your users' devices and to maintain proper operation of Kaspersky Endpoint Security for Windows on the devices.
Page top
Configuring password protection of Network Agent
You can set password protection for Network Agent, to protect it from accidental removal from your users' devices and to maintain proper operation of Kaspersky Endpoint Security for Windows on the devices.
This setting is applied to all of the managed devices simultaneously.
To configure password protection of Network Agent on your users' devices:
- Open Kaspersky Next Management Console.
- Select the Settings section.
The General settings of Kaspersky Next page is displayed.
- Click the Settings link in the Network Agent settings section.
The Network Agent settings page opens.
- By default, password protection is disabled. To enable password protection, set the toggle switch to Password protection is enabled.
- Specify the password that users must enter to remove Network Agent from their devices.
- Click the Save button.
Removal of Network Agent is password-protected.
Additionally, you can set password protection for Kaspersky Endpoint Security for Windows, to restrict user access to the management of functions and settings of the security application that is installed on their devices.
Page top
Configuring the unlock password for mobile devices
To protect access to a user mobile device, you need to set the device unlock password.
This section provides information about how to configure password protection on Android, iOS, and iPadOS devices.
Configuring the password on Android devices
You can configure the device unlock password only if Kaspersky Endpoint Security for Android has been set as the device administrator.
You can impose restrictions on user activity on the device if the unlock password is weak (for example, lock the device). You can impose restrictions by using the Compliance Control component. To do so, in the scan rule settings, you must select the Unlock password is not compliant with security requirements criterion.
On certain Samsung devices running Android 7.0 or later, when the user attempts to configure unsupported methods for unlocking the device (such as a graphical password), the device may be locked if the following conditions are met: Kaspersky Endpoint Security for Android removal protection is enabled and screen unlock password strength requirements are set. To unlock the device, you must send a special command to the device.
To set the unlock password on Android devices:
- Open Kaspersky Next Management Console.
- Select the Security management → Security profiles section.
The Security profiles section contains a list of security profiles configured in Kaspersky Next.
- In the list, select the security profile for the devices on which you want to configure the unlock password.
- Click the link with the profile name to open the security profile properties window.
The security profile properties window displays settings available for all devices.
- In the Android group, select the Security settings section.
- Set the toggle switch to Screen lock is enabled.
- Click the Settings link below the Screen lock is enabled toggle switch.
The password settings page opens.
- In the drop-down list, select the minimum number of characters in the unlock password.
You can select 4, 8, 12, or 16 characters.
- If necessary, select the Allow use of fingerprints for screen unlock check box.
This check box is cleared by default.
- Click the Save button.
After you apply a security profile on the device, Kaspersky Next checks it for an unlock password and tests the strength of the password. If no unlock password is set on the device or if the password strength does not meet the requirements, the user receives a notification that prompts him or her to set or change the password.
Page top
Configuring the password on iOS and iPadOS devices
To set the unlock password on iOS and iPadOS devices:
- Open Kaspersky Next Management Console.
- Select the Security management → Security profiles section.
The Security profiles section contains a list of security profiles configured in Kaspersky Next.
- In the list, select the security profile for the devices on which you want to configure the unlock password.
- Click the link with the profile name to open the security profile properties window.
The security profile properties window displays settings available for all devices.
- In the iOS group, select the Security settings section.
- Set the toggle switch to Screen lock is enabled.
- Click the Settings link below the Screen lock is enabled toggle switch.
The Screen lock settings page opens.
- Define the settings for protecting iOS and iPadOS devices with an unlock password.
- Click the Save button.
After you apply a security profile on the device, Kaspersky Next checks it for an unlock password and tests the strength of the password. If no unlock password is set on the device or if the password strength does not meet the requirements, the user receives a notification that prompts him or her to set or change the password within 60 minutes. If the user has not set a strong password within this period of time, the mobile device will be locked until the password is set.
Page top
Configuring Firewall on Windows devices
Firewall protects a user's computer against network threats when browsing the internet or using a local network. Firewall blocks unauthorized network connections to the computer, thus reducing the risk of infection. Firewall also monitors network activity of applications on the client computer. This reduces the risk of malware propagation in the network, as well as restricts actions performed by users who violate, whether intentionally or not, the security policy adopted in the company.
On Windows devices connected to Kaspersky Next, Firewall is enabled by default; it is running under the settings recommended by Kaspersky experts. You can disable Firewall or edit its settings, if necessary.
Configuring network rules for Firewall
Firewall filters all network activity on a Windows device in accordance with the network rules. Network rules contain conditions that Firewall applies to monitor network connections on the device (for example, connection direction or protocol). Each network rule also specifies the action to be performed by Firewall on a connection that meets the rule conditions (whether the connection should be allowed or not).
To configure network rules for Firewall:
- Open Kaspersky Next Management Console.
- Select the Security management → Security profiles section.
The Security profiles section contains a list of security profiles configured in Kaspersky Next.
- In the list, select the security profile for the devices on which you want to configure Firewall.
- Click the link with the profile name to open the security profile properties window.
The security profile properties window displays settings available for all devices.
- In the Windows group, select the Security settings section.
- Set the toggle switch to Firewall is enabled.
- Click the Settings link below the Firewall is enabled toggle switch.
The Firewall settings page opens.
- Click the Settings link below Rules for processing network packets and data streams.
The Rules for processing network packets and data streams page opens.
- To add a new network rule, click Add.
The New record page opens.
- In the Action drop-down list, define whether Kaspersky Next must allow or block any network activity by applications that meet the conditions set by the rule.
- In the Name field, enter a name for the network rule.
- In the Direction drop-down list, select the data stream to which the network rule must be applied.
- In the Protocol section, perform one of the following actions:
- If you need the rule to be applied to network packets and data streams transmitted over any protocols, select Any.
- If you need the rule to be applied to specific protocols, select Select protocol and define the following settings:
- In the Select protocol drop-down list, select the relevant value.
- Click the Settings link below Select protocol.
- Depending on the value selected in the Select protocol drop-down list, either specify the local and remote port or select the relevant values for the ICMP type and ICMP code.
- In the Remote network addresses drop-down list, select the group of addresses for which Firewall will monitor network activity.
- If you selected Addresses from the list during the previous step, click the Settings link below the Remote network addresses drop-down list.
The New record page opens.
- Generate a list of addresses of the devices whose network activity the Firewall should monitor:
- If you want to add a new address, click the Add button, and then specify the address in the entry field in the IP address or DNS name of the computer window that opens. Click OK.
- If you want to change a previously added address, select the check box to the left of it and click the Edit button. Make the required changes and click the OK button.
- If you want to delete a previously added address, select the check box to the left of it and click the Delete button.
- Click the OK button.
The rule that you added will be displayed in the list of rules for network packets and data streams.
After the security profile is applied, Firewall will be enabled on Windows devices. The network activity of applications on those devices will be monitored in accordance with the configured network rules.
Page top
Configuring the statuses of networks
You can specify the statuses of networks to which your users' devices are connected (local network, public network, or trusted network). Firewall defines the settings of protecting your users' devices against network threats depending on the network statuses.
A network is specified by means of a range of IP addresses. If the IP address of a user's device is included into the range of IP addresses of a network, Firewall protects the device according to the status of this network. If the device's IP address is not included in any range of IP addresses specified on this page, Firewall determines the status of the device's network based on the network status in the device's operating system. All IP addresses other than those specified on this page and in the operating system of devices are considered IP addresses of public networks.
By default, three ranges of IP addresses are specified as local networks: 172.16.0.0/12, 192.168.0.0/16, and 10.0.0.0/8.
Example.
You remove all default networks and specify network 172.16.0.0/16 as a local network. A user's device has two network adapters that get IP addresses from the ranges 172.16.55.0/24 and 192.168.5.0/24, respectively. Both networks in the device's operating system are defined as public networks. Because IP addresses 172.16.55.0/24 are included into the range 172.16.0.0/16, the status of network 172.16.55.0/24 is taken from the defined settings and is a local network. Because the defined settings contain no suitable range for network 192.168.5.0/24, its status is taken from the device's operating system and is a public network.
To configure the statuses of networks:
- Open Kaspersky Next Management Console.
- Select the Security management → Security profiles section.
The Security profiles section contains a list of security profiles configured in Kaspersky Next.
- In the list, select the security profile for the devices on which you want to configure the statuses of networks.
- Click the link with the profile name to open the security profile properties window.
The security profile properties window displays settings available for all devices.
- In the Windows group, select the Security settings section.
- Click the Settings link below the Firewall is enabled toggle switch.
The Firewall settings page opens.
- Click the Settings link in the Available networks section.
The Available networks page opens.
- Do any of the following:
- To specify the status of a new network:
- Click the Add button.
The Network connection window opens.
- In the Name field, specify the name of the new network.
- In the Status drop-down list, select one of the following values:
- Local networks.
This status is assigned to networks whose users are trusted to gain access to files and printers on this computer (for example, a LAN or home network). - Public networks.
This status is assigned to networks that are not protected by any anti-malware applications, firewalls, or filters (for example, for internet café networks). The users of computers connected to such a network are blocked by Firewall from gaining access to files and printers on this computer. Moreover, unauthorized users cannot obtain access to any information through shared folders and remote access to the desktop of this computer. Firewall filters the network activity of each application according to the network rules that are set for it. - Trusted networks.
This status is assigned to safe networks in which the computer is not exposed to any attacks or unauthorized access attempts. For networks with this status, Firewall allows any network activity within the network.
- Local networks.
- In the IP address field, specify the range of IP addresses of the network.
- Click OK to close the Network connection window.
The added record appears in the list of networks in the Available networks window.
- Click the Add button.
- To modify a record in the list of networks:
- Select the check box next to the required record.
- Click the Edit button.
The Network connection window opens. It contains details about the selected network.
- Make the necessary changes.
- Click OK to close the New record window.
The modified record is displayed in the list of networks in the Available networks window.
- To delete a record from the list of networks:
- Select the check box next to the required record.
- Click the Delete button.
The deleted record disappears from the list of networks in the Available networks window.
- To specify the status of a new network:
- Click Save to save the changes.
The list of networks is updated.
After the security profile is applied, your users' devices are protected against network threats in accordance with the rules that match the specified network statuses.
Page top
Configuring user access to websites
This section provides instructions on how to configure access to websites on Windows, Android, iOS, and iPadOS devices.
Configuring access to websites on Windows devices
You can configure Windows device users' access to websites through Web Control. Web Control allows you to monitor actions performed by users in the local corporate network, by restricting or blocking their access to websites.
All restricting and blocking activities concerning access to websites are implemented as Web Control rules. A rule is a set of filters and the corresponding action that Kaspersky Next performs when the user visits any of the websites covered by the rule.
By default, the list of Web Control rules contains a number of preset rules. Kaspersky experts consider them suitable for most. If necessary, you can edit them or add new rules, as described in this section.
Web Control monitors user access to websites that is gained using the HTTP protocol. If you enable the Encrypted Connections Scan feature, Web Control also monitors access to websites that is gained using the HTTPS protocol. You can also configure the list of trusted domains. The feature does not control or process encrypted connections made during visits to those domains.
To configure website access rules on Windows devices:
- Open Kaspersky Next Management Console.
- Select the Security management → Security profiles section.
The Security profiles section contains a list of security profiles configured in Kaspersky Next.
- In the list, select the security profile for the devices on which you want to configure the website access rule.
- Click the link with the profile name to open the security profile properties window.
The security profile properties window displays settings available for all devices.
- In the Windows group, select the Management settings section.
- Set the toggle switch to Web Control is enabled.
- In Access mode, select the general mode of using Web Control:
- Default allow
All websites are allowed, except for those that you explicitly block in Web Control rules.
- Default deny
All websites are blocked, except for those that you explicitly allow in Web Control rules.
- Default allow
- To edit the template of the message that will be displayed to a user when he or she attempts to access a blocked website, click the Message about website blocking link.
In the window that opens, edit the message template text. In the text, you can use the following variables:
%USER_NAME%Name of the current user of the device, in the
<device name>\<user alias>format (for example "DESKTOP-123\John.Smith").%CANONIC_REQUEST_URL%URL of the website that the user attempted to gain access to.
%RULE%Name of the Web Control rule that blocked the website access attempt.
%COMPLAIN_EMAIL%Link to send feedback about the website blocking. When the user clicks this link, a separate window opens where he or she can compose a message to you or another administrator about the website blocking.
%CONTENT_CATEGORY_LIST%List of website categories in the Web Control rule that blocked the website access attempt.
%TYPE_CATEGORY_LIST%List of data types in the Web Control rule that blocked the website access attempt.
[URL=<website address>]<link text>[/URL]Link to a website. For example, this can be an intranet web page with additional information about Web Control rules.
Here,
<website address>—URL address of the website.<link text>—Optional text that will be displayed over the URL.
For example,
[URL=https://example.com/webcontrol]List of Web Control Rules[/URL]. As a result, the message to the user will contain this link as follows: List of Web Control Rules.
- Do any of the following:
- To add a Web Control rule:
- Click the Add button.
- In the New record window that opens, define the rule settings, as described later in this section.
- Click OK to close the New record window.
- To enable or disable an added Web Control rule, set the toggle switch next to that rule to the desired state:
- If the toggle switch is green, the rule is enabled. Web Control performs the action specified by the rule when the user attempts to open a website.
By default, a newly added rule is enabled.
- If the toggle switch is gray, the rule is disabled. Web Control does not perform the action specified by the rule, even when the user attempts to open a website.
- If the toggle switch is green, the rule is enabled. Web Control performs the action specified by the rule when the user attempts to open a website.
- To edit an added Web Control rule:
- Select the check box next to the required rule.
- Click the Edit button.
- In the New record window that opens, define the new settings of the rule, as described later in this section.
- Click OK to close the New record window.
- To delete a Web Control rule that was added:
- Select the check box next to the required rule.
- Click the Delete button.
- To add a Web Control rule:
- Click Save to save the changes.
The list of Web Control rules is updated.
After the security profile is applied, Web Control is enabled on Windows devices. User access to websites is governed according to the currently enabled access rules.
To define the settings of a Web Control rule:
- Start adding or editing a rule, as described earlier in this section.
- In the Name field, enter the name of the rule.
- Select the criteria to be applied to websites.
You can specify any of the three criteria:
- Website categories
The application scans only websites from the selected categories.
Categorization of websites is provided by Kaspersky Security Network, heuristic analysis, and the database of known websites. This database is included in the set of databases of Kaspersky Endpoint Security for Windows.
- Data types
The application scans only contents of the selected types.
- Individual websites
The application scans only the specified websites.
The specified settings will be applied simultaneously. The application scans only the data of the selected types on the specified websites from the selected categories.
For example, you specify the Violence content category, the Executable files data type, and website http://example.com. In this case, the application scans only executable files at http://example.com and only if the website belongs to the Violence category.
If the specified websites are not included in the website categories that you select for this rule, both websites and website categories will be ignored. That is why we do not recommend configuring individual websites and website categories in a single rule.
Do the following:
- To configure website categories to be scanned:
- Click Settings in the Website categories section.
- In the window that opens, select the check boxes next to the required website categories.
- Click OK to save the changes.
- To configure data types to be scanned:
- Click Settings in the Data types section.
- In the window that opens, select the check boxes next to the required data types.
- Click OK to save the changes.
- To configure specific websites to be scanned:
- Click the Settings link in the Individual websites section.
The Individual websites page opens.
- Click the Add button to add a new website.
The New record window opens.
- Specify the full path to the website.
You can use the asterisk (
*) and thewww.characters as masks. For more information about masks for web resource addresses, refer to Kaspersky Endpoint Security for Windows Help. - Click OK to save the changes.
The added web address is displayed in the list on the Individual websites page.
- If necessary, edit or delete added websites.
- Click OK to save the changes.
- Click the Settings link in the Individual websites section.
- Website categories
- In the Action section, select the action that Kaspersky Next must perform when the user attempts to gain access to websites that match the selected criteria:
- Allow
Access to the website is allowed. Rules with this action can be used if the general mode of using Web Control is Default deny.
- Block
Access to the website is blocked. Rules with this action can be used if the general mode of using Web Control is Default allow.
- Warn
Access to the website is allowed, but a warning is displayed to the user.
- Allow
- Click OK to save the changes.
The defined settings are saved.
Page top
Configuring the Encrypted Connections Scan feature
The Encrypted Connections Scan feature allows the Web Threat Protection, Web Control, and Cloud Discovery features to control and process encrypted connections (connections over the HTTPS protocol).
You can enable or disable the Encrypted Connections Scan feature. You can also configure the list of trusted domains. Encrypted connections made during visits to those domains are not controlled and processed.
This feature is available only for Kaspersky Endpoint Security for Windows version 11.1 or later.
To enable or disable Encrypted Connections Scan:
- Open Kaspersky Next Management Console.
- Select the Security management → Security profiles section.
The Security profiles section contains a list of security profiles configured in Kaspersky Next.
- In the list, select the security profile for the devices on which you want to configure Encrypted Connections Scan.
- Click the link with the profile name to open the security profile properties window.
The security profile properties window displays settings available for all devices.
- In the Windows group, select the Advanced section.
- Click the Settings link below the Threat detection and exclusions section.
The Threat detection and exclusions window opens.
- Do one of the following:
- To enable Encrypted Connections Scan, set the toggle switch to Encrypted Connections Scan is enabled. Click Save to save the changes.
The feature is enabled.
- To disable Encrypted Connections Scan, set the toggle switch to Encrypted Connections Scan is disabled. Click Save to save the changes.
The feature is disabled.
- To enable Encrypted Connections Scan, set the toggle switch to Encrypted Connections Scan is enabled. Click Save to save the changes.
To configure the list of trusted domains:
- Open Kaspersky Next Management Console.
- Select the Security management → Security profiles section.
The Security profiles section contains a list of security profiles configured in Kaspersky Next.
- In the list, select the security profile for the devices on which you want to configure the list of trusted domains.
- Click the link with the profile name to open the security profile properties window.
The security profile properties window displays settings available for all devices.
- In the Windows group, select the Advanced section.
- Click the Settings link below the Threat detection and exclusions section.
The Threat detection and exclusions window opens.
- Click the Settings link below the Encrypted Connections Scan is enabled toggle switch.
The Encrypted Connections Scan page opens.
- Do any of the following:
- To add a trusted domain:
- Click the Add button.
- In the New record window that opens, specify the required domain name. You can use the asterisk (*) as a mask (for example, *.example.com).
- Click OK to close the New record window.
If you add a domain that is accessed via the SSL or TLS protocol, and if the respective option under Block SSL/TLS connections is enabled, the connection will be blocked.
- To edit an added trusted domain:
- Select the check box next to the required domain.
- Click the Edit button.
- In the New record window that opens, edit the domain name as required.
- Click OK to close the New record window.
- To delete a trusted domain that was added:
- Select the check box next to the required domain.
- Click the Delete button.
- To add a trusted domain:
- Click Save to save the changes.
The list of trusted domains is updated.
Page top
Blocking SSL and TLS connections
You can enable or disable the blocking of network connections established over the TLS 1.0, SSL 2.0, and SSL 3.0 protocols.
We recommend that you block these protocols, because they are obsolete and have flaws that affect the security of data transfer.
To block SSL and TLS connections:
- Open Kaspersky Next Management Console.
- Select the Security management → Security profiles section.
The Security profiles section contains a list of security profiles configured in Kaspersky Next.
- In the list, select the security profile for the devices on which you want to configure the blocking of SSL and TLS connections.
- Click the link with the profile name to open the security profile properties window.
The security profile properties window displays settings available for all devices.
- In the Windows group, select the Advanced → Threat detection and exclusions section.
- Under Block SSL/TLS connections, select or clear the check boxes for the protocols that you want to block or to stop blocking.
If you select the Block TLS 1.0 connections check box, the Block SSL 3.0 connections check box is also automatically selected and cannot be cleared.
The blocking of SSL and TLS connections is updated.
Page top
Configuring access to websites on Android devices
You can configure the access of Android device users to websites by using Web Control. Web Control is included in the Kaspersky Endpoint Security for Android app. Web Control allows you to block access to malicious websites designed to spread malicious code. Web Control also blocks access to faked (phishing) websites designed to steal confidential data from users (for example, passwords to online banking or payment systems), thereby gaining access to their financial accounts. Web Control scans websites before you open them using the Kaspersky Security Network cloud service. After scanning, Web Control allows trusted websites to load and blocks malicious websites.
Web Control also supports website filtering by categories defined in Kaspersky Security Network cloud service. Filtering allows you to restrict user access to certain categories of websites (for example, those from the "Gambling, lotteries, sweepstakes" or "Internet communication" categories).
Web Control works only with supported versions of Google Chrome and does not work with other browsers.
Prerequisites
The operation of Web Control on a managed device requires the following:
- Kaspersky Endpoint Security for Android must be set as the Accessibility service.
Kaspersky Endpoint Security for Android prompts the device user to set the application as an Accessibility service through the Quick Start Wizard. The user can skip this step or disable the service through the device settings later. In this case, Web Control is not running.
- The device user must read and accept Statement regarding data processing for Web Protection (Web Protection Statement) in Kaspersky Endpoint Security for Android.
Otherwise, Kaspersky Endpoint Security for Android regularly prompts the device user to read and accept Web Protection Statement. The device status is set to Warning.
- On some devices, the user must manually grant two permissions: Display pop-up windows while running in the background and Display pop-up window.
Configuring access to websites
To configure access of Android device users to websites:
- Open Kaspersky Next Management Console.
- Select the Security management → Security profiles section.
The Security profiles section contains a list of security profiles configured in Kaspersky Next.
- In the list, select the security profile for the devices on which you want to configure access to websites.
- Click the link with the profile name to open the security profile properties window.
The security profile properties window displays settings available for all devices.
- In the Android group, select the Management settings section.
- Set the toggle switch to Web Control is enabled.
- Click the Settings link below the Web Control is enabled toggle switch.
The Web Control settings page opens.
- To block users from browsing websites with specific content (for example, adult websites):
- In the Operation mode section, select Websites of selected categories are forbidden.
- In the Website access rules section, click the Settings link to create a list of blocked categories of websites.
- To allow user access only to websites that you specify:
- In the Operation mode section, select Only listed websites are allowed.
- In the Allowed websites section, click the Settings link to create a list of websites that users can browse. Kaspersky Next supports only regular expressions. When entering the address of an allowed website, use the following templates:
http:\/\/www\.example\.com.*—all child pages are allowed from this website (for example,http://www.example.com/about).https:\/\/.*example\.com—all subdomain pages of the website are allowed (for example,https://pictures.example.com).
You can also use the expression
https?to select the HTTP and HTTPS protocols. For more details on regular expressions, please refer to the Oracle Technical Support website.
- To block users from accessing all websites, in the Operation mode section, select All websites are blocked.
- Click the Save button.
If the prerequisites are met, Web Control is enabled on Android devices. Web Control blocks access to malicious and phishing websites in Google Chrome. User access to other websites is allowed according to the currently configured access rules.
Page top
Configuring access to websites on iOS and iPadOS devices
You can configure the access of users of iOS and iPadOS devices to websites through Web Control for Safari.
Web Control for Safari allows you to control device user access to websites on the basis of lists of allowed and blocked websites. Web Control also allows you to add bookmarks of allowed websites on the bookmark panel in Safari.
Web Control settings are only applied to supervised devices.
To configure user access to websites on an iOS or iPadOS device in Safari:
- Open Kaspersky Next Management Console.
- Select the Security management → Security profiles section.
The Security profiles section contains a list of security profiles configured in Kaspersky Next.
- In the list, select the security profile for the devices on which you want to configure access to websites.
- Click the link with the profile name to open the security profile properties window.
The security profile properties window displays settings available for all devices.
- In the iOS group, select the Management settings section.
- Set the toggle switch to Web Control is enabled.
- Click the Settings link below the Web Control is enabled toggle switch.
The Web Control settings page opens.
- To restrict user access to blocked websites and allow user access to allowed ones:
- In the Operation mode section, select "Adult" websites forbidden.
- In the Allowed websites and Forbidden websites sections, click the Settings link to create the lists of allowed and blocked websites.
The web address must begin with
http://orhttps://. Web Control applies the access rule to all websites in the domain. - To allow user access only to websites from the list of bookmarks:
- In the Operation mode section, select Only bookmarked websites are allowed.
- In the Bookmarks section, click the Settings link to create a list of allowed websites that will be added to the bookmark panel in Safari.
The web address must begin with
http://orhttps://. Kaspersky Next applies the access rule to all websites in the domain. Websites from the bookmark list will be added to the Safari bookmark panel. - Click the Save button.
When the security profile is applied, Web Control is enabled on the devices, which will restrict user access to websites in Safari according to the access rules that you configured.
Page top
Configuring a proxy server
This section contains instructions on configuring a proxy server for connecting Windows devices and Mac devices to the internet.
Configuring a proxy server for Windows devices
You can define the proxy server settings for Windows devices only in the settings of the distribution package of Kaspersky Endpoint Security for Windows.
To define the proxy server settings for Windows devices:
- Open Kaspersky Next Management Console.
- Select the Distribution packages section.
The Distribution packages section contains distribution packages of security applications for Windows and Mac devices.
- In the block of the distribution package of Kaspersky Endpoint Security for Windows, click the Proxy server link.
The link is available only if the most recent distribution package for the security application has been prepared.
The Proxy server settings for Windows devices window opens.
- Define the proxy server settings.
- Click the Next button.
Kaspersky Next starts preparing the new version of the distribution package of Kaspersky Endpoint Security for Windows. After the distribution package is prepared, you can download it or copy the link to it.
Configuring a proxy server for Mac devices
The proxy server settings that are described in this section will be used only by Kaspersky Endpoint Security for Mac. Network Agent will use the proxy server settings that you defined when you downloaded the distribution package.
You can define the proxy server settings for Mac devices, which will be used for connecting those devices to the internet.
To define the proxy server settings for Mac devices:
- Open Kaspersky Next Management Console.
- Select the Security management → Security profiles section.
The Security profiles section contains a list of security profiles configured in Kaspersky Next.
- In the list, select the security profile for the devices on which you want to configure the proxy server.
- Click the link with the profile name to open the security profile properties window.
The security profile properties window displays settings available for all devices.
- In the Mac group, select the Advanced → Network section.
The navigation area will then display the network settings.
- Set the toggle switch to Use proxy server.
- To enable automatic detection of the proxy server address, select Automatically detect proxy server settings.
- To manually specify the proxy server address and port number, select Use defined proxy server settings, and then define the proxy server settings:
- Specify the proxy server address and port number.
- Enable or disable the use of the proxy server for local addresses. By default, the use of the proxy server is enabled for local addresses.
- Enable or disable user authentication on the proxy server, and specify the user name and password. By default, user authentication is enabled on the proxy server.
- Click the Save button.
After the security profile is applied, Mac devices will use the specified proxy server settings when connecting to the internet.
Page top
Configuring an internet connection
This section provides instructions on how to configure automatic connection to the internet on Android, iOS, and iPadOS devices.
Connecting Android devices to a Wi-Fi network
Before configuring connection to a Wi-Fi network, make sure that the toggle switch in the settings of the security profile for Android devices, in the Management settings > Feature Control section, in the Restriction of device features block, is set to Use of Wi-Fi is allowed.
To connect Android devices to a Wi-Fi network:
- Open Kaspersky Next Management Console.
- Select the Security management → Security profiles section.
The Security profiles section contains a list of security profiles configured in Kaspersky Next.
- In the list, select the security profile for the devices on which you want to configure access to the Wi-Fi network.
- Click the link with the profile name to open the security profile properties window.
The security profile properties window displays settings available for all devices.
- In the Android group, select the Network settings section.
- In the Wi-Fi is not configured section, click Settings.
A page opens listing Wi-Fi networks.
- Click Add.
A page opens for configuring a Wi-Fi network connection.
- In the Service set identifier (SSID) field, specify the name of a wireless network that includes an access point (SSID).
- In the Security type section, select a security protocol for the wireless network (open or protected with WEP [Wireless Encryption Protocol], or with WPA / WPA2 PSK [Wi-Fi Protected Access]).
- In the Password field, enter the network access password if you selected the protected network in the previous step.
- If necessary, in the Proxy server address and port field, specify the IP address or DNS name of the proxy server and the port number.
- Click OK.
The new Wi-Fi network appears in the list.
- Click the Save button.
After applying the security profile on the device, the user can select the newly added Wi-Fi network in the device settings and connect to it, without specifying the connection settings.
Page top
Connecting iOS and iPadOS devices to a Wi-Fi network
To connect iOS and iPadOS devices to a Wi-Fi network:
- Open Kaspersky Next Management Console.
- Select the Security management → Security profiles section.
The Security profiles section contains a list of security profiles configured in Kaspersky Next.
- In the list, select the security profile for the devices on which you want to configure access to the Wi-Fi network.
- Click the link with the profile name to open the security profile properties window.
The security profile properties window displays settings available for all devices.
- In the iOS group, select the Network settings section.
- In the Wi-Fi is not configured section, click Settings.
A page opens listing Wi-Fi networks.
- Click Add.
A page opens for configuring a Wi-Fi network connection.
- In the Service set identifier (SSID) field, specify the name of a wireless network that includes an access point (SSID).
- To prevent the Wi-Fi network from appearing on the list of available networks on iOS and iPadOS devices, select the Hidden network check box.
In this case, to connect to the Wi-Fi network, the user will have to manually enter the network SSID set in the Wi-Fi router settings.
- For the device to connect to the Wi-Fi network automatically, select the Automatic connection check box.
- In the Security type section, select a security protocol for the wireless network (open or protected with WEP, WPA / WPA2).
If you have selected the corporate or dynamic network security type in the Security type list, you can select EAP (Extensible Authentication Protocol) types in the Protocols section for user authentication in the Wi-Fi network.
- Configure device user authentication in the Wi-Fi network if you selected a protected network in the previous step:
- In the Authentication section, click the Settings link.
The Authentication settings window opens.
- Enter the credentials for user authentication in the Wi-Fi network.
- Click OK.
- In the Authentication section, click the Settings link.
- If necessary, configure the device connection to a proxy server:
- In the Proxy server settings section, click the Settings link.
The Proxy server settings window opens.
- Configure the device connection to the proxy server.
- Click OK.
- In the Proxy server settings section, click the Settings link.
- Click Save.
The new Wi-Fi network appears in the list.
After the security profile is applied to the device, the user can connect to the Wi-Fi network that has been added, without specifying the connection settings or by only specifying the SSID if the network is hidden.
Page top
Connecting iOS and iPadOS devices to a mobile network (APN)
You can configure an Access Point Name (APN) for connecting iOS and iPadOS devices to data services (internet and MMS) on a GPRS/3G/4G mobile network. To use an access point on a user's iOS or iPadOS device, a SIM card must be inserted. You can also define the settings for a Built-in Access Point Name (APN)—access point settings for a built-in Apple SIM. For more details about a built-in Apple SIM, please visit the Apple Technical Support website. Access point settings are provided by the mobile communication service provider. Incorrect access point settings may result in additional mobile communication charges.
To connect an iOS or iPadOS device to a mobile network:
- Open Kaspersky Next Management Console.
- Select the Security management → Security profiles section.
The Security profiles section contains a list of security profiles configured in Kaspersky Next.
- In the list, select the security profile for the devices on which you want to configure a connection to a mobile network.
- Click the link with the profile name to open the security profile properties window.
The security profile properties window displays settings available for all devices.
- In the iOS group, select the Management settings section.
- Set the toggle switch to Access Point Name (APN) configuration is disabled.
The Access Point Name (APN) section is outdated. It is recommended to define APN settings in the Virtual private networks (Cellular) section. The settings of the APN and Cellular sections cannot be used concurrently.
- Set the toggle switch to Access Point Name (Cellular) configuration is enabled.
The access point configuration page opens.
- In the APN type list, select the type of access point for data transfer on a mobile network:
- Built-in APN—Definition of Access Point Name settings for data transfer through a mobile network operator that supports operation with a built-in Apple SIM. For more details about devices with a built-in Apple SIM, please visit the Apple Technical Support website.
- APN—Definition of Access Point Name settings for data transfer via the mobile network operator of the inserted SIM card.
- Built-in APN and APN—Definition of Access Point Name settings for data transfer via the mobile network operators of the inserted SIM card and the built-in Apple SIM.
- In the Access Point Name and/or Built-in Access Point Name field, enter the access point name.
- In the APN authentication type and/or Built-in APN authentication type list, select the type of user authentication for network access of an iOS or iPadOS device on the server of the mobile network operator: or .
- In the APN user name and/or Built-in APN user name field, enter the user name for authentication on the mobile network.
- In the APN password and/or Built-in APN password field, enter the password for user authentication on the mobile network.
- In the APN proxy server address and port field, enter the name of the host, domain, or the IP address of a proxy server and the number of the proxy server port.
- Click the Save button.
After applying the security profile on the user's device, the Access Point Name (APN) will be configured and the user will be able to connect to mobile network services.
Page top
Configuring email on iOS and iPadOS devices
To configure a corporate email on an iOS or iPadOS device:
- Open Kaspersky Next Management Console.
- Select the Security management → Security profiles section.
The Security profiles section contains a list of security profiles configured in Kaspersky Next.
- In the list, select the security profile for the devices on which you want to configure a corporate email.
- Click the link with the profile name to open the security profile properties window.
The security profile properties window displays settings available for all devices.
- In the iOS group, select the Network settings section.
- In the Email is not configured section, click Settings.
A page opens displaying a list of email user accounts.
- Click Add.
The email user account settings window opens.
- In the Description field, enter a description for the email user account.
- In the Protocol list, select POP (Post Office Protocol v3) or IMAP (Internet Message Access Protocol v4). If you are not sure as to which of these two protocols must be selected, please contact your email provider.
- If you have selected IMAP, if necessary, specify the IMAP path prefix in the IMAP path prefix.
Type the IMAP path prefix in all uppercase letters (for example,
GMAILfor Google Mail). - In the User name as displayed in messages field, enter the user name, which will be displayed in the From field for all outgoing messages.
- In the Email address field, enter the user's email address.
- Define the advanced settings of the email user account:
- Message moving between the user's email accounts
- Synchronization of currently used addresses between the user's email accounts
- Use of the standard Mail client only
- Encryption of outgoing messages sent via Secure/Multipurpose Internet Mail Extensions (S/MIME)
- In the Inbound mail server and Outbound mail server sections, define the server connection settings by clicking Settings:
- In the Server address and port field, enter the host name or the IP address of a server and the number of a server port.
- In the Account name field, enter the user account name for authentication on the mail server.
The user account name is usually identical to the first portion of the email address (up to the "@" character).
- In the Authentication type list, select a protection scheme for the mail server. In the Password field, set the password of the email user account for authentication on the server.
- To use Secure Sockets Layer (SSL) to secure data transmission between the mail server and the mobile device, select the Use SSL connection check box.
- Click OK.
- Click the Save button.
The new email user account appears in the list.
When the security profile is applied on the device, Kaspersky Next configures the corporate email.
Page top
Configuring CalDAV Calendar on iOS and iPadOS devices
To enable a user to work with events from a corporate calendar, you should add their user account on the CalDAV server and also add subscriptions to third-party calendars. Synchronization with the CalDAV server enables the user to create and receive invitations, receive event updates, and synchronize tasks with the Reminders app. For more details on working with the CalDAV calendar service and calendar subscriptions, please refer to the Apple Technical Support website.
To configure CalDAV on an iOS or iPadOS device:
- Open Kaspersky Next Management Console.
- Select the Security management → Security profiles section.
The Security profiles section contains a list of security profiles configured in Kaspersky Next.
- In the list, select the security profile for the devices on which you want to configure CalDAV.
- Click the link with the profile name to open the security profile properties window.
The security profile properties window displays settings available for all devices.
- In the iOS group, select the Network settings section.
- Click the Settings link in the CalDAV is not configured section.
A page opens showing a list of CalDAV user accounts.
- Click Add.
The CalDAV user account settings window opens.
- In the Description field, enter a description of the CalDAV user account.
- In the Server address and port field, enter the name of a host or the IP address of a CalDAV server and the number of the CalDAV server port.
- In the Main URL field, specify the web address of the CalDAV account of the iOS or iPadOS device user on the CalDAV server (for example:
http://example.com/caldav/users/mycompany/user).The web address must begin with
http://orhttps://. - In the Account name field, enter the user account name for authorization on the CalDAV server.
- In the Password field, set the CalDAV account password for authorization on the CalDAV server.
- To use the SSL (Secure Sockets Layer) data transport protocol to secure the transmission of event data between the CalDAV server and the mobile device, select the Use SSL connection check box.
- Click OK.
The new CalDAV account appears in the list.
- Click the Save button.
When the security profile is applied on the device, Kaspersky Next adds events from the CalDAV server to the iOS or iPadOS device.
To add subscriptions to third-party calendars on an iOS or iPadOS device:
- Open Kaspersky Next Management Console.
- Select the Security management → Security profiles section.
The Security profiles section contains a list of security profiles configured in Kaspersky Next.
- In the list, select the security profile for the devices on which you want to configure calendar subscriptions.
- Click the link with the profile name to open the security profile properties window.
The security profile properties window displays settings available for all devices.
- In the iOS group, select the Network settings section.
- Click the Settings link below the Calendar subscriptions are not configured section.
This opens a page containing the list of calendar subscriptions.
- Click Add.
The Calendar subscription window opens.
- In the Description field, enter a description of the calendar subscription.
- In the Web address field, specify the web address of the third-party calendar.
In this field, you can enter the main URL of the CalDAV account of the user to whose calendar you are subscribing. You can also specify the web address of an iCal calendar or another openly published calendar.
- In the User name field, enter the user account name for authentication on the server of the third-party calendar.
- In the Password field, enter the calendar subscription password for authentication on the server of the third-party calendar.
- To use the SSL (Secure Sockets Layer) data transport protocol to secure the transmission of event data between the CalDAV server and the mobile device, select the Use SSL connection check box.
- Click OK.
The new calendar subscription appears in the list.
- Click the Save button.
After the security profile is applied on the device, Kaspersky Next adds events from the third-party calendars to the iOS or iPadOS device.
Page top
Protecting Kaspersky Endpoint Security for Android against removal
For mobile device protection and compliance with corporate security requirements, you can enable protection against the removal of Kaspersky Endpoint Security for Android. In this case, the device user cannot remove the app by using the Kaspersky Endpoint Security for Android interface. When removing the app by using the tools of the Android operating system, you are prompted to disable administrator rights for Kaspersky Endpoint Security for Android. After disabling the rights, the mobile device will be locked. To unlock the device, you must send a special command.
To protect the app from removal on devices running Android 7.0 or later, Kaspersky Endpoint Security for Android must be set as an Accessibility Features service. When the Quick Start Wizard is running, Kaspersky Endpoint Security for Android prompts the user to grant the application all required rights. The user can skip those steps or disable the rights through the device settings later. If this is the case, the app is not protected from removal.
On certain Samsung devices running Android 7.0 or later, when the user attempts to configure unsupported methods for unlocking the device (such as a graphical password), the device may be locked if the following conditions are met: Kaspersky Endpoint Security for Android removal protection is enabled and screen unlock password strength requirements are set. To unlock the device, you must send a special command to the device.
To enable protection against removal of Kaspersky Endpoint Security for Android:
- Open Kaspersky Next Management Console.
- Select the Security management → Security profiles section.
The Security profiles section contains a list of security profiles configured in Kaspersky Next.
- In the list, select the security profile for the devices on which you want to configure protection against removal of Kaspersky Endpoint Security for Android.
- Click the link with the profile name to open the security profile properties window.
The security profile properties window displays settings available for all devices.
- In the Android group, select the Advanced section.
- Set the toggle switch to Removal of Kaspersky Endpoint Security for Android is prohibited.
- Click the Save button.
After the security profile is applied, app removal protection will be enabled on users' Android devices. If an attempt is made to remove the app, the mobile device will be locked.
Page top
Configuring notifications from Kaspersky Endpoint Security for Android
If you do not want the mobile device users to be distracted by notifications and pop-ups from Kaspersky Endpoint Security for Android when the app is in background mode, you can disable these notifications.
We recommend that you enable notifications and pop-ups from Kaspersky Endpoint Security for Android when the app is in background mode. Otherwise, the app does not warn users about threats in real time and users learn about the device protection status only when they open the app.
To configure the display of notifications and pop-ups from Kaspersky Endpoint Security for Android when the app is in background mode:
- Open Kaspersky Next Management Console.
- Select the Security management → Security profiles section.
The Security profiles section contains a list of security profiles configured in Kaspersky Next.
- In the list, select the security profile for the devices on which you want to configure notifications.
- Click the link with the profile name to open the security profile properties window.
The security profile properties window displays settings available for all devices.
- In the Android group, select Advanced.
- Do one of the following:
- To display notifications and pop-ups, set the toggle switch to Notifications and pop-ups in background mode are displayed.
Kaspersky Endpoint Security for Android displays all notifications and pop-ups, even if the app is in background mode.
- To hide notifications and pop-ups, set the toggle switch to Notifications and pop-ups in background mode are hidden.
Kaspersky Endpoint Security for Android displays the protection status notifications only. Also, the app displays notifications when the user is working with the app (for example, when the user manually updates anti-malware databases).
- To display notifications and pop-ups, set the toggle switch to Notifications and pop-ups in background mode are displayed.
- Click Save to save the changes.
After the security profile is applied, the notification settings are changed on users' devices.
Page top
Enabling and disabling performance features of Kaspersky Endpoint Security for Windows
You can enable or disable the following performance features of Kaspersky Endpoint Security for Windows:
- Pausing the running scheduled tasks and freeing up operating system resources for user applications when the CPU load increases.
- Background scan.
- Postpone scheduled tasks while running on battery power.
To enable or disable performance features of Kaspersky Endpoint Security for Windows:
- Open Kaspersky Next Management Console.
- Select the Security management → Security profiles section.
The Security profiles section contains a list of security profiles configured in Kaspersky Next.
- In the list, select the security profile for the devices on which you want to configure performance of Kaspersky Endpoint Security for Windows.
- Click the link with the profile name to open the security profile properties window.
The security profile properties window displays settings available for all devices.
- In the Windows group, select Advanced → Performance.
- Do any of the following:
- To enable or disable the freeing up of operating system resources by Kaspersky Endpoint Security for Windows, set the toggle switch to Free up resources for other applications is enabled or Free up resources for other applications is disabled, respectively.
By default, this feature is enabled.
- To enable or disable background scan, set the toggle switch to Background scan is enabled or Background scan is disabled, respectively.
By default, this feature is enabled.
- To enable or disable the postponement of scheduled tasks while the device is running on battery power, set the toggle switch to Postpone scheduled tasks while running on battery power is enabled or Postpone scheduled tasks while running on battery power is disabled, respectively.
When this feature is enabled and the device is running on battery power, the following tasks are not run even if scheduled:
- Update of anti-malware databases.
- Full scan.
- IoC scan.
- Other tasks configured by the users in Kaspersky Endpoint Security for Windows on their devices.
By default, this feature is enabled.
- To enable or disable the freeing up of operating system resources by Kaspersky Endpoint Security for Windows, set the toggle switch to Free up resources for other applications is enabled or Free up resources for other applications is disabled, respectively.
- Click the Save button.
The performance features of Kaspersky Endpoint Security for Windows are configured.
Page top
Configuring performance features of Kaspersky Endpoint Security for Mac
You can limit the usage of CPU resources during a malware scan on your users' macOS devices.
To configure performance features of Kaspersky Endpoint Security for Mac:
- Open Kaspersky Next Management Console.
- Select the Security management → Security profiles section.
The Security profiles section contains a list of security profiles configured in Kaspersky Next.
- In the list, select the security profile for the devices on which you want to configure performance features of Kaspersky Endpoint Security for Mac.
- Click the link with the profile name to open the security profile properties window.
The security profile properties window displays settings available for all devices.
- In the Mac group, select Advanced → Performance.
- Do either of the following:
- To enable the limitation of CPU usage during a malware scan, set the toggle switch to Limiting CPU usage during a malware scan is enabled, and then select the necessary CPU usage percentage from the Upper limit list.
Enabling this option can negatively affect the performance of Kaspersky Endpoint Security for Mac.
- To disable the limitation of CPU usage during a malware scan, set the toggle switch to Limiting CPU usage during a malware scan is disabled.
By default, this option is disabled.
- To enable the limitation of CPU usage during a malware scan, set the toggle switch to Limiting CPU usage during a malware scan is enabled, and then select the necessary CPU usage percentage from the Upper limit list.
- Click the Save button.
The performance features of Kaspersky Endpoint Security for Mac are configured.
Page top
Enabling and disabling the transmission of dump files and trace files to Kaspersky for analysis
To examine possible failures in the security application operation on the Windows device, Technical Support specialists may need some details of the system and events that have occurred during the application operation. This information is stored in dump files and trace files created by the security application on Windows devices of end users. You can enable and disable the transmission of dump files and trace files from users' Windows devices to Kaspersky.
To enable or disable the transmission of dump files and trace files to Kaspersky for analysis:
- Open Kaspersky Next Management Console.
- Select the Security management → Security profiles section.
The Security profiles section contains a list of security profiles configured in Kaspersky Next.
- In the list, select the security profile for the devices on which you want to configure the delivery of dump files and trace files.
- Click the link with the profile name to open the security profile properties window.
The security profile properties window displays settings available for all devices.
- In the Windows group, select the Advanced section.
- Click the Settings link in the Information for Technical Support section.
- In the Technical Support settings section, set the toggle switch to Dump writing is enabled.
- Click the Save button.
After the security profile is applied, dump files will be created on Windows devices. After a failure at the next run of the security application on the Windows device, the window to upload information for Technical Support opens. In this window, you can view the details of dump files created and confirm sending those files to Kaspersky.
Page top
Viewing license details and entering an activation code
This section describes how to view license details and how to enter an activation code in Kaspersky Next Management Console. Information about changes in the operation of Kaspersky Next after license expiration is also provided.
Viewing license details
In Kaspersky Next Management Console, you can view information about the currently active Kaspersky Next license.
To view the details of the Kaspersky Next license:
- Open Kaspersky Next Management Console.
- Select the Information panel section.
- Select the License tab.
The License tab shows the following information:
- Details of the limitation imposed on the number of users by the license.
- The actual number of users who use the software under the license.
- The number of days remaining until the license expires.
From this tab, you can do the following:
- If you are using a subscription, click the Refresh license information button to refresh the displayed data.
By default, license information is updated in Kaspersky Next Management Console every 24 hours.
- Click the Details link in the section containing information about the number of days until license expiration.
This opens a window containing detailed information about the Kaspersky Next license (see the figure below).
If you are using a subscription, in some cases N/A may be displayed instead of a license expiration date.
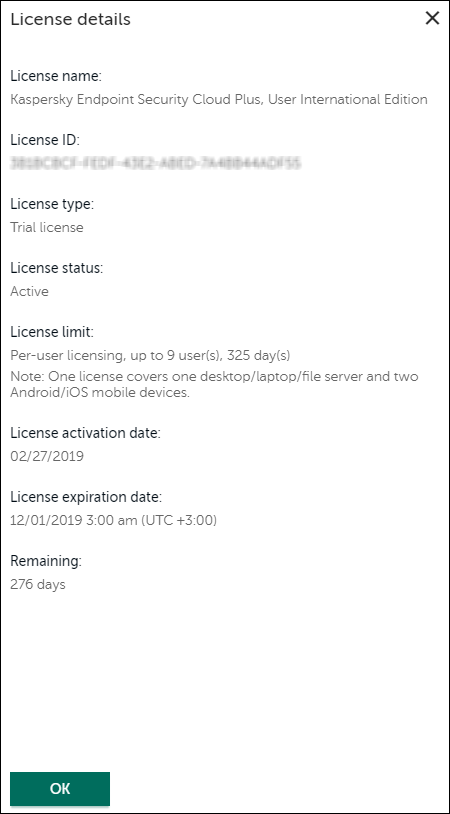
Detailed license information
- Click the Enter activation code button to enter the activation code that matches a new license.
Entering an activation code
In Kaspersky Next Management Console, you can enter an activation code that matches a new license if the current license is about to expire or if you want to change the set of available features.
To enter an activation code:
- Open Kaspersky Next Management Console.
- Select the Information panel section.
- Select the License tab.
The License tab shows the following information:
- Details of the limitation imposed on the number of users by the license.
- The actual number of users who use the software under the license.
- The number of days remaining until the license expires.
- Click the Enter activation code button.
The License replacement window opens.
- In the entry field, enter the Kaspersky Next activation code that you received from a Kaspersky representative.
An activation code is comprised of four blocks, each containing five characters.
- Click the Send button.
The activation code is sent to Kaspersky activation servers for verification. If you entered an invalid code, the License replacement window displays a message informing you that an invalid code was entered. Try to enter the activation code again.
- If the code you entered is valid, the Check new license details window displays information on the license currently being used, and information on the license corresponding to the entered activation code.
The window states whether you are about to upgrade Kaspersky Next (and the list of new features you will get), to downgrade your application (and the list of features you will no longer have access to), or simply to replace the license (and keep the set of current features).
Sections of the window show, respectively, values for the current license and, next to an arrow, values for the new license—or one value, if it is the same for both licenses. See the window sections License name, Licensing model, License limit, and License expiration date.
- Click the Apply button to confirm replacement of the license.
- If you are upgrading Kaspersky Next to an edition with more features, the displayed Try out additional features window allows you to configure some of the new features. Define the settings as required, and then click the OK button. Or, click the Later button if you want to configure the features at a later time.
The license ID and all of its associated information change. The data that you modified is displayed in the license details window.
After the license is replaced, the licenses on managed devices running Windows, Android, iOS, and iPadOS are replaced automatically. On a managed device running macOS, the new license is registered. If the previous license is still current, the new one will come into effect only after the previous one expires. If you want to activate the application under the new license earlier, you must do it manually on the device.
License expiration
After the license expires, there are changes in the operation of Kaspersky Next. The changes in software operation do not depend on the type of license that you used. Below is a list of changes in the operation of Kaspersky Next that may occur when the license expires:
- On Kaspersky Business Hub in the list of workspaces, a message about license expiration appears next to the name of the workspace.
- You can open Kaspersky Next Management Console but cannot make any changes, such as add user accounts or configure security profiles. However, settings that you defined in the Management Console before the license expiration are not affected.
- On managed devices running Windows, macOS, and Android, the installed security application switches to license expiration mode according to its own rules. Devices no longer synchronize with the server, get updates of anti-malware databases, and updates for the installed applications.
For more information about the license expiration mode of a supported security application, refer to the respective Help.
- On iOS and iPadOS devices that have an MDM profile, the defined profile settings are deleted.
- If Encryption Management was enabled before the license expiration, managed devices remain encrypted. We recommend that you decrypt and encrypt the devices in the device operating systems. In this way, you can give users methods to gain access to encrypted devices in the event the devices cannot be decrypted normally.
Before the workspace is deleted, you still have access to the recovery keys in the properties of a Windows device encrypted by BitLocker or a macOS device encrypted by FileVault.
- The company workspace is deleted automatically, according to the data removal rules.
Leaving feedback
You can leave feedback on the Kaspersky Next operation. Your feedback can then be used to improve the software solution.
Kaspersky Next allows you to leave general feedback or more specific feedback about certain usage scenarios that the development team are interested in (for example, examining a threat development chain graph).
About data provision.
Kaspersky do not store any location or other personal data along with your response. We receive the following information: statistics about the viewed page: URL, referrer, time spent on the page; statistics about the device that shows the page: operating system, browser type, version, language, and viewport or screen size; type of the license under which Kaspersky Next is activated; the number of protected devices.
To leave feedback on the Kaspersky Next operation:
- Open Kaspersky Next Management Console.
- To leave general feedback, do either of the following:
- On the Information panel → Monitoring page, click the Leave feedback button.
- On any page of Management Console, click the Leave feedback link in the lower part of the left navigation area.
The feedback window appears.
The same feedback window appears automatically after you complete certain usage scenarios that the development team are interested in (for example, examining a threat development chain graph).
- Select the numerical value that signifies your answer to the question asked in the feedback window (for example, How satisfied are you with Management Console?).
- If you want to, type what you liked or disliked most in Kaspersky Next or in the specific scenario.
- Click the Send button to send your feedback.
Your feedback is sent.
Additionally, you can leave feedback on the operation of Kaspersky Next and Kaspersky Security for Microsoft Office 365 from Kaspersky Business Hub.
Page top
Reports on device protection
You can create reports about the protection of managed devices. This feature is available on the Reports tab in the Information panel section. You can view the reports onscreen, or create files in the Portable Document Format (PDF) and Comma-Separated Values (CSV) format (for example, to send reports to company managers or to store them for purposes of statistics). You can also configure regular delivery of reports by email.
All of the reports are presented in tabular format.
List of reports on device protection
The reports on protection of devices are grouped in three categories—Protection, Management, and Installed applications.
Each report includes information for all managed devices in the current workspace. Unless otherwise specified, reports that are generated for a period cover a period not more than 30 days. The maximum number of entries displayed in a report is 1000.
Above each report there is information about the time the report was generated. In a report, the time of the device operating system is displayed.
Protection status report
This report displays the protection status of managed devices, except for those running iOS and iPadOS. This report includes the following columns:
- Status. Device protection status.
- Device. Device name.
- IPv4 address. IPv4 address of the managed device.
- IPv6 address. IPv6 address of the managed device.
- Device owner. Owner of the managed device.
- Group name. Name of the group to which the device owner belongs.
- Reason. Reason why the device was assigned the current status. For example, Device has not connected to Administration Server in a long time.
- Device status defined by application. The device status that is stated by the security application installed on the device (for example, Self-protection is disabled or Tasks do not work).
- Operating system. Name of the operating system on the device.
- Anti-malware database date. Date of the Kaspersky anti-malware database release.
- Last full scan date. Date of the last full scan of the device.
Threats report
This report displays threats detected on managed devices. This report includes the following columns:
- Device. Device name.
- Application. Kaspersky security application installed on the device.
- Component. Name of the component that detected the threat. You can view names of components in the Security profiles section.
- Detected object. Name of the detected object. This name is received from the security application.
- Object type. Type of detected object. For example, a value in this column can be Malicious tools, Adware, Auto-dialers, Packed files that may cause harm, or Multi-packed files.
- Time. Date and time of object detection.
- Path to file. Path to the infected file on the device.
- Action. Action that has been performed on the infected file. For example, a value in this column can be Disinfected, Deleted, or Blocked.
Status of anti-malware database updates report
This report displays the status of anti-malware databases on managed devices. This report includes the following columns:
- Device. Device name.
- Application. Kaspersky security application installed on the device.
- Version number. Security application version number.
- Anti-malware database date. Date of the anti-malware database release.
Network attacks report
This report displays network attacks on managed devices over the last seven days. This report includes the following columns:
- Device. Device name.
- Attack. Attack name. This name is received from the security application.
- Attack time. Date and time of the network attack.
- Attack IP address. IP address of the attacking computer.
- Protocol. Name of the protocol used by the attacking computer.
- Port. Device port used for the network attack.
- Attacked interface address. IP address of the network interface card that was attacked on the managed device.
Vulnerabilities report
This report displays software vulnerabilities detected on managed devices. This report includes the following columns:
- Severity level. Vulnerability severity level.
- Vendor. Vendor of the application in which the vulnerability is detected.
- Application. Application in which the vulnerability is detected.
- Application version. Version of the application in which the vulnerability is detected.
- Device. Device on which the vulnerability is detected.
- Vulnerability name. Name of the detected vulnerability. This name is received from the security application.
- Object. The object in which the vulnerability is detected. For example, if the vulnerability is detected in a file, this column contains the path to the file.
- Detection time. Time of the vulnerability detection.
- Updates are available. Whether patches that fix the vulnerability are available.
Cloud Discovery reports
Kaspersky Next provides you with two reports related to the Cloud Discovery feature: Cloud Discovery: Successful attempts to access cloud services and Cloud Discovery: Blocked attempts to access cloud services.
Cloud Discovery: Successful attempts to access cloud services report
This report displays successful attempts to access cloud services from Windows devices in your company. This report includes the following columns:
- Device owner. Owner of the device on which the use of a cloud service is detected.
- Device. Device on which the use of a cloud service is detected.
- Category of cloud services. Category of the cloud service whose use is detected on the device.
- Cloud service. Cloud service whose use is detected on the device.
- Connections from browsers. Number of connections made to the detected cloud service from browsers.
- Connections from client applications. Number of connections made to the detected cloud service from applications.
Cloud Discovery: Blocked attempts to access cloud services report
This report displays blocked attempts to access cloud services from Windows devices in your company. This report is displayed on the Reports tab only if you activated Kaspersky Next under a Kaspersky Next EDR Optimum or XDR Expert license. This report includes the following columns:
- Device owner. Owner of the device on which the use of a cloud service is detected.
- Device. Device on which the use of a cloud service is detected.
- Category of cloud services. Category of the cloud service whose use is detected on the device.
- Cloud service. Cloud service whose use is detected on the device.
- Connections from browsers. Number of connections made to the detected cloud service from browsers.
- Connections from client applications. Number of connections made to the detected cloud service from applications.
Adaptive Anomaly Control reports
Kaspersky Next provides you with two reports related to the Adaptive Anomaly Control feature: Adaptive Anomaly Control rules state and Adaptive Anomaly Control detections.
Adaptive Anomaly Control rules state report
This report displays states of Adaptive Anomaly Control rules. This report is displayed on the Reports tab only if you activated Kaspersky Next under a Kaspersky Next EDR Optimum or XDR Expert license.
In the summary part, the report shows the distribution of Adaptive Anomaly Control rules by their state.
A table with detailed information includes the following columns:
- Device name
Device on which a rule has a certain state. If a rule is in the "Smart" mode, its state on different devices may vary: on some devices, the training may be finished; while on others, it may still be in progress.
- Rule name
Name of the Adaptive Anomaly Control rule.
- Rule state
State of the Adaptive Anomaly Control rule.
- Training progress, % (for rules in "Smart training" state)
The value depends on the rule state:
- For rules in the "Off," "Notify," or "Block" state, the value is always 0.
- For rules in the "Smart training" state, the value is as follows:
100%*(period from the latest unprocessed detection to now):(rule training duration)
- For rules in the "Smart block" state, the value is always 100, because the training for them has already finished.
- Number of detections (for rules in "Smart training" state)
The value depends on the rule state:
- For rules that are or have ever been in the "Smart training" state, the value is the number of actual detections that you have not yet processed.
- For other rules, the value is always 0.
Adaptive Anomaly Control detections report
This report displays detections of Adaptive Anomaly Control. This report is displayed on the Reports tab only if you activated Kaspersky Next under a Kaspersky Next EDR Optimum or XDR Expert license. This report includes the following columns:
- Device name
Device on which the detection occurred.
- User name
Owner of the device on which the detection occurred.
- Rule name
Name of the Adaptive Anomaly Control rule that made the detection.
- Action
Mode of the Adaptive Anomaly Control rule: Notify, Block, or Smart.
- Source process and Source object
The object that performed the detected actions (for example, a file that the user opened).
- Target process and Target object
The object on which the detected actions were performed (for example, a browser that uses a library that is loaded into the computer memory as a result of opening the file).
Detections by Device Control component report
This report displays connected devices that are detected by the Device Control component. This report includes the following columns:
- Device. Device name.
- Date. Detection date.
- Event. Type of event that occurred. For example, a value can be Access to the device was granted, Access to the device was denied, or Connection of the device was blocked.
- Information about the network or storage device to which the user attempted to gain access: Type, Name, Description, and ID.
Detections by Web Control component report
The report displays managed devices on which attempts to gain access to blocked websites were registered. Blocked websites are those that are listed in the Web Control component settings. The report displays information from the last day. This report includes the following columns:
- Affected device. Device name.
- Rule. Name of the web resource access rule that was applied by the Web Control component.
- Web address. Web address defined in the web resource access rule.
- Time. Web address access date and time.
- Result. Action performed by the web resource access rule. For example, a value can be Allowed, Blocked, or Warning.
Encryption status of devices report
This report displays the encryption status of managed devices. This report is displayed on the Reports tab only if you activated Kaspersky Next under a Kaspersky Next EDR Optimum or XDR Expert license. This report includes the following columns:
- Encryption status. For example, Applying the policy or Meets the policy.
- Device. Device name.
Kaspersky applications versions report
This report displays versions of Kaspersky applications installed on managed devices. This report includes the following columns:
- Device. Device name.
- Application. Name of the Kaspersky security application installed on the device. Also, Network Agent is displayed.
- Version number. Application version number.
- Installation date. Application installation date.
When you export this report to a CSV file, the maximum number of entries is 5000 instead of 1000.
Page top
Working with reports
This section lists operations that you can perform with reports on device protection:
- Generate a report.
- View the properties of a device that is shown in a report.
- Sort the data in a report.
- Create a PDF or CSV file of a report.
You can also configure regular delivery of reports by email.
To generate a report,
On the Reports tab, click the link with the name of the report.
The report is displayed in a new window. At the top of the window, a caption is displayed. The caption includes a report name, date, and time of the report generation. Under the caption, a line of totals and a chart (if applicable) with a legend are displayed. Below a table with the report, data is shown. If there is no data for report generation, the appropriate text is displayed.
You can view the properties of the devices listed in a report. You can also sort data in a report by any column. By default, data is sorted by the Device column.
To view the properties of a device,
In the Device column, click the link with the device name.
The device properties page opens. If the device is not found, the Devices section opens.
To sort the data in a report,
Click the link containing the column name.
The column name is displayed in uppercase characters. Next to the name of the column, an up arrow (˄) indicates the sorting direction. To change the sorting direction, click one more time. Next to the name of the column, a down arrow (˅) appears.
To create a PDF or CSV file of a report,
Do one of the following:
- On the Reports tab, next to the name of a report, click the PDF or CSV link.
- In the upper-right corner of the generated report window, click the Create PDF file or Create CSV file link.
The report in PDF or CSV format will be downloaded to your device.
The data in the report in PDF or CSV can differ from the data in the same report displayed onscreen, because when you create a file, you generate the report at a different moment in time.
Page top
Configuring regular delivery of reports by email
A report delivery is a rule that orders Kaspersky Next to email reports to administrators, according to a schedule.
This section describes how to create, modify, and delete report deliveries.
Creating a report delivery
You can create a maximum of 10 report deliveries per workspace.
To create a regular delivery of reports by email:
- Open Kaspersky Next Management Console.
- Select the Information panel section.
- Select the Reports tab.
- Click the Report deliveries link.
The Deliveries of reports by email window opens. The window displays the list of the report deliveries that you have configured.
- Click the Add delivery button.
The New report delivery window opens.
- If you are creating the first report delivery in your workspace, a disclaimer is displayed at the top of the window. Carefully read the information in this disclaimer and make sure that you understand the risk of sending reports by email.
- If you want to disable report delivery, set the toggle switch to Delivery is disabled. In this case, reports will not be sent according to the delivery settings. Later, you will be able to enable report delivery.
By default, report delivery is enabled.
- In the Delivery name field, specify the name of the new report delivery.
By default, the first report delivery is named "Delivery"; and all other report deliveries are named "Delivery (N)", where N is a sequential number.
You can enter a maximum of 100 characters.
- If you want, change the default values in the From and Subject fields.
In these fields, you can type uppercase and lowercase letters, digits, and whitespaces, up to 100 characters.
- Specify the reports that you want to send:
- Click the Settings link below No reports yet.
The Reports to send window opens.
- In the Format list, select the format that you want to send the reports in: CSV or PDF, or both.
- In the Language drop-down list, select the language in which you want to send reports.
By default, your current language in Management Console is selected.
- Under List of reports, select the check boxes next to the required reports.
In one report delivery, you can have a maximum of 20 attachments. The number of attachments is the number of reports multiplied by the number of formats. This means that if you selected both formats, you cannot select more than ten reports.
- Click OK to close the Reports to send window.
- Click the Settings link below No reports yet.
- Specify the recipients to whom you want to send the selected reports:
- Click the Settings link below No recipients yet.
The Recipients window opens. This window displays the list of all user accounts that have been added to Kaspersky Next.
- Under List of recipients, select the accounts of the required users.
In one report delivery, you can select a maximum of 24 recipients.
- Click OK to close the Recipients window.
- Click the Settings link below No recipients yet.
- Specify the schedule for sending the reports:
- Click the Settings link below Schedule.
The Schedule window opens.
- In the Schedule drop-down list, select the schedule: Every day, Every week, or Every month.
- If the selected schedule is Every week, select the required value in the Day of week drop-down list.
If the selected schedule is Every month, select the required value in the Day of month drop-down list.
- In the Time and Time zone fields, specify the required values.
By default, the time zone of your current device is selected.
- Click OK to close the Schedule window.
- Click the Settings link below Schedule.
- Click the Apply button to save the report delivery.
You cannot add the same report to several deliveries if the start time in those deliveries differs by less than one hour. If Kaspersky Next displays the relevant message, please change either the start time or the set of reports.
The new report delivery is displayed in the list in the Deliveries of reports by email window. You can now enable or disable the new delivery, modify its settings, or delete the delivery.
Page top
Enabling and disabling a report delivery
To enable or disable a report delivery:
- Open Kaspersky Next Management Console.
- Select the Information panel section.
- Select the Reports tab.
- Click the Report deliveries link.
The Deliveries of reports by email window opens. The window displays the list of the report deliveries that you have configured.
- In the line that corresponds to the required report delivery, click the value in the Status column.
Occasionally, the Status column may contain the Unavailable value. This happens when the report delivery contains no reports or no recipients (for example, all of the recipients that you specified in the delivery settings have been removed from Management Console). In this case, the report delivery is disabled but you cannot enable it. Modify the delivery settings or delete the report delivery if it is not needed any more.
- Do one of the following:
- To enable the report delivery, select Enabled.
The report delivery is enabled. Now, reports are sent according to the delivery settings.
- To disable the report delivery, select Disabled.
The report delivery is disabled. Now, reports are not sent.
- To enable the report delivery, select Enabled.
Modifying a report delivery
After you modify a report delivery, Kaspersky Next needs up to 30 minutes to apply the updated settings. Therefore, we do not recommend modifying a report delivery close to the scheduled delivery time.
To modify a report delivery:
- Open Kaspersky Next Management Console.
- Select the Information panel section.
- Select the Reports tab.
- Click the Report deliveries link.
The Deliveries of reports by email window opens. The window displays the list of the report deliveries that you have configured.
- Select the check box next to the required report delivery.
- Click the Edit button.
The Edit report delivery window opens.
- Change the report delivery settings as required.
- Click the Apply button to save the changes.
The report delivery is updated.
Page top
Deleting report deliveries
To delete one or several report deliveries:
- Open Kaspersky Next Management Console.
- Select the Information panel section.
- Select the Reports tab.
- Click the Report deliveries link.
The Deliveries of reports by email window opens. The window displays the list of the report deliveries that you have configured.
- Select the check boxes next to the required report deliveries.
- Click the Delete button.
- In the confirmation window that opens, click the Delete button to confirm deletion.
The deleted report deliveries disappear from the list in the Deliveries of reports by email window and are no longer used for sending reports.
Page top
Viewing the event log and configuring event notifications
This section describes how to view the event log, which displays events that occur on managed devices and general events, and how to configure regular notifications about these events to the email addresses of users. This section also provides you with information about how long events are stored.
Viewing the event log
The event log displays events that occur on managed devices and general events. This information is available on the Information panel → Event log tab of Kaspersky Next Management Console.
The event log contains columns with the following details:
- Severity.
Event severity, in descending order:
 (Critical event)
A critical event indicates a problem that may lead to data loss, an operational malfunction, or a critical error.
 (Functional failure)
A functional failure indicates a serious problem, error, or malfunction that occurred during the operation of the application.
 (Warning)
A warning is not necessarily serious, but nevertheless indicates a potential future problem.
 (Informational event)
An informational event notifies about the successful completion of an operation or a procedure, or of the proper functioning of the application.
- Event category and description.
Category and description of the occurred event. For example, after you add a user account to the list of users, the log displays an event with the category "User has been added" and the description "A user with alias <user alias> and email address <email address> has been added".
- Date and time.
Date and time when the event was registered in the event database. The value displays the time of the device operating system on which Management Console opens.
- User and device.
Name of the device on which the event occurred, and email address or alias of the device owner.
By default, the event log does not display any data.
To view events in the list,
Click the Retrieve latest events button.
You can filter the event log.
By default, the quick filter is displayed. It allows you to filter the displayed records by the event severity.
To apply the quick filter to the event log,
Next to Show events, click the link with the required severity.
To remove the quick filter,
Click the All link.
To apply the extended filter to the event log:
- Click Extended filter to use the extended filter.
- Select the required values in the drop-down lists:
- Period.
The period over which events occurred.
- Event severity.
The severity of events.
- Type.
The type of devices on which events occurred. The list contains operating systems for protected devices and General for other events.
- Period.
You can sort the event log by any column.
To sort the event log,
Click the link containing the column name.
The column name is displayed in uppercase characters. Next to the name of the column, an up arrow (˄) indicates the sorting direction. To change the sorting direction, click one more time. Next to the name of the column, a down arrow (˅) appears.
By default, the event log is sorted by the Date and time column.
Page top
Configuring event notifications on managed devices
Kaspersky Next receives information about events occurring on connected devices (for example, about threats detected), as well as information about its own events (for example, on a name conflict between client devices). You can configure event notifications to be sent to device users and other employees who may be concerned.
You can specify up to 24 recipient email addresses for receiving notifications of events.
To configure event notification:
- Open Kaspersky Next Management Console.
- Select the Settings section.
The General settings of Kaspersky Next page is displayed.
- Click the Settings link in the Event notifications section.
The Event notifications page opens (see the figure below).
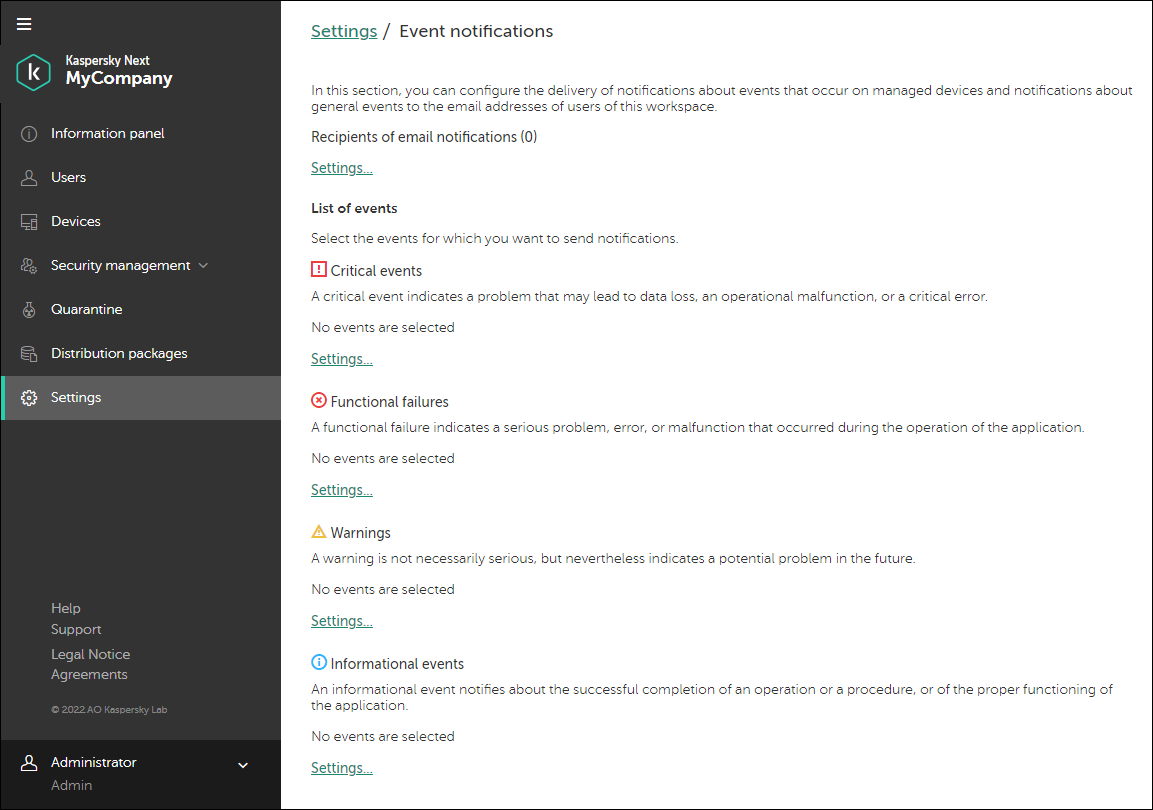
Configuring event notifications in Kaspersky Next
- Specify the recipients to whom you want to send the event notifications:
- Click the Settings link below Recipients of email notifications.
The Recipients window opens (see the figure below). This window displays the list of all user accounts that have been added to Kaspersky Next.
- Under List of recipients, select the accounts of the required users.
You can select a maximum of 24 recipients.
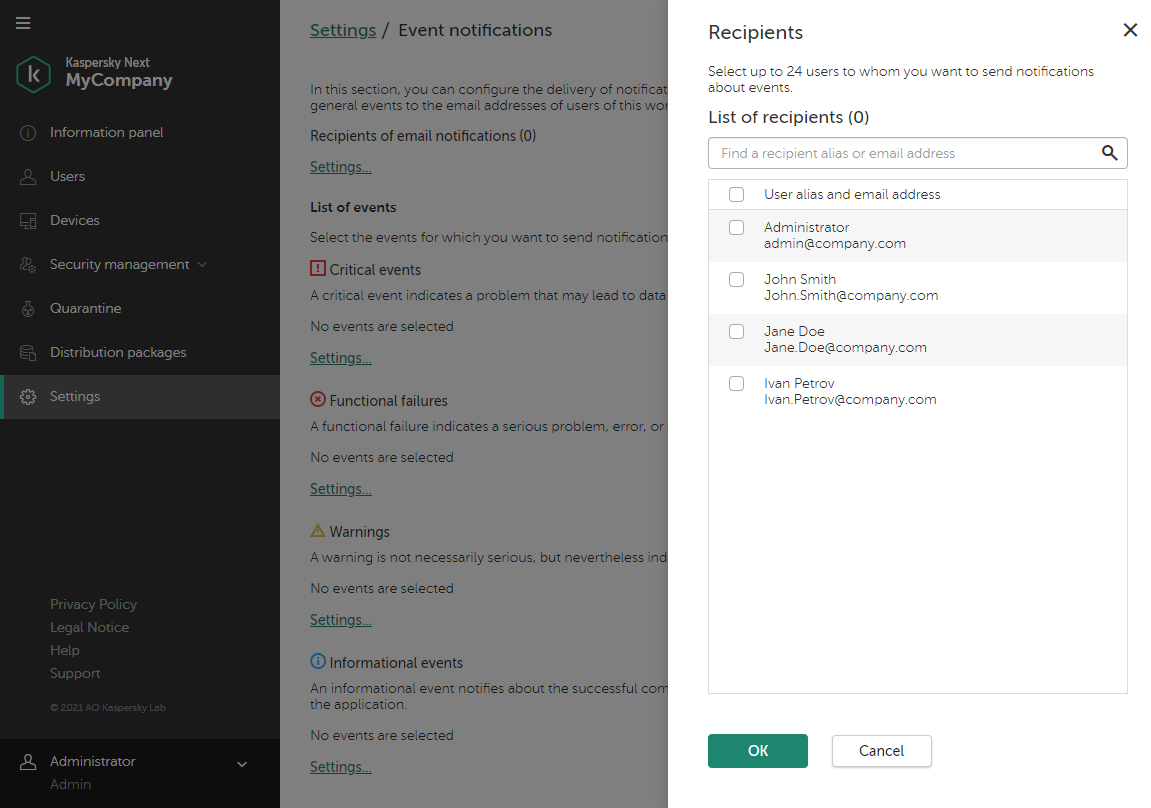
Selecting recipients of event notifications
- Click OK to close the Recipients window.
- Click the Settings link below Recipients of email notifications.
- Select the events for which you want to send notifications:
- Click the Settings link below the required event severity.
The opened window contains events with the selected severity (see the figure below).
- Enable toggle switches next to the names of required events.
Events are grouped by platform. Within each platform, events are divided into two groups: recommended and optional. Recommended events are used for generating reports and/or widgets. Optional events are not.
We recommend switching on notifications about all recommended events.
By default, all toggle switches are disabled.
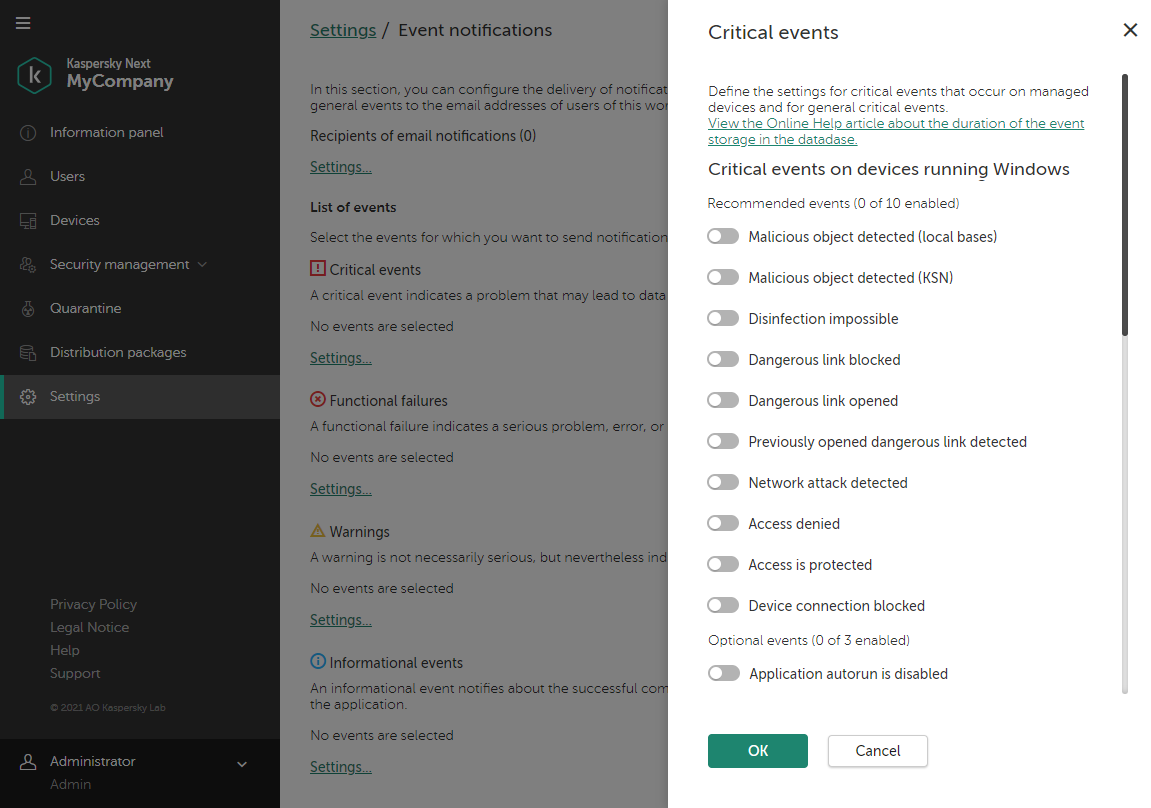
Selecting events to be notified of
- Click OK to close the window.
- Click the Settings link below the required event severity.
Event notifications will be sent to the user email addresses that you selected. Users will only receive notifications of events for which you enabled toggle switches.
Page top
How long events are stored on the server
This section lists the maximum duration of storing events on the server. The actual storage duration depends on the number of events. If there are too many events, the most recent events overflow the storage and, as a result, older events are deleted earlier.
The maximum duration of storing events is determined according to the following rules:
- If an event is used for generating reports and/or widgets (in the notification settings, such events are grouped under Recommended events), its storage duration depends on the exact report that uses the event:
- If the event is used by the Detections by Web Control component report, it is stored for not more than 1 day.
- If the event is used by the Network attacks report, it is stored for not more than 7 days.
- If the event is used by any other report, it is stored for not more than 30 days.
- If an event is not used for generating reports and/or widgets, its storage duration depends on whether you have enabled the notifications about this event (in this case, in the notification settings such events are grouped under Optional events) or on whether notifications about this event are not available at all (in this case, such events are not present in the notification settings).
- If notifications about the event are enabled, its storage duration depends on the event severity:
- A critical event or a functional failure is stored for not more than 7 days.
Exceptions:
- The Network activity blocked event is stored for not more than 1 day.
- The Application startup prohibited event is stored for not more than 1 day.
- A warning or an informational event is stored for not more than 1 day.
- A critical event or a functional failure is stored for not more than 7 days.
- If notifications about the event are disabled or not available, its storage duration depends on the event origin:
- An event from your user's device is not stored on the server.
- An event from the server is stored according to the table below.
Storage duration of server events
Event description
Storage duration, not more than, days
License expires soon.
90
Malware outbreak.
180
Audit: Group settings have been modified.
30
Audit: Object has been modified.
30
Audit: Connection to the Administration Server has been established.
30
Audit: Object status has changed.
30
Files have been found to send to Kaspersky for analysis.
30
Certificate has expired.
180
Certificate has been removed.
90
Certificate has been requested.
90
No free space in the Administration Server database.
180
The Administration Server database is unavailable.
180
No free disk space.
180
License limit has been exceeded.
90
Over 90 percent of the license key is used up.
30
License limit has been exceeded.
180
License expires soon.
180
Limited functionality mode.
180
Connection to the primary Administration Server has been established.
30
Connection to the primary Administration Server has been interrupted.
90
Connection to the secondary Administration Server has been established.
30
Connection to the secondary Administration Server has been interrupted.
90
New device has been detected.
0
Device has remained inactive on the network for a long time.
90
Device has been automatically moved according to a rule.
30
Device has become unmanaged.
180
Device status is Warning.
90
Device has been removed from the group: inactive on the network for a long time.
30
Limit of installations has been exceeded for one of the licensed applications groups.
180
Limit of installations will soon be reached for one of the licensed applications groups.
90
Limit of installations will soon be exceeded (more than 95 percent is used up) for one of the licensed applications groups.
30
The key file has been added to the denylist.
180
No free space in the Administration Server database.
90
Little free space on the hard drive.
90
Runtime error.
180
New updates for Kaspersky software modules have been registered.
90
Updates for Kaspersky software modules have been revoked.
180
Shared folder is not available.
180
Databases have been updated.
30
Failed to copy the updates to the specified folder.
180
Updates have been successfully copied to the specified folder.
30
User has logged in.
90
User has been added.
90
User has been renamed.
90
User details have been changed.
90
User has been deleted.
90
Group has been added.
90
Group has been renamed.
90
Group has been changed.
90
Group has been deleted.
90
User has been granted administrator privileges.
90
User no longer has administrator privileges.
90
User has been added to a group.
90
User has been moved to another group.
90
User has been removed from a group.
90
Security profile has been added.
90
Security profile has been renamed.
90
Security profile has been changed.
90
Security profile has been deleted.
90
Operation with a file in Quarantine.
90
Security profile has been changed.
90
- If notifications about the event are enabled, its storage duration depends on the event severity:
Adjusting the general settings of Kaspersky Next
This section describes how to configure updates of anti-malware databases and scan runs, as well as notifications of Kaspersky Next events.
Configuring updates of anti-malware databases
This section explains how to configure updates of anti-malware databases on Windows, Mac, and Android devices.
Updates functionality (including providing anti-malware signature updates and codebase updates), as well as KSN functionality may not be available in the software in the U.S.
Configuring updates of anti-malware databases on Windows devices and Mac devices
To configure updates of anti-malware databases on Windows devices or Mac devices:
- Open Kaspersky Next Management Console.
- Select the Settings section.
The General settings of Kaspersky Next page is displayed.
- Click the Settings link in the Anti-malware database update settings section.
The Anti-malware database update settings page opens.
- On the Anti-malware database update settings page, click the Windows or Mac button, depending on the operating system of the devices for which you want to configure the anti-malware database updates.
By default, the Windows button is selected.
- In the Anti-malware database update mode section, select an update mode:
- At the security application startup.
The update starts automatically after the application starts on the user's Windows device or Mac device.
If you have selected this option for Windows devices, in the "At the security application startup" mode settings section, specify the time interval that must elapse after application startup before updates begin to be downloaded. By default, the security application starts when the device is turned on and immediately begins updating the anti-malware databases. For more flexible use of resources on the device, you can postpone the update of anti-malware databases to a later time.
- By schedule.
The update starts automatically on a schedule you set up. If you have selected this option, in the "By schedule" mode settings section, set up a schedule for updates to start.
This option is selected by default.
- Manually.
Users manually start the update on their device. In this case, device users choose the frequency and time of anti-malware database updates on their own.
If your users should be able to manually run database updates on Windows devices, allow them to manage tasks in the local interface of Kaspersky Endpoint Security for Windows. To do this:
- Open Kaspersky Next Management Console.
- Select the Security management → Security profiles section.
The Security profiles section contains a list of security profiles configured in Kaspersky Next.
- In the list, select the necessary security profile.
The security profile properties window displays settings available for all devices.
- In the Windows group, select the Advanced section.
- Click the Settings link in the Interaction with end users section.
- Set the toggle switch to Running malware scan and update tasks is allowed.
- At the security application startup.
- In the Advanced settings of anti-malware database update section, define the following settings:
- Run skipped tasks.
Select this check box to download missed updates on devices that were turned off or inaccessible at the time the scheduled update started. The update starts immediately after the cause for the missed anti-malware database updates on the device has been eliminated.
This check box is cleared by default.
- Automatically determine interval to randomize the task start time.
Select this check box to run the anti-malware database update on devices at random within a specified time interval, instead of running it according to a precise schedule. If the check box is selected, the distributed start interval is calculated automatically when the task is created, depending on the number of Windows devices or Mac devices to which the task is assigned.
This check box is selected by default.
You can change the distributed start interval by clearing the Automatically determine interval to randomize the task start time check box, and then selecting the Randomize the task start with interval (min) check box. The distributed task start allows you to avoid a large number of simultaneous requests by Windows devices or Mac devices to Kaspersky Next when a task is started. By default, the Randomize the task start with interval (min) check box is cleared.
- Stop if the task is taking longer than (min).
This setting is relevant only for Windows devices. Select this check box to limit the time interval for updating anti-malware databases on the Windows device. You can set the limit for updating anti-malware databases on the Windows device within an interval from 1 minute to 999 minutes. If the update duration limit is exceeded, the database update will be forced to stop.
This check box is cleared by default.
- Run skipped tasks.
- Click the Save button in the bottom part of the Anti-malware database update settings page.
The anti-malware database update on Windows devices and Mac devices will be performed in accordance with the specified settings.
If necessary, you can also manually start and stop updates of anti-malware databases on Windows devices and Mac devices.
Page top
Configuring updates of anti-malware databases on Android devices
To configure updates of anti-malware databases on Android devices:
- Open Kaspersky Next Management Console.
- Select the Settings section.
The General settings of Kaspersky Next page is displayed.
- Click the Settings link in the Anti-malware database update settings section.
The Anti-malware database update settings page appears.
- On the Anti-malware database update settings page, click the Android button.
- In the Anti-malware database update mode section, select an update mode:
- By schedule.
The update starts automatically on a schedule you set up.
This option is selected by default.
If you have selected the scheduled update, in the "By schedule" mode settings section, in the drop-down list, select the frequency of anti-malware database updates: daily or weekly. In this same section, specify the time to run the update task. Anti-malware database updates are performed according to the system clock of the device.
- Manually.
The user runs the anti-malware database update on the Android device manually. In this case, device users choose the anti-malware database update task frequency and start time on their own.
- By schedule.
- Click the Save button in the bottom part of the Anti-malware database update settings page.
The anti-malware database update on Android devices will be performed in accordance with the settings defined.
In the security profile settings for Android devices, you can disable anti-malware database updates while roaming on Android devices. In the Android → Advanced section of the security profile, set the toggle switch to Updates of anti-malware databases while in roaming are disabled. Disabling anti-malware database updates while in roaming allows you to cut mobile communication costs.
Page top
Configuring a malware scan
This section explains how to configure a malware scan run schedule on Windows, Mac, and Android devices.
Configuring a malware scan on Windows devices and Mac devices
If user computers have a third-party application installed that collects and sends information for further processing, the Kaspersky security application may classify this third-party application as a malicious one. To avoid this, you can exclude that application from scanning.
To configure a malware scan run schedule on Windows devices or Mac devices:
- Open Kaspersky Next Management Console.
- Select the Settings section.
The General settings of Kaspersky Next page is displayed.
- Click the Settings link in the Malware scan settings section.
The Malware scan settings window opens.
- In the Malware scan settings window, click the Windows or Mac button depending on the operating system of the devices for which you want to configure malware scanning.
By default, the Windows button is selected.
- In the Security level section, select the level:
- High.
This level provides the most comprehensive protection. Select the high level if there is a high risk of infection of Windows devices or Mac devices.
- Medium (recommended).
This level is viewed as optimal and so it is recommended for most users.
This option is selected by default.
- Low.
This level provides minimum protection and maximum performance of managed devices.
- High.
- For Windows devices, in the Action when a threat is detected section, select the action that the security application should perform when it detects a threat on a device:
- Disinfect. Delete if disinfection fails
If this option is selected, the security application automatically attempts to disinfect all infected files that are detected. If disinfection fails, the application deletes the files.
- Disinfect. Inform if disinfection fails
If this option is selected, the security application automatically attempts to disinfect all infected files that are detected. If disinfection fails, the application adds the information about the infected files to the list of active threats on the device.
- Inform
If this option is selected, the security application adds the information about the infected files to the list of active threats on the device.
- Disinfect. Delete if disinfection fails
- For Windows devices, in the Pause malware scan section, if necessary, select the Allow pausing of malware scan unless computer is in sleep mode check box.
This check box is cleared by default.
- In the Malware scan task run mode section, select the mode:
- At the security application startup.
This setting is relevant only for Mac devices. The scan starts automatically after the application starts on the user's Mac device.
- By schedule.
The scan starts automatically according to a schedule that you set up. If you selected this option, in the "By schedule" mode settings section, set up the schedule for the malware scan.
For Mac devices, this option is selected by default.
- Manually.
The user runs the scan manually on his or her Windows device or Mac device. In this case, users choose the frequency and time for starting the malware scan on their own.
For Windows devices, this option is selected by default.
- At the security application startup.
- In the Advanced settings of malware scan section, define the advanced settings of the malware scan run:
- Run skipped tasks.
Select this check box to run scheduled scan tasks that were missed on the device (when it was turned off or inaccessible). If this check box is selected, each missed scan will be performed after the device is turned back on.
For Windows devices, this check box is cleared by default; for Mac devices, it is selected by default.
- Automatically determine interval to randomize the task start time.
Select this check box to run a malware scan on devices at random within a specified time interval, instead of running it according to a precise schedule. If the check box is selected, the distributed start interval is calculated automatically when the task is created, depending on the number of Windows devices or Mac devices to which the task is assigned.
For Windows devices, this check box is selected by default; for Mac devices, it is cleared by default.
You can change the distributed start interval by clearing the Automatically determine interval to randomize the task start time check box, and then selecting the Randomize the task start with interval (min) check box. The distributed task start allows you to avoid a large number of simultaneous requests by Windows devices or Mac devices to Kaspersky Next when a task is started. By default, the Randomize the task start with interval (min) check box is cleared.
- Stop if the task is taking longer than (min).
This setting is relevant only for Windows devices. Select this check box to limit the time interval for a malware scan and free up resources of the Windows device for other tasks. If you have selected this check box, set the limit for the malware scan duration within an interval from 1 minute to 999 minutes. If the time limit is exceeded, the scan will be forced to cease.
This check box is cleared by default.
- Run skipped tasks.
- Click the Save button in the bottom part of the Malware scan settings window.
The malware scan on Windows devices and Mac devices is performed in accordance with the specified settings.
If necessary, you can also manually start and stop a malware scan on Windows devices and Mac devices.
Page top
Configuring a malware scan on Android devices
To configure a malware scan run schedule on Android devices:
- Open Kaspersky Next Management Console.
- Select the Settings section.
The General settings of Kaspersky Next page is displayed.
- Click the Settings link in the Malware scan settings section.
The Malware scan settings window opens.
- In the Malware scan settings window, click the Android button.
- In the Scan settings section, define the file scan settings:
- Scan executable files only.
Only executable files are scanned on the Android device.
This check box is selected by default.
- Scan archives with extraction.
Archives are unpacked before being scanned on the Android device. If this check box is cleared, archived files are not scanned.
This check box is selected by default.
- Scan executable files only.
- In the Malware scan task run mode section, select the mode:
- After anti-malware database update.
A malware scan runs automatically on Android devices after anti-malware databases are updated.
This mode is selected by default.
- By schedule.
A malware scan runs on Android devices according to the schedule that you have set up. If you have selected this mode, set the scan frequency in the "By schedule" mode settings section.
- Manually.
The user runs the malware scan on his or her Android device manually.
- After anti-malware database update.
- Click the Save button in the bottom part of the Malware scan settings window.
The malware scan is performed on Android devices in accordance with the settings defined.
Page top
Managing objects in Quarantine
This section contains information about categories of objects that are displayed in the Quarantine section of Kaspersky Next and about how to work with files there.
About categories of objects in the Quarantine section
Security applications may move files to Quarantine or create backup copies while running malware scans on managed devices.
The Quarantine section of Kaspersky Next Management Console contains three categories of objects:
- Quarantine and backup
This category includes files that could not be disinfected or were considered to be probably infected when they were detected, as well as files that were deleted or modified during disinfection.
The Quarantine can contain files whose size is not more than 100 MB. If a file that needs to be quarantined is larger, the file remains intact and Kaspersky Endpoint Security for Windows generates a respective event.
- Unprocessed files
This category includes files whose disinfection failed or was postponed (for example, a file that is currently used by another process or an archived file that is not supported in the current version of Kaspersky Next).
- Detections of Adaptive Anomaly Control rules
This category includes events about detections that were made during the training of Adaptive Anomaly Control rules in the Smart mode. When processing the list of detections, you can either confirm them or add them to exclusions, depending on whether a detection is actually anomalous behavior or not.
Selecting the Quarantine section in Kaspersky Next Management Console displays a list of files in the Quarantine and backup category.
The Quarantine section displays files detected on Windows devices and Mac devices. Adaptive Anomaly Control detections are made only on Windows devices
Objects in the Quarantine section are stored in encrypted form.
You can perform the following actions in the Quarantine section:
- View information about files.
- Restore files to their original folders on the device.
- Delete files.
The list of files in the Quarantine and backup and Unprocessed files categories is displayed as a table with the following columns:
- File
Name of the file and version of the operating system installed on the device on which the file was detected.
- Device name
Name of the device on which the file was detected.
- Device owner
Name of the device owner on whose device the file was detected.
- Location (only in the Quarantine and backup category)
Where the file is placed: Quarantine or Backup.
- Last operation
Last operation performed on the file, including the time, date, and name of the initiator of the operation.
You can sort the list of files by the Name column.
To sort the list,
Click the link containing the column name.
The column name is displayed in uppercase characters. Next to the name of the column, an up arrow (˄) indicates the sorting direction. To change the sorting direction, click one more time. Next to the name of the column, a down arrow (˅) appears.
Viewing files in the Quarantine section
To view detailed information about a file in the Quarantine section:
- Open Kaspersky Next Management Console.
- Select the Quarantine section.
The Quarantine section contains a list of objects belonging to the following categories: Quarantine and backup, Unprocessed files, and Detections of Adaptive Anomaly Control rules.
- In the File category drop-down list, select the relevant file category: Quarantine and backup or Unprocessed files.
- Select the check box next to the name of the file whose properties you want to view.
- Click the File properties button above the list of files.
You can open a window containing information about a file by clicking the link containing the file name in the list.
Detailed information about this file is displayed in the File details window.
Page top
Restoring files in the Quarantine and backup category
You can restore any files belonging to the Quarantine and backup category to their original folders.
You may need to restore a file in the following cases:
- The integrity of a file was corrupted during disinfection. As a result, some important information became unavailable in the file.
- Although the security application moved the file to Quarantine, you consider it to be safe and need to use it.
Restoring files from the Quarantine and backup category could lead to infection of the device.
To restore a file from the Quarantine and backup category:
- Open Kaspersky Next Management Console.
- Select the Quarantine section.
The Quarantine section contains a list of objects belonging to the following categories: Quarantine and backup, Unprocessed files, and Detections of Adaptive Anomaly Control rules.
- In the File category drop-down list, select the Quarantine and backup file category.
- In the list of files, select the check box next to the one that you want to restore.
You can select the check boxes for multiple files.
- Click the Restore button above the list of objects.
The file is restored to its original folder on the device. After being restored, the file is no longer shown in the Quarantine section.
If the original folder on the device contains a file with the same name as the file you want to restore, the file is not restored.
Page top
Removing files from Quarantine
You can remove any files belonging to the Quarantine and backup and Unprocessed files categories from the Quarantine section of Kaspersky Next Management Console.
To remove a file from the Quarantine section:
- Open Kaspersky Next Management Console.
- Select the Quarantine section.
The Quarantine section contains a list of objects belonging to the following categories: Quarantine and backup, Unprocessed files, and Detections of Adaptive Anomaly Control rules.
- In the File category drop-down list, select the relevant file category: Quarantine and backup or Unprocessed files.
- Select the check box next to the name of the file that you need to remove.
You can select the check boxes for multiple files.
- Click the Remove button above the list of files.
The selected file is removed from the Quarantine section of Kaspersky Next Management Console. After it is removed, the file is not shown in the list of files of the category to which it previously belonged.
Page top
Kaspersky Security Network
This section contains information about the infrastructure of Kaspersky Security Network (KSN) online services, as well as instructions on how to enable use of KSN in Kaspersky Next.
Updates functionality (including providing anti-malware signature updates and codebase updates), as well as KSN functionality may not be available in the software in the U.S.
About Kaspersky Security Network
Kaspersky Security Network (KSN) is an online service infrastructure that provides access to the online Knowledge Base of Kaspersky, which contains information about the reputation of files, web resources, and software. The use of data from Kaspersky Security Network ensures faster responses by Kaspersky applications to threats, improves the effectiveness of some protection components, and reduces the risk of false positives. KSN allows you to use Kaspersky reputation databases to retrieve information about applications installed on managed devices.
By participating in KSN, you agree to send to Kaspersky in automatic mode information about the operation of Kaspersky applications installed on client devices that are managed through Kaspersky Next, in accordance with the KSN Statement. Information is sent in accordance with the defined KSN access settings.
Participation in Kaspersky Security Network is voluntary. The decision to participate in Kaspersky Security Network is made when you first open Kaspersky Next Management Console. You can change your decision at any time.
Updates functionality (including providing anti-malware signature updates and codebase updates), as well as KSN functionality may not be available in the software in the U.S.
Exchanging information with Kaspersky Security Network
By participating in Kaspersky Security Network, you agree to provide in automatic mode to Kaspersky information about the operation of Kaspersky applications that are installed on computers and mobile devices managed with Kaspersky Next. Kaspersky experts use information retrieved from client devices in order to fix problems in Kaspersky software operation or to modify some features.
To view the list of data submitted to KSN, please refer to the documentation on the applications included in the set of security applications.
Retrieved information is protected by AO Kaspersky Lab, pursuant to the requirements of the current legislation and the existing rules of Kaspersky. Kaspersky uses retrieved information in a non-personalized form and as general statistics only. The general statistical data is generated automatically based on originally retrieved information, and does not contain any personal or other confidential data. The originally retrieved information is stored in encrypted form and erased as it is accumulated (two times per year). The storage term of general statistical data is unlimited.
Provision of data is accepted on a voluntary basis. The data provision feature for Windows devices and Mac devices can be enabled or disabled in Kaspersky Next Management Console at any time. Devices running Android, iOS, and iPadOS provide information to KSN by default. Mobile device users give their consent to data provision at the moment they accept the terms of the End User License Agreement when installing the security application.
Page top
Enabling and disabling the use of Kaspersky Security Network in Kaspersky Next
To obtain access to KSN, computers and mobile devices must be connected to the internet.
You can enable or disable KSN separately for each available version of Kaspersky Endpoint Security for Windows and Kaspersky Endpoint Security for Mac.
For devices running Android, iOS, and iPadOS, KSN is always enabled by default. KSN is enabled on mobile devices at the moment you accept the End User License Agreement when installing the security application. The use of KSN can be disabled directly on mobile devices by you or the device owners.
The default status of KSN use depends on whether or not you accepted the terms of the KSN Statement when you first opened Kaspersky Next Management Console. If you accepted the KSN Statement, the use of KSN is enabled. If you did not accept the KSN Statement, the use of KSN is disabled.
To enable the use of KSN:
- Open Kaspersky Next Management Console.
- Select the Settings section.
The General settings of Kaspersky Next page is displayed.
- Under Use of Kaspersky Security Network, do one of the following:
- Click the Prepare distribution packages link.
This link is displayed if you refused to accept the KSN Statements for all available versions of Kaspersky Endpoint Security for Windows and Kaspersky Endpoint Security for Mac when you first opened Kaspersky Next Management Console.
You are redirected to the Distribution packages section where you can prepare the required package. The package preparation includes accepting the KSN Statement. No further actions are required.
- Click the Settings link.
This link is displayed if you have accepted the KSN Statement for at least one available version of Kaspersky Endpoint Security for Windows or Kaspersky Endpoint Security for Mac.
The Kaspersky Security Network page is displayed. The page allows you to enable or disable the use of KSN separately for each available version of Kaspersky Endpoint Security for Windows and Kaspersky Endpoint Security for Mac.
- Click the Prepare distribution packages link.
- If the use of KSN for the required security application version is disabled, click the Enable KSN button.
The Kaspersky Security Network for <Security application name> (<Security application version>) window is displayed.
- Carefully read the KSN Statement.
- Select the check box under the text of the KSN Statement.
- Click the I accept the terms button.
If you click the I decline button, KSN will not be enabled.
The Kaspersky Security Network for <Security application name> (<Security application version>) window closes.
The use of KSN for the selected security application version is enabled. The Enable KSN button is replaced with the Disable KSN button.
To disable the use of KSN:
- Open Kaspersky Next Management Console.
- Select the Settings section.
The General settings of Kaspersky Next page is displayed.
- Under Use of Kaspersky Security Network, click the Settings link.
This link is displayed if you have accepted the KSN Statement for at least one available version of Kaspersky Endpoint Security for Windows or Kaspersky Endpoint Security for Mac.
The Kaspersky Security Network page is displayed. The page allows you to enable or disable the use of KSN separately for each available version of Kaspersky Endpoint Security for Windows and Kaspersky Endpoint Security for Mac.
- If the use of KSN for the required security application version is enabled, click the Disable KSN button.
- In the confirmation window that opens, click the Disable button.
The use of KSN for the selected security application version is disabled. The respective Disable KSN button is replaced with the Enable KSN button. Later, you can again enable KSN for the selected security application version.
Page top
Kaspersky Business Hub
This section describes operations that you can perform in Kaspersky Business Hub.
About Kaspersky Business Hub
Kaspersky Business Hub is a portal where you can manage company workspaces for the following Kaspersky software solutions:
- Kaspersky Next
- Kaspersky Security for Microsoft Office 365
Using Kaspersky Business Hub, you can do the following:
- Create an account.
- Edit an account.
- Create a company workspace for a supported Kaspersky software solution.
- Purchase and renew a license for a supported Kaspersky software solution.
- Edit information about companies.
- Take a demo training on malicious software.
- Leave feedback about the training.
- Leave feedback about the supported Kaspersky software solutions.
- Delete a company workspace.
- Delete an account.
Managing the list of companies on Kaspersky Business Hub
This section describes how to view the list of companies registered under your account on Kaspersky Business Hub, add a new company to Kaspersky Business Hub, add a software solution for a company registered on the portal, change company information, and delete a company workspace.
Viewing the list of companies on Kaspersky Business Hub
You can view information about companies added to Kaspersky Business Hub, such as the date on which the company was added to the portal, the number of connected devices and mailboxes in the company, and license information. The list of companies may also display aggregated protection statistics.
To view information about companies available to you as an administrator on Kaspersky Business Hub:
- Do one of the following:
- If you have not signed in to your account on Kaspersky Business Hub:
- In your browser, go to Kaspersky Business Hub.
- Sign in to your account on Kaspersky Business Hub.
- If you set up two-step verification, enter the one-time security code that is either sent to you by SMS or generated in your authenticator app (depending on the two-step verification method that you set up).
- If you are currently working with Kaspersky Next Management Console, select Manage workspaces from the drop-down list on the left.
The portal page displays a list of companies for which you are an administrator.
By default, brief company information is displayed.
- If you have not signed in to your account on Kaspersky Business Hub:
- To view detailed company information, click the link with the company name or the arrow icon to the left of it.
By default, the list of companies contains the following information:
- The company name that was specified during the company registration on the portal.
- Icons of the Kaspersky software solutions that can be used by the company. If the company uses a software solution, the relevant icon is available. If the company does not use a solution, the icon is unavailable (dimmed). Clicking a dimmed icon opens the Create a Workspace Wizard.
In the detailed information display mode, the following information is also displayed:
- The date and time of company registration on Kaspersky Business Hub.
- The identifier of each company workspace (displayed as an ID) that is assigned automatically when the workspace is created. This identifier is used by Kaspersky experts for supporting the software solution.
- License type.
- For a Kaspersky Next workspace: licensing model—per user or per device.
- The exact license expiration date and time. For an active subscription, Not applicable is displayed instead.
- For a Kaspersky Next workspace: number of users that use the software under the license; number of connected desktops, laptops, file servers; number of connected Android, iOS, and iPadOS mobile devices; and the maximum number of users or devices allowed under the license.
If you have a Kaspersky Next EDR Optimum or XDR Expert license, and if you have not created a Kaspersky Security for Microsoft Office 365 workspace yet, this area also displays the Activate link. When you click this link, the Create a Workspace Wizard starts and you can create a Kaspersky Security for Microsoft Office 365 workspace. Later, you can activate this or any other Kaspersky Security for Microsoft Office 365 workspace by entering the activation code for the Kaspersky Next EDR Optimum or XDR Expert license. You can find the activation code in the email message that you received after the license purchase. For more information about activating Kaspersky Security for Microsoft Office 365, please refer to Kaspersky Security for Microsoft Office 365 Help.
- For a Kaspersky Security for Microsoft Office 365 workspace: number of connected mailboxes and maximum number of mailboxes allowed under the license.
In the detailed information display mode, you can open Kaspersky Next Management Console.
The Marked for deletion drop-down list is located below the list of companies. This list displays information about the workspaces that were marked for deletion by you or by other administrators of the company. You can use the links in this list to force deletion or cancel deletion of workspaces.
You can sort the list of companies by company name or by company registration date. By default, the list of companies is sorted by company registration date in ascending order (from the oldest company to the newest one).
To sort the list of companies:
- Click the Company name link to sort by company name or the Registration date link to sort by registration date.
The list of companies is sorted by the selected setting. Next to the link, the Ascending sorting order (
 ) or Descending sorting order (
 ) icon indicates the order that the list is sorted in.
 - If you want to change the sorting order, click the link again.
The sorting order is changed.
Viewing aggregated protection statistics
Kaspersky Business Hub displays a number of banners and widgets with aggregated protection statistics. These banners and widgets provide administrators—in particular, managed service provider (MSP) administrators—with an overview of the main health indicators across all their workspaces.
The banners and widgets are displayed only if you have two or more active Kaspersky Next workspaces (active workspaces are those that are not marked for deletion). Also, the banners are displayed only if you work from a computer; they are not displayed if you work from a mobile device.
The banners display the following information:
- Number of devices with critical-level vulnerabilities.
- Number of devices with the OK status.
- Number of threats that have been disinfected.
The banner displays the total number of threats that have been disinfected over the last 30 days.
The widgets display the following information:
- Distribution of devices by severity level of vulnerabilities.
- Distribution of devices by protection status.
- Distribution of devices by status of anti-malware database updates.
To view aggregated protection statistics:
- Do one of the following:
- If you have not signed in to your account on Kaspersky Business Hub:
- In your browser, go to Kaspersky Business Hub.
- Sign in to your account on Kaspersky Business Hub.
- If you set up two-step verification, enter the one-time security code that is either sent to you by SMS or generated in your authenticator app (depending on the two-step verification method that you set up).
- If you are currently working with Kaspersky Next Management Console, select Manage workspaces from the drop-down list on the left.
The portal page displays a list of companies for which you are an administrator.
- If you have not signed in to your account on Kaspersky Business Hub:
The banners and widgets with aggregated protection statistics are displayed at the top of the list of companies.
Page top
Adding a new company to Kaspersky Business Hub
The procedure of adding a workspace to Kaspersky Business Hub for a new (second and any further) company differs from creating the first company workspace.
Follow this instruction if you have created at least one company workspace under your account on Kaspersky Business Hub and want to add another workspace.
Before you start, make sure that you know the following:
- The name of the company in which you intend to use the software solution.
- The country in which the company is located. If the company is located in Canada, you must also know the province.
- The total number of company computers and mobile devices that you want to protect (this information is needed only when you are creating a workspace for Kaspersky Next).
To add a new company on Kaspersky Business Hub:
- In your browser, go to Kaspersky Business Hub.
- Sign in to your account on Kaspersky Business Hub by specifying the user name and the password.
- If you set up two-step verification, enter the one-time security code that is either sent to you by SMS or generated in your authenticator app (depending on the two-step verification method that you set up).
- Specify your country if you did not provide this information before.
This information is required to display license prices in the correct currency.
- On the Companies tab, click the New company button in the right area of the screen.
The Create a Workspace Wizard starts. Proceed through the Wizard by using the Next button.
- On the Step 01: Select a software solution page of the Wizard, select the Kaspersky software solution that you plan to use:
- Kaspersky Next, if you want to protect the computers and mobile devices of company employees.
- Kaspersky Security for Microsoft Office 365, if you want to protect the Exchange Online mailboxes, OneDrive files, and SharePoint Online sites of company employees.
- On the Step 02: Terms of Use of Kaspersky Next page of the Wizard, do the following:
- Carefully read the Agreement, the Privacy Policy, and the Data Processing Agreement for the selected software solution.
- If you agree to the terms and conditions of the Agreement and the Data Processing Agreement, and if you are aware and agree that your data will be handled and transmitted (including to third countries) as described in the Privacy Policy, and you confirm that you have fully read and understand the Privacy Policy, select the check boxes next to the three listed documents, and then click the I accept the terms button.
If you do not agree to the terms and conditions, do not use the selected Kaspersky software solution.
If you click the I decline button, the workspace creation process on Kaspersky Business Hub will be terminated.
- On the Step 03: Workspace information page of the Wizard, specify the main details of your company:
- Fill in the following required fields:
- Name of your company. Specify the name of the company in which you intend to use the software solution. You can enter a string up to 255 characters long. The string can contain upper- and lowercase characters, numerals, whitespaces, dots, commas, minuses, dashes, and underscores. The specified company name will be displayed on Kaspersky Business Hub and in Kaspersky Next Management Console.
- Country. In the drop-down list, select the country in which your company is located. If you select Canada, also specify the province in the State drop-down list that appears below this field.
- Number of devices (only when creating a workspace for Kaspersky Next). Enter the total number of company computers and mobile devices that you want to protect.
In the entry field, you can enter a number from 5 to 999. In some regions, the maximum available number of devices may be different.
- Data center (only when creating a workspace for Kaspersky Security for Microsoft Office 365). Location of the data center that will process your email traffic and store the application databases. Select the data center location in accordance with domestic legal requirements.
Available locations are as follows:
- Brazil South
- Western Europe
- Fill in the Additional company description field (optional).
It may be useful if you have more than one workspace on Kaspersky Business Hub. You can enter a string up to 255 characters long. The string can contain upper- and lowercase characters, numerals, whitespaces, dots, commas, minuses, dashes, and underscores.
- Fill in the following required fields:
The new company is now added to Kaspersky Business Hub. Kaspersky Business Hub displays a page prompting you to wait until the company workspace is ready. Further actions depend on the selected software solution:
- Kaspersky Next. Do the following:
- In the workspace creation message, click the link to go to the list of companies.
- Click Go to workspace.
After several minutes, when the workspace is ready, Management Console will open. You can also open Management Console by clicking the link in the email message sent from Kaspersky. You receive this message at the email address that you specified when you created an account on Kaspersky Business Hub.
After Management Console opens, you must perform the initial setup of Kaspersky Next.
- Kaspersky Security for Microsoft Office 365. After the workspace is created, you are automatically redirected to the Management Console. You can proceed to configuring a connection to Exchange Online, configuring a connection to OneDrive, configuring a connection to SharePoint Online, and configuring a Service Account.
A link with the name of the company that has been added appears on your account page on Kaspersky Business Hub in the list of companies.
Page top
Adding another workspace for a company registered on Kaspersky Business Hub
If a company registered on Kaspersky Business Hub has a workspace for one of the Kaspersky software solutions, a workspace can be added for another software solution.
To add a workspace for a company:
- Do one of the following:
- If you have not signed in to your account on Kaspersky Business Hub:
- In your browser, go to Kaspersky Business Hub.
- Sign in to your account on Kaspersky Business Hub.
- If you set up two-step verification, enter the one-time security code that is either sent to you by SMS or generated in your authenticator app (depending on the two-step verification method that you set up).
- If you are currently working with Kaspersky Next Management Console, select Manage workspaces from the drop-down list on the left.
The portal page displays a list of companies for which you are an administrator.
- If you have not signed in to your account on Kaspersky Business Hub:
- In the line containing the company name, click the icon of the required Kaspersky software solution.
The icon of a software solution that has not been added is dimmed.
The Create a Workspace Wizard starts.
- Follow the Wizard instructions.
The workspace is created for the company. On the Companies tab of Kaspersky Business Hub, the line with the company name contains bright icons corresponding to the connected software solutions.
Page top
Editing company information
You can modify the company name and description that you specified when you added the company to Kaspersky Business Hub.
To modify the company name and/or description:
- Do one of the following:
- If you have not signed in to your account on Kaspersky Business Hub:
- In your browser, go to Kaspersky Business Hub.
- Sign in to your account on Kaspersky Business Hub.
- If you set up two-step verification, enter the one-time security code that is either sent to you by SMS or generated in your authenticator app (depending on the two-step verification method that you set up).
- If you are currently working with Kaspersky Next Management Console, select Manage workspaces from the drop-down list on the left.
The portal page displays a list of companies for which you are an administrator.
- If you have not signed in to your account on Kaspersky Business Hub:
- Follow the link with the name of the company for which you want to edit information or click the arrow icon to the left of the name.
- Click the Edit (
 ) icon in the area with the company information.
The page displays an information section containing the Company name and Company description entry fields.
- Modify the company name and/or description as you want.
- Click the Save button.
To cancel the changes, click the Cancel button.
The modified details are displayed on the page of your account on Kaspersky Business Hub and in Kaspersky Next Management Console.
Page top
Deleting the workspace of a company
You can delete a workspace of a company if that company has decided to stop using the workspace.
To delete a company workspace:
- Do one of the following:
- If you have not signed in to your account on Kaspersky Business Hub:
- In your browser, go to Kaspersky Business Hub.
- Sign in to your account on Kaspersky Business Hub.
- If you set up two-step verification, enter the one-time security code that is either sent to you by SMS or generated in your authenticator app (depending on the two-step verification method that you set up).
- If you are currently working with Kaspersky Next Management Console, select Manage workspaces from the drop-down list on the left.
The portal page displays a list of companies for which you are an administrator.
- If you have not signed in to your account on Kaspersky Business Hub:
- Select the workspace that you want to delete.
- On the right, in the section containing the selected workspace, click the Delete () icon.
The Delete workspace window opens.
- In the Delete workspace window, confirm that you want to delete the workspace.
The workspace is marked for deletion. The information block for the workspace is highlighted with a red border.
The information block for the workspace is duplicated at the bottom of the page, in the Marked for deletion section.
You cannot go to a workspace that is marked for deletion and manage it.
If you have not been able to mark a workspace for deletion, contact Kaspersky Technical Support. After a Technical Support engineer at Kaspersky receives your request, the company workspace will be deleted.
Workspaces that are marked for deletion may remain in that status for a period of seven days after being marked. After seven days, they are automatically deleted.
During that period, you can forcibly delete a workspace that is marked for deletion or cancel deletion of a workspace.
To forcibly delete a company workspace:
- Do one of the following:
- If you have not signed in to your account on Kaspersky Business Hub:
- In your browser, go to Kaspersky Business Hub.
- Sign in to your account on Kaspersky Business Hub.
- If you set up two-step verification, enter the one-time security code that is either sent to you by SMS or generated in your authenticator app (depending on the two-step verification method that you set up).
- If you are currently working with Kaspersky Next Management Console, select Manage workspaces from the drop-down list on the left.
The portal page displays a list of companies for which you are an administrator.
- If you have not signed in to your account on Kaspersky Business Hub:
- In the Marked for deletion section, in the information block for the workspace marked for deletion, click the Force deletion option.
The Delete workspace window opens.
- In the Delete workspace window, enter the ID of the workspace that you want to delete.
You are prompted to confirm the ID of the workspace to make sure that you are not mistakenly deleting the workspace. After a workspace is deleted, it cannot be restored.
The workspace ID is displayed in the workspace information section under its name.
If the security application was protected with a password on managed devices, it is recommended to disable the password. Otherwise, the password will still be active after the workspace is deleted, which may cause problems when uninstalling the security application from devices.
- In the Delete workspace window, click OK.
The workspace is deleted. All data about users, managed devices, or connected mailboxes, and their settings, is deleted.
After the workspace for Kaspersky Security for Microsoft Office 365 is deleted, protection for the corresponding Office 365 organization is no longer provided. Any data related to the Office 365 organization is automatically deleted from Kaspersky servers.
If more than one Kaspersky software solution was used at the company whose workspace was deleted, the icon corresponding to the deleted workspace becomes dimmed in the list of companies on your account page on Kaspersky Business Hub. The data about the company and its administrators continues to be stored on the portal.
If only one software solution was used at the company whose workspace was deleted, the data about this company is deleted together with the workspace of the software solution. The deleted company and workspace are no longer displayed in the list of companies in your account on Kaspersky Business Hub. Information about administrators of the company is also deleted.
After the license expires, a company workspace is deleted automatically according to the data removal rules.
Canceling deletion of a company workspace
You can cancel the deletion of a workspace that has been marked for deletion.
You cannot cancel the deletion of a workspace that already has been deleted.
To cancel the deletion of a company workspace:
- Do one of the following:
- If you have not signed in to your account on Kaspersky Business Hub:
- In your browser, go to Kaspersky Business Hub.
- Sign in to your account on Kaspersky Business Hub.
- If you set up two-step verification, enter the one-time security code that is either sent to you by SMS or generated in your authenticator app (depending on the two-step verification method that you set up).
- If you are currently working with Kaspersky Next Management Console, select Manage workspaces from the drop-down list on the left.
The portal page displays a list of companies for which you are an administrator.
- If you have not signed in to your account on Kaspersky Business Hub:
- In the Marked for deletion section, in the information block for the workspace marked for deletion, click the Cancel deletion link.
Workspace deletion is canceled. You can now go to the workspace and continue working with it.
Page top
Viewing news and sending feedback
You can view news on current releases of Kaspersky Next and Kaspersky Security for Microsoft Office 365, and send feedback on the Kaspersky Next operation. Your feedback can then be used to improve the software solution.
To send feedback:
- Do one of the following:
- If you have not signed in to your account on Kaspersky Business Hub:
- In your browser, go to Kaspersky Business Hub.
- Sign in to your account on Kaspersky Business Hub.
- If you set up two-step verification, enter the one-time security code that is either sent to you by SMS or generated in your authenticator app (depending on the two-step verification method that you set up).
- If you are currently working with Kaspersky Next Management Console, select Manage workspaces from the drop-down list on the left.
The portal page displays a list of companies for which you are an administrator.
- If you have not signed in to your account on Kaspersky Business Hub:
- Select the What's new tab.
The list of news on current releases is displayed.
- Click the Feedback button on the left of the list.
The feedback form is displayed.
- From the Feedback type drop-down list, select the type of your feedback.
By default, Complaint is selected. You can also select Suggestion or Compliment.
- In the input field, type your feedback.
- If you agree to receive a reply about your feedback, below the feedback text, enable the corresponding option. In this case, the Kaspersky Next development team will receive your feedback, as well as your email address. The development team can contact you via this email address for further details. Three months after your feedback, it will be anonymized. All the information concerning your email address will be deleted.
If you do not agree to receive a reply about your feedback, below the feedback text, do not enable the corresponding option. In this case, the Kaspersky Next development team will receive your feedback anonymously. You will not receive a reply on your feedback.
By default, the option is not enabled.
- Click the Send button.
If you click the Cancel button, the list of news is displayed.
When you send feedback, an error can occur. In this case, please try to send your feedback later. On the fourth attempt during 15 minutes to send the feedback, a CAPTCHA field is displayed below the feedback form.
Your feedback is sent and the list of news is displayed.
Additionally, you can leave feedback on the Kaspersky Next operation from inside Management Console.
Page top
Managing the list of licenses on Kaspersky Business Hub
This section describes how to view the list of licenses that are used by the companies registered under your account on Kaspersky Business Hub, how to purchase or renew a software license, and how to download a license report.
Viewing the list of licenses on Kaspersky Business Hub
You can view information about the licenses used by the companies that are added to Kaspersky Business Hub. Kaspersky Business Hub displays information such as the license type and status, number of workspaces, and devices or mailboxes connected under this license.
In particular, viewing the list of licenses can help a managed service provider (MSP) administrator to view all of the workspaces connected under their license.
To view information about licenses on Kaspersky Business Hub:
- Do one of the following:
- If you have not signed in to your account on Kaspersky Business Hub:
- In your browser, go to Kaspersky Business Hub.
- Sign in to your account on Kaspersky Business Hub.
- If you set up two-step verification, enter the one-time security code that is either sent to you by SMS or generated in your authenticator app (depending on the two-step verification method that you set up).
- If you are currently working with Kaspersky Next Management Console, select Manage workspaces from the drop-down list on the left.
The portal page displays a list of companies for which you are an administrator.
- If you have not signed in to your account on Kaspersky Business Hub:
- At the top left of the page, select the Licenses tab.
The portal page displays a list of licenses for all workspaces in which you are an administrator.
By default, brief license information is displayed.
- To view detailed license information, click the link with the license name or the arrow icon to the left of it.
By default, the list of licenses contains the following information:
- Software solution, icon.
- Information about the license.
- Number of workspaces connected under the license.
- For a Kaspersky Next license: number of users that use the software under the license in all workspaces; number of connected desktops, laptops, file servers; number of connected Android, iOS, and iPadOS mobile devices; and the maximum number of users or devices allowed under the license.
- For a Kaspersky Security for Microsoft Office 365 license: number of connected mailboxes for all workspaces and the maximum number of mailboxes allowed under the license.
In the detailed information display mode, the following information is also displayed:
- License ID.
- Date of the license term start.
- Date of license expiration.
- Name of company (or companies) using the license.
- IDs of workspaces using the license.
You can read the Kaspersky Security Network Statements, End User License Agreements, and User Agreements for software solutions and security applications before registering the company on Kaspersky Business Hub and purchasing a license to a software solution by following the link at the bottom of the page under the list of licenses.
Purchasing a software license
From Kaspersky Business Hub, you can purchase licenses for Kaspersky Next. Online purchase of licenses is not available in some countries.
You can purchase a license online if you are using a trial version of the software solution or if you previously bought a license for this software solution on the Kaspersky website. Otherwise, you can purchase a license by contacting a partner company of Kaspersky.
To purchase a software license:
- Do one of the following:
- If you have not signed in to your account on Kaspersky Business Hub:
- In your browser, go to Kaspersky Business Hub.
- Sign in to your account on Kaspersky Business Hub.
- If you set up two-step verification, enter the one-time security code that is either sent to you by SMS or generated in your authenticator app (depending on the two-step verification method that you set up).
- If you are currently working with Kaspersky Next Management Console, select Manage workspaces from the drop-down list on the left.
The portal page displays a list of companies for which you are an administrator.
- If you have not signed in to your account on Kaspersky Business Hub:
- In the upper-left area of the portal page, select the Licenses tab.
A list of licenses is displayed for all workspaces in which you are an administrator. It may take a while to download license information. In this case, a message is displayed asking you to wait.
- Click the Buy license button above the list of licenses.
The portal redirects you to the online store on a separate browser tab. The price of the license is displayed in the currency of the country you specified during company workspace creation on Kaspersky Business Hub. If you did not specify a country on the portal at the workspace creation stage, or selected the wrong country, please contact Kaspersky Technical Support.
The price of a license can vary. It depends on the country you specified during company workspace creation and on the licenses that you purchased earlier for your workspace. Price differences may also be due to temporary special offers.
- Follow the instructions in the online store.
After completing the purchase, you will receive an email message from the online store with an activation code and instructions.
Renewing the software license
From Kaspersky Business Hub, you can renew licenses for Kaspersky Next.
You can renew a license online if fewer than 30 days remain before the license expiration date and only if the license was purchased on the Kaspersky website. To renew other licenses, you must contact a partner company of Kaspersky.
If you renew the license before the current license expiration date, the term of the new license will be extended for the number of days remaining.
To renew the software license:
- Do one of the following:
- If you have not signed in to your account on Kaspersky Business Hub:
- In your browser, go to Kaspersky Business Hub.
- Sign in to your account on Kaspersky Business Hub.
- If you set up two-step verification, enter the one-time security code that is either sent to you by SMS or generated in your authenticator app (depending on the two-step verification method that you set up).
- If you are currently working with Kaspersky Next Management Console, select Manage workspaces from the drop-down list on the left.
The portal page displays a list of companies for which you are an administrator.
- If you have not signed in to your account on Kaspersky Business Hub:
- In the upper-left area of the portal page, select the Licenses tab.
A list of licenses is displayed for all workspaces in which you are an administrator. It may take a while to download license information. In this case, a message is displayed asking you to wait.
- In the list, select the license that you want to renew.
Detailed information about the license is shown.
- Click the Renew license button.
The portal redirects you to the online store on a separate browser tab. The price of the license is displayed in the currency of the country you specified during company workspace creation on Kaspersky Business Hub. If you did not specify a country on the portal at the workspace creation stage, or selected the wrong country, please contact Kaspersky Technical Support.
The price of a license can vary. It depends on the country you specified during company workspace creation and on the license that you are renewing. Price differences may also be due to temporary special offers.
- Follow the instructions in the online store.
After renewing the license, you will receive an email message with an activation code and instructions.
Increasing a license limit
Increasing a license limit in Kaspersky Next means purchasing a new license for the required number of protected users.
To increase a license limit:
- Do either of the following:
- If your current license is about to expire, renew the license. You will be able to select the required license limit.
- If your current license is far from expiration:
- Identify the organization from which you bought your license (Kaspersky or a partner company).
For detailed information about how to identify this organization, refer to the Kaspersky support page → Purchase and payment help.
- Contact the detected organization to ask about whether it is possible to be reimbursed for the unused period of the current license.
- Purchase a new license.
- Identify the organization from which you bought your license (Kaspersky or a partner company).
- Enter the activation code that matches the new license.
Kaspersky Next is activated under the new license. The license limit is increased.
Downloading a license report
From Kaspersky Business Hub, you can download a license report. This report contains information about all licenses that are used by the companies registered under your account. The report is downloaded as a CSV file.
To download a license report:
- Do one of the following:
- If you have not signed in to your account on Kaspersky Business Hub:
- In your browser, go to Kaspersky Business Hub.
- Sign in to your account on Kaspersky Business Hub.
- If you set up two-step verification, enter the one-time security code that is either sent to you by SMS or generated in your authenticator app (depending on the two-step verification method that you set up).
- If you are currently working with Kaspersky Next Management Console, select Manage workspaces from the drop-down list on the left.
The portal page displays a list of companies for which you are an administrator.
- If you have not signed in to your account on Kaspersky Business Hub:
- In the upper-left area of the portal page, select the Licenses tab.
A list of licenses is displayed for all workspaces in which you are an administrator. It may take a while to download license information. In this case, a message is displayed asking you to wait.
- Click the License report button above the list of licenses.
The report is created and downloaded to your device.
The report contains detailed information about each license, including license ID, license limit, and the number of protected users, computers (desktops, laptops, and file servers), mobile devices, and mailboxes.
Taking cybersecurity training
Kaspersky Business Hub provides you with in-app cybersecurity training. The training is split into several modules, each containing a number of sections.
First, each section of each training module gives you some relevant theory. Then, you move on to interactive assignments in a simulated Windows environment, to learn first-level incident response skills. After you complete all sections of a module, you can download a certificate of your accomplishment.
To gain access to all training modules, you need a commercial Kaspersky Next EDR Optimum or XDR Expert license in at least one of your workspaces. Otherwise, you can take a demo of the Malicious software training.
To take cybersecurity training:
- In your browser, go to Kaspersky Business Hub.
- Sign in to your account on Kaspersky Business Hub by specifying the user name and the password.
- If you set up two-step verification, enter the one-time security code that is either sent to you by SMS or generated in your authenticator app (depending on the two-step verification method that you set up).
- Click the Training tab.
- To start a training module, click the Start button for that module.
Training modules are independent of each other. You can take them in any order.
After you start a training module for the first time, the button name changes to Continue.
- Follow the training module.
- If necessary, pause the training module, and then continue later from the last section that you were studying.
You take the training module.
After you complete a training module, you can do the following:
- Click the Get certificate button to download a certificate of completion for the training module.
The name that you specify is used only for issuing a certificate. This information is stored locally and under no condition is sent to Kaspersky. You can delete this name at any time.
- Click the Repeat training button to start the training module again.
- Click the Leave feedback button to send us your feedback on the cybersecurity training.
Selecting the data centers used to store Kaspersky Next information
A company workspace for Kaspersky Next is created by using servers from a network of global data centers based on a cloud platform. The selection of data centers to host a company workspace depends on the country that you specified when you registered the company on Kaspersky Business Hub (see the table below). The distribution packages of security applications are hosted on the same servers as workspaces.
Matching the company location with a data center region
Country in which the company is located |
Data center region |
|---|---|
Argentina |
Brazil or Brazil South |
Bolivia |
Brazil or Brazil South |
Brazil |
Brazil or Brazil South |
Chile |
Brazil or Brazil South |
Colombia |
Brazil or Brazil South |
Ecuador |
Brazil or Brazil South |
Guyana |
Brazil or Brazil South |
Peru |
Brazil or Brazil South |
Paraguay |
Brazil or Brazil South |
Suriname |
Brazil or Brazil South |
Uruguay |
Brazil or Brazil South |
Venezuela |
Brazil or Brazil South |
Antigua and Barbuda |
Mexico or Brazil South |
Anguilla |
Mexico or Brazil South |
Aruba |
Mexico or Brazil South |
Barbados |
Mexico or Brazil South |
Saint Barthelemy |
Mexico or Brazil South |
Bonaire, Sint Eustatius, and Saba |
Mexico or Brazil South |
Belize |
Mexico or Brazil South |
Costa Rica |
Mexico or Brazil South |
Cuba |
Mexico or Brazil South |
Curacao |
Mexico or Brazil South |
Dominica |
Mexico or Brazil South |
Dominican Republic |
Mexico or Brazil South |
Grenada |
Mexico or Brazil South |
Guadeloupe |
Mexico or Brazil South |
Guatemala |
Mexico or Brazil South |
Honduras |
Mexico or Brazil South |
Haiti |
Mexico or Brazil South |
Jamaica |
Mexico or Brazil South |
Saint Kitts and Nevis |
Mexico or Brazil South |
Cayman Islands |
Mexico or Brazil South |
Saint Lucia |
Mexico or Brazil South |
Saint Martin |
Mexico or Brazil South |
Martinique |
Mexico or Brazil South |
Montserrat |
Mexico or Brazil South |
Nicaragua |
Mexico or Brazil South |
Panama |
Mexico or Brazil South |
Puerto Rico |
Not available |
Sint Maarten |
Mexico or Brazil South |
Trinidad and Tobago |
Mexico or Brazil South |
Saint Vincent and the Grenadines |
Mexico or Brazil South |
British Virgin Islands |
Mexico or Brazil South |
United States Virgin Islands |
Not available |
Japan |
Mexico or West Europe (Netherlands) |
Canada (New Brunswick) |
Mexico or Brazil South |
Canada (Newfoundland and Labrador) |
Mexico or Brazil South |
Canada (Nova Scotia) |
Mexico or Brazil South |
Canada (Ontario) |
Mexico or Brazil South |
Canada (Prince Edward Island) |
Mexico or Brazil South |
Canada (Quebec) |
Mexico or Brazil South |
United States of America |
Not available |
Albania |
Ireland or North Europe (Ireland) |
Bosnia and Herzegovina |
Ireland or North Europe (Ireland) |
Bulgaria |
Ireland or North Europe (Ireland) |
Belarus |
Ireland or North Europe (Ireland) |
Czech Republic |
Ireland or North Europe (Ireland) |
Denmark |
Ireland or North Europe (Ireland) |
Estonia |
Ireland or North Europe (Ireland) |
Finland |
Ireland or North Europe (Ireland) |
United Kingdom |
Ireland or North Europe (Ireland) |
Greenland |
Ireland or North Europe (Ireland) |
Greece |
Ireland or North Europe (Ireland) |
Croatia |
Ireland or North Europe (Ireland) |
Hungary |
Ireland or North Europe (Ireland) |
Ireland |
Ireland or North Europe (Ireland) |
Iceland |
Ireland or North Europe (Ireland) |
Kyrgyzstan |
Ireland or North Europe (Ireland) |
Kazakhstan |
Ireland or North Europe (Ireland) |
Lithuania |
Ireland or North Europe (Ireland) |
Latvia |
Ireland or North Europe (Ireland) |
Moldova |
Ireland or North Europe (Ireland) |
Montenegro |
Ireland or North Europe (Ireland) |
Macedonia |
Ireland or North Europe (Ireland) |
Mongolia |
Ireland or North Europe (Ireland) |
Norway |
Ireland or North Europe (Ireland) |
Poland |
Ireland or North Europe (Ireland) |
Romania |
Ireland or North Europe (Ireland) |
Serbia |
Ireland or North Europe (Ireland) |
Russian Federation |
Ireland or North Europe (Ireland) |
Sweden |
Ireland or North Europe (Ireland) |
Slovenia |
Ireland or North Europe (Ireland) |
Slovakia |
Ireland or North Europe (Ireland) |
Tajikistan |
Ireland or North Europe (Ireland) |
Turkmenistan |
Ireland or North Europe (Ireland) |
Uzbekistan |
Ireland or North Europe (Ireland) |
Canada (Alberta) |
Mexico or Brazil South |
Canada (British Columbia) |
Mexico or Brazil South |
Canada (Manitoba) |
Mexico or Brazil South |
Canada (Northwest Territories) |
Mexico or Brazil South |
Canada (Nunavut) |
Mexico or Brazil South |
Canada (Yukon) |
Mexico or Brazil South |
Canada (Saskatchewan) |
Mexico or Brazil South |
Mexico |
Mexico or Brazil South |
Other countries |
Ireland or West Europe (Netherlands) |
Resetting your password
If you forget your password for your Kaspersky Business Hub account, you can restore access to your account by resetting your password.
To reset the account password:
- In your browser, go to Kaspersky Business Hub.
- Click the Sign in button.
- In the Sign in to Kaspersky Business Hub window of the Kaspersky Account portal that appears, click the Forgot your password? link.
- Enter the email address that you specified when creating your account.
- Click Next.
- A message from Kaspersky is sent to the email address that you specified. The message contains a one-time security code.
Open the email message, and then copy the one-time security code that it contains.
- Return to Kaspersky Account, and then paste the code to the entry field.
- If you configured a secret question, answer this question.
If you set up two-step verification, enter the one-time security code that is either sent to you by SMS or generated in your authenticator app (depending on the two-step verification method that you set up).
- In the window that opens, type a new password.
- Click Save.
The new password for signing in to Kaspersky Business Hub is saved.
If you did not receive an email message, check the email address that you entered, your spam folder, and then try again. If you do not receive a message when you try again, the email address you specified is probably not registered on the website. Please contact Kaspersky Technical Support.
Page top
Editing the settings of an account in Kaspersky Business Hub
This section provides instructions on how to edit and delete an account in Kaspersky Business Hub.
Changing an email address
To change your email address in the settings of your account in Kaspersky Business Hub:
- In Kaspersky Next Management Console, click the link containing your account name, and then select Manage user account.
The My Profile window of the Kaspersky Account portal opens.
- Click the Change your email address link (see the figure below).
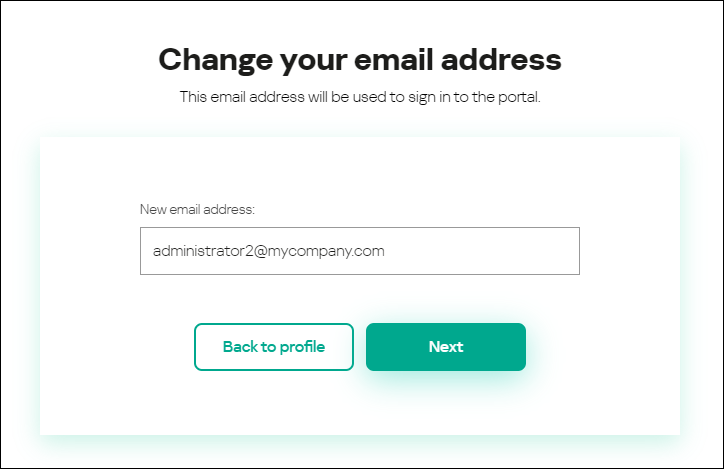
Changing the email address in the settings of an account in Kaspersky Business Hub
- In the New email address entry field, enter your new email.
Please enter the address carefully. If you enter an invalid address, you will not be able to proceed to your account and use Kaspersky Next Management Console.
- Click the Next button.
- In the Enter your current password window that opens, specify the password of your account in Kaspersky Business Hub, and then click the Next button.
- A message from Kaspersky is sent to the email address that you specified. The message contains a one-time security code.
Open the email message, and then copy the one-time security code that it contains.
- Return to Kaspersky Account, and then paste the code to the entry field.
- Go back to Management Console by clicking the Go back to Kaspersky Next link or exit the portal by clicking the Account → Sign out link.
Your email address is now changed in the Kaspersky Business Hub account settings and in the My Kaspersky account settings. A message is sent to your new email address to notify you that your email address for gaining access to the account has been changed. The next time you sign in to Kaspersky Business Hub, you will have to specify your new email address.
Page top
Changing a password
To change your password in the settings of your account in Kaspersky Business Hub:
- In Kaspersky Next Management Console, click the link containing your account name, and then select Manage user account.
The My Profile window of the Kaspersky Account portal opens.
- Click the Change password link (see the figure below).
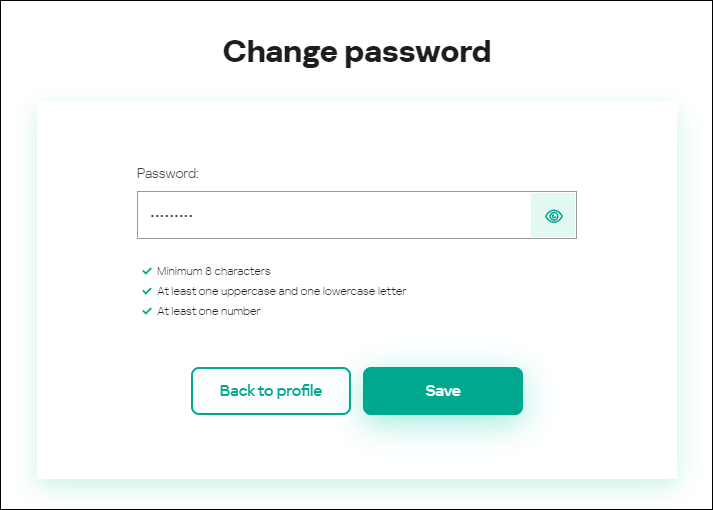
Changing the account password in Kaspersky Business Hub
- In the Password entry field, enter your new password.
Under the entry field, the requirements for the password are shown. You cannot save the new password until you comply with the requirements.
- Click the Save button.
- In the Enter your current password window that opens, specify the password of your account in Kaspersky Business Hub, and then click the Next button.
- Select or clear the Automatically request password change every 180 days check box.
By default, this check box is selected.
- Go back to Management Console by clicking the Go back to Kaspersky Next link or exit the portal by clicking the Account → Sign out link.
Your password is now changed. You will have to enter the new password when signing in to Kaspersky Business Hub and when signing in to My Kaspersky.
Page top
Using two-step verification
This section describes two-step verification, which can help you increase the security of your account in Kaspersky Business Hub.
About two-step verification
Two-step verification can help you increase the security of your account in Kaspersky Business Hub. When this feature is enabled, every time you sign in to Kaspersky Business Hub with your email address and password, you enter an additional one-time security code. With two-step verification, criminals cannot sign in to your account if they steal or guess your password, they must have access to your mobile phone as well. Also, when two-step verification is enabled, you must enter an additional one-time security code if you forget your password.
After you set up two-step verification, you are responsible for keeping your mobile phone physically secure and for maintaining access to your phone number.
You can get a one-time security code in either of the following ways:
- A security code is sent by SMS to your mobile phone number.
In this case, if you lose access to your mobile phone, you are not able to sign in to your account in Kaspersky Business Hub until you restore access to your phone number.
- A security code is generated in an authenticator app that is installed on your mobile phone.
We strongly recommend that you set up two-step verification by using an authenticator app. In this case, you can sign in to your account even if your mobile phone is not connected to the internet or a mobile network.
We have tested only Google Authenticator and Microsoft Authenticator for compatibility with Kaspersky Business Hub, and these applications were free to use at that time. The interfaces of these applications may be unavailable in your preferred language. Please also check the GDPR compliance and privacy policies of the applications before using them. Kaspersky is in no way sponsored, endorsed by, or otherwise affiliated with any of the owners of these applications.
Microsoft Authenticator can be installed on mobile devices only.
We also recommend that you install an authenticator app on a device other than your mobile phone. This will allow you to sign in to your account if your mobile phone is ever lost or stolen.
In this case, if you lose access to your mobile phone and you do not have an authenticator app on another device, you are not able to sign in to your account in Kaspersky Business Hub until you restore access to your phone number. After that, use the security code that is sent by SMS.
If you previously configured a secret question to restore your password if it is lost, the security question feature will be permanently disabled after you set up two-step verification.
Page top
Scenario: Setting up two-step verification
Two-step verification can help you increase the security of your account in Kaspersky Business Hub. After you complete the scenario in this section, two-step verification of your account will be set up.
The scenario proceeds in stages:
- Adding your phone number
At this stage, you set up two-step verification by SMS.
- Installing and configuring an authenticator app
Install and configure an authenticator app.
We strongly recommend that you set up two-step verification by using an authenticator app. In this case, you can sign in to your account even if your mobile phone is not connected to the internet or a mobile network.
We also recommend that you install an authenticator app on a device other than your mobile phone. This will allow you to sign in to your account if your mobile phone is ever lost or stolen.
- Changing your phone number
If necessary, you can change the phone number that you use for two-step verification.
Setting up two-step verification by SMS
To set up two-step verification by SMS:
- In Kaspersky Next Management Console, click the link containing your account name, and then select Manage user account.
The My Profile window of the Kaspersky Account portal opens.
- If two-step verification is disabled, enable the Two-step verification is disabled toggle switch.
- In the No phone number provided window that appears, click the Confirm button.
- Under Enter your phone number, specify the mobile phone number that you want to use in two-step verification, and then click the Provide phone number button.
You can use the same phone number for up to five accounts.
A 6-digit security code is sent to the specified phone number.
- Under Enter the verification code that was sent to <phone number>, enter the received security code.
- In the Enter your current password window that opens, specify the password of your account in Kaspersky Business Hub, and then click the Next button.
Two-step verification is set up. Now, every time you sign in with your email address and password, or if you forget your password, you will need to enter a one-time security code that you get by SMS to the specified phone number.
You can now install and configure an authenticator app, change your phone number, or disable two-step verification.
Page top
Setting up two-step verification by using an authenticator app
Authenticator apps cannot be used in Kaspersky Business Hub as a standalone verification method. You must first set up two-step verification by SMS. If you disable two-step verification via your mobile phone number, verification via an authenticator app is turned off automatically. After you have set up both verification via SMS and via an app, you will be able to select a verification method on the sign-in page or if you forget your password.
To set up two-step verification by an authenticator app:
- Set up two-step verification by SMS.
- Download, install, and run the authenticator app that you want to use.
We have tested only Google Authenticator and Microsoft Authenticator for compatibility with Kaspersky Business Hub, and these applications were free to use at that time. The interfaces of these applications may be unavailable in your preferred language. Please also check the GDPR compliance and privacy policies of the applications before using them. Kaspersky is in no way sponsored, endorsed by, or otherwise affiliated with any of the owners of these applications.
Microsoft Authenticator can be installed on mobile devices only.
If you want, you can use other apps at your own risk. The app that you use must support 6-digit security codes.
We also recommend that you install an authenticator app on a device other than your mobile phone. This will allow you to sign in to your account if your mobile phone is ever lost or stolen.
- In Kaspersky Next Management Console, click the link containing your account name, and then select Manage user account.
The My Profile window of the Kaspersky Account portal opens.
- If two-step verification is disabled, enable the Two-step verification is disabled toggle switch.
- Enable the Authenticator app is disabled toggle switch.
The portal page displays a QR code.
If you want to set up the authenticator app on a device that cannot scan QR codes, click the I can't scan it link. A 16-character secret key is displayed.
- In the authenticator app on each device, scan the QR code to create an account. Please refer to your app's documentation for more information.
If you want to set up the authenticator app on a device that cannot scan QR codes, create an account in the authenticator app, and then enter the displayed secret key.
A 6-digit security code is generated in your authenticator apps.
- Verify that the security codes generated in your apps are the same on each device.
- Return to the Kaspersky Account portal, and then click the Next button.
- Enter the generated security code.
- In the Enter your current password window that opens, specify the password of your account in Kaspersky Business Hub, and then click the Next button.
Two-step verification by an authenticator app is set up. Now, every time you sign in with your email address and password, or if you forget your password, you will need to enter a one-time security code that is generated in your authenticator app.
You can now disable the use of an authenticator app or completely disable two-step verification.
Page top
Changing your mobile phone number
To change the mobile phone number that is used in two-step verification by SMS:
- In Kaspersky Next Management Console, click the link containing your account name, and then select Manage user account.
The My Profile window of the Kaspersky Account portal opens.
- If two-step verification is disabled, enable the Two-step verification is disabled toggle switch.
- Under Phone number, click the Change phone number link.
- Under Enter your phone number, specify the new mobile phone number that you want to use in two-step verification, and then click the Provide phone number button.
A 6-digit security code is sent to the specified phone number.
- Under Enter the verification code that was sent to <phone number>, enter the received security code.
Your mobile phone number is changed. Now, one-time security codes will be sent to the new phone number.
Page top
Disabling two-step verification
If you no longer want to use two-step verification, you can disable it, as described in this section.
Disabling two-step verification will decrease the security of your account. We strongly recommend that you continue using two-step verification.
If you set up two-step verification by SMS, you can disable two-step verification. If you set up two-step verification by an authenticator app, you can disable the use of the app or completely disable two-step verification.
To disable the use of an authenticator app:
- In Kaspersky Next Management Console, click the link containing your account name, and then select Manage user account.
The My Profile window of the Kaspersky Account portal opens.
- Disable the Authenticator app is enabled toggle switch.
- In the confirmation window that opens, click the Confirm button.
- In the Enter your current password window that opens, specify the password of your account in Kaspersky Business Hub, and then click the Next button.
The use of an authenticator app is disabled. The settings of two-step verification by an authenticator app are deleted. You can now delete accounts in your authenticator apps.
Later, you can set up two-step verification by an authenticator app again.
To completely disable two-step verification:
- In Kaspersky Next Management Console, click the link containing your account name, and then select Manage user account.
The My Profile window of the Kaspersky Account portal opens.
- Disable the Two-step verification is enabled toggle switch.
- In the confirmation window that opens, click the Confirm button.
- In the Enter your current password window that opens, specify the password of your account in Kaspersky Business Hub, and then click the Next button.
Two-step verification is disabled. If you used two-step verification by an authenticator app, the settings of two-step verification are deleted. You can now delete accounts in your authenticator apps.
Later, you can set up two-step verification again.
Page top
Deleting an account in Kaspersky Business Hub
If you want to stop using Kaspersky Next and Kaspersky Security for Microsoft Office 365, you can delete your account from Kaspersky Business Hub.
When deleting an account, all data associated with that account is lost.
After you delete your account, you can no longer gain access to your workspaces in Kaspersky Next, Kaspersky Security for Microsoft Office 365, and Expert View. If you were the only administrator in a workspace, the workspace will be duly deleted. Additionally, you lose access to your My Kaspersky account.
To delete an account in Kaspersky Business Hub:
- In Kaspersky Next Management Console, click the link containing your account name, and then select Manage user account.
The My Profile window of the Kaspersky Account portal opens.
- Click the Account → Delete link.
- In the Delete your account window that opens, read the information about the consequences of account deletion, and then click the Delete button to confirm the account deletion.
- In the Enter your current password window that opens, specify the password of your account in Kaspersky Business Hub, and then click the Next button.
Your account is deleted.
Quick Start Guide for Managed Service Providers (MSPs)
This Quick Start Guide is intended for administrators of Managed Service Providers (MSPs).
Read this Guide to get started with Kaspersky Next. The Guide contains tips for managing the accounts of your customers and installing security applications on their devices.
Introduction
Kaspersky Next is a software solution developed specifically for small and medium-sized businesses. It lets you manage security for multiple endpoints, mobile devices, and file servers remotely by using a cloud-based console.
Key features
Kaspersky Next comes in three editions: Kaspersky Next EDR Foundations, Kaspersky Next EDR Optimum, and Kaspersky Next XDR Expert. The table below compares the features available in these editions.
Feature |
Kaspersky Next EDR Foundations |
Kaspersky Next EDR Optimum |
Kaspersky Next XDR Expert |
|---|---|---|---|
Default preconfigured security profile This is the security profile with the default protection settings that are recommended by Kaspersky experts. |
|
|
|
One security profile for all devices Every security profile contains security settings for devices running Microsoft Windows, Apple macOS, Google Android, Apple iOS and iPadOS. |
|
|
|
Simple deployment of security applications Install and update Kaspersky applications in a centralized way on customer computers and mobile devices that have been connected to Kaspersky Next. |
|
|
|
Security feature set |
|||
File Threat Protection |
|
|
|
Mail Threat Protection |
|
|
|
Web Threat Protection |
|
|
|
Network Threat Protection |
|
|
|
Firewall |
|
|
|
Behavior Detection, Exploit Prevention, and Remediation Engine |
|
|
|
Wiping data from a Windows device |
|
|
|
Scan removable drives on connection |
|
|
|
BadUSB Attack Prevention |
|
|
|
Advanced Disinfection |
|
|
|
Vulnerability Assessment |
|
|
|
Root-Cause Analysis |
|
(Within Endpoint Detection and Response) |
(Within Endpoint Detection and Response) |
Endpoint Detection and Response |
|
|
|
Data Discovery |
|
|
|
Cloud Discovery: Monitoring cloud services |
|
|
|
Manageability feature set |
|||
Cloud Discovery: Blocking access to cloud services |
|
|
|
Patch Management |
|
|
|
Encryption Management |
|
|
|
Host Intrusion Prevention |
|
|
|
Device Control |
|
|
|
Web Control |
|
|
|
Adaptive Anomaly Control |
|
|
|
Application Control |
|
|
|
Other features |
|||
Microsoft Office 365 protection |
|
|
|
Cybersecurity training |
|
|
|
Licensing
When you start using Kaspersky Next, you are granted a 30-day trial license that is embedded in your workspace. To continue using Kaspersky Next after the trial license expires, you must purchase a commercial license or a subscription. You can choose the number and properties of licenses for your customers.
Page top
Recommendations on managing your customers' devices
This section contains recommendations for organizing customer devices that you want to protect, and for selecting the number and properties of the licenses that you must purchase.
Recommendations depend on the number of devices owned by your customers:
- If you have several large customers with 25 and more devices each, we recommend that you create a separate workspace and purchase a separate license for each customer.
- If you have customers with various quantities of devices, we recommend the following:
- For each customer with ten or more devices, create a separate workspace and purchase a separate license.
- All customers that own less than ten devices can be managed within one workspace and under one license.
Kaspersky Next allows you to view the license usage in each of your workspaces.
Page top
Getting started with Kaspersky Next
After you complete the scenario in this section, your customers' devices will be protected.
Getting started scenario
The scenario proceeds in stages:
- Create an account
To start using Kaspersky Next, you need an account on Kaspersky Business Hub.
To create an account:
- Open your browser and enter the following URL: https://cloud.kaspersky.com.
- Click the Create an account button.
- Follow the onscreen instructions.
- Create a workspace
After you create the account, you can create your first workspace. We recommend that you first create one test workspace, connect your own devices to it, and then test any modifications to the settings, noting the results.
Please see the recommendations on creating workspaces for your customers.
To create a company workspace:
- Open your browser and enter the following URL: https://cloud.kaspersky.com.
- Click the Sign in button.
- Follow the onscreen instructions.
- Perform initial setup of Kaspersky Next
After you create a company workspace, you must perform initial setup of Kaspersky Next. The initial setup begins automatically when you start Kaspersky Next Management Console for the first time. The Welcome to Kaspersky Next window is displayed. Follow the onscreen instructions.
When initial setup is complete, Kaspersky Next Management Console is ready to use.
- Deploy security applications on customers' devices
You use two basic methods to deploy Kaspersky applications on devices that you want to protect:
- Use your customer's Active Directory infrastructure to deploy security applications on multiple devices running Windows.
- Use Kaspersky Next to install security applications on the devices.
- Manage protection
After the security application is installed on a device, the device is assigned the Default security profile. This is the security profile with the default settings that are recommended by Kaspersky experts.
In the Security management → Security profiles section, you can create different security profiles. Every new security profile holds the default settings until you modify them. You can also copy existing security profiles.
Each security profile has a tab for each platform: Windows, macOS, Android, and iOS with iPadOS. Note that iOS and iPadOS are configured together.
When you assign a security profile to a user, the security profile is applied to all devices owned by the user. Only the Default security profile can be applied to devices without owners.
- Specify licenses
After you have created a workspace, you are granted a 30-day trial license that is embedded in your workspace. To continue using Kaspersky Next after the trial license expires, you must purchase a commercial license or a subscription. Click Information panel → License, and then enter the activation code.
The activation code will be distributed automatically to the security applications, which may take 15 minutes, as the applications attempt to sync with the workspace every 15 minutes.
Deploying security applications by using Active Directory
If Active Directory is used in your customer's infrastructure, you can deploy Kaspersky Endpoint Security for Windows on multiple devices simultaneously.
The procedure in this section contains a pre-configured logon script. This script runs automatically every time a device starts up and checks whether Kaspersky Endpoint Security for Windows installation has been started on the device. If it has not been started, the script runs the installation in silent mode.
To deploy security applications on multiple Windows devices by using Active Directory:
- Download the distribution package of the required security application.
- Save the package to a shared folder that is accessible to the devices on which you want to deploy security applications.
We recommend that you select a folder for which the full path does not contain space characters.
If the package name contains spaces, remove them or change them to the underscore (_) character.
- Go to the folder with the downloaded package and create a .bat file with the following script:
set SHARE_PATH=<path to distribution package>set PACKAGE_NAME=<name of distribution package>set __KESCLOUD_ROOT_KEY="HKLM\Software\KasperskyLab\KESCloud"set __KESCLOUD_KEY_NAME="<name of registry entry>"set __KESCLOUD_PACKAGE_FULL_PATH="%SHARE_PATH%\%PACKAGE_NAME%"set __KESCLOUD_PACKAGE_ARGUMENTS=-sREG QUERY %__KESCLOUD_ROOT_KEY% /v %__KESCLOUD_KEY_NAME% | FIND "0x1"IF %ERRORLEVEL% == 1 GOTO INSTALLGOTO END:INSTALLREG ADD %__KESCLOUD_ROOT_KEY% /v %__KESCLOUD_KEY_NAME% /t REG_DWORD /f /D 1%__KESCLOUD_PACKAGE_FULL_PATH% %__KESCLOUD_PACKAGE_ARGUMENTS%:ENDHere:
<path to distribution package>stands for the actual path to the shared folder with the downloaded distribution package. We recommend that you avoid using quotation marks.<name of distribution package>stands for the actual name of the downloaded distribution package. We recommend that you avoid using quotation marks."<name of registry entry>"stands for the name of the registry entry that is used to confirm that the installation has been started. You can specify any name that contains numeric and Latin characters. We recommend that you use the Kaspersky Endpoint Security for Windows version number in quotation marks.
- Go to Control Panel → Administrative Tools, and then open Group Policy Management.
- Expand the node with the required domain, and then click Group Policy Objects.
Group Policy Objects node in Group Policy Management window
- In the right pane, right-click the empty space, and then select New.
New context menu item in Group Policy Management window
- Name the new object as you like. Click OK to save the object.
- Right-click the created object, and then select Edit.
- Specify that you want Kaspersky Endpoint Security for Windows installed on the devices at the operating system startup. To do so:
- Expand the Computer Configuration → Policies → Windows Settings node, and then select Scripts (Startup/Shutdown).
- In the right pane, right-click Startup, and then select Properties.
Properties context menu item in Group Policy Management window
- In the Startup Properties window that opens, click Add.
- In the Add a Script window that opens, click Browse, and then select the file of the script that you have created. No script parameters are required.
- Click OK to close the Add a Script window.
- Click OK to close the Startup Properties window.
- Associate the created object with the devices to which Kaspersky Endpoint Security for Windows must be installed. The simplest method is to associate the object with the entire domain. To do so:
- Right-click the required domain, and then select Link an Existing GPO.
Link an Existing GPO context menu item in Group Policy Management window
- In the Select GPO window that opens, select the created object.
- Click OK to close the Select GPO window.
In a similar way, you can associate the created group policy object with an organizational unit or a site.
- Right-click the required domain, and then select Link an Existing GPO.
- Depending on the selected moment when you want Kaspersky Endpoint Security for Windows installed on the devices, do one of the following:
- If you selected to install Kaspersky Endpoint Security for Windows at the operating system startup, tell the users to restart their devices.
- If you selected to install Kaspersky Endpoint Security for Windows at the user logon, tell the users either to re-log on to their devices or to restart their devices.
After the security application is installed, the added Windows devices appear in the Devices list. The security profile named Default is applied to these devices.
Deploying security applications by using Kaspersky Next
This section describes how you can manually deploy security applications on the devices of your customers.
You have two options:
- Add user accounts to Kaspersky Next. Users install security applications on their devices.
We recommend that you use this option to tie all the devices of a small customer (less than 10 devices) to a single contact person. This way, you are able to quickly define the protection settings of the customer's devices.
- Download the distribution packages of the security applications. Either you or your customers install the security applications on their devices.
We recommend that you use this option to organize the devices of larger customers (10 or more devices). This option allows you to differentiate the protection settings of various customer devices.
Adding user accounts
This method works as follows:
- In the Users section, add the user accounts of the contact persons for your customers, and then send them an email message with an automatically generated link to download a security application.
- The user (contact person) receives the message, clicks the link in the message, and then installs the security applications on the devices of the customer. When the user clicks the link, Kaspersky Next recognizes the device operating system, thus ensuring that the proper software is downloaded.
By using a received email message, the user can connect any number of devices running Windows or macOS, but only a single mobile device running Android, iOS, or iPadOS. If the user needs to connect multiple mobile devices, send the user multiple messages based on the number of devices.
- After the security applications are installed on all of the required devices, do the following:
- Go to the Users section and assign the user as the owner of these devices.
This will allow you to configure protection of each customer's devices individually.
- Go to the Distribution packages section and reconfigure the distribution packages of the security applications.
As a result, the old download links become invalid, which prevents the installation of security applications on additional devices.
- Go to the Users section and assign the user as the owner of these devices.
- If you manage more than 20 customers within one workspace and you want to use identical protection settings for the devices of those customers, create a group and move the required users to that group.
Downloading distribution packages
This method works as follows:
- In the Distribution packages section, download the distribution packages of the security applications.
- If necessary, send these distribution packages to your customers.
- Either you or the customers install the received distribution packages on their devices.
- In the Users section, you add the user accounts of your customer's employees and you do not send them an email message containing instructions.
- If necessary, grant administrator rights to the required users. For example, this may be necessary if customers want to have access to their workspaces.
- Assign the users as the owners of the devices.
- If necessary, create groups and move the required users to those groups. For example, you may need groups in the following cases:
- You want to use different protection settings for the devices of employees who work in different departments.
- You want to use identical protection settings for the devices of more than 20 employees within one workspace.
Viewing the list of customers and the list of licenses
The software lists the companies that you registered for your customers in Kaspersky Next and the licenses used by those customers.
To view information about your customers and licenses:
- Open your browser and go to https://cloud.kaspersky.com.
- Click the Sign in button.
- Enter the email address and password that you specified when creating the account, and then click the Sign in button.
List of companies
The information displayed on the Companies tab includes the date on which the company was added to Kaspersky Next, the number of connected devices in the company, and license information.
To view detailed company information, click the link with the company name or the arrow icon to the left of it.
If a license limit is exceeded, the license information is highlighted in red.
List of licenses
The information displayed on the Licenses tab includes the license type and status, the list of companies that use each license, and the total number of devices connected under this license.
To view detailed license information, click the link with the license name or the arrow icon to the left of it.
If a license limit is exceeded, the license information is highlighted in red.
Page top
Kaspersky Next licensing
This section provides information about general concepts related to Kaspersky Next licensing.
About per-user licensing
Kaspersky Next uses per-user licensing. For each user, Kaspersky Next can protect one desktop, laptop, or file server, and up to two Android, iOS, or iPadOS mobile devices.
A user considered as a licensing unit is not the same as a user added to the Management Console. An actual user can own more than the above-mentioned number of devices; or, there can be devices without assigned owners. In either case, these devices will be protected.
The number of users that use Kaspersky Next under a license is calculated by the number of protected devices. The number of users is the total number of protected desktops, laptops, and file servers, or half of the total number of Android, iOS, or iPadOS mobile devices—whichever is larger.
Examples:
- If you protect 10 desktops, laptops, or file servers, and 12 Android, iOS, or iPadOS mobile devices, the number of users that use the software under the license is 10 (which is the number of desktops, laptops, and file servers).
- If you protect 10 desktops, laptops, or file servers, and 32 Android, iOS, or iPadOS mobile devices, the number of users that use the software under the license is 16 (which is half of the number of mobile devices).
You can view the number of users that use the software under your licenses in Kaspersky Next Management Console or on Kaspersky Business Hub.
Page top
About the End User License Agreement
The End User License Agreement (License Agreement) is a binding agreement between you and AO Kaspersky Lab, stipulating the terms on which you may use Kaspersky Next.
Read through the terms of the License Agreement carefully before you start using Kaspersky Next.
You accept the terms of the License Agreement by confirming that you agree with the License Agreement text when connecting to Kaspersky Next. If you do not accept the terms of the License Agreement, you must renounce the use of Kaspersky Next.
Page top
About the license
A license is a time-limited right to use Kaspersky Next, granted under the terms of the signed License Contract (End User License Agreement).
The scope of services and validity period depend on the license under which the application is used.
The following license types are provided:
- Trial license
A free license intended for trying out the application. A trial license usually has a short term.
You can use the application under a trial license for only one trial period.
- Commercial license
A paid license.
You can purchase a commercial license on the Kaspersky website or from a partner company of Kaspersky. When a commercial license expires, you must purchase another license.
- Subscription
A paid license.
You can purchase a subscription only from a partner company of Kaspersky.
A subscription can be automatically renewed. In this case, you get continuous protection of your devices. You can also opt out of a subscription. If a partner company of Kaspersky provides this option, you can suspend and resume a subscription.
A subscription can have a grace period. This is a period of time after a subscription expires during which Kaspersky Next continues to be available and fully functional. The presence and duration of a grace period is determined by the partner company of Kaspersky.
As soon as a license expires, all Kaspersky Next features are disabled. To continue using Kaspersky Next, you must purchase a commercial license or a subscription.
We recommend renewing your license before it expires, to ensure uninterrupted protection against all security threats.
Page top
About the license certificate
The license certificate is a document that you receive together with the activation code.
A license certificate contains the following information about the license provided:
- License ID
- Information about the user who has been granted the license
- Information about the application that can be activated under the license provided
- Limit on the number of licensing units (e.g., devices on which the application can be used under the license provided)
- License validity start date
- License expiration date or license term
- License type
About the activation code
An activation code is a unique sequence of 20 letters and numbers. You have to enter an activation code in order to add a license key for activating Kaspersky Next. You receive the activation code at the email address that you provided when you bought Kaspersky Next or requested the trial version of Kaspersky Next.
To activate the application by using the activation code, you need internet access in order to connect to Kaspersky activation servers.
If you have lost your activation code after installing the application, contact the Kaspersky partner from whom you purchased the license.
Page top
About data provision
Kaspersky Next is designed for administration of security applications that have been connected to the software solution, in accordance with the list of supported applications and in the framework of the functionality described in Help.
To use Kaspersky Next, you must create an account on the website of the Right Owner (Kaspersky) at cloud.kaspersky.com and connect the security software installed on the devices owned by your users. By using the software solution, you agree that said software solution may receive data from devices that have security applications installed. The software solution also may store, process, and display information that is intended for ensuring the software solution's functionality.
By creating an account and connecting administered security software to the software solution, you confirm that you are the sole owner of any data you provide or that you are entitled to provide any data.
- For the purpose of device identification and management, Kaspersky Next may receive, store, and process the types of data that are listed in the relevant agreements and data processing agreements that you read and accept when creating and using the Kaspersky Next workspace.
- For the purpose of improving the software solution, the following data may be used:
- Data about a workspace: Workspace ID, creation date, country, province (only for Canada); number of devices in the company that was specified during registration; identifier and region of Virtual Administration Server
- Number of devices with the security software installed that are connected to the workspace, distribution of the connected devices by type
- Number of users in the workspace, number of user groups in the workspace, number of users with administrator rights
- Date of the last authentication of the administrator in the workspace
- Information about the utilized license: License type (commercial, subscription, trial), license restriction on the number of devices, number of connected devices, expiration date of the previously used license, date of the license term start, order number for the license in the order management system; name of the partner company that sold the license; software to which the license applies
- Names and versions of security applications connected to the workspace
- Whether an administrator signed in to the workspace but did not perform any management or configuration actions during the connection session
Data and backup copies are removed from the software solution infrastructure based on the following rules:
- If the software solution has been used under a trial license, the workspace data is automatically deleted one month after the trial license expires.
- If the software solution has been used under a commercial license or a subscription, the workspace data is automatically deleted three months after the license or subscription expires.
- Backup copies of data are stored no longer than three months after they are created.
- Kaspersky can delete workspace data following a request from a company. In this case, data is deleted following a request sent to Kaspersky Technical Support. All information in backup copies is automatically deleted when those backup copies are deleted.
- The user can manually delete the associated account with all its related information on Kaspersky Business Hub, or by using the My Kaspersky service.
About data provision when using Kaspersky Security Network
When you enable the use of Kaspersky Security Network in Kaspersky Endpoint Security for Windows or Kaspersky Endpoint Security for Mac, Kaspersky Next starts sending certain data to Kaspersky. The set of data depends on the type of license that you use to activate Kaspersky Next and on the security application version.
Kaspersky Endpoint Security for Windows (11.5 and later)
Kaspersky Endpoint Security for Mac (11.1 and later)
The set of data that is sent to Kaspersky depends on the number of devices that your license allows you to protect. The specific differences are described in the Kaspersky Security Network Statement that you accept when enabling the use of Kaspersky Security Network.
Kaspersky Endpoint Security for Windows (between 11.0 and 11.4, inclusive)
The set of data that is sent to Kaspersky depends on the number of devices that your license allows you to protect. The specific differences are described in the Help of your security application version. For example, if you use Kaspersky Endpoint Security 11.4 for Windows, please refer to this Help article.
The description in the Online Help mentions the Extended KSN mode check box. If your license allows you to protect not more than four devices, it means that the extended KSN mode is disabled in the security application. If your license allows you to protect five devices and more, it means that the extended KSN mode is enabled in the security application.
Kaspersky Endpoint Security for Windows (10.x)
Kaspersky Endpoint Security for Mac (between 10.1 and 11.0, inclusive)
If your license allows you to protect not more than four devices, you cannot enable the use of Kaspersky Security Network. In this case, no data related to the use of Kaspersky Security Network is sent to Kaspersky.
Otherwise, you can enable the use of Kaspersky Security Network. In this case, the data related to the use of Kaspersky Security Network is sent to Kaspersky. The set of data is described in the Kaspersky Security Network Statement that you accept when enabling the use of Kaspersky Security Network.
Page top
Contact Technical Support
This section describes how to get technical support and the terms on which it is available.
How to get technical support
If you cannot find a solution to your issue in the Kaspersky Next documentation or in any of the sources of information about Kaspersky Next, contact Kaspersky Technical Support. Technical Support specialists will answer all your questions about configuring and using Kaspersky Next.
Before contacting Technical Support, please read the support rules.
You can contact Technical Support in one of the following ways:
- By visiting the Technical Support website
- By sending a request to Technical Support from the Kaspersky CompanyAccount portal
When you register an account at the Kaspersky CompanyAccount portal, you need the following information:
- Your activation code (listed under Support in the lower-left corner of your Kaspersky Next workspace).
When you contact Kaspersky Technical Support, always include the following information:
- Your Kaspersky Next user email.
- The Kaspersky Next server address (starting with https://s0XX.cloud.kaspersky.com:8080) of the workspace that you experience problems in.
- Whether the issue is related to one or several of your workspaces.
- The workspace ID (listed under Support in the lower-left corner of your Kaspersky Next workspace).
- The license ID (also listed under Support in the lower-left corner of your Kaspersky Next workspace).
- The name of the browser that you use, plus full version information.
- How many devices are affected.
- Versions of Kaspersky applications installed on your users' devices (you can open and download the Kaspersky applications versions report under Support in the lower-left corner of your Kaspersky Next workspace).
Technical support via Kaspersky CompanyAccount
Kaspersky CompanyAccount is a portal for companies that use Kaspersky applications. The Kaspersky CompanyAccount portal is designed to facilitate interaction between users and Kaspersky specialists through online requests. You can use Kaspersky CompanyAccount to track the status of your online requests and store a history of them as well.
You can register all of your organization's employees under a single account on Kaspersky CompanyAccount. A single account lets you centrally manage electronic requests from registered employees to Kaspersky and also manage the privileges of these employees via Kaspersky CompanyAccount.
The Kaspersky CompanyAccount portal is available in the following languages:
- English
- Spanish
- Italian
- German
- Polish
- Portuguese
- Russian
- French
- Japanese
To learn more about Kaspersky CompanyAccount, visit the Technical Support website.
Page top
Sources of information about the application
Kaspersky Next page on the Kaspersky website
On the Kaspersky Next page on the Kaspersky website, you can view general information about the application, its functions, and features.
Kaspersky Next page in the Knowledge Base
The Knowledge Base is a section on the Kaspersky Technical Support website.
On the Kaspersky Next page in the Knowledge Base, you can read articles that provide useful information, recommendations, and answers to frequently asked questions on how to buy, install, and use the application.
Articles in the Knowledge Base may provide answers to questions that relate both to Kaspersky Next as well as to other Kaspersky applications. Articles in the Knowledge Base may also contain Technical Support news.
Discuss Kaspersky applications on our Forum
If your question does not require an immediate answer, you can discuss it with Kaspersky experts and other users on our Forum.
On the Forum, you can view discussion topics, post your comments, and create new discussion topics.
An internet connection is required to access website resources.
If you can't find a solution to your problem, contact Technical Support.
Page topGlossary
Account on Kaspersky Business Hub
An account that you must have to configure Kaspersky Next by, for example, adding and removing user accounts, and configuring security profiles (security policies). This account lets you use the My Kaspersky service. You create this account when you start using Kaspersky Next.
Administration Server
Server by Kaspersky that is designed to manage security applications on devices connected to Kaspersky Next and to store the individual settings of Kaspersky Next for the companies that use these applications.
Anti-malware databases
Databases that contain information about computer security threats known to Kaspersky as of when the anti-malware databases are released. Entries in anti-malware databases allow malicious code to be detected in scanned objects. Anti-malware databases are created by Kaspersky experts and updated hourly.
Apple Push Notification service (APNs) certificate
Certificate signed by Apple, which allows you to use Apple Push Notification. Through Apple Push Notification, an iOS MDM Server can manage iOS and iPadOS devices.
Background scan
The background scan mode of Kaspersky Endpoint Security for Windows does not display notifications for the user. This scan requires less computer resources than other types of scans (such as a full scan). In this mode, Kaspersky Endpoint Security for Windows scans startup objects, the boot sector, system memory, and the system partition.
Certificate Signing Request
File with the settings of an Administration Server, which is approved by Kaspersky and then sent to Apple to obtain an APNs certificate.
Compliance control
Verification that the settings of a mobile device and Kaspersky Endpoint Security for Android comply with corporate security requirements. Corporate security requirements regulate the device usage. For example, real-time protection must be enabled on the device, the anti-malware databases must be up-to-date, and the device password must be strong enough. Compliance control is based on a list of rules. A compliance rule includes the following components:
- Device check criterion (for example, absence of prohibited apps on the device)
- Time interval allocated for the user to fix the noncompliance (for example, 24 hours)
- Action that will be taken on the device if the user does not fix the noncompliance within the time set (for example, locking the device)
Device owner
Device user whose account has been added to the list of users of Kaspersky Next. The owner of a mobile device (Android, iOS, or iPadOS) is determined automatically by the software. The owner of a Windows device or Mac device is manually assigned by the Kaspersky Next administrator for the purpose of simplifying device security management.
File Threat Protection
Security application component that resides in the device RAM and scans all files that are opened, saved, or executed. By default, this component is configured with the settings that are recommended by Kaspersky experts.
Host Intrusion Prevention (Application Privilege Control)
Security application component that prevents applications from performing actions that may be harmful to the operating system, and controls access to operating system resources and to personal data.
Kaspersky Business Hub
Online resource for registering companies to use the Kaspersky software solution intended for centralized management and protection of the computers and mobile devices of employees of the registered companies.
Kaspersky Next Management Console
The Kaspersky Next component that provides a user interface for configuring and tracking the operation of Kaspersky Next.
Kaspersky Security Network (KSN)
An infrastructure of cloud services that provides access to the Kaspersky database with constantly updated information about the reputation of files, web resources, and software. Kaspersky Security Network ensures faster responses by Kaspersky applications to threats, improves the performance of some protection components, and reduces the likelihood of false positives.
Mail Threat Protection
Security application component that scans incoming and outgoing email messages. The component is started when the application starts, resides in the device RAM, and scans all messages sent or received via the POP3, SMTP, IMAP, and NNTP protocols.
Malicious web addresses
Web addresses of resources that propagate malware.
Malware
A program that infects other ones, by adding its code to them in order to gain control when infected files are run. This simple definition allows identifying the main action performed by any malware: infection.
Managed device
Device with a security application installed that is connected to Kaspersky Next.
Network Agent
A program component that enables interaction between the Administration Server and the security applications that are installed on devices connected to Kaspersky Next. Security applications for Windows devices and for Mac devices use different versions of Network Agent.
Network Threat Protection
Security application component that scans inbound network traffic of a device for activity that is typical of a network attack, such as an intrusion of a remote device into the operating system. When it detects an attempted network attack on the device, the component blocks network activity from the attacking computer.
Patch
Software update that fixes a vulnerability.
Phishing
A type of internet fraud aimed at obtaining unauthorized access to users' confidential data.
Proxy server
A computer network service which allows users to make indirect requests to other network services. First, a user connects to a proxy server and requests a resource (e.g., a file) located on another server. Then the proxy server either connects to the specified server and obtains the resource from it or returns the resource from its own cache (if the proxy has its own cache). In some cases, a user's request or a server's response can be modified by the proxy server for certain purposes.
Quarantine
Section in the Kaspersky Next Management Console that is named after one of the categories of files in this section. The Quarantine section displays copies of infected files that security applications deleted or modified during disinfection. The Quarantine section also displays files that could not be disinfected when they were detected, as well as files for which disinfection failed or was postponed. Files in the Quarantine section are stored in encrypted form.
The Quarantine file category refers to files that were considered to be probably infected or could not be disinfected at the time they were detected.
Security application
The Kaspersky application that protects computers, mobile devices, and data stored on them from malware. One of the following Kaspersky applications can be employed as your security application:
- For Windows devices: Kaspersky Endpoint Security for Windows
- For Mac devices: Kaspersky Endpoint Security for Mac
- For Android devices: Kaspersky Endpoint Security for Android
Security profile
Named collection of settings of Kaspersky applications. This collection of settings ensures security on computers and mobile devices added to Kaspersky Next. A single profile contains the settings of all of the supported security applications. After a security profile is applied to a device that has been added to Kaspersky Next, the settings of the Kaspersky application on the device are replaced with those specified in the profile.
Supervised device
iOS or iPadOS device whose settings are monitored by Apple Configurator, a program for group configuration of iOS and iPadOS devices. A supervised device has the supervised status in Apple Configurator. Every time a supervised device connects to the computer, Apple Configurator checks the device configuration against the specified reference settings, and then redefines them if necessary. A supervised device cannot be synchronized with Apple Configurator installed on a different computer.
Every supervised device provides more settings to redefine through the Kaspersky Mobile Device Management policy than a non-supervised device. For example, you can configure an HTTP proxy server to monitor internet traffic on a device within the corporate network. By default, all mobile devices are non-supervised.
Trusted device
Windows device that can be fully accessed at any time by the users specified in the trusted device settings.
Trusted Platform Module (TPM)
A microchip developed to provide basic functions related to security (for example, for storing encryption keys). A TPM is usually installed on the computer motherboard and interacts with all other system components through the hardware bus.
Trusted zone
The trusted zone contains files, folders, and objects that you consider safe. Kaspersky Next does not scan or monitor items from this zone.
Update importance level
Attribute of an update. If a third-party update or Microsoft update is a patch that fixes vulnerabilities, its importance level is determined by the most critical severity level among the vulnerabilities that the patch can fix. If an update does not fix any vulnerability, its importance level is Low.
User alias
User account name that is displayed in Kaspersky Next Management Console.
Vulnerability
A flaw in an operating system or an application that may be exploited by malware makers to penetrate the operating system or application, and corrupt its integrity. The presence of a large number of vulnerabilities in an operating system makes it unreliable, because malware that penetrates the operating system may cause disruptions in the operating system itself and in installed applications.
Vulnerability severity level
Attribute of a vulnerability. It determines the risk associated with the vulnerability, namely, the worst theoretical outcome if the vulnerability is exploited.
There are three severity levels for vulnerabilities:
- Critical
A vulnerability whose exploitation could allow malicious code execution without user interaction, warnings, or prompts.
- High
A vulnerability whose exploitation could result in compromise of the confidentiality, integrity, or availability of your user's data, or of the integrity or availability of processing resources.
- Medium
Impact of the vulnerability is increased by such factors as authentication requirements or applicability only to non-default configurations.
Web Threat Protection
Security application component that protects incoming and outgoing data that is sent to and from a device over the HTTP, HTTPS, and FTP protocols, and prevents dangerous scripts from running on the device.
Windows device name
Full name of the Windows device that is displayed in the computer properties window.
Workspace
An instance of Kaspersky Next created for a specific company. When you create a workspace, Kaspersky creates and configures the infrastructure behind this workspace. You use Kaspersky Next Management Console to manage your workspace and the security applications installed on the devices of the company.
Page top
Information about third-party code
You can download and read information about third-party code in the file legal_notices.txt.
Trademark notices
Registered trademarks and service marks are the property of their respective owners.
Adobe, Acrobat, Flash, Reader are either registered trademarks or trademarks of Adobe in the United States and/or other countries.
Apple, Apple Configurator, AirDrop, AirPlay, AirPrint, Face ID, FaceTime, FileVault, Find My Friends, iBooks, iBooks Store, iCal, iCloud, iMessage, iPadOS, iTunes, iTunes Store, Mac, macOS, Safari, Siri, and Touch ID are trademarks of Apple Inc.
The Bluetooth word, mark and logos are owned by Bluetooth SIG, Inc.
IOS is a registered trademark or trademark of Cisco Systems, Inc. and/or its affiliates in the United States and certain other countries.
Radmin is a registered trademark of Famatech.
Google, Android, Chrome, Google Chrome, Google Mail, Google Play, and Hangouts are trademarks of Google LLC.
HUAWEI and HUAWEI CLOUD are trademarks of Huawei Technologies Co., Ltd.
Mail.ru is a Trademark of Mail.ru LLC.
Microsoft, Active Directory, ActiveSync, BitLocker, Internet Explorer, Microsoft Edge, Office 365, Outlook, PowerShell, SharePoint, Windows, and Windows Server are trademarks of the Microsoft group of companies.
Mozilla and Firefox are trademarks of the Mozilla Foundation in the U.S. and other countries.
Oracle, Java are registered trademarks of Oracle and/or its affiliates.
Samsung is a trademark of SAMSUNG in the United States or other countries.
Page top